
Document Operation (24)
This article demonstrates how to add, count, retrieve and remove variables in a Word document in Java using Spire.Doc for Java library.
Add a Variable
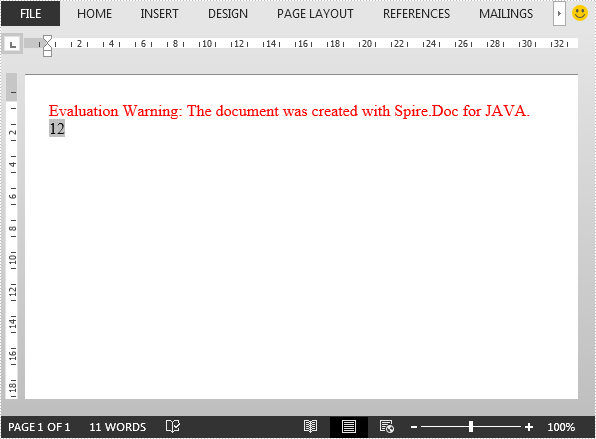
The following example adds a document variable named "A1" with a value of 12 to a Word document.
import com.spire.doc.Document;
import com.spire.doc.FieldType;
import com.spire.doc.FileFormat;
import com.spire.doc.Section;
import com.spire.doc.documents.Paragraph;

public class AddVariables {
    public static void main(String[] args){
        //Create a Document instance
        Document document = new Document();
        //Add a section
        Section section = document.addSection();

        //Add a paragraph to the section
        Paragraph paragraph = section.addParagraph();

        //Add a DocVariable field to the paragraph
        paragraph.appendField("A1", FieldType.Field_Doc_Variable);

        //Add a document variable to the DocVariable field
        document.getVariables().add("A1", "12");

        //Update fields in the document
        document.isUpdateFields(true);

        //Save the result document
        document.saveToFile("AddVariables.docx", FileFormat.Docx_2013);
    }
}
Count the number of Variables
import com.spire.doc.Document;
public class CountVariables {
public static void main(String[] args){
//Load the Word document
Document document = new Document();
document.loadFromFile("AddVariables.docx");
//Get the number of variables in the document
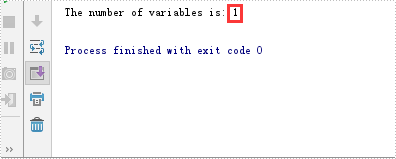
int number = document.getVariables().getCount();
StringBuilder content = new StringBuilder();
content.append("The number of variables is: " + number);
System.out.println(content.toString());
}
}
Retrieve Name and Value of a Variable
import com.spire.doc.Document;
public class RetrieveVariables {
public static void main(String[] args){
//Load the Word document
Document document = new Document();
document.loadFromFile("AddVariables.docx");
//Retrieve the name of a variable by index
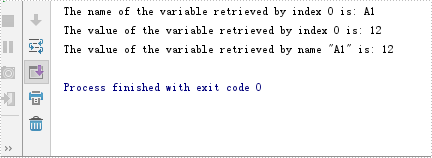
String s1 = document.getVariables().getNameByIndex(0);
//Retrieve the value of a variable by index
String s2 = document.getVariables().getValueByIndex(0);
//Retrieve the value of a variable by name
String s3 = document.getVariables().get("A1");
System.out.println("The name of the variable retrieved by index 0 is: " + s1);
System.out.println("The value of the variable retrieved by index 0 is: " + s2);
System.out.println("The value of the variable retrieved by name \"A1\" is: " + s3);
}
}
Remove a specific Variable
import com.spire.doc.Document;
import com.spire.doc.FileFormat;

public class RemoveVariables {
    public static void main(String[] args){
        //Load the Word document
        Document document = new Document();
        document.loadFromFile("AddVariables.docx");

        //Remove a variable by name
        document.getVariables().remove("A1");

        //Update fields in the document
        document.isUpdateFields (true);

        //Save the result document
        document.saveToFile("RemoveVariables.docx", FileFormat.Docx_2013);
    }
}
This article demonstrates how to insert math equations i.e. Latex and MathML equations and Symbols in a Word document in Java using Spire.Doc for Java.
import com.spire.doc.Document;
import com.spire.doc.FileFormat;
import com.spire.doc.Section;
import com.spire.doc.Table;
import com.spire.doc.documents.Paragraph;
import com.spire.doc.fields.omath.OfficeMath;
public class AddMathEquationsAndSymbols {
public static void main(String[] args){
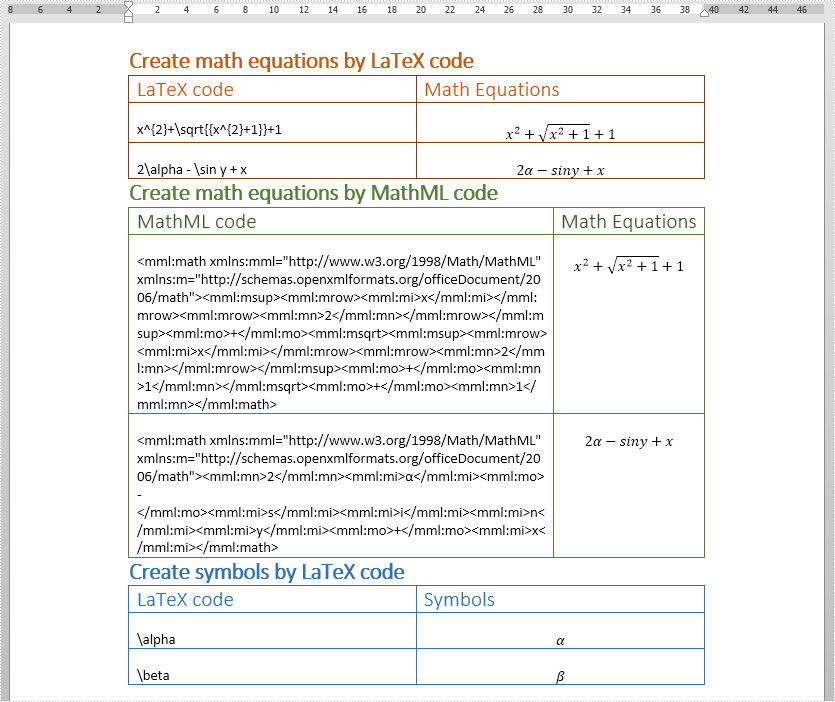
//Latex code
String[] latexMathCode1 = {
"x^{2}+\\sqrt{{x^{2}+1}}+1",
"2\\alpha - \\sin y + x",
};
//MathML code
String[] mathMLCode = {
"<mml:math xmlns:mml=\"http://www.w3.org/1998/Math/MathML\" xmlns:m=\"http://schemas.openxmlformats.org/officeDocument/2006/math\"><mml:msup><mml:mrow><mml:mi>x</mml:mi></mml:mrow><mml:mrow><mml:mn>2</mml:mn></mml:mrow></mml:msup><mml:mo>+</mml:mo><mml:msqrt><mml:msup><mml:mrow><mml:mi>x</mml:mi></mml:mrow><mml:mrow><mml:mn>2</mml:mn></mml:mrow></mml:msup><mml:mo>+</mml:mo><mml:mn>1</mml:mn></mml:msqrt><mml:mo>+</mml:mo><mml:mn>1</mml:mn></mml:math>",
"<mml:math xmlns:mml=\"http://www.w3.org/1998/Math/MathML\" xmlns:m=\"http://schemas.openxmlformats.org/officeDocument/2006/math\"><mml:mn>2</mml:mn><mml:mi>α</mml:mi><mml:mo>-</mml:mo><mml:mi>s</mml:mi><mml:mi>i</mml:mi><mml:mi>n</mml:mi><mml:mi>y</mml:mi><mml:mo>+</mml:mo><mml:mi>x</mml:mi></mml:math>",
};
//Latex code
String[] latexMathCode2 = {
"\\alpha",
"\\beta",
};
//Create a Document instance
Document doc = new Document();
//Load the Word document
doc.loadFromFile("MathEquationTemplate.docx");
//Get the first section
Section section = doc.getSections().get(0);
Paragraph paragraph = null;
OfficeMath officeMath;
//Insert Latex equations
Table table1 = section.getTables().get(0);
for (int i = 0; i < latexMathCode1.length; i++) {
paragraph = table1.getRows().get(i + 1).getCells().get(0).addParagraph();
paragraph.setText(latexMathCode1[i]);
paragraph = table1.getRows().get(i + 1).getCells().get(1).addParagraph();
officeMath = new OfficeMath(doc);
officeMath.fromLatexMathCode(latexMathCode1[i]);
paragraph.getItems().add(officeMath);
}
//Insert MathML equations
Table table2 = section.getTables().get(1);
for (int i = 0; i < mathMLCode.length; i++) {
paragraph = table2.getRows().get(i + 1).getCells().get(0).addParagraph();
paragraph.setText(mathMLCode[i]);
paragraph = table2.getRows().get(i + 1).getCells().get(1).addParagraph();
officeMath = new OfficeMath(doc);
officeMath.fromMathMLCode(mathMLCode[i]);
paragraph.getItems().add(officeMath);
}
//Insert Symbols
Table table3 = section.getTables().get(2);
for (int i = 0; i < latexMathCode2.length; i++) {
//Insert Latex code to the first column of the table
paragraph = table3.getRows().get(i + 1).getCells().get(0).addParagraph();
paragraph.setText(latexMathCode2[i]);
//Insert symbols to the second column of the table
paragraph = table3.getRows().get(i + 1).getCells().get(1).addParagraph();
officeMath = new OfficeMath(doc);
officeMath.fromLatexMathCode(latexMathCode2[i]);
paragraph.getItems().add(officeMath);
}
//Save the document
String result = "addMathEquationAndSymbols.docx";
doc.saveToFile(result, FileFormat.Docx_2013);
}
}
Output:
Track Changes is a built-in feature in Microsoft Word which allows you to see all changes that were made to the document, and you can decide whether to accept or reject those changes. It is very useful especially when you are collaborating with multiple people on the same contracts or school assignments. In this article, you will learn how to programmatically accept or reject all tracked changes in a Word document using Spire.Doc for Java.
Install Spire.Doc for Java
First of all, you're required to add the Spire.Doc.jar file as a dependency in your Java program. The JAR file can be downloaded from this link. If you use Maven, you can easily import the JAR file in your application by adding the following code to your project's pom.xml file.
<repositories>
    <repository>
        <id>com.e-iceblue</id>
        <name>e-iceblue</name>
        <url>https://repo.e-iceblue.com/nexus/content/groups/public/</url>
    </repository>
</repositories>
<dependencies>
    <dependency>
        <groupId>e-iceblue</groupId>
        <artifactId>spire.doc</artifactId>
        <version>14.7.0</version>
    </dependency>
</dependencies>
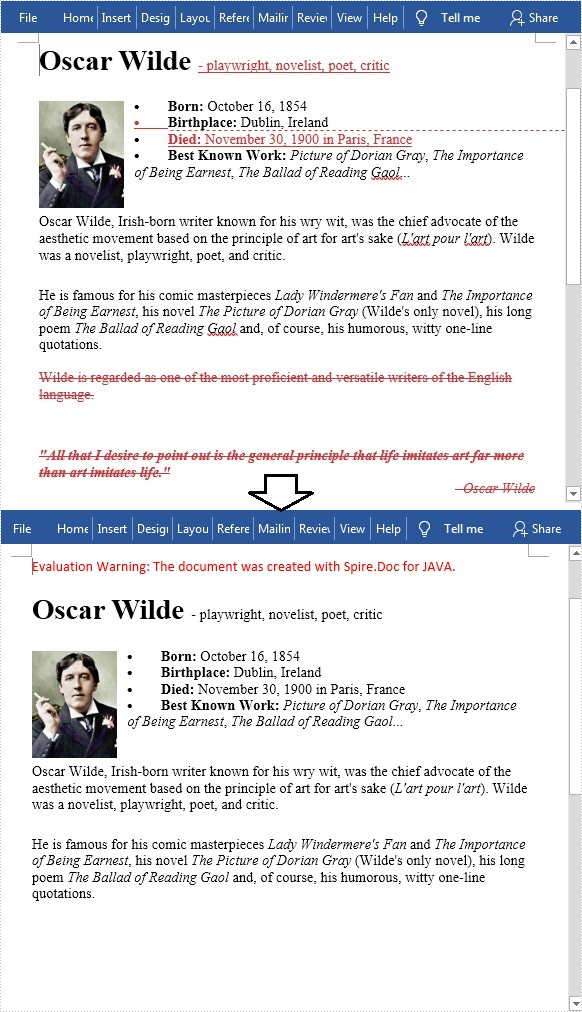
Accept All Tracked Changes in a Word document
The detailed steps are as follows.
- Create a Document instance.
- Load a sample Word document using Document.loadFromFile() method.
- Accept all changes in the document using Document.acceptChanges() method.
- Save the document to another file using Document.saveToFile() method.
- Java
import com.spire.doc.Document;
import com.spire.doc.FileFormat;

public class AcceptTrackedChanges {
    public static void main(String[] args) {

        //Create a Document instance
        Document doc = new Document();

        //Load the sample Word document
        doc.loadFromFile("test file.docx");

        //Accept all changes in the document
        doc.acceptChanges();

        //Save the document
        doc.saveToFile("AcceptAllChanges.docx", FileFormat.Docx);
    }
}
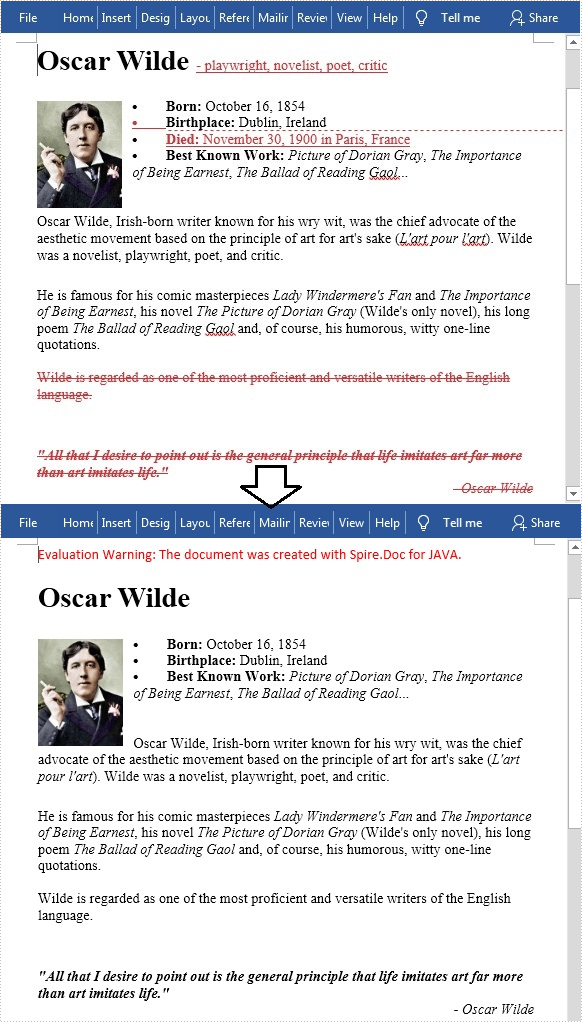
Reject All Tracked Changes in a Word document
The detailed steps are as follows.
- Create a Document instance.
- Load a sample Word document using Document.loadFromFile() method.
- Reject all changes in the document using Document.rejectChanges() method.
- Save the document to another file using Document.saveToFile() method.
- Java
import com.spire.doc.Document;
import com.spire.doc.FileFormat;

public class RejectTrackedChanges {
    public static void main(String[] args) {

        //Create a Document instance
        Document doc = new Document();

        //Load the sample Word document
        doc.loadFromFile("test file.docx");

        //Reject all changes in the document
        doc.rejectChanges();

        //Save the document
        doc.saveToFile("RejectAllChanges.docx", FileFormat.Docx);
    }
}
Apply for a Temporary License
If you'd like to remove the evaluation message from the generated documents, or to get rid of the function limitations, please request a 30-day trial license for yourself.
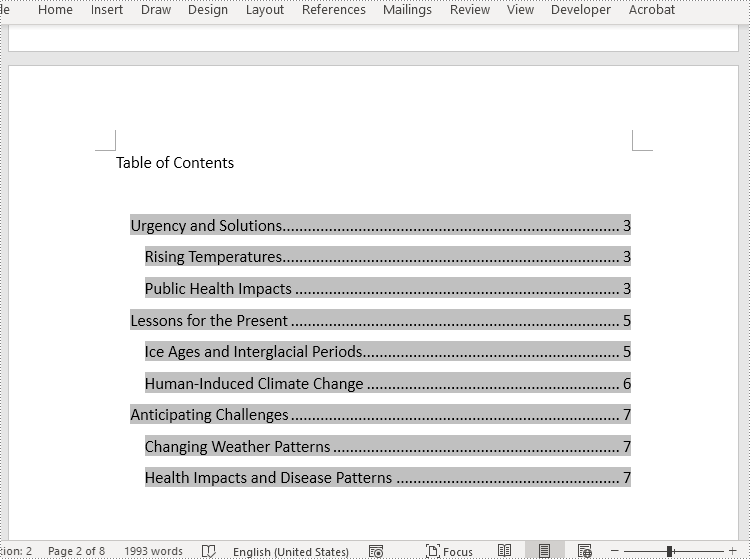
The table of contents is a field in a Word document that displays the headings of all levels and their corresponding page numbers in the document. Moreover, the table of contents can be updated after changes are made to the content of the document, and new headings and page numbers can be generated according to the new document content. Therefore, the table of contents can be a great convenience both when editing documents and reading them, while also making them more professional. This article is going to show how to insert the table of contents into Word documents through Java programs using Spire.Doc for Java.
- Create a Table of Contents with the Default Format
- Create a Table of Contents with Customized Format
Install Spire.Doc for Java
First, you're required to add the Spire.Doc.jar file as a dependency in your Java program. The JAR file can be downloaded from this link. If you use Maven, you can easily import the JAR file in your application by adding the following code to your project's pom.xml file.
<repositories>
    <repository>
        <id>com.e-iceblue</id>
        <name>e-iceblue</name>
        <url>https://repo.e-iceblue.com/nexus/content/groups/public/</url>
    </repository>
</repositories>
<dependencies>
    <dependency>
        <groupId>e-iceblue</groupId>
        <artifactId>spire.doc</artifactId>
        <version>14.7.0</version>
    </dependency>
</dependencies>
Create a Table of Contents with the Default Format
Before creating a table of contents, it is necessary to set the level for each heading, so that the table of contents can be generated according to each heading and its level. The level of a heading can be set by using the Paragraph.getListFormat().setListLevelNumber(int) method.
Spire.Doc for Java provides the Paragraph.appendTOC() method to insert a table of contents into a paragraph. The detailed steps for inserting a table of contents with the default style in a Word document are as follows:
- Create an object of Document class.
- Load a Word document using Document.loadFromFile() method.
- Add a section to the document using Document.addSection() method and insert it into the document after the cover section using Document.getSections().insert() method.
- Add a paragraph to the section using Section.addParagraph() method.
- Create a table of contents in the paragraph using Paragraph.appendTOC() method.
- Update the table of contents to display the headings in the document and their page numbers using Document.updateTableOfContents() method.
- Save the document using Document.saveToFile() method.
- Java
import com.spire.doc.Document;
import com.spire.doc.Section;
import com.spire.doc.documents.Paragraph;
import com.spire.doc.fields.TableOfContent;

public class insertTableOfContents {
    public static void main(String[] args) {
        //Create an object of Document class
        Document doc = new Document();

        //Load a Word document
        doc.loadFromFile("Sample.docx");

        //Add a section and insert it into the document after the cover section
        Section section = doc.addSection();
        doc.getSections().insert(1, section);

        //Add a paragraph to the section
        Paragraph paragraph = section.addParagraph();
        paragraph.appendText("Table of Contents\r\n");
        paragraph.getStyle().getCharacterFormat().setFontSize(14f);

        //Create a table of contents in the paragraph
        paragraph.appendTOC(2, 3);

        //Update the table of contents
        doc.updateTableOfContents();

        //Save the document
        doc.saveToFile("CreateTableOfContents.docx");
    }
}
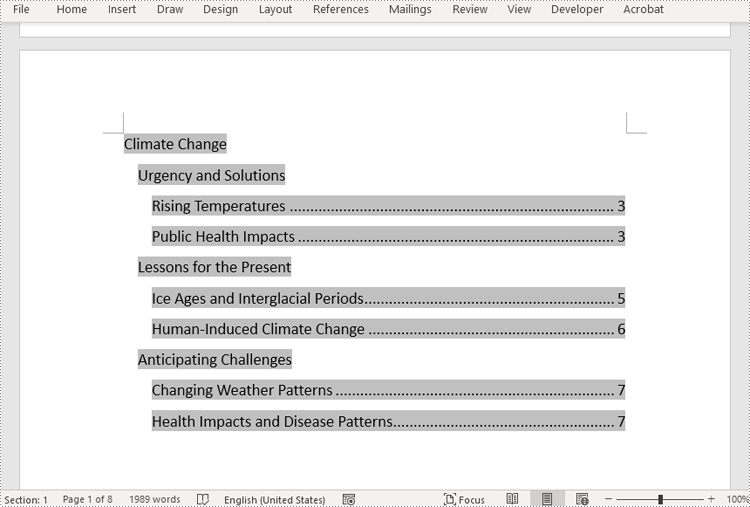
Create a Table of Contents with Customized Format
In Spire.Doc for Java, the TableOfContent class represents a table of contents of a Word document. The parts displayed in the table of contents can be customized by the switches while initializing an instance of the TableOfContent class. For example, the switches, "{\\o \"1-3\" \\n 1-2}", mean displaying the first to third level headings while omitting the page numbers of the first and second level headings.
The detailed steps for customizing a table of contents in a Word document are as follows:
- Create an object of Document class.
- Load a Word document using Document.loadFromFile() method.
- Insert a section after the cover section using Document.getSections().insert() method and add a paragraph to the section using Section.addParagraph() method.
- Create an instance of TableOfContent class to create a table of contents that displays the first to third level headings and omits page numbers of the first and second level headings.
- Insert the table of contents to the paragraph using Paragraph.getItems().add() method.
- Insert a field separator mark and a field end mark to the paragraph using Paragraph.appendFieldMark() method to end the table of contents field.
- Set the instance as the table of contents of the document using Document.setTOC() method.
- Update the table of contents to display the current contents for the document using Document.updateTableOfContents() method.
- Save the document using Document.saveToFile() method.
- Java
import com.spire.doc.Document;
import com.spire.doc.Section;
import com.spire.doc.documents.FieldMarkType;
import com.spire.doc.documents.Paragraph;
import com.spire.doc.fields.TableOfContent;

public class insertTableOfContentsWithCustomizedStyle {
    public static void main(String[] args) {
        //Create an object of Document class
        Document doc = new Document();

        //Load a Word document
        doc.loadFromFile("Sample.docx");

        //Insert a section after the first section and add a paragraph in the section
        Section section = doc.addSection();
        doc.getSections().insert(1, section);
        Paragraph paragraph = section.addParagraph();
        paragraph.getStyle().getCharacterFormat().setFontSize(14f);

        //Initialize an instance of TableOfContent class
        TableOfContent toc = new TableOfContent(doc, "{\\o \"1-3\" \\n 1-2}");

        //Insert the table of contents to the document
        paragraph.getItems().add(toc);

        //Insert field marks to end the field
        paragraph.appendFieldMark(FieldMarkType.Field_Separator);
        paragraph.appendFieldMark(FieldMarkType.Field_End);

        //Set the created table of contents as the table of contents of the document
        doc.setTOC(toc);

        //Update the table of contents
        doc.updateTableOfContents();

        //Save the document
        doc.saveToFile("TableOfContentsWithCustomizedStyle.docx");
        doc.dispose();
    }
}
Apply for a Temporary License
If you'd like to remove the evaluation message from the generated documents, or to get rid of the function limitations, please request a 30-day trial license for yourself.
This article demonstrates how to add combo box, check box, text, picture, date picker and drop-down list content controls to a Word document using Spire.Doc for Java.
import com.spire.doc.*;
import com.spire.doc.documents.*;
import com.spire.doc.fields.*;

import java.util.Date;

public class ContentControls {
    public static void main(String[] args){
        //create a new Word document
        Document document = new Document();
        Section section = document.addSection();
        Paragraph paragraph = section.addParagraph();
        TextRange txtRange = paragraph.appendText("The following example shows how to add content controls in a Word document.");
        section.addParagraph();

        //add combo box content control
        paragraph = section.addParagraph();
        txtRange = paragraph.appendText("Add Combo Box Content Control:  ");
        txtRange.getCharacterFormat().setItalic(true);
        StructureDocumentTagInline sd = new StructureDocumentTagInline(document);
        paragraph.getChildObjects().add(sd);
        sd.getSDTProperties().setSDTType(SdtType.Combo_Box);
        sd.getSDTProperties().setAlias("ComboBox");
        sd.getSDTProperties().setTag("ComboBox");
        SdtComboBox cb = new SdtComboBox();
        cb.getListItems().add(new SdtListItem("Spire.Doc"));
        cb.getListItems().add(new SdtListItem("Spire.XLS"));
        cb.getListItems().add(new SdtListItem("Spire.PDF"));
        sd.getSDTProperties().setControlProperties(cb);
        TextRange rt = new TextRange(document);
        rt.setText(cb.getListItems().get(0).getDisplayText());
        sd.getSDTContent().getChildObjects().add(rt);
        section.addParagraph();

        //Add checkbox content control
        paragraph = section.addParagraph();
        txtRange = paragraph.appendText("Add Check Box Content Control:  ");
        txtRange.getCharacterFormat().setItalic(true);
        sd = new StructureDocumentTagInline(document);
        paragraph.getChildObjects().add(sd);
        sd.getSDTProperties().setSDTType(SdtType.Check_Box);
        sd.getSDTProperties().setAlias("CheckBox");
        sd.getSDTProperties().setTag("CheckBox");
        SdtCheckBox scb = new SdtCheckBox();
        sd.getSDTProperties().setControlProperties(scb);
        rt = new TextRange(document);
        sd.getChildObjects().add(rt);
        scb.setChecked(true);
        section.addParagraph();

        //add text content control
        paragraph = section.addParagraph();
        txtRange = paragraph.appendText("Add Text Content Control:  ");
        txtRange.getCharacterFormat().setItalic(true);
        sd = new StructureDocumentTagInline(document);
        paragraph.getChildObjects().add(sd);
        sd.getSDTProperties().setSDTType(SdtType.Text);
        sd.getSDTProperties().setAlias("Text");
        sd.getSDTProperties().setTag("Text");
        SdtText text = new SdtText(true);
        text.isMultiline(true);
        sd.getSDTProperties().setControlProperties(text);
        rt = new TextRange(document);
        rt.setText("Text");
        sd.getSDTContent().getChildObjects().add(rt);
        section.addParagraph();

        //add picture content control
        paragraph = section.addParagraph();
        txtRange = paragraph.appendText("Add Picture Content Control:  ");
        txtRange.getCharacterFormat().setItalic(true);
        sd = new StructureDocumentTagInline(document);
        paragraph.getChildObjects().add(sd);
        sd.getSDTProperties().setControlProperties(new SdtPicture());
        sd.getSDTProperties().setAlias("Picture");
        sd.getSDTProperties().setTag("Picture");
        DocPicture pic = new DocPicture(document);
        pic.setWidth(10f);
        pic.setHeight(10f);
        pic.loadImage("logo.png");
        sd.getSDTContent().getChildObjects().add(pic);
        section.addParagraph();

        //add date picker content control
        paragraph = section.addParagraph();
        txtRange = paragraph.appendText("Add Date Picker Content Control:  ");
        txtRange.getCharacterFormat().setItalic(true);
        sd = new StructureDocumentTagInline(document);
        paragraph.getChildObjects().add(sd);
        sd.getSDTProperties().setSDTType(SdtType.Date_Picker);
        sd.getSDTProperties().setAlias("Date");
        sd.getSDTProperties().setTag("Date");
        SdtDate date = new SdtDate();
        date.setCalendarType(CalendarType.Default);
        date.setDateFormat("yyyy.MM.dd");
        date.setFullDate(new Date());
        sd.getSDTProperties().setControlProperties(date);
        rt = new TextRange(document);
        rt.setText("2018.12.25");
        sd.getSDTContent().getChildObjects().add(rt);
        section.addParagraph();

        //add drop-down list content control
        paragraph = section.addParagraph();
        txtRange = paragraph.appendText("Add Drop-Down List Content Control:  ");
        txtRange.getCharacterFormat().setItalic(true);
        sd = new StructureDocumentTagInline(document);
        paragraph.getChildObjects().add(sd);
        sd.getSDTProperties().setSDTType(SdtType.Drop_Down_List);
        sd.getSDTProperties().setAlias("DropDownList");
        sd.getSDTProperties().setTag("DropDownList");
        SdtDropDownList sddl = new SdtDropDownList();
        sddl.getListItems().add(new SdtListItem("Harry"));
        sddl.getListItems().add(new SdtListItem("Jerry"));
        sd.getSDTProperties().setControlProperties(sddl);
        rt = new TextRange(document);
        rt.setText(sddl.getListItems().get(0).getDisplayText());
        sd.getSDTContent().getChildObjects().add(rt);

        //save the resultant document
        document.saveToFile("addContentControls.docx", FileFormat.Docx_2013);
    }
}
Output:

In document creation, divisions of content are frequently required to fulfill specific layout requirements and establish logical structures. The insertion of section breaks and page breaks is the most commonly employed method for dividing content, as it enables flexible control over page and section organization. Moreover, page breaks and section breaks are quite helpful in formatting purposes and the establishment of distinct document styles. This article aims to demonstrate how to use Spire.Doc for Java to insert page breaks and section breaks into Word documents through Java programs.
Install Spire.Doc for Java
First, you're required to add the Spire.Doc.jar file as a dependency in your Java program. The JAR file can be downloaded from this link. If you use Maven, you can easily import the JAR file in your application by adding the following code to your project's pom.xml file.
<repositories>
    <repository>
        <id>com.e-iceblue</id>
        <name>e-iceblue</name>
        <url>https://repo.e-iceblue.com/nexus/content/groups/public/</url>
    </repository>
</repositories>
<dependencies>
    <dependency>
        <groupId>e-iceblue</groupId>
        <artifactId>spire.doc</artifactId>
        <version>14.7.0</version>
    </dependency>
</dependencies>
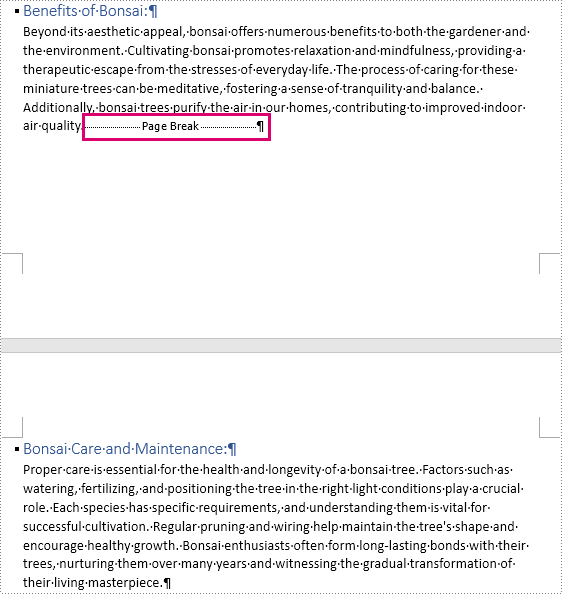
Insert Page Breaks into Word Documents
Spire.Doc for Java provides the Paragraph.appendBreak(BreakType.PageBreak) method to insert a page break at the end of a paragraph. The detailed steps are as follows:
- Create an object of Document class.
- Load a Word document using Document.loadFromFile() method.
- Get the first section using Document.getSections().get() method.
- Get the eighth paragraph of the section using Section.getParagraphs().get() method.
- Add a page break to the end of the paragraph using Paragraph.appendBreak(BreakType.PageBreak) method.
- Save the document using Document.saveToFile() method.
- Java
import com.spire.doc.Document;
import com.spire.doc.FileFormat;
import com.spire.doc.Section;
import com.spire.doc.documents.BreakType;
import com.spire.doc.documents.Paragraph;

public class InsertPageBreak {
    public static void main(String[] args) {
        //Create an object of Document class
        Document doc = new Document();

        //Load a Word document
        doc.loadFromFile("Sample.docx");

        //Get the first section
        Section section = doc.getSections().get(0);

        //Get the eighth paragraph
        Paragraph paragraph = section.getParagraphs().get(7);

        //Add a page break to the end of the paragraph
        paragraph.appendBreak(BreakType.Page_Break);

        //Save the document
        doc.saveToFile("PageBreak.docx", FileFormat.Auto);
    }
}
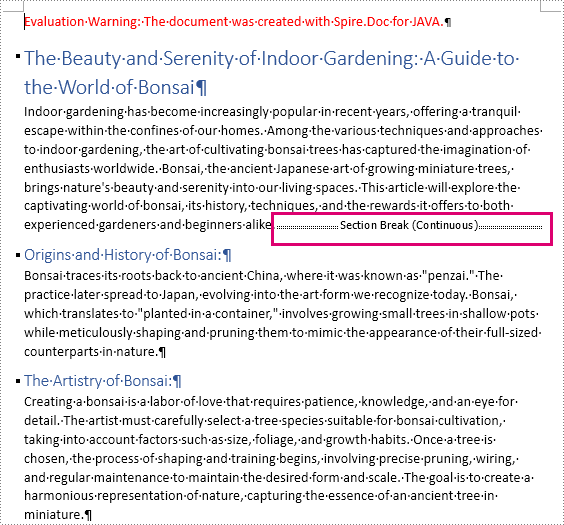
Insert Section Breaks into Word Documents
Inserting section breaks involves using the Paragraph.insertSectionBreak(SectionBreakType) method. This method allows users to specify the type of section break you want to insert. he following table provides an overview of the section break types, along with their corresponding Enums and descriptions:
| Section Break | Enum | Description |
| New page | SectionBreakType.New_Page | Start the new section on a new page. |
| Continuous | SectionBreakType.No_Break | Start the new section without starting a new page, allowing for continuous content flow. |
| Odd page | SectionBreakType.Odd_Page | Start the new section on the next odd-numbered page. |
| Even page | SectionBreakType.Even_Page | Start the new section on the next even-numbered page. |
| New column | SectionBreakType.New_Column | Start the new section in the next column if columns are enabled. |
The detailed steps for inserting a continuous section break are as follows:
- Create an object of Document class.
- Load a Word document using Document.loadFromFile() method.
- Get the first section using Document.getSections().get() method.
- Get the second paragraph of the section using Section.getParagraphs().get() method.
- Add a continuous section break to the end of the paragraph using Paragraph.insertSectionBreak(SectionBreakType.No_Break) method.
- Save the document using Document.saveToFile() method.
- Java
import com.spire.doc.Document;
import com.spire.doc.FileFormat;
import com.spire.doc.Section;
import com.spire.doc.documents.Paragraph;
import com.spire.doc.documents.SectionBreakType;

public class InsertSectionBreak {
    public static void main(String[] args) {
        //Create an object of Document class
        Document doc = new Document();

        //Load a Word document
        doc.loadFromFile("Sample.docx");

        //Get the first section
        Section section = doc.getSections().get(0);

        //Get the second paragraph
        Paragraph paragraph = section.getParagraphs().get(1);

        //Insert a section break
        paragraph.insertSectionBreak(SectionBreakType.No_Break);

        //Save the document
        doc.saveToFile("SectionBreak.docx", FileFormat.Auto);
    }
}
Apply for a Temporary License
If you'd like to remove the evaluation message from the generated documents, or to get rid of the function limitations, please request a 30-day trial license for yourself.
Document properties are some important information contained in Word documents, including title, subject, author, company, keywords, etc. Reading this information can help identify the document, quickly determine the document type or source, and improve the efficiency of document storage and organization. However, if the document properties such as author and company are inappropriate for others to know, you can remove them to protect privacy. This article is going to show how to read or remove document properties in Word documents programmatically using Spire.Doc for Java.
- Read Built-in and Custom Properties from Word Documents
- Remove Built-in and Custom Properties from Word Documents
Install Spire.Doc for Java
First, you're required to add the Spire.Doc.jar file as a dependency in your Java program. The JAR file can be downloaded from this link. If you use Maven, you can easily import the JAR file in your application by adding the following code to your project's pom.xml file.
<repositories>
    <repository>
        <id>com.e-iceblue</id>
        <name>e-iceblue</name>
        <url>https://repo.e-iceblue.com/nexus/content/groups/public/</url>
    </repository>
</repositories>
<dependencies>
    <dependency>
        <groupId>e-iceblue</groupId>
        <artifactId>spire.doc</artifactId>
        <version>14.7.0</version>
    </dependency>
</dependencies>
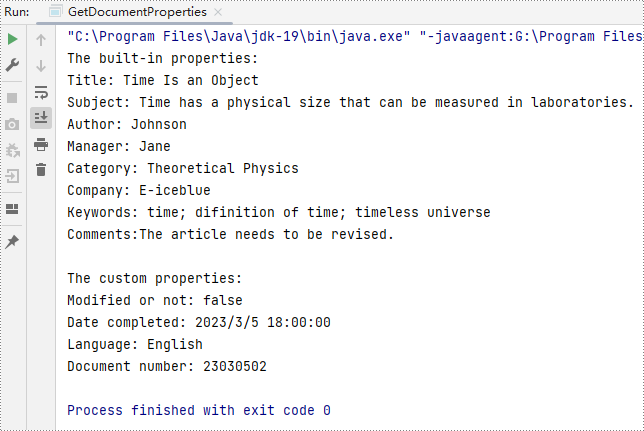
Read Built-in and Custom Properties from Word Documents
There are two types of properties in Word documents: built-in properties and custom properties. Built-in properties are some predefined properties, while custom properties are properties with custom names, types, and values. The detailed steps for reading the two kinds of document properties are as follows:
- Create an object of Document.
- Load a Word document using Document.loadFromFile() method.
- Get all the built-in properties and custom properties using Document.getBuiltinDocumentProperties() method and Document.getCustomDocumentProperties() method.
- Get each built-in property using methods under BuiltinDocumentProperties class.
- Loop through the custom properties to get their name and value using methods under CustomDocumentProperties class.
- Java
import com.spire.doc.BuiltinDocumentProperties;
import com.spire.doc.CustomDocumentProperties;
import com.spire.doc.Document;

public class GetDocumentProperties {
    public static void main(String[] args) {

        //Create an object of Document
        Document document = new Document();

        //Load a Word document
        document.loadFromFile("C:/Sample.docx");

        //Create an object of StringBuilder
        StringBuilder properties = new StringBuilder();

        //Get all the built-in properties and custom properties
        BuiltinDocumentProperties builtinDocumentProperties = document.getBuiltinDocumentProperties();
        CustomDocumentProperties customDocumentProperties = document.getCustomDocumentProperties();

        //Get each built-in property
        String title = builtinDocumentProperties.getTitle();
        String subject = builtinDocumentProperties.getSubject();
        String author = builtinDocumentProperties.getAuthor();
        String manager = builtinDocumentProperties.getManager();
        String category = builtinDocumentProperties.getCategory();
        String company = builtinDocumentProperties.getCompany();
        String keywords = builtinDocumentProperties.getKeywords();
        String comments = builtinDocumentProperties.getComments();

        //Set string format for displaying
        String builtinProperties = String.format("The built-in properties:\r\nTitle: " + title
                + "\r\nSubject: " + subject + "\r\nAuthor: " + author
                + "\r\nManager: " + manager + "\r\nCategory: " + category
                + "\r\nCompany: " + company + "\r\nKeywords: "+ keywords
                + "\r\nComments:" + comments
        );

        //Add the built-in properties to the StringBuilder object
        properties.append(builtinProperties);

        //Get each custom property
        properties.append("\r\n\r\nThe custom properties:");
        for (int i = 0; i < customDocumentProperties.getCount(); i++) {
            String customProperties = String.format("\r\n" + customDocumentProperties.get(i).getName() + ": " + document.getCustomDocumentProperties().get(i).getValue());

            //Add the custom properties to the StringBuilder object
            properties.append(customProperties);
        }

        //Output the properties of the document
        System.out.println(properties);
    }
}
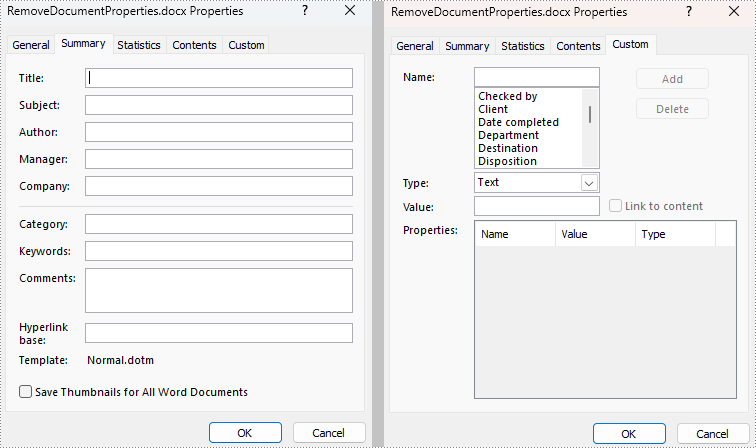
Remove Built-in and Custom Properties from Word Documents
Built-in document properties can be removed by setting their values as empty. For custom document properties, we can use the CustomDocumentProperties.get().getName() method to get their name and then use CustomDocumentProperties.remove() method to remove them. The detailed steps are as follows:
- Create an object of Document.
- Load a Word document using Document.loadFromFile() method.
- Get all built-in properties and custom properties using Document.getBuiltinDocumentProperties() method and Document.getCustomDocumentProperties() method.
- Remove the built-in properties by setting their values as empty using methods under BuiltinDocumentProperties class.
- Get the count of custom properties using CustomDocumentProperties.getCount() method.
- Loop through the custom properties, get their names by using CustomDocumentProperties.get().getName() method, and remove each custom property by their name using CustomDocumentProperties.remove() method.
- Save the document using Document.saveToFile() method.
- Java
import com.spire.doc.BuiltinDocumentProperties;
import com.spire.doc.CustomDocumentProperties;
import com.spire.doc.Document;
import com.spire.doc.FileFormat;

public class RemoveDocumentProperties {
    public static void main(String[] args) {

        //Create an object of Document
        Document document = new Document();

        //Load a Word document
        document.loadFromFile("C:/Sample.docx");

        //Get all built-in properties and custom properties
        BuiltinDocumentProperties builtinDocumentProperties = document.getBuiltinDocumentProperties();
        CustomDocumentProperties customDocumentProperties = document.getCustomDocumentProperties();

        //Remove built-in properties by setting their value to empty
        builtinDocumentProperties.setTitle("");
        builtinDocumentProperties.setSubject("");
        builtinDocumentProperties.setAuthor("");
        builtinDocumentProperties.setManager("");
        builtinDocumentProperties.setCompany("");
        builtinDocumentProperties.setCategory("");
        builtinDocumentProperties.setKeywords("");
        builtinDocumentProperties.setComments("");

        //Get the count of custom properties
        int count = customDocumentProperties.getCount();

        //Loop through the custom properties to remove them
        for (int i = count; i > 0; i-- ){

            //Get the name of a custom property
            String name = customDocumentProperties.get(i-1).getName();

            //Remove the custom property by its name
            customDocumentProperties.remove(name);
        }

        //Save the document
        document.saveToFile("RemoveDocumentProperties.docx", FileFormat.Auto);
        document.dispose();
    }
}
Apply for a Temporary License
If you'd like to remove the evaluation message from the generated documents, or to get rid of the function limitations, please request a 30-day trial license for yourself.
The properties of a document are a set of information about the document and its content, such as title, subject, author's name, manager, company, category, keywords (also known as tags), and comments. This information does not appear in the content of the document, but it can help you better search, sort, and filter files. In this article, you will learn how to add document properties to Word documents in Java using Spire.Doc for Java.
- Add Built-in Document Properties to a Word Document
- Add Custom Document Properties to a Word Document
Install Spire.Doc for Java
First, you're required to add the Spire.Doc.jar file as a dependency in your Java program. The JAR file can be downloaded from this link. If you use Maven, you can easily import the JAR file in your application by adding the following code to your project's pom.xml file.
<repositories>
    <repository>
        <id>com.e-iceblue</id>
        <name>e-iceblue</name>
        <url>https://repo.e-iceblue.com/nexus/content/groups/public/</url>
    </repository>
</repositories>
<dependencies>
    <dependency>
        <groupId>e-iceblue</groupId>
        <artifactId>spire.doc</artifactId>
        <version>14.7.0</version>
    </dependency>
</dependencies>
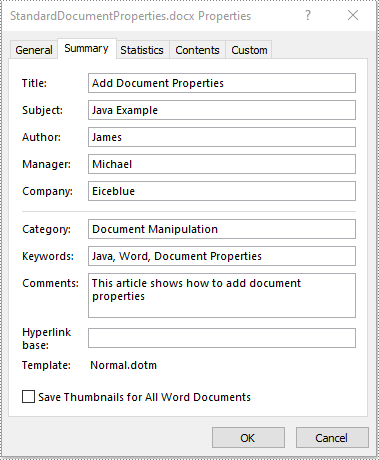
Add Built-in Document Properties to a Word Document in Java
A built-in document property (also known as a standard document property) consists of a name and a value. You cannot set or change the name of a built-in document property as it’s predefined by Microsoft Word, but you can set or change its value. The following steps demonstrate how to set values for built-in document properties in a Word document in Java using Spire.Doc for Java:
- Initialize an instance of Document class.
- Load a Word document using Document.loadFromFile() method.
- Access the built-in document properties of the document using Document.getBuiltinDocumentProperties() method.
- Set the values of specific document properties such as title, subject and author using setTitle(), setSubject() and setAuthor() methods provided by BuiltinDocumentProperties class.
- Save the result document using Document.saveToFile() method.
- Java
import com.spire.doc.BuiltinDocumentProperties;
import com.spire.doc.Document;
import com.spire.doc.FileFormat;

public class AddBuiltinDocumentProperties {
    public static void main(String []args) throws Exception {
        //Create a Document instance
        Document document = new Document();
        //Load a Word document
        document.loadFromFile("Sample.docx");

        //Access the built-in document properties of the document
        BuiltinDocumentProperties standardProperties = document.getBuiltinDocumentProperties();
        //Set the values of specific built-in document properties
        standardProperties.setTitle("Add Document Properties");
        standardProperties.setSubject("Java Example");
        standardProperties.setAuthor("James");
        standardProperties.setCompany("Eiceblue");
        standardProperties.setManager("Michael");
        standardProperties.setCategory("Document Manipulation");
        standardProperties.setKeywords("Java, Word, Document Properties");
        standardProperties.setComments("This article shows how to add document properties");

        //Save the result document
        document.saveToFile("AddStandardDocumentProperties.docx", FileFormat.Docx_2013);
    }
}
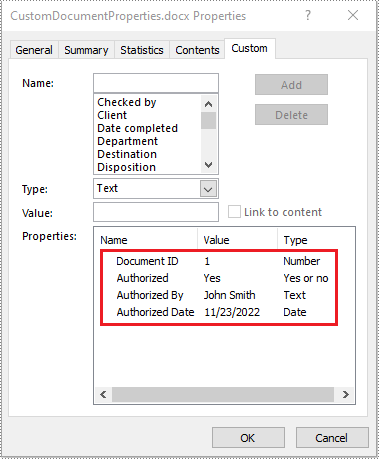
Add Custom Document Properties to a Word Document in Java
A custom document property can be defined by a document author or user. Each custom document property should contain a name, a value and a data type. The data type can be one of these four types: Text, Date, Number and Yes or No. The following steps demonstrate how to add custom document properties with different data types to a Word document in Java using Spire.Doc for Java:
- Initialize an instance of Document class.
- Load a Word document using Document.loadFromFile() method.
- Access the custom document properties of the document using Document.getCustomDocumentProperties() method.
- Add custom document properties with different data types to the document using CustomDocumentProperties.add(String, Object) method.
- Save the result document using Document.saveToFile() method.
- Java
import com.spire.doc.CustomDocumentProperties;
import com.spire.doc.Document;
import com.spire.doc.FileFormat;

import java.util.Date;

public class AddCustomDocumentProperties {
    public static void main(String []args) throws Exception {
        //Create a Document instance
        Document document = new Document();
        //Load a Word document
        document.loadFromFile("Sample.docx");

        //Access the custom document properties of the document
        CustomDocumentProperties customProperties = document.getCustomDocumentProperties();
        //Add custom document properties with different data types to the document
        customProperties.add("Document ID", 1);
        customProperties.add("Authorized", true);
        customProperties.add("Authorized By", "John Smith");
        customProperties.add("Authorized Date", new Date());

        //Save the result document
        document.saveToFile("AddCustomDocumentProperties.docx", FileFormat.Docx_2013);
    }
}
Apply for a Temporary License
If you'd like to remove the evaluation message from the generated documents, or to get rid of the function limitations, please request a 30-day trial license for yourself.
Sometimes we need to merge several related Word documents to make a more complete one. To merge documents with MS Word, you need to manually copy and paste contents or import contents from other documents, which can be tedious. Luckily, Spire.Doc for Java provides 2 easy ways to merge Word documents by programming. This article will show the detailed steps to merge Word documents.
Install Spire.Doc for Java
First, you're required to add the Spire.Doc.jar file as a dependency in your Java program. The JAR file can be downloaded from this link. If you use Maven, you can easily import the JAR file in your application by adding the following code to your project's pom.xml file.
<repositories>
    <repository>
        <id>com.e-iceblue</id>
        <name>e-iceblue</name>
        <url>https://repo.e-iceblue.com/nexus/content/groups/public/</url>
    </repository>
</repositories>
<dependencies>
    <dependency>
        <groupId>e-iceblue</groupId>
        <artifactId>spire.doc</artifactId>
        <version>14.7.0</version>
    </dependency>
</dependencies>
Merge Documents by Inserting the Entire File
The method Document.insertTextFromFile() provided by Spire.Doc allows merging Word documents by inserting other documents entirely into a document with the inserted contents starting from a new page.
The detailed steps of merging documents by inserting the entire file are as follows:
- Create an object of Document class and load a Word document from disk.
- Insert another Word document entirely to the loaded document using Document.insertTextFromFile() method.
- Save the result document using Document.saveToFile() method.
- Java
import com.spire.doc.*;

public class merge {
    public static void main(String[] args) {
        //Create an object of Document and load a Word document from disk
        Document document = new Document("C:/Samples/Sample1.docx");

        //Insert another Word document entirely to the document
        document.insertTextFromFile("C:/Samples/Sample2.docx", FileFormat.Docx_2013);

        //Save the result document
        document.saveToFile("MergingResult.docx", FileFormat.Docx_2013);
    }
}
Merge Documents by Cloning Contents
If you want to merge documents without starting a new page, you can clone the contents of other documents to add to the end of a document.
The detailed steps of merging documents by cloning contents are as follows:
- Create two objects of Document and load the two Word documents from disk.
- Loop through the second document to get all the sections using Document.getSections() method, then loop through all the sections to get their child objects using Section.getBod().getChildObjects() method, then get the last section of the first document using Document.getLastSection() method, and then add the child objects to the last section of the first document using Body.getChildObjects().add() method.
- Save the result document using Document.saveToFile() method.
- Java
import com.spire.doc.*;

public class mergeDocuments {
    public static void main(String[] args){
        //Create two Document objects and load two Word documents from disk
        Document document1 = new Document("C:/Samples/Sample1.docx");
        Document document2 = new Document("C:/Samples/Sample2.docx");

        //Loop through the second document to get all the sections
        for (Object sectionObj : (Iterable) document2.getSections()) {
            Section sec=(Section)sectionObj;
            //Loop through the sections of the second document to get their child objects
            for (Object docObj :(Iterable ) sec.getBody().getChildObjects()) {
                DocumentObject obj=(DocumentObject)docObj;

                //Get the last section of the first document
                Section lastSection = document1.getLastSection();

                //Add the child objects to the last section of the first document
                Body body = lastSection.getBody();
                body.getChildObjects().add(obj.deepClone());
            }
        }

        //Save the result document
        document1.saveToFile("MergingResult.docx", FileFormat.Docx_2013);
    }
}

Apply for a Temporary License
If you'd like to remove the evaluation message from the generated documents, or to get rid of the function limitations, please request a 30-day trial license for yourself.
Creating Word documents programmatically in Java enables developers to automate report generation, invoice creation, and other document workflows with precision. With Spire.Doc for Java, you can dynamically build, format, and customize Word files directly from your applications-without relying on Microsoft Office.
This article guides you through the essential steps to generate a Word document from scratch, covering text formatting, image insertion, table creation, and list management. Whether you're producing business reports, contracts, or data-driven documents, this tutorial provides the foundation to streamline your document automation process in Java.
- Add Titles, Headings, and Paragraphs to a Word Document
- Add an Image to a Word Document
- Add a Table to a Word Document
- Add a List to a Word Document
Install Spire.Doc for Java
First of all, you're required to add the Spire.Doc.jar file as a dependency in your Java program. The JAR file can be downloaded from this link. If you use Maven, you can easily import the JAR file in your application by adding the following code to your project's pom.xml file.
<repositories>
    <repository>
        <id>com.e-iceblue</id>
        <name>e-iceblue</name>
        <url>https://repo.e-iceblue.com/nexus/content/groups/public/</url>
    </repository>
</repositories>
<dependencies>
    <dependency>
        <groupId>e-iceblue</groupId>
        <artifactId>spire.doc</artifactId>
        <version>14.7.0</version>
    </dependency>
</dependencies>
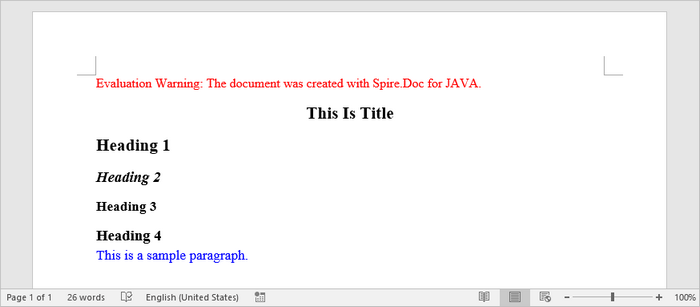
Add Titles, Headings, and Paragraphs to a Word Document in Java
When creating structured Word documents with Spire.Doc for .NET, its core functionality revolves around the Document and Section classes. Use the addParagraph() method to add new paragraphs and the appendText() method to insert text content. To ensure consistent formatting, you can apply built-in styles (such as Title or Heading 1-4), which achieve professional and standardized typesetting effects. You can also customize styles to precisely control fonts, colors, and sizes, thereby creating personalized document designs.
The steps to add titles, headings, and paragraphs to a Word document in Java are as follows:
- Create a Document object.
- Use Document.addSection() to add sections to the document.
- Use Section.addParagraph() to add paragraphs to a section.
- Apply built-in styles (Title, Heading1, Heading2, Heading3) to specific paragraphs using Paragraph.applyStyle().
- Define a custom paragraph style using ParagraphStyle() and apply it to the specified paragraph.
- Save the document as a DOCX file.
- Java
import com.spire.doc.*;
import com.spire.doc.documents.*;
import com.spire.doc.fields.*;
import java.awt.Color;

public class CreateSimpleDocument {
    public static void main(String[] args) {

        // Create a Document object
        Document document = new Document();

        // Add a section
        Section section = document.addSection();

        // Set page margins
        section.getPageSetup().getMargins().setAll(60f);

        // Add a title paragraph
        Paragraph title_para = section.addParagraph();
        TextRange textRange = title_para.appendText("This Is Title");
        title_para.applyStyle(BuiltinStyle.Title);
        textRange.getCharacterFormat().setFontName("Times New Roman");

        // Add a couple of heading paragraphs
        Paragraph heading_one = section.addParagraph();
        textRange = heading_one.appendText("Heading 1");
        heading_one.applyStyle(BuiltinStyle.Heading_1);
        textRange.getCharacterFormat().setFontName("Times New Roman");

        Paragraph heading_two = section.addParagraph();
        textRange = heading_two.appendText("Heading 2");
        heading_two.applyStyle(BuiltinStyle.Heading_2);
        textRange.getCharacterFormat().setFontName("Times New Roman");

        Paragraph heading_three = section.addParagraph();
        textRange = heading_three.appendText("Heading 3");
        heading_three.applyStyle(BuiltinStyle.Heading_3);
        textRange.getCharacterFormat().setFontName("Times New Roman");

        Paragraph heading_four = section.addParagraph();
        textRange = heading_four.appendText("Heading 4");
        heading_four.applyStyle(BuiltinStyle.Heading_4);
        textRange.getCharacterFormat().setFontName("Times New Roman");

        // Add a normal paragraph
        Paragraph normal_para = section.addParagraph();
        normal_para.appendText("This is a sample paragraph.");

        // Create a paragraph style
        ParagraphStyle style = new ParagraphStyle(document);
        style.setName("paraStyle");
        style.getCharacterFormat().setFontName("Times New Roman");
        style.getCharacterFormat().setFontSize(13f);
        style.getCharacterFormat().setTextColor(Color.blue);
        document.getStyles().add(style);

        // Apply the custom style to the paragraph
        normal_para.applyStyle("paraStyle");

        // Save the document
        document.saveToFile("output/AddText.docx", FileFormat.Docx);

        // Dispose resources
        document.dispose();
    }
}
Add an Image to a Word Document in Java
To insert an image into a Word document, you first need to create a dedicated paragraph element as the image container. By using the appendPicture() method, you can load an image from the file system and embed it directly into the document structure.
The steps to add an image to a Word document in Java are as follows:
- Create a Document object.
- Use Document.addSection() to add a section to the document.
- Add a paragraph to the section using Section.addParagraph().
- Insert the image into the paragraph using Paragraph.appendPicture().
- Save the document as a DOCX file.
- Java
import com.spire.doc.*;
import com.spire.doc.documents.*;

import javax.imageio.ImageIO;
import java.awt.image.BufferedImage;
import java.io.File;
import java.io.IOException;

public class AddImage {
    public static void main(String[] args) throws IOException {

        // Create a Document object
        Document document = new Document();

        // Add a section
        Section section = document.addSection();

        // Set page margins
        section.getPageSetup().getMargins().setAll(60f);

        // Add a paragraph
        Paragraph image_para = section.addParagraph();

        // Load an image file
        BufferedImage image =  ImageIO.read(new File("C:\\Users\\Administrator\\Desktop\\logo.png"));

        // Append it to the paragraph
        image_para.appendPicture(image);

        // Save the document
        document.saveToFile("output/AddImage.docx", FileFormat.Docx);

        // Dispose resources
        document.dispose();
    }
}
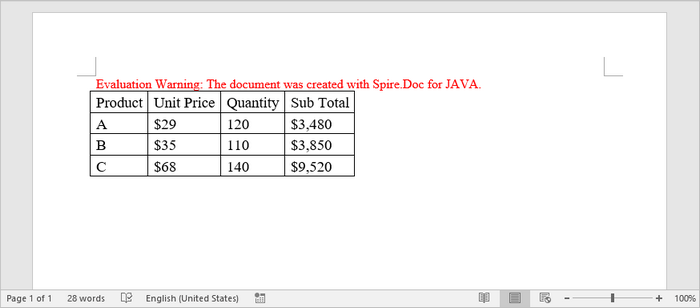
Add a Table to a Word Document in Java
The table creation process begins with the addTable() method, which is used to establish the basic table structure. Using the resetCells() method, you can specify the desired number of rows and columns. Once initialized, filling each cell with content requires first adding a paragraph element via the addParagraph() method, followed by inserting text using the appendText() method.
The steps to add a table to a Word document in Java are as follows:
- Create a Document object.
- Use Document.addSection() to add a section to the document.
- Create a two-dimensional array to store table data (including headers and values).
- Generate the table using Section.addTable().
- Call the Table.resetCells() method to define the number of rows and columns based on the data.
- Iterate through the data array and use the TableCell.addParagraph() and Paragraph.appendText() methods to add text to each cell.
- Save the document as a DOCX file.
- Java
import com.spire.doc.*;
import com.spire.doc.documents.*;
import com.spire.doc.fields.*;

public class AddTable {
    public static void main(String[] args) {

        // Create a Document object
        Document document = new Document();

        // Add a section
        Section section = document.addSection();

        // Set page margins
        section.getPageSetup().getMargins().setAll(60f);

        // Define table data as a 2D array
        String[][] data = {
                {"Product", "Unit Price", "Quantity", "Sub Total"},
                {"A", "$29", "120", "$3,480"},
                {"B", "$35", "110", "$3,850"},
                {"C", "$68", "140", "$9,520"}
        };

        // Add a table
        Table table = section.addTable(true);

        // Set row number and column number
        table.resetCells(data.length, data[0].length);

        // Write data to cells
        for (int r = 0; r < data.length; r++) {
            TableRow row = table.getRows().get(r);
            row.setHeight(20);
            row.setHeightType(TableRowHeightType.Exactly);

            for (int c = 0; c < data[r].length; c++) {
                TableCell cell = row.getCells().get(c);
                cell.getCellFormat().setVerticalAlignment(VerticalAlignment.Middle);
                TextRange textRange = cell.addParagraph().appendText(data[r][c]);
                textRange.getCharacterFormat().setFontName("Times New Roman");
                textRange.getCharacterFormat().setFontSize(14);
            }
        }

        // Automatically adjusts the column widths of a table to fit its contents
        table.autoFit(AutoFitBehaviorType.Auto_Fit_To_Contents);

        // Save the document to file
        document.saveToFile("output/AddTable.docx", FileFormat.Docx);

        // Dispose resources
        document.dispose();
    }
}
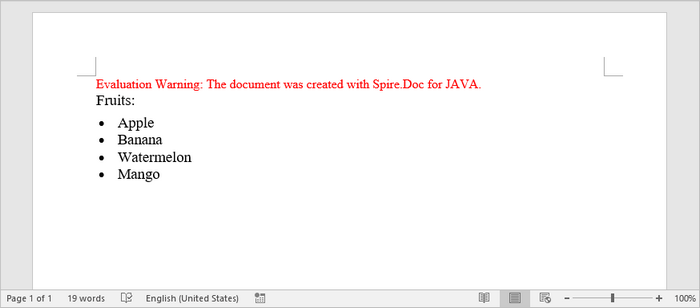
Add a List to a Word Document in Java
The ListStyle class provides the foundation for implementing bulleted lists and numbered lists in documents. By configuring this class, you can establish a unified visual format for all list items. Once the list style is defined, simply apply it to target paragraphs using the applyStyle() method.
The steps to add a list to a Word document in Java are as follows:
- Create a Document object.
- Use Document.addSection() to add a section to the document.
- Define the list style using ListStyle().
- Add paragraphs to the section using Section.addParagraph().
- Apply the defined list style to paragraphs using Paragraph.getListFormat().applyStyle().
- Save the document as a DOCX file.
- Java
import com.spire.doc.*;
import com.spire.doc.documents.*;
import com.spire.doc.fields.*;

public class AddList {
    public static void main(String[] args) {

        // Create a Document object
        Document document = new Document();

        // Add a section
        Section section = document.addSection();

        // Set page margins
        section.getPageSetup().getMargins().setAll(60f);

        // Create a bulleted list style
        ListStyle listStyle = new ListStyle(document, ListType.Bulleted);
        listStyle.setName("bulletedList");
        listStyle.getLevels().get(0).setBulletCharacter("\u00B7");
        listStyle.getLevels().get(0).getCharacterFormat().setFontName("Symbol");
        listStyle.getLevels().get(0).setTextPosition(20);
        document.getListStyles().add(listStyle);

        // Add a paragraph
        Paragraph paragraph = section.addParagraph();
        TextRange textRange = paragraph.appendText("Fruits:");
        paragraph.getFormat().setAfterSpacing(5f);
        textRange.getCharacterFormat().setFontName("Times New Roman");
        textRange.getCharacterFormat().setFontSize(14);

        // Add another four paragraphs as bulleted list items
        String[] fruits = {"Apple", "Banana", "Watermelon", "Mango"};
        for (String fruit : fruits) {
            paragraph = section.addParagraph();
            textRange = paragraph.appendText(fruit);
            paragraph.getListFormat().applyStyle(listStyle.getName());
            paragraph.getListFormat().setListLevelNumber(0);
            textRange.getCharacterFormat().setFontName("Times New Roman");
            textRange.getCharacterFormat().setFontSize(14);
        }

        // Save the document to file
        document.saveToFile("output/AddList.docx", FileFormat.Docx);

        // Dispose resources
        document.dispose();
    }
}
This tutorial provides a brief introduction to the basic operations of creating Word documents using Spire.Doc for Java, including core functionalities such as inserting titles, paragraphs, images, tables, and lists. For more comprehensive element additions and finer formatting settings, please refer to the official Spire.Doc online tutorials for complete guidance.
Get a Free License
To fully experience the capabilities of Spire.Doc for Java without any evaluation limitations, you can request a free 30-day trial license.
