Python: Add Border to Text and Paragraphs in Word
Adding borders to specific text and paragraphs in Word documents is an effective way to highlight key information and improve the document's structure. Whether it's important terms or entire sections, borders help them stand out. In this guide, we'll show you how to use Spire.Doc for Python to add borders to text and paragraphs in Word with Python, boosting both the readability and professionalism of your document while saving you time from manual formatting.
Install Spire.Doc for Python
This scenario requires Spire.Doc for Python and plum-dispatch v1.7.4. They can be easily installed in your Windows through the following pip command.
pip install Spire.Doc
If you are unsure how to install, please refer to this tutorial: How to Install Spire.Doc for Python on Windows.
Add a Border to Text in Word Documents with Python
In Word documents, important information like technical terms, company names, or legal clauses can be highlighted with borders to draw readers' attention. Using Python, you can locate the required text with the Document.FindAllString() method and apply borders using the CharacterFormat.Border.BorderType property. Here's a step-by-step guide to help you do this efficiently.
Steps to add borders to all matched text in a Word document:
- Create an object of Document class.
- Read a source Word document from files using Document.LoadFromFile() method.
- Find all occurrences of the specified text through Document.FindAllString() method.
- Loop through all matched text and get the text as a text range.
- Add a border to the text with CharacterFormat.Border.BorderType property.
- Customize the color of the border through CharacterFormat.Border.Color property.
- Save the modified document with Document.SaveToFile() method.
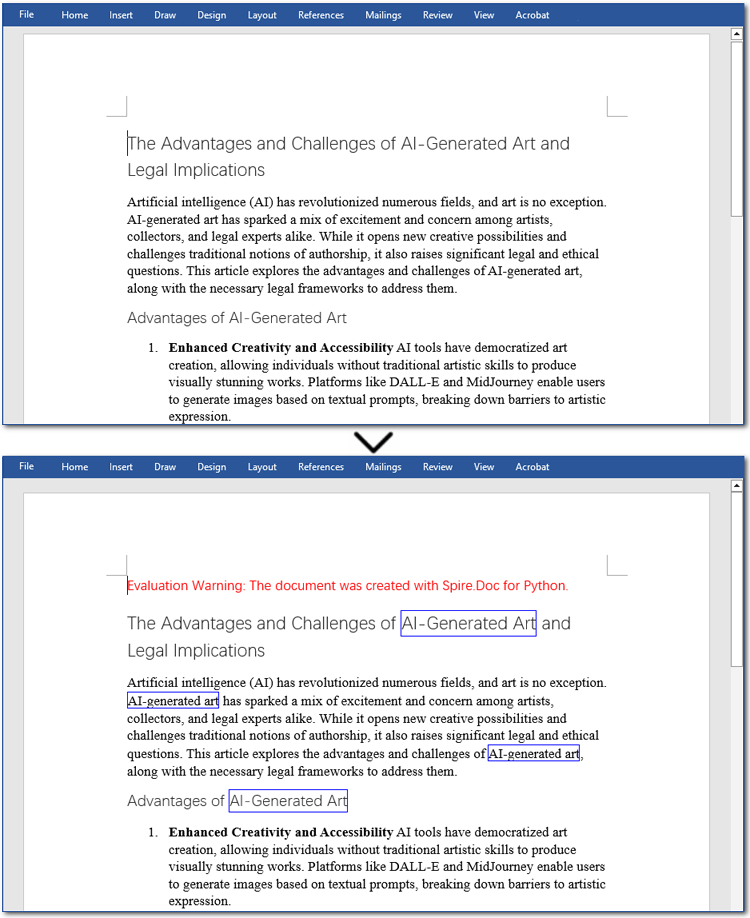
The code example below shows how to add a border to all occurrences of "AI-Generated Art":
- Python
from spire.doc import *
from spire.doc.common import *

# Create a Document object
doc = Document()
doc.LoadFromFile("/AI-Generated Art.docx")

# Set the target text
target_text = "AI-Generated Art"
# Create a TextSelection object and find all matches
text_selections = doc.FindAllString(target_text, False, True)

# Loop through the text selections
for selection in text_selections:
    text_range = selection.GetAsOneRange()
    # Add a border to the text
    text_range.CharacterFormat.Border.BorderType = BorderStyle.Single
    # Set the border color
    text_range.CharacterFormat.Border.Color = Color.get_Blue()

# Save the resulting document
doc.SaveToFile("/AddBorder_Text.docx", FileFormat.Docx2013)
doc.Close()
Add a Border to Paragraphs in Word Files Using Python
Important clauses or legal statements in contracts, summaries in reports, and quotations in papers often require adding borders to paragraphs for emphasis or distinction. Unlike text borders, adding a border to a paragraph involves finding the target paragraph by its index and then using the Format.Borders.BorderType property. Let's check out the detailed instructions.
Steps to add a border to paragraphs in Word documents:
- Create a Document instance.
- Read a Word document through Document.LoadFromFile() method.
- Get the specified paragraph with Document.Sections[].Paragraphs[] property.
- Add a border to the paragraph using Format.Borders.BorderType property.
- Set the type and color of the border.
- Save the resulting Word file through Document.SaveToFile() method.
Here is an example showing how to add a border to the fourth paragraph in a Word document:
- Python
from spire.doc import *
from spire.doc.common import *

# Create a Document object
doc = Document()
doc.LoadFromFile("/AI-Generated Art.docx")

# Get the fourth paragraph
paragraph = doc.Sections[0].Paragraphs[3]

# Add a border to the paragraph
borders = paragraph.Format.Borders
borders.BorderType(BorderStyle.DotDotDash)
borders.Color(Color.get_Blue())

# Save the updated document
doc.SaveToFile("/AddBorder_Paragraph.docx", FileFormat.Docx2013)
doc.Close()

Get a Free License
To fully experience the capabilities of Spire.Doc for Python without any evaluation limitations, you can request a free 30-day trial license.
Python: Insert Paragraphs in Word
In Word, each paragraph should convey a unique idea or point, helping to organize information in a way that is easy for readers to understand. Inserting new paragraphs allows you to introduce new concepts or expand on different aspects of a topic, making the text clearer. In this article, you will learn how to insert a new paragraph in Word in Python using Spire.Doc for Python.
- Add a Paragraph at the End of a Word Document in Python
- Insert a Paragraph at a Specified Location in Word in Python
Install Spire.Doc for Python
This scenario requires Spire.Doc for Python and plum-dispatch v1.7.4. They can be easily installed in your Windows through the following pip commands.
pip install Spire.Doc
If you are unsure how to install, please refer to this tutorial: How to Install Spire.Doc for Python on Windows
Add a Paragraph at the End of a Word Document in Python
To add a new paragraph at the end, you need to get the last section of the Word document through the Document.LastSection property, and then add a paragraph at the end of the section through the Section.AddParagraph() method. The following are the detailed steps:
- Create a Document instance.
- Load a Word document using Document.LoadFromFile() method.
- Get the last section of the document using Document.LastSection property.
- Add a paragraph at the end of the section using Section.AddParagraph() method, and then add text to it using Paragraph.AppendText() method.
- Create a ParagraphStyle object and set the font name, size, style of the paragraph text.
- Apply the paragraph style using Paragraph.ApplyStyle() method
- Save the result document using Document.SaveToFile() method.
- Python
from spire.doc import *
from spire.doc.common import *

# Create a Document object
doc = Document()

# Load a Word document
doc.LoadFromFile("Test.docx")

# Get the first section
section = doc.LastSection

# Add a paragraph at the end and set its text content
para = section.AddParagraph()
para.AppendText("Add a paragraph to the end of the document.")

# Set the paragraph style
style = ParagraphStyle(doc)
style.Name = "Style1"
style.CharacterFormat.FontName = "Times New Roman"
style.CharacterFormat.FontSize = 12
style.CharacterFormat.TextColor = Color.get_Blue()
style.CharacterFormat.Bold= True
doc.Styles.Add(style)
para.ApplyStyle("Style1")
para.Format.BeforeSpacing = 10

# Save the result file
doc.SaveToFile("AddParagraph.docx", FileFormat.Docx2016)
doc.Close()

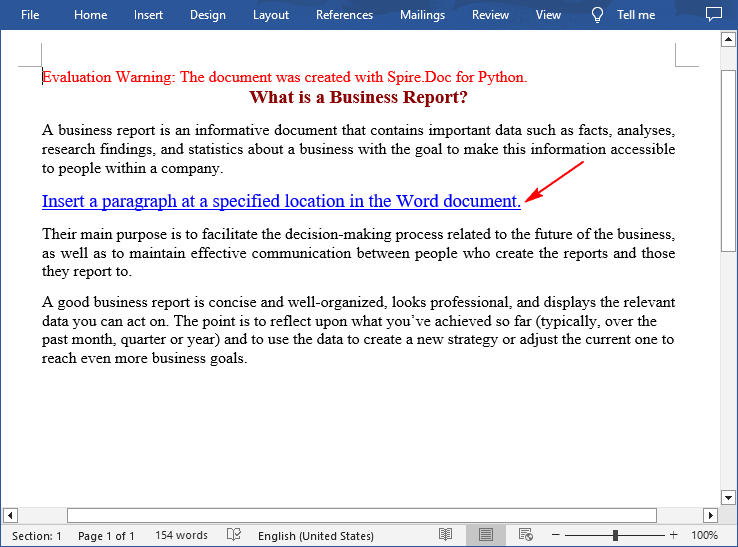
Insert a Paragraph at a Specified Location in Word in Python
You can also add a paragraph and then insert it to a specified position in Word through the Section.Paragraphs.Insert(index: int, paragraph: IParagraph) method. The following are the detailed steps:
- Create a Document instance.
- Load a Word document using Document.LoadFromFile() method.
- Get a specified section using Document.Sections[] property.
- Add a paragraph using Section.AddParagraph() method, and then add text to it using Paragraph.AppendText() method.
- Set the font name, size, style of the paragraph text.
- Insert the newly added paragraph at a specified index using Section.Paragraphs.Insert(index: int, paragraph: IParagraph) method.
- Save the result document using Document.SaveToFile() method.
- Python
from spire.doc import *
from spire.doc.common import *

# Create a Document object
doc = Document()

# Load a Word document
doc.LoadFromFile("Test.docx")

# Get the first section
section = doc.Sections[0]

# Add a paragraph and set its text content
para = section.AddParagraph()
textRange = para.AppendText("Insert a paragraph at a specified location in the Word document.")

# Set the font name, size, color and style
textRange.CharacterFormat.TextColor = Color.get_Blue()
textRange.CharacterFormat.FontName = "Times New Roman"
textRange.CharacterFormat.FontSize = 14
textRange.CharacterFormat.UnderlineStyle = UnderlineStyle.Single

# Insert the paragraph as the third paragraph
section.Paragraphs.Insert(2, para)

# Set spacing after the paragraph
para.Format.AfterSpacing = 10

# Save the result file
doc.SaveToFile("InsertParagraph.docx", FileFormat.Docx2016)
doc.Close()
Apply for a Temporary License
If you'd like to remove the evaluation message from the generated documents, or to get rid of the function limitations, please request a 30-day trial license for yourself.
Python: Set Paragraph Indentations in Word
Paragraph indentations determine the horizontal space between the page margins and the text of paragraphs. They are an important formatting tool used in various types of written documents, such as essays, reports, and articles, to improve readability and create a visual distinction between paragraphs. In this article, we will demonstrate how to set paragraph indentations in Word documents in Python using Spire.Doc for Python.
Install Spire.Doc for Python
This scenario requires Spire.Doc for Python and plum-dispatch v1.7.4. They can be easily installed in your Windows through the following pip command.
pip install Spire.Doc
If you are unsure how to install, please refer to this tutorial: How to Install Spire.Doc for Python on Windows
Set Paragraph Indentations in Word in Python
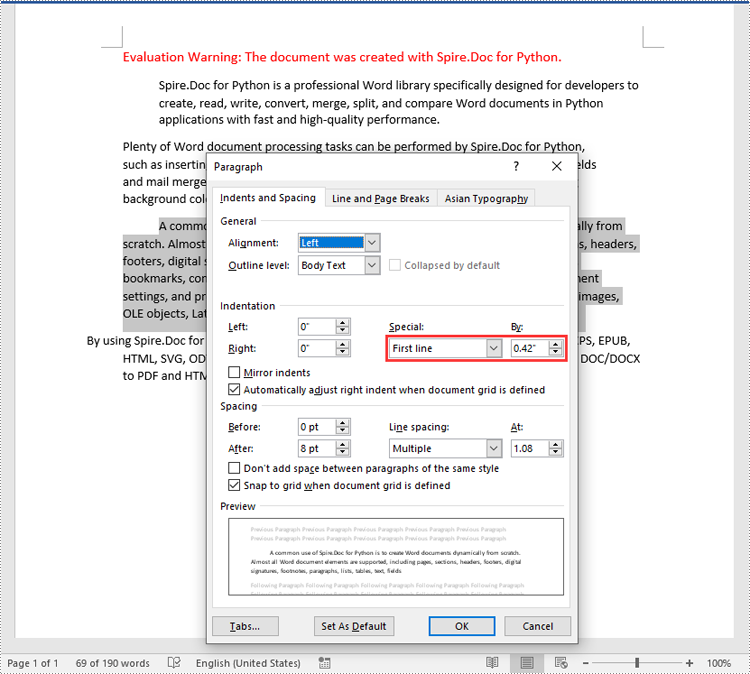
Microsoft Word provides four types of paragraph indent options that enable you to format your document efficiently. These options are as follows:
- First Line Indent: The first line indent refers to the horizontal space between the left margin and the beginning of the first line of a paragraph. It indents only the first line while keeping the subsequent lines aligned with the left margin.
- Left Indent: The left indent, also known as the paragraph indent or the left margin indent, determines the horizontal distance between the left margin and the entire paragraph. It uniformly indents the entire paragraph from the left margin.
- Right Indent: The right indent sets the horizontal distance between the right margin and the entire paragraph. It indents the paragraph from the right side, shifting the text towards the left.
- Hanging Indent: The hanging indent is a unique indentation style where the first line remains aligned with the left margin, while all subsequent lines of the paragraph are indented inward. This creates a "hanging" effect, commonly used for bibliographies, references, or citations.
Spire.Doc for Python supports all these types of indents. The table below lists some of the core classes and methods that are used to set different paragraph indents in Word with Spire.Doc for Python:
| Name | Description |
| ParagraphFormat Class | Represents the format of a paragraph. |
| ParagraphFormat.SetLeftIndent() Method | Sets the left indent value for paragraph. |
| ParagraphFormat.SetRightIndent() Method | Sets the right indent value for paragraph. |
| ParagraphFormat.SetFirstLineIndent() Method | Sets the first line or hanging indent value. Positive value represents first-line indent, and negative value represents hanging indent. |
The steps below explain how to set paragraph indents in a Word document using Spire.Doc for Python:
- Create a Document instance.
- Load a sample Word document using Document.LoadFromFile() method.
- Get a specific section using Document.Sections[] property.
- Get a specific paragraph using Section.Paragraphs[] property.
- Get the paragraph format using Paragraph.Format property, and then set the paragraph indent using the above listed methods of ParagraphFormat class.
- Save the document to another file using Document.SaveToFile() method.
- Python
from spire.doc import *
from spire.doc.common import *

# Create a Document instance
doc = Document()
# Load a sample Word document
doc.LoadFromFile(""Sample6.docx"")

# Get the first section
section = doc.Sections.get_Item(0)

# Get the first paragraph and set the left indent
para1 = section.Paragraphs.get_Item(0)
para1.Format.SetLeftIndent(30)

# Get the second paragraph and set the right indent
para2 = section.Paragraphs.get_Item(1)
para2.Format.SetRightIndent(30)

# Get the third paragraph and set the first line indent
para3 = section.Paragraphs.get_Item(2)
para3.Format.SetFirstLineIndent(30)

# Get the fourth paragraph and set the hanging indent
para4 = section.Paragraphs.get_Item(3)
para4.Format.SetFirstLineIndent(-30)

# Save the document to file
doc.SaveToFile(""SetIndents.docx"", FileFormat.Docx2013)
doc.Close()
Apply for a Temporary License
If you'd like to remove the evaluation message from the generated documents, or to get rid of the function limitations, please request a 30-day trial license for yourself.
Text Alignment in Python | Left, Right, Center Align & More
In the world of document automation, proper text alignment is crucial for creating professional, readable, and visually appealing documents. For developers and data professionals building reports, drafting letters, or designing invoices, mastering text alignment in Python is essential to producing polished, consistent documents without manual editing.
This guide delivers a step-by-step walkthrough on how to align text in Python using Spire.Doc for Python, a library that enables effortless control over Word document formatting.
- Why Choose Spire.Doc for Python to Align Text?
- Core Text Alignment Types in Spire.Doc
- Step-by-Step: Align Text in Word in Python
- FAQs About Python Text Alignment
- Conclusion
Why Choose Spire.Doc for Python to Align Text?
Before diving into code, let’s clarify why Spire.Doc is a top choice for text alignment tasks:
- Full Alignment Support: Natively supports all standard alignment types (Left, Right, Center, Justify) for paragraphs.
- No Microsoft Word Dependency: Runs independently - no need to install Word on your machine.
- High Compatibility: Works with .docx, .doc, and other Word formats, ensuring your aligned documents open correctly across devices.
- Fine-Grained Control: Adjust alignment for entire paragraphs or table cells.
Core Text Alignment Types in Spire.Doc
Spire.Doc uses the HorizontalAlignment enum to define text alignment. The most common values are:
- HorizontalAlignment.Left: Aligns text to the left margin (default).
- HorizontalAlignment.Right: Aligns text to the right margin.
- HorizontalAlignment.Center: Centers text horizontally between margins.
- HorizontalAlignment.Justify: Adjusts text spacing so both left and right edges align with margins.
- HorizontalAlignment.Distribute: Adjusts character spacing (adds space between letters) and word spacing to fill the line.
Below, we’ll cover how to programmatically set paragraph alignment (left, right, center, justified, and distributed) in Word using Python
Step-by-Step: Align Text in Word in Python
Here are the actionable steps to generate a Word document with 5 paragraphs, each using a different alignment style.
Step 1: Install Spire.Doc for Python
Open your terminal/command prompt, and then run the following command to install the latest version:
pip install Spire.Doc
Step 2: Import Required Modules
Import the core classes from Spire.Doc. These modules let you create documents, sections, paragraphs, and configure formatting:
from spire.doc import *
from spire.doc.common import *
Step 3: Create a New Word Document
Initialize a Document instance that represents your empty Word file:
# Create a Document instance
doc = Document()
Step 4: Add a Section to the Document
Word documents organize content into sections (each section can have its own margins, page size, etc.). We’ll add one section to hold our paragraphs:
# Add a section to the document
section = doc.AddSection()
Step 5: Add Paragraphs with Different Alignments
A section contains paragraphs, and each paragraph’s alignment is controlled via the HorizontalAlignment enum. We’ll create 5 paragraphs, one for each alignment type.
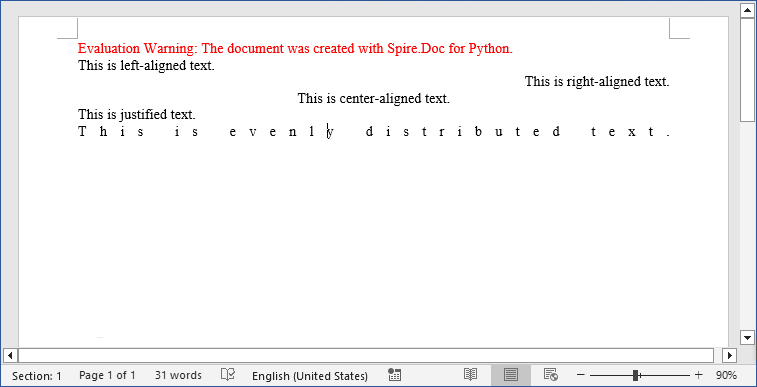
Left alignment is the default for most text (text aligns to the left margin).
# Left aligned text
paragraph1 = section.AddParagraph()
paragraph1.AppendText("This is left-aligned text.")
paragraph1.Format.HorizontalAlignment = HorizontalAlignment.Left
Right alignment is useful for dates, signatures, or page numbers (text aligns to the right margin).
# Right aligned text
paragraph2 = section.AddParagraph()
paragraph2.AppendText("This is right-aligned text.")
paragraph2.Format.HorizontalAlignment = HorizontalAlignment.Right
Center alignment works well for titles or headings (text centers between left and right margins). Use to center text in Python:
# Center aligned text
paragraph3 = section.AddParagraph()
paragraph3.AppendText("This is center-aligned text.")
paragraph3.Format.HorizontalAlignment = HorizontalAlignment.Center
Justified text aligns both left and right margins (spaces between words are adjusted for consistency). Ideal for formal documents like essays or reports.
# Justified
paragraph4 = section.AddParagraph()
paragraph4.AppendText("This is justified text.")
paragraph4.Format.HorizontalAlignment = HorizontalAlignment.Justify
Note: Justified alignment is more visible with longer text - short phrases may not show the spacing adjustment.
Distributed alignment is similar to justified, but evenly distributes single-line text (e.g., unevenly spaced words or short phrases).
# Distributed
Paragraph5 = section.AddParagraph()
Paragraph5.AppendText("This is evenly distributed text.")
Paragraph5.Format.HorizontalAlignment = HorizontalAlignment.Distribute
Step 6: Save and Close the Document
Finally, save the document to a specified path and close the Document instance to free resources:
# Save the document
document.SaveToFile("TextAlignment.docx", FileFormat.Docx2016)
# Close the document to release memory
document.Close()
Output:
Pro Tip: Spire.Doc for Python also provides interfaces to align tables in Word or align text in table cells.
FAQs About Python Text Alignment
Q1: Is Spire.Doc for Python free?
A: Spire.Doc offers a free version with limitations. For full functionality, you can request a 30-day trial license here.
Q2: Can I set text alignment for existing Word documents
A: Yes. Spire.Doc lets you load existing documents and modify text alignment for specific paragraphs. Here’s a quick example:
from spire.doc import *

# Load an existing document
doc = Document()
doc.LoadFromFile("ExistingDocument.docx")

# Get the first section and first paragraph
section = doc.Sections[0]
paragraph = section.Paragraphs[0]

# Change alignment to center
paragraph.Format.HorizontalAlignment = HorizontalAlignment.Center

# Save the modified document
doc.SaveToFile("UpdatedDocument.docx", FileFormat.Docx2016)
doc.Close()
Q3: Can I apply different alignments to different parts of the same paragraph?
A: No. Text alignment is a paragraph-level setting in Word, not a character-level setting. This means all text within a single paragraph must share the same alignment (left, right, center, etc.).
If you need mixed alignment in the same line, you’ll need to use a table with invisible borders.
Q4: Can Spire.Doc for Python handle other text formatting?
A: Absolutely! Spire.Doc lets you combine alignment with other formatting like fonts, line spacing, bullet points, and more.
Conclusion
Automating Word text alignment with Python and Spire.Doc saves time, reduces human error, and ensures consistency across documents. The code example provided offers a clear template for implementing left, right, center, justified, and distributed alignment, and adapting it to your needs is as simple as modifying the text or adding more formatting rules.
Try experimenting with different alignment combinations, and explore Spire.Doc’s online documentation to unlock more formatting possibilities.
Python: Set Paragraph Spacing and Line Spacing in Word
Paragraph spacing and line spacing are crucial formatting options in Microsoft Word that greatly influence the visual presentation and readability of your documents. Paragraph spacing determines the vertical space between paragraphs, creating a distinct separation between each paragraph. Line spacing, on the other hand, controls the vertical distance between lines within a paragraph, directly impacting the density and readability of the text. By appropriately setting paragraph spacing and line spacing, you can easily create visually appealing and easy-to-read documents. In this article, we will explain how to set paragraph spacing and line spacing in Word documents in Python using Spire.Doc for Python.
Install Spire.Doc for Python
This scenario requires Spire.Doc for Python and plum-dispatch v1.7.4. They can be easily installed in your Windows through the following pip commands.
pip install Spire.Doc
If you are unsure how to install, please refer to this tutorial: How to Install Spire.Doc for Python on Windows
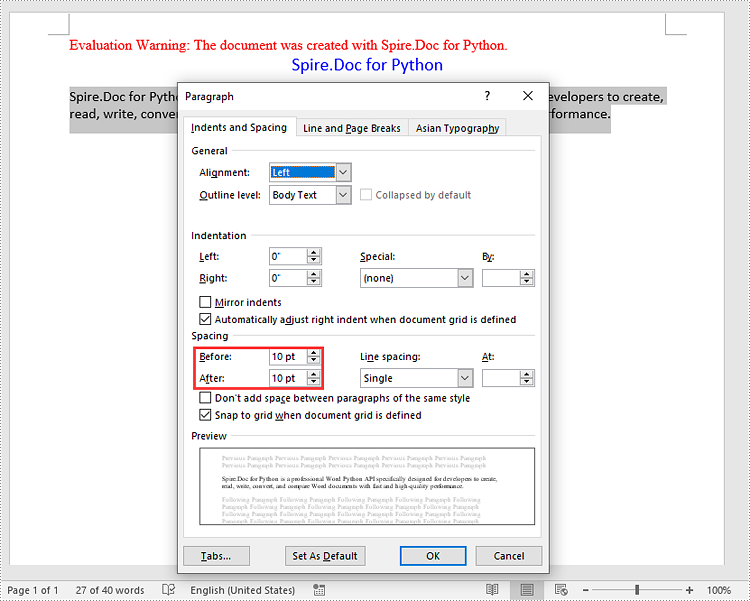
Set Paragraph Spacing in Word in Python
Spire.Doc for Python provides the Paragraph.Format.BeforeSpacing and Paragraph.Format.AfterSpacing properties to adjust the spacing before and after a paragraph. The detailed steps are as follows.
- Create an object of the Document class.
- Add a section to the document using Document.AddSection() method.
- Add two paragraphs to the section using Section.AddParagraph() methods.
- Set the spacing before and after the paragraphs using Paragraph.Format.BeforeSpacing and Paragraph.Format.AfterSpacing properties.
- Save the result document using Document.SaveToFile() method.
- Python
from spire.doc import *
from spire.doc.common import *

# Create an object of the Document class
document = Document()
# Add a section to the document
section = document.AddSection()

# Add two paragraphs to the section
para1 = section.AddParagraph()
para1.Format.HorizontalAlignment = HorizontalAlignment.Center
textRange1 = para1.AppendText("Spire.Doc for Python")
textRange1.CharacterFormat.TextColor = Color.get_Blue()
textRange1.CharacterFormat.FontName = "Calibri"
textRange1.CharacterFormat.FontSize = 15

para2 = section.AddParagraph()
textRange2 = para2.AppendText("Spire.Doc for Python is a professional Word Python API specifically designed for developers to create, read, write, convert, and compare Word documents with fast and high-quality performance.")
textRange2.CharacterFormat.FontName = "Calibri"
textRange2.CharacterFormat.FontSize = 12

# Set the spacing after the first paragraph
para1.Format.AfterAutoSpacing = False
para1.Format.AfterSpacing = 10

# Set the spacing before and after the second paragraph
para2.Format.BeforeAutoSpacing = False
para2.Format.BeforeSpacing = 10
para2.Format.AfterAutoSpacing = False
para2.Format.AfterSpacing = 10

# Save the result file
document.SaveToFile("SetParagraphSpacing.docx", FileFormat.Docx2013)
document.Close()
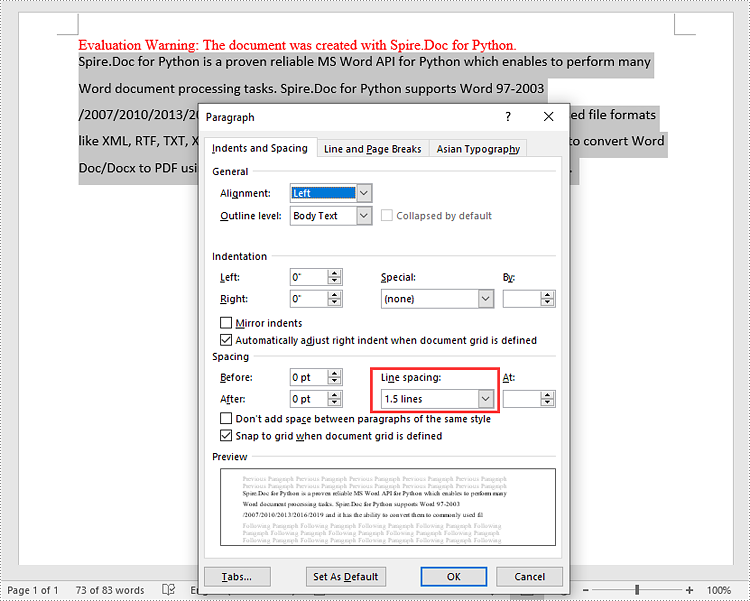
Set Line Spacing in Word in Python
To set the pacing between lines in a paragraph, you can use the Paragraph.Format.LineSpacing property. The detailed steps are as follows.
- Create an object of the Document class.
- Add a section to the document using Document.AddSection() method.
- Add a paragraph to the section using Section.AddParagraph() methods.
- Set the spacing between lines in the paragraph using Paragraph.Format.LineSpacing property.
- Save the result document using Document.SaveToFile() method.
- Python
from spire.doc import *
from spire.doc.common import *

# Create an object of the Document class
document = Document()
# Add a section
section = document.AddSection()

# Add a paragraph to the section
para = section.AddParagraph()
textRange = para.AppendText("Spire.Doc for Python is a proven reliable MS Word API for Python which enables to perform many Word document processing tasks. Spire.Doc for Python supports Word 97-2003 /2007/2010/2013/2016/2019 and it has the ability to convert them to commonly used file formats like XML, RTF, TXT, XPS, EPUB, EMF, HTML and vice versa. Furthermore, it supports to convert Word Doc/Docx to PDF using Python, Word to SVG, and Word to PostScript in high quality.")
textRange.CharacterFormat.FontName = "Calibri"
textRange.CharacterFormat.FontSize = 12

# Set line spacing rule
para.Format.LineSpacingRule = LineSpacingRule.Multiple
# Set line spacing value (The line spacing rule "Multiple" with value 18 sets the line spacing to "1.5 lines", value 12 sets the line spacing to "Single")
para.Format.LineSpacing = 18

# Save the result file
document.SaveToFile("SetLineSpacing.docx", FileFormat.Docx2013)
document.Close()
Apply for a Temporary License
If you'd like to remove the evaluation message from the generated documents, or to get rid of the function limitations, please request a 30-day trial license for yourself.
Python: Set Background Colors for Word Paragraphs or Text
Setting the background colors for paragraphs and text in Word documents can significantly enhance the presentation and readability of content. Customizing background color is an effective approach to emphasize key information, categorize content, and add a personalized touch, thereby making it easy to create polished and professional documents. By carefully selecting and applying background colors, documents can be transformed into visually appealing works that effectively convey information and engage the reader. This article shows how to use Spire.Doc for Python to set background colors for paragraphs and text in Word documents, unlocking new possibilities for document styling and customization.
- Set Background Colors for Paragraphs Using Python
- Set Background Colors for Selected Text Using Python
Install Spire.Doc for Python
This scenario requires Spire.Doc for Python and plum-dispatch v1.7.4. They can be easily installed in your Windows through the following pip command.
pip install Spire.Doc
If you are unsure how to install, please refer to this tutorial: How to Install Spire.Doc for Python on Windows
Set Background Color for Paragraphs Using Python
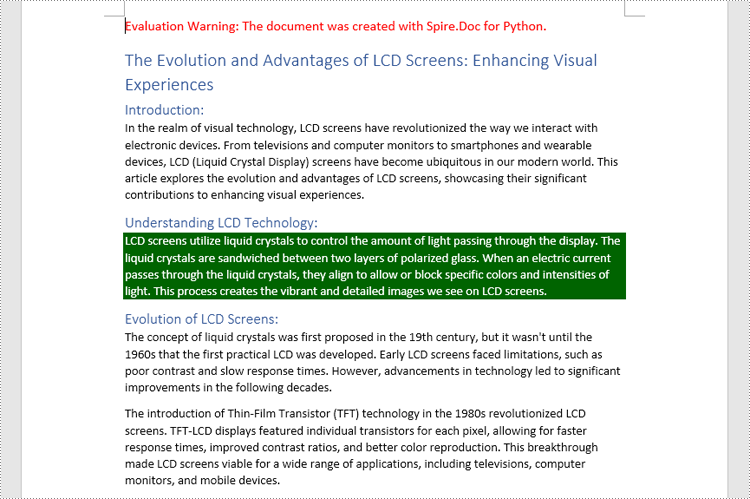
By using Spire.Doc for Python, developers can get any paragraph in any section. After getting a paragraph, developers can apply a background color to it by assigning a Color object to Paragraph.Format.BackColor property. Below are the detailed steps:
- Create an instance of Document class and load a Word document using Document.LoadFromFile() method.
- Get a section using Document.Sections.get_Item() method.
- Get a paragraph in the section using Section.Paragraphs.get_Item() method.
- Set the background color of the paragraph through Paragraph.Format.BackColor property.
- Save the document using Document.SaveToFile() method.
- Python
from spire.doc import *
from spire.doc.common import *

# Create an instance of Document class and load a Word document
doc = Document()
doc.LoadFromFile("Sample.docx")

# Get the first section
section = doc.Sections.get_Item(0)

# Get the fifth paragraph
paragraph = section.Paragraphs.get_Item(4)

# Set background color for the paragraph
paragraph.Format.BackColor = Color.get_DarkGreen()

# Save the document
doc.SaveToFile("output/ParagraphBackground.docx")
doc.Close()
Set Background Colors for Selected Text Using Python
Spire.Doc for Python enables developers to find all the occurrences of specific text in a Word document with Document.FindAllString() method. After getting the finding results, developers can set the background for them through TextRange.CharacterFormat.TextBackgroundColor property. The detailed steps are as follows:
- Create an instance of Document class and load a Word document using Document.LoadFromFile() method.
- Find all the occurrences of specific text using Document.FindAllString() method.
- Loop through the occurrences, get each occurrence as a text range using TextSelection.GetAsOneRange(True) method, and set the background color of each occurrence through TextRange.CharacterFormat.TextBackgroundColor property. It is also possible to get only one occurrence from the result list and set the background color for the occurrence.
- Save the document using Document.SaveToFile() method.
- Python
from spire.doc import *
from spire.doc.common import *
# Create an instance of Document class and load a Word document
doc = Document()
doc.LoadFromFile("Sample.docx")
# Find text in the Word document
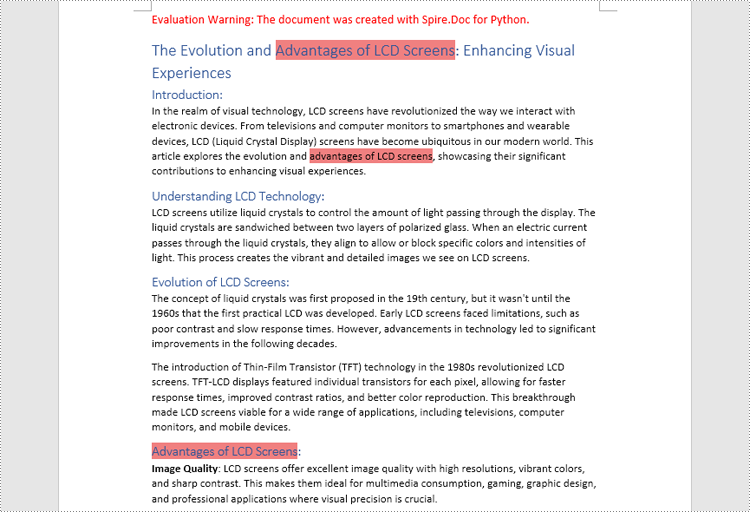
findResults = doc.FindAllString("advantages of LCD screens", False, False)
# Loop through the finding results to set background color for all occurrences
for text in findResults:
# Get an occurrence as a text range
textRange = text.GetAsOneRange(True)
# Set the background color of the text range
textRange.CharacterFormat.TextBackgroundColor = Color.get_LightCoral()
# Set the background color of a sepecified occurrence
# Get an occurrence as one text range
# textRange = findResults[1].GetAsOneRange()
# Set the background color of the text range
# textRange.CharacterFormat.BackgroundColor = Color.get_DarkCyan()
# Save the document
doc.SaveToFile("output/TextBackground.docx")
doc.Close()
Apply for a Temporary License
If you'd like to remove the evaluation message from the generated documents, or to get rid of the function limitations, please request a 30-day trial license for yourself.
Python: Remove Paragraphs from Word Documents
When working with Word documents, sometimes you may need to adjust the content or layout of the document by deleting certain paragraphs. For example, when you have copied a very long paragraph from the Internet, you can delete redundant paragraphs as needed and keep only the useful ones. Or you can create a new document by deleting irrelevant paragraphs in an existing document. In this case, performing this process programmatically is a better option than tedious manual deletion, which can help you batch process a large number of documents in a short period of time. In this article, we will show you how to remove a specific paragraph or all paragraphs from Word documents in python using Spire.Doc for Python.
Install Spire.Doc for Python
This scenario requires Spire.Doc for Python and plum-dispatch v1.7.4. They can be easily installed in your Windows through the following pip command.
pip install Spire.Doc
If you are unsure how to install, please refer to this tutorial: How to Install Spire.Doc for Python on Windows
Delete a Specific Paragraph from Word Documents
With Spire.Doc for Python library, you are allowed to remove specific paragraphs from Word documents. You just need to get the desired section, and then call the Section.Paragraphs.RemoveAt() method to remove the paragraphs you want. The detailed steps are as follows.
- Create an object of Document class.
- Load a Word document from disk using Document.LoadFromFile() method.
- Get the first section of this file using Document.Sections[] property.
- Remove the first paragraph from this section using Section.Paragraphs.RemoveAt() method.
- Save the result file using Document.SaveToFile() method.
- Python
from spire.doc import *
from spire.doc.common import *

inputFile = "C:/Users/Administrator/Desktop/Sample.docx"
outputFile = "C:/Users/Administrator/Desktop/RemoveParagraphs.docx"

#Create an object of Document class
document = Document()

#Load a sample file from disk
document.LoadFromFile(inputFile)

#Get the first section of this file
section=document.Sections[0]

#Remove the first paragraph from this section
section.Paragraphs.RemoveAt(0)

#Save the result file
document.SaveToFile(outputFile, FileFormat.Docx2013)
document.Close()
Delete All Paragraphs from Word Documents
In addition, if you want to clear all paragraphs of the Word document at once, please loop through all sections first and call the Section.Paragraphs.Clear() method to do that. The detailed steps are as follows.
- Create an object of Document class.
- Load a Word document from disk using Document.LoadFromFile() method.
- Loop through all sections first and remove all paragraphs in each section by using Section.Paragraphs.Clear() method.
- Save the result file using Document.SaveToFile() method.
- Python
from spire.doc import *
from spire.doc.common import *

inputFile = "C:/Users/Administrator/Desktop/Sample.docx"
outputFile = "C:/Users/Administrator/Desktop/RemoveAllParagraphs.docx"

#Create an object of Document class
document = Document()

#Load a sample file from disk
document.LoadFromFile(inputFile)

#Remove paragraphs from the body of every section in the document
for i in range(document.Sections.Count):
    section = document.Sections.get_Item(i)
    section.Paragraphs.Clear()

#Save the result file
document.SaveToFile(outputFile, FileFormat.Docx2013)
document.Close()
Apply for a Temporary License
If you'd like to remove the evaluation message from the generated documents, or to get rid of the function limitations, please request a 30-day trial license for yourself.
Python: Remove Blank Lines from Word Documents
During the process of document creation, it is common to encounter numerous blank lines. These empty spaces can disrupt the flow of the content, clutter the layout, and undermine the overall aesthetic presentation of the document. In order to optimize the reading experience and ensure a well-structured document, it becomes crucial to eliminate the blank lines. This article will demonstrate how to delete blank lines from Word documents through Python programs using Spire.Doc for Python.
Install Spire.Doc for Python
This scenario requires Spire.Doc for Python and plum-dispatch v1.7.4. They can be easily installed in your Windows through the following pip command.
pip install Spire.Doc
If you are unsure how to install, please refer to this tutorial: How to Install Spire.Doc for Python on Windows
Remove Blank Lines from Word Documents
Blank lines in a Word document appear as blank paragraphs, which are child objects of sections. Therefore, removing blank lines simply requires iterating through the sections, identifying and deleting empty paragraphs within them. The detailed steps are as follows:
- Create an object of Document class.
- Load a Word document using Document.LoadFromFile() method.
- Iterate through each section and each child object of the sections.
- First, check if a child object is of paragraph type. If it is, continue to check if the sub-object is an instance of the "Paragraph" class. If it is, further check if the paragraph has no text. If there is no text, delete the paragraph using Section.Body.ChildObjects.Remove() method.
- Save the document using Document.SaveToFile() method.
- Python
from spire.doc import *
from spire.doc.common import *

# Create an object of the Document class
doc = Document()

# Load a Word document
doc.LoadFromFile("Sample.docx")

# Iterate through each section in the document
for i in range(doc.Sections.Count):
    section = doc.Sections.get_Item(i)
    j = 0
    # Iterate through each child object in the section
    while j < section.Body.ChildObjects.Count:
        # Check if the child object is of type Paragraph
        if section.Body.ChildObjects[j].DocumentObjectType == DocumentObjectType.Paragraph:
            objItem = section.Body.ChildObjects[j]
            # Check if the child object is an instance of the Paragraph class
            if isinstance(objItem, Paragraph):
                paraObj = Paragraph(objItem)
                # Check if the paragraph text is empty
                if len(paraObj.Text) == 0:
                    # If the paragraph text is empty, remove the object from the section's child objects list
                    section.Body.ChildObjects.Remove(objItem)
                    j -= 1
        j += 1

# Save the document
doc.SaveToFile("output/RemoveBlankLines.docx")
Apply for a Temporary License
If you'd like to remove the evaluation message from the generated documents, or to get rid of the function limitations, please request a 30-day trial license for yourself.