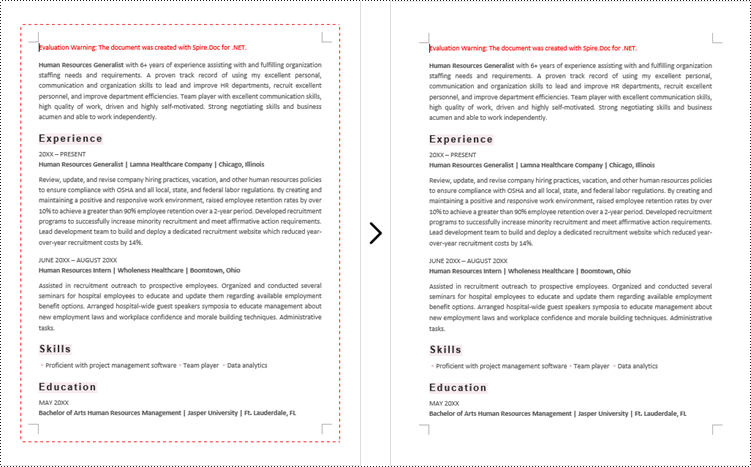
C#/VB.NET: Remove Text or Image Watermarks from Word Documents
Watermarks can be added to Word documents to inform other people about the documents' ownership or status. Sometimes, you may want to get rid of an existing watermark in a Word document. This article will demonstrate how to remove watermarks from Word documents in C# and VB.NET using Spire.Doc for .NET.
Install Spire.Doc for .NET
To begin with, you need to add the DLL files included in the Spire.Doc for .NET package as references in your .NET project. The DLL files can be either downloaded from this link or installed via NuGet.
PM> Install-Package Spire.Doc
Remove Text or Image Watermarks from Word Documents in C# and VB.NET
You can remove the watermark of a Word document by setting the Document.Watermark property as null.
The following steps show you how to remove the watermark from a Word document:
- Initialize an instance of Document class.
- Load a Word document using Document.LoadFromFile() method.
- Remove the watermark from the document by setting the Document.Watermark property as null.
- Save the result document using Document.SaveToFile() method.
- C#
- VB.NET
using Spire.Doc;

namespace RemoveWatermark
{
    class Program
    {
        static void Main(string[] args)
        {
            //Create a Document instance
            Document doc = new Document();
            //Load a Word document
            doc.LoadFromFile("Sample.docx");

            //Remove the watermark from the document
            doc.Watermark = null;

            //Save the result document
            doc.SaveToFile("RemoveWatermark.docx", FileFormat.Docx2013);
        }
    }
}
Apply for a Temporary License
If you'd like to remove the evaluation message from the generated documents, or to get rid of the function limitations, please request a 30-day trial license for yourself.
Add text watermark and image watermark to word document in C#
Text watermark and image watermark are two kinds of watermarks in Word document. The text watermark always shows some additional but related information to the word context. While image watermark is used to make the Word document be more attractive. This section will demonstrate how to use Spire.Doc to add text watermark and image watermark to Word document in C#.
Add Image Watermark in C#:
using Spire.Doc;
namespace SetImageWatermark
{
    class Program
    {
        static void Main(string[] args)
        {
            {
                //create a new instance of Document and load the document from file.
                Document doc = new Document();
                doc.LoadFromFile("Sample.docx", FileFormat.Docx2013);

                //create a new instance of the PictureWatermark and load the picture from file.
                PictureWatermark picture = new PictureWatermark();
                picture.Picture = System.Drawing.Image.FromFile("logo.png");

                //set the image watermark scaling and Washout property
                picture.Scaling = 20;
                picture.IsWashout = false;

                //add the picture watermark
                doc.Watermark = picture;

                //save the document to file
                doc.SaveToFile("ImageWatermark.docx", FileFormat.Docx2013);

            }
        }
    }
}

Add Text Watermark in C#::
using Spire.Doc;
using Spire.Doc.Documents;
using System.Drawing;
namespace SetTextWatermark
{
    class Program
    {
        static void Main(string[] args)
        {
            {
                //create a new instance of Document and load the document from file.
                Document doc = new Document();
                doc.LoadFromFile("Sample.docx", FileFormat.Docx2013);

                //create a new instance of the TextWatermark
                TextWatermark txtWatermark = new TextWatermark();

                //set the text watermark with text string, font, color and layout.
                txtWatermark.Text = "Confidential";
                txtWatermark.FontSize = 45;
                txtWatermark.Color = Color.Green;
                txtWatermark.Layout = WatermarkLayout.Diagonal;

                //add the text watermark
                doc.Watermark = txtWatermark;

                //save the file.
                doc.SaveToFile("TextWatermark.docx", FileFormat.Docx2013);

            }
        }
    }
}

C#/VB.NET: Add Background Color or Image to Word Documents
The default background of a Word document is white, and in the vast majority of cases, a simple white background is sufficient. However, if you are creating a resume, a broacher or other creative document that needs to be eye-catching, setting a unique background color or image may also be essential. This article will demonstrate how to programmatically add a background color or image to a Word document using Spire.Doc for .NET.
- Add a Background Color to a Word Document
- Add a Gradient Background to a Word Document
- Insert a Background Image to a Word Document
Install Spire.Doc for .NET
To begin with, you need to add the DLL files included in the Spire.Doc for.NET package as references in your .NET project. The DLL files can be either downloaded from this link or installed via NuGet.
PM> Install-Package Spire.Doc
Add a Background Color to a Word Document
Adding a background color to a Word document is quite simple. You just need to set the background type as color and then choose a color as the background. The detailed steps are as follows.
- Create a Document instance.
- Load a sample Word document using Document.LoadFromFile() method.
- Set the background type as color using Document.Background.Type property.
- Set a background color for the document using Document.Background.Color property.
- Save the result document using Document.SaveToFile() method.
- C#
- VB.NET
using Spire.Doc;
using System.Drawing;
using Spire.Doc.Documents;

namespace ConvertWordToPng
{
    class Program
    {
        static void Main(string[] args)
        {
            //Create a Document instance
            Document document = new Document();

            //Load a sample Word document
            document.LoadFromFile("Test.docx");

            //Set the background type as color
            document.Background.Type = BackgroundType.Color;

            //Set the background color
            document.Background.Color = Color.AliceBlue;

            //Save the document
            document.SaveToFile("PureColorBackground.docx", FileFormat.Docx);
        }
    }
}

Add a Gradient Background to a Word Document
Adding gradient background requires more steps. You need to set the background type as gradient, choose two colors, and then set shading variant and style. The detailed steps are as follows.
- Create a Document instance.
- Load a sample Word document using Document.LoadFromFile() method.
- Set the background type as gradient using Document.Background.Type property.
- Get the background gradient using Document.Background.Gradient property.
- Select two colors using BackgroundGradient.Color1 and BackgroundGradient.Color2 properties.
- Set shading variant and style for the gradient using BackgroundGradient.ShadingVariant and BackgroundGradient. ShadingStyle properties.
- Save the result document using Document.SaveToFile() method.
- C#
- VB.NET
using Spire.Doc;
using System.Drawing;
using Spire.Doc.Documents;

namespace ConvertWordToPng
{
    class Program
    {
        static void Main(string[] args)
        {
            //Create a Document instance
            Document document = new Document();

            //Load a sample Word document
            document.LoadFromFile("Test.docx");

            //Set the background type as gradient
            document.Background.Type = BackgroundType.Gradient;

            //Get the background gradient
            BackgroundGradient gradient = document.Background.Gradient;

            //Select two colors
            gradient.Color1 = Color.White;
            gradient.Color2 = Color.LightBlue;

            //Set shading variant and style for the gradient
            gradient.ShadingVariant = GradientShadingVariant.ShadingDown;
            gradient.ShadingStyle = GradientShadingStyle.Horizontal;

            //Save the document
            document.SaveToFile("AddGradientBackground.docx", FileFormat.Docx);

        }
    }
}

Insert a Background Image to a Word Document
To insert a background image to a Word document, you need to set the background type as picture, and then insert a picture as the background. The detailed steps are as follows.
- Create a Document instance.
- Load a sample Word document using Document.LoadFromFile() method.
- Set the background type as picture using Document.Background.Type property.
- Set a background picture for the document using Document.Background.Picture property.
- Save the result document using Document.SaveToFile() method.
- C#
- VB.NET
using Spire.Doc;
using Spire.Doc.Documents;
using System.Drawing;
namespace SetImageBackground
{
    class Program
    {
        static void Main(string[] args)
        {
            {
                //Create a Document instance
                Document document = new Document();

                //Load a sample Word document
                document.LoadFromFile("Test.docx");

                //Set the background type as picture
                document.Background.Type = BackgroundType.Picture;

                //Set background picture
                document.Background.Picture = Image.FromFile("background.jpg");

                //Save the document
                document.SaveToFile("AddBackgroundPicture.docx", FileFormat.Docx);
            }

        }
    }
}

Apply for a Temporary License
If you'd like to remove the evaluation message from the generated documents, or to get rid of the function limitations, please request a 30-day trial license for yourself.
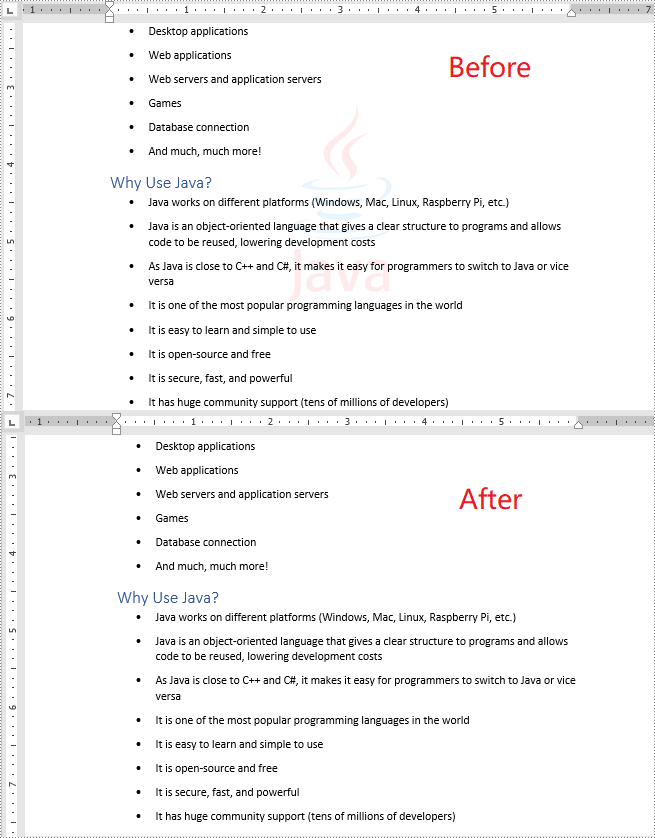
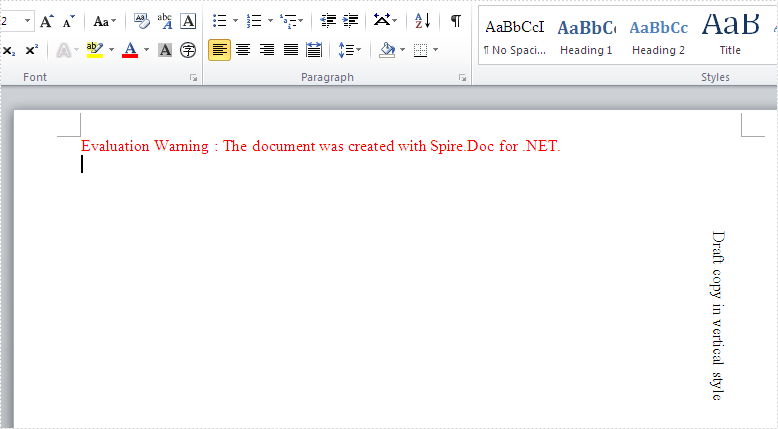
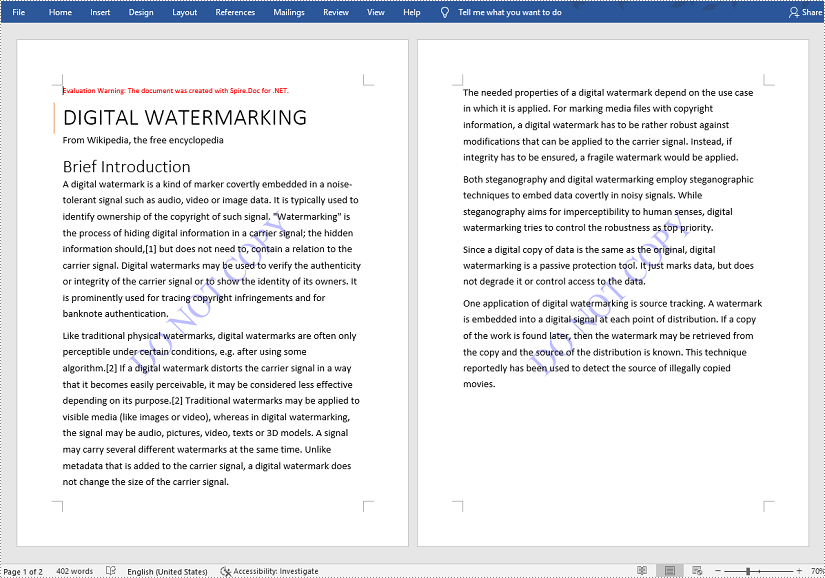
How to create vertical table at one side of the word document
Spire.Doc can help developers to create word table with data and format cells easily and it also supports to add text watermark into the word documents. This article will show you how to create a vertical table at one side of the word document, which looks like the vertical watermark in the word document.
Firstly, please check the effective screenshot of the vertical table at the right of the word document added by Spire.Doc:
Here comes to the steps of how to create vertical table in C#.
Step 1: Create a new document and add a section to the document.
Document document = new Document();
Section section=document.AddSection();
Step 2: Add a table with rows and columns and set the text for the table.
Table table = section.AddTable();
table.ResetCells(1, 1);
TableCell cell = table.Rows[0].Cells[0];
table.Rows[0].Height = 150;
cell.AddParagraph().AppendText("Draft copy in vertical style");
Step 3: Set the TextDirection for the table to RightToLeftRotated.
cell.CellFormat.TextDirection = TextDirection.RightToLeftRotated;
Step 4: Set the table format.
table.TableFormat.WrapTextAround = true;
table.TableFormat.Positioning.VertRelationTo = VerticalRelation.Page;
table.TableFormat.Positioning.HorizRelationTo = HorizontalRelation.Page;
table.TableFormat.Positioning.HorizPosition = section.PageSetup.PageSize.Width- table.Width;
table.TableFormat.Positioning.VertPosition = 200;
Step 5: Save the document to file.
document.SaveToFile("result.docx",FileFormat.docx2013);
Full codes in C#:
using Spire.Doc;
using Spire.Doc.Documents;

namespace CreateVerticalTable
{
    class Program
    {
        static void Main(string[] args)
        {

            Document document = new Document();
            Section section=document.AddSection();
            Table table = section.AddTable();
            table.ResetCells(1, 1);
            TableCell cell = table.Rows[0].Cells[0];
            table.Rows[0].Height = 150;
            cell.AddParagraph().AppendText("Draft copy in vertical style");
            cell.CellFormat.TextDirection = TextDirection.RightToLeftRotated;
            table.Format.WrapTextAround = true;
            table.Format.Positioning.VertRelationTo = VerticalRelation.Page;
            table.Format.Positioning.HorizRelationTo = HorizontalRelation.Page;
            table.Format.Positioning.HorizPosition = section.PageSetup.PageSize.Width - table.Width;
            table.Format.Positioning.VertPosition = 200;

            document.SaveToFile(""result.docx"", FileFormat.Docx2013);

        }
    }
}
C#: Apply Shading to Word Paragraphs or Text
Shading is a powerful feature in MS Word that adds a background color to specified text or paragraphs in a document. This not only enhances the visual appeal of the document, but also helps to differentiate between different sections and makes the content more readable. In this article, you will learn how to apply shading to a paragraph or text in Word in C# using Spire.Doc for .NET.
Install Spire.Doc for .NET
To begin with, you need to add the DLL files included in the Spire.Doc for.NET package as references in your .NET project. The DLL files can be either downloaded from this link or installed via NuGet.
PM> Install-Package Spire.Doc
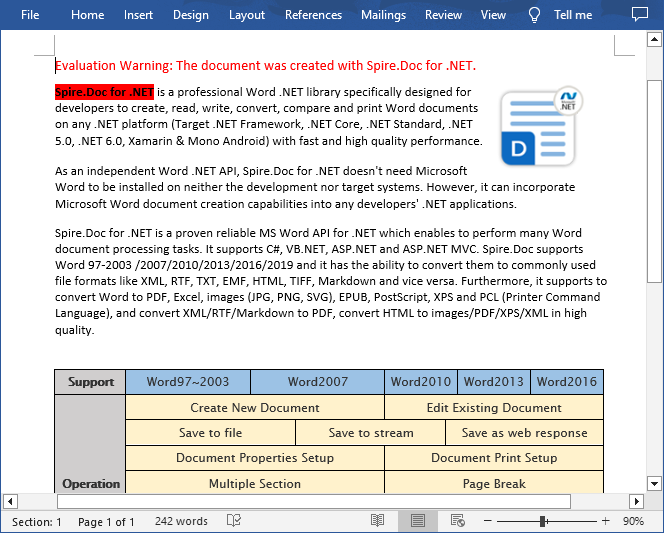
Apply Paragraph Shading in Word in C#
Spire.Doc for .NET provides developers with the Paragraph.Format.BackColor property to apply a background color to a specified paragraph in Word. The following are the detailed steps:
- Create a Document instance.
- Load a Word document using Document.LoadFromFile() method.
- Get a specified section using Document.Sections[] property.
- Get a specified paragraph using Section.Paragraphs[] property.
- Set a background color for the paragraph using Paragraph.Format.BackColor property.
- Save the result document using Document.SaveToFile() method.
- C#
using Spire.Doc;
using Spire.Doc.Documents;
using System.Drawing;

namespace WordParagrahShade
{
    class Program
    {
        static void Main(string[] args)
        {
            // Create a Document instance
            Document document = new Document();

            // Load a Word document
            document.LoadFromFile("Sample.docx");

            // Get the first section
            Section section = document.Sections[0];

            // Get the second paragraph
            Paragraph paragaph = section.Paragraphs[1];

            // Set a background color for the paragraph
            paragaph.Format.BackColor = Color.Yellow;

            // Save the result document
            document.SaveToFile("ParagraphBackground.docx", FileFormat.Docx);
        }
    }
}
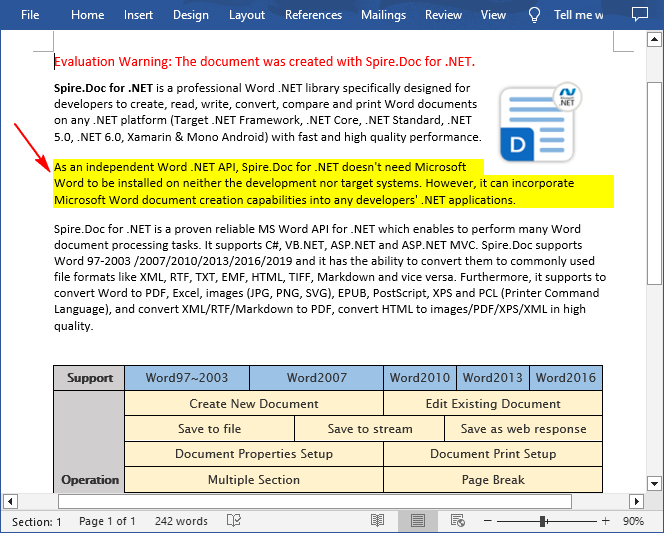
Apply Shading to Specified Text in Word in C#
If you only need to apply shading to specified text, you can first find the specific text through the Paragraph.Find() method, get its text range and then set a background color for the text range through the TextRange.CharacterFormat.TextBackgroundColor property. The following are the detailed steps:
- Create a Document instance.
- Load a Word document using Document.LoadFromFile() method.
- Get a specified section using Document.Sections[] property.
- Get a specified paragraph using Section.Paragraphs[] property.
- Find a specified text in the paragraph Paragraph.Find() method.
- Get the text range of the found text using TextSelection.GetAsOneRange() method.
- Set a background color for the text range using TextRange.CharacterFormat.TextBackgroundColor property.
- Save the document using Document.SaveToFile() method.
- C#
using Spire.Doc;
using Spire.Doc.Documents;
using Spire.Doc.Fields;
using System.Drawing;

namespace ShadeText
{
    class Program
    {
        static void Main(string[] args)
        {
            // Create a Document instance
            Document document = new Document();

            // Load a Word document
            document.LoadFromFile("Sample.docx");

            // Get the first section
            Section section = document.Sections[0];

            // Get the first paragraph
            Paragraph paragaph = section.Paragraphs[0];

            // Find a specified text in the paragraph
            TextSelection selection = paragaph.Find("Spire.Doc for .NET", true, false);

            // Get the text range of the found text
            TextRange range = selection.GetAsOneRange();

            // Set a background color for the text range
            range.CharacterFormat.TextBackgroundColor = Color.Red;

            // Save the result document
            document.SaveToFile("TextBackground.docx", FileFormat.Docx);
        }
    }
}
Apply for a Temporary License
If you'd like to remove the evaluation message from the generated documents, or to get rid of the function limitations, please request a 30-day trial license for yourself.
C#: Add, Modify, or Remove Page Borders in Word
Page borders in Microsoft Word can be a useful tool for improving the visual appeal and organization of your documents. Knowing how to effectively add, modify, and remove page borders can help you customize the appearance of your Word documents and elevate their overall presentation.
In this article, you will learn how to programmatically manage page borders in Word documents using C# and Spire.Doc for .NET.
- Add Borders to All Pages in Word in C#
- Modify Page Borders in Word in C#
- Remove Page Borders in Word in C#
Install Spire.Doc for .NET
To begin with, you need to add the DLL files included in the Spire.Doc for.NET package as references in your .NET project. The DLL files can be either downloaded from this link or installed via NuGet.
PM> Install-Package Spire.Doc
Add Borders to All Pages in Word in C#
Spire.Doc for .NET provides the Borders class to manage the page borders in a Word document. This class offers a set of properties that allow you to control the appearance of the page border, including BorderType, Color, and LineWidth.
The steps to add borders to all pages in a Word document using C# are as follows:
- Create a Document object.
- Load a Word file from the given file path.
- Iterate through the sections in the document.
- Get a specific section.
- Get the PageSetup object of the section.
- Apply borders to all page by setting PageSetup.PageBordersApplyType to PageBordersApplyType.AllPages.
- Get the Borders object through PageSetup.Borders property.
- Set the border type, color, line width and other attributes through the properties under the Borders object.
- Save the updated document to a different Word file.
- C#
using Spire.Doc;
using System.Drawing;

namespace AddPageBorder
{
    class Program
    {
        static void Main(string[] args)
        {
            // Create a Document object
            Document doc = new Document();

            // Load a Word file
            doc.LoadFromFile("C:\\Users\\Administrator\\Desktop\\source.docx");

            // Iterate through the sections in the document
            for (int i = 0; i < doc.Sections.Count; i++)
            {
                // Get a specific section
                Section section = doc.Sections[i];

                // Get page setup object
                PageSetup pageSetup = section.PageSetup;

                // Apply page border to all pages
                pageSetup.PageBordersApplyType = PageBordersApplyType.AllPages;

                // Set the border type
                pageSetup.Borders.BorderType = Spire.Doc.Documents.BorderStyle.DashLargeGap;

                // Set the border width
                pageSetup.Borders.LineWidth = 2;

                // Set the border color
                pageSetup.Borders.Color = Color.Red;

                // Set the spacing between borders and text within them
                pageSetup.Borders.Top.Space = 30;
                pageSetup.Borders.Bottom.Space = 30;
                pageSetup.Borders.Left.Space = 30;
                pageSetup.Borders.Right.Space = 30;
            }

            // Save the updated document to a different file
            doc.SaveToFile("AddPageBorder.docx", FileFormat.Docx);

            // Dispose resources
            doc.Dispose();
        }
    }
}

Modify Page Borders in Word in C#
The page borders in an existing Word document can be accessed through PageSetup.Borders class and their appearance can be modified using the properties under the Borders object.
The following are the steps to modify page border in a Word document using C#:
- Create a Document object.
- Load a Word file from the given file path.
- Iterate through the sections in the document.
- Get a specific section.
- Get the PageSetup object of the section.
- Get the Borders object through PageSetup.Borders property.
- Set the border type, color, line width and other attributes through the properties under the Borders object.
- Save the updated document to a different Word file.
- C#
using Spire.Doc;
using System.Drawing;

namespace ModifyPageBorder
{
    class Program
    {
        static void Main(string[] args)
        {
            // Create a Document object
            Document doc = new Document();

            // Load a Word file
            doc.LoadFromFile("C:\\Users\\Administrator\\Desktop\\Border.docx");

            // Iterate through the sections in the document
            for (int i = 0; i < doc.Sections.Count; i++)
            {
                // Get a specific section
                Section section = doc.Sections[i];

                // Get page setup of the section
                PageSetup pageSetup = section.PageSetup;

                // Change the border type
                section.PageSetup.Borders.BorderType = Spire.Doc.Documents.BorderStyle.Double;

                // Change the border color
                section.PageSetup.Borders.Color = Color.Orange;

                // Change the border width
                section.PageSetup.Borders.LineWidth = 3;
            }

            // Save the updated document to a different file
            doc.SaveToFile("ModifyBorder.docx", FileFormat.Docx);

            // Dispose resources
            doc.Dispose();
        }
    }
}

Remove Page Borders in Word in C#
To remove the page borders of a Word document, you can simply set the Borders.BorderType property to BorderStyle.None. The following are the detailed steps.
- Create a Document object.
- Load a Word file from the given file path.
- Iterate through the sections in the document.
- Get a specific section.
- Get the PageSetup object of the section.
- Get the Borders object through PageSetup.Borders property.
- Set the Borders.BorderType property as BorderStyle.None.
- Save the updated document to a different Word file.
- C#
using Spire.Doc;

namespace RemovePageBorder
{
    class Program
    {
        static void Main(string[] args)
        {
            // Create a Document object
            Document doc = new Document();

            // Load a Word file
            doc.LoadFromFile("C:\\Users\\Administrator\\Desktop\\Border.docx");

            // Iterate through the sections in the document
            for (int i = 0; i < doc.Sections.Count; i++)
            {
                // Get a specific section
                Section section = doc.Sections[i];

                // Get page setup object
                PageSetup pageSetup = section.PageSetup;

                // Set the border type to none
                pageSetup.Borders.BorderType = Spire.Doc.Documents.BorderStyle.None;
            }

            // Save the updated document to a different file
            doc.SaveToFile("RemovePageBorder.docx", FileFormat.Docx);

            // Dispose resources
            doc.Dispose();
        }
    }
}
Apply for a Temporary License
If you'd like to remove the evaluation message from the generated documents, or to get rid of the function limitations, please request a 30-day trial license for yourself.
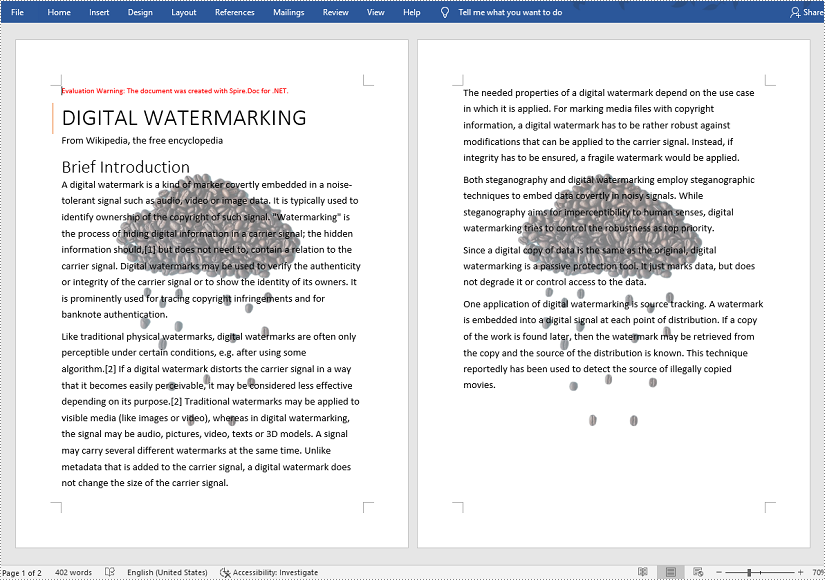
C#/VB.NET: Insert Watermarks in Word
Watermarks are text or images displayed fadedly or in gray color in the background of a Word document. They can be used to declare confidentiality, copyright, or other attributes of the document, or just as decorations to make the document more attractive. This article shows an easy way to insert watermarks in Word documents with the help of Spire.Doc for .NET, including text watermarks and image watermarks.
Install Spire.Doc for .NET
To begin with, you need to add the DLL files included in the Spire.Doc for.NET package as references in your .NET project. The DLL files can be either downloaded from this link or installed via NuGet.
PM> Install-Package Spire.Doc
Insert a Text Watermark in a Word Document
The detailed steps are as follows:
- Create an object of Document class.
- Load a Word document from disk using Document.LoadFromFile() method.
- Insert a text watermark in the document using custom method InsertTextWatermark().
- Save the document using Doucment.SaveToFile() method.
- C#
- VB.NET
using System;
using System.Drawing;
using Spire.Doc;
using Spire.Doc.Documents;

namespace InsertImageWatermark
{
    internal class Program
    {
        static void Main(string[] args)
        {
            //Create an object of Document class
            Document document = new Document();

            //Load a Word document from disk
            document.LoadFromFile(@"D:\Samples\Sample.docx");

            //Insert a text watermark
            InsertTextWatermark(document.Sections[0]);

            //Save the document
            document.SaveToFile("InsertTextWatermark.docx", FileFormat.Docx);
        }
        private static void InsertTextWatermark(Section section)
        {
            TextWatermark txtWatermark = new TextWatermark();
            txtWatermark.Text = "DO NOT COPY";
            txtWatermark.FontSize = 50;
            txtWatermark.Color = Color.Blue;
            txtWatermark.Layout = WatermarkLayout.Diagonal;
            section.Document.Watermark = txtWatermark;

        }
    }
}
Insert an Image Watermark in a Word Document
The detailed steps are as follows:
- Create an object of Document class.
- Load a Word document from disk using Document.LoadFromFile() method.
- Insert an image watermark in the document using custom method InsertImageWatermark().
- Save the document using Document.SaveToFile() method.
- C#
- VB.NET
using System;
using System.Drawing;
using Spire.Doc;
using Spire.Doc.Documents;

namespace InsertWatermark
{
    internal class Program
    {
        static void Main(string[] args)
        {
            //Create an object of Document class
            Document document = new Document();

            //Load a Word document from disk
            document.LoadFromFile(@"D:\Samples\Sample.docx");

            //Insert an image watermark
            InsertImageWatermark(document);

            //Save the document
            document.SaveToFile("InsertImageWatermark.docx", FileFormat.Docx);
        }
        private static void InsertImageWatermark(Document document)
        {
            PictureWatermark picture = new PictureWatermark();
            picture.Picture = Image.FromFile(@"D:\Samples\Watermark.png");
            picture.Scaling = 200;
            picture.IsWashout = false;
            document.Watermark = picture;
        }
    }
}
Apply for a Temporary License
If you'd like to remove the evaluation message from the generated documents, or to get rid of the function limitations, please request a 30-day trial license for yourself.