C#: Read or Remove Document Properties from Excel
Excel document properties, also known as metadata, are essential for understanding the content and context of an Excel file. They provide valuable information about the document's content, authorship, and creation/revision history, which can facilitate the efficient organization and retrieval of files. In addition to adding document properties to Excel, this article will show you how to read or remove document properties from Excel in C# using Spire.XLS for .NET.
- Read Standard and Custom Document Properties from Excel in C#
- Remove Standard and Custom Document Properties from Excel in C#
Install Spire.XLS for .NET
To begin with, you need to add the DLL files included in the Spire.XLS for .NET package as references in your .NET project. The DLL files can be either downloaded from this link or installed via NuGet.
PM> Install-Package Spire.XLS
Read Standard and Custom Document Properties from Excel in C#
Excel properties are divided into two main categories:
- Standard Properties: These are predefined properties that are built into Excel files. They typically include basic details about the file such as title, subject, author, keywords, etc.
- Custom Properties: These are user-defined attributes that can be added to Excel to track additional information about the file based on your specific needs.
Spire.XLS for .NET allows to read both the standard and custom document properties of an Excel file. The following are the detailed steps:
- Create a Workbook instance.
- Load an Excel file using Workbook.LoadFromFile() method.
- Create a StringBuilder instance.
- Get a collection of all standard document properties using Workbook.DocumentProperties property.
- Get specific standard document properties using the properties of the BuiltInDocumentProperties class and append them to the StringBuilder instance.
- Get a collection of all custom document properties using Workbook.CustomDocumentProperties property.
- Iterate through the collection.
- Get the name and value of each custom document property using IDocumentProperty.Name and IDocumentProperty.Value properties and append them to the StringBuilder instance.
- Write the content of the StringBuilder instance into a txt file.
- C#
using Spire.Xls;
using Spire.Xls.Collections;
using Spire.Xls.Core;
using System.IO;
using System.Text;
namespace GetExcelProperties
{
class Program
{
static void Main(string[] args)
{
{
//Create a Workbook instance
Workbook workbook = new Workbook();
//Load a sample Excel file
workbook.LoadFromFile("Budget Template.xlsx");
//Create a StringBuilder instance
StringBuilder sb = new StringBuilder();
//Get a collection of all standard document properties
BuiltInDocumentProperties standardProperties = workbook.DocumentProperties;
//Get specific standard properties and append them to the StringBuilder instance
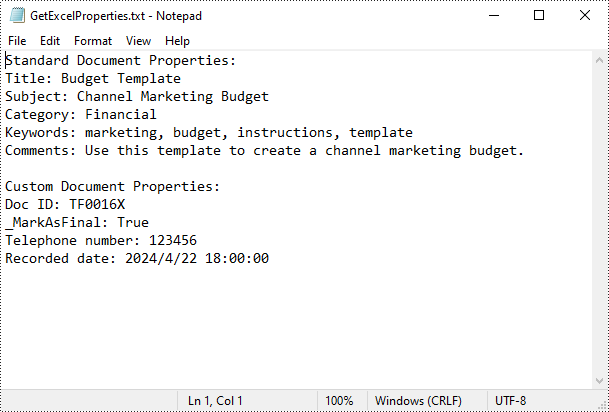
sb.AppendLine("Standard Document Properties:");
sb.AppendLine("Title: " + standardProperties.Title);
sb.AppendLine("Subject: " + standardProperties.Subject);
sb.AppendLine("Category: " + standardProperties.Category);
sb.AppendLine("Keywords: " + standardProperties.Keywords);
sb.AppendLine("Comments: " + standardProperties.Comments);
sb.AppendLine();
//Get a collection of all custom document properties
ICustomDocumentProperties customProperties = workbook.CustomDocumentProperties;
sb.AppendLine("Custom Document Properties:");
//Iterate through the collection
for (int i = 0; i < customProperties.Count; i++)
{
//Get the name and value of each custom document property and append them to the StringBuilder instance
string name = customProperties[i].Name;
string value = customProperties[i].Value.ToString();
sb.AppendLine(name + ": " + value);
}
//Write the content of the StringBuilder instance into a text file
File.WriteAllText("GetExcelProperties.txt", sb.ToString());
}
}
}
}
Remove Standard and Custom Document Properties from Excel in C#
You can easily delete standard document properties from an Excel file by setting their values as empty. For custom document properties, you can use the ICustomDocumentProperties.Remove() method to delete them. The following are the detailed steps:
- Create a Workbook instance.
- Load a sample Excel file using Workbook.LoadFromFile() method.
- Get a collection of all standard document properties using Workbook.DocumentProperties property.
- Set the values of specific standard document properties as empty through the corresponding properties of the BuiltInDocumentProperties class.
- Get a collection of all custom document properties using Workbook.CustomDocumentProperties property.
- Iterate through the collection.
- Delete each custom property from the collection by its name using ICustomDocumentProperties.Remove(string strName) method.
- Save the result file using Workbook.SaveToFile() method.
- C#
using Spire.Xls;
using Spire.Xls.Collections;
using Spire.Xls.Core;

namespace DeleteExcelProperties
{
    class Program
    {

        static void Main(string[] args)
        {
            {
                //Create a Workbook instance
                Workbook workbook = new Workbook();

                //Load a sample Excel file
                workbook.LoadFromFile("Budget Template.xlsx");

                //Get a collection of all standard document properties
                BuiltInDocumentProperties standardProperties = workbook.DocumentProperties;

                //Set the value of each standard document property as empty
                standardProperties.Title = "";
                standardProperties.Subject = "";
                standardProperties.Category = "";
                standardProperties.Keywords = "";
                standardProperties.Comments = "";

                //Get a collection of all custom document properties
                ICustomDocumentProperties customProperties = workbook.CustomDocumentProperties;

                //Iterate through the collection
                for (int i = customProperties.Count -1; i >=0; i--)
                {
                    //Delete each custom document property from the collection by its name
                    customProperties.Remove(customProperties[i].Name);

                }

                //Save the result file
                workbook.SaveToFile("DeleteDocumentProperties.xlsx", ExcelVersion.Version2016);
            }
        }
    }
}

Apply for a Temporary License
If you'd like to remove the evaluation message from the generated documents, or to get rid of the function limitations, please request a 30-day trial license for yourself.
C#/VB.NET: Split an Excel Worksheet into Multiple Files
When dealing with an Excel worksheet containing a large amount of data, splitting it into several separate Excel files based on specific criteria can be beneficial. By dividing the worksheet into smaller, more manageable files, you can improve your work efficiency and make data analysis easier. This article will demonstrate how to programmatically split an Excel worksheet into multiple Excel files using Spire.XLS for .NET.
Install Spire.XLS for .NET
To begin with, you need to add the DLL files included in the Spire.XLS for .NET package as references in your .NET project. The DLL files can be either downloaded from this link or installed via NuGet.
PM> Install-Package Spire.XLS
Split an Excel Sheet into Multiple Files in C# and VB.NET
The Worksheet.Copy(CellRange sourceRange, CellRange destRange) method provided by Spire.XLS for .NET allows you to split a worksheet by copying a specified cell range from the original Excel file to a new Excel file. The following are the detailed steps.
- Create a Workbook instance.
- Load a sample Excel file using Workbook.LoadFromFile() method.
- Get a specific worksheet using Workbook.Worksheets[] property.
- Get the header row and the specified cell ranges using Worksheet.Range property.
- Create a new workbook and get its first worksheet.
- Copy the header row and specified cell range to the first worksheet of the new workbook using Worksheet.Copy(CellRange sourceRange, CellRange destRange) method.
- Copy the column width from the original workbook to the new workbook, and then save the new workbook to an Excel file using Workbook.SaveToFile() method.
- Create another new workbook, and then repeat the above steps to copy the header row and specified cell range into the new workbook.
- Save the new workbook to another Excel file.
- C#
- VB.NET
using Spire.Xls;

namespace splitworksheet
{
    class Program
    {
        static void Main(string[] args)
        {
            //Create a Workbook instance
            Workbook originalBook= new Workbook();

            //Load the original Excel document from file
            originalBook.LoadFromFile("Info.xlsx");

            //Get the first worksheet
            Worksheet sheet = originalBook.Worksheets[0];

            //Get the header row
            CellRange headerRow = sheet.Range[1, 1, 1,5];

            //Get two cell ranges
            CellRange range1 = sheet.Range[2, 1, 6, sheet.LastColumn];
            CellRange range2 = sheet.Range[7, 1, sheet.LastRow, sheet.LastColumn];

            //Create a new workbook
            Workbook newBook1 = new Workbook();

            //Get the first worksheet of new workbook
            Worksheet newSheet1 = newBook1.Worksheets[0];

            //Copy the header row and range 1 to the first worksheet of the new workbook
            sheet.Copy(headerRow, newSheet1.Range[1, 1]);
            sheet.Copy(range1, newSheet1.Range[2, 1]);

            //Copy the column width from the original workbook to the new workbook
            for (int i = 0; (i < sheet.LastColumn); i++)
            {
                newBook1.Worksheets[0].SetColumnWidth(i + 1, sheet.GetColumnWidth(i + 1));
            }

            //Save the new workbook to an Excel file
            newBook1.SaveToFile("Sales Depart.xlsx", ExcelVersion.Version2016);

            //Create another new workbook
            Workbook newBook2 = new Workbook();

            //Get the first worksheet of new workbook
            Worksheet newSheet2 = newBook2.Worksheets[0];

            //Copy the header row and range 2 to the first worksheet of the new workbook
            sheet.Copy(headerRow, newSheet2.Range[1, 1]);
            sheet.Copy(range2, newSheet2.Range[2, 1]);

            //Copy the column width from the original workbook to the new workbook
            for (int i = 0; (i < sheet.LastColumn); i++)
            {
                newBook2.Worksheets[0].SetColumnWidth(i + 1, sheet.GetColumnWidth(i + 1));
            }

            //Save the new workbook to another Excel file
            newBook2.SaveToFile("Development Depart.xlsx", ExcelVersion.Version2016);

        }
    }
}

Apply for a Temporary License
If you'd like to remove the evaluation message from the generated documents, or to get rid of the function limitations, please request a 30-day trial license for yourself.
How to set Excel page margins before printing a worksheet in C#
Page margins in Excel are the blank spaces between the worksheet data and the edges of the printed page. It is where we could add headers, footers and page numbers, etc. Before printing a worksheet, it's necessary to specify custom margins for a better layout. In Excel, we could set top margin, bottom margin, left margin, right margin, header margin, and footer margin, which are all supported by Spire.XLS library. This article is going to introduce the method to set Excel page margins in C# using Spire.XLS.
Note: Before start, please download the latest version of Spire.Doc and add the .dll in the bin folder as the reference of Visual Studio.
Step 1: Initial a new workbook and load the sample document.
            Workbook workbook = new Workbook();
            workbook.LoadFromFile("Sample.xlsx");
            Worksheet sheet = workbook.Worksheets[0];
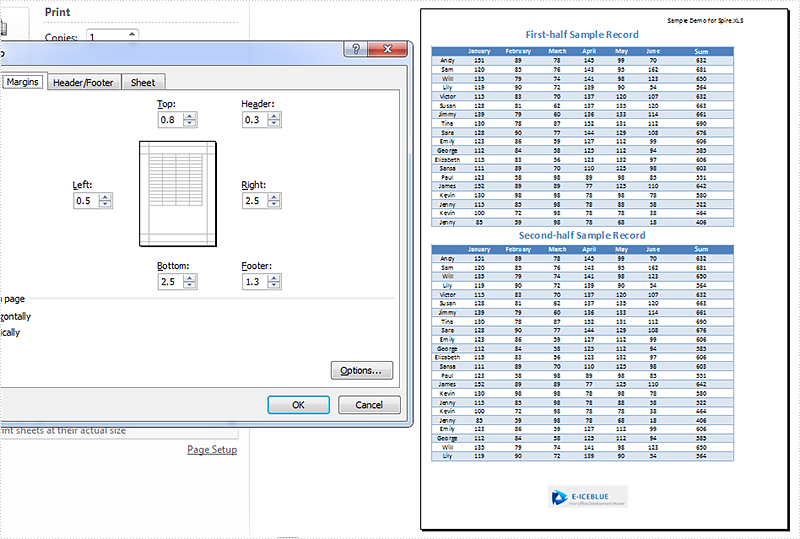
Step 2: Set margins for top, bottom, left and right of the worksheet page. Here the unit of measure is Inch (1 inch=2.54 cm).
            sheet.PageSetup.TopMargin = 0.3;
            sheet.PageSetup.BottomMargin = 1;
            sheet.PageSetup.LeftMargin = 0.2;
            sheet.PageSetup.RightMargin = 1;
Step 3: Set the header margin and footer margin.
            sheet.PageSetup.HeaderMarginInch = 0.1;
            sheet.PageSetup.FooterMarginInch = 0.5;
Step 4: Save the document and launch to see effect.
            workbook.SaveToFile("S3.xlsx", ExcelVersion.Version2010);
            System.Diagnostics.Process.Start("S3.xlsx");
Effect:
Full codes:
using System;
using System.Collections.Generic;
using System.Linq;
using System.Text;
using Spire.Xls;

namespace How_to_set_Excel_margin_to_print
{
    class Program
    {
        static void Main(string[] args)
        {
            Workbook workbook = new Workbook();
            workbook.LoadFromFile("Sample.xlsx");
            Worksheet sheet = workbook.Worksheets[0];

            sheet.PageSetup.TopMargin = 0.3;
            sheet.PageSetup.BottomMargin = 1;
            sheet.PageSetup.LeftMargin = 0.2;
            sheet.PageSetup.RightMargin = 1;

            sheet.PageSetup.HeaderMarginInch = 0.1;
            sheet.PageSetup.FooterMarginInch = 0.5;

            workbook.SaveToFile("S3.xlsx", ExcelVersion.Version2010);
            System.Diagnostics.Process.Start("S3.xlsx");

        }
    }
}
Insert HTML-Formatted RichText into Excel Cell in C#
Some time back, one of registered members on our Forum had a requirement to display the value of HTML code in Excel cell. This article is aimed to provide a fine way to manage this issue using Spire.Doc and Spire.XLS.
Main Method:
At present, we have to use Document.LoadHTML() method which is available in Spire.Doc.Document class to load HTML string to a Word document, this way, HTML formatted text will be save in specific paragraphs. Then, get the paragraph with rich text style and return a RichTextString object, save RichText to a specified CellRange. Besides, the paragraph text style must be applied to this CellRange.
Detailed Steps:
Step 1: Create a new Workbook and Word document.
Workbook workbook = new Workbook();
Document doc = new Document();
Step 2: Save the HTML code to StringReader and load the HTML string to Word document.
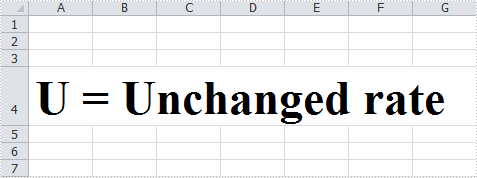
StringReader sr = new StringReader("<span style=\"border-width:thin;border-color:#FFFFFF;\"><font color=#000000 size=8><b>U = Unchanged rate</b></font></span>");
doc.LoadHTML(sr, XHTMLValidationType.None);
Step 3: Get the formatted text from Word document and save to cell 'A4' in the first worksheet.
foreach (Section section in doc.Sections)
{
    foreach (Paragraph paragraph in section.Paragraphs)
    {
        if (paragraph.Items.Count > 0)
        {
           workbook.Worksheets[0].Range["A4"].RichText.Text += paragraph.Text;
        }
     }
}
Step 4: Apply text style including font color and font size to cell 'A4'.
int index = 0;

foreach (var item in paragraph.Items)
{
    if (item is Spire.Doc.Fields.TextRange)
    {
        for (int i = index; i < (item as Spire.Doc.Fields.TextRange).Text.Length + index; i++)
        {
            ExcelFont excelFont = workbook.CreateFont();
            excelFont.FontName = (item as Spire.Doc.Fields.TextRange).CharacterFormat.FontName;
            excelFont.Size = (item as Spire.Doc.Fields.TextRange).CharacterFormat.FontSize;
            excelFont.IsBold = (item as Spire.Doc.Fields.TextRange).CharacterFormat.Bold;
            excelFont.IsItalic = (item as Spire.Doc.Fields.TextRange).CharacterFormat.Italic;
            excelFont.Underline = (FontUnderlineType)(item as Spire.Doc.Fields.TextRange).CharacterFormat.UnderlineStyle; excelFont.Color = (item as Spire.Doc.Fields.TextRange).CharacterFormat.TextColor;
            workbook.Worksheets[0].Range["A4"].RichText.SetFont(i, i, excelFont);
        }
    }
    index += (item as Spire.Doc.Fields.TextRange).Text.Length;

}
Step 5: Change the width and height of the row to achieve the best fit.
workbook.Worksheets[0].Range["A4"].AutoFitRows();
Step 6: Save changes to the workbook in a new file.
workbook.SaveToFile("result.xlsx", ExcelVersion.Version2010);
HTML-Formatted Text in Excel would be shown as:
Full Code:
Workbook workbook = new Workbook();
Document doc = new Document();

StringReader sr = new StringReader("<span style=\"border-width:thin;border-color:#FFFFFF;\"><font color=#000000 size=8><b>U = Unchanged rate</b></font></span>");
doc.LoadHTML(sr, XHTMLValidationType.None);

int index = 0;

foreach (Section section in doc.Sections)
{
    foreach (Paragraph paragraph in section.Paragraphs)
    {
        if (paragraph.Items.Count > 0)
        {
            workbook.Worksheets[0].Range["A4"].RichText.Text += paragraph.Text;
            foreach (var item in paragraph.Items)
            {
                if (item is Spire.Doc.Fields.TextRange)
                {
for (int i = index; i < (item as Spire.Doc.Fields.TextRange).Text.Length + index; i++)
{
    ExcelFont excelFont = workbook.CreateFont();
    excelFont.FontName = (item as Spire.Doc.Fields.TextRange).CharacterFormat.FontName;
    excelFont.Size = (item as Spire.Doc.Fields.TextRange).CharacterFormat.FontSize;
    excelFont.IsBold = (item as Spire.Doc.Fields.TextRange).CharacterFormat.Bold;
    excelFont.IsItalic = (item as Spire.Doc.Fields.TextRange).CharacterFormat.Italic;
    excelFont.Underline = (FontUnderlineType)(item as Spire.Doc.Fields.TextRange).CharacterFormat.UnderlineStyle;
    excelFont.Color = (item as Spire.Doc.Fields.TextRange).CharacterFormat.TextColor;
    workbook.Worksheets[0].Range["A4"].RichText.SetFont(i, i, excelFont);
}
                }
                index += (item as Spire.Doc.Fields.TextRange).Text.Length;
            }
        }
    }
}
workbook.Worksheets[0].Range["A4"].AutoFitRows();
workbook.SaveToFile("result.xlsx", ExcelVersion.Version2010);
Set Excel View Mode in C#, VB.NET
Users can change the Excel view mode according to reading habit. By default, there are several view modes we can choose, including Normal View, Page Layout View, Page Break Preview, Full Screen View and Custom Views. Besides, Microsoft Excel also enables us to zoom in/out the document to a specified level. In this article, I'll make a brief introduction about how to set Excel view mode using Spire.XLS in C# and VB.NET.
In this sample, the Excel view mode will be set as Page Break Preview with zoom in 80 percent. Download the Spire.XLS for .NET, add the Spire.Xls.dll as a reference into assemblies, then we can use the following code snippet to achieve this end goal.
Detailed Steps
Step 1: Create a new instance of Workbook and load the sample file.
Workbook workbook = new Workbook();
workbook.LoadFromFile("Sample.xlsx", ExcelVersion.Version2010);
Step 2: Get the first the worksheet from the Excel workbook.
Worksheet sheet = workbook.Worksheets[0];
Step 3: Set view mode as Page Break Preview and Zoom in the sheet with 80 percent.
sheet.ViewMode = ViewMode.Preview;
sheet.ZoomScalePageBreakView = 80;
Step 4: Save the changes to workbook in a new file.
workbook.SaveToFile("Result.xlsx", ExcelVersion.Version2010);
Output:

Full Code:
using Spire.Xls;
namespace SetExcelViewMode
{
    class Program
    {

        static void Main(string[] args)
        {
            Workbook workbook = new Workbook();
            workbook.LoadFromFile("Sample.xlsx", ExcelVersion.Version2010);
            Worksheet sheet = workbook.Worksheets[0];
            ////Page Layout
            //sheet.ViewMode = ViewMode.Layout;
            //sheet.ZoomScalePageLayoutView = 80;
            ////Normal View(Default)
            //sheet.ViewMode = ViewMode.Normal;
            //sheet.ZoomScaleNormal = 80;
            //Preview
            sheet.ViewMode = ViewMode.Preview;
            sheet.ZoomScalePageBreakView = 80;

            workbook.SaveToFile("Result.xlsx", ExcelVersion.Version2010);

        }

    }
}
Imports Spire.Xls
Namespace SetExcelViewMode
	Class Program

		Private Shared Sub Main(args As String())
			Dim workbook As New Workbook()
			workbook.LoadFromFile("Sample.xlsx", ExcelVersion.Version2010)
			Dim sheet As Worksheet = workbook.Worksheets(0)
			'''/Page Layout
			'sheet.ViewMode = ViewMode.Layout;
			'sheet.ZoomScalePageLayoutView = 80;
			'''/Normal View(Default)
			'sheet.ViewMode = ViewMode.Normal;
			'sheet.ZoomScaleNormal = 80;
			'Preview
			sheet.ViewMode = ViewMode.Preview
			sheet.ZoomScalePageBreakView = 80

			workbook.SaveToFile("Result.xlsx", ExcelVersion.Version2010)

		End Sub

	End Class
End Namespace
Get information of pagination in Excel document
When we print Word and PDF documents which have regular page size, we can clearly know the pagination information for Word and PDF by delimiters. Excel document is different since Excel pagination is based on its content when we print Excel document or convert to Pdf. So get Excel pagination information is important to developer. Below would introduce a solution to get pagination information in Excel document.
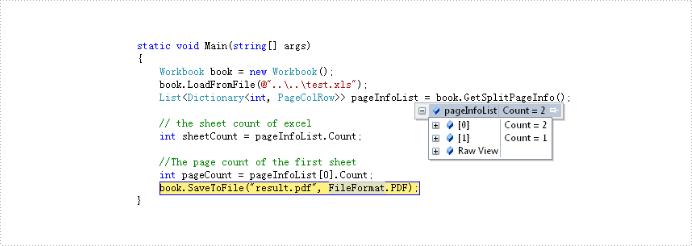
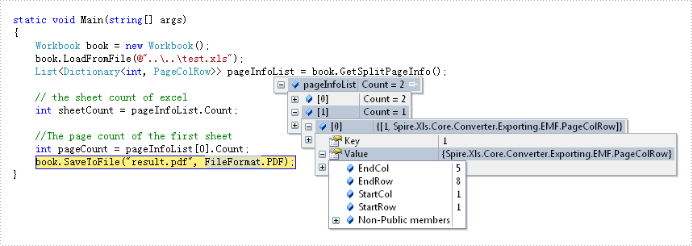
The solution call book.GetSplitPageInfo() method to obtain information of excel document and return this information to the List<Dictionary<int, PageColRow>> object via Spire.XLS. By the object we can get this information about: sheet count, page count and the start and end column and row of every page in excel document. Below is effect screenshots:
The main steps of the solution are:
Step 1: Create and load an excel document.
Workbook book = new Workbook();
book.LoadFromFile(@"test.xlsx");
Step 2: Call GetSplitPageInfo() method to Excel information.
List> pageInfoList = book.GetSplitPageInfo();
The full code:
using Spire.Xls;

namespace GetPageInformation
{
    class Program
    {
        static void Main(string[] args)
        {
            // create and load Excel document
            Workbook book = new Workbook();
            book.LoadFromFile(@"test.xlsx");
            // get the Excel document information and save in pageInfoList object
            var pageInfoList = book.GetSplitPageInfo();

            // the sheet count of excel
            int sheetCount = pageInfoList.Count;

            //The page count of the first sheet
            int pageCount = pageInfoList[0].Count;
            book.SaveToFile("result.pdf", FileFormat.PDF);
        }
    }
}
Imports Spire.Xls
Module Module1

    Sub Main()
        'create and load Excel document
        Dim book As New Workbook()
        book.LoadFromFile("test.xlsx")
        ' get the Excel document information and save in pageInfoList object
        Dim pageInfoList As List(Of Dictionary(Of Integer, PageColRow)) = book.GetSplitPageInfo()

        ' the sheet count of excel
        Dim sheetCount As Integer = pageInfoList.Count

        'The page count of the first sheet
        Dim pageCount As Integer = pageInfoList(0).Count
        book.SaveToFile("result.pdf", FileFormat.PDF)
    End Sub

End Module
C#/VB.NET: Print Excel Documents
Excel documents are easy to print, but it would be a bit tricky if you have some special printing requirements. For example, printing only selected range of a sheet, repeating the header row on each page, or fitting a worksheet on one page. This article covers how to set Excel print options via page setup and how to send an Excel document to printer in C# and VB.NET by using Spire.XLS for .NET.
- Set Excel Print Options via Page Setup in C# and VB.NET
- Print Excel Documents Using Print Dialog in C# and VB.NET
- Silently Print Excel Documents in C# and VB.NET
Install Spire.XLS for .NET
To begin with, you need to add the DLL files included in the Spire.XLS for .NET package as references in your .NET project. The DLL files can be either downloaded from this link or installed via NuGet.
PM> Install-Package Spire.XLS
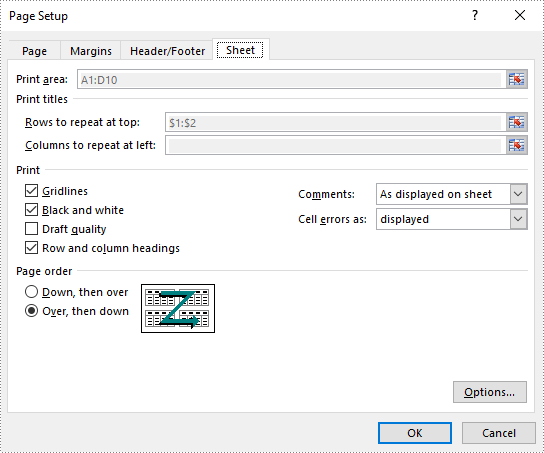
Set Excel Print Options via Page Setup in C# and VB.NET
Excel Page Setup provides options to control how a worksheet will be printed, such as whether to print comments, whether to print gridlines and specify the cell range to print. Spire.XLS offers the PageSetup object to deal with these things. The following are the steps to set Excel print options through PageSetup using Spire.XLS for .NET.
- Create a Workbook object.
- Load an Excel file using Workbook.LoadFromFile() method.
- Get a specific worksheet through Workbook.Worksheets[index] property.
- Get PageSetup object through Worksheet.PageSetup property.
- Set page margins, print area, pint title row, print quality, etc. through the properties under PageSetup object.
- Save the workbook to another Excel file using Workbook.SaveToFile() method.
- C#
- VB.NET
using Spire.Xls;

namespace PrintOptions
{
    class Program
    {
        static void Main(string[] args)
        {
            //Create a workbook
            Workbook workbook = new Workbook();

            //Load an Excel document
            workbook.LoadFromFile(@"C:\Users\Administrator\Desktop\sample.xlsx");

            //Get the first worksheet
            Worksheet worksheet = workbook.Worksheets[0];

            //Get the PageSetup object of the first worksheet
            PageSetup pageSetup = worksheet.PageSetup;

            //Set page margins
            pageSetup.TopMargin = 0.3;
            pageSetup.BottomMargin = 0.3;
            pageSetup.LeftMargin = 0.3;
            pageSetup.RightMargin = 0.3;

            //Specify print area
            pageSetup.PrintArea = "A1:D10";

            //Specify title row
            pageSetup.PrintTitleRows = "$1:$2";

            //Allow to print with row/column headings
            pageSetup.IsPrintHeadings = true;

            //Allow to print with gridlines
            pageSetup.IsPrintGridlines = true;

            //Allow to print comments as displayed on worksheet
            pageSetup.PrintComments = PrintCommentType.InPlace;

            //Set printing quality (dpi)
            pageSetup.PrintQuality = 300;

            //Allow to print worksheet in black & white mode
            pageSetup.BlackAndWhite = true;

            //Set the printing order
            pageSetup.Order = OrderType.OverThenDown;

            //Fit worksheet on one page
            pageSetup.IsFitToPage = true;

            //Save the workbook
            workbook.SaveToFile("PagePrintOptions.xlsx", ExcelVersion.Version2016);
        }
    }
}
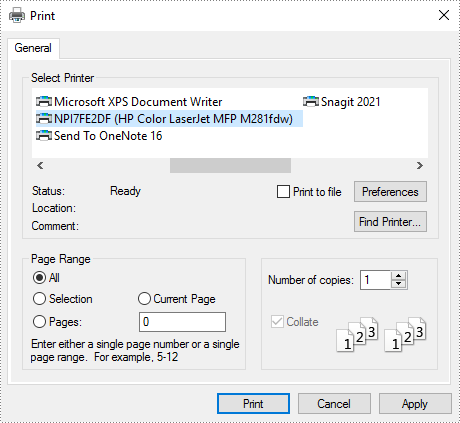
Print Excel Documents Using Print Dialog in C# and VB.NET
A Print Dialog box lets users to select options for a particular print job. For example, the user can specify the printer to use. The following are the steps to send an Excel document to a print dialog using Spire.XLS for .NET.
- Create a Workbook object.
- Load an Excel file using Workbook.LoadFromFile() method.
- Create a PrintDialog object.
- Specify printer settings through the properties under PrintDialog object.
- Apply the print dialog to workbook.
- Get PrintDocument object from the workbook through Workbook.PrintDocument property.
- Invoke the print dialog and start printing using PrintDocument.Print() method.
- C#
- VB.NET
using System;
using Spire.Xls;
using System.Drawing.Printing;
using System.Windows.Forms;

namespace PrintExcelUsingPrintDialog
{
    public partial class Form1 : Form
    {
        public Form1()
        {
            InitializeComponent();
        }

        private void button1_Click(object sender, EventArgs e)
        {
            //Create a Workbook object
            Workbook workbook = new Workbook();

            //Load an Excel file
            workbook.LoadFromFile(@"C:\Users\Administrator\Desktop\sample.xlsx");

            //Fit worksheet on one page
            PageSetup pageSetup = workbook.Worksheets[0].PageSetup;
            pageSetup.IsFitToPage = true;

            //Create a PrintDialog object
            PrintDialog dialog = new PrintDialog();

            //Specify printer settings
            dialog.AllowCurrentPage = true;
            dialog.AllowSomePages = true;
            dialog.AllowSelection = true;
            dialog.UseEXDialog = true;
            dialog.PrinterSettings.Duplex = Duplex.Simplex;

            //Apply the dialog to workbook
            workbook.PrintDialog = dialog;

            //Create a PrintDocument object based on the workbook
            PrintDocument printDocument = workbook.PrintDocument;

            //Invoke the print dialog
            if (dialog.ShowDialog() == DialogResult.OK)
            {
                printDocument.Print();
            }
        }
    }
}
Silently Print Excel Documents in C# and VB.NET
If you do not want to see the print dialog or the print process, you can silently print Excel documents to a specified printer. The following are the steps.
- Create a Workbook object.
- Load an Excel file using Workbook.LoadFromFile() method.
- Set the print controller to StandardPrintController, which will prevent print process from showing.
- Get PrinterSettings object from the workbook through Workbook.PrintDocument.PrinterSettings property.
- Specify printer name, duplex mode and print pages through the properties under PrinerSettings object.
- Print the workbook using Workbook.PrintDocument.Print() method.
- C#
- VB.NET
using Spire.Xls;
using System.Drawing.Printing;

namespace SilentlyPrint
{
    class Program
    {
        static void Main(string[] args)
        {
            //Create a Workbook object
            Workbook workbook = new Workbook();

            //Load an Excel file
            workbook.LoadFromFile(@"C:\Users\Administrator\Desktop\sample.xlsx");

            //Fit worksheet on one page
            PageSetup pageSetup = workbook.Worksheets[0].PageSetup;
            pageSetup.IsFitToPage = true;

            //Set the print controller to StandardPrintController, which will prevent print process from showing
            workbook.PrintDocument.PrintController = new StandardPrintController();

            //Get PrinterSettings from the workbook
            PrinterSettings settings = workbook.PrintDocument.PrinterSettings;

            //Specify printer name, duplex mode and print pages
            settings.PrinterName = "HP LaserJet P1007";
            settings.Duplex = Duplex.Simplex;
            settings.FromPage = 1;
            settings.ToPage = 3;

            //Print the workbook
            workbook.PrintDocument.Print();
        }
    }
}
Apply for a Temporary License
If you'd like to remove the evaluation message from the generated documents, or to get rid of the function limitations, please request a 30-day trial license for yourself.
C#: Dynamically Create, Load, and Save Excel Files via Stream
Using stream operations in C#, developers can dynamically create, load, and save Excel files, enabling flexible and efficient data handling. This approach eliminates the need for physical file storage, improving application performance and responsiveness. Ideal for real-time data manipulation or environments with storage limitations, it streamlines data exchange and system integration. This article demonstrates how to create, load, modify, and save Excel files using streams in C# with Spire.XLS for .NET, offering agile and scalable data management solutions.
- Dynamically Create an Excel File and Save It to Stream
- Load and Read Excel Files from Stream with C#
- Modify an Excel File in Stream with C#
Install Spire.XLS for .NET
To begin with, you need to add the DLL files included in the Spire.XLS for .NET package as references in your .NET project. The DLL files can be either downloaded from this link or installed via NuGet.
PM> Install-Package Spire.XLS
Dynamically Create an Excel File and Save It to Stream
Using Spire.XLS for .NET, developers can dynamically create Excel files in memory by initializing a Workbook object, populating it with data and formatting, and then saving the workbook to a stream using the Workbook.SaveToStream() method. This approach eliminates the need for physical file storage, enhancing both application performance and responsiveness.
Below are the steps for creating an Excel file and saving it to a stream with C#:
- Create an instance of the Workbook class to generate a new Excel workbook, which includes three default worksheets.
- Retrieve a specific worksheet using the Workbook.Worksheets[] property.
- Define the data to write to the worksheet, such as using a DataTable to organize the data.
- Insert the data into the worksheet using the Worksheet.InsertDataTable() method or the Worksheet.Range[].Value property for individual cell values.
- Format the worksheet cells, applying styles like colors, fonts, and borders, or adjusting column widths as needed.
- Save the workbook to a memory stream using the Workbook.SaveToStream() method. The stream can then be used for further processing, such as saving it to a file or transmitting it over a network.
- C#
using Spire.Xls;
using System.Data;
using System.Drawing;

namespace CreateExcelStream
{
    class Program
    {
        static void Main(string[] args)
        {
            // Create a new workbook instance
            Workbook workbook = new Workbook();

            // Access the first worksheet in the workbook
            Worksheet sheet = workbook.Worksheets[0];

            // Create and populate a DataTable with sample data
            DataTable dataTable = new DataTable("Data");
            dataTable.Columns.Add("ID", typeof(int));
            dataTable.Columns.Add("Name", typeof(string));
            dataTable.Columns.Add("Age", typeof(int));
            dataTable.Columns.Add("Country", typeof(string));
            dataTable.Columns.Add("Salary ($)", typeof(decimal));
            dataTable.Rows.Add(101, "John Smith", 28, "USA", 54000m);
            dataTable.Rows.Add(102, "Maria Garcia", 34, "Spain", 65500m);
            dataTable.Rows.Add(103, "Liam Johnson", 22, "Canada", 48000m);
            dataTable.Rows.Add(104, "Emma Brown", 30, "Australia", 72300m);
            dataTable.Rows.Add(105, "Wei Zhang", 40, "China", 58700m);
            dataTable.Rows.Add(106, "Sofia Lopez", 26, "Mexico", 45200m);

            // Insert data from the DataTable into the worksheet
            sheet.InsertDataTable(dataTable, true, 1, 1);

            // Format the worksheet
            // Style the header row
            sheet.Rows[0].Style.Color = Color.LightGreen;
            sheet.Rows[0].Style.Font.FontName = "Arial";
            sheet.Rows[0].Style.Font.Size = 12f;
            sheet.Rows[0].BorderAround(); // Apply borders around the header row
            sheet.Rows[0].Borders.Color = Color.Blue;

            // Style the data rows
            for (int i = 1; i < sheet.AllocatedRange.Rows.Count(); i++)
            {
                sheet.Rows[i].Style.Color = Color.LightGray;
                sheet.Rows[i].Style.Font.FontName = "Arial";
                sheet.Rows[i].Style.Font.Size = 11f;
            }

            // Adjust the column widths to fit the content
            for (int j = 1; j <= sheet.AllocatedRange.Columns.Count(); j++)
            {
                sheet.AutoFitColumn(j);
            }

            // Save the workbook to a memory stream
            MemoryStream stream = new MemoryStream();
            workbook.SaveToStream(stream, FileFormat.Version2016);

            // Write the stream content to a file
            File.WriteAllBytes("output/CreateExcelByStream.xlsx", stream.ToArray());

            // Release resources
            workbook.Dispose();
        }
    }
}

Load and Read Excel Files from Stream with C#
Spire.XLS for .NET simplifies loading Excel files directly from a stream using the Workbook.LoadFromStream() method. Once the file is loaded, developers can easily access and read cell data, optimizing memory usage and enabling fast, flexible data processing without requiring file I/O operations.
The steps for loading and reading Excel files from streams with C# are as follows:
- Create a Workbook instance.
- Create a MemoryStream or FileStream object.
- Use the Workbook.LoadFromStream() method to load the Excel file from the stream into the workbook.
- Retrieve the first worksheet using the Workbook.Worksheets[] property.
- Loop through the rows and columns of the worksheet to extract the cell through the Worksheet.AllocatedRange[].Value property.
- Print the extracted data, or use the data for further operations.
- C#
using Spire.Xls;

namespace LoadExcelStream
{
    class Program
    {
        static void Main(string[] args)
        {
            // Create an instance of the Workbook class
            Workbook workbook = new Workbook();

            // Create a memory stream
            MemoryStream stream = new MemoryStream();
            File.OpenRead("Sample.xlsx").CopyTo(stream);

            // Load the Excel file from the stream
            workbook.LoadFromStream(stream);

            // Access the first worksheet in the workbook
            Worksheet sheet = workbook.Worksheets[0];

            // Initialize a list to store the data retrieved from the worksheet
            List<List<string>> data = new List<List<string>>();
            for (int i = 0; i < sheet.AllocatedRange.Rows.Count(); i++)
            {
                // Create a list to hold each row of data
                List<string> lines = new List<string>();
                for (int j = 0; j < sheet.AllocatedRange.Columns.Count(); j++)
                {
                    // Retrieve the cell text and add it to the row
                    lines.Add(sheet.AllocatedRange[i + 1, j + 1].Text);
                }
                // Add the row to the data list
                data.Add(lines);
            }

            // Print the retrieved data or use it for further operations
            foreach (List<string> lines in data)
            {
                Console.WriteLine(string.Join(" | ", lines));
            }
        }
    }
}

Modify an Excel File in Stream with C#
With Spire.XLS for .NET, developers can modify an Excel file in memory by first loading it into a Workbook object with the LoadFromStream() method. After making updates (such as changing cell values or formatting), the file can be saved back to a stream using the Workbook.SaveToStream() method. This approach allows seamless real-time changes without relying on physical storage.
Follow the steps below to modify Excel files in streams with C#:
- Create a Workbook instance to represent the Excel file.
- Create a MemoryStream or FileStream instance.
- Use the Workbook.LoadFromStream() to load the Excel file from the stream.
- Access the first worksheet through the Workbook.Worksheets[] property.
- Modify the header row and the data rows' styles (font, size, background color, etc.) through the properties in CellRange.Style.
- Autofit the columns to adjust their width based on the content using the Worksheet.AutoFitColumn() method.
- Save the changes to the stream using the Workbook.SaveToStream() method.
- C#
using Spire.Xls;
using System.Drawing;

namespace ModifyExcelStream
{
    class Program
    {
        static void Main(string[] args)
        {
            // Create a new instance of the Workbook class
            Workbook workbook = new Workbook();

            // Create a memory stream
            MemoryStream stream = new MemoryStream();
            File.OpenRead("Sample.xlsx").CopyTo(stream);

            // Load the Excel file from the stream
            workbook.LoadFromStream(stream);

            // Access the first worksheet in the workbook
            Worksheet sheet = workbook.Worksheets[0];

            // Modify the style of the header row
            CellRange headerRow = sheet.AllocatedRange.Rows[0];
            headerRow.Style.Font.FontName = "Times New Roman";
            headerRow.Style.Font.Size = 12f;
            headerRow.Style.Color = Color.LightBlue;

            // Modify the style of the data rows
            for (int i = 1; i < sheet.AllocatedRange.Rows.Count(); i++)
            {
                CellRange dataRow = sheet.AllocatedRange.Rows[i];
                dataRow.Style.Font.FontName = "Arial";
                dataRow.Style.Font.Size = 10f;
                dataRow.Style.Color = Color.LightGray;
                // Alternate row coloring (even rows)
                if (i % 2 == 0)
                {
                    dataRow.Style.Color = Color.LightSlateGray;
                }
            }

            // Autofit columns to adjust their width based on content
            for (int k = 1; k <= sheet.AllocatedRange.Columns.Count(); k++)
            {
                sheet.AutoFitColumn(k);
            }

            // Change the border color
            sheet.AllocatedRange.Style.Borders.Color = Color.White;

            // Save the modified workbook back to the stream
            workbook.SaveToStream(stream);

            // Write the stream content to a new file
            File.WriteAllBytes("output/ModifyExcelByStream.xlsx", stream.ToArray());

            // Release resources
            workbook.Dispose();
        }
    }
}

Apply for a Temporary License
If you'd like to remove the evaluation message from the generated documents, or to get rid of the function limitations, please request a 30-day trial license for yourself.
C#/VB.NET: Add Document Properties in Excel
Document properties, also known as metadata, are a set of data that describe a document. In Excel, you can add built-in document properties such as author, title, and keywords to quickly locate and identify documents in a folder. Or you can also add custom properties to provide more information about the Excel document. In this article, you will learn how to programmatically add built-in and custom document properties to an Excel document using Spire.XLS for .NET.
- Add Built-in Document Properties in Excel in C# and VB.NET
- Add Custom Document Properties in Excel in C# and VB.NET
Install Spire.XLS for .NET
To begin with, you need to add the DLL files included in the Spire.XLS for .NET package as references in your .NET project. The DLL files can be either downloaded from this link or installed via NuGet.
PM> Install-Package Spire.XLS
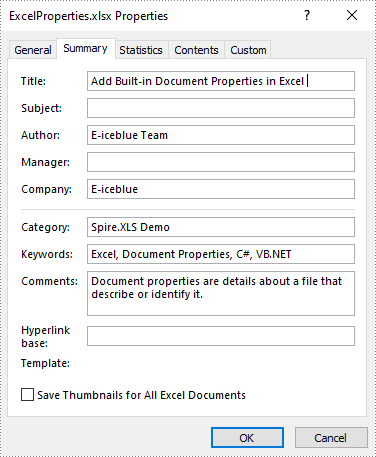
Add Built-in Document Properties in Excel in C# and VB.NET
Built-in document properties are basic information about a document such as title, subject, author, category, etc. The names of these properties are predefined that cannot be edited, but Spire.XLS for .NET allows you to set specific values for these properties. The following are the detailed steps.
- Create a Workbook object.
- Load a sample Excel document using Workbook.LoadFromFile() method.
- Get the built-in document properties of the document using Workbook.DocumentProperties property.
- Set specific document properties such as title, author, keywords and comments using the properties of BuiltInDocumentProperties class.
- Save the result document using Workbook.SaveToFile() method.
- C#
- VB.NET
using Spire.Xls;

namespace ExcelProperties
{
    class Program
    {
        static void Main(string[] args)
        {
            //Create a Workbook object
            Workbook workbook = new Workbook();

            //Load a sample Excel document
            workbook.LoadFromFile("sample.xlsx");

            //Set built-in document properties for the Excel workbook
            workbook.DocumentProperties.Author = "E-iceblue Team";
            workbook.DocumentProperties.Title = "Add Built-in Document Properties in Excel ";
            workbook.DocumentProperties.Keywords = "Excel, Document Properties, C#, VB.NET";
            workbook.DocumentProperties.Category = "Spire.XLS Demo";
            workbook.DocumentProperties.Company = "E-iceblue";
            workbook.DocumentProperties.Comments = "Document properties are details about a file that describe or identify it.";

            //Save the result document
            workbook.SaveToFile("ExcelProperties.xlsx", FileFormat.Version2013);
        }
    }
}
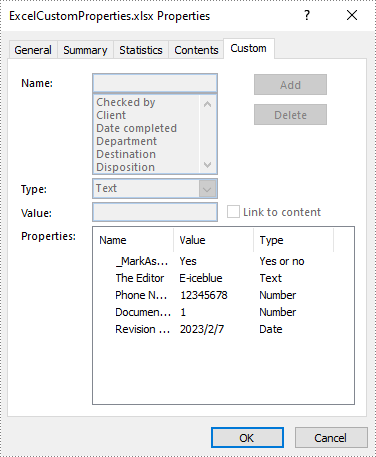
Add Custom Document Properties in Excel in C# and VB.NET
Custom document properties are additional properties that you can define for an Excel document. Spire.XLS for .NET allows you to add custom properties with specified names and values using ICustomDocumentProperties.Add() method. The following are the detailed steps.
- Create a Workbook object.
- Load a sample Excel document using Workbook.LoadFromFile() method.
- Get the custom document properties of the document using Workbook.CustomDocumentProperties property.
- Add custom document properties with different data types to the document using ICustomDocumentProperties.Add() method.
- Save the result document using Workbook.SaveToFile() method.
- C#
- VB.NET
using Spire.Xls;
using System;

namespace CustomExcelProperties
{
    class Program
    {
        static void Main(string[] args)
        {
            //Create a Workbook object
            Workbook workbook = new Workbook();

            //Load a sample Excel document
            workbook.LoadFromFile("sample.xlsx");

            //Add custom document properties to the document
            workbook.CustomDocumentProperties.Add("_MarkAsFinal", true);
            workbook.CustomDocumentProperties.Add("The Editor", "E-iceblue");
            workbook.CustomDocumentProperties.Add("Phone Number", 12345678);
            workbook.CustomDocumentProperties.Add("Document ID", 1);
            workbook.CustomDocumentProperties.Add("Revision Date", DateTime.Now);

            //Save the result document
            workbook.SaveToFile("ExcelCustomProperties.xlsx", FileFormat.Version2013);
        }
    }
}
Apply for a Temporary License
If you'd like to remove the evaluation message from the generated documents, or to get rid of the function limitations, please request a 30-day trial license for yourself.
C#/VB.NET: Merge Excel Files into One
Sometimes, we may get annoyed when we have to open many Excel files simultaneously. Merging Excel files of the same type or category can help us avoid the trouble and save us much time. This article will demonstrate how to merge Excel files into One in C# and VB.NET using Spire.XLS for .NET library.
- Merge Multiple Excel Workbooks into One in C# and VB.NET
- Merge Multiple Excel Worksheets into One in C# and VB.NET
Install Spire.XLS for .NET
To begin with, you need to add the DLL files included in the Spire.XLS for .NET package as references in your .NET project. The DLL files can be either downloaded from this link or installed via NuGet.
PM> Install-Package Spire.XLS
Merge Multiple Excel Workbooks into One in C# and VB.NET
The following are the steps to merge multiple Excel workbooks into one:
- Create a string array from the Excel file paths.
- Initialize a Workbook object to create a new Excel workbook, and clear the default worksheets in the workbook using Workbook.Worksheets.Clear() method.
- Initialize another temporary Workbook object.
- Loop through the string array, load the current workbook into the temporary Workbook object using Workbook.LoadFromFile() method.
- loop through the worksheets in the current workbook, then copy each worksheet from the current workbook to the new workbook using Workbook.Worksheets.AddCopy() method.
- Save the new workbook to file using Workbook.SaveToFile() method.
- C#
- VB.NET
using Spire.Xls;
namespace MergeExcelFiles
{
class Program
{
static void Main(string[] args)
{
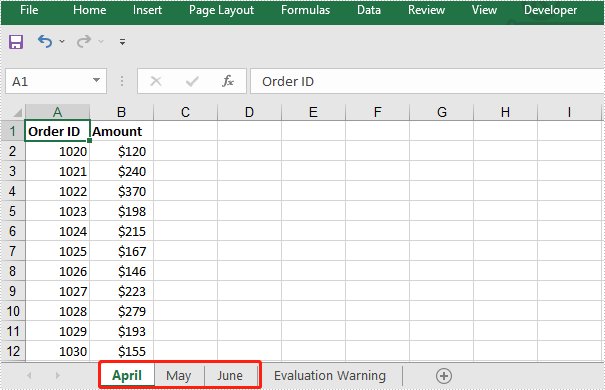
//Create a string array from Excel file paths
string[] inputFiles = new string[] { "April.xlsx", "May.xlsx", "June.xlsx" };
//Initialize a new Workbook object
Workbook newWorkbook = new Workbook();
//Clear the default worksheets
newWorkbook.Worksheets.Clear();
//Initialize another temporary Workbook object
Workbook tempWorkbook = new Workbook();
//Loop through the string array
foreach (string file in inputFiles)
{
//Load the current workbook
tempWorkbook.LoadFromFile(file);
//Loop through the worksheets in the current workbook
foreach (Worksheet sheet in tempWorkbook.Worksheets)
{
//Copy each worksheet from the current workbook to the new workbook
newWorkbook.Worksheets.AddCopy(sheet, WorksheetCopyType.CopyAll);
}
}
//Save the new workbook to file
newWorkbook.SaveToFile("MergeWorkbooks.xlsx", ExcelVersion.Version2013);
}
}
}
The input Excel workbooks:

The merged Excel workbook:
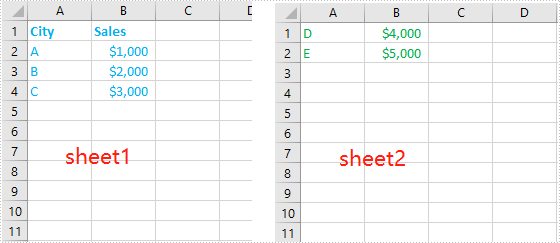
Merge Multiple Excel Worksheets into One in C# and VB.NET
We can merge multiple worksheets in the same or different workbooks into one. The following steps show how to merge two Excel worksheets in the same workbook into a single worksheet:
- Initialize a Workbook object and load an Excel file using Workbook.LoadFromFile() method.
- Get the two worksheets that need to be merged using Workbook.Worksheets[sheetIndex] property. Note the sheet index is zero-based.
- Get the used range of the second worksheet using Worksheet.AllocatedRange property.
- Specify the destination range in the first worksheet using Worksheet.Range[rowIndex, columnIndex] property. Note the row and column indexes are 1-based.
- Copy the used range of the second worksheet to the destination range in the first worksheet using CellRange.Copy(destRange) method.
- Remove the second worksheet using XlsWorksheet.Remove() method.
- Save the result file using Workbook.SaveToFile() method.
- C#
- VB.NET
using Spire.Xls;

namespace MergeExcelWorksheets
{
    class Program
    {
        static void Main(string[] args)
        {
            //Create a Workbook object
            Workbook workbook = new Workbook();
            //Load an Excel file
            workbook.LoadFromFile("Sample.xlsx");

            //Get the first worksheet
            Worksheet sheet1 = workbook.Worksheets[0];
            //Get the second worksheet
            Worksheet sheet2 = workbook.Worksheets[1];

            //Get the used range in the second worksheet
            CellRange sourceRange = sheet2.AllocatedRange;
            //Specify the destination range in the first worksheet
            CellRange destRange = sheet1.Range[sheet1.LastRow + 1, 1];

            //Copy the used range of the second worksheet to the destination range in the first worksheet
            sourceRange.Copy(destRange);

            //Remove the second worksheet
            sheet2.Remove();

            //Save the result file
            workbook.SaveToFile("MergeWorksheets.xlsx", ExcelVersion.Version2013);
        }
    }
}
The input Excel worksheets:
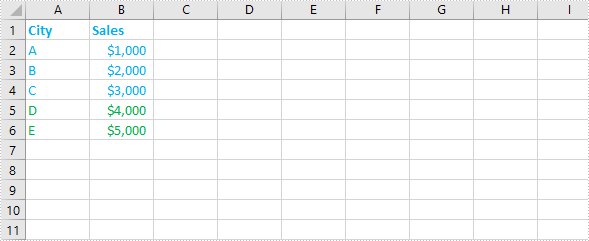
The merged Excel worksheets:
Apply for a Temporary License
If you'd like to remove the evaluation message from the generated documents, or to get rid of the function limitations, please request a 30-day trial license for yourself.