
Document Operation (14)
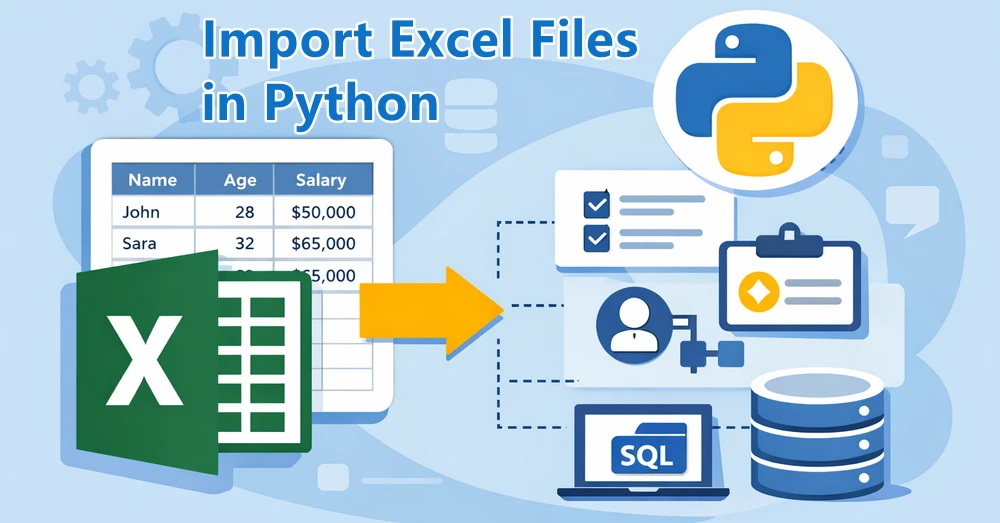
Importing an Excel file in Python typically involves more than just reading the file. In most cases, the data needs to be converted into Python structures such as lists, dictionaries, or other formats that can be directly used in your application.
This transformation step is important because Excel data is usually stored in a tabular format, while Python applications often require structured data for processing, integration, or storage. Depending on how the data will be used, it may be represented as a list for sequential processing, a dictionary for field-based access, custom objects for structured modeling, or a database for persistent storage.
This guide demonstrates how to import Excel file in Python and convert the data into multiple structures using Spire.XLS for Python, with practical examples for each approach.
Overall Implementation Approach and Quick Example
Importing Excel data into Python is essentially a two-step process:
- Load Excel file – Load the Excel file and access its raw data
- Transform data – Convert the data into Python structures such as lists, dictionaries, or objects
This separation is important because in real-world applications, simply reading Excel is not enough—the data must be transformed into a format that can be processed, stored, or integrated into systems.
Key Components
When importing Excel data using Spire.XLS for Python, the following components are involved:
- Workbook – Represents the entire Excel file and is responsible for loading data from disk
- Worksheet – Represents a single sheet within the Excel file
- CellRange – Represents a group of cells that contain actual data
- Data Transformation Layer – Your Python logic that converts cell values into target structures
Data Flow Overview
The typical workflow looks like this:
Excel File → Workbook → Worksheet → CellRange → Python Data Structure
Understanding this pipeline helps you design flexible import logic for different scenarios.
Quick Example: Import Excel File in Python
Before running the example, install Spire.XLS for Python using pip:
pip install spire.xls
If needed, you can also download Spire.XLS for Python manually and include it in your project.
The following example shows the simplest way to import Excel data into Python:
from spire.xls import *

workbook = Workbook()
workbook.LoadFromFile("SalesReport.xlsx")

data = []
sheet = workbook.Worksheets[0]

# Get the used cell range
cellRange = sheet.AllocatedRange

# Get the data from the first row
for col in range(cellRange.Columns.Count):
    data.append(sheet.Range[1, col +1].Value)

print(data)

workbook.Dispose()
Below is a preview of the data imported from the Excel file:
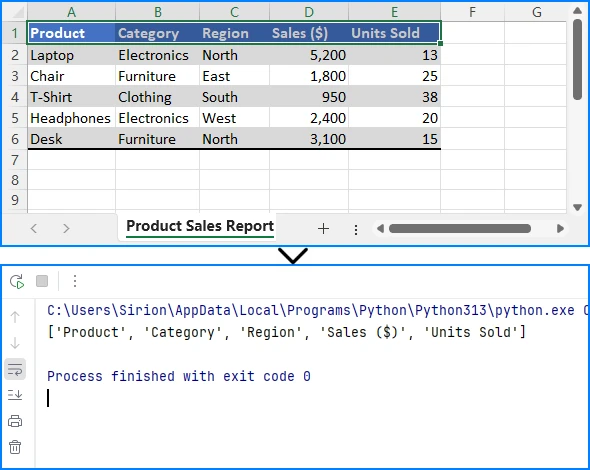
This minimal example demonstrates the fundamental workflow: initialize a workbook, load the Excel file, access the worksheet and cell data, and then dispose of the workbook to release resources.
For more advanced scenarios, such as reading Excel files from memory or handling file streams, see how to import Excel data from a stream in Python.
Import Excel Data in Python as a List
One of the simplest ways to import Excel data in Python is to convert it into a list of rows. This structure is useful for iteration and basic data processing.
Example
from spire.xls import *

# Load the Workbook
workbook = Workbook()
workbook.LoadFromFile("SalesReport.xlsx")

# Get the used range in the first worksheet
sheet = workbook.Worksheets[0]
cellRange = sheet.AllocatedRange

# Create a list to store the data
data = []
for row_index in range(cellRange.RowCount):
    row_data = []
    for cell_index in range(cellRange.ColumnCount):
        row_data.append(cellRange[row_index + 1, cell_index + 1].Value)
    data.append(row_data)

workbook.Dispose()
Technical Explanation
Importing Excel data as a list treats each row in the worksheet as a Python list, preserving the original row order.
How the code works:
- A nested loop is used to traverse the worksheet in a row-first (row-major) pattern
- The outer loop iterates through rows, while the inner loop accesses each cell
- Index offsets (
+1) are applied because Spire.XLS uses 1-based indexing
Why this design works:
- AllocatedRange limits iteration to only populated cells, improving efficiency
- Row-by-row extraction keeps the structure consistent with Excel’s layout
- The intermediate row_data list ensures clean aggregation before appending
This structure is ideal for sequential processing, simple transformations, or as a base format before converting into dictionaries or objects.
If you want to load more than just text and numeric data, see How to Read Excel Files in Python for more data types.
Import Excel Data as a Dictionary in Python
If your Excel file contains headers, importing it as a dictionary provides better data organization and access by column names.
Example
from spire.xls import *

workbook = Workbook()
workbook.LoadFromFile("SalesReport.xlsx")

sheet = workbook.Worksheets[0]
cellRange = sheet.AllocatedRange

rows = list(cellRange.Rows)

headers = [cellRange[1, cell_index + 1].Value for cell_index in range(cellRange.ColumnCount)]

data_dict = []
for row in rows[1:]:
    row_dict = {}
    for i, cell in enumerate(row.Cells):
        row_dict[headers[i]] = cell.Value
    data_dict.append(row_dict)

workbook.Dispose()
Technical Explanation
Importing Excel data as a dictionary converts each row into a key-value structure using column headers.
How the code works:
- The first row is extracted as headers
- Each subsequent row is iterated and processed
- Cell values are mapped to headers using their column index
Why this design works:
- Both headers and row cells follow the same column order, enabling simple index-based mapping
- This removes reliance on fixed column positions
- The result is a self-descriptive structure with named fields
This method is useful when you need structured data access, such as working with JSON, APIs, or labeled datasets.
Import Excel Data into Custom Objects
For structured applications, you may need to import Excel data into Python objects to maintain type safety and encapsulate business logic.
Example
class Employee:
    def __init__(self, name, age, department):
        self.name = name
        self.age = age
        self.department = department

from spire.xls import *
from spire.xls.common import *

workbook = Workbook()
workbook.LoadFromFile("EmployeeData.xlsx")

sheet = workbook.Worksheets[0]
cellRange = sheet.AllocatedRange

employees = []
for row in list(cellRange.Rows)[1:]:
    name = row.Cells[0].Value
    age = int(row.Cells[1].Value) if row.Cells[1].Value else None
    department = row.Cells[2].Value

    emp = Employee(name, age, department)
    employees.append(emp)

workbook.Dispose()
Technical Explanation
Importing Excel data into objects maps each row to a structured class instance.
How the code works:
- A class is defined to represent the data model
- Each row is read and its values are extracted
- Values are passed into the class constructor to create objects
Why this design works:
- The constructor acts as a controlled transformation point
- It allows validation, type conversion, or preprocessing
- Data is no longer loosely structured, but aligned with domain logic
This is ideal for applications with clear data models, such as backend systems or business logic layers.
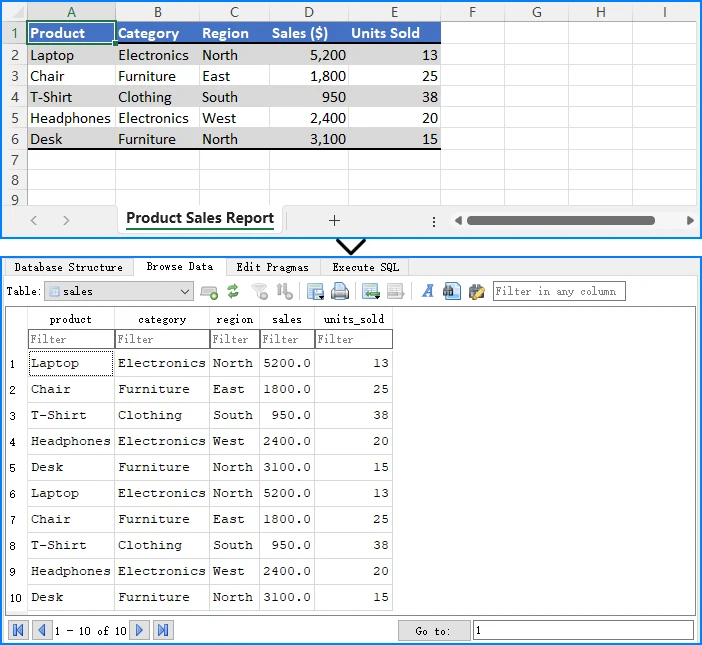
Import Excel Data to Database in Python
In many applications, Excel data needs to be stored in a database for persistent storage and querying.
Example
import sqlite3
from spire.xls import *

# Connect to SQLite database
conn = sqlite3.connect("sales.db")
cursor = conn.cursor()

# Create table matching the Excel structure
cursor.execute("""
CREATE TABLE IF NOT EXISTS sales (
    product TEXT,
    category TEXT,
    region TEXT,
    sales REAL,
    units_sold INTEGER
)
""")

# Load the Excel file
workbook = Workbook()
workbook.LoadFromFile("Sales.xlsx")

# Access the first worksheet
sheet = workbook.Worksheets[0]
rows = list(sheet.AllocatedRange.Rows)

# Iterate through rows (skip header row)
for row in rows[1:]:
    product = row.Cells[0].Value
    category = row.Cells[1].Value
    region = row.Cells[2].Value

    # Remove thousand-separators and convert to float
    sales_text = row.Cells[3].Value
    sales = float(str(sales_text).replace(",", "")) if sales_text else 0

    # Convert units sold to integer
    units_text = row.Cells[4].Value
    units_sold = int(units_text) if units_text else 0

    # Insert data into the database
    cursor.execute(
        "INSERT INTO sales VALUES (?, ?, ?, ?, ?)",
        (product, category, region, sales, units_sold)
    )

# Commit changes and close connection
conn.commit()
conn.close()

# Release Excel resources
workbook.Dispose()
Here is a preview of the Excel data and the SQLite database structure:
Technical Explanation
Importing Excel data into a database converts each row into a persistent record.
How the code works:
- A database connection is established and a table is created
- The table schema is aligned with the Excel structure
- Each row is read and inserted using parameterized SQL queries
Why this design works:
- Schema alignment ensures consistent data mapping
- Data normalization (e.g., numeric conversion) improves compatibility
- Parameterized queries provide safety and proper type handling
When to use this approach:
This approach is suitable for data storage, querying, and integration into larger data pipelines.
For a more detailed guide on importing Excel data into Databases, check out How to Transfer Data Between Excel Files and Databases.
Why Use Spire.XLS for Importing Excel Data
The examples in this guide use Spire.XLS for Python because it provides a clear and consistent way to access and transform Excel data. The main advantages in this context include:
-
Structured Object Model The library exposes components such as Workbook, Worksheet, and CellRange, which align directly with how Excel data is organized. This makes the data flow easier to understand and implement. See more details on Spire.XLS for Python API Reference.
-
Focused Data Access Layer Instead of handling low-level file parsing, you can work directly with cell values and ranges, allowing the import logic to focus on data transformation rather than file structure.
-
Format Compatibility It supports common Excel formats, such as XLS and XLSX, and other spreadsheet formats, such as CSV, ODS, and OOXML, enabling the same import logic to be applied across different file types.
-
No External Dependencies Excel files can be processed without requiring Microsoft Excel to be installed, which is important for backend services and automated environments.
Common Pitfalls
Incorrect File Path
Ensure the Excel file path is correct and accessible from your script. Use absolute paths or verify the current working directory.
import os
print(os.getcwd())  # Check current directory
Missing Headers
When importing as a dictionary, verify that your Excel file has headers in the first row. Otherwise, the keys will be incorrect.
Memory Management
Always dispose of the workbook object after processing to release resources, especially when processing large files.
workbook.Dispose()
Data Type Conversion
Excel cells may return different data types than expected. Validate and convert data types as needed for your application.
Import vs Read Excel in Python
In Python, "reading" and "importing" Excel files refer to related but distinct steps in data processing.
Read Excel focuses on accessing raw file content. This typically involves retrieving cell values, rows, or specific ranges without changing how the data is structured.
Import Excel includes both reading and transformation. After extracting the data, it is converted into structures such as lists, dictionaries, objects, or database records so that it can be used directly within an application.
In practice, reading is a subset of importing. The distinction lies in the goal—reading retrieves data, while importing prepares it for use.
Conclusion
Importing Excel file in Python is not just about reading data—it's about converting it into structures that your application can use effectively. In this guide, you learned how to import Excel file in Python as a list, convert Excel data into dictionaries, map Excel data into Python objects, and import Excel data into a database.
With Spire.XLS for Python, you can easily import Excel data into different structures with minimal code. The library provides a consistent API for handling various Excel formats and complex content, making it suitable for a wide range of data processing scenarios.
To evaluate the full performance of Spire.XLS for Python, you can apply for a 30 day trial license.
FAQ
What does it mean to import Excel file in Python?
Importing Excel means converting Excel data into Python structures such as lists, dictionaries, or databases for further processing and integration into your applications.
How do I import Excel data into Python?
You can use libraries like Spire.XLS for Python to load Excel files and convert their content into usable Python data structures. The process involves loading the workbook, accessing the worksheet, and iterating through cells to extract data.
Can I import Excel data into a database using Python?
Yes, you can read Excel data and insert it into databases like SQLite, MySQL, or PostgreSQL using Python. This approach is commonly used for data migration and backend system integration.
What is the best structure for importing Excel data?
The best structure depends on your use case. Lists are suitable for simple iteration, dictionaries for structured data access by column names, objects for type safety and business logic, and databases for persistent storage and querying.
Do I need Microsoft Excel installed to import Excel files in Python?
No, libraries like Spire.XLS for Python work independently and do not require Microsoft Excel to be installed on the system.
CSV (Comma-Separated Values) files are the backbone of data exchange across industries—from data analysis to backend systems. They’re lightweight, human-readable, and compatible with almost every tool (Excel, Google Sheets, databases). If you’re a developer seeking a reliable way to create a CSV file in Python, Spire.XLS for Python is a powerful library that simplifies the process.
In this comprehensive guide, we'll explore how to generate a CSV file in Python with Spire.XLS, covering basic CSV creation and advanced use cases like list to CSV and Excel to CSV conversion.
What You’ll Learn
- Installation and Setup
- Basic: Create a Simple CSV File in Python
- Dynamic Data: Generate CSV from a List of Dictionaries in Python
- Excel-to-CSV: Generate CSV From an Excel File in Python
- Best Practices for CSV Creation
- FAQ: Create CSV in Python
Installation and Setup
Getting started with Spire.XLS for Python is straightforward. Follow these steps to set up your environment:
Step 1: Ensure Python 3.6 or higher is installed.
Step 2: Install the library via pip (the official package manager for Python):
pip install Spire.XLS
Step 3 (Optional): Request a temporary free license to test full features without any limitations.
Basic: Create a Simple CSV File in Python
Let’s start with a simple scenario: creating a CSV file from scratch with static data (e.g., a sales report). The code below creates a new workbook, populates it with data, and saves it as a CSV file.
from spire.xls import *
from spire.xls.common import *

# 1. Create a new workbook
workbook = Workbook()

# 2. Get the first worksheet (default sheet)
worksheet = workbook.Worksheets[0]

# 3. Populate data into cells
# Header row
worksheet.Range["A1"].Text = "ProductID"
worksheet.Range["B1"].Text = "ProductName"
worksheet.Range["C1"].Text = "Price"
worksheet.Range["D1"].Text = "QuantitySold"

worksheet.Range["A2"].NumberValue = 101
worksheet.Range["B2"].Text = "Wireless Headphones"
worksheet.Range["C2"].NumberValue = 79.99
worksheet.Range["D2"].NumberValue = 250

worksheet.Range["A3"].NumberValue = 102
worksheet.Range["B3"].Text = "Bluetooth Speaker"
worksheet.Range["C3"].NumberValue = 49.99
worksheet.Range["D3"].NumberValue = 180

# Save the worksheet to CSV
worksheet.SaveToFile("BasicSalesReport.csv", ",", Encoding.get_UTF8())
workbook.Dispose()
Core Workflow
- Initialize Core object: Workbook() creates a new Excel workbook, Worksheets[0] accesses the target sheet.
- Fill data into cells: Use .Text (for strings) and .NumberValue (for numbers) to ensure correct data types.
- Export & cleanup: SaveToFile() exports the worksheet to CSV , and Dispose() prevents memory leaks.
Output:
The resulting BasicSalesReport.csv will look like this:

Dynamic Data: Generate CSV from a List of Dictionaries in Python
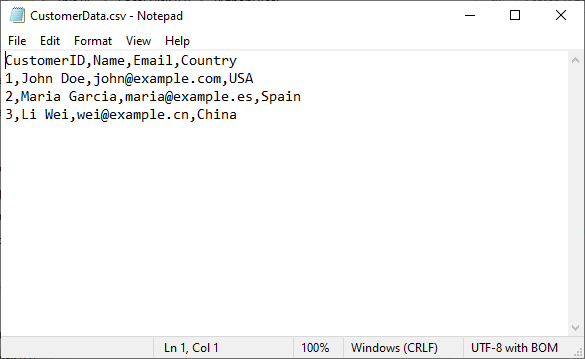
In real-world scenarios, data is often stored in dictionaries (e.g., from APIs/databases). The code below converts a list of dictionaries to a CSV:
from spire.xls import *
from spire.xls.common import *

# Sample data (e.g., from a database/API)
customer_data = [
    {"CustomerID": 1, "Name": "John Doe", "Email": "john@example.com", "Country": "USA"},
    {"CustomerID": 2, "Name": "Maria Garcia", "Email": "maria@example.es", "Country": "Spain"},
    {"CustomerID": 3, "Name": "Li Wei", "Email": "wei@example.cn", "Country": "China"}
]

# 1. Create workbook and worksheet
workbook = Workbook()
worksheet = workbook.Worksheets[0]

# 2. Write headers (extract keys from the first dictionary)
headers = list(customer_data[0].keys())
for col_idx, header in enumerate(headers, start=1):
    worksheet.Range[1, col_idx].Text = header  # Row 1 = headers

# 3. Write data rows
for row_idx, customer in enumerate(customer_data, start=2):  # Start at row 2
    for col_idx, key in enumerate(headers, start=1):
        # Handle different data types (text/numbers)
        value = customer[key]
        if isinstance(value, (int, float)):
            worksheet.Range[row_idx, col_idx].NumberValue = value
        else:
            worksheet.Range[row_idx, col_idx].Text = value

# 4. Save as CSV
worksheet.SaveToFile("CustomerData.csv", ",", Encoding.get_UTF8())
workbook.Dispose()
This example is ideal for JSON to CSV conversion, database dumps, and REST API data exports. Key advantages include:
- Dynamic Headers: Automatically extracts headers from the keys of the first dictionary in the dataset.
- Scalable: Seamlessly adapts to any volume of dictionaries or key-value pairs (perfect for dynamic data).
- Clean Output: Preserves the original order of dictionary keys for consistent CSV structure.
The generated CSV file:
Excel-to-CSV: Generate CSV From an Excel File in Python
Spire.XLS excels at converting Excel (XLS/XLSX) to CSV in Python. This is useful if you have Excel reports and need to export them to CSV for data pipelines or third-party tools.
from spire.xls import *

# 1. Initialize a workbook instance
workbook = Workbook()

# 2. Load a xlsx file
workbook.LoadFromFile("Expenses.xlsx")

# 3. Save Excel as a CSV file
workbook.SaveToFile("XLSXToCSV.csv", FileFormat.CSV)
workbook.Dispose()
Conversion result:
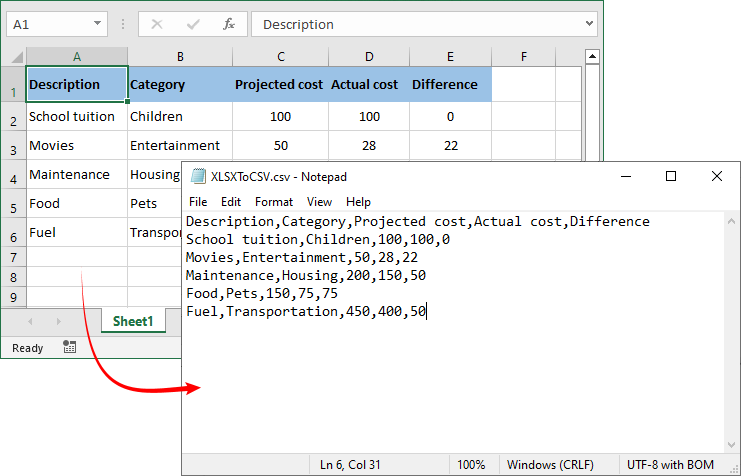
Note: By default, SaveToFile() converts only the first worksheet. For converting multiple sheets to separate CSV files, refer to the comprehensive guide: Convert Excel (XLSX/XLS) to CSV in Python – Batch & Multi-Sheet
Best Practices for CSV Creation
Follow these guidelines to ensure robust and professional CSV output:
- Validate Data First: Clean empty rows/columns before exporting to CSV.
- Use UTF-8 Encoding: Always specify UTF-8 encoding (Encoding.get_UTF8()) to support international characters seamlessly.
- Batch Process Smartly: For 100k+ rows, process data in chunks (avoid loading all data into memory at once).
- Choose the Correct Delimiter: Be mindful of regional settings. For European users, use a semicolon (;) as the delimiter to avoid locale issues.
- Dispose Objects: Release workbook/worksheet resources with Dispose() to prevent memory leaks.
Conclusion
Spire.XLS simplifies the process of leveraging Python to generate CSV files. Whether you're creating reports from scratch, converting Excel workbooks, or handling dynamic data from APIs and databases, this library delivers a robust and flexible solution.
By following this guide, you can easily customize delimiters, specify encodings such as UTF-8, and manage data types—ensuring your CSV files are accurate, compatible, and ready for any application. For more advanced features, you can explore the Spire.XLS for Python tutorials.
FAQ: Create CSV in Python
Q1: Why choose Spire.XLS over Python’s built-in csv module?
A: While Python's csv module is excellent for basic read/write operations, Spire.XLS offers significant advantages:
- Better data type handling: Automatic distinction between text and numeric data.
- Excel Compatibility: Seamlessly converts between Excel (XLSX/XLS) and CSV—critical for teams using Excel as a data source.
- Advanced Customization: Supports customizing the delimiter and encoding of the generated CSV file.
- Batch processing: Efficient handling of large datasets and multiple files.
- Cross-Platform Support: Works on Windows, macOS, and Linux (no Excel installation required).
Q2: Can I use Spire.XLS for Python to read CSV files?
A: Yes. Spire.XLS supports parsing CSV files and extracting their data. Details refer to: How to Read CSV Files in Python: A Comprehensive Guide
Q3: Can Spire.XLS convert CSV files back to Excel format?
A: Yes! Spire.XLS supports bidirectional conversion. A quick example:
from spire.xls import *

# Create a workbook
workbook = Workbook()

# Load a CSV file
workbook.LoadFromFile("sample.csv", ",", 1, 1)

# Save CSV as Excel
workbook.SaveToFile("CSVToExcel.xlsx", ExcelVersion.Version2016)
Q4: How do I change the CSV delimiter?
A: The SaveToFile() method’s second parameter controls the delimiter:
# Semicolon (for European locales):
worksheet.SaveToFile("EU.csv", ";", Encoding.get_UTF8())
# Tab (for tab-separated values/TSV)
worksheet.SaveToFile("TSV_File.csv", "\t", Encoding.get_UTF8())
Automate Excel Writing in Python: Professional Reporting Practices
2025-09-18 09:49:49 Written by zaki zou
Excel remains one of the most widely used tools for organizing, analyzing, and presenting data. From financial reports to operational dashboards, many workflows require exporting data into Excel for better readability and sharing. Instead of manually entering information, automating Excel file writing with Python makes it faster, more reliable, and more scalable.
This tutorial explains how to write data to Excel files with Python, covering structured data insertion, formatting, and exporting. The examples use a Python Excel library that allows programmatic creation and customization of workbooks.
What's Included in This Tutorial:
- Setting Up the Environment
- Writing Data into Excel Files
- Formatting While Writing
- Working with Multiple Worksheets
- Best Practices
- Conclusion
- FAQ
Setting Up the Environment
Before writing Excel files in Python, you need a library that supports creating, loading, and saving workbooks programmatically. Spire.XLS for Python provides a complete API for these operations, enabling automated report generation and data processing.
Install the package using pip:
pip install spire.xls
Once installed, you can handle Excel files using three core operations:
- Creating a new workbook – initialize a new Excel document with Workbook().
- Loading an existing workbook – open an existing Excel file using LoadFromFile().
- Saving a workbook – export the workbook to the desired format with SaveToFile(), supporting .xlsx, .xls, CSV, and more.
These operations form the foundation for further data writing, formatting, and multi-sheet management in Python.
Writing Data into Excel Files with Python
In real-world business scenarios, you may need to create new Excel files, update existing reports, or write different types of data—such as text, numbers, dates, and formulas. This section demonstrates how to efficiently write and manage data in Excel files with Python across these common use cases.
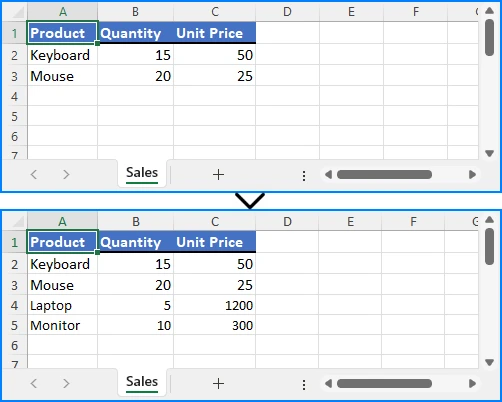
Appending Data to an Existing Excel File
When you need to update an existing Excel workbook with new information—such as adding recent sales records, inventory updates, or additional data rows—you can open the file, append the data programmatically, and save it without overwriting existing content:
from spire.xls import Workbook, ExcelVersion

workbook = Workbook()
workbook.LoadFromFile("Sample.xlsx")
sheet = workbook.Worksheets[0]

# Add new rows
sheet.Range["A4"].Value = "Laptop"
sheet.Range["B4"].NumberValue = 5
sheet.Range["C4"].NumberValue = 1200.00

sheet.Range["A5"].Value = "Monitor"
sheet.Range["B5"].NumberValue = 10
sheet.Range["C5"].NumberValue = 300.00

workbook.SaveToFile("output/updated_excel.xlsx", ExcelVersion.Version2016)
Key elements used:
- LoadFromFile() – loads an existing Excel file into the workbook object.
- Range["CellName"] – references a specific cell in the sheet using its name.
- Value / NumberValue – assigns text or numeric data to cells.
- SaveToFile() – saves the workbook to a file in the specified Excel format.
This method allows continuous updates to reports while preserving existing content.
Example showing appended data:
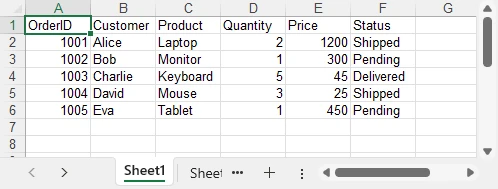
Writing Multiple Rows and Columns to a New Excel File
When dealing with larger datasets, writing multiple rows and columns at once is much more efficient than updating individual cells one by one. This approach not only saves time but also ensures consistent data insertion across the worksheet:
from spire.xls import Workbook, ExcelVersion

# Create a new Excel workbook
workbook = Workbook()
sheet = workbook.Worksheets[0]

orders = [
    ["OrderID", "Customer", "Product", "Quantity", "Price", "Status"],
    [1001, "Alice", "Laptop", 2, 1200.00, "Shipped"],
    [1002, "Bob", "Monitor", 1, 300.00, "Pending"],
    [1003, "Charlie", "Keyboard", 5, 45.00, "Delivered"],
    [1004, "David", "Mouse", 3, 25.00, "Shipped"],
    [1005, "Eva", "Tablet", 1, 450.00, "Pending"]
]

for row_index, row_data in enumerate(orders, start=1):
    for col_index, value in enumerate(row_data, start=1):
        if isinstance(value, (int, float)):
            sheet.Range[row_index, col_index].NumberValue = value
        else:
            sheet.Range[row_index, col_index].Value = value

workbook.SaveToFile("output/orders.xlsx", ExcelVersion.Version2016)
Important elements in this example:
- enumerate() – provides row and column indices for looping.
- Range[row, col] – references a cell in the worksheet by its row and column indexes.
Batch writing ensures efficiency, especially when exporting database query results or operational reports.
Example showing batch data insertion:
Writing Different Data Types
Excel cells can contain various types of data, such as text, numbers, dates, formulas, and more. Using the correct properties and methods ensures that each type is stored and displayed appropriately, allowing accurate calculations and proper formatting:
from spire.xls import Workbook, ExcelVersion, DateTime, TimeSpan

workbook = Workbook()
sheet = workbook.Worksheets[0]

# Set general value
sheet.Range[2, 2].Text = "General Example"
sheet.Range[2, 3].Value = "General 123"

# Set number value
sheet.Range[3, 2].Text = "Number Example"
sheet.Range[3, 3].NumberValue = 1234.56
sheet.Range[3, 3].NumberFormat = "0.000"

# Set datetime value
sheet.Range[4, 2].Text = "Date Example"
sheet.Range[4, 3].DateTimeValue = DateTime.get_UtcNow()

# Set formula value
sheet.Range[5, 2].Text = "Formula Example"
sheet.Range[5, 5].NumberValue = 1234.56
sheet.Range[5, 6].NumberValue = 6543.21
sheet.Range[5, 3].Formula = "=SUM(E5:F5)"

# Set text
sheet.Range[6, 2].Text = "Text Example"
sheet.Range[6, 3].Text = "Text"

# Set boolean value
sheet.Range[7, 2].Text = "Boolean Example"
sheet.Range[7, 3].BooleanValue = True

sheet.AllocatedRange.AutoFitColumns()

workbook.SaveToFile("output/value_types.xlsx", ExcelVersion.Version2016)
Key functions and properties used:
- Value – assigns or retrieves the general value of a cell, suitable for text or mixed content.
- NumberValue – specifically handles numeric values in a cell, ensuring proper number formatting and calculations.
- DateTimeValue – used to input or obtain date and time values in a cell with correct formatting.
- Formula – sets or retrieves the formula expression in a cell to perform dynamic calculations.
- BooleanValue – stores or returns a Boolean (True/False) value in a cell.
- Text – retrieves the displayed text of a cell, including any applied formatting.
Proper handling of different data types is essential for accurate business calculations and reporting. For more details on supported data types, see the XlsRange API reference.
Example showing mixed data types:

Formatting Excel While Writing Data with Python
To make Excel reports clear and professional, it’s important to apply formatting while entering or updating data. This section demonstrates how to enhance readability and presentation by styling cells, setting number formats, and adjusting column widths and row heights as you write data into Excel.
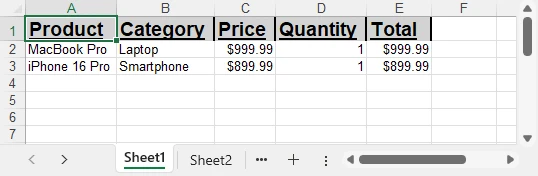
Applying Cell Styles
You can enhance the readability and appearance of your Excel sheet by applying various styles to cells, such as fonts, borders, and background colors:
from spire.xls import Workbook, Color, FontUnderlineType, ExcelVersion

workbook = Workbook()
sheet = workbook.Worksheets[0]
sheet.Range["A1"].Value = "Product"
sheet.Range["B1"].Value = "Category"
sheet.Range["C1"].Value = "Price"
sheet.Range["D1"].Value = "Quantity"
sheet.Range["E1"].Value = "Total"
sheet.Range["A2"].Value = "MacBook Pro"
sheet.Range["B2"].Value = "Laptop"
sheet.Range["C2"].NumberValue = 999.99
sheet.Range["D2"].NumberValue = 1
sheet.Range["E2"].Formula = "=C2*D2"
sheet.Range["A3"].Value = "iPhone 16 Pro"
sheet.Range["B3"].Value = "Smartphone"
sheet.Range["C3"].NumberValue = 899.99
sheet.Range["D3"].NumberValue = 1
sheet.Range["E3"].Formula = "=C3*D3"

# Set header style
header = sheet.Range["A1:E1"]
header.Style.Font.FontName = "Arial"
header.Style.Font.Size = 14.0
header.Style.Font.IsBold = True
header.Style.Font.Underline = FontUnderlineType.Single
header.Style.Interior.Color = Color.get_LightGray()
header.Style.Borders[BordersLineType.EdgeRight].LineStyle = LineStyleType.Medium
Core components demonstrated:
- Style.Font – controls font-related settings such as bold, underline, and more (full list of supported properties can be found in the Style.Font API documentation).
- FontUnderlineType.Single – applies a single underline.
- Interior.Color – fills the cell background with a specified color.
- Borders.LineStyle – adds borders around cells.
Styled cells enhance readability and emphasize critical sections.
Setting Number Formats for Excel Cells
Numbers in Excel often require specific display formats to improve readability and presentation. Using CellRange.NumberFormat, you can control how numeric values appear, such as applying currency, percentage, or integer formats:
# Apply number formats
sheet.Range["C2:C3"].NumberFormat = "$#,##0.00"   # Currency format
sheet.Range["D2:D3"].NumberFormat = "0"           # Integer format
sheet.Range["E2:E3"].NumberFormat = "$#,##0.00"
Key highlights:
- NumberFormat – enables reading and setting Excel cell number formats, controlling how numbers are displayed while keeping the raw data intact.
- Format codes define display rules such as currency symbols, decimal places, or percentage styles, giving you flexibility in presenting numerical data.
With proper number formatting, financial data is easier to interpret and looks more professional. For more details and a full list of format codes, see our dedicated guide on Setting Excel Cell Number Format in Python.
Adjusting Column Widths and Row Heights
Properly adjusting column widths and row heights ensures that all content is clearly visible. You can set them manually or use automatic fitting to match the content:
# Auto-fit column widths and row heights
for col in range(1, 5):
    sheet.AutoFitColumn(col)
for row in range(1, 3):
    sheet.AutoFitRow(row)

# Auto-fit a specific range of cells
#sheet.Range["A1:E3"].AutoFitColumns()
#sheet.Range["A1:E3"].AutoFitRows()

# Set a fixed column width and row height
sheet.Columns[1].Width = 150
sheet.Rows[1].Height = 30

workbook.SaveToFile("output/formatted_excel.xlsx", ExcelVersion.Version2016)
Key highlights:
- AutoFitColumn(colIndex) / AutoFitRow(rowIndex) – automatically adjust a single column or row to fit its content.
- CellRange.AutoFitColumns() / AutoFitRows() – automatically adjust all columns or rows within a specified cell range.
- Columns[colIndex].Width / Rows[rowIndex].Height – manually set a fixed width or height for precise control.
With these options, you can choose between automatic fitting for dynamic data or fixed dimensions for consistent layout, ensuring your Excel worksheets remain both readable and professionally formatted.
Example showing styled and auto-fitted headers:
To explore more advanced techniques for formatting Excel sheets in Python, including fonts, colors, borders, and conditional formatting, check out our dedicated guide on Formatting Excel in Python for detailed instructions.
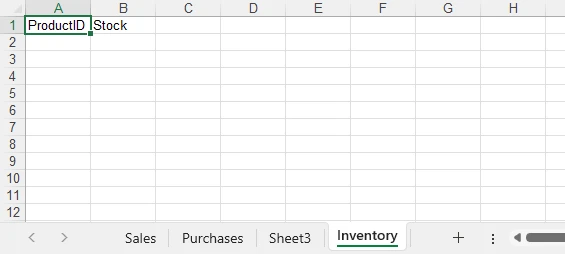
Managing Multiple Worksheets in Excel with Python
In Excel, organizing data into multiple worksheets helps keep related information separated and easy to manage. For example, you can maintain separate sheets for sales, purchases, inventory, or other categories within the same workbook. This section demonstrates how to create, access, and manage multiple worksheets using Python.
from spire.xls import Workbook, ExcelVersion

workbook = Workbook()

sheet = workbook.Worksheets[0]
sheet.Name = "Sales"

sheet1 = workbook.Worksheets["Sheet2"]
sheet1.Name = "Purchases"

sheet2 = workbook.Worksheets.Add("Inventory")
sheet2.Range["A1"].Value = "ProductID"
sheet2.Range["B1"].Value = "Stock"

workbook.SaveToFile("output/multi_sheet.xlsx", ExcelVersion.Version2016)
Main features highlighted:
- Worksheets[Index] – access a worksheet by its position in the workbook (useful for iterating over all sheets or referencing the first/last sheet).
- Worksheets["SheetName"] – access a worksheet by its name, which is more readable and reliable if the sheet order might change.
- Worksheets.Add("SheetName") – create a new worksheet to organize different categories of data such as departments, sales regions, or product lines.
These methods allow you to structure your Excel file efficiently, keeping related data on separate sheets for clarity and easier management.
Example showing multiple worksheets:
Best Practices for Writing Excel Files with Python
When writing Excel files with Python, follow best practices to maintain efficiency, consistency, and usability:
- Use descriptive sheet names like “Sales_2024” instead of “Sheet1.”
- Batch write large datasets instead of individual cell updates to improve performance.
- Apply consistent formatting for headers, totals, and key columns.
- Leverage Excel formulas to maintain dynamic calculations.
- Validate data types to prevent misinterpretation in charts or formulas.
- Choose file formats suited to the audience: .xlsx for modern users, .xls only for legacy compatibility.
- Organize worksheets logically, grouping related datasets for easy navigation.
Implementing these practices avoids common pitfalls and produces professional, reusable reports.
Conclusion
Automating Excel writing in Python significantly streamlines reporting. By creating workbooks, writing data efficiently, applying styles, managing worksheets, and handling diverse data types, developers can ensure consistent, accurate, and professional Excel reports. To explore the library further, you can request a free temporary license or try the Free Spire.XLS for Python edition.
Python Excel Writing FAQ
Q1: Can Python write to an existing Excel file?
Yes, Python can load an existing workbook, append or modify data, and save it while preserving all previously entered content.
Q2: How to efficiently handle large datasets in Python?
Batch writing multiple rows and minimizing formatting during data insertion helps maintain high performance even with thousands of rows.
Q3: Can formulas be included in Excel files?
Yes, you can insert formulas, including =SUM() and more complex calculations, to keep your Excel reports dynamic and automatically updated.
Q4: Which Excel formats are supported?
Spire.XLS for Python can save files in .xlsx, .xls, CSV, and even export to PDF, covering most common use cases and compatibility needs.
In development, reading CSV files in Python is a common task in data processing, analytics, and backend integration. While Python offers built-in modules like csv and pandas for handling CSV files, Spire.XLS for Python provides a powerful, feature-rich alternative for working with CSV and Excel files programmatically.
In this article, you’ll learn how to use Python to read CSV files, from basic CSV parsing to advanced techniques.
- Getting Started with Spire.XLS for Python
- Basic Example: Read a CSV in Python
- Advanced CSV Reading Techniques
- Conclusion
Getting Started with Spire.XLS for Python
Spire.XLS for Python is a feature-rich library for processing Excel and CSV files. Unlike basic CSV parsers in Python, it offers advanced capabilities such as:
- Simple API to load, read, and manipulate CSV data.
- Reading/writing CSV files with support for custom delimiters.
- Converting CSV files to Excel formats (XLSX, XLS) and vice versa.
These features make Spire.XLS ideal for data analysts, developers, and anyone working with structured data in CSV format.
Install via pip
Before getting started, install the library via pip. It works with Python 3.6+ on Windows, macOS, and Linux:
pip install Spire.XLS
Basic Example: Read a CSV in Python
Let’s start with a simple example: parsing a CSV file and extracting its data. Suppose we have a CSV file named “input.csv” with the following content:
Name,Age,City,Salary
Alice,30,New York,75000
Bob,28,Los Angeles,68000
Charlie,35,San Francisco,90000
Python Code to Read the CSV File
Here’s how to load and get data from the CSV file with Python:
from spire.xls import *
from spire.xls.common import *
# Create a Workbook object
workbook = Workbook()
# Load a CSV file
workbook.LoadFromFile("input.csv", ",", 1, 1)
# Get the first worksheet (CSV files are loaded as a single sheet)
worksheet = workbook.Worksheets[0]
# Get the number of rows and columns with data
row_count = worksheet.LastRow
col_count = worksheet.LastColumn
# Iterate through rows and columns to print data
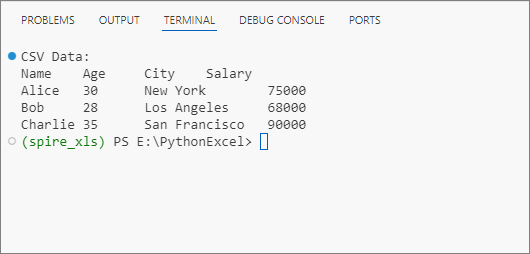
print("CSV Data:")
for row in range(row_count):
for col in range(col_count):
# Get cell value
cell_value = worksheet.Range[row+1, col+1].Value
print(cell_value, end="\t")
print() # New line after each row
# Close the workbook
workbook.Dispose()
Explanation:
-
Workbook Initialization: The Workbook class is the core object for handling Excel files.
-
Load CSV File: LoadFromFile() imports the CSV data. Its parameters are:
- fileName: The CSV file to read.
- separator: Specified delimiter (e.g., “,”).
- row/column: The starting row/column index.
-
Access Worksheet: The CSV data is loaded into the first worksheet.
-
Read Data: Iterate through rows and columns to extract cell values via worksheet.Range[].Value.
Output: Get data from a CSV file and print in a tabular format.
Advanced CSV Reading Techniques
1. Read CSV with Custom Delimiters
Not all CSVs use commas. If your CSV file uses a different delimiter (e.g., ;), specify it during loading:
# Load a CSV file
workbook.LoadFromFile("input.csv", ";", 1, 1)
2. Skip Header Rows
If your CSV has headers, skip them by adjusting the row iteration to start from the second row instead of the first.
for row in range(1, row_count):
    for col in range(col_count):
        # Get cell value (row+1 because Spire.XLS uses 1-based indexing)
        cell_value = worksheet.Range[row+1, col+1].Value
        print(cell_value, end="\t")
3. Convert CSV to Excel in Python
One of the most powerful features of Spire.XLS is the ability to convert a CSV file into a native Excel format effortlessly. For example, you can read a CSV and then:
- Apply Excel formatting (e.g., set cell colors, borders).
- Create charts (e.g., a bar chart for sales by region).
- Save the data as an Excel file (.xlsx) for sharing.
Code Example: Convert CSV to Excel (XLSX) in Python – Single & Batch
Conclusion
Reading CSV files in Python with Spire.XLS simplifies both basic and advanced data processing tasks. Whether you need to extract CSV data, convert it to Excel, or handle advanced scenarios like custom delimiters, the examples outlined in this guide enables you to implement robust CSV reading capabilities in your projects with minimal effort.
Try the examples above, and explore the online documentation for more advanced features!
Editing an Excel document involves a variety of actions, such as inputting and formatting text, applying formulas, generating visualizations, and organizing data for clarity and insight. Being able to edit Excel documents programmatically is a crucial skill that empowers developers to enhance their data management capabilities.
In this article, you will learn how to edit an existing Excel document in Python using Spire.XLS for Python.
- Read and Write Excel Files in Python
- Apply Formatting to Excel Cells in Python
- Find and Replace Text in Excel in Python
- Add Formulas and Charts to Excel in Python
Install Spire.XLS for Python
This scenario requires Spire.XLS for Python and plum-dispatch v1.7.4. They can be easily installed in your Windows through the following pip command.
pip install Spire.XLS
If you are unsure how to install, please refer to this tutorial: How to Install Spire.XLS for Python on Windows
Read and Write Excel Files in Python
A key task when handling Excel files in Python is the efficient reading and writing of data, which is essential for numerous applications such as data analysis and report generation. Spire.XLS for Python simplifies this process by offering the CellRange.Value property. This feature allows developers to easily retrieve values from individual cells and reassign them as needed.
Here are the steps to read and write an Excel file using Python:
- Create a Workbook object.
- Load an Excel file from a given file path.
- Get a specific worksheet using the Workbook.Worksheets[index] property.
- Get a specific cell using the Worksheet.Range property
- Get or set the cell value using the CellRange.Value property.
- Save the workbook to a different Excel file.
- Python
from spire.xls import *
from spire.xls.common import *
# Create a Workbook object
workbook = Workbook()
# Load an Excel file
workbook.LoadFromFile("C:\\Users\\Administrator\\Desktop\\Input.xlsx")
# Get a specific worksheet
worksheet = workbook.Worksheets[0]
# Get a specific cell
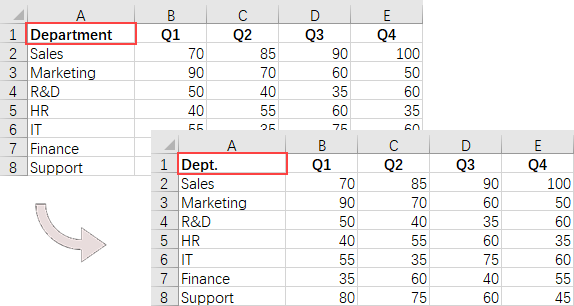
cell = worksheet.Range["A1"]
# Read the cell value
cellValue = cell.Value
# Determine if the cell value is "Department"
if (cellValue == "Department"):
# Update the cell value
cell.Value = "Dept."
# Save the workbook to a different
workbook.SaveToFile("ModifyExcel.xlsx", ExcelVersion.Version2016)
# Dispose resources
workbook.Dispose()
Apply Formatting to Excel Cells in Python
Formatting Excel documents is essential for producing professional-looking reports that effectively communicate information. Spire.XLS for Python offers a comprehensive suite of APIs within the CellRange class, empowering developers to manage various formatting options seamlessly. This includes adjusting font styles, selecting cell colors, aligning text, and modifying row heights and column widths.
Here are the steps to apply styles and formats to Excel cells using Python:
- Create a Workbook object.
- Load an Excel file from a given file path.
- Get a specific worksheet using the Workbook.Worksheets[index] property.
- Get all located range using the Worksheet.AllocatedRange property.
- Get a specific row using the CellRange.Rows[index] property, and set the cell color, text color, text alignment, and row height using the properties under the CellRange object.
- Get a specific column using the CellRange.Columns[index] property, and set the column width using the ColumnWidth property under the CellRange object.
- Save the workbook to a different Excel file.
- Python
from spire.xls import *
from spire.xls.common import *

# Create a Workbook object
workbook = Workbook()

# Load an Excel file
workbook.LoadFromFile("C:\\Users\\Administrator\\Desktop\\Input.xlsx")

# Get a specific worksheet
worksheet = workbook.Worksheets[0]

# Get all located range from the worksheet
allocatedRange = worksheet.AllocatedRange

#Iterate through the rows
for rowNum in range(0, allocatedRange.RowCount):
    if rowNum == 0:

        # Apply cell color to the header row
        allocatedRange.Rows[rowNum].Style.Color = Color.get_Black()

        # Change the font color of the header row
        allocatedRange.Rows[rowNum].Style.Font.Color = Color.get_White()
    else:
        # Apply alternate colors to other rows
        if rowNum % 2 == 1:
            allocatedRange.Rows[rowNum].Style.Color = Color.get_LightGray()
        else:
            allocatedRange.Rows[rowNum].Style.Color = Color.get_White()

    # Align text to center
    allocatedRange.Rows[rowNum].HorizontalAlignment = HorizontalAlignType.Center
    allocatedRange.Rows[rowNum].VerticalAlignment = VerticalAlignType.Center

    # Set the row height
    allocatedRange.Rows[rowNum].RowHeight = 20

# Iterate through the columns
for columnNum in range(0, allocatedRange.ColumnCount):
    if (columnNum > 0):

        # Set the column width
        allocatedRange.Columns[columnNum].ColumnWidth = 10

# Save the workbook to a different
workbook.SaveToFile("FormatExcel.xlsx", ExcelVersion.Version2016)

# Dispose resources
workbook.Dispose()

Find and Replace Text in Excel in Python
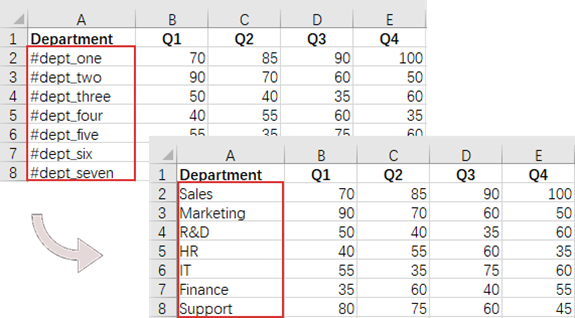
The find and replace functionality in Excel enables users to swiftly locate specific text within their spreadsheets and substitute it with new content, which is particularly useful for data corrections and updates. With Spire.XLS for Python, you can efficiently locate a cell containing a specific string using the Worksheet.FindString() method. Once identified, you can easily replace its value using the CellRange.Value property.
Here are the steps to find and replace text in Excel using Python:
- Create a Workbook object.
- Load an Excel file from a given file path.
- Get a specific worksheet using the Workbook.Worksheets[index] property.
- Find the cell that contains a specified string using the Worksheet.FindString() method.
- Update the cell value using the CellRange.Value property.
- Save the workbook to a different Excel file.
- Python
from spire.xls import *
from spire.xls.common import *

# Create a Workbook object
workbook = Workbook()

# Load an Excel file
workbook.LoadFromFile("C:\\Users\\Administrator\\Desktop\\Input.xlsx")

# Get a specific worksheet
worksheet = workbook.Worksheets[0]

# Define a list of department names for replacement
departments = ["Sales", "Marketing", "R&D", "HR", "IT", "Finance", "Support"]

# Define a list of placeholders that will be replaced in the Excel sheet
placeholders = ["#dept_one", "#dept_two", "#dept_three", "#dept_four", "#dept_five", "#dept_six", "#dept_seven"]

# Iterate through the placeholder strings
for i in range (0, len(placeholders)):

    # Find the cell containing the current placeholder string
    cell = worksheet.FindString(placeholders[i], False, False)

    # Replace the value in the found cell with the corresponding department name
    cell.Value = departments[i]


# Save the workbook to a different
workbook.SaveToFile("ReplaceText.xlsx", ExcelVersion.Version2016)

# Dispose resources
workbook.Dispose()
Add Formulas and Charts to Excel in Python
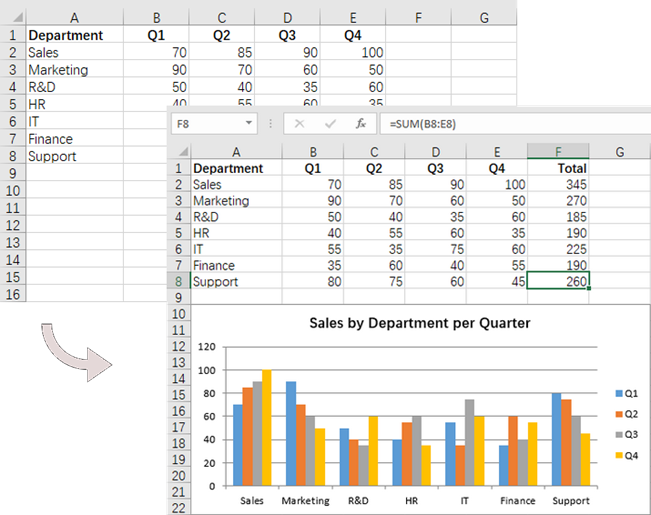
In addition to basic file operations, Spire.XLS for Python provides a variety of advanced techniques for working with Excel files. For example, you can insert formulas into cells using the CellRange.Formula property, which allows for real-time calculations and data analysis directly within your spreadsheet. Furthermore, it allows you to create visually appealing data presentations by adding charts to your worksheets using the Worksheet.Charts.Add() method.
Here are the steps to add formulas and charts to Excel using Python:
- Create a Workbook object.
- Load an Excel file from a given file path.
- Get a specific worksheet using the Workbook.Worksheets[index] property.
- Get a specific cell using the Worksheet.Range property.
- Add a formula to the cell using the CellRange.Formula property.
- Add a column chart to the worksheet using the Worksheet.Charts.Add() method.
- Set the chart data range, position, title and other attributes using the properties under the Chart object.
- Save the workbook to a different Excel file.
- Python
from spire.xls import *
from spire.xls.common import *

# Create a Workbook object
workbook = Workbook()

# Load an Excel file
workbook.LoadFromFile("C:\\Users\\Administrator\\Desktop\\Input.xlsx")

# Get a specific worksheet
worksheet = workbook.Worksheets[0]

# Get all located range
allocatedRange = worksheet.AllocatedRange

#Iterate through the rows
for rowNum in range(0, allocatedRange.RowCount):
    if (rowNum == 0):

        # Write text to cell G1
        worksheet.Range[rowNum + 1, 6].Text = "Total"

        # Apply style to the cell
        worksheet.Range[rowNum + 1, 6].Style.Font.IsBold = True
        worksheet.Range[rowNum + 1, 6].Style.HorizontalAlignment = HorizontalAlignType.Right
    else:

        # Add formulas to the cells from G2 to G8
        worksheet.Range[rowNum + 1, 6].Formula = f"=SUM(B{rowNum + 1}:E{rowNum + 1})"

# Add a clustered column chart
chart = worksheet.Charts.Add(ExcelChartType.ColumnClustered)

# Set data range for the chart
chart.DataRange = worksheet.Range["A1:E8"]
chart.SeriesDataFromRange = False

# Set position of the chart
chart.LeftColumn = 1
chart.TopRow = 10
chart.RightColumn = 8
chart.BottomRow = 23

# Set and format chart title
chart.ChartTitle = "Sales by Department per Quarter"
chart.ChartTitleArea.Size = 13
chart.ChartTitleArea.IsBold = True

# Save the workbook to a different
workbook.SaveToFile("AddFormulaAndChart.xlsx", ExcelVersion.Version2016)

# Dispose resources
workbook.Dispose()
Apply for a Temporary License
If you'd like to remove the evaluation message from the generated documents, or to get rid of the function limitations, please request a 30-day trial license for yourself.
Python: Dynamically Create, Read, and Modify Excel Files by Byte Streams
2025-01-07 01:19:20 Written by KoohjiIn Excel file processing, using byte streams in Python to create, read, and modify Excel files enables efficient data manipulation and automation. This approach eliminates reliance on physical storage or local filesystems, making it ideal for cloud-based or memory-constrained environments. It also supports real-time data exchange, system integration, and instant feedback in web applications, promoting rapid development and adaptable workflows. In this article, we will explore how to use Spire.XLS for Python to dynamically process Excel workbooks by byte streams with simple Python code.
- Create Excel Files and Save as Byte Streams in Python
- Read Excel Files from Byte Streams in Python
- Modify Excel Files from Byte Streams in Python
Install Spire.XLS for Python
This scenario requires Spire.XLS for Python and plum-dispatch v1.7.4. They can be easily installed in your Windows through the following pip commands.
pip install Spire.XLS
If you are unsure how to install, please refer to: How to Install Spire.XLS for Python on Windows
Create Excel Files and Save as Byte Streams in Python
With Spire.XLS for Python, we can create an Excel workbook by initializing a Workbook instance and populating it with data. Once the workbook is ready, we can save it to a Stream object and convert that stream into a bytes object for further use or storage. This method allows us to efficiently generate Excel files in memory without the need for disk storage.
Below are the steps for creating an Excel file and saving it as a byte stream with Python:
- Create an instance of the Workbook class to initialize a new Excel workbook. The new workbook includes three default worksheets.
- Retrieve a worksheet using the Workbook.Worksheets.get_Item() method.
- Create a data list or obtain it from another source.
- Iterate through rows and columns to populate the worksheet with data using the Worksheet.Range.get_Item().Value or NumberValue properties.
- Format cells using the properties available in CellRange.Style.
- Create a Stream object and save the workbook to it using the Workbook.SaveToStream() method.
- Convert the stream to a bytes object using the Stream.ToArray() method.
- Python
from spire.xls import Workbook, FileFormat, Stream, Color, HorizontalAlignType
# Create an instance of Workbook class
workbook = Workbook()
# Get the first worksheet
sheet = workbook.Worksheets.get_Item(0)
# Create a 2D list of data or read data from other sources
data = [
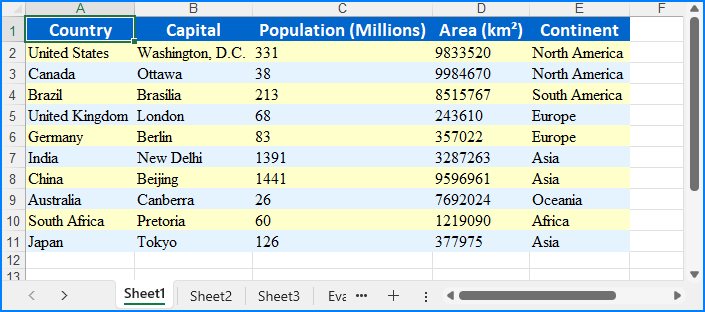
["Country", "Capital", "Population (Millions)", "Area (km²)", "Continent"],
["United States", "Washington, D.C.", 331, 9833520, "North America"],
["Canada", "Ottawa", 38, 9984670, "North America"],
["Brazil", "Brasília", 213, 8515767, "South America"],
["United Kingdom", "London", 68, 243610, "Europe"],
["Germany", "Berlin", 83, 357022, "Europe"],
["India", "New Delhi", 1391, 3287263, "Asia"],
["China", "Beijing", 1441, 9596961, "Asia"],
["Australia", "Canberra", 26, 7692024, "Oceania"],
["South Africa", "Pretoria", 60, 1219090, "Africa"],
["Japan", "Tokyo", 126, 377975, "Asia"]
]
# Insert the data into the worksheet
for i, row in enumerate(data):
for j, value in enumerate(row):
if isinstance(value, str):
sheet.Range.get_Item(i + 1, j + 1).Value = value
else:
sheet.Range.get_Item(i + 1, j + 1).NumberValue = value
# Format the header row with new colors
headerRow = sheet.AllocatedRange.Rows.get_Item(0)
headerRow.Style.Color = Color.FromRgb(0, 102, 204) # Blue color for the header
headerRow.Style.Font.FontName = "Calibri"
headerRow.Style.Font.Size = 14
headerRow.Style.Font.IsBold = True
headerRow.Style.Font.Color = Color.FromRgb(255, 255, 255) # White text
headerRow.Style.HorizontalAlignment = HorizontalAlignType.Center
# Format the data rows with new alternating colors
for i in range(1, sheet.AllocatedRange.Rows.Count):
row = sheet.AllocatedRange.Rows.get_Item(i)
row.Style.Font.FontName = "Times New Roman"
row.Style.Font.Size = 12
row.Style.HorizontalAlignment = HorizontalAlignType.Left
if i % 2 == 0:
row.Style.Color = Color.FromRgb(229, 243, 255) # Light blue for even rows
else:
row.Style.Color = Color.FromRgb(255, 255, 204) # Light yellow for odd rows
# Auto-fit the columns
for i in range(sheet.AllocatedRange.Columns.Count):
sheet.AutoFitColumn(i + 1)
# Create a Stream object
stream = Stream()
# Save the workbook to the stream
workbook.SaveToStream(stream, FileFormat.Version2016)
workbook.Dispose()
# Convert the stream to bytes
bytes_data = stream.ToArray()
# Write the bytes to a file or use them as needed
with open("output/CreateExcelByStream.xlsx", "wb") as file:
file.write(bytes_data)
Read Excel Files from Byte Streams in Python
To load an Excel workbook from a byte stream, we can convert the byte data into a Stream object and load it into a Workbook instance. Then, we can then access the worksheet data to extract and utilize the data within the Python application seamlessly.
The steps for reading Excel files from byte streams using Python are as follows:
- Create or convert to a bytes object for the Excel file, or use an existing one.
- Create a Stream object from the bytes.
- Instantiate the Workbook class and load the Excel file from the Stream object using the Workbook.LoadFromStream() method.
- Retrieve a worksheet using the Workbook.Worksheets.get_Item() method.
- Iterate through rows and columns to access cell values using the Worksheet.AllocatedRange.get_Item().Value property.
- Output the values or utilize them as needed.
- Python
from spire.xls import Workbook, Stream

# Create a bytes object or use an existing one
with open("output/CreateExcelByStream.xlsx", "rb") as file:
    bytes_data = file.read()

# Create an instance of the Workbook class
workbook = Workbook()

# Load the Excel file from the byte stream
workbook.LoadFromStream(Stream(bytes_data))

# Get the first worksheet
sheet = workbook.Worksheets.get_Item(0)

# Read data from the worksheet
# Create a list to store the data
data = []
for i in range(sheet.AllocatedRange.Rows.Count):
    # Retrieve a row of data
    row = sheet.AllocatedRange.Rows.get_Item(i)
    # Create a list to store the row's data
    row_data = []
    for j in range(row.Cells.Count):
        # Get the value of the cell
        cellValue = sheet.AllocatedRange.get_Item(i + 1, j + 1).Value
        row_data.append(cellValue)
    data.append(row_data)

# Display the data or use it as needed
for row in data:
    print(row)

# Release resources
workbook.Dispose()
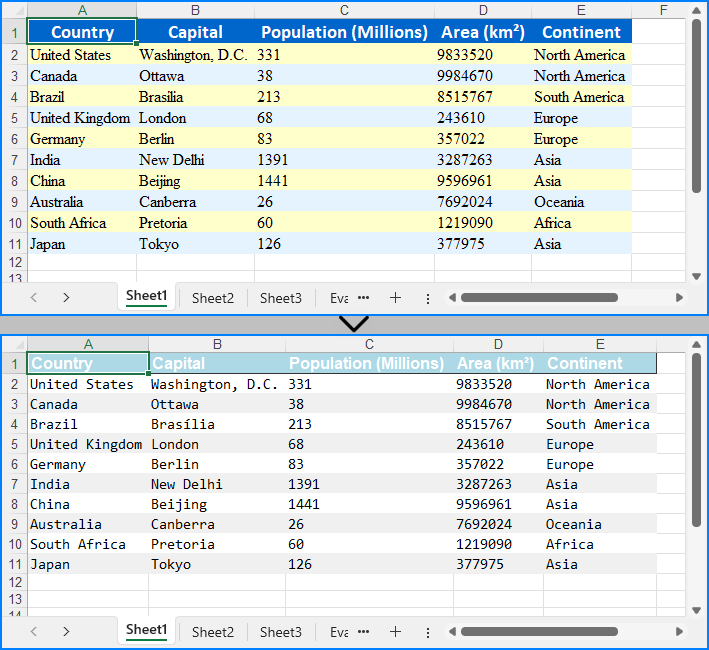
Modify Excel Files from Byte Streams in Python
Modifying Excel files from byte streams enables us to update or enhance data dynamically without saving it to disk. This method involves loading the byte stream into a Workbook instance, making changes to its content or formatting, and saving the changes back to a byte stream for reuse.
The following steps show how to modify an Excel workbook from a byte stream using Python:
- Create or convert to a bytes object of the Excel file, or use an existing one.
- Initialize a Stream object from the bytes and load it into a Workbook using the Workbook.LoadFromStream() method.
- Access a worksheet using the Workbook.Worksheets.get_Item() method.
- Modify cell values with the Worksheet.AllocatedRange.get_Item().Value property.
- Format cells using properties in CellRange.Style and add borders with the CellRange.BorderAround() method or the CellRange.BorderInside() method.
- Auto-fit column widths using the Worksheet.AutoFitColumn() method.
- Save the workbook to a new Stream object using the Workbook.SaveToStream() method and convert it back to bytes or bytearray using Stream.ToArray() method.
- Python
from spire.xls import Workbook, Stream, HorizontalAlignType, Color, FileFormat

# Create a bytes object or use an existing one
with open("output/CreateExcelByStream.xlsx", "rb") as file:
    bytes_data = file.read()

# Create an instance of the Workbook class
workbook = Workbook()

# Load the Excel file from the byte stream
stream = Stream(bytes_data)
workbook.LoadFromStream(stream)
stream.Close()

# Remove unnecessary worksheets (commented out in this case)
#for i in range(1, workbook.Worksheets.Count):
#    workbook.Worksheets.RemoveAt(i)

# Get the first worksheet
sheet = workbook.Worksheets.get_Item(0)

# Modify the style of the header row
headerRow = sheet.AllocatedRange.Rows.get_Item(0)
headerRow.Style.Font.Bold = False
headerRow.Style.Font.FontName = "Arial"
headerRow.Style.Font.Size = 12
headerRow.Style.HorizontalAlignment = HorizontalAlignType.Left
headerRow.Style.Color = Color.FromRgb(173, 216, 230) # Light blue background color
# Add outline borders for the header row
headerRow.BorderAround()

# Modify the style of the data rows
for i in range(1, sheet.AllocatedRange.Rows.Count):
    row = sheet.AllocatedRange.Rows.get_Item(i)
    row.Style.Font.FontName = "Consolas"
    row.Style.Font.Size = 11
    if i % 2 == 0:
        row.Style.Color = Color.FromRgb(240, 240, 240)  # Light gray background color for even rows
    else:
        row.Style.Color = Color.FromRgb(255, 255, 255)  # White background color for odd rows

# Auto-adjust the column widths
for i in range(sheet.AllocatedRange.Columns.Count):
    sheet.AutoFitColumn(i + 1)

# Save the modified Excel file
streamTemp = Stream()
workbook.SaveToStream(streamTemp, FileFormat.Version2016)
workbook.Dispose()

# Convert the stream to bytes
bytes_data = streamTemp.ToArray()

# Write the bytes to a file or use them as needed
with open("output/ModifiedExcel.xlsx", "wb") as file:
    file.write(bytes_data)
Apply for a Temporary License
If you'd like to remove the evaluation message from the generated documents, or to get rid of the function limitations, please request a 30-day trial license for yourself.
Page setup in Excel refers to the various settings that control how an Excel worksheet will be printed or displayed in a print preview. These settings determine the appearance and layout of the printed document, ensuring that it meets the desired formatting and readability standards. Page setup options include page margins, orientation, paper size, print area, headers, footers, scaling, and other print-related settings. In this article, we will explain how to set page setup options in Excel in Python using Spire.XLS for Python.
- Set Page Margins in Excel in Python
- Set Page Orientation in Excel in Python
- Set Paper Size in Excel in Python
- Set Print Area in Excel in Python
- Set Scaling Factor in Excel in Python
- Set FitToPages Options in Excel in Python
- Set Headers and Footers in Excel in Python
Install Spire.XLS for Python
This scenario requires Spire.XLS for Python and plum-dispatch v1.7.4. They can be easily installed in your Windows through the following pip command.
pip install Spire.XLS
If you are unsure how to install, please refer to this tutorial: How to Install Spire.XLS for Python on Windows
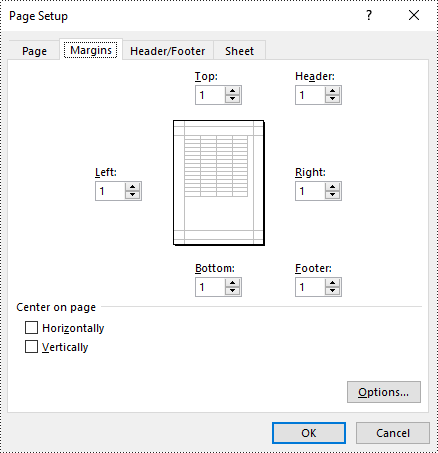
Set Page Margins in Excel in Python
In Spire.XLS for Python, the PageSetup class is used to configure page setup options for Excel worksheets. You can access the PageSetup object of a worksheet through the Worksheet.PageSetup property. Then, you can use properties like PageSetup.TopMargin, PageSetup.BottomMargin, PageSetup.LeftMargin, PageSetup.RightMargin, PageSetup.HeaderMarginInch, and PageSetup.FooterMarginInch to set the respective margins for the worksheet. The detailed steps are as follows:
- Create an object of the Workbook class.
- Load an Excel file using Workbook.LoadFromFile() method.
- Get a specific worksheet using Workbook.Worksheets[index] property.
- Access the PageSetup object of the worksheet using Worksheet.PageSetup property.
- Set the top, bottom, left, right, header, and footer margins using PageSetup.TopMargin, PageSetup.BottomMargin, PageSetup.LeftMargin, PageSetup.RightMargin, PageSetup.HeaderMarginInch, and PageSetup.FooterMarginInch properties.
- Save the modified workbook to a new file using Workbook.SaveToFile() method.
- Python
from spire.xls import *
from spire.xls.common import *

# Create a Workbook object
workbook = Workbook()
# Load an Excel file
workbook.LoadFromFile("Sample.xlsx")

# Get the first worksheet
sheet = workbook.Worksheets[0]

# Get the PageSetup object of the worksheet
pageSetup = sheet.PageSetup

# Set top, bottom, left, and right page margins for the worksheet
# The measure of the unit is Inch (1 inch = 2.54 cm)
pageSetup.TopMargin = 1
pageSetup.BottomMargin = 1
pageSetup.LeftMargin = 1
pageSetup.RightMargin = 1
pageSetup.HeaderMarginInch= 1
pageSetup.FooterMarginInch= 1

# Save the modified workbook to a new file
workbook.SaveToFile("SetPageMargins.xlsx", ExcelVersion.Version2016)
workbook.Dispose()
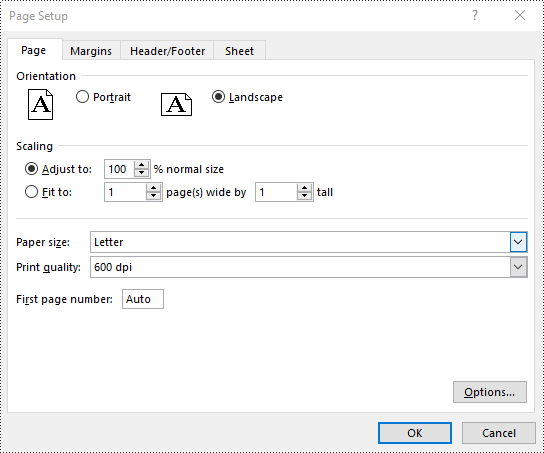
Set Page Orientation in Excel in Python
To set the page orientation for an Excel worksheet, you can use the PageSetup.Orientation property. The detailed steps are as follows.
- Create an object of the Workbook class.
- Load an Excel file using Workbook.LoadFromFile() method.
- Get a specific worksheet using Workbook.Worksheets[index] property.
- Access the PageSetup object of the worksheet using Worksheet.PageSetup property.
- Set the page orientation using PageSetup.Orientation property.
- Save the modified workbook to a new file using Workbook.SaveToFile() method.
- Python
from spire.xls import *
from spire.xls.common import *

# Create a Workbook object
workbook = Workbook()
# Load an Excel file
workbook.LoadFromFile("Sample.xlsx")

# Get the first worksheet
sheet = workbook.Worksheets[0]

# Get the PageSetup object of the worksheet
pageSetup = sheet.PageSetup

# Set the page orientation for printing the worksheet to landscape mode
pageSetup.Orientation = PageOrientationType.Landscape

# Save the modified workbook to a new file
workbook.SaveToFile("SetPageOrientation.xlsx", ExcelVersion.Version2016)
workbook.Dispose()
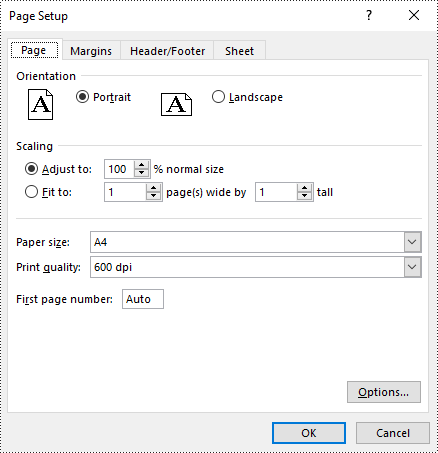
Set Paper Size in Excel in Python
You can set a wide range of paper sizes, such as A3, A4, A5, B4, B5, Letter, Legal, and Tabloid for printing an Excel worksheet using the PageSetup.PaperSize property. The detailed steps are as follows:
- Create an object of the Workbook class.
- Load an Excel file using Workbook.LoadFromFile() method.
- Get a specific worksheet using Workbook.Worksheets[index] property.
- Access the PageSetup object of the worksheet using Worksheet.PageSetup property.
- Set the paper size using PageSetup.PaperSize property.
- Save the modified workbook to a new file using Workbook.SaveToFile() method.
- Python
from spire.xls import *
from spire.xls.common import *

# Create a Workbook object
workbook = Workbook()
# Load an Excel file
workbook.LoadFromFile("Sample.xlsx")

# Get the first worksheet
sheet = workbook.Worksheets[0]

# Get the PageSetup object of the worksheet
pageSetup = sheet.PageSetup

# Set the paper size to A4
pageSetup.PaperSize = PaperSizeType.PaperA4

# Save the modified workbook to a new file
workbook.SaveToFile("SetPaperSize.xlsx", ExcelVersion.Version2016)
workbook.Dispose()
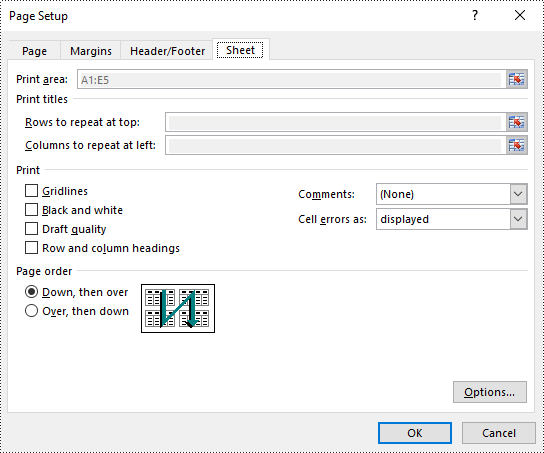
Set Print Area in Excel in Python
The print area of an Excel worksheet can be customized using the PageSetup.PringArea property. The detailed steps are as follows.
- Create an object of the Workbook class.
- Load an Excel file using Workbook.LoadFromFile() method.
- Get a specific worksheet using Workbook.Worksheets[index] property.
- Access the PageSetup object of the worksheet using Worksheet.PageSetup property.
- Set the print area using PageSetup.PringArea property.
- Save the modified workbook to a new file using Workbook.SaveToFile() method.
- Python
from spire.xls import *
from spire.xls.common import *

# Create a Workbook object
workbook = Workbook()
# Load an Excel file
workbook.LoadFromFile("Sample.xlsx")

# Get the first worksheet
sheet = workbook.Worksheets[0]

# Get the PageSetup object of the worksheet
pageSetup = sheet.PageSetup

# Set the print area of the worksheet to "A1:E5"
pageSetup.PrintArea = "A1:E5"

# Save the modified workbook to a new file
workbook.SaveToFile("SetPrintArea.xlsx", ExcelVersion.Version2016)
workbook.Dispose()
Set Scaling Factor in Excel in Python
You can scale the content of a worksheet to a specific percentage of its original size with the PageSetup.Zoom property. The detailed steps are as follows.
- Create an object of the Workbook class.
- Load an Excel file using Workbook.LoadFromFile() method.
- Get a specific worksheet using Workbook.Worksheets[index] property.
- Access the PageSetup object of the worksheet using Worksheet.PageSetup property.
- Set the scaling factor using PageSetup.Zoom property.
- Save the modified workbook to a new file using Workbook.SaveToFile() method.
- Python
from spire.xls import *
from spire.xls.common import *

# Create a Workbook object
workbook = Workbook()
# Load an Excel file
workbook.LoadFromFile("Sample.xlsx")

# Get the first worksheet
sheet = workbook.Worksheets[0]

# Get the PageSetup object of the worksheet
pageSetup = sheet.PageSetup

# Set the scaling factor of the worksheet to 90%
pageSetup.Zoom = 90

# Save the modified workbook to a new file
workbook.SaveToFile("SetScalingFactor.xlsx", ExcelVersion.Version2016)
workbook.Dispose()

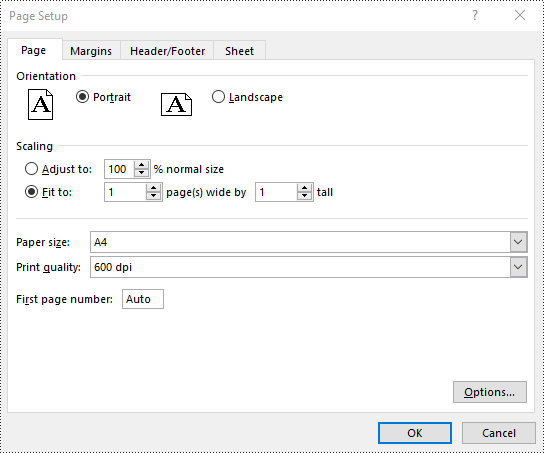
Set FitToPages Options in Excel in Python
In addition to scaling the content of a worksheet to a specific percentage of its original size, you can also fit the content of a worksheet to a specific number of pages using PageSetup.FitToPagesTall and PageSetup.FitToPagesWide properties. The detailed steps are as follows.
- Create an object of the Workbook class.
- Load an Excel file using Workbook.LoadFromFile() method.
- Get a specific worksheet using Workbook.Worksheets[index] property.
- Access the PageSetup object of the worksheet using Worksheet.PageSetup property.
- Fit the content of the worksheet to one page using PageSetup.FitToPagesTall and PageSetup.FitToPagesWide properties.
- Save the modified workbook to a new file using Workbook.SaveToFile() method.
- Python
from spire.xls import *
from spire.xls.common import *

# Create a Workbook object
workbook = Workbook()
# Load an Excel file
workbook.LoadFromFile("Sample.xlsx")

# Get the first worksheet
sheet = workbook.Worksheets[0]

# Get the PageSetup object of the worksheet
pageSetup = sheet.PageSetup

# Fit the content of the worksheet within one page vertically (i.e., all rows will fit on a single page)
pageSetup.FitToPagesTall = 1
# Fit the content of the worksheet within one page horizontally (i.e., all columns will fit on a single page)
pageSetup.FitToPagesWide = 1

# Save the modified workbook to a new file
workbook.SaveToFile("FitToPages.xlsx", ExcelVersion.Version2016)
workbook.Dispose()
Set Headers and Footers in Excel in Python
For setting headers and footers in Excel, please check this article: Python: Add Headers and Footers to Excel.
Apply for a Temporary License
If you'd like to remove the evaluation message from the generated documents, or to get rid of the function limitations, please request a 30-day trial license for yourself.
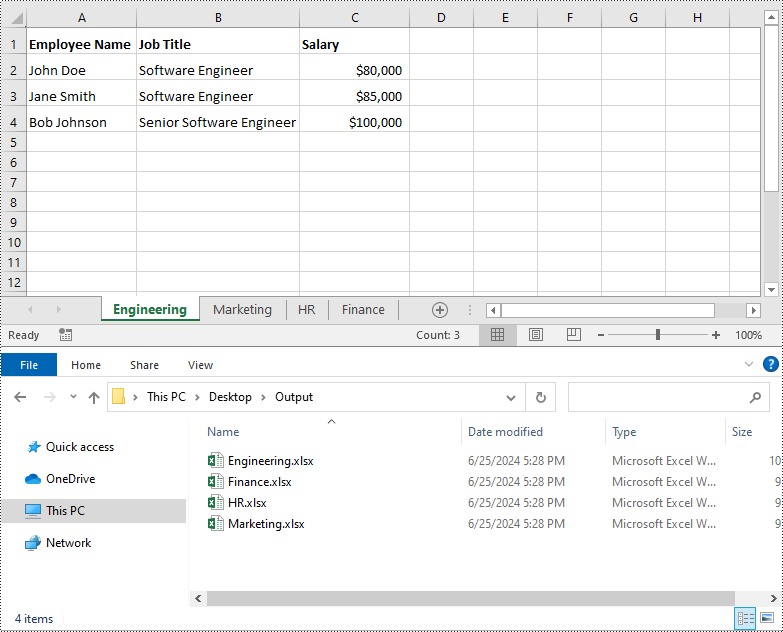
Working with large Excel workbooks can sometimes become unwieldy, especially when you need to share or distribute parts of the data independently. In these cases, it can be helpful to split your Excel file into multiple smaller files. This not only makes the individual files more manageable, but also allows you to better organize and share your data. In this article, we will demonstrate how to split an Excel file in Python using Spire.XLS for Python.
Install Spire.XLS for Python
This scenario requires Spire.XLS for Python and plum-dispatch v1.7.4. They can be easily installed in your Windows through the following pip command.
pip install Spire.XLS
If you are unsure how to install, please refer to this tutorial: How to Install Spire.XLS for Python on Windows
Split Excel by Worksheets in Python
If your Excel file contains multiple worksheets, you can easily split each sheet into an Excel file by using the Workbook.Worksheets.AddCopy() method provided by Spire.XLS for Python. The detailed steps are as follows.
- Create an object of the Workbook class.
- Load an Excel file using Workbook.LoadFromFile() method.
- Iterate through the worksheets in the Excel file.
- For each worksheet, create a new Workbook object for it.
- Remove the default worksheets in the new workbook using Workbook.Worksheets.Clear() method.
- Copy the worksheet to the new workbook using Workbook.Worksheets.AddCopy() method.
- Save the new workbook to an Excel file using Workbook.SaveToFile() method.
- Python
from spire.xls import *
from spire.xls.common import *

# Create an object of the Workbook class
workbook = Workbook()
# Load an Excel file
workbook.LoadFromFile("Sample.xlsx")

# Specify the folder path for the generated Excel files
folderPath = "C:\\Users\\Administrator\\Desktop\\Output\\"

# Iterate through all worksheets in the Excel file
for worksheet in workbook.Worksheets:
    # For each worksheet, create a new Workbook object
    newWorkbook = Workbook()
    # Remove the worksheets from the new workbook
    newWorkbook.Worksheets.Clear()

    # Copy the worksheet from the Excel file to the new workbook
    newWorkbook.Worksheets.AddCopy(worksheet)

    # Save the new workbook to the specified folder
    newWorkbook.SaveToFile(folderPath + worksheet.Name + ".xlsx", FileFormat.Version2016)

workbook.Dispose()
Split Excel by Rows in Python
If you have a large worksheet where a specific number of rows represent a unique record or entry, you can extract these individual rows or records into separate Excel files for focused data analysis using the Worksheet.CopyRow() method. The detailed steps are as follows.
- Create an object of the Workbook class.
- Load an Excel file using Workbook.LoadFromFile() method.
- Get the original worksheet where you want to copy rows from using Workbook.Worksheets[index] property.
- Create a new Workbook object and remove the default worksheets from the new workbook using Workbook.Worksheets.Clear() method.
- Add a new Worksheet to the new workbook using Workbook.Worksheets.Add() method.
- Copy specific rows from the original worksheet to the new worksheet using Worksheet.CopyRow() method.
- Copy Column widths from the original worksheet to the new worksheet.
- Save the new workbook to an Excel file using Workbook.SaveToFile() method.
- Python
from spire.xls import *
from spire.xls.common import *

# Create a Workbook object and load an Excel file
workbook = Workbook()
workbook.LoadFromFile("Sample.xlsx")
# Get the original (the 1st) worksheet
worksheet = workbook.Worksheets[0]
# Get the header row
header = worksheet.Rows[0]

# Specify the folder path for the generated Excel files
folderPath = "C:\\Users\\Administrator\\Desktop\\Output\\"

# Create a new Workbook object
newWorkbook1 = Workbook()
# Remove the default worksheets
newWorkbook1.Worksheets.Clear()
# Add a new worksheet
newWorksheet1 = newWorkbook1.Worksheets.Add("Sheet1")
# Copy rows 1-5 from the original worksheet to the new worksheet
for i in range(1, 6):
    worksheet.CopyRow(worksheet.Rows[i - 1], newWorksheet1, newWorksheet1.LastDataRow + 1, CopyRangeOptions.All)
# Copy column widths from the original worksheet to the new worksheet
for i in range(worksheet.Columns.Count):
    newWorksheet1.SetColumnWidth(i + 1, worksheet.GetColumnWidth(i + 1))
# Save the new workbook to the specified folder
newWorkbook1.SaveToFile(folderPath + "Rows1-5.xlsx", FileFormat.Version2016)
newWorkbook1.Dispose()

# Create a new Workbook object
newWorkbook2 = Workbook()
# Remove the default worksheets
newWorkbook2.Worksheets.Clear()
# Add a new worksheet
newWorksheet2 = newWorkbook2.Worksheets.Add("Sheet1")
# Copy header row from the original worksheet to the new worksheet
worksheet.CopyRow(worksheet.Rows[0], newWorksheet2, newWorksheet2.LastDataRow + 1, CopyRangeOptions.All)
# Copy rows 6-10 from the original worksheet to the new worksheet
for i in range(6, 11):
    worksheet.CopyRow(worksheet.Rows[i - 1], newWorksheet2, newWorksheet2.LastDataRow + 1, CopyRangeOptions.All)
# Copy column widths from the original worksheet to the new worksheet
for i in range(worksheet.Columns.Count):
    newWorksheet2.SetColumnWidth(i + 1, worksheet.GetColumnWidth(i + 1))
# Save the new workbook to the specified folder
newWorkbook2.SaveToFile(folderPath + "Rows6-10.xlsx", FileFormat.Version2016)
newWorkbook2.Dispose()
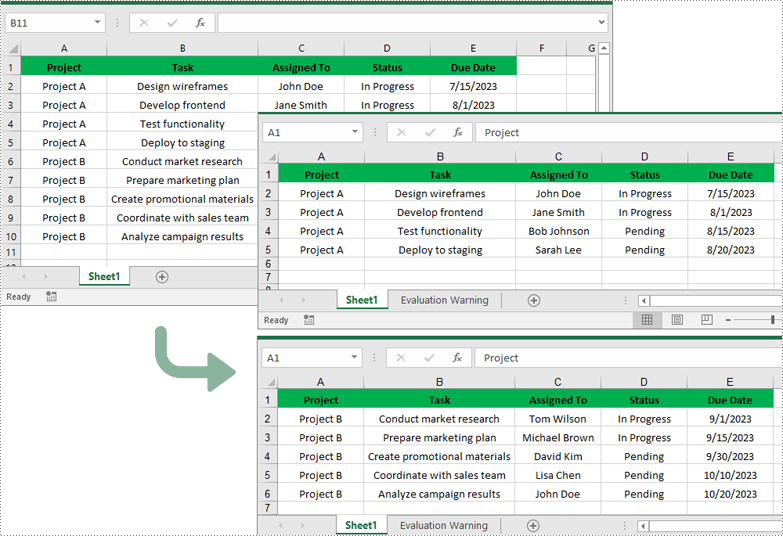
Split Excel by Columns in Python
In addition to splitting by rows, you can also split an Excel file by columns using the Worksheet.CopyColumn() method. The detailed steps are as follows.
- Create an object of the Workbook class.
- Load an Excel file using Workbook.LoadFromFile() method.
- Get the original worksheet where you want to copy columns from using Workbook.Worksheets[index] property.
- Create a new Workbook object and remove the default worksheets from the new workbook using Workbook.Worksheets.Clear() method.
- Add a new Worksheet to the new workbook using Workbook.Worksheets.Add() method.
- Copy specific columns from the original worksheet to the new worksheet using Worksheet.CopyColumn() method.
- Copy row heights from the original worksheet to the new worksheet.
- Save the new workbook to an Excel file using Workbook.SaveToFile() method.
- Python
from spire.xls import *
from spire.xls.common import *

# Create a Workbook object and load an Excel file
workbook = Workbook()
workbook.LoadFromFile("Sample.xlsx")
# Get the original (the 1st) worksheet
worksheet = workbook.Worksheets[0]

# Specify the folder path for the generated Excel files
folderPath = "C:\\Users\\Administrator\\Desktop\\Output\\"

# Create a new Workbook object
newWorkbook1 = Workbook()
# Remove the default worksheets
newWorkbook1.Worksheets.Clear()
# Add a new worksheet
newWorksheet1 = newWorkbook1.Worksheets.Add("Sheet1")
# Copy columns 1-2 from the original worksheet to the new worksheet
for i in range(1, 3):
    worksheet.CopyColumn(worksheet.Columns[i-1], newWorksheet1, newWorksheet1.LastDataColumn + 1, CopyRangeOptions.All)
# Copy row heights from the original worksheet to the new worksheet
for i in range(worksheet.Rows.Count):
    newWorksheet1.SetRowHeight(i + 1, worksheet.GetRowHeight(i + 1))
# Save the new workbook to the specified folder
newWorkbook1.SaveToFile(folderPath + "Columns1-2.xlsx", FileFormat.Version2016)
newWorkbook1.Dispose()

# Create a new Workbook object
newWorkbook2 = Workbook()
# Remove the default worksheets
newWorkbook2.Worksheets.Clear()
# Add a new worksheet
newWorksheet2 = newWorkbook2.Worksheets.Add("Sheet1")
# Copy columns 3-5 from the original worksheet to the new worksheet
for i in range(3, 6):
    worksheet.CopyColumn(worksheet.Columns[i-1], newWorksheet2, newWorksheet2.LastDataColumn + 1, CopyRangeOptions.All)

# Copy row heights from the original worksheet to the new worksheet
for i in range(worksheet.Rows.Count):
    newWorksheet2.SetRowHeight(i + 1, worksheet.GetRowHeight(i + 1))
# Save the new workbook to the specified folder
newWorkbook2.SaveToFile(folderPath + "Columns3-5.xlsx", FileFormat.Version2016)
newWorkbook2.Dispose()
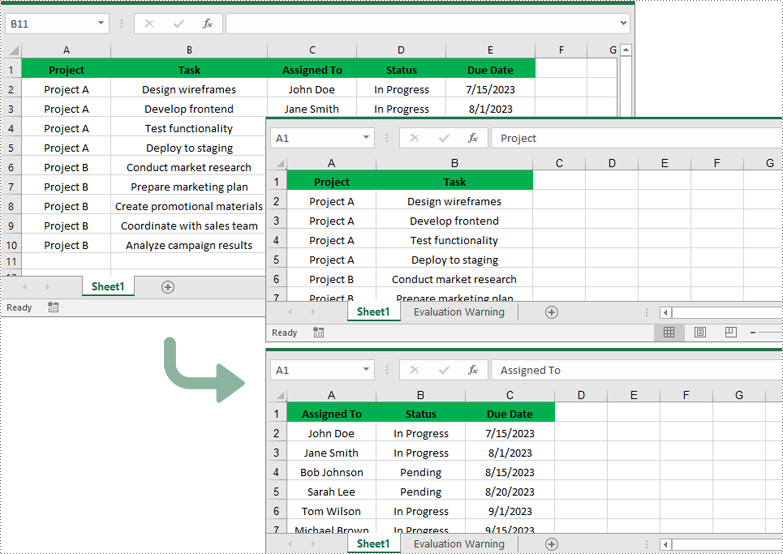
Apply for a Temporary License
If you'd like to remove the evaluation message from the generated documents, or to get rid of the function limitations, please request a 30-day trial license for yourself.
Document properties provide additional information about an Excel file, such as author, title, subject, and other metadata associated with the file. Retrieving these properties from Excel can help users gain insight into the file content and history, enabling better organization and management of files. At times, users may also need to remove document properties to protect the privacy and confidentiality of the information contained in the file. In this article, you will learn how to read or remove document properties in Excel in Python using Spire.XLS for Python.
- Read Standard and Custom Document Properties in Excel
- Remove Standard and Custom Document Properties in Excel
Install Spire.XLS for Python
This scenario requires Spire.XLS for Python and plum-dispatch v1.7.4. They can be easily installed in your Windows through the following pip command.
pip install Spire.XLS
If you are unsure how to install, please refer to this tutorial: How to Install Spire.XLS for Python on Windows
Read Standard and Custom Document Properties in Excel in Python
Excel properties are divided into two main categories:
- Standard Properties: These are predefined properties that are built into Excel files. They typically include basic details about the file such as title, subject, author, keywords, etc.
- Custom Properties: These are user-defined attributes that can be added to Excel to track additional information about the file based on your specific needs.
Spire.XLS for Python allows to read both the standard and custom document properties of an Excel file. The following are the detailed steps:
- Create a Workbook instance.
- Load an Excel file using Workbook.LoadFromFile() method.
- Create a StringBuilder instance.
- Get a collection of all standard document properties using Workbook.DocumentProperties property.
- Get specific standard document properties using the properties of the BuiltInDocumentProperties class and append them to the StringBuilder instance.
- Get a collection of all custom document properties using Workbook.CustomDocumentProperties property.
- Iterate through the collection.
- Get the name, type, and value of each custom document property using ICustomDocumentProperties[].Name, ICustomDocumentProperties[].PropertyType and ICustomDocumentProperties[].Value properties.
- Determine the specific property type, and then convert the property value to the value of the corresponding data type.
- Append the property name and converted property value to the StringBuilder instance using StringBuilde.append() method.
- Write the content of the StringBuilder instance into a txt file.
- Python
from spire.xls import *
from spire.xls.common import *

def AppendAllText(fname: str, text: List[str]):
    fp = open(fname, "w")
    for s in text:
        fp.write(s + "\n")
    fp.close()

inputFile = "Budget Template.xlsx"
outputFile = "GetExcelProperties.txt"

# Create a Workbook instance
workbook = Workbook()

# Load an Excel document from disk
workbook.LoadFromFile(inputFile)

# Create a StringBuilder instance
builder = []

# Get a collection of all standard document properties
standardProperties = workbook.DocumentProperties

# Get specific standard properties and append them to the StringBuilder instance
builder.append("Standard Document Properties:")
builder.append("Title: " + standardProperties.Title)
builder.append("Subject: " + standardProperties.Subject)
builder.append("Category: " + standardProperties.Category)
builder.append("Keywords: " + standardProperties.Keywords)
builder.append("Comments: " + standardProperties.Comments)
builder.append("")

# Get a collection of all custom document properties
customProperties = workbook.CustomDocumentProperties

builder.append("Custom Properties:")
# Iterate through the collection
for i in range(len(customProperties)):

    # Get the name, type, and value of each custom document property
    name = customProperties[i].Name
    type = customProperties[i].PropertyType
    obj = customProperties[i].Value

    # Determine the specific property type, and then convert the property value to the value of the corresponding data type
    value = None
    if type == PropertyType.Double:
        value = Double(obj).Value
    elif type == PropertyType.DateTime:
        value = DateTime(obj).ToShortDateString()
    elif type == PropertyType.Bool:
        value = Boolean(obj).Value
    elif type == PropertyType.Int:
        value = Int32(obj).Value
    elif type == PropertyType.Int32:
        value = Int32(obj).Value
    else:
        value = String(obj).Value

    # Append the property name and converted property value to the StringBuilder instance
    builder.append(name + ": " + str(value))

# Write the content of the StringBuilder instance into a text file
AppendAllText(outputFile, builder)
workbook.Dispose()
Remove Standard and Custom Document Properties in Excel in Python
You can easily delete standard document properties from an Excel file by setting their values as empty. For custom document properties, you can use the ICustomDocumentProperties.Remove() method to delete them. The following are the detailed steps:
- Create a Workbook instance.
- Load a sample Excel file using Workbook.LoadFromFile() method.
- Get a collection of all standard document properties using Workbook.DocumentProperties property.
- Set the values of specific standard document properties as empty through the corresponding properties of the BuiltInDocumentProperties class.
- Get a collection of all custom document properties using Workbook.CustomDocumentProperties property.
- Iterate through the collection.
- Delete each custom property from the collection by its name using ICustomDocumentProperties.Remove() method.
- Save the result file using Workbook.SaveToFile() method.
- Python
from spire.xls import *
from spire.xls.common import *

inputFile = "Budget Template.xlsx"
outputFile = "RemoveExcelProperties.xlsx"

# Create a Workbook instance
workbook = Workbook()

# Load an Excel document from disk
workbook.LoadFromFile(inputFile)

# Get a collection of all standard document properties
standardProperties = workbook.DocumentProperties

# Set the value of each standard document property as empty
standardProperties.Title = ""
standardProperties.Subject = ""
standardProperties.Category = ""
standardProperties.Keywords = ""
standardProperties.Comments = ""

# Get a collection of all custom document properties
customProperties = workbook.CustomDocumentProperties

# Iterate through the collection
for i in range(len(customProperties) - 1, -1, -1):
    # Delete each custom document property from the collection by its name
    customProperties.Remove(customProperties[i].Name)

# Save the result file
workbook.SaveToFile(outputFile, ExcelVersion.Version2016)
workbook.Dispose()
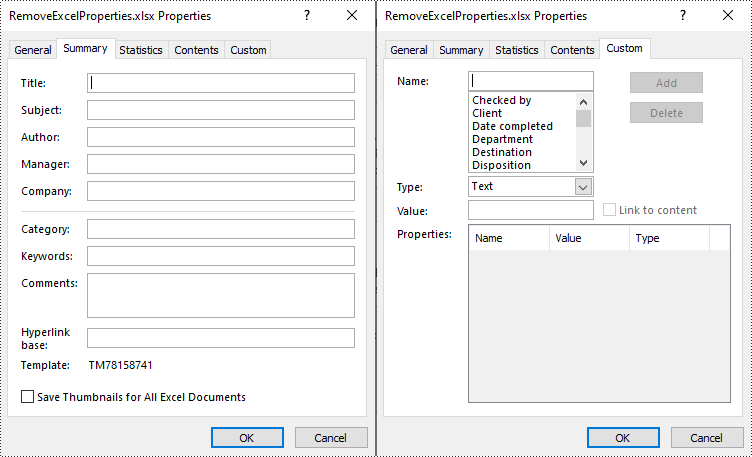
Apply for a Temporary License
If you'd like to remove the evaluation message from the generated documents, or to get rid of the function limitations, please request a 30-day trial license for yourself.

Excel’s AutoFilter feature is a powerful tool that allows you to quickly filter worksheet data based on specific criteria. When applying auto filter to a range of cells, you can display only those rows that meet certain conditions and hide the rest of the data.
However, while filters simplify workflows, knowing how to remove auto filters in Excel is equally critical to maintaining accurate, accessible, and error-free datasets. In this article, you will learn how to add or remove AutoFilters in Excel in Python using Spire.XLS for Python library.
- Installation Guide for Spire.XLS for Python
- How to Use Excel Auto Filters in Python
- How to Remove Auto Filters in Excel
- Conclusion
Installation Guide for Spire.XLS for Python
Spire.XLS for Python is a robust library that enables developers to automate AutoFilter operations in Excel, including adding or removing auto filters.
To install the Python library, open your terminal or command prompt and run the following:
pip install Spire.XLSThe pip tool will search for the latest version of the Spire.XLS library on the Python Package Index (PyPI) and then download and install it along with any necessary dependencies.
How to Use Excel Auto Filters in Python
Add AutoFilter in Excel in Python
Excel AutoFilter can be applied to entire columns or specified cell ranges. The following are the core properties used:
- Worksheet.AutoFilters property: Gets a collection of auto filters in the worksheet, and return an AutoFiltersCollection object.
- AutoFiltersCollection.Range property: Specify the cell range to be filtered.
Code Example:
- Python
from spire.xls import *
from spire.xls.common import *

inputFile = "Data.xlsx"
outputFile = "ExcelAutoFilter.xlsx"

# Create a Workbook instance
workbook = Workbook()

# Load an Excel file
workbook.LoadFromFile(inputFile)

# Get the first worksheet
sheet = workbook.Worksheets[0]

# Create an AutoFilter in the sheet and specify the range to be filtered
sheet.AutoFilters.Range = sheet.Range["A1:C1"]

# Save the result file
workbook.SaveToFile(outputFile, ExcelVersion.Version2016)
workbook.Dispose()Result: Dropdown arrows appear in the header row for filtering.
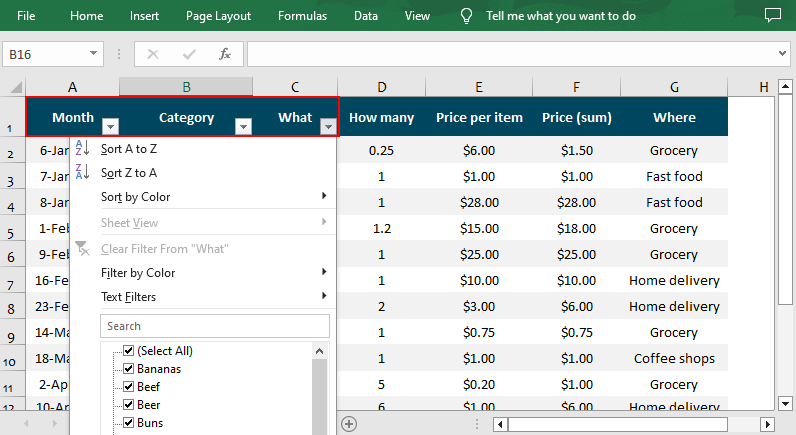
Different Excel Filter Types in Spire.XLS
The AutoFiltersCollection class of the Spire.XLS for Python library offers various methods for you to filter data in Excel in different ways. Check below for the details:
| Filters | Details |
| Filter text data | Use the AddFilter() to filter cells that contain specified text content. |
| Filter dates | Use the AddDateFilter() method to filter dates associated with the specified year/month/date, etc. |
| Filter blank / non-blank cells |
|
| Filter by color |
|
| Custom filter | Use the CustomFilter() method to filter by the custom criteria. |
Apply Custom Auto Filter in Excel in Python
After adding one of the above filters, you can use the AutoFiltersCollection.Filter() method to apply the filter within the given range. The following is a code example of applying a custom AutoFilter to filter data that is not equal to the specified text string.
- Python
from spire.xls import *
from spire.xls.common import *

inputFile = "Data.xlsx"
outputFile = "CustomFilter.xlsx"

# Create a Workbook instance
workbook = Workbook()

#Load an Excel file
workbook.LoadFromFile(inputFile)

#Get the first worksheet
sheet = workbook.Worksheets[0]

# Create an auto filter in the sheet and specify the range to be filtered
sheet.AutoFilters.Range = sheet.Range["B1:B12"]

# Get the column to be filtered
filtercolumn = sheet.AutoFilters[0]

# Add a custom filter to filter data that does not contain the string "Drinks"
strCrt = String("Drinks")
sheet.AutoFilters.CustomFilter(filtercolumn , FilterOperatorType.NotEqual, strCrt)

# Apply the filter
sheet.AutoFilters.Filter()

# Save the result file
workbook.SaveToFile(outputFile, ExcelVersion.Version2016)
workbook.Dispose()Result: Only cells that are not equal to the string “Drinks” are visible.
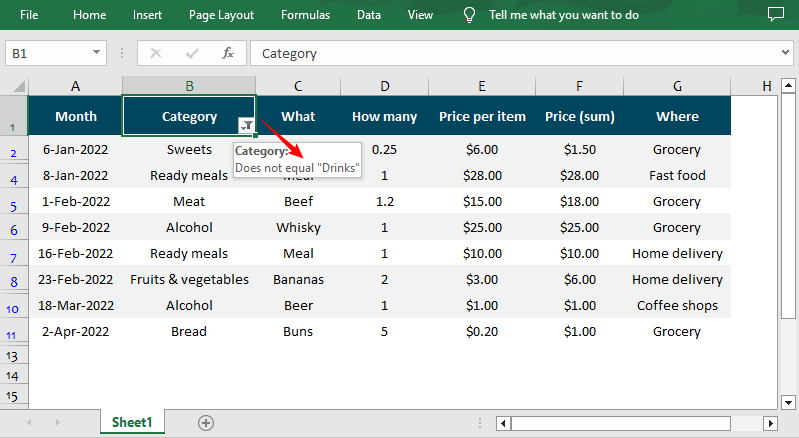
How to Remove Auto Filters in Excel in Python
AutoFilters are great for focusing on specific data, but leaving them active can lead to critical issues. Removing auto filters ensures:
- Full data disclosure: All rows/columns are visible.
- Consistent formatting: Eliminates dropdown arrows for a cleaner look.
- Avoid confusion: Prevents recipients from misinterpreting filtered data as the complete dataset.
Spire.XLS for Python provides the AutoFiltersCollection.Clear() method to remove or delete all AutoFilters from an Excel worksheet. Here’s the complete code example:
- Python
from spire.xls import *
from spire.xls.common import *

inputFile = "CustomFilter.xlsx"
outputFile = "RemoveAutoFilter.xlsx"

# Create a Workbook instance
workbook = Workbook()

# Load an Excel file
workbook.LoadFromFile(inputFile)

# Get the first worksheet
sheet = workbook.Worksheets[0]

# Delete AutoFilter from the sheet
sheet.AutoFilters.Clear()

# Save the result file
workbook.SaveToFile(outputFile, ExcelVersion.Version2016)
workbook.Dispose()Result: All rows are visible, and AutoFilter dropdowns are removed.
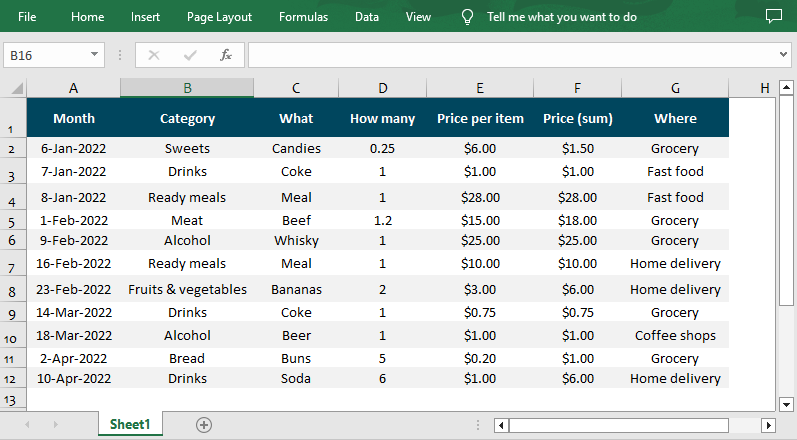
Conclusion
With Spire.XLS for Python, adding or removing auto filters in Excel becomes a seamless, automated process. This guide covered installation, basic and custom filters, and code examples to help you streamline data tasks. For more advanced features, explore the Python Excel library’s full documentation.
Get a Free License
To fully experience the capabilities of Spire.XLS for Python without any evaluation limitations, you can request a free 30-day trial license.
