
Cells (17)
Format Excel with Python: From Basics to Professional Reports
2025-09-11 09:13:41 Written by jie zou
When working with spreadsheets, readability is just as important as the data itself. A well-formatted Excel file makes it easier to analyze, present, and share information. Instead of manually adjusting styles in Excel, you can use Python for Excel formatting to automate the process and save significant time.
This tutorial shows you how to format Excel with Python using the library Spire.XLS for Python. We’ll cover basic styling, advanced formatting, and practical use cases, while also explaining the key classes and properties that make Excel formatting in Python efficient.
Here's What's Covered:
- Why Use Python for Excel Formatting
- Setting Up the Environment and Project
- Basic Excel Formatting in Python
- Extended Excel Formatting in Python
- Key APIs for Excel Styling in Python
- Use Case: Formatting an Excel Report with Python
- Conclusion
- FAQ
Why Use Python for Excel Formatting
Formatting Excel manually is time-consuming, especially when handling large datasets or generating reports dynamically. By using Python Excel formatting, you can:
- Apply consistent formatting to multiple workbooks.
- Automate repetitive tasks like setting fonts, borders, and colors.
- Generate styled reports programmatically for business or research.
- Save time while improving accuracy and presentation quality.
With Python, you can quickly build scripts that apply professional-looking styles to your spreadsheets. Next, let’s see how to set up the environment.
Setting Up the Environment and Project
To follow this tutorial, you need to install Spire.XLS for Python, a library designed for working with Excel files. It supports creating, reading, modifying, and formatting Excel documents programmatically.
Install Spire.XLS for Python
Install the library via pip:
pip install Spire.XLS
Then import it in your Python script:
from spire.xls import *
Creating or Loading an Excel Workbook
Before we start formatting, we need a workbook to work with.
Create a new workbook:
workbook = Workbook()
sheet = workbook.Worksheets[0]
Or load an existing file:
workbook = Workbook()
workbook.LoadFromFile("input.xlsx")
sheet = workbook.Worksheets[0]
After applying formatting, save the result:
workbook.SaveToFile("output/formatted_output.xlsx", ExcelVersion.Version2016)
With the workbook ready, let’s move on to formatting examples.
Basic Excel Formatting in Python
Before diving into advanced operations, it’s important to master the fundamental Excel formatting features in Python. These basic techniques—such as fonts, alignment, borders, background colors, and adjusting column widths or row heights—are the building blocks of clear, professional spreadsheets. Once familiar with them, you can combine and extend these methods to create more complex styles later.
1. Formatting Fonts
Changing font properties is one of the most frequent tasks when working with styled Excel sheets. In Spire.XLS for Python, font settings are accessed through the CellRange.Style.Font object, which lets you control the typeface, size, color, and emphasis (bold, italic, underline).
cell = sheet.Range[2, 2]
cell.Text = "Python Excel Formatting"

cell.Style.Font.FontName = "Arial"
cell.Style.Font.Size = 14
cell.Style.Font.Color = Color.get_Blue()
cell.Style.Font.IsBold = True
This modifies the text appearance directly within the cell by adjusting its style attributes.
2. Alignment and Wrapping
Cell alignment is managed through the HorizontalAlignment and VerticalAlignment properties of the Style object. In addition, the WrapText property ensures that longer text fits within a cell without overflowing.
cell = sheet.Range[4, 2]
cell.Text = "This text is centered and wrapped."

cell.Style.HorizontalAlignment = HorizontalAlignType.Center
cell.Style.VerticalAlignment = VerticalAlignType.Center
cell.Style.WrapText = True
This produces neatly centered text that remains readable even when it spans multiple lines.
3. Adding Borders
Borders are defined through the Borders collection on the Style object, where you can set the line style and color for each edge individually.
cell = sheet.Range[6, 2]
cell.Text = "Border Example"

cell.Style.Borders[BordersLineType.EdgeBottom].LineStyle = LineStyleType.Thin
cell.Style.Borders[BordersLineType.EdgeBottom].Color = Color.get_Black()
This adds a thin black line to separate the cell from the content below.
4. Background Colors
Cell background is controlled by the Style.Color property. This is often used to highlight headers or important values.
cell = sheet.Range[8, 2]
cell.Text = "Highlighted Cell"
cell.Style.Color = Color.get_Yellow()
This makes the cell stand out in the worksheet.
5. Setting Column Widths and Row Heights
Besides styling text and borders, adjusting the column widths and row heights ensures that your content fits properly without overlapping or leaving excessive blank space.
# Set specific column width
sheet.Columns[1].ColumnWidth = 20
# Set specific row height
sheet.Rows[7].RowHeight = 20
In addition to specifying widths and heights, Excel rows and columns can also be automatically adjusted to fit their content:
- Use Worksheet.AutoFitColumn(columnIndex) or Worksheet.AutoFitRow(rowIndex) to adjust a specific column or row.
- Use CellRange.AutoFitColumns() or CellRange.AutoFitRows() to adjust all columns or rows in a selected range.
This helps create well-structured spreadsheets where data is both readable and neatly aligned.
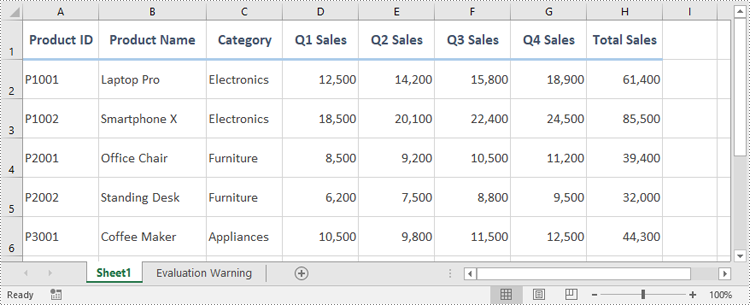
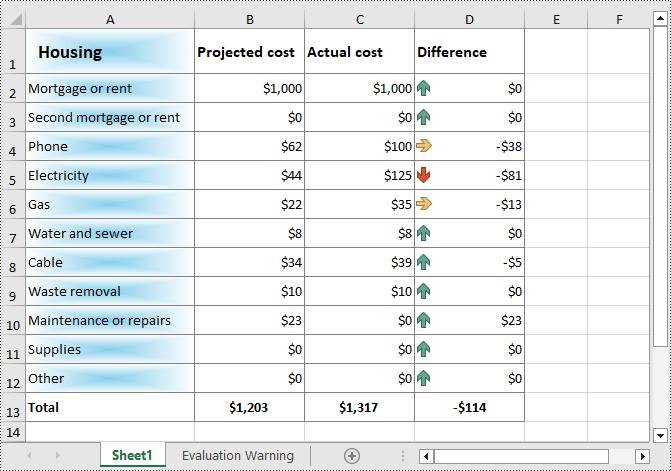
Preview of Basic Formatting Result
Here’s what the basic Excel formatting looks like in practice:
In addition to these visual styles, you can also customize how numbers, dates, or currency values are displayed—see How to Set Excel Number Format in Python for details.
Extended Excel Formatting in Python
Instead of formatting individual cells, you can also work with ranges and reusable styles. These operations typically involve the CellRange object for merging and sizing, and the Workbook.Styles collection for creating reusable Style definitions.
1. Merging Cells
Merging cells is often used to create report titles or section headers that span multiple columns.
range = sheet.Range[2, 2, 2, 4]
range.Merge()
range.Text = "Quarterly Report"
range.Style.HorizontalAlignment = HorizontalAlignType.Center
range.RowHeight = 30
Here, three columns (B2:D2) are merged into one, styled as a bold, centered title with a shaded background—perfect for highlighting key sections in a report.
2. Applying Built-in Styles
Excel comes with a set of predefined styles that can be applied quickly. In Spire.XLS, you can directly assign these built-in styles to ranges.
range.BuiltInStyle = BuiltInStyles.Heading1
This instantly applies Excel’s built-in Heading 1 style, giving the range a consistent and professional appearance without manually setting fonts, borders, or colors.
3. Creating a Custom Style and Applying It
Creating a custom style is useful when you need to apply the same formatting rules across multiple cells or sheets. The Workbook.Styles.Add() method allows you to define a named style that can be reused throughout the workbook.
# Create a custom style
custom_style = workbook.Styles.Add("CustomStyle")
custom_style.Font.FontName = "Calibri"
custom_style.Font.Size = 12
custom_style.Font.Color = Color.get_DarkGreen()
custom_style.Borders[BordersLineType.EdgeTop].LineStyle = LineStyleType.MediumDashDot

# Apply style to a cell
cell = sheet.Range[4, 2]
cell.Text = "Custom Style Applied"
cell.Style = custom_style
This method makes Excel style management in Python more efficient, especially when working with large datasets.
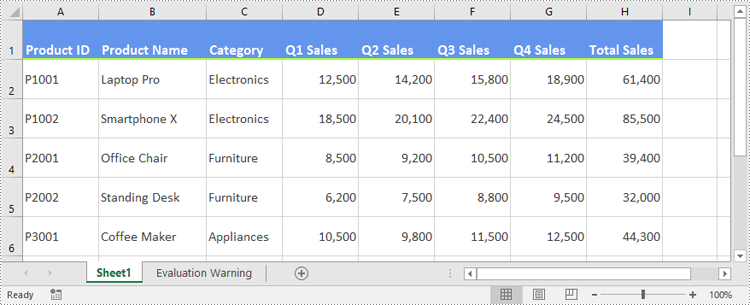
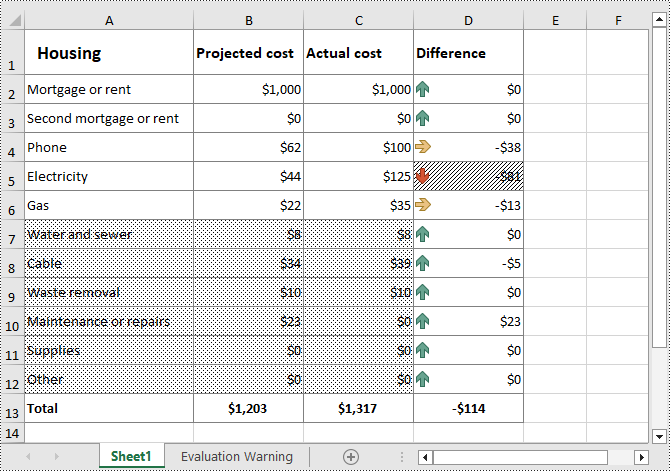
Preview of Advanced Formatting Result
Below is an example showing the results of merged cells, built-in styles, and a custom style applied:
For highlighting data patterns and trends, you can also use conditional rules—see How to Apply Conditional Formatting in Python Excel.
Key APIs for Excel Styling in Python
After exploring both basic and advanced formatting examples, it’s helpful to step back and look at the core classes, properties, and methods that make Excel styling in Python possible. Understanding these elements will give you the foundation to write scripts that are flexible, reusable, and easier to maintain.
The following table summarizes the most important classes, properties, and methods for formatting Excel with Python. You can use it as a quick reference whenever you need to recall the key styling options.
| Class / Property / Method | Description |
|---|---|
| Workbook / Worksheet | Represent Excel files and individual sheets. |
| Workbook.LoadFromFile() / SaveToFile() | Load and save Excel files. |
| Workbook.Styles.Add() | Create and define a custom reusable style that can be applied across cells. |
| CellRange | Represents one or more cells; used for applying styles or formatting. |
| CellRange.Style | Represents formatting information (font, alignment, borders, background, text wrapping, etc.). |
| CellRange.Merge() | Merge multiple cells into a single cell. |
| CellRange.BuiltInStyle | Apply one of Excel’s predefined built-in styles (e.g., Heading1). |
| CellRange.BorderAround() / BorderInside() | Apply border formatting to the outside or inside of a range. |
| CellRange.ColumnWidth / RowHeight | Adjust the width of columns and the height of rows. |
| CellRange.NumberFormat | Defines the display format for numbers, dates, or currency. |
With these building blocks, you can handle common formatting tasks—such as fonts, borders, alignment, colors, and number formats—in a structured and highly customizable way. This ensures that your spreadsheets look professional, remain easy to manage, and can be consistently styled across different Python automation projects. For more details, see the Spire.XLS for Python API reference.
Real-World Use Case: Formatting an Annual Excel Sales Report with Python
Now that we’ve explored both basic and advanced Excel formatting techniques, let’s apply them in a real-world scenario. The following example demonstrates how to generate a comprehensive Excel annual sales report with Python. By combining structured data, regional breakdowns, and advanced formatting, the report becomes much easier to interpret and presents business data in a clear and professional way.
from spire.xls import *

workbook = Workbook()
sheet = workbook.Worksheets[0]
sheet.Name = "Sales Report"

# Report title
title = sheet.Range[1, 1, 1, 7]
title.Merge()
title.Text = "Annual Sales Report - 2024"
title.Style.Font.IsBold = True
title.Style.Font.Size = 16
title.Style.HorizontalAlignment = HorizontalAlignType.Center
title.Style.Color = Color.get_LightGray()
title.RowHeight = 30

# Data
data = [
    ["Product", "Region", "Q1", "Q2", "Q3", "Q4", "Total"],
    ["Laptop", "North", 1200, 1500, 1300, 1600, 5600],
    ["Laptop", "South", 1000, 1200, 1100, 1300, 4600],
    ["Tablet", "North", 800, 950, 1000, 1200, 3950],
    ["Tablet", "South", 700, 850, 900, 1000, 3450],
    ["Phone", "North", 2000, 2200, 2100, 2500, 8800],
    ["Phone", "South", 1800, 1900, 2000, 2200, 7900],
    ["Accessories", "All", 600, 750, 720, 900, 2970],
    ["", "", "", "", "", "Grand Total", 39370]
]

for r in range(len(data)):
    for c in range(len(data[r])):
        sheet.Range[r+2, c+1].Text = str(data[r][c])

# Header formatting
header = sheet.Range[2, 1, 2, 7]
header.Style.Font.IsBold = True
header.Style.Color = Color.get_LightBlue()
header.Style.HorizontalAlignment = HorizontalAlignType.Center
header.Style.Borders[BordersLineType.EdgeBottom].LineStyle = LineStyleType.Thin

# Numeric columns as currency
for row in range(3, 10):
    for col in range(3, 8):
        cell = sheet.Range[row, col]
        if cell.Text.isdigit():
            cell.NumberValue = float(cell.Text)
            cell.NumberFormat = "$#,##0"

# Highlight totals
grand_total = sheet.Range[10, 7]
grand_total.Style.Color = Color.get_LightYellow()
grand_total.Style.Font.IsBold = True

# Freeze the first row and the first two columns
sheet.FreezePanes(2, 3)

# Auto fit columns
sheet.AllocatedRange.AutoFitColumns()

workbook.SaveToFile("output/annual_sales_report.xlsx", ExcelVersion.Version2016)
This script combines several formatting techniques—such as a merged and styled title, bold headers with borders, currency formatting, highlighted totals, and frozen panes—into a single workflow. Applying these styles programmatically improves readability and ensures consistency across every report, which is especially valuable for business and financial data.
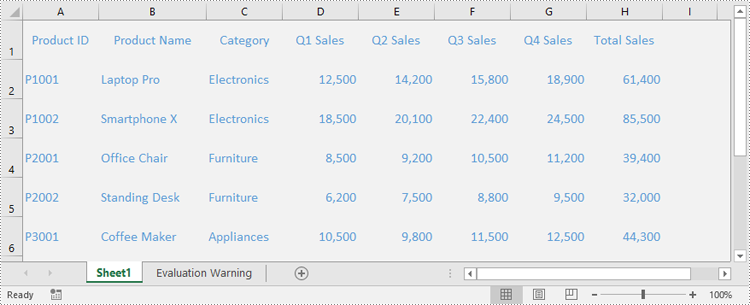
Here’s the final styled annual sales report generated with Python:
Conclusion
Formatting Excel with Python is a practical way to automate report generation and ensure professional presentation of data. By combining basic styling with advanced techniques like custom styles and column adjustments, you can create clear, consistent, and polished spreadsheets.
Whether you are working on financial reports, research data, or business dashboards, formatting Excel with Python helps you save time while maintaining presentation quality. With the right use of styles, properties, and formatting options, your spreadsheets will not only contain valuable data but also deliver it in a visually effective way.
You can apply for a free temporary license to unlock the full functionality of Spire.XLS for Python or try Free Spire.XLS for Python to get started quickly.
FAQ - Excel Fpormatting in Python
Q1: Can you format Excel with Python?
Yes. Python provides libraries that allow you to apply fonts, colors, borders, alignment, conditional formatting, and more to Excel files programmatically.
Q2: How to do formatting in Python?
For Excel formatting, you can use a library such as Spire.XLS for Python. It lets you change fonts, set alignment, adjust column widths, merge cells, and apply custom or built-in styles through code.
Q3: Can I use Python to edit Excel?
Yes. Python can not only format but also create, read, modify, and save Excel files, making it useful for dynamic reporting and data automation.
Q4: What’s the best way to automate repeated Excel styling tasks?
Define custom styles or reusable functions that standardize formatting rules across multiple workbooks and sheets. This ensures consistency and saves time.
Applying styles is one of the simplest ways to enhance the professionalism and readability of Excel spreadsheets. Excel provides a wide range of built-in styles that allow users to quickly format cells, ranges, or worksheets. Additionally, users can create custom styles to specify fonts, colors, borders, number formats, and more, tailored to their individual preferences. Whether you're designing professional reports, sales presentations, or project management plans, knowing how to use styles effectively helps make data more visually appealing and easier to understand.
In this guide, you will learn how to apply styles to cells or worksheets in Excel in Python using Spire.XLS for Python.
- Apply a Built-in Style to Cells in Excel in Python
- Apply a Custom Style to Cells in Excel in Python
- Apply a Custom Style to a Worksheet in Excel in Python
Install Spire.XLS for Python
This scenario requires Spire.XLS for Python and plum-dispatch v1.7.4. They can be easily installed in your Windows through the following pip command.
pip install Spire.XLS
If you are unsure how to install, please refer to this tutorial: How to Install Spire.XLS for Python on Windows
Apply a Built-in Style to Cells in Excel in Python
Spire.XLS for Python offers the CellRange.BuiltInStyle property, which enables developers to apply built-in styles, such as Title, Heading 1, and Heading 2 to individual cells or ranges in Excel. The detailed steps are as follows.
- Create an object of the Workbook class.
- Load an Excel file using the Workbook.LoadFromFile() method.
- Get a specific worksheet by its index using the Workbook.Worksheets[index] property.
- Get the desired cell or range of cells using the Worksheet.Range[] property.
- Apply a built-in style to the cell or range of cells using the CellRange.BuiltInStyle property.
- Save the resulting file using the Workbook.SaveToFile() method.
- Python
from spire.xls import *
from spire.xls.common import *

# Create an object of the Workbook class
workbook = Workbook()
# Load the Excel file
workbook.LoadFromFile("Sample.xlsx")

# Get the first sheet
sheet = workbook.Worksheets[0]

# Get the desired cell range
range = sheet.Range["A1:H1"]
# Apply a built-in style to the cell range
range.BuiltInStyle = BuiltInStyles.Heading2

# Save the resulting file
workbook.SaveToFile("ApplyBuiltinStyle.xlsx", ExcelVersion.Version2016)
workbook.Dispose()
Apply a Custom Style to Cells in Excel in Python
Developers can use the Workbook.Styles.Add() method to create a custom style, which can then be applied to individual cells or ranges using the CellRange.Style property. The detailed steps are as follows.
- Create an object of the Workbook class.
- Load an Excel file using the Workbook.LoadFromFile() method.
- Get a specific worksheet by its index using the Workbook.Worksheets[index] property.
- Get the desired cell or range of cells using the Worksheet.Range[] property.
- Add a custom style to the workbook using the Workbook.Styles.Add() method.
- Define the formatting, such as the font size, font color, text alignment, cell borders and cell background color, using the properties of the CellStyle class.
- Apply the custom style to the cell or range of cells using the CellRange.Style property.
- Save the resulting file using the Workbook.SaveToFile() method.
- Python
from spire.xls import *
from spire.xls.common import *

# Create an object of the Workbook class
workbook = Workbook()
# Load the Excel file
workbook.LoadFromFile("Sample.xlsx")

# Get the first sheet
sheet = workbook.Worksheets[0]

# Get the desired cell range
range = sheet.Range["A1:H1"]

# Add a custom style to the workbook
style = workbook.Styles.Add("CustomCellStyle")
# Set the font size
style.Font.Size = 13
# Set the font color
style.Font.Color = Color.get_White()
# Bold the text
style.Font.IsBold = True
# Set the vertical text alignment
style.VerticalAlignment = VerticalAlignType.Bottom
# Set the horizontal text alignment
style.HorizontalAlignment = HorizontalAlignType.Left
# Set the bottom border color
style.Borders[BordersLineType.EdgeBottom].Color = Color.get_GreenYellow()
# Set the bottom border type
style.Borders[BordersLineType.EdgeBottom].LineStyle = LineStyleType.Medium
# Set the background color
style.Color = Color.get_CornflowerBlue()

# Apply the custom style to the cell range
range.Style = style

# Save the resulting file
workbook.SaveToFile("ApplyCustomStyle.xlsx", ExcelVersion.Version2016)
workbook.Dispose()
Apply a Custom Style to a Worksheet in Excel in Python
In certain cases, it may be necessary to apply a custom style to an entire worksheet rather than to specific cells or ranges. This can be accomplished using the Worksheet.ApplyStyle() method. The detailed steps are as follows.
- Create an object of the Workbook class.
- Load an Excel file using the Workbook.LoadFromFile() method.
- Get a specific worksheet by its index using the Workbook.Worksheets[index] property.
- Add a custom style to the workbook using the Workbook.Styles.Add() method.
- Define the formatting, such as the font size, font color, and cell background color, using the properties of the CellStyle class.
- Apply the custom style to the worksheet using the Worksheet.ApplyStyle() method.
- Save the resulting file using the Workbook.SaveToFile() method.
- Python
from spire.xls import *
from spire.xls.common import *

# Create an object of the Workbook class
workbook = Workbook()
# Load the Excel file
workbook.LoadFromFile("Sample.xlsx")

# Get the first sheet
sheet = workbook.Worksheets[0]

# Add a custom style to the workbook
style = workbook.Styles.Add("CustomSheetStyle")
# Set the font size
style.Font.Size = 12
# Set the font color
style.Font.Color = Color.FromRgb(91, 155, 213)
# Set the cell background color
style.Color = Color.FromRgb(242, 242, 242)

# Apply the custom style to the worksheet
sheet.ApplyStyle(style)

# Save the resulting file
workbook.SaveToFile("ApplyCustomStyleToSheet.xlsx", ExcelVersion.Version2016)
workbook.Dispose()
Apply for a Temporary License
If you'd like to remove the evaluation message from the generated documents, or to get rid of the function limitations, please request a 30-day trial license for yourself.
The Excel workbook, as a widely used data management tool, can be combined with Python to enable the automation of large-scale data processing. Using Python to set, update, and read cell values in Excel can significantly improve work efficiency, reduce repetitive tasks, and enhance the flexibility and scalability of data processing workflows, thus creating added value. This approach is applicable across a range of fields, from automating financial reports to generating data analysis reports, and can greatly boost productivity in various work contexts.
This article will demonstrate how to set, update, and retrieve cell values in Excel files using Spire.XLS for Python.
- Set cell values in Excel Files with Python
- Update cell values in Excel Files with Python
- Retrieve cell values in Excel Files with Python
Install Spire.XLS for Python
This scenario requires Spire.XLS for Python and plum-dispatch v1.7.4. They can be easily installed in your Windows through the following pip commands.
pip install Spire.XLS
If you are unsure how to install, please refer to: How to Install Spire.XLS for Python on Windows
Set cell values in Excel Files with Python
We can use the Worksheet.Range.get_Item() method from Spire.XLS for Python to obtain a specified cell in an Excel worksheet as a CellRange object, such as Range.get_Item(2, 1) or Range.get_Item("A2") (row 2, column 1). Then, we can use the CellRange.Value property to set the cell value, or other properties within this class to set text, numbers, boolean values, and other types of data. The following is an example of the procedure:
- Create a Workbook object.
- Get the first default worksheet using Workbook.Worksheets.get_Item() method.
- Obtain the specified cell as a CellRange object using Worksheet.Range.get_Item() method.
- Use properties within the CellRange class, such as Text, Value, DateTimeValue, Formula, and NumberValue, to set cell values.
- Format the cells.
- Save the workbook using Workbook.SaveToFile().
- Python
from spire.xls import Workbook, FileFormat, DateTime, HorizontalAlignType
import datetime
# Create an instance of Workbook to create an Excel workbook
workbook = Workbook()
# Get the first default worksheet
sheet = workbook.Worksheets.get_Item(0)
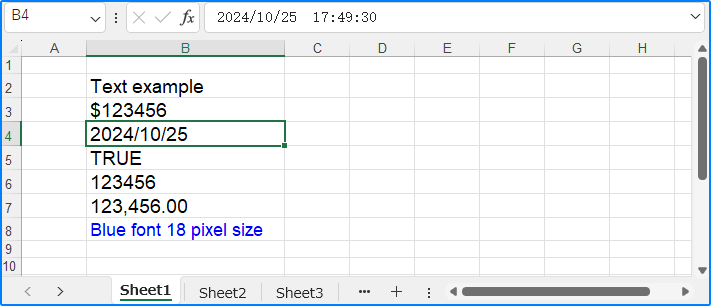
# Get cell and set text
cell = sheet.Range.get_Item(2, 2)
cell.Text = "Text example"
# Get cell and set a regular value
cell1 = sheet.Range.get_Item(3, 2)
cell1.Value = "$123456"
# Get cell and set a date value
cell2 = sheet.Range.get_Item(4, 2)
cell2.DateTimeValue = DateTime.get_Now()
# Get cell and set a boolean value
cell3 = sheet.Range.get_Item(5, 2)
cell3.BooleanValue = True
# Get cell and set a formula
cell4 = sheet.Range.get_Item(6, 2)
cell4.Formula = "=SUM(B7)"
# Get cell, set a number value, and set number format
cell5 = sheet.Range.get_Item(7, 2)
cell5.NumberValue = 123456
cell5.NumberFormat = "#,##0.00"
# Get cell and set a formula array
cell6 = sheet.Range.get_Item(8, 2)
cell6.HtmlString = "<p><span style='color: blue; font-size: 18px;'>Blue font 18 pixel size</span></p>"
# Set formatting
cellRange = sheet.Range.get_Item(2, 2, 7, 2)
cellRange.Style.Font.FontName = "Arial"
cellRange.Style.Font.Size = 14
cellRange.Style.HorizontalAlignment = HorizontalAlignType.Left
# Auto-fit the column width
sheet.AutoFitColumn(2)
# Save the file
workbook.SaveToFile("output/SetExcelCellValue.xlsx", FileFormat.Version2016)
workbook.Dispose()
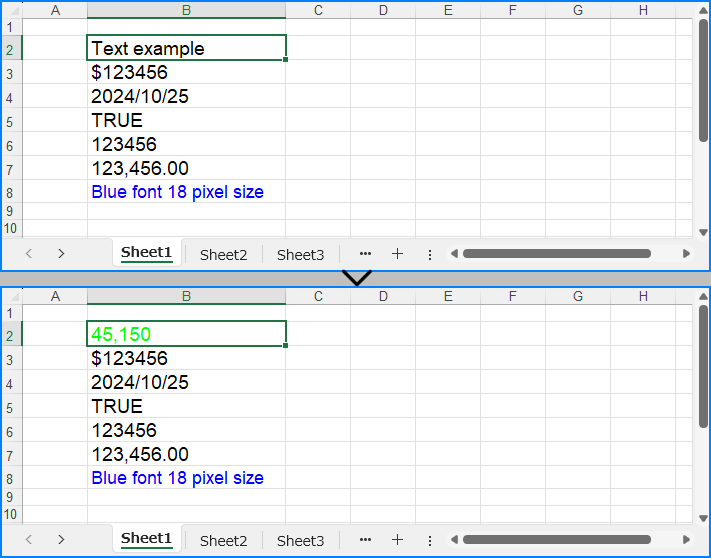
Update cell values in Excel Files with Python
To update a cell value in Excel, we can retrieve the cell to update and use the same approach as above to reset its value, thus updating the cell value. Below is an example of the procedure:
- Create a Workbook object.
- Load the Excel file using Workbook.LoadFromFile() method.
- Get a worksheet using Workbook.Worksheets.get_Item() method.
- Obtain the cell to update using Worksheet.Range.get_Item() method.
- Use properties under the CellRange class to reset the cell value.
- Save the workbook with Workbook.SaveToFile() method.
- Python
from spire.xls import Workbook

# Create an instance of Workbook
workbook = Workbook()

# Load the Excel file
workbook.LoadFromFile("output/SetExcelCellValue.xlsx")

# Get the worksheet
sheet = workbook.Worksheets.get_Item(0)

# Get the cell
cell = sheet.Range.get_Item(2, 2)

# Change the cell value to a number
cell.NumberValue = 45150
# Set the cell number format
cell.NumberFormat = "[Green]#,##0;[RED]-#,##0"

# Save the workbook
workbook.SaveToFile("output/UpdateExcelCellValue.xlsx")
workbook.Dispose()
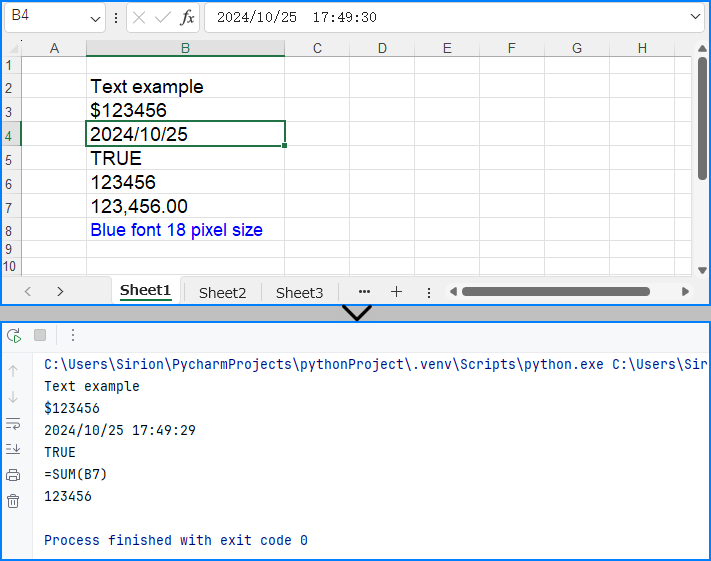
Retrieve cell values in Excel Files with Python
The CellRange.Value property can also be used to directly read cell values. Below is an example of the procedure to read cell values in Excel files:
- Create a Workbook object.
- Load the Excel file with Workbook.LoadFromFile() method.
- Get a worksheet using Workbook.Worksheets.get_Item() method.
- Loop through the specified cell range and use the CellRange.Value property to get the cell value.
- Print the results.
- Python
from spire.xls import Workbook

# Create an instance of Workbook
workbook = Workbook()

# Load the Excel file
workbook.LoadFromFile("output/SetExcelCellValue.xlsx")

# Get the worksheet
sheet = workbook.Worksheets.get_Item(0)

# Loop through cells from row 2 to 8 in column 2
for i in range(2, 8):
    # Get the cell
    cell = sheet.Range.get_Item(i, 2)
    # Get the cell value
    value = cell.Value
    # Output the value
    print(value)

workbook.Dispose()
Apply for a Temporary License
If you'd like to remove the evaluation message from the generated documents, or to get rid of the function limitations, please request a 30-day trial license for yourself.
Formatting plays a crucial role in making your Excel spreadsheets clean, organized, and visually appealing. Often, you may want to apply the same formatting to multiple cells or ranges in your workbook. Instead of manually formatting each cell individually, Excel provides a convenient feature called "Copy Cell Formatting" that allows you to quickly replicate the formatting from one cell to others.
Here in this article, you will learn how to programmatically copy cell formatting in Excel using Spire.XLS for Python.
Install Spire.XLS for Python
This scenario requires Spire.XLS for Python and plum-dispatch v1.7.4. They can be easily installed in your system through the following pip command.
pip install Spire.XLS
If you are unsure how to install, please refer to this tutorial: How to Install Spire.XLS for Python on Windows
Copy Formatting from One Cell to Another in Python
You can access a specific cell by using the Worksheet.Range[row:int, column:int] property. The formatting of that cell can be retrieved through the CellRange.Style property, and this formatting can then be applied to a different cell.
The steps to copy formatting from one to cell to anther are as follows.
- Create a Workbook object.
- Load an Excel document from a give path.
- Get a specific worksheet within the workbook.
- Get a specific cell through Worksheet.Range[row:int, column:int] property.
- Get the cell formatting through CellRange.Style property, and apply it to another cell through the same property.
- Save the workbook to a different Excel file.
This code example loads an existing Excel document, copies the formatting (style) from the cells in the second column to the cells in the fourth column for rows 2 through 14, and then saves the modified workbook to a new Excel file.
- Python
from spire.xls import *
from spire.xls.common import *

# Create a Workbook object
workbook = Workbook()

# Load an Excel document
workbook.LoadFromFile("C:\\Users\\Administrator\\Desktop\\Input.xlsx")

# Get a specific worksheet
worksheet = workbook.Worksheets[0]

# Loop through the selected rows
for i in range(2, 15):

    # Get style (formatting) of a specific cell
    style = worksheet.Range[i, 2].Style

    # Apply the style to a different cell
    worksheet.Range[i, 4].Style = style

# Save the workbook to file
workbook.SaveToFile("output/CopyFormatting.xlsx",ExcelVersion.Version2016)

# Dispose resources
workbook.Dispose()
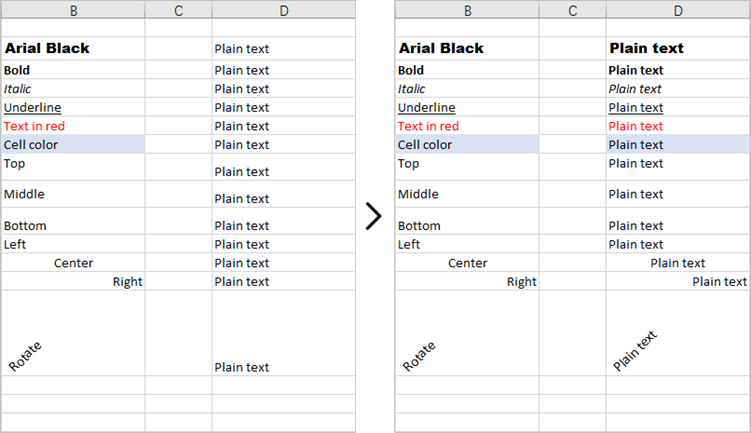
Copy Formatting from One Cell to a Cell Range in Python
Once you get the style (formatting) of a certain cell, you can apply it to a cell rang which is retrieved through the Worksheet.Range[row:int, column:int, endRow:int, endColumn:int] property.
Here are the steps to copy formatting from once cell to a cell range.
- Create a Workbook object.
- Load an Excel document from a give path.
- Get a specific worksheet within the workbook.
- Get a specific cell through Worksheet.Range[row:int, column:int] property.
- Get the formatting of the cell through CellRange.Style property.
- Get a cell range through Worksheet.Range[row:int, column:int, endRow:int, endColumn:int] property.
- Apply the formatting to the cell range through CellRange.Style property.
- Save the workbook to a different Excel file.
This code example loads an existing Excel document, retrieves the style of a cell located in the third row and first column, and then applies that style to a range of cells from the third row, fourth column to the fourth row, sixth column.
- Python
from spire.xls import *
from spire.xls.common import *

# Create a Workbook object
workbook = Workbook()

# Load an Excel document
workbook.LoadFromFile("C:\\Users\\Administrator\\Desktop\\Input.xlsx")

# Get a specific worksheet
worksheet = workbook.Worksheets[0]

# Get style (formatting) of a specific cell
style = worksheet.Range[3, 1].Style

# Apply the style to a cell range
worksheet.Range[3, 4, 4, 6].Style = style

# Save the workbook to file
workbook.SaveToFile("output/ApplyFormatToCellRange.xlsx",ExcelVersion.Version2016)

# Dispose resources
workbook.Dispose()
Apply for a Temporary License
If you'd like to remove the evaluation message from the generated documents, or to get rid of the function limitations, please request a 30-day trial license for yourself.
Setting the number format for cells in Excel worksheets is crucial for data management and presentation, which enhances readability, ensures consistency, and facilitates accurate data analysis. Proper number formatting allows users to distinguish between different types of numerical data, such as currency, percentages, dates, and scientific notations, making complex datasets more comprehensible at a glance. In this article, we will explore how to automate the process of setting the number format for cells in Excel worksheets with Spire.XLS for Python in Python programs.
Install Spire.XLS for Python
This scenario requires Spire.XLS for Python and plum-dispatch v1.7.4. They can be easily installed in your Windows through the following pip command.
pip install Spire.XLS
If you are unsure how to install, please refer to: How to Install Spire.XLS for Python on Windows
Set the Number Format for Cells in Excel Worksheets
In an Excel workbook, the number format of a cell is determined by its format code. Developers can utilize various symbols in format code to define how numerical data, date and time, currency, etc. are displayed. Below are some commonly used symbols in number format codes:
- #: Represents a digit placeholder that displays only non-zero digits.
- 0: Represents a digit placeholder and always occupies at least one position.
- ; (semicolon): Separates formats for positive numbers, negative numbers, and zero.
- / (slash): In date formats, separates year, month, and day.
- $: Currency symbol, used for representing monetary values, adaptable to system regional settings.
- () (parentheses): Formats negative numbers by enclosing them in parentheses.
- [ ] (square brackets): Utilized in conditional formatting, such as color settings [Red] or conditions like [<=100]"Low";[>100]"High".
Spire.XLS for Python provides the CellRange.NumberValue property to set the number value of a cell and the CellRange.NumberFormat property to set the number format with format code. Below are the steps for setting the number format for cells in Excel worksheets with Python:
- Create an instance of Workbook class to create an Excel workbook.
- Get the first default worksheet using Workbook.Worksheets.get_Item() method.
- Add text to header row through Worksheet.Range[].Text property.
- Add number value to cells through Worksheet.Range[].NumberValue property and set the number format for the cells with format code through Worksheet.Range[].NumberFormat property.
- Save the Excel workbook using Workbook.SaveToFile() method.
- Python
from spire.xls import *
from spire.xls.common import *
# Create an instance of Workbook
workbook = Workbook()
# Get the first worksheet
sheet = workbook.Worksheets.get_Item(0)
# Set the header row
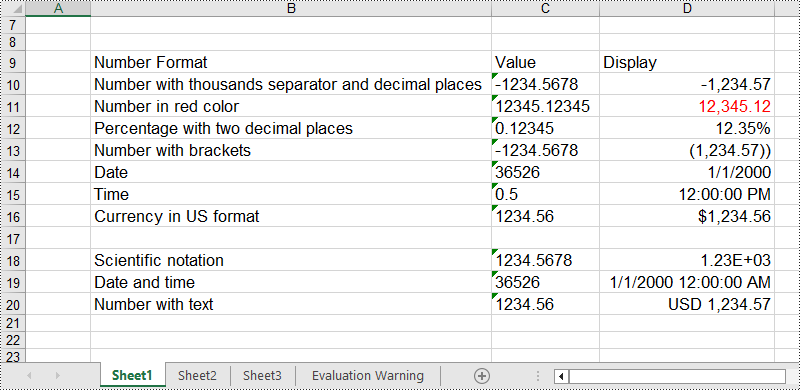
sheet.Range["B9"].Text = "Number Format"
sheet.Range["C9"].Text = "Value"
sheet.Range["D9"].Text = "Display"
# Number with thousands separator and decimal places
sheet.Range["B10"].Text = "Number with thousands separator and decimal places"
sheet.Range["C10"].Text = "-1234.5678"
sheet.Range["D10"].NumberValue = -1234.5678
sheet.Range["D10"].NumberFormat = "#,##0.00"
# Number in red color
sheet.Range["B11"].Text = "Number in red color"
sheet.Range["C11"].Text = "12345.12345"
sheet.Range["D11"].NumberValue = 12345.12345
sheet.Range["D11"].NumberFormat = "[Red]#,##0.00"
# Percentage with two decimal places
sheet.Range["B12"].Text = "Percentage with two decimal places"
sheet.Range["C12"].Text = "0.12345"
sheet.Range["D12"].NumberValue = 0.12345
sheet.Range["D12"].NumberFormat = "0.00%"
# Number with brackets
sheet.Range["B13"].Text = "Number with brackets"
sheet.Range["C13"].Text = "-1234.5678"
sheet.Range["D13"].NumberValue = -1234.5678
sheet.Range["D13"].NumberFormat = "(#,##0.00;(#,##0.00))"
# Date
sheet.Range["B14"].Text = "Date"
sheet.Range["C14"].Text = "36526"
sheet.Range["D14"].NumberValue = 36526
sheet.Range["D14"].NumberFormat = "m/d/yyyy"
# Time
sheet.Range["B15"].Text = "Time"
sheet.Range["C15"].Text = "0.5"
sheet.Range["D15"].NumberValue = 0.5
sheet.Range["D15"].NumberFormat = "h:mm:ss AM/PM"
# Currency in US format
sheet.Range["B16"].Text = "Currency in US format"
sheet.Range["C16"].Text = "1234.56"
sheet.Range["D16"].NumberValue = 1234.56
sheet.Range["D16"].NumberFormat = "$#,##0.00"
# Scientific notation
sheet.Range["B18"].Text = "Scientific notation"
sheet.Range["C18"].Text = "1234.5678"
sheet.Range["D18"].NumberValue = 1234.5678
sheet.Range["D18"].NumberFormat = "0.00E+00"
# Date and time
sheet.Range["B19"].Text = "Date and time"
sheet.Range["C19"].Text = "36526"
sheet.Range["D19"].NumberValue = 36526
sheet.Range["D19"].NumberFormat = "m/d/yyyy h:mm:ss AM/PM"
# Number with text
sheet.Range["B20"].Text = "Number with text"
sheet.Range["C20"].Text = "1234.56"
sheet.Range["D20"].NumberValue = 1234.5678
sheet.Range["D20"].NumberFormat = "\"USD \"#,##0.00"
# Set the font size and autofit rows and columns
sheet.AllocatedRange.Style.Font.Size = 13
sheet.AllocatedRange.AutoFitRows()
sheet.AllocatedRange.AutoFitColumns()
# Save the file
workbook.SaveToFile("output/SetNumberFormatExcel.xlsx", FileFormat.Version2016)
workbook.Dispose()
Apply for a Temporary License
If you'd like to remove the evaluation message from the generated documents, or to get rid of the function limitations, please request a 30-day trial license for yourself.
Copying data in Excel is a fundamental feature that allows you to quickly and efficiently reproduce data. It can be especially valuable when building spreadsheets with similar structures, or needing to propagate the same information across multiple areas of your workbook. By mastering the art of copying in Excel, you can boost your productivity and reduce the risk of manual data entry errors. In this article, we will explain how to copy rows, columns and cells in Excel in Python using Spire.XLS for Python.
Install Spire.XLS for Python
This scenario requires Spire.XLS for Python and plum-dispatch v1.7.4. They can be easily installed in your Windows through the following pip command.
pip install Spire.XLS
If you are unsure how to install, please refer to this tutorial: How to Install Spire.XLS for Python on Windows
Copy Rows in Excel in Python
You can use the Worksheet.CopyRow(sourceRow, destSheet, destRowIndex, copyOptions) method provided by Spire.XLS for Python to easily copy a row in the same or between different worksheets in Excel. The detailed steps are as follows.
- Create an object of the Workbook class.
- Load an Excel file using the Workbook.LoadFromFile() method.
- Get the source worksheet and the destination worksheet using the Workbook.Worksheets[index] property.
- Get the desired row that you want to copy using the Worksheet.Rows[index] property.
- Copy the row and its format from the source worksheet to the destination worksheet using the Worksheet.CopyRow(sourceRow, destSheet, destRowIndex, copyOptions) method.
- Copy the column widths of cells in the source row to the corresponding cells in the destination row.
- Save the workbook to a file using the Workbook.SaveToFile() method.
- Python
from spire.xls import *
from spire.xls.common import *
# Create a Workbook object
workbook = Workbook()
# Load an Excel file
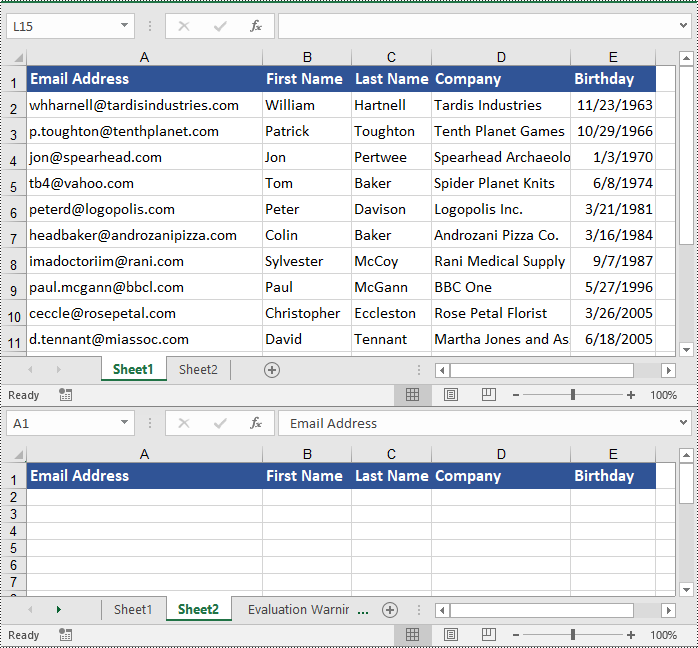
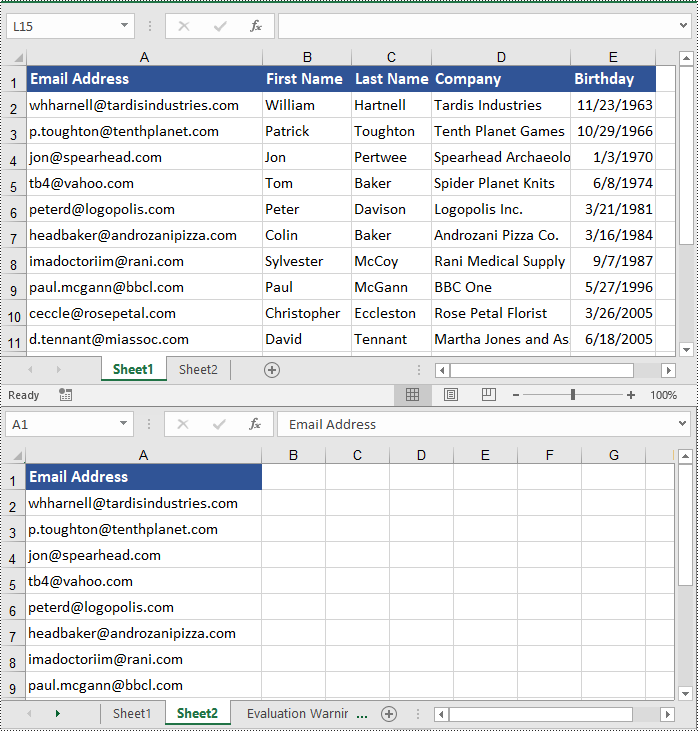
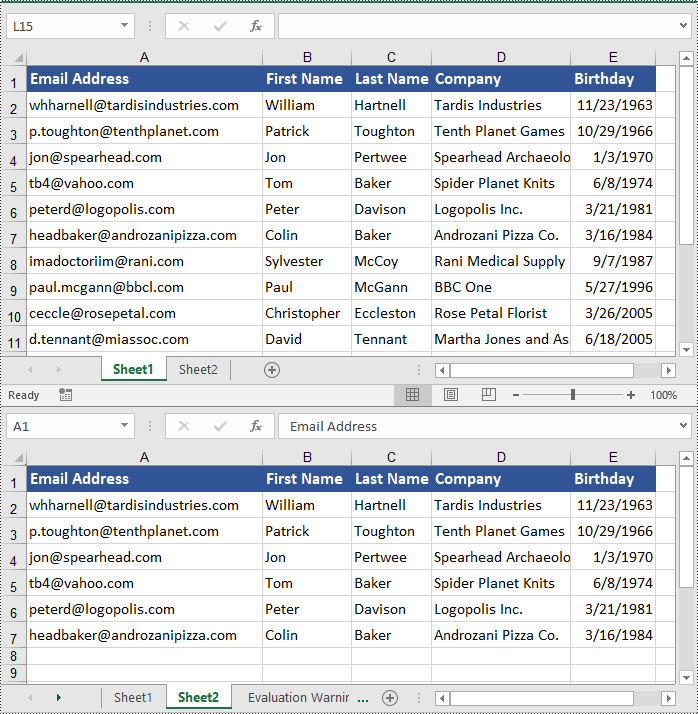
workbook.LoadFromFile("ContactList.xlsx")
# Get the source worksheet
sheet1 = workbook.Worksheets[0]
# Get the destination worksheet
sheet2 = workbook.Worksheets[1]
# Get the desired row that you want to copy
row = sheet1.Rows[0]
# Copy the row from the source worksheet to the first row of the destination worksheet
sheet1.CopyRow(row, sheet2, 1, CopyRangeOptions.All)
columns = sheet1.Columns.Length
# Copy the column widths of the cells in the source row to the corresponding cells in the destination row
for i in range(columns):
column_width = row.Columns[i].ColumnWidth
sheet2.Rows[0].Columns[i].ColumnWidth = column_width
# Save the workbook to a file
workbook.SaveToFile("CopyRow.xlsx", ExcelVersion.Version2016)
workbook.Dispose()
Copy Columns in Excel in Python
To copy a column in an Excel worksheet, you can use the Worksheet.CopyColumn(sourceColumn, destSheet, destColIndex, copyOptions) method. The detailed steps are as follows.
- Create an object of the Workbook class.
- Load an Excel file using the Workbook.LoadFromFile() method.
- Get the source worksheet and the destination worksheet using the Workbook.Worksheets[index] property.
- Get the desired column that you want to copy using the Worksheet.Columns[index] property.
- Copy the column and its format from the source worksheet to the destination worksheet using the Worksheet.CopyColumn(sourceColumn, destSheet, destColIndex, copyOptions) method.
- Copy the row heights of cells in the source column to the corresponding cells in the destination column.
- Save the workbook to a file using the Workbook.SaveToFile() method.
- Python
from spire.xls import *
from spire.xls.common import *

# Create a Workbook object
workbook = Workbook()
# Load an Excel file
workbook.LoadFromFile("ContactList.xlsx")

# Get the source worksheet
sheet1 = workbook.Worksheets[0]
# Get the destination worksheet
sheet2 = workbook.Worksheets[1]

# Get the desired column that you want to copy
column = sheet1.Columns[0]

# Copy the column from the source worksheet to the first column of the destination worksheet
sheet1.CopyColumn(column, sheet2, 1, CopyRangeOptions.All)

rows = column.Rows.Length
# Copy the row heights of cells in the source column to the corresponding cells in the destination column
for i in range(rows):
    row_height = column.Rows[i].RowHeight
    sheet2.Columns[0].Rows[i].RowHeight = row_height

# Save the workbook to a file
workbook.SaveToFile("CopyColumn.xlsx", ExcelVersion.Version2016)
workbook.Dispose()
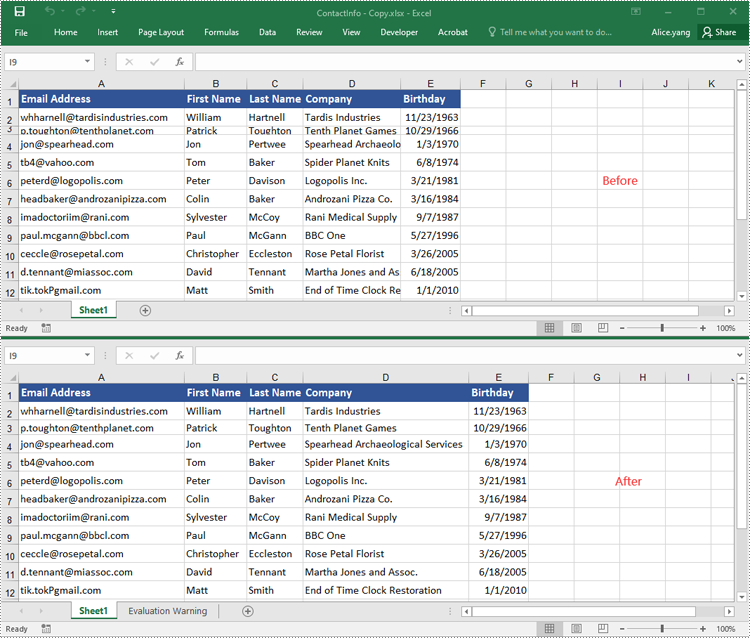
Copy Cells in Excel in Python
In addition to copying entire rows and columns, you are also able to copy an individual cell or a range of cells using the CellRange.Copy(destRange, copyOptions) method. The detailed steps are as follows.
- Create an object of the Workbook class.
- Load an Excel file using the Workbook.LoadFromFile() method.
- Get the source worksheet and the destination worksheet using the Workbook.Worksheets[index] property.
- Get the source cell range and the destination cell range using the Worksheet.Range[] property.
- Copy the source cell range and its format from the source worksheet to the destination cell range in the destination worksheet using the CellRange.Copy(destRange, copyOptions) method.
- Copy the row heights and column widths of the source cell range to the destination cell range.
- Save the workbook to a file using the Workbook.SaveToFile() method.
- Python
from spire.xls import *
from spire.xls.common import *

# Create a Workbook object
workbook = Workbook()
# Load an Excel file
workbook.LoadFromFile("ContactList.xlsx")

# Get the source worksheet
sheet1 = workbook.Worksheets[0]
# Get the destination worksheet
sheet2 = workbook.Worksheets[1]

# Get the source cell range
range1 = sheet1.Range["A1:E7"]
# Get the destination cell range
range2 = sheet2.Range["A1:E7"]

# Copy the source cell range from the source worksheet to the destination cell range in the destination worksheet
range1.Copy(range2, CopyRangeOptions.All)

# Copy the row heights and column widths of the source cell range to the destination cell range
for i, row in enumerate(range1.Rows):
    for j, column in enumerate(row.Columns):
        range2.Rows[i].Columns[j].ColumnWidth = column.ColumnWidth
        range2.Rows[i].RowHeight = row.RowHeight

# Save the workbook to a file
workbook.SaveToFile("CopyCells.xlsx", ExcelVersion.Version2016)
workbook.Dispose()
Apply for a Temporary License
If you'd like to remove the evaluation message from the generated documents, or to get rid of the function limitations, please request a 30-day trial license for yourself.
Drop-down lists in Excel worksheets are an indispensable tool for enhancing data accuracy, efficiency, and usability in spreadsheet management. By offering pre-defined options within a cell, they not only streamline data entry processes but also enforce consistency, reducing the likelihood of input errors. This feature is particularly valuable when working with large datasets or collaborative projects where maintaining uniformity across multiple entries is crucial. This article demonstrates how to create customized drop-down lists within Excel worksheets using Spire.XLS for Python, empowering users to create organized and user-friendly worksheets.
- Create Drop-Down Lists Based on Cell Values Using Python
- Create Drop-Down Lists Based on Strings Using Python
Install Spire.XLS for Python
This scenario requires Spire.XLS for Python and plum-dispatch v1.7.4. They can be easily installed in your Windows through the following pip command.
pip install Spire.XLS
If you are unsure how to install, please refer to: How to Install Spire.XLS for Python on Windows
Create Drop-Down Lists Based on Cell Values Using Python
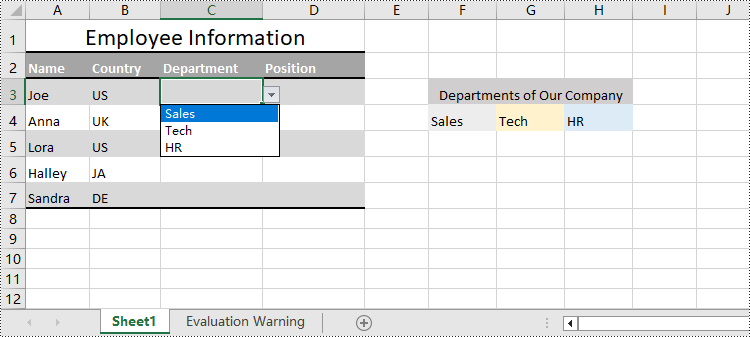
In Excel worksheets, creating drop-down lists is accomplished through the data validation feature. With Spire.XLS for Python, developers can use the CellRange.DataValidation.DataRange property to create drop-down lists within cells and use the data from the specified cell range as list options.
The detailed steps for creating a drop-down list based on cell values are as follows:
- Create an instance of Workbook class.
- Load an Excel file using Workbook.LoadFromFile() method.
- Get a worksheet using Workbook.Worksheets.get_Item() method.
- Get a specific cell range through Worksheet.Range[] property.
- Set the data range for data validation of the cell range through CellRange.DataValidation.DataRange property to create drop-down lists with cell values.
- Save the workbook using Workbook.SaveToFile() method.
- Python
from spire.xls import *
from spire.xls.common import *

# Create an instance of Workbook
workbook = Workbook()

# Load an Excel file
workbook.LoadFromFile("Sample.xlsx")

# Get the first worksheet
sheet = workbook.Worksheets.get_Item(0)

# Get a specific cell range
cellRange = sheet.Range["C3:C7"]

# Set the data range for data validation to create drop-down lists in the cell range
cellRange.DataValidation.DataRange = sheet.Range["F4:H4"]

# Save the workbook
workbook.SaveToFile("output/DropDownListExcel.xlsx", FileFormat.Version2016)
workbook.Dispose()
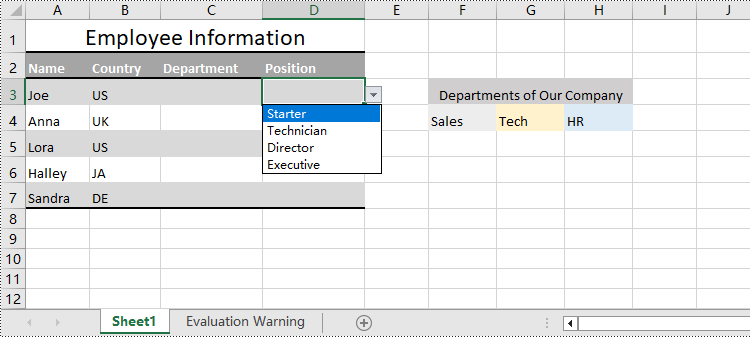
Create Drop-Down Lists Based on String Using Python
Spire.XLS for Python also provides the CellRange.DataValidation.Values property to create drop-down lists in cells directly using string lists.
The detailed steps for creating drop-down lists based on values are as follows:
- Create an instance of Workbook class.
- Load an Excel file using Workbook.LoadFromFile() method.
- Get a worksheet using Workbook.Worksheets.get_Item() method.
- Get a specific cell range through Worksheet.Range[] property.
- Set a string list as the values of data validation in the cell range through CellRange.DataValidation.Values property to create drop-down lists based on strings.
- Save the workbook using Workbook.SaveToFile() method.
- Python
from spire.xls import *
from spire.xls.common import *

# Create an instance of Workbook
workbook = Workbook()

# Load an Excel file
workbook.LoadFromFile("Sample.xlsx")

# Get the first worksheet
sheet = workbook.Worksheets.get_Item(0)

# Get a cell range
cellRange = sheet.Range["D3:D7"]

# Set the value for data validation to create drop-down lists
cellRange.DataValidation.Values = ["Starter", "Technician", "Director", "Executive"]

# Save the workbook
workbook.SaveToFile("output/ValueDropDownListExcel.xlsx", FileFormat.Version2016)
workbook.Dispose()
Apply for a Temporary License
If you'd like to remove the evaluation message from the generated documents, or to get rid of the function limitations, please request a 30-day trial license for yourself.
The AutoFit feature in Microsoft Excel is a handy tool that allows you to automatically adjust the height of rows or the width of columns in an Excel spreadsheet to fit the content within them. This feature is particularly useful when you have data that may vary in length or when you want to ensure that all the content is visible without having to manually adjust the column widths or row heights. In this article, we will explain how to AutoFit rows and columns in Excel in Python using Spire.XLS for Python.
Install Spire.XLS for Python
This scenario requires Spire.XLS for Python and plum-dispatch v1.7.4. They can be easily installed in your Windows through the following pip command.
pip install Spire.XLS
If you are unsure how to install, please refer to this tutorial: How to Install Spire.XLS for Python on Windows
AutoFit a Specific Row and Column in Python
To AutoFit a specific row and column in an Excel worksheet, you can use the Worksheet.AutoFitRow() and Worksheet.AutoFitColumn() methods. The detailed steps are as follows.
- Create an object of the Workbook class.
- Load an Excel file using Workbook.LoadFromFile() method.
- Get a specific worksheet using Workbook.Worksheets[index] property.
- AutoFit a specific row and column in the worksheet by its index (1-based) using Worksheet.AutoFitRow(rowIndex) and Worksheet.AutoFitColumn(columnIndex) methods.
- Save the result file using Workbook.SaveToFile() method.
- Python
from spire.xls import *
from spire.xls.common import *

# Create an object of the Workbook class
workbook = Workbook()
# Load an Excel file
workbook.LoadFromFile("Sample.xlsx")

# Get the first worksheet
sheet = workbook.Worksheets[0]

# Automatically adjust the height of the 3rd row in the worksheet
sheet.AutoFitRow(3)
# Automatically adjust the width of the 4th column in the worksheet
sheet.AutoFitColumn(4)

# Save the resulting file
workbook.SaveToFile("AutoFitSpecificRowAndColumn.xlsx", ExcelVersion.Version2016)
workbook.Dispose()
AutoFit Multiple Rows and Columns in Excel in Python
To AutoFit multiple rows and columns within a cell range, you can use the CellRange.AutoFitRows() and CellRange.AutoFitColumns() methods. The following are the detailed steps.
- Create an object of the Workbook class.
- Load an Excel file using Workbook.LoadFroFmFile() method.
- Get a specific worksheet using Workbook.Worksheets[index] property.
- Get a specific cell range in the worksheet using Worksheet.Range[] property.
- AutoFit the rows and columns in the cell range using CellRange.AutoFitRows() and CellRange.AutoFitColumns() methods.
- Save the result file using Workbook.SaveToFile() method.
- Python
from spire.xls import *
from spire.xls.common import *

# Create an object of the Workbook class
workbook = Workbook()
# Load an Excel file
workbook.LoadFromFile("Sample.xlsx")

# Get the first worksheet
sheet = workbook.Worksheets[0]

# Get a specific cell range in the worksheet
range = sheet.Range["A1:E14"]
# Or get the used cell range in the worksheet
# range = sheet.AllocatedRange

# Automatically adjust the heights of all rows in the cell range
range.AutoFitRows()
# Automatically adjust the widths of all columns in the cell range
range.AutoFitColumns()

# Save the resulting file
workbook.SaveToFile("AutoFitMultipleRowsAndColumns.xlsx", ExcelVersion.Version2016)
workbook.Dispose()
Apply for a Temporary License
If you'd like to remove the evaluation message from the generated documents, or to get rid of the function limitations, please request a 30-day trial license for yourself.
Excel is a powerful tool for organizing and analyzing data, but the default black-and-white spreadsheet can make it difficult to interpret information at a glance. By adding fill colors, gradients, or patterns to specific cells, you can highlight important data, separate different categories of information, and make the spreadsheet more visually appealing. In this article, you will learn how to set a fill color, gradient or pattern in Excel cells using Spire.XLS for Python.
- Add Fill Color to Excel Cells with Python
- Add Gradient Fill to Excel Cells with Python
- Add Fill Pattern to Excel Cells with Python
Install Spire.XLS for Python
This scenario requires Spire.XLS for Python and plum-dispatch v1.7.4. They can be easily installed in your Windows through the following pip command.
pip install Spire.XLS
If you are unsure how to install, please refer to this tutorial: How to Install Spire.XLS for Python on Windows
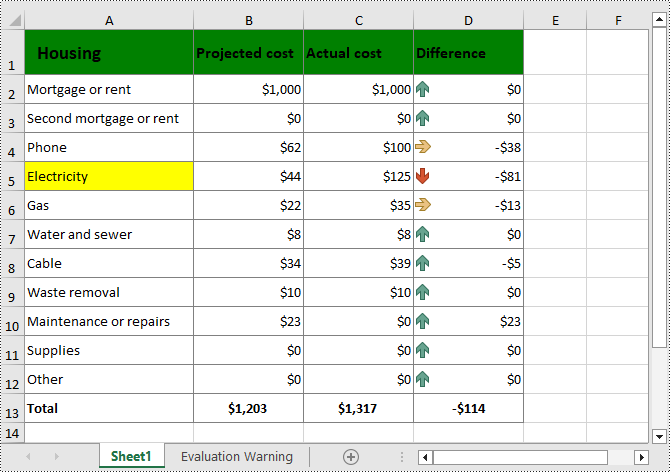
Add Fill Color to Excel Cells with Python
The CellRange.Style.Color property provided by Spire.XLS for Python allows to add a solid background color to Excel cells. The following are detailed steps.
- Create a Workbook instance.
- Load a sample Excel file using Workbook.LoadFromFile() method.
- Get a specified worksheet using Workbook.Worksheets[] property.
- Get a specified cell or cell range using Worksheet.Range[] property.
- Add a background color to the cells using CellRange.Style.Color property.
- Save the result file using Workbook.SaveToFile() method.
- Python
from spire.xls import *
from spire.xls.common import *

inputFile = "Cost.xlsx"
outputFile = "CellFillColor.xlsx"

# Create a Workbook instance
workbook = Workbook()

# Load an Excel file from disk
workbook.LoadFromFile(inputFile)

# Get the first worksheet
worksheet = workbook.Worksheets[0]

# Set fill color for a cell or cell range
worksheet.Range["A1:D1"].Style.Color = Color.get_Green()
worksheet.Range["A5"].Style.Color = Color.get_Yellow()

# Save the result file
workbook.SaveToFile(outputFile, ExcelVersion.Version2016)
workbook.Dispose()
Add Gradient Fill to Excel Cells with Python
To apply gradient fill in Excel, you first need to set the cell fill pattern type to gradient, and then specify two colors and the shading style of the gradient fill. The following are detailed steps.
- Create a Workbook instance.
- Load a sample Excel file using Workbook.LoadFromFile() method.
- Get a specified worksheet using Workbook.Worksheets[] property.
- Get the cell style of a specified cell or cell range using Worksheet.Range[].Style property.
- Get the interior cell style using CellStyle.Interior property.
- Set cell fill effect to gradient through ExcelInterior.FillPattern property.
- Set the background and foreground colors of the gradient fill using ExcelInterior.Gradient.BackColor and ExcelInterior.Gradient.ForeColor properties.
- Set the gradient shading style using ExcelInterior.Gradient.GradientStyle property.
- Save the result file using Workbook.SaveToFile() method.
- Python
from spire.xls import *
from spire.xls.common import *

inputFile = "Cost.xlsx"
outputFile = "CellGradientFill.xlsx"

# Create a Workbook instance
workbook = Workbook()

# Load an Excel file from disk
workbook.LoadFromFile(inputFile)

# Get the first worksheet
worksheet = workbook.Worksheets[0]

# Get the cell style of a specified range
cellStyle = worksheet.Range["A1:A12"].Style

# Set cell fill pattern type to gradient
cellStyle.Interior.FillPattern  = ExcelPatternType.Gradient

# Set the background and foreground colors of the gradient fill
cellStyle.Interior.Gradient.BackColor = Color.get_SkyBlue()
cellStyle.Interior.Gradient.ForeColor = Color.get_White()

# Set the gradient shading style
cellStyle.Interior.Gradient.GradientStyle = GradientStyleType.From_Center

# Save the result file
workbook.SaveToFile(outputFile, ExcelVersion.Version2016)
workbook.Dispose()
Add Fill Pattern to Excel Cells with Python
You can also add predefined patterns such as different styles of stripes, dots, and crosshatch to specific cells through the CellRange.Style.FillPattern property. The following are the detailed steps:
- Create a Workbook instance.
- Load a sample Excel file using Workbook.LoadFromFile() method.
- Get a specified worksheet using Workbook.Worksheets[] property.
- Get a specified cell or cell range using Worksheet.Range[] property.
- Add a background pattern to the cells using CellRange.Style.FillPattern property.
- Save the result file using Workbook.SaveToFile() method.
- Python
from spire.xls import *
from spire.xls.common import *

inputFile = "Cost.xlsx"
outputFile = "CellFillPattern.xlsx"

# Create a Workbook instance
workbook = Workbook()

# Load an Excel file from disk
workbook.LoadFromFile(inputFile)

# Get the first worksheet
worksheet = workbook.Worksheets[0]

#Set cell fill pattern for a cell or cell range
worksheet.Range["A7:C12"].Style.FillPattern = ExcelPatternType.Percent125Gray
worksheet.Range["D5"].Style.FillPattern = ExcelPatternType.ThinDiagonalStripe

# Save the result file
workbook.SaveToFile(outputFile, ExcelVersion.Version2016)
workbook.Dispose()
Apply for a Temporary License
If you'd like to remove the evaluation message from the generated documents, or to get rid of the function limitations, please request a 30-day trial license for yourself.
In Microsoft Excel, freezing panes is a practical feature that allows you to lock specific rows or columns in place while navigating through a spreadsheet. When you freeze panes, the selected rows or columns remain visible on the screen, even as you scroll through the rest of the worksheet. This feature proves especially useful when dealing with large datasets where headers, titles, or other important reference points must stay visible to provide context.
Unfreezing panes, on the other hand, allows you to release the locked rows or columns. It is beneficial when you no longer need certain sections to remain fixed and want to regain the ability to navigate the entire spreadsheet without any restrictions. In this article, we will demonstrate how to freeze and unfreeze panes in Excel in Python using Spire.XLS for Python.
Install Spire.XLS for Python
This scenario requires Spire.XLS for Python and plum-dispatch v1.7.4. They can be easily installed in your Windows through the following pip commands.
pip install Spire.XLS
If you are unsure how to install, please refer to this tutorial: How to Install Spire.XLS for Python on Windows
Freeze Panes in Excel in Python
Rows and columns can be frozen by using the Worksheet.FreezePanes() method. This method takes two parameters - rowIndex (1-based) and columnIndex (1-based). The first parameter represents the index of the row above which all rows will be frozen. The second parameter represents the index of the column to the left of which all columns will be frozen.
The following steps show you how to freeze specific rows and/or columns in Excel using Spire.XLS for Python.
- Create an instance of the Workbook class.
- Load an Excel file using Workbook.LoadFromFile() method.
- Get a specific worksheet using Workbook.Worksheets[index] property.
- Freeze specific rows and/or columns in the worksheet using Worksheet.FreezePanes(rowIndex, columnIndex) method.
- Save the result Excel file using Workbook.SaveToFile() method.
- Python
from spire.xls import *
from spire.xls.common import *

# Specify the paths for the input and output Excel files
inputFile = "Sample.xlsx"
outputFile = "FreezePanes.xlsx"

# Create a Workbook instance
workbook = Workbook()
# Load an Excel file
workbook.LoadFromFile(inputFile)

# Get the first worksheet in the file
sheet = workbook.Worksheets[0]

# Freeze specific rows and/or columns
# Freeze the top row
sheet.FreezePanes(2, 1)
# Or freeze the first column
# sheet.FreezePanes(1, 2)
# Or freeze the top row and the first column
# sheet.FreezePanes(2, 2)

# Save the result file
workbook.SaveToFile(outputFile, ExcelVersion.Version2013)
workbook.Dispose()
Unfreeze Panes in Excel in Python
To unfreeze rows and columns in Excel, use the Worksheet.RemovePanes() method. The detailed steps are as follows.
- Create an instance of the Workbook class.
- Load an Excel file using Workbook.LoadFromFile() method.
- Get a specific worksheet using Workbook.Worksheets[index] property.
- Unfreeze rows and columns in the worksheet using Worksheet.RemovePanes() method.
- Save the result Excel file using Workbook.SaveToFile() method.
- Python
from spire.xls import *
from spire.xls.common import *

# Specify the paths for the input and output Excel files
inputFile = " FreezePanes.xlsx"
outputFile = "UnfreezePanes.xlsx"

# Create a Workbook instance
workbook = Workbook()
# Load an Excel file
workbook.LoadFromFile(inputFile)

# Get the first worksheet in the file
sheet = workbook.Worksheets[0]

# Unfreeze rows and/or columns in the worksheet
sheet.RemovePanes()

# Save the result file
workbook.SaveToFile(outputFile, ExcelVersion.Version2013)
workbook.Dispose()
Apply for a Temporary License
If you'd like to remove the evaluation message from the generated documents, or to get rid of the function limitations, please request a 30-day trial license for yourself.
