
Cells (17)
Proper row height and column width are essential for optimizing data readability and ensuring that all content is fully visible in Excel. While the default row height and column width settings may be suitable in some cases, they may not be sufficient when dealing with lengthy text, large numbers, or complex formulas. In such cases, it becomes necessary to set appropriate row heights and column widths. In this article, we will explain how to set row height and column width in Excel in Python using Spire.XLS for Python.
Install Spire.XLS for Python
This scenario requires Spire.XLS for Python and plum-dispatch v1.7.4. They can be easily installed in your Windows through the following pip command.
pip install Spire.XLS
If you are unsure how to install, please refer to this tutorial: How to Install Spire.XLS for Python on Windows
Set Row Height in Excel in Python
Spire.XLS for Python provides the Worksheet.SetRowHeight() method to set the height for a specific row. The detailed steps are as follows:
- Create a Workbook object.
- Load an Excel file using Workbook.LoadFromFile() method.
- Get a specific worksheet using Workbook.Worksheets[] property.
- Set the height of a specific row using Worksheet.SetRowHeight() method.
- Save the resulting file using Workbook.SaveToFile() method.
- Python
from spire.xls import *
from spire.xls.common import *

# Create a Workbook object
workbook = Workbook()
# Load an Excel file
workbook.LoadFromFile("Sample.xlsx")

# Get the first worksheet
worksheet = workbook.Worksheets[0]

# Set the height of the first row
worksheet.SetRowHeight(1, 25)

# Save the resulting file
workbook.SaveToFile("SetRowHeight.xlsx", ExcelVersion.Version2016)
workbook.Dispose()
Set Column Width in Excel in Python
To set the width of a specific column, you can use the Worksheet.SetColumnWidth() method. The detailed steps are as follows:
- Create a Workbook object.
- Load an Excel file using Workbook.LoadFromFile() method.
- Get a specific worksheet using Workbook.Worksheets[] property.
- Set the width of a specific column using Worksheet.SetColumnWidth() method.
- Save the resulting file using Workbook.SaveToFile() method.
- Python
from spire.xls import *
from spire.xls.common import *

# Create a Workbook object
workbook = Workbook()
# Load an Excel file
workbook.LoadFromFile("Sample.xlsx")

# Get the first worksheet
worksheet = workbook.Worksheets[0]

# Set the width of the third column
worksheet.SetColumnWidth(3, 15)

# Save the resulting file
workbook.SaveToFile("SetColumnWidth.xlsx", ExcelVersion.Version2016)
workbook.Dispose()
Apply for a Temporary License
If you'd like to remove the evaluation message from the generated documents, or to get rid of the function limitations, please request a 30-day trial license for yourself.
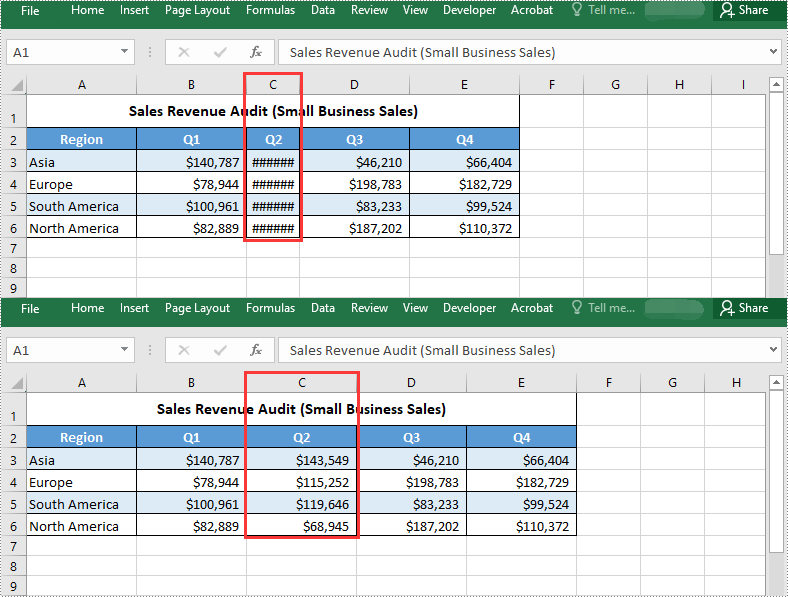
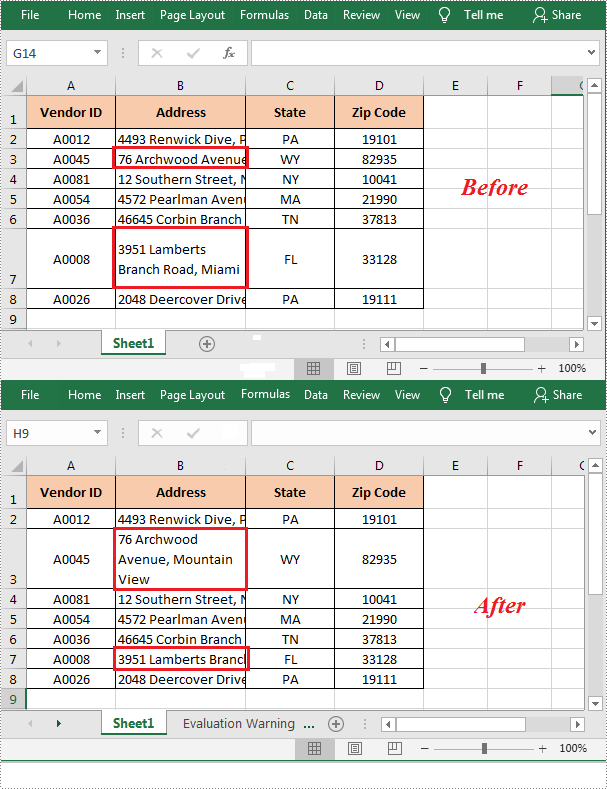
Text wrapping and unwrapping are powerful formatting options in Microsoft Excel that offer flexibility in displaying text within cells. When text wrapping is enabled, long text is automatically wrapped into multiple lines within a cell, which ensures that the entire content is visible without truncation. This feature is particularly useful for presenting lengthy descriptions, notes, or paragraphs within a confined cell space. On the other hand, text unwrapping allows you to remove line breaks and display the text in a single line within the cell. This can be beneficial in scenarios where you need to fit the text into a specific layout or when exporting data to other applications or file formats that may not handle wrapped text correctly. In this article, we will demonstrate how to wrap or unwrap text in Excel cells in Python using Spire.XLS for Python.
Install Spire.XLS for Python
This scenario requires Spire.XLS for Python and plum-dispatch v1.7.4. They can be easily installed in your Windows through the following pip command.
pip install Spire.XLS
If you are unsure how to install, please refer to this tutorial: How to Install Spire.XLS for Python on Windows
Wrap or Unwrap Text in Excel Cells in Python
Spire.XLS for Python provides the CellStyle.WrapText property to control whether the text should be wrapped or unwrapped within a cell. If you want to wrap text in a cell, you can set the property as True. Conversely, if you want to unwrap text in a cell, you can set the property as False.
The following steps explain how to wrap or unwrap text in an Excel cell using Spire.XLS for Python:
- Create a Workbook object.
- Load a sample Excel file using Workbook.LoadFromFile() method.
- Get a specified worksheet using Workbook.Worksheets[] property.
- Get a specified cell using Worksheet.Range[] property.
- Get the style of the specified cell using CellRange.Style property.
- Wrap the text in the cell by setting the CellStyle.WrapText property to True. Or unwrapping the text in the cell by setting the CellStyle.WrapText property to False.
- Save the resulting file using Workbook.SaveToFile() method.
- Python
from spire.xls import *
from spire.xls.common import *

# Create a Workbook object
workbook = Workbook()
# Load a sample Excel file
workbook.LoadFromFile("Sample.xlsx")

# Get the first worksheet of the file
sheet = workbook.Worksheets[0]

# Wrap the text in cell B3
sheet.Range["B3"].Style.WrapText = True

# Unwrap the text in cell B7
sheet.Range["B7"].Style.WrapText = False

#Save the resulting file
workbook.SaveToFile("WrapOrUnwrapTextInCells.xlsx", ExcelVersion.Version2013)
workbook.Dispose()
Apply for a Temporary License
If you'd like to remove the evaluation message from the generated documents, or to get rid of the function limitations, please request a 30-day trial license for yourself.
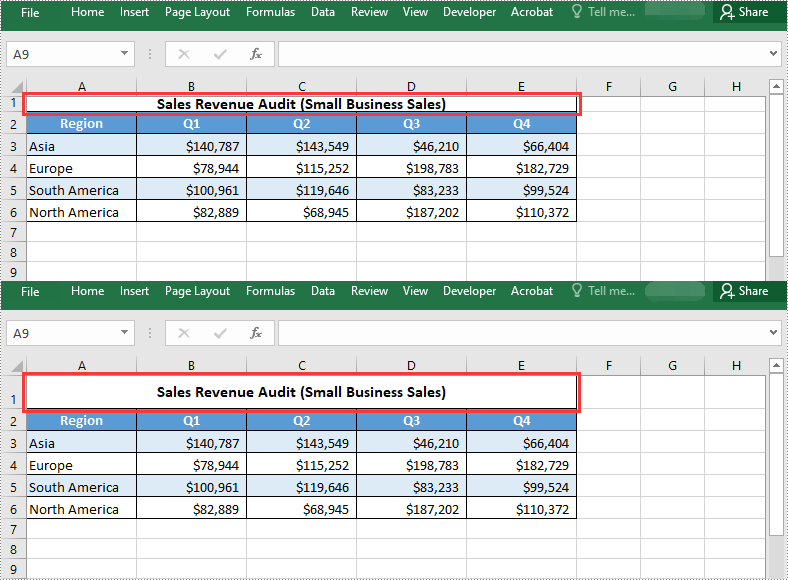
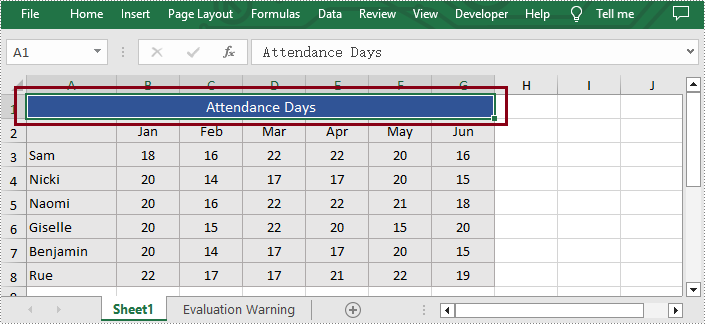
Merging cells means combining multiple adjacent cells into a larger one. The merged cell will inherit all the properties and contents of the original cells. This feature is particularly useful when you need to create a larger cell to accommodate more content or create a header row. Unmerging cells, on the other hand, involves reverting the merged cells back to the original multiple cells. The unmerged cells will revert back to their original independent state, and you can input different content into each individual cell. Merging and unmerging cells are common operations in spreadsheet software, allowing you to adjust the layout and structure of a table as needed, making the data clearer and easier to understand. In this article, you will learn how to merge or unmerge cells in Excel in Python by using Spire.XLS for Python.
- Merge the Cells of the Specified Row or Column
- Merge Ranges of Cells
- Unmerge the Cells of the Specified Row or Column
- Unmerge Ranges of Cells
Install Spire.XLS for Python
This scenario requires Spire.XLS for Python and plum-dispatch v1.7.4. They can be easily installed in your Windows through the following pip command.
pip install Spire.XLS
If you are unsure how to install, please refer to this tutorial: How to Install Spire.XLS for Python on Windows
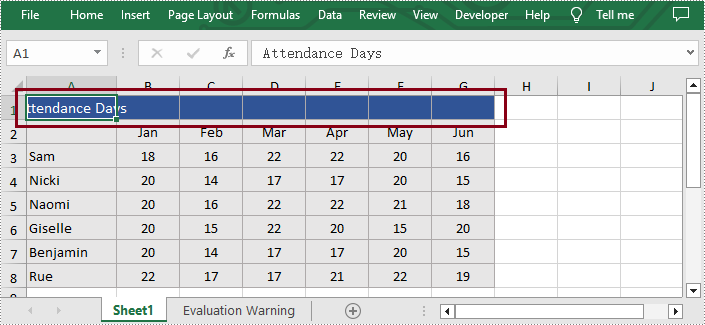
Merge the Cells of the Specified Row or Column
With Spire.XLS for Python, users are able to effortlessly merge the cells of the specific column or row in Excel, thereby enhancing their data manipulation capabilities. The following are the detailed steps.
- Create an object of Workbook class.
- Load a sample Excel file using Workbook.LoadFromFile() method.
- Get the desired worksheet by using Workbook.Worksheets[] property.
- Access the cells of the specific column or row and merge them by calling Worksheet.Columns[].Merge() or Worksheet.Rows[].Merge() methods.
- Save the result file using Workbook.SaveToFile() method.
- Python
from spire.xls import *
from spire.xls.common import *

inputFile = "Sample.xlsx"
outputFile = "MergeRowColumn.xlsx"

#Create an object of Workbook class
workbook = Workbook()

#Load a sample Excel file from disk
workbook.LoadFromFile(inputFile)

#Get the first worksheet of this file
sheet = workbook.Worksheets[0]

#Merge the first column in Excel
#sheet.Columns[0].Merge()

#Merge the first row in Excel
sheet.Rows[0].Merge()

#Save the result file
workbook.SaveToFile(outputFile, ExcelVersion.Version2013)
workbook.Dispose()
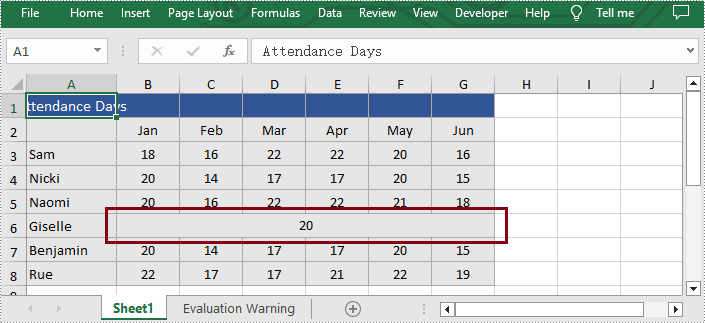
Merge Ranges of Cells
In addition to merging the specific column or row, Spire.XLS for Python also supports users to merge the specified cell ranges. The following are the detailed steps.
- Create an object of Workbook class.
- Load a sample Excel file using Workbook.LoadFromFile() method.
- Get the desired worksheet by using Workbook.Worksheets[] property.
- Access the specific range of cells and merge them together by calling Worksheet.Range[].Merge() method.
- Save the result file using Workbook.SaveToFile() method.
- Python
from spire.xls import *
from spire.xls.common import *

inputFile = "Sample.xlsx"
outputFile = "MergeCellRange.xlsx"

#Create an object of Workbook class
workbook = Workbook()

#Load a sample Excel file from disk
workbook.LoadFromFile(inputFile)

#Get the first worksheet of this file
sheet = workbook.Worksheets[0]

#Merge the particular cell range in Excel
sheet.Range["B6:G6"].Merge()

#Save the result file
workbook.SaveToFile(outputFile, ExcelVersion.Version2013)
workbook.Dispose()
Unmerge the Cells of the Specified Row or Column
Additionally, users are also allowed to unmerge the merged cells of the specific column or row at any time with Spire.XLS for Python. The following are the detailed steps.
- Create an object of Workbook class.
- Load a sample Excel file using Workbook.LoadFromFile() method.
- Get the desired worksheet by using Workbook.Worksheets[] property.
- Access the merged cells of the specific column or row and unmerge them by calling Worksheet.Columns[].UnMerge() and Worksheet.Rows[].UnMerge() methods.
- Save the result file using Workbook.SaveToFile() method.
- Python
from spire.xls import *
from spire.xls.common import *

inputFile = "MergeRowColumn.xlsx"
outputFile = "UnmergeRowColumn.xlsx"

#Create an object of Workbook class
workbook = Workbook()

#Load a sample file from disk
workbook.LoadFromFile(inputFile)

#Get the first worksheet of this file
sheet = workbook.Worksheets[0]

#Unmerge the first column in Excel
#sheet.Columns[0].UnMerge()

#Unmerge the first column in Excel
sheet.Rows[0].UnMerge()

#Save to file.
workbook.SaveToFile(outputFile, ExcelVersion.Version2013)
workbook.Dispose()
Unmerge Ranges of Cells
What's more, users are also able to unmerge the specified cell ranges using Spire.XLS for Python. The following are the detailed steps.
- Create an object of Workbook class.
- Load a sample Excel file using Workbook.LoadFromFile() method.
- Get the desired worksheet by using Workbook.Worksheets[] property.
- Access the specific cell ranges and unmerge them by calling Worksheet.Range[].UnMerge() method.
- Save the result file using Workbook.SaveToFile() method.
- Python
from spire.xls import *
from spire.xls.common import *

inputFile = "MergeCellRange.xlsx"
outputFile = "UnmergeCellRange.xlsx"

#Create an object of Workbook class
workbook = Workbook()

#Load a sample file from disk
workbook.LoadFromFile(inputFile)

#Get the first worksheet of this file
sheet = workbook.Worksheets[0]

#Unmerge the particular cell range in Excel
sheet.Range["B6:G6"].UnMerge()

#Save to file.
workbook.SaveToFile(outputFile, ExcelVersion.Version2013)
workbook.Dispose()
Apply for a Temporary License
If you'd like to remove the evaluation message from the generated documents, or to get rid of the function limitations, please request a 30-day trial license for yourself.
