
Data (29)

Auto filters in Excel are a powerful feature for sorting and analyzing data. However, once you’ve finished your data review or need to share the file in its original, unfiltered form, it’s often necessary to remove auto filters from Excel worksheets. If you’re building .NET applications, you can automate this task easily using Spire.XLS for .NET — whether you're removing filters from a single sheet or processing Excel files in batches.
In this article, you'll learn how to remove auto filters in Excel using Spire.XLS for .NET in C# programs.
Here’s what we will cover:
- Why Remove Auto Filters in Excel?
- How to Remove Auto Filters in Excel Using Spire.XLS
- Why Use Spire.XLS to Remove Filters?
- Frequently Asked Questions
Why Remove Auto Filters in Excel?
Removing auto filters in Excel can be essential for:
- Restoring full visibility of your data after filtering
- Preparing spreadsheets for export, printing, or presentation
- Sharing files without hidden or partial data views
In other words, removing filters in Excel files helps maintain data clarity, especially when passing documents to clients, teams, or reports.
How to Remove Auto Filters in Excel Using Spire.XLS
Setting Up Spire.XLS for .NET
Before getting started, install the Spire.XLS library via NuGet:
PM> Install-Package Spire.XLS
Or install the free version for lightweight Excel processing:
PM> Install-Package FreeSpire.XLS
You can also download Spire.XLS for .NET or Free Spire.XLS for .NET, and install the version you choose manually.
Key Methods and Properties Used
- Workbook.LoadFromFile() – Loads an existing Excel file into the Workbook object for processing.
- Workbook.Worksheets[] – Accesses a specific worksheet by index from the workbook.
- Worksheet.AutoFilters.Clear() – Removes all existing filter rules and makes all rows visible.
- Worksheet.AutoFilters.Range – Defines or updates the range of cells to which auto filters are applied.
- Workbook.SaveToFile() – Saves the modified workbook as a new Excel file.
C# Code Example: Remove All AutoFilters in Excel
Here’s a complete example of how to remove all auto-filters in Excel using C# and Spire.XLS:
- C#
using Spire.Xls;

// Create a Workbook instance
Workbook workbook = new Workbook();

// Load an Excel workbook
workbook.LoadFromFile("Sample.xlsx");

// Get a worksheet
Worksheet sheet = workbook.Worksheets[0];

// Remove auto-filters
sheet.AutoFilters.Clear();

// Save the workbook
workbook.SaveToFile("output/RemoveExcelFilter.xlsx");
workbook.Dispose();
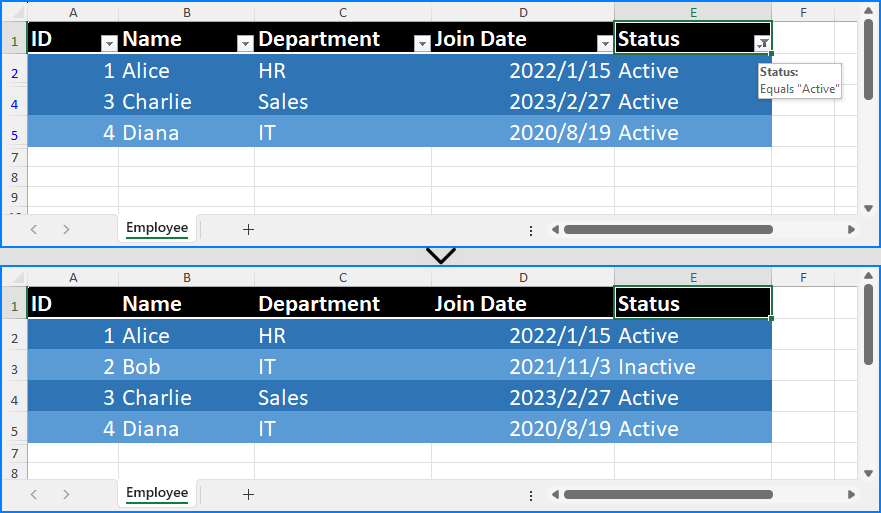
Excel Worksheet Before and After Removing All Auto Filters
Removing a Specific Filter Column in an Excel Worksheet
In Excel, auto filters are applied to a continuous range of columns. This means you can’t directly remove the filter from just one column if it's part of a larger filter range. If you need to exclude a specific column from filtering, you’ll have to reset the filter range in Excel worksheets to adjacent columns.
Here’s how you can do it using Spire.XLS:
- C#
using Spire.Xls;

// Create a Workbook instance
Workbook workbook = new Workbook();

// Load an Excel workbook
workbook.LoadFromFile("Sample.xlsx");

// Get a worksheet
Worksheet sheet = workbook.Worksheets[0];

// Remove the current filters to show all data (to avoid missing data)
sheet.AutoFilters.Clear();

// Reset the filter range
sheet.AutoFilters.Range = sheet.Range[1, 3, 5, 5];

// Save the workbook
workbook.SaveToFile("output/ResetExcelFilter.xlsx");
workbook.Dispose();
Note: Before resetting the filter range, make sure to remove any existing auto filters. Skipping this step can result in hidden (filtered-out) rows being excluded from the new range, potentially causing data to be lost or missed.
Excel Worksheet Before and After Removing a Specific Filter Column
Why Use Spire.XLS to Remove Filters?
- Fast & efficient: No need to open Excel files manually.
- Easy to integrate: Compatible with .NET Framework and .NET Core.
- No dependencies: Does not require Microsoft Office.
- Production-ready: Great for batch jobs and enterprise systems.
See Also: How to Add, Update, and Remove Excel Slicers in C#
Conclusion
Removing auto filters in Excel with Spire.XLS for .NET is quick and simple. Whether you're processing reports or resetting spreadsheets for clean data presentation, you can automate it easily using C#.
Frequently Asked Questions
- Q: How do you remove auto filters in Excel using C#?
Use the AutoFilters.Clear() method from Spire.XLS. It removes all filters from the specified worksheet in just one line of code.
- Q: What’s the easiest way to remove auto filters on Excel programmatically?
Using Spire.XLS for .NET, you can remove filters with a few lines of C# without opening Excel. It's fast, lightweight, and reliable.
- Q: Can I remove only specific filters instead of all of them?
In Excel (and Spire.XLS), auto filters must be applied to a continuous block of columns. You can’t directly remove a filter from just one column in the middle of a filtered range. To remove a specific filter, you need to clear all filters first using Worksheet.AutoFilters.Clear(), then reset the filter range using Worksheet.AutoFilters.Range to exclude the unwanted column.
- Q: Is there a free version of Spire.XLS for .NET?
Yes! We offer a free version – Free Spire.XLS for .NET, which is completely free to use and does not add watermarks to output files. It’s ideal for lightweight Excel processing.
If you want to evaluate the full feature set without any limitations, you can request a temporary license.
Auto Filter is the most convenient way to select the data we want from a large amount of the data in an excel data table. With the help of Spire.XLS for .NET, developers can use the method ListObjects to filter the data and format it as a table. This article will focus on show you how to add table with filter in Excel.
Step 1: Create an excel document and load the Excel from file:
Workbook workbook = new Workbook();
workbook.LoadFromFile("DataTable.xlsx");
Step 2: Gets the first worksheet in the Excel file
Worksheet sheet = workbook.Worksheets[0];
Step 3: Create a List Object named in Table
sheet.ListObjects.Create("Table", sheet.Range[1, 1, sheet.LastRow, sheet.LastColumn]);
Step 4: Set the BuiltInTableStyle for List object.
sheet.ListObjects[0].BuiltInTableStyle = TableBuiltInStyles.TableStyleLight9;
Step 5: Save the document to file.
workbook.SaveToFile("Filter.xlsx", ExcelVersion.Version2010);
Effective screenshot after the date has been auto filtered:
Full codes:
namespace Excelfilter
{
    class Program
    {
        static void Main(string[] args)
        {
            Workbook workbook = new Workbook();
            workbook.LoadFromFile("DataTable.xlsx");

            Worksheet sheet = workbook.Worksheets[0];

            sheet.ListObjects.Create("Table", sheet.Range[1, 1, sheet.LastRow, sheet.LastColumn]);

            sheet.ListObjects[0].BuiltInTableStyle = TableBuiltInStyles.TableStyleLight9;

            workbook.SaveToFile("Filter.xlsx", ExcelVersion.Version2010);
        }
    }
}
Spire.XLS for .NET is a professional Excel component which enables developers/programmers to fast generate, read, write and modify Excel document for .NET. Spire.XLS for .NET doesn't need Microsoft Office Excel Automation. It allows user to operate Excel document directly such as save to stream, save as web response, copy, lock/unlock worksheet, set up workbook properties, etc. As a professional .NET Excel component, it also includes many useful features, for example, functionalities of importing data from Excel to dataTable and exporting dataTable to Excel from Database.
In this article introduces a method of updating excel data by dataTable via using sheet.ExportDataTable() method and sheet.InsertDataTable() method to import data from excel to dataTable and export dataTable to excel from Database.
The main steps of method are:
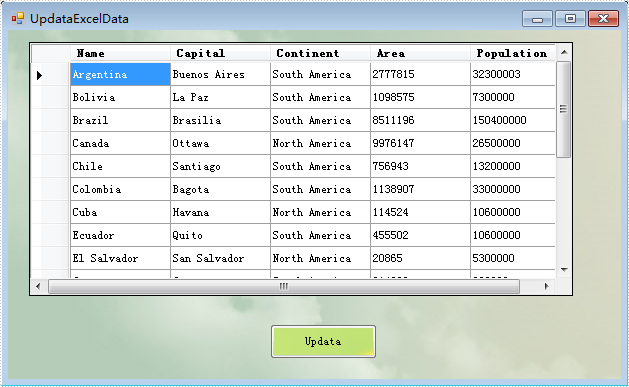
Step 1: Load the excel document and use sheet.ExportDataTable() method extract data to dataTable and show by dataGridView control.
private void Form1_Load(object sender, EventArgs e)
        {
            //load excel document to workbook
            workbook.LoadFromFile(@"DatatableSample.xls");
            Worksheet sheet = workbook.Worksheets[0];
            sheet.Name = "Original table";
            //extract data to dataTable from sheet
            DataTable dataTable = sheet.ExportDataTable();
            //show the data to dataGridView
            this.dataGridView.DataSource = dataTable;
        }
The effect screenshot:
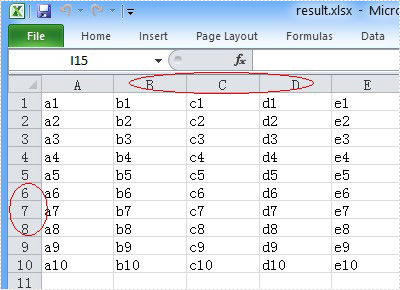
Step 2: Create a new sheet to save the updata data and use sheet.InsertDataTable() method to insert dataTable to the sheet.
            //create a new sheet to save Updata data.
            Worksheet sheet = workbook.CreateEmptySheet("Updata Table");
            //extract data from dataGridView
            DataTable dataTable = this.dataGridView.DataSource as DataTable;
            // insert dataTable to sheet
            sheet.InsertDataTable(dataTable, true, 1, 1);
Step 3: Save the result excel document.
workbook.SaveToFile("result.xlsx", ExcelVersion.Version2007);
The effect screenshot:

Download and install Spire.XLS for .NET and use below code to experience this method to update excel data by dataTable.
The full code:
using System;
using System.Data;
using System.Windows.Forms;
using Spire.Xls;
namespace UpdataExcelDataByDataTable
{

    public partial class UpdataExcelData : Form
    {
        private Workbook workbook = new Workbook();
        private void Form1_Load(object sender, EventArgs e)
        {
            workbook.LoadFromFile(@"DatatableSample.xls");
            Worksheet sheet = workbook.Worksheets[0];
            sheet.Name = "Original table";
            DataTable dataTable = sheet.ExportDataTable();
            this.dataGridView.DataSource = dataTable;
        }
        private void Updata_Click(object sender, EventArgs e)
        {
            Worksheet sheet = workbook.CreateEmptySheet("Updata Table");
            DataTable dataTable = this.dataGridView.DataSource as DataTable;
            sheet.InsertDataTable(dataTable, true, 1, 1);
            workbook.SaveToFile("result.xlsx", ExcelVersion.Version2007);
            System.Diagnostics.Process.Start("result.xlsx");
        }
    }
}
Imports System.Data
Imports System.Windows.Forms
Imports Spire.Xls
Public Class Form1
    Private workbook As New Workbook()
    Private Sub Form1_Load(sender As System.Object, e As System.EventArgs) Handles MyBase.Load
        'load excel document to workbook
        workbook.LoadFromFile("DatatableSample.xls")
        Dim sheet As Worksheet = workbook.Worksheets(0)
        sheet.Name = "Original table"
        'extract data to dataTable from sheet
        Dim dataTable As DataTable = sheet.ExportDataTable()
        'show the data to dataGridView
        Me.DataGridView.DataSource = dataTable
    End Sub
If you couldn't successfully use the Spire.Xls, please refer Spire.XLS Quick Start which can guide you quickly use the Spire.Xls.
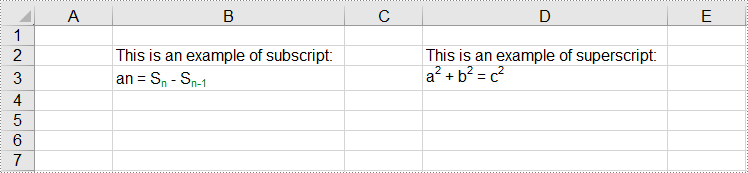
Superscript and subscript are formatting styles that allow you to display characters or numerals above or below the regular text baseline respectively. By utilizing these formatting styles, you can emphasize certain elements, denote exponents, powers, chemical formulas, or mathematical equations, and present data in a more visually appealing and informative manner. In this article, we will demonstrate how to apply superscript and subscript styles in Excel in C# and VB.NET using Spire.XLS for .NET.
Install Spire.XLS for .NET
To begin with, you need to add the DLL files included in the Spire.XLS for .NET package as references in your .NET project. The DLL files can be either downloaded from this link or installed via NuGet.
PM> Install-Package Spire.XLS
Apply Superscript and Subscript in Excel in C# and VB.NET
To apply the superscript or subscript style to specific characters in a cell, you need to create a custom font, enable the superscript or subscript property of the font, and then assign the custom font to the specific characters within the cell. The detailed steps are as follows:
- Create a Workbook object.
- Get a specific worksheet using Workbook.Worksheets[int index] property.
- Get a specific cell using Worksheet.Range[string name] property and add rich text to the cell using CellRange.RichText.Text property.
- Create a custom font using Workbook.CreateFont() method.
- Enable the subscript property of the font by setting ExcelFont.IsSubscript property to true.
- Assign the custom font to specific characters of the rich text in the cell using CellRange.RichText.SetFont() method.
- Get a specific cell using Worksheet.Range[string name] property and add rich text to the cell using CellRange.RichText.Text property.
- Create a custom font using Workbook.CreateFont() method.
- Enable the superscript property of the font by setting ExcelFont.IsSuperscript property to true.
- Assign the custom font to specific characters of the rich text in the cell using CellRange.RichText.SetFont() method.
- Save the result file using Workbook.SaveToFile() method.
- C#
- VB.NET
using Spire.Xls;
using System.Drawing;

namespace ApplySuperscriptAndSubscript
{
    internal class Program
    {
        static void Main(string[] args)
        {
            //Create a Workbook object
            Workbook workbook = new Workbook();

            //Get the first worksheet
            Worksheet sheet = workbook.Worksheets[0];

            //Add text to specific cells
            sheet.Range["B2"].Text = "This is an example of subscript:";
            sheet.Range["D2"].Text = "This is an example of superscript:";

            //Add rich text to a specific cell
            CellRange range = sheet.Range["B3"];
            range.RichText.Text = "an = Sn - Sn-1";

            //Create a custom font
            ExcelFont font = workbook.CreateFont();
            //Enable the subscript property of the font
            font.IsSubscript = true;
            //Set font color
            font.Color = Color.Green;
            //Assign the font to specific characters of the rich text in the cell
            range.RichText.SetFont(6, 6, font);
            range.RichText.SetFont(11, 13, font);

            //Add rich text to a specific cell
            range = sheet.Range["D3"];
            range.RichText.Text = "a2 + b2 = c2";

            //Create a custom font
            font = workbook.CreateFont();
            //Enable the superscript property of the font
            font.IsSuperscript = true;
            //Assign the font to specific characters of the rich text in the cell
            range.RichText.SetFont(1, 1, font);
            range.RichText.SetFont(6, 6, font);
            range.RichText.SetFont(11, 11, font);

            //Auto-fit column widths
            sheet.AllocatedRange.AutoFitColumns();

            //Save the result file
            workbook.SaveToFile("ApplySubscriptAndSuperscript.xlsx", ExcelVersion.Version2013);
            workbook.Dispose();
        }
    }
}
Apply for a Temporary License
If you'd like to remove the evaluation message from the generated documents, or to get rid of the function limitations, please request a 30-day trial license for yourself.
You can hide the Excel row or column by using the c# code, but a row or column also becomes hidden when you want to show the full Excel worksheet. You can unhide the Excel row and column by using the c# code. This article aims at introducing the method sheet.ShowRow and sheet.ShowColumn in the Excel .NET component Spire.Xls to show the hidden row and column.
First, let’s preview the hidden row and column.

Here comes to the steps of the process.
Step 1: Create an instance of Spire.XLS.Workbook.
Workbook workbook = new Workbook();
Step 2: Load the existing Excel file that hidden the row and column in the specified path.
workbook.LoadFromFile("hide.xlsx");
Step 3: Get the first worksheet of the Excel file.
Worksheet sheet = workbook.Worksheets[0];
Step 4: Unhide the hidden row and column.
sheet.ShowRow(7);
sheet.ShowColumn(3);
Step 5: Generate the new Excel file.
workbook.SaveToFile("result.xlsx", ExcelVersion.Version2010);
Now let's preview the effect screenshot.
Here is the full code.
using Spire.Xls;
namespace UnhideExcelRow
{
    class Program
    {
        static void Main(string[] args)
        {
            Workbook workbook = new Workbook();
            workbook.LoadFromFile("hide.xlsx");
            Worksheet sheet = workbook.Worksheets[0];
            // unhide the hidden row and column of the worksheet.
            sheet.ShowRow(7);
            sheet.ShowColumn(3);
            workbook.SaveToFile("result.xlsx", ExcelVersion.Version2010);
        }
    }
}
Text alignment and orientation are essential formatting features in Excel that allow you to position and orient text within cells according to your specific needs. By adjusting text alignment and orientation, you can enhance the readability and aesthetics of your spreadsheet. In this article, we will explain how to set text alignment and orientation in Excel in C# and VB.NET using Spire.XLS for .NET.
Install Spire.XLS for .NET
To begin with, you need to add the DLL files included in the Spire.XLS for.NET package as references in your .NET project. The DLL files can be either downloaded from this link or installed via NuGet.
PM> Install-Package Spire.XLS
Set Text Alignment and Orientation in Excel in C# and VB.NET
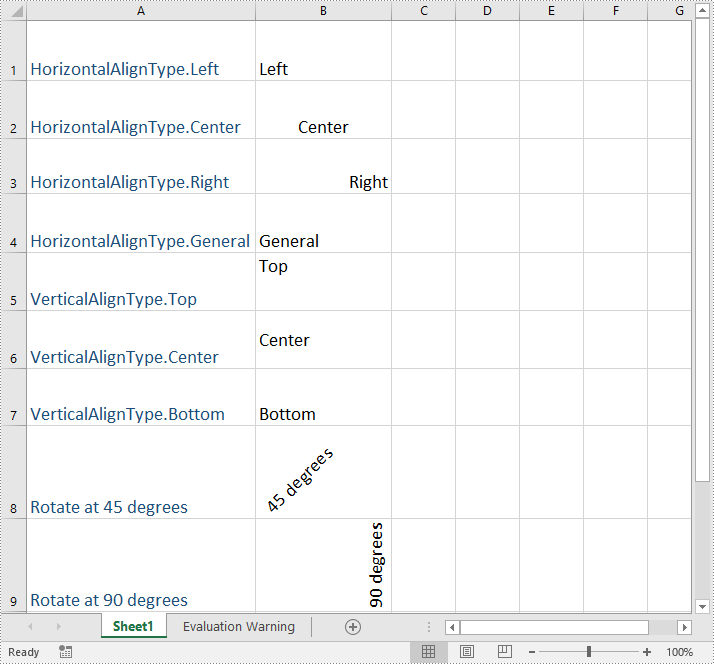
You can set the horizontal or vertical alignment of text in individual cells or a range of cells using the CellRange.Style.HorizontalAlignment or CellRange.Style.VerticalAlignment properties. In addition, you are also able to change the orientation of text by assigning a rotation value to the corresponding cell or cells using the CellRange.Style.Rotation property. The detailed steps are as follows:
- Create a Workbook object.
- Load an Excel file using Workbook.LoadFromFile() method.
- Get a specific worksheet using Workbook.Worksheets[int index] property.
- Access specific cells in the worksheet using Worksheet.Range[string name] property and then set the horizontal alignment of text in them using CellRange.Style.HorizontalAlignment property.
- Access specific cells in the worksheet using Worksheet.Range[string name] property and then set the vertical alignment of text in them using CellRange.Style.VerticalAlignment property.
- Access specific cells in the worksheet using Worksheet.Range[string name] property and then change their text orientation using CellRange.Style.Rotation property.
- Save the result file using Workbook.SaveToFile() method.
- C#
- VB.NET
using Spire.Xls;

namespace TextAlignmentAndRotation
{
    internal class Program
    {
        static void Main(string[] args)
        {
            //Create a Workbook object
            Workbook workbook = new Workbook();

            //Load an Excel file
            workbook.LoadFromFile(@"Sample.xlsx");

            //Get the first worksheet
            Worksheet sheet = workbook.Worksheets[0];

            //Set the horizontal alignment for text in a specific cell to Left
            sheet.Range["B1"].Style.HorizontalAlignment = HorizontalAlignType.Left;

            //Set the horizontal alignment for text in a specific cell to Center
            sheet.Range["B2"].Style.HorizontalAlignment = HorizontalAlignType.Center;

            //Set the horizontal alignment for text in a specific cell to Right
            sheet.Range["B3"].Style.HorizontalAlignment = HorizontalAlignType.Right;

            //Set the horizontal alignment for text in a specific cell to General
            sheet.Range["B4"].Style.HorizontalAlignment = HorizontalAlignType.General;

            //Set the vertical alignment for text in a specific cell to Top
            sheet.Range["B5"].Style.VerticalAlignment = VerticalAlignType.Top;

            //Set the vertical alignment for text in a specific cell to Center
            sheet.Range["B6"].Style.VerticalAlignment = VerticalAlignType.Center;

            //Set the vertical alignment for text in a specific cell to Bottom
            sheet.Range["B7"].Style.VerticalAlignment = VerticalAlignType.Bottom;

            //Change the text orientation in specific cells by assigning a rotation value
            sheet.Range["B8"].Style.Rotation = 45;
            sheet.Range["B9"].Style.Rotation = 90;

            //Set the row height for specific cells
            sheet.Range["B8:C9"].RowHeight = 70;

            //Save the result file
            workbook.SaveToFile("TextAlignmentAndOrientation.xlsx", ExcelVersion.Version2016);
            workbook.Dispose();
        }
    }
}
Apply for a Temporary License
If you'd like to remove the evaluation message from the generated documents, or to get rid of the function limitations, please request a 30-day trial license for yourself.
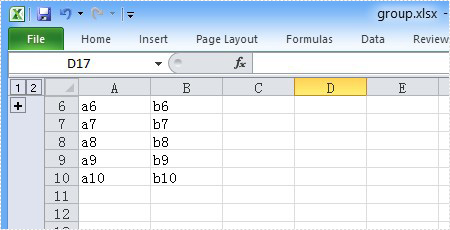
Group the Excel cells is to tie a range of cells together so that they can be collapsed or expanded. But usually, we also need to ungroup the Excel cells. Consequently, the articles aims at introducing how to ungroup Excel cells in C#, through a professional Excel .NET Component Spire.Xls.
Just as its name implies, ungroup Excel cells is to ungroup a range of cells that were previously grouped. Before ungroup Excel cells, we should complete the preparatory work:
- Download the Spire.XLS and install it on your machine.
- Add the Spire.XLS.dll files as reference.
- Open bin folder and select the three dll files under .NET 4.0.
- Right click property and select properties in its menu.
- Set the target framework as .NET 4.
- Add Spire.XLS as namespace.
Then here comes to the explanation of the code:
Step 1: Create an instance of Spire.XLS.Workbook.
Workbook workbook = new Workbook();
Step 2: Load the file base on a specified file path.
workbook.LoadFromFile(@"group.xlsx");
Step 3: Get the first worksheet.
Worksheet sheet = workbook.Worksheets[0];
Step 4: Ungroup the first 5 row cells.
sheet.UngroupByRows(1, 5);
Step 5: Save as the generated file.
workbook.SaveToFile(@"result.xlsx", ExcelVersion.Version2010);
Full code:
using Spire.Xls;
namespace UngroupCell
{
    class Program
    {

        static void Main(string[] args)
        {

            Workbook workbook = new Workbook();
            workbook.LoadFromFile(@"group.xlsx");
            Worksheet sheet = workbook.Worksheets[0];
            sheet.UngroupByRows(1, 5);
            workbook.SaveToFile(@"..\..\result.xlsx", ExcelVersion.Version2010);

        }
    }
}
Please preview the original group effect screenshot:
And the generated ungroup effect screenshot:
The Find function in Excel is one of the most commonly used functions for quickly locating specified data, and users can also highlight the data to make it more obvious. In this article, you will learn how to programmatically find and highlight cells with a specific value using Spire.XLS for .NET.
Install Spire.XLS for .NET
To begin with, you need to add the DLL files included in the Spire.XLS for .NET package as references in your .NET project. The DLL files can be either downloaded from this link or installed via NuGet.
PM> Install-Package Spire.XLS
Find and Highlight Data in Excel
The detailed steps are as follows.
- Create a Workbook instance.
- Load a sample Excel file using Workbook.LoadFromFile() method.
- Get a specified worksheet using Workbook.Worksheets[sheetIndex] property.
- Find all cells with matching text using Worksheet.FindAllString(string stringValue, bool formula, bool formulaValue) method.
- Set color to highlight the cells using CellRange.Style.Color property.
- Save the result file using Workbook.SaveToFile() method.
- C#
- VB.NET
using Spire.Xls;
using System.Drawing;
namespace FindHighlight
{
class Program
{
static void Main(string[] args)
{
//Create a Workbook instance
Workbook workbook = new Workbook();
//Load a sample Excel file
workbook.LoadFromFile("Test.xlsx");
//Get the first worksheet
Worksheet sheet = workbook.Worksheets[0];
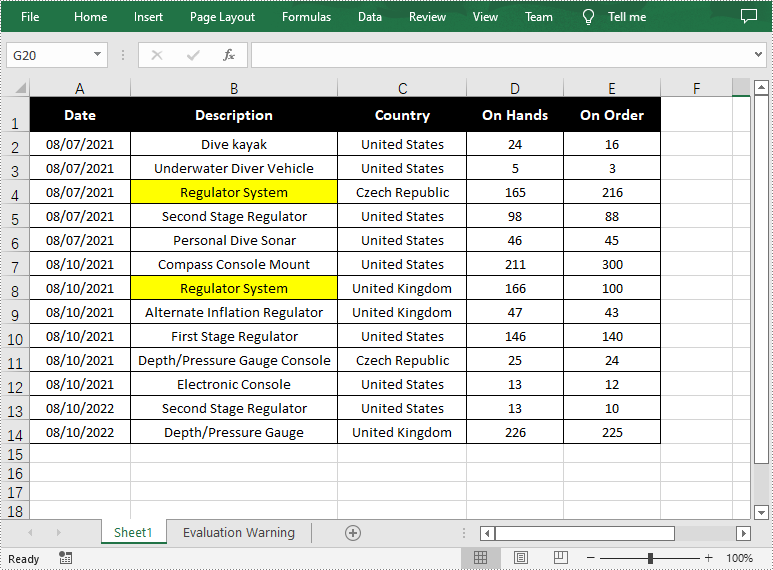
//Find all cells with the text "Regulator System"
foreach (CellRange range in sheet.FindAllString("Regulator System", true, true))
{
//Set color to highlight the cells
range.Style.Color = Color.Yellow;
}
//Save the result file
workbook.SaveToFile("FindHighlight.xlsx", ExcelVersion.Version2016);
}
}
}
Apply for a Temporary License
If you'd like to remove the evaluation message from the generated documents, or to get rid of the function limitations, please request a 30-day trial license for yourself.
Excel's Find and Replace feature is an indispensable tool for users when editing large Excel spreadsheets. It allows users to search for specific values within a worksheet or cell range and update them with new values quickly and accurately. With this feature, users don't need to perform manual searches, which significantly improves their working efficiency. In this article, we will introduce how to programmatically find and replace data in Excel in C# and VB.NET using Spire.XLS for .NET library.
- Find and Replace Data in a Worksheet in Excel
- Find and Replace Data in a Specific Cell Range in Excel
Install Spire.XLS for .NET
To begin with, you need to add the DLL files included in the Spire.XLS for .NET package as references in your .NET project. The DLL files can be either downloaded from this link or installed via NuGet.
PM> Install-Package Spire.XLS
Find and Replace Data in a Worksheet in Excel in C# and VB.NET
Spire.XLS for .NET offers the Worksheet.FindAllString(string stringValue, bool formula, bool formulaValue) method which enables you to find the cells containing specific data values in an Excel worksheet. Once the cells are found, you can use the CellRange.Text property to update their values with new values. The detailed steps are as follows:
- Initialize an instance of the Workbook class.
- Load an Excel file using the Workbook.LoadFromFile(string fileName) method.
- Get a specific worksheet of the file using the Workbook.Worksheets[int index] property.
- Find the cells containing a specific value in the worksheet using the Worksheet.FindAllString(string stringValue, bool formula, bool formulaValue) method.
- Iterate through the found cells.
- Update the value of each cell with another value using the CellRange.Text property.
- Set a background for the cell so you can easily find the updated cells using the CellRange.Style.Color property.
- Save the result file to a specific location using the Workbook.SaveToFile(string fileName, ExcelVersion version) method.
- C#
- VB.NET
using Spire.Xls;
using System.Drawing;
namespace ReplaceDataInWorksheet
{
internal class Program
{
static void Main(string[] args)
{
//Initialize an instance of the Workbook class
Workbook workbook = new Workbook();
//Load an Excel file
workbook.LoadFromFile(@"Sample.xlsx");
//Get the first worksheet
Worksheet worksheet = workbook.Worksheets[0];
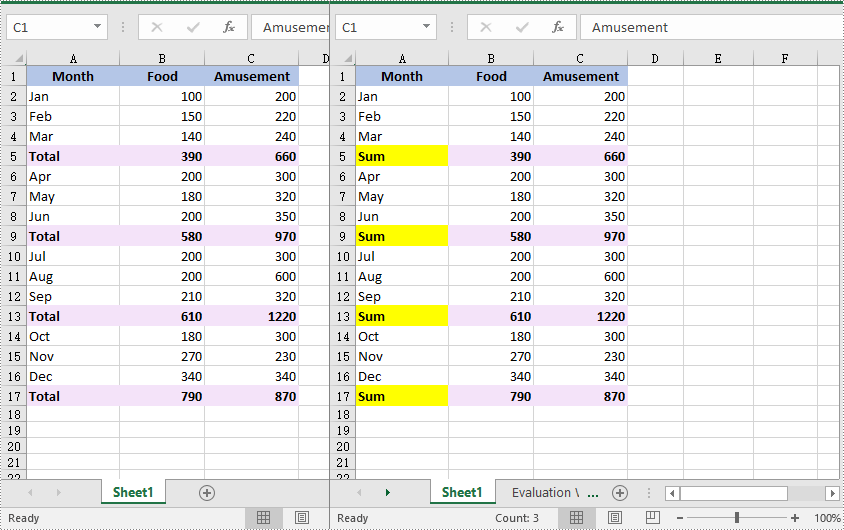
//Find the cells with the specific string value “Total” in the worksheet
CellRange[] cells = worksheet.FindAllString("Total", true, true);
//Iterate through the found cells
foreach (CellRange cell in cells)
{
//Replace the value of the cell with another value
cell.Text = "Sum";
//Set a background color for the cell
cell.Style.Color = Color.Yellow;
}
//Save the result file to a specific location
workbook.SaveToFile("ReplaceDataInWorksheet.xlsx", ExcelVersion.Version2016);
workbook.Dispose();
}
}
}
Find and Replace Data in a Specific Cell Range in Excel in C# and VB.NET
You can find the cells containing a specific value in a cell range using the CellRange.FindAllString(string stringValue, bool formula, bool formulaValue) method. Then you can update the value of each found cell with another value using the CellRange.Text property. The detailed steps are as follows:
- Initialize an instance of the Workbook class.
- Load an Excel file using the Workbook.LoadFromFile(string fileName) method.
- Get a specific worksheet of the file using the Workbook.Worksheets[int index] property.
- Get a specific cell range of the worksheet using the Worksheet.Range[string rangeName] property.
- Find the cells with a specific value in the cell range using the CellRange.FindAllString(string stringValue, bool formula, bool formulaValue) method.
- Iterate through the found cells.
- Update the value of each found cell to another value using the CellRange.Text property.
- Set a background for the cell so you can easily find the updated cells using the CellRange.Style.Color property.
- Save the result file to a specific location using the Workbook.SaveToFile(string fileName, ExcelVersion version) method.
- C#
- VB.NET
using Spire.Xls;
using System.Drawing;

namespace ReplaceDataInCellRange
{
    internal class Program
    {
        static void Main(string[] args)
        {
            //Initialize an instance of the Workbook class
            Workbook workbook = new Workbook();
            //Load an Excel file
            workbook.LoadFromFile(@"Sample.xlsx");

            //Get the first worksheet
            Worksheet worksheet = workbook.Worksheets[0];

            //Get a specific cell range
            CellRange range = worksheet.Range["A1:C9"];

            //Find the cells with the specific value "Total" in the cell range
            CellRange[] cells = range.FindAllString("Total", true, true);

            //Iterate through the found cells
            foreach (CellRange cell in cells)
            {
                //Replace the value of the cell with another value
                cell.Text = "Sum";
                //Set a background color for the cell
                cell.Style.Color = Color.Yellow;
            }

            //Save the result file to a specific location
            workbook.SaveToFile("ReplaceDataInCellRange.xlsx", ExcelVersion.Version2016);
            workbook.Dispose();
        }
    }
}

Apply for a Temporary License
If you'd like to remove the evaluation message from the generated documents, or to get rid of the function limitations, please request a 30-day trial license for yourself.
Sorting data in Excel is a fundamental skill that enhances data organization and analysis. By rearranging rows based on specific criteria—such as alphabetical order, numerical value, or date—users can easily identify trends, patterns, and outliers. In this article, you will learn how to sort data in Excel using C# with Spire.XLS for .NET.
Install Spire.XLS for .NET
To begin with, you need to add the DLL files included in the Spire.XLS for .NET package as references in your .NET project. The DLL files can be either downloaded from this link or installed via NuGet.
PM> Install-Package Spire.XLS
Sort a Single Column in Excel in C#
Sorting a single column in Excel enables quick organization of your data in ascending or descending order for easier analysis. However, this method leaves other columns unchanged, potentially leading to misalignment of related data.
Spire.XLS for .NET provides the Workbook.DataSorter.SortColumns.Add(int key, SortComparisonType sortComparisonType, OrderBy orderBy) method. This method enables developers to set sorting criteria by selecting a specific column, defining the comparison type, and specifying the sort order (ascending or descending). To apply the sorting to the defined range, use the Workbook.DataSorter.Sort(CellRange range) method.
Here are the steps to sort a single column in Excel using C#:
- Create a Workbook object.
- Load an Excel file using the Workbook.LoadFromFile() method.
- Get a specific worksheet using the Workbook.Worksheets[index] property.
- Get the column where you want to sort data using the Worksheet.Range property.
- Create sorting criteria for the selected column using the Workbook.DataSorter.SortColumns.Add() method.
- Execute sorting within the column using the Workbook.DataSorter.Sort() method.
- Save the workbook to a different Excel file.
- C#
using Spire.Xls;
namespace SortSingleColumn
{
class Program
{
static void Main(string[] args)
{
// Create a Workbook object
Workbook workbook = new Workbook();
// Load an Excel file
workbook.LoadFromFile("C:\\Users\\Administrator\\Desktop\\Input.xlsx");
// Get a specific worksheet
Worksheet sheet = workbook.Worksheets[0];
// Get the cell range (a single column) where you want to sort data
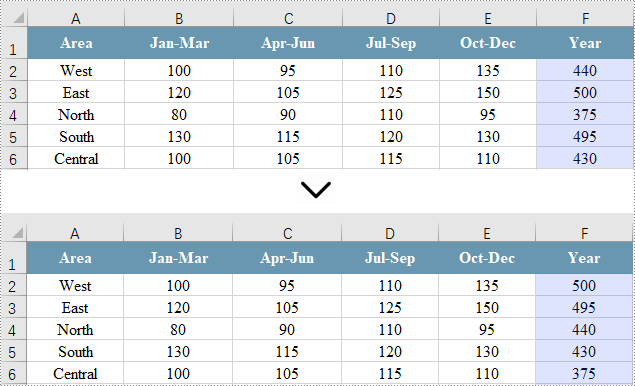
CellRange cellRange = sheet.Range["F1:F6"];
// Sort values in the specified column in descending order
workbook.DataSorter.SortColumns.Add(5, SortComparsionType.Values, OrderBy.Descending);
// Sort in the specified cell range
workbook.DataSorter.Sort(cellRange);
// Save the workbook
workbook.SaveToFile("SortSingleColumn.xlsx", ExcelVersion.Version2013);
// Dispose resources
workbook.Dispose();
}
}
}
Sort Multiple Columns in Excel in C#
Sorting data across multiple columns ensures that all related data across the selected columns remains aligned and meaningful, which is useful for complex datasets where relationships between data points matter.
Sorting data across multiple columns is similar to sorting a single column. The main difference lies in the CellRange parameter used in Workbook.DataSorter.Sort(CellRange range), which specifies multiple columns instead of just one.
Here are the steps to sort multiple column in Excel using C#:
- Create a Workbook object.
- Load an Excel file using the Workbook.LoadFromFile() method.
- Get a specific worksheet using the Workbook.Worksheets[index] property.
- Get the cell range (columns) where you want to sort data using the Worksheet.Range property.
- Create sorting criteria for the selected column using the Workbook.DataSorter.SortColumns.Add() method.
- Execute sorting within the range using the Workbook.DataSorter.Sort() method.
- Save the workbook to a different Excel file.
- C#
using Spire.Xls;
namespace SortMultipleColumns
{
class Program
{
static void Main(string[] args)
{
// Create a new workbook
Workbook workbook = new Workbook();
// Load an Excel file
workbook.LoadFromFile("C:\\Users\\Administrator\\Desktop\\Input.xlsx");
// Get a specific worksheet
Worksheet sheet = workbook.Worksheets[0];
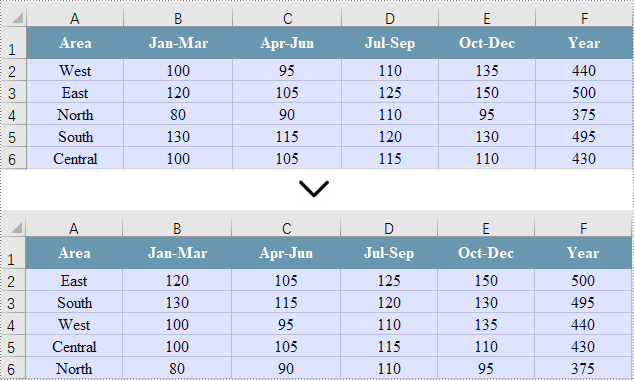
// Get the cell range (multiple columns) where you want to sort data
CellRange cellRange = sheet.Range["A1:F6"];
// Sort values in the specified column in descending order
workbook.DataSorter.SortColumns.Add(5, SortComparsionType.Values, OrderBy.Descending);
// Sort in the specified cell range
workbook.DataSorter.Sort(cellRange);
// Save the workbook
workbook.SaveToFile("SortMultipleColumns.xlsx", ExcelVersion.Version2013);
// Dispose resources
workbook.Dispose();
}
}
}
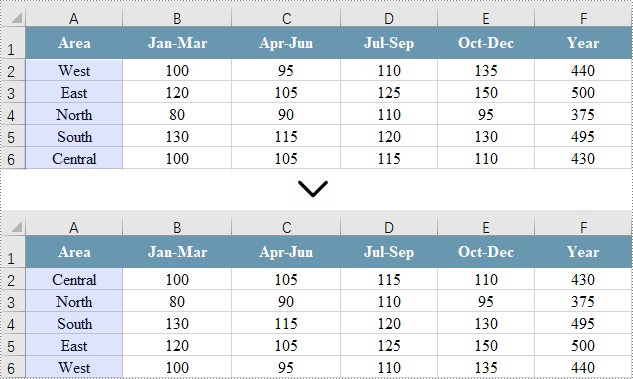
Sort by a Custom List in C#
Sorting by a custom list in Excel allows you to arrange data based on specific, non-alphabetical criteria tailored to your needs, ensuring the order is meaningful for your analysis or reporting.
To accomplish this, create an array of strings that defines the custom sorting order. Next, set the sorting criteria using the Workbook.DataSorter.SortColumns.Add(int key, OrderBy orderBy) method. Finally, invoke the Workbook.DataSorter.Sort(CellRange range) method to sort the specified cell range.
Here are the steps to sort data by a custom list in Excel using C#:
- Create a Workbook object.
- Load an Excel file using the Workbook.LoadFromFile() method.
- Get a specific worksheet using the Workbook.Worksheets[index] property.
- Get the cell range where you want to sort data using the Worksheet.Range property.
- Define the custom sorting order with an array of strings.
- Create sorting criteria for the selected column using the Workbook.DataSorter.SortColumns.Add() method.
- Execute sorting within the range using the Workbook.DataSorter.Sort() method.
- Save the workbook to a different Excel file.
- C#
using Spire.Xls;

namespace SortMultipleColumns
{
    class Program
    {
        static void Main(string[] args)
        {
            // Create a new workbook
            Workbook workbook = new Workbook();

            // Load an Excel file
            workbook.LoadFromFile("C:\\Users\\Administrator\\Desktop\\Input.xlsx");

            // Get a specific worksheet
            Worksheet sheet = workbook.Worksheets[0];

            // Get the cell range where you want to sort data
            CellRange cellRange = sheet.Range["A1:F6"];

            String[] customList = { "Central", "North", "South", "East", "West" };

            // Sort a specified column using the custom list
            workbook.DataSorter.SortColumns.Add(0, customList);

            // Sort in the specified cell range
            workbook.DataSorter.Sort(cellRange);

            // Save the workbook
            workbook.SaveToFile("SortByCustomList.xlsx", ExcelVersion.Version2013);

            // Dispose resources
            workbook.Dispose();
        }
    }
}
Apply for a Temporary License
If you'd like to remove the evaluation message from the generated documents, or to get rid of the function limitations, please request a 30-day trial license for yourself.
