Add Sparklines in Excel in React with JavaScript
A chart makes the trend behind one set of numbers visible, but it is far less good at showing the trends behind dozens of sets at once. Sparklines are built for exactly that: each one compresses a trend into a single cell, with no axes and no legend, so a whole column of trends can be taken in at a glance. Give every region's quarterly sales figures their own sparkline and you can see which row is climbing and which one turned back long before you could read it out of a column of numbers. Spire.XLS for JavaScript performs this directly in the browser through WebAssembly, managing input and output files with a virtual file system (VFS) and requiring no backend service.
This article covers three feature points:
- Add line sparklines
- Add column sparklines and highlight the high and low points
- Clear sparklines from a worksheet
For installation and project setup, see Integrating Spire.XLS for JavaScript in a React Project. The examples below assume Spire.XLS is installed and the WebAssembly module has been initialized.
Add Line Sparklines
A line sparkline joins a row of values in order into a single thin line, making the rise and fall of the trend immediately readable. It occupies no cell of its own and hides none of the numbers underneath, so a single narrow column can carry the trends of dozens of rows at once, and which one is climbing and which one turned back is there at a glance. A sparkline cannot exist outside a sparkline group, and the group decides the type, colors and marker settings shared by the whole batch. The steps are:
- Load the font and the sample data file into the VFS.
- Load the workbook and get the first worksheet.
- Create a line sparkline group with
SparklineGroups.AddGroup()and set the line weight and marker color. - Get the group's sparkline collection with
Add()and add one sparkline per data row in column F. - Save the workbook.
The following is the complete code example, showing how to add line sparklines to Excel data in React:
function App() {
  const addLineSparkline = async () => {
    // Get the Spire.XLS WASM module
    const xlsModule = window.wasmModule?.spirexls;

    // Check if the module is ready
    if (!xlsModule) {
      alert('Spire.Xls is not ready yet');
      return;
    }

    // Load the font and the sample data file into the VFS
    await window.spire.FetchFileToVFS('ARIAL.TTF', '/Library/Fonts/', `${process.env.PUBLIC_URL}/font/`);
    const inputFileName = 'SparklineData.xlsx';
    await window.spire.FetchFileToVFS(inputFileName, '', `${process.env.PUBLIC_URL}data/`);

    // Load the workbook and get the first worksheet
    const workbook = new xlsModule.Workbook();
    workbook.LoadFromFile({ fileName: inputFileName });
    const sheet = workbook.Worksheets.get(0);

    // Create a line sparkline group on the worksheet
    const sparklineGroup = sheet.SparklineGroups.AddGroup({ sparklineType: xlsModule.SparklineType.Line });

    // Style the line: thicker stroke and visible data point markers
    sparklineGroup.LineWeight = 1.5;
    sparklineGroup.ShowMarkers = true;
    sparklineGroup.MarkersColor = xlsModule.Color.get_Red();

    // Get the sparkline collection of the group
    const sparklines = sparklineGroup.Add();

    // Add one sparkline per data row in column F
    for (let row = 2; row <= 9; row++) {
      sparklines.Add({
        dataRange: sheet.Range.get(`B${row}:E${row}`),
        referenceRange: sheet.Range.get(`F${row}`),
      });
    }

    // Save the workbook
    const outputFileName = 'AddLineSparkline.xlsx';
    workbook.SaveToFile({ fileName: outputFileName });

    // Dispose of the workbook object to free resources
    workbook.Dispose();

    // Read the result file from the VFS and trigger the download
    const fileArray = window.dotnetRuntime.Module.FS.readFile(outputFileName);
    const blob = new Blob([fileArray], { type: 'application/vnd.openxmlformats-officedocument.spreadsheetml.sheet' });
    const url = URL.createObjectURL(blob);
    const a = document.createElement('a');
    a.href = url;
    a.download = outputFileName;
    a.click();
    URL.revokeObjectURL(url);
  };

  return (
    <div style={{ textAlign: 'center', height: '300px' }}>
      <h1>Line Sparkline</h1>
      <button onClick={addLineSparkline}>Start</button>
    </div>
  );
}

export default App;
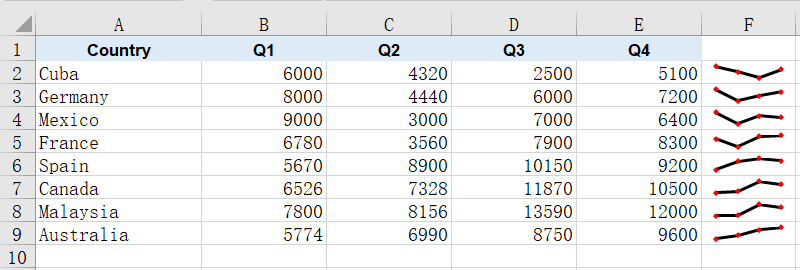
After running, the effect of adding line sparklines:
Add Column Sparklines and Highlight the High and Low Points
A column sparkline represents values as a row of thin bars, which reads more directly than a line when you are comparing several numbers within the same row. It works the same way as the line sparkline, except that the color lands on each bar itself rather than on a connecting stroke.
What really makes column sparklines useful is the high and low point markers: the strongest and the weakest quarter in each row are picked out and colored on their own, so you no longer have to compare the numbers by eye to see where a row peaked and where it fell away. The steps are:
- Load the font and the sample data file into the VFS.
- Load the workbook and get the first worksheet.
- Create a column sparkline group with
SparklineGroups.AddGroup()(passingSparklineType.Column) and set the series color withSparklineColor. - Turn on
ShowHighPointandShowLowPoint, and give each its own color withHighPointColorandLowPointColor. - Get the group's sparkline collection with
Add(), add one sparkline per data row in column G and save the workbook.
The following is the complete code example, showing how to add column sparklines to Excel data and highlight the high and low points in React:
function App() {
  const addColumnSparkline = async () => {
    // Get the Spire.XLS WASM module
    const xlsModule = window.wasmModule?.spirexls;

    // Check if the module is ready
    if (!xlsModule) {
      alert('Spire.Xls is not ready yet');
      return;
    }

    // Load the font and the sample data file into the VFS
    await window.spire.FetchFileToVFS('ARIAL.TTF', '/Library/Fonts/', `${process.env.PUBLIC_URL}/font/`);
    const inputFileName = 'SparklineData.xlsx';
    await window.spire.FetchFileToVFS(inputFileName, '', `${process.env.PUBLIC_URL}data/`);

    // Load the workbook and get the first worksheet
    const workbook = new xlsModule.Workbook();
    workbook.LoadFromFile({ fileName: inputFileName });
    const sheet = workbook.Worksheets.get(0);

    // Create a column sparkline group
    const sparklineGroup = sheet.SparklineGroups.AddGroup({ sparklineType: xlsModule.SparklineType.Column });

    // Set the color of the sparkline itself
    sparklineGroup.SparklineColor = xlsModule.Color.get_CadetBlue();

    // Turn on the high and low point markers and give each its own color
    sparklineGroup.ShowHighPoint = true;
    sparklineGroup.HighPointColor = xlsModule.Color.get_Red();
    sparklineGroup.ShowLowPoint = true;
    sparklineGroup.LowPointColor = xlsModule.Color.get_Purple();

    const sparklines = sparklineGroup.Add();

    // Add one sparkline per data row in column G
    for (let row = 2; row <= 9; row++) {
      sparklines.Add({
        dataRange: sheet.Range.get(`B${row}:E${row}`),
        referenceRange: sheet.Range.get(`G${row}`),
      });
    }

    // Save the workbook
    const outputFileName = 'AddColumnSparkline.xlsx';
    workbook.SaveToFile({ fileName: outputFileName });

    // Dispose of the workbook object to free resources
    workbook.Dispose();

    // Read the result file from the VFS and trigger the download
    const fileArray = window.dotnetRuntime.Module.FS.readFile(outputFileName);
    const blob = new Blob([fileArray], { type: 'application/vnd.openxmlformats-officedocument.spreadsheetml.sheet' });
    const url = URL.createObjectURL(blob);
    const a = document.createElement('a');
    a.href = url;
    a.download = outputFileName;
    a.click();
    URL.revokeObjectURL(url);
  };

  return (
    <div style={{ textAlign: 'center', height: '300px' }}>
      <h1>Column Sparkline</h1>
      <button onClick={addColumnSparkline}>Start</button>
    </div>
  );
}

export default App;
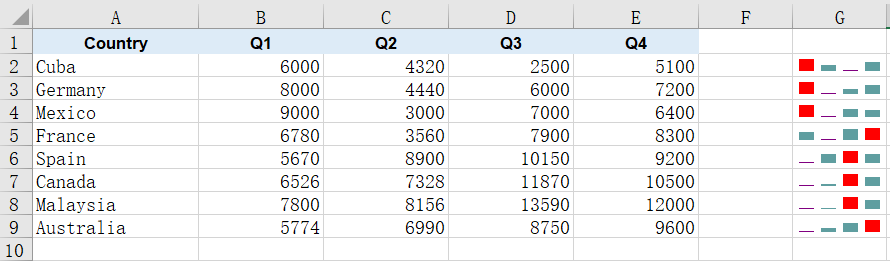
After running, the effect of adding column sparklines and highlighting the high and low points:
Clear Sparklines from a Worksheet
When a report is revised or the figures are restated, the sparklines drawn beside the old numbers may no longer apply and need to be removed and drawn again. Sparkline groups are held by the worksheet, and once they are gone the cells return to their ordinary state, with their data and other formatting untouched. The steps are:
- Load the font and the sample data file into the VFS.
- Load the workbook and get the second worksheet, which already carries a line sparkline group.
- Clear all sparkline groups on that worksheet with
SparklineGroups.Clear(). - Save the workbook.
The following is the complete code example, showing how to clear sparklines from a worksheet in React:
function App() {
  const clearSparklines = async () => {
    // Get the Spire.XLS WASM module
    const xlsModule = window.wasmModule?.spirexls;

    // Check if the module is ready
    if (!xlsModule) {
      alert('Spire.Xls is not ready yet');
      return;
    }

    // Load the font and the sample data file into the VFS
    await window.spire.FetchFileToVFS('ARIAL.TTF', '/Library/Fonts/', `${process.env.PUBLIC_URL}/font/`);
    const inputFileName = 'SparklineData.xlsx';
    await window.spire.FetchFileToVFS(inputFileName, '', `${process.env.PUBLIC_URL}data/`);

    // Load the workbook and get the second worksheet
    const workbook = new xlsModule.Workbook();
    workbook.LoadFromFile({ fileName: inputFileName });
    const sheet = workbook.Worksheets.get(1);

    // Clear all sparkline groups on that worksheet
    sheet.SparklineGroups.Clear();

    // Save the workbook
    const outputFileName = 'ClearSparklines.xlsx';
    workbook.SaveToFile({ fileName: outputFileName });

    // Dispose of the workbook object to free resources
    workbook.Dispose();

    // Read the result file from the VFS and trigger the download
    const fileArray = window.dotnetRuntime.Module.FS.readFile(outputFileName);
    const blob = new Blob([fileArray], { type: 'application/vnd.openxmlformats-officedocument.spreadsheetml.sheet' });
    const url = URL.createObjectURL(blob);
    const a = document.createElement('a');
    a.href = url;
    a.download = outputFileName;
    a.click();
    URL.revokeObjectURL(url);
  };

  return (
    <div style={{ textAlign: 'center', height: '300px' }}>
      <h1>Clear Sparklines</h1>
      <button onClick={clearSparklines}>Start</button>
    </div>
  );
}

export default App;
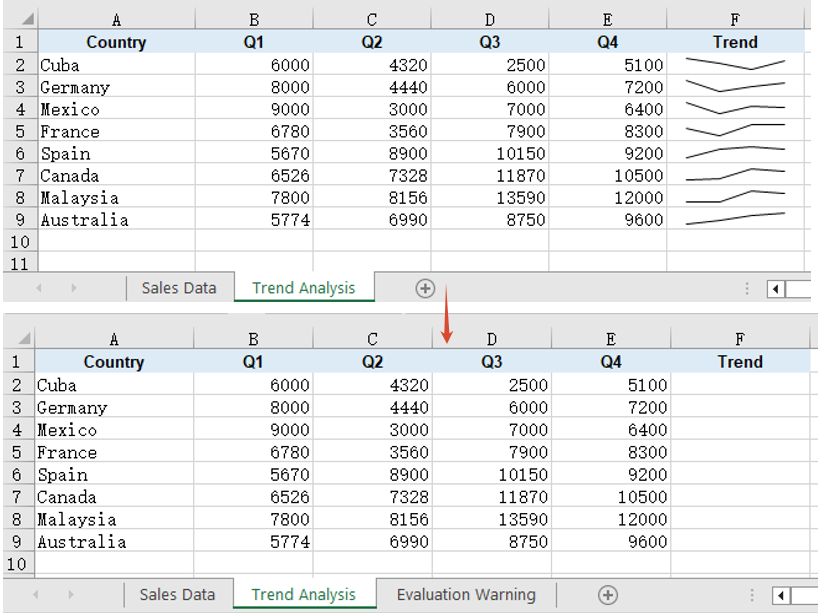
After running, the effect of clearing sparklines from a worksheet:
FAQ
Reading the cells back does not show the sparklines
Cause: A sparkline is not cell content. It belongs to a sparkline group on the worksheet and is drawn over its anchor cell, while its data and settings are written into the worksheet's extension block, so walking the cells returns an empty value for the anchor column and no cell-level call can tell you whether a sparkline is there.
Solution: Read it from the worksheet-level SparklineGroups instead. get_Item(0) returns the first group, and its SparklineType tells you whether the batch is a line or a column one; the color settings are read from the same place:
const group = sheet.SparklineGroups.get_Item(0);
console.log(group.SparklineType);   // SparklineType.Line or SparklineType.Column
Setting the line weight and markers on a column sparkline has no effect
Cause: LineWeight and ShowMarkers apply to line sparklines only. A column sparkline represents values as bars, so it has neither a connecting stroke nor data point markers, and although the assignment succeeds, neither property is written to the result file.
Solution: If you need a stroke and markers, create the sparkline group as a line type and set them there:
const sparklineGroup = sheet.SparklineGroups.AddGroup({ sparklineType: xlsModule.SparklineType.Line });
sparklineGroup.LineWeight = 1.5;
sparklineGroup.ShowMarkers = true;
sparklineGroup.MarkersColor = xlsModule.Color.get_Red();
Get a Free License
Spire.XLS for JavaScript offers a 30-day full-featured free trial license with no functional limitations. Apply here to evaluate before purchasing.
Compress, Resize or Move Excel Pictures in React with JavaScript
Once a report has accumulated a few pictures, the awkward part is rarely the text: a few hundred kilobytes of product photos pushed straight into a worksheet will swell the file until sending and archiving become painful, and pictures copied in from elsewhere rarely share one size—a large one covers an entire block of data while a small one sits unreadable in a corner. Fixing these by hand in Excel is bearable, but there is no entry point once the work has to be done in code.Spire.XLS for JavaScript performs this work directly in the browser through WebAssembly, managing input and output files with a virtual file system (VFS) and requiring no backend service.
This article covers three key features:
For installation and project setup, see Integrating Spire.XLS for JavaScript in a React Project. The examples below assume Spire.XLS is already installed and the WebAssembly module has been initialized.
Compress Pictures in Excel
Compress() re-encodes a picture at the quality ratio you pass in: a value of 50 brings the picture quality down to 50%. The lower the quality, the less data the picture takes up and the lighter the workbook becomes. Compression only touches the picture's own data—the picture keeps its position and its display size on the worksheet—so it is the right move when you want a smaller file without disturbing the layout. The steps are:
- Load the workbook.
- Walk every picture of every worksheet.
- Call
Compressto bring each picture down to 50% quality. - Save the workbook.
The following is a complete code example that compresses the pictures in an Excel file in React:
function App() {
  const compressPictures = async () => {
    // Get the Spire.XLS WASM module
    const xlsModule = window.wasmModule?.spirexls;

    // Check if the module is ready
    if (!xlsModule) {
      alert('Spire.Xls is not ready yet');
      return;
    }

    // Load the font into VFS
    await window.spire.FetchFileToVFS('ARIAL.TTF', '/Library/Fonts/', `${process.env.PUBLIC_URL}/font/`);

    // Load the Excel file into VFS
    const inputFileName = 'ResizeAndMovePictures.xlsx';
    await window.spire.FetchFileToVFS(inputFileName, '', `${process.env.PUBLIC_URL}/static/data/`);

    // Load the workbook
    const workbook = new xlsModule.Workbook();
    workbook.LoadFromFile(inputFileName);

    // Walk every picture of every worksheet
    for (const sheet of workbook.Worksheets) {
      for (const picture of sheet.Pictures) {
        // Compress the picture quality down to 50%
        picture.Compress(50);
      }
    }

    // Save the workbook
    const outputFileName = "CompressPictures.xlsx";
    workbook.SaveToFile(outputFileName);

    // Release resources
    workbook.Dispose();

    // Read the result file from VFS and trigger the download
    const fileArray = window.dotnetRuntime.Module.FS.readFile(outputFileName);
    const blob = new Blob([fileArray], { type: "application/vnd.openxmlformats-officedocument.spreadsheetml.sheet" });
    const url = URL.createObjectURL(blob);
    const a = document.createElement('a');
    a.href = url;
    a.download = outputFileName;
    a.click();
    URL.revokeObjectURL(url);
  };

  return (
    <div style={{ textAlign: 'center', height: '300px' }}>
      <h1>Compress, Resize or Move Pictures in Excel</h1>
      <button onClick={compressPictures}>Start</button>
    </div>
  );
}

export default App;
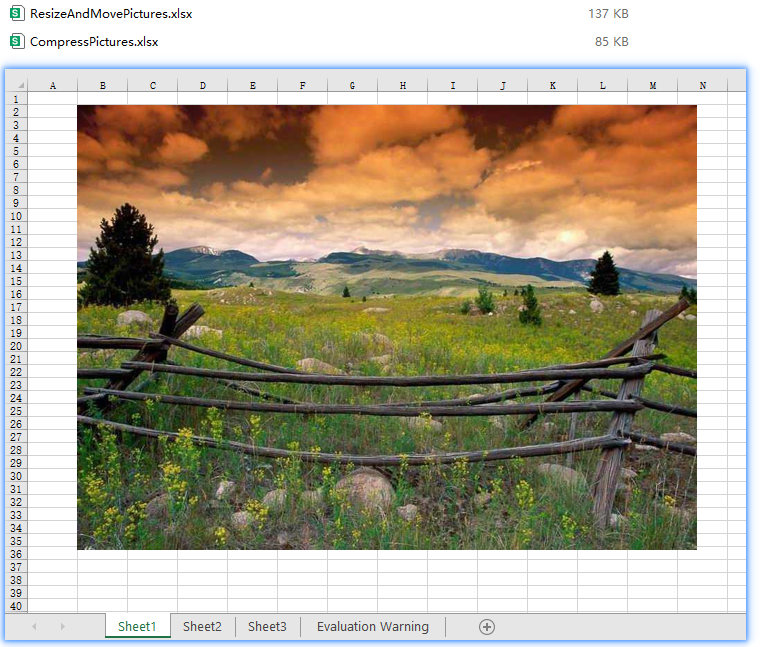
Compress handles every picture it reaches in one pass; the compressed pictures stay where they were and only lose some image quality.
After running, the effect of compressing pictures in Excel:
Resize a Picture in Excel
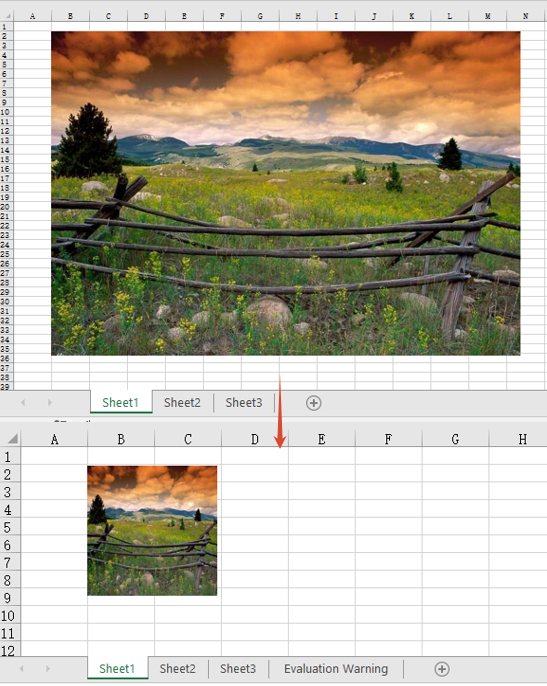
The size a picture is displayed at on a worksheet is controlled by two properties, Width and Height, measured in pixels. Assigning new values to them brings the picture to the size you want—a shrunken picture no longer covers the data next to it, and an enlarged one can fill a reserved picture slot. The steps are:
- Load the workbook and get the first worksheet.
- Get the first picture of the worksheet with
sheet.Pictures.get(0). - Set
WidthandHeightto resize the picture. - Save the workbook.
The following is a complete code example that resizes a picture in Excel in React:
function App() {
  const resizePicture = async () => {
    // Get the Spire.XLS WASM module
    const xlsModule = window.wasmModule?.spirexls;

    // Check if the module is ready
    if (!xlsModule) {
      alert('Spire.Xls is not ready yet');
      return;
    }

    // Load the font into VFS
    await window.spire.FetchFileToVFS('ARIAL.TTF', '/Library/Fonts/', `${process.env.PUBLIC_URL}/font/`);

    // Load the Excel file into VFS
    const inputFileName = 'ResizeAndMovePictures.xlsx';
    await window.spire.FetchFileToVFS(inputFileName, '', `${process.env.PUBLIC_URL}/static/data/`);

    // Load the workbook
    const workbook = new xlsModule.Workbook();
    workbook.LoadFromFile(inputFileName);

    // Get the first worksheet
    const sheet = workbook.Worksheets.get(0);

    // Get the first picture of the worksheet
    const picture = sheet.Pictures.get(0);

    // Resize the picture to 140 pixels wide and 140 pixels high
    picture.Width = 140;
    picture.Height = 140;

    // Save the workbook
    const outputFileName = "ResizePicture.xlsx";
    workbook.SaveToFile(outputFileName);

    // Release resources
    workbook.Dispose();

    // Read the result file from VFS and trigger the download
    const fileArray = window.dotnetRuntime.Module.FS.readFile(outputFileName);
    const blob = new Blob([fileArray], { type: "application/vnd.openxmlformats-officedocument.spreadsheetml.sheet" });
    const url = URL.createObjectURL(blob);
    const a = document.createElement('a');
    a.href = url;
    a.download = outputFileName;
    a.click();
    URL.revokeObjectURL(url);
  };

  return (
    <div style={{ textAlign: 'center', height: '300px' }}>
      <h1>Compress, Resize or Move Pictures in Excel</h1>
      <button onClick={resizePicture}>Start</button>
    </div>
  );
}

export default App;
Width and Height map to the picture's width and height and take effect independently, so the picture shows at its new size as soon as they are assigned. Note that this sets the size of the picture frame rather than scaling proportionally—when the new width and height do not match the original ratio, the picture is stretched. See the FAQ below for how to handle that.
After running, the effect of resizing a picture in Excel:
Move a Picture in Excel
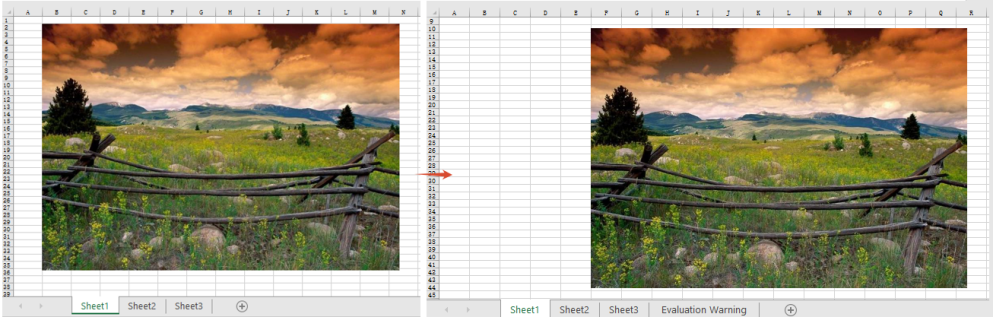
A picture in Excel is a floating object anchored to a cell, so setting its size alone does not change where it shows up. The Left and Top properties are measured in pixels and give the distance from the top-left corner of the worksheet to the top-left corner of the picture; assigning them moves the picture to the new coordinates, which is how you push a picture out of a block of data or line several pictures up in the same column. The steps are:
- Load the workbook and get the first worksheet.
- Get the first picture of the worksheet with
sheet.Pictures.get(0). - Set
LeftandTopto move the picture. - Save the workbook.
The following is a complete code example that moves a picture in Excel in React:
function App() {
  const movePicture = async () => {
    // Get the Spire.XLS WASM module
    const xlsModule = window.wasmModule?.spirexls;

    // Check if the module is ready
    if (!xlsModule) {
      alert('Spire.Xls is not ready yet');
      return;
    }

    // Load the font into VFS
    await window.spire.FetchFileToVFS('ARIAL.TTF', '/Library/Fonts/', `${process.env.PUBLIC_URL}/font/`);

    // Load the Excel file into VFS
    const inputFileName = 'ResizeAndMovePictures.xlsx';
    await window.spire.FetchFileToVFS(inputFileName, '', `${process.env.PUBLIC_URL}/static/data/`);

    // Load the workbook
    const workbook = new xlsModule.Workbook();
    workbook.LoadFromFile(inputFileName);

    // Get the first worksheet
    const sheet = workbook.Worksheets.get(0);

    // Get the first picture of the worksheet
    const picture = sheet.Pictures.get(0);

    // Move the top-left corner of the picture 360 pixels from the left and 180 pixels from the top
    picture.Left = 360;
    picture.Top = 180;

    // Save the workbook
    const outputFileName = "MovePicture.xlsx";
    workbook.SaveToFile(outputFileName);

    // Release resources
    workbook.Dispose();

    // Read the result file from VFS and trigger the download
    const fileArray = window.dotnetRuntime.Module.FS.readFile(outputFileName);
    const blob = new Blob([fileArray], { type: "application/vnd.openxmlformats-officedocument.spreadsheetml.sheet" });
    const url = URL.createObjectURL(blob);
    const a = document.createElement('a');
    a.href = url;
    a.download = outputFileName;
    a.click();
    URL.revokeObjectURL(url);
  };

  return (
    <div style={{ textAlign: 'center', height: '300px' }}>
      <h1>Compress, Resize or Move Pictures in Excel</h1>
      <button onClick={movePicture}>Start</button>
    </div>
  );
}

export default App;
Left and Top describe the absolute coordinates of the picture's top-left corner on the worksheet, regardless of which row or column the picture was originally anchored to.
After running, the effect of moving a picture in Excel:
FAQ
Why does a picture look stretched after resizing?
Cause: Width and Height are two independent properties, and assigning them separately does not preserve the picture's original aspect ratio. Give a rectangular picture the same value for width and height and it is forced into a square.
Solution: read the picture's current width and height first, work out the ratio, and derive the other dimension from it. The size properties only accept integers, so round the result:
// Read the picture's current width and height to work out the ratio
const picture = sheet.Pictures.get(0);
const ratio = picture.Height / picture.Width;

// Fix the width and derive the height from the ratio so the picture is not distorted
picture.Width = 140;
picture.Height = Math.round(140 * ratio);
Does IsLockAspectRatio keep a picture from being distorted?
Cause: no. The property is true by default, and what it sets is the picture's lock flag, which constrains resizing by hand in Excel. It does not scale the other side for you when Width / Height are assigned from code—setting Width to 140 left Height at its original 300 whether IsLockAspectRatio was true or false.
Solution: proportional resizing still has to be computed by hand. The property reads and writes fine and survives a save, so set it when the file's lock state needs to match:
// The lock flag: true by default; setting it to false is written to the file and reads back as false
picture.IsLockAspectRatio = false;

// But it takes no part in the width / height conversion: change Width alone and Height stays put
picture.Width = 140;

// To scale proportionally, work out the ratio first
const ratio = picture.Height / picture.Width;
picture.Width = 140;
picture.Height = Math.round(140 * ratio);
Get a Free License
Spire.XLS for JavaScript offers a 30-day full-featured free trial license with no functional limitations. Apply here to evaluate before purchasing.
Batch PDF Encryption, Distribution and Decryption with Spire.Agent.Office
In HR, finance and legal workflows, PDF is the format most often used for sensitive content such as payslips, labor contracts, statements and reconciliations — and "distributing a batch of PDFs to different people" happens every month. Sending plain-text PDFs directly is risky: once a file is forwarded, anyone who receives it can open and read it. The traditional approach is to manually set an open password on each file with a dedicated tool before distribution; doing this for dozens or even hundreds of files is slow and easy to get wrong (some files simply get missed). On the receiving side, users often need a separate tool just to remove the password before they can read the file, which makes the whole loop inefficient.
The PDF AI capability of Spire.Agent.Office lets you describe what you need in natural language. The AI agent understands the request and completes the whole flow — "batch encryption → distribution list → decrypt on demand" — automatically.
Comparison with Traditional SDK API
| Traditional Spire.Office for .NET API | Spire.Agent.Office | |
|---|---|---|
| Driving style | Write loops to iterate files plus password-setting and permission code that controls every step | Describe the goal in natural language; the AI understands it and orchestrates the execution path |
| Code size | Batch encryption/decryption usually needs 200-400 lines of C# (file enumeration, encryption parameters, exception handling, etc.) | About 10 lines of calling code + 1 natural-language instruction |
| Password strategy | Hard-code passwords file by file, or design and maintain a password-generation rule in code | State the rule in one sentence of the instruction (e.g., generated from the employee ID); the AI applies it automatically |
| Distribution list | Need to write extra logic to produce the manifest/table | The same instruction can also output an encryption distribution password list |
| Format handling | Need to handle low-level details such as encryption algorithm and permission flags by hand | The AI recognizes and preserves the layout, fonts and page settings of the original documents |
| Requirement change | Change a rule/path → change code → compile → redeploy | Modify the instruction and it takes effect immediately |
This article shows how to use the Spire.Agent.Office PDF AI capability to set open passwords on a batch of PDFs and produce an encryption distribution list, then remove password protection on demand. Two cases demonstrate the two typical uses — encryption for distribution and decryption for archiving:
- Case 1: Batch-encrypt PDFs and generate a distribution list
- Case 2: Batch-decrypt password-protected PDFs
For product installation and SpireToken configuration, please refer to Integrating Spire.Agent.Office in a .NET Project. The examples below assume that Spire.Agent.Office has been installed and SpireToken has been configured.
Batch PDF Encryption, Distribution and Decryption
The core idea is: take one or more PDF documents to process as input, and let the AI agent set an open password on each one and save the encrypted copy — or remove the protection when the password is known — while keeping the original layout unchanged. The whole process of "file reading → password rule application → encryption/decryption → result output" is completed automatically by the AI, with no need to write per-file processing code. Case 1 below demonstrates batch encryption and distribution to recipients; Case 2 demonstrates how an administrator decrypts and archives the documents after they are collected back.
Case 1: Batch-encrypt PDFs and generate a distribution list
The most common batch-encryption scenario is adding an open password to many sensitive PDFs (such as employee payslips) before they are sent out. There are many files and each has a different recipient; if every file shares one password the protection is meaningless, but if passwords all differ they are hard to remember and communicate.
The example below uses the Spire.Agent.Office agent to treat every PDF in the attachments folder (i.e., all PDF files under the specified folder) as documents to be encrypted, assigns each one an independent open password based on the rule "employee date of birth + 4 random digits + @2026", saves the encrypted documents as PDFs, and at the same time produces an encryption distribution list that maps the original file name, the encrypted file name and the open password row by row:
using Spire.Agent.Office.AI;
using Spire.Agent.Office.Extensions;
using Spire.Pdf;

// Folder containing the PDFs to encrypt: every PDF in this folder is treated as an attachment (one per recipient)
string attachmentDir = @"E:\pdfs";  // folder that holds the PDFs to be encrypted
string[] attachmentPaths = Directory.GetFiles(attachmentDir, "*.pdf");

// PDF-related configuration
string inputPath = null;
string savePath = null;  // result path (null here: the output folder below will be used)
string OutDir = @"E:\output";  // output directory (encrypted PDFs and the distribution list are saved here)
string key = "**************************";  // SpireToken key
string instruction =
    "Read all the PDF files in the attachments and encrypt each one with an open password:" +
    "1. Generate the password for each file as 'employee date of birth + 4 random digits @2026' (for example, salary-1001.pdf corresponds to password 199805083371@2026). This open password only restricts opening the document and does not affect other functions such as printing, copying or editing;" +
    "2. Save every encrypted PDF to the output directory, appending '-encrypted' to the original file name, and keep the layout, fonts and page settings of the original document;" +
    "3. Generate an Excel-format encryption distribution list in the output directory, listing the original file name, encrypted file name and open password in each row.";

// Call the PDF document processing function
AIResult result = ExecuteDemoPDF(instruction, inputPath, savePath, key, OutDir, attachmentPaths);

// Execute PDF AI processing
static AIResult ExecuteDemoPDF(string instruction, string inputPath, string savePath, string key, string output, string[] attachmentPaths)
{
    // Create the AIOptions configuration object
    AIOptions options = new AIOptions();
    options.WorkDir = output;  // set the working directory to the output directory
    options.SpireToken = key;  // set the SpireToken key

    // Process the PDF document using a PdfDocument object
    using (PdfDocument pdf = new PdfDocument())
    {
        // Load the PDF document from file
        if (!string.IsNullOrEmpty(inputPath) && File.Exists(inputPath))
        {
            pdf.LoadFromFile(inputPath);
        }
        // Create the AI document processor
        AIDocumentProcessor processor = pdf.AI(options);

        // Execute the AI instruction
        return processor.ExecuteInstruction(pdf, instruction, savePath, attachmentPaths);
    }
}
The original PDF documents to be encrypted  Batch-encrypted PDFs and the encryption distribution list
Every PDF gets an independent open password while the layout of the original document is preserved, and the encryption distribution list maps each file to its recipient's password so the sender can deliver it securely together with the files. When a new recipient is added later, you only need to put the new file into the attachments folder and rerun the instruction to complete the next round of encryption and distribution.
Case 2: Batch-decrypt password-protected PDFs
After recipients have finished reviewing, the administrator usually collects the files back for archiving and needs to remove the previously set open passwords in batch so the documents can be searched and merged. In this case the input file is empty; the encrypted PDFs and an Excel table that records the "file name / file password" mapping are provided together as attachments. The key to decryption is that the AI reads the open password of each file from the Excel table and opens the document with it.
The example below uses the Spire.Agent.Office agent with an empty input file. Through a natural-language instruction it reads the password-table Excel and the encrypted PDFs among the attachments, opens each document with the corresponding password from the table, removes the password protection, and saves the password-free documents one by one as PDFs:
using Spire.Agent.Office.AI;
using Spire.Agent.Office.Extensions;
using Spire.Pdf;

// The attachments are all the files under this folder (a password-table Excel plus the encrypted PDFs to decrypt)
string attachmentDir = @"E:\pdfs";  // folder that holds the password-table Excel and the encrypted PDFs
string[] attachmentPaths = Directory.GetFiles(attachmentDir);

// PDF-related configuration
string inputPath = "";  // empty input: all files to decrypt are among the attachments
string savePath = null;  // result path
string OutDir = @"E:\output-decrypted";  // output directory (decrypted documents are saved here)
string key = "**************************";  // SpireToken key
string instruction =
    "Read the 'file name / file password' mapping from the password-table Excel among the attachments and decrypt the matching encrypted PDFs in batch:" +
    "1. Read each row of the Excel to get its file name and the corresponding open password;" +
    "2. Locate the PDF document with the same file name among the attachments, open it with that row's password and remove the password protection;" +
    "3. Save each decrypted password-free PDF to the output directory, removing the '-encrypted' suffix from the file name, and keep the layout, fonts and page settings of the original document;" +
    "Save the final result as a PDF file";

// Call the PDF document processing function
AIResult result = ExecuteDemoPDF(instruction, inputPath, savePath, key, OutDir, attachmentPaths);

// Execute PDF AI processing
static AIResult ExecuteDemoPDF(string instruction, string inputPath, string savePath, string key, string output, string[] attachmentPaths)
{
    // Create the AIOptions configuration object
    AIOptions options = new AIOptions();
    options.WorkDir = output;  // set the working directory to the output directory
    options.SpireToken = key;  // set the SpireToken key

    // Process the PDF document using a PdfDocument object
    using (PdfDocument pdf = new PdfDocument())
    {
        // The input file is empty so nothing is loaded; all files to process come from the attachments (the password-table Excel + the encrypted PDFs)
        if (!string.IsNullOrEmpty(inputPath) && File.Exists(inputPath))
        {
            pdf.LoadFromFile(inputPath);
        }
        // Create the AI document processor
        AIDocumentProcessor processor = pdf.AI(options);

        // Execute the AI instruction
        return processor.ExecuteInstruction(pdf, instruction, savePath, attachmentPaths);
    }
}
The password-table Excel and the encrypted PDF documents to decrypt  The decrypted password-free PDF documents
The "file name → file password" mapping in the password-table Excel is read and applied one row at a time, and the collected encrypted files are restored to password-free plain-text PDFs in batch, ready for archiving, searching or further merging.
FAQ
After setting an "open password", will printing / copying / editing be affected (besides needing the password to open)?
Cause: An open password and document permissions are two different things. The examples in this article only set an open password on the document and do not apply restrictions such as "no printing" or "no copying".
Solution: After encryption, apart from needing the password to open the document, the original functions such as printing, copying and editing remain unaffected. If you need to restrict printing or copying for security reasons, add a permission description to the instruction (for example, "view only; printing and copying are not allowed") and the AI will configure the corresponding permissions accordingly.
Does encrypting a PDF with an open password change its layout?
Cause: Encryption only affects opening and permission validation of the document; it does not reflow the page content.
Solution: Spire.Agent.Office preserves the layout, fonts and page settings of the original documents during encryption. If you are concerned about a particular style change, add "keep the layout, fonts and page settings of the original document" to the instruction.
Getting a SpireToken Key
- Contact sales@e-iceblue.com or visit https://www.e-iceblue.com/TemLicense.html to obtain a trial/commercial API key
Configure it in your code:
AIOptions options = new AIOptions();
options.SpireToken = key;
Create and Style Excel Tables with JavaScript in React
When organizing data such as sales records or statistical reports, converting a plain data range into an Excel table (Table / ListObject) gives the data a dedicated header row, automatic filter drop-downs, banded styling, and a "total row", which makes later browsing and summarizing more convenient. After the table is created, its appearance can also be adjusted at any time through built-in styles and various display options. Spire.XLS for JavaScript completes all of these operations directly in the browser based on WebAssembly, and manages input/output files through a virtual file system (VFS), with no backend service required.
This article covers two core features:
For installation and project configuration, refer to Integrating Spire.XLS for JavaScript in a React Project. The examples below assume Spire.XLS is installed and the WebAssembly module is initialized.
Create a Table in Excel
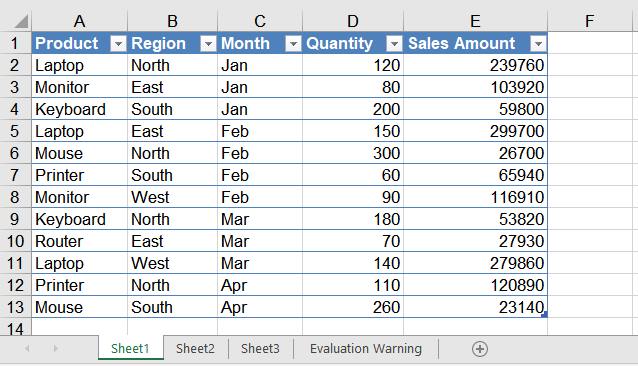
Converting a data range into a table is a quick way to obtain a structured range that has built-in filter buttons and banded styling. In this example, a sales detail list (Product, Region, Month, Quantity, Sales Amount) is first written into the worksheet, then the A1:E13 range is converted into a table named "Table1" with ListObjects.Create(), and finally the built-in light style TableStyleLight9 is applied. The main steps are as follows:
- Create a
Workbookobject and get the first worksheet. - Write the headers and the sample data into the cells.
- Call the
Worksheet.ListObjects.Create()method to convert the range that contains the headers into a table. - Apply a built-in style to the table through the
IListObject.BuiltInTableStyleproperty. - Save the workbook with the
Workbook.SaveToFile()method.
Here is a complete code example showing how to create an Excel table for a worksheet in React:
function App() {
  const createTable = async () => {
    // Get the Spire.XLS WASM module
    const xlsModule = window.wasmModule?.spirexls;

    // Check whether the module is ready
    if (!xlsModule) {
      alert('Spire.Xls is not ready yet');
      return;
    }

    // Load the font into the VFS for text measurement and column auto-fit
    await window.spire.FetchFileToVFS('ARIAL.TTF', '/Library/Fonts/', `${process.env.PUBLIC_URL}/font/`);

    // Create a new workbook and get the first worksheet
    const workbook = new xlsModule.Workbook();
    const sheet = workbook.Worksheets.get(0);

    // Write the headers
    sheet.Range.get('A1').Value = 'Product';
    sheet.Range.get('B1').Value = 'Region';
    sheet.Range.get('C1').Value = 'Month';
    sheet.Range.get('D1').Value = 'Quantity';
    sheet.Range.get('E1').Value = 'Sales Amount';

    // Write the sample data
    sheet.Range.get('A2').Value = 'Laptop';
    sheet.Range.get('B2').Value = 'North';
    sheet.Range.get('C2').Value = 'Jan';
    sheet.Range.get('D2').NumberValue = 120;
    sheet.Range.get('E2').NumberValue = 239760;

    sheet.Range.get('A3').Value = 'Monitor';
    sheet.Range.get('B3').Value = 'East';
    sheet.Range.get('C3').Value = 'Jan';
    sheet.Range.get('D3').NumberValue = 80;
    sheet.Range.get('E3').NumberValue = 103920;

    sheet.Range.get('A4').Value = 'Keyboard';
    sheet.Range.get('B4').Value = 'South';
    sheet.Range.get('C4').Value = 'Jan';
    sheet.Range.get('D4').NumberValue = 200;
    sheet.Range.get('E4').NumberValue = 59800;

    sheet.Range.get('A5').Value = 'Laptop';
    sheet.Range.get('B5').Value = 'East';
    sheet.Range.get('C5').Value = 'Feb';
    sheet.Range.get('D5').NumberValue = 150;
    sheet.Range.get('E5').NumberValue = 299700;

    sheet.Range.get('A6').Value = 'Mouse';
    sheet.Range.get('B6').Value = 'North';
    sheet.Range.get('C6').Value = 'Feb';
    sheet.Range.get('D6').NumberValue = 300;
    sheet.Range.get('E6').NumberValue = 26700;

    sheet.Range.get('A7').Value = 'Printer';
    sheet.Range.get('B7').Value = 'South';
    sheet.Range.get('C7').Value = 'Feb';
    sheet.Range.get('D7').NumberValue = 60;
    sheet.Range.get('E7').NumberValue = 65940;

    sheet.Range.get('A8').Value = 'Monitor';
    sheet.Range.get('B8').Value = 'West';
    sheet.Range.get('C8').Value = 'Feb';
    sheet.Range.get('D8').NumberValue = 90;
    sheet.Range.get('E8').NumberValue = 116910;

    sheet.Range.get('A9').Value = 'Keyboard';
    sheet.Range.get('B9').Value = 'North';
    sheet.Range.get('C9').Value = 'Mar';
    sheet.Range.get('D9').NumberValue = 180;
    sheet.Range.get('E9').NumberValue = 53820;

    sheet.Range.get('A10').Value = 'Router';
    sheet.Range.get('B10').Value = 'East';
    sheet.Range.get('C10').Value = 'Mar';
    sheet.Range.get('D10').NumberValue = 70;
    sheet.Range.get('E10').NumberValue = 27930;

    sheet.Range.get('A11').Value = 'Laptop';
    sheet.Range.get('B11').Value = 'West';
    sheet.Range.get('C11').Value = 'Mar';
    sheet.Range.get('D11').NumberValue = 140;
    sheet.Range.get('E11').NumberValue = 279860;

    sheet.Range.get('A12').Value = 'Printer';
    sheet.Range.get('B12').Value = 'North';
    sheet.Range.get('C12').Value = 'Apr';
    sheet.Range.get('D12').NumberValue = 110;
    sheet.Range.get('E12').NumberValue = 120890;

    sheet.Range.get('A13').Value = 'Mouse';
    sheet.Range.get('B13').Value = 'South';
    sheet.Range.get('C13').Value = 'Apr';
    sheet.Range.get('D13').NumberValue = 260;
    sheet.Range.get('E13').NumberValue = 23140;

    // Convert the A1:E13 data range into an Excel table (ListObject)
    const table = sheet.ListObjects.Create('Table1', sheet.Range.get({ row: 1, column: 1, lastRow: 13, lastColumn: 5 }));

    // Apply a built-in light table style
    table.BuiltInTableStyle = xlsModule.TableBuiltInStyles.TableStyleLight9;

    // Auto-fit the columns so that the contents are fully shown
    sheet.AllocatedRange.AutoFitColumns();

    // Save the workbook
    const outputFileName = 'CreateTable.xlsx';
    workbook.SaveToFile({ fileName: outputFileName, version: xlsModule.ExcelVersion.Version2010 });

    // Release resources
    workbook.Dispose();

    // Read the saved file from the VFS and trigger the download
    const fileArray = window.dotnetRuntime.Module.FS.readFile(outputFileName);
    const blob = new Blob([fileArray], { type: 'application/vnd.openxmlformats-officedocument.spreadsheetml.sheet' });
    const url = URL.createObjectURL(blob);
    const a = document.createElement('a');
    a.href = url;
    a.download = outputFileName;
    a.click();
    URL.revokeObjectURL(url);
  };

  return (
    <div style={{ textAlign: 'center', height: '300px' }}>
      <h1>Create Table</h1>
      <button onClick={createTable}>Start</button>
    </div>
  );
}

export default App;
Effect of creating the table:
Set the Table Style, Total Row and Stripes
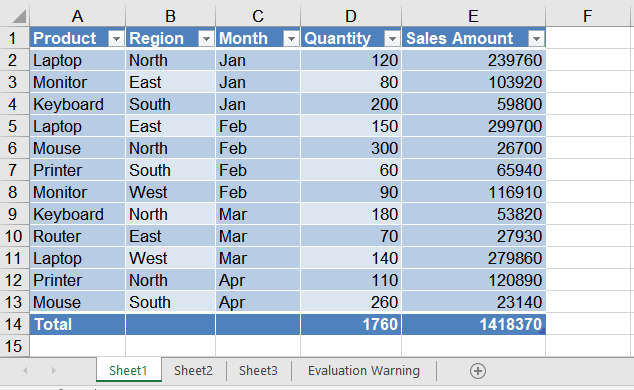
A created table can be restyled at any time: for example, replace the light style with the built-in Medium dark style, show a total row at the bottom of the table and let the "Quantity" and "Sales Amount" columns be summed automatically, and enable both row and column stripes to make the data easier to read. The main steps are as follows:
- Create a
Workbookobject and load a workbook that already contains a table with theWorkbook.LoadFromFile()method. - Get the worksheet with the
Workbook.Worksheets.get()method, and then get the table object withListObjects.get(). - Assign a new built-in style through the
BuiltInTableStyleproperty. - Set
DisplayTotalRowtotrueto show the total row, and useColumns[].TotalsRowLabelandColumns[].TotalsCalculationto set the label and the calculation of the total row columns. - Enable row and column stripes with
ShowTableStyleRowStripesandShowTableStyleColumnStripes. - Save the workbook with the
Workbook.SaveToFile()method.
Here is a complete code example showing how to load a created table in React and set its style and total row:
function App() {
  const formatTable = async () => {
    // Get the Spire.XLS WASM module
    const xlsModule = window.wasmModule?.spirexls;

    // Check whether the module is ready
    if (!xlsModule) {
      alert('Spire.Xls is not ready yet');
      return;
    }

    // Load the font into the VFS for text measurement and column auto-fit
    await window.spire.FetchFileToVFS('ARIAL.TTF', '/Library/Fonts/', `${process.env.PUBLIC_URL}/font/`);

    // Load the Excel file created in the previous section, which already contains a table
    const inputFileName = 'CreateTable.xlsx';
    await window.spire.FetchFileToVFS(inputFileName, '', `${process.env.PUBLIC_URL}data/`);

    // Create a Workbook object and load the workbook
    const workbook = new xlsModule.Workbook();
    workbook.LoadFromFile({ fileName: inputFileName });

    // Get the first worksheet and the table in it
    const sheet = workbook.Worksheets.get(0);
    const table = sheet.ListObjects.get(0);

    // Apply a built-in Medium table style
    table.BuiltInTableStyle = xlsModule.TableBuiltInStyles.TableStyleMedium9;

    // Show the total row
    table.DisplayTotalRow = true;

    // Set the label of the first column of the total row to "Total"
    table.Columns.get(0).TotalsRowLabel = 'Total';

    // Do not calculate the text columns, and sum the "Quantity" and "Sales Amount" columns automatically
    table.Columns.get(1).TotalsCalculation = xlsModule.ExcelTotalsCalculation.None;
    table.Columns.get(2).TotalsCalculation = xlsModule.ExcelTotalsCalculation.None;
    table.Columns.get(3).TotalsCalculation = xlsModule.ExcelTotalsCalculation.Sum;
    table.Columns.get(4).TotalsCalculation = xlsModule.ExcelTotalsCalculation.Sum;

    // Show the row stripes and column stripes
    table.ShowTableStyleRowStripes = true;
    table.ShowTableStyleColumnStripes = true;

    // Auto-fit the columns so that the contents are fully shown
    sheet.AllocatedRange.AutoFitColumns();

    // Save the workbook
    const outputFileName = 'FormatTable_out.xlsx';
    workbook.SaveToFile({ fileName: outputFileName, version: xlsModule.ExcelVersion.Version2010 });

    // Release resources
    workbook.Dispose();

    // Read the saved file from the VFS and trigger the download
    const fileArray = window.dotnetRuntime.Module.FS.readFile(outputFileName);
    const blob = new Blob([fileArray], { type: 'application/vnd.openxmlformats-officedocument.spreadsheetml.sheet' });
    const url = URL.createObjectURL(blob);
    const a = document.createElement('a');
    a.href = url;
    a.download = outputFileName;
    a.click();
    URL.revokeObjectURL(url);
  };

  return (
    <div style={{ textAlign: 'center', height: '300px' }}>
      <h1>Format Table</h1>
      <button onClick={formatTable}>Start</button>
    </div>
  );
}

export default App;
Effect of setting the table style:
Frequently Asked Questions
How do I change the built-in style of a table? What styles are available?
Reason: The BuiltInTableStyle property was not reassigned after the table was created, or the wrong enum type was assigned to the property.
Solution: Reassign the IListObject.BuiltInTableStyle property. Its values come from the TableBuiltInStyles enum, which provides multiple built-in styles including Light (TableStyleLight1 ~ TableStyleLight21), Medium (TableStyleMedium1 ~ TableStyleMedium28) and Dark (TableStyleDark1 ~ TableStyleDark11). For example, this article first applies TableStyleLight9 and then switches to TableStyleMedium9.
How do I name a table or rename it? What happens if two tables have the same name?
Reason: The first parameter of ListObjects.Create() is the table name, e.g. Create("Table1", ...). Within the same worksheet, table names must be unique; otherwise creating another table with the same name raises an error.
Solution: Pass a unique name when creating the table (e.g. "SalesTable1"). To rename an existing table, set its DisplayName property directly, for example table.DisplayName = "SalesTable2025";.
Get a Free License
Spire.XLS for JavaScript offers a 30-day full-featured free trial license with no functional limitations. Apply here to evaluate before purchasing.
Como remover comentários de um PDF: com ou sem Adobe
Esteja você preparando um contrato final, enviando uma tese ou compartilhando um relatório com clientes, remover comentários internos, destaques e notas de revisão ajuda a manter uma aparência profissional e evita a exposição acidental de dados.
Neste guia, mostraremos como remover comentários de documentos PDF com três abordagens. Dependendo de suas necessidades, você pode usar o Adobe Acrobat, ferramentas online gratuitas ou um script Python automatizado.
- Como excluir todos os comentários no Adobe
- Remover comentários de PDF online
- Remover anotações de PDF automaticamente com Python
- Perguntas frequentes
Como excluir todos os comentários no Adobe
O Adobe Acrobat é uma das formas mais populares de gerenciar e limpar PDFs. Ele permite que você remova comentários usando recursos integrados. Veja como excluir todos os comentários no Adobe usando duas abordagens diferentes.
1. Seleção em massa pelo painel de comentários
Este método é útil quando você deseja remover anotações de um PDF rapidamente e sem complicações. Aqui estão os passos detalhados:
- Passo 1. Abra um PDF no Adobe Acrobat.
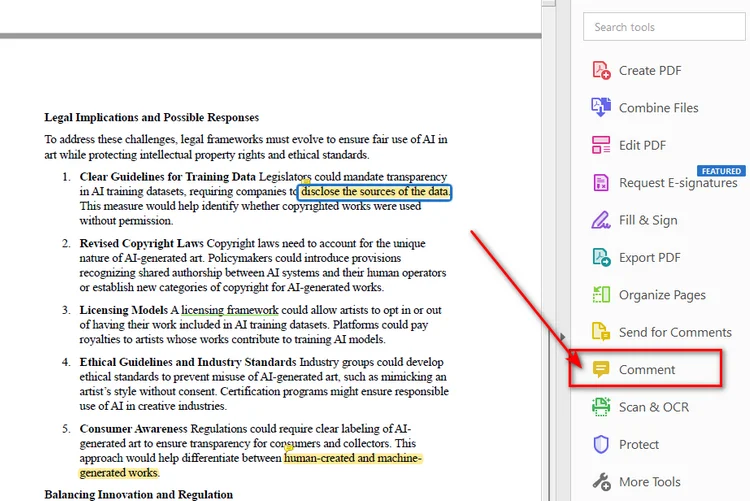
- Passo 2. Abra o painel de comentários clicando no ícone Comentário na barra de ferramentas à direita.
- Passo 3. Clique com o botão esquerdo no primeiro comentário no topo do painel.
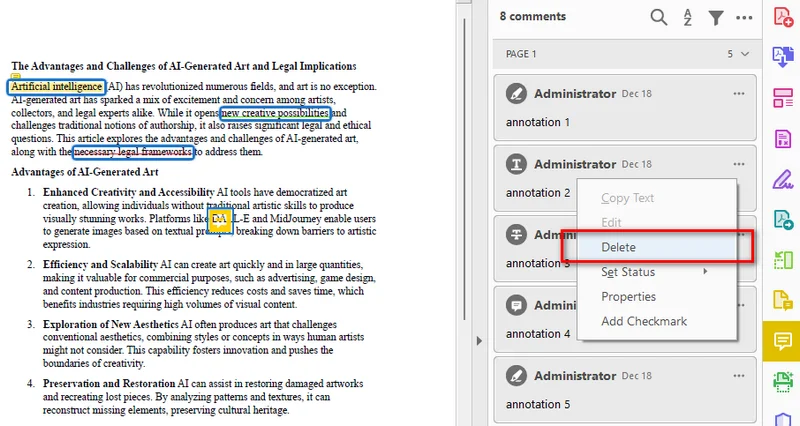
- Passo 4. Role até o final da lista, mantenha pressionada a tecla Shift no seu teclado e clique no último comentário para selecionar todas as anotações.
- Passo 5. Clique com o botão direito em qualquer lugar da lista destacada e selecione Excluir.
2. Usar o recurso de higienização de documentos
Se você estiver lidando com um documento altamente confidencial, a exclusão manual pode deixar passar dados ocultos. O recurso de higienização (Sanitize) do Acrobat pode remover informações ocultas, incluindo comentários, metadados e outros conteúdos privados.
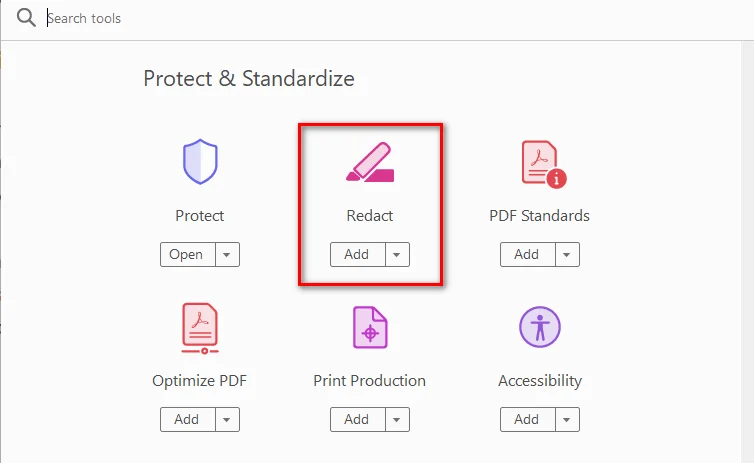
- Passo 1. Vá ao menu superior e selecione Ferramentas -> Redigir.
- Passo 2. Clique no botão Higienizar documento na barra superior.
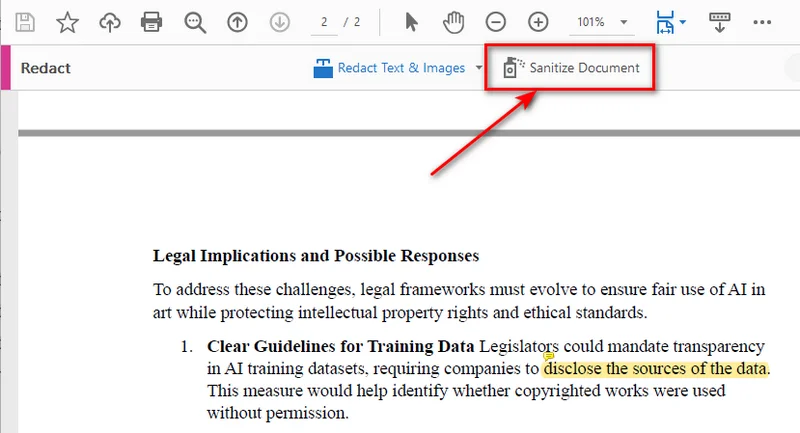
- Passo 3. Um pop-up aparecerá. Clique em OK para remover permanentemente todos os comentários ocultos, históricos de revisão e metadados privados.
Nota: Ao usar este método, o Adobe criará automaticamente uma versão nova e limpa do PDF. Isso deixa seu PDF original intacto, tornando-o perfeito para manter uma cópia interna com seus comentários preservados enquanto cria um rascunho limpo para outros.
Você pode gostar de: Como tornar um PDF somente leitura em 2025 (Um guia completo)
Como remover comentários de PDF online (Sem Adobe)
Embora o Adobe Acrobat seja muito poderoso, a maioria de seus recursos avançados, incluindo o gerenciamento completo de comentários, requer uma assinatura paga. Se você só precisa excluir comentários em documentos PDF uma ou duas vezes, usar um editor de PDF baseado na web é uma alternativa melhor. Com plataformas como o Smallpdf, você pode enviar arquivos diretamente no navegador e começar a editar instantaneamente. As maiores vantagens são que essas ferramentas geralmente são gratuitas, leves e não exigem instalação, tornando-as uma opção conveniente para edições rápidas em PDF.
Passos para remover comentários online:
- Passo 1. Pesquise por editores de PDF online em um navegador.
- Passo 2. Envie o arquivo PDF para o editor.
- Passo 3. Clique em qualquer anotação na página e toque no ícone da lixeira para excluir o comentário.
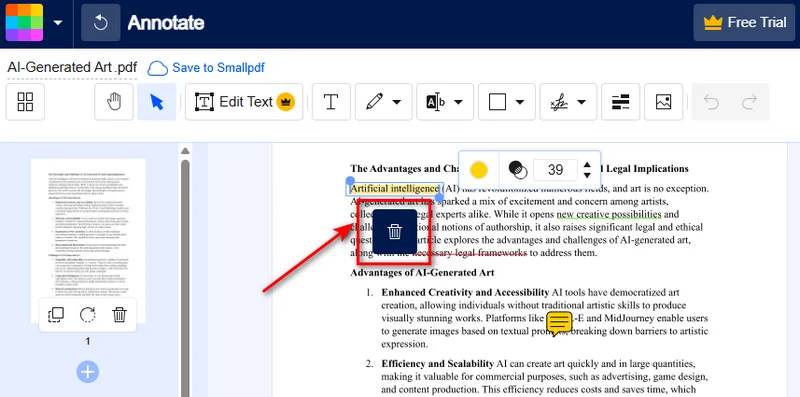
Embora as ferramentas online sejam gratuitas e convenientes, tenha duas coisas em mente: primeiro, evite enviar PDFs com dados financeiros sensíveis ou segredos comerciais para servidores de terceiros. Segundo, a maioria das ferramentas web exige que você exclua os comentários um por um. Se o seu documento tiver dezenas de notas ou contiver dados confidenciais, experimente o Adobe Acrobat ou o método Python abaixo.
Como remover anotações de PDF automaticamente com Python
Para desenvolvedores ou usuários que precisam processar vários PDFs regularmente, a automação pode economizar um tempo significativo em comparação com a edição manual. Se você precisa automatizar fluxos de trabalho de documentos ou processar grandes lotes de arquivos, pode remover todos os comentários de documentos PDF usando um script Python.
Nas especificações oficiais de PDF, elementos interativos como notas adesivas, marcações de texto e formas são tecnicamente chamados de "anotações". Usando a biblioteca Free Spire.PDF for Python, você pode limpar facilmente esses elementos da estrutura do arquivo automaticamente. Como um componente independente, ele permite que você processe arquivos PDF localmente sem depender do Adobe Acrobat, o que é útil para processamento em lote automatizado.
Código Python para limpar comentários de PDF
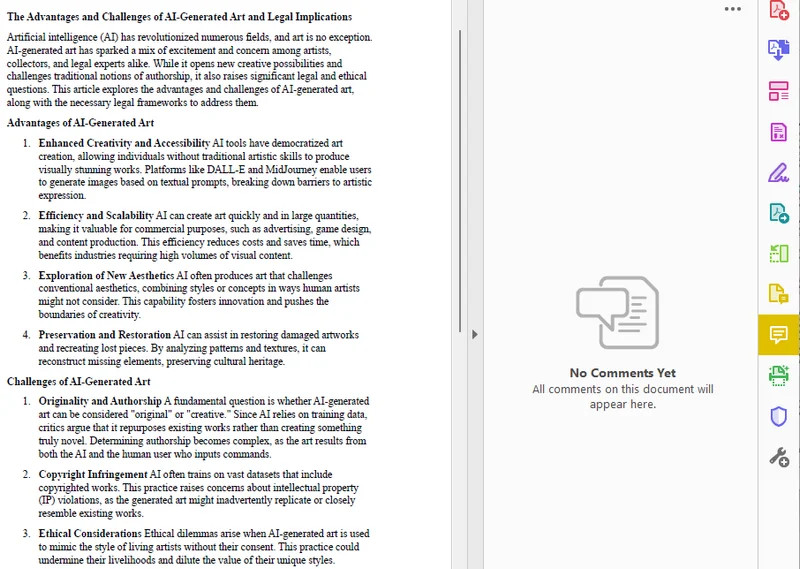
Com a ajuda do Free Spire.PDF, podemos excluir anotações de PDFs com dois passos principais: percorrer cada página do PDF, acessar a coleção de anotações de cada página e remover todos os objetos de anotação.
Aqui está o exemplo de código:
from spire.pdf.common import *
from spire.pdf import *

# Carregar o documento PDF de destino do seu diretório local
pdf = PdfDocument()
pdf.LoadFromFile("/input/sample.pdf")

# Percorrer todas as páginas para remover todos os comentários do PDF
for i in range(pdf.Pages.Count):
    page = pdf.Pages.get_Item(i)

    # Limpar todas as notas adesivas, destaques e anotações na página atual
    page.AnnotationsWidget.Clear()

# Salvar o PDF limpo
pdf.SaveToFile("/output/commentremoved.pdf")
pdf.Close()
Perguntas frequentes sobre a remoção de comentários de PDF
P1: Como remover comentários de um documento PDF gratuitamente?
R: Você pode usar ferramentas web gratuitas como o Smallpdf para enviar, limpar e baixar seu arquivo em segundos. No entanto, se a segurança for sua prioridade máxima, usar a biblioteca Free Spire.PDF é uma alternativa melhor. Ela roda inteiramente offline na sua máquina local, permitindo que você limpe documentos confidenciais em lote gratuitamente com risco zero de vazamento de dados.
P2: Remover comentários também excluirá o efeito de destaque no PDF?
R: Sim. Em PDFs, destaques, sublinhados e tachados são classificados como anotações de marcação de texto. Quando você remove anotações de um PDF via ferramenta de higienização do Adobe, editores online ou scripts Python, esses destaques visuais serão excluídos junto com as notas adesivas.
P3: Como ocultar comentários em vez de excluí-los no Adobe?
R: Se você deseja manter o feedback para mais tarde, mas precisa de uma visualização limpa agora, você pode abrir o painel Comentário no Adobe Acrobat e clicar no ícone Ocultar todos os comentários no topo do painel.
Conclusão
Saber como remover comentários de arquivos PDF ajuda você a preparar documentos limpos e profissionais antes de compartilhá-los. Seja usando o Adobe Acrobat, um editor de PDF online ou um script Python com o Free Spire.PDF, você pode excluir comentários facilmente com base em suas necessidades específicas. Escolha o Adobe Acrobat para edição manual detalhada, ferramentas online para tarefas rápidas e únicas, ou automação Python quando precisar processar vários arquivos PDF com eficiência.
Leia também:
PDF에서 댓글을 제거하는 방법: Adobe 사용 여부와 관계없이
최종 계약서를 준비하거나, 논문을 제출하거나, 고객과 보고서를 공유할 때 내부 댓글, 강조 표시 및 검토 메모를 제거하면 전문적인 모습을 유지하고 실수로 데이터가 노출되는 것을 방지할 수 있습니다.
이 가이드에서는 세 가지 방법을 통해 PDF 문서에서 댓글을 제거하는 방법을 보여드립니다. 필요에 따라 Adobe Acrobat, 무료 온라인 도구 또는 자동화된 Python 스크립트를 사용할 수 있습니다.
Adobe에서 모든 댓글을 삭제하는 방법
Adobe Acrobat은 PDF를 관리하고 정리하는 가장 인기 있는 방법 중 하나입니다. 내장된 기능을 사용하여 댓글을 제거할 수 있습니다. 다음은 Adobe에서 두 가지 다른 방법을 사용하여 모든 댓글을 삭제하는 방법입니다.
1. 댓글 창을 통한 일괄 선택
이 방법은 번거로움 없이 PDF에서 주석을 빠르게 제거하려는 경우 유용합니다. 자세한 단계는 다음과 같습니다.
- 1단계. Adobe Acrobat에서 PDF를 엽니다.
- 2단계. 오른쪽 도구 모음에서 댓글(Comment) 아이콘을 클릭하여 댓글 패널을 엽니다.
- 3단계. 패널 상단에 있는 첫 번째 댓글을 왼쪽 클릭합니다.
- 4단계. 목록 맨 아래로 스크롤한 다음, 키보드의 Shift 키를 누른 상태에서 마지막 댓글을 클릭하여 모든 주석을 선택합니다.
- 5단계. 강조 표시된 목록의 아무 곳이나 마우스 오른쪽 버튼으로 클릭하고 삭제(Delete)를 선택합니다.
2. 문서 정리(Sanitize) 기능 사용
매우 기밀인 문서를 다루는 경우 수동 삭제로는 숨겨진 데이터를 놓칠 수 있습니다. Acrobat의 '문서 정리(Sanitize)' 기능은 댓글, 메타데이터 및 기타 개인 콘텐츠를 포함하여 숨겨진 정보를 제거할 수 있습니다.
- 1단계. 상단 메뉴로 이동하여 도구(Tools) -> 편집(Redact)을 선택합니다.
- 2단계. 상단 바에서 문서 정리(Sanitize Document) 버튼을 클릭합니다.
- 3단계. 팝업이 나타납니다. 확인(OK)을 클릭하여 모든 숨겨진 댓글, 수정 기록 및 개인 메타데이터를 영구적으로 제거합니다.
참고: 이 방법을 사용하면 Adobe가 자동으로 새롭고 깨끗한 버전의 PDF를 생성합니다. 원본 PDF는 그대로 유지되므로, 댓글이 포함된 내부 사본을 보관하면서 다른 사람을 위한 깨끗한 초안을 만드는 데 적합합니다.
관련 글: 2025년 PDF를 읽기 전용으로 만드는 방법 (완벽 가이드)
온라인에서 PDF 댓글 제거하기 (Adobe 없이)
Adobe Acrobat은 매우 강력하지만, 전체 댓글 관리를 포함한 대부분의 고급 기능을 사용하려면 유료 구독이 필요합니다. PDF 문서에서 댓글을 한두 번만 삭제하면 된다면 웹 기반 PDF 편집기를 사용하는 것이 더 나은 대안입니다. Smallpdf와 같은 플랫폼을 사용하면 브라우저에서 직접 파일을 업로드하고 즉시 편집을 시작할 수 있습니다. 가장 큰 장점은 이러한 도구가 일반적으로 무료이고 가벼우며 설치가 필요 없다는 점으로, 빠른 PDF 편집을 위한 편리한 옵션입니다.
온라인에서 댓글을 제거하는 단계:
- 1단계. 브라우저에서 온라인 PDF 편집기를 검색합니다.
- 2단계. PDF 파일을 편집기에 업로드합니다.
- 3단계. 페이지의 아무 주석이나 클릭하고 휴지통 아이콘을 눌러 댓글을 삭제합니다.
온라인 도구는 무료이고 편리하지만 두 가지 사항을 염두에 두십시오. 첫째, 민감한 금융 데이터나 영업 비밀이 포함된 PDF를 타사 서버에 업로드하지 마십시오. 둘째, 대부분의 웹 도구는 댓글을 하나씩 삭제해야 합니다. 문서에 수십 개의 메모가 있거나 기밀 데이터가 포함되어 있다면 Adobe Acrobat이나 아래의 Python 방법을 시도해 보십시오.
Python을 사용하여 PDF에서 주석을 자동으로 제거하기
개발자나 정기적으로 여러 PDF를 처리해야 하는 사용자의 경우, 자동화는 수동 편집에 비해 상당한 시간을 절약할 수 있습니다. 문서 워크플로를 자동화하거나 대량의 파일을 처리해야 하는 경우, Python 스크립트를 사용하여 PDF 문서에서 모든 댓글을 제거할 수 있습니다.
공식 PDF 사양에서 스티커 메모, 텍스트 마크업 및 도형과 같은 대화형 요소는 기술적으로 "주석(annotations)"이라고 합니다. Free Spire.PDF for Python 라이브러리를 사용하면 파일 구조에서 이러한 요소를 자동으로 쉽게 지울 수 있습니다. 독립형 구성 요소로서 Adobe Acrobat에 의존하지 않고 로컬에서 PDF 파일을 처리할 수 있어 자동화된 일괄 처리에 유용합니다.
PDF 댓글을 지우기 위한 Python 코드
Free Spire.PDF의 도움으로 PDF에서 주석을 삭제하는 두 가지 주요 단계는 다음과 같습니다. 각 PDF 페이지를 반복하고, 각 페이지의 주석 컬렉션에 액세스하여 모든 주석 개체를 제거합니다.
코드 예시는 다음과 같습니다:
from spire.pdf.common import *
from spire.pdf import *

# 로컬 디렉토리에서 대상 PDF 문서 로드
pdf = PdfDocument()
pdf.LoadFromFile("/input/sample.pdf")

# 모든 페이지를 반복하여 PDF에서 모든 댓글 제거
for i in range(pdf.Pages.Count):
    page = pdf.Pages.get_Item(i)

    # 현재 페이지의 모든 스티커 메모, 강조 표시 및 주석 지우기
    page.AnnotationsWidget.Clear()

# 깨끗한 PDF 저장
pdf.SaveToFile("/output/commentremoved.pdf")
pdf.Close()
PDF에서 댓글 제거에 관한 자주 묻는 질문(FAQs)
Q1: PDF 문서에서 댓글을 무료로 제거하는 방법은 무엇인가요?
A: Smallpdf와 같은 무료 웹 도구를 사용하여 파일을 업로드하고 정리한 후 몇 초 만에 다운로드할 수 있습니다. 그러나 보안이 최우선이라면 Free Spire.PDF 라이브러리를 사용하는 것이 더 나은 대안입니다. 이 라이브러리는 로컬 컴퓨터에서 완전히 오프라인으로 실행되므로 데이터 유출 위험 없이 무료로 기밀 문서를 일괄 정리할 수 있습니다.
Q2: 댓글을 제거하면 PDF의 강조 표시(highlight) 효과도 삭제되나요?
A: 네. PDF에서 강조 표시, 밑줄 및 취소선은 텍스트 마크업 주석으로 분류됩니다. Adobe의 정리 도구, 온라인 편집기 또는 Python 스크립트를 통해 PDF에서 주석을 제거하면 이러한 시각적 강조 표시도 스티커 메모와 함께 삭제됩니다.
Q3: Adobe에서 댓글을 삭제하는 대신 숨기는 방법은 무엇인가요?
A: 나중에 참고하기 위해 피드백을 유지해야 하지만 지금 당장은 깨끗한 화면이 필요한 경우, Adobe Acrobat에서 댓글(Comment) 패널을 열고 패널 상단의 모든 댓글 숨기기(Hide All Comments) 아이콘을 클릭하면 됩니다.
결론
PDF 파일에서 댓글을 제거하는 방법을 알면 공유하기 전에 깨끗하고 전문적인 문서를 준비하는 데 도움이 됩니다. Adobe Acrobat, 온라인 PDF 편집기 또는 Free Spire.PDF를 사용하는 Python 스크립트 중 무엇을 사용하든 특정 요구 사항에 따라 댓글을 쉽게 삭제할 수 있습니다. 세부적인 수동 편집이 필요하면 Adobe Acrobat을, 빠른 일회성 작업에는 온라인 도구를, 여러 PDF 파일을 효율적으로 처리해야 할 때는 Python 자동화를 선택하십시오.
함께 읽어보기:
Come rimuovere i commenti da un PDF: con o senza Adobe
Che tu stia preparando un contratto definitivo, presentando una tesi o condividendo un rapporto con dei clienti, rimuovere commenti interni, evidenziazioni e note di revisione aiuta a mantenere un aspetto professionale e previene l'esposizione accidentale di dati.
In questa guida, ti mostreremo come rimuovere i commenti dai documenti PDF con tre approcci. A seconda delle tue esigenze, puoi utilizzare Adobe Acrobat, strumenti online gratuiti o uno script Python automatizzato.
- Come eliminare tutti i commenti in Adobe
- Rimuovere i commenti da un PDF online
- Rimuovere automaticamente le annotazioni da un PDF con Python
- Domande frequenti (FAQ)
Come eliminare tutti i commenti in Adobe
Adobe Acrobat è uno dei modi più popolari per gestire e ripulire i PDF. Ti consente di rimuovere i commenti utilizzando le funzionalità integrate. Ecco come eliminare tutti i commenti in Adobe usando due diversi approcci.
1. Selezione in blocco tramite il riquadro Commenti
Questo metodo è utile quando vuoi rimuovere rapidamente le annotazioni da un PDF senza complicazioni. Ecco i passaggi dettagliati:
- Passaggio 1. Apri un PDF in Adobe Acrobat.
- Passaggio 2. Apri il pannello dei commenti cliccando sull'icona Commento nella barra degli strumenti a destra.
- Passaggio 3. Clicca con il tasto sinistro sul primo commento in cima al pannello.
- Passaggio 4. Scorri fino in fondo all'elenco, tieni premuto il tasto Shift sulla tastiera e clicca sull'ultimo commento per selezionare tutte le annotazioni.
- Passaggio 5. Clicca con il tasto destro ovunque nell'elenco evidenziato e seleziona Elimina.
2. Utilizzo della funzione "Sanifica documento"
Se hai a che fare con un documento altamente riservato, l'eliminazione manuale potrebbe non rilevare dati nascosti. La funzione "Sanifica" di Acrobat può rimuovere informazioni nascoste, inclusi commenti, metadati e altri contenuti privati.
- Passaggio 1. Vai al menu in alto e seleziona Strumenti -> Redazione.
- Passaggio 2. Clicca sul pulsante Sanifica documento nella barra superiore.
- Passaggio 3. Apparirà una finestra pop-up. Clicca su OK per eliminare definitivamente tutti i commenti nascosti, le cronologie di revisione e i metadati privati.
Nota: Utilizzando questo metodo, Adobe creerà automaticamente una versione nuova e pulita del PDF. Il PDF originale rimarrà intatto, rendendolo perfetto per conservare una copia interna con i commenti, creando al contempo una bozza pulita per gli altri.
Potrebbe interessarti: Come rendere un PDF di sola lettura nel 2025 (Guida completa)
Come rimuovere i commenti da un PDF online (senza Adobe)
Sebbene Adobe Acrobat sia molto potente, la maggior parte delle sue funzionalità avanzate, inclusa la gestione completa dei commenti, richiede un abbonamento a pagamento. Se hai bisogno di eliminare i commenti in documenti PDF solo una o due volte, utilizzare un editor PDF basato sul web è un'alternativa migliore. Con piattaforme come Smallpdf, puoi caricare i file direttamente nel browser e iniziare a modificare istantaneamente. I maggiori vantaggi sono che questi strumenti sono solitamente gratuiti, leggeri e non richiedono installazione, rendendoli un'opzione comoda per modifiche rapide ai PDF.
Passaggi per rimuovere i commenti online:
- Passaggio 1. Cerca editor PDF online in un browser.
- Passaggio 2. Carica il file PDF nell'editor.
- Passaggio 3. Clicca su qualsiasi annotazione nella pagina e tocca l'icona del cestino per eliminare il commento.
Sebbene gli strumenti online siano gratuiti e convenienti, tieni a mente due cose: primo, evita di caricare PDF con dati finanziari sensibili o segreti commerciali su server di terze parti. Secondo, la maggior parte degli strumenti web richiede di eliminare i commenti uno per uno. Se il tuo documento contiene decine di note o dati riservati, prova Adobe Acrobat o il metodo Python qui sotto.
Come rimuovere automaticamente le annotazioni da un PDF con Python
Per gli sviluppatori o gli utenti che devono elaborare regolarmente più PDF, l'automazione può far risparmiare molto tempo rispetto alla modifica manuale. Se hai bisogno di automatizzare i flussi di lavoro dei documenti o elaborare grandi lotti di file, puoi rimuovere tutti i commenti dai documenti PDF utilizzando uno script Python.
Nelle specifiche ufficiali dei PDF, gli elementi interattivi come note adesive, markup di testo e forme sono tecnicamente chiamati "annotazioni". Utilizzando la libreria Free Spire.PDF for Python, puoi facilmente eliminare questi elementi dalla struttura del file automaticamente. Essendo un componente autonomo, ti consente di elaborare file PDF localmente senza fare affidamento su Adobe Acrobat, il che è utile per l'elaborazione batch automatizzata.
Codice Python per cancellare i commenti dai PDF
Con l'aiuto di Free Spire.PDF, possiamo eliminare le annotazioni dai PDF in due passaggi principali: scorrere ogni pagina del PDF, accedere alla raccolta di annotazioni di ogni pagina e rimuovere tutti gli oggetti di annotazione.
Ecco l'esempio di codice:
from spire.pdf.common import *
from spire.pdf import *

# Carica il documento PDF di destinazione dalla tua directory locale
pdf = PdfDocument()
pdf.LoadFromFile("/input/sample.pdf")

# Scorri tutte le pagine per rimuovere tutti i commenti dal PDF
for i in range(pdf.Pages.Count):
    page = pdf.Pages.get_Item(i)

    # Cancella tutte le note adesive, le evidenziazioni e le annotazioni sulla pagina corrente
    page.AnnotationsWidget.Clear()

# Salva il PDF pulito
pdf.SaveToFile("/output/commentremoved.pdf")
pdf.Close()
Domande frequenti (FAQ) sulla rimozione dei commenti dai PDF
D1: Come rimuovere i commenti da un documento PDF gratuitamente?
R: Puoi utilizzare strumenti web gratuiti come Smallpdf per caricare, pulire e scaricare il tuo file in pochi secondi. Tuttavia, se la sicurezza è la tua priorità assoluta, utilizzare la libreria Free Spire.PDF è un'alternativa migliore. Funziona interamente offline sul tuo computer locale, consentendoti di pulire in blocco documenti riservati gratuitamente con zero rischi di fuga di dati.
D2: La rimozione dei commenti eliminerà anche l'effetto di evidenziazione nel PDF?
R: Sì. Nei PDF, le evidenziazioni, le sottolineature e le barrature sono classificate come annotazioni di markup del testo. Quando rimuovi le annotazioni da un PDF tramite lo strumento Sanifica di Adobe, editor online o script Python, queste evidenziazioni visive verranno eliminate insieme alle note adesive.
D3: Come posso nascondere i commenti invece di eliminarli in Adobe?
R: Se vuoi conservare i feedback per dopo ma hai bisogno di una visualizzazione pulita al momento, puoi aprire il pannello Commento in Adobe Acrobat e cliccare sull'icona Nascondi tutti i commenti nella parte superiore del pannello.
Conclusione
Sapere come rimuovere i commenti dai file PDF ti aiuta a preparare documenti puliti e professionali prima di condividerli. Che tu utilizzi Adobe Acrobat, un editor PDF online o uno script Python con Free Spire.PDF, puoi facilmente eliminare i commenti in base alle tue esigenze specifiche. Scegli Adobe Acrobat per modifiche manuali dettagliate, strumenti online per attività rapide una tantum o l'automazione Python quando devi elaborare più file PDF in modo efficiente.
Leggi anche:
Comment supprimer les commentaires d'un PDF : avec ou sans Adobe
Que vous prépariez un contrat final, soumettiez une thèse ou partagiez un rapport avec des clients, la suppression des commentaires internes, des surlignages et des notes de révision permet de conserver une apparence professionnelle et d'éviter toute exposition accidentelle de données.
Dans ce guide, nous vous montrerons comment supprimer les commentaires des documents PDF avec trois approches. Selon vos besoins, vous pouvez utiliser Adobe Acrobat, des outils en ligne gratuits ou un script Python automatisé.
- Comment supprimer tous les commentaires dans Adobe
- Supprimer les commentaires d'un PDF en ligne
- Supprimer automatiquement les annotations d'un PDF avec Python
- FAQ
Comment supprimer tous les commentaires dans Adobe
Adobe Acrobat est l'un des moyens les plus populaires pour gérer et nettoyer les PDF. Il vous permet de supprimer les commentaires à l'aide de fonctionnalités intégrées. Voici comment supprimer tous les commentaires dans Adobe en utilisant deux approches différentes.
1. Sélection en masse via le volet Commentaires
Cette méthode est utile lorsque vous souhaitez supprimer rapidement les annotations d'un PDF sans difficulté. Voici les étapes détaillées :
- Étape 1. Ouvrez un PDF dans Adobe Acrobat.
- Étape 2. Ouvrez le panneau des commentaires en cliquant sur l'icône Commentaire dans la barre d'outils de droite.
- Étape 3. Faites un clic gauche sur le premier commentaire en haut du panneau.
- Étape 4. Faites défiler jusqu'en bas de la liste, maintenez la touche Maj (Shift) de votre clavier enfoncée et cliquez sur le dernier commentaire pour sélectionner toutes les annotations.
- Étape 5. Faites un clic droit n'importe où sur la liste en surbrillance et sélectionnez Supprimer.
2. Utiliser la fonction Assainir le document
Si vous traitez un document hautement confidentiel, la suppression manuelle pourrait laisser passer des données cachées. La fonction « Assainir » d'Acrobat peut supprimer les informations masquées, y compris les commentaires, les métadonnées et tout autre contenu privé.
- Étape 1. Allez dans le menu supérieur et sélectionnez Outils -> Rédaction.
- Étape 2. Cliquez sur le bouton Assainir le document dans la barre supérieure.
- Étape 3. Une fenêtre contextuelle apparaîtra. Cliquez sur OK pour supprimer définitivement tous les commentaires masqués, l'historique des révisions et les métadonnées privées.
Remarque : En utilisant cette méthode, Adobe créera automatiquement une nouvelle version propre du PDF. Cela laisse votre PDF original intact, ce qui est parfait pour conserver une copie interne avec vos commentaires tout en créant une version propre pour les autres.
Vous pourriez aimer : Comment rendre un PDF en lecture seule en 2025 (Guide complet)
Comment supprimer les commentaires d'un PDF en ligne (Sans Adobe)
Bien qu'Adobe Acrobat soit très puissant, la plupart de ses fonctionnalités avancées, y compris la gestion complète des commentaires, nécessitent un abonnement payant. Si vous n'avez besoin de supprimer des commentaires dans des documents PDF qu'une ou deux fois, l'utilisation d'un éditeur PDF en ligne est une meilleure alternative. Avec des plateformes comme Smallpdf, vous pouvez télécharger des fichiers directement dans un navigateur et commencer à modifier instantanément. Les plus grands avantages sont que ces outils sont généralement gratuits, légers et ne nécessitent aucune installation, ce qui en fait une option pratique pour des modifications rapides de PDF.
Étapes pour supprimer les commentaires en ligne :
- Étape 1. Recherchez des éditeurs PDF en ligne dans un navigateur.
- Étape 2. Téléchargez le fichier PDF dans l'éditeur.
- Étape 3. Cliquez sur n'importe quelle annotation sur la page et appuyez sur l'icône de la corbeille pour supprimer le commentaire.
Bien que les outils en ligne soient gratuits et pratiques, gardez deux choses à l'esprit : premièrement, évitez de télécharger des PDF contenant des données financières sensibles ou des secrets commerciaux sur des serveurs tiers. Deuxièmement, la plupart des outils Web vous obligent à supprimer les commentaires un par un. Si votre document contient des dizaines de notes ou des données confidentielles, essayez Adobe Acrobat ou la méthode Python ci-dessous.
Comment supprimer automatiquement les annotations d'un PDF avec Python
Pour les développeurs ou les utilisateurs qui doivent traiter plusieurs PDF régulièrement, l'automatisation peut faire gagner un temps considérable par rapport à l'édition manuelle. Si vous avez besoin d'automatiser des flux de travail documentaires ou de traiter de grands lots de fichiers, vous pouvez supprimer tous les commentaires des documents PDF à l'aide d'un script Python.
Dans les spécifications officielles des PDF, les éléments interactifs tels que les notes adhésives, les annotations textuelles et les formes sont techniquement appelés « annotations ». En utilisant la bibliothèque Free Spire.PDF for Python, vous pouvez facilement effacer ces éléments de la structure du fichier automatiquement. En tant que composant autonome, il vous permet de traiter des fichiers PDF localement sans dépendre d'Adobe Acrobat, ce qui est utile pour le traitement par lots automatisé.
Code Python pour effacer les commentaires PDF
Avec l'aide de Free Spire.PDF, nous pouvons supprimer les annotations des PDF en deux étapes principales : parcourir chaque page du PDF, accéder à la collection d'annotations de chaque page et supprimer tous les objets d'annotation.
Voici l'exemple de code :
from spire.pdf.common import *
from spire.pdf import *

# Charger le document PDF cible depuis votre répertoire local
pdf = PdfDocument()
pdf.LoadFromFile("/input/sample.pdf")

# Parcourir toutes les pages pour supprimer tous les commentaires du PDF
for i in range(pdf.Pages.Count):
    page = pdf.Pages.get_Item(i)

    # Effacer toutes les notes adhésives, surlignages et annotations sur la page actuelle
    page.AnnotationsWidget.Clear()

# Enregistrer le PDF propre
pdf.SaveToFile("/output/commentremoved.pdf")
pdf.Close()
FAQ sur la suppression des commentaires d'un PDF
Q1 : Comment supprimer gratuitement les commentaires d'un document PDF ?
R : Vous pouvez utiliser des outils Web gratuits comme Smallpdf pour télécharger, nettoyer et télécharger votre fichier en quelques secondes. Cependant, si la sécurité est votre priorité absolue, l'utilisation de la bibliothèque Free Spire.PDF est une meilleure alternative. Elle fonctionne entièrement hors ligne sur votre machine locale, vous permettant de nettoyer par lots des documents confidentiels gratuitement sans aucun risque de fuite de données.
Q2 : La suppression des commentaires supprimera-t-elle également l'effet de surlignage dans le PDF ?
R : Oui. Dans les PDF, les surlignages, soulignements et barrés sont classés comme des annotations de balisage de texte. Lorsque vous supprimez des annotations d'un PDF via l'outil Assainir d'Adobe, des éditeurs en ligne ou des scripts Python, ces surlignages visuels seront supprimés en même temps que les notes adhésives.
Q3 : Comment masquer les commentaires au lieu de les supprimer dans Adobe ?
R : Si vous souhaitez conserver les commentaires pour plus tard mais avez besoin d'une vue propre dès maintenant, vous pouvez ouvrir le volet Commentaire dans Adobe Acrobat et cliquer sur l'icône Masquer tous les commentaires en haut du panneau.
Conclusion
Savoir comment supprimer les commentaires des fichiers PDF vous aide à préparer des documents propres et professionnels avant de les partager. Que vous utilisiez Adobe Acrobat, un éditeur PDF en ligne ou un script Python avec Free Spire.PDF, vous pouvez facilement supprimer les commentaires en fonction de vos besoins spécifiques. Choisissez Adobe Acrobat pour une édition manuelle détaillée, des outils en ligne pour des tâches ponctuelles rapides, ou l'automatisation Python lorsque vous devez traiter plusieurs fichiers PDF efficacement.
À lire aussi :
Cómo eliminar comentarios de un PDF: con o sin Adobe
Tabla de contenidos
Ya sea que esté preparando un contrato final, enviando una tesis o compartiendo un informe con clientes, eliminar los comentarios internos, resaltados y notas de revisión ayuda a mantener una apariencia profesional y previene la exposición accidental de datos.
En esta guía, le mostraremos cómo eliminar comentarios de documentos PDF con tres enfoques. Dependiendo de sus necesidades, puede utilizar Adobe Acrobat, herramientas gratuitas en línea o un script de Python automatizado.
- Cómo eliminar todos los comentarios en Adobe
- Eliminar comentarios de un PDF en línea
- Eliminar anotaciones de un PDF automáticamente con Python
- Preguntas frecuentes
Cómo eliminar todos los comentarios en Adobe
Adobe Acrobat es una de las formas más populares de gestionar y limpiar archivos PDF. Le permite eliminar comentarios utilizando funciones integradas. A continuación, le explicamos cómo eliminar todos los comentarios en Adobe mediante dos enfoques diferentes.
1. Selección masiva a través del panel de comentarios
Este método es útil cuando desea eliminar anotaciones de un PDF rápidamente y sin complicaciones. Estos son los pasos detallados:
- Paso 1. Abra un PDF en Adobe Acrobat.
- Paso 2. Abra el panel de comentarios haciendo clic en el icono de Comentario en la barra de herramientas derecha.
- Paso 3. Haga clic izquierdo en el primer comentario en la parte superior del panel.
- Paso 4. Desplácese hasta la parte inferior de la lista, mantenga presionada la tecla Shift en su teclado y haga clic en el último comentario para seleccionar todas las anotaciones.
- Paso 5. Haga clic derecho en cualquier parte de la lista resaltada y seleccione Eliminar.
2. Usar la función de desinfectar documento
Si está tratando con un documento altamente confidencial, la eliminación manual podría pasar por alto datos ocultos. La función de desinfectar de Acrobat puede eliminar información oculta, incluidos comentarios, metadatos y otro contenido privado.
- Paso 1. Vaya al menú superior y seleccione Herramientas -> Redactar.
- Paso 2. Haga clic en el botón Desinfectar documento en la barra superior.
- Paso 3. Aparecerá una ventana emergente. Haga clic en Aceptar para eliminar permanentemente todos los comentarios ocultos, historiales de revisión y metadatos privados.
Nota: Al usar este método, Adobe creará automáticamente una versión nueva y limpia del PDF. Esto deja su PDF original intacto, lo que lo hace perfecto para conservar una copia interna con sus comentarios mientras crea un borrador limpio para otros.
Quizás le interese: Cómo hacer que un PDF sea de solo lectura en 2025 (Guía completa)
Cómo eliminar comentarios de un PDF en línea (sin Adobe)
Aunque Adobe Acrobat es muy potente, la mayoría de sus funciones avanzadas, incluida la gestión completa de comentarios, requieren una suscripción de pago. Si solo necesita eliminar comentarios en documentos PDF una o dos veces, utilizar un editor de PDF basado en web es una mejor alternativa. Con plataformas como Smallpdf, puede cargar archivos directamente en un navegador y comenzar a editar al instante. Las mayores ventajas son que estas herramientas suelen ser gratuitas, ligeras y no requieren instalación, lo que las convierte en una opción conveniente para ediciones rápidas de PDF.
Pasos para eliminar comentarios en línea:
- Paso 1. Busque editores de PDF en línea en un navegador.
- Paso 2. Cargue el archivo PDF en el editor.
- Paso 3. Haga clic en cualquier anotación de la página y toque el icono de la papelera para eliminar el comentario.
Aunque las herramientas en línea son gratuitas y convenientes, tenga en cuenta dos cosas: primero, evite cargar archivos PDF con datos financieros confidenciales o secretos comerciales a servidores de terceros. Segundo, la mayoría de las herramientas web requieren que elimine los comentarios uno por uno. Si su documento tiene docenas de notas o contiene datos confidenciales, pruebe Adobe Acrobat o el método de Python a continuación.
Cómo eliminar anotaciones de un PDF automáticamente con Python
Para desarrolladores o usuarios que necesitan procesar múltiples archivos PDF regularmente, la automatización puede ahorrar un tiempo significativo en comparación con la edición manual. Si necesita automatizar flujos de trabajo de documentos o procesar grandes lotes de archivos, puede eliminar todos los comentarios de documentos PDF utilizando un script de Python.
En las especificaciones oficiales de PDF, los elementos interactivos como notas adhesivas, marcas de texto y formas se denominan técnicamente "anotaciones". Usando la biblioteca Free Spire.PDF for Python, puede limpiar fácilmente estos elementos de la estructura del archivo automáticamente. Como componente independiente, le permite procesar archivos PDF localmente sin depender de Adobe Acrobat, lo cual es útil para el procesamiento por lotes automatizado.
Código de Python para limpiar comentarios de PDF
Con la ayuda de Free Spire.PDF, podemos eliminar anotaciones de archivos PDF en dos pasos principales: recorrer cada página del PDF, acceder a la colección de anotaciones de cada página y eliminar todos los objetos de anotación.
Aquí tiene el ejemplo de código:
from spire.pdf.common import *
from spire.pdf import *

# Cargar el documento PDF de destino desde su directorio local
pdf = PdfDocument()
pdf.LoadFromFile("/input/sample.pdf")

# Recorrer todas las páginas para eliminar todos los comentarios del PDF
for i in range(pdf.Pages.Count):
    page = pdf.Pages.get_Item(i)

    # Borrar todas las notas adhesivas, resaltados y anotaciones en la página actual
    page.AnnotationsWidget.Clear()

# Guardar el PDF limpio
pdf.SaveToFile("/output/commentremoved.pdf")
pdf.Close()
Preguntas frecuentes sobre cómo eliminar comentarios de un PDF
P1: ¿Cómo eliminar comentarios de un documento PDF de forma gratuita?
R: Puede utilizar herramientas web gratuitas como Smallpdf para cargar, limpiar y descargar su archivo en segundos. Sin embargo, si la seguridad es su máxima prioridad, utilizar la biblioteca Free Spire.PDF es una mejor alternativa. Se ejecuta completamente sin conexión en su máquina local, lo que le permite limpiar por lotes documentos confidenciales de forma gratuita y sin riesgos de fuga de datos.
P2: ¿Eliminar comentarios también borrará el efecto de resaltado en el PDF?
R: Sí. En los archivos PDF, los resaltados, subrayados y tachados se clasifican como anotaciones de marcado de texto. Cuando elimina anotaciones de un PDF a través de la herramienta de desinfección de Adobe, editores en línea o scripts de Python, estos resaltados visuales se eliminarán junto con las notas adhesivas.
P3: ¿Cómo oculto los comentarios en lugar de eliminarlos en Adobe?
R: Si desea conservar los comentarios para más tarde pero necesita una vista limpia en este momento, puede abrir el panel de Comentarios en Adobe Acrobat y hacer clic en el icono Ocultar todos los comentarios en la parte superior del panel.
Conclusión
Saber cómo eliminar comentarios de archivos PDF le ayuda a preparar documentos limpios y profesionales antes de compartirlos. Ya sea que utilice Adobe Acrobat, un editor de PDF en línea o un script de Python con Free Spire.PDF, puede eliminar comentarios fácilmente según sus necesidades específicas. Elija Adobe Acrobat para una edición manual detallada, herramientas en línea para tareas rápidas de una sola vez o la automatización con Python cuando necesite procesar múltiples archivos PDF de manera eficiente.
Lea también:
So entfernen Sie Kommentare aus PDFs: mit oder ohne Adobe
Egal, ob Sie einen endgültigen Vertrag vorbereiten, eine Abschlussarbeit einreichen oder einen Bericht mit Kunden teilen – das Entfernen von internen Kommentaren, Hervorhebungen und Überprüfungsnotizen trägt zu einem professionellen Erscheinungsbild bei und verhindert die versehentliche Offenlegung von Daten.
In dieser Anleitung zeigen wir Ihnen, wie Sie Kommentare aus PDF-Dokumenten entfernen können, und zwar mit drei verschiedenen Ansätzen. Je nach Bedarf können Sie Adobe Acrobat, kostenlose Online-Tools oder ein automatisiertes Python-Skript verwenden.
- So löschen Sie alle Kommentare in Adobe
- Kommentare aus PDF online entfernen
- Anmerkungen aus PDF automatisch mit Python entfernen
- FAQs
So löschen Sie alle Kommentare in Adobe
Adobe Acrobat ist eine der beliebtesten Möglichkeiten, PDFs zu verwalten und zu bereinigen. Es ermöglicht Ihnen, Kommentare mithilfe integrierter Funktionen zu entfernen. Hier erfahren Sie, wie Sie alle Kommentare in Adobe mit zwei verschiedenen Ansätzen löschen.
1. Massenauswahl über das Kommentarfenster
Diese Methode ist nützlich, wenn Sie Anmerkungen schnell und ohne großen Aufwand aus einem PDF entfernen möchten. Hier sind die detaillierten Schritte:
- Schritt 1. Öffnen Sie ein PDF in Adobe Acrobat.
- Schritt 2. Öffnen Sie das Kommentarfenster, indem Sie auf das Symbol Kommentar in der rechten Symbolleiste klicken.
- Schritt 3. Klicken Sie mit der linken Maustaste auf den ersten Kommentar oben im Fenster.
- Schritt 4. Scrollen Sie zum Ende der Liste, halten Sie die Umschalttaste (Shift) auf Ihrer Tastatur gedrückt und klicken Sie auf den letzten Kommentar, um alle Anmerkungen auszuwählen.
- Schritt 5. Klicken Sie mit der rechten Maustaste auf eine beliebige Stelle der markierten Liste und wählen Sie Löschen.
2. Die Funktion „Dokument bereinigen“ verwenden
Wenn Sie mit einem hochvertraulichen Dokument arbeiten, könnten bei einer manuellen Löschung versteckte Daten übersehen werden. Die Bereinigungsfunktion von Acrobat kann versteckte Informationen entfernen, einschließlich Kommentaren, Metadaten und anderen privaten Inhalten.
- Schritt 1. Gehen Sie zum oberen Menü und wählen Sie Werkzeuge -> Schwärzen.
- Schritt 2. Klicken Sie auf die Schaltfläche Dokument bereinigen in der oberen Leiste.
- Schritt 3. Ein Pop-up-Fenster erscheint. Klicken Sie auf OK, um alle versteckten Kommentare, Revisionsverläufe und privaten Metadaten dauerhaft zu entfernen.
Hinweis: Bei dieser Methode erstellt Adobe automatisch eine neue, saubere Version des PDFs. Ihr ursprüngliches PDF bleibt unangetastet, was ideal ist, wenn Sie eine interne Kopie mit Ihren Kommentaren behalten und gleichzeitig einen sauberen Entwurf für andere erstellen möchten.
Das könnte Sie auch interessieren: So machen Sie ein PDF schreibgeschützt im Jahr 2025 (Ein vollständiger Leitfaden)
So entfernen Sie Kommentare aus PDF online (ohne Adobe)
Obwohl Adobe Acrobat sehr leistungsfähig ist, erfordern die meisten erweiterten Funktionen, einschließlich der vollständigen Kommentarverwaltung, ein kostenpflichtiges Abonnement. Wenn Sie Kommentare in PDF-Dokumenten nur ein- oder zweimal löschen müssen, ist ein webbasierter PDF-Editor eine bessere Alternative. Mit Plattformen wie Smallpdf können Sie Dateien direkt im Browser hochladen und sofort mit der Bearbeitung beginnen. Die größten Vorteile sind, dass diese Tools meist kostenlos und leichtgewichtig sind und keine Installation erfordern, was sie zu einer bequemen Option für schnelle PDF-Bearbeitungen macht.
Schritte zum Online-Entfernen von Kommentaren:
- Schritt 1. Suchen Sie in einem Browser nach Online-PDF-Editoren.
- Schritt 2. Laden Sie die PDF-Datei in den Editor hoch.
- Schritt 3. Klicken Sie auf eine beliebige Anmerkung auf der Seite und tippen Sie auf das Papierkorb-Symbol, um den Kommentar zu löschen.
Obwohl Online-Tools kostenlos und bequem sind, sollten Sie zwei Dinge beachten: Erstens sollten Sie keine PDFs mit sensiblen Finanzdaten oder Geschäftsgeheimnissen auf Server von Drittanbietern hochladen. Zweitens erfordern die meisten Web-Tools, dass Sie Kommentare einzeln löschen. Wenn Ihr Dokument Dutzende von Notizen enthält oder vertrauliche Daten enthält, versuchen Sie es mit Adobe Acrobat oder der unten beschriebenen Python-Methode.
So entfernen Sie Anmerkungen aus PDF automatisch mit Python
Für Entwickler oder Benutzer, die regelmäßig mehrere PDFs verarbeiten müssen, kann die Automatisierung im Vergleich zur manuellen Bearbeitung viel Zeit sparen. Wenn Sie Dokumenten-Workflows automatisieren oder große Dateimengen verarbeiten müssen, können Sie alle Kommentare aus PDF-Dokumenten mit einem Python-Skript entfernen.
In offiziellen PDF-Spezifikationen werden interaktive Elemente wie Haftnotizen, Textmarkierungen und Formen technisch als „Anmerkungen“ (Annotations) bezeichnet. Mit der Bibliothek Free Spire.PDF for Python können Sie diese Elemente einfach und automatisch aus der Dateistruktur entfernen. Als eigenständige Komponente ermöglicht sie die lokale Verarbeitung von PDF-Dateien, ohne auf Adobe Acrobat angewiesen zu sein, was für die automatisierte Stapelverarbeitung nützlich ist.
Python-Code zum Löschen von PDF-Kommentaren
Mit Hilfe von Free Spire.PDF können wir Anmerkungen aus PDFs löschen, indem wir zwei Hauptschritte ausführen: Durchlaufen jeder PDF-Seite, Zugriff auf die Anmerkungssammlung jeder Seite und Entfernen aller Anmerkungsobjekte.
Hier ist das Code-Beispiel:
from spire.pdf.common import *
from spire.pdf import *

# Laden des Ziel-PDF-Dokuments aus Ihrem lokalen Verzeichnis
pdf = PdfDocument()
pdf.LoadFromFile("/input/sample.pdf")

# Durchlaufen aller Seiten, um alle Kommentare aus dem PDF zu entfernen
for i in range(pdf.Pages.Count):
    page = pdf.Pages.get_Item(i)

    # Löschen aller Haftnotizen, Hervorhebungen und Anmerkungen auf der aktuellen Seite
    page.AnnotationsWidget.Clear()

# Speichern des bereinigten PDFs
pdf.SaveToFile("/output/commentremoved.pdf")
pdf.Close()
FAQs zum Entfernen von Kommentaren aus PDF
Q1: Wie entferne ich Kommentare aus einem PDF-Dokument kostenlos?
A: Sie können kostenlose Web-Tools wie Smallpdf verwenden, um Ihre Datei in Sekundenschnelle hochzuladen, zu bereinigen und herunterzuladen. Wenn Sicherheit jedoch Ihre oberste Priorität ist, ist die Bibliothek Free Spire.PDF eine bessere Alternative. Sie läuft vollständig offline auf Ihrem lokalen Computer und ermöglicht es Ihnen, vertrauliche Dokumente kostenlos und ohne Risiko von Datenlecks stapelweise zu bereinigen.
Q2: Löscht das Entfernen von Kommentaren auch den Hervorhebungseffekt im PDF?
A: Ja. In PDFs werden Hervorhebungen, Unterstreichungen und Durchstreichungen als Textmarkierungs-Anmerkungen klassifiziert. Wenn Sie Anmerkungen aus einem PDF über Adobes Bereinigungs-Tool, Online-Editoren oder Python-Skripte entfernen, werden diese visuellen Hervorhebungen zusammen mit den Haftnotizen gelöscht.
Q3: Wie kann ich Kommentare in Adobe ausblenden, anstatt sie zu löschen?
A: Wenn Sie das Feedback für später behalten möchten, aber jetzt eine saubere Ansicht benötigen, können Sie das Kommentar-Fenster in Adobe Acrobat öffnen und auf das Symbol Alle Kommentare ausblenden oben im Fenster klicken.
Fazit
Zu wissen, wie man Kommentare aus PDF-Dateien entfernt, hilft Ihnen dabei, saubere und professionelle Dokumente vorzubereiten, bevor Sie diese teilen. Egal, ob Sie Adobe Acrobat, einen Online-PDF-Editor oder ein Python-Skript mit Free Spire.PDF verwenden – Sie können Kommentare ganz einfach nach Ihren spezifischen Anforderungen löschen. Wählen Sie Adobe Acrobat für detaillierte manuelle Bearbeitungen, Online-Tools für schnelle einmalige Aufgaben oder Python-Automatisierung, wenn Sie mehrere PDF-Dateien effizient verarbeiten müssen.