
Data (29)
C# Write to Excel Guide: Insert Data into Worksheets Easily
2025-09-04 09:05:06 Written by Administrator
Excel remains one of the most widely used tools for managing and analyzing data due to its powerful features and user-friendly interface. In C# applications, developers often need to generate reports, export database results, or automate tasks by writing directly to Excel files.
To achieve this efficiently, developers often turn to third-party libraries. Spire.XLS for .NET makes it simple to write to Excel programmatically without relying on Microsoft Excel. With Spire.XLS, you can insert text, numbers, dates, formulas, or even bulk datasets such as arrays, DataTables, and lists into Excel worksheets. This provides a fast, flexible, and reliable way to automate Excel writing in C# applications.
On this page:
- Getting Started with Spire.XLS for .NET
- How to Create a New Excel File in C#
- Write Different Data Types to Excel Cells
- Write Bulk Data to Excel Sheets
- Save and Export Excel Files
- Common Issues and Solutions
- Conclusion
- FAQs
Getting Started with Spire.XLS for .NET
What’s Spire.XLS for .NET
Spire.XLS for .NET is a professional .NET Excel library developed by E-iceblue. It allows developers to write to Excel files in C# and perform a wide range of operations including creating, editing, reading, and exporting Excel documents—without requiring Microsoft Excel to be installed.
Key features include:
- Write and update Excel files programmatically.
- Support for Excel formats (XLS, XLSX, CSV, ODS).
- Advanced features such as formulas, charts, pivot tables, and data validation.
- Export Excel to PDF, HTML, and image formats.
- High performance with large datasets, suitable for desktop, server, and web applications.
How to Install Spire.XLS for .NET
Option 1: Install via NuGet (recommended)
- Open Visual Studio.
- Navigate to Tools > NuGet Package Manager > Manage NuGet Packages for Solution.
- Search for Spire.XLS and install it.
Or, install it directly using the Package Manager Console :
PM> Install-Package Spire.XLS
Option 2: Manual installation
- Download the Spire.XLS package from our official website
- Add a reference to Spire.Xls.dll in your project.
Once installed, you’re ready to start writing to Excel in C#.
How to Create a New Excel File in C#
The first step is to create a new workbook and add a worksheet. Here’s how:
using Spire.Xls;

namespace CreateNewExcel
{
    class Program
    {
        static void Main(string[] args)
        {
            // Create a new workbook
            Workbook workbook = new Workbook();

            // Remove default worksheets
            workbook.Worksheets.Clear();

            // Add a worksheet
            Worksheet sheet = workbook.Worksheets.Add("Report");

            // Save the empty Excel file
            workbook.SaveToFile("NewExcelFile.xlsx", ExcelVersion.Version2016);
            workbook.Dispose();
        }
    }
}
At this point, you have created an empty Excel file with a worksheet named “Report”. Next, let’s write data into it.
Write Different Data Types to Excel Cells in C#
Spire.XLS allows you to write various data types directly to Excel cells. Below are common examples:
Write Text Values
sheet.Range["A1"].Text = "Hello Excel!";
Write Numeric Values
sheet.Range["A2"].NumberValue = 123.45;
Write Date and Time
sheet.Range["A3"].DateTimeValue = DateTime.Now;
sheet.Range["A3"].NumberFormat = "yyyy-mm-dd hh:mm";
Write Boolean Values
sheet.Range["A4"].BooleanValue = true;
Write TimeSpan Values
sheet.Range["A5"].TimeSpanValue = new TimeSpan(2, 30, 0); // 2 hours 30 minutes;
sheet.Range["A5"].NumberFormat = "[h]:mm:ss";
Insert Formulas
sheet.Range["A6"].Formula = "=SUM(A2,100)";
Insert HTML Formatted Strings
string htmlText = "<span style=\"font-family: Times New Roman; color: blue; font-size: 15pt;\">Hello
<strong>Spire.XLS</strong></span>";
sheet.Range["A7"].HtmlString = htmlText;
Write General Values Without Specific Type
sheet.Range["A8"].Value = "General Value";
Output:

You might also be interested in: How to Read Excel Files in C#
Write Bulk Data to Excel Sheets in C#
When dealing with larger datasets, writing values cell by cell isn’t efficient. Spire.XLS provides methods to insert arrays , and DataTables directly. Other data structures can be converted to arrays or DataTables before being written to the Excel sheet.
Write Arrays to Excel
Spire.XLS provides the Worksheet.InsertArray(string[] stringArray, int firstRow, int firstColumn, bool isVertical) method, allowing developers to insert one-dimensional or two-dimensional arrays into a specified range of cells in a worksheet.
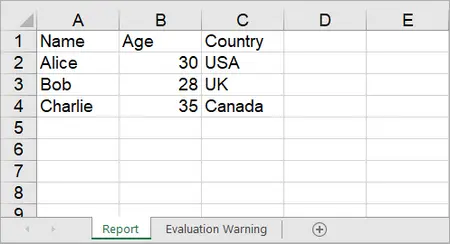
string[,] data = {
    { "Name", "Age", "Country" },
    { "Alice", "30", "USA" },
    { "Bob", "28", "UK" },
    { "Charlie", "35", "Canada" }
};
sheet.InsertArray(data, 1, 1);
Output:
Write DataTables to Excel
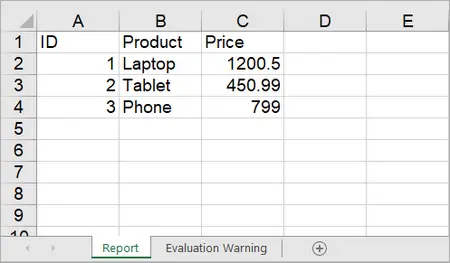
To import data from a DataTable to a worksheet, use the Worksheet.InsertDataTable(DataTable dataTable, bool columnHeaders, int firstRow, int firstColumn, bool transTypes) method.
using System.Data;

DataTable dt = new DataTable();
dt.Columns.Add("ID", typeof(int));
dt.Columns.Add("Product", typeof(string));
dt.Columns.Add("Price", typeof(double));

// Add rows
dt.Rows.Add(1, "Laptop", 1200.5);
dt.Rows.Add(2, "Tablet", 450.99);
dt.Rows.Add(3, "Phone", 799.0);

// Insert DataTable starting at cell A1
sheet.InsertDataTable(dt, true, 1, 1, true);
Output:
On the contrary, you can export data from Excel to DataTable by using the ExportDataTable method of the Worksheet class.
Write Lists to Excel
While Spire.XLS does not provide a direct method for writing lists to Excel, you can convert lists to a DataTable and then use the InsertDataTable method to write the DataTable to Excel.
using Spire.Xls;
using System.Data;
namespace WriteListToExcel
{
class Program
{
static void Main(string[] args)
{
// Create a Workbook instance
Workbook workbook = new Workbook();
// Remove default worksheets
workbook.Worksheets.Clear();
// Add a worksheet and name it
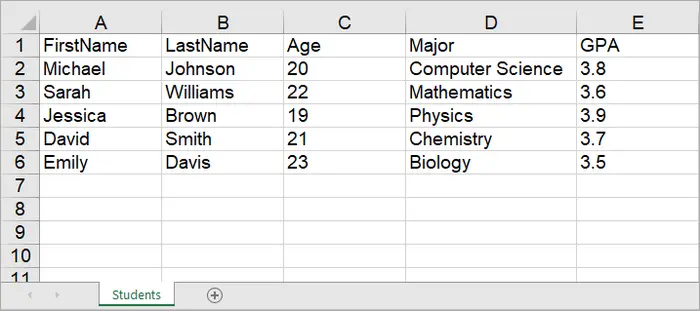
Worksheet worksheet = workbook.Worksheets.Add("Students");
// Create a list with student data
List<Student> students = new List<Student>
{
new Student("Michael", "Johnson", 20, "Computer Science", 3.8),
new Student("Sarah", "Williams", 22, "Mathematics", 3.6),
new Student("Jessica", "Brown", 19, "Physics", 3.9),
new Student("David", "Smith", 21, "Chemistry", 3.7),
new Student("Emily", "Davis", 23, "Biology", 3.5)
};
// Convert the list to DataTable
DataTable dataTable = ConvertListToDataTable(students);
// Write DataTable to the worksheet
worksheet.InsertDataTable(dataTable, true, 1, 1, true);
// Set column width
worksheet.AllocatedRange.ColumnWidth = 12;
// Align content to left
worksheet.AllocatedRange.HorizontalAlignment = HorizontalAlignType.Left;
// Save to an Excel file
workbook.SaveToFile("InsertStudents.xlsx", ExcelVersion.Version2016);
// Dispose resources
workbook.Dispose();
}
static DataTable ConvertListToDataTable(List<Student> students)
{
DataTable dataTable = new DataTable();
// Add columns
dataTable.Columns.Add("FirstName", typeof(string));
dataTable.Columns.Add("LastName", typeof(string));
dataTable.Columns.Add("Age", typeof(int));
dataTable.Columns.Add("Major", typeof(string));
dataTable.Columns.Add("GPA", typeof(double));
// Add rows
foreach (var student in students)
{
DataRow row = dataTable.NewRow();
row["FirstName"] = student.FirstName;
row["LastName"] = student.LastName;
row["Age"] = student.Age;
row["Major"] = student.Major;
row["GPA"] = student.GPA;
dataTable.Rows.Add(row);
}
return dataTable;
}
}
class Student
{
public string FirstName { get; set; }
public string LastName { get; set; }
public int Age { get; set; }
public string Major { get; set; }
public double GPA { get; set; }
public Student(string firstName, string lastName, int age, string major, double gpa)
{
FirstName = firstName;
LastName = lastName;
Age = age;
Major = major;
GPA = gpa;
}
}
}
Output:
Save and Export Excel Files
After writing data, you’ll want to save or export the Excel file. Spire.XLS supports multiple formats including XLSX, CSV, and PDF .
// Save as XLSX
workbook.SaveToFile("Output.xlsx", ExcelVersion.Version2016);

// Save as CSV
workbook.SaveToFile("Output.csv", ",", Encoding.UTF8);

// Export as PDF
workbook.SaveToFile("Output.pdf", FileFormat.PDF);
For web applications, you can also save to a MemoryStream :
using (MemoryStream ms = new MemoryStream())
{
    workbook.SaveToStream(ms, FileFormat.Version2016);
    // Write to Response in ASP.NET if needed
}
Common Issues and Solutions
1. Incorrect Date or Time Format
Issue: Dates/times appear as serial numbers.
Solution :
- Apply a proper number format to the cell:
sheet.Range["A1"].DateTimeValue = DateTime.Now;
sheet.Range["A1"].NumberFormat = "yyyy-mm-dd hh:mm";
2. Data Overwriting or Misaligned
Issue : Writing arrays or DataTables overwrites existing data unintentionally.
Solution :
- Check firstRow and firstColumn parameters in InsertArray() or InsertDataTable().
- Use separate worksheets or offset ranges if necessary.
3. Large Dataset Performance Issues
Issue : Writing thousands of rows is slow.
Solution :
- Use bulk writing methods instead of looping cell by cell.
- Apply styles after inserting data to avoid repeated formatting overhead.
4. Formula Not Calculating Correctly
Issue : Excel formulas inserted via sheet.Range["A1"].Formula do not return expected results.
Solution :
- Ensure the formula syntax is correct for Excel (e.g., =SUM(A2:A10)).
- Call workbook.CalculateAllValue() to update all formulas before saving if needed.
Conclusion
Writing to Excel in C# doesn’t have to be complex. With Spire.XLS for .NET , you can seamlessly write different data types—whether individual values or large datasets—into Excel worksheets. The library also provides support for styling, formulas, and advanced formatting, ensuring your Excel files are not only accurate but also presentation-ready.
By using efficient bulk-writing techniques like arrays and DataTables, you can handle both small and large data operations with ease. If your goal is to write to Excel files quickly and reliably , Spire.XLS gives you the tools you need—without the overhead of Microsoft Excel.
FAQs
Q1. Can I write to an existing Excel file with Spire.XLS?
Yes. Use workbook.LoadFromFile("file.xlsx") to open an existing file, then modify and save it.
Q2. Does Spire.XLS require Microsoft Excel to be installed?
No. It’s a standalone library that works without Excel.
Q3. Can Spire.XLS handle large Excel files with thousands of rows?
Yes. It’s optimized for high performance with large datasets.
Q4. How do I format cells while writing data?
You can style cells using properties like font, color, borders, and alignment:
sheet.Range["A1"].Style.Font.IsBold = true;
sheet.Range["A1"].Style.Color = Color.Yellow;
sheet.Range["A1"].Style.HorizontalAlignment  = HorizontalAlignType.Left;
Get a Free License
To fully experience the capabilities of Spire.XLS for .NET without any evaluation limitations, you can request a free 30-day trial license.
Slicers in Excel offer a user-friendly way to filter data in pivot tables and tables, making data analysis both visually appealing and interactive. Unlike traditional filter options, which can be less intuitive, slicers present filter choices as buttons. This allows users to quickly and easily refine their data views. Whether you are handling large datasets or building dynamic dashboards, slicers improve the user experience by providing immediate feedback on the selected criteria. This article explains how to add, update, and remove slicers in Excel in C# using Spire.XLS for .NET.
- Add Slicers to Tables in Excel
- Add Slicers to Pivot Tables in Excel
- Update Slicers in Excel
- Remove Slicers from Excel
Install Spire.XLS for .NET
To begin with, you need to add the DLL files included in the Spire.XLS for .NET package as references in your .NET project. The DLL files can be either downloaded from this link or installed via NuGet.
PM> Install-Package Spire.XLS
Add Slicers to Tables in Excel
Spire.XLS for .NET offers the Worksheet.Slicers.Add(IListObject table, string destCellName, int index) method to add a slicer to a table in an Excel worksheet. The detailed steps are as follows.
- Create an object of the Workbook class.
- Get the first worksheet using the Workbook.Worksheets[0] property.
- Add data to the worksheet using the Worksheet.Range[].Value property.
- Add a table to the worksheet using the Worksheet.IListObjects.Create() method.
- Add a slicer to the table using the Worksheeet.Slicers.Add(IListObject table, string destCellName, int index) method.
- Save the resulting file using the Workbook.SaveToFile() method.
- C#
using Spire.Xls;
using Spire.Xls.Core;
namespace AddSlicerToTable
{
internal class Program
{
static void Main(string[] args)
{
// Create an object of the Workbook class
Workbook workbook = new Workbook();
// Get the first worksheet
Worksheet worksheet = workbook.Worksheets[0];
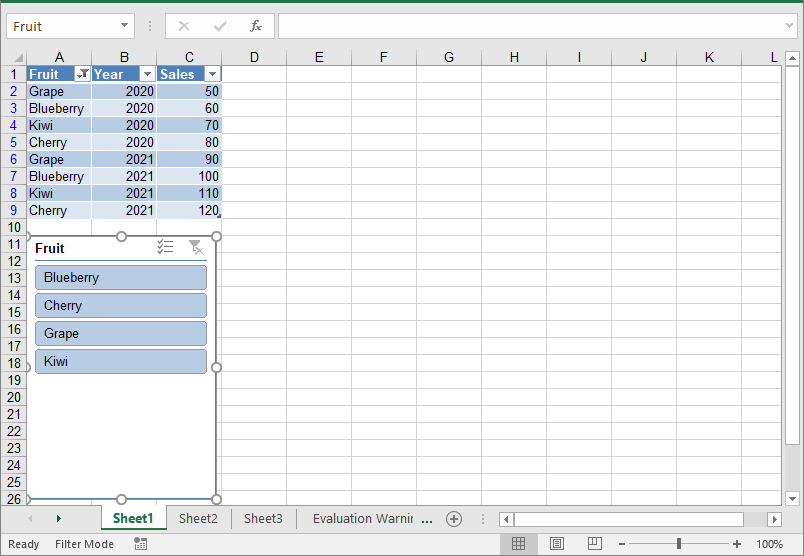
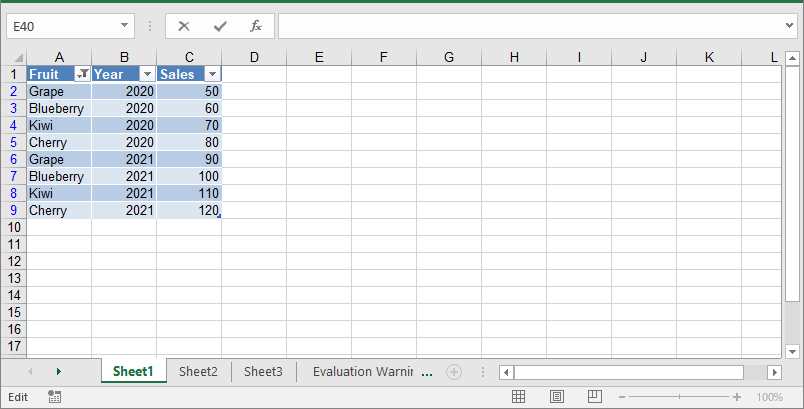
// Add data to the worksheet
worksheet.Range["A1"].Value = "Fruit";
worksheet.Range["A2"].Value = "Grape";
worksheet.Range["A3"].Value = "Blueberry";
worksheet.Range["A4"].Value = "Kiwi";
worksheet.Range["A5"].Value = "Cherry";
worksheet.Range["A6"].Value = "Grape";
worksheet.Range["A7"].Value = "Blueberry";
worksheet.Range["A8"].Value = "Kiwi";
worksheet.Range["A9"].Value = "Cherry";
worksheet.Range["B1"].Value = "Year";
worksheet.Range["B2"].Value2 = 2020;
worksheet.Range["B3"].Value2 = 2020;
worksheet.Range["B4"].Value2 = 2020;
worksheet.Range["B5"].Value2 = 2020;
worksheet.Range["B6"].Value2 = 2021;
worksheet.Range["B7"].Value2 = 2021;
worksheet.Range["B8"].Value2 = 2021;
worksheet.Range["B9"].Value2 = 2021;
worksheet.Range["C1"].Value = "Sales";
worksheet.Range["C2"].Value2 = 50;
worksheet.Range["C3"].Value2 = 60;
worksheet.Range["C4"].Value2 = 70;
worksheet.Range["C5"].Value2 = 80;
worksheet.Range["C6"].Value2 = 90;
worksheet.Range["C7"].Value2 = 100;
worksheet.Range["C8"].Value2 = 110;
worksheet.Range["C9"].Value2 = 120;
//Create a table from the specific data range
IListObject table = worksheet.ListObjects.Create("Fruit Sales", worksheet.Range["A1:C9"]);
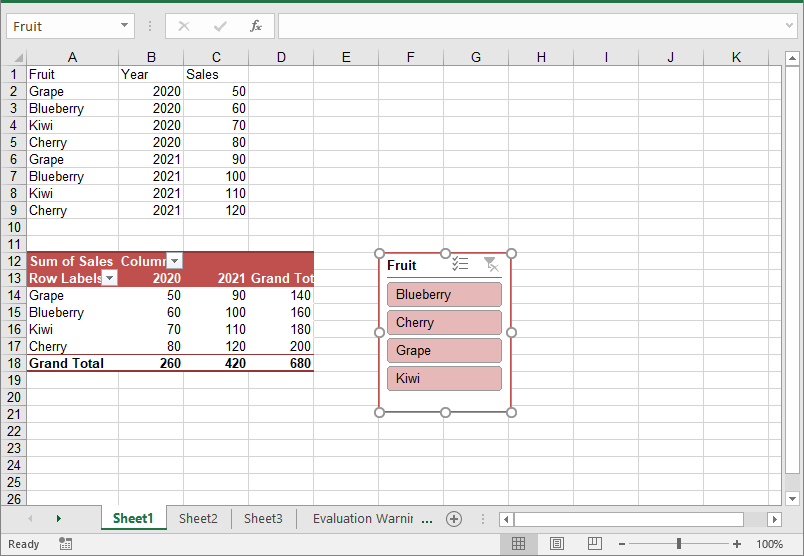
// Add a slicer to cell "A11" to filter the data based on the first column of the table
int index = worksheet.Slicers.Add(table, "A11", 0);
// Set name and style for the slicer
worksheet.Slicers[index].Name = "Fruit";
worksheet.Slicers[index].StyleType = SlicerStyleType.SlicerStyleLight1;
//Save the resulting file
workbook.SaveToFile("AddSlicerToTable.xlsx", ExcelVersion.Version2013);
workbook.Dispose();
}
}
}
Add Slicers to Pivot Tables in Excel
In addition to adding slicers to tables, Spire.XLS for .NET also enables you to add slicers to pivot tables in Excel using the Worksheet.Slicers.Add(IPivotTable pivot, string destCellName, int baseFieldIndex) method. The detailed steps are as follows.
- Create an object of the Workbook class.
- Get the first worksheet using the Workbook.Worksheets[0] property.
- Add data to the worksheet using the Worksheet.Range[].Value property.
- Create a pivot cache from the data using the Workbook.PivotCaches.Add() method.
- Create a pivot table from the pivot cache using the Worksheet.PivotTables.Add() method.
- Drag the pivot fields to the row, column, and data areas. Then calculate the data in the pivot table.
- Add a slicer to the pivot table using the Worksheet.Slicers.Add(IPivotTable pivot, string destCellName, int baseFieldIndex) method.
- Set the properties, such as the name, width, height, style, and cross filter type for the slicer.
- Calculate the data in the pivot table.
- Save the resulting file using the Workbook.SaveToFile() method.
- C#
using Spire.Xls;
using Spire.Xls.Core;

namespace AddSlicerToPivotTable
{
    internal class Program
    {
        static void Main(string[] args)
        {
            // Create an object of the Workbook class
            Workbook workbook = new Workbook();
            // Get the first worksheet
            Worksheet worksheet = workbook.Worksheets[0];

            // Add data to the worksheet
            worksheet.Range["A1"].Value = "Fruit";
            worksheet.Range["A2"].Value = "Grape";
            worksheet.Range["A3"].Value = "Blueberry";
            worksheet.Range["A4"].Value = "Kiwi";
            worksheet.Range["A5"].Value = "Cherry";
            worksheet.Range["A6"].Value = "Grape";
            worksheet.Range["A7"].Value = "Blueberry";
            worksheet.Range["A8"].Value = "Kiwi";
            worksheet.Range["A9"].Value = "Cherry";

            worksheet.Range["B1"].Value = "Year";
            worksheet.Range["B2"].Value2 = 2020;
            worksheet.Range["B3"].Value2 = 2020;
            worksheet.Range["B4"].Value2 = 2020;
            worksheet.Range["B5"].Value2 = 2020;
            worksheet.Range["B6"].Value2 = 2021;
            worksheet.Range["B7"].Value2 = 2021;
            worksheet.Range["B8"].Value2 = 2021;
            worksheet.Range["B9"].Value2 = 2021;

            worksheet.Range["C1"].Value = "Sales";
            worksheet.Range["C2"].Value2 = 50;
            worksheet.Range["C3"].Value2 = 60;
            worksheet.Range["C4"].Value2 = 70;
            worksheet.Range["C5"].Value2 = 80;
            worksheet.Range["C6"].Value2 = 90;
            worksheet.Range["C7"].Value2 = 100;
            worksheet.Range["C8"].Value2 = 110;
            worksheet.Range["C9"].Value2 = 120;

            // Create a pivot cache from the specific data range
            CellRange dataRange = worksheet.Range["A1:C9"];
            PivotCache cache = workbook.PivotCaches.Add(dataRange);

            // Create a pivot table from the pivot cache
            PivotTable pt = worksheet.PivotTables.Add("Fruit Sales", worksheet.Range["A12"], cache);


            // Drag the fields to the row and column areas
            PivotField pf = pt.PivotFields["Fruit"] as PivotField;
            pf.Axis = AxisTypes.Row;
            PivotField pf2 = pt.PivotFields["Year"] as PivotField;
            pf2.Axis = AxisTypes.Column;

            // Drag the field to the data area
            pt.DataFields.Add(pt.PivotFields["Sales"], "Sum of Sales", SubtotalTypes.Sum);

            // Set style for the pivot table
            pt.BuiltInStyle = PivotBuiltInStyles.PivotStyleMedium10;

            // Calculate the pivot table data
            pt.CalculateData();

            // Add a Slicer to the pivot table
            int index_1 = worksheet.Slicers.Add(pt, "F12", 0);

            // Set the name, width, height, and style for the slicer
            worksheet.Slicers[index_1].Name = "Fruit";
            worksheet.Slicers[index_1].Width = 100;
            worksheet.Slicers[index_1].Height = 120;
            worksheet.Slicers[index_1].StyleType = SlicerStyleType.SlicerStyleLight2;

            // Set the cross filter type for the slicer
            XlsSlicerCache slicerCache = worksheet.Slicers[index_1].SlicerCache;
            slicerCache.CrossFilterType = SlicerCacheCrossFilterType.ShowItemsWithNoData;

            // Calculate the pivot table data
            pt.CalculateData();

            // Save the resulting file
            workbook.SaveToFile("AddSlicerToPivotTable.xlsx", ExcelVersion.Version2013);
            workbook.Dispose();
        }
    }
}
Update Slicers in Excel
You can update the properties of a slicer, such as its style, name, caption, and more using the corresponding properties of the XlsSlicer class. The detailed steps are as follows.
- Create an object of the Workbook class.
- Load an Excel file using the Workbook.LoadFromFile() method.
- Get a specific worksheet by its index using the Workbook.Worksheets[index] property.
- Get a specific slicer from the worksheet by its index using the Worksheet.Slicers[index] property.
- Update the properties of the slicer, such as its style, name, caption, and cross filter type using the properties of the XlsSlicer class.
- Save the resulting file using the Workbook.SaveToFile() method.
- C#
using Spire.Xls;
using Spire.Xls.Core;

namespace UpdateSlicer
{
    internal class Program
    {
        static void Main(string[] args)
        {
            // Create an object of the Workbook class
            Workbook workbook = new Workbook();
            // Load an Excel file
            workbook.LoadFromFile("AddSlicerToTable.xlsx");

            // Get the first worksheet
            Worksheet worksheet = workbook.Worksheets[0];

            // Get the first slicer in the worksheet
            XlsSlicer slicer = worksheet.Slicers[0];

            // Change the style, name, and caption for the slicer
            slicer.StyleType = SlicerStyleType.SlicerStyleDark4;
            slicer.Name = "Slicer";
            slicer.Caption = "Slicer";

            // Change the cross filter type for the slicer
            slicer.SlicerCache.CrossFilterType = SlicerCacheCrossFilterType.ShowItemsWithDataAtTop;

            // Deselect an item in the slicer
            XlsSlicerCacheItemCollection slicerCacheItems = slicer.SlicerCache.SlicerCacheItems;
            XlsSlicerCacheItem xlsSlicerCacheItem = slicerCacheItems[0];
            xlsSlicerCacheItem.Selected = false;

            // Save the resulting file
            workbook.SaveToFile("UpdateSlicer.xlsx", ExcelVersion.Version2013);
            workbook.Dispose();
        }
    }
}

Remove Slicers from Excel
You can remove a specific slicer from an Excel worksheet using the Worksheet.Slicers.RemoveAt() method, or remove all slicers at once using the Worksheet.Slicers.Clear() method. The detailed steps are as follows.
- Create an object of the Workbook class.
- Load an Excel file using the Workbook.LoadFromFile() method.
- Get a specific worksheet by its index using the Workbook.Worksheets[index] property.
- Remove a specific slicer from the worksheet by its index using the Worksheet.Slicers.RemoveAt(index) method. Or remove all slicers from the worksheet using the Worksheet.Slicers.Clear() method.
- Save the resulting file using the Workbook.SaveToFile() method.
- C#
using Spire.Xls;
using Spire.Xls.Core;

namespace RemoveSlicer
{
    internal class Program
    {
        static void Main(string[] args)
        {
            // Create an object of the Workbook class
            Workbook workbook = new Workbook();
            // Load an Excel file
            workbook.LoadFromFile("AddSlicerToTable.xlsx");

            // Get the first worksheet
            Worksheet worksheet = workbook.Worksheets[0];

            // Remove the first slicer by index
            worksheet.Slicers.RemoveAt(0);

            //// Or remove all slicers
            //worksheet.Slicers.Clear();

            // Save the resulting file
            workbook.SaveToFile("RemoveSlicer.xlsx", ExcelVersion.Version2013);
            workbook.Dispose();
        }
    }
}
Apply for a Temporary License
If you'd like to remove the evaluation message from the generated documents, or to get rid of the function limitations, please request a 30-day trial license for yourself.
Transforming text to numbers and vice versa in Excel is essential for effective data management. By converting text to numbers, you enhance the accuracy of calculations and data processing, which is vital for activities such as financial reporting and statistical analysis. Conversely, changing numbers to text can improve formatting, making outputs clearer and more readable, ultimately presenting data in a more user-friendly way.
In this article, you will learn how to convert text to numbers and numbers to text in Excel using Spire.XLS for .NET.
Install Spire.XLS for .NET
To begin with, you need to add the DLL files included in the Spire.XLS for .NET package as references in your .NET project. The DLL files can be either downloaded from this link or installed via NuGet.
PM> Install-Package Spire.XLS
Convert Text to Numbers in C#
When you import data from an external source into Excel, you might notice a small green triangle in the upper-left corner of certain cells. This triangle serves as an error indicator, signaling that the number is formatted as text. When numbers are stored as text, it can lead to unexpected outcomes, such as formulas not calculating correctly and displaying as text instead of yielding results.
To convert text-formatted numbers back to numeric format, you can use the CellRange.ConvertToNumber() method. The CellRange object can refer to either a single cell or a range of cells.
Here are the steps to convert text to numbers in Excel:
- Create a Workbook object.
- Load an Excel file using Workbook.LoadFromFile() method.
- Access a specific worksheet with Workbook.Worksheets[index] property.
- Retrieve a cell or range of cells using Worksheet.Range property.
- Convert the text in the cell(s) to numbers using CellRange.ConvertToNumber() method.
- Save the document as a new Excel file.
- C#
using Spire.Xls;

namespace ConvertTextToNumbers
{
    class Program
    {
        static void Main(string[] args)
        {

            // Create a Workbook object
            Workbook workbook = new Workbook();

            // Load an Excel document
            workbook.LoadFromFile("C:\\Users\\Administrator\\Desktop\\Input.xlsx");

            // Get a specific worksheet
            Worksheet worksheet = workbook.Worksheets[0];

            // Get a cell range
            CellRange range = worksheet.Range["D2:G13"];

            // Convert text to number
            range.ConvertToNumber();

            // Save the workbook to a different Excel file
            workbook.SaveToFile("TextToNumbers.xlsx", ExcelVersion.Version2013);

            // Dispose resources
            workbook.Dispose();
        }
    }
}
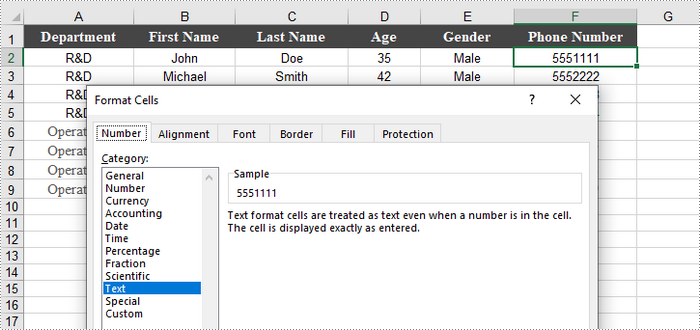
Convert Numbers to Text in C#
When working with numerical data in Excel, you may find occasions where converting numbers to text is necessary. This is especially crucial for data that requires specific formatting, such as IDs or phone numbers, where leading zeros must be preserved.
To convert a number in a cell to text, you can set the CellRange.NumberFormat property to @. The CellRange object can represent either a single cell or a range of cells.
Here are the steps to convert numbers to text in Excel:
- Create a Workbook object.
- Load an Excel file using Workbook.LoadFromFile() method.
- Access a specific worksheet through Workbook.Worksheets[index] property.
- Retrieve a specific cell or range of cells using Worksheet.Range property.
- Convert the numbers in the cell(s) to text by setting CellRange.NumberFormat to @.
- Save the document as a new Excel file.
- C#
using Spire.Xls;

namespace ConvertNumbersToText
{
    class Program
    {
        static void Main(string[] args)
        {
            // Create a Workbook object
            Workbook workbook = new Workbook();

            // Load an Excel document
            workbook.LoadFromFile("C:\\Users\\Administrator\\Desktop\\Employee.xlsx");

            // Get a specific worksheet
            Worksheet worksheet = workbook.Worksheets[0];

            // Get a cell range
            CellRange cellRange = worksheet.Range["F2:F9"];

            // Convert numbers in the cell range to text
            cellRange.NumberFormat = "@";

            // Save the workbook to a different Excel file
            workbook.SaveToFile("NumbersToText.xlsx", ExcelVersion.Version2013);

            // Dispose resources
            workbook.Dispose();
        }
    }
}
Apply for a Temporary License
If you'd like to remove the evaluation message from the generated documents, or to get rid of the function limitations, please request a 30-day trial license for yourself.
Excel spreadsheets are scalable grid-based files that are used to organize data and perform calculations. People all across the world use spreadsheets to create tables for personal and business usage. To write a large amount of data into an Excel spreadsheet, it is recommended to use the programming method, which saves time and is less error-prone. In this article, you will learn how to write data into Excel in C# and VB.NET using Spire.XLS for .NET.
- Write Text or Number Values to Specific Cells
- Write Arrays to a Worksheet
- Write a DataTable to a Worksheet
Install Spire.XLS for .NET
To begin with, you need to add the DLL files included in the Spire.XLS for .NET package as references in your .NET project. The DLL files can be either downloaded from this link or installed via NuGet.
PM> Install-Package Spire.XLS
Write Text or Number Values to Specific Cells
A certain cell in a worksheet can be accessed by Worksheet.Range[int row, int column] property. Then, you can add a text value or a number value to the cell through the XlsRange.Value or XlsRange.Value2 property. The following are the detailed steps.
- Create a Workbook object.
- Get the first worksheet through Workbook.Worksheets[] property.
- Get a specific cell through Workhseet.Range[] property.
- Add a text value or a number value to the cell through XlsRange.Value or XlsRange.Value2 property.
- Save the workbook to an Excel file using Workbook.SaveToFile() method.
- C#
- VB.NET
using Spire.Xls;
namespace WriteDataToCells
{
class Program
{
static void Main(string[] args)
{
//Create a Workbook object
Workbook workbook = new Workbook();
//Get the first worksheet
Worksheet worksheet = workbook.Worksheets[0];
//Write data to specific cells
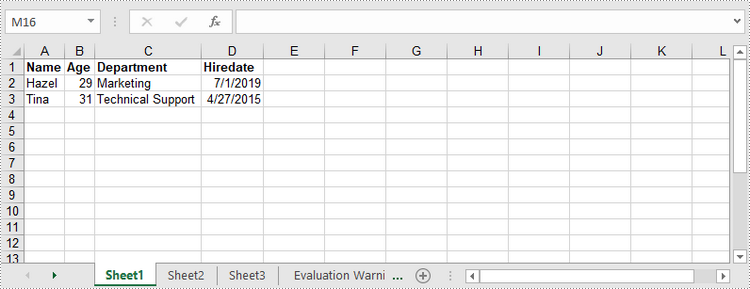
worksheet.Range[1, 1].Value = "Name";
worksheet.Range[1, 2].Value = "Age";
worksheet.Range[1, 3].Value = "Department";
worksheet.Range[1, 4].Value = "Hiredate";
worksheet.Range[1, 2].Value = "Hazel";
worksheet.Range[2, 2].Value2 = 29;
worksheet.Range[2, 3].Value = "Marketing";
worksheet.Range[2, 4].Value = "2019-07-01";
worksheet.Range[3, 1].Value = "Tina";
worksheet.Range[3, 2].Value2 = 31;
worksheet.Range[3, 3].Value = "Technical Support";
worksheet.Range[3, 4].Value = "2015-04-27";
//Auto fit column widths
worksheet.AllocatedRange.AutoFitColumns();
//Apply a style to the first row
CellStyle style = workbook.Styles.Add("newStyle");
style.Font.IsBold = true;
worksheet.Range[1, 1, 1, 4].Style = style;
//Save to an Excel file
workbook.SaveToFile("WriteToCells.xlsx", ExcelVersion.Version2016);
}
}
}
Write Arrays to a Worksheet
Spire.XLS for .NET provides the Worksheet.InsertArrary() method, allowing programmers to write one-dimensional arrays or two-dimensional arrays into the specified cell range of a worksheet. The steps to write arrays to a worksheet are as follows:
- Create a Workbook object.
- Get the first worksheet through Workbook.Worksheets[] property.
- Create a one-dimensional array and a two-dimensional array.
- Insert the arrays to worksheet using Worksheet.InsertArray() method.
- Save the workbook to an Excel file using Workbook.SaveToFile() method.
- C#
- VB.NET
using Spire.Xls;
namespace WriteArraysToWorksheet
{
class Program
{
static void Main(string[] args)
{
//Create a Workbook instance
Workbook workbook = new Workbook();
//Get the first worksheet
Worksheet worksheet = workbook.Worksheets[0];
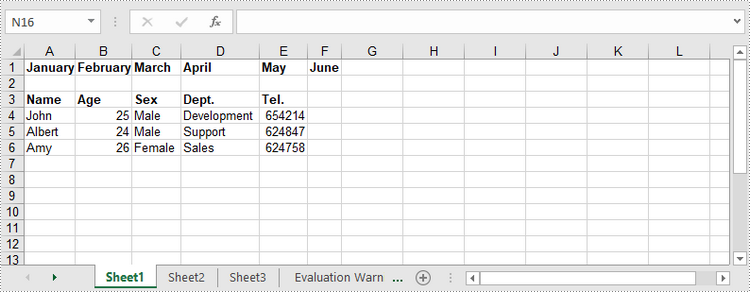
//Create a one-dimensional array
string[] oneDimensionalArray = new string[] { "January", "February", "March", "April", "May", "June" };
//Write the array to the first row of the worksheet
worksheet.InsertArray(oneDimensionalArray, 1, 1, false);
//Create a two-dimensional array
string[,] twoDimensionalArray = new string[,]{
{"Name", "Age", "Sex", "Dept.", "Tel."},
{"John", "25", "Male", "Development","654214"},
{"Albert", "24", "Male", "Support","624847"},
{"Amy", "26", "Female", "Sales","624758"}
};
//Write the array to the worksheet starting from the cell A3
worksheet.InsertArray(twoDimensionalArray, 3, 1);
//Auto fit column width in the located range
worksheet.AllocatedRange.AutoFitColumns();
//Apply a style to the first and the third row
CellStyle style = workbook.Styles.Add("newStyle");
style.Font.IsBold = true;
worksheet.Range[1, 1, 1, 6].Style = style;
worksheet.Range[3, 1, 3, 6].Style = style;
//Save to an Excel file
workbook.SaveToFile("InsertArrays.xlsx", ExcelVersion.Version2016);
}
}
}
Write a DataTable to a Worksheet
To import data from a DataTable to a worksheet, use the Worksheet.InsertDataTable() method. The following are the detailed steps.
- Create a Workbook object.
- Get the first worksheet through Workbook.Worksheets[] property.
- Create a DataTable with random data.
- Write the DataTable to the worksheet at the specified location using Worksheet.InsertDataTable() method.
- Save the workbook to an Excel file using Workbook.SaveToFile() method.
- C#
- VB.NET
using System;
using System.Data;
using Spire.Xls;
namespace WriteDataTableToWorksheet
{
class Program
{
static void Main(string[] args)
{
//Create a Workbook instance
Workbook workbook = new Workbook();
//Get the first worksheet
Worksheet worksheet = workbook.Worksheets[0];
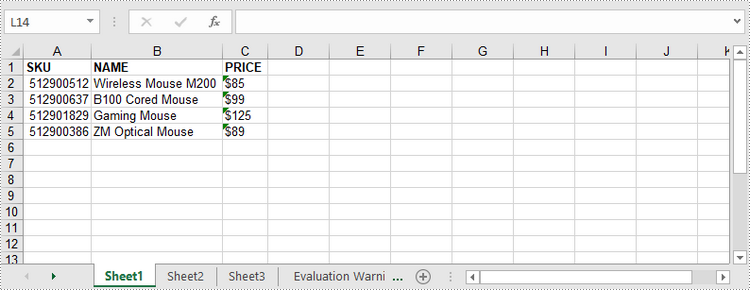
//Create a DataTable object
DataTable dataTable = new DataTable();
dataTable.Columns.Add("SKU", typeof(Int32));
dataTable.Columns.Add("NAME", typeof(String));
dataTable.Columns.Add("PRICE", typeof(String));
//Create rows and add data
DataRow dr = dataTable.NewRow();
dr[0] = 512900512;
dr[1] = "Wireless Mouse M200";
dr[2] = "$85";
dataTable.Rows.Add(dr);
dr = dataTable.NewRow();
dr[0] = 512900637;
dr[1] = "B100 Cored Mouse";
dr[2] = "$99";
dataTable.Rows.Add(dr);
dr = dataTable.NewRow();
dr[0] = 512901829;
dr[1] = "Gaming Mouse";
dr[2] = "$125";
dataTable.Rows.Add(dr);
dr = dataTable.NewRow();
dr[0] = 512900386;
dr[1] = "ZM Optical Mouse";
dr[2] = "$89";
dataTable.Rows.Add(dr);
//Write datatable to the worksheet
worksheet.InsertDataTable(dataTable, true, 1, 1, true);
//Auto fit column width in the located range
worksheet.AllocatedRange.AutoFitColumns();
//Apply a style to the first and the third row
CellStyle style = workbook.Styles.Add("newStyle");
style.Font.IsBold = true;
worksheet.Range[1, 1, 1, 3].Style = style;
//Save to an Excel file
workbook.SaveToFile("InsertDataTable.xlsx", ExcelVersion.Version2016);
}
}
}
Apply for a Temporary License
If you'd like to remove the evaluation message from the generated documents, or to get rid of the function limitations, please request a 30-day trial license for yourself.
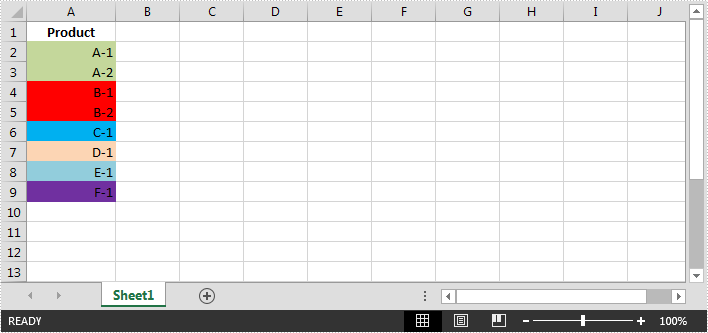
In Excel, cells can be filtered based on the cell color. This article is going to show you how to filter rows by cell color using Spire.XLS.
The example Excel file:
Detail steps:
Step 1: Instantiate a Workbook object and load the Excel file.
Workbook workbook = new Workbook();
workbook.LoadFromFile("sample.xlsx");
Step 2: Get the first worksheet.
Worksheet sheet = workbook.Worksheets[0];
Step 3: Add a color filter to filter cells based on cell color.
//Create an auto filter in the sheet and specify the range to be filterd
sheet.AutoFilters.Range = sheet.Range["A1:A9"];
//Get the coloumn to be filterd
FilterColumn filtercolumn = (FilterColumn)sheet.AutoFilters[0];
//Add a color filter to filter the column based on cell color
sheet.AutoFilters.AddFillColorFilter(filtercolumn, Color.Red);
Step 4: Filter the data.
sheet.AutoFilters.Filter();
Step 5: Save the file.
workbook.SaveToFile("ColorFilter.xlsx", ExcelVersion.Version2013);
Screenshot:

Full code:
using Spire.Xls;
using Spire.Xls.Core.Spreadsheet.AutoFilter;
namespace FilterCells
{
    class Program
    {
        static void Main(string[] args)
        {
            //Instantiate a Workbook object
            Workbook workbook = new Workbook();
            //Load the Excel file
            workbook.LoadFromFile("sample.xlsx");

            //Get the first worksheet
            Worksheet sheet = workbook.Worksheets[0];

            //Create an auto filter in the sheet and specify the range to be filterd
            sheet.AutoFilters.Range = sheet.Range["A1:A9"];
            //Get the coloumn to be filterd
            FilterColumn filtercolumn = (FilterColumn)sheet.AutoFilters[0];
            //Add a color filter to filter the column based on cell color
            sheet.AutoFilters.AddFillColorFilter(filtercolumn, Color.Red);

            //Filter the data
            sheet.AutoFilters.Filter();

            //Save the file
            workbook.SaveToFile("ColorFilter.xlsx", ExcelVersion.Version2013);
        }
    }
}
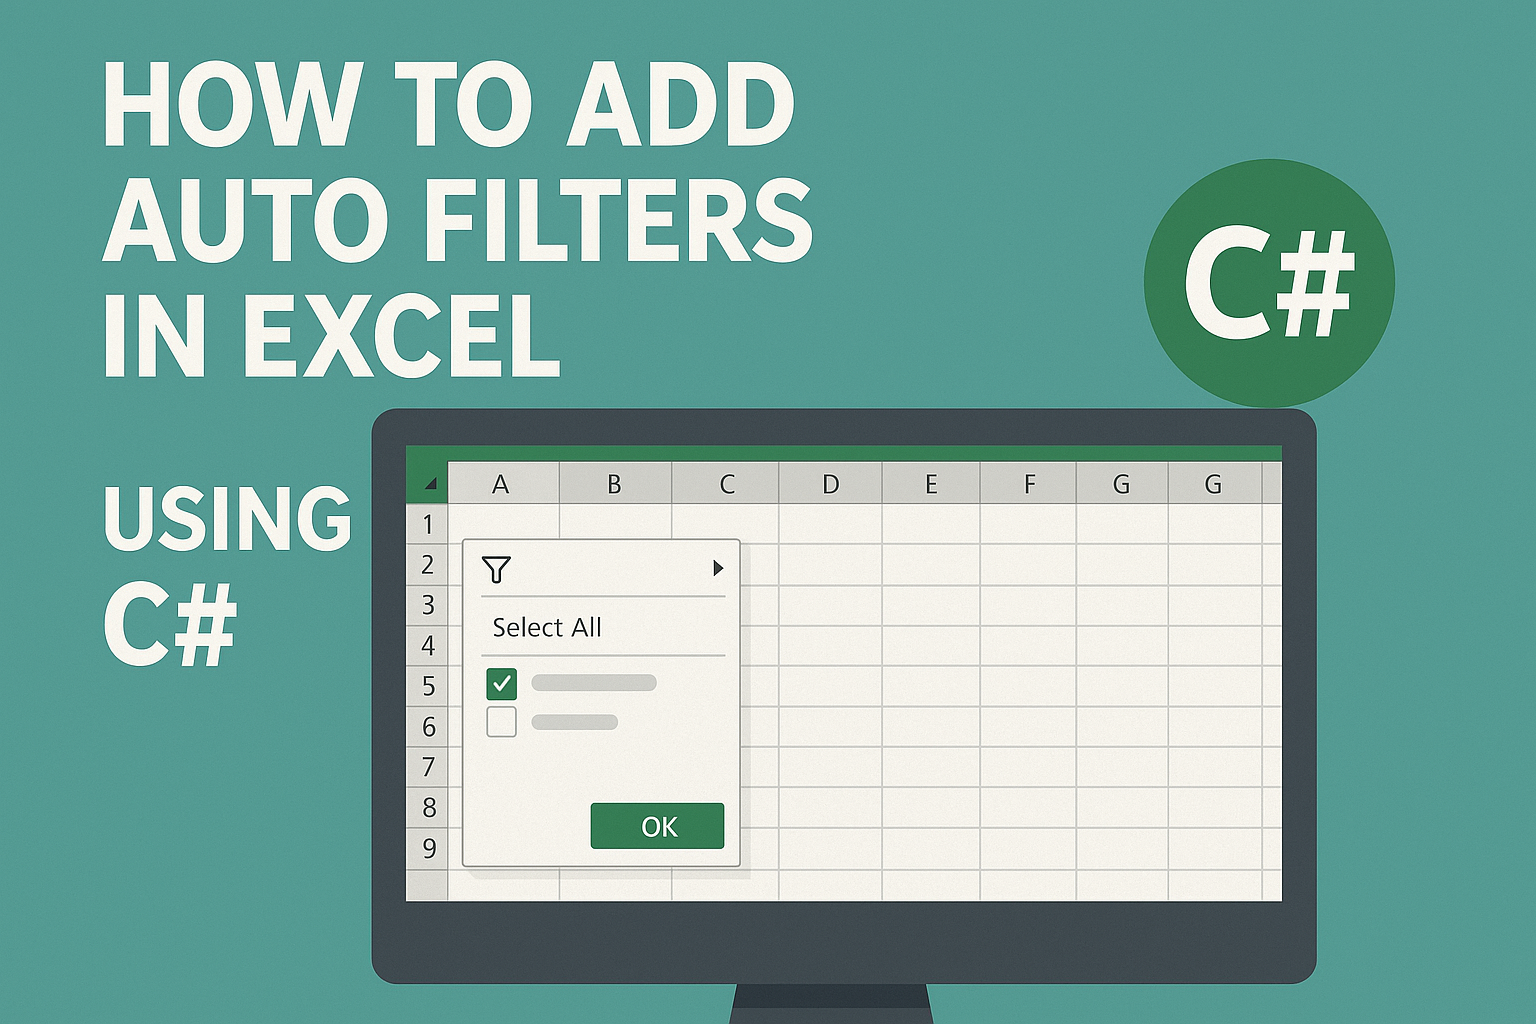
Want to make your Excel data easier to explore and analyze? Auto Filters are your go-to tool. With just a few clicks, you can sort, filter and focus on the rows that matter. In this guide, you’ll learn how to add filters in Excel with C# using Spire.XLS for .NET, making it easy to insert Auto Filters into your spreadsheets. As a bonus, we’ll also show you how to remove Auto Filters in Excel when you're done.
Let’s dive in and make your spreadsheets smarter!
- Add Auto Filters to a Cell Range in Excel
- Apply Built-in Auto Filters in Excel: Date
- Create Custom Auto Filters in Excel
- Bonus: How to Remove Auto Filters in Excel
- Wrapping Up
- FAQ: Excel AutoFilter Questions Answered
What is Spire.XLS and Why Use It
Spire.XLS for .NET is a powerful Excel library that enables you to create, edit, and convert Excel files programmatically — no need for Microsoft Excel to be installed on your machine. It’s ideal for automating Excel tasks in C# and other .NET applications.
To get started, you can install the library via NuGet with the following command:
PM> Install-Package Spire.XLSFor smaller or lightweight Excel projects, the free version is available:
PM> Install-Package FreeSpire.XLSIf you prefer manual setup or need more installation options, you can also download Spire.XLS for .NET or Free Spire.XLS for .NET directly from the official website.
How to Add Auto Filters to a Cell Range in Excel
If you want to quickly filter data in an Excel sheet without writing formulas, Auto Filters will help to instantly display only the needed rows. In this section, you'll learn how to add Auto Filters to a specific cell range in Excel using C#. Whether you're working with a small table or a large dataset, this method helps streamline data analysis with just a few lines of code.
The steps to apply Auto Filters to a cell range with C#:
- Create a Workbook instance and read an Excel file.
- Get a certain worksheet.
- Add an AutoFilter to a specified cell range using Worksheet.AutoFilters.Range property.
- Save the modified Excel file.
Here’s a code example showing how to add an Auto Filter in the cell range “A1:C1”:
- C#
using Spire.Xls;

namespace AddAutoFilter
{
    class Program
    {
        static void Main(string[] args)
        {
            // Create a Workbook instance
            Workbook workbook = new Workbook();

            // Load an Excel file
            workbook.LoadFromFile(@"C:\Users\Administrator\Desktop\Data.xlsx");

            // Get the first worksheet
            Worksheet sheet = workbook.Worksheets[0];

            // Create an AutoFilter in the sheet and specify the range to be filtered
            sheet.AutoFilters.Range = sheet.Range["A1:C1"];

            // Save the result file
            workbook.SaveToFile("ExcelAutoFilter.xlsx", ExcelVersion.Version2016);
        }
    }
}
How to Add Built-in Auto Filters in Excel - Date
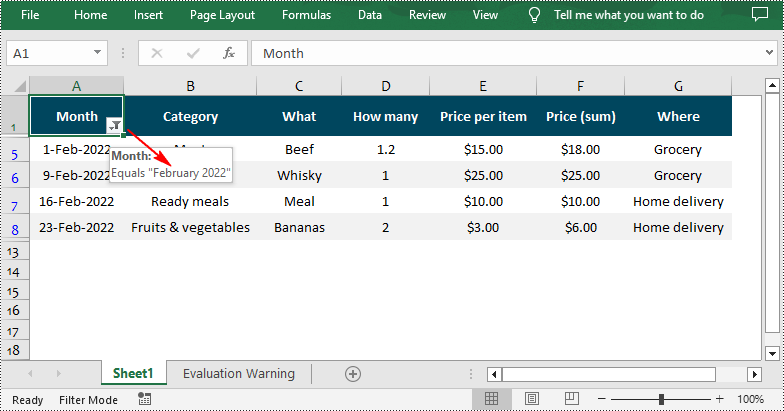
Excel’s built-in Auto Filters make it easy to filter data by common criteria like dates, numbers, and text. In this part, we’ll show you how to add a date Auto Filter in Excel using C#. The example focuses on applying a filter to a date column so you can quickly display rows based on specific days, months, or years.
- Create a Workbook instance and load a sample Excel spreadsheet.
- Get a worksheet and apply filters to a cell range through Worksheet.AutoFilters.Range property.
- Add a date filter to the cell range with Workbook.AutoFilters.AddDateFilter() method.
- Apply the date filter using Workbook.AutoFilters.Filter() method.
- Save the updated Excel file.
- C#
using Spire.Xls;
using Spire.Xls.Core;
using Spire.Xls.Core.Spreadsheet.AutoFilter;

namespace AddAutoFilter
{
    class Program
    {
        static void Main(string[] args)
        {
            // Create a Workbook instance
            Workbook workbook = new Workbook();

            // Load an Excel file
            workbook.LoadFromFile(@"C:\Users\Administrator\Desktop\Data.xlsx");

            // Get the first worksheet
            Worksheet sheet = workbook.Worksheets[0];

            // Create an auto filter in the sheet and specify the range to be filtered
            sheet.AutoFilters.Range = sheet.Range["A1:A12"];

            // Get the column to be filtered
            IAutoFilter filtercolumn = sheet.AutoFilters[0];

            // Add a date filter to filter data related to February 2022
            sheet.AutoFilters.AddDateFilter(filtercolumn, DateTimeGroupingType.Month, 2022, 2, 0, 0, 0, 0);

            // Apply the filter
            sheet.AutoFilters.Filter();

           // Save the result file
            workbook.SaveToFile("DateAutoFilter.xlsx", ExcelVersion.Version2016);
        }
    }
}
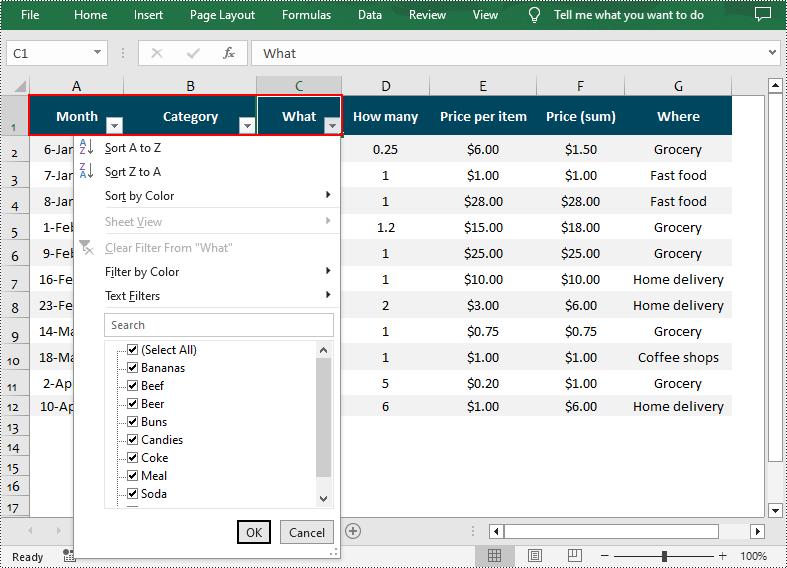
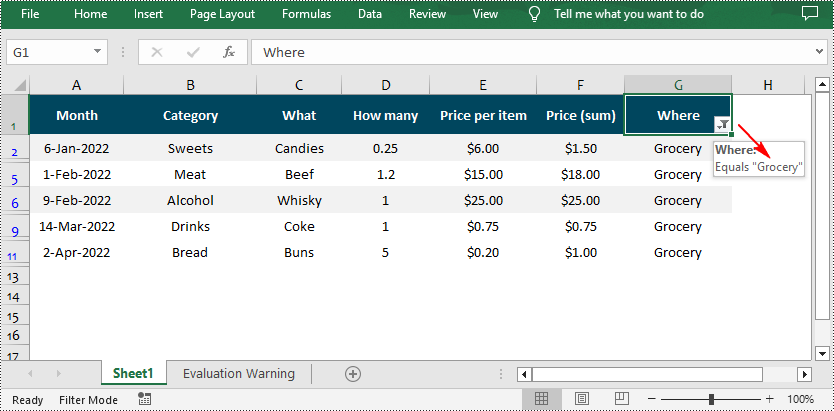
Quickly Apply Custom AutoFilter in Excel in C#
While built-in filters like date filters offer quick presets, there are times when you need more control over what gets displayed. That’s where custom AutoFilters come in. In this section, we’ll show you how to add a custom AutoFilter in Excel using C#, allowing you to filter by specific values or conditions — such as greater than, contains, or equals — to fit more complex data scenarios.
Steps to apply custom Auto Filters in Excel:
- Create a Workbook object and load an Excel file.
- Retrieve a worksheet.
- Add an Auto Filter to a cell range.
- Add a custom filter to the cell range through Workbook.AutoFilters.CustomFilter() method.
- Apply the filter using Workbook.AutoFilters.Filter() method.
- Save the resulting file.
- C#
using Spire.Xls;
using Spire.Xls.Core.Spreadsheet.AutoFilter;

namespace AddAutoFilter
{
    class Program
    {
        static void Main(string[] args)
        {
            // Create a Workbook instance
            Workbook workbook = new Workbook();

            // Load an Excel file
            workbook.LoadFromFile(@"C:\Users\Administrator\Desktop\Data.xlsx");

            // Get the first worksheet
            Worksheet sheet = workbook.Worksheets[0];

            // Create an auto filter in the sheet and specify the range to be filtered
            sheet.AutoFilters.Range = sheet.Range["G1:G12"];

            // Get the column to be filtered
            FilterColumn filtercolumn = (FilterColumn)sheet.AutoFilters[0];

            // Add a custom filter to filter data containing the string "Grocery"
            string strCrt = "Grocery";
            sheet.AutoFilters.CustomFilter(filtercolumn, FilterOperatorType.Equal, strCrt);

            // Apply the filter
            sheet.AutoFilters.Filter();

           // Save the result file
            workbook.SaveToFile("CustomAutoFilter.xlsx", ExcelVersion.Version2016);
        }
    }
}
Bonus Tip: How to Remove AutoFilters in Excel
Once you're done filtering, removing AutoFilters in Excel is just as easy. You can clear filters from a worksheet using a single line of C# code. This helps reset the view and ensures your data is fully visible again.
Want the exact steps? Check out our full guide on how to remove AutoFilters in Excel, including detailed instructions and code samples.
Wrapping Up
Adding AutoFilters in Excel using C# doesn’t have to be complicated — whether you’re working with a standard cell range, dates, or applying custom filter criteria. With just a few lines of code, you can make your Excel spreadsheets far more interactive and easier to analyze.
FAQ: Excel AutoFilter Questions Answered
Q1: How do I quickly add filters in Excel using C#?
You can quickly add filters to a cell range in Excel by using the Worksheet.AutoFilters.Range property in C#. Just define the target range and apply the filter with a single line of code.
Q2: How do I insert a drop-down filter in Excel?
Excel AutoFilters are essentially drop-down filters. Once you apply an AutoFilter to a column, Excel automatically creates a drop-down menu that lets you sort or filter the data based on values, conditions, or custom criteria.
Q3: How do I add a drop-down slicer in Excel?
Slicers are a visual filtering tool mainly used with PivotTables. While AutoFilters apply to standard worksheets, slicers offer a more user-friendly UI for filtering PivotTable data. If you're working with regular data (not PivotTables), AutoFilters are the better choice.
Q4: Can I remove filters once they’re applied in Excel with C#?
Yes, you can easily remove filters using C#. Just call the Worksheet.AutoFilters.Clear() method to remove all active filters from your worksheet.
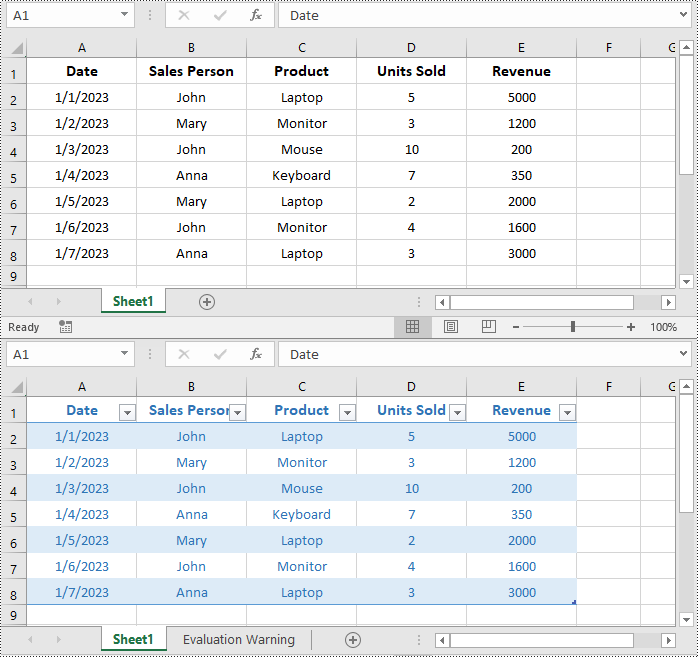
A table in Excel is a structured range of data that includes headers for each column. When you convert a range of cells into a table, Excel automatically applies formatting, adds filter arrows to each header cell, and provides enhanced features for manipulating and analyzing the data. In this article, we will explain how to create, resize, and remove tables in Excel in C# using Spire.XLS for .NET.
- Create a Table in Excel in C#
- Add a Total Row to a Table in Excel in C#
- Resize a Table in Excel in C#
- Remove a Table from Excel in C#
Install Spire.XLS for .NET
To begin with, you need to add the DLL files included in the Spire.XLS for .NET package as references in your .NET project. The DLL files can be either downloaded from this link or installed via NuGet.
PM> Install-Package Spire.XLS
Create a Table in Excel in C#
Spire.XLS for .NET allows you to convert a specific range of data in an Excel worksheet to a table using the Worksheet.ListObjects.Create(tableName, cellRange) method. The detailed steps are as follows.
- Create an object of the Workbook class.
- Load an Excel file using Workbook.LoadFromFile() method.
- Get a specific worksheet using Workbook.Worksheets[index] property.
- Get the cell range you want to convert to a table using Worksheet.Range[] property.
- Convert the cell range to a table using Worksheet.ListObjects.Create(tableName, cellRange) method.
- Save the resulting workbook to a file using Workbook.SaveToFile() method.
- C#
using Spire.Xls;
using Spire.Xls.Core;

namespace CreateTable
{
    internal class Program
    {
        static void Main(string[] args)
        {
            //Create an object of the Workbook class
            Workbook workbook = new Workbook();
            //Load an Excel file
            workbook.LoadFromFile("Sample.xlsx");

            //Get the first worksheet
            Worksheet sheet = workbook.Worksheets[0];

            //Get the cell range you want to convert to a table
            CellRange range = sheet.Range[1, 1, sheet.LastRow, sheet.LastColumn];

            //Convert the cell range to a table
            IListObject table = sheet.ListObjects.Create("SalesTransactions", range);

            //Format the table with a built-in table style
            table.BuiltInTableStyle = TableBuiltInStyles.TableStyleLight2;

            //Save the resulting workbook to a file
            workbook.SaveToFile("CreateTable.xlsx", ExcelVersion.Version2016);
            workbook.Dispose();
        }
    }
}
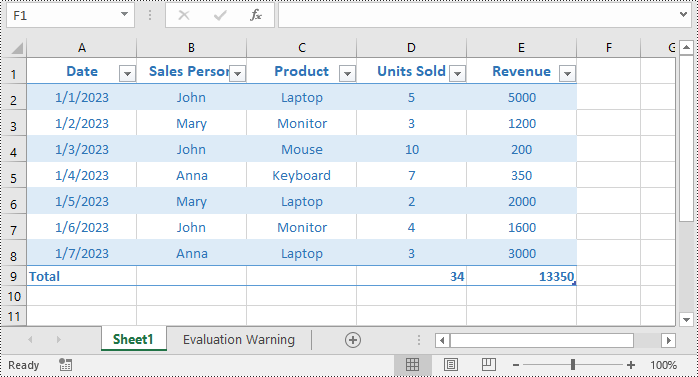
Add a Total Row to a Table in Excel in C#
You can add a total row after the end of a table to display summary calculations, such as sums, averages, or other aggregations of the data in the table. The detailed steps are as follows.
- Create an object of the Workbook class.
- Load an Excel file using Workbook.LoadFromFile() method.
- Get a specific worksheet using Workbook.Worksheets[index] property.
- Get a specific table in the worksheet using Worksheet.ListObjects[index] property.
- Display a total row at the end of the table by setting Table.DisplayTotalRow property to true.
- Set total row label in a specific table column using IListObject.Columns[index].TotalsRowLabel property.
- Set the calculation functions for specific table columns using IListObject.Columns[index].TotalsCalculation property.
- Save the resulting workbook to a file using Workbook.SaveToFile() method.
- C#
using Spire.Xls;
using Spire.Xls.Core;

namespace AddTotalRowToTable
{
    internal class Program
    {
        static void Main(string[] args)
        {
            //Create an object of the Workbook class
            Workbook workbook = new Workbook();
            //Load an Excel file
            workbook.LoadFromFile("CreateTable.xlsx");

            //Get the first worksheet
            Worksheet sheet = workbook.Worksheets[0];

            //Get the first table in the worksheet
            IListObject table = sheet.ListObjects[0];

            //Show total row
            table.DisplayTotalRow = true;
            // Set total row label
            table.Columns[0].TotalsRowLabel = "Total";
            //Set the function used for the total calculation
            table.Columns[3].TotalsCalculation = ExcelTotalsCalculation.Sum;
            table.Columns[4].TotalsCalculation = ExcelTotalsCalculation.Sum;

            //Save the resulting workbook to a file
            workbook.SaveToFile("AddTotalRow.xlsx", ExcelVersion.Version2016);
            workbook.Dispose();
        }
    }
}
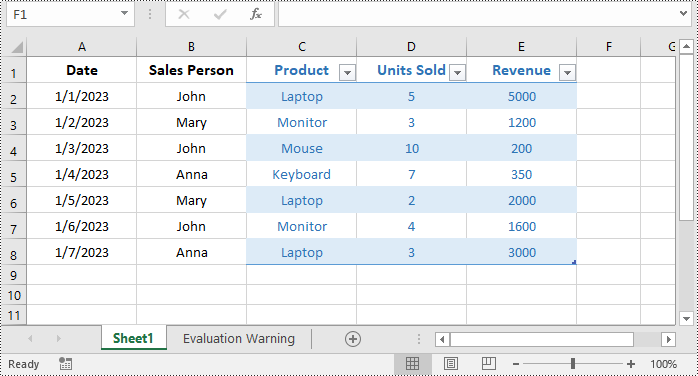
Resize a Table in Excel in C#
You can resize a table by updating the data range of it using IListObject.Location property. The detailed steps are as follows.
- Create an object of the Workbook class.
- Load an Excel file using Workbook.LoadFromFile() method.
- Get a specific worksheet using Workbook.Worksheets[index] property.
- Get a specific table in the worksheet using Worksheet.ListObjects[index] property.
- Resize the table by updating the data range of it using IListObject.Location property.
- Save the resulting workbook to a file using Workbook.SaveToFile() method.
- C#
using Spire.Xls;
using Spire.Xls.Core;

namespace ResizeTable
{
    internal class Program
    {
        static void Main(string[] args)
        {
            //Create an object of the Workbook class
            Workbook workbook = new Workbook();
            //Load an Excel file
            workbook.LoadFromFile("CreateTable.xlsx");

            //Get the first worksheet
            Worksheet sheet = workbook.Worksheets[0];

            //Get the first table in the worksheet
            IListObject table = sheet.ListObjects[0];

            table.Location = sheet.Range["C1:E8"];

            //Save the resulting workbook to a file
            workbook.SaveToFile("ResizeTable.xlsx", ExcelVersion.Version2016);
            workbook.Dispose();
        }
    }
}
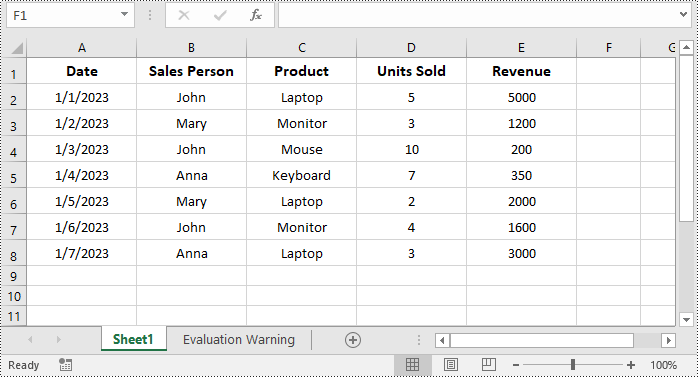
Remove a Table from Excel in C#
If you no longer need a table, you can convert it back to a normal range of cells by using the IListObjects.RemoveAt(tableIndex) method. The detailed steps are as follows.
- Create an object of the Workbook class.
- Load an Excel file using Workbook.LoadFromFile() method.
- Get a specific worksheet using Workbook.Worksheets[index] property.
- Get the table collection of the worksheet using Worksheet.ListObjects property.
- Remove a specific table from the table collection using IListObjects.RemoveAt(tableIndex) property.
- Save the resulting workbook to a file using Workbook.SaveToFile() method.
- C#
using Spire.Xls;
using Spire.Xls.Core;

namespace RemoveTable
{
    internal class Program
    {
        static void Main(string[] args)
        {
            //Create an object of the Workbook class
            Workbook workbook = new Workbook();
            //Load an Excel file
            workbook.LoadFromFile("CreateTable.xlsx");

            //Get the first worksheet
            Worksheet sheet = workbook.Worksheets[0];

            //Get the table collection of the worksheet
            IListObjects tables = sheet.ListObjects;
            //Remove a specific table by its index
            tables.RemoveAt(0);

            ////Or remove a specific table by its name
            //for (int i = tables.Count - 1; i >= 0; i--)
            //{
            //    // Check if the table name matches the specific value
            //    if (tables[i].Name == "SalesTransactions")
            //    {
            //        // Remove the table
            //        tables.RemoveAt(i);
            //    }
            //}

            //Save the resulting workbook to a file
            workbook.SaveToFile("RemoveTable.xlsx", ExcelVersion.Version2016);
            workbook.Dispose();
            System.Diagnostics.Process.Start("RemoveTable.xlsx");
        }
    }
}
Apply for a Temporary License
If you'd like to remove the evaluation message from the generated documents, or to get rid of the function limitations, please request a 30-day trial license for yourself.
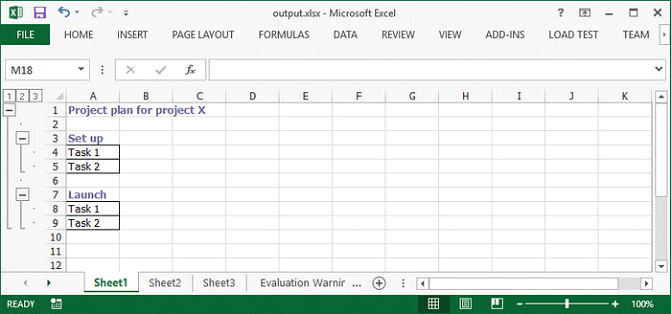
Nested group is a group that contains multiple inner, nested groups. This article demonstrates how to create groups and how to outline the outer and inner groups using Spire.XLS with C# and VB.NET.
Step 1: Create a Workbook instance and get the first worksheet.
Workbook workbook = new Workbook();
Worksheet sheet = workbook.Worksheets[0];
Step 2: Insert sample data to cells.
sheet.Range["A1"].Value = "Project plan for project X";
sheet.Range["A3"].Value = "Set up";
sheet.Range["A4"].Value = "Task 1";
sheet.Range["A5"].Value = "Task 2";
sheet.Range["A7"].Value = "Launch";
sheet.Range["A8"].Value = "Task 1";
sheet.Range["A9"].Value = "Task 2";
Step 3: Set the IsSummaryRowBelow property as false, which indicates the summary rows appear above detail rows.
sheet.PageSetup.IsSummaryRowBelow = false;
Step 4: Group the rows that you want to group.
sheet.GroupByRows(2, 9, false);
sheet.GroupByRows(4, 5, false);
sheet.GroupByRows(8, 9, false);
Step 5: Save the file.
workbook.SaveToFile("output.xlsx", ExcelVersion.Version2013);
Output:
Full Code:
using Spire.Xls;
using System.Drawing;
namespace CreateNestedGroup
{
    class Program
    {
        static void Main(string[] args)
        {
            Workbook workbook = new Workbook();
            Worksheet sheet = workbook.Worksheets[0];

            CellStyle style = workbook.Styles.Add("style");
            style.Font.Color = Color.CadetBlue;
            style.Font.IsBold = true;

            sheet.PageSetup.IsSummaryRowBelow = false;
            sheet.Range["A1"].Value = "Project plan for project X";
            sheet.Range["A1"].CellStyleName = style.Name;

            sheet.Range["A3"].Value = "Set up";
            sheet.Range["A3"].CellStyleName = style.Name;
            sheet.Range["A4"].Value = "Task 1";
            sheet.Range["A5"].Value = "Task 2";
            sheet.Range["A4:A5"].BorderAround(LineStyleType.Thin);
            sheet.Range["A4:A5"].BorderInside(LineStyleType.Thin);

            sheet.Range["A7"].Value = "Launch";
            sheet.Range["A7"].CellStyleName = style.Name;
            sheet.Range["A8"].Value = "Task 1";
            sheet.Range["A9"].Value = "Task 2";
            sheet.Range["A8:A9"].BorderAround(LineStyleType.Thin);
            sheet.Range["A8:A9"].BorderInside(LineStyleType.Thin);

            sheet.GroupByRows(2, 9, false);
            sheet.GroupByRows(4, 5, false);
            sheet.GroupByRows(8, 9, false);
            workbook.SaveToFile("output.xlsx", ExcelVersion.Version2013);
        }
    }
}
Imports Spire.Xls
Imports System.Drawing
Namespace CreateNestedGroup
	Class Program
		Private Shared Sub Main(args As String())
			Dim workbook As New Workbook()
			Dim sheet As Worksheet = workbook.Worksheets(0)

			Dim style As CellStyle = workbook.Styles.Add("style")
			style.Font.Color = Color.CadetBlue
			style.Font.IsBold = True

			sheet.PageSetup.IsSummaryRowBelow = False
			sheet.Range("A1").Value = "Project plan for project X"
			sheet.Range("A1").CellStyleName = style.Name

			sheet.Range("A3").Value = "Set up"
			sheet.Range("A3").CellStyleName = style.Name
			sheet.Range("A4").Value = "Task 1"
			sheet.Range("A5").Value = "Task 2"
			sheet.Range("A4:A5").BorderAround(LineStyleType.Thin)
			sheet.Range("A4:A5").BorderInside(LineStyleType.Thin)

			sheet.Range("A7").Value = "Launch"
			sheet.Range("A7").CellStyleName = style.Name
			sheet.Range("A8").Value = "Task 1"
			sheet.Range("A9").Value = "Task 2"
			sheet.Range("A8:A9").BorderAround(LineStyleType.Thin)
			sheet.Range("A8:A9").BorderInside(LineStyleType.Thin)

			sheet.GroupByRows(2, 9, False)
			sheet.GroupByRows(4, 5, False)
			sheet.GroupByRows(8, 9, False)
			workbook.SaveToFile("output.xlsx", ExcelVersion.Version2013)
		End Sub
	End Class
End Namespace
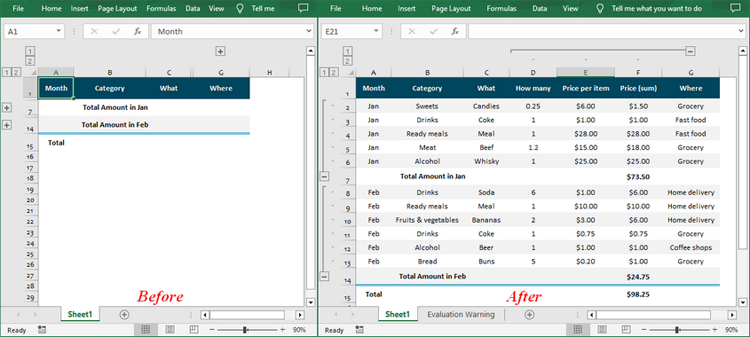
In Excel, you can group related rows and columns to better organize and manage data. This feature is especially useful for simplifying complex spreadsheets, making data easier to navigate and analyze. When data is grouped, Excel provides the option to expand or collapse the groups, allowing users to control how much information is displayed at any given time. In this article, you will learn how to expand or collapse rows and columns in Excel in C# using Spire.XLS for .NET.
Install Spire.XLS for .NET
To begin with, you need to add the DLL files included in the Spire.XLS for .NET package as references in your .NET project. The DLL files can be either downloaded from this link or installed via NuGet.
PM> Install-Package Spire.XLS
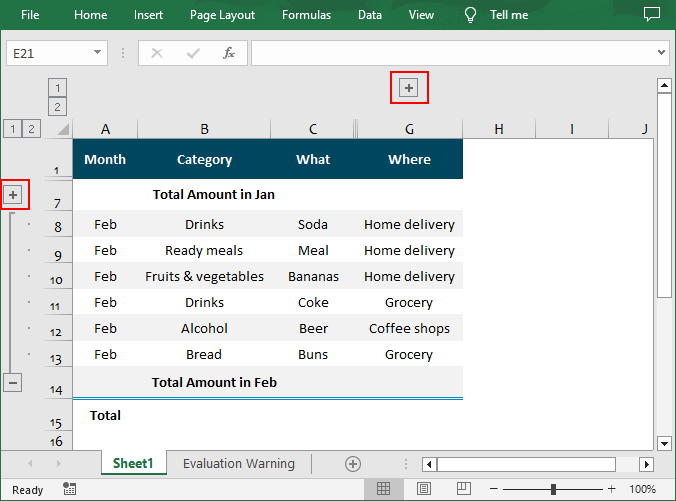
Expand Rows and Columns in Excel in C#
Expanding a group reveals all the detailed data within it. Using Spire.XLS for .NET, you can expand the grouped columns or rows through the Worksheet.Range[].ExpandGroup() method. The following are the detailed steps:
- Create a Workbook instance.
- Load an Excel file using Workbook.LoadFromFile() method.
- Get a specified worksheet using Workbook.Worksheets[] property.
- Expand the grouped rows using Worksheet.Range[].ExpandGroup(GroupByType.ByRows) method.
- Expand the grouped columns using Worksheet.Range[].ExpandGroup(GroupByType.ByColumns) method.
- Save the result file using Workbook.SaveToFile() method.
- C#
using Spire.Xls;
namespace ExpandandExcelGroups
{
    class Program
    {
        static void Main(string[] args)
        {
            // Create Workbook instance
            Workbook workbook = new Workbook();

            // Load an Excel file
            workbook.LoadFromFile("Grouped.xlsx");

            // Get the first worksheet
            Worksheet sheet = workbook.Worksheets[0];

            // Expand the grouped rows
            sheet.Range["A2:G6"].ExpandGroup(GroupByType.ByRows, ExpandCollapseFlags.ExpandParent);
            sheet.Range["A8:G13"].ExpandGroup(GroupByType.ByRows);

            // Expand the grouped columns
            sheet.Range["D2:G13"].ExpandGroup(GroupByType.ByColumns);

            // Save the result file
            workbook.SaveToFile("ExpandGroups.xlsx");
        }
    }
}
Collapse Rows and Columns in Excel in C#
Collapsing a group hides the information, showing only the summary or parent data. To collapse rows or columns in Excel, you can use the Worksheet.Range[].CollapseGroup() method. The following are the detailed steps:
- Create a Workbook instance.
- Load an Excel file using Workbook.LoadFromFile() method.
- Get a specified worksheet using Workbook.Worksheets[] property.
- Collapse the rows using Worksheet.Range[].CollapseGroup(GroupByType.ByRows) method.
- Collapse the columns using Worksheet.Range[].CollapseGroup(GroupByType.ByColumns) method.
- Save the result file using Workbook.SaveToFile() method.
- C#
using Spire.Xls;
namespace CollapseExcelGroups
{
    class Program
    {
        static void Main(string[] args)
        {
            // Create Workbook instance
            Workbook workbook = new Workbook();

            // Load an Excel file
            workbook.LoadFromFile("ExpandGroups.xlsx");

            // Get the first worksheet
            Worksheet sheet = workbook.Worksheets[0];

            // Collapse rows
            sheet.Range["A2:A6"].CollapseGroup(GroupByType.ByRows);

            // Collapse Columns
            sheet.Range["D1:G1"].CollapseGroup(GroupByType.ByColumns);

            // Save the result file
            workbook.SaveToFile("CollapseGroups.xlsx");
        }
    }
}
Apply for a Temporary License
If you'd like to remove the evaluation message from the generated documents, or to get rid of the function limitations, please request a 30-day trial license for yourself.
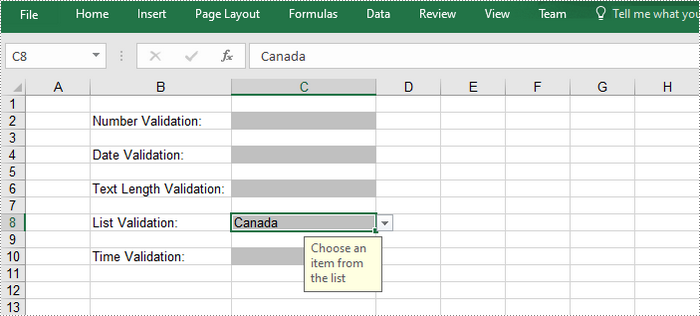
The data validation feature in Excel allows the user to control what data can be entered into a cell. For example, you could use data validation to make sure a numeric entry is between 1 and 5, make sure a text entry is less than 20 characters, or make sure the value entered in a cell is from a predefined list. In this article, you will learn how to apply or remove data validation in Excel in C# and VB.NET using Spire.XLS for .NET.
Install Spire.XLS for .NET
To begin with, you need to add the DLL files included in the Spire.XLS for .NET package as references in your .NET project. The DLL files can be either downloaded from this link or installed via NuGet.
PM> Install-Package Spire.XLS
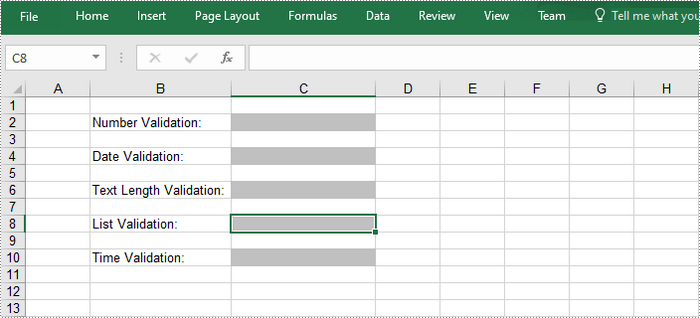
Apply Data Validation to Excel Cells
The following are the steps to add various types of data validation to cells using Spire.XLS for .NET.
- Create a Workbook object
- Get the first worksheet through Workbook.Worksheets[index] property.
- Get a specific cell through Worksheet.Range property.
- Set the data type allowed in the cell through CellRange.DataValidation.AllowType property. You can select Integer, Time, Date, TextLength, Decimal, etc. as the data type.
- Set the comparison operator through CellRange.DataValiation.CompareOperator property. The comparison operators include Between, NotBetween, Less, Greater, and Equal.
- Set one or two formulas for the data validation through CellRange.DataValidation.Formula1 and CellRange.DataValidation.Formula2 properties.
- Set the input prompt through CellRange.DataValidation.InputMessage property.
- Save the workbook to an Excel file using Workbook.SaveToFile() method.
- C#
- VB.NET
using System;
using Spire.Xls;

namespace ApplyDataValidation
{
    class Program
    {
        static void Main(string[] args)
        {
            //Create a Workbook object
            Workbook workbook = new Workbook();

            //Get the first worksheet
            Worksheet sheet = workbook.Worksheets[0];

            //Insert text in cells
            sheet.Range["B2"].Text = "Number Validation:";
            sheet.Range["B4"].Text = "Date Validation:";
            sheet.Range["B6"].Text = "Text Length Validation:";
            sheet.Range["B8"].Text = "List Validation:";
            sheet.Range["B10"].Text = "Time Validation:";

            //Add a number validation to C2
            CellRange rangeNumber = sheet.Range["C2"];
            rangeNumber.DataValidation.AllowType = CellDataType.Integer;
            rangeNumber.DataValidation.CompareOperator = ValidationComparisonOperator.Between;
            rangeNumber.DataValidation.Formula1 = "1";
            rangeNumber.DataValidation.Formula2 = "10";
            rangeNumber.DataValidation.InputMessage = "Enter a number between 1 and 10";
            rangeNumber.Style.KnownColor = ExcelColors.Gray25Percent;

            //Add a date validation to C4
            CellRange rangeDate = sheet.Range["C4"];
            rangeDate.DataValidation.AllowType = CellDataType.Date;
            rangeDate.DataValidation.CompareOperator = ValidationComparisonOperator.Between;
            rangeDate.DataValidation.Formula1 = "1/1/2010";
            rangeDate.DataValidation.Formula2 = "12/31/2020";
            rangeDate.DataValidation.InputMessage = "Enter a date between 1/1/2010 and 12/31/2020";
            rangeDate.Style.KnownColor = ExcelColors.Gray25Percent;

            //Add a text length validation to C6
            CellRange rangeTextLength = sheet.Range["C6"];
            rangeTextLength.DataValidation.AllowType = CellDataType.TextLength;
            rangeTextLength.DataValidation.CompareOperator = ValidationComparisonOperator.LessOrEqual;
            rangeTextLength.DataValidation.Formula1 ="5";
            rangeTextLength.DataValidation.InputMessage = "Enter text lesser than 5 characters";
            rangeTextLength.Style.KnownColor = ExcelColors.Gray25Percent;

            //Apply a list validation to C8
            CellRange rangeList = sheet.Range["C8"];
            rangeList.DataValidation.Values = new String[] { "United States", "Canada", "United Kingdom", "Germany" };
            rangeList.DataValidation.IsSuppressDropDownArrow = false;
            rangeList.DataValidation.InputMessage ="Choose an item from the list";
            rangeList.Style.KnownColor =ExcelColors.Gray25Percent;

            //Apply a time validation to C10
            CellRange rangeTime = sheet.Range["C10"];
            rangeTime.DataValidation.AllowType = CellDataType.Time;
            rangeTime.DataValidation.CompareOperator = ValidationComparisonOperator.Between;
            rangeTime.DataValidation.Formula1 = "9:00";
            rangeTime.DataValidation.Formula2 = "12:00";
            rangeTime.DataValidation.InputMessage = "Enter a time between 9:00 and 12:00";
            rangeTime.Style.KnownColor = ExcelColors.Gray25Percent;

            //Auto fit width of column 2
            sheet.AutoFitColumn(2);

            //Set the width of column 3
            sheet.Columns[2].ColumnWidth = 20;

            //Save to file
            workbook.SaveToFile("ApplyDataValidation.xlsx", ExcelVersion.Version2016);
        }
    }
}
Remove Data Validation from Excel Cells
Below are the steps to remove data validation from the specified cell using Spire.XLS for .NET.
- Create a Workbook object.
- Load the Excel file containing data validation using Workbook.LoadFromFile() method.
- Get the first worksheet though Workbook.Worksheets[index] property.
- Create an array of rectangles, which is used to locate the cells where the validation will be removed.
- Remove the data validation from the selected cells using Worksheet.DVTable.Remove() method.
- Save the workbook to another Excel file using Workbook.SaveToFile() method.
- C#
- VB.NET
using Spire.Xls;
using System.Drawing;

namespace RemoveDataValidation
{
    class Program
    {
        static void Main(string[] args)
        {
            //Create a Workbook object
            Workbook workbook = new Workbook();

            //Load a sample Excel file
            workbook.LoadFromFile("C:\\Users\\Administrator\\Desktop\\ApplyDataValidation.xlsx");

            //Get the first worksheet
            Worksheet worksheet = workbook.Worksheets[0];

            //Create an array of rectangles, which is used to locate the ranges in worksheet
            Rectangle[] rectangles = new Rectangle[]{

                //one Rectangle(startColumnIndex, startRowIndex, endColumnIndex, endRowIndex) specifies a  cell range to remove data validation
                //the column or row index starts at 0
                new Rectangle(0, 0, 2, 9)
            };

            //Remove the data validation from the selected cells
            worksheet.DVTable.Remove(rectangles);

            //Save the workbook to an Excel file
            workbook.SaveToFile("RemoveDataValidation.xlsx");
        }
    }
}
Apply for a Temporary License
If you'd like to remove the evaluation message from the generated documents, or to get rid of the function limitations, please request a 30-day trial license for yourself.
