
When sharing a Word document, you may not want others to accidentally change your content. Whether it’s a contract, report, certificate, or finalized proposal, making a Word file read-only helps preserve formatting, maintain document integrity, and ensure recipients view — but don’t alter — your work.
Microsoft Word offers multiple ways to make your files read-only, depending on the version you’re using and the level of protection you need. In this guide, we’ll explore five effective methods — from simple manual settings like “Mark as Final” to automated solutions using Python. By the end, you’ll know exactly how to protect your Word documents, whether you’re using Word 2016, Word 2019, or newer Microsoft 365 editions.
- Mark a Word Document as Final (All Word Versions)
- Always Open Word Files in View-Only Mode (Word 2019 or Later)
- Restrict Editing to Make Word Documents Read-Only
- Save Word Files as PDF for Complete Read-Only Protection
- Automate Word File Protection with Python (Password or PDF)
Mark a Word Document as Final (All Word Versions)
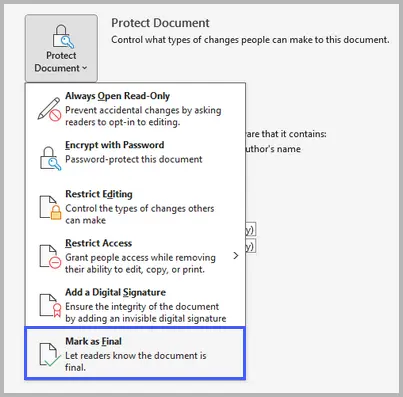
If you’re using Microsoft Word, one of the simplest ways to make a file read-only is by marking it as final . This feature is available in all modern versions of Word and indicates that the document is complete, discouraging others from making further edits.
Steps:
-
Open your Word document.
-
Go to File → Info → Protect Document → Mark as Final .
-
Click OK when prompted.
-
Save and close the document.
This approach sets the document to a read-only status and discourages editing, but it doesn’t prevent someone from removing the “Mark as Final” flag to edit the file. It’s best used as a signal that the document is complete, not as a strict security measure.
Pros and Cons
✔ Quick and simple; no password needed.
✘ Users can easily bypass it by clicking Edit Anyway .
Always Open Word Files in Read-Only Mode (Word 2019 or Later)
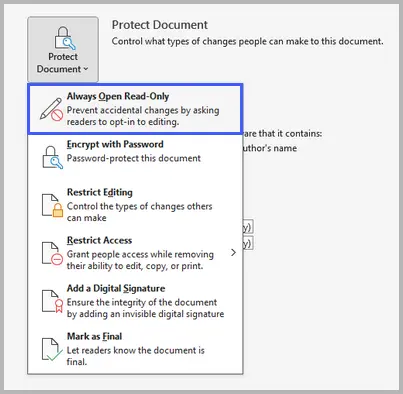
Starting with Word 2019 and Microsoft 365, Microsoft introduced a more modern way to make documents open in view-only mode — the “Always Open Read-Only” feature.
Steps:
-
Open your file in Word.
-
Click File → Info → Protect Document → Always Open Read-Only .
- Save the document.
This feature tells Word to always open the file in read-only mode by default. It doesn’t lock editing entirely, but users must manually enable editing before making changes — reducing the risk of accidental modifications.
Pros and Cons
✔ Convenient and version-aware; works seamlessly with OneDrive and SharePoint.
✘ Only available in Word 2019 and later versions.
Restrict Editing to Make Word Documents Read-Only
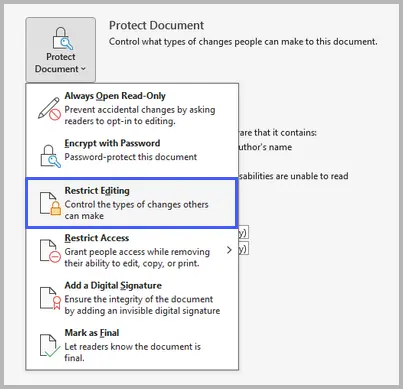
For stronger control, use Word’s Restrict Editing feature. It lets you prevent changes and optionally add a password , ensuring only authorized users can modify the file. This method is available in nearly all Word versions.
Steps:
-
Open your document.
-
Go to File → Info → Protect Document → Restrict Editing .
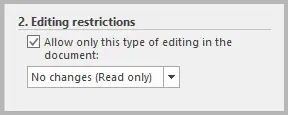
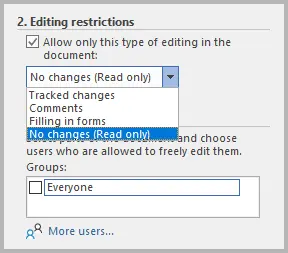
- Under Editing restrictions , check Allow only this type of editing in the document .
- From the dropdown, select No changes (Read only) .
- Click Yes, Start Enforcing Protection , and set a password (optional).
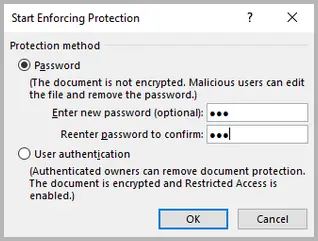
This option provides robust protection. It requires a password to unprotect the document, preventing anyone without it from making changes. It’s ideal for confidential files, contracts, and official documents.
Pros and Cons
✔ Strong and password-protected; prevents both intentional and accidental edits.
✘ Requires setup time and password management.
Save Word Files as PDF for Complete Read-Only Protection
If you need to completely lock the content and formatting, converting the Word document to a PDF is the best choice. PDFs are naturally more secure and harder to edit.
Steps:
- Open your Word document.
- Go to File → Save As .
- Choose PDF as the file format.
-
(Optional) Click Options and enable ISO 19005-1 compliant (PDF/A) for archival quality.
-
Save your file.

This approach transforms your Word file into a read-only format that preserves layout and design. You can add further restrictions or passwords in a PDF editor to control printing, copying, or editing.
Pros and Cons
✔ Ensures consistent formatting; excellent for distributing final versions.
✘ Cannot be easily converted back to editable Word format.
Automate Word File Protection with Python (Password or PDF)
If you handle many Word documents regularly, automating the protection process can save a lot of time. Using Spire.Doc for Python, you can programmatically add passwords or convert files to PDF in bulk.
Before starting, you’ll need to install the library from PyPI using the following command:
pip install spire.doc
Example 1: Protect a Word file with a password
from spire.doc import *
from spire.doc.common import *

# Create a Document object
doc = Document()

# Load a Word file
doc.LoadFromFile("C:\\Users\\Administrator\\Desktop\\input.docx")

# Encrypt the document with an open password
doc.Encrypt("open-psd")

# Set the editing restriction type to allow read only
doc.Protect(ProtectionType.AllowOnlyReading, "permission-psd")

# Save the document
doc.SaveToFile("output/EditingRestrictions.docx")
doc.Close()
Here is the full guide on how to: Set or Remove Word Document Editing Resections in Python
Example 2: Convert Word to PDF automatically
from spire.doc import *
from spire.doc.common import *

# Create a Document object
doc = Document()

# Load a Word file
doc.LoadFromFile("C:\\Users\\Administrator\\Desktop\\input.docx")

# Save the document to PDF
doc.SaveToFile("output/ToPDF.pdf", FileFormat.PDF)
doc.Close()
Read further: Convert Word to PDF with Python
Automating protection is perfect for organizations or developers who need to safeguard multiple files at once. It ensures consistency, efficiency, and minimizes human error.
Pros and Cons
✔ Great for batch protection and document workflows.
✘ Requires basic programming knowledge.
Which Method Should You Choose?
Here’s a quick comparison to help you decide:
| Method | Protection Level | Works In | Best For |
|---|---|---|---|
| Mark as Final | Basic | All versions | Signaling a document is complete |
| Always Open Read-Only | Moderate | Word 2019+ | Preventing casual edits |
| Restrict Editing | Strong | All versions | Password-based protection |
| Save as PDF | Strong | All versions | Sharing finalized documents |
| Python Automation | Advanced | Cross platform | Automating document security |
If you only need to discourage edits, “Mark as Final” or “Always Open Read-Only” is sufficient. For professional or legal use, “Restrict Editing” or “Save as PDF” offers stronger control. Developers managing large numbers of files should consider automating protection with Python.
Final Words
Making a Word document read-only is simple — but the right method depends on your purpose. For basic protection, marking as final or enabling read-only mode works well. For stronger control, use editing restrictions or save as PDF. And for large-scale or automated scenarios, Python scripts provide a reliable solution.
By applying the right approach, you can confidently share documents without worrying about unwanted edits, ensuring your work remains secure and unchanged.
FAQs About Making Word Files Read-Only
Q1. Can I make a Word file read-only without a password?
Yes. You can use Mark as Final or Always Open Read-Only to discourage edits without requiring a password.
Q2. Can someone still edit a “read-only” Word document?
It depends on the method. “Mark as Final” and “Always Open Read-Only” can be bypassed, but “Restrict Editing” with a password prevents unauthorized edits.
Q3. How do I remove read-only restrictions from a Word file?
Open the document, go to File → Info → Protect Document , and uncheck or disable the applied protection method. You may need a password if one was set.
Q4. What’s the most secure way to make a document read-only?
Saving it as a PDF or applying Restrict Editing with a password offers the highest level of protection.
Q5. Can I automate read-only settings in bulk?
Yes. You can use Python and libraries like Spire.Doc for Python to apply passwords or convert multiple Word files to PDF automatically.