Reading Excel files in C# is a common requirement for many applications, whether for data analysis, reporting, or database integration. While Microsoft’s Interop libraries can be used, they have limitations (such as requiring Excel to be installed). Instead, we’ll explore a more efficient approach using Spire.XLS , a .NET library that allows reading and writing Excel files without Interop . This article covers:
- C# .NET Library for Reading Excel Without Interop
- How to Read an Excel File in C#
- Read Excel Data into a DataTable
- Read Excel Data into a DataBase
- Conclusion
- FAQs
C# .NET Library for Reading Excel Without Interop
Microsoft's Excel Interop requires Excel to be installed on the machine, making it unsuitable for server-side applications. Instead, libraries like Spire.XLS offer a lightweight, high-performance solution without dependencies on Excel.
Why Use Spire.XLS?
- No Excel Installation Required – Works independently.
- Supports .NET Core & .NET Framework – Cross-platform compatibility.
- Read/Write Excel Files – Supports .xls, .xlsx, and .xlsm.
- Import to DataTable & Databases – Seamless integration with ADO.NET.
Installation of Spire.XLS
To get started, install the library via NuGet Package Manager:
Install-Package Spire.XLS
Alternatively, you can download Spire.XLS for .NET from our official website and reference the DLL file manually.
How to Read an Excel File in C#
This section demonstrates how to read an Excel file in C# using the Spire.XLS library. The process involves loading the file, accessing worksheets, and retrieving cell values programmatically. This is useful for automating data extraction, processing Excel reports, or integrating spreadsheet data into applications.
Step 1. Import Necessary Namespace
To utilize the Spire.XLS functionality, you need to import its namespace. This gives access to classes like Workbook and Worksheet , which are essential for Excel file operations.
- C#
using Spire.Xls;Step 2. Load an Excel File
To load an Excel file, create a Workbook object and call the LoadFromFile method. This reads the file into memory, allowing further manipulation.
- C#
Workbook wb = new Workbook();
wb.LoadFromFile("input.xlsx");
Step 3. Get a Specific Worksheet
Excel files can contain multiple worksheets. You can access a specific sheet by indexing the Worksheets collection (zero-based). The first sheet is at index 0, the second at 1, and so on.
- C#
Worksheet sheet = wb.Worksheets[0]; //First sheetStep 4. Retrieve Value of a Specific Cell
To retrieve a cell’s value, use the CellRange.Valueproperty. Specify the row and column indices (starting from 1) to locate the cell. This is useful for extracting structured data like headers or individual records.
- C#
CellRange cell = sheet.Range[1, 1]; // Row1, Column 1 (A1)
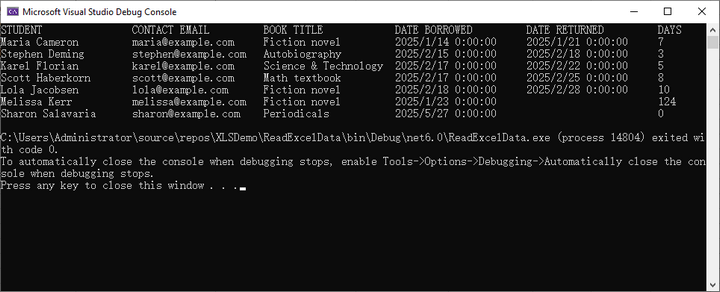
string value = cell.Value;Below is a complete example of reading data from an entire worksheet and printing it to the console:
- C#
using Spire.Xls;

namespace ReadExcelData
{
    class Program
    {
        static void Main(string[] args)
        {
            // Create a Workbook object
            Workbook wb = new Workbook();

            // Load an existing Excel file
            wb.LoadFromFile("C:\\Users\\Administrator\\Desktop\\Input.xlsx");

            // Get the first worksheet
            Worksheet sheet = wb.Worksheets[0];

            // Get the cell range containing data
            CellRange locatedRange = sheet.AllocatedRange;

            // Iterate through the rows
            for (int i = 0; i < locatedRange.Rows.Length; i++)
            {
                // Iterate through the columns
                for (int j = 0; j < locatedRange.Rows[i].ColumnCount; j++)
                {
                    // Get data of a specific cell
                    string cellValue = locatedRange[i + 1, j + 1].Value?.ToString() ?? "N/A";

                    // Align output with a width of 22
                    Console.Write($"{cellValue,-22}");
                }
                Console.WriteLine();
            }
        }
    }
}
Result:
Read Excel Data into a DataTable
Exporting Excel data into a DataTable enables seamless integration with UI controls like DataGridView or backend data processing. Spire.XLS simplifies this process with its built-in ExportDataTable() method, which automatically converts worksheet data into a structured DataTable while preserving column headers and data types.
Step 1. Import Necessary Namespace
Include the Spire.XLS namespace to access essential classes.
- C#
using Spire.Xls;Step 2. Create a Form and Button Click Event
Create a form (e.g., Form1) and add a button with an event handler for reading the Excel file.
- C#
public partial class Form1 : Form
{
    public Form1()
    {
        InitializeComponent();
    }

    private void button1_Click(object sender, EventArgs e)
    {
        // Code will go here
    }
}
Step 3. Load the Workbook
Within the button click event, create a Workbook object and load the Excel file.
- C#
Workbook wb = new Workbook();
wb.LoadFromFile("C:\\Users\\Administrator\\Desktop\\Input.xlsx");
Step 4. Export Data to DataTable
Access a specific worksheet by its index and export its data to a DataTable using the ExportDataTable method.
- C#
DataTable dataTable = wb.Worksheets[0].ExportDataTable();Step 5. Bind Data to DataGridView
Assuming you have a DataGridView control on your form, bind the DataTable to the DataGridView to display the data.
- C#
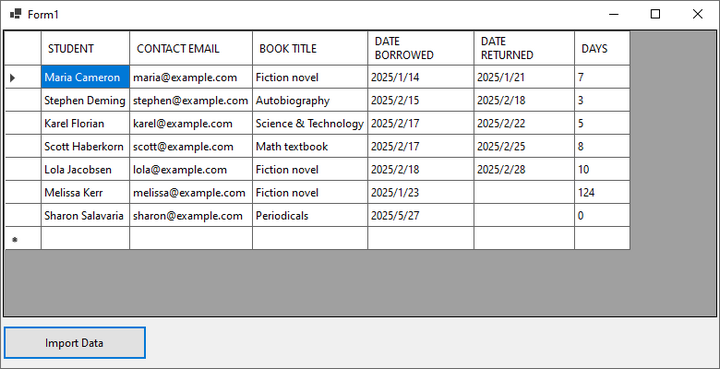
dataGridView1.DataSource = dataTable;The following is the full code for reading data from an Excel file into a DataTable and displaying it in a Windows Forms DataGridView control:
- C#
using Spire.Xls;
using System.Data;

namespace ReadExcelIntoDataTable
{
    public partial class Form1 : Form
    {
        public Form1()
        {
            InitializeComponent();
        }

        private void button1_Click(object sender, EventArgs e)
        {
            // Create a Workbook object
            Workbook wb = new Workbook();

            // Load an existing Excel file
            wb.LoadFromFile("C:\\Users\\Administrator\\Desktop\\Input.xlsx");

            // Get the first worksheet
            Worksheet sheet = wb.Worksheets[0];

            // Export data from worksheet into a DataTable
            DataTable dataTable = sheet.ExportDataTable();

            // Bind DataTable to DataGridView
            dataGridView1.DataSource = dataTable;

            // Dispose resources
            wb.Dispose();
        }
    }
}Result:
Read Excel Data into a DataBase
Integrating Excel data with a database can streamline data management. Below, we will walk through the process of reading an Excel file and importing its contents into a MySQL database. This method is ideal for automating data migration, reporting, or synchronizing Excel data with a structured database.
Step 1. Install MySQL Data Library
To interact with MySQL databases in your .NET applications, you’ll need to install MySql.Data library. This NuGet package provides the necessary classes and methods to connect to and manipulate MySQL databases.
- C#
Install-Package MySql.DataStep 2. Import Necessary Namespaces
Before working with Excel files and MySQL, you must include the required namespaces. Spire.XLS is used for Excel operations, while MySql.Data.MySqlClient enables MySQL database connectivity.
- C#
using Spire.Xls;
using MySql.Data.MySqlClient;
Step 3. Extract Headers and Data from Excel
The following code snippet demonstrates how to extract headers and data from the Excel file. Headers are cleaned to avoid MySQL column naming conflicts, while data is stored in a structured format for later insertion.
- C#
// Create a Workbook object
Workbook wb = new Workbook();

// Load an Excel document
wb.LoadFromFile("C:\\Users\\Administrator\\Desktop\\Input.xlsx");

// Get a specific sheet
Worksheet sheet = wb.Worksheets[0];

// Retrieve headers
List<string> headers = new List<string>();
for (int col = 1; col <= sheet.LastColumn; col++)
{
    string header = sheet.Range[1, col].Value?.ToString();
    // Removing spaces to avoid conflicts with MySQL column names
    string cleanHeader = header?.Replace(" ", "");
    headers.Add($"`{cleanHeader}`");
}

// Retrieve data
List<List<string>> data = new List<List<string>>();
for (int row = 2; row <= sheet.LastRow; row++) {
    List<string> record = new List<string>();
    for (int col = 1; col <= sheet.LastColumn; col++)
    {
        record.Add(sheet.Range[row, col].Value?.ToString() ?? string.Empty);
    }
    data.Add(record);
}
Step 4. Connect to a MySQL Database
A connection to the MySQL database is established using a connection string, which includes server details, credentials, and the target database name. The using statement ensures proper resource disposal.
- C#
string connectionString = "server=localhost;user=root;password=yourpassword;database=yourdatabase;";
using (MySqlConnection connection = new MySqlConnection(connectionString))
{
    connection.Open();
    // Connection is established; perform database operations here
}
Step 5. Dynamically Create a Table in MySQL
This step dynamically generates a MySQL table with columns matching the Excel headers. For simplicity, all columns are set as VARCHAR(255), but data types can be adjusted based on requirements.
- C#
// Create a table with dynamic columns based on headers
List<string> columns = new List<string>();
foreach (string header in headers)
{
    // Assuming all header values are VARCHAR for simplicity; adjust types as needed
    columns.Add($"{header} VARCHAR(255)");
}

// Create a table in database
string columnsSql = string.Join(", ", columns);
string createTableQuery = $@"
    CREATE TABLE IF NOT EXISTS my_table (
        id INT AUTO_INCREMENT PRIMARY KEY,
        {columnsSql}
)";

// Execute the create table query
using (MySqlCommand createCommand = new MySqlCommand(createTableQuery, connection))
{
    createCommand.ExecuteNonQuery();
}
Step 6. Populate the Table with Data
The extracted Excel data is inserted into the MySQL table using parameterized queries to prevent SQL injection. Each row from the Excel file is mapped to a corresponding database record.
- C#
// Prepare the SQL INSERT statement
string placeholders = string.Join(", ", new string[headers.Count].Select(h => "?"));
string insertQuery = $"INSERT INTO my_table ({string.Join(", ", headers.Select(h => h.Trim('`')))}) VALUES ({placeholders})";

// Insert data into the table
foreach (List<string> record in data)
{
    using (MySqlCommand insertCommand = new MySqlCommand(insertQuery, connection))
    {
        for (int i = 0; i < record.Count; i++)
        {
            insertCommand.Parameters.AddWithValue($"@param{i}", record[i]);
        }
        insertCommand.ExecuteNonQuery();
    }
}
Here’s the full code for importing data from an Excel file into a MySQL table:
- C#
using Spire.Xls;
using MySql.Data.MySqlClient;

namespace ExcelToMySQL
{
    class Program
    {
        static void Main(string[] args)
        {
            // Create a Workbook object
            Workbook wb = new Workbook();

            // Load an Excel document
            wb.LoadFromFile("C:\\Users\\Administrator\\Desktop\\Input.xlsx");

            // Get a specific sheet
            Worksheet sheet = wb.Worksheets[0];

            // Retrieve headers
            List<string> headers = new List<string>();
            for (int col = 1; col <= sheet.LastColumn; col++)
            {
                string header = sheet.Range[1, col].Value?.ToString();
                // Removing spaces to avoid conflicts with MySQL column names
                string cleanHeader = header?.Replace(" ", "");
                headers.Add($"`{cleanHeader}`");
            }

            // Retrieve data
            List<List<string>> data = new List<List<string>>();
            for (int row = 2; row <= sheet.LastRow; row++)
            {
                List<string> record = new List<string>();
                for (int col = 1; col <= sheet.LastColumn; col++)
                {
                    record.Add(sheet.Range[row, col].Value?.ToString() ?? string.Empty);
                }
                data.Add(record);
            }

            // Establish a connection to the MySQL database
            string connectionString = "server=localhost;user=root;password=admin;database=excel_db;";
            using (MySqlConnection connection = new MySqlConnection(connectionString))
            {
                connection.Open();

                // Create a table with dynamic columns based on headers
                List<string> columns = new List<string>();
                foreach (string header in headers)
                {
                    // Assuming all header values are VARCHAR for simplicity; adjust types as needed
                    columns.Add($"{header} VARCHAR(255)");
                }

                // Create a table in database
                string columnsSql = string.Join(", ", columns);
                string createTableQuery = $@"
                    CREATE TABLE IF NOT EXISTS my_table (
                        id INT AUTO_INCREMENT PRIMARY KEY,
                        {columnsSql}
                    )";

                // Execute the create table query
                using (MySqlCommand createCommand = new MySqlCommand(createTableQuery, connection))
                {
                    createCommand.ExecuteNonQuery();
                }

                // Prepare the SQL INSERT statement
                string placeholders = string.Join(", ", new string[headers.Count].Select(h => "?"));
                string insertQuery = $"INSERT INTO my_table ({string.Join(", ", headers.Select(h => h.Trim('`')))}) VALUES ({placeholders})";

                // Insert data into the table
                foreach (List<string> record in data)
                {
                    using (MySqlCommand insertCommand = new MySqlCommand(insertQuery, connection))
                    {
                        for (int i = 0; i < record.Count; i++)
                        {
                            insertCommand.Parameters.AddWithValue($"@param{i}", record[i]);
                        }
                        insertCommand.ExecuteNonQuery();
                    }
                }
            }

            Console.WriteLine("Data exported successfully!");
        }
    }
}Result:

Conclusion
Reading Excel files in C# has never been easier, thanks to libraries like Spire.XLS. This guide has walked you through the process of loading Excel files, reading their contents, and even importing the data into a MySQL database. With these techniques, you can enhance your applications' data handling capabilities significantly.
FAQs
Q1: Can I read password-protected Excel files?
A: Yes, Spire.XLS supports reading encrypted Excel files using:
- C#
wb.OpenPassword = "psd";
wb.LoadFromFile("file.xlsx");
Q2: How do I read formula results instead of the formula itself?
A: You have two options to retrieve formula results:
For individual cells:
Check if a cell contains a formula using CellRange.HasFormula , and get the value with CellRange.FormulaValue :
- C#
CellRange cell = sheet.Range[1, 1];
if (cell.HasFormula)
{
    string result = cell.FormulaValue.ToString();
}
For bulk export to DataTable:
Use Worksheet.ExportDataTable() with computedFormulaValue: true to export calculated values:
- C#
DataTable data = sheet.ExportDataTable(range, exportColumnNames: true, computedFormulaValue: true);Q3: How can I read Excel data into a DataTable?
A: Use the Worksheet.ExportDataTable() method provided by Spire.XLS.
Q4: How can I read an Excel file line by line?
A: Refer to the following code:
- C#
Workbook workbook = new Workbook();
workbook.LoadFromFile("input.xlsx");
Worksheet sheet = workbook.Worksheets[0];

for (int row = 1; row <= sheet.LastRow; row++)
{
    for (int col = 1; col <= sheet.LastColumn; col++)
    {
        string cellValue = sheet.Range[row, col].Value?.ToString() ?? string.Empty;
        Console.WriteLine(cellValue);
    }
}
Get a Free License
To fully experience the capabilities of Spire.XLS for .NET without any evaluation limitations, you can request a free 30-day trial license.