When working with Excel, one of the most common frustrations is that your text doesn’t fit inside the cells. A long product name, a detailed comment, or a customer address can easily spill over into adjacent cells or appear cut off. Many users turn to the Shrink to Fit option, while others look for ways to automatically resize the cells themselves.
In this article, we will explain what Shrink to Fit in Excel really does, how it differs from auto-fiting column widths and row heights, and how you can achieve both goals—shrinking text and shrinking cells. We’ll also cover automation methods using VBA and Python, and finally look at printing options such as Fit Sheet on One Page.
Methods Overview:
- How to Shrink Text to Fit in Excel
- How to Shrink Cells to Fit Text in Excel
- Shrink to Fit in Excel with VBA
- Automating Shrink to Fit Using Python Without Excel
- Print Options: Fit Sheet on One Page
What Does “Shrink to Fit” in Excel Mean?
The Shrink to Fit option in Excel automatically reduces the font size so that text fits horizontally within a cell without changing the column width. It only adjusts the text size in a single line, so text that wraps onto multiple lines or exceeds the cell height vertically may still be cut off. This feature is accessible from:
- Right-click a cell → Format Cells → Alignment → Shrink to Fit
- Ribbon path: Home → Alignment group → Format Cells dialog
- Keyboard shortcut: Ctrl + 1 (opens the Format Cells dialog)
Key points about Shrink to Fit:
- It does not resize the cell; instead, it makes the text smaller.
- If the text is very long, the resulting font can become too small to read comfortably.
- It can be used together with Merge Cells, but it does not work well with Wrap Text.
This feature is especially useful when you want to maintain a fixed table layout but still ensure that all data that is horizontally too long is visible inside each cell.
Shrink to Fit only handles horizontal overflow. If text exceeds a cell vertically and you want to keep the row height unchanged, you can adjust the font size of Excel cells programmatically to ensure all content is visible.
How to Shrink Text to Fit in Excel
In many cases, users simply want to make long text fit within a single cell without changing column widths. Excel provides a built-in way to shrink text to fit cell size, which can be done directly from the Ribbon menu. You can also compare this method with Wrap Text to see which is more appropriate for your data.
1. Using the Ribbon Menu
- Select the target cell(s).
- Go to Home → Alignment → Format Cells → Alignment tab.
- Check the option Shrink to Fit and click OK.
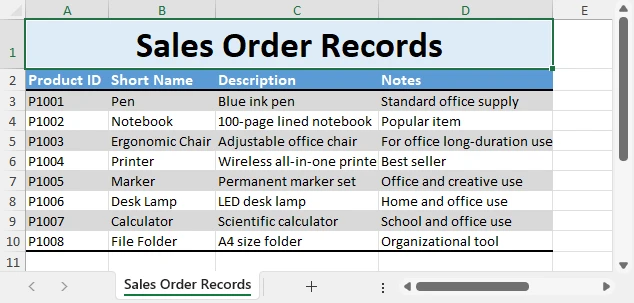
The screenshot below shows the Alignment tab in the Format Cells dialog, where you can enable Shrink to Fit for the selected cell(s).
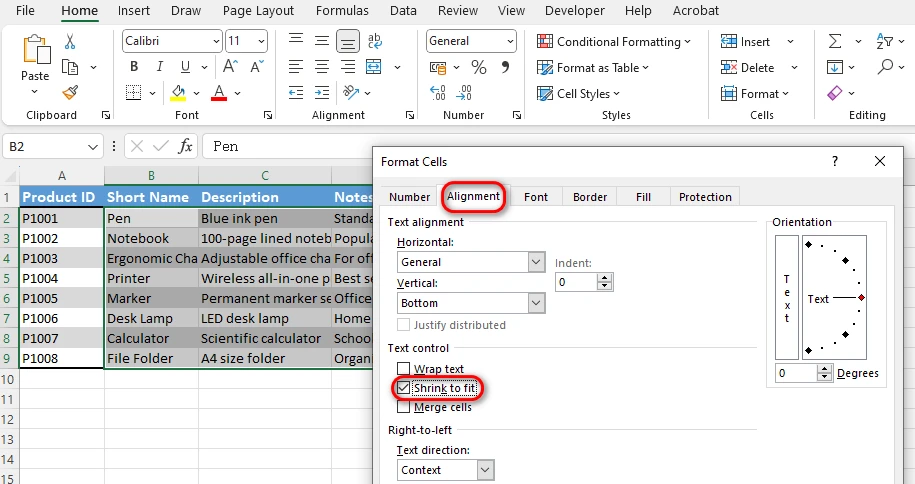
Once enabled, Shrink to Fit reduces the font size so that long text fits horizontally within the cell. For example, a long customer address can remain in a single column without overflowing.
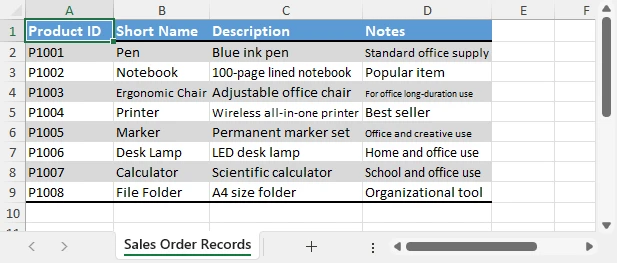
2. Shrink to Fit vs Wrap Text
- Shrink to Fit → Reduces font size to keep text in one line horizontally.
- Wrap Text → Breaks text into multiple lines inside the same cell, increasing row height.
The screenshot below illustrates the difference between Shrink to Fit and Wrap Text, so you can see how each option affects the appearance of cell content:
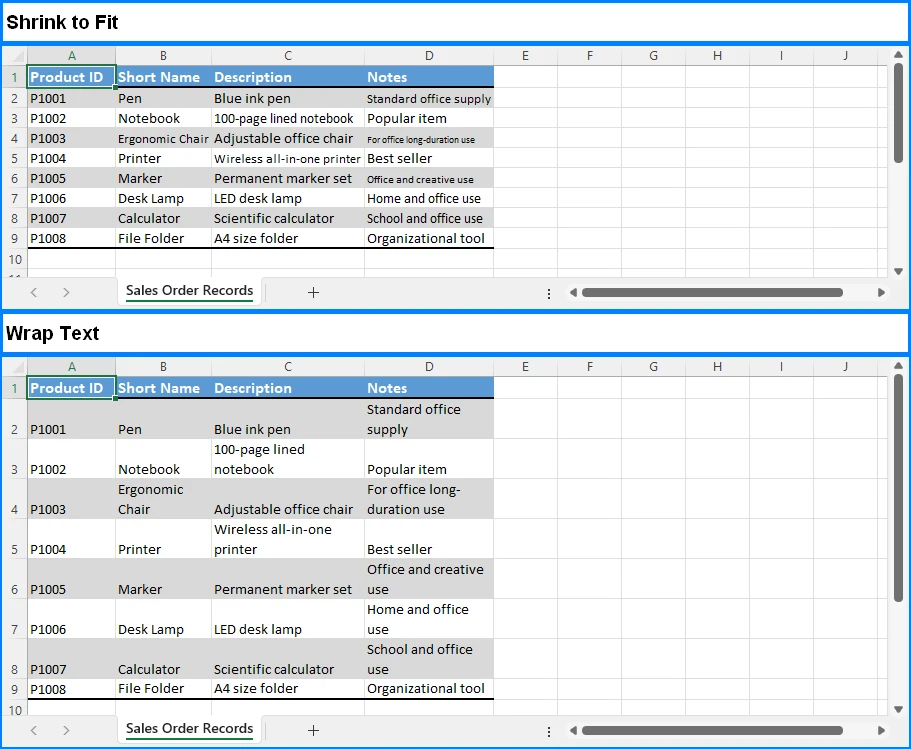
If readability is more important than keeping the table compact, Wrap Text may be a better choice.
How to Shrink Cells to Fit Text in Excel
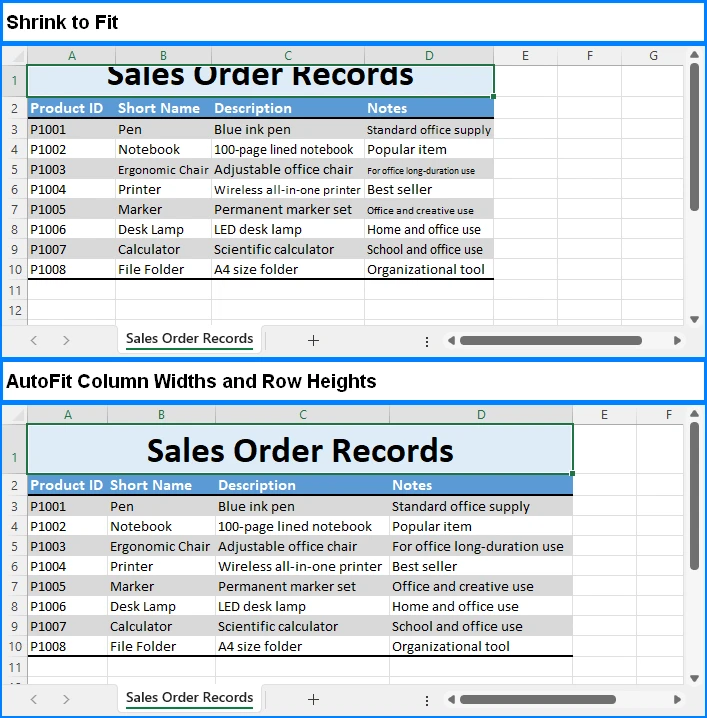
The expression “shrink cells to fit text” can be a little misleading. In Excel, the Shrink to Fit option reduces the font size so that text fits within the existing cell width, but it does not actually resize the cell. If your goal is to make the cell itself adjust to the content, the correct tool is AutoFit, which automatically changes the column width or row height to match the text.
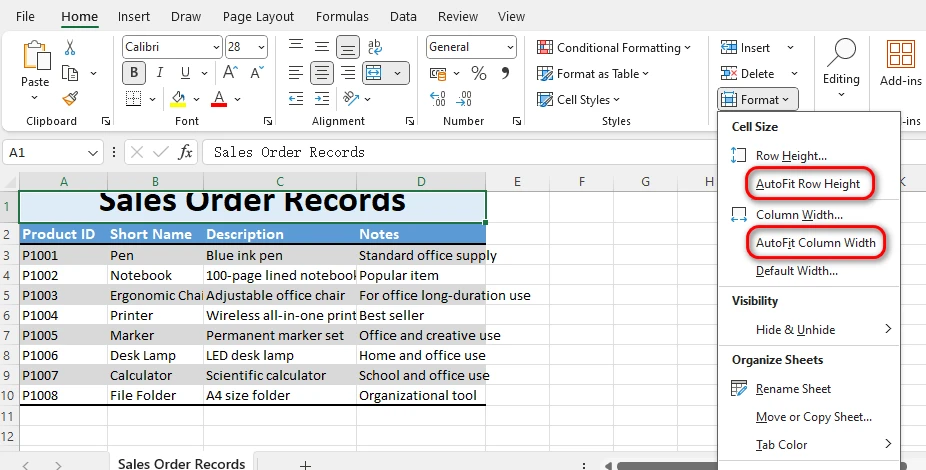
1. AutoFit Column Width and Row Height
To automatically adjust both column width and row height to fit the text, you can either double-click the column or row boundaries, or use the Ribbon menu:
- Home → Cells → Format → AutoFit Column Width / AutoFit Row Height
The screenshot below shows how AutoFit automatically resizes the selected column and row to fit the content:
2. Pros and Cons of AutoFit vs Shrink to Fit
- Shrink to Fit: Keeps cell size constant but shrinks text. Best when table dimensions must remain fixed.
- AutoFit: Keeps font size constant but resizes cells. Best when readability is a priority.
The screenshot below shows the difference between Shrink to Fit and AutoFit in Excel cells.
By understanding both methods, you can choose the right approach depending on your report or data entry needs.
Shrink to Fit in Excel with VBA
For repetitive tasks, you can use the Range.ShrinkToFit property in VBA (Visual Basic for Applications) to automate text fitting. This allows you to apply Shrink to Fit or AutoFit to multiple ranges in one step, saving time when handling large worksheets.
Example: Enable Shrink to Fit via VBA
The following VBA code enables Shrink to Fit for a specified cell range, making long text shrink automatically inside the cells:
Sub ApplyShrinkToFit()
    Dim ws As Worksheet
    Set ws = ThisWorkbook.Sheets("Sheet1")
    ws.Range("A1:A10").ShrinkToFit = True
End Sub
Example: Apply AutoFit via VBA
If you want to adjust columns and rows to match text size instead of shrinking fonts, you can use the AutoFit method:
Sub AutoFitColumnsAndRows()
    Dim ws As Worksheet
    Set ws = ThisWorkbook.Sheets("Sheet1")
    ws.Columns("A:C").AutoFit
    ws.Rows("1:10").AutoFit
End Sub
This way, you can process hundreds of cells at once automatically instead of adjusting them manually one by one.
Automating Shrink to Fit Using Python Without Excel
If you are working with Python and want to manage Excel files programmatically without a GUI, Spire.XLS for Python provides a complete API for Excel automation. Unlike VBA, it works independently of Excel and can be integrated into web applications or data pipelines.
Before you start, make sure you have installed Spire.XLS for Python in your environment:
pip install spire.xls
Example: Enable Shrink to Fit in Python
The following Python example demonstrates how to enable Shrink to Fit for Excel cells programmatically. With this approach, you can easily achieve Python shrink to fit Excel functionality and ensure that text always fits within the given cell boundaries:
from spire.xls import Workbook

workbook = Workbook()
workbook.LoadFromFile("Sample1.xlsx")
sheet = workbook.Worksheets[0]

cells = sheet.AllocatedRange
cells.Style.ShrinkToFit = True

workbook.SaveToFile("output/shrink_to_fit.xlsx")
The image below shows the result of the above Python code, where Shrink to Fit is applied so that a long text string fits within a single cell.
Example: AutoFit Columns and Rows in Python
Similarly, if you want to automatically resize columns and rows to fit the content, you can use the AutoFitColumns and AutoFitRows methods:
from spire.xls import Workbook

workbook = Workbook()
workbook.LoadFromFile("Sample2.xlsx")
sheet = workbook.Worksheets[0]

sheet.AllocatedRange.AutoFitColumns()
sheet.AllocatedRange.AutoFitRows()

workbook.SaveToFile("output/autofit_column_row.xlsx")
The image below shows the result of the above Python code, where AutoFit has been applied to columns and rows so that the cell sizes automatically adjust to fit the content.
This approach is ideal for automatically generating reports with consistent formatting across thousands of records. If you need more Excel automation tips with Python, check out the official Spire.XLS for Python tutorials.
Print Options: Fit Sheet on One Page
Besides managing cell content on screen, many users also need to optimize worksheets for printing. In such cases, you can use the Fit Sheet on One Page option, which scales the entire sheet to fit neatly onto one printed page.
Steps:
- Go to Page Layout → Scale to Fit → Fit Sheet on One Page.
- Alternatively: File → Print → Scaling → Fit Sheet on One Page.
The screenshot below shows the Page Setup options in Excel, where you can enable Fit Sheet on One Page for printing.
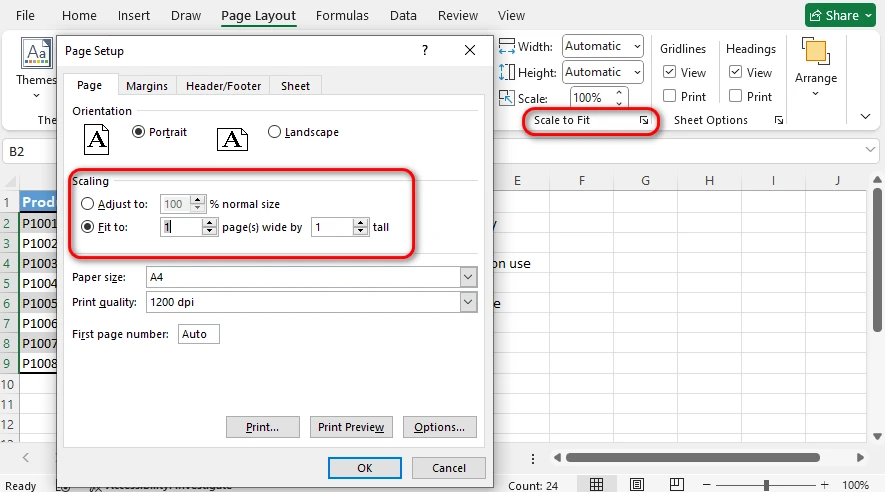
This feature reduces the overall scaling of the worksheet so that it prints neatly on a single page. It’s particularly useful for:
- Financial reports
- Long product catalogs
- Annual summaries
However, keep in mind that excessive scaling may result in very small text, which could reduce readability on paper.
For printing automation, you can use C# to automate Excel printing tasks. Please refer to How to Automate Excel Printing Using C# for details.
Best Practices for Text Management in Excel
- Use Shrink to Fit when table layout must remain unchanged.
- Note: Shrink to Fit only works for horizontal overflow, not vertical.
- Use AutoFit when readability is more important.
- Combine Wrap Text with AutoFit for multiline addresses or comments.
- Automate with VBA or Python when dealing with large datasets.
- For printing, use Fit Sheet on One Page to ensure professional-looking reports.
Conclusion
Excel provides multiple ways to handle text overflow inside cells. The Shrink to Fit feature shrinks the font size to resolve horizontal overflow, while AutoFit expands cells (both column width and row height) to fit text in either direction. If you need more flexibility, VBA and Spire.XLS for Python can automate both approaches. For printing, the Fit Sheet on One Page option ensures that large sheets look neat and professional.
By understanding the differences and applying the right method, you can make your Excel files both readable and professional-looking, no matter how much text they contain.
FAQ
Q1: What is Shrink to Fit in Excel?
Shrink to Fit is a cell formatting option that automatically reduces the font size so text fits within the cell’s width without changing column width or row height. It only works for horizontal overflow.
Q2: How do you shrink text to fit in Excel?
Select the cell, open Format Cells → Alignment, and check Shrink to Fit. Excel will reduce the font size until the text fits within the cell width.
Q3: How to shrink Excel cells to fit text?
In Excel, the Shrink to Fit option reduces the font size so text fits within the cell, but it does not resize the cell itself. To make the cell adjust to the content, use AutoFit, which automatically changes the column width or row height to fit the text.
Q4: How do I wrap text and autofit height?
Enable Wrap Text in the Alignment options, then use AutoFit Row Height to automatically expand the row so all lines of text are visible.
See Also
Explore related tutorials to enhance your Excel automation and formatting skills: