Excel remains one of the most widely used tools for organizing, analyzing, and presenting data. From financial reports to operational dashboards, many workflows require exporting data into Excel for better readability and sharing. Instead of manually entering information, automating Excel file writing with Python makes it faster, more reliable, and more scalable.
This tutorial explains how to write data to Excel files with Python, covering structured data insertion, formatting, and exporting. The examples use a Python Excel library that allows programmatic creation and customization of workbooks.
What's Included in This Tutorial:
- Setting Up the Environment
- Writing Data into Excel Files
- Formatting While Writing
- Working with Multiple Worksheets
- Best Practices
- Conclusion
- FAQ
Setting Up the Environment
Before writing Excel files in Python, you need a library that supports creating, loading, and saving workbooks programmatically. Spire.XLS for Python provides a complete API for these operations, enabling automated report generation and data processing.
Install the package using pip:
pip install spire.xls
Once installed, you can handle Excel files using three core operations:
- Creating a new workbook – initialize a new Excel document with Workbook().
- Loading an existing workbook – open an existing Excel file using LoadFromFile().
- Saving a workbook – export the workbook to the desired format with SaveToFile(), supporting .xlsx, .xls, CSV, and more.
These operations form the foundation for further data writing, formatting, and multi-sheet management in Python.
Writing Data into Excel Files with Python
In real-world business scenarios, you may need to create new Excel files, update existing reports, or write different types of data—such as text, numbers, dates, and formulas. This section demonstrates how to efficiently write and manage data in Excel files with Python across these common use cases.
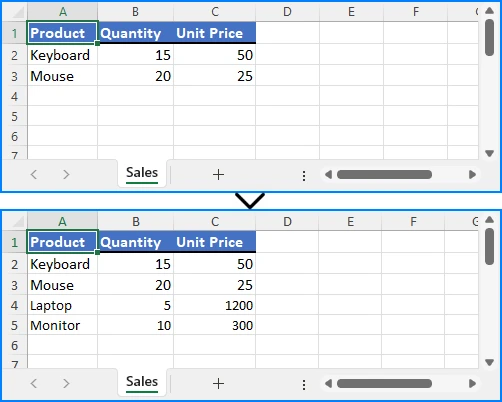
Appending Data to an Existing Excel File
When you need to update an existing Excel workbook with new information—such as adding recent sales records, inventory updates, or additional data rows—you can open the file, append the data programmatically, and save it without overwriting existing content:
from spire.xls import Workbook, ExcelVersion

workbook = Workbook()
workbook.LoadFromFile("Sample.xlsx")
sheet = workbook.Worksheets[0]

# Add new rows
sheet.Range["A4"].Value = "Laptop"
sheet.Range["B4"].NumberValue = 5
sheet.Range["C4"].NumberValue = 1200.00

sheet.Range["A5"].Value = "Monitor"
sheet.Range["B5"].NumberValue = 10
sheet.Range["C5"].NumberValue = 300.00

workbook.SaveToFile("output/updated_excel.xlsx", ExcelVersion.Version2016)
Key elements used:
- LoadFromFile() – loads an existing Excel file into the workbook object.
- Range["CellName"] – references a specific cell in the sheet using its name.
- Value / NumberValue – assigns text or numeric data to cells.
- SaveToFile() – saves the workbook to a file in the specified Excel format.
This method allows continuous updates to reports while preserving existing content.
Example showing appended data:
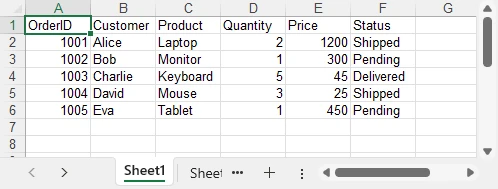
Writing Multiple Rows and Columns to a New Excel File
When dealing with larger datasets, writing multiple rows and columns at once is much more efficient than updating individual cells one by one. This approach not only saves time but also ensures consistent data insertion across the worksheet:
from spire.xls import Workbook, ExcelVersion

# Create a new Excel workbook
workbook = Workbook()
sheet = workbook.Worksheets[0]

orders = [
    ["OrderID", "Customer", "Product", "Quantity", "Price", "Status"],
    [1001, "Alice", "Laptop", 2, 1200.00, "Shipped"],
    [1002, "Bob", "Monitor", 1, 300.00, "Pending"],
    [1003, "Charlie", "Keyboard", 5, 45.00, "Delivered"],
    [1004, "David", "Mouse", 3, 25.00, "Shipped"],
    [1005, "Eva", "Tablet", 1, 450.00, "Pending"]
]

for row_index, row_data in enumerate(orders, start=1):
    for col_index, value in enumerate(row_data, start=1):
        if isinstance(value, (int, float)):
            sheet.Range[row_index, col_index].NumberValue = value
        else:
            sheet.Range[row_index, col_index].Value = value

workbook.SaveToFile("output/orders.xlsx", ExcelVersion.Version2016)
Important elements in this example:
- enumerate() – provides row and column indices for looping.
- Range[row, col] – references a cell in the worksheet by its row and column indexes.
Batch writing ensures efficiency, especially when exporting database query results or operational reports.
Example showing batch data insertion:
Writing Different Data Types
Excel cells can contain various types of data, such as text, numbers, dates, formulas, and more. Using the correct properties and methods ensures that each type is stored and displayed appropriately, allowing accurate calculations and proper formatting:
from spire.xls import Workbook, ExcelVersion, DateTime, TimeSpan

workbook = Workbook()
sheet = workbook.Worksheets[0]

# Set general value
sheet.Range[2, 2].Text = "General Example"
sheet.Range[2, 3].Value = "General 123"

# Set number value
sheet.Range[3, 2].Text = "Number Example"
sheet.Range[3, 3].NumberValue = 1234.56
sheet.Range[3, 3].NumberFormat = "0.000"

# Set datetime value
sheet.Range[4, 2].Text = "Date Example"
sheet.Range[4, 3].DateTimeValue = DateTime.get_UtcNow()

# Set formula value
sheet.Range[5, 2].Text = "Formula Example"
sheet.Range[5, 5].NumberValue = 1234.56
sheet.Range[5, 6].NumberValue = 6543.21
sheet.Range[5, 3].Formula = "=SUM(E5:F5)"

# Set text
sheet.Range[6, 2].Text = "Text Example"
sheet.Range[6, 3].Text = "Text"

# Set boolean value
sheet.Range[7, 2].Text = "Boolean Example"
sheet.Range[7, 3].BooleanValue = True

sheet.AllocatedRange.AutoFitColumns()

workbook.SaveToFile("output/value_types.xlsx", ExcelVersion.Version2016)
Key functions and properties used:
- Value – assigns or retrieves the general value of a cell, suitable for text or mixed content.
- NumberValue – specifically handles numeric values in a cell, ensuring proper number formatting and calculations.
- DateTimeValue – used to input or obtain date and time values in a cell with correct formatting.
- Formula – sets or retrieves the formula expression in a cell to perform dynamic calculations.
- BooleanValue – stores or returns a Boolean (True/False) value in a cell.
- Text – retrieves the displayed text of a cell, including any applied formatting.
Proper handling of different data types is essential for accurate business calculations and reporting. For more details on supported data types, see the XlsRange API reference.
Example showing mixed data types:

Formatting Excel While Writing Data with Python
To make Excel reports clear and professional, it’s important to apply formatting while entering or updating data. This section demonstrates how to enhance readability and presentation by styling cells, setting number formats, and adjusting column widths and row heights as you write data into Excel.
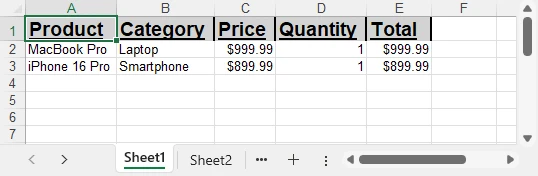
Applying Cell Styles
You can enhance the readability and appearance of your Excel sheet by applying various styles to cells, such as fonts, borders, and background colors:
from spire.xls import Workbook, Color, FontUnderlineType, ExcelVersion

workbook = Workbook()
sheet = workbook.Worksheets[0]
sheet.Range["A1"].Value = "Product"
sheet.Range["B1"].Value = "Category"
sheet.Range["C1"].Value = "Price"
sheet.Range["D1"].Value = "Quantity"
sheet.Range["E1"].Value = "Total"
sheet.Range["A2"].Value = "MacBook Pro"
sheet.Range["B2"].Value = "Laptop"
sheet.Range["C2"].NumberValue = 999.99
sheet.Range["D2"].NumberValue = 1
sheet.Range["E2"].Formula = "=C2*D2"
sheet.Range["A3"].Value = "iPhone 16 Pro"
sheet.Range["B3"].Value = "Smartphone"
sheet.Range["C3"].NumberValue = 899.99
sheet.Range["D3"].NumberValue = 1
sheet.Range["E3"].Formula = "=C3*D3"

# Set header style
header = sheet.Range["A1:E1"]
header.Style.Font.FontName = "Arial"
header.Style.Font.Size = 14.0
header.Style.Font.IsBold = True
header.Style.Font.Underline = FontUnderlineType.Single
header.Style.Interior.Color = Color.get_LightGray()
header.Style.Borders[BordersLineType.EdgeRight].LineStyle = LineStyleType.Medium
Core components demonstrated:
- Style.Font – controls font-related settings such as bold, underline, and more (full list of supported properties can be found in the Style.Font API documentation).
- FontUnderlineType.Single – applies a single underline.
- Interior.Color – fills the cell background with a specified color.
- Borders.LineStyle – adds borders around cells.
Styled cells enhance readability and emphasize critical sections.
Setting Number Formats for Excel Cells
Numbers in Excel often require specific display formats to improve readability and presentation. Using CellRange.NumberFormat, you can control how numeric values appear, such as applying currency, percentage, or integer formats:
# Apply number formats
sheet.Range["C2:C3"].NumberFormat = "$#,##0.00"   # Currency format
sheet.Range["D2:D3"].NumberFormat = "0"           # Integer format
sheet.Range["E2:E3"].NumberFormat = "$#,##0.00"
Key highlights:
- NumberFormat – enables reading and setting Excel cell number formats, controlling how numbers are displayed while keeping the raw data intact.
- Format codes define display rules such as currency symbols, decimal places, or percentage styles, giving you flexibility in presenting numerical data.
With proper number formatting, financial data is easier to interpret and looks more professional. For more details and a full list of format codes, see our dedicated guide on Setting Excel Cell Number Format in Python.
Adjusting Column Widths and Row Heights
Properly adjusting column widths and row heights ensures that all content is clearly visible. You can set them manually or use automatic fitting to match the content:
# Auto-fit column widths and row heights
for col in range(1, 5):
    sheet.AutoFitColumn(col)
for row in range(1, 3):
    sheet.AutoFitRow(row)

# Auto-fit a specific range of cells
#sheet.Range["A1:E3"].AutoFitColumns()
#sheet.Range["A1:E3"].AutoFitRows()

# Set a fixed column width and row height
sheet.Columns[1].Width = 150
sheet.Rows[1].Height = 30

workbook.SaveToFile("output/formatted_excel.xlsx", ExcelVersion.Version2016)
Key highlights:
- AutoFitColumn(colIndex) / AutoFitRow(rowIndex) – automatically adjust a single column or row to fit its content.
- CellRange.AutoFitColumns() / AutoFitRows() – automatically adjust all columns or rows within a specified cell range.
- Columns[colIndex].Width / Rows[rowIndex].Height – manually set a fixed width or height for precise control.
With these options, you can choose between automatic fitting for dynamic data or fixed dimensions for consistent layout, ensuring your Excel worksheets remain both readable and professionally formatted.
Example showing styled and auto-fitted headers:
To explore more advanced techniques for formatting Excel sheets in Python, including fonts, colors, borders, and conditional formatting, check out our dedicated guide on Formatting Excel in Python for detailed instructions.
Managing Multiple Worksheets in Excel with Python
In Excel, organizing data into multiple worksheets helps keep related information separated and easy to manage. For example, you can maintain separate sheets for sales, purchases, inventory, or other categories within the same workbook. This section demonstrates how to create, access, and manage multiple worksheets using Python.
from spire.xls import Workbook, ExcelVersion
workbook = Workbook()
sheet = workbook.Worksheets[0]
sheet.Name = "Sales"
sheet1 = workbook.Worksheets["Sheet2"]
sheet1.Name = "Purchases"
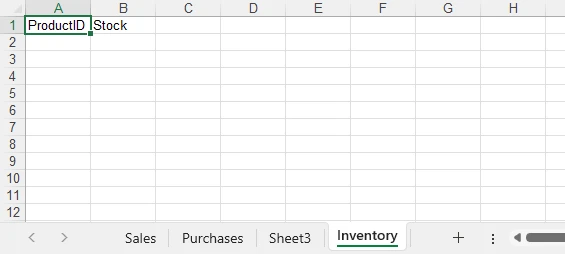
sheet2 = workbook.Worksheets.Add("Inventory")
sheet2.Range["A1"].Value = "ProductID"
sheet2.Range["B1"].Value = "Stock"
workbook.SaveToFile("output/multi_sheet.xlsx", ExcelVersion.Version2016)
Main features highlighted:
- Worksheets[Index] – access a worksheet by its position in the workbook (useful for iterating over all sheets or referencing the first/last sheet).
- Worksheets["SheetName"] – access a worksheet by its name, which is more readable and reliable if the sheet order might change.
- Worksheets.Add("SheetName") – create a new worksheet to organize different categories of data such as departments, sales regions, or product lines.
These methods allow you to structure your Excel file efficiently, keeping related data on separate sheets for clarity and easier management.
Example showing multiple worksheets:
Best Practices for Writing Excel Files with Python
When writing Excel files with Python, follow best practices to maintain efficiency, consistency, and usability:
- Use descriptive sheet names like “Sales_2024” instead of “Sheet1.”
- Batch write large datasets instead of individual cell updates to improve performance.
- Apply consistent formatting for headers, totals, and key columns.
- Leverage Excel formulas to maintain dynamic calculations.
- Validate data types to prevent misinterpretation in charts or formulas.
- Choose file formats suited to the audience: .xlsx for modern users, .xls only for legacy compatibility.
- Organize worksheets logically, grouping related datasets for easy navigation.
Implementing these practices avoids common pitfalls and produces professional, reusable reports.
Conclusion
Automating Excel writing in Python significantly streamlines reporting. By creating workbooks, writing data efficiently, applying styles, managing worksheets, and handling diverse data types, developers can ensure consistent, accurate, and professional Excel reports. To explore the library further, you can request a free temporary license or try the Free Spire.XLS for Python edition.
Python Excel Writing FAQ
Q1: Can Python write to an existing Excel file?
Yes, Python can load an existing workbook, append or modify data, and save it while preserving all previously entered content.
Q2: How to efficiently handle large datasets in Python?
Batch writing multiple rows and minimizing formatting during data insertion helps maintain high performance even with thousands of rows.
Q3: Can formulas be included in Excel files?
Yes, you can insert formulas, including =SUM() and more complex calculations, to keep your Excel reports dynamic and automatically updated.
Q4: Which Excel formats are supported?
Spire.XLS for Python can save files in .xlsx, .xls, CSV, and even export to PDF, covering most common use cases and compatibility needs.
