C#/VB.NET: Apply or Remove Data Validation in Excel
The data validation feature in Excel allows the user to control what data can be entered into a cell. For example, you could use data validation to make sure a numeric entry is between 1 and 5, make sure a text entry is less than 20 characters, or make sure the value entered in a cell is from a predefined list. In this article, you will learn how to apply or remove data validation in Excel in C# and VB.NET using Spire.XLS for .NET.
Install Spire.XLS for .NET
To begin with, you need to add the DLL files included in the Spire.XLS for .NET package as references in your .NET project. The DLL files can be either downloaded from this link or installed via NuGet.
PM> Install-Package Spire.XLS
Apply Data Validation to Excel Cells
The following are the steps to add various types of data validation to cells using Spire.XLS for .NET.
- Create a Workbook object
- Get the first worksheet through Workbook.Worksheets[index] property.
- Get a specific cell through Worksheet.Range property.
- Set the data type allowed in the cell through CellRange.DataValidation.AllowType property. You can select Integer, Time, Date, TextLength, Decimal, etc. as the data type.
- Set the comparison operator through CellRange.DataValiation.CompareOperator property. The comparison operators include Between, NotBetween, Less, Greater, and Equal.
- Set one or two formulas for the data validation through CellRange.DataValidation.Formula1 and CellRange.DataValidation.Formula2 properties.
- Set the input prompt through CellRange.DataValidation.InputMessage property.
- Save the workbook to an Excel file using Workbook.SaveToFile() method.
- C#
- VB.NET
using System;
using Spire.Xls;
namespace ApplyDataValidation
{
class Program
{
static void Main(string[] args)
{
//Create a Workbook object
Workbook workbook = new Workbook();
//Get the first worksheet
Worksheet sheet = workbook.Worksheets[0];
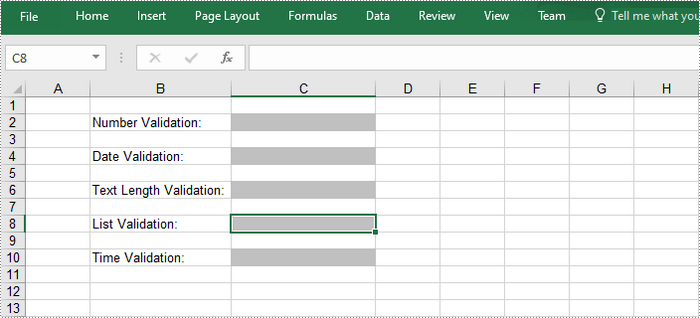
//Insert text in cells
sheet.Range["B2"].Text = "Number Validation:";
sheet.Range["B4"].Text = "Date Validation:";
sheet.Range["B6"].Text = "Text Length Validation:";
sheet.Range["B8"].Text = "List Validation:";
sheet.Range["B10"].Text = "Time Validation:";
//Add a number validation to C2
CellRange rangeNumber = sheet.Range["C2"];
rangeNumber.DataValidation.AllowType = CellDataType.Integer;
rangeNumber.DataValidation.CompareOperator = ValidationComparisonOperator.Between;
rangeNumber.DataValidation.Formula1 = "1";
rangeNumber.DataValidation.Formula2 = "10";
rangeNumber.DataValidation.InputMessage = "Enter a number between 1 and 10";
rangeNumber.Style.KnownColor = ExcelColors.Gray25Percent;
//Add a date validation to C4
CellRange rangeDate = sheet.Range["C4"];
rangeDate.DataValidation.AllowType = CellDataType.Date;
rangeDate.DataValidation.CompareOperator = ValidationComparisonOperator.Between;
rangeDate.DataValidation.Formula1 = "1/1/2010";
rangeDate.DataValidation.Formula2 = "12/31/2020";
rangeDate.DataValidation.InputMessage = "Enter a date between 1/1/2010 and 12/31/2020";
rangeDate.Style.KnownColor = ExcelColors.Gray25Percent;
//Add a text length validation to C6
CellRange rangeTextLength = sheet.Range["C6"];
rangeTextLength.DataValidation.AllowType = CellDataType.TextLength;
rangeTextLength.DataValidation.CompareOperator = ValidationComparisonOperator.LessOrEqual;
rangeTextLength.DataValidation.Formula1 ="5";
rangeTextLength.DataValidation.InputMessage = "Enter text lesser than 5 characters";
rangeTextLength.Style.KnownColor = ExcelColors.Gray25Percent;
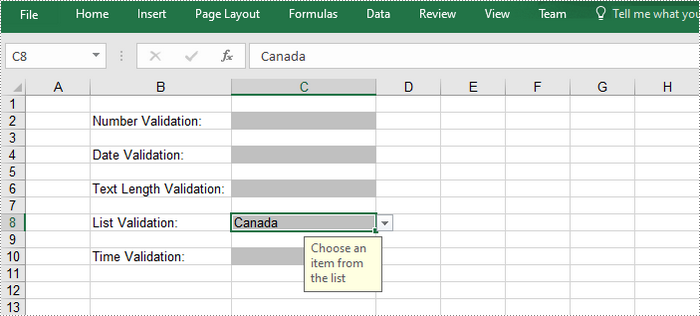
//Apply a list validation to C8
CellRange rangeList = sheet.Range["C8"];
rangeList.DataValidation.Values = new String[] { "United States", "Canada", "United Kingdom", "Germany" };
rangeList.DataValidation.IsSuppressDropDownArrow = false;
rangeList.DataValidation.InputMessage ="Choose an item from the list";
rangeList.Style.KnownColor =ExcelColors.Gray25Percent;
//Apply a time validation to C10
CellRange rangeTime = sheet.Range["C10"];
rangeTime.DataValidation.AllowType = CellDataType.Time;
rangeTime.DataValidation.CompareOperator = ValidationComparisonOperator.Between;
rangeTime.DataValidation.Formula1 = "9:00";
rangeTime.DataValidation.Formula2 = "12:00";
rangeTime.DataValidation.InputMessage = "Enter a time between 9:00 and 12:00";
rangeTime.Style.KnownColor = ExcelColors.Gray25Percent;
//Auto fit width of column 2
sheet.AutoFitColumn(2);
//Set the width of column 3
sheet.Columns[2].ColumnWidth = 20;
//Save to file
workbook.SaveToFile("ApplyDataValidation.xlsx", ExcelVersion.Version2016);
}
}
}
Remove Data Validation from Excel Cells
Below are the steps to remove data validation from the specified cell using Spire.XLS for .NET.
- Create a Workbook object.
- Load the Excel file containing data validation using Workbook.LoadFromFile() method.
- Get the first worksheet though Workbook.Worksheets[index] property.
- Create an array of rectangles, which is used to locate the cells where the validation will be removed.
- Remove the data validation from the selected cells using Worksheet.DVTable.Remove() method.
- Save the workbook to another Excel file using Workbook.SaveToFile() method.
- C#
- VB.NET
using Spire.Xls;
using System.Drawing;

namespace RemoveDataValidation
{
    class Program
    {
        static void Main(string[] args)
        {
            //Create a Workbook object
            Workbook workbook = new Workbook();

            //Load a sample Excel file
            workbook.LoadFromFile("C:\\Users\\Administrator\\Desktop\\ApplyDataValidation.xlsx");

            //Get the first worksheet
            Worksheet worksheet = workbook.Worksheets[0];

            //Create an array of rectangles, which is used to locate the ranges in worksheet
            Rectangle[] rectangles = new Rectangle[]{

                //one Rectangle(startColumnIndex, startRowIndex, endColumnIndex, endRowIndex) specifies a  cell range to remove data validation
                //the column or row index starts at 0
                new Rectangle(0, 0, 2, 9)
            };

            //Remove the data validation from the selected cells
            worksheet.DVTable.Remove(rectangles);

            //Save the workbook to an Excel file
            workbook.SaveToFile("RemoveDataValidation.xlsx");
        }
    }
}
Apply for a Temporary License
If you'd like to remove the evaluation message from the generated documents, or to get rid of the function limitations, please request a 30-day trial license for yourself.
Split Data into Multiple Columns in Excel in C#
When working with spreadsheets, you may find that certain cells contain combined information that need to be split for further sorting, filtering, or analyzing. MS Excel provides the “Text to Columns” feature to help users handle such situation, but manually processing large datasets is tedious and error prone. Using Spire.XLS, a robust .NET library, you can automate splitting data into columns efficiently.
This article will guide you through the process of splitting Excel data into multiple columns with C#, saving you time and ensuring accuracy.
- Why Use Spire.XLS for Splitting Excel Data?
- How to Install the .NET Excel Library?
- Split Excel Data into Multiple Columns with C# (Steps & Code)
Why Use Spire.XLS for Splitting Excel Data?
- No Office Dependency: Manipulate Excel files without installing Microsoft Office.
- Rich Features: Beyond splitting data, Spire.XLS also allows to edit, format, or export split data to other formats.
- .NET Integration: Seamlessly embed Excel automation into .NET applications.
How to Install the .NET Excel Library?
To follow along with the examples in this article, you'll need to have the Spire.XLS for .NET library installed. The product package can be downloaded from the official website and then imported manually. Or you can install it directly via NuGet:
PM> Install-Package Spire.XLS
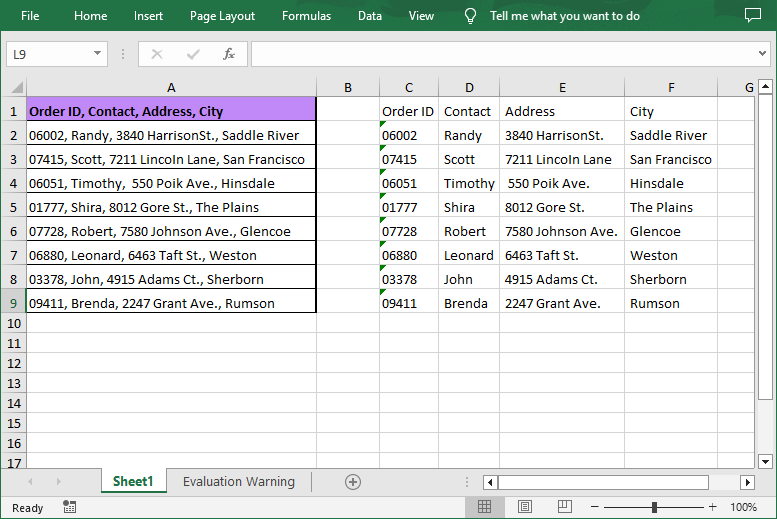
Split Excel Data into Multiple Columns with C# (Steps & Code)
With Spire.XLS, you can first retrieve the content in a cell, then split the cell content based on specific delimiter, and finally write the split data into different columns. The detailed steps are as follows:
- Load Excel and get a worksheet.
- Create a Workbook object and use its LoadFromFile() method to load an Excel file.
- Access a specified worksheet through the Workbook.Worksheets[index] property.
- Retrieve and split cell data.
- Iterate through each row in the sheet.
- Access a specified cell and then get its content using the CellRange.Text property.
- Call the string.Split(params char[] separator) method to split the content based on a specified separator (e.g., comma, space, semicolon, etc.).
- Write data into multiple columns and save.
- Iterate through each split data.
- Write the split data into different columns.
- Save the modified workbook to a new file using the Workbook.SaveToFile() method.
Below is the sample code:
- C#
using Spire.Xls;

namespace ConvertTextToColumns
{
    class Program
    {
        static void Main(string[] args)
        {
            // Create a Workbook object
            Workbook workbook = new Workbook();

            // Load an Excel file
            workbook.LoadFromFile("Data.xlsx");

            // Get the first worksheet
            Worksheet sheet = workbook.Worksheets[0];

            // Loop through each row in the worksheet
            for (int i = 0; i < sheet.LastRow; i++)
            {
                // Get the text of the first cell in the current row
                string cellText = sheet.Range[i + 1, 1].Text;

                // Split the text by comma
                string[] splitText = cellText.Split(',');

                // Iterate through each split value
                for (int j = 0; j < splitText.Length; j++)
                {
                    // Write the split data into different columns
                    sheet.Range[i + 1, j + 3].Text = splitText[j];
                }
            }

            // Autofit column widths
            sheet.AllocatedRange.AutoFitColumns();

            // Save the result file
            workbook.SaveToFile("SplitExcelData.xlsx", ExcelVersion.Version2016);
        }
    }
}
Get a Free License
To fully experience the capabilities of Spire.XLS for .NET without any evaluation limitations, you can request a free 30-day trial license.
Conclusion
Splitting text into columns in Excel using C# streamlines data processing and reduces the risk of errors. With Spire.XLS, you can automate complex tasks while maintaining data integrity, making data management easier.
How to clone Excel Font Style in C#
The colorful excel font makes the whole excel document attractive and it is easy to give more importance to some data we'd like to show to others. With the help of Spire.XLS, developers can easily set Excel font and copy formatting from one place and apply it to another. This article will focus on demonstrating how to clone Excel font style directly when adding the new text to Excel worksheet in C#.
Note: Before Start, please ensure that you have download the latest version of Spire.XLS (V7.8.64 or above) and add Spire.xls.dll in the bin folder as the reference of Visual Studio.
Here comes to the code snippet of how to clone cell style for the text in Excel worksheets.
Step 1: Create a new excel document instance and get the first worksheet.
Workbook book = new Workbook();
Worksheet sheet = book.Worksheets[0];
Step 2: Add the text to the Excel sheet cell range A1.
sheet.Range["A1"].Text = "Text1";
Step 3: Set A1 cell range's CellStyle.
CellStyle style = book.Styles.Add("style");
style.Font.FontName = "Calibri";
style.Font.Color = Color.Red;
style.Font.Size = 12;
style.Font.IsBold = true;
style.Font.IsItalic = true;
sheet.Range["A1"].CellStyleName = style.Name
Step 4: Use the method style.clone() to clone the same style for B2 cell range.
CellStyle csOrieign = style.clone();
sheet.Range["B2"].Text = "Text2";
sheet.Range["B2"].CellStyleName = csOrieign.Name;
Step 5: Clone the same style for C3 cell range and then reset the font color for the text.
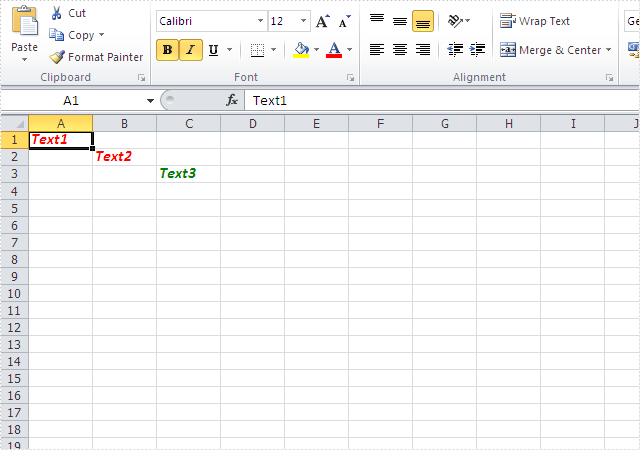
CellStyle csGreen = style.clone();
csGreen.Font.Color = Color.Green;
sheet.Range["C3"].Text = "Text3";
sheet.Range["C3"].CellStyleName = csGreen.Name;
Step 6: Save the document to file and set the excel version.
book.SaveToFile("sample2.xlsx", ExcelVersion.Version2010);
Effective screenshots:
Full codes:
using Spire.Xls;
using System.Drawing;
namespace CloneExcelFont
{
    class Program
    {
        static void Main(string[] args)
        {
            Workbook book = new Workbook();
            Worksheet sheet = book.Worksheets[0];

            sheet.Range["A1"].Text = "Text1";
            CellStyle style = book.Styles.Add("style");

            style.Font.FontName = "Calibri";
            style.Font.Color = Color.Red;
            style.Font.Size = 12;
            style.Font.IsBold = true;
            style.Font.IsItalic = true;
            sheet.Range["A1"].CellStyleName = style.Name;

            CellStyle csOrieign = style.clone();
            sheet.Range["B2"].Text = "Text2";
            sheet.Range["B2"].CellStyleName = csOrieign.Name;

            CellStyle csGreen = style.clone();
            csGreen.Font.Color = Color.Green;
            sheet.Range["C3"].Text = "Text3";
            sheet.Range["C3"].CellStyleName = csGreen.Name;

            book.SaveToFile("sample2.xlsx", ExcelVersion.Version2010);

        }
    }
}
Retrieve data from one excel worksheet and extract to a new excel file in C#
Searching data is a powerful data processing function of Microsoft excel, but it doesn't allow users to extract the selected data to a new excel file directly. It's almost impossible for us to copy data row by row manually from one excel file to another, so it cannot entirely meet our requirements especially when we want to retrieve and extract the interesting data from a large excel file.
This article will demonstrate how to retrieve data from one excel worksheet and extract to a new excel file with Spire.XLS in C#.
Note: Before start, please download and install Spire.XLS correctly. Then add Spire.XLS.dll file as reference of your project.
Below is the screenshot of the original excel worksheet:
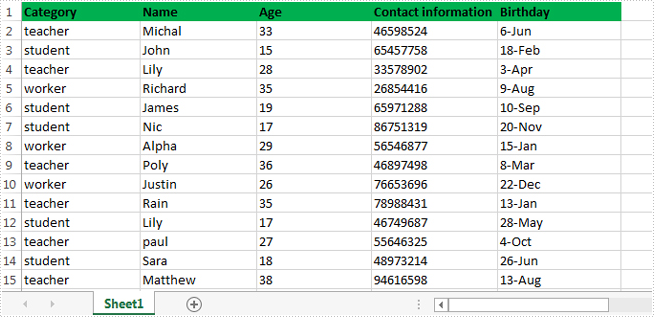
In this sample, all of the data related to teacher were extracted to a new excel file.
Detail steps overview:
Step 1: Create a new workbook instance and get the first worksheet.
Workbook newBook = new Workbook();
Worksheet newSheet = newBook.Worksheets[0];
Step 2: Create a new workbook instance and load the sample excel file.
Workbook workbook = new Workbook();
workbook.LoadFromFile("Information.xlsx");
Step 3: Get the worksheet where you want to retrieve and extract data from. In this sample, it's the first worksheet.
Worksheet sheet = workbook.Worksheets[0];
Step 4: Retrieve data and extract to the first worksheet of the new excel workbook.
int i = 1;
int columnCount = sheet.Columns.Count();
foreach (CellRange range in sheet.Columns[0])
{
    if (range.Text == "teacher")
        {
            CellRange sourceRange = sheet.Range[range.Row, 1, range.Row, columnCount];
            CellRange destRange = newSheet.Range[i, 1, i, columnCount];
            sheet.Copy(sourceRange, destRange, true);
            i++;
        }
}
Step 5: Save the target file as NewForm.xlsx.
newBook.SaveToFile("NewForm.xlsx", ExcelVersion.Version2010);
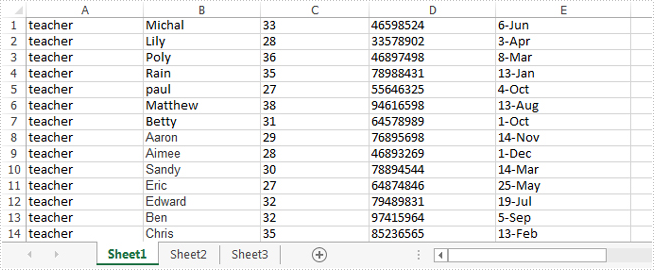
Effective screenshot:
Full codes:
using System.Linq;
using Spire.Xls;

namespace Retrieve_and_extract_data
{
    class Program
    {
        static void Main(string[] args)
        {
            Workbook newBook = new Workbook();
            Worksheet newSheet = newBook.Worksheets[0];
            Workbook workbook = new Workbook();
            workbook.LoadFromFile("Information.xlsx");
            Worksheet sheet = workbook.Worksheets[0];
            int i = 1;
            int columnCount = sheet.Columns.Count();
            foreach (CellRange range in sheet.Columns[0])
            {
                if (range.Text == "teacher")
                {
                    CellRange sourceRange = sheet.Range[range.Row, 1, range.Row, columnCount];
                    CellRange destRange = newSheet.Range[i, 1, i, columnCount];
                    sheet.Copy(sourceRange, destRange, true);
                    i++;
                }
            }
            newBook.SaveToFile("NewForm.xlsx", ExcelVersion.Version2010);

        }
    }
}
Formatting text in Excel in C#
Spire.XLS can help developers to write rich text into the spreadsheet easily, such as set the text in bold, italic, and set the colour and font for them. We have already shown you how to set Subscript and Superscript in Excel files by using Spire.XLS. This article will focus on demonstrate how to formatting text in Excel sheet in C#.
Spire.Xls offers ExcelFont class and developers can format the text of cells easily. By using RichText, we can add the text into cells and set font for it. Here comes to the steps of how to write rich text into excel cells.
Step 1: Create an excel document and get its first worksheet.
Workbook workbook = new Workbook();
Worksheet sheet = workbook.Worksheets[0];
Step 2: Create the fonts and sent the format for each font.
//create a font and set the format to bold.
ExcelFont fontBold = workbook.CreateFont();
fontBold.IsBold = true;

//create a font and set the format to underline.
ExcelFont fontUnderline = workbook.CreateFont();
fontUnderline.Underline = FontUnderlineType.Single;

//create a font and set the format to italic.
ExcelFont fontItalic = workbook.CreateFont();
fontItalic.IsItalic = true;

//create a font and set the color to green.
ExcelFont fontColor = workbook.CreateFont();
fontColor.KnownColor = ExcelColors.Green;
Step 3: Set the font for specified cell range.
RichText richText = sheet.Range["A1"].RichText;
richText.Text="It is in Bold";
richText.SetFont(0, richText.Text.Length-1, fontBold);

richText = sheet.Range["A2"].RichText;
richText.Text = "It is underlined";
richText.SetFont(0, richText.Text.Length-1, fontUnderline);

richText = sheet.Range["A3"].RichText;
richText.Text = "It is Italic";
richText.SetFont(0, richText.Text.Length - 1, fontItalic);

richText = sheet.Range["A4"].RichText;
richText.Text = "It is Green";
richText.SetFont(0, richText.Text.Length - 1, fontColor);
Step 4: Save the document to file.
workbook.SaveToFile("Sample.xls",ExcelVersion.Version97to2003);
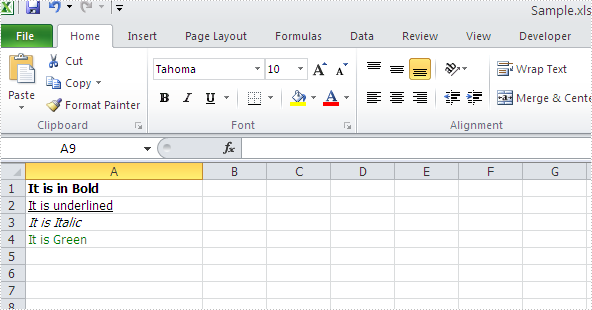
Effective screenshot of writing rich text into excel worksheet:
Full codes:
using Spire.Xls;
namespace WriteRichtextinExcel
{
    class Program
    {
        static void Main(string[] args)
        {
            Workbook workbook = new Workbook();
            Worksheet sheet = workbook.Worksheets[0];

            ExcelFont fontBold = workbook.CreateFont();
            fontBold.IsBold = true;

            ExcelFont fontUnderline = workbook.CreateFont();
            fontUnderline.Underline = FontUnderlineType.Single;

            ExcelFont fontItalic = workbook.CreateFont();
            fontItalic.IsItalic = true;

            ExcelFont fontColor = workbook.CreateFont();
            fontColor.KnownColor = ExcelColors.Green;

            RichText richText = sheet.Range["A1"].RichText;
            richText.Text = "It is in Bold";
            richText.SetFont(0, richText.Text.Length - 1, fontBold);

            richText = sheet.Range["A2"].RichText;
            richText.Text = "It is underlined";
            richText.SetFont(0, richText.Text.Length - 1, fontUnderline);

            richText = sheet.Range["A3"].RichText;
            richText.Text = "It is Italic";
            richText.SetFont(0, richText.Text.Length - 1, fontItalic);

            richText = sheet.Range["A4"].RichText;
            richText.Text = "It is Green";
            richText.SetFont(0, richText.Text.Length - 1, fontColor);

            workbook.SaveToFile("Sample.xls", ExcelVersion.Version97to2003);

        }
    }
}
How to Remove Auto Filters in Excel Using C#

Auto filters in Excel are a powerful feature for sorting and analyzing data. However, once you’ve finished your data review or need to share the file in its original, unfiltered form, it’s often necessary to remove auto filters from Excel worksheets. If you’re building .NET applications, you can automate this task easily using Spire.XLS for .NET — whether you're removing filters from a single sheet or processing Excel files in batches.
In this article, you'll learn how to remove auto filters in Excel using Spire.XLS for .NET in C# programs.
Here’s what we will cover:
- Why Remove Auto Filters in Excel?
- How to Remove Auto Filters in Excel Using Spire.XLS
- Why Use Spire.XLS to Remove Filters?
- Frequently Asked Questions
Why Remove Auto Filters in Excel?
Removing auto filters in Excel can be essential for:
- Restoring full visibility of your data after filtering
- Preparing spreadsheets for export, printing, or presentation
- Sharing files without hidden or partial data views
In other words, removing filters in Excel files helps maintain data clarity, especially when passing documents to clients, teams, or reports.
How to Remove Auto Filters in Excel Using Spire.XLS
Setting Up Spire.XLS for .NET
Before getting started, install the Spire.XLS library via NuGet:
PM> Install-Package Spire.XLS
Or install the free version for lightweight Excel processing:
PM> Install-Package FreeSpire.XLS
You can also download Spire.XLS for .NET or Free Spire.XLS for .NET, and install the version you choose manually.
Key Methods and Properties Used
- Workbook.LoadFromFile() – Loads an existing Excel file into the Workbook object for processing.
- Workbook.Worksheets[] – Accesses a specific worksheet by index from the workbook.
- Worksheet.AutoFilters.Clear() – Removes all existing filter rules and makes all rows visible.
- Worksheet.AutoFilters.Range – Defines or updates the range of cells to which auto filters are applied.
- Workbook.SaveToFile() – Saves the modified workbook as a new Excel file.
C# Code Example: Remove All AutoFilters in Excel
Here’s a complete example of how to remove all auto-filters in Excel using C# and Spire.XLS:
- C#
using Spire.Xls;

// Create a Workbook instance
Workbook workbook = new Workbook();

// Load an Excel workbook
workbook.LoadFromFile("Sample.xlsx");

// Get a worksheet
Worksheet sheet = workbook.Worksheets[0];

// Remove auto-filters
sheet.AutoFilters.Clear();

// Save the workbook
workbook.SaveToFile("output/RemoveExcelFilter.xlsx");
workbook.Dispose();
Excel Worksheet Before and After Removing All Auto Filters
Removing a Specific Filter Column in an Excel Worksheet
In Excel, auto filters are applied to a continuous range of columns. This means you can’t directly remove the filter from just one column if it's part of a larger filter range. If you need to exclude a specific column from filtering, you’ll have to reset the filter range in Excel worksheets to adjacent columns.
Here’s how you can do it using Spire.XLS:
- C#
using Spire.Xls;

// Create a Workbook instance
Workbook workbook = new Workbook();

// Load an Excel workbook
workbook.LoadFromFile("Sample.xlsx");

// Get a worksheet
Worksheet sheet = workbook.Worksheets[0];

// Remove the current filters to show all data (to avoid missing data)
sheet.AutoFilters.Clear();

// Reset the filter range
sheet.AutoFilters.Range = sheet.Range[1, 3, 5, 5];

// Save the workbook
workbook.SaveToFile("output/ResetExcelFilter.xlsx");
workbook.Dispose();
Note: Before resetting the filter range, make sure to remove any existing auto filters. Skipping this step can result in hidden (filtered-out) rows being excluded from the new range, potentially causing data to be lost or missed.
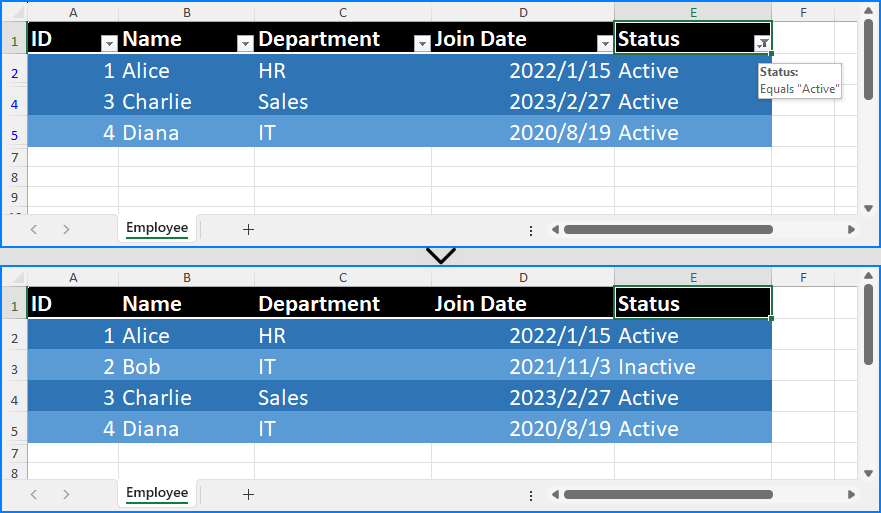
Excel Worksheet Before and After Removing a Specific Filter Column
Why Use Spire.XLS to Remove Filters?
- Fast & efficient: No need to open Excel files manually.
- Easy to integrate: Compatible with .NET Framework and .NET Core.
- No dependencies: Does not require Microsoft Office.
- Production-ready: Great for batch jobs and enterprise systems.
See Also: How to Add, Update, and Remove Excel Slicers in C#
Conclusion
Removing auto filters in Excel with Spire.XLS for .NET is quick and simple. Whether you're processing reports or resetting spreadsheets for clean data presentation, you can automate it easily using C#.
Frequently Asked Questions
- Q: How do you remove auto filters in Excel using C#?
Use the AutoFilters.Clear() method from Spire.XLS. It removes all filters from the specified worksheet in just one line of code.
- Q: What’s the easiest way to remove auto filters on Excel programmatically?
Using Spire.XLS for .NET, you can remove filters with a few lines of C# without opening Excel. It's fast, lightweight, and reliable.
- Q: Can I remove only specific filters instead of all of them?
In Excel (and Spire.XLS), auto filters must be applied to a continuous block of columns. You can’t directly remove a filter from just one column in the middle of a filtered range. To remove a specific filter, you need to clear all filters first using Worksheet.AutoFilters.Clear(), then reset the filter range using Worksheet.AutoFilters.Range to exclude the unwanted column.
- Q: Is there a free version of Spire.XLS for .NET?
Yes! We offer a free version – Free Spire.XLS for .NET, which is completely free to use and does not add watermarks to output files. It’s ideal for lightweight Excel processing.
If you want to evaluate the full feature set without any limitations, you can request a temporary license.
How to add table with filter in Excel
Auto Filter is the most convenient way to select the data we want from a large amount of the data in an excel data table. With the help of Spire.XLS for .NET, developers can use the method ListObjects to filter the data and format it as a table. This article will focus on show you how to add table with filter in Excel.
Step 1: Create an excel document and load the Excel from file:
Workbook workbook = new Workbook();
workbook.LoadFromFile("DataTable.xlsx");
Step 2: Gets the first worksheet in the Excel file
Worksheet sheet = workbook.Worksheets[0];
Step 3: Create a List Object named in Table
sheet.ListObjects.Create("Table", sheet.Range[1, 1, sheet.LastRow, sheet.LastColumn]);
Step 4: Set the BuiltInTableStyle for List object.
sheet.ListObjects[0].BuiltInTableStyle = TableBuiltInStyles.TableStyleLight9;
Step 5: Save the document to file.
workbook.SaveToFile("Filter.xlsx", ExcelVersion.Version2010);
Effective screenshot after the date has been auto filtered:
Full codes:
namespace Excelfilter
{
    class Program
    {
        static void Main(string[] args)
        {
            Workbook workbook = new Workbook();
            workbook.LoadFromFile("DataTable.xlsx");

            Worksheet sheet = workbook.Worksheets[0];

            sheet.ListObjects.Create("Table", sheet.Range[1, 1, sheet.LastRow, sheet.LastColumn]);

            sheet.ListObjects[0].BuiltInTableStyle = TableBuiltInStyles.TableStyleLight9;

            workbook.SaveToFile("Filter.xlsx", ExcelVersion.Version2010);
        }
    }
}
Update excel data via GridViewTable
Spire.XLS for .NET is a professional Excel component which enables developers/programmers to fast generate, read, write and modify Excel document for .NET. Spire.XLS for .NET doesn't need Microsoft Office Excel Automation. It allows user to operate Excel document directly such as save to stream, save as web response, copy, lock/unlock worksheet, set up workbook properties, etc. As a professional .NET Excel component, it also includes many useful features, for example, functionalities of importing data from Excel to dataTable and exporting dataTable to Excel from Database.
In this article introduces a method of updating excel data by dataTable via using sheet.ExportDataTable() method and sheet.InsertDataTable() method to import data from excel to dataTable and export dataTable to excel from Database.
The main steps of method are:
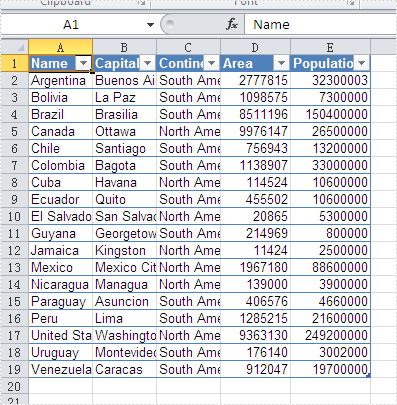
Step 1: Load the excel document and use sheet.ExportDataTable() method extract data to dataTable and show by dataGridView control.
private void Form1_Load(object sender, EventArgs e)
        {
            //load excel document to workbook
            workbook.LoadFromFile(@"DatatableSample.xls");
            Worksheet sheet = workbook.Worksheets[0];
            sheet.Name = "Original table";
            //extract data to dataTable from sheet
            DataTable dataTable = sheet.ExportDataTable();
            //show the data to dataGridView
            this.dataGridView.DataSource = dataTable;
        }
The effect screenshot:
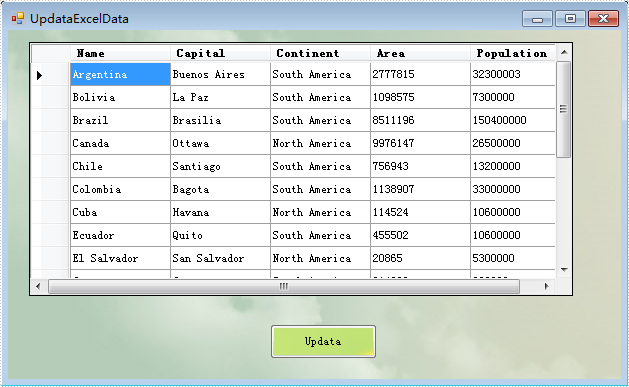
Step 2: Create a new sheet to save the updata data and use sheet.InsertDataTable() method to insert dataTable to the sheet.
            //create a new sheet to save Updata data.
            Worksheet sheet = workbook.CreateEmptySheet("Updata Table");
            //extract data from dataGridView
            DataTable dataTable = this.dataGridView.DataSource as DataTable;
            // insert dataTable to sheet
            sheet.InsertDataTable(dataTable, true, 1, 1);
Step 3: Save the result excel document.
workbook.SaveToFile("result.xlsx", ExcelVersion.Version2007);
The effect screenshot:

Download and install Spire.XLS for .NET and use below code to experience this method to update excel data by dataTable.
The full code:
using System;
using System.Data;
using System.Windows.Forms;
using Spire.Xls;
namespace UpdataExcelDataByDataTable
{

    public partial class UpdataExcelData : Form
    {
        private Workbook workbook = new Workbook();
        private void Form1_Load(object sender, EventArgs e)
        {
            workbook.LoadFromFile(@"DatatableSample.xls");
            Worksheet sheet = workbook.Worksheets[0];
            sheet.Name = "Original table";
            DataTable dataTable = sheet.ExportDataTable();
            this.dataGridView.DataSource = dataTable;
        }
        private void Updata_Click(object sender, EventArgs e)
        {
            Worksheet sheet = workbook.CreateEmptySheet("Updata Table");
            DataTable dataTable = this.dataGridView.DataSource as DataTable;
            sheet.InsertDataTable(dataTable, true, 1, 1);
            workbook.SaveToFile("result.xlsx", ExcelVersion.Version2007);
            System.Diagnostics.Process.Start("result.xlsx");
        }
    }
}
Imports System.Data
Imports System.Windows.Forms
Imports Spire.Xls
Public Class Form1
    Private workbook As New Workbook()
    Private Sub Form1_Load(sender As System.Object, e As System.EventArgs) Handles MyBase.Load
        'load excel document to workbook
        workbook.LoadFromFile("DatatableSample.xls")
        Dim sheet As Worksheet = workbook.Worksheets(0)
        sheet.Name = "Original table"
        'extract data to dataTable from sheet
        Dim dataTable As DataTable = sheet.ExportDataTable()
        'show the data to dataGridView
        Me.DataGridView.DataSource = dataTable
    End Sub
If you couldn't successfully use the Spire.Xls, please refer Spire.XLS Quick Start which can guide you quickly use the Spire.Xls.
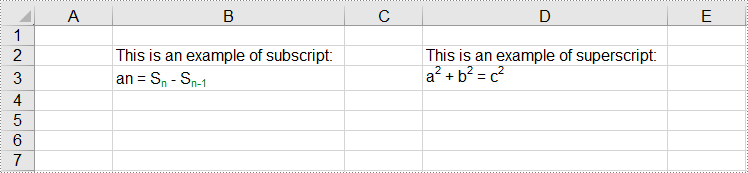
C#/VB.NET: Apply Superscript and Subscript in Excel
Superscript and subscript are formatting styles that allow you to display characters or numerals above or below the regular text baseline respectively. By utilizing these formatting styles, you can emphasize certain elements, denote exponents, powers, chemical formulas, or mathematical equations, and present data in a more visually appealing and informative manner. In this article, we will demonstrate how to apply superscript and subscript styles in Excel in C# and VB.NET using Spire.XLS for .NET.
Install Spire.XLS for .NET
To begin with, you need to add the DLL files included in the Spire.XLS for .NET package as references in your .NET project. The DLL files can be either downloaded from this link or installed via NuGet.
PM> Install-Package Spire.XLS
Apply Superscript and Subscript in Excel in C# and VB.NET
To apply the superscript or subscript style to specific characters in a cell, you need to create a custom font, enable the superscript or subscript property of the font, and then assign the custom font to the specific characters within the cell. The detailed steps are as follows:
- Create a Workbook object.
- Get a specific worksheet using Workbook.Worksheets[int index] property.
- Get a specific cell using Worksheet.Range[string name] property and add rich text to the cell using CellRange.RichText.Text property.
- Create a custom font using Workbook.CreateFont() method.
- Enable the subscript property of the font by setting ExcelFont.IsSubscript property to true.
- Assign the custom font to specific characters of the rich text in the cell using CellRange.RichText.SetFont() method.
- Get a specific cell using Worksheet.Range[string name] property and add rich text to the cell using CellRange.RichText.Text property.
- Create a custom font using Workbook.CreateFont() method.
- Enable the superscript property of the font by setting ExcelFont.IsSuperscript property to true.
- Assign the custom font to specific characters of the rich text in the cell using CellRange.RichText.SetFont() method.
- Save the result file using Workbook.SaveToFile() method.
- C#
- VB.NET
using Spire.Xls;
using System.Drawing;

namespace ApplySuperscriptAndSubscript
{
    internal class Program
    {
        static void Main(string[] args)
        {
            //Create a Workbook object
            Workbook workbook = new Workbook();

            //Get the first worksheet
            Worksheet sheet = workbook.Worksheets[0];

            //Add text to specific cells
            sheet.Range["B2"].Text = "This is an example of subscript:";
            sheet.Range["D2"].Text = "This is an example of superscript:";

            //Add rich text to a specific cell
            CellRange range = sheet.Range["B3"];
            range.RichText.Text = "an = Sn - Sn-1";

            //Create a custom font
            ExcelFont font = workbook.CreateFont();
            //Enable the subscript property of the font
            font.IsSubscript = true;
            //Set font color
            font.Color = Color.Green;
            //Assign the font to specific characters of the rich text in the cell
            range.RichText.SetFont(6, 6, font);
            range.RichText.SetFont(11, 13, font);

            //Add rich text to a specific cell
            range = sheet.Range["D3"];
            range.RichText.Text = "a2 + b2 = c2";

            //Create a custom font
            font = workbook.CreateFont();
            //Enable the superscript property of the font
            font.IsSuperscript = true;
            //Assign the font to specific characters of the rich text in the cell
            range.RichText.SetFont(1, 1, font);
            range.RichText.SetFont(6, 6, font);
            range.RichText.SetFont(11, 11, font);

            //Auto-fit column widths
            sheet.AllocatedRange.AutoFitColumns();

            //Save the result file
            workbook.SaveToFile("ApplySubscriptAndSuperscript.xlsx", ExcelVersion.Version2013);
            workbook.Dispose();
        }
    }
}
Apply for a Temporary License
If you'd like to remove the evaluation message from the generated documents, or to get rid of the function limitations, please request a 30-day trial license for yourself.
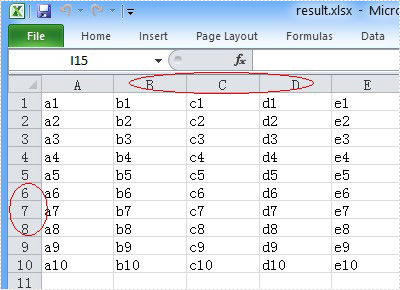
Unhide the Excel Row and Column in C#
You can hide the Excel row or column by using the c# code, but a row or column also becomes hidden when you want to show the full Excel worksheet. You can unhide the Excel row and column by using the c# code. This article aims at introducing the method sheet.ShowRow and sheet.ShowColumn in the Excel .NET component Spire.Xls to show the hidden row and column.
First, let’s preview the hidden row and column.

Here comes to the steps of the process.
Step 1: Create an instance of Spire.XLS.Workbook.
Workbook workbook = new Workbook();
Step 2: Load the existing Excel file that hidden the row and column in the specified path.
workbook.LoadFromFile("hide.xlsx");
Step 3: Get the first worksheet of the Excel file.
Worksheet sheet = workbook.Worksheets[0];
Step 4: Unhide the hidden row and column.
sheet.ShowRow(7);
sheet.ShowColumn(3);
Step 5: Generate the new Excel file.
workbook.SaveToFile("result.xlsx", ExcelVersion.Version2010);
Now let's preview the effect screenshot.
Here is the full code.
using Spire.Xls;
namespace UnhideExcelRow
{
    class Program
    {
        static void Main(string[] args)
        {
            Workbook workbook = new Workbook();
            workbook.LoadFromFile("hide.xlsx");
            Worksheet sheet = workbook.Worksheets[0];
            // unhide the hidden row and column of the worksheet.
            sheet.ShowRow(7);
            sheet.ShowColumn(3);
            workbook.SaveToFile("result.xlsx", ExcelVersion.Version2010);
        }
    }
}