C#/VB.NET: Set Text Alignment and Orientation in Excel
Text alignment and orientation are essential formatting features in Excel that allow you to position and orient text within cells according to your specific needs. By adjusting text alignment and orientation, you can enhance the readability and aesthetics of your spreadsheet. In this article, we will explain how to set text alignment and orientation in Excel in C# and VB.NET using Spire.XLS for .NET.
Install Spire.XLS for .NET
To begin with, you need to add the DLL files included in the Spire.XLS for.NET package as references in your .NET project. The DLL files can be either downloaded from this link or installed via NuGet.
PM> Install-Package Spire.XLS
Set Text Alignment and Orientation in Excel in C# and VB.NET
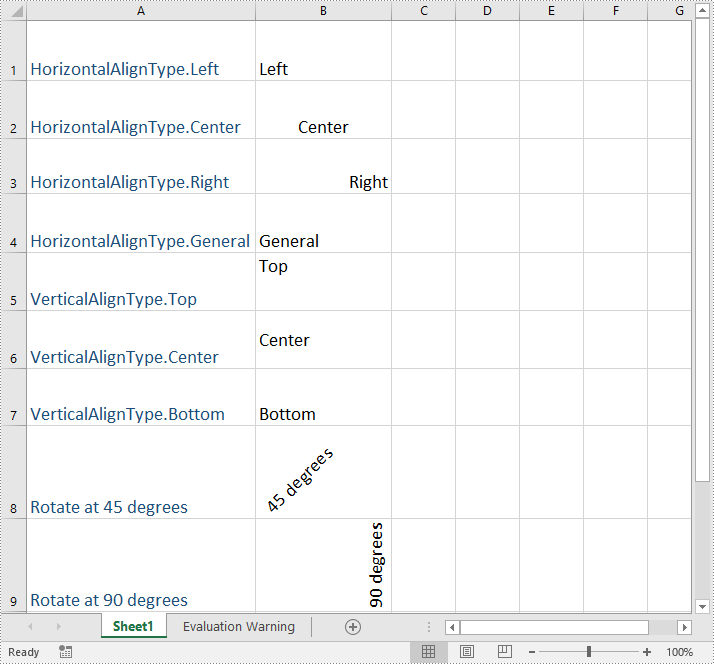
You can set the horizontal or vertical alignment of text in individual cells or a range of cells using the CellRange.Style.HorizontalAlignment or CellRange.Style.VerticalAlignment properties. In addition, you are also able to change the orientation of text by assigning a rotation value to the corresponding cell or cells using the CellRange.Style.Rotation property. The detailed steps are as follows:
- Create a Workbook object.
- Load an Excel file using Workbook.LoadFromFile() method.
- Get a specific worksheet using Workbook.Worksheets[int index] property.
- Access specific cells in the worksheet using Worksheet.Range[string name] property and then set the horizontal alignment of text in them using CellRange.Style.HorizontalAlignment property.
- Access specific cells in the worksheet using Worksheet.Range[string name] property and then set the vertical alignment of text in them using CellRange.Style.VerticalAlignment property.
- Access specific cells in the worksheet using Worksheet.Range[string name] property and then change their text orientation using CellRange.Style.Rotation property.
- Save the result file using Workbook.SaveToFile() method.
- C#
- VB.NET
using Spire.Xls;

namespace TextAlignmentAndRotation
{
    internal class Program
    {
        static void Main(string[] args)
        {
            //Create a Workbook object
            Workbook workbook = new Workbook();

            //Load an Excel file
            workbook.LoadFromFile(@"Sample.xlsx");

            //Get the first worksheet
            Worksheet sheet = workbook.Worksheets[0];

            //Set the horizontal alignment for text in a specific cell to Left
            sheet.Range["B1"].Style.HorizontalAlignment = HorizontalAlignType.Left;

            //Set the horizontal alignment for text in a specific cell to Center
            sheet.Range["B2"].Style.HorizontalAlignment = HorizontalAlignType.Center;

            //Set the horizontal alignment for text in a specific cell to Right
            sheet.Range["B3"].Style.HorizontalAlignment = HorizontalAlignType.Right;

            //Set the horizontal alignment for text in a specific cell to General
            sheet.Range["B4"].Style.HorizontalAlignment = HorizontalAlignType.General;

            //Set the vertical alignment for text in a specific cell to Top
            sheet.Range["B5"].Style.VerticalAlignment = VerticalAlignType.Top;

            //Set the vertical alignment for text in a specific cell to Center
            sheet.Range["B6"].Style.VerticalAlignment = VerticalAlignType.Center;

            //Set the vertical alignment for text in a specific cell to Bottom
            sheet.Range["B7"].Style.VerticalAlignment = VerticalAlignType.Bottom;

            //Change the text orientation in specific cells by assigning a rotation value
            sheet.Range["B8"].Style.Rotation = 45;
            sheet.Range["B9"].Style.Rotation = 90;

            //Set the row height for specific cells
            sheet.Range["B8:C9"].RowHeight = 70;

            //Save the result file
            workbook.SaveToFile("TextAlignmentAndOrientation.xlsx", ExcelVersion.Version2016);
            workbook.Dispose();
        }
    }
}
Apply for a Temporary License
If you'd like to remove the evaluation message from the generated documents, or to get rid of the function limitations, please request a 30-day trial license for yourself.
How to Ungroup Excel Cells in C#
Group the Excel cells is to tie a range of cells together so that they can be collapsed or expanded. But usually, we also need to ungroup the Excel cells. Consequently, the articles aims at introducing how to ungroup Excel cells in C#, through a professional Excel .NET Component Spire.Xls.
Just as its name implies, ungroup Excel cells is to ungroup a range of cells that were previously grouped. Before ungroup Excel cells, we should complete the preparatory work:
- Download the Spire.XLS and install it on your machine.
- Add the Spire.XLS.dll files as reference.
- Open bin folder and select the three dll files under .NET 4.0.
- Right click property and select properties in its menu.
- Set the target framework as .NET 4.
- Add Spire.XLS as namespace.
Then here comes to the explanation of the code:
Step 1: Create an instance of Spire.XLS.Workbook.
Workbook workbook = new Workbook();
Step 2: Load the file base on a specified file path.
workbook.LoadFromFile(@"group.xlsx");
Step 3: Get the first worksheet.
Worksheet sheet = workbook.Worksheets[0];
Step 4: Ungroup the first 5 row cells.
sheet.UngroupByRows(1, 5);
Step 5: Save as the generated file.
workbook.SaveToFile(@"result.xlsx", ExcelVersion.Version2010);
Full code:
using Spire.Xls;
namespace UngroupCell
{
    class Program
    {

        static void Main(string[] args)
        {

            Workbook workbook = new Workbook();
            workbook.LoadFromFile(@"group.xlsx");
            Worksheet sheet = workbook.Worksheets[0];
            sheet.UngroupByRows(1, 5);
            workbook.SaveToFile(@"..\..\result.xlsx", ExcelVersion.Version2010);

        }
    }
}
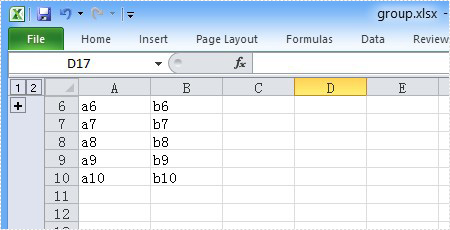
Please preview the original group effect screenshot:
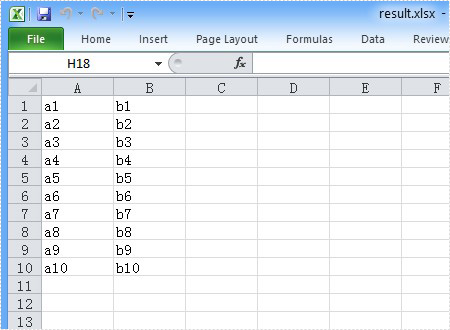
And the generated ungroup effect screenshot:
C#/VB.NET: Find and Highlight Data in Excel
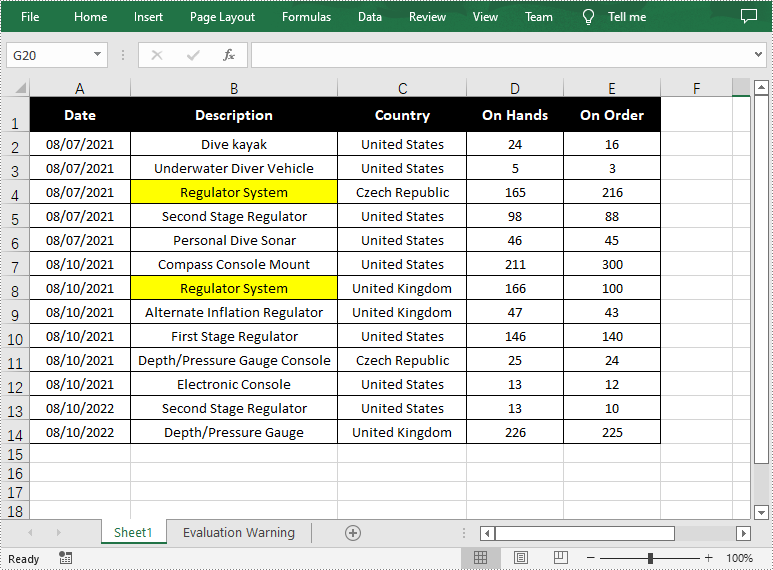
The Find function in Excel is one of the most commonly used functions for quickly locating specified data, and users can also highlight the data to make it more obvious. In this article, you will learn how to programmatically find and highlight cells with a specific value using Spire.XLS for .NET.
Install Spire.XLS for .NET
To begin with, you need to add the DLL files included in the Spire.XLS for .NET package as references in your .NET project. The DLL files can be either downloaded from this link or installed via NuGet.
PM> Install-Package Spire.XLS
Find and Highlight Data in Excel
The detailed steps are as follows.
- Create a Workbook instance.
- Load a sample Excel file using Workbook.LoadFromFile() method.
- Get a specified worksheet using Workbook.Worksheets[sheetIndex] property.
- Find all cells with matching text using Worksheet.FindAllString(string stringValue, bool formula, bool formulaValue) method.
- Set color to highlight the cells using CellRange.Style.Color property.
- Save the result file using Workbook.SaveToFile() method.
- C#
- VB.NET
using Spire.Xls;
using System.Drawing;

namespace FindHighlight
{
    class Program
    {
        static void Main(string[] args)
        {
            //Create a Workbook instance
            Workbook workbook = new Workbook();

            //Load a sample Excel file
            workbook.LoadFromFile("Test.xlsx");

            //Get the first worksheet
            Worksheet sheet = workbook.Worksheets[0];

            //Find all cells with the text "Regulator System"
            foreach (CellRange range in sheet.FindAllString("Regulator System", true, true))
            {
                //Set color to highlight the cells
                range.Style.Color = Color.Yellow;
            }

            //Save the result file
            workbook.SaveToFile("FindHighlight.xlsx", ExcelVersion.Version2016);
        }
    }
}
Apply for a Temporary License
If you'd like to remove the evaluation message from the generated documents, or to get rid of the function limitations, please request a 30-day trial license for yourself.
C#/VB.NET: Find and Replace Data in Excel
Excel's Find and Replace feature is an indispensable tool for users when editing large Excel spreadsheets. It allows users to search for specific values within a worksheet or cell range and update them with new values quickly and accurately. With this feature, users don't need to perform manual searches, which significantly improves their working efficiency. In this article, we will introduce how to programmatically find and replace data in Excel in C# and VB.NET using Spire.XLS for .NET library.
- Find and Replace Data in a Worksheet in Excel
- Find and Replace Data in a Specific Cell Range in Excel
Install Spire.XLS for .NET
To begin with, you need to add the DLL files included in the Spire.XLS for .NET package as references in your .NET project. The DLL files can be either downloaded from this link or installed via NuGet.
PM> Install-Package Spire.XLS
Find and Replace Data in a Worksheet in Excel in C# and VB.NET
Spire.XLS for .NET offers the Worksheet.FindAllString(string stringValue, bool formula, bool formulaValue) method which enables you to find the cells containing specific data values in an Excel worksheet. Once the cells are found, you can use the CellRange.Text property to update their values with new values. The detailed steps are as follows:
- Initialize an instance of the Workbook class.
- Load an Excel file using the Workbook.LoadFromFile(string fileName) method.
- Get a specific worksheet of the file using the Workbook.Worksheets[int index] property.
- Find the cells containing a specific value in the worksheet using the Worksheet.FindAllString(string stringValue, bool formula, bool formulaValue) method.
- Iterate through the found cells.
- Update the value of each cell with another value using the CellRange.Text property.
- Set a background for the cell so you can easily find the updated cells using the CellRange.Style.Color property.
- Save the result file to a specific location using the Workbook.SaveToFile(string fileName, ExcelVersion version) method.
- C#
- VB.NET
using Spire.Xls;
using System.Drawing;
namespace ReplaceDataInWorksheet
{
internal class Program
{
static void Main(string[] args)
{
//Initialize an instance of the Workbook class
Workbook workbook = new Workbook();
//Load an Excel file
workbook.LoadFromFile(@"Sample.xlsx");
//Get the first worksheet
Worksheet worksheet = workbook.Worksheets[0];
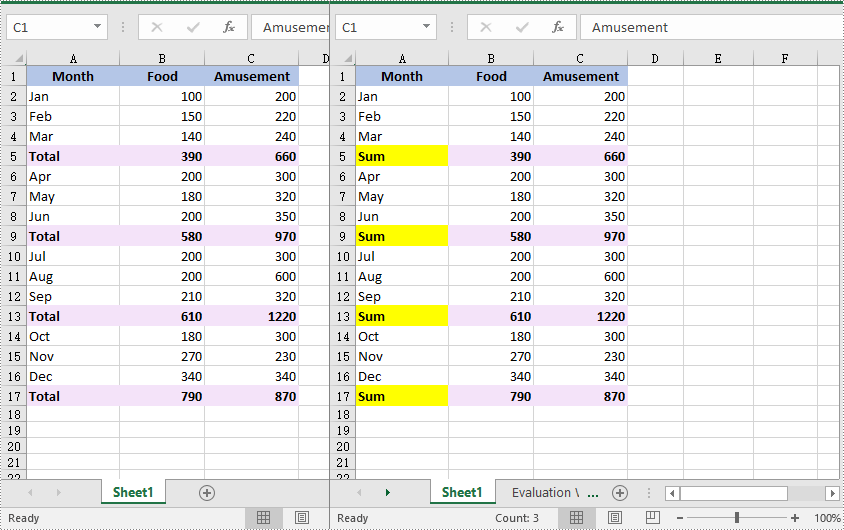
//Find the cells with the specific string value “Total” in the worksheet
CellRange[] cells = worksheet.FindAllString("Total", true, true);
//Iterate through the found cells
foreach (CellRange cell in cells)
{
//Replace the value of the cell with another value
cell.Text = "Sum";
//Set a background color for the cell
cell.Style.Color = Color.Yellow;
}
//Save the result file to a specific location
workbook.SaveToFile("ReplaceDataInWorksheet.xlsx", ExcelVersion.Version2016);
workbook.Dispose();
}
}
}
Find and Replace Data in a Specific Cell Range in Excel in C# and VB.NET
You can find the cells containing a specific value in a cell range using the CellRange.FindAllString(string stringValue, bool formula, bool formulaValue) method. Then you can update the value of each found cell with another value using the CellRange.Text property. The detailed steps are as follows:
- Initialize an instance of the Workbook class.
- Load an Excel file using the Workbook.LoadFromFile(string fileName) method.
- Get a specific worksheet of the file using the Workbook.Worksheets[int index] property.
- Get a specific cell range of the worksheet using the Worksheet.Range[string rangeName] property.
- Find the cells with a specific value in the cell range using the CellRange.FindAllString(string stringValue, bool formula, bool formulaValue) method.
- Iterate through the found cells.
- Update the value of each found cell to another value using the CellRange.Text property.
- Set a background for the cell so you can easily find the updated cells using the CellRange.Style.Color property.
- Save the result file to a specific location using the Workbook.SaveToFile(string fileName, ExcelVersion version) method.
- C#
- VB.NET
using Spire.Xls;
using System.Drawing;

namespace ReplaceDataInCellRange
{
    internal class Program
    {
        static void Main(string[] args)
        {
            //Initialize an instance of the Workbook class
            Workbook workbook = new Workbook();
            //Load an Excel file
            workbook.LoadFromFile(@"Sample.xlsx");

            //Get the first worksheet
            Worksheet worksheet = workbook.Worksheets[0];

            //Get a specific cell range
            CellRange range = worksheet.Range["A1:C9"];

            //Find the cells with the specific value "Total" in the cell range
            CellRange[] cells = range.FindAllString("Total", true, true);

            //Iterate through the found cells
            foreach (CellRange cell in cells)
            {
                //Replace the value of the cell with another value
                cell.Text = "Sum";
                //Set a background color for the cell
                cell.Style.Color = Color.Yellow;
            }

            //Save the result file to a specific location
            workbook.SaveToFile("ReplaceDataInCellRange.xlsx", ExcelVersion.Version2016);
            workbook.Dispose();
        }
    }
}

Apply for a Temporary License
If you'd like to remove the evaluation message from the generated documents, or to get rid of the function limitations, please request a 30-day trial license for yourself.
C#: Sort Data in Excel
Sorting data in Excel is a fundamental skill that enhances data organization and analysis. By rearranging rows based on specific criteria—such as alphabetical order, numerical value, or date—users can easily identify trends, patterns, and outliers. In this article, you will learn how to sort data in Excel using C# with Spire.XLS for .NET.
Install Spire.XLS for .NET
To begin with, you need to add the DLL files included in the Spire.XLS for .NET package as references in your .NET project. The DLL files can be either downloaded from this link or installed via NuGet.
PM> Install-Package Spire.XLS
Sort a Single Column in Excel in C#
Sorting a single column in Excel enables quick organization of your data in ascending or descending order for easier analysis. However, this method leaves other columns unchanged, potentially leading to misalignment of related data.
Spire.XLS for .NET provides the Workbook.DataSorter.SortColumns.Add(int key, SortComparisonType sortComparisonType, OrderBy orderBy) method. This method enables developers to set sorting criteria by selecting a specific column, defining the comparison type, and specifying the sort order (ascending or descending). To apply the sorting to the defined range, use the Workbook.DataSorter.Sort(CellRange range) method.
Here are the steps to sort a single column in Excel using C#:
- Create a Workbook object.
- Load an Excel file using the Workbook.LoadFromFile() method.
- Get a specific worksheet using the Workbook.Worksheets[index] property.
- Get the column where you want to sort data using the Worksheet.Range property.
- Create sorting criteria for the selected column using the Workbook.DataSorter.SortColumns.Add() method.
- Execute sorting within the column using the Workbook.DataSorter.Sort() method.
- Save the workbook to a different Excel file.
- C#
using Spire.Xls;
namespace SortSingleColumn
{
class Program
{
static void Main(string[] args)
{
// Create a Workbook object
Workbook workbook = new Workbook();
// Load an Excel file
workbook.LoadFromFile("C:\\Users\\Administrator\\Desktop\\Input.xlsx");
// Get a specific worksheet
Worksheet sheet = workbook.Worksheets[0];
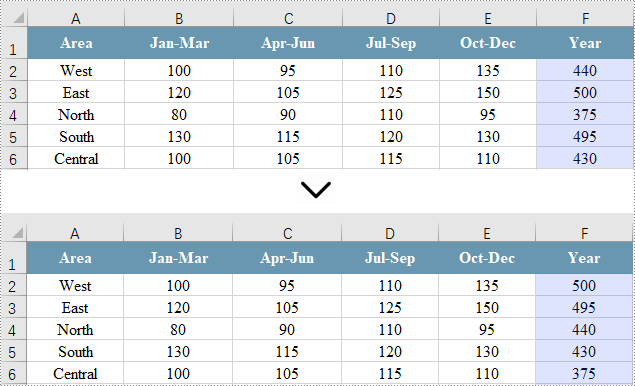
// Get the cell range (a single column) where you want to sort data
CellRange cellRange = sheet.Range["F1:F6"];
// Sort values in the specified column in descending order
workbook.DataSorter.SortColumns.Add(5, SortComparsionType.Values, OrderBy.Descending);
// Sort in the specified cell range
workbook.DataSorter.Sort(cellRange);
// Save the workbook
workbook.SaveToFile("SortSingleColumn.xlsx", ExcelVersion.Version2013);
// Dispose resources
workbook.Dispose();
}
}
}
Sort Multiple Columns in Excel in C#
Sorting data across multiple columns ensures that all related data across the selected columns remains aligned and meaningful, which is useful for complex datasets where relationships between data points matter.
Sorting data across multiple columns is similar to sorting a single column. The main difference lies in the CellRange parameter used in Workbook.DataSorter.Sort(CellRange range), which specifies multiple columns instead of just one.
Here are the steps to sort multiple column in Excel using C#:
- Create a Workbook object.
- Load an Excel file using the Workbook.LoadFromFile() method.
- Get a specific worksheet using the Workbook.Worksheets[index] property.
- Get the cell range (columns) where you want to sort data using the Worksheet.Range property.
- Create sorting criteria for the selected column using the Workbook.DataSorter.SortColumns.Add() method.
- Execute sorting within the range using the Workbook.DataSorter.Sort() method.
- Save the workbook to a different Excel file.
- C#
using Spire.Xls;
namespace SortMultipleColumns
{
class Program
{
static void Main(string[] args)
{
// Create a new workbook
Workbook workbook = new Workbook();
// Load an Excel file
workbook.LoadFromFile("C:\\Users\\Administrator\\Desktop\\Input.xlsx");
// Get a specific worksheet
Worksheet sheet = workbook.Worksheets[0];
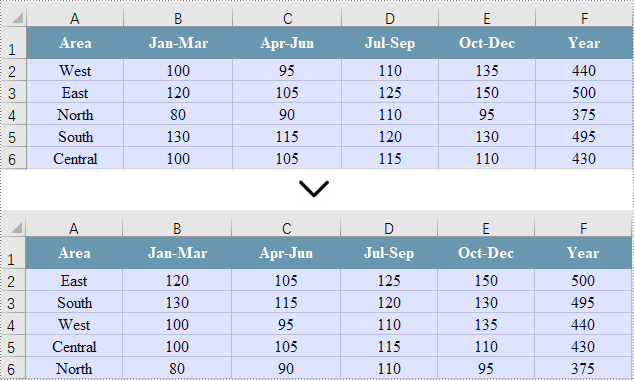
// Get the cell range (multiple columns) where you want to sort data
CellRange cellRange = sheet.Range["A1:F6"];
// Sort values in the specified column in descending order
workbook.DataSorter.SortColumns.Add(5, SortComparsionType.Values, OrderBy.Descending);
// Sort in the specified cell range
workbook.DataSorter.Sort(cellRange);
// Save the workbook
workbook.SaveToFile("SortMultipleColumns.xlsx", ExcelVersion.Version2013);
// Dispose resources
workbook.Dispose();
}
}
}
Sort by a Custom List in C#
Sorting by a custom list in Excel allows you to arrange data based on specific, non-alphabetical criteria tailored to your needs, ensuring the order is meaningful for your analysis or reporting.
To accomplish this, create an array of strings that defines the custom sorting order. Next, set the sorting criteria using the Workbook.DataSorter.SortColumns.Add(int key, OrderBy orderBy) method. Finally, invoke the Workbook.DataSorter.Sort(CellRange range) method to sort the specified cell range.
Here are the steps to sort data by a custom list in Excel using C#:
- Create a Workbook object.
- Load an Excel file using the Workbook.LoadFromFile() method.
- Get a specific worksheet using the Workbook.Worksheets[index] property.
- Get the cell range where you want to sort data using the Worksheet.Range property.
- Define the custom sorting order with an array of strings.
- Create sorting criteria for the selected column using the Workbook.DataSorter.SortColumns.Add() method.
- Execute sorting within the range using the Workbook.DataSorter.Sort() method.
- Save the workbook to a different Excel file.
- C#
using Spire.Xls;
namespace SortMultipleColumns
{
class Program
{
static void Main(string[] args)
{
// Create a new workbook
Workbook workbook = new Workbook();
// Load an Excel file
workbook.LoadFromFile("C:\\Users\\Administrator\\Desktop\\Input.xlsx");
// Get a specific worksheet
Worksheet sheet = workbook.Worksheets[0];
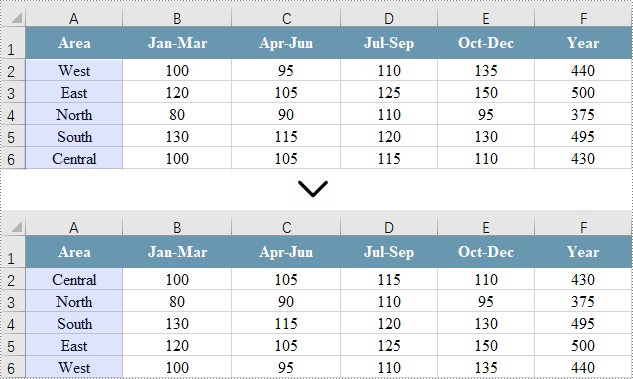
// Get the cell range where you want to sort data
CellRange cellRange = sheet.Range["A1:F6"];
String[] customList = { "Central", "North", "South", "East", "West" };
// Sort a specified column using the custom list
workbook.DataSorter.SortColumns.Add(0, customList);
// Sort in the specified cell range
workbook.DataSorter.Sort(cellRange);
// Save the workbook
workbook.SaveToFile("SortByCustomList.xlsx", ExcelVersion.Version2013);
// Dispose resources
workbook.Dispose();
}
}
}
Apply for a Temporary License
If you'd like to remove the evaluation message from the generated documents, or to get rid of the function limitations, please request a 30-day trial license for yourself.
C#/VB.NET: Wrap or Unwrap Text in Excel Cells
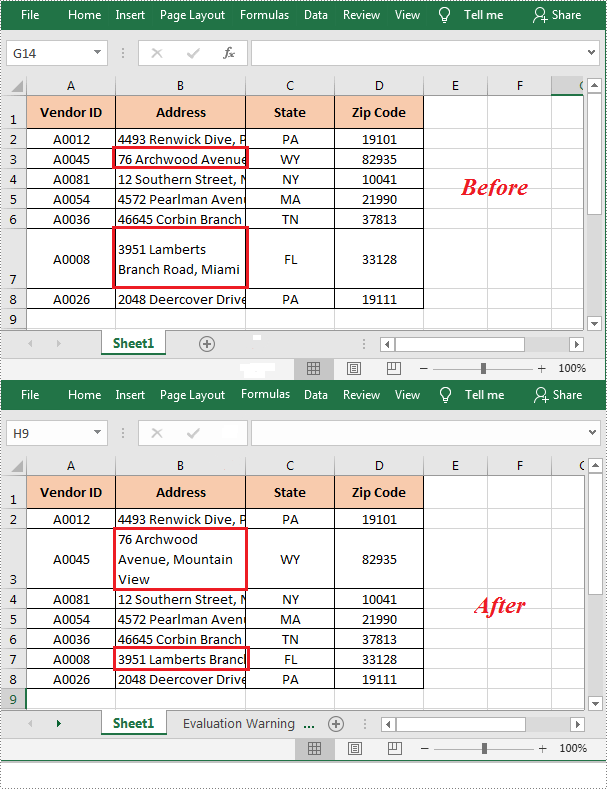
In Excel, the content of a cell may look incomplete when it exceeds the length of the cell. Under the circumstance, you can apply wrap text in the cell to ensure that all content can be viewed at once. This article will demonstrate how to programmatically wrap or unwrap text in Excel cells using Spire.XLS for .NET.
Install Spire.XLS for .NET
To begin with, you need to add the DLL files included in the Spire.XLS for .NET package as references in your .NET project. The DLL files can be either downloaded from this link or installed via NuGet.
PM> Install-Package Spire.XLS
Wrap or Unwrap Text in Excel Cells
The detailed steps are as follows.
- Create a Workbook object.
- Load a sample Excel file using Workbook.LoadFromFile() method.
- Get a specified worksheet using Workbook.Worksheets[] property.
- Get a specified cell using Worksheet.Range[] property.
- Get the style of the specified cell using CellRange.Style property.
- Wrap text in the specified cell by setting the CellStyle.WrapText property to true. Or set the property to false to unwrap text in the specified cell.
- Save the result file using Workbook.SaveToFile() method.
- C#
- VB.NET
using Spire.Xls;

namespace WrapText
{
    class Program
    {
        static void Main(string[] args)
        {
            //Create a Workbook object
            Workbook workbook = new Workbook();

            //Load a sample Excel file
            workbook.LoadFromFile(@"D:\Files\sample.xlsx");

            //Get the first worksheet
            Worksheet sheet = workbook.Worksheets[0];

            //Wrap text in cell B3
            sheet.Range["B3"].Style.WrapText = true;

            //Unwrap text in cell B7
            sheet.Range["B7"].Style.WrapText = false;

            //Save the result file
            workbook.SaveToFile("WarpText.xlsx", ExcelVersion.Version2010);
        }
    }
}
Apply for a Temporary License
If you'd like to remove the evaluation message from the generated documents, or to get rid of the function limitations, please request a 30-day trial license for yourself.
C#: Edit Excel Documents (Without Interop)
In today's digital age, managing and manipulating Excel files programmatically has become an essential skill for developers. Whether you're building a reporting tool, automating data processing, or enhancing your applications with dynamic data handling, having a robust library at your disposal can make all the difference. Enter Spire.XLS for .NET - a versatile and powerful library that allows you to create, read, write, and edit Excel files seamlessly using C#.
In this article, you will learn how to edit Excel documents effortlessly using C# and Spire.XLS for .NET.
- Read and Write Excel Files in C#
- Apply Styles and Formats to Excel Cells in C#
- Find and Replace Text in Excel in C#
- Add Formulas and Charts to Excel in C#
Install Spire.XLS for .NET
To begin with, you need to add the DLL files included in the Spire.XLS for .NET package as references in your .NET project. The DLL files can be either downloaded from this link or installed via NuGet.
PM> Install-Package Spire.XLS
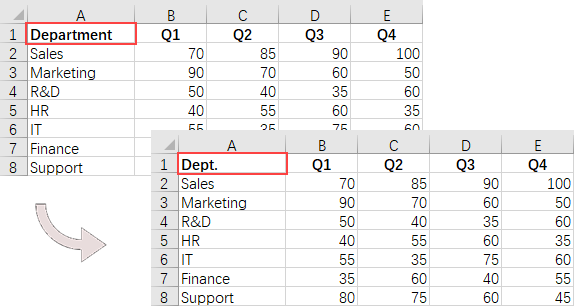
Read and Write Excel Files in C#
One of the most common tasks when working with Excel files in C# is reading and writing data. Spire.XLS for .NET provides the CellRange.Value property, enabling developers to easily retrieve or assign values to individual cells.
The step to read and write an Excel file using C# are as follows:
- Create a Workbook object.
- Load an Excel file from a given file path.
- Get a specific worksheet using the Workbook.Worksheets[] property.
- Get a specific cell using the Worksheet.Range[] property
- Get or set the cell value using the CellRange.Value property.
- Save the workbook to a different Excel file.
- C#
using Spire.Xls;

namespace ReadAndWriteExcel
{
    class Program
    {
        static void Main(string[] args)
        {
            // Create a Workbook object
            Workbook workbook = new Workbook();

            // Load an Excel file
            workbook.LoadFromFile("C:\\Users\\Administrator\\Desktop\\Sample.xlsx");

            // Get a specific worksheet
            Worksheet worksheet = workbook.Worksheets[0];

            // Get a specific cell
            CellRange cell = worksheet.Range["A1"];

            // Read the cell value
            String text = cell.Value;

            // Determine if the cell value is "Department"
            if (text == "Department")
            {
                // Update the cell value
                cell.Value = "Dept.";
            }

            // Save the workbook to a different
            workbook.SaveToFile("ModifyExcel.xlsx", ExcelVersion.Version2016);

            // Dispose resources
            workbook.Dispose();
        }
    }
}
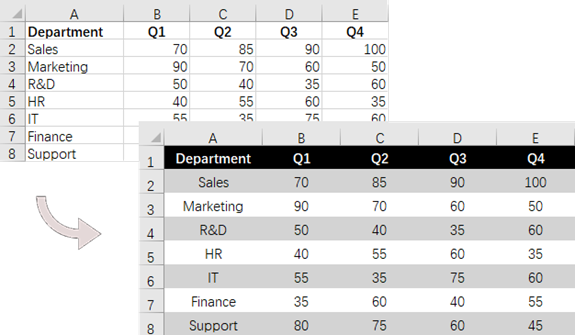
Apply Styles and Formats to Excel Cells in C#
Styling and formatting Excel documents is an important aspect of creating professional-looking reports. Spire.XLS for .NET offers a variety of APIs within the CellRange class for managing cell styles, fonts, colors, and alignments, as well as adjusting row heights and column widths.
The steps to apply styles and formats to Excel cells are as follows:
- Create a Workbook object.
- Load an Excel file from a given file path.
- Get a specific worksheet using the Workbook.Worksheets[] property.
- Get all located range using the Worksheet.AllocatedRange property.
- Get a specific row using the CellRange.Rows[] property, and set the cell color, text color, text alignment, and row height using the properties under the CellRange object.
- Get a specific column using the CellRange.Columns[] property, and set the column width using the ColumnWidth property under the CellRange object.
- Save the workbook to a different Excel file.
- C#
using Spire.Xls;
using System.Drawing;

namespace FormatCells
{
    class Program
    {
        static void Main(string[] args)
        {
            // Create a Workbook object
            Workbook workbook = new Workbook();

            // Load an Excel file
            workbook.LoadFromFile("C:\\Users\\Administrator\\Desktop\\Sample.xlsx");

            // Get a specific worksheet
            Worksheet worksheet = workbook.Worksheets[0];

            // Get all located range from the worksheet
            CellRange allocatedRange = worksheet.AllocatedRange;

            // Iterate through the rows
            for (int rowNum = 0; rowNum < allocatedRange.RowCount; rowNum++)
            {
                if(rowNum == 0)
                {
                    // Apply cell color to the header row
                    allocatedRange.Rows[rowNum].Style.Color = Color.Black;

                    // Change the font color of the header row
                    allocatedRange.Rows[rowNum].Style.Font.Color = Color.White;
                }

                // Apply alternate colors to other rows
                else if (rowNum % 2 == 1)
                {
                    allocatedRange.Rows[rowNum].Style.Color = Color.LightGray;
                }
                else if (rowNum % 2 == 0)
                {
                    allocatedRange.Rows[rowNum].Style.Color = Color.White;
                }

                // Align text to center
                allocatedRange.Rows[rowNum].HorizontalAlignment = HorizontalAlignType.Center;
                allocatedRange.Rows[rowNum].VerticalAlignment = VerticalAlignType.Center;

                // Set the row height
                allocatedRange.Rows[rowNum].RowHeight = 20;
            }

            // Iterate through the columns
            for (int columnNum = 0; columnNum < allocatedRange.ColumnCount; columnNum++)
            {
                // Set the column width
                if (columnNum > 0)
                {
                    allocatedRange.Columns[columnNum].ColumnWidth = 10;
                }
            }

            // Save the workbook to a different
            workbook.SaveToFile("FormatExcel.xlsx", ExcelVersion.Version2016);

            // Dispose resources
            workbook.Dispose();
        }
    }
}
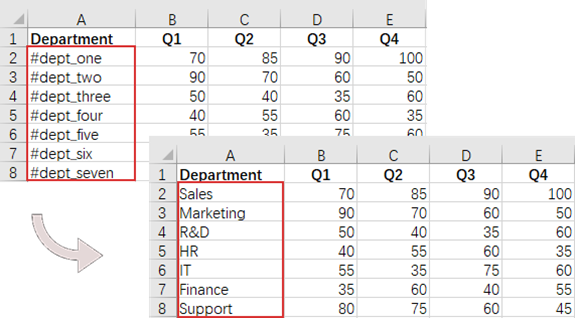
Find and Replace Text in Excel in C#
The find and replace feature in Excel enhances data accuracy and consistency while significantly improving efficiency. With Spire.XLS for .NET, you can easily locate a cell containing a specific string using the Worksheet.FindString() method and then update the cell value with the CellRange.Value property.
The steps to find and replace text in Excel using C# are as follows:
- Create a Workbook object.
- Load an Excel file from a given file path.
- Get a specific worksheet using the Workbook.Worksheets[] property.
- Find the cell that contains a specified string using the Worksheet.FindString() method.
- Update the cell value using the CellRange.Value property.
- Save the workbook to a different Excel file.
- C#
using Spire.Xls;

namespace FindAndReplaceText
{
    class Program
    {
        static void Main(string[] args)
        {
            // Create a Workbook object
            Workbook workbook = new Workbook();

            // Load an Excel file
            workbook.LoadFromFile("C:\\Users\\Administrator\\Desktop\\Sample.xlsx");

            // Get a specific worksheet
            Worksheet worksheet = workbook.Worksheets[0];

            // Define an array of department names for replacement
            String[] departments = new String[] { "Sales", "Marketing", "R&D", "HR", "IT", "Finance", "Support" };

            // Define an array of placeholders that will be replaced in the Excel sheet
            String[] placeholders = new String[] { "#dept_one", "#dept_two", "#dept_three", "#dept_four", "#dept_five", "#dept_six", "#dept_seven" };

            // Iterate through the placeholder strings
            for (int i = 0; i < placeholders.Length; i++)
            {
                // Find the cell containing the current placeholder string
                CellRange cell = worksheet.FindString(placeholders[i], false, false);

                // Replace the text in the found cell with the corresponding department name
                cell.Text = departments[i];
            }

            // Save the workbook to a different
            workbook.SaveToFile("ReplaceText.xlsx", ExcelVersion.Version2016);

            // Dispose resources
            workbook.Dispose();
        }
    }
}
Add Formulas and Charts to Excel in C#
In addition to basic file operations, Spire.XLS for .NET provides a variety of advanced techniques for working with Excel files. These techniques can be used to automate complex tasks, perform calculations, and generate dynamic reports.
The following are the steps to add formulas and create a chart in Excel using C#:
- Create a Workbook object.
- Load an Excel file from a given file path.
- Get a specific worksheet using the Workbook.Worksheets[] property.
- Get a specific cell using the Worksheet.Range[] property.
- Add a formula to the cell using the CellRange.Formula property.
- Add a column chart to the worksheet using the Worksheet.Charts.Add() method.
- Set the chart data range, position, title and other attributes using the methods and properties under the Chart object.
- Save the workbook to a different Excel file.
- C#
using Spire.Xls;
namespace AddFormulaAndChart
{
class Program
{
static void Main(string[] args)
{
// Create a Workbook object
Workbook workbook = new Workbook();
// Load an Excel file
workbook.LoadFromFile("C:\\Users\\Administrator\\Desktop\\Sample.xlsx");
// Get a specific worksheet
Worksheet worksheet = workbook.Worksheets[0];
// Get all located range
CellRange allocatedRange = worksheet.AllocatedRange;
// Iterate through the rows
for (int rowNum = 0; rowNum < allocatedRange.RowCount; rowNum++)
{
if (rowNum == 0)
{
// Write text in the cell F1
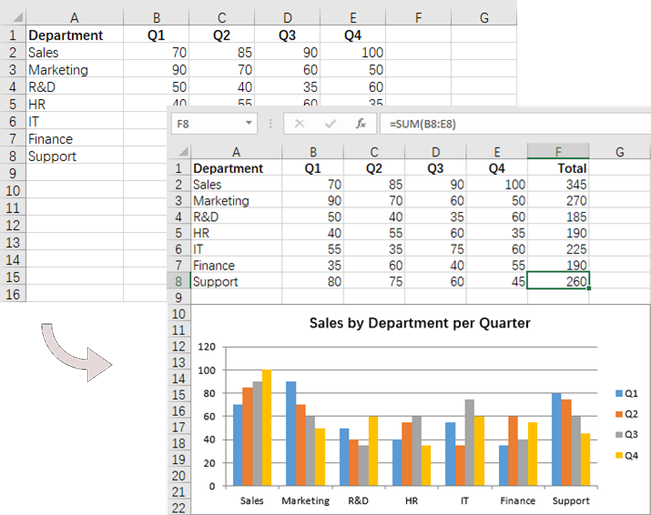
worksheet.Range[rowNum + 1, 6].Text = "Total";
// Apply style to the cell
worksheet.Range[rowNum + 1, 6].Style.Font.IsBold = true;
worksheet.Range[rowNum + 1, 6].Style.HorizontalAlignment = HorizontalAlignType.Right;
}
else
{
// Add formulas to the cells from F2 to F8
worksheet.Range[rowNum + 1, 6].Formula = $"=SUM(B{rowNum + 1}:E{rowNum + 1})";
}
}
// Add a clustered column chart
Chart chart = worksheet.Charts.Add(ExcelChartType.ColumnClustered);
// Set data range for the chart
chart.DataRange = worksheet.Range["A1:E8"];
chart.SeriesDataFromRange = false;
// Set position of the chart
chart.LeftColumn = 1;
chart.TopRow = 10;
chart.RightColumn = 8;
chart.BottomRow = 23;
// Set and format chart title
chart.ChartTitle = "Sales by Department per Quarter";
chart.ChartTitleArea.Size = 13;
chart.ChartTitleArea.IsBold = true;
// Save the workbook to a different
workbook.SaveToFile("AddFormulaAndChart.xlsx", ExcelVersion.Version2016);
// Dispose resources
workbook.Dispose();
}
}
}
Apply for a Temporary License
If you'd like to remove the evaluation message from the generated documents, or to get rid of the function limitations, please request a 30-day trial license for yourself.
C#/VB.NET: Group or Ungroup Rows and Columns in Excel
Grouping rows and columns in an Excel worksheet can separate data into groups, and each group presents information about one item. You can then expand or collapse certain groups to display only the most important information. In this article, you'll learn how to group or ungroup Excel rows and columns using Spire.XLS for .NET in C# and VB.NET.
Install Spire.XLS for .NET
To begin with, you need to add the DLL files included in the Spire.XLS for .NET package as references in your .NET project. The DLL files can be either downloaded from this link or installed via NuGet.
PM> Install-Package Spire.XLS
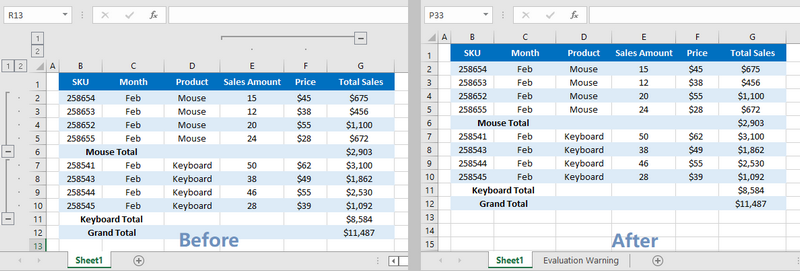
Group Rows and Columns
The following are the steps to group rows and columns using Spire.XLS for .NET.
- Create a Workbook object.
- Load a sample Excel file using Workbook.LoadFromFile() method.
- Get the specific sheet through Workbook.Worksheets[index] property.
- Group rows using Worksheet.GroupByRows() method.
- Group columns using Worksheet.GroupByColumns() method.
- Save the result to another Excel file using Workbook.SaveToFile() method.
- C#
- VB.NET
using Spire.Xls;

namespace GroupRowsAndColumns
{
    class Program
    {
        static void Main(string[] args)
        {
            //Create a Workbook object
            Workbook workbook = new Workbook();

            //Load a sample Excel file
            workbook.LoadFromFile(@"C:\Users\Administrator\Desktop\sample.xlsx");

            //Get the first worksheet
            Worksheet sheet = workbook.Worksheets[0];

            //Group rows
            sheet.GroupByRows(2, 5, false);
            sheet.GroupByRows(7, 10, false);

            //Group columns
            sheet.GroupByColumns(5, 6, false);

            //Save to another Excel file
            workbook.SaveToFile("GroupRowsAndColumns.xlsx", ExcelVersion.Version2016);
        }
    }
}
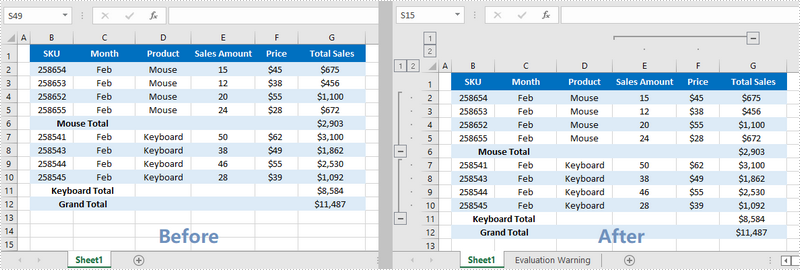
Ungroup Rows and Columns
The following are the steps to ungroup rows and columns using Spire.XLS for .NET.
- Create a Workbook object.
- Load a sample Excel file using Workbook.LoadFromFile() method.
- Get the specific sheet through Workbook.Worksheets[index] property.
- Ungroup rows using Worksheet.UngroupByRows() method.
- Ungroup columns using Worksheet.UngroupByColumns() method.
- Save the result to another Excel file using Workbook.SaveToFile() method.
- C#
- VB.NET
using Spire.Xls;

namespace UngroupRowsAndColumns
{
    class Program
    {
        static void Main(string[] args)
        {
            //Create a Workbook object
            Workbook workbook = new Workbook();

            //Load a sample Excel file
            workbook.LoadFromFile(@"C:\Users\Administrator\Desktop\sample.xlsx");

            //Get the first worksheet
            Worksheet sheet = workbook.Worksheets[0];

            //Ungroup rows
            sheet.UngroupByRows(2, 5);
            sheet.UngroupByRows(7, 10);

            //Ungroup columns
            sheet.UngroupByColumns(5, 6);

            //Save to a different Excel file
            workbook.SaveToFile("UngroupRowsAndColumns.xlsx", ExcelVersion.Version2016);
        }
    }
}
Apply for a Temporary License
If you'd like to remove the evaluation message from the generated documents, or to get rid of the function limitations, please request a 30-day trial license for yourself.
C#/VB.NET: Apply Fonts to Excel Cells
When you’re creating or reviewing a worksheet, you may want to format text in some specific cells using font styles in order to make them stand out. For example, you can change the font type, font color, font size and make text bold. This article will show you how to apply fonts to individual cells or cell ranges by using Spire.XLS for .NET.
- Apply Different Fonts to Different Cells
- Appy Multiple Fonts in a Single Cell
- Apply a Font to a Cell Range
Install Spire.XLS for .NET
To begin with, you need to add the DLL files included in the Spire.XLS for.NET package as references in your .NET project. The DLL files can be either downloaded from this link or installed via NuGet.
PM> Install-Package Spire.XLS
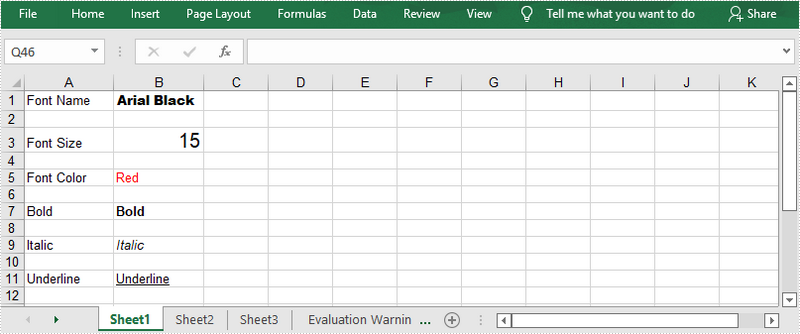
Apply Different Fonts to Different Cells
Spire.XLS provides the CellRange.Style.Font property which you can use to set or change the font name, color, size and style in a cell easily. The following are the steps to apply a font style to a specific cell using Spire.XLS for .NET.
- Create a Workbook object.
- Get the first worksheet using Workbook.Worksheets[index] property.
- Get a specific cell using Worksheet.Range[int Row, int Column] property.
- Set the value of the cell using CellRange.Value property.
- Set the font name, color, size and style of the cell value through the properties under the CellRange.Value.Font object.
- Save the workbook to an Excel file using Workbook.SaveToFile() method.
- C#
- VB.NET
using Spire.Xls;
using System.Drawing;

namespace ApplySingleFontInCellRange
{
    class Program
    {
        static void Main(string[] args)
        {
            //Create a Workbook object
            Workbook workbook = new Workbook();

            //Get the first worksheet
            Worksheet sheet = workbook.Worksheets[0];

            //Set font name
            int row = 1;
            sheet.Range[row, 1].Value = "Font Name";
            sheet.Range[row, 2].Value = "Arial Black";
            sheet.Range[row, 2].Style.Font.FontName = "Arial Black";

            //Set font size
            sheet.Range[row += 2, 1].Value = "Font Size";
            sheet.Range[row, 2].Value = "15";
            sheet.Range[row, 2].Style.Font.Size = 15;

            //Set font color
            sheet.Range[row += 2, 1].Value = "Font Color";
            sheet.Range[row, 2].Value = "Red";
            sheet.Range[row, 2].Style.Font.Color = Color.Red;

            //Make text bold
            sheet.Range[row += 2, 1].Value = "Bold";
            sheet.Range[row, 2].Value = "Bold";
            sheet.Range[row, 2].Style.Font.IsBold = true;

            //Make text italic
            sheet.Range[row += 2, 1].Value = "Italic";
            sheet.Range[row, 2].Value = "Italic";
            sheet.Range[row, 2].Style.Font.IsItalic = true;

            //Underline text
            sheet.Range[row += 2, 1].Value = "Underline";
            sheet.Range[row, 2].Value = "Underline";
            sheet.Range[row, 2].Style.Font.Underline = FontUnderlineType.Single;

            //Strikethrough text
            sheet.Range[row += 2, 1].Value = "Strikethrough ";
            sheet.Range[row, 2].Value = "Strikethrough ";
            sheet.Range[row, 2].Style.Font.IsStrikethrough = true;

            //Auto fit column width
            sheet.AllocatedRange.AutoFitColumns();

            //Save the workbook to an Excel file
            workbook.SaveToFile("ApplySingleFontInCell.xlsx", ExcelVersion.Version2016);
        }
    }
}
Appy Multiple Fonts in a Single Cell
Mixing fonts in a single cell can help you emphasize some specific characters within the cell. The following are the steps to apply multiple fonts in a cell using Spire.XLS for .NET.
- Create a Workbook object.
- Get the first worksheet using Workbook.Worksheets[index] property.
- Create two ExcelFont objects using Workbook.CreateFont() method.
- Get a specific cell using Worksheet.Range[int Row, int Column] property, and set the rich text content of the cell using CellRange.RichText.Text property.
- Apply the two ExcelFont objects to the rich text using RichText.SetFont() method.
- Save the workbook to an Excel file using Workbook.SaveToFile() method.
- C#
- VB.NET
using Spire.Xls;
namespace ApplyMultipleFontsInACell
{
class Program
{
static void Main(string[] args)
{
//Create a Workbook object
Workbook workbook = new Workbook();
//Get the first worksheet
Worksheet sheet = workbook.Worksheets[0];
//Create a font
ExcelFont font1 = workbook.CreateFont();
font1.FontName = "Arial Black";
font1.KnownColor = ExcelColors.LightBlue;
font1.IsBold = true;
font1.Size = 13;
//Create another font
ExcelFont font2 = workbook.CreateFont();
font2.KnownColor = ExcelColors.Red;
font2.IsBold = true;
font2.IsItalic = true;
font2.FontName = "Algerian";
font2.Size = 15;
//Returns a RichText object from a specified cell
RichText richText = sheet.Range["A1"].RichText;
//Set the text of RichText object
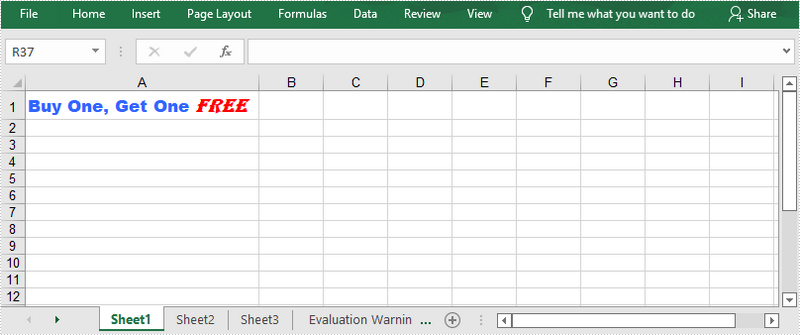
richText.Text = "Buy One, Get One Free";
//Apply the first font to specified range of characters
richText.SetFont(0, 16, font1);
//Apply the second font to specified range of characters
richText.SetFont(17, 21, font2);
//Set column width
sheet.Columns[0].ColumnWidth = 33;
//Save the workbook to an Excel file
workbook.SaveToFile("ApplyMultipleFonts.xlsx", ExcelVersion.Version2016);
}
}
}
Apply a Font to a Cell Range
Spire.XLS provides the CellStyle class to manage the cell formatting such as fill color, text alignment and font style. You can create a cell style and apply it to a cell range or the whole worksheet using CellRange.ApplyStyle() method and Worksheet.ApplyStyle() method, respectively. The following are the steps to apply a font to a cell range using Spire.XLS for .NET.
- Create a Workbook object.
- Load a sample Excel file using Workbook.LoadFromFile() method.
- Get the first worksheet using Workbook.Worksheets[index] property.
- Create a CellStyle object using Workbook.Styles.Add() method, and set the font style through the CellStyle.Font property.
- Apply the cell style to a cell range using CellRange.ApplyStyle() method.
- Save the workbook to another Excel file using Workbook.SaveToFile() method.
- C#
- VB.NET
using Spire.Xls;
using System.Drawing;
namespace ApplyFontToCellRange
{
class Program
{
static void Main(string[] args)
{
//Create a Workbook object
Workbook workbook = new Workbook();
//Load a sample Excel file
workbook.LoadFromFile(@"C:\Users\Administrator\Desktop\sample.xlsx");
//Get the first worksheet
Worksheet sheet = workbook.Worksheets[0];
//Create a CellStyle object
CellStyle fontStyle = workbook.Styles.Add("headerFontStyle");
//Set the font color, size and style
fontStyle.Font.Color = Color.White;
fontStyle.Font.IsBold = true;
fontStyle.Font.Size = 12;
fontStyle.HorizontalAlignment = HorizontalAlignType.Center;
//Create a CellStyleFlag object, setting the FontColor, FontBold, FontSize and HorizontalAlignment properties to true
CellStyleFlag flag = new CellStyleFlag();
flag.FontColor = true;
flag.FontBold = true;
flag.FontSize = true;
flag.HorizontalAlignment = true;
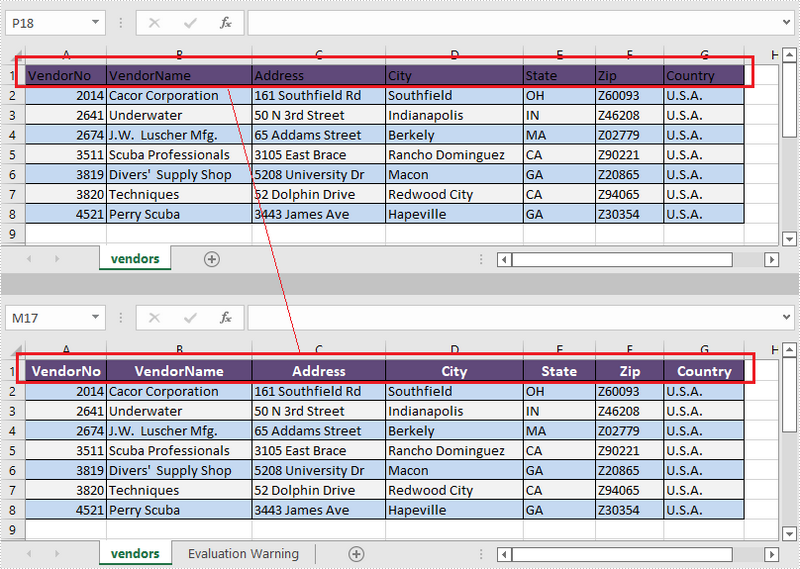
//Apply the cell style to header row
sheet.Range[1, 1, 1, 8].ApplyStyle(fontStyle, flag);
//Apply the cell style to the whole worksheet
//sheet.ApplyStyle(fontStyle);
//Save the workbook to another Excel file
workbook.SaveToFile("ApplyFontToCellRange.xlsx", ExcelVersion.Version2016);
}
}
}
Apply for a Temporary License
If you'd like to remove the evaluation message from the generated documents, or to get rid of the function limitations, please request a 30-day trial license for yourself.