Format Excel Files in C#: Fonts, Colors, Borders, and More
Formatting plays an important role in making Excel spreadsheets easier to read, analyze, and present. Whether you are generating reports, invoices, financial statements, or dashboards, raw data often needs proper styling before it can be shared with end users.
In C#, Excel formatting tasks may include changing fonts, applying colors, aligning content, formatting numbers and dates, adding borders, creating tables, and configuring page layouts. Performing these tasks manually can be time-consuming, especially when dealing with large volumes of spreadsheets.
Spire.XLS for .NET provides a comprehensive set of APIs for creating, editing, formatting, and converting Excel documents without requiring Microsoft Excel to be installed. In this article, you will learn how to apply various types of formatting to Excel files in C# using Spire.XLS for .NET.
Table of Contents:
- Prepare Your C# Project for Excel Formatting
- Part 1. Format Cell Appearance
- Part 2. Format Cell Values
- Part 3. Format Ranges and Layout
- Part 4. Apply Advanced Formatting
- Part 5. Format Excel Tables and Worksheets
- Part 6. Create a Professional Report Example
- Conclusion
- FAQs
Prepare Your C# Project for Excel Formatting
Spire.XLS for .NET is a powerful Excel library that enables developers to work with XLS, XLSX, XLSM, CSV, and other spreadsheet formats programmatically. Besides formatting operations, it also supports formula calculation, chart creation, pivot tables, worksheet management, printing, and file conversion.
To install Spire.XLS for .NET, run the following NuGet command:
Install-Package Spire.XLS
Before applying formatting, load an existing Excel workbook (or create a new one) and access the worksheet you want to modify. Once all formatting operations are complete, save the result to a new Excel file using the SaveToFile() method.
using Spire.Xls;
using System.Drawing;

// Create a workbook object
Workbook workbook = new Workbook();

// Load an existing Excel file
workbook.LoadFromFile("input.xlsx");

// Get a specific worksheet
Worksheet sheet = workbook.Worksheets[0];

// Apply formatting
...

// Save the result
workbook.SaveToFile("output.xlsx", ExcelVersion.Version2016);
Note: The following examples assume that the workbook has already been loaded and the worksheet object has been obtained.
Part 1. Format Cell Appearance
Cell appearance settings control how data looks inside a worksheet. Proper formatting can significantly improve readability and help users quickly identify important information.
Format Cell Fonts
Font formatting allows you to customize the visual style of cell content. Common options include font family, font size, bold, italic, underline, and font color. These settings are frequently used for report titles, section headers, and highlighted values.
CellStyle style = workbook.Styles.Add("FontStyle");

style.Font.FontName = "Calibri";
style.Font.Size = 14;
style.Font.IsBold = true;
style.Font.IsItalic = true;
style.Font.Underline = FontUnderlineType.Single;
style.Font.Color = Color.Blue;

sheet.Range["A1"].Text = "Formatted Text";
sheet.Range["A1"].Style = style;
Set Cell Background Colors
Background colors help distinguish different sections of a worksheet and draw attention to key cells. For example, you may use a colored header row or highlight summary data with a contrasting fill color.
sheet.Range["A2"].Text = "Background Color";
sheet.Range["A2"].Style.Color = Color.LightSkyBlue;
Align Cell Content
Excel provides horizontal alignment, vertical alignment, indentation, and text rotation options. Proper alignment improves the overall layout of a worksheet and makes tabular data easier to scan.
sheet.Range["B2"].Text = "Centered Text";
CellStyle style = sheet.Range["B2"].Style;

style.HorizontalAlignment = HorizontalAlignType.Center;
style.VerticalAlignment = VerticalAlignType.Center;
style.Rotation = 45;

sheet.SetRowHeight(2, 40);
sheet.SetColumnWidth(2, 20);
Add Cell Borders
Borders are useful for separating rows and columns and defining table structures. Depending on the scenario, you can apply borders to individual cells or entire ranges and customize their styles and colors.
CellRange range = sheet.Range["A4:D6"];
range.Text = "Border";

range.Style.Borders[BordersLineType.EdgeTop].LineStyle = LineStyleType.Thin;
range.Style.Borders[BordersLineType.EdgeBottom].LineStyle = LineStyleType.Thin;
range.Style.Borders[BordersLineType.EdgeLeft].LineStyle = LineStyleType.Thin;
range.Style.Borders[BordersLineType.EdgeRight].LineStyle = LineStyleType.Thin;
range.Style.Borders[BordersLineType.EdgeTop].Color = Color.Black;
Wrap Text
When cell content exceeds the available column width, wrapping text allows multiple lines to be displayed within the same cell, preventing important information from being truncated.
sheet.Range["A8"].Text = "This is a very long sentence that will automatically wrap within the cell.";

sheet.Range["A8"].Style.WrapText = true;

sheet.SetColumnWidth(1, 20);
sheet.SetRowHeight(8, 60);
Part 2. Format Cell Values
Value formatting changes how data is displayed without modifying the underlying values. This is particularly important for business and financial spreadsheets.
Format Numbers
Numeric formats can control decimal places, thousands separators, scientific notation, and other display rules. Choosing the right format improves accuracy and readability.
sheet.Range["A10"].NumberValue = 1234567.891;
sheet.Range["A10"].NumberFormat = "#,##0.00";
Format Currency
Currency formatting automatically displays monetary symbols and decimal precision according to your requirements. This is commonly used in invoices, budgets, and financial reports.
sheet.Range["A11"].NumberValue = 5999.95;
sheet.Range["A11"].NumberFormat = "$#,##0.00";
Format Dates
Date formatting allows the same date value to be displayed in different styles, such as short dates, long dates, or custom patterns. Consistent date formats make reports easier to interpret.
sheet.Range["A12"].DateTimeValue = DateTime.Now;
sheet.Range["A12"].NumberFormat = "yyyy-MM-dd";
Part 3. Format Ranges and Layout
Instead of formatting cells one by one, you can apply styles to larger worksheet areas to improve efficiency and maintain consistency.
Format Ranges
A range may contain multiple rows and columns. Applying formatting to a range ensures that all cells share the same appearance and reduces repetitive code.
CellRange range = sheet.Range["A14:D18"];

range.Style.Color = Color.LightYellow;
range.Style.Font.IsBold = true;
range.Style.HorizontalAlignment = HorizontalAlignType.Center;
Merge Cells
Merged cells are often used for report titles and section headers. After merging, the content can be centered and styled to create a more professional appearance.
sheet.Range["A20:D20"].Merge();

sheet.Range["A20"].Text = "Monthly Sales Report";
sheet.Range["A20"].Style.Font.Size = 18;
sheet.Range["A20"].Style.Font.IsBold = true;
sheet.Range["A20"].Style.HorizontalAlignment = HorizontalAlignType.Center;
Format Rows and Columns
Formatting entire rows or columns is useful when all cells in a specific area should follow the same style, such as a header row or a currency column.
sheet.Rows[21].Style.Font.IsBold = true;
sheet.Rows[21].Style.Color = Color.LightGray;

sheet.Columns[1].Style.NumberFormat = "$#,##0.00";
AutoFit Rows and Columns
AutoFit automatically adjusts row heights and column widths based on cell content. This helps prevent clipped text and improves the presentation of generated spreadsheets.
sheet.AllocatedRange.AutoFitColumns();
sheet.AllocatedRange.AutoFitRows();
Part 4. Apply Advanced Formatting
Conditional formatting enables Excel to apply styles automatically based on cell values. Instead of manually highlighting data, rules can be configured to identify trends, exceptions, or important values.
For example, you can highlight numbers above a threshold, display data bars, apply color scales, or use icon sets to visualize performance indicators. These features make large datasets easier to analyze and understand.
sheet.Range["A25"].NumberValue = 1200;
sheet.Range["A26"].NumberValue = 800;
sheet.Range["A27"].NumberValue = 1500;

XlsConditionalFormats formats = sheet.ConditionalFormats.Add();
formats.AddRange(sheet.Range["A25:A27"]);
IConditionalFormat format = formats.AddCondition();
format.FormatType = ConditionalFormatType.CellValue;
format.FirstFormula = "1000";
format.Operator = ComparisonOperatorType.Greater;
format.BackColor = Color.LightGreen;
Part 5. Format Excel Tables and Worksheets
Formatting can also be applied at the worksheet level to improve the overall structure and appearance of a workbook.
Format Excel Tables
Excel tables provide built-in styling options such as header formatting, alternating row colors, and predefined themes. Converting a data range into a table can instantly enhance readability and organization.
sheet.Range["A30"].Text = "Product";
sheet.Range["B30"].Text = "Sales";
sheet.Range["A31"].Text = "Laptop";
sheet.Range["B31"].NumberValue = 5000;
sheet.Range["A32"].Text = "Monitor";
sheet.Range["B32"].NumberValue = 2000;

IListObject table = sheet.ListObjects.Create("SalesTable", sheet.Range["A30:B32"]);
table.BuiltInTableStyle = TableBuiltInStyles.TableStyleMedium2;
Configure Page Layout
Page layout settings determine how worksheets appear when printed or exported. Common options include page orientation, margins, print areas, scaling, and repeating header rows.
Proper page setup ensures that reports look professional both on screen and on paper.
sheet.PageSetup.Orientation = PageOrientationType.Landscape;
sheet.PageSetup.LeftMargin = 0.5;
sheet.PageSetup.RightMargin = 0.5;
sheet.PageSetup.TopMargin = 0.75;
sheet.PageSetup.BottomMargin = 0.75;
sheet.PageSetup.FitToPagesWide = 1;
sheet.PageSetup.FitToPagesTall = 1;
Part 6. Create a Professional Report Example
In real-world scenarios, multiple formatting techniques are often used together. A typical report may include a merged title, custom fonts, colored headers, borders, number formats, conditional formatting, and optimized page settings.
By combining these features, you can generate polished Excel documents that are ready for distribution without requiring manual editing.
using Spire.Xls;
using Spire.Xls.Core.Spreadsheet.Collections;
using Spire.Xls.Core;
using System.Drawing;

class Program
{
    static void Main()
    {
        // Create a new workbook
        Workbook workbook = new Workbook();
        Worksheet sheet = workbook.Worksheets[0];

        sheet.Name = "Sales Summary Report";

        // Title Row
        CellRange title = sheet.Range["A1:E1"];
        title.Merge();
        title.Text = "Sales Summary Report";

        title.Style.Font.FontName = "Arial";
        title.Style.Font.Size = 16;
        title.Style.Font.Color = Color.White;
        title.Style.Color = Color.DarkBlue;

        title.Style.HorizontalAlignment = HorizontalAlignType.Center;
        title.Style.VerticalAlignment = VerticalAlignType.Center;

        sheet.Rows[0].RowHeight = 30;

        // Headers
        string[] headers = { "Order ID", "Product", "Region", "Order Date", "Sales Amount" };

        for (int i = 0; i < headers.Length; i++)
        {
            CellRange cell = sheet.Range[2, i + 1];

            cell.Text = headers[i];
            cell.Style.Font.IsBold = true;
            cell.Style.Color = Color.LightGray;

            cell.Style.Borders[BordersLineType.EdgeBottom].LineStyle = LineStyleType.Medium;
            cell.Style.Borders[BordersLineType.EdgeBottom].Color = Color.DarkBlue;
        }

        // Data
        object[][] data =
        {
            new object[] { 1001, "Laptop", "North", "2024-01-15", 15000 },
            new object[] { 1002, "Monitor", "West", "2024-02-10", 12000 },
            new object[] { 1003, "Keyboard", "East", "2024-03-05", 13500 },
            new object[] { 1004, "Mouse", "South", "2024-04-12", 16000 }
        };

        for (int r = 0; r < data.Length; r++)
        {
            for (int c = 0; c < data[r].Length; c++)
            {
                CellRange cell = sheet.Range[r + 3, c + 1];
                var value = data[r][c];

                if (c == 3) // Order Date
                {
                    cell.DateTimeValue = DateTime.Parse(value.ToString());
                    cell.NumberFormat = "yyyy-MM-dd";
                }
                else if (c == 4) // Sales Amount
                {
                    cell.NumberValue = Convert.ToDouble(value);
                    cell.NumberFormat = "$#,##0.00";
                }
                else
                {
                    cell.Text = value.ToString();
                }

                // Alternate row colors
                cell.Style.Color = (r % 2 == 0)
                    ? Color.LightYellow
                    : Color.LightCyan;
            }
        }

        // Borders
        CellRange range = sheet.Range["A2:E6"];

        range.BorderAround(LineStyleType.Medium, Color.Black);
        range.BorderInside(LineStyleType.Thin, Color.Gray);

        // Auto Fit Columns
        for (int i = 1; i <= 5; i++)
        {
            sheet.AutoFitColumn(i);
        }

        // Conditional Formatting
        XlsConditionalFormats formats = sheet.ConditionalFormats.Add();
        formats.AddRange(sheet.Range["E3:E6"]);

        IConditionalFormat condition = formats.AddCondition();
        condition.FormatType = ConditionalFormatType.CellValue;
        condition.Operator = ComparisonOperatorType.Greater;
        condition.FirstFormula = "14000";

        condition.FontColor = Color.Red;
        condition.IsBold = true;

        // Align + Layout Formatting
        CellRange all = sheet.AllocatedRange;

        for (int r = 1; r < all.RowCount; r++)
        {
            all.Rows[r].HorizontalAlignment = HorizontalAlignType.Center;
           // all.Rows[r].VerticalAlignment = VerticalAlignType.Center;
            all.Rows[r].RowHeight = 20;
        }

        for (int c = 0; c < all.ColumnCount; c++)
        {
            all.Columns[c].ColumnWidth = (c == 1) ? 19 : 14;
        }

        // Save
        workbook.SaveToFile("SalesSummaryReport.xlsx", ExcelVersion.Version2016);
        workbook.Dispose();
    }
}
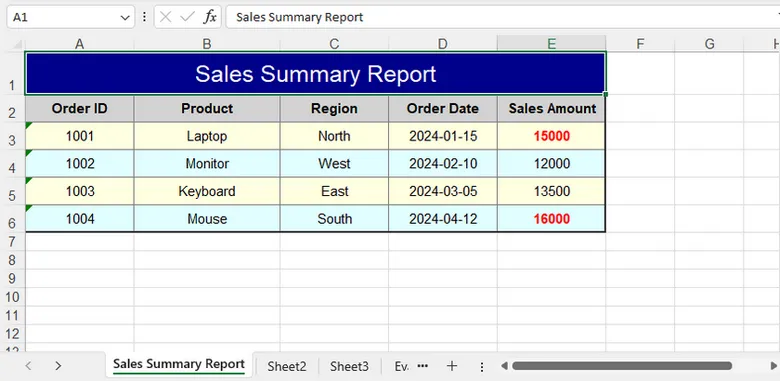
Output:
Conclusion
Formatting is an essential step in creating professional Excel documents. With Spire.XLS for .NET, you can efficiently customize cell appearance, control number and date formats, manage worksheet layouts, apply conditional formatting, and build visually appealing reports entirely in C#.
By using the techniques covered in this guide, you can automate Excel formatting tasks and generate polished spreadsheets suitable for business, reporting, and data analysis scenarios.
FAQs
Can I format Excel files without Microsoft Excel installed?
Yes. Spire.XLS for .NET works independently of Microsoft Excel and can create, edit, and format spreadsheets directly through code.
Does formatting change the actual cell values?
No. Most formatting operations only affect how data is displayed. The underlying values remain unchanged unless explicitly modified.
Can I apply the same style to multiple cells at once?
Yes. Styles can be applied to ranges, rows, columns, or entire worksheets, making it easy to maintain consistent formatting.
Does Spire.XLS support conditional formatting?
Yes. The library supports common conditional formatting features, including highlighting rules, data bars, color scales, and icon sets.
Which Excel formats are supported?
Spire.XLS supports XLS, XLSX, XLSM, CSV, and several other spreadsheet formats for both reading and writing.
How to Add Macros to Excel in C# – Read & Edit VBA
VBA macros provide a convenient way to automate data processing, formatting, and business logic within Excel, especially for repetitive or rule-based tasks. However, managing macros manually inside Excel becomes inefficient when you need to generate, update, or maintain files at scale.
For .NET developers, a more scalable approach is to programmatically add macros to Excel using C#. By working with Excel VBA in C#, you can write Excel macros, read existing macro code, and modify VBA logic across multiple files without opening Excel and manually editing the VBA code.
In this article, you'll learn how to add, read, and edit Excel VBA macros in C# for automated workflows. Using Spire.XLS for .NET, you can directly manipulate VBA projects embedded in Excel files without requiring Microsoft Excel installation.
Quick Navigation
- How C# Works with Excel Macros
- Environment Setup
- How to Add a Macro to Excel in C#
- Read, Edit, and Remove Macros from Excel in C#
- Common Pitfalls When Working with Excel Macros
- Conclusion
- Frequently Asked Questions
Understanding Excel Macros and How C# Works with Them
An Excel macro is essentially VBA (Visual Basic for Applications) code stored inside a workbook. In macro-enabled files (such as .xlsm), this code is organized within a VBA project, which contains modules and procedures.
In practice, most programmatic macro operations focus on standard modules, which are simple containers for VBA procedures (Sub or Function). When working with C#, you typically do not interact with Excel UI elements like buttons or events. Instead, you directly create modules and inject VBA code.
From a technical perspective, macros are not just executable scripts—they are part of the file structure. This means they can be accessed and modified programmatically, provided that your tool supports VBA project manipulation.
In C#, there are two main approaches to working with Excel macros:
- Using Microsoft Excel Interop to automate Excel
- Using standalone libraries such as Spire.XLS for .NET to manipulate the file directly
The first approach depends on Excel being installed and is typically used to execute macros. The second approach allows you to create, read, edit, and delete VBA code directly inside Excel files, making it more suitable for backend services and automated workflows.
In the following sections, we'll focus on the second approach and demonstrate how to manage Excel macros entirely in C#.
Environment Setup: Install Spire.XLS for .NET
Before working with Excel macros in C#, you need to install Spire.XLS for .NET, which allows you to manage Excel files and manipulate VBA projects without requiring Microsoft Excel.
Install via NuGet
You can install Spire.XLS for .NET using NuGet Package Manager:
Install-Package Spire.XLS
Or via the .NET CLI:
dotnet add package Spire.XLS
You can also download the Spire.XLS for .NET package and add it to your project manually.
Project Requirements
- .NET Framework, .NET Core, .NET Standard, or .NET 5+
- No Microsoft Excel installation required
- Supports Windows, Linux, and macOS environments
The library is runtime-agnostic and can be used in any .NET-supported environment, including web, desktop, and cross-platform applications.
Namespace to Import
After installation, include the following namespaces in your project:
using Spire.Xls;
Once the setup is complete, you can start creating, reading, and modifying Excel VBA macros programmatically.
How to Add a Macro to Excel in C# (Complete Example)
Before writing macro code, it's important to understand how Spire.XLS exposes the VBA structure in Excel:
- Workbook.VbaProject represents the VBA project embedded in the workbook
- IVbaProject.Modules provides access to all VBA modules
- IVbaModule represents an individual module that stores macro code
In addition to modules, the VBA project also supports project-level configuration, such as name, description, password protection, and conditional compilation settings.
The following example shows how to create a VBA project, configure its properties, add a module, and write a macro into an Excel file programmatically.
using Spire.Xls;

Workbook workbook = new Workbook();

// Create VBA project
IVbaProject vbaProject = workbook.VbaProject;

// Configure project-level properties (optional but important in real scenarios)
vbaProject.Name = "ReportGenerator";
vbaProject.Description = "VBA project for generating quarterly reports";
vbaProject.Password = "securepassword";
vbaProject.LockProjectView = false;
vbaProject.HelpFileName = "ReportGeneratorHelp.chm";
vbaProject.ConditionalCompilation = "DEBUG_MODE=1"; // External compile-time flag

// Add a VBA module
IVbaModule vbaModule = vbaProject.Modules.Add("ReportModule", VbaModuleType.Module);

// Write VBA macro code
vbaModule.SourceCode = @"
Sub GenerateQuarterlyReport()
    Dim ws As Worksheet
    Dim i As Integer
    Dim quarter As String

    Set ws = ActiveSheet
    ws.Cells.Clear

    ' Prompt user input
    quarter = InputBox(""Enter quarter (e.g., Q1 2026):"", ""Report Generation"")

    With ws
        .Range(""A1:E1"").Value = Array(""Date"", ""Product"", ""Region"", ""Sales"", ""Status"")

        For i = 1 To 50
            .Cells(i + 1, 1).Value = DateSerial(2026, 1 + Int((i - 1) / 17), 1 + ((i - 1) Mod 17))
            .Cells(i + 1, 2).Value = ""Product "" & (1 + Int((i - 1) / 10))
            .Cells(i + 1, 3).Value = Choose((i Mod 5) + 1, ""North"", ""South"", ""East"", ""West"", ""Central"")
            .Cells(i + 1, 4).Value = Round(Rnd() * 10000, 2)
            .Cells(i + 1, 5).Value = IIf(.Cells(i + 1, 4).Value > 5000, ""Target Met"", ""Below Target"")
        Next i

        .Columns(""A:E"").AutoFit

        ' Conditional compilation example
        #If DEBUG_MODE = 1 Then
            MsgBox ""DEBUG: Report generated (50 rows)"", vbInformation, ""Debug Info""
        #End If
    End With

    MsgBox ""Quarterly report for "" & quarter & "" generated successfully!"", vbInformation, ""Report Status""
End Sub";

// Save as macro-enabled Excel file
workbook.SaveToFile("QuarterlyReportGenerator.xlsm", FileFormat.Version2016);
workbook.Dispose();
Below is a preview of the generated Macro in Excel:
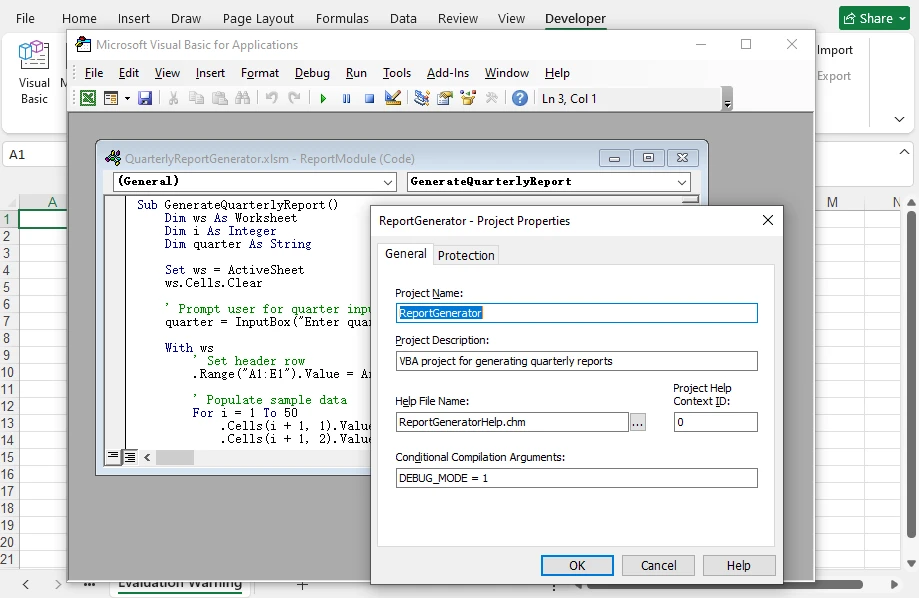
In this workflow, Spire.XLS allows you to construct the full VBA structure—not only modules and macro code, but also project-level metadata and compilation behavior—directly in code. This is conceptually similar to configuring a VBA project in the editor, but fully automated and independent of Excel.
Key API Breakdown
-
workbook.VbaProject
Initializes or retrieves the VBA project within the workbook.
-
vbaProject.Modules.Add(name, type)
Adds a new module to the project as a container for macro code.
-
vbaModule.SourceCode
Defines the full VBA script inside the module.
-
vbaProject.Description
Adds a description to the VBA project.
-
vbaProject.CodePage
Defines the character encoding used in the VBA project.
-
vbaProject.Password / LockProjectView
Controls access and visibility of the VBA project.
-
vbaProject.ConditionalCompilation
Enables compile-time flags (e.g., debug logic) inside VBA using #If.
Workbooks containing macros must be saved in macro-enabled formats such as .xls, .xlsm, .xltm, or .xlsb, as other formats (e.g., .xlsx) do not support VBA. Refer to the FileFormat enumeration to correctly set the output format when saving.
Reading, Editing, and Removing Excel Macros in C#
Once a VBA project exists, you can use Spire.XLS to inspect and modify its contents programmatically, including both module code and project-level metadata.
In real-world scenarios, this allows you to analyze existing macros, update business logic, enforce security settings, or remove legacy VBA code without opening Excel. Whether you're maintaining automated reporting systems or processing third-party Excel files, having full control over VBA projects in code is essential.
Read Macro Code and Project-Level Metadata
To read macros from an Excel file, load the workbook and iterate through all modules in the VBA project.
using Spire.Xls;

Workbook workbook = new Workbook();
workbook.LoadFromFile("QuarterlyReportGenerator.xlsm");

IVbaProject vbaProject = workbook.VbaProject;

string macroInfo = "VBA Project Name: " + vbaProject.Name + Environment.NewLine;
macroInfo += "Code Page: " + vbaProject.CodePage + Environment.NewLine;
macroInfo += "Is Protected: " + vbaProject.IsProtected + Environment.NewLine;

foreach (IVbaModule module in vbaProject.Modules)
{
    macroInfo += Environment.NewLine + "Module: " + module.Name + Environment.NewLine;
    macroInfo += "Source Code:" + Environment.NewLine;
    macroInfo += module.SourceCode + Environment.NewLine;
}

Console.WriteLine(macroInfo);

System.IO.File.WriteAllText("MacroAnalysis.txt", macroInfo);
workbook.Dispose();
Below is a preview of the console output:
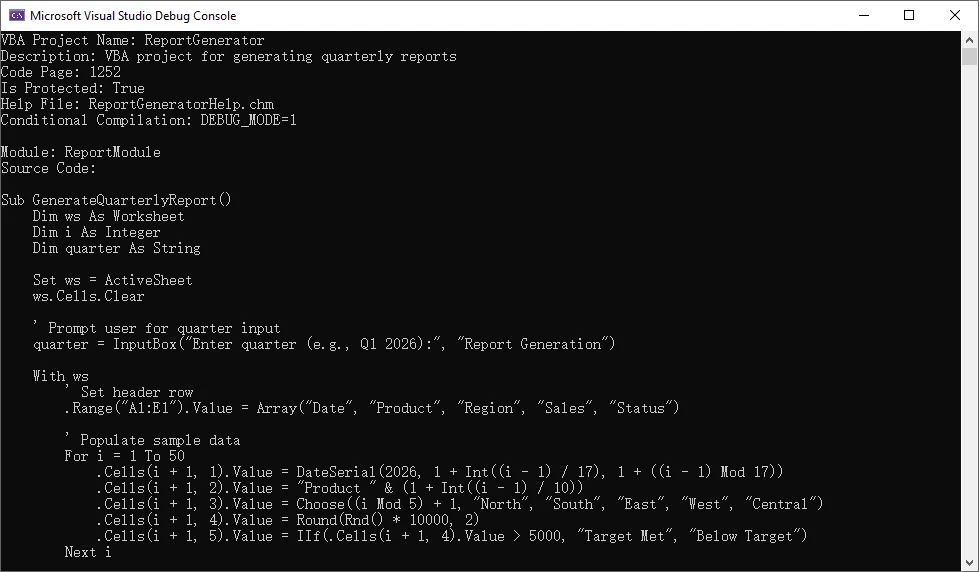
Here, each module exposes its VBA code through the SourceCode property, while the VBA project itself provides metadata such as name, encoding, and protection status.
The property vbaProject.IsProtected in this example indicates whether the VBA project is protected (locked for viewing or editing).
Edit Macro Code and Project-Level Metadata
To edit a macro, access a specific module and update its SourceCode. You can also modify project-level properties if needed. If the VBA project is protected, the correct password must be provided through vbaProject.Password before making such changes.
using Spire.Xls;

Workbook workbook = new Workbook();
workbook.LoadFromFile("QuarterlyReportGenerator.xlsm");

IVbaProject vbaProject = workbook.VbaProject;

// Update macro logic
IVbaModule module = vbaProject.Modules["ReportModule"];  // Or use index if name is unknown
module.SourceCode = module.SourceCode.Replace(
    "\"North\", \"South\", \"East\", \"West\", \"Central\"",
    "\"North America\", \"Europe\", \"Asia Pacific\", \"Latin America\", \"Middle East\"");

// Update project metadata
// For protected VBA projects, passwords are required to modify the project-level metadata
vbaProject.Password = "securepassword";
vbaProject.Description = "Updated report logic with global regions";
vbaProject.Name = "UpdatedReportGenerator";

workbook.SaveToFile("UpdatedReportGenerator.xlsm", FileFormat.Version2016);
workbook.Dispose();
Below is a preview of the updated macro code:
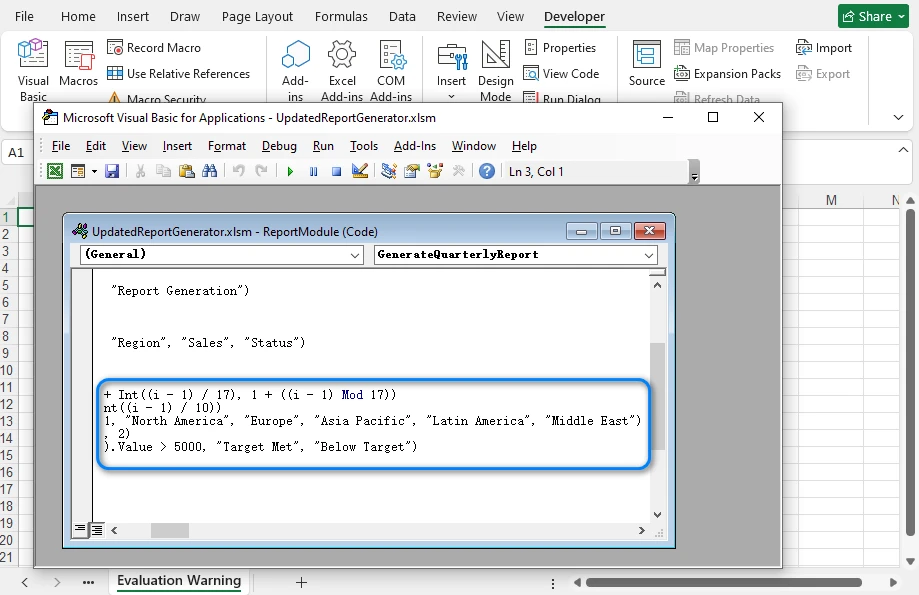
Spire.XLS treats macro code as editable text within a module, so updates are typically done by modifying the existing source and saving the workbook.
If you need to convert legacy .xls files to .xlsm format while preserving macros, see How to Convert XLS to XLSM and Maintain Macros Using C#.
Remove Macros
To remove macros, delete modules from the VBA project. This effectively removes all macro logic from the workbook.
using Spire.Xls;
using Spire.Xls.Core.Spreadsheet;

Workbook workbook = new Workbook();
workbook.LoadFromFile("LegacyReport.xlsm");

IVbaProject vbaProject = workbook.VbaProject;

// Remove specific module by its name
vbaProject.Modules.Remove("ReportModule");

// Or remove a module by its index
vbaProject.Modules.RemoveAt(0);

// Remove all modules
vbaProject.Modules.Clear();

workbook.SaveToFile("CleanReport.xlsm", FileFormat.Version2016);
workbook.Dispose();
After removing all modules, the workbook no longer contains executable VBA code, making it equivalent to a macro-free Excel file.
Alternatively, converting a macro-enabled Excel file to .xlsx will remove all macros, since the .xlsx format does not support VBA code.
Common Pitfalls When Working with Excel Macros
File Format Requirements
Macros require macro-enabled formats such as .xlsm, .xls, or .xlsb. The .xlsx format does not support VBA code. Always save files with the appropriate extension.
Encoding Issues
VBA code uses specific encoding (typically CodePage 1252 for Western languages). When working with international characters, ensure the CodePage is set correctly before writing macro code.
Common CodePage values include:
- 1252 – English / Western European (default in many environments)
- 936 – Simplified Chinese (GBK)
- 950 – Traditional Chinese (Big5)
- 932 – Japanese (Shift-JIS)
- 65001 – UTF-8 (⚠️ limited support in VBA, may cause compatibility issues)
Macro Security Settings
Excel macro security settings may prevent macros from running. When distributing macro-enabled files, consider adding instructions for enabling macros or digitally signing the VBA project.
Excel Version Compatibility
VBA code written for newer Excel versions may not work correctly in older versions. Test macros across target Excel versions to ensure compatibility.
Conclusion
C# provides robust capabilities for managing Excel macros programmatically. By using Spire.XLS for .NET, developers can add, read, edit, and remove VBA code directly inside Excel files without requiring Excel installation.
This approach focuses on managing macro code rather than executing it, making it ideal for automated workflows, backend services, and large-scale document processing.
To test these features without limitations, you can apply for a free temporary license of Spire.XLS for .NET.
Frequently Asked Questions (FAQ)
Can C# add VBA macros without Microsoft Excel?
Yes. Libraries such as Spire.XLS for .NET allow you to manipulate VBA projects directly without requiring Excel installation.
What format is required for Excel macros?
Macros require macro-enabled formats such as .xlsm, .xls, .xlsb, or .xltm (for templates). The .xlsx format does not support VBA code.
Can I edit existing macros in Excel using C#?
Yes. You can access VBA modules and modify their source code programmatically to update business logic or fix issues across multiple files.
Is this approach suitable for server environments?
Yes. Since it does not rely on Microsoft Excel, this approach is ideal for backend services, automated systems, and cloud-based applications.
Can I read macro code from password-protected Excel files?
It depends on the type of protection applied to the Excel file.
- Workbook protection (file password): You must provide the password (e.g., via Workbook.OpenPassword) when loading the file before accessing its contents.
- VBA project protection: Reading macro code is generally allowed, but modifying project-level properties (such as name or description) requires the VBA project password.
Additionally, if the Excel file is digitally signed, any modification to the document (including macros or metadata) will invalidate the signature.
How to Create a CSV File in C# (From Scratch, List, or Excel)
CSV (Comma-Separated Values) files remain one of the most widely used data exchange formats in modern software development. Their simplicity, human-readability, and compatibility across different systems make them ideal for data export, import, and transformation tasks. If you’re a developer looking to create a CSV file in C#, the Spire.XLS for .NET library offers a robust, easy-to-use solution—no need for manual string manipulation or complex Excel interop.
In this guide, we’ll walk you through everything you need to know to create or write CSV files in C# with Spire.XLS, from basic CSV creation to advanced Excel to CSV conversion.
- Why Choose Spire.XLS to Create CSV?
- Getting Started with Spire.XLS
- Create a Basic CSV File in C#
- Create a CSV from a List of Objects with C
- Create a CSV File from Excel in C#
- FAQs (Common Questions)
Why Choose Spire.XLS to Create CSV?
Spire.XLS for .NET is a professional Excel API that provides extensive spreadsheet manipulation capabilities, including robust CSV support. Here's why developers prefer it:
- No Excel Dependency: Unlike Microsoft Office Interop, Spire.XLS works independently of Excel, eliminating dependency issues in production environments.
- Simplified API: Intuitive methods to create, populate, and save CSV files without low-level file handling.
- Seamless Excel-CSV Conversion: Export existing Excel files (XLS/XLSX) to CSV with zero manual parsing.
- Customization: Control delimiters, encodings, and formatting to meet specific CSV requirements.
Getting Started with Spire.XLS
To get started, you need to:
- Have Visual Studio installed.
- Install the Spire.XLS for .NET library via NuGet:
- Visual Studio GUI: Right-click your project → Manage NuGet Packages → Search for Spire.XLS → Install.
- Package Manager Console:
PM> Install-Package Spire.XLS
Create a Basic CSV File in C#
Here's a straightforward example demonstrating how to create a CSV file from scratch:
using System.Text;
using Spire.Xls;

namespace CreateCSV
{
    class Program
    {
        static void Main(string[] args)
        {
            // 1. Create a new Excel workbook
            Workbook workbook = new Workbook();

            // 2. Add a worksheet (CSV is based on a single worksheet)
            Worksheet worksheet = workbook.Worksheets.Add("ProductData");

            // 3. Define header row
            worksheet.Range["A1"].Value = "ProductID";
            worksheet.Range["B1"].Value = "ProductName";
            worksheet.Range["C1"].Value = "Price";
            worksheet.Range["D1"].Value = "InStock";

            // 4. Populate sample data rows
            worksheet.Range["A2"].Value2 = 1001;
            worksheet.Range["B2"].Value = "Laptop XPS 15";
            worksheet.Range["C2"].Value2 = 1299.99;
            worksheet.Range["D2"].Value = "YES";

            worksheet.Range["A3"].Value2 = 1002;
            worksheet.Range["B3"].Value = "Wireless Mouse";
            worksheet.Range["C3"].Value2 = 29.99;
            worksheet.Range["D3"].Value = "NO";

            worksheet.Range["A4"].Value2 = 1003;
            worksheet.Range["B4"].Value = "Mechanical Keyboard";
            worksheet.Range["C4"].Value2 = 89.99;
            worksheet.Range["D4"].Value = "YES";

            // 5. Save as CSV
            worksheet.SaveToFile("ProductList.csv", ",", Encoding.UTF8);
            workbook.Dispose();
        }
    }
}
How It Works:
- Workbook Initialization: Start by creating a Workbook object (Spire.XLS’s core object for Excel/CSV operations).
- Worksheet Creation: Add a worksheet to write data as CSV files map to a single worksheet.
- Data Population: Spire.XLS provides two properties for cell values to handle data types correctly:
- Value: Used for text/string data.
- Value2: Used for booleans, strings, numbers, dates, etc.
- Save as CSV: The SaveToFile method converts the worksheet to a CSV file.
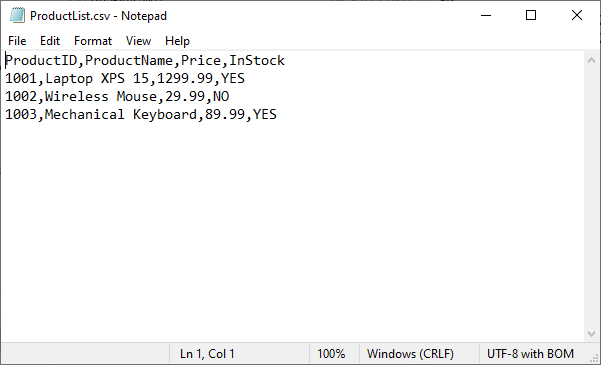
Output:
The generated ProductList.csv will look like this:
If you need to read a CSV file, refer to: Read CSV Files in C#: Basic Parsing & DataTable Conversion
Create a CSV from a List of Objects with C#
In real projects, data usually comes from collections (e.g., List<T>). This example populates a CSV from a list of Product objects:
using System.Collections.Generic;
using System.Text;
using Spire.Xls;
namespace CreateCSVFromList
{
// Define a custom Product class
public class Product
{
public int ID { get; set; }
public string Name { get; set; }
public decimal Price { get; set; }
public bool InStock { get; set; }
}
class Program
{
static void Main(string[] args)
{
// Step 1: Prepare structured list data
List<Product> productList = new List<Product>()
{
new Product { ID = 1001, Name = "Laptop", Price = 999.99m, InStock = true },
new Product { ID = 1002, Name = "T-shirt", Price = 19.99m, InStock = false },
new Product { ID = 1003, Name = "Coffee Mug", Price = 8.99m, InStock = false },
new Product { ID = 1004, Name = "Wireless Mouse", Price = 24.99m, InStock = true }
};
// Step 2: Create Spire.XLS objects
Workbook workbook = new Workbook();
Worksheet worksheet = workbook.Worksheets[0];
// Step 3: Write CSV header (Row 1)
worksheet.Range[1, 1].Text = "ID";
worksheet.Range[1, 2].Text = "Name";
worksheet.Range[1, 3].Text = "Price";
worksheet.Range[1, 4].Text = "InStock";
// Step 4: Fill structured data into worksheet (start from Row 2)
for (int i = 0; i < productList.Count; i++)
{
int rowNum = i + 2;
Product product = productList[i];
// Assign data to cells
worksheet.Range[rowNum, 1].NumberValue = product.ID; // Numeric type
worksheet.Range[rowNum, 2].Text = product.Name; // String type
worksheet.Range[rowNum, 3].NumberValue = (double)product.Price; // Decimal → Double
worksheet.Range[rowNum, 4].BooleanValue = product.InStock; // Boolean value
}
// Step 5: Save as CSV
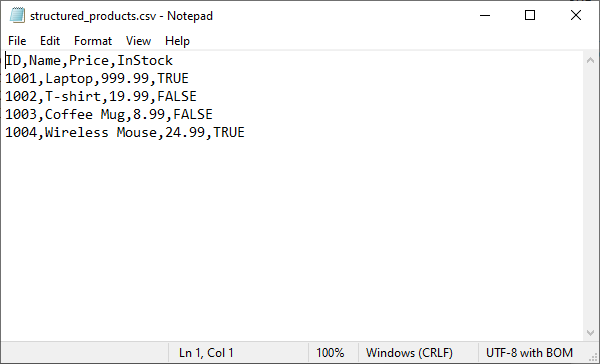
string csvPath = "structured_products.csv";
worksheet.SaveToFile(csvPath, ",", Encoding.UTF8);
workbook.Dispose();
}
}
}
Key Code Explanations:
- Workbook/Worksheet: Spire.XLS uses Workbook to manage worksheets, even for CSV.
- Cell Indexing: Spire.XLS uses 1-based indexing (rows/columns start at 1, not 0).
- Data Type Handling:
- Use .Text for string values (e.g., product name/category).
- Use .NumberValue for numeric values (int/decimal/double).
- Use .BooleanValue for Boolean values.
Output CSV:
Create a CSV File from Excel in C#
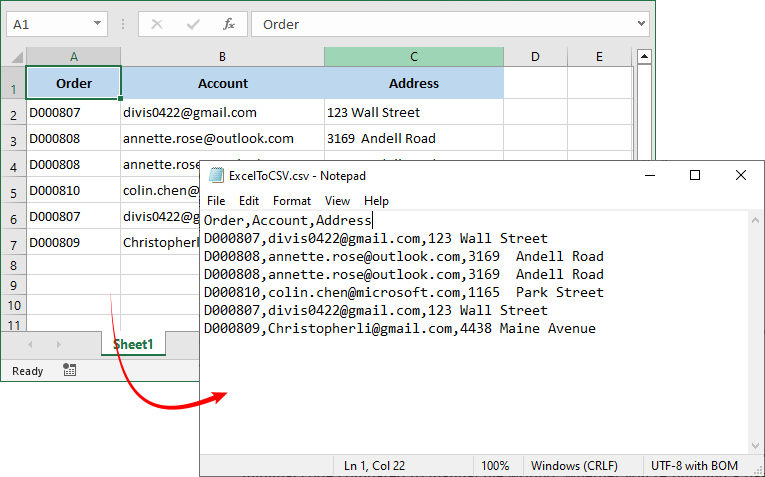
A common real-world scenario is converting Excel to CSV. This example loads an existing Excel file (.xls or .xlsx) and exports its first worksheet to a CSV file.
using System.Text;
using Spire.Xls;

namespace ExcelToCSV
{
    class Program
    {
        static void Main(string[] args)
        {
            // 1. Load an existing Excel file
            Workbook workbook = new Workbook();
            workbook.LoadFromFile("Test.xlsx");

            // 2. Select the first worksheet
            Worksheet worksheet = workbook.Worksheets[0];

            // 3. Save worksheet as CSV
            worksheet.SaveToFile("ExcelToCSV.csv", ",", Encoding.UTF8);
            workbook.Dispose();

        }
    }
}
Excel to CSV Conversion Result:
Customization Tip: You can change the delimiter and encoding parameters of the SaveToFile() method to meet regional requirements.
Conclusion
Creating a CSV file in C# with Spire.XLS for .NET is fast, reliable, and requires minimal code compared to manual file writing. Whether you’re building a basic CSV from scratch, mapping collections to CSV, or converting from Excel files, this guide offers detailed, actionable instructions to streamline your workflow.
With Spire.XLS, you can generate CSV file in C# easily. For more Excel or CSV-related tasks in .NET development, visit the online documentation.
FAQs (Common Questions)
Q1: How to handle non-English characters in CSV?
A: Use Encoding.UTF8 or Encoding.Unicode in SaveToFile to preserve non-ASCII characters.
Q2: Can I create a CSV with multiple worksheets?
A: No—CSV is a single-sheet format. For multiple datasets, create separate CSV files or merge sheets into one before saving.
Q3: How do I save a CSV without a header row?
A: Simply skip writing the header row in the worksheet and start populating data from the first row.
Q4: Is Spire.XLS free?
A: Spire.XLS offers a free version with limitations. Or you can request a trial license here to test its full features without restrictions.
Read CSV Files in C#: Basic Parsing & DataTable Conversion
CSV (Comma-Separated Values) files remain one of the most widely used formats for data exchange between applications. Whether you’re processing financial data, user records, or analytics reports, efficiently reading CSV files in C# is a common task in .NET development.
In this comprehensive guide, we'll explore how to parse CSV files in C# using Spire.XLS for .NET, covering both direct reading and converting CSV to DataTable.
- Install the C# CSV File Reader Library
- Read a CSV File in C#
- Read CSV into a DataTable in C#
- When to Use Each Method
- Conclusion
- FAQs
Install the C# CSV File Reader Library
While primarily designed for Excel files, Spire.XLS can also be used as a .NET CSV reader. It provides excellent support for CSV files, offering a range of features that make CSV processing efficient and straightforward.
The first step is to install the Spire.XLS package in your project. Here's how:
- Open your project in Visual Studio
- Right-click on your project in the Solution Explorer
- Select "Manage NuGet Packages"
- In the NuGet Package Manager, search for "Spire.XLS"
- Click "Install" to add the package to your project
Alternatively, you can install it using the Package Manager Console:
PM> Install-Package Spire.XLS
This will add the necessary dependencies to your project, allowing you to use Spire.XLS classes.
Read a CSV File in C#
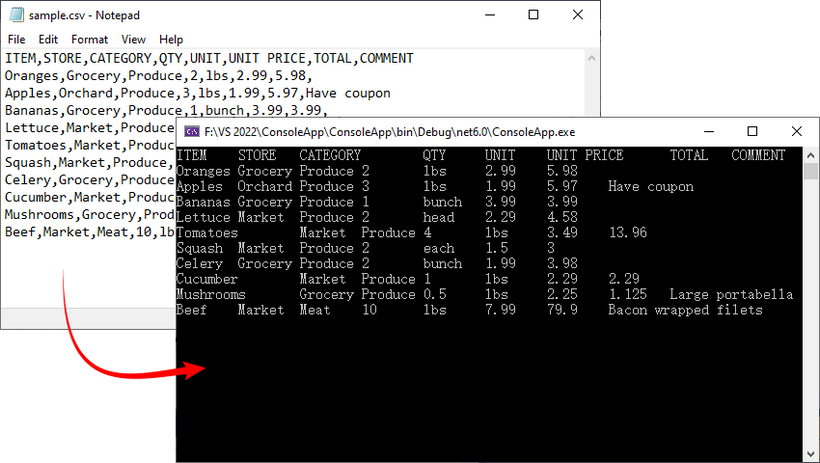
Let's start with the fundamentals: reading a simple CSV file and extracting its data. The C# code example below loads a CSV file, accesses its data, and prints the contents to the console in a tabular format.
using Spire.Xls;

namespace ReadCSV
{
    class Program
    {
        static void Main(string[] args)
        {
            // Create a workbook instance
            Workbook workbook = new Workbook();

            // Load the CSV file
            workbook.LoadFromFile("sample.csv", ",");

            // Get the first worksheet
            Worksheet sheet = workbook.Worksheets[0];

            // Get the used range
            CellRange range = sheet.AllocatedRange;

            // Iterate through rows and columns
            for (int row = 1; row <= range.RowCount; row++)
            {
                for (int col = 1; col <= range.ColumnCount; col++)
                {
                    // Get cell value
                    string cellValue = range[row, col].Value;
                    Console.Write(cellValue + "\t");
                }
                Console.WriteLine();
            }

            Console.ReadLine();
        }
    }
}
Explanation:
- Workbook class: Acts as a "container" for your CSV file in memory. Even though CSV isn’t a full Excel file, Spire.Xls treats it as a single-sheet workbook for consistency.
- Workbook.LoadFromFile(): Loads the CSV file. The parameters are:
- File path: "sample.csv".
- Delimiter: "," (comma, default for CSV).
- Worksheet.AllocatedRange: Retrieves only the cells that contain data.
- CellRange[row, col].Value: Retrieves the value of a specific cell.
Result: CSV data printed in a clean, tab-separated format.
If you need a demo for reading CSV files in VB.NET, convert the code directly using the C# to VB.NET converter.
Read CSV into a DataTable in C#
A DataTable is a versatile in-memory data structure in .NET that simplifies data manipulation (e.g., filtering, sorting, or binding to UI components). Here’s how to load CSV data into a DataTable using Spire.XLS:
using Spire.Xls;
using System.Data;
namespace ReadCSV
{
class Program
{
static void Main(string[] args)
{
// Create a workbook instance
Workbook workbook = new Workbook();
// Load the CSV file
workbook.LoadFromFile("sample.csv", ",");
// Get the first worksheet
Worksheet worksheet = workbook.Worksheets[0];
// Export data from the worksheet to a DataTable
DataTable dataTable = worksheet.ExportDataTable();
// Get row and column count
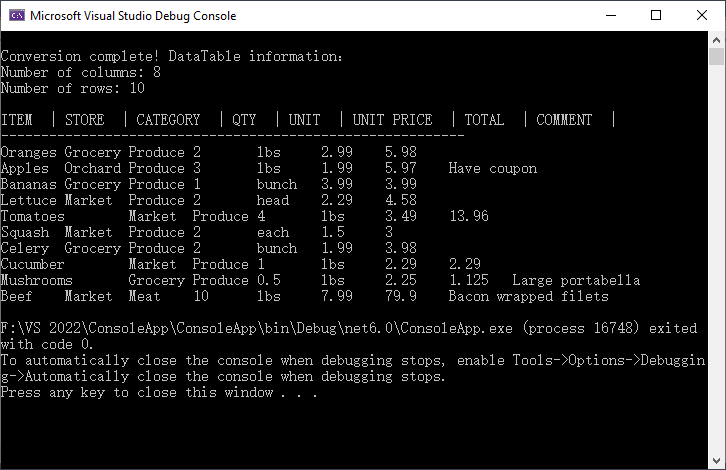
Console.WriteLine("\nConversion complete! DataTable information:");
Console.WriteLine($"Number of columns: {dataTable.Columns.Count}");
Console.WriteLine($"Number of rows: {dataTable.Rows.Count}");
Console.WriteLine();
// Print column names
for (int i = 0; i < dataTable.Columns.Count; i++)
{
Console.Write(dataTable.Columns[i].ColumnName + " | ");
}
Console.WriteLine();
Console.WriteLine("----------------------------------------------------------");
// Print row data
for (int i = 0; i < dataTable.Rows.Count; i++)
{
for (int j = 0; j < dataTable.Columns.Count; j++)
{
string value = dataTable.Rows[i][j].ToString();
Console.Write(value + "\t");
}
Console.WriteLine();
}
}
}
}
Explanation:
- Worksheet.ExportDataTable(): Converts the entire CSV worksheet into a DataTable.
- Metadata Access: DataTable.Columns.Count and DataTable.Rows.Count shows the size of your dataset, helping you verify that the import was successful.
- Column Headers and Data Output: Iterates through to display column names and row data.
Result: Structured output with metadata, headers, and rows:
To analyze, calculate, or format the data, you can convert CSV to Excel in C#.
When to Use Each Method
Choose the right approach based on your goal:
| Method | Best For | Use Case Example |
|---|---|---|
| Direct CSV Reading | Quick data verification | Checking if a CSV is loaded correctly. |
| Convert to DataTable | Advanced data processing | Filtering rows, sorting, or saving to SQL Server. |
Conclusion
Reading CSV files in C# is streamlined with Spire.XLS for .NET, and converting CSV data to a DataTable adds flexibility for data manipulation. Whether you’re working with small datasets or large files, Spire.XLS offers flexible options to meet your requirements.
The code examples in this guide are ready to use - just copy, paste, and adjust for your CSV file path. For more advanced features, refer to Spire.XLS’s official documentation.
FAQs (Common Questions)
Q1: Why choose Spire.XLS for CSV reading?
A: While the .NET Framework offers built-in StreamReader for CSV handling, Spire.XLS provides several distinct advantages:
- No dependencies: Doesn't require Microsoft Excel or Office to be installed
- High performance: Optimized for handling large CSV files efficiently
- Flexibility: Multiple ways to read CSV data based on your needs
- Cross-platform: Works with .NET Framework, .NET Core, .NET Standard, and Mono
Q2: Can I use a different delimiter (e.g., semicolon or tab)?
A: Yes. Replace the second parameter of LoadFromFile() method with your delimiter:
// For tab-delimited files
workbook.LoadFromFile("data.txt", "\t");

// For semicolon-delimited files
workbook.LoadFromFile("data.csv", ";");

// For pipe-delimited files
workbook.LoadFromFile("data.csv", "|");
Q3: Can I read specified rows or columns from a CSV file?
A: Yes. You can target a precise subset of your data by defining exact row and column boundaries. This is useful for extracting specific information (e.g., skipping headers, focusing on relevant columns) without processing the entire file.
For example:
// Define the specific range
int startRow = 2;   // Start from row 2 (skip header)
int endRow = 4;     // End at row 4
int startCol = 2;   // Start from column 2
int endCol = 6;     // End at column 6


// Loop through rows and columns
for (int row = startRow; row <= endRow; row++)
{
   for (int col = startCol; col <= endCol; col++)
   {
      // Get cell value
      string cellValue = worksheet.Range[row, col].Value;
      Console.Write(cellValue + "\t");
Note: Spire.Xls uses 1-based indexing (like Excel), so the first row/column is numbered 1 (not 0).
Generate Excel File in C# – Create and Export in .NET & ASP.NET
Generating Excel files in C# is a common task for developers building reporting systems, exporting structured data, or automating Excel-based workflows. Whether you're building desktop tools, web APIs with ASP.NET Core, or cross-platform apps using .NET, the ability to generate .xlsx files programmatically can simplify many data exchange scenarios.
In this guide, you'll learn how to generate Excel files in C# using Spire.XLS for .NET — a standalone Excel library that works seamlessly across different types of .NET applications — from desktop tools to web services and background jobs. We’ll cover use cases such as creating spreadsheets from scratch, exporting data from a DataTable, generating files on the server side, and applying formatting or formulas, all with practical code examples.
Table of Contents
- Set Up the Environment
- Create Excel Files from Scratch in C#
- Export DataTable to Excel in C#
- Apply Formatting and Formulas in Excel
- Generate Excel Files in ASP.NET Core
- Generate Excel Files in ASP.NET Web Forms
- FAQ
- Conclusion
Set Up the Environment
Spire.XLS for .NET is a lightweight Excel library that allows you to create .xlsx/.xls files entirely through code — without installing Microsoft Office or using COM Interop. This makes it an ideal solution for web servers, microservices, and cloud-hosted applications.
You can install the library via NuGet:
Install-Package Spire.XLS
For smaller tasks, Free Spire.XLS for .NET is also a good choice:
Install-Package FreeSpire.XLS
Create Excel Files from Scratch in C#
For simple tasks like configuration files, small datasets, or template generation, creating an Excel file from scratch in C# provides full control over content and layout.
The example below shows how to generate a basic worksheet with text and numeric data:
using Spire.Xls;
// Create a new workbook and worksheet
Workbook workbook = new Workbook();
Worksheet sheet = workbook.Worksheets[0];
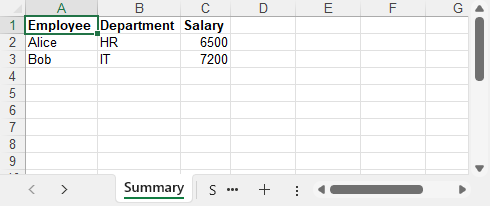
sheet.Name = "Summary";
// Fill in headers and data
// Access cells by name
sheet.Range["A1"].Text = "Employee";
sheet.Range["B1"].Text = "Department";
sheet.Range["C1"].Text = "Salary";
// Access cells by row and column
sheet.Range[2, 1].Text = "Alice";
sheet.Range[2, 2].Text = "HR";
sheet.Range[2, 3].NumberValue = 6500;
sheet.Range[3, 1].Text = "Bob";
sheet.Range[3, 2].Text = "IT";
sheet.Range[3, 3].NumberValue = 7200;
// Apply styles
CellStyle headerStyle = workbook.Styles.Add("Header");
headerStyle.Font.IsBold = true;
sheet.Range["A1:C1"].Style = headerStyle;
// sheet.Range[1, 1, 1, 3].Style = headerStyle;
// Auto-fit columns
sheet.AllocatedRange.AutoFitColumns();
// Save the file
workbook.SaveToFile("BasicExcel.xlsx", ExcelVersion.Version2016);
workbook.Dispose();
Example output: A basic Excel file with employee names, departments, and salaries created in C#.
This approach works entirely without Excel installed, and is ideal for lightweight, structured exports.
Export DataTable to Excel in C#
When working with databases or APIs, exporting a DataTable directly to Excel in C# is often necessary. Instead of looping through rows manually, Spire.XLS provides an efficient way to load structured data in one line.
Here’s how you can convert a DataTable into a worksheet, including headers:
using System.Data;
using Spire.Xls;
// Create a simulated data table
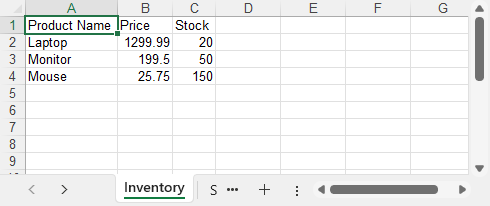
DataTable dt = new DataTable("Products");
dt.Columns.Add("Product Name", typeof(string));
dt.Columns.Add("Price", typeof(double));
dt.Columns.Add("Stock", typeof(int));
dt.Rows.Add("Laptop", 1299.99, 20);
dt.Rows.Add("Monitor", 199.5, 50);
dt.Rows.Add("Mouse", 25.75, 150);
// Import into Excel
Workbook workbook = new Workbook();
Worksheet sheet = workbook.Worksheets[0];
sheet.Name = "Inventory";
sheet.InsertDataTable(dt, true, 1, 1);
// Auto-fit column widths
sheet.AllocatedRange.AutoFitColumns();
// Save the file
workbook.SaveToFile("InventoryReport.xlsx", ExcelVersion.Version2016);
workbook.Dispose();
Example output: Excel spreadsheet generated from a DataTable containing product details, prices, and stock levels.
This is a common approach for exporting reports, inventory lists, and analytics — with no Excel or Interop automation required.
Related article: Convert Data Between Excel Files and DataTable in C#
Apply Formatting and Formulas in Excel Using C#
In addition to exporting raw data, you can generate professional Excel files in C# by applying formatting, styling, and formulas — improving readability and enabling automatic calculations.
Below is an example that demonstrates basic styling and formula use:
using Spire.Xls;
using System.Drawing;
Workbook workbook = new Workbook();
Worksheet sheet = workbook.Worksheets[0];
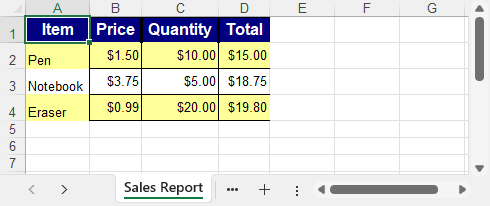
sheet.Name = "Sales Report";
// Set header labels
sheet.Range["A1"].Text = "Item";
sheet.Range["B1"].Text = "Price";
sheet.Range["C1"].Text = "Quantity";
sheet.Range["D1"].Text = "Total";
// Add sample data
string[,] items = {
{ "Pen", "1.5", "10" },
{ "Notebook", "3.75", "5" },
{ "Eraser", "0.99", "20" }
};
for (int i = 0; i < items.GetLength(0); i++)
{
int row = i + 2;
sheet.Range[$"A{row}"].Text = items[i, 0];
sheet.Range[$"B{row}"].NumberValue = double.Parse(items[i, 1]);
sheet.Range[$"C{row}"].NumberValue = double.Parse(items[i, 2]);
sheet.Range[$"D{row}"].Formula = $"=B{row}*C{row}";
}
// Style: Header row
CellStyle headerStyle = workbook.Styles.Add("HeaderStyle");
headerStyle.Font.IsBold = true;
headerStyle.Font.Color = Color.White;
headerStyle.Font.Size = 12;
headerStyle.KnownColor = ExcelColors.DarkBlue;
headerStyle.HorizontalAlignment = HorizontalAlignType.Center;
headerStyle.VerticalAlignment = VerticalAlignType.Center;
headerStyle.Borders[BordersLineType.EdgeTop].LineStyle = LineStyleType.Thick;
headerStyle.Borders[BordersLineType.EdgeLeft].LineStyle = LineStyleType.Thick;
sheet.Range["A1:D1"].Style = headerStyle;
sheet.Range["A1:D1"].RowHeight = 22;
// Style: Data cells
CellStyle dataStyle = workbook.Styles.Add("DataStyle");
dataStyle.NumberFormat = "\"$\"#,##0.00";
dataStyle.HorizontalAlignment = HorizontalAlignType.Right;
dataStyle.VerticalAlignment = VerticalAlignType.Center;
dataStyle.Borders[BordersLineType.EdgeLeft].LineStyle = LineStyleType.Thin;
dataStyle.Borders[BordersLineType.EdgeBottom].LineStyle = LineStyleType.Thin;
// Apply data style to Price, Quantity, Total
sheet.Range["B2:D4"].Style = dataStyle;
// Optional: Alternating row colors for readability
for (int r = 2; r <= 4; r++)
{
if (r % 2 == 0)
sheet.Range[$"A{r}:D{r}"].Style.KnownColor = ExcelColors.LightYellow;
}
// Adjust widths and heights
sheet.AllocatedRange.AutoFitColumns();
sheet.AllocatedRange.RowHeight = 20;
// Save file
workbook.SaveToFile("styled.xlsx", FileFormat.Version2016);
workbook.Dispose();
Example output: A styled Excel sheet with headers, formulas, alternating row colors, and formatted currency values.
By using C# and Spire.XLS, you can apply styles, borders, colors, alignments, and Excel-compatible formulas to generate clean, automated, and user-friendly Excel reports.
To further enhance your Excel reports, you can also apply number formats such as currency, percentage, or custom formats. Learn more about setting number formats in C#
Generate Excel Files in ASP.NET Core
In modern ASP.NET Core applications (e.g., .NET 6/7/8), generating Excel files is a common requirement for admin dashboards, data exports, and reporting features. The example below shows how to generate an Excel file on the server and return it as a downloadable file from a Razor Page handler.
Here’s how you can implement it in a Razor Pages project:
using Microsoft.AspNetCore.Mvc;
using Microsoft.AspNetCore.Mvc.RazorPages;
using Spire.Xls;
using System.Data;
public class ExportModel : PageModel
{
public IActionResult OnGet()
{
// Simulated data
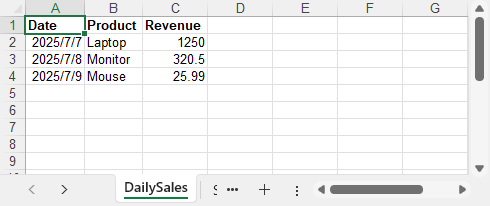
DataTable dt = new DataTable("Sales");
dt.Columns.Add("Date", typeof(DateTime));
dt.Columns.Add("Product", typeof(string));
dt.Columns.Add("Revenue", typeof(double));
dt.Rows.Add(DateTime.Today.AddDays(-2), "Laptop", 1250.00);
dt.Rows.Add(DateTime.Today.AddDays(-1), "Monitor", 320.50);
dt.Rows.Add(DateTime.Today, "Mouse", 25.99);
// Create Excel workbook and sheet
Workbook workbook = new Workbook();
Worksheet sheet = workbook.Worksheets[0];
sheet.Name = "DailySales";
// Insert data
sheet.InsertDataTable(dt, true, 1, 1);
// Apply simple header style
CellStyle headerStyle = workbook.Styles.Add("HeaderStyle");
headerStyle.Font.IsBold = true;
sheet.Rows[0].Style = headerStyle;
sheet.AllocatedRange.AutoFitColumns();
// Save to memory stream
using var stream = new MemoryStream();
workbook.SaveToStream(stream, FileFormat.Version2016);
stream.Position = 0;
// Return file to browser
return File(stream.ToArray(),
"application/vnd.openxmlformats-officedocument.spreadsheetml.sheet",
"SalesReport.xlsx");
}
}
Example output: Daily sales report generated in a .NET 8 console app with date, product, and revenue columns.
This method is ideal for web-based reporting tools, internal portals, and admin dashboards that require dynamic Excel downloads.
- ✅ Works in ASP.NET Core 3.1, .NET 5, .NET 6, .NET 7, .NET 8
- ✅ Suitable for: Razor Pages, MVC, and API endpoints with file download support
Generate Excel Files in ASP.NET Web Forms
If you're building an internal admin panel or classic ASP.NET Web Forms application, you may want to allow users to download Excel files directly from the browser. The example below demonstrates how to create an Excel file entirely in memory and return it in the HTTP response for immediate download — without saving it to disk.
using Spire.Xls;
using System;
using System.IO;
namespace YourNamespace
{
public partial class Default : System.Web.UI.Page
{
protected void btnExport_Click(object sender, EventArgs e)
{
// Create Excel file and output for download
Workbook workbook = new Workbook();
Worksheet sheet = workbook.Worksheets[0];
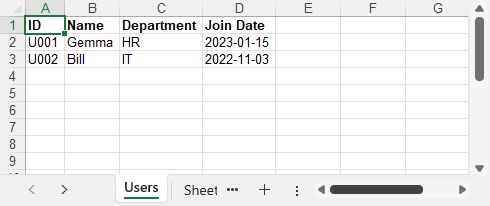
sheet.Name = "Users";
// Headers
string[] headers = { "ID", "Name", "Department", "Join Date" };
for (int i = 0; i < headers.Length; i++)
{
sheet.Range[1, i + 1].Text = headers[i];
sheet.Range[1, i + 1].Style.Font.IsBold = true;
}
// Sample data
string[,] data = {
{ "U001", "Gemma", "HR", "2023-01-15" },
{ "U002", "Bill", "IT", "2022-11-03" }
};
// Fill data
for (int r = 0; r < data.GetLength(0); r++)
for (int c = 0; c < data.GetLength(1); c++)
sheet.Range[r + 2, c + 1].Text = data[r, c];
// Auto-fit column widths
sheet.AllocatedRange.AutoFitColumns();
// Export for browser download
using (MemoryStream ms = new MemoryStream())
{
workbook.SaveToStream(ms, FileFormat.Version2016);
byte[] bytes = ms.ToArray();
Response.Clear();
Response.ContentType = "application/vnd.openxmlformats-officedocument.spreadsheetml.sheet";
Response.AddHeader("Content-Disposition", "attachment; filename=Users.xlsx");
Response.BinaryWrite(bytes);
Response.End();
}
}
}
}
Example output: Excel file created and streamed to browser in ASP.NET containing employee records.
This pattern allows Excel files to be generated and downloaded dynamically, without writing to disk or requiring Office installed on the server.
FAQ
How to create an Excel file from C#?
You can use a library like Spire.XLS to create a new workbook, write data to worksheets, and save it as an Excel file — all without Office installed.
How to export an Excel file in C#?
If you want to export data (e.g. from a DataTable), you can load it into a worksheet and save the file using Spire.XLS. It supports automatic column headers and formatting.
How to generate Excel files in ASP.NET using C#?
You can generate Excel files in both ASP.NET Web Forms and ASP.NET Core using Spire.XLS. In ASP.NET Core, create the file in memory and return it in the HTTP response. In Web Forms, use a similar approach with Response.BinaryWrite() to stream the file to the browser.
Is Spire.XLS compatible with .NET Core?
Yes. It supports .NET Core 3.1+, .NET 5, .NET 6, .NET 7, and .NET 8, making it suitable for cross-platform Excel generation.
Conclusion
With Spire.XLS for .NET, you can easily generate Excel files in C# for any scenario — including desktop, ASP.NET Core, and classic Web Forms applications. Whether you need to export a DataTable, generate formatted reports, or automate Excel output, this guide helps you build Excel files in C# with zero dependencies.
Apply for a Free Temporary License to unlock all features and remove evaluation warnings.
C#: Set Page Setup Options in Excel
When printing Excel spreadsheets, particularly those containing complex datasets or detailed reports, configuring the page setup properly is crucial. Excel’s page setup options enable you to adjust key factors such as page margins, orientation, paper size, and scaling, ensuring your documents are tailored to fit various printing needs. By customizing these settings, you can control how your content is displayed on the page, making sure it appears polished and professional. In this article, we will demonstrate how to set page setup options in Excel in C# using Spire.XLS for .NET.
- Set Page Margins in Excel in C#
- Set Page Orientation in Excel in C#
- Set Paper Size in Excel in C#
- Set Print Area in Excel in C#
- Set Scaling Factor in Excel in C#
- Set Fit-to-Pages Options in Excel in C#
- Set Headers and Footers in Excel in C#
Install Spire.XLS for .NET
To begin with, you need to add the DLL files included in the Spire.XLS for .NET package as references in your .NET project. The DLL files can be either downloaded from this link or installed via NuGet.
PM> Install-Package Spire.XLS
Set Page Margins in Excel in C#
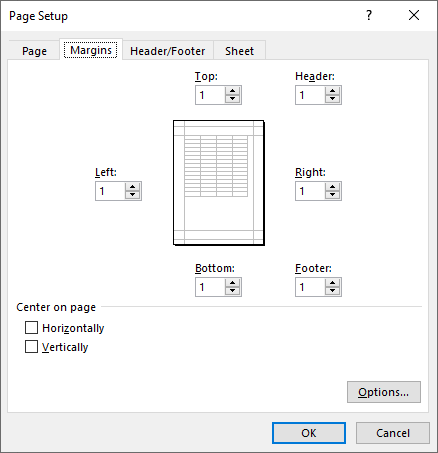
The PageSetup class in Spire.XLS for .NET is used to configure page setup options for Excel worksheets. You can access the PageSetup object of a worksheet through the Worksheet.PageSetup property. Then, use properties like PageSetup.TopMargin, PageSetup.BottomMargin, PageSetup.LeftMargin, PageSetup.RightMargin, PageSetup.HeaderMarginInch, and PageSetup.FooterMarginInch to set the corresponding margins for the worksheet. The detailed steps are as follows.
- Create an object of the Workbook class.
- Load an Excel file using Workbook.LoadFromFile() method.
- Get a specific worksheet using Workbook.Worksheets[index] property.
- Access the PageSetup object of the worksheet using Worksheet.PageSetup property.
- Set the top, bottom, left, right, header, and footer margins using PageSetup.TopMargin, PageSetup.BottomMargin, PageSetup.LeftMargin, PageSetup.RightMargin, PageSetup.HeaderMarginInch, and PageSetup.FooterMarginInch properties.
- Save the modified workbook to a new file using Workbook.SaveToFile() method.
- C#
using Spire.Xls;

namespace SetPageMargins
{
    internal class Program
    {
        static void Main(string[] args)
        {
            // Create a Workbook object
            Workbook workbook = new Workbook();

            // Load an Excel file
            workbook.LoadFromFile("Sample.xlsx");

            // Get the first worksheet
            Worksheet sheet = workbook.Worksheets[0];

            // Get the PageSetup object of the worksheet
            PageSetup pageSetup = sheet.PageSetup;

            // Set top, bottom, left, and right page margins for the worksheet
            // The measure of the unit is Inch (1 inch = 2.54 cm)
            pageSetup.TopMargin = 1;
            pageSetup.BottomMargin = 1;
            pageSetup.LeftMargin = 1;
            pageSetup.RightMargin = 1;
            pageSetup.HeaderMarginInch = 1;
            pageSetup.FooterMarginInch = 1;

            // Save the modified workbook to a new file
            workbook.SaveToFile("SetPageMargins.xlsx", ExcelVersion.Version2016);
            workbook.Dispose();
        }
    }
}
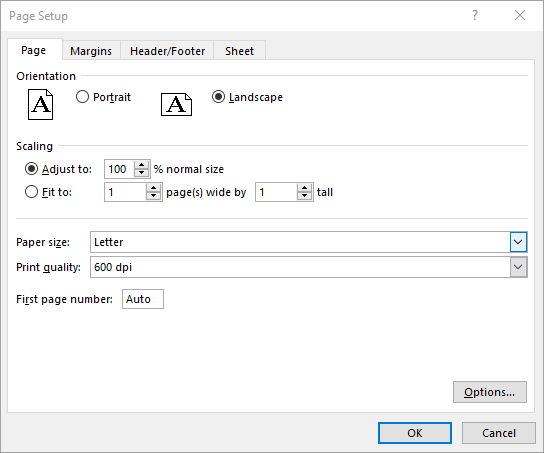
Set Page Orientation in Excel in C#
The PageSetup.Orientation property lets you determine how the page should be oriented when printed. You can choose between two options: portrait mode or landscape mode. The detailed steps are as follows.
- Create an object of the Workbook class.
- Load an Excel file using Workbook.LoadFromFile() method.
- Get a specific worksheet using Workbook.Worksheets[index] property.
- Access the PageSetup object of the worksheet using Worksheet.PageSetup property.
- Set the page orientation using PageSetup.Orientation property.
- Save the modified workbook to a new file using Workbook.SaveToFile() method.
- C#
using Spire.Xls;

namespace SetPageOrientation
{
    internal class Program
    {
        static void Main(string[] args)
        {
            // Create a Workbook object
            Workbook workbook = new Workbook();

            // Load an Excel file
            workbook.LoadFromFile("Sample.xlsx");

            // Get the first worksheet
            Worksheet sheet = workbook.Worksheets[0];

            // Get the PageSetup object of the worksheet
            PageSetup pageSetup = sheet.PageSetup;

            // Set the page orientation for printing the worksheet to landscape mode
            pageSetup.Orientation = PageOrientationType.Landscape;

            // Save the modified workbook to a new file
            workbook.SaveToFile("SetPageOrientation.xlsx", ExcelVersion.Version2016);
            workbook.Dispose();
        }
    }
}
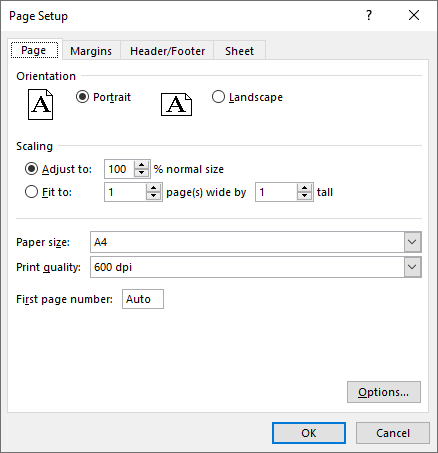
Set Paper Size in Excel in C#
The PageSetup.PaperSize property enables you to select from a variety of paper sizes for printing your worksheet. These options include A3, A4, A5, B4, B5, letter, legal, tabloid, and more. The detailed steps are as follows.
- Create an object of the Workbook class.
- Load an Excel file using Workbook.LoadFromFile() method.
- Get a specific worksheet using Workbook.Worksheets[index] property.
- Access the PageSetup object of the worksheet using Worksheet.PageSetup property.
- Set the paper size using PageSetup.PaperSize property.
- Save the modified workbook to a new file using Workbook.SaveToFile() method.
- C#
using Spire.Xls;

namespace SetPaperSize
{
    internal class Program
    {
        static void Main(string[] args)
        {
            // Create a Workbook object
            Workbook workbook = new Workbook();

            // Load an Excel file
            workbook.LoadFromFile("Sample.xlsx");

            // Get the first worksheet
            Worksheet sheet = workbook.Worksheets[0];

            // Get the PageSetup object of the worksheet
            PageSetup pageSetup = sheet.PageSetup;

            // Set the paper size to A4
            pageSetup.PaperSize = PaperSizeType.PaperA4;

            // Save the modified workbook to a new file
            workbook.SaveToFile("SetPaperSize.xlsx", ExcelVersion.Version2016);
            workbook.Dispose();
        }
    }
}
Set Print Area in Excel in C#
You can specify the exact area that you want to print using the PageSetup.PringArea property. The detailed steps are as follows.
- Create an object of the Workbook class.
- Load an Excel file using Workbook.LoadFromFile() method.
- Get a specific worksheet using Workbook.Worksheets[index] property.
- Access the PageSetup object of the worksheet using Worksheet.PageSetup property.
- Set the print area using PageSetup.PringArea property.
- Save the modified workbook to a new file using Workbook.SaveToFile() method.
- C#
using Spire.Xls;

namespace SetPrintArea
{
    internal class Program
    {
        static void Main(string[] args)
        {
            // Create a Workbook object
            Workbook workbook = new Workbook();

            // Load an Excel file
            workbook.LoadFromFile("Sample.xlsx");

            // Get the first worksheet
            Worksheet sheet = workbook.Worksheets[0];

            // Get the PageSetup object of the worksheet
            PageSetup pageSetup = sheet.PageSetup;

            // Set the print area of the worksheet to "A1:E5"
            pageSetup.PrintArea = "A1:E5";

            // Save the modified workbook to a new file
            workbook.SaveToFile("SetPrintArea.xlsx", ExcelVersion.Version2016);
            workbook.Dispose();
        }
    }
}

Set Scaling Factor in Excel in C#
If you want to scale the content of your worksheet to a specific percentage of its original size, use the PageSetup.Zoom property. The detailed steps are as follows.
- Create an object of the Workbook class.
- Load an Excel file using Workbook.LoadFromFile() method.
- Get a specific worksheet using Workbook.Worksheets[index] property.
- Access the PageSetup object of the worksheet using Worksheet.PageSetup property.
- Set the scaling factor using PageSetup.Zoom property.
- Save the modified workbook to a new file using Workbook.SaveToFile() method.
- C#
using Spire.Xls;

namespace SetScalingFactor
{
    internal class Program
    {
        static void Main(string[] args)
        {
            // Create a Workbook object
            Workbook workbook = new Workbook();

            // Load an Excel file
            workbook.LoadFromFile("Sample.xlsx");

            // Get the first worksheet
            Worksheet sheet = workbook.Worksheets[0];

            // Get the PageSetup object of the worksheet
            PageSetup pageSetup = sheet.PageSetup;

            // Set the scaling factor of the worksheet to 90%
            pageSetup.Zoom = 90;

            // Save the modified workbook to a new file
            workbook.SaveToFile("SetScalingFactor.xlsx", ExcelVersion.Version2016);
            workbook.Dispose();
        }
    }
}

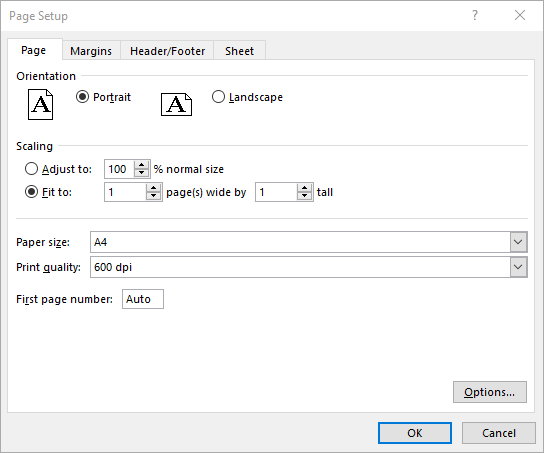
Set Fit-to-Pages Options in Excel in C#
Spire.XLS also enables you to fit your worksheet content to a specific number of pages by using the PageSetup.FitToPagesTall and PageSetup.FitToPagesWide properties. The detailed steps are as follows.
- Create an object of the Workbook class.
- Load an Excel file using Workbook.LoadFromFile() method.
- Get a specific worksheet using Workbook.Worksheets[index] property.
- Access the PageSetup object of the worksheet using Worksheet.PageSetup property.
- Fit the content of the worksheet to one page using PageSetup.FitToPagesTall and PageSetup.FitToPagesWide properties.
- Save the modified workbook to a new file using Workbook.SaveToFile() method.
- C#
using Spire.Xls;

namespace SetFitToPages
{
    internal class Program
    {
        static void Main(string[] args)
        {
            // Create a Workbook object
            Workbook workbook = new Workbook();

            // Load an Excel file
            workbook.LoadFromFile("Sample.xlsx");

            // Get the first worksheet
            Worksheet sheet = workbook.Worksheets[0];

            // Get the PageSetup object of the worksheet
            PageSetup pageSetup = sheet.PageSetup;

            // Fit the content of the worksheet within one page vertically (i.e., all rows will fit on a single page)
            pageSetup.FitToPagesTall = 1;
            // Fit the content of the worksheet within one page horizontally (i.e., all columns will fit on a single page)
            pageSetup.FitToPagesWide = 1;

            // Save the modified workbook to a new file
            workbook.SaveToFile("FitToPages.xlsx", ExcelVersion.Version2016);
            workbook.Dispose();
        }
    }
}
Set Headers and Footers in Excel in C#
For setting headers and footers in Excel, please check this article: C#/VB.NET: Add Headers and Footers to Excel.
Apply for a Temporary License
If you'd like to remove the evaluation message from the generated documents, or to get rid of the function limitations, please request a 30-day trial license for yourself.
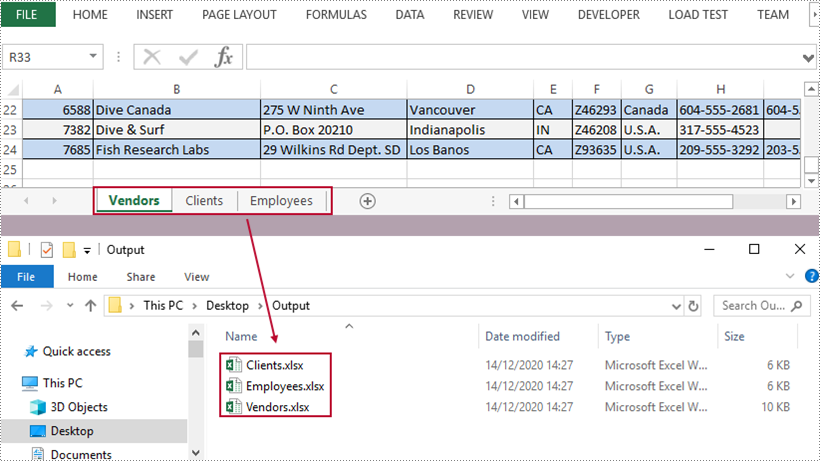
C#/VB.NET: Split Excel Sheets into Separate Files
A workbook containing multiple worksheets helps to centrally manage relevant information, but sometimes we have to split the worksheets into separate Excel files so that individual worksheets can be distributed without disclosing other information. In this article, you will learn how to split Excel worksheets into separate workbooks in C# and VB.NET using Spire.XLS for .NET.
Install Spire.XLS for .NET
To begin with, you need to add the DLL files included in the Spire.XLS for .NET package as references in your .NET project. The DLL files can be either downloaded from this link or installed via NuGet.
PM> Install-Package Spire.XLS
Split Excel Sheets into Separate Files
The following are the main steps to split Excel sheets into separate workbooks using Spire.XLS for .NET.
- Create a Workbook object
- Load a sample Excel file using Workbook.LoadFromFile() method.
- Declare a new Workbook variable, which is used to create new Excel workbooks.
- Loop through the worksheets in the source document.
- Initialize the Workbook object, and add the copy of a specific worksheet of source document into it.
- Save the workbook to an Excel file using Workbook.SaveToFile() method.
- C#
- VB.NET
using Spire.Xls;
using System;

namespace SplitWorksheets
{
    class Program
    {
        static void Main(string[] args)
        {
            //Create a Workbook object
            Workbook wb = new Workbook();

            //Load an Excel document
            wb.LoadFromFile("C:\\Users\\Administrator\\Desktop\\data.xlsx");

            //Declare a new Workbook variable
            Workbook newWb;

            //Declare a String variable
            String sheetName;

            //Specify the folder path which is used to store the generated Excel files
            String folderPath = "C:\\Users\\Administrator\\Desktop\\Output\\";

            //Loop through the worksheets in the source file
            for (int i = 0; i < wb.Worksheets.Count; i++)
            {

                //Initialize the Workbook object
                newWb = new Workbook();

                //Remove the default sheets
                newWb.Worksheets.Clear();

                //Add the specific worksheet of the source document to the new workbook
                newWb.Worksheets.AddCopy(wb.Worksheets[i]);

                //Get the worksheet name
                sheetName = wb.Worksheets[i].Name;

                //Save the new workbook to the specified folder
                newWb.SaveToFile(folderPath + sheetName + ".xlsx", ExcelVersion.Version2013);
            }
        }
    }
}
Apply for a Temporary License
If you'd like to remove the evaluation message from the generated documents, or to get rid of the function limitations, please request a 30-day trial license for yourself.
C#/VB.NET: Accept or Reject Tracked Changes in Excel
When sending an Excel document to others for review, it is recommended to turn on the Track Changes to ensure that all changes made to the worksheet or workbook are recorded. For the altered cells in Excel, each one will be highlighted with a blue triangle in the upper left corner of the cell. You can then view the changes and decide whether to accept or reject them. This article will demonstrate how to programmatically accept or reject all tracked changes in an Excel workbook using Spire.XLS for .NET.
Install Spire.XLS for .NET
To begin with, you need to add the DLL files included in the Spire.XLS for .NET package as references in your .NET project. The DLL files can be either downloaded from this link or installed via NuGet.
PM> Install-Package Spire.XLS
Accept All Tracked Changes in a Workbook
To accept tracked changes in a workbook, you'll first need to determine whether the workbook has tracked changes using Workbook.HasTrackedChanges property. If yes, you can then accept all changes at once using Workbook.AcceptAllTrackedChanges() method. The following are the steps to accept all tracked changes in an Excel workbook.
- Create a Workbook object.
- Load a sample Excel document using Workbook.LoadFromFile() method.
- Determine if the workbook has tracked changes using Workbook.HasTrackedChanges property.
- Accept all tracked changes in the workbook using Workbook.AcceptAllTrackedChanges() method.
- Save the result document using Workbook.SaveToFile() method.
- C#
- VB.NET
using Spire.Xls;

namespace AcceptTrackedChanges
{
    class Program
    {
        static void Main(string[] args)
        {
            //Create a Workbook object
            Workbook workbook = new Workbook();

            //Load a sample Excel document
            workbook.LoadFromFile("Sample.xlsx");

            //Determine if the workbook has tracked changes
            if (workbook.HasTrackedChanges)
            {

                //Accept all tracked changes in the workbook
                workbook.AcceptAllTrackedChanges();
            }

            //Save the result document
            workbook.SaveToFile("AcceptChanges.xlsx", FileFormat.Version2013);
        }
    }
}
Reject All Tracked Changes in a Workbook
If the tracked changes have been proven to exist in a workbook, Spire.XLS for .NET also provides the Workbook.RejectAllTrackedChanges() method to reject all tracked changes at once. The detailed steps are as follows.
- Create a Workbook object.
- Load a sample Excel document using Workbook.LoadFromFile() method.
- Determine if the workbook has tracked changes using Workbook.HasTrackedChanges property.
- Reject all tracked changes in the workbook using Workbook.RejectAllTrackedChanges() method.
- Save the result document using Workbook.SaveToFile() method.
- C#
- VB.NET
using Spire.Xls;
namespace AcceptTrackedChanges
{
class Program
{
static void Main(string[] args)
{
//Create a Workbook object
Workbook workbook = new Workbook();
//Load a sample Excel document
workbook.LoadFromFile("Sample.xlsx");
//Determine if the workbook has tracked changes
if (workbook.HasTrackedChanges)
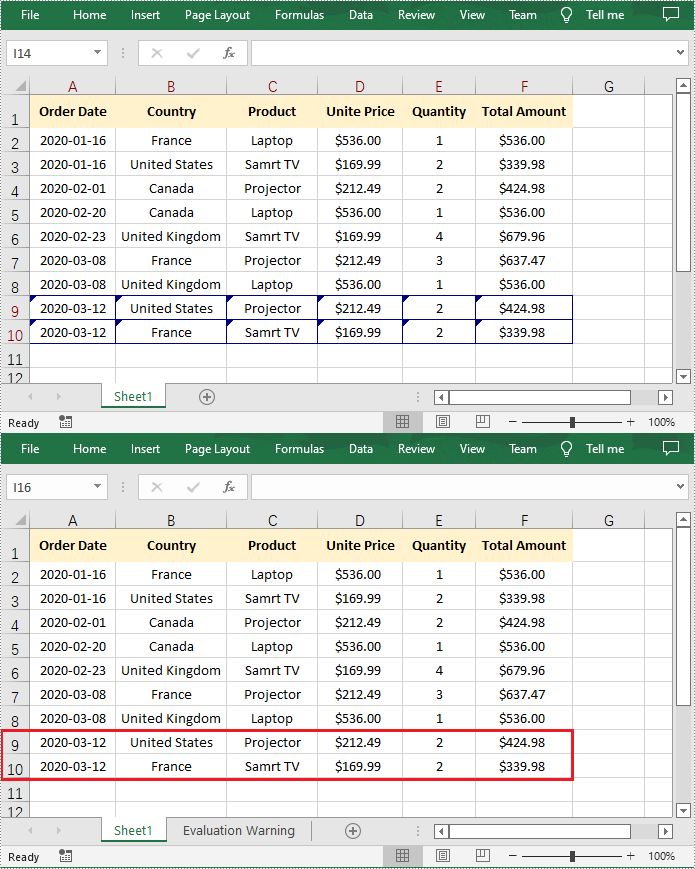
{
//Reject all tracked changes in the workbook
workbook.RejectAllTrackedChanges();
}
//Save the result document
workbook.SaveToFile("RejectChanges.xlsx", FileFormat.Version2013);
}
}
}
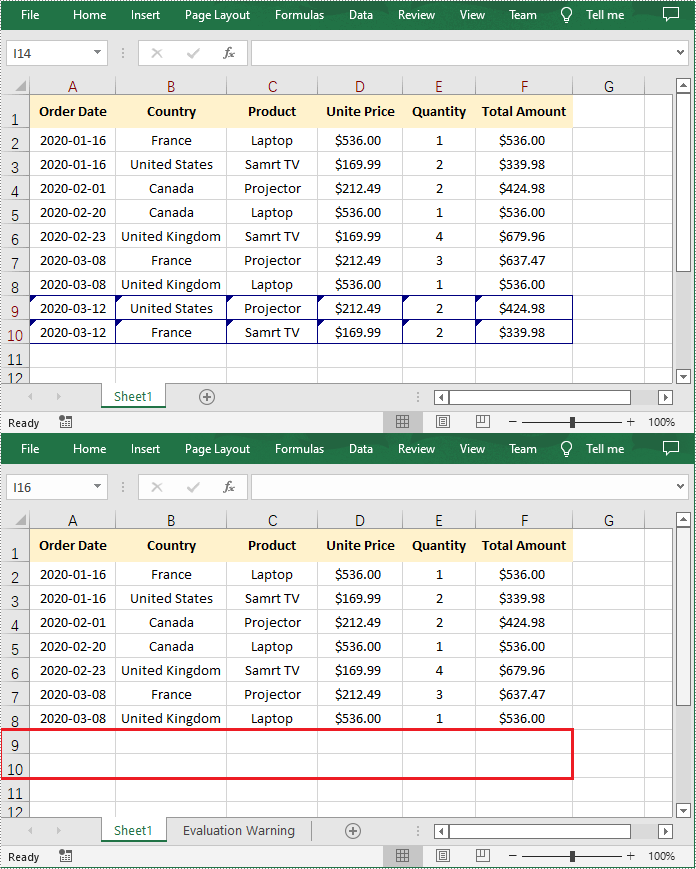
Apply for a Temporary License
If you'd like to remove the evaluation message from the generated documents, or to get rid of the function limitations, please request a 30-day trial license for yourself.
C#/VB.NET hide and unhide window for Excel Workbook
We have demonstrated how to use Spire.XLS for .NET to hide/show Excel worksheets. From Spire.XLS v 10.9.0, it starts to support hide the current window of Excel workbook by setting the property of workbook.IsHideWindow.
using Spire.Xls;

namespace HideWindow
{
    class Program
    {
        static void Main(string[] args)
        {
            //Load Sample Document
            Workbook workbook = new Workbook();
            workbook.LoadFromFile("Sample.xlsx");

            //Hide Excel Window
            workbook.IsHideWindow = true;

             //Save the document to file
            workbook.SaveToFile("result.xlsx", ExcelVersion.Version2013);
        }
    }

}
Imports Spire.Xls

Namespace HideWindow

    Class Program

        Private Shared Sub Main(ByVal args() As String)
            'Load Sample Document
            Dim workbook As Workbook = New Workbook
            workbook.LoadFromFile("Sample.xlsx")
            'Hide Excel Window
            workbook.IsHideWindow = true
            'Save the document to file
            workbook.SaveToFile("result.xlsx", ExcelVersion.Version2013)
        End Sub
    End Class
End Namespace
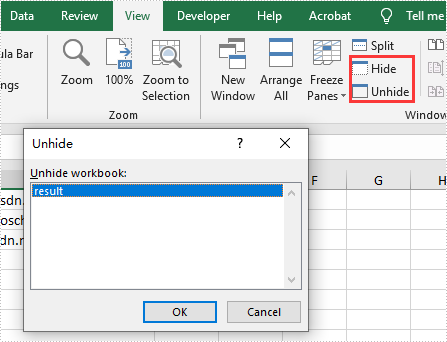
Determine if an Excel File Contains VBA Macros in C#, VB.NET
At some point, programmers may need to determine if an Excel file contains VBA macros. This article is going to show you how to programmatically determine if an Excel file contains VBA macros in C# and VB.NET using Spire.XLS.
Detail steps:
Step 1: Instantiate a Workbook object and load the Excel file.
Workbook workbook = new Workbook();
workbook.LoadFromFile("Macro.xlsm");
Step 2: Determine if the Excel file contains VBA macros.
bool hasMacros = false;
hasMacros = workbook.HasMacros;
if (hasMacros)
{
    Console.WriteLine("The file contains VBA macros");
}

else
{
    Console.WriteLine("The file doesn't contain VBA macros");
}
Screenshot:
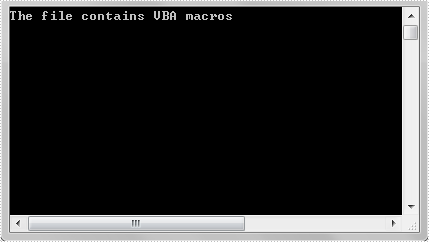
Full code:
using System;
using Spire.Xls;

namespace Determine_if_Excel_file_contains_macros
{
    class Program
    {
        static void Main(string[] args)
        {
            //Instantiate a Workbook object
            Workbook workbook = new Workbook();
            //Load the Excel file
            workbook.LoadFromFile("Macro.xlsm");

            bool hasMacros = false;

            //Determine if the Excel file contains VBA macros
            hasMacros = workbook.HasMacros;

            if (hasMacros)
            {
                Console.WriteLine("The file contains VBA macros");
            }

            else
            {
                Console.WriteLine("The file doesn't contain VBA macros");
            }

            Console.ReadKey();
        }
    }
}
Imports System
Imports Spire.Xls

Namespace Determine_if_Excel_file_contains_macros
    Class Program
        Private Shared Sub Main(ByVal args As String())
            Dim workbook As Workbook = New Workbook()
            workbook.LoadFromFile("Macro.xlsm")
            Dim hasMacros As Boolean = False
            hasMacros = workbook.HasMacros

            If hasMacros Then
                Console.WriteLine("The file contains VBA macros")
            Else
                Console.WriteLine("The file doesn't contain VBA macros")
            End If

            Console.ReadKey()
        End Sub
    End Class
End Namespace