
React (67)
Children categories
Add Multi-Row Text and Image Watermarks to Word Documents with JavaScript in React
2026-11-05 10:01:28 Written by Amy ZhaoMicrosoft Word's built-in watermark feature can place only one watermark at a time, and its position and number are fixed by the built-in layout, so it cannot tile the whole page with multiple rows and columns. For contracts, internal documents and presentation drafts that need full-page coverage, the watermark can be implemented by adding a shape or a picture to the header and then cloning it by row and column.
This article adds multi-row, multi-column text watermarks and image watermarks to Word documents in the browser with Spire.Doc for JavaScript. The whole process runs in the browser on WebAssembly, requires no Office installation and depends on no backend service, and the file always remains on the user's device.
This article covers the following topics:
- Add Multi-Row Text Watermarks
- Add Multi-Row Image Watermarks
- Adjust the Tiling Rows, Columns and Spacing
The two kinds of watermarks are implemented as follows:
| Watermark type | Carrier object | How it is created | Key properties |
|---|---|---|---|
| Text watermark | WordArt shape | new ShapeObject(doc, ShapeType.TextPlainText) |
WordArt.Text, WordArt.FontFamily, Rotation, FillColor |
| Image watermark | Picture object | new DocPicture(doc) with LoadImage() |
TextWrappingStyle, Width, Height |
For installation and project setup, refer to Integrating Spire.Doc for JavaScript in a React Project. The examples below assume that Spire.Doc is installed and the WebAssembly module is initialized. The examples read Sample.docx and logo.png from the project's public/data directory and the font file from the public/font directory, so put the corresponding files into these two directories before running them.
Add Multi-Row Text Watermarks
To add a multi-row, multi-column text watermark, a WordArt shape is created in the header, then cloned in a loop over rows and columns, and each copy is given its own vertical and horizontal coordinates. The watermark object lives in the header, so it is repeated on every page together with the header and does not have to be added page by page.
The following members are involved in adding multi-row text watermarks:
| Member | Purpose |
|---|---|
ShapeObject |
Shape object that carries the watermark text |
ShapeType.TextPlainText |
Sets the shape to ordinary WordArt |
ShapeObject.Width, Height |
Width and height of the shape, in points |
ShapeObject.VerticalPosition, HorizontalPosition |
Vertical and horizontal coordinates of the shape on the page |
ShapeObject.Rotation |
Rotation angle, in degrees |
WordArt.Text, WordArt.FontFamily |
WordArt content and font |
ShapeObject.FillColor, StrokeColor |
Text fill color and outline color |
ShapeObject.Clone() |
Clones the shape for tiling |
HeaderFooter.AddParagraph() |
Adds a paragraph in the header to carry the watermark |
Paragraph.ChildObjects.Add() |
Adds the shape to the header paragraph |
The specific steps are as follows:
- Get the Spire.Doc WASM module and confirm that it is ready.
- Load the sample document and the font into the virtual file system (VFS), create a
Documentobject and load the document. - Create a
ShapeObject, set its shape type toShapeType.TextPlainText, and set its width, height, rotation angle, WordArt content, font, fill color and outline color. - Iterate over every section of the document, get the header through
HeadersFooters.Header, and add a paragraph withAddParagraph(). - Clone the shape with
Clone()in a loop over rows and columns, give each copy its ownVerticalPositionandHorizontalPosition, and add it to theChildObjectsof the header paragraph. - Save the result file with
SaveToFile(), read it from the VFS and trigger a browser download.
The code for adding multi-row text watermarks is as follows:
function App() {
  const addTextWatermark = async () => {
    // Get the Spire.Doc WASM module
    const wasmModule = window.wasmModule?.spiredoc;

    if (!wasmModule) {
      alert('Spire.Doc is not ready yet');
      return;
    }

    // Load the sample document and the font
    await window.spire.FetchFileToVFS('Sample.docx', '', `${process.env.PUBLIC_URL}/data/`);
    await window.spire.FetchFileToVFS('arial.ttf', '/Library/Fonts/', `${process.env.PUBLIC_URL}/font/`);
    await window.spire.FetchFileToVFS('arialbd.ttf', '/Library/Fonts/', `${process.env.PUBLIC_URL}/font/`);

    // Create a Document instance and load the document
    const doc = new wasmModule.Document();
    doc.LoadFromFile('Sample.docx');

    // Create a WordArt shape and set its size, position, rotation and style
    let shape = new wasmModule.ShapeObject(doc, wasmModule.ShapeType.TextPlainText);
    shape.Width = 60;
    shape.Height = 15;
    shape.VerticalPosition = 25;
    shape.HorizontalPosition = 20;
    shape.Rotation = 320;
    shape.WordArt.Text = 'INTERNAL USE';
    shape.WordArt.FontFamily = 'Arial';
    shape.FillColor = wasmModule.Color.FromArgb(255, 255, 0, 0);
    shape.StrokeColor = wasmModule.Color.FromArgb(255, 255, 0, 0);

    // Iterate over all sections and add the watermark to the header of each section
    for (let n = 0; n < doc.Sections.Count; n++) {
      const section = doc.Sections.get_Item(n);
      const header = section.HeadersFooters.Header;
      const paragraph = header.AddParagraph();

      // 5 rows and 6 columns: clone the shape and set the coordinates of each copy
      for (let i = 0; i < 5; i++) {
        for (let j = 0; j < 6; j++) {
          shape = shape.Clone();
          shape.VerticalPosition = 50 + 150 * i;
          shape.HorizontalPosition = 20 + 85 * j;
          paragraph.ChildObjects.Add(shape);
        }
      }
    }

    // Save the result file
    const outputFileName = 'AddTextWatermark.docx';
    doc.SaveToFile({ fileName: outputFileName, fileFormat: wasmModule.FileFormat.Docx2013 });
    doc.Dispose();

    // Read the generated file from the VFS and trigger the download
    const fileArray = window.dotnetRuntime.Module.FS.readFile(outputFileName);
    const blob = new Blob([fileArray], { type: 'application/vnd.openxmlformats-officedocument.wordprocessingml.document' });
    const url = URL.createObjectURL(blob);
    const a = document.createElement('a');
    a.href = url;
    a.download = outputFileName;
    a.click();
    URL.revokeObjectURL(url);
  };

  return (
    <div style={{ textAlign: 'center', height: '300px' }}>
      <h1>Add Multi-Row Text Watermarks</h1>
      <button onClick={addTextWatermark}>Generate Document</button>
    </div>
  );
}

export default App;
After adding multi-row, multi-column text watermarks, the document looks like this:

Add Multi-Row Image Watermarks
To add a multi-row, multi-column image watermark, a picture is loaded into the header, then cloned by row and column and given its own coordinates. Compared with a text watermark, the appearance of an image watermark is determined by the picture itself, and the code only has to control the wrapping style and the arrangement of the copies.
The following members are involved in adding multi-row image watermarks:
| Member | Purpose |
|---|---|
DocPicture |
Object that carries the watermark image |
DocPicture.LoadImage(path) |
Loads the watermark image from the VFS |
TextWrappingStyle.Behind |
Places the picture behind the body text |
DocPicture.VerticalPosition, HorizontalPosition |
Vertical and horizontal coordinates of each copy |
DocPicture.Clone() |
Clones the picture object for tiling |
HeaderFooter.AddParagraph() |
Adds a paragraph in the header to carry the watermark |
Paragraph.ChildObjects.Add() |
Adds the picture to the header paragraph |
The specific steps are as follows:
- Get the Spire.Doc WASM module and confirm that it is ready.
- Load the sample document and the watermark image into the virtual file system (VFS), create a
Documentobject and load the document. - Iterate over every section of the document, get the header through
HeadersFooters.Header, and add a paragraph withAddParagraph(). - Create a
DocPicture, callLoadImage()to load the watermark image, and setTextWrappingStyletoTextWrappingStyle.Behind. - Clone the picture with
Clone()in a loop over rows and columns, give each copy its ownVerticalPositionandHorizontalPosition, and add it to theChildObjectsof the header paragraph. - Save the result file with
SaveToFile(), read it from the VFS and trigger a browser download.
The code for adding multi-row image watermarks is as follows:
function App() {
  const addImageWatermark = async () => {
    // Get the Spire.Doc WASM module
    const wasmModule = window.wasmModule?.spiredoc;

    if (!wasmModule) {
      alert('Spire.Doc is not ready yet');
      return;
    }

    // Load the sample document and the watermark image
    await window.spire.FetchFileToVFS('Sample.docx', '', `${process.env.PUBLIC_URL}/data/`);
    await window.spire.FetchFileToVFS('logo.png', '', `${process.env.PUBLIC_URL}/data/`);

    // Create a Document instance and load the document
    const doc = new wasmModule.Document();
    doc.LoadFromFile('Sample.docx');

    // Iterate over all sections and add the watermark to the header of each section
    for (let n = 0; n < doc.Sections.Count; n++) {
      const section = doc.Sections.get_Item(n);
      const header = section.HeadersFooters.Header;
      const paragraph = header.AddParagraph();

      // Create a picture object and load the watermark image
      const picture = new wasmModule.DocPicture(doc);
      picture.LoadImage('logo.png');
      picture.TextWrappingStyle = wasmModule.TextWrappingStyle.Behind;

      // 5 rows and 3 columns: clone the picture and set the coordinates of each copy
      for (let p = 0; p < 5; p++) {
        for (let q = 0; q < 3; q++) {
          const pic = picture.Clone();
          pic.VerticalPosition = 50 + 150 * p;
          pic.HorizontalPosition = 10 + 150 * q;
          paragraph.ChildObjects.Add(pic);
        }
      }
    }

    // Save the result file
    const outputFileName = 'AddImageWatermark.docx';
    doc.SaveToFile({ fileName: outputFileName, fileFormat: wasmModule.FileFormat.Docx2013 });
    doc.Dispose();

    // Read the generated file from the VFS and trigger the download
    const fileArray = window.dotnetRuntime.Module.FS.readFile(outputFileName);
    const blob = new Blob([fileArray], { type: 'application/vnd.openxmlformats-officedocument.wordprocessingml.document' });
    const url = URL.createObjectURL(blob);
    const a = document.createElement('a');
    a.href = url;
    a.download = outputFileName;
    a.click();
    URL.revokeObjectURL(url);
  };

  return (
    <div style={{ textAlign: 'center', height: '300px' }}>
      <h1>Add Multi-Row Image Watermarks</h1>
      <button onClick={addImageWatermark}>Generate Document</button>
    </div>
  );
}

export default App;
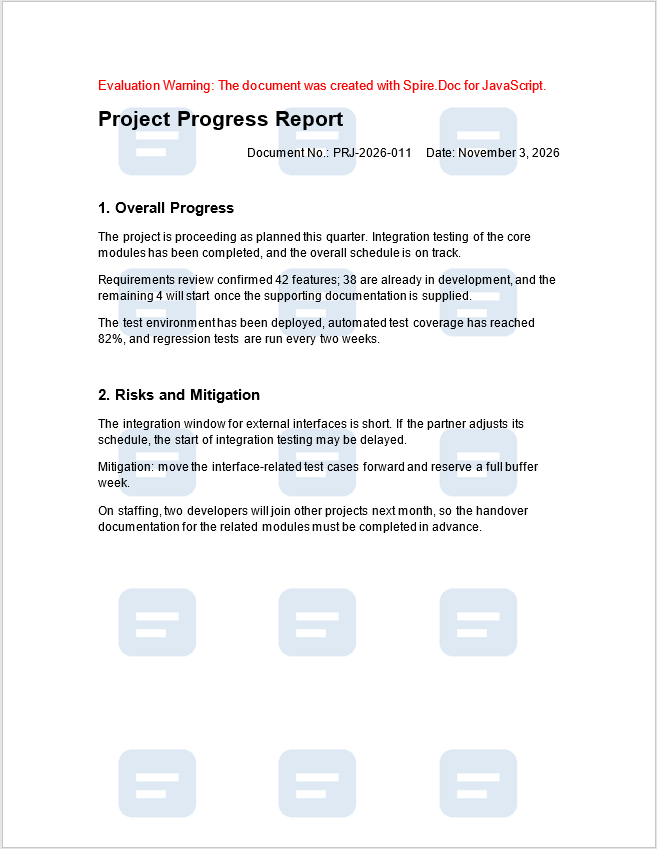
After adding multi-row, multi-column image watermarks, the document looks like this:
Adjust the Tiling Rows, Columns and Spacing
Adjusting the tiling rows, columns and spacing means changing the loop counts and the two coefficients in the coordinate formula: the number of rows and columns determines how many watermarks there are, while the row gap and column gap determine the distance between neighboring watermarks. Together they decide how dense the tiling is on the page.
The coordinate formula used for tiling is as follows:
| Parameter | Example value | Purpose |
|---|---|---|
Rows rows |
4 | Number of watermarks arranged vertically |
Columns cols |
5 | Number of watermarks arranged horizontally |
Row gap rowGap |
180 | Vertical distance between two neighboring rows, in points |
Column gap colGap |
100 | Horizontal distance between two neighboring columns, in points |
| Start coordinates | 40, 20 | Vertical and horizontal coordinates of the first row and first column |
The coordinates of each watermark are calculated as follows:
VerticalPosition = start vertical coordinate + row gap × row indexHorizontalPosition = start horizontal coordinate + column gap × column index
The specific steps are as follows:
- Estimate the width and height available for the watermarks from the page size and the page margins.
- Decide the number of rows and columns, and the start coordinates of the first row and first column.
- Change the loop counts and the row gap and column gap in the coordinate formula, and adjust the width and height of the shape as needed.
- Save the file and preview it, then fine-tune the spacing according to the actual result.
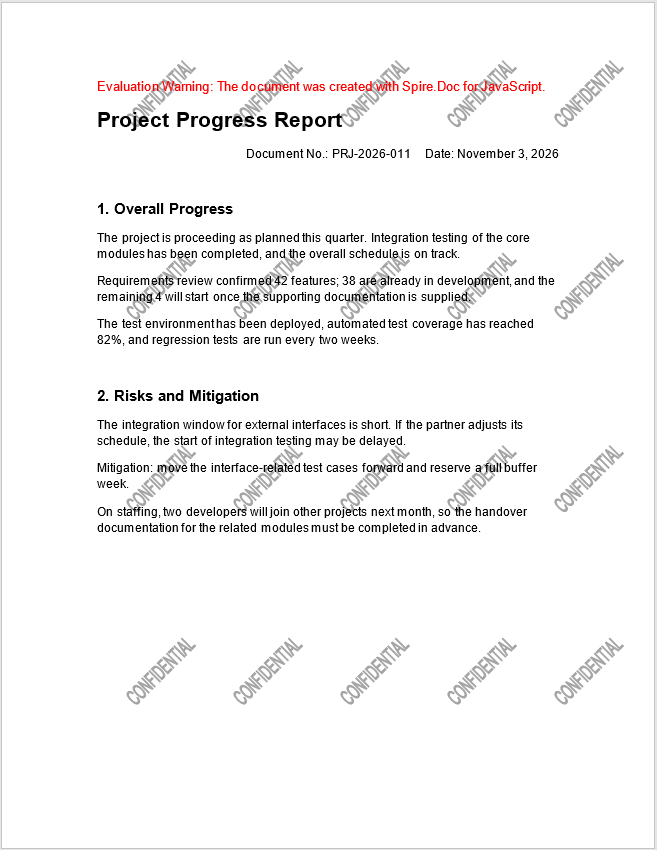
The code for adjusting the tiling rows, columns and spacing is as follows. The example uses 4 rows and 5 columns, a row gap of 180 points and a column gap of 100 points, and changes the watermark to dark gray:
// Number of rows, columns and the spacing
const rows = 4;
const cols = 5;
const rowGap = 180;
const colGap = 100;

// Create the base shape and clone it later with Clone()
const base = new wasmModule.ShapeObject(doc, wasmModule.ShapeType.TextPlainText);
base.Width = 80;
base.Height = 20;
base.Rotation = 315;
base.WordArt.Text = 'CONFIDENTIAL';
base.WordArt.FontFamily = 'Arial';
base.FillColor = wasmModule.Color.FromArgb(255, 70, 70, 70);
base.StrokeColor = wasmModule.Color.FromArgb(255, 70, 70, 70);

for (let n = 0; n < doc.Sections.Count; n++) {
  const header = doc.Sections.get_Item(n).HeadersFooters.Header;
  const paragraph = header.AddParagraph();

  for (let i = 0; i < rows; i++) {
    for (let j = 0; j < cols; j++) {
      const shape = base.Clone();
      shape.VerticalPosition = 40 + rowGap * i;
      shape.HorizontalPosition = 20 + colGap * j;
      paragraph.ChildObjects.Add(shape);
    }
  }
}
After adjusting the rows, columns and spacing, the text watermark looks like this:
FAQ
Why does the watermark not appear on the first page
Cause: Headers are set per section. The example writes to HeadersFooters.Header, which applies to the normal pages of the section. When a document uses "Different first page", the first page uses HeadersFooters.FirstPageHeader instead; when it uses "Different odd and even pages", even pages use HeadersFooters.EvenHeader. The sample document uses neither option, so the watermark appears on every page.
Solution: Add the watermark to HeadersFooters.FirstPageHeader or HeadersFooters.EvenHeader as well when the corresponding option is enabled.
Why do the rightmost columns fall outside the page
Cause: HorizontalPosition is measured in points and starts from the left page margin. With text watermarks 60 points wide, a column gap of 85 points and 6 columns, the right edge of the last column is about 20 + 85 × 5 + 60 = 505 points, which is already close to the right edge of the page once the left margin is added. If the column gap or the number of columns is increased further, the rightmost objects go beyond the page.
Solution: Before adjusting, estimate the total width as "start coordinate + gap × (count − 1) + object width" and compare it with the page width.
Why does the set position differ from the actual position on the page
Cause: Shapes in the header are positioned absolutely: horizontally from the left page margin and vertically from the top of the header area. The sample document has a left margin of 90 points and the header sits 36 points from the top of the page, so with HorizontalPosition = 20 the watermark actually appears at about 110 points from the left edge of the page.
Solution: After changing the template or adjusting the page margins, re-estimate the start coordinates.
Do duplicated image watermarks significantly increase the file size
Usually not. The copies share the same image: Clone() duplicates the picture object and the layout properties, while the image itself is stored only once in the document. The example produces 15 image watermarks, and the word/media/ directory of the docx still contains a single image file, which the other copies reference. The increase in file size comes mainly from the shape and positioning data rather than from the image data.
What if the image watermark covers the body text
The example places the picture behind the body text with TextWrappingStyle.Behind, so the pictures have a negative z-order in the generated document and the body text stays on top. If the watermark is still too prominent, reduce its opacity or use a lighter version when preparing the image; the example uses a semi-transparent, light-colored PNG.
Get a Free License
Spire.Doc for JavaScript offers a 30-day full-featured free trial license with no functional limitations. Apply here to evaluate before purchasing.
Word documents have long carried manuals, reports and contracts, while Markdown serves documentation sites, knowledge bases and code repositories as plain text. Moving existing Word content into Markdown is a routine step in documentation migration and content publishing.
If the conversion runs on a server, the file has to be uploaded first, and the original content leaves the user's device. This article performs the conversion in the browser with Spire.Doc for JavaScript: the Word document is read through a virtual file system (VFS), the export result is written back to the VFS, and the page then reads it and triggers the download. Everything runs in the browser as a WebAssembly module, so no Office installation and no backend service are required.
This article covers three features:
For installation and project setup, refer to Integrating Spire.Doc for JavaScript in a React Project. The examples below assume that Spire.Doc is installed and the WebAssembly module is initialized.
Convert a Word Document to Markdown
The conversion takes two steps: Document.LoadFromFile() reads the .docx into a document object, and Document.SaveToFile() writes a .md file with FileFormat.Markdown as the target format. The saved result first lands in the VFS and is then read and downloaded by the page.
The document structure is written out with the corresponding syntax; the main mappings are as follows:
| Word content | Markdown output |
|---|---|
| Paragraphs with the built-in Heading 1, Heading 2 and other heading styles applied | # and ## headings of the matching level |
| Bold, italic | **text**, *text* |
| Bulleted list | - item |
| Numbered list | 1. item |
| Table | Pipe table with a bold header |
| Image | , with the image written out separately |
| Hyperlink | [text](url) |
The specific steps are as follows:
- Get the Spire.Doc WASM module and confirm that it is ready.
- Load the sample document
Product Release Notes.docxinto the virtual file system (VFS). - Create a
Documentobject and load the document. - Set
MarkdownExportOptions.ImagesFoldertoimagesso that the images are written into that folder. - Save the document with
SaveToFile()asFileFormat.Markdown, producingProduct Release Notes.md. - Read the Markdown text and the image files from the VFS and trigger their browser downloads.
The code for converting a Word document to Markdown is as follows:
// Read the file from VFS and trigger the download
function downloadBlob(blob, fileName) {
  const url = URL.createObjectURL(blob);
  const a = document.createElement('a');
  a.href = url;
  a.download = fileName;
  a.click();
  URL.revokeObjectURL(url);
}

function App() {
  const convertToMarkdown = async () => {
    // Get the Spire.Doc WASM module
    const docModule = window.wasmModule?.spiredoc;

    // Make sure the WASM module has fully loaded
    if (!docModule) {
      alert('Spire.Doc is not ready yet');
      return;
    }

    // Load the sample document into VFS
    await window.spire.FetchFileToVFS('Product Release Notes.docx', '', `${process.env.PUBLIC_URL}/data/`);

    // Create a Document instance and load the Word document
    const doc = new docModule.Document();
    doc.LoadFromFile('Product Release Notes.docx', docModule.FileFormat.Docx2016);

    // Write the images into the images folder in VFS and reference them by relative path
    doc.MarkdownExportOptions.ImagesFolder = 'images';

    // Save as Markdown; the result is written into VFS
    const outputFileName = 'Product Release Notes.md';
    doc.SaveToFile({ fileName: outputFileName, fileFormat: docModule.FileFormat.Markdown });
    doc.Dispose();

    const FS = window.dotnetRuntime.Module.FS;

    // Read the Markdown text and download it (UTF-8 encoding)
    const text = new TextDecoder('utf-8').decode(FS.readFile(outputFileName));
    downloadBlob(new Blob([text], { type: 'text/markdown;charset=utf-8' }), outputFileName);

    // The images are stored separately, so download them as well
    FS.readdir('images')
      .filter((name) => name !== '.' && name !== '..')
      .forEach((name) => {
        const data = FS.readFile(`images/${name}`);
        downloadBlob(new Blob([data], { type: 'image/png' }), name);
      });
  };

  return (
    <div style={{ textAlign: 'center', height: '300px' }}>
      <h1>Convert Word to Markdown</h1>
      <button onClick={convertToMarkdown}>
        Convert and Download
      </button>
    </div>
  );
}

export default App;
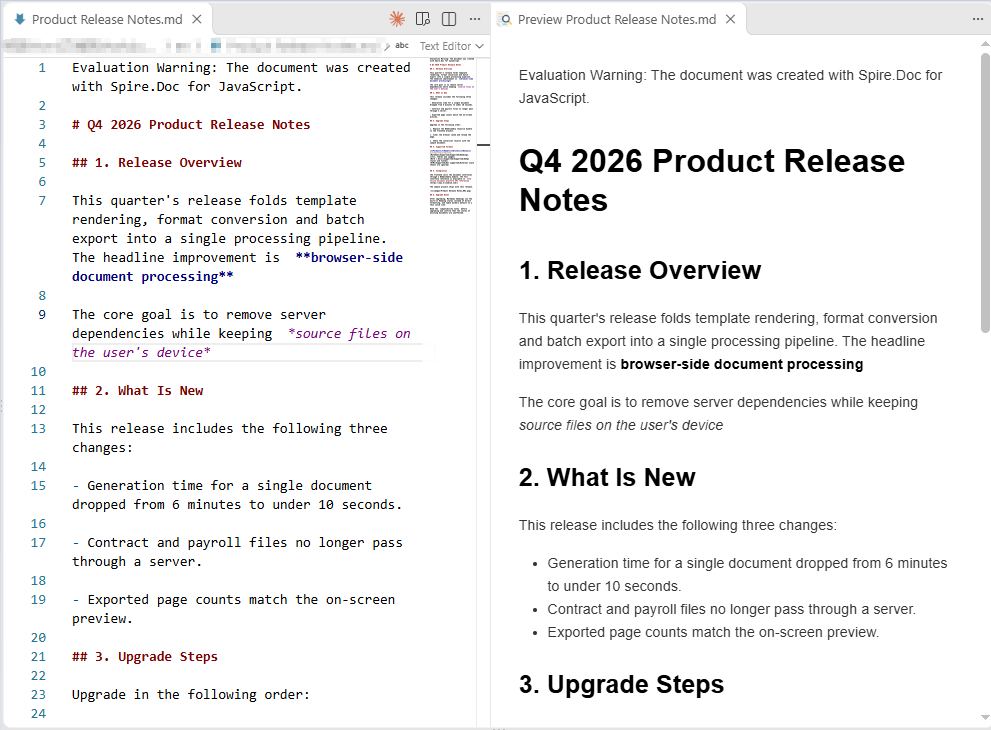
Once the converted Markdown is rendered in a browser, the headings, lists, table, hyperlink and image all appear in their corresponding syntax:
Markdown generated from the Word document, rendered in a browser
Save Images to a Specified Folder
When ImagesFolder is not set, images are written into the root of the VFS under a name prefixed with the output file name, for example Product Release Notes_001.png, and the Markdown references them as /Product Release Notes_001.png. That form makes the files easy to locate directly, but the reference carries a root prefix. Once ImagesFolder is set to a relative folder, the images are written into that folder in the VFS and the references become relative paths:
doc.MarkdownExportOptions.ImagesFolder = 'images';
The conversion result then contains references such as images/Product Release Notes_001.png. The images have to be downloaded together with the .md file; the page can list the folder content with FS.readdir() and read and download each file, as shown in the example above. If the result should be a single file, use the Base64 approach described in the next section instead.
Embed Images as Base64
With MarkdownExportOptions.ImagesAsBase64 = true, the images in the document are no longer written out separately; they are encoded as data URIs and placed directly inside the brackets of ![](). The result is a single .md file, so image paths never break when the file is copied, uploaded or committed to a repository.
The trade-off is file size: Base64-encoded data is about 4/3 the size of the original image. With many images or high-resolution images, the size of a single Markdown file grows noticeably.
The specific steps are as follows:
- Get the Spire.Doc WASM module and confirm that it is ready.
- Load the sample document
Product Release Notes.docxinto the virtual file system (VFS). - Create a
Documentobject and load the document. - Set
MarkdownExportOptions.ImagesAsBase64totrue. - Save the document with
SaveToFile()asFileFormat.Markdown, read the text from the VFS and trigger the download.
The code for embedding images as Base64 is as follows:
function downloadBlob(blob, fileName) {
  const url = URL.createObjectURL(blob);
  const a = document.createElement('a');
  a.href = url;
  a.download = fileName;
  a.click();
  URL.revokeObjectURL(url);
}

function App() {
  const convertWithBase64 = async () => {
    // Get the Spire.Doc WASM module
    const docModule = window.wasmModule?.spiredoc;

    // Make sure the WASM module has fully loaded
    if (!docModule) {
      alert('Spire.Doc is not ready yet');
      return;
    }

    // Load the sample document into VFS
    await window.spire.FetchFileToVFS('Product Release Notes.docx', '', `${process.env.PUBLIC_URL}/data/`);

    // Create a Document instance and load the Word document
    const doc = new docModule.Document();
    doc.LoadFromFile('Product Release Notes.docx', docModule.FileFormat.Docx2016);

    // Write the images into the Markdown as inline Base64
    doc.MarkdownExportOptions.ImagesAsBase64 = true;

    // Save the result file
    const outputFileName = 'Product Release Notes - Inline Images.md';
    doc.SaveToFile({ fileName: outputFileName, fileFormat: docModule.FileFormat.Markdown });
    doc.Dispose();

    // Read the Markdown text and download it; no separate image download is needed
    const text = new TextDecoder('utf-8').decode(window.dotnetRuntime.Module.FS.readFile(outputFileName));
    downloadBlob(new Blob([text], { type: 'text/markdown;charset=utf-8' }), outputFileName);
  };

  return (
    <div style={{ textAlign: 'center', height: '300px' }}>
      <h1>Embed Images as Base64</h1>
      <button onClick={convertWithBase64}>
        Convert and Download
      </button>
    </div>
  );
}

export default App;
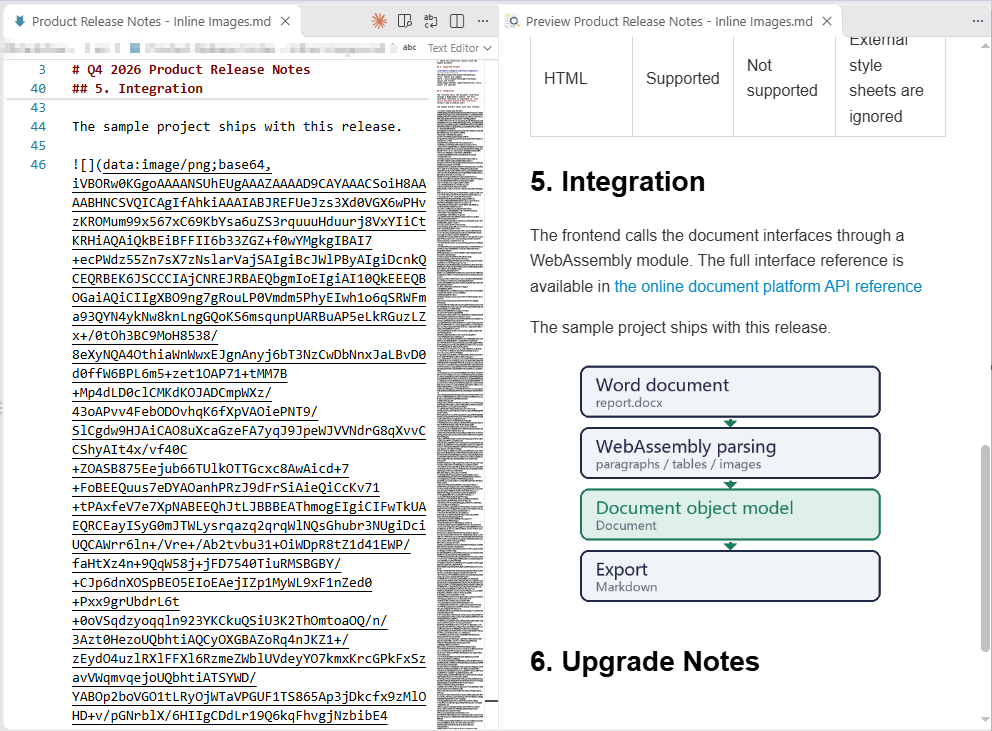
After embedding, the image appears in the Markdown as a long string starting with data:image/png;base64,, and no separate image file accompanies the document:
Image line in the Markdown after the image is embedded as Base64
Customize the Markdown Export Options
Document.MarkdownExportOptions controls how the Markdown is written. Beyond image handling, lists, links, tables, underlines and equations can each be adjusted separately:
| Option | Common values | Effect |
|---|---|---|
ImagesFolder |
A folder name | Images are written into the specified folder in the VFS and referenced from it |
ImagesAsBase64 |
true / false |
Images are embedded as data URIs |
ListOutputMode |
MarkdownSyntax / PlainText |
Emit list syntax, or escape the list markers as plain text |
LinkOutputMode |
Auto / Inline / Reference |
Inline links, or reference-style links |
SaveAsHtml |
None / Tables |
Keep tables in pipe syntax, or output them as HTML tables |
SaveUnderlineFormatting |
true / false |
Whether underlines are kept as ++text++ |
OfficeMathOutputMode |
Text / Image / MathML |
The output form of equations |
When SaveAsHtml is set to Tables, the export needs fonts to lay out the tables; if no fonts are loaded, saving throws Cannot find any fonts in specified font sources. The sample therefore loads the fonts into the VFS before converting. This step is not needed when only text, lists and images are exported.
The specific steps are as follows:
- Get the Spire.Doc WASM module and confirm that it is ready.
- Load the fonts
msyh.ttcandmsyhbd.ttcand the sample document into the virtual file system (VFS). - Create a
Documentobject and load the Word document. - Get
MarkdownExportOptionsand set the image folder, list, link, table and underline options in turn. - Save the result file with
SaveToFile()asFileFormat.Markdown. - Read the Markdown text and the image files from the VFS and trigger their browser downloads.
The code for customizing the Markdown export options is as follows:
function downloadBlob(blob, fileName) {
  const url = URL.createObjectURL(blob);
  const a = document.createElement('a');
  a.href = url;
  a.download = fileName;
  a.click();
  URL.revokeObjectURL(url);
}

function App() {
  const convertWithOptions = async () => {
    // Get the Spire.Doc WASM module
    const docModule = window.wasmModule?.spiredoc;

    // Make sure the WASM module has fully loaded
    if (!docModule) {
      alert('Spire.Doc is not ready yet');
      return;
    }

    // Exporting HTML tables needs fonts for layout, so load the fonts into VFS first
    await window.spire.FetchFileToVFS('msyh.ttc', '/Library/Fonts/', `${process.env.PUBLIC_URL}/font/`);
    await window.spire.FetchFileToVFS('msyhbd.ttc', '/Library/Fonts/', `${process.env.PUBLIC_URL}/font/`);

    // Load the sample document into VFS
    await window.spire.FetchFileToVFS('Product Release Notes.docx', '', `${process.env.PUBLIC_URL}/data/`);

    // Create a Document instance and load the Word document
    const doc = new docModule.Document();
    doc.LoadFromFile('Product Release Notes.docx', docModule.FileFormat.Docx2016);

    // Customize the Markdown export options
    const options = doc.MarkdownExportOptions;
    options.ImagesFolder = 'images';
    options.ListOutputMode = docModule.MarkdownListOutputMode.PlainText;
    options.LinkOutputMode = docModule.MarkdownLinkOutputMode.Reference;
    options.SaveAsHtml = docModule.MarkdownSaveAsHtml.Tables;
    options.SaveUnderlineFormatting = true;

    // Save the result file
    const outputFileName = 'Product Release Notes - Export Options.md';
    doc.SaveToFile({ fileName: outputFileName, fileFormat: docModule.FileFormat.Markdown });
    doc.Dispose();

    const FS = window.dotnetRuntime.Module.FS;

    // Download the Markdown text
    const text = new TextDecoder('utf-8').decode(FS.readFile(outputFileName));
    downloadBlob(new Blob([text], { type: 'text/markdown;charset=utf-8' }), outputFileName);

    // Download the written images
    FS.readdir('images')
      .filter((name) => name !== '.' && name !== '..')
      .forEach((name) => downloadBlob(new Blob([FS.readFile(`images/${name}`)], { type: 'image/png' }), name));
  };

  return (
    <div style={{ textAlign: 'center', height: '300px' }}>
      <h1>Customize the Markdown Export Options</h1>
      <button onClick={convertWithOptions}>
        Convert and Download
      </button>
    </div>
  );
}

export default App;
With these options in effect, lists, links, tables and underlines are each written in a different form. Part of the output is as follows:
\- Generation time for a single document dropped from 6 minutes to under 10 seconds.
\- Contract and payroll files no longer pass through a server.
\- Exported page counts match the on-screen preview.
\1. Replace the WebAssembly resource bundle in the frontend project.
\2. Clear the browser cache and reload the page.
\3. Check the conversion results with the sample document.

The frontend calls the document interfaces through a WebAssembly module. The full interface reference is available in [the online document platform API reference] , and the sample project ships with this release.

Read the ++compatibility notes++ before upgrading and confirm that the styles of existing documents are unaffected.

[the online document platform API reference]: https://www.e-iceblue.com/
[ref1]: images/Product Release Notes - Export Options_001.png
Set the Output Style of Lists and Links
ListOutputMode defaults to MarkdownSyntax, in which bullets and numbers are written as - and 1.; with PlainText, a backslash is placed before the marker, as in \- and \1., so the text renders as plain content and no longer forms a list.
LinkOutputMode defaults to Auto, in which hyperlinks are written in the inline form [text](url); with Reference, only [text] remains in the body text, and the actual addresses are collected in the link definitions at the end of the file — images likewise switch to ![ref1] plus a definition line. When a document has many links whose addresses need to be maintained in one place, the reference style is easier to read.
const options = doc.MarkdownExportOptions;
options.ListOutputMode = docModule.MarkdownListOutputMode.PlainText;
options.LinkOutputMode = docModule.MarkdownLinkOutputMode.Reference;
Save Tables as HTML
SaveAsHtml defaults to None, in which tables are written in pipe syntax with the header text in bold; with Tables, tables are output with <table> tags, the cell styles are written inline, and column widths, borders and text formatting are preserved. The output is a single line of HTML and is no longer bound by the limits of pipe syntax.
Two points are worth noting: first, the option requires fonts to be loaded into the VFS, otherwise saving reports an error; second, if a heading follows a table directly, some Markdown parsers merge the heading line into the table — leaving one empty paragraph after the table in Word avoids this.
options.SaveAsHtml = docModule.MarkdownSaveAsHtml.Tables;
Keep Underline Formatting
Markdown has no standard syntax for underlines, so the default export drops the underlines of the Word document. With SaveUnderlineFormatting = true, underlined text is written as ++text++. That notation is an extension syntax; whether the target platform renders it as an underline depends on the parser in use.
options.SaveUnderlineFormatting = true;
FAQ
Why are the image files missing from the converted Markdown
Cause: By default, images are written out separately from the .md file, in the root of the VFS under a name prefixed with the output file name. If the page only reads and downloads the .md file, the images naturally do not appear in the download.
Solution: Set ImagesFolder to name an image folder and download the files in that folder together with the .md file; alternatively set ImagesAsBase64 = true, so that the images are written into the Markdown itself and the result is a single file.
Why has the underline in Word disappeared from the Markdown
Cause: Markdown has no standard syntax for underlines, and SaveUnderlineFormatting defaults to false, so the underline formatting is dropped during export.
Solution: Set SaveUnderlineFormatting = true and underlined text is written as ++text++. Not every Markdown parser supports that syntax, so it is worth checking how the target platform renders it before relying on it.
Why were the headings not converted to # headings
Cause: Headings are recognized by style during export; only paragraphs with a built-in heading style such as Heading 1 or Heading 2 applied become # headings of the matching level. Paragraphs that are merely bold or set to a larger font size, or that use the Title style, are still output as ordinary paragraphs.
Solution: Apply a built-in heading style to the paragraphs that should become headings; a document title that uses the Title style can be changed to Heading 1, or the # can be added manually in the Markdown after conversion.
What should I do when a heading after a table is merged into the table
Cause: When there is no blank line between a table and the heading that follows it, some Markdown parsers treat the adjacent heading line as one more row of the table.
Solution: Leave one empty paragraph after the table in Word before writing the heading, so that the exported Markdown contains a blank line; alternatively add a blank line between the table and the heading after conversion.
Does the conversion upload the file to a server
Not in the usage described in this article. Spire.Doc for JavaScript runs in the browser on WebAssembly, the Word document and the conversion result are both read and written locally through the virtual file system (VFS), and the library itself does not send files to a server. Whether a file ultimately leaves the device depends on other code added to the page.
Get a Free License
Spire.Doc for JavaScript offers a 30-day full-featured free trial license with no functional limitations. Apply here to evaluate before purchasing.
Technical documentation, API references and release notes are increasingly maintained in Markdown: it is easy to keep in a code repository, easy to review, and easy to compare between versions. For external delivery, however, the recipient usually needs a Word or PDF document. Copying and pasting into a desktop application loses the formatting, and tables and code blocks have to be rearranged by hand; converting on a server takes the source file off the user's device.
This article converts Markdown to Word documents and PDF documents in the browser with Spire.Doc for JavaScript. The library runs in the browser as a WebAssembly module, the source file is read through a virtual file system (VFS), and the conversion result is written back to the VFS before the download is triggered. The whole process requires neither an Office installation nor any backend service.
This article covers three features:
- Convert a Markdown Document to Word
- Convert a Markdown Document to PDF
- Use Template Styles to Convert Markdown to Word
For installation and project setup, refer to Integrating Spire.Doc for JavaScript in a React Project. The examples below assume that Spire.Doc is installed and the WebAssembly module is initialized. The sample Markdown source and the template document are placed in the public/data/ directory, and the font files in the public/static/font/ directory. To make them easy to run directly, the code for each feature is a complete single file, so the content of App.js can be replaced with it wholesale.
Convert a Markdown Document to Word
Spire.Doc for JavaScript loads the source file with Document.LoadFromFile(), and the second parameter specifies the file format. Pass FileFormat.Markdown when loading Markdown: the library parses headings, paragraphs, lists, tables, quotes, code blocks and images according to Markdown syntax rules, and turns them into the corresponding Word document objects.
The syntax used in the source file and the styles applied after conversion correspond as follows:
| Markdown syntax | Style applied after conversion | Notes |
|---|---|---|
# to ###### |
Heading 1 to Heading 6 | The six heading levels map to the six built-in heading styles respectively |
| Ordinary paragraphs | Normal | Paragraph text and inline formatting such as bold and italic are kept |
> quotes |
Quote | Converted to an indented quote paragraph |
- lists, 1. lists |
List paragraphs | Bulleted and numbered lists become automatically numbered items |
| Pipe tables | Word tables | The first row becomes the header, and cells carry thin borders |
| Backtick inline code | InlineCode | A character-level style that affects only the marked text |
| Fenced code blocks | FencedCode plus the language name | A code block marked js, for example, is given FencedCodejs |
| Indented code blocks | FencedCode | Code blocks without a language label |
The specific steps are as follows:
- Get the Spire.Doc WASM module and confirm that it is ready.
- Load the Markdown source file into the virtual file system (VFS).
- Create a
Documentinstance and load the source file withLoadFromFile()asFileFormat.Markdown. - Save the document with
SaveToFile()as a DOCX file. - Read the result file from the VFS and trigger its browser download.
The code for converting a Markdown document to a Word document is as follows:
function App() {
  const convertToWord = async () => {
    // Get the Spire.Doc WASM module
    const docModule = window.wasmModule?.spiredoc;

    // Make sure the WASM module has fully loaded
    if (!docModule) {
      alert('Spire.Doc is not ready yet');
      return;
    }

    // Load the Markdown source and the images it references into VFS
    await window.spire.FetchFileToVFS('Sample.md', "", `${process.env.PUBLIC_URL}/data/`);
    await window.spire.FetchFileToVFS('pipeline.png', "", `${process.env.PUBLIC_URL}/data/`);
    await window.spire.FetchFileToVFS('msyh.ttc', "/Library/Fonts/", `${process.env.PUBLIC_URL}/static/font/`);
    await window.spire.FetchFileToVFS('msyhbd.ttc', "/Library/Fonts/", `${process.env.PUBLIC_URL}/static/font/`);

    // Create a Document instance and load the source file as Markdown
    const doc = new docModule.Document();
    doc.LoadFromFile('Sample.md', docModule.FileFormat.Markdown);

    // Save as a Word document
    const outputFileName = 'MarkdownToWord.docx';
    doc.SaveToFile({ fileName: outputFileName, fileFormat: docModule.FileFormat.Docx2016 });
    doc.Dispose();

    // Read the generated file from VFS and trigger the download
    const fileArray = window.dotnetRuntime.Module.FS.readFile(outputFileName);
    const blob = new Blob([fileArray], { type: 'application/vnd.openxmlformats-officedocument.wordprocessingml.document' });
    const url = URL.createObjectURL(blob);
    const a = document.createElement('a');
    a.href = url;
    a.download = outputFileName;
    a.click();
    URL.revokeObjectURL(url);
  };

  return (
    <div style={{ textAlign: 'center', height: '300px' }}>
      <h1>Convert Markdown to Word</h1>
      <button onClick={convertToWord}>
        Convert to Word
      </button>
    </div>
  );
}

export default App;
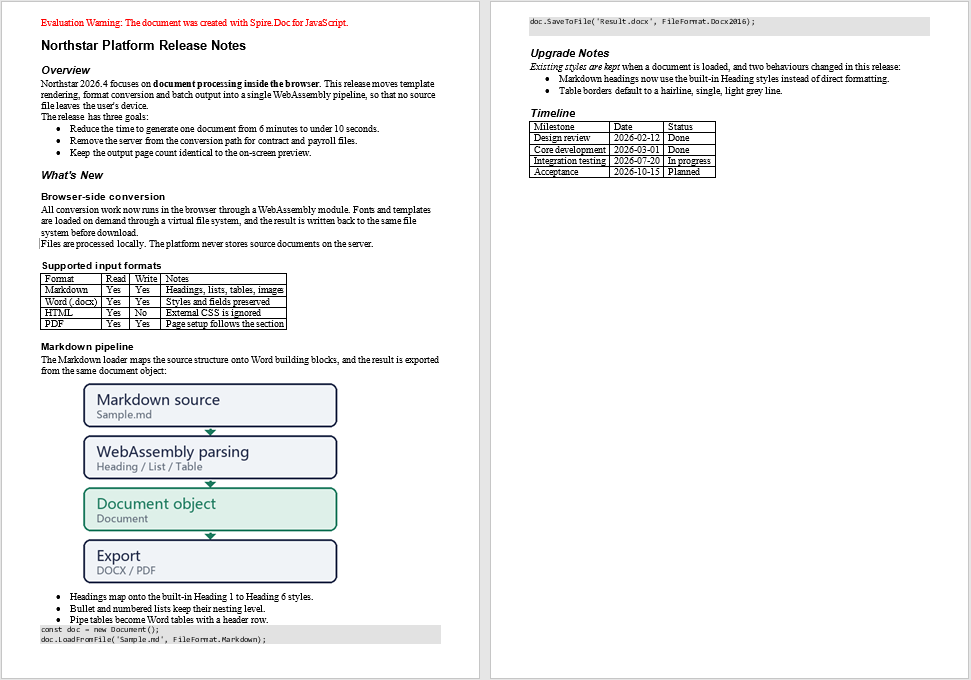
The converted Word document is shown below; the headings, lists, quotes, tables and code blocks have all been restored according to the structure of the source file:
Word document converted with the default styles
Convert a Markdown Document to PDF
Once Markdown has been loaded, the result is a complete Word document object, so the same object can be saved as DOCX or exported directly to PDF without reading the source file again. For export, simply change the fileFormat of SaveToFile() to FileFormat.PDF. The page size and margins follow the section settings of the document, and the pagination is determined by the layout computed during export.
Unlike DOCX, PDF requires the text to be genuinely rasterized, so before export the fonts used by the document should be loaded into the font directory of the virtual file system; the examples place the fonts in /Library/Fonts/.
The specific steps are as follows:
- Get the Spire.Doc WASM module and confirm that it is ready.
- Load the Markdown source file and the font files into the virtual file system (VFS).
- Create a
Documentinstance and load the source file withLoadFromFile()asFileFormat.Markdown. - Export the document with
SaveToFile()as a PDF file. - Read the result file from the VFS and trigger its browser download.
The code for converting a Markdown document to a PDF document is as follows:
function App() {
  const convertToPdf = async () => {
    // Get the Spire.Doc WASM module
    const docModule = window.wasmModule?.spiredoc;

    // Make sure the WASM module has fully loaded
    if (!docModule) {
      alert('Spire.Doc is not ready yet');
      return;
    }

    // Load the Markdown source and the fonts into VFS
    await window.spire.FetchFileToVFS('Sample.md', "", `${process.env.PUBLIC_URL}/data/`);
    await window.spire.FetchFileToVFS('pipeline.png', "", `${process.env.PUBLIC_URL}/data/`);
    await window.spire.FetchFileToVFS('msyh.ttc', "/Library/Fonts/", `${process.env.PUBLIC_URL}/static/font/`);
    await window.spire.FetchFileToVFS('msyhbd.ttc', "/Library/Fonts/", `${process.env.PUBLIC_URL}/static/font/`);

    // Create a Document instance and load the source file as Markdown
    const doc = new docModule.Document();
    doc.LoadFromFile('Sample.md', docModule.FileFormat.Markdown);

    // Export as a PDF document
    const outputFileName = 'MarkdownToPdf.pdf';
    doc.SaveToFile({ fileName: outputFileName, fileFormat: docModule.FileFormat.PDF });
    doc.Dispose();

    // Read the generated file from VFS and trigger the download
    const fileArray = window.dotnetRuntime.Module.FS.readFile(outputFileName);
    const blob = new Blob([fileArray], { type: 'application/pdf' });
    const url = URL.createObjectURL(blob);
    const a = document.createElement('a');
    a.href = url;
    a.download = outputFileName;
    a.click();
    URL.revokeObjectURL(url);
  };

  return (
    <div style={{ textAlign: 'center', height: '300px' }}>
      <h1>Convert Markdown to PDF</h1>
      <button onClick={convertToPdf}>
        Convert to PDF
      </button>
    </div>
  );
}

export default App;
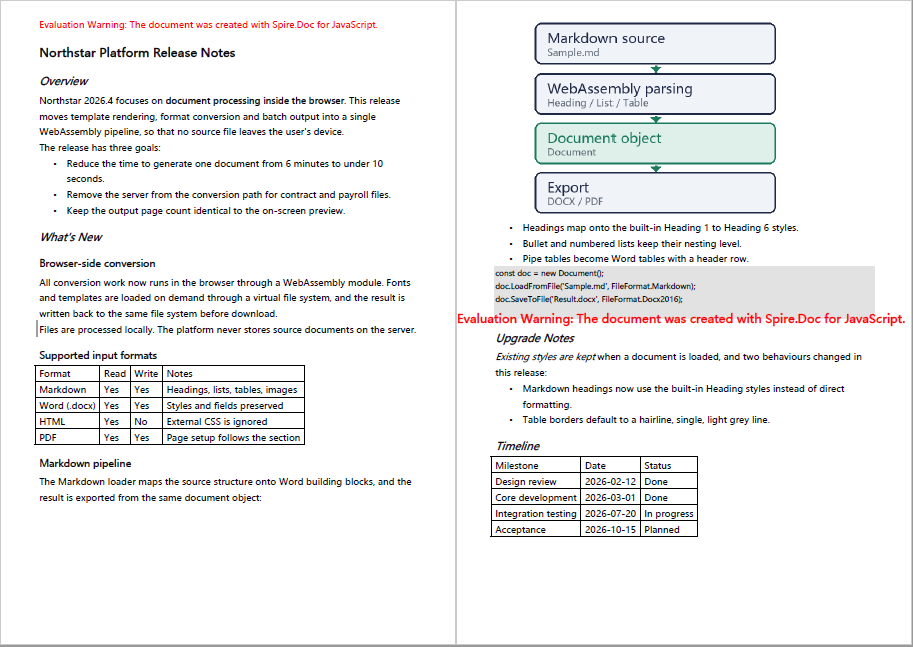
The PDF document exported from the same Markdown is shown below:
PDF document exported from the same Markdown
Use Template Styles to Convert Markdown to Word
The document produced by the default rules uses the built-in styles, whose fonts, color schemes and line spacing are generic in appearance. In actual delivery, a document often has to meet the layout requirements of a company or department: which font size the headings use, which line spacing the body text uses, whether a separator line appears below a heading. These requirements have usually already been organized into a Word template; all that is needed is to copy the styles of the template onto the conversion result.
The current JavaScript version does not provide a method that copies all template styles at once, so the example handles it as follows: first find the style of the same name in the target document, then copy the character formatting and paragraph formatting of the template style onto it item by item. The style names in the template therefore have to match the names of the styles produced by the conversion; the common correspondences are as follows:
| Template style name | Affected content | Settings in the sample template |
|---|---|---|
| Normal | Body paragraphs | Microsoft YaHei 10.5 pt, grey text, 1.35 line spacing |
| Heading 1 | # level-one headings |
18 pt bold, dark blue, separator line below |
| Heading 2 | ## level-two headings |
14 pt bold, dark green |
| Heading 3 | ### level-three headings |
12 pt bold, dark blue |
| Quote | > quote paragraphs |
10 pt italic, dark green, left indent |
The specific steps are as follows:
- Get the Spire.Doc WASM module and confirm that it is ready.
- Load the Markdown source file and the template document into the virtual file system (VFS).
- Create a
Documentinstance and load the source file withLoadFromFile()asFileFormat.Markdown. - Create another
Documentinstance and load the template document, then take its styles by name. - Use the
copyStyle()helper to copy the character formatting and paragraph formatting of each template style onto the style of the same name in the target document. - Save the result file with
SaveToFile(), then read it from the VFS and trigger the download.
The code for converting Markdown with the template styles is as follows:
// Names of the styles to copy from the template; they must match the styles applied by the Markdown conversion
const TEMPLATE_STYLES = ['Normal', 'Heading 1', 'Heading 2', 'Heading 3', 'Quote'];

// Copy one style from the template document to the style of the same name in the target document
function copyStyle(src, dst) {
  // Character formatting: font, font size, bold, italic, text color
  const sf = src.CharacterFormat;
  const df = dst.CharacterFormat;
  df.FontName = sf.FontName;
  df.FontSize = sf.FontSize;
  df.Bold = sf.Bold;
  df.Italic = sf.Italic;
  df.TextColor = sf.TextColor;

  // Paragraph formatting: spacing before and after, line spacing, indent, alignment and pagination control
  const sp = src.ParagraphFormat;
  const dp = dst.ParagraphFormat;
  dp.BeforeSpacing = sp.BeforeSpacing;
  dp.AfterSpacing = sp.AfterSpacing;
  dp.LineSpacing = sp.LineSpacing;
  dp.LineSpacingRule = sp.LineSpacingRule;
  dp.LeftIndent = sp.LeftIndent;
  dp.FirstLineIndent = sp.FirstLineIndent;
  dp.HorizontalAlignment = sp.HorizontalAlignment;
  dp.KeepFollow = sp.KeepFollow;

  // Paragraph borders: the separator line below a heading
  const sb = sp.Borders.Bottom;
  const db = dp.Borders.Bottom;
  db.BorderType = sb.BorderType;
  db.LineWidth = sb.LineWidth;
  db.Color = sb.Color;
  db.Space = sb.Space;
}

function App() {
  const convertWithTemplate = async () => {
    // Get the Spire.Doc WASM module
    const docModule = window.wasmModule?.spiredoc;

    // Make sure the WASM module has fully loaded
    if (!docModule) {
      alert('Spire.Doc is not ready yet');
      return;
    }

    // Load the Markdown source and the template document into VFS
    await window.spire.FetchFileToVFS('Sample.md', "", `${process.env.PUBLIC_URL}/data/`);
    await window.spire.FetchFileToVFS('Template.docx', "", `${process.env.PUBLIC_URL}/data/`);
    await window.spire.FetchFileToVFS('msyh.ttc', "/Library/Fonts/", `${process.env.PUBLIC_URL}/static/font/`);
    await window.spire.FetchFileToVFS('msyhbd.ttc', "/Library/Fonts/", `${process.env.PUBLIC_URL}/static/font/`);

    // Load the source file as Markdown
    const doc = new docModule.Document();
    doc.LoadFromFile('Sample.md', docModule.FileFormat.Markdown);

    // Load the template document and take only its styles
    const template = new docModule.Document();
    template.LoadFromFile('Template.docx');

    // Copy each template style onto the style of the same name in the target document
    TEMPLATE_STYLES.forEach((name) => {
      const src = template.Styles.FindByName(name);
      const dst = doc.Styles.FindByName(name);
      if (src && dst) {
        copyStyle(src, dst);
      }
    });
    template.Dispose();

    // Save as a Word document
    const outputFileName = 'MarkdownToWordWithTemplate.docx';
    doc.SaveToFile({ fileName: outputFileName, fileFormat: docModule.FileFormat.Docx2016 });
    doc.Dispose();

    // Read the generated file from VFS and trigger the download
    const fileArray = window.dotnetRuntime.Module.FS.readFile(outputFileName);
    const blob = new Blob([fileArray], { type: 'application/vnd.openxmlformats-officedocument.wordprocessingml.document' });
    const url = URL.createObjectURL(blob);
    const a = document.createElement('a');
    a.href = url;
    a.download = outputFileName;
    a.click();
    URL.revokeObjectURL(url);
  };

  return (
    <div style={{ textAlign: 'center', height: '300px' }}>
      <h1>Convert Markdown with Template Styles</h1>
      <button onClick={convertWithTemplate}>
        Convert and Apply Template Styles
      </button>
    </div>
  );
}

export default App;
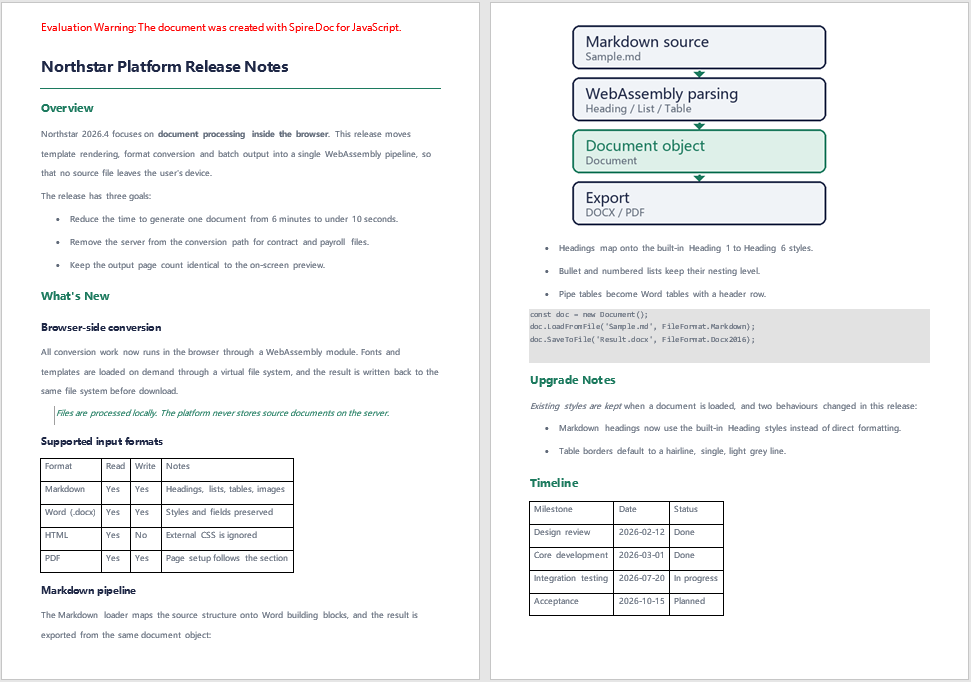
The first page of the Word document after the template styles are applied is shown below; the headings, body text, quotes and tables all follow the fonts, color scheme and line spacing of the template:
First page of the Word document after applying the template styles
The Sample Markdown File
All three features share the same Sample.md, which is placed in the public/data/ directory. The sample is a product release note covering level-one to level-three headings, bulleted lists, quotes, pipe tables, fenced code blocks, inline code, images, and bold and italic text, so that the conversion result of each syntax in Word can be observed side by side.
Images are referenced by relative path; before conversion, the image files have to be loaded into the virtual file system under the same path as written in the Markdown.
The content of the sample Markdown file is as follows:
# Northstar Platform Release Notes
## Overview
Northstar 2026.4 focuses on **document processing inside the browser**. This release moves template rendering, format conversion and batch output into a single WebAssembly pipeline, so that no source file leaves the user's device.
The release has three goals:
- Reduce the time to generate one document from 6 minutes to under 10 seconds.
- Remove the server from the conversion path for contract and payroll files.
- Keep the output page count identical to the on-screen preview.
## What's New
### Browser-side conversion
All conversion work now runs in the browser through a WebAssembly module. Fonts and templates are loaded on demand through a virtual file system, and the result is written back to the same file system before download.
> Files are processed locally. The platform never stores source documents on the server.
### Supported input formats
| Format | Read | Write | Notes |
|---|---|---|---|
| Markdown | Yes | Yes | Headings, lists, tables, images |
| Word (.docx) | Yes | Yes | Styles and fields preserved |
| HTML | Yes | No | External CSS is ignored |
| PDF | Yes | Yes | Page setup follows the section |
### Markdown pipeline
The Markdown loader maps the source structure onto Word building blocks, and the result is exported from the same document object:

- Headings map onto the built-in Heading 1 to Heading 6 styles.
- Bullet and numbered lists keep their nesting level.
- Pipe tables become Word tables with a header row.
```js
const doc = new Document();
doc.LoadFromFile('Sample.md', FileFormat.Markdown);
doc.SaveToFile('Result.docx', FileFormat.Docx2016);
```
## Upgrade Notes
*Existing styles are kept* when a document is loaded, and two behaviours changed in this release:
- Markdown headings now use the built-in Heading styles instead of direct formatting.
- Table borders default to a hairline, single, light grey line.
## Timeline
| Milestone | Date | Status |
|---|---|---|
| Design review | 2026-02-12 | Done |
| Core development | 2026-03-01 | Done |
| Integration testing | 2026-07-20 | In progress |
| Acceptance | 2026-10-15 | Planned |
The template document Template.docx only provides styles; its body content does not take part in the conversion. The style names in the template have to match the names of the styles produced by the conversion (Normal, Heading 1, Heading 2, Heading 3, Quote); styles whose names do not match are not copied.
FAQ
Why is the first paragraph of the converted document a red line of English text
Cause: This line is an evaluation notice inserted by Spire.Doc for JavaScript when the file is saved. Its content is Evaluation Warning: The document was created with Spire.Doc for JavaScript., and it has nothing to do with the content of the source file.
Solution: The notice exists only in the evaluation version; once a license is applied, the saved file no longer contains this paragraph.
Why do the converted headings and body text not use the font and line spacing I expect
Cause: LoadFromFile() converts Markdown with the built-in styles — headings use Heading 1 to Heading 6 and body text uses Normal — and these styles themselves do not define the fonts and color schemes commonly used in corporate documents.
Solution: Organize the layout requirements into a Word template and copy the styles as described in Use Template Styles to Convert Markdown to Word; alternatively, after loading, modify the CharacterFormat and ParagraphFormat of the corresponding styles in doc.Styles directly.
Why do the entries after the first one in a multi-item ordered list end up merged into the first paragraph
Cause: The parser recognizes ordered lists by paragraph; when there is no blank line between items, the text of the second item onwards is treated as a continuation line of the first, and the number is kept in the paragraph as plain text.
Solution: Leave a blank line between items so that each one becomes an independently numbered list item; bulleted lists are not subject to this restriction and can be written consecutively:
1. First step.

2. Second step.

3. Third step.
Why are the images in the Markdown not displayed, or displayed exceptionally large
Cause: Images are read from the virtual file system by the path written in the Markdown; when the file has not been loaded into the VFS it cannot be embedded. Image size is converted from the original pixel dimensions at 96 dpi, so an image with a large pixel width may exceed the text width on an A4 page.
Solution: Load the image into the VFS first, under the same path as written in the Markdown:
await window.spire.FetchFileToVFS('pipeline.png', "", `${process.env.PUBLIC_URL}/data/`);
To specify a width, write the image as an HTML img tag; the width attribute is written into the document in pixels:
<img src="pipeline.png" width="360">
What should I do when the Chinese font in the exported PDF is wrong, or appears blank or as boxes
Cause: A DOCX records only font names, which Word resolves when the file is opened; PDF requires the text to be rendered as graphics, so when the font file has not been loaded, the export can only use a substitute font or leave the text blank.
Solution: Before exporting to PDF, load the fonts used by the document into the font directory of the virtual file system; the examples place them in /Library/Fonts/. When there are many Chinese fonts, it is advisable to load both the regular and the bold face:
await window.spire.FetchFileToVFS('msyh.ttc', "/Library/Fonts/", `${process.env.PUBLIC_URL}/static/font/`);
await window.spire.FetchFileToVFS('msyhbd.ttc', "/Library/Fonts/", `${process.env.PUBLIC_URL}/static/font/`);
Get a Free License
Spire.Doc for JavaScript offers a 30-day full-featured free trial license with no functional limitations. Apply here to evaluate before purchasing.
Mail Merge Word Documents and Format Values by Culture with JavaScript in React
2026-10-16 08:17:26 Written by Amy ZhaoWhen the same document has to be sent to multiple recipients, only a few elements change from one copy to the next, such as the recipient name, fax number and date, while the rest of the layout and wording remains identical. Word's mail merge turns this variable content into merge fields kept in a mail merge template; at run time, a set of data is filled in to generate the corresponding document. Compared with saving each copy separately on the desktop, performing the merge in the browser does not require recipients to install Office, and the data does not have to be uploaded to a server for processing.
Using Spire.Doc for JavaScript as an example, this article explains the structure of the merge fields in a mail merge template, how MailMerge.Execute() is called, and how to prepare a date string for a target culture before the merge. The entire process runs in the browser through WebAssembly, and both the template and the data are read from and written to the local virtual file system (VFS).
This article covers three core features:
- Prepare a Mail Merge Template with Merge Fields in Word
- Execute a Mail Merge
- Format Date Fields by Culture
For installation and project setup, refer to Integrating Spire.Doc for JavaScript in a React Project. The examples below assume Spire.Doc is installed and the WebAssembly module is initialized.
Prepare a Mail Merge Template with Merge Fields in Word
A mail merge template is an ordinary .docx document: the fixed content is laid out as usual, and the positions that change with the data are replaced by merge fields. A merge field is enclosed by a pair of field markers; the field code declares the field name with MERGEFIELD, and the field result area displays placeholder text in the form «field name», which is the text replaced during the mail merge.
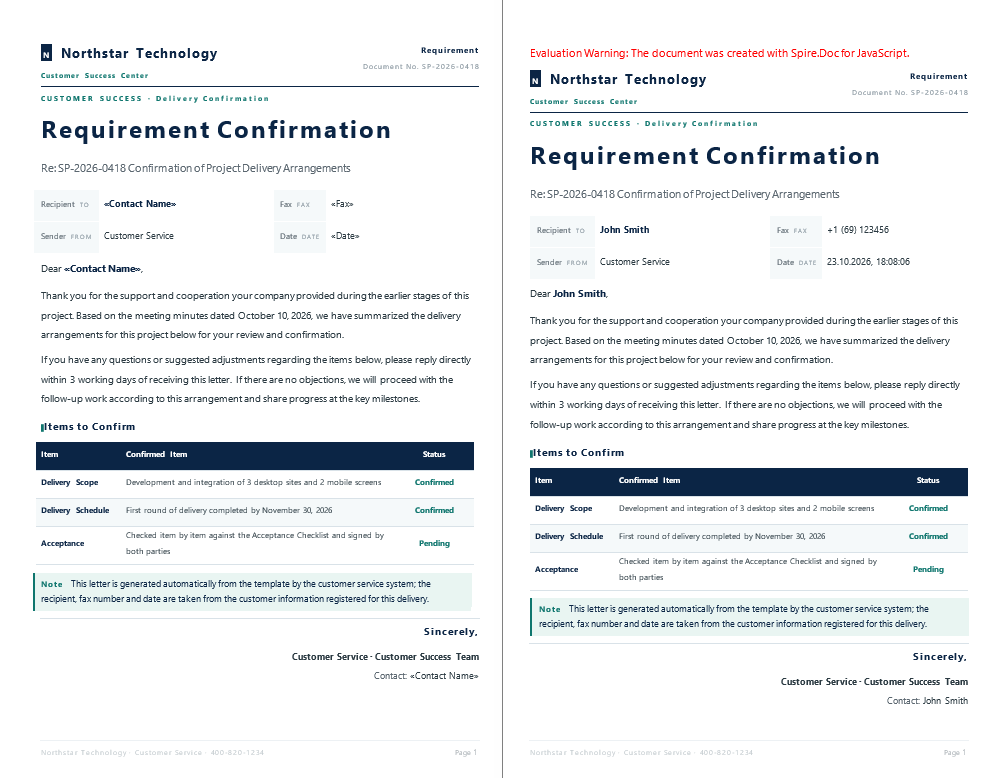
The mail merge template used in this article is a "Requirement Confirmation" letter. The letterhead, document number, body text and confirmation table are all fixed content, and three merge fields are defined:
| Merge Field | Location | Occurrences |
|---|---|---|
Contact Name |
Recipient row, salutation, closing contact | 3 |
Fax |
Fax row | 1 |
Date |
Date row | 1 |
Contact Name appears three times in the document. After the merge, all three occurrences take the same value, so it only has to be supplied once in the field value array.
The specific steps are as follows:
- Create a Word document and lay out the fixed content.
- Place the cursor where the variable content should go and press Ctrl + F9 to insert a pair of field markers.
- Enter the field code inside the markers, for example
MERGEFIELD "Contact Name" \* MERGEFORMAT; enclose the field name in double quotes when it contains spaces. - Press F9 to update the field. The position then displays placeholder text in the form
«Contact Name». - Insert the remaining merge fields at the other variable positions in the same way, save the document as .docx, and place it in the project's public directory, for example
public/static/data/MailMerge.docx.
It is important to note that the placeholder text «field name» belongs to the field's result area, which lies between the separate and end field markers. If the angle brackets are typed manually outside the field, they do not belong to that field and are not replaced during the merge. Pressing Alt + F9 switches between the field code and the field result, which helps verify where the field markers begin and end.
Execute a Mail Merge
MailMerge.Execute(fieldNames, fieldValues) takes two arrays of equal length, whose elements correspond by index:
| Parameter | Description |
|---|---|
fieldNames |
Array of field names, corresponding to the field names declared by MERGEFIELD in the template |
fieldValues |
Array of field values, corresponding to fieldNames by index |
Field name matching is case-insensitive. A field that exists in the template but is not listed in fieldNames is left blank in its result area after the merge.
The specific steps are as follows:
- Get the Spire.Doc WASM module and confirm that it is ready.
- Load the mail merge template and the font into the virtual file system (VFS).
- Create a
Documentobject and load the template. - Prepare the field name array and the field value array so that their order corresponds one to one.
- Call the
Document.MailMerge.Execute()method to execute the mail merge. - Save the result file with the
Document.SaveToFile()method, read it back from the VFS, and trigger a browser download.
The code for executing a mail merge is as follows:
function App() {
  const MailMerge = async () => {
    // Get the Spire.Doc WASM module
    const docModule = window.wasmModule?.spiredoc;

    // Check if the module is ready
    if (!docModule) {
      alert('Spire.Doc is not ready yet');
      return;
    }

    // Load the mail merge template and the font
    let inputFileName = 'MailMerge.docx';
    await window.spire.FetchFileToVFS(inputFileName, "", `${process.env.PUBLIC_URL}static/data/`);
    await window.spire.FetchFileToVFS('ARIALUNI.TTF', "/Library/Fonts/", `${process.env.PUBLIC_URL}static/font/`);

    // Create a Document instance and load the template
    const doc = new docModule.Document();
    doc.LoadFromFile(inputFileName);

    // Field names and field values correspond by index
    let fieldNames = ["Contact Name", "Fax", "Date"];
    let fieldValues = ["John Smith", "+1 (69) 123456", docModule.DateTime.get_Now().Date.ToString()];

    // Execute the mail merge
    doc.MailMerge.Execute(fieldNames, fieldValues);

    // Save the result file
    const outputFileName = 'MailMerge-result.docx';
    doc.SaveToFile({ fileName: outputFileName, fileFormat: docModule.FileFormat.Docx2013 });
    doc.Dispose();

    // Read the generated file from the VFS and trigger the download
    const fileArray = window.dotnetRuntime.Module.FS.readFile(outputFileName);
    const blob = new Blob([fileArray], { type: 'application/vnd.openxmlformats-officedocument.wordprocessingml.document' });
    const url = URL.createObjectURL(blob);
    const a = document.createElement('a');
    a.href = url;
    a.download = outputFileName;
    a.click();
    URL.revokeObjectURL(url);
  };

  return (
    <div style={{ textAlign: 'center', height: '300px' }}>
      <h1>Execute a Mail Merge</h1>
      <button onClick={MailMerge}>Generate</button>
    </div>
  );
}

export default App;
The merge logic itself is a single line, doc.MailMerge.Execute(fieldNames, fieldValues); the rest of the code delivers the template to the VFS and retrieves the result for download. DateTime.get_Now().Date.ToString() returns a string representation of the current date, which can be passed directly as the field value.
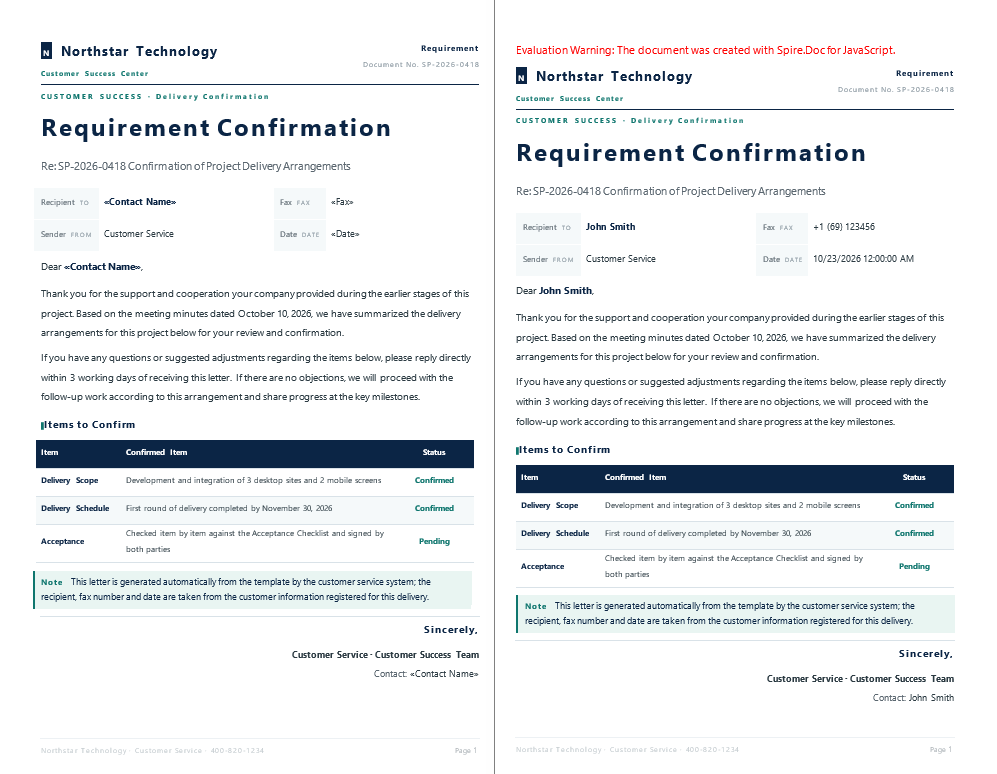
After the merge, all five merge field occurrences in the template are replaced with the corresponding field values, and the rest of the layout remains unchanged:
| Merge Field | Before Merge | After Merge |
|---|---|---|
Contact Name |
«Contact Name» | John Smith |
Fax |
«Fax» | +1 (69) 123456 |
Date |
«Date» | 10/22/2026 12:00:00 AM |
The three occurrences of Contact Name (recipient row, salutation, closing contact) all become John Smith, which shows that fields with the same name share one value.
Word document after a mail merge has been executed with JavaScript in React
Format Date Fields by Culture
The output format of DateTime.get_Now().Date.ToString() depends on the culture settings of the runtime environment: a Chinese environment produces 2026/10/22 上午12:00:00, while switching to an English environment may produce 10/22/2026 12:00:00 AM. For a recipient in Germany, the conventional form is 22.10.2026, 17:19:45 — day first, month in the middle, separated by dots.
The mail merge itself only places a piece of text at the field position and does not rearrange the date. The way to control the date format is therefore to format the value as a string for the target culture before it reaches MailMerge.Execute(). The browser's built-in Intl.DateTimeFormat performs this step; its first argument is the locale code and its second argument is the format options.
The specific steps are as follows:
- Get the Spire.Doc WASM module and confirm that it is ready.
- Load the mail merge template and the font into the virtual file system (VFS).
- Use
Intl.DateTimeFormat("de-DE", formatOptions)to format the current time as a German-style date string. - Replace the value of the
Datefield with this string, and keep the other field values unchanged. - Call the
Document.MailMerge.Execute()method to execute the mail merge. - Save the result file with the
Document.SaveToFile()method, read it back from the VFS, and trigger a browser download.
The code for formatting the date field by culture is as follows:
function App() {
  const ChangeLocale = async () => {
    // Get the Spire.Doc WASM module
    const docModule = window.wasmModule?.spiredoc;

    // Check if the module is ready
    if (!docModule) {
      alert('Spire.Doc is not ready yet');
      return;
    }

    // Load the mail merge template and the font
    let inputFileName = 'MailMerge.docx';
    await window.spire.FetchFileToVFS(inputFileName, "", `${process.env.PUBLIC_URL}static/data/`);
    await window.spire.FetchFileToVFS('ARIALUNI.TTF', "/Library/Fonts/", `${process.env.PUBLIC_URL}static/font/`);

    // Create a Document instance and load the template
    const doc = new docModule.Document();
    doc.LoadFromFile(inputFileName);

    // Prepare the date string for the German culture (day.month.year)
    const datestr = new Intl.DateTimeFormat('de-DE', {
      year: 'numeric', month: '2-digit', day: '2-digit',
      hour: '2-digit', minute: '2-digit', second: '2-digit'
    }).format(new Date());

    // Field names and field values correspond by index
    let fieldNames = ["Contact Name", "Fax", "Date"];
    let fieldValues = ["John Smith", "+1 (69) 123456", datestr];

    // Execute the mail merge
    doc.MailMerge.Execute(fieldNames, fieldValues);

    // Save the result file
    const outputFileName = 'ChangeLocale-result.docx';
    doc.SaveToFile({ fileName: outputFileName, fileFormat: docModule.FileFormat.Docx2013 });
    doc.Dispose();

    // Read the generated file from the VFS and trigger the download
    const fileArray = window.dotnetRuntime.Module.FS.readFile(outputFileName);
    const blob = new Blob([fileArray], { type: 'application/vnd.openxmlformats-officedocument.wordprocessingml.document' });
    const url = URL.createObjectURL(blob);
    const a = document.createElement('a');
    a.href = url;
    a.download = outputFileName;
    a.click();
    URL.revokeObjectURL(url);
  };

  return (
    <div style={{ textAlign: 'center', height: '300px' }}>
      <h1>Format Date Fields by Culture</h1>
      <button onClick={ChangeLocale}>Generate</button>
    </div>
  );
}

export default App;
The template is exactly the same and the merge call is exactly the same; what changes is the source of the date string in fieldValues:
const datestr = new Intl.DateTimeFormat('de-DE', { /* format options */ }).format(new Date());
Intl.DateTimeFormat is provided natively by the browser. The locale code can be switched among de-DE, en-US, fr-FR and ja-JP, and the date convention changes accordingly.
With the same template and the same set of data, only the format of the Date field differs:
| Source of the date field | Merge result |
|---|---|
DateTime.get_Now().Date.ToString() |
10/22/2026 12:00:00 AM |
Intl.DateTimeFormat('de-DE', …).format(new Date()) |
22.10.2026, 17:19:45 |
Word document after the date field has been formatted by culture with JavaScript in React
Output a Localized Date with toLocaleString
In addition to Intl.DateTimeFormat, the Date object itself provides localized output methods. toLocaleString() accepts the same locale code and format options and produces the same result:
const datestr = new Date().toLocaleString('de-DE', {
  year: 'numeric', month: '2-digit', day: '2-digit',
  hour: '2-digit', minute: '2-digit', second: '2-digit'
});
When only the date part is needed, use toLocaleDateString('de-DE', { year: 'numeric', month: '2-digit', day: '2-digit' }) instead. In data exchange scenarios that require an ISO-style form, toISOString().slice(0, 10) returns a string such as 2026-10-22 (this method uses the UTC date).
FAQ
Why does the merged document still contain a placeholder such as «Contact Name»
Cause: The placeholder text belongs to the field's result area, which lies between the separate and end markers of the field code. If « and » were typed as text outside the field, they are not part of that field; MailMerge.Execute() only replaces content inside the field, and text outside it remains as it is.
Solution: In Word, press Ctrl + F9 to create the field, enter the field code, and then press F9 so that Word generates the result text. Do not type the angle brackets manually outside the field. When the template is generated from code, « and » must be written between the separate and end markers, not as a separate run outside the field.
How should a field name that contains a space be written in the template and in JavaScript
In a Word field code, a field name containing spaces or other special characters is enclosed in double quotes:
{ MERGEFIELD "Contact Name" \* MERGEFORMAT }
What is passed to MailMerge.Execute() is the field name itself, without quotes:
let fieldNames = ["Contact Name"];
What is the result when a field in the template is not included in fieldNames
The field's result area is merged as an empty string rather than keeping the original placeholder, and the other fields in the template are processed as usual. This behavior can be used to leave a blank automatically when data is missing; if the original placeholder text should be kept, add the field name to fieldNames and place the original value at the corresponding position in fieldValues.
In addition, field name matching is case-insensitive, so "contact name" and "Contact Name" match the same field. The value actually used is determined by the array index, so the field names and the field values must keep the same order.
Why does the date appear differently on different computers after it is merged into the document
DateTime.get_Now().Date.ToString() produces output according to the current culture settings of the runtime environment, so systems or browsers with different regional settings return different strings. For stable output, follow the approach in "Format Date Fields by Culture": specify the locale code explicitly with Intl.DateTimeFormat and then pass the result to Execute.
In addition, in the environment used for the examples in this article, the time portion returned by DateTime.get_Now() is 12:00:00 AM, meaning that only the date is carried over. When a specific time is required, use the browser's Date object together with Intl.DateTimeFormat to generate the date string.
The downloaded docx will not open and is reported as corrupted
Cause: The Blob's MIME type is incomplete, or the downloaded bytes are not the ones read from the VFS after SaveToFile().
Solution: Declare the full MIME type for the docx and read the file only after saving is complete:
const fileArray = window.dotnetRuntime.Module.FS.readFile(outputFileName);
const blob = new Blob([fileArray], {
  type: 'application/vnd.openxmlformats-officedocument.wordprocessingml.document'
});
Get a Free License
Spire.Doc for JavaScript offers a 30-day full-featured free trial license with no functional limitations. Apply here to evaluate before purchasing.
Set Word Merge Field Switches and Conditional Fields with JavaScript in React
2026-10-16 08:16:41 Written by Amy ZhaoThe same Word template often has to look different on different occasions: in a letter to a customer the name should carry a courtesy title, while in an internal filing table it should be upper case throughout. Editing the template field by field means maintaining a new file for every variation; assembling the judgement in code means the template loses its value for reuse.
This article handles both requirements in the browser with Spire.Doc for JavaScript. One is handled by field switches: instructions such as \b, \f and \* Upper are written into the template's field codes, so the same field value can land in the document in different shapes. The other is handled by a conditional field: the document hard-codes no sentence at all, but carries an IF field that lets Word decide, when the document is saved, which sentence the current data calls for; this kind of field is assembled dynamically in code.
The whole process runs in the browser on WebAssembly and manages the template document through a virtual file system (VFS); it needs neither an Office installation nor a backend service.
This article covers two core features:
For installation and project setup, refer to Integrating Spire.Doc for JavaScript in a React Project. The examples below assume Spire.Doc is installed and the WebAssembly module is initialized.
Use Field Switches in a Merge Field
A field switch is a short instruction written inside the MERGEFIELD field code, after the field name. It does not change the value passed in; it changes only the shape in which the value is written into the document: a prefix, a suffix, a change of case. Because the switch belongs to the template itself, hanging different switches on the same field in different places produces different results within one document.
The merge field switches used most often are:
| Switch | What it does |
|---|---|
| (none) | Outputs the field value as it is |
\b "Mr " |
Adds a prefix; the argument includes a trailing space |
\b Mr |
Adds a prefix; the argument has no space and sits flush against the field value |
\f " (Author)" |
Adds a suffix; the argument includes a leading space |
\* Upper |
Converts everything to upper case |
\* Lower |
Converts everything to lower case |
\* FirstCap |
Capitalises the first character only |
\* Caps |
Capitalises the first letter of every word |
\* MERGEFORMAT |
Keeps the field formatting; the text is unchanged |
Prepare the Template
To lay the output of every switch side by side for comparison, the sample uses a Customer Contact Card as its template: the same merge field XX_Name appears ten times in the “Name Format Comparison” table, each occurrence carrying a different switch, so the merge only has to supply the value once.
The ten field codes in the template are as follows ({ } are Word's field braces, which you type with Ctrl + F9):
{ MERGEFIELD  XX_Name }
{ MERGEFIELD  XX_Name  \b "Mr " }
{ MERGEFIELD  XX_Name  \b Mr }
{ MERGEFIELD  XX_Name  \f " (Author)" }
{ MERGEFIELD  XX_Name  \* Upper }
{ MERGEFIELD  XX_Name  \* Lower }
{ MERGEFIELD  XX_Name  \* FirstCap }
{ MERGEFIELD  XX_Name  \* Caps }
{ MERGEFIELD  XX_Name  \* MERGEFORMAT }
{ MERGEFIELD  XX_Name  \b "Mr " \f " (Author)" }
Spaces separate the field name from the switches and the switches from one another. If the text argument of a switch itself contains a space, wrap it in double quotes (as in \b "Mr "); in that case the space inside the quotes is part of the argument.
The Code
The steps are as follows:
- Get the Spire.Doc WASM module and confirm that it is ready.
- Load the sample template into the virtual file system (VFS), create a
Documentobject and load the file. - Prepare the field name and field value arrays: the field name is
XX_Nameand the field value isjason tang. - Call
Document.MailMerge.Execute()to run the mail merge. - Save the result with
Document.SaveToFile(). - Read the result file back from the VFS and trigger the browser download.
The code for using field switches in a Word merge field is as follows:
function App() {
  const MailMergeSwitches = async () => {
    // Get the Spire.Doc WASM module
    const docModule = window.wasmModule?.spiredoc;

    // Check if the module is ready
    if (!docModule) {
      alert('Spire.Doc is not ready yet');
      return;
    }

    // Load the sample template into the virtual file system (VFS)
    let inputFileName = "MailMergeSwitches.docx";
    await window.spire.FetchFileToVFS(inputFileName, "", `${process.env.PUBLIC_URL}static/data/`);

    // Create a document and load the template
    const doc = new docModule.Document();
    doc.LoadFromFile(inputFileName);

    // Provide a value for one field only; all ten occurrences in the template use it
    let fieldNames = ["XX_Name"];
    let fieldValues = ["jason tang"];

    // Execute the mail merge
    doc.MailMerge.Execute(fieldNames, fieldValues);

    // Define the output file name
    const outputFileName = "MailMergeSwitches-result.docx";

    // Save the document
    doc.SaveToFile({ fileName: outputFileName, fileFormat: docModule.FileFormat.Docx2013 });

    doc.Dispose()

    // Read the saved file and convert it to a Blob
    const modifiedFileArray = window.dotnetRuntime.Module.FS.readFile(outputFileName);
    const blob = new Blob([modifiedFileArray], {type: "application/vnd.openxmlformats-officedocument.wordprocessingml.document"});
    const url = URL.createObjectURL(blob);
    const a = document.createElement('a');
    a.href = url;
    a.download = outputFileName;
    a.click();
    URL.revokeObjectURL(url);
  };

  return (
    <div style={{ textAlign: 'center', height: '300px' }}>
      <h1>Merge data into a Word template that carries field switches</h1>
      <button onClick={MailMergeSwitches}>Generate</button>
    </div>
  );
}

export default App;
Notice that the code contains no switch-related API at all: every switch lives in the template's field codes, and Execute only has to give XX_Name a value. This is exactly how a field switch is meant to be used — the data stays the same, and the template decides the shape. The sample deliberately passes the value in lower case, as jason tang; if Jack Tang were passed, several of the case-related switches would produce output indistinguishable from the default row.
The Result
Merged with jason tang, the result is as follows:
Word output after the customer contact card has been merged, with all ten XX_Name occurrences generated from a single field value
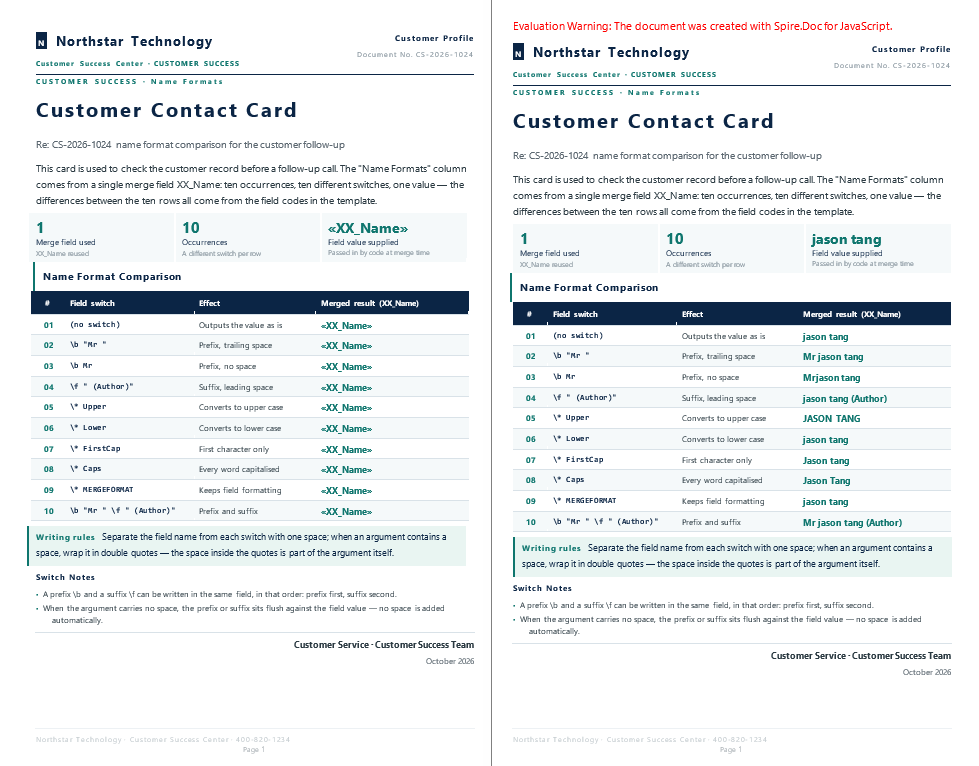
| Field switch | What it does | Merged result (XX_Name) |
|---|---|---|
(no switch) |
Outputs the value as is | jason tang |
\b "Mr " |
Prefix, trailing space | Mr jason tang |
\b Mr |
Prefix, no space | Mrjason tang |
\f " (Author)" |
Suffix, leading space | jason tang (Author) |
\* Upper |
Converts to upper case | JASON TANG |
\* Lower |
Converts to lower case | jason tang |
\* FirstCap |
First character only | Jason tang |
\* Caps |
Every word capitalised | Jason Tang |
\* MERGEFORMAT |
Keeps field formatting | jason tang |
\b "Mr " \f " (Author)" |
Prefix and suffix | Mr jason tang (Author) |
A few points are worth noting:
- The difference between
\b "Mr "and\b Mris that pair of quotes. The argument of the first isMrwith a trailing space, which outputsMr jason tang; the argument of the second isMrwith no space, so it sits flush against the field value and becomesMrjason tang. To leave a gap between the added text and the field value, write the space inside the quotes. \bis a prefix and\fis a suffix, and both can appear in the same field.\* FirstCapcapitalises only the first character (Jason tang), while\* Capscapitalises the first letter of every word (Jason Tang). The two names are similar but the effects differ.\* MERGEFORMATdoes not affect the text. It preserves the field's formatting, Word adds it by default when it creates a merge field.
Combine a Prefix and a Suffix in One Field
When a position needs both a courtesy title and a signature, there is no need to split \b and \f into two fields. Write both into the field code of the same field, in the order “prefix first, suffix second”; line 10 of the template is written exactly that way:
{ MERGEFIELD XX_Name \b "Mr " \f " (Author)" }
Passing jason tang produces Mr jason tang (Author) after the merge: one field value, with both the title and the signature attached at once.
Build and Execute a Conditional Field
Field switches can only change the shape; they cannot choose different text according to the data. When “show this sentence if the data meets the condition, otherwise show that one” is needed, a conditional field (an IF field) is required: an IF field holds a merge field as the test, followed by two result texts, and Word evaluates it when the document is saved.
{ IF { MERGEFIELD Count } > "1" "Greater than one" "Less than one" }
Taken apart, this stretch contains four kinds of element:
- an
IfField, whose field type is set toFieldType.FieldIf; - a merge field node (
FieldType.FieldMergeField) — the value being compared in the condition; - the operator and the two branch texts, appended as ordinary text fragments;
- a
FieldMarkof typeFieldMarkType.FieldEnd, which closes the field off and has to be assigned back toIfField.Endfor the field to be complete.
This document has no input template at all; both IF fields are built from scratch, so LoadFromFile is not needed — but the font still has to be loaded first for the layout Word performs when the document is saved.
The Code
The steps are as follows:
- Get the Spire.Doc WASM module and confirm that it is ready.
- Load the
ARIALUNI.TTFfont into the virtual file system (VFS). - Create a
Documentobject, add a section and then add the first paragraph. - Build an IF field with
IfField, appending in order the merge field that serves as the test, the operator, the comparison basis and the two branch texts. - Create a
FieldEndmark withCreateParagraphItem(), append it to the paragraph and assign it toIfField.End. - Build the second conditional field in the same way.
- Call
MailMerge.Execute()to supply values for the merge fields inside the conditional fields, and setIsUpdateFields = true. - Save the result file, read it back from the VFS and trigger the browser download.
The code for building and executing a conditional field is as follows:
function App() {
  const ExecuteConditionalField = async () => {
    // Get the Spire.Doc WASM module
    const docModule = window.wasmModule?.spiredoc;

    // Check if the module is ready
    if (!docModule) {
      alert('Spire.Doc is not ready yet');
      return;
    }

    // Load the ARIALUNI.TTF font into the virtual file system (VFS)
    await window.spire.FetchFileToVFS('ARIALUNI.TTF','/Library/Fonts/',`${process.env.PUBLIC_URL}/static/font/`);

    // Create a document and add a section
    let doc = new docModule.Document();
    let section = doc.AddSection();

    // First conditional field: Count > 1
    let paragraph = section.AddParagraph();
    let ifField1 = new docModule.IfField(doc);
    ifField1.Type = docModule.FieldType.FieldIf;
    ifField1.Code = "IF ";
    paragraph.Items.Add(ifField1);
    paragraph.AppendField("Count", docModule.FieldType.FieldMergeField);
    paragraph.AppendText(" > ");
    paragraph.AppendText("\"1\" ");
    paragraph.AppendText("\"Greater than one\" ");
    paragraph.AppendText("\"Less than one\"");
    let end1 = doc.CreateParagraphItem(docModule.ParagraphItemType.FieldMark);
    end1.Type = docModule.FieldMarkType.FieldEnd;
    paragraph.Items.Add(end1);
    ifField1.End = end1;

    // Second conditional field: Age > 50
    paragraph = section.AddParagraph();
    let ifField2 = new docModule.IfField(doc);
    ifField2.Type = docModule.FieldType.FieldIf;
    ifField2.Code = "IF ";
    paragraph.Items.Add(ifField2);
    paragraph.AppendField("Age", docModule.FieldType.FieldMergeField);
    paragraph.AppendText(" > ");
    paragraph.AppendText("\"50\" ");
    paragraph.AppendText("\"The old man\" ");
    paragraph.AppendText("\"The young man\"");
    let end2 = doc.CreateParagraphItem(docModule.ParagraphItemType.FieldMark);
    end2.Type = docModule.FieldMarkType.FieldEnd;
    paragraph.Items.Add(end2);
    ifField2.End = end2;

    // Supply values for the merge fields inside the conditional fields
    let fieldNames = ["Count", "Age"];
    let fieldValues = ["2", "30"];
    doc.MailMerge.Execute(fieldNames, fieldValues);

    // Make the fields evaluate when the document is saved
    doc.IsUpdateFields = true;

    // Define the output file name
    const outputFileName = "ExecuteConditionalField-result.docx";

    // Save the document
    doc.SaveToFile({ fileName: outputFileName, fileFormat: docModule.FileFormat.Docx2013 });

    doc.Dispose()

    // Read the saved file and convert it to a Blob
    const modifiedFileArray = window.dotnetRuntime.Module.FS.readFile(outputFileName);
    const blob = new Blob([modifiedFileArray], {type: "application/vnd.openxmlformats-officedocument.wordprocessingml.document"});
    const url = URL.createObjectURL(blob);
    const a = document.createElement('a');
    a.href = url;
    a.download = outputFileName;
    a.click();
    URL.revokeObjectURL(url);
  };

  return (
    <div style={{ textAlign: 'center', height: '300px' }}>
      <h1>Create and execute a conditional field</h1>
      <button onClick={ExecuteConditionalField}>Generate</button>
    </div>
  );
}

export default App;
A few details of the assembly order matter:
ifField.Code = "IF "only marks the field type. What actually assembles the body of the field is theAppendFieldand theAppendTextcalls that follow; they are laid out into this field one after another.- The operator and the two branch texts are all appended with
AppendText, and the quotes among them have to be written into the string itself ("\"1\" "). An IF field requires both result texts to be quoted, and these quote characters are what does it. - The order is fixed: compared value → operator → comparison basis → true branch → false branch. The false branch needs no extra space after its closing quote.
FieldEndis the field's closing mark. It has to be created withCreateParagraphItem(ParagraphItemType.FieldMark), given itsend.Type, appended to the paragraph and then assigned toifField.End. Skip any one of those steps and the field is incomplete.IsUpdateFields = truedecides whether the field is evaluated when the document is saved; it belongs afterExecuteand beforeSaveToFile.
The Result
With Count = "2" and Age = "30", the two conditional fields take the true branch and the false branch respectively. The evaluated result of a conditional field is only one line of text and the rest of the page is blank, so the two branches are shown here in a table:
| Field values | First paragraph (IF Count > "1") |
Second paragraph (IF Age > "50") |
|---|---|---|
Count = "2", Age = "30" |
Greater than one |
The young man |
Count = "0", Age = "70" |
Less than one |
The old man |
Replacing the values flips the result, without changing either the template structure or the code.
FAQ
The conditional field saves as two blank paragraphs — why
Cause: A field in the document is only an instruction waiting to be evaluated. When IsUpdateFields is not set, saving does not trigger evaluation, neither branch's text is output, and the result looks like two blank paragraphs.
Solution: Turn the switch on after Execute and before SaveToFile:
doc.MailMerge.Execute(fieldNames, fieldValues);
doc.IsUpdateFields = true;   // Make the fields evaluate when the document is saved
doc.SaveToFile({ fileName: outputFileName, fileFormat: docModule.FileFormat.Docx2013 });
The prefix added by \b is stuck to the name — what now
Cause: The text argument of a switch carries no space of its own. The argument of \b Mr is the two characters Mr, and the field value follows immediately in the output, which gives Mrjason tang.
Solution: Write the space into the argument and wrap it in double quotes:
{ MERGEFIELD XX_Name \b "Mr " }
\f works the same way: write the leading space inside the quotes. One space between the field name and the switch, and between switches, is enough; extra spaces do not affect parsing.
What is the difference between \* FirstCap and \* Caps
\* FirstCap converts only the first character to upper case and leaves the rest alone: jason tang → Jason tang.
\* Caps converts the first letter of every word to upper case: jason tang → Jason Tang.
When checking these two switches, the field value has to be lower case or mixed case; if the value is already Jack Tang, both lines look the same as the default line.
Why do some switches written on a merge field have no effect
Not every Word field switch takes part in the text replacement of a mail merge. \* MERGEFORMAT preserves the field's formatting and never changes the text to begin with; switches such as \m, \v and \# 0.00 (a number format) usually produce no visible change when used on a plain-text field value.
The ones verified in this article and usable as they are: \b, \f, \* Upper, \* Lower, \* FirstCap, \* Caps, and \* MERGEFORMAT, which can be stacked with a prefix or a suffix.
Changing the values of Count and Age does not change the output
Cause: The result text of a conditional field is cached in the document. When IsUpdateFields is not on, saving keeps the previous evaluation; changing only the values passed to Execute without running the merge and saving again naturally leaves the old content in the file.
Solution: After every change, go through “pass values → evaluate → save” again:
// Pass the new Count and Age
doc.MailMerge.Execute(fieldNames, fieldValues);

// Re-evaluate on save so the result follows the new values
doc.IsUpdateFields = true;

doc.SaveToFile({ fileName: outputFileName, fileFormat: docModule.FileFormat.Docx2013 });
Field name matching is case-insensitive: AppendField("Count", …) and Execute(["count"], …) are treated as the same field. What does affect the result is that the name itself cannot change — a field name not listed in Execute is not replaced, and its result area is left empty.
Get a Free License
Spire.Doc for JavaScript offers a 30-day full-featured free trial license with no functional limitations. Apply here to evaluate before purchasing.
Hide Empty Word Regions and Identify Merge Fields with JavaScript in React
2026-10-16 08:16:25 Written by Amy ZhaoMail merge templates usually carry a few lines that only make sense when there is data behind them: a supplementary note, a remark, an optional cc. When the data is missing and only blank space is left behind, the layout is stretched apart, and the reader can hardly tell “this item was not included this time” from “something was left out”. The ideal outcome is for that line, together with the space it takes up, to disappear.
A related requirement turns up when a template has to be checked. When someone hands you a template, you need to know which merge fields it contains and how those fields are divided into merge regions. Expanding the field codes one by one to take stock of them is not realistic.
Spire.Doc for JavaScript handles both tasks in the browser: empty paragraphs and empty regions are cleaned up by the mail merge process itself, while region names and merge field names are read directly from MailMerge. The component runs on WebAssembly and reads and writes the template through a virtual file system (VFS), so no backend service is required.
This article covers two core features:
- Hide empty paragraphs and merge regions automatically after the merge
- Read the region names and merge field names from a Word template
For installation and project setup, refer to Integrating Spire.Doc for JavaScript in a React Project. The examples below assume Spire.Doc is installed and the WebAssembly module is initialized.
Hide Empty Paragraphs and Merge Regions After a Mail Merge
Prepare the Template
Two boolean properties on MailMerge control the automatic hiding of empty paragraphs and merge regions after a mail merge:
| Property | What it does | Default |
|---|---|---|
MailMerge.HideEmptyParagraphs |
Deletes paragraphs whose content is empty after the merge | false |
MailMerge.HideEmptyGroup |
Deletes merge regions whose internal paragraphs have all become empty | false |
Both properties are off by default and have to be set explicitly before MailMerge.Execute().
The sample template is a “Service Follow-up Confirmation” in which three optional constructs are written in three different ways:
| How it is written | Where it sits in the template | Merge result with hiding off |
|---|---|---|
«Optional Note» in a paragraph of its own |
after the introductory copy | kept as one blank line |
the merge region OptionalBlock (two region-marker paragraphs + two field paragraphs) |
after the delivery data row | kept as four blank lines |
Note: «Optional Remark» (label and field in one paragraph) |
before the signature | kept as the label Note: |
The part of the template that concerns hiding looks like this:
«Optional Note»

«GroupStart:OptionalBlock»
«Optional Line 1»
«Optional Line 2»
«GroupEnd:OptionalBlock»

Note: «Optional Remark»
In Word a region marker is a MERGEFIELD field like any other; only the field name is written as GroupStart:region name and GroupEnd:region name, and without quotation marks.
The Code
The steps are as follows:
- Get the Spire.Doc WASM module and confirm that it is ready.
- Load the sample template into the virtual file system (VFS), create a
Documentobject and load the file. - Before
MailMerge.Execute(), setHideEmptyParagraphsandHideEmptyGrouptotrue. - Call
MailMerge.Execute()with the field names and their values to run the mail merge. - Save the result with
Document.SaveToFile(), read it back from the VFS and trigger the browser download.
The code for hiding empty paragraphs and merge regions after a mail merge is as follows:
function App() {
  const HideEmptyRegions = async () => {
    // Get the Spire.Doc WASM module
    const docModule = window.wasmModule?.spiredoc;

    // Check if the module is ready
    if (!docModule) {
      alert('Spire.Doc is not ready yet');
      return;
    }
    // Load the sample template into the virtual file system (VFS)
    let inputFileName = "HideEmptyRegions.docx";
    await window.spire.FetchFileToVFS(inputFileName, "", `${process.env.PUBLIC_URL}static/data/`);

    // Create a document and load the template
    let doc = new docModule.Document();
    doc.LoadFromFile(inputFileName);

    // Provide values for three fields only; the optional fields in the
    // template are left empty
    let fieldNames = ["Contact Name", "Fax", "Date"];
    let fieldValues = ["John Smith", "+1 (69) 123456", docModule.DateTime.get_Now().Date.ToString()];

    // Hide the paragraphs and merge regions that come out empty
    doc.MailMerge.HideEmptyParagraphs = true;
    doc.MailMerge.HideEmptyGroup = true;

    // Execute the mail merge
    doc.MailMerge.Execute(fieldNames, fieldValues);

    // Define the output file name and save the document
    const outputFileName = "HideEmptyRegions-result.docx";
    doc.SaveToFile({ fileName: outputFileName, fileFormat: docModule.FileFormat.Docx2013 });

    doc.Dispose()

    // Read the saved file and convert it to a Blob
    const modifiedFileArray = window.dotnetRuntime.Module.FS.readFile(outputFileName);
    const blob = new Blob([modifiedFileArray], {type: "application/vnd.openxmlformats-officedocument.wordprocessingml.document"});
    const url = URL.createObjectURL(blob);
    const a = document.createElement('a');
    a.href = url;
    a.download = outputFileName;
    a.click();
    URL.revokeObjectURL(url);
  };

  return (
    <div style={{ textAlign: 'center', height: '300px' }}>
      <h1>Hide empty paragraphs and merge regions</h1>
      <button onClick={HideEmptyRegions}>Generate</button>
    </div>
  );
}
export default App;
The key statements are the two lines before Execute():
doc.MailMerge.HideEmptyParagraphs = true;
doc.MailMerge.HideEmptyGroup = true;
Both live on MailMerge, both default to false, and both have to be turned on explicitly. The timing matters: they have to be set before Execute(), because the deletion happens during the merge, and changing the properties after the merge has finished has no effect on the result that has already been produced.
fieldNames lists only the three main fields; Optional Note, Optional Line 1, Optional Line 2 and Optional Remark are given no values, so all of them come out empty after the merge.
The Result
With both switches on, the empty paragraphs and the empty region disappear along with the merge, and the follow-up confirmation returns to a compact single-page layout:
Word output after empty paragraphs and regions have been hidden during the mail merge
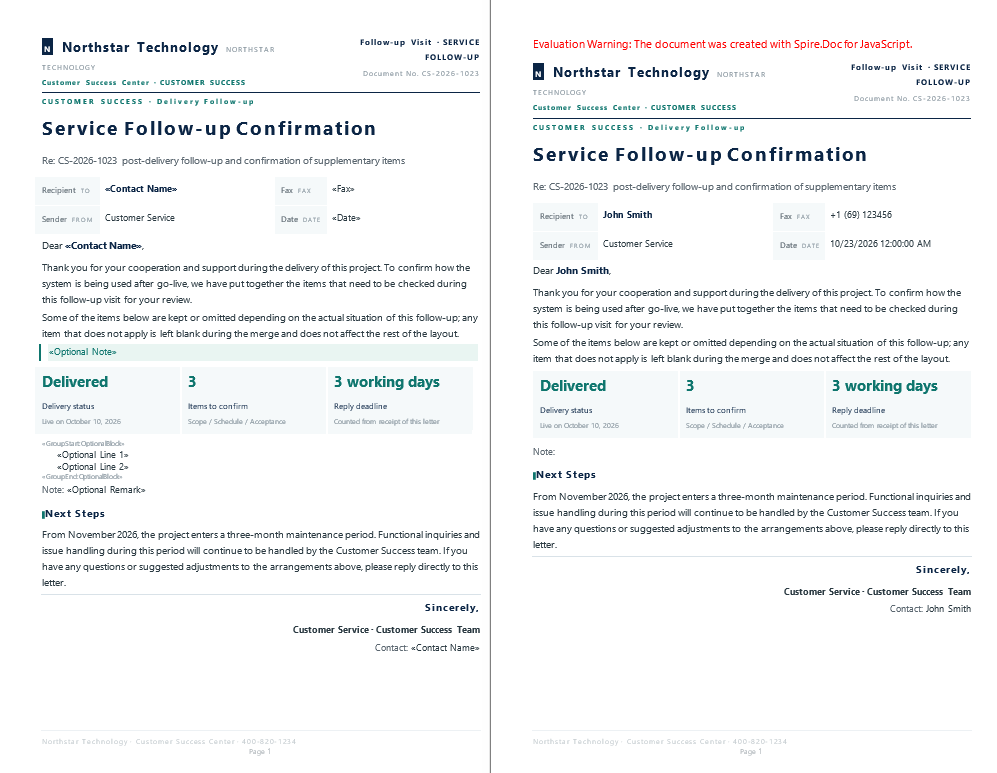
Comparing the output with both switches off (the control) and with both switches on, item by item against the template:
| What the template holds | Both switches off | Both switches on |
|---|---|---|
«Optional Note» (a paragraph of its own) |
kept as one blank line | the whole paragraph is removed |
the region OptionalBlock (four paragraphs) |
kept as four blank lines | all four paragraphs are removed |
Note: «Optional Remark» |
keeps Note: |
keeps Note: |
| empty paragraphs already in the template (used for spacing) | kept | kept |
The control document has 46 lines of text in total and the result document has 41; the difference of 5 lines corresponds exactly to the paragraph holding «Optional Note» and the four paragraphs of the region OptionalBlock, while the empty lines the template already used for spacing are left untouched.
Two rules follow from this:
- The test is whether the paragraph still holds content after the merge, not whether the field received a value.
Optional Remarkin the third construct is just as empty, but the paragraph also holds the labelNote:, so the whole paragraph is kept and only the field's position is left blank. To make the label disappear together with the field, the label has to be folded into the field value. HideEmptyParagraphsis the property that actually performs the deletion. SettingHideEmptyGroup = truealone while leavingHideEmptyParagraphs = falseproduces output identical to leaving both switches off; setting onlyHideEmptyParagraphs = trueproduces output identical to turning both on.
Hide Only Empty Paragraphs Without Merge Regions
If a template only needs a line to disappear when it comes out empty and defines no merge regions, setting HideEmptyParagraphs alone is enough:
// When the template has no merge regions, this switch alone is enough
doc.MailMerge.HideEmptyParagraphs = true;
With that setting the paragraphs inside a region are still deleted one by one, so the region disappears as well, with the same result as turning both switches on. Conversely, if the template really does define regions that should be cleared as a whole, setting both properties expresses the intent more clearly.
Read the Region Names and Merge Field Names from a Word Template
The Approach
Reading the region names and the merge field list from a Word template takes three methods on MailMerge, each at a different granularity:
| Method | What it returns |
|---|---|
GetMergeGroupNames() |
every region name in the document |
GetMergeFieldNames({ groupName: "Products" }) |
the merge field names inside the named region |
GetMergeFieldNames() |
every merge field name in the document (including region markers) |
The second method receives the region name inside an object as a named argument. That is how the WebAssembly build handles an overloaded method: methods sharing a name are dispatched by argument count and argument name, so the call has to be written as { groupName: "Products" }; passing a plain string will not match that overload.
Prepare the Template
The sample template is a product and team information list that contains two merge regions, Products and TeamRanking:
«GroupStart:Products»
Owner        «Contact Name»
Code         «Number»
Category     «Type»
Unit Price   «Price»
Date         «Date»
Vendor       «Vendor»
«GroupEnd:Products»

«GroupStart:TeamRanking»
Participant  «Name»
Points       «Score»
Place        «Ranking»
Award        «Award»
«GroupEnd:TeamRanking»
Each field occupies a paragraph of its own, and the region markers are paragraphs of their own as well.
The Code
The steps are as follows:
- Get the Spire.Doc WASM module and confirm that it is ready.
- Load the sample template into the virtual file system (VFS), create a
Documentobject and load the file. - Call
GetMergeGroupNames(),GetMergeFieldNames({ groupName: "Products" })andGetMergeFieldNames()in turn to read the three lists. - Join the three lists into text and write it to the VFS with
window.dotnetRuntime.Module.FS.writeFile(). - Read that text file back from the VFS, build a
text/plainBlob and trigger the browser download.
The code for reading the region names and merge field names from a Word template is as follows:
function App() {
  const IdentifyMergeFieldName = async () => {
    // Get the Spire.Doc WASM module
    const docModule = window.wasmModule?.spiredoc;

    // Check if the module is ready
    if (!docModule) {
      alert('Spire.Doc is not ready yet');
      return;
    }
    // Load the sample template into the virtual file system (VFS)
    let inputFileName = "IdentifyMergeFieldNames.docx";
    await window.spire.FetchFileToVFS(inputFileName, "", `${process.env.PUBLIC_URL}static/data/`);

    // Create a document and load the template
    let doc = new docModule.Document();
    doc.LoadFromFile(inputFileName);

    // Read all region names
    let GroupNames = doc.MailMerge.GetMergeGroupNames();

    // Read the merge field names inside a specific region
    let MergeFieldNamesWithinRegion = doc.MailMerge.GetMergeFieldNames({ groupName: "Products" });

    // Read every merge field name in the document
    let MergeFieldNames = doc.MailMerge.GetMergeFieldNames();

    // Join the results into text
    let content = [];
    content.push("----------------Group Names-----------------------------------------\n");
    for (let i = 0; i < GroupNames.length; i++) {
      content.push(GroupNames[i] + "\n");
    }
    content.push("----------------Merge field names within a specific group-----------\n");
    for (let j = 0; j < MergeFieldNamesWithinRegion.length; j++) {
      content.push(MergeFieldNamesWithinRegion[j] + "\n");
    }
    content.push("----------------All of the merge field names------------------------\n");
    for (let k = 0; k < MergeFieldNames.length; k++) {
      content.push(MergeFieldNames[k] + "\n");
    }

    // Write the TXT file
    const outputFileName = "IdentifyMergeFieldName-result.txt";
    window.dotnetRuntime.Module.FS.writeFile(outputFileName, content.join("\n"));

    // Close the document
    doc.Close();

    doc.Dispose()

    // Read the saved file and convert it to a Blob
    const modifiedFileArray = window.dotnetRuntime.Module.FS.readFile(outputFileName);
    const blob = new Blob([modifiedFileArray], {type: "text/plain"});
    const url = URL.createObjectURL(blob);
    const a = document.createElement('a');
    a.href = url;
    a.download = outputFileName;
    a.click();
    URL.revokeObjectURL(url);
  };

  return (
    <div style={{ textAlign: 'center', height: '300px' }}>
      <h1>Read region names and merge field names from a template</h1>
      <button onClick={IdentifyMergeFieldName}>Generate</button>
    </div>
  );
}
export default App;
Compared with the previous example, two things are different:
Execute()is not called. The example only reads the template's structure without merging any data, so the three lists can be read straight after loading.- The output goes through
window.dotnetRuntime.Module.FS.writeFile(fileName, text), writing the string directly into the virtual file system before atext/plainBlob triggers the download. It closes withdoc.Close(), because the example never changes the document's content.
All three methods return a collection (supporting length and indexed access) and are walked in the same way as Sections and Paragraphs.
The Result
Reading the two merge regions and all of the merge field names produces the following result:
Word output after the region names and merge field names have been read from a Word template
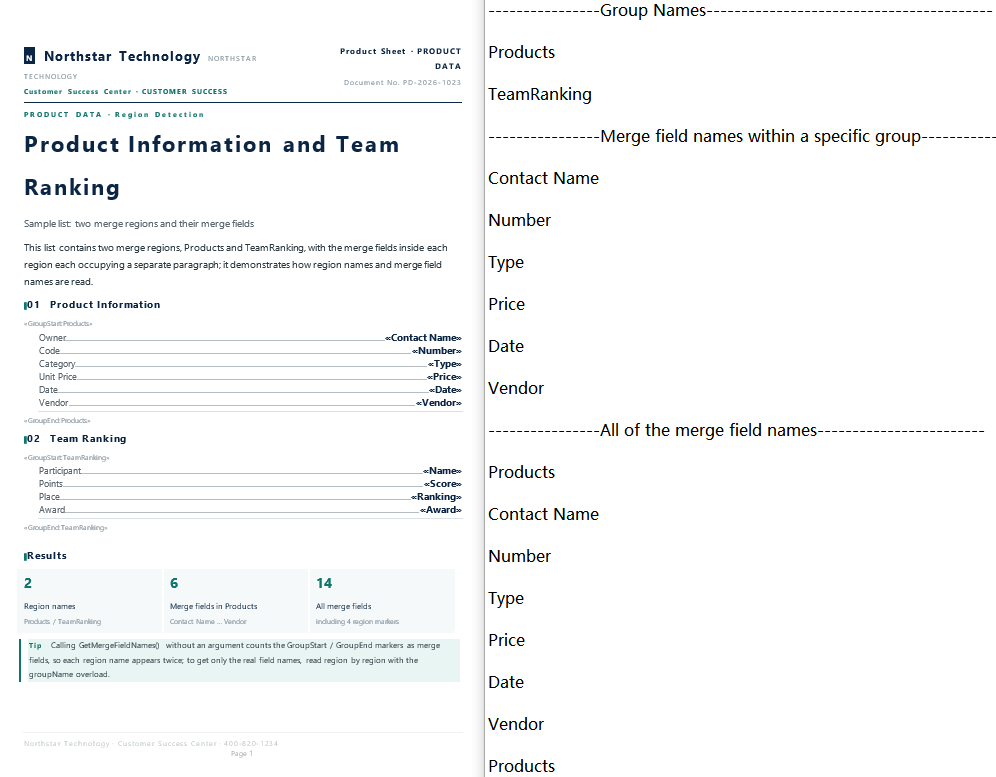
The output file is laid out as follows (the ---…--- lines are separators):
----------------Group Names-----------------------------------------

Products

TeamRanking

----------------Merge field names within a specific group-----------

Contact Name

Number

Type

Price

Date

Vendor

----------------All of the merge field names------------------------

Products

Contact Name

Number

Type

Price

Date

Vendor

Products

TeamRanking

Name

Score

Ranking

Award

TeamRanking
The three lists come out as:
Region names (2)
  Products, TeamRanking

Field names inside the Products region (6)
  Contact Name, Number, Type, Price, Date, Vendor

All field names (14 entries)
  Products, Contact Name, Number, Type, Price, Date, Vendor, Products,
  TeamRanking, Name, Score, Ranking, Award, TeamRanking
Two points are worth noting:
GetMergeFieldNames()with no argument counts the region markers themselves as field names.GroupStart:Productsis aMERGEFIELDfield in the document, so every region name appears twice: once for the opening marker and once for the closing marker. Among the 14 entries above,ProductsandTeamRankingeach appear twice.- The version that takes
groupNamereturns only the field names inside that region; none of the six results forProductscontains aGroupStart:orGroupEnd:marker.
Why is there an extra blank line between the entries? While the text is assembled,
content.push(name + "\n")already puts a newline at the end of every entry, andcontent.join("\n")adds another one between the elements, so two newlines end up in a row. For a compact list, drop the"\n"from thepushcall:
content.push(GroupNames[i]);
Filter Region Markers Out of the Full Field List
If the full list is really needed, take the region names first and filter them out of the result of GetMergeFieldNames():
const groups = doc.MailMerge.GetMergeGroupNames();
const names = doc.MailMerge.GetMergeFieldNames();

// Collect the region names into a set
const groupSet = {};
for (let i = 0; i < groups.length; i++) groupSet[groups[i]] = true;

// Filter out the region markers, keeping only real merge field names
const realFields = [];
for (let i = 0; i < names.length; i++) {
  if (!groupSet[names[i]]) realFields.push(names[i]);
}
If only the field names inside one particular region are needed, the overload that takes groupName is simpler, and its result never contains region markers.
FAQ
The switches for hiding empty lines are on and the blank line is still there
Cause: The property tests whether the paragraph still holds content after the merge. If the paragraph contains fixed text besides the field (for example, Note:), or the field itself is given a value, the whole paragraph is kept.
Solution: Check that the paragraph you want hidden holds nothing but the field. If the label should disappear together with the field, fold it into the field value: pass a complete string such as Note: … when there is data, and an empty string when there is none:
// The paragraph holds a single field; the label is carried by the field value
let fieldNames = ["Contact Name", "Remark Line"];
let fieldValues = ["John Smith", ""];
Why does setting only HideEmptyGroup = true have no effect
Cause: HideEmptyParagraphs is what actually deletes paragraphs. A region disappears as a whole because the paragraphs inside it are deleted one by one; with HideEmptyGroup turned on alone, the output is identical to leaving both switches off.
Solution: Set both properties together. If the template uses no merge regions, setting HideEmptyParagraphs alone produces the same output.
GetMergeFieldNames({ groupName: ... }) returns no data
Cause: The method is overloaded, and the WebAssembly build dispatches by argument name; passing a plain string (such as GetMergeFieldNames("Products")) does not match the overload that takes a region name.
Solution: Pass an object with a key, taking the region name from the name after GroupStart: in the template:
const fields = doc.MailMerge.GetMergeFieldNames({ groupName: "Products" });
Why do region names appear in the result of GetMergeFieldNames()
Cause: The opening and closing markers of a region are also MERGEFIELD fields in the document, so they are counted when the method is called without arguments, and every region name appears twice.
Solution: When only the field names inside one region are needed, use the overload that takes groupName; when the full list is needed, filter it using the result of GetMergeGroupNames() (see “Filter Region Markers Out of the Full Field List” above).
The template defines merge regions but GetMergeGroupNames() returns 0
Cause: The field code of a region marker is written as MERGEFIELD GroupStart:region name, with the field name unquoted. Written as MERGEFIELD "GroupStart:Products", it is usually treated as an ordinary merge field name and does not form a region. In addition, GroupStart and GroupEnd have to appear in pairs with the same region name at both ends; a marker without its counterpart is not recognised as a region.
Solution: Check these two field codes in the template:
{ MERGEFIELD  GroupStart:Products  \* MERGEFORMAT }
{ MERGEFIELD  GroupEnd:Products  \* MERGEFORMAT }
Get a Free License
Spire.Doc for JavaScript offers a 30-day full-featured free trial license with no functional limitations. Apply here to evaluate before purchasing.
Character formatting decides what text looks like on the page — which font it uses, how large it is, what color it is, and whether it is bold, slanted, underlined or struck through. In Word's Open XML structure these properties hang off the run, not the paragraph: every run in a sentence can carry a set of its own. Spire.Doc for JavaScript maps that structure onto the TextRange.CharacterFormat object and reads and writes it directly in the browser via WebAssembly, with no backend server required.
This article covers two core features:
For installation and project setup, refer to Integrating Spire.Doc for JavaScript in a React Project. The examples below assume Spire.Doc is installed and the WebAssembly module is initialized.
Set Character Formatting
After Document.AddSection() creates a section, section.AddParagraph() gives you a paragraph and paragraph.AppendText() appends text to it — the return value of AppendText is a TextRange object, and once you hold it you can set CharacterFormat on it directly. To break the line without starting a new paragraph, call paragraph.AppendBreak(wasmModule.BreakType.LineBreak).
The sample below walks through the common character formats one by one. Each line of text changes exactly one property, so the effect can be read straight off the result. One line is the exception: the font-name example deliberately mixes a Chinese word into its text, because only East Asian characters are read from the Far-East font slot that the line sets.
function App() {
  const CharacterFormatting = async () => {
    const docModule = window.wasmModule?.spiredoc;
    if (!docModule) {
      alert('Spire.Doc is not ready yet');
      return;
    }

    // Create the document and the section
    let doc = new docModule.Document();
    let sec = doc.AddSection();

    // The title paragraph takes the built-in "Title" style
    let titleParagraph = sec.AddParagraph();
    titleParagraph.AppendText("Character Formatting Overview");
    titleParagraph.ApplyStyle({ builtinStyle: docModule.BuiltinStyle.Title });

    let paragraph = sec.AddParagraph();

    // Strikeout
    let tr = paragraph.AppendText("Strikethough Text");
    tr.CharacterFormat.IsStrikeout = true;

    // Shadow
    paragraph.AppendBreak(docModule.BreakType.LineBreak);
    tr = paragraph.AppendText("Shadow Text");
    tr.CharacterFormat.IsShadow = true;

    // Small caps
    paragraph.AppendBreak(docModule.BreakType.LineBreak);
    tr = paragraph.AppendText("Small caps Text");
    tr.CharacterFormat.IsSmallCaps = true;

    // Double strikeout
    paragraph.AppendBreak(docModule.BreakType.LineBreak);
    tr = paragraph.AppendText("Double Strikethough Text");
    tr.CharacterFormat.DoubleStrike = true;

    // Outline
    paragraph.AppendBreak(docModule.BreakType.LineBreak);
    tr = paragraph.AppendText("Outline Text");
    tr.CharacterFormat.IsOutLine = true;

    // All caps
    paragraph.AppendBreak(docModule.BreakType.LineBreak);
    tr = paragraph.AppendText("AllCaps Text");
    tr.CharacterFormat.AllCaps = true;

    // Subscript and superscript
    paragraph.AppendBreak(docModule.BreakType.LineBreak);
    tr = paragraph.AppendText("Text");
    tr = paragraph.AppendText("SubScript");
    tr.CharacterFormat.SubSuperScript = docModule.SubSuperScript.SubScript;
    tr = paragraph.AppendText("And");
    tr = paragraph.AppendText("SuperScript");
    tr.CharacterFormat.SubSuperScript = docModule.SubSuperScript.SuperScript;

    // Emboss, with a white text color so the effect shows up better
    paragraph.AppendBreak(docModule.BreakType.LineBreak);
    tr = paragraph.AppendText("Emboss Text");
    tr.CharacterFormat.Emboss = true;
    tr.CharacterFormat.TextColor = docModule.Color.get_White();

    // Hidden text
    paragraph.AppendBreak(docModule.BreakType.LineBreak);
    tr = paragraph.AppendText("Hidden:");
    tr = paragraph.AppendText("Hidden Text");
    tr.CharacterFormat.Hidden = true;

    // Engrave
    paragraph.AppendBreak(docModule.BreakType.LineBreak);
    tr = paragraph.AppendText("Engrave Text");
    tr.CharacterFormat.Engrave = true;
    tr.CharacterFormat.TextColor = docModule.Color.get_White();

    // The Western, non-Far-East and Far-East font names are set separately
    paragraph.AppendBreak(docModule.BreakType.LineBreak);
    tr = paragraph.AppendText("WesternFonts中文字体");
    tr.CharacterFormat.FontNameAscii = "Calibri";
    tr.CharacterFormat.FontNameNonFarEast = "Calibri";
    tr.CharacterFormat.FontNameFarEast = "Simsun";

    // Font size
    paragraph.AppendBreak(docModule.BreakType.LineBreak);
    tr = paragraph.AppendText("Font Size");
    tr.CharacterFormat.FontSize = 20;

    // Font color
    paragraph.AppendBreak(docModule.BreakType.LineBreak);
    tr = paragraph.AppendText("Font Color");
    tr.CharacterFormat.TextColor = docModule.Color.get_Red();

    // Bold + italic
    paragraph.AppendBreak(docModule.BreakType.LineBreak);
    tr = paragraph.AppendText("Bold Italic Text");
    tr.CharacterFormat.Bold = true;
    tr.CharacterFormat.Italic = true;

    // Underline
    paragraph.AppendBreak(docModule.BreakType.LineBreak);
    tr = paragraph.AppendText("Underline Style");
    tr.CharacterFormat.UnderlineStyle = docModule.UnderlineStyle.Single;

    // Highlight (background)
    paragraph.AppendBreak(docModule.BreakType.LineBreak);
    tr = paragraph.AppendText("Highlight Text");
    tr.CharacterFormat.HighlightColor = docModule.Color.get_Yellow();

    // Character shading
    paragraph.AppendBreak(docModule.BreakType.LineBreak);
    tr = paragraph.AppendText("Text has shading");
    tr.CharacterFormat.TextBackgroundColor = docModule.Color.get_Green();

    // Border around the characters
    paragraph.AppendBreak(docModule.BreakType.LineBreak);
    tr = paragraph.AppendText("Border Around Text");
    tr.CharacterFormat.Border.BorderType = docModule.BorderStyle.Single;

    // Character scaling at 150%
    paragraph.AppendBreak(docModule.BreakType.LineBreak);
    tr = paragraph.AppendText("Text Scale");
    tr.CharacterFormat.TextScale = 150;

    // Character spacing of 2 points
    paragraph.AppendBreak(docModule.BreakType.LineBreak);
    tr = paragraph.AppendText("Character Spacing is 2 point");
    tr.CharacterFormat.CharacterSpacing = 2;

    // Define the output file name
    const outputFileName = "CharacterFormatting-result.docx";

    // Save the document to the given path
    doc.SaveToFile({ fileName: outputFileName, fileFormat: docModule.FileFormat.Docx2013 });
    // Release resources
    doc.Dispose();

    // Read the saved file back and wrap it as a Blob
    const modifiedFileArray = window.dotnetRuntime.Module.FS.readFile(outputFileName);
    const blob = new Blob([modifiedFileArray], {type: "application/vnd.openxmlformats-officedocument.wordprocessingml.document"});
    const url = URL.createObjectURL(blob);
    const a = document.createElement('a');
    a.href = url;
    a.download = outputFileName;
    a.click();
    URL.revokeObjectURL(url);
  };

  return (
    <div style={{ textAlign: 'center', height: '300px' }}>
      <h1>Set Various Character Formats</h1>
      <button onClick={CharacterFormatting}>Generate</button>
    </div>
  );
}
export default App;
Every line of the generated document shows the matching character effect, and can be compared with the code line by line
Apply Several Character Formats in One Paragraph
One paragraph can hold several TextRange objects, and each of them has its own CharacterFormat. That means layouts such as "the first half in bold blue, the second half back at a regular size" do not need to be split into two paragraphs — just call AppendText again; the format only applies to the text appended by that one call.
function App() {
  const MultiStylesInAParagraph = async () => {
    const docModule = window.wasmModule?.spiredoc;
    if (!docModule) {
      alert('Spire.Doc is not ready yet');
      return;
    }

    // Create the document and the section
    let doc = new docModule.Document();
    let section = doc.AddSection();

    // Add a new paragraph
    let para = section.AddParagraph();

    // The first TextRange: Calibri 16 pt, blue, bold, single underline
    let range = para.AppendText("Quarterly Delivery Note ");
    range.CharacterFormat.FontName = "Calibri";
    range.CharacterFormat.FontSize = 16;
    range.CharacterFormat.TextColor = docModule.Color.get_Blue();
    range.CharacterFormat.Bold = true;
    range.CharacterFormat.UnderlineStyle = docModule.UnderlineStyle.Single;

    // The second TextRange: still the same paragraph, now Calibri 15 pt regular
    range = para.AppendText("This delivery covers three business areas, and acceptance is based on the result of the online trial run");
    range.CharacterFormat.FontName = "Calibri";
    range.CharacterFormat.FontSize = 15;

    // Define the output file name
    const outputFileName = "MultiStylesInAParagraph-result.docx";

    // Save the document to the given path
    doc.SaveToFile({ fileName: outputFileName, fileFormat: docModule.FileFormat.Docx2013 });
    // Release resources
    doc.Dispose();

    // Read the saved file back and wrap it as a Blob
    const modifiedFileArray = window.dotnetRuntime.Module.FS.readFile(outputFileName);
    const blob = new Blob([modifiedFileArray], {type: "application/vnd.openxmlformats-officedocument.wordprocessingml.document"});
    const url = URL.createObjectURL(blob);
    const a = document.createElement('a');
    a.href = url;
    a.download = outputFileName;
    a.click();
    URL.revokeObjectURL(url);
  };

  return (
    <div style={{ textAlign: 'center', height: '300px' }}>
      <h1>Apply Multiple Character Formats in One Paragraph</h1>
      <button onClick={MultiStylesInAParagraph}>Generate</button>
    </div>
  );
}
export default App;
The first half of the paragraph is bold, blue and underlined; the second half is back to a regular weight
FAQ
FontName is set, but the Chinese text does not change
Cause: CharacterFormat.FontName only writes to the Western (ascii/hAnsi) font slots, while Chinese characters are taken from the separate "East Asian" slot. The two are stored independently, so setting one leaves the other exactly as it was.
Solution: Set the font used by each script separately — FontNameAscii / FontNameNonFarEast for the Western text, FontNameFarEast for the Chinese:
tr.CharacterFormat.FontNameAscii = "Calibri";
tr.CharacterFormat.FontNameNonFarEast = "Calibri";
tr.CharacterFormat.FontNameFarEast = "Simsun";
Emboss and Engrave show no visible effect
Cause: Both effects rely on a light-and-shadow contrast, and the default black text on a white background has almost no visual difference to work with.
Solution: Set the text color to white, so that the characters are shaped by their highlight and shadow alone:
tr.CharacterFormat.Emboss = true;
tr.CharacterFormat.TextColor = wasmModule.Color.get_White();
The downloaded Word document cannot be opened, or is reported as corrupted
Cause: The MIME type was wrong when the Blob was created, so the browser cannot identify the file format correctly.
Solution: Make sure the exact docx MIME type is used:
const modifiedFile = new Blob([modifiedFileArray], {
  type: "application/vnd.openxmlformats-officedocument.wordprocessingml.document"
});
Get a Free License
Spire.Doc for JavaScript offers a 30-day full-featured free trial license with no functional limitations. Apply here to evaluate before purchasing.
Set Paragraph and List Formatting in Word with JavaScript in React
2026-10-16 07:59:18 Written by Amy ZhaoThe paragraph is the basic unit of layout in Word, and every paragraph in a document carries two formatting objects. Paragraph.Format controls how the paragraph itself is laid out — its border, alignment, shading, indentation, spacing before and after, and line spacing — while Paragraph.ListFormat controls the numbering or bullet it shows as a list item. The two are independent, so a single paragraph can be centred and indented and still be the third level of a numbered list. Spire.Doc for JavaScript reads and writes both objects directly in the browser via WebAssembly, with no backend server required.
This article covers two core features:
For installation and project setup, refer to Integrating Spire.Doc for JavaScript in a React Project. The examples below assume Spire.Doc is installed and the WebAssembly module is initialized.
Set Paragraph Formatting
Paragraph formatting is set through paragraph.Format. The sample below walks through a paragraph border, the five horizontal alignments, shading, three kinds of indentation and the spacing rules, one at a time:
function App() {
  const ParagraphFormatting = async () => {
    const docModule = window.wasmModule?.spiredoc;
    if (!docModule) {
      alert('Spire.Doc is not ready yet');
      return;
    }

    // Create the document and the section
    let doc = new docModule.Document();
    let sec = doc.AddSection();

    // Title
    let para = sec.AddParagraph();
    para.AppendText("Paragraph Formatting Overview");
    para.ApplyStyle({ builtinStyle: docModule.BuiltinStyle.Title });

    // Paragraph border
    para = sec.AddParagraph();
    para.AppendText("This paragraph has a red border.");
    para.Format.Borders.BorderType = docModule.BorderStyle.Single;
    para.Format.Borders.Color = docModule.Color.get_Red();

    // The five horizontal alignments: left, center, right, justify, distribute
    para = sec.AddParagraph();
    para.AppendText("This paragraph is left-aligned.");
    para.Format.HorizontalAlignment = docModule.HorizontalAlignment.Left;

    para = sec.AddParagraph();
    para.AppendText("This paragraph is center-aligned.");
    para.Format.HorizontalAlignment = docModule.HorizontalAlignment.Center;

    para = sec.AddParagraph();
    para.AppendText("This paragraph is right-aligned.");
    para.Format.HorizontalAlignment = docModule.HorizontalAlignment.Right;

    para = sec.AddParagraph();
    para.AppendText("This paragraph is justified.");
    para.Format.HorizontalAlignment = docModule.HorizontalAlignment.Justify;

    para = sec.AddParagraph();
    para.AppendText("This paragraph is distributed.");
    para.Format.HorizontalAlignment = docModule.HorizontalAlignment.Distribute;

    // Paragraph shading
    para = sec.AddParagraph();
    para.AppendText("This paragraph has gray shading.");
    para.Format.BackColor = docModule.Color.get_Gray();

    // 10 pt left indent, 10 pt right indent, 15 pt first-line indent
    para = sec.AddParagraph();
    para.AppendText("This paragraph has a 10 pt left indent, a 10 pt right indent and a 15 pt first-line indent.");
    para.Format.SetLeftIndent(10);
    para.Format.SetRightIndent(10);
    para.Format.SetFirstLineIndent(15);

    // A negative value passed to the first-line indent is a hanging indent
    para = sec.AddParagraph();
    para.AppendText("This paragraph has a hanging indent of 15 pt.");
    para.Format.SetFirstLineIndent(-15);

    // 10 pt before, 20 pt after, line spacing of at least 10 pt
    para = sec.AddParagraph();
    para.AppendText("This paragraph has 10 pt before, 20 pt after and a line spacing of at least 10 pt.");
    para.Format.AfterSpacing = 20;
    para.Format.BeforeSpacing = 10;
    para.Format.LineSpacingRule = docModule.LineSpacingRule.AtLeast;
    para.Format.LineSpacing = 10;

    // Define the output file name
    const outputFileName = "ParagraphFormatting-result.docx";

    // Save the document to the given path
    doc.SaveToFile({ fileName: outputFileName, fileFormat: docModule.FileFormat.Docx2013 });
    // Release resources
    doc.Dispose();

    // Read the saved file back and wrap it as a Blob
    const modifiedFileArray = window.dotnetRuntime.Module.FS.readFile(outputFileName);
    const blob = new Blob([modifiedFileArray], {type: "application/vnd.openxmlformats-officedocument.wordprocessingml.document"});
    const url = URL.createObjectURL(blob);
    const a = document.createElement('a');
    a.href = url;
    a.download = outputFileName;
    a.click();
    URL.revokeObjectURL(url);
  };

  return (
    <div style={{ textAlign: 'center', height: '300px' }}>
      <h1>Set Various Paragraph Formats</h1>
      <button onClick={ParagraphFormatting}>Generate</button>
    </div>
  );
}
export default App;
Each paragraph in the generated document shows its border, alignment, indentation and spacing in turn
Create and Apply List Styles
A list style is one kind of document style, created with document.Styles.Add({ listType, name }). listType is ListType.Numbered or ListType.Bulleted, and name is the custom style name you choose.
A new style also needs the numbering rule for each level. Those settings live in ListRef.Levels and are indexed from 0:
NumberPrefix— the prefix template for the number, where%1stands for the first level's counter,%2for the second, and so on;PatternType— how the number is rendered, e.g.ListPatternType.Arabicfor Arabic numerals;- on the paragraph side,
ListFormat.ApplyStyle(styleName)attaches the list style, andListFormat.ListLevelNumbersets which level the paragraph sits at (0 is the first level).
function App() {
  const Lists = async () => {
    const docModule = window.wasmModule?.spiredoc;
    if (!docModule) {
      alert('Spire.Doc is not ready yet');
      return;
    }

    // Create the document and the section
    const doc = new docModule.Document();
    let sec = doc.AddSection();

    // The title and the group headings
    let paragraph = sec.AddParagraph();
    paragraph.AppendText("List Styles Overview");
    paragraph.ApplyStyle({ builtinStyle: docModule.BuiltinStyle.Title });

    paragraph = sec.AddParagraph();
    paragraph.AppendText("Numbered list:").CharacterFormat.Bold = true;

    // Create the numbered list style and configure the numbering for levels 1 and 2
    let numberList = doc.Styles.Add({ listType: docModule.ListType.Numbered, name: "numberList" });
    numberList.ListRef.Levels.get_Item(1).NumberPrefix = "%1.";
    numberList.ListRef.Levels.get_Item(1).PatternType = docModule.ListPatternType.Arabic;
    numberList.ListRef.Levels.get_Item(2).NumberPrefix = "%1.%2.";
    numberList.ListRef.Levels.get_Item(2).PatternType = docModule.ListPatternType.Arabic;

    // Create the bulleted list style
    let bulletList = doc.Styles.Add({ listType: docModule.ListType.Bulleted, name: "bulletList" });

    // Add both list styles to the document's style collection
    doc.Styles.Add(numberList);
    doc.Styles.Add(bulletList);

    // Apply the numbered list style paragraph by paragraph, setting the level with ListLevelNumber
    paragraph = sec.AddParagraph();
    paragraph.AppendText("Overview");
    paragraph.ListFormat.ApplyStyle(numberList.Name);

    paragraph = sec.AddParagraph();
    paragraph.AppendText("Delivery Scope");
    paragraph.ListFormat.ApplyStyle(numberList.Name);

    paragraph = sec.AddParagraph();
    paragraph.AppendText("Three Business Areas");
    paragraph.ListFormat.ApplyStyle(numberList.Name);
    paragraph.ListFormat.ListLevelNumber = 1;

    paragraph = sec.AddParagraph();
    paragraph.AppendText("Data Ingestion");
    paragraph.ListFormat.ApplyStyle(numberList.Name);
    paragraph.ListFormat.ListLevelNumber = 1;

    paragraph = sec.AddParagraph();
    paragraph.AppendText("API Integration");
    paragraph.ListFormat.ApplyStyle(numberList.Name);
    paragraph.ListFormat.ListLevelNumber = 2;

    paragraph = sec.AddParagraph();
    paragraph.AppendText("Field Verification");
    paragraph.ListFormat.ApplyStyle(numberList.Name);
    paragraph.ListFormat.ListLevelNumber = 2;

    paragraph = sec.AddParagraph();
    paragraph.AppendText("Canary Release");
    paragraph.ListFormat.ApplyStyle(numberList.Name);
    paragraph.ListFormat.ListLevelNumber = 2;

    paragraph = sec.AddParagraph();
    paragraph.AppendText("Acceptance Criteria");
    paragraph.ListFormat.ApplyStyle(numberList.Name);
    paragraph.ListFormat.ListLevelNumber = 1;

    paragraph = sec.AddParagraph();
    paragraph.AppendText("Follow-up Plan");
    paragraph.ListFormat.ApplyStyle(numberList.Name);

    // The bulleted list
    paragraph = sec.AddParagraph();
    paragraph.AppendText("Bulleted list:").CharacterFormat.Bold = true;

    paragraph = sec.AddParagraph();
    paragraph.AppendText("Clause One");
    paragraph.ListFormat.ApplyStyle(bulletList.Name);

    paragraph = sec.AddParagraph();
    paragraph.AppendText("Clause Two");
    paragraph.ListFormat.ApplyStyle(bulletList.Name);

    paragraph = sec.AddParagraph();
    paragraph.AppendText("Supplementary Notes");
    paragraph.ListFormat.ApplyStyle(bulletList.Name);
    paragraph.ListFormat.ListLevelNumber = 1;

    paragraph = sec.AddParagraph();
    paragraph.AppendText("Exceptions");
    paragraph.ListFormat.ApplyStyle(bulletList.Name);
    paragraph.ListFormat.ListLevelNumber = 1;

    paragraph = sec.AddParagraph();
    paragraph.AppendText("Clause Three");
    paragraph.ListFormat.ApplyStyle(bulletList.Name);

    // Define the output file name
    const outputFileName = "Lists-result.docx";

    // Save the document to the given path
    doc.SaveToFile({ fileName: outputFileName, fileFormat: docModule.FileFormat.Docx2013 });
    doc.Dispose();

    // Read the saved file back and wrap it as a Blob
    const modifiedFileArray = window.dotnetRuntime.Module.FS.readFile(outputFileName);
    const blob = new Blob([modifiedFileArray], {type: "application/vnd.openxmlformats-officedocument.wordprocessingml.document"});
    const url = URL.createObjectURL(blob);
    const a = document.createElement('a');
    a.href = url;
    a.download = outputFileName;
    a.click();
    URL.revokeObjectURL(url);
  };

  return (
    <div style={{ textAlign: 'center', height: '300px' }}>
      <h1>Create and Apply List Styles</h1>
      <button onClick={Lists}>Generate</button>
    </div>
  );
}
export default App;
The numbered list generates 1. / 1.1. style counters automatically, while the bulleted list indents by level
FAQ
The hanging indent does not take effect
Cause: A negative value passed to SetFirstLineIndent means a hanging indent, but if the paragraph has no left indent of its own there is no room for the hanging part to pull back into, so the effect is almost invisible.
Solution: Give the paragraph a left indent first, then use a negative first-line indent for the hanging effect:
para.Format.SetLeftIndent(20);
para.Format.SetFirstLineIndent(-15);
The list numbers do not appear at the expected level
Cause: ListLevelNumber defaults to 0 (the first level) when it is not set, so a child paragraph that does not set its level explicitly is numbered alongside its parent.
Solution: Set the level explicitly on every paragraph that needs one, keeping in mind that it is also counted from 0:
paragraph.ListFormat.ApplyStyle(numberList.Name);
paragraph.ListFormat.ListLevelNumber = 1;   // Second level, numbered 1.1.
A paragraph has both shading and a border, but only one of them shows
Cause: Format.BackColor is paragraph shading and Format.Borders is the paragraph border. Both are written under the same paragraph property node, so a misspelled property name is silently ignored.
Solution: Check which property belongs where — shading goes on BackColor, the border on Borders.BorderType:
para.Format.BackColor = docModule.Color.get_Gray();
para.Format.Borders.BorderType = docModule.BorderStyle.Single;
para.Format.Borders.Color = docModule.Color.get_Red();
Get a Free License
Spire.Doc for JavaScript offers a 30-day full-featured free trial license with no functional limitations. Apply here to evaluate before purchasing.
Insert Content based on Word Bookmarks with JavaScript in React
2026-10-16 07:58:52 Written by Amy ZhaoA bookmark is a named anchor that marks a specific position or a range of content in a Word document. Writing content into a bookmark lets business data land at the designated place in a template automatically, without the caller having to know how the document is actually laid out. Spire.Doc for JavaScript performs this entirely in the browser via WebAssembly, using a virtual file system (VFS) to manage fonts, documents and image resources — no backend server required.
This article covers two core features:
For installation and project setup, refer to Integrating Spire.Doc for JavaScript in a React Project. The examples below assume Spire.Doc is installed and the WebAssembly module is initialized.
Insert Document Content at a Bookmark
Inserting document content into a bookmark runs in three stages: first, instantiate two Document objects and load a file into each, one for the document to be filled and one that provides the content; then locate the bookmark by name with BookmarksNavigator.MoveToBookmark, take the bookmark's start marker through CurrentBookmark.BookmarkStart, work out the index of the paragraph holding that bookmark within the section through its OwnerParagraph and the section's IndexOf, and insert every paragraph of the source document after that index (each one Clone()d first); last, save the document, read the generated file from VFS, wrap it as a Blob and trigger a browser download.
function App() {
  const InsertDocAtBookmark = async () => {
    const docModule = window.wasmModule?.spiredoc;
    if (!docModule) {
      alert('Spire.Doc is not ready yet');
      return;
    }
    // Load the target document to be filled into VFS
    let inputFileName_1 = "InsertDocAtBookmark1.docx";
    await window.spire.FetchFileToVFS(inputFileName_1, "", `${process.env.PUBLIC_URL}/static/data/`);

    // Load the source document that provides the content into VFS
    let inputFileName_2 = "InsertDocAtBookmark2.docx";
    await window.spire.FetchFileToVFS(inputFileName_2, "", `${process.env.PUBLIC_URL}/static/data/`);

    // Load the target document
    let document1 = new docModule.Document();
    document1.LoadFromFile(inputFileName_1);

    // Load the source document
    let document2 = new docModule.Document();
    document2.LoadFromFile(inputFileName_2);

    // Get the first section of the target document
    let section1 = document1.Sections.get_Item();

    // Create a bookmark navigator to locate the bookmark
    let bn = new docModule.BookmarksNavigator(document1);

    // Find the bookmark by name
    bn.MoveToBookmark("Test", true, true);

    // Get the bookmark's start marker
    let start = bn.CurrentBookmark.BookmarkStart;

    // Get the paragraph that holds the start marker
    let para = start.OwnerParagraph;

    // Get the index of that paragraph in the section
    let index = section1.Body.ChildObjects.IndexOf(para);

    // Insert the paragraphs of the source document one by one after the paragraph holding the bookmark
    for (let i = 0; i < document2.Sections.Count; i++) {
      let section2 = document2.Sections.get_Item(i);
      for (let j = section2.Paragraphs.Count-1; j >=0; j--) {
        let paragraph = section2.Paragraphs.get_Item(j);
        section1.Body.ChildObjects.Insert(index + 1, paragraph.Clone());
      }
    }

    // Define the output file name
    const outputFileName = "InsertDocAtBookmark-result.docx";

    // Save the document
    document1.SaveToFile({ fileName: outputFileName, fileFormat: docModule.FileFormat.Docx2013 });

    document1.Dispose();
    document2.Dispose();

    // Read the saved file and convert it to a Blob
    const modifiedFileArray = window.dotnetRuntime.Module.FS.readFile(outputFileName);
    const blob = new Blob([modifiedFileArray], {type: "application/vnd.openxmlformats-officedocument.wordprocessingml.document"});
    const url = URL.createObjectURL(blob);
    const a = document.createElement('a');
    a.href = url;
    a.download = outputFileName;
    a.click();
    URL.revokeObjectURL(url);
  };

  return (
    <div style={{ textAlign: 'center', height: '300px' }}>
      <h1>Insert a document at a Word bookmark</h1>
      <button onClick={InsertDocAtBookmark}>Generate</button>
    </div>
  );
}
export default App;
Word output after the paragraphs of the source document have been inserted at the bookmark

Insert an Image at a Bookmark
A bookmark marks a position in the document, so it can carry non-text content just as well — inserting a seal image at a signature bookmark in a contract template, for example. The core process runs in three stages: first, instantiate a Document and load the file; then locate the bookmark with a BookmarksNavigator, create a temporary section with AddSection, add a paragraph inside that temporary section and append the image to it with AppendPicture, insert the whole paragraph at the bookmark with InsertParagraph, and finally remove the temporary section; last, save the document, read the generated file from VFS, wrap it as a Blob and trigger a browser download.
function App() {
  const InsertImageAtBookmark = async () => {
    const docModule = window.wasmModule?.spiredoc;
    if (!docModule) {
      alert('Spire.Doc is not ready yet');
      return;
    }
    // Load the target document into VFS
    let inputFileName = "InsertImageAtBookmark.docx";
    await window.spire.FetchFileToVFS(inputFileName, "", `${process.env.PUBLIC_URL}/static/data/`);

    // Load the image to be inserted into VFS
    let imageFileName = "Word.png";
    await window.spire.FetchFileToVFS(imageFileName, "", `${process.env.PUBLIC_URL}/static/data/`);

    // Load the document
    let doc = new docModule.Document();
    doc.LoadFromFile(inputFileName);

    // Create a bookmark navigator to locate the bookmark
    let bn = new docModule.BookmarksNavigator(doc);

    // Find the bookmark by name
    bn.MoveToBookmark("Test", true, true);

    // Add a temporary section to hold the image paragraph
    let section0 = doc.AddSection();

    // Add a paragraph in the temporary section
    let paragraph = section0.AddParagraph();

    // Append the image to the paragraph
    paragraph.AppendPicture({ imgFile: imageFileName });

    // Insert that paragraph at the bookmark
    bn.InsertParagraph(paragraph);

    // Remove the temporary section
    doc.Sections.Remove(section0);

    // Define the output file name
    const outputFileName = "InsertImageAtBookmark-result.docx";

    // Save the document
    doc.SaveToFile({ fileName: outputFileName, fileFormat: docModule.FileFormat.Docx2013 });
    doc.Dispose();

    // Read the saved file and convert it to a Blob
    const modifiedFileArray = window.dotnetRuntime.Module.FS.readFile(outputFileName);
    const blob = new Blob([modifiedFileArray], {type: "application/vnd.openxmlformats-officedocument.wordprocessingml.document"});
    const url = URL.createObjectURL(blob);
    const a = document.createElement('a');
    a.href = url;
    a.download = outputFileName;
    a.click();
    URL.revokeObjectURL(url);
  };

  return (
    <div style={{ textAlign: 'center', height: '300px' }}>
      <h1>Insert an image at a Word bookmark</h1>
      <button onClick={InsertImageAtBookmark}>Generate</button>
    </div>
  );
}
export default App;
Word output after the image has been inserted at the bookmark
FAQ
The bookmark cannot be found and MoveToBookmark fails to locate it
Cause: MoveToBookmark locates a bookmark by its name. The name is case-sensitive and has to match the bookmark name in the document exactly. If the spelling does not match, or the target document has no bookmark with that name at all, the lookup fails.
Solution: Before locating, walk the Bookmarks collection to confirm the bookmark names the document actually carries, then pass the exact name:
// Walk all the bookmarks in the document to check whether the name matches
for (let i = 0; i < doc.Bookmarks.Count; i++) {
  console.log(doc.Bookmarks.get_Item(i).Name);
}

// Once the bookmark is confirmed to exist, locate it by its exact name
let bn = new wasmModule.BookmarksNavigator(doc);
bn.MoveToBookmark("Test", true, true);
The inserted image is larger than the page
Cause: AppendPicture inserts the image at its original pixel size and does not fit it to the page width. If the image resolution is far above the available page width, it overflows the page or stretches the original layout once inserted.
Solution: AppendPicture returns the picture object, so it can be scaled proportionally to a maximum width before it is inserted at the bookmark (Width and Height are measured in points):
// Append the image and keep the returned picture object
let paragraph = section0.AddParagraph();
let picture = paragraph.AppendPicture({ imgFile: imageFileName });

// Scale proportionally to the maximum width
let maxWidth = 400;
if (picture.Width > maxWidth) {
  picture.Height = picture.Height * (maxWidth / picture.Width);
  picture.Width = maxWidth;
}
Get a Free License
Spire.Doc for JavaScript offers a 30-day full-featured free trial license with no functional limitations. Apply here to evaluate before purchasing.
Retrieve Style Information from a Word Document with JavaScript in React
2026-09-30 08:40:53 Written by Amy ZhaoA well-formatted document is worth more than its looks: the style a paragraph carries is structured information in its own right. Whether a heading paragraph is on Heading 1 or Heading 2, and which style the body copy uses, both say something about how the document is organised. The same works in reverse — when the headings of a document have to be pulled out to build a table of contents or a summary, the reliable way is to select them by style name rather than to guess which line looks bigger.
In Spire.Doc for JavaScript every paragraph carries a StyleName property, and reading it returns the style that paragraph is currently using. Both examples in this article write their output to a TXT file.
This article covers two core features:
For installation and project setup, refer to Integrating Spire.Doc for JavaScript in a React Project. The examples below assume Spire.Doc is installed and the WebAssembly module is initialized.
Export the Style Names of a Document
The paragraphs of a document are organised in two levels, section then paragraph: doc.Sections is the collection of sections, and each section's Paragraphs is the collection of paragraphs. Walk both with Count + get_Item(index), read the StyleName of each paragraph and join the results up.
function App() {
  const RetrieveStyle = async () => {
    const docModule = window.wasmModule?.spiredoc;
    if (!docModule) {
      alert('Spire.Doc is not ready yet');
      return;
    }

    // Load the sample file into the virtual file system (VFS)
    let inputFileName = "RetrieveStyle.docx";
    await window.spire.FetchFileToVFS(inputFileName, "", `${process.env.PUBLIC_URL}static/data/`);

    // Load the document
    let doc = new docModule.Document();
    doc.LoadFromFile(inputFileName);

    // Walk every section -> paragraph and read each paragraph's StyleName
    let styleName = "";
    for (let i = 0; i < doc.Sections.Count; i++) {
      let section = doc.Sections.get_Item(i);
      for (let j = 0; j < section.Paragraphs.Count; j++) {
        let paragraph = section.Paragraphs.get_Item(j);
        styleName += paragraph.StyleName + "\r\n";
      }
    }

    // Define the output file name
    const outputFileName = "RetrieveStyle-result.txt";

    // Write the content to the TXT file (straight into the VFS, not through SaveToFile)
    window.dotnetRuntime.Module.FS.writeFile(outputFileName, styleName);
    doc.Close();

    // Read the written file and wrap it in a Blob
    const modifiedFileArray = window.dotnetRuntime.Module.FS.readFile(outputFileName);
    const blob = new Blob([modifiedFileArray], { type: "text/plain" });
    const url = URL.createObjectURL(blob);
    const a = document.createElement('a');
    a.href = url;
    a.download = outputFileName;
    a.click();
    URL.revokeObjectURL(url);
  };

  return (
    <div style={{ textAlign: 'center', height: '300px' }}>
      <h1>Read the Style Name of Every Paragraph</h1>
      <button onClick={RetrieveStyle}>Generate</button>
    </div>
  );
}
export default App;
The sample document holds 14 paragraphs, and the exported TXT lists one style name per line, in paragraph order:
Title
Heading1
Normal
Heading2
Normal
Heading1
Normal
Heading2
Normal
Heading1
Normal
ListBullet
ListBullet
ListBullet
Note that the built-in style names come back without the space — Heading1 rather than Heading 1, ListBullet rather than List Bullet. That matters a great deal once a style name is used in a comparison.
The style name list exported for each paragraph of the sample document
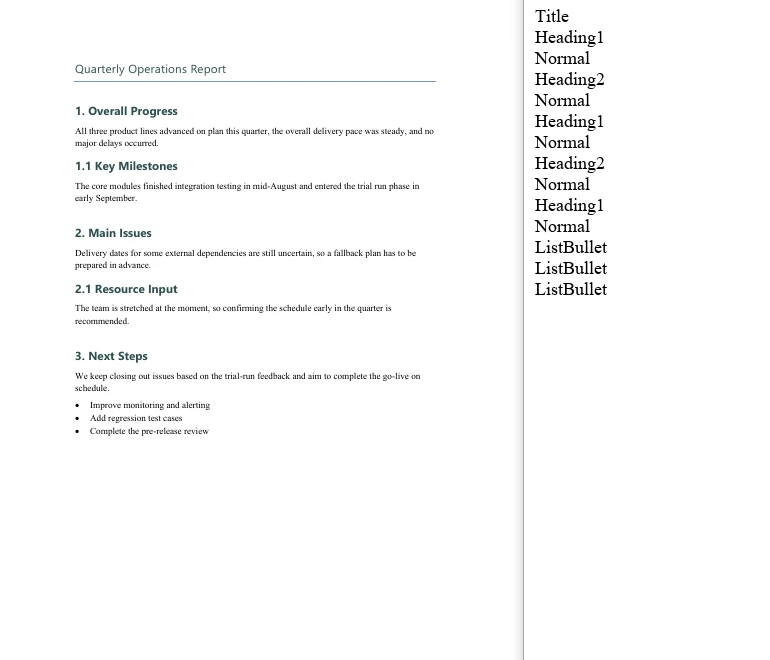
Extract Paragraph Text by Style Name
The same two-level walk applies; all it takes is one extra test per paragraph — only when StyleName equals the target style name does paragraph.Text go into the result. The sample document holds 3 Heading1 paragraphs, with a Title, Heading 2 and body paragraphs around them, which shows that the filter really does pick out the target style alone.
function App() {
  const GetTextByStyleName = async () => {
    const docModule = window.wasmModule?.spiredoc;
    if (!docModule) {
      alert('Spire.Doc is not ready yet');
      return;
    }

    // Load the sample file into the virtual file system (VFS)
    let inputFileName = "GetTextByStyleName.docx";
    await window.spire.FetchFileToVFS(inputFileName, "", `${process.env.PUBLIC_URL}static/data/`);

    // Load the document
    let doc = new docModule.Document();
    doc.LoadFromFile(inputFileName);

    // Collect the text of the paragraphs that match
    let builder = [];

    // Walk every section -> paragraph
    for (let i = 0; i < doc.Sections.Count; i++) {
      let section = doc.Sections.get_Item(i);
      for (let j = 0; j < section.Paragraphs.Count; j++) {
        let para = section.Paragraphs.get_Item(j);

        // Take only the paragraphs whose style name is Heading1
        if (para.StyleName == "Heading1") {
          builder.push(para.Text);
        }
      }
    }

    // Define the output file name
    const outputFileName = "GetTextByStyleName-result.txt";

    // Write the content to the TXT file
    window.dotnetRuntime.Module.FS.writeFile(outputFileName, builder.join("\n"));
    doc.Close();

    // Read the written file and wrap it in a Blob
    const modifiedFileArray = window.dotnetRuntime.Module.FS.readFile(outputFileName);
    const blob = new Blob([modifiedFileArray], { type: "text/plain" });
    const url = URL.createObjectURL(blob);
    const a = document.createElement('a');
    a.href = url;
    a.download = outputFileName;
    a.click();
    URL.revokeObjectURL(url);
  };

  return (
    <div style={{ textAlign: 'center', height: '300px' }}>
      <h1>Extract Paragraph Text by Style Name</h1>
      <button onClick={GetTextByStyleName}>Generate</button>
    </div>
  );
}
export default App;
The exported TXT holds just 3 lines, which are exactly the Heading1 paragraphs of the document:
1. Review of Last Week
2. This Week’s Priorities
3. Items Awaiting Confirmation
Only the paragraphs on the target style reached the exported TXT
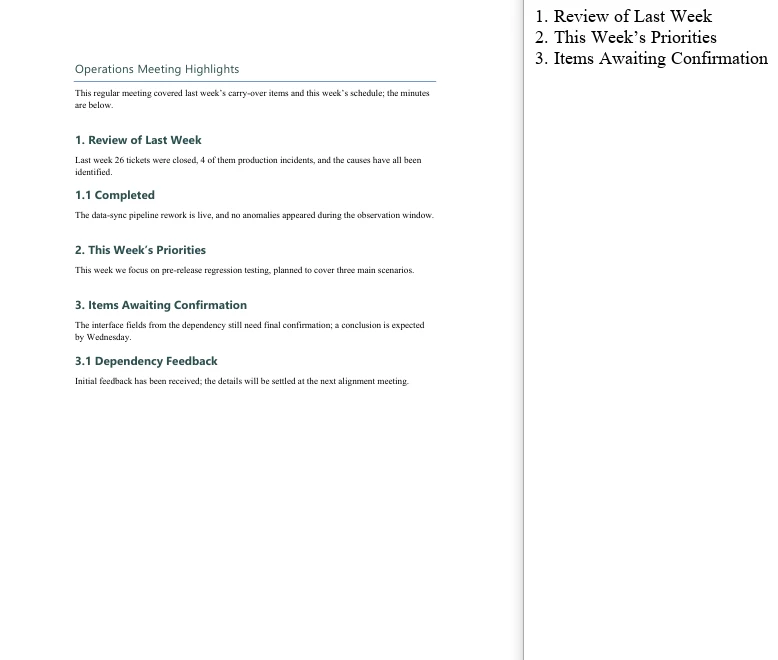
FAQ
Filtering by style name matches no paragraph at all
Cause: The StyleName of a built-in style is the space-free form, so writing "Heading 1" matches nothing.
Solution: Use the name without the space. In the sample, "Heading1" matches 3 paragraphs while "Heading 1" matches 0:
// Right
if (para.StyleName == "Heading1") { ... }

// Matches nothing
if (para.StyleName == "Heading 1") { ... }
Names are case-sensitive as well, so run the style-name export first to confirm the names the document actually uses before writing the condition.
The exported TXT has a blank line between every line
Cause: The text is joined both ways at once — push(text + "\n") and then join("\n"). Every element already carries a newline and join adds another one, so a blank line appears between every pair.
Solution: Keep only one of the two — either leave the newline off the elements and let join add it, or keep it on the elements and join with join(""):
// Let join supply the line breaks
builder.push(para.Text);
window.dotnetRuntime.Module.FS.writeFile(outputFileName, builder.join("\n"));
The downloaded file opens as garbled text
Cause: The MIME type of the Blob is set to docx, or the text is treated as a binary document when it is read back, so opening it in Word naturally shows nonsense.
Solution: A TXT output has to declare text/plain, and it should be opened in a text editor such as Notepad:
const modifiedFile = new Blob([modifiedFileArray], { type: "text/plain" });
Paragraphs inside tables are missed when walking Sections and Paragraphs
Cause: section.Paragraphs holds the body paragraphs only — paragraphs inside table cells are not in it. Table content hangs off section.Tables, and the Paragraphs of every cell has to be walked separately.
Solution: If the document contains tables and they need to be processed too, walk them outside the body loop:
for (let t = 0; t < section.Tables.Count; t++) {
  let table = section.Tables.get_Item(t);
  for (let r = 0; r < table.Rows.Count; r++) {
    for (let c = 0; c < table.Rows.get_Item(r).Cells.Count; c++) {
      let cell = table.Rows.get_Item(r).Cells.get_Item(c);
      // cell.Paragraphs holds the paragraphs inside the cell
    }
  }
}
Get a Free License
Spire.Doc for JavaScript offers a 30-day full-featured free trial license with no functional limitations. Apply here to evaluate before purchasing.
