In today's digital age, managing and manipulating Excel files programmatically has become an essential skill for developers. Whether you're building a reporting tool, automating data processing, or enhancing your applications with dynamic data handling, having a robust library at your disposal can make all the difference. Enter Spire.XLS for .NET - a versatile and powerful library that allows you to create, read, write, and edit Excel files seamlessly using C#.
In this article, you will learn how to edit Excel documents effortlessly using C# and Spire.XLS for .NET.
- Read and Write Excel Files in C#
- Apply Styles and Formats to Excel Cells in C#
- Find and Replace Text in Excel in C#
- Add Formulas and Charts to Excel in C#
Install Spire.XLS for .NET
To begin with, you need to add the DLL files included in the Spire.XLS for .NET package as references in your .NET project. The DLL files can be either downloaded from this link or installed via NuGet.
PM> Install-Package Spire.XLS
Read and Write Excel Files in C#
One of the most common tasks when working with Excel files in C# is reading and writing data. Spire.XLS for .NET provides the CellRange.Value property, enabling developers to easily retrieve or assign values to individual cells.
The step to read and write an Excel file using C# are as follows:
- Create a Workbook object.
- Load an Excel file from a given file path.
- Get a specific worksheet using the Workbook.Worksheets[] property.
- Get a specific cell using the Worksheet.Range[] property
- Get or set the cell value using the CellRange.Value property.
- Save the workbook to a different Excel file.
- C#
using Spire.Xls;
namespace ReadAndWriteExcel
{
class Program
{
static void Main(string[] args)
{
// Create a Workbook object
Workbook workbook = new Workbook();
// Load an Excel file
workbook.LoadFromFile("C:\\Users\\Administrator\\Desktop\\Sample.xlsx");
// Get a specific worksheet
Worksheet worksheet = workbook.Worksheets[0];
// Get a specific cell
CellRange cell = worksheet.Range["A1"];
// Read the cell value
String text = cell.Value;
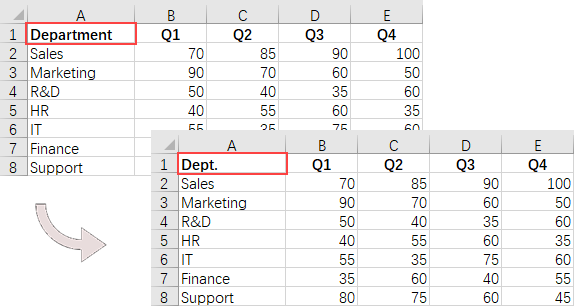
// Determine if the cell value is "Department"
if (text == "Department")
{
// Update the cell value
cell.Value = "Dept.";
}
// Save the workbook to a different
workbook.SaveToFile("ModifyExcel.xlsx", ExcelVersion.Version2016);
// Dispose resources
workbook.Dispose();
}
}
}
Apply Styles and Formats to Excel Cells in C#
Styling and formatting Excel documents is an important aspect of creating professional-looking reports. Spire.XLS for .NET offers a variety of APIs within the CellRange class for managing cell styles, fonts, colors, and alignments, as well as adjusting row heights and column widths.
The steps to apply styles and formats to Excel cells are as follows:
- Create a Workbook object.
- Load an Excel file from a given file path.
- Get a specific worksheet using the Workbook.Worksheets[] property.
- Get all located range using the Worksheet.AllocatedRange property.
- Get a specific row using the CellRange.Rows[] property, and set the cell color, text color, text alignment, and row height using the properties under the CellRange object.
- Get a specific column using the CellRange.Columns[] property, and set the column width using the ColumnWidth property under the CellRange object.
- Save the workbook to a different Excel file.
- C#
using Spire.Xls;
using System.Drawing;
namespace FormatCells
{
class Program
{
static void Main(string[] args)
{
// Create a Workbook object
Workbook workbook = new Workbook();
// Load an Excel file
workbook.LoadFromFile("C:\\Users\\Administrator\\Desktop\\Sample.xlsx");
// Get a specific worksheet
Worksheet worksheet = workbook.Worksheets[0];
// Get all located range from the worksheet
CellRange allocatedRange = worksheet.AllocatedRange;
// Iterate through the rows
for (int rowNum = 0; rowNum < allocatedRange.RowCount; rowNum++)
{
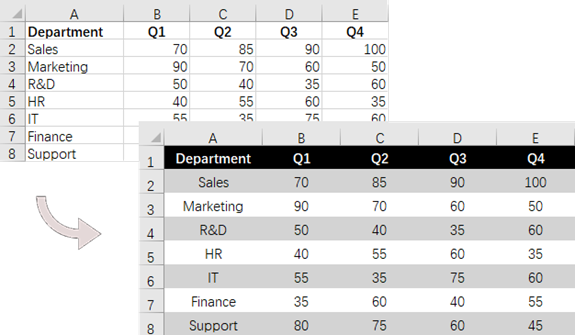
if(rowNum == 0)
{
// Apply cell color to the header row
allocatedRange.Rows[rowNum].Style.Color = Color.Black;
// Change the font color of the header row
allocatedRange.Rows[rowNum].Style.Font.Color = Color.White;
}
// Apply alternate colors to other rows
else if (rowNum % 2 == 1)
{
allocatedRange.Rows[rowNum].Style.Color = Color.LightGray;
}
else if (rowNum % 2 == 0)
{
allocatedRange.Rows[rowNum].Style.Color = Color.White;
}
// Align text to center
allocatedRange.Rows[rowNum].HorizontalAlignment = HorizontalAlignType.Center;
allocatedRange.Rows[rowNum].VerticalAlignment = VerticalAlignType.Center;
// Set the row height
allocatedRange.Rows[rowNum].RowHeight = 20;
}
// Iterate through the columns
for (int columnNum = 0; columnNum < allocatedRange.ColumnCount; columnNum++)
{
// Set the column width
if (columnNum > 0)
{
allocatedRange.Columns[columnNum].ColumnWidth = 10;
}
}
// Save the workbook to a different
workbook.SaveToFile("FormatExcel.xlsx", ExcelVersion.Version2016);
// Dispose resources
workbook.Dispose();
}
}
}
Find and Replace Text in Excel in C#
The find and replace feature in Excel enhances data accuracy and consistency while significantly improving efficiency. With Spire.XLS for .NET, you can easily locate a cell containing a specific string using the Worksheet.FindString() method and then update the cell value with the CellRange.Value property.
The steps to find and replace text in Excel using C# are as follows:
- Create a Workbook object.
- Load an Excel file from a given file path.
- Get a specific worksheet using the Workbook.Worksheets[] property.
- Find the cell that contains a specified string using the Worksheet.FindString() method.
- Update the cell value using the CellRange.Value property.
- Save the workbook to a different Excel file.
- C#
using Spire.Xls;
namespace FindAndReplaceText
{
class Program
{
static void Main(string[] args)
{
// Create a Workbook object
Workbook workbook = new Workbook();
// Load an Excel file
workbook.LoadFromFile("C:\\Users\\Administrator\\Desktop\\Sample.xlsx");
// Get a specific worksheet
Worksheet worksheet = workbook.Worksheets[0];
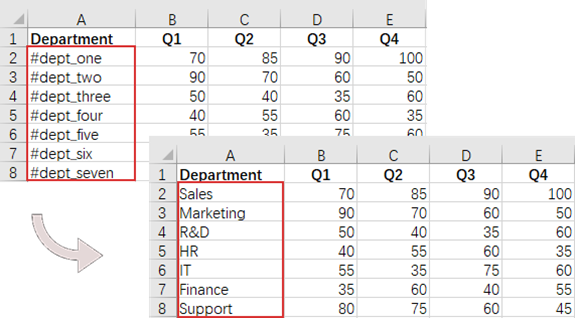
// Define an array of department names for replacement
String[] departments = new String[] { "Sales", "Marketing", "R&D", "HR", "IT", "Finance", "Support" };
// Define an array of placeholders that will be replaced in the Excel sheet
String[] placeholders = new String[] { "#dept_one", "#dept_two", "#dept_three", "#dept_four", "#dept_five", "#dept_six", "#dept_seven" };
// Iterate through the placeholder strings
for (int i = 0; i < placeholders.Length; i++)
{
// Find the cell containing the current placeholder string
CellRange cell = worksheet.FindString(placeholders[i], false, false);
// Replace the text in the found cell with the corresponding department name
cell.Text = departments[i];
}
// Save the workbook to a different
workbook.SaveToFile("ReplaceText.xlsx", ExcelVersion.Version2016);
// Dispose resources
workbook.Dispose();
}
}
}
Add Formulas and Charts to Excel in C#
In addition to basic file operations, Spire.XLS for .NET provides a variety of advanced techniques for working with Excel files. These techniques can be used to automate complex tasks, perform calculations, and generate dynamic reports.
The following are the steps to add formulas and create a chart in Excel using C#:
- Create a Workbook object.
- Load an Excel file from a given file path.
- Get a specific worksheet using the Workbook.Worksheets[] property.
- Get a specific cell using the Worksheet.Range[] property.
- Add a formula to the cell using the CellRange.Formula property.
- Add a column chart to the worksheet using the Worksheet.Charts.Add() method.
- Set the chart data range, position, title and other attributes using the methods and properties under the Chart object.
- Save the workbook to a different Excel file.
- C#
using Spire.Xls;
namespace AddFormulaAndChart
{
class Program
{
static void Main(string[] args)
{
// Create a Workbook object
Workbook workbook = new Workbook();
// Load an Excel file
workbook.LoadFromFile("C:\\Users\\Administrator\\Desktop\\Sample.xlsx");
// Get a specific worksheet
Worksheet worksheet = workbook.Worksheets[0];
// Get all located range
CellRange allocatedRange = worksheet.AllocatedRange;
// Iterate through the rows
for (int rowNum = 0; rowNum < allocatedRange.RowCount; rowNum++)
{
if (rowNum == 0)
{
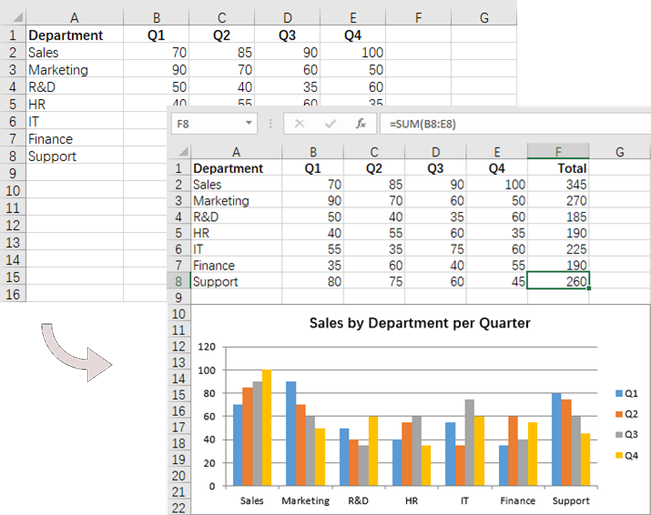
// Write text in the cell F1
worksheet.Range[rowNum + 1, 6].Text = "Total";
// Apply style to the cell
worksheet.Range[rowNum + 1, 6].Style.Font.IsBold = true;
worksheet.Range[rowNum + 1, 6].Style.HorizontalAlignment = HorizontalAlignType.Right;
}
else
{
// Add formulas to the cells from F2 to F8
worksheet.Range[rowNum + 1, 6].Formula = $"=SUM(B{rowNum + 1}:E{rowNum + 1})";
}
}
// Add a clustered column chart
Chart chart = worksheet.Charts.Add(ExcelChartType.ColumnClustered);
// Set data range for the chart
chart.DataRange = worksheet.Range["A1:E8"];
chart.SeriesDataFromRange = false;
// Set position of the chart
chart.LeftColumn = 1;
chart.TopRow = 10;
chart.RightColumn = 8;
chart.BottomRow = 23;
// Set and format chart title
chart.ChartTitle = "Sales by Department per Quarter";
chart.ChartTitleArea.Size = 13;
chart.ChartTitleArea.IsBold = true;
// Save the workbook to a different
workbook.SaveToFile("AddFormulaAndChart.xlsx", ExcelVersion.Version2016);
// Dispose resources
workbook.Dispose();
}
}
}
Apply for a Temporary License
If you'd like to remove the evaluation message from the generated documents, or to get rid of the function limitations, please request a 30-day trial license for yourself.
