How to Integrate Spire.Presentation for C++ in a C++ Application
Spire.Presentation for C++ is a professional PowerPoint library built for developers to read, create, edit, and convert PowerPoint documents in any type of C++ applications. This article demonstrates how to integrate Spire.Presentation for C++ into your C++ application in two different ways.
- Install Spire.Presentation for C++ via NuGet
- Install Spire.Presentation for C++ by Manually Importing Libraries
Install Spire.Presentation for C++ via NuGet
Step 1
Create a C++ project in Visual Studio 2022.

Step 2
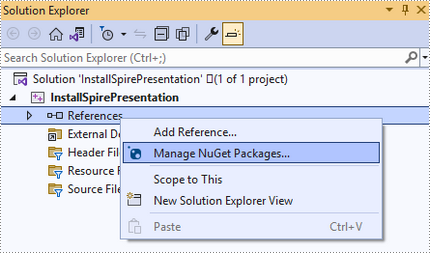
Right-click "References" in the Solution Explorer and choose "Manage NuGet Package" in the popup menu.
Click "Browse", search for "spire.presentation.cpp", and install it in your project.

Step 3
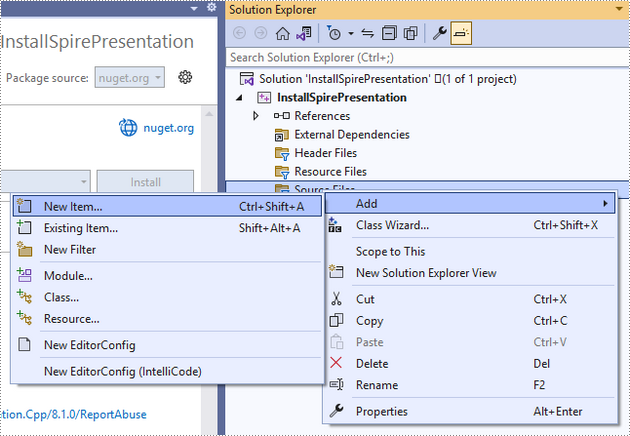
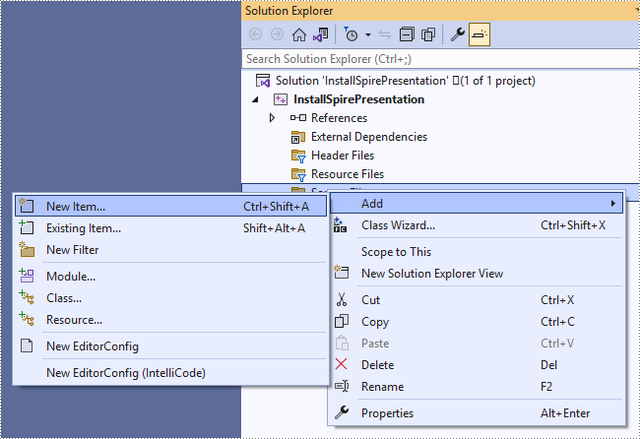
Right-click "Source Files" in the Solution Explorer, choose "Add" and then "New Item".
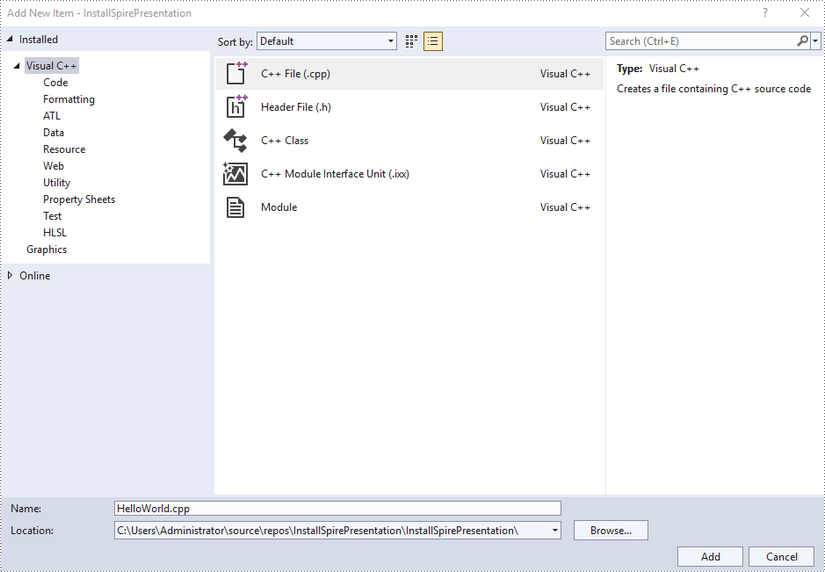
Create a .cpp file.
Step 4
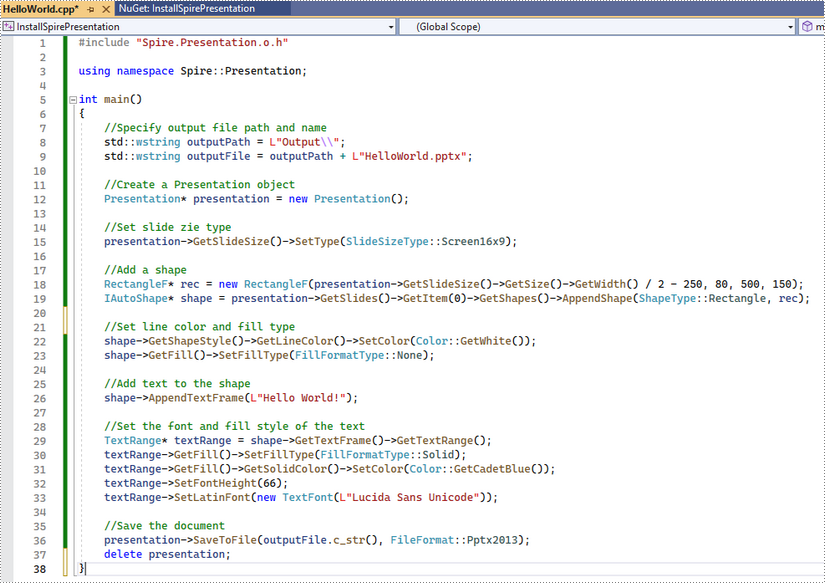
Click the .cpp file you just created to write code. Before starting, you need to include the header file “Spire.Presentation.o.h” by adding the following line of code to your program.
- C++
#include "Spire.Presentation.o.h"
The code example below shows you how to create a simple Presentation file using Spire.Presentation for C++.
Install Spire.Presentation for C++ by Manually Importing Libraries
Step 1
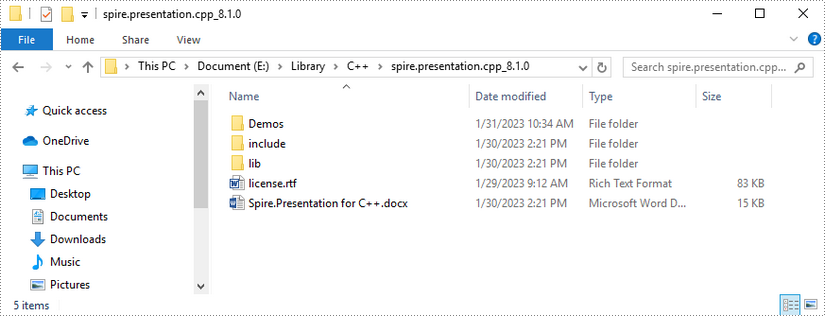
Download Spire.Presentation for C++ package and unzip it somewhere on your disc to get the following files.
Step 2
Create a C++ project in Visual Studio 2022.
Step 3
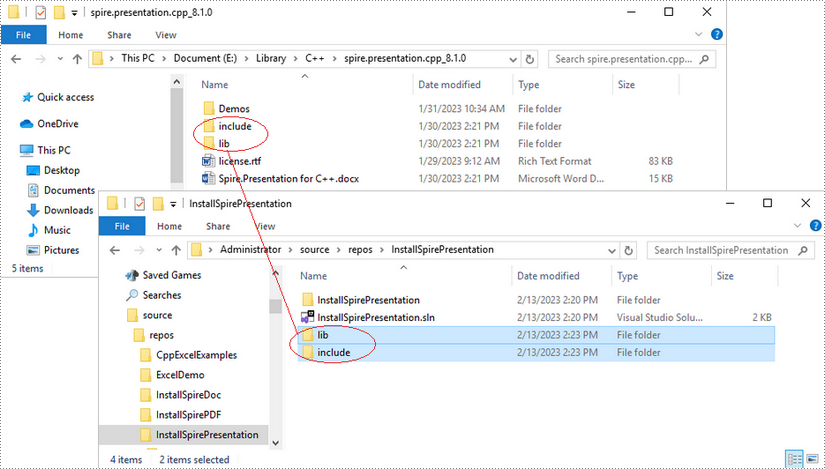
Copy the "include" folder and the "lib" folder from the product package to your project, and save them under the same folder where the .sln file exists.
Step 4
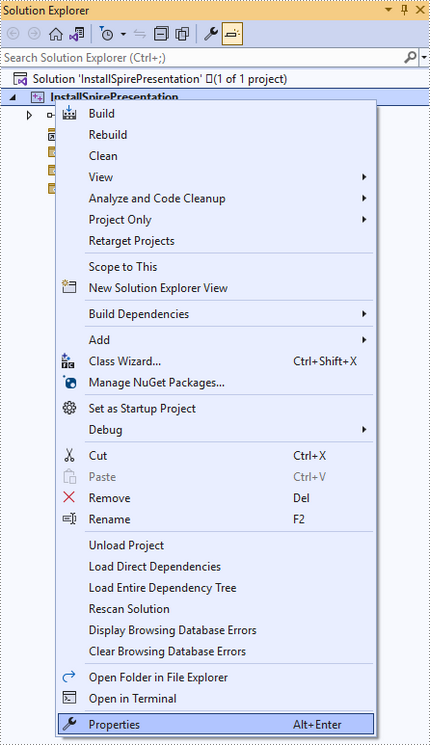
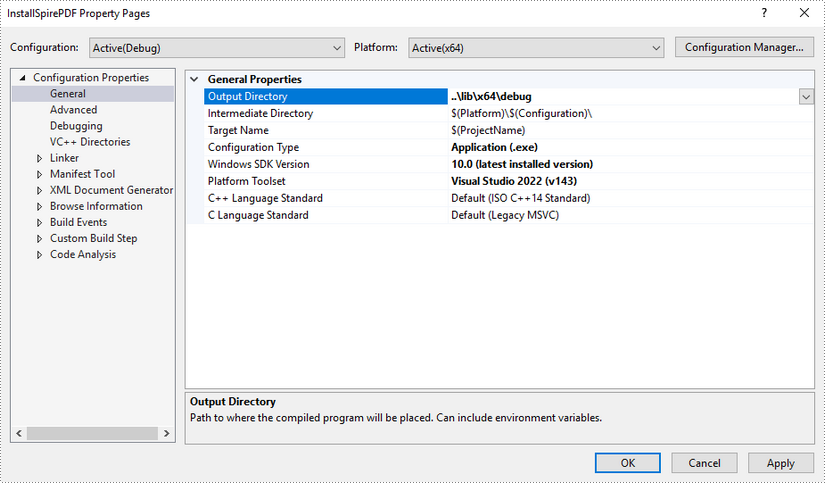
Right-click the project name and select "Properties".
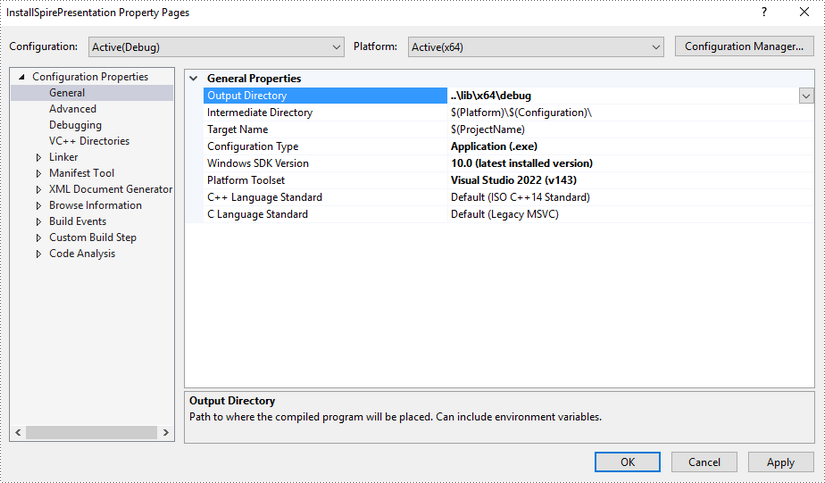
Configure output directory. Depending on the build mode (Debug or Release) you choose, you can set the output directory to "..\lib\x64\debug" or "..\lib\x64\release".
Step 5
Right-click "Source Files" in the Solution Explorer, choose "Add" and then "New Item".
Create a .cpp file.

Step 6
Click the .cpp file you just created to write code. Before starting, you need to include the following two lines of code to your program.
- C++
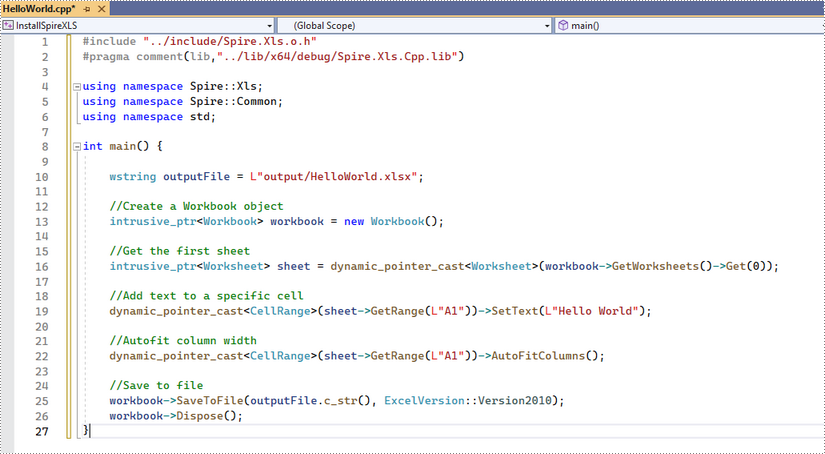
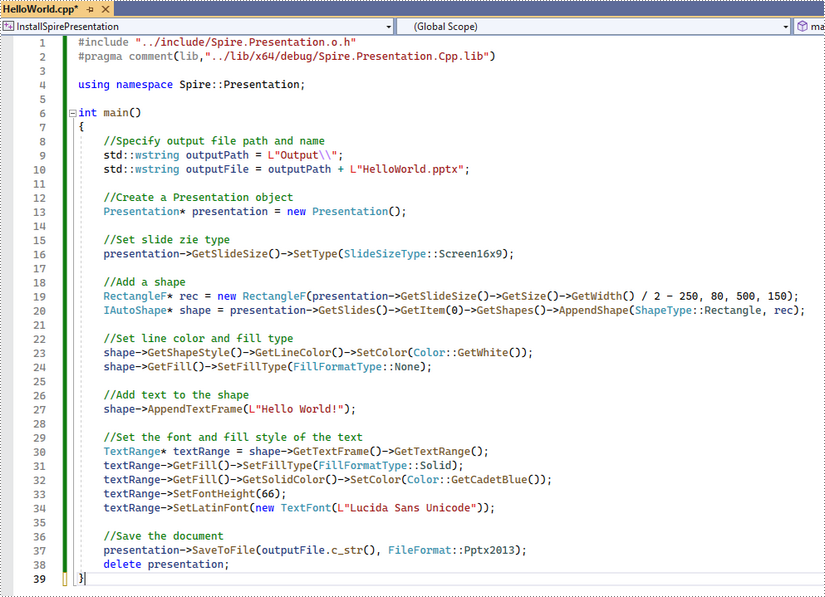
#include "../include/Spire.Presentation.o.h"
#pragma comment(lib,"../lib/x64/debug/Spire.Presentation.Cpp.lib")
The code example below shows you how to create a simple PowerPoint file using Spire.Presentation for C++.
How to Integrate Spire.PDF for C++ in a C++ Application
Spire.PDF for C++ is a professional PDF library built for developers to read, create, edit, and convert PDF documents in any type of C++ applications. This article demonstrates how to integrate Spire.PDF for C++ into your C++ application in two different ways.
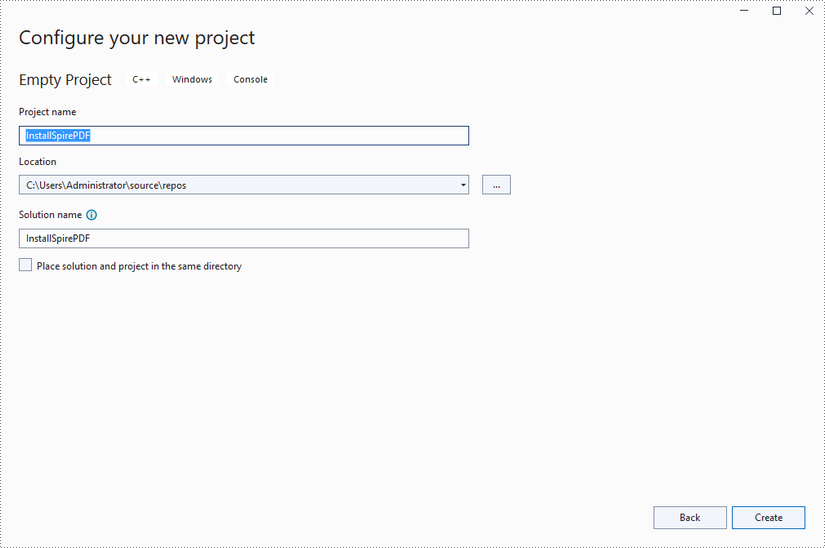
Install Spire.PDF for C++ via NuGet
Step 1
Create a C++ project in Visual Studio 2022.
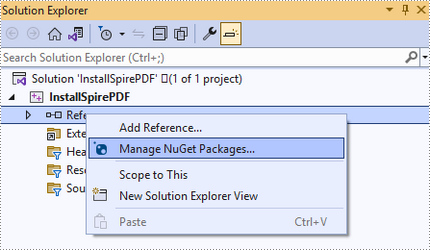
Step 2
Right-click "References" in the Solution Explorer and choose "Manage NuGet Package" in the popup menu.
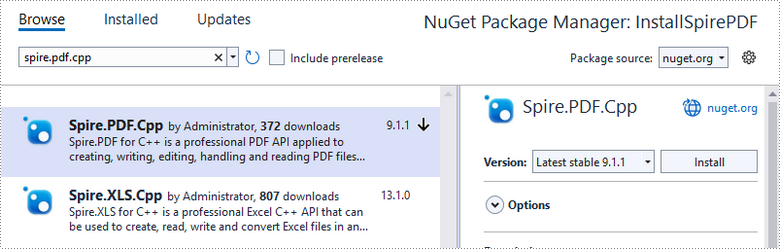
Click "Browse", search for "spire.PDF.cpp", and install it in your project.
Step 3
Right-click "Source Files" in the Solution Explorer, choose "Add" and then "New Item".
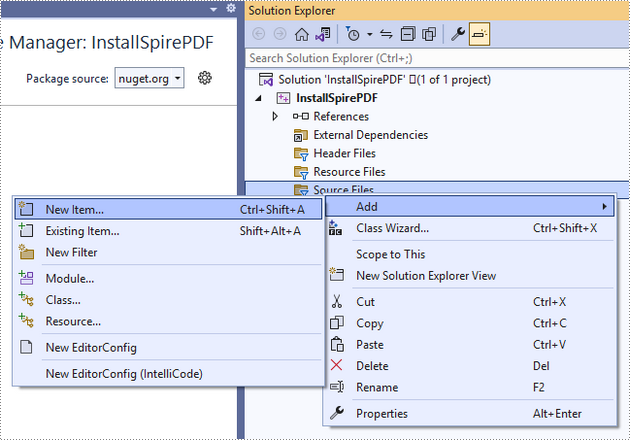
Create a .cpp file.

Step 4
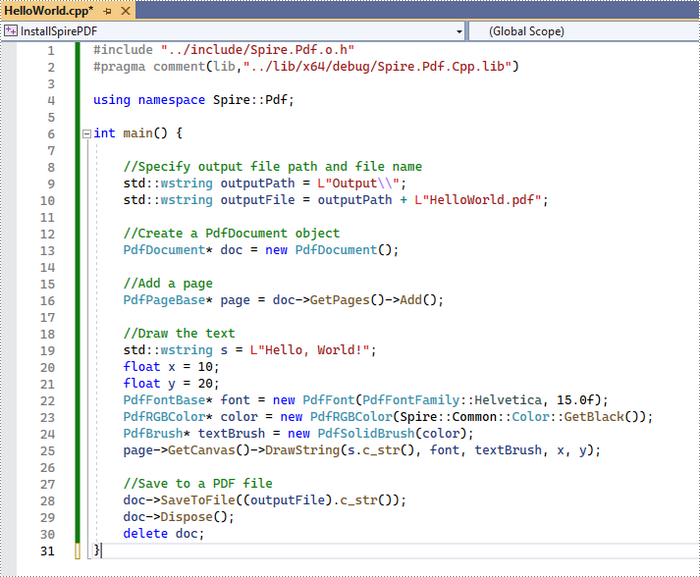
Click the .cpp file you just created to write code. Before starting, you need to include the header file “Spire.Pdf.o.h” by adding the following line of code to your program.
- C++
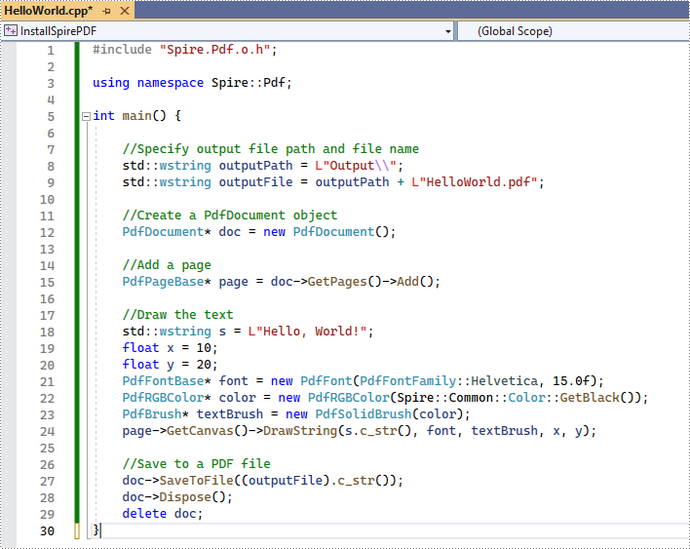
#include "Spire.Pdf.o.h"
The code example below shows you how to create a simple PDF file using Spire.PDF for C++.
Install Spire.PDF for C++ by Manually Importing Libraries
Step 1
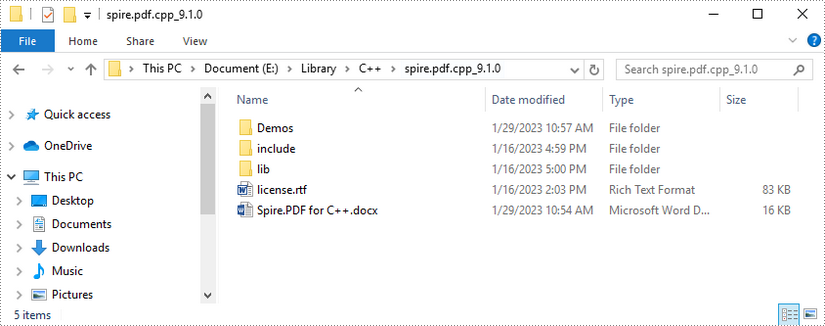
Download Spire.PDF for C++ package and unzip it somewhere on your disc to get the following files.
Step 2
Create a C++ project in Visual Studio 2022.

Step 3
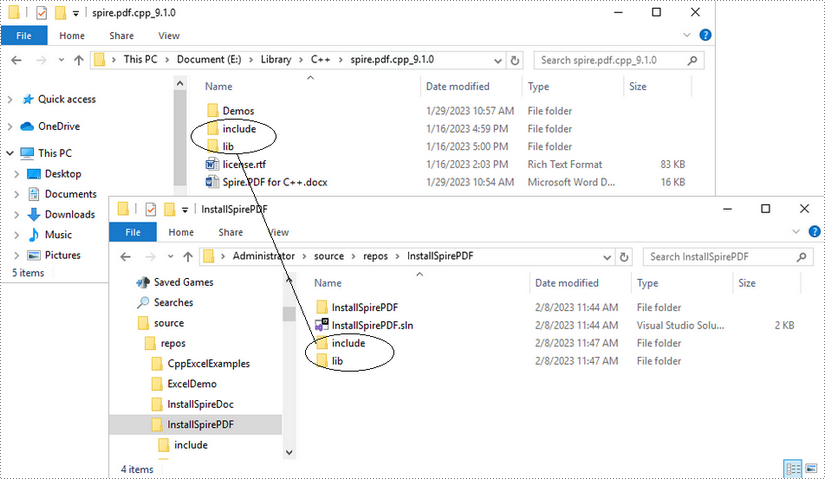
Copy the "include" folder and the "lib" folder from the product package to your project, and save them under the same folder where the .sln file exists.
Step 4
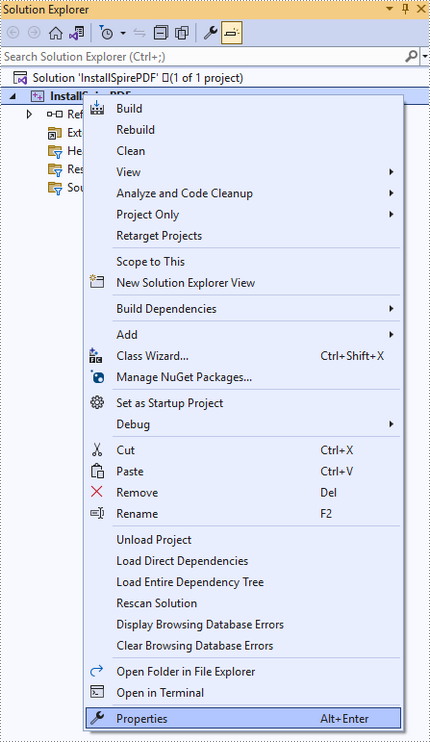
Right-click the project name and select "Properties".
Configure output directory. Depending on the build mode (Debug or Release) you choose, you can set the output directory to "..\lib\x64\debug" or "..\lib\x64\release".
Step 5
Right-click "Source Files" in the Solution Explorer, choose "Add" and then "New Item".
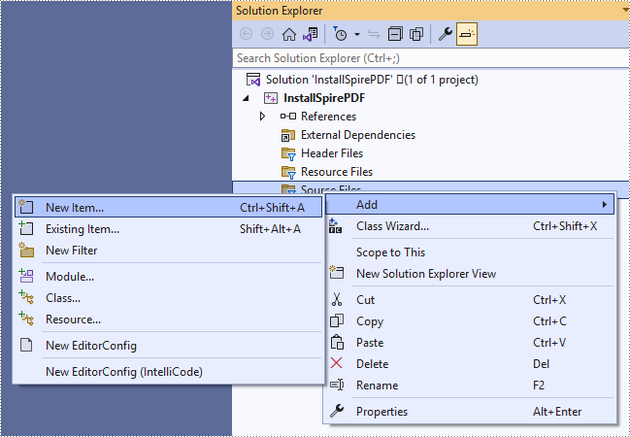
Create a .cpp file.

Step 6
Click the .cpp file you just created to write code. Before starting, you need to include the following two lines of code to your program.
- C++
#include "../include/Spire.Pdf.o.h"
#pragma comment(lib,"../lib/x64/debug/Spire.Pdf.Cpp.lib")
The code example below shows you how to create a simple PDF file using Spire.PDF for C++.
How to Integrate Spire.Doc for C++ in a C++ Application
Spire.Doc for C++ is a professional Word library built for developers to read, create, edit, compare and convert Word documents in any type of C++ applications. This article demonstrates how to integrate Spire.Doc for C++ into your C++ application in two different ways.
Install Spire.Doc for C++ via NuGet
Step 1
Create a C++ project in Visual Studio 2022.
Step 2
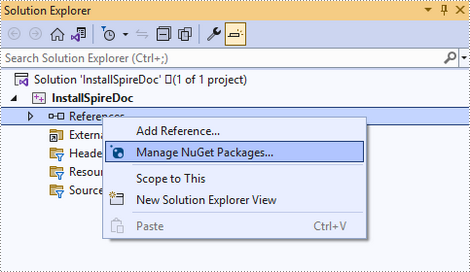
Right-click 'References' in the Solution Explorer and choose 'Manage NuGet Package' in the popup menu.
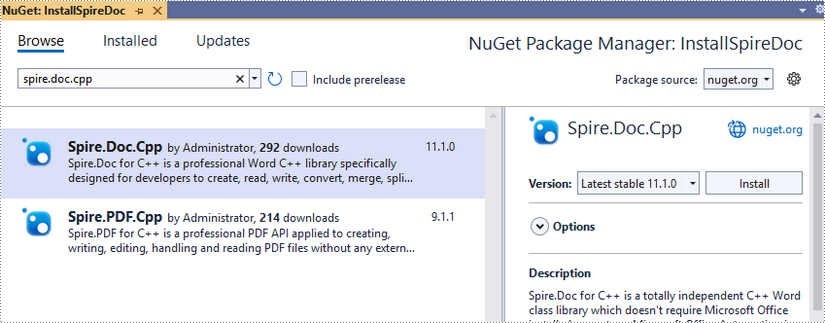
Click 'Browse', search for 'spire.doc.cpp', and install it in your project.
Step 3
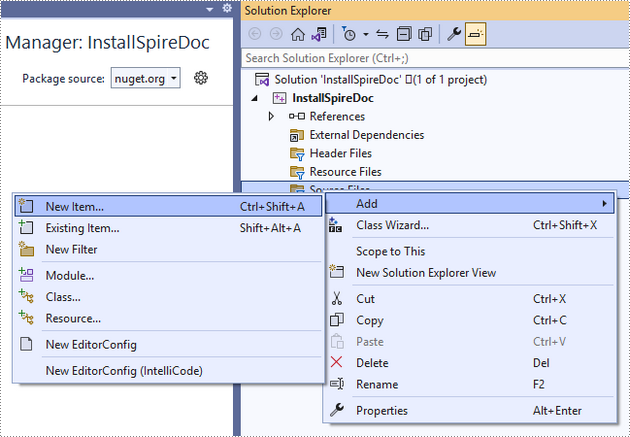
Right-click 'Source Files' in the Solution Explorer, choose 'Add' and then 'New Item'.
Create a .cpp file.

Step 4
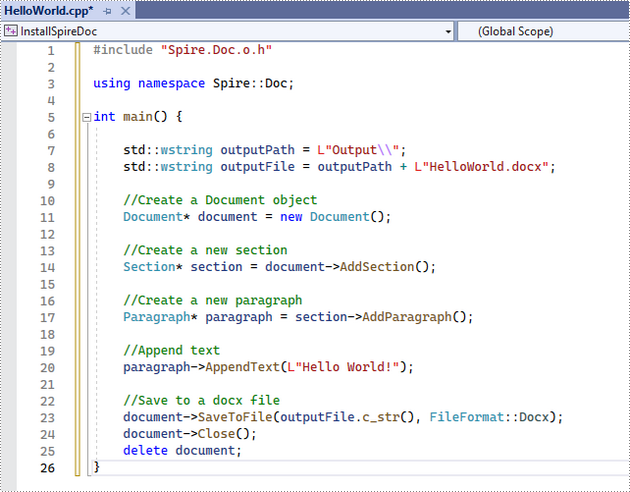
Click the .cpp file you just created to write code. Before starting, you need to include the header file “Spire.Doc.o.h” by adding the following line of code to your program.
- C++
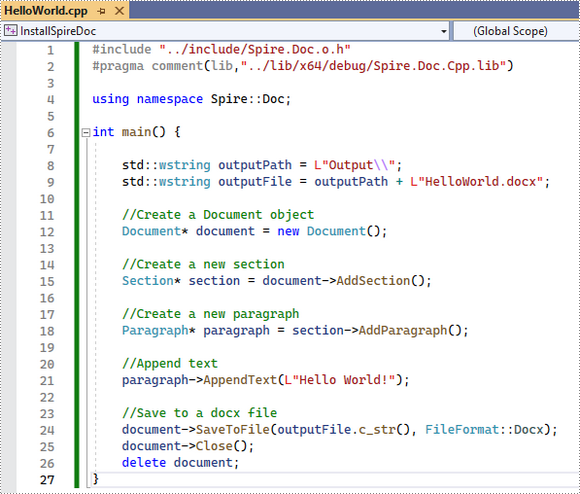
#include "Spire.Doc.o.h"
The code example below shows you how to create a simple Word file using Spire.Doc for C++.
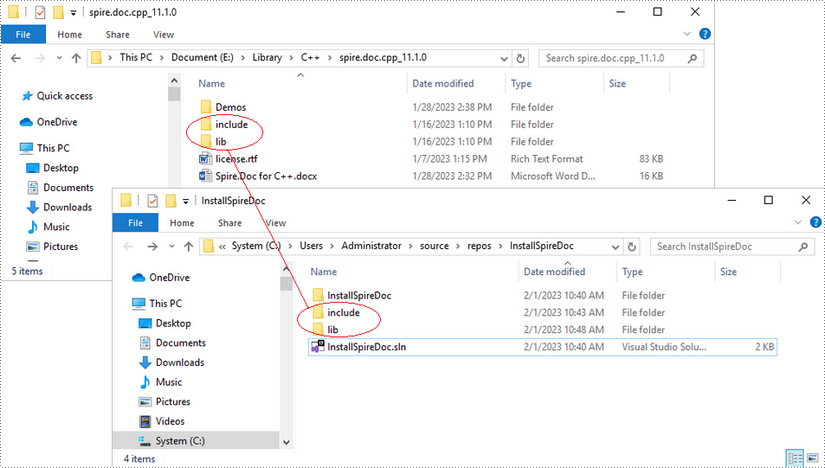
Install Spire.Doc for C++ by Manually Importing Libraries
Step 1
Download Spire.Doc for C++ package and unzip it somewhere on your disc to get the following files.

Step 2
Create a C++ project in Visual Studio 2022.

Step 3
Copy the 'include' folder and the 'lib' folder from the product package to your project, and save them under the same folder where the .sln file exists.
Step 4
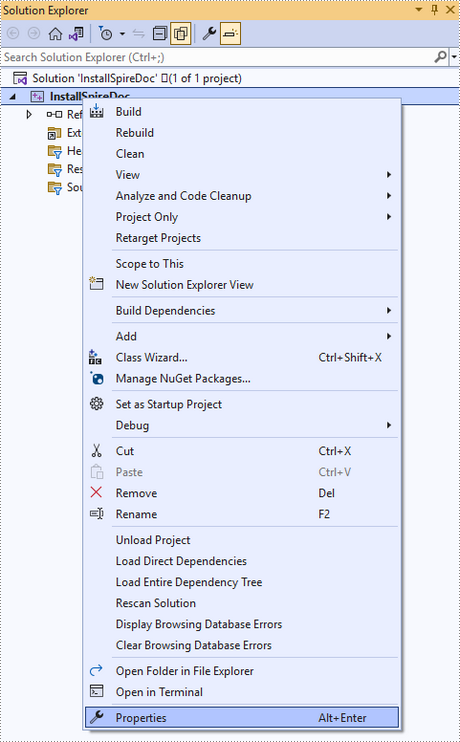
Right-click the project name and select 'Properties'.
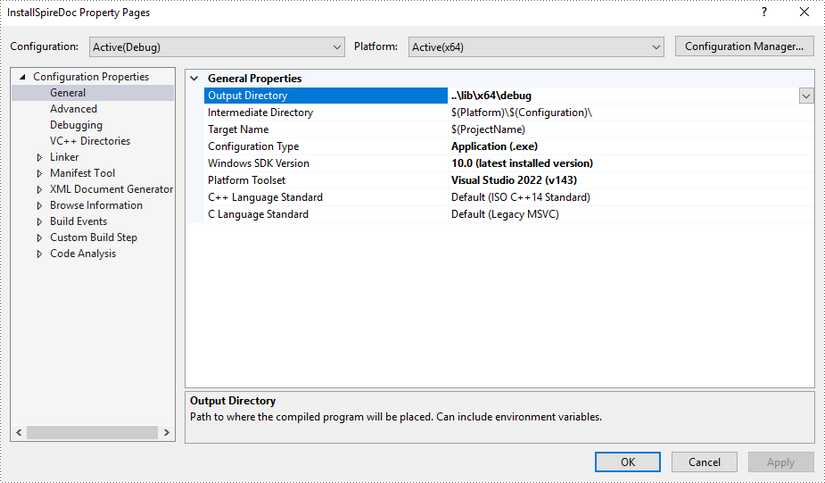
Configure output directory. Depending on the build mode (Debug or Release) you choose, you can set the output directory to '..\lib\x64\debug' or '..\lib\x64\release'.
Step 5
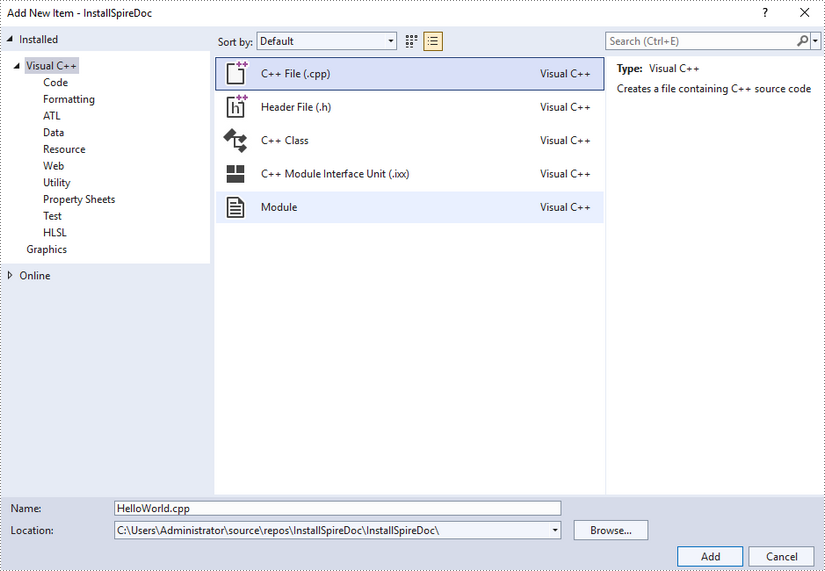
Right-click 'Source Files' in the Solution Explorer, choose 'Add' and then 'New Item'.

Create a .cpp file.
Step 6
Click the .cpp file you just created to write code. Before starting, you need to include the following two lines of code to your program.
- C++
#include "../include/Spire.Doc.o.h"
#pragma comment(lib,"../lib/x64/debug/Spire.Doc.Cpp.lib")
The code example below shows you how to create a simple Word file using Spire.Doc for C++.
How to Integrate Spire.XLS for C++ in a C++ Application
Spire.XLS for C++ is an Excel library built for developers to manipulate Excel documents (XLS, XLSX, XLSB and XLSM) in any type of C++ applications. This article demonstrates how to integrate Spire.XLS for C++ into your C++ application in two different ways.
Install Spire.XLS for C++ via NuGet
Step 1
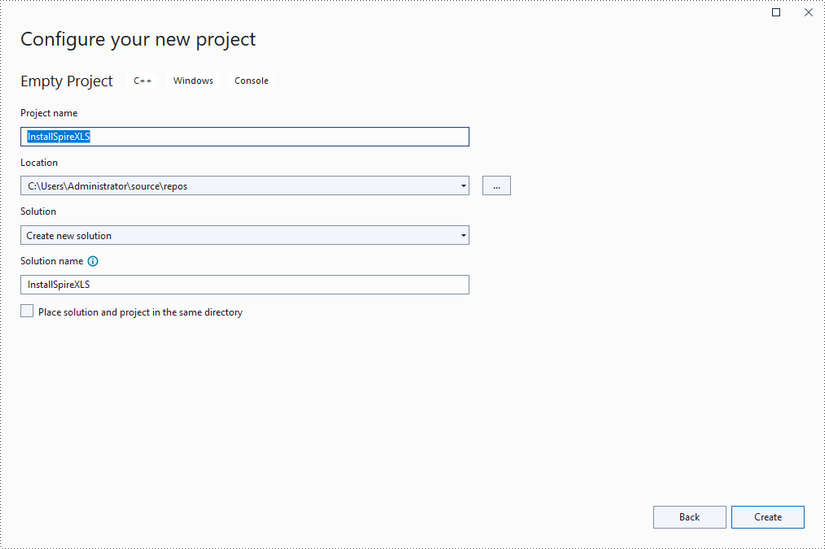
Create a C++ project in Visual Studio 2022.
Step 2
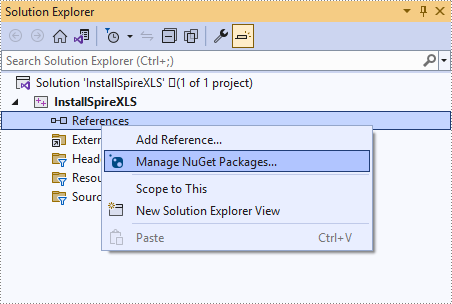
Right-click 'References' in the Solution Explorer and choose 'Manage NuGet Package' in the popup menu.
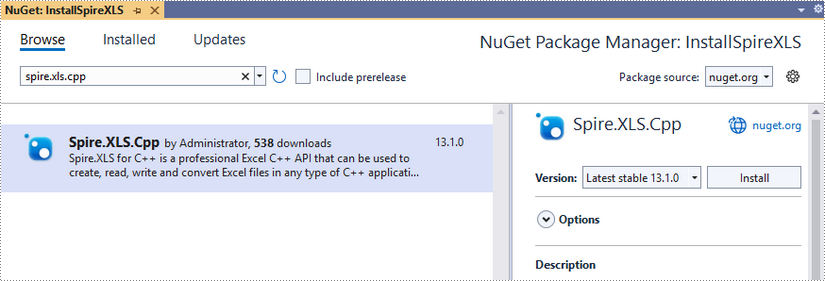
Click 'Browse', search for 'spire.xls.cpp', and install it in your project.
Step 3
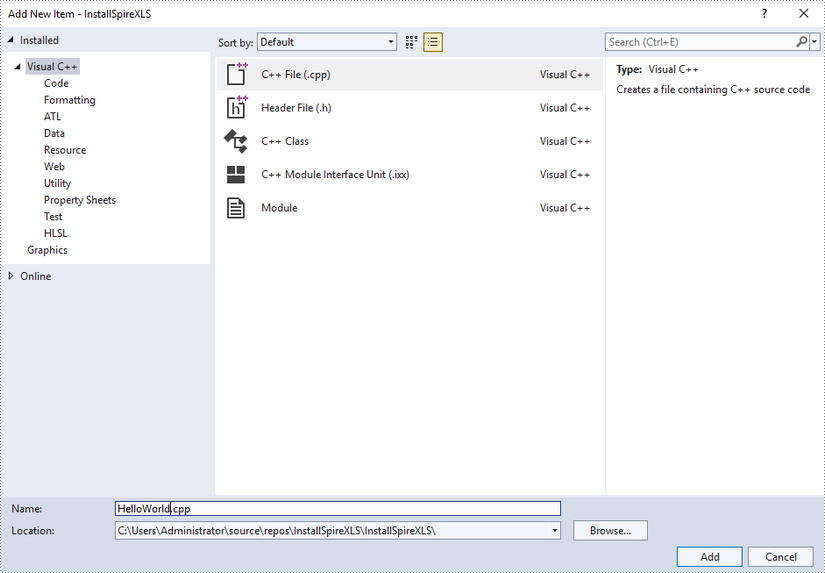
Right-click 'Source Files' in the Solution Explorer, choose 'Add' and then 'New Item'.
Create a .cpp file.

Step 4
Click the .cpp file you just created to write code. Before starting, you need to include the header file “Spire.Xls.o.h” by adding the following line of code to your program.
- C++
#include "Spire.Xls.o.h"
The code example below shows you how to create a simple Excel file using Spire.XLS for C++.
Install Spire.XLS for C++ by Manually Importing Libraries
Step 1
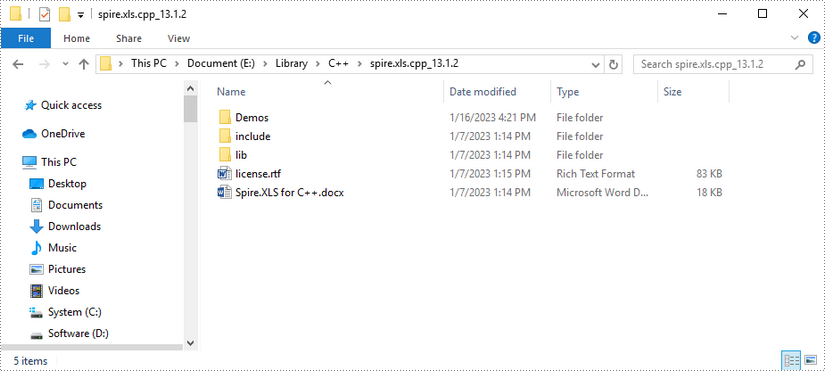
Download Spire.XLS for C++ package and unzip it somewhere on your disc to get the following files.
Step 2
Create a C++ project in Visual Studio 2022.

Step 3
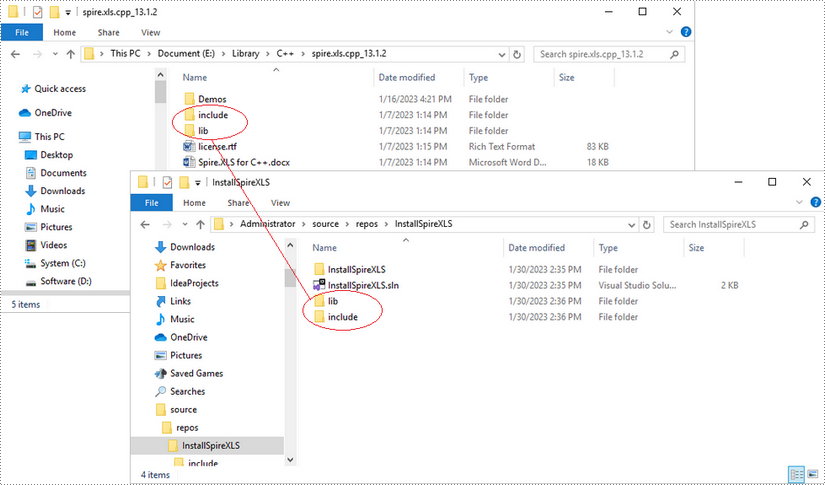
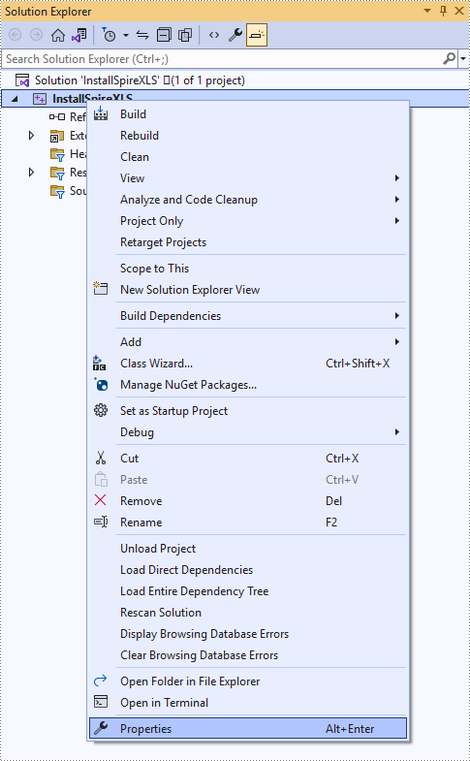
Copy the 'include' folder and the 'lib' folder from the product package to your project, and save them under the same folder where the .sln file exists.
Step 4
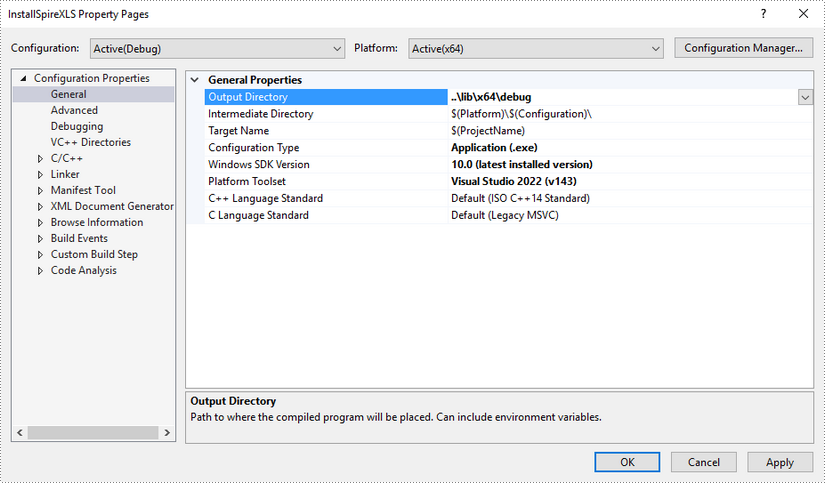
Right-click the project name and select 'Properties'.
Configure output directory. Depending on the build mode (Debug or Release) you choose, you can set the output directory to '..\lib\x64\debug' or '..\lib\x64\release'.
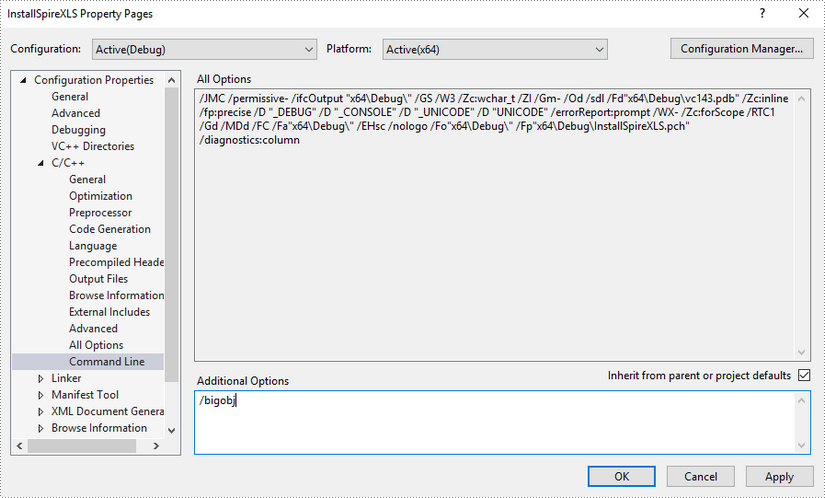
Click 'C/C++', select 'Command Line', and then input '/bigobj' in the 'Additional Options' field.
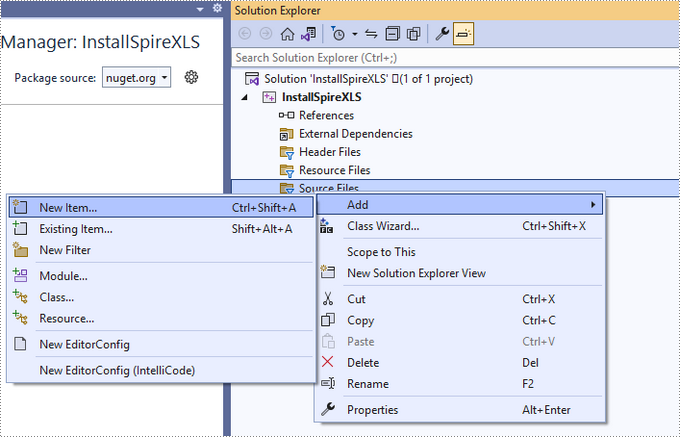
Step 5
Right-click 'Source Files' in the Solution Explorer, choose 'Add' and then 'New Item'.
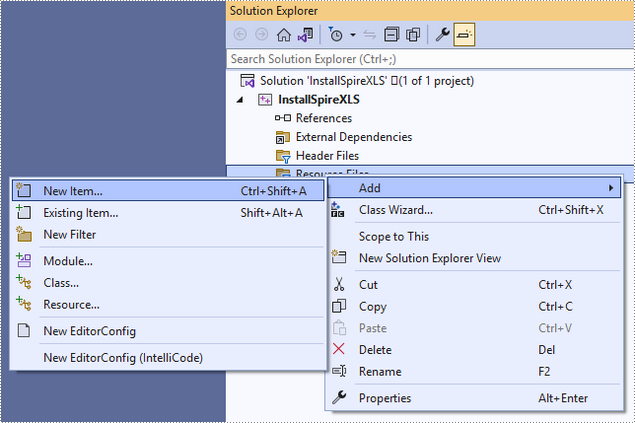
Create a .cpp file.
Step 6
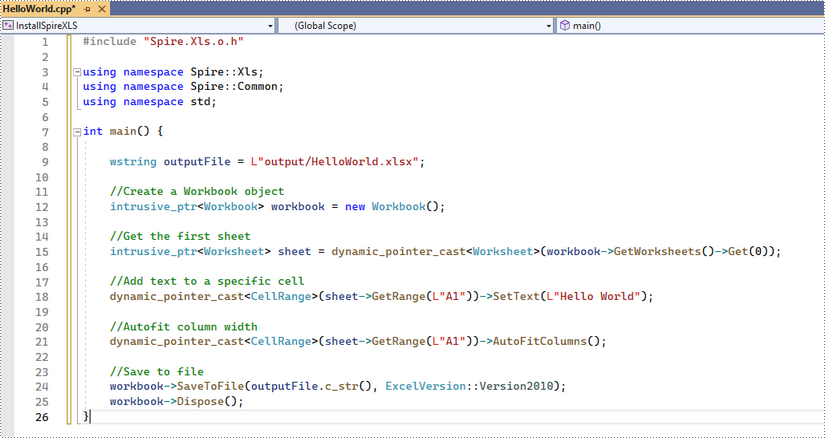
Click the .cpp file you just created to write code. Before starting, you need to include the following two lines of code to your program.
- C++
#include "../include/Spire.Xls.o.h"
#pragma comment(lib,"../lib/x64/debug/Spire.Xls.Cpp.lib")
The code example below shows you how to create a simple Excel file using Spire.XLS for C++.