C++: Merge or Unmerge Cells in Excel
Merging and unmerging cells are two essential features in Microsoft Excel that allow users to create a more organized and visually appealing spreadsheet. Merging cells enables users to combine adjacent cells to create a single cell that spans multiple columns or rows. This feature is particularly useful for creating headers, titles, or labels for tables, as well as for combining data into a more concise format.
Unmerging cells, on the other hand, is the process of separating a merged cell back into individual cells. This feature is useful when users need to apply different formatting or styles to individual cells within a merged cell or when they want to separate data that were previously combined.
In this article, we will demonstrate how to merge or unmerge cells in an Excel file in C++ using Spire.XLS for C++ library.
- Merge Specific Cells in Excel in C++
- Unmerge Specific Merged Cells in Excel in C++
- Unmerge All Merged Cells in Excel in C++
Install Spire.XLS for C++
There are two ways to integrate Spire.XLS for C++ into your application. One way is to install it through NuGet, and the other way is to download the package from our website and copy the libraries into your program. Installation via NuGet is simpler and more recommended. You can find more details by visiting the following link.
Integrate Spire.XLS for C++ in a C++ Application
Merge Specific Cells in Excel in C++
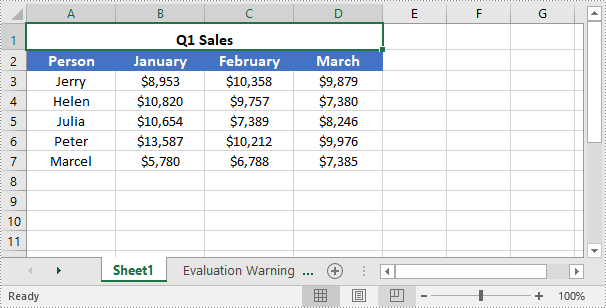
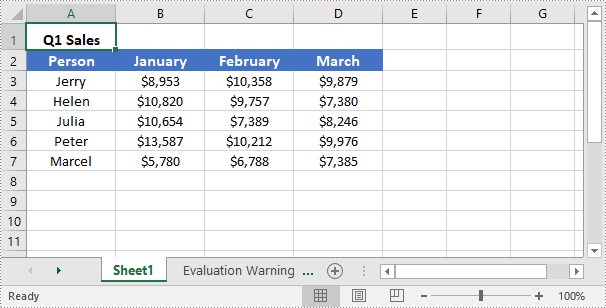
You can easily use the IXLSRange->Merge() method provided by Spire.XLS for C++ to merge a specific range of cells into a single cell. The detailed steps are as follows:
- Initialize an instance of the Workbook instance.
- Load an Excel file using the Workbook->LoadFromFile(LPCWSTR_S fileName) method.
- Get a specific worksheet of the file using the Workbbok->GetWorksheets()->Get(int index) method.
- Get the cell range that you want to merge using the Worksheet->GetRange(LPCWSTR_S name) method.
- Merge the cell range using the IXLSRange->Merge() method.
- Center the text in the merged cell using the IXLSRange->GetStyle()->SetHorizontalAlignment(HorizontalAlignType::Center) method.
- Save the result file to a specific location using the Workbook->SaveToFile(LPCWSTR_S fileName, ExcelVersion version) method.
- C++
#include "Spire.Xls.o.h";

using namespace Spire::Xls;
using namespace std;


int main()
{
	//Specify the input and output file paths
	wstring inputFile = L"Template.xlsx";
	wstring outputFile = L"MergeCells.xlsx";

	//Initialize an instance of the Workbook instance
	intrusive_ptr<Workbook> workbook = new Workbook();

	//Load an Excel file
	workbook->LoadFromFile(inputFile.c_str());

	//Get the first worksheet of the file
	intrusive_ptr<Worksheet> sheet = dynamic_pointer_cast<Worksheet>(workbook->GetWorksheets()->Get(0));

	//Merge a particular range of cells in the worksheet
	intrusive_ptr<IXLSRange> range = sheet->GetRange(L"A1:D1");
	range->Merge();

	//Center the text in the merged cell
	range->GetStyle()->SetHorizontalAlignment(HorizontalAlignType::Center);

	//Save the result file to the specific path
	workbook->SaveToFile(outputFile.c_str(), ExcelVersion::Version2013);
	workbook->Dispose();
}
Unmerge Specific Merged Cells in Excel in C++
To unmerge merged cells, you can use the IXLSRange->UnMerge() method. The detailed steps are as follows:
- Initialize an instance of the Workbook instance.
- Load an Excel file using the Workbook->LoadFromFile(LPCWSTR_S fileName) method.
- Get a specific worksheet of the file using the Workbbok->GetWorksheets()->Get(int index) method.
- Get the cell that you want to unmerge using the Worksheet->GetRange(LPCWSTR_S name) method.
- Unmerge the cell using the IXLSRange->UnMerge() method.
- Save the result file to a specific location using the Workbook->SaveToFile(LPCWSTR_S fileName, ExcelVersion version) method.
- C++
#include "Spire.Xls.o.h";

using namespace Spire::Xls;
using namespace std;

int main()
{
	//Specify the input and output file paths
	wstring inputFile = L"MergeCells.xlsx";
	wstring outputFile = L"UnmergeCells.xlsx";

	//Initialize an instance of the Workbook instance
	intrusive_ptr<Workbook> workbook = new Workbook();

	//Load an Excel file
	workbook->LoadFromFile(inputFile.c_str());

	//Get the first worksheet of the file
	intrusive_ptr<Worksheet> sheet = dynamic_pointer_cast<Worksheet>(workbook->GetWorksheets()->Get(0));

	//Unmerge a specific merged cell in the worksheet
	intrusive_ptr<IXLSRange> range = sheet->GetRange(L"A1");
	range->UnMerge();

	//Save the result file to the specific path
	workbook->SaveToFile(outputFile.c_str(), ExcelVersion::Version2013);
	workbook->Dispose();
}
Unmerge All Merged Cells in Excel in C++
Spire.XLS for C++ provides the Worksheet->GetMergedCells() method which enables you to obtain all merged cells in a specific worksheet. Once the merged cells are obtained, you can use the IXLSRange->UnMerge() method to unmerge them. The detailed steps are as follows:
- Initialize an instance of the Workbook instance.
- Load an Excel file using the Workbook->LoadFromFile(LPCWSTR_S fileName) method.
- Get a specific worksheet of the file using the Workbbok->GetWorksheets()->Get(int index) method.
- Get the merged cells in the worksheet using the Worksheet->GetMergedCells() method.
- Iterate through all the merged cells, then unmerge each merged cell using the IXLSRange->UnMerge() method.
- Save the result file to a specific location using the Workbook->SaveToFile(LPCWSTR_S fileName, ExcelVersion version) method.
- C++
#include ""Spire.Xls.o.h"";

using namespace Spire::Xls;
using namespace std;

int main()
{
	//Specify the input and output file paths
	wstring inputFile = L""MergeCells.xlsx"";
	wstring outputFile = L""UnmergeAllCells.xlsx"";

	//Initialize an instance of the Workbook class
	intrusive_ptr<Workbook> workbook = new Workbook();

	//Load an Excel file
	workbook->LoadFromFile(inputFile.c_str());

	//Get the first worksheet
	intrusive_ptr<Worksheet> sheet = dynamic_pointer_cast<Worksheet>(workbook->GetWorksheets()->Get(0));

	//Get the merged cell ranges in the first worksheet
	intrusive_ptr<Spire::Xls::IList<XlsRange>> range = dynamic_pointer_cast<Spire::Xls::IList<XlsRange>>(sheet->GetMergedCells());

	//Iterate through the merged cells
	for (int i = 0; i < range->GetCount(); i++)
	{
		intrusive_ptr<XlsRange> cell = range->GetItem(i);
		//Unmerge each merged cell
		cell->UnMerge();
	}

	//Save the result file to the specific path
	workbook->SaveToFile(outputFile.c_str(), ExcelVersion::Version2013);
	workbook->Dispose();
}
Apply for a Temporary License
If you'd like to remove the evaluation message from the generated documents, or to get rid of the function limitations, please request a 30-day trial license for yourself.
C++: Group or Ungroup Rows and Columns in Excel
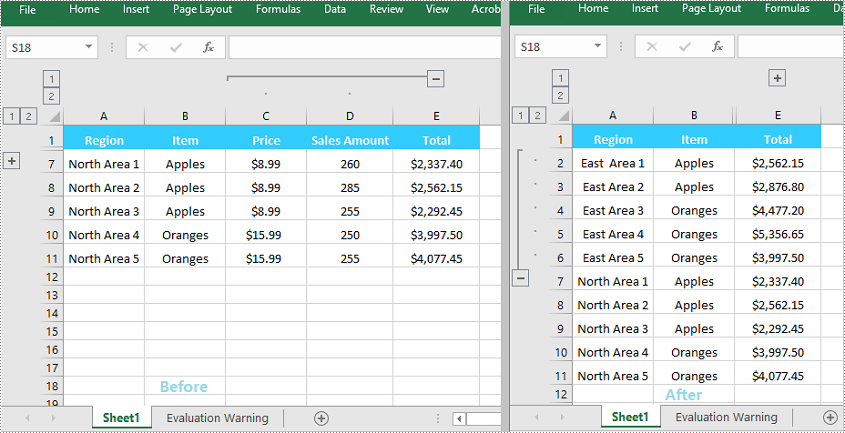
Grouping rows and columns in Excel is a valuable feature that can simplify working with large or complex datasets. This feature enables you to hide or show individual sections of data for better viewing and analysis. For instance, if you have a worksheet with data for various regions or departments, you can group the rows for each region or department together. Once grouped, you can collapse or expand each group as required, which makes it easier for you to focus on specific parts of the data while keeping the rest of the worksheet unaffected. In this article, you will learn how to group or ungroup rows and columns, along with how to expand or collapse groups in Excel in C++ using Spire.XLS for C++.
- Group Rows and Columns in Excel in C++
- Ungroup Rows and Columns in Excel in C++
- Expand or Collapse Groups in Excel in C++
Install Spire.XLS for C++
There are two ways to integrate Spire.XLS for C++ into your application. One way is to install it through NuGet, and the other way is to download the packageThere are two ways to integrate Spire.XLS for C++ into your application. One way is to install it through NuGet, and the other way is to download the package from our website and copy the libraries into your program. Installation via NuGet is simpler and more recommended. You can find more details by visiting the following link.from our website and copy the libraries into your program. Installation via NuGet is simpler and more recommended. You can find more details by visiting the following link.
Integrate Spire.XLS for C++ in a C++ Application
Group Rows and Columns in Excel in C++
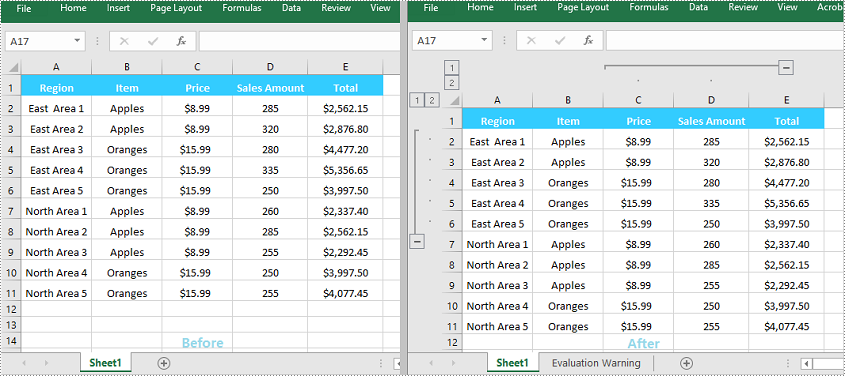
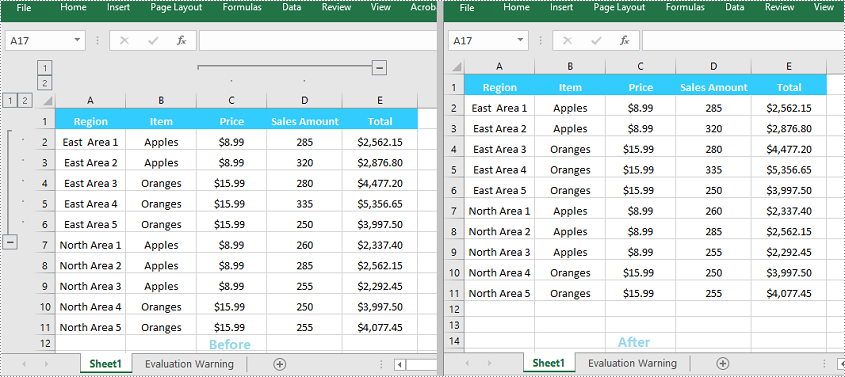
The XlsWorksheet->GroupByRows(int firstRow, int lastRow, bool isCollapsed) and XlsWorksheet->GroupByColumns (int firstColumn, int lastColumn, bool isCollapsed) methods in Spire.XLS for C++ can be used to group specific rows and columns in an Excel worksheet. The detailed steps are as follows:
- Initialize an instance of the Workbook class.
- Load an Excel file using the Workbook->LoadFromFile(LPCWSTR_S fileName) method.
- Get a specific worksheet by its index using the Workbook->GetWorksheets()->Get(int index) method.
- Group specific rows in the worksheet using the XlsWorksheet->GroupByRows(int firstRow, int lastRow, bool isCollapsed) method.
- Group specific columns in the worksheet using the XlsWorksheet->GroupByColumns (int firstColumn, int lastColumn, bool isCollapsed) method.
- Save the result file using the Workbook->SaveToFile (LPCWSTR_S fileName, ExcelVersion version) method.
- C++
#include "Spire.Xls.o.h";

using namespace Spire::Xls;

int main()
{
	//Initialize an instance of the Workbook class
	intrusive_ptr<Workbook> workbook = new Workbook();

	//Load an Excel file
	workbook->LoadFromFile(L"Sample.xlsx");

	//Get the first worksheet
	intrusive_ptr<Worksheet> sheet = dynamic_pointer_cast<Worksheet>(workbook->GetWorksheets()->Get(0));

	//Group the 2nd, 3rd, 4th, 5th and 6th rows
	sheet->GroupByRows(2, 6, false);
	//Group the 3rd and 4th columns
	sheet->GroupByColumns(3, 4, false);

	//Save the result file
	workbook->SaveToFile(L"GroupRowsAndColumns.xlsx", ExcelVersion::Version2013);
	workbook->Dispose();
}
Ungroup Rows and Columns in Excel in C++
By ungrouping rows and columns, you can restore each cell to its initial, standalone state, helping you view the data as it was originally presented.
Spire.XLS for C++ offers the XlsWorksheet->UngroupByRows(int firstRow, int lastRow) and XlsWorksheet->UngroupByColumns (int firstColumn, int lastColumn) methods to help you ungroup rows and columns. The detailed steps are as follows:
- Initialize an instance of the Workbook class.
- Load an Excel file using the Workbook->LoadFromFile(LPCWSTR_S fileName) method.
- Get a specific worksheet by its index using the Workbook->GetWorksheets()->Get(int index) method.
- Ungroup specific rows in the worksheet using the XlsWorksheet->UngroupByRows(int firstRow, int lastRow) method.
- Ungroup specific columns in the worksheet using the XlsWorksheet->UngroupByColumns (int firstColumn, int lastColumn) method.
- Save the result file using the Workbook->SaveToFile (LPCWSTR_S fileName, ExcelVersion version) method.
- C++
#include "Spire.Xls.o.h";

using namespace Spire::Xls;

int main()
{
	//Initialize an instance of the Workbook class
	intrusive_ptr<Workbook> workbook = new Workbook();

	//Load an Excel file
	workbook->LoadFromFile(L" GroupRowsAndColumns.xlsx");

	//Get the first worksheet
	intrusive_ptr<Worksheet> sheet = dynamic_pointer_cast<Worksheet>(workbook->GetWorksheets()->Get(0));

	//Ungroup the 2nd, 3rd, 4th, 5th and 6th rows
	sheet->UngroupByRows(2, 6);

	//Ungroup the 3rd and 4th columns
	sheet->UngroupByColumns(3, 4);

	//Save the result file
	workbook->SaveToFile(L"UngroupRowsAndColumns.xlsx", ExcelVersion::Version2013);
	workbook->Dispose();
}
Expand or Collapse Groups in Excel in C++
When grouping rows or columns in Excel, you can click the expand (+) or collapse (-) button to show or hide the grouped data. In Spire.XLS for C++, you can use the Worksheet->GetRange(LPCWSTR_S name)->ExpandGroup(GroupByType groupBy) method or the Worksheet->GetRange(LPCWSTR_S name)->CollapseGroup(GroupByType groupBy) method to achieve the same expanding or collapsing effect. The detailed steps are as follows:
- Initialize an instance of the Workbook class.
- Load an Excel file using the Workbook->LoadFromFile(LPCWSTR_S fileName) method.
- Get a specific worksheet by its index using the Workbook->GetWorksheets()->Get(int index) method.
- Expand a specific group using the Worksheet->GetRange(LPCWSTR_S name)->ExpandGroup(GroupByType groupBy) method.
- Collapse a specific group using the Worksheet->GetRange(LPCWSTR_S name)->CollapseGroup(GroupByType groupBy) method.
- Save the result file using the Workbook->SaveToFile (LPCWSTR_S fileName, ExcelVersion version) method.
- C++
#include "Spire.Xls.o.h";

using namespace Spire::Xls;

int main()
{
	//Initialize an instance of the Workbook class
	intrusive_ptr<Workbook> workbook = new Workbook();

	//Load an Excel file
	workbook->LoadFromFile(L"Input.xlsx");

	//Get the first worksheet
	intrusive_ptr<Worksheet> sheet = dynamic_pointer_cast<Worksheet>(workbook->GetWorksheets()->Get(0));

	//Expand a group
	sheet->GetRange(L"A2:E6")->ExpandGroup(GroupByType::ByRows);

	//Collapse a group
	sheet->GetRange(L"C1:D11")->CollapseGroup(GroupByType::ByColumns);

	//Save the result file
	workbook->SaveToFile(L"ExpandOrCollapseGroups.xlsx", ExcelVersion::Version2013);
	workbook->Dispose();
}
Apply for a Temporary License
If you'd like to remove the evaluation message from the generated documents, or to get rid of the function limitations, please request a 30-day trial license for yourself.
C++: Hide or Show Rows and Columns in Excel
Sometimes, certain rows and columns of an Excel file may contain sensitive or confidential information. Before presenting the file to others, it is critical to hide these specific rows and columns to prevent unauthorized people from viewing this information. After the representation, you can show the hidden rows and columns to redisplay the information as needed. In this article, we will demonstrate how to hide or show rows and columns in Excel in C++ using Spire.XLS for C++.
- Hide Specific Rows and Columns in Excel in C++
- Show Specific Hidden Rows and Columns in Excel in C++
- Hide Multiple Rows and Columns at Once in Excel in C++
- Show All Hidden Rows and Columns in Excel in C++
Install Spire.XLS for C++
There are two ways to integrate Spire.XLS for C++ into your application. One way is to install it through NuGet, and the other way is to download the package from our website and copy the libraries into your program. Installation via NuGet is simpler and more recommended. You can find more details by visiting the following link.
Integrate Spire.XLS for C++ in a C++ Application
Hide Specific Rows and Columns in Excel in C++
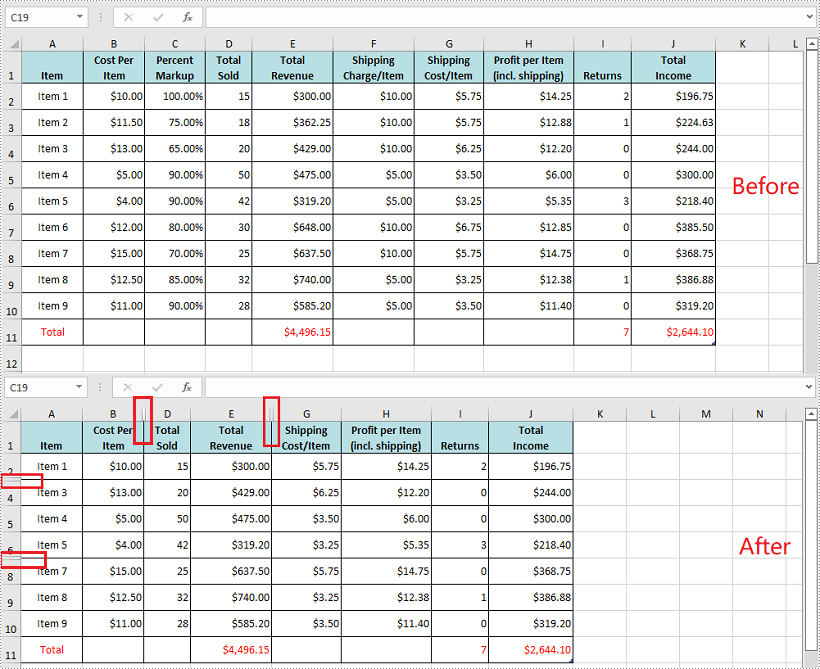
You can hide specific rows and columns in an Excel worksheet by using the XlsWorksheet->HideRow(int rowIndex) and XlsWorksheet->HideColumn(int columnIndex) methods. The detailed steps are as follows:
- Initialize an instance of the Workbook class.
- Load an Excel file using Workbook->LoadFromFile() method.
- Get a specific worksheet using Workbook->GetWorksheets()->Get(int index) method.
- Hide specific rows in the worksheet using XlsWorksheet->HideRow(int rowIndex) method.
- Hide Specific columns in the worksheet using XlsWorksheet->HideColumn(int columnIndex) method.
- Save the result file using Workbook->SaveToFile() method.
- C++
#include "Spire.Xls.o.h";

using namespace Spire::Xls;

int main()
{
	//Initialize an instance of the workbook class
	intrusive_ptr<Workbook> workbook = new Workbook();
	//Load an Excel file
	workbook->LoadFromFile(L"Input.xlsx");

	//Get the first worksheet
	intrusive_ptr<Worksheet> sheet = dynamic_pointer_cast<Worksheet>(workbook->GetWorksheets()->Get(0));

	//Hide the 3rd and the 7th rows
	sheet->HideRow(3);
	sheet->HideRow(7);

	//Hide the 3rd and the 6th columns
	sheet->HideColumn(3);
	sheet->HideColumn(6);

	//Save the result file
	workbook->SaveToFile(L"HideRowsAndColumns.xlsx", ExcelVersion::Version2013);
	workbook->Dispose();
}
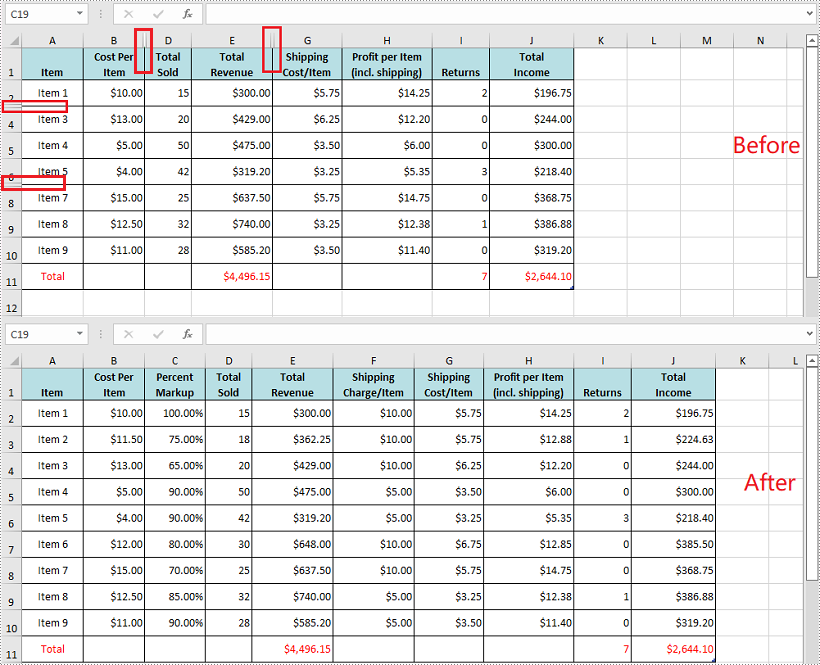
Show Specific Hidden Rows and Columns in Excel in C++
To show specific hidden rows and columns in an Excel worksheet, you can use the XlsWorksheet->ShowRow(int rowIndex) and XlsWorksheet->ShowColumn(int columnIndex) methods. The detailed steps are as follows:
- Initialize an instance of the Workbook class.
- Load an Excel file using Workbook->LoadFromFile() method.
- Get a specific worksheet using Workbook->GetWorksheets()->Get(int index) method.
- Show specific hidden rows in the worksheet using XlsWorksheet->ShowRow(int rowIndex) method.
- Show specific hidden columns in the worksheet using XlsWorksheet->ShowColumn(int columnIndex) method.
- Save the result file using Workbook->SaveToFile() method.
- C++
#include "Spire.Xls.o.h";

using namespace Spire::Xls;

int main()
{
	//Initialize an instance of the workbook class
	intrusive_ptr<Workbook> workbook = new Workbook();
	//Load an Excel file
	workbook->LoadFromFile(L"HideRowsAndColumns.xlsx");

	//Get the first worksheet
	intrusive_ptr<Worksheet> sheet = dynamic_pointer_cast<Worksheet>(workbook->GetWorksheets()->Get(0));

	//Show the 3rd and the 7th rows
	sheet->ShowRow(3);
	sheet->ShowRow(7);

	//Show the 3rd and the 6th columns
	sheet->ShowColumn(3);
	sheet->ShowColumn(6);

	//Save the result file
	workbook->SaveToFile(L"ShowRowsAndColumns.xlsx", ExcelVersion::Version2013);
	workbook->Dispose();
}
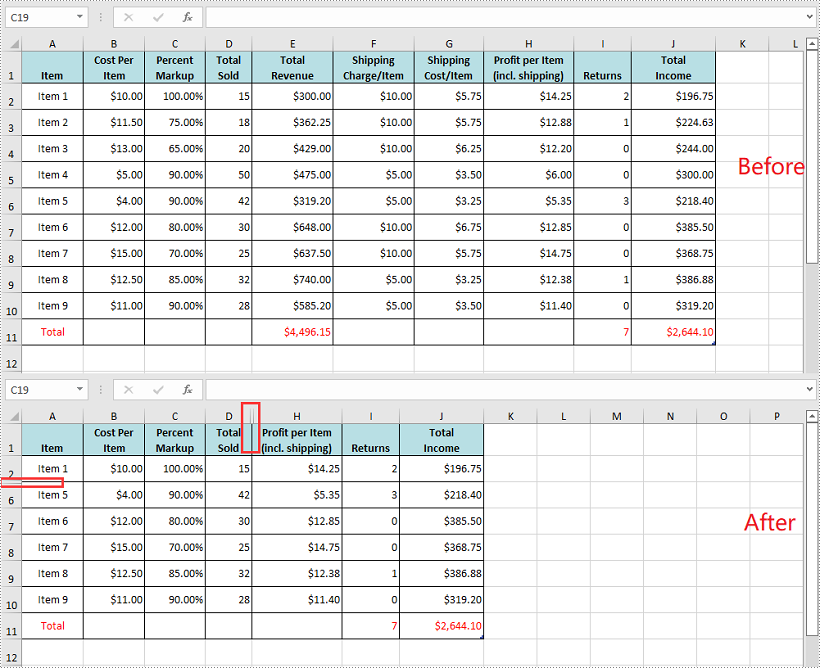
Hide Multiple Rows and Columns at Once in Excel in C++
You can hide multiple adjacent rows and columns at once by using the XlsWorksheet->HideRows(int rowIndex, int rowCount) and XlsWorksheet->HideColumns(int columnIndex, int columnCount) methods. The detailed steps are as follows:
- Initialize an instance of the Workbook class.
- Load an Excel file using Workbook->LoadFromFile() method.
- Get a specific worksheet using Workbook->GetWorksheets()->Get(int index) method.
- Hide multiple adjacent rows in the worksheet at once using XlsWorksheet->HideRows(int rowIndex, int rowCount) method.
- Hide multiple adjacent columns in the worksheet at once using XlsWorksheet->HideColumns(int columnIndex, int columnCount) method.
- Save the result file using Workbook->SaveToFile() method.
- C++
#include "Spire.Xls.o.h";

using namespace Spire::Xls;

int main()
{
	//Initialize an instance of the workbook class
	intrusive_ptr<Workbook> workbook = new Workbook();
	//Load an Excel file
	workbook->LoadFromFile(L"Input.xlsx");

	//Get the first worksheet
	intrusive_ptr<Worksheet> sheet = dynamic_pointer_cast<Worksheet>(workbook->GetWorksheets()->Get(0));

	//Hide the 3rd, 4th and 5th rows
	sheet->HideRows(3, 3);

	//Hide the 5th, 6th and 7th columns
	sheet->HideColumns(5, 3);

	//Save the result file
	workbook->SaveToFile(L"HideMultipleRowsAndColumns.xlsx", ExcelVersion::Version2013);
	workbook->Dispose();
}
Show All Hidden Rows and Columns in Excel in C++
To show all the hidden rows and columns in an Excel worksheet, you need to iterate through all the rows and columns in the worksheet, then find the hidden rows and columns and call the XlsWorksheet->ShowRow(int rowIndex) and XlsWorksheet->ShowColumn(int columnIndex) methods to redisplay them. The detailed steps are as follows:
- Initialize an instance of the Workbook class.
- Load an Excel file using Workbook->LoadFromFile() method.
- Get a specific worksheet using Workbook->GetWorksheets()->Get(int index) method.
- Iterate through all the rows in the worksheet, then find the hidden rows using XlsWorksheet->GetRowIsHide(int rowIndex) method.
- Show the hidden rows using XlsWorksheet->ShowRow(int rowIndex) method.
- Iterate through all the columns in the worksheet, then find the hidden columns using XlsWorksheet->GetColumnIsHide(int columnIndex) method.
- Show the hidden columns using XlsWorksheet->ShowColumn(int columnIndex) method.
- Save the result file using Workbook->SaveToFile() method.
- C++
#include "Spire.Xls.o.h";

using namespace Spire::Xls;

int main()
{
	//Initialize an instance of the workbook class
	intrusive_ptr<Workbook> workbook = new Workbook();
	//Load an Excel file
	workbook->LoadFromFile(L"HideMultipleRowsAndColumns.xlsx");

	//Get the first worksheet
	intrusive_ptr<Worksheet> sheet = dynamic_pointer_cast<Worksheet>(workbook->GetWorksheets()->Get(0));

	//Iterate through all the rows in the worksheet
	for (int i = 1; i <= sheet->GetLastRow(); i++)
	{
		//Check if the current row is hidden
		if (sheet->GetRowIsHide(i))
		{
			sheet->ShowRow(i);
		}
	}

	//Iterate through all the columns in the worksheet
	for (int j = 1; j <= sheet->GetLastColumn(); j++)
	{
		//Check if the current column is hidden
		if (sheet->GetColumnIsHide(j))
		{
			//Show the hidden column
			sheet->ShowColumn(j);
		}
	}

	//Save the result file
	workbook->SaveToFile(L"ShowAllHiddenRowsAndColumns.xlsx", ExcelVersion::Version2013);
	workbook->Dispose();
}
Apply for a Temporary License
If you'd like to remove the evaluation message from the generated documents, or to get rid of the function limitations, please request a 30-day trial license for yourself.
C++: Apply Fonts to Excel Cells
While creating a worksheet, the default font MS Excel uses is "Calibri" with a size of 11 and a color of black. However, there are times when you may want to apply a different font style such as bold, italic to optimize the appearance of your document, or set a unique font color to highlight useful information within a large set of data. In this article, you will learn how to programmatically apply multiple font styles to Excel cells using Spire.XLS for C++.
- Apply Different Fonts to Different Excel Cells in C++
- Apply Multiple Fonts to a Single Excel Cell in C++
Install Spire.XLS for C++
There are two ways to integrate Spire.XLS for C++ into your application. One way is to install it through NuGet, and the other way is to download the package from our website and copy the libraries into your program. Installation via NuGet is simpler and more recommended. You can find more details by visiting the following link.
Integrate Spire.XLS for C++ in a C++ Application
Apply Different Fonts to Different Excel Cells in C++
The ExcelFont class provided by Spire.XLS for C++ allows you to set or change the font name, color, size, and style in a cell easily. The following are the steps to apply different fonts to different cells in Excel.
- Create a Workbook object.
- Get a specific worksheet using Workbook->GetWorksheets()->Get() method.
- Get a specified cell using Worksheet->GetRange() method.
- Set the value of the cell using CellRange->SetText() method.
- Get the font in the specified cell using CellRange->GetStyle()->GetFont() method.
- Set the font name, color, size and style using the methods under the ExcelFont class.
- Save the result file using Workbook->SaveToFile() method.
- C++
#include ""Spire.Xls.o.h"";

using namespace Spire::Xls;

int main()
{
	//Specify output file path and name
	std::wstring outputPath = L""Output\\"";
	std::wstring outputFile = outputPath + L""ApplyFontToCell.xlsx"";

	//Create a Workbook object
	intrusive_ptr<Workbook> workbook = new Workbook();

	//Get the first worksheet
	intrusive_ptr<Worksheet> sheet = dynamic_pointer_cast<Worksheet>(workbook->GetWorksheets()->Get(0));

	//Set font name
	sheet->GetRange(L""B1"")->SetText(L""Font name: Comic Sans MS"");
	sheet->GetRange(L""B1"")->GetStyle()->GetFont()->SetFontName(L""Comic Sans MS"");

	//Set font size
	sheet->GetRange(L""B2"")->SetText(L""Font size: 25"");
	sheet->GetRange(L""B2"")->GetStyle()->GetFont()->SetSize(25);

	//Set text to bold
	sheet->GetRange(L""B3"")->SetText(L""Font style: Bold"");
	sheet->GetRange(L""B3"")->GetStyle()->GetFont()->SetIsBold(true);

	//Underline text
	sheet->GetRange(L""B4"")->SetText(L""Font style: Underline"");
	sheet->GetRange(L""B4"")->GetStyle()->GetFont()->SetUnderline(FontUnderlineType::Single);

	//Set font color
	sheet->GetRange(L""B5"")->SetText(L""Font color: Red"");
	sheet->GetRange(L""B5"")->GetStyle()->GetFont()->SetColor(Spire::Xls::Color::GetRed());

	//Set text to italic
	sheet->GetRange(L""B6"")->SetText(L""Font style: Italic"");
	sheet->GetRange(L""B6"")->GetStyle()->GetFont()->SetIsItalic(true);

	//Add strikethrough to text
	sheet->GetRange(L""B7"")->SetText(L""Font style: Strikethrough"");
	sheet->GetRange(L""B7"")->GetStyle()->GetFont()->SetIsStrikethrough(true);

	//Save the result file
	workbook->SaveToFile(outputFile.c_str(), ExcelVersion::Version2013);
	workbook->Dispose();
}

Apply Multiple Fonts to a Single Excel Cell in C++
Mixing different fonts in one cell can help you emphasize some specific characters. The following are the steps to apply multiple fonts in an Excel cell.
- Create a Workbook object.
- Get a specific worksheet using Workbook->GetWorksheets()->Get() method.
- Create two ExcelFont objects using Workbook->CreateExcelFont() method.
- Get a specified cell using Worksheet->GetRange() method, and then set the rich text content of the cell using CellRange->GetRichText()->SetText() method.
- Apply the two ExcelFont objects to the rich text using RichText->SetFont(int startPos, int endPos, ExcelFont* font) method.
- Save the result file using Workbook->SaveToFile() method.
- C++
#include ""Spire.Xls.o.h"";
using namespace Spire::Xls;
int main()
{
//Specify output file path and name
std::wstring outputPath = L""Output\\"";
std::wstring outputFile = outputPath + L""ApplyMultipleFontstoCell.xlsx"";
//Create a Workbook object
intrusive_ptr<Workbook> workbook = new Workbook();
//Get the first worksheet
intrusive_ptr<Worksheet> sheet = dynamic_pointer_cast<Worksheet>(workbook->GetWorksheets()->Get(0));
//Create a ExcelFont object and set its font style, color and size
intrusive_ptr<ExcelFont> font1 = workbook->CreateExcelFont();
font1->SetKnownColor(ExcelColors::LightBlue);
font1->SetIsBold(true);
font1->SetSize(13);
//Create another ExcelFont object and set its font style, color and size
intrusive_ptr<ExcelFont> font2 = workbook->CreateExcelFont();
font2->SetKnownColor(ExcelColors::Red);
font2->SetIsBold(true);
font2->SetIsItalic(true);
font2->SetFontName(L""Times New Roman"");
font2->SetSize(15);
//Write a RichText string to cell B5
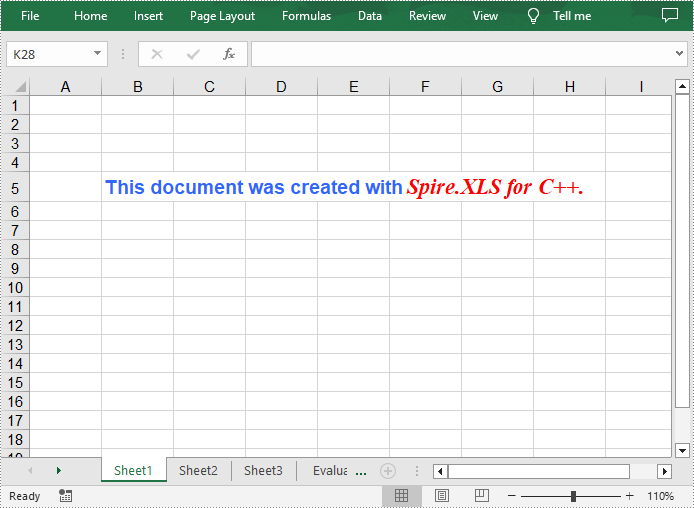
intrusive_ptr<RichText> richText = dynamic_pointer_cast<RichText>(dynamic_pointer_cast<CellRange>(sheet->GetRange(L""B5""))->GetRichText());
richText->SetText(L""This document was created with Spire.XLS for C++."");
//Apply two fonts to the text in the cell B5
richText->SetFont(0, 29, font1);
richText->SetFont(31, 48, font2);
//Save to the result file
workbook->SaveToFile(outputFile.c_str(), ExcelVersion::Version2013);
workbook->Dispose();
}
Apply for a Temporary License
If you'd like to remove the evaluation message from the generated documents, or to get rid of the function limitations, please request a 30-day trial license for yourself.