Slicers in Excel offer a user-friendly way to filter data in pivot tables and tables, making data analysis both visually appealing and interactive. Unlike traditional filter options, which can be less intuitive, slicers present filter choices as buttons. This allows users to quickly and easily refine their data views. Whether you are handling large datasets or building dynamic dashboards, slicers improve the user experience by providing immediate feedback on the selected criteria. This article explains how to add, update, and remove slicers in Excel in C# using Spire.XLS for .NET.
- Add Slicers to Tables in Excel
- Add Slicers to Pivot Tables in Excel
- Update Slicers in Excel
- Remove Slicers from Excel
Install Spire.XLS for .NET
To begin with, you need to add the DLL files included in the Spire.XLS for .NET package as references in your .NET project. The DLL files can be either downloaded from this link or installed via NuGet.
PM> Install-Package Spire.XLS
Add Slicers to Tables in Excel
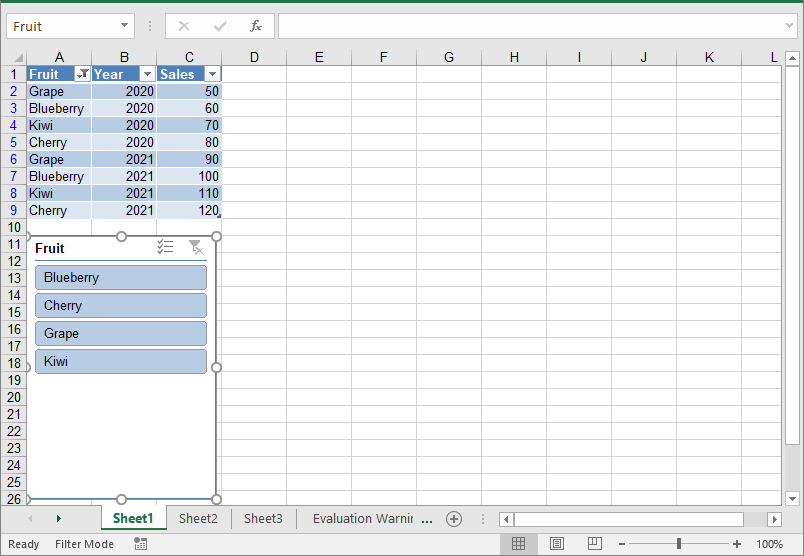
Spire.XLS for .NET offers the Worksheet.Slicers.Add(IListObject table, string destCellName, int index) method to add a slicer to a table in an Excel worksheet. The detailed steps are as follows.
- Create an object of the Workbook class.
- Get the first worksheet using the Workbook.Worksheets[0] property.
- Add data to the worksheet using the Worksheet.Range[].Value property.
- Add a table to the worksheet using the Worksheet.IListObjects.Create() method.
- Add a slicer to the table using the Worksheeet.Slicers.Add(IListObject table, string destCellName, int index) method.
- Save the resulting file using the Workbook.SaveToFile() method.
- C#
using Spire.Xls;
using Spire.Xls.Core;
namespace AddSlicerToTable
{
internal class Program
{
static void Main(string[] args)
{
// Create an object of the Workbook class
Workbook workbook = new Workbook();
// Get the first worksheet
Worksheet worksheet = workbook.Worksheets[0];
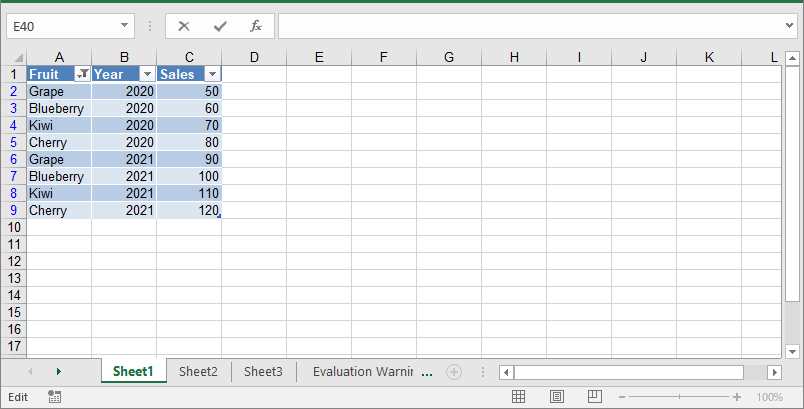
// Add data to the worksheet
worksheet.Range["A1"].Value = "Fruit";
worksheet.Range["A2"].Value = "Grape";
worksheet.Range["A3"].Value = "Blueberry";
worksheet.Range["A4"].Value = "Kiwi";
worksheet.Range["A5"].Value = "Cherry";
worksheet.Range["A6"].Value = "Grape";
worksheet.Range["A7"].Value = "Blueberry";
worksheet.Range["A8"].Value = "Kiwi";
worksheet.Range["A9"].Value = "Cherry";
worksheet.Range["B1"].Value = "Year";
worksheet.Range["B2"].Value2 = 2020;
worksheet.Range["B3"].Value2 = 2020;
worksheet.Range["B4"].Value2 = 2020;
worksheet.Range["B5"].Value2 = 2020;
worksheet.Range["B6"].Value2 = 2021;
worksheet.Range["B7"].Value2 = 2021;
worksheet.Range["B8"].Value2 = 2021;
worksheet.Range["B9"].Value2 = 2021;
worksheet.Range["C1"].Value = "Sales";
worksheet.Range["C2"].Value2 = 50;
worksheet.Range["C3"].Value2 = 60;
worksheet.Range["C4"].Value2 = 70;
worksheet.Range["C5"].Value2 = 80;
worksheet.Range["C6"].Value2 = 90;
worksheet.Range["C7"].Value2 = 100;
worksheet.Range["C8"].Value2 = 110;
worksheet.Range["C9"].Value2 = 120;
//Create a table from the specific data range
IListObject table = worksheet.ListObjects.Create("Fruit Sales", worksheet.Range["A1:C9"]);
// Add a slicer to cell "A11" to filter the data based on the first column of the table
int index = worksheet.Slicers.Add(table, "A11", 0);
// Set name and style for the slicer
worksheet.Slicers[index].Name = "Fruit";
worksheet.Slicers[index].StyleType = SlicerStyleType.SlicerStyleLight1;
//Save the resulting file
workbook.SaveToFile("AddSlicerToTable.xlsx", ExcelVersion.Version2013);
workbook.Dispose();
}
}
}
Add Slicers to Pivot Tables in Excel
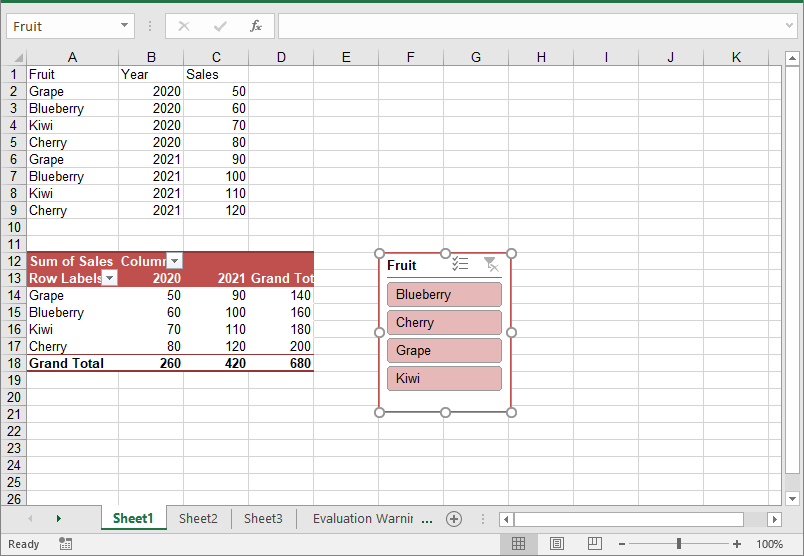
In addition to adding slicers to tables, Spire.XLS for .NET also enables you to add slicers to pivot tables in Excel using the Worksheet.Slicers.Add(IPivotTable pivot, string destCellName, int baseFieldIndex) method. The detailed steps are as follows.
- Create an object of the Workbook class.
- Get the first worksheet using the Workbook.Worksheets[0] property.
- Add data to the worksheet using the Worksheet.Range[].Value property.
- Create a pivot cache from the data using the Workbook.PivotCaches.Add() method.
- Create a pivot table from the pivot cache using the Worksheet.PivotTables.Add() method.
- Drag the pivot fields to the row, column, and data areas. Then calculate the data in the pivot table.
- Add a slicer to the pivot table using the Worksheet.Slicers.Add(IPivotTable pivot, string destCellName, int baseFieldIndex) method.
- Set the properties, such as the name, width, height, style, and cross filter type for the slicer.
- Calculate the data in the pivot table.
- Save the resulting file using the Workbook.SaveToFile() method.
- C#
using Spire.Xls;
using Spire.Xls.Core;

namespace AddSlicerToPivotTable
{
    internal class Program
    {
        static void Main(string[] args)
        {
            // Create an object of the Workbook class
            Workbook workbook = new Workbook();
            // Get the first worksheet
            Worksheet worksheet = workbook.Worksheets[0];

            // Add data to the worksheet
            worksheet.Range["A1"].Value = "Fruit";
            worksheet.Range["A2"].Value = "Grape";
            worksheet.Range["A3"].Value = "Blueberry";
            worksheet.Range["A4"].Value = "Kiwi";
            worksheet.Range["A5"].Value = "Cherry";
            worksheet.Range["A6"].Value = "Grape";
            worksheet.Range["A7"].Value = "Blueberry";
            worksheet.Range["A8"].Value = "Kiwi";
            worksheet.Range["A9"].Value = "Cherry";

            worksheet.Range["B1"].Value = "Year";
            worksheet.Range["B2"].Value2 = 2020;
            worksheet.Range["B3"].Value2 = 2020;
            worksheet.Range["B4"].Value2 = 2020;
            worksheet.Range["B5"].Value2 = 2020;
            worksheet.Range["B6"].Value2 = 2021;
            worksheet.Range["B7"].Value2 = 2021;
            worksheet.Range["B8"].Value2 = 2021;
            worksheet.Range["B9"].Value2 = 2021;

            worksheet.Range["C1"].Value = "Sales";
            worksheet.Range["C2"].Value2 = 50;
            worksheet.Range["C3"].Value2 = 60;
            worksheet.Range["C4"].Value2 = 70;
            worksheet.Range["C5"].Value2 = 80;
            worksheet.Range["C6"].Value2 = 90;
            worksheet.Range["C7"].Value2 = 100;
            worksheet.Range["C8"].Value2 = 110;
            worksheet.Range["C9"].Value2 = 120;

            // Create a pivot cache from the specific data range
            CellRange dataRange = worksheet.Range["A1:C9"];
            PivotCache cache = workbook.PivotCaches.Add(dataRange);

            // Create a pivot table from the pivot cache
            PivotTable pt = worksheet.PivotTables.Add("Fruit Sales", worksheet.Range["A12"], cache);


            // Drag the fields to the row and column areas
            PivotField pf = pt.PivotFields["Fruit"] as PivotField;
            pf.Axis = AxisTypes.Row;
            PivotField pf2 = pt.PivotFields["Year"] as PivotField;
            pf2.Axis = AxisTypes.Column;

            // Drag the field to the data area
            pt.DataFields.Add(pt.PivotFields["Sales"], "Sum of Sales", SubtotalTypes.Sum);

            // Set style for the pivot table
            pt.BuiltInStyle = PivotBuiltInStyles.PivotStyleMedium10;

            // Calculate the pivot table data
            pt.CalculateData();

            // Add a Slicer to the pivot table
            int index_1 = worksheet.Slicers.Add(pt, "F12", 0);

            // Set the name, width, height, and style for the slicer
            worksheet.Slicers[index_1].Name = "Fruit";
            worksheet.Slicers[index_1].Width = 100;
            worksheet.Slicers[index_1].Height = 120;
            worksheet.Slicers[index_1].StyleType = SlicerStyleType.SlicerStyleLight2;

            // Set the cross filter type for the slicer
            XlsSlicerCache slicerCache = worksheet.Slicers[index_1].SlicerCache;
            slicerCache.CrossFilterType = SlicerCacheCrossFilterType.ShowItemsWithNoData;

            // Calculate the pivot table data
            pt.CalculateData();

            // Save the resulting file
            workbook.SaveToFile("AddSlicerToPivotTable.xlsx", ExcelVersion.Version2013);
            workbook.Dispose();
        }
    }
}
Update Slicers in Excel
You can update the properties of a slicer, such as its style, name, caption, and more using the corresponding properties of the XlsSlicer class. The detailed steps are as follows.
- Create an object of the Workbook class.
- Load an Excel file using the Workbook.LoadFromFile() method.
- Get a specific worksheet by its index using the Workbook.Worksheets[index] property.
- Get a specific slicer from the worksheet by its index using the Worksheet.Slicers[index] property.
- Update the properties of the slicer, such as its style, name, caption, and cross filter type using the properties of the XlsSlicer class.
- Save the resulting file using the Workbook.SaveToFile() method.
- C#
using Spire.Xls;
using Spire.Xls.Core;

namespace UpdateSlicer
{
    internal class Program
    {
        static void Main(string[] args)
        {
            // Create an object of the Workbook class
            Workbook workbook = new Workbook();
            // Load an Excel file
            workbook.LoadFromFile("AddSlicerToTable.xlsx");

            // Get the first worksheet
            Worksheet worksheet = workbook.Worksheets[0];

            // Get the first slicer in the worksheet
            XlsSlicer slicer = worksheet.Slicers[0];

            // Change the style, name, and caption for the slicer
            slicer.StyleType = SlicerStyleType.SlicerStyleDark4;
            slicer.Name = "Slicer";
            slicer.Caption = "Slicer";

            // Change the cross filter type for the slicer
            slicer.SlicerCache.CrossFilterType = SlicerCacheCrossFilterType.ShowItemsWithDataAtTop;

            // Deselect an item in the slicer
            XlsSlicerCacheItemCollection slicerCacheItems = slicer.SlicerCache.SlicerCacheItems;
            XlsSlicerCacheItem xlsSlicerCacheItem = slicerCacheItems[0];
            xlsSlicerCacheItem.Selected = false;

            // Save the resulting file
            workbook.SaveToFile("UpdateSlicer.xlsx", ExcelVersion.Version2013);
            workbook.Dispose();
        }
    }
}

Remove Slicers from Excel
You can remove a specific slicer from an Excel worksheet using the Worksheet.Slicers.RemoveAt() method, or remove all slicers at once using the Worksheet.Slicers.Clear() method. The detailed steps are as follows.
- Create an object of the Workbook class.
- Load an Excel file using the Workbook.LoadFromFile() method.
- Get a specific worksheet by its index using the Workbook.Worksheets[index] property.
- Remove a specific slicer from the worksheet by its index using the Worksheet.Slicers.RemoveAt(index) method. Or remove all slicers from the worksheet using the Worksheet.Slicers.Clear() method.
- Save the resulting file using the Workbook.SaveToFile() method.
- C#
using Spire.Xls;
using Spire.Xls.Core;

namespace RemoveSlicer
{
    internal class Program
    {
        static void Main(string[] args)
        {
            // Create an object of the Workbook class
            Workbook workbook = new Workbook();
            // Load an Excel file
            workbook.LoadFromFile("AddSlicerToTable.xlsx");

            // Get the first worksheet
            Worksheet worksheet = workbook.Worksheets[0];

            // Remove the first slicer by index
            worksheet.Slicers.RemoveAt(0);

            //// Or remove all slicers
            //worksheet.Slicers.Clear();

            // Save the resulting file
            workbook.SaveToFile("RemoveSlicer.xlsx", ExcelVersion.Version2013);
            workbook.Dispose();
        }
    }
}
Apply for a Temporary License
If you'd like to remove the evaluation message from the generated documents, or to get rid of the function limitations, please request a 30-day trial license for yourself.