
Spire.XLS for Python (113)
Comment in Excel is a function that allows users to add extra details or remarks as explanatory notes. Comments can be in the form of text or images. It enables users to provide additional information to explain or supplement the data in specified cells. After adding a comment, users can view the content of the comment by hovering the mouse over the cell with the comment. This feature enhances the readability and comprehensibility of the document, helping readers better understand and handle the data in Excel. In this article, we will show you how to add comments in Excel by using Spire.XLS for Python.
Install Spire.XLS for Python
This scenario requires Spire.XLS for Python and plum-dispatch v1.7.4. They can be easily installed in your Windows through the following pip command.
pip install Spire.XLS
If you are unsure how to install, please refer to this tutorial: How to Install Spire.XLS for Python on Windows
Add Comment with Text in Excel
Spire.XLS for Python allows users to add comment with text in Excel by calling CellRange.AddComment() method. The following are detailed steps.
- Create an object of Workbook class.
- Load an Excel file using Workbook.LoadFromFile() method.
- Get the first worksheet of this file using Workbook.Worksheets[] property.
- Get the specified cell by using Worksheet.Range[] property.
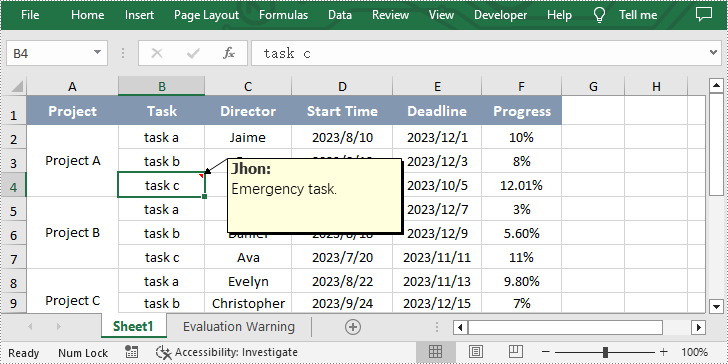
- Set the author and content of the comment and add them to the obtained cell using CellRange.AddComment() method.
- Set the font of the comment.
- Save the result file using Workbook.SaveToFile() method.
- Python
from spire.xls import *
from spire.xls.common import *

inputFile = "sample.xlsx"
outputFile = "CommentWithAuthor.xlsx"

#Create an object of Workbook class
workbook = Workbook()

#Load the sample file from disk
workbook.LoadFromFile(inputFile)

#Get the first worksheet
sheet = workbook.Worksheets[0]

#Get the specified cell
range = sheet.Range["B4"]

#Set the author and content of the comment
author = "Jhon"
text = "Emergency task."

#Add comment to the obtained cell
comment = range.AddComment()
comment.Width = 200
comment.Visible = True
comment.Text = author + ":\n" + text

#Set the font of the comment
font = workbook.CreateFont()
font.FontName = "Tahoma"
font.KnownColor = ExcelColors.Black
font.IsBold = True
comment.RichText.SetFont(0, len(author), font)

#Save the result file
workbook.SaveToFile(outputFile, ExcelVersion.Version2013)
workbook.Dispose()
Add Comment with Picture in Excel
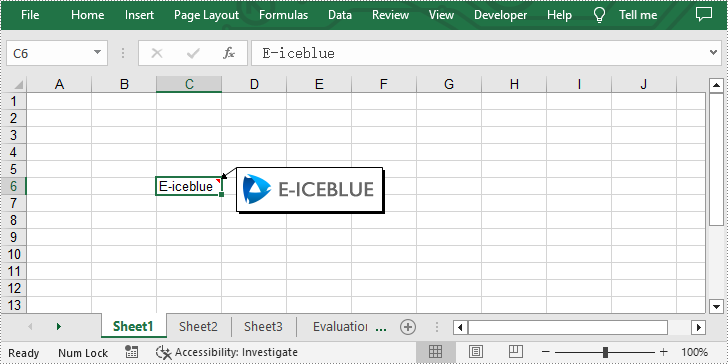
Additionally, Spire.XLS for Python also enable users to add comment with picture to the specified cell in Excel by using CellRange.AddComment() and ExcelCommentObject.Fill.CustomPicture() methods. The following are detailed steps.
- Create an object of Workbook class.
- Get the first worksheet using Workbook.Worksheets[] property.
- Get the specified cell by using Worksheet.Range[] property and set text for it.
- Add comment to the obtained cell by using CellRange.AddComment() method.
- Load an image and fill the comment with it by calling ExcelCommentObject.Fill.CustomPicture() method.
- Set the height and width of the comment.
- Save the result file using Workbook.SaveToFile() method.
- Python
from spire.xls import *
from spire.xls.common import *

inputFile = "logo.png"
outputFile = "CommentWithPicture.xlsx"

#Create an object of Workbook class
workbook = Workbook()

#Get the first worksheet
sheet = workbook.Worksheets[0]

#Get the specified cell and set text for it
range = sheet.Range["C6"]
range.Text = "E-iceblue"

#Add comment to the obtained cell
comment = range["C6"].AddComment()

#Load an image file and fill the comment with it
image = Image.FromFile(inputFile)
comment.Fill.CustomPicture(image, "logo.png")

#Set the height and width of the comment
comment.Height = image.Height
comment.Width = image.Width
comment.Visible = True

#Save the result file
workbook.SaveToFile(outputFile, ExcelVersion.Version2010)
workbook.Dispose()
Apply for a Temporary License
If you'd like to remove the evaluation message from the generated documents, or to get rid of the function limitations, please request a 30-day trial license for yourself.
Hyperlinks are a commonly used tool in Excel that facilitates navigation between different sheets, workbooks, websites, or even specific cells within a worksheet. There are instances where you may need to manage hyperlinks in Excel files, such as extracting hyperlinks for further analysis, modifying existing links, or removing them entirely. In this article, we will introduce how to extract, modify, and remove hyperlinks in Excel in Python using Spire.XLS for Python.
- Extract Hyperlinks from Excel in Python
- Modify Hyperlinks in Excel in Python
- Remove Hyperlinks from Excel in Python
Install Spire.XLS for Python
This scenario requires Spire.XLS for Python and plum-dispatch v1.7.4. They can be easily installed in your Windows through the following pip command.
pip install Spire.XLS
If you are unsure how to install, please refer to this tutorial: How to Install Spire.XLS for Python on Windows
Extract Hyperlinks from Excel in Python
Extracting hyperlinks from an Excel worksheet can be beneficial when you need to analyze or export the link data for further processing.
The following steps demonstrate how to extract hyperlinks from an Excel worksheet in Python using Spire.XLS for Python:
- Create a Workbook object.
- Load an Excel file using Workbook.LoadFromFile() method.
- Get a specific worksheet using Workbook.Worksheets[] property.
- Get the collection of all hyperlinks in the worksheet using Worksheet.HyperLinks property.
- Create an empty list to store the extracted hyperlink information.
- Loop through the hyperlinks in the hyperlink collection.
- Get the address of each hyperlink using XlsHyperlink.Address property and append the address to the list.
- Write the addresses in the list into a text file.
- Python
from spire.xls import *
from spire.xls.common import *

# Create a Workbook object
workbook = Workbook()
# Load an Excel file
workbook.LoadFromFile("Hyperlinks.xlsx")

# Get the first worksheet of the file
sheet = workbook.Worksheets[0]

# Get the hyperlink collection of the worksheet
links = sheet.HyperLinks

# Create an empty list to store the extracted hyperlinks
list = []

# Loop through the hyperlinks in the hyperlink collection
for link in links:
    # Get the address of each hyperlink
    address = link.Address
    # Append the address to the list
    list.append(address)

# Write the extracted hyperlink addresses to a text file
with open("ExtractHyperlinks.txt", "w", encoding = "utf-8") as file:
    for item in list:
        file.write(item + "\n")

workbook.Dispose()

Modify Hyperlinks in Excel in Python
Modifying hyperlinks allows you to update URLs or alter the display text to suit your needs.
The following steps demonstrate how to modify an existing hyperlink in an Excel worksheet in Python using Spire.XLS for Python:
- Create a Workbook object.
- Load an Excel file using Workbook.LoadFromFile() method.
- Get a specific worksheet using Workbook.Worksheets[] property.
- Get a specific hyperlink in the worksheet using Worksheet.HyperLinks[] property.
- Modify the display text and address of the hyperlink using XlsHyperlink.TextToDisplay and XlsHyperlink.Address properties.
- Save the resulting file using Workbook.SaveToFile() method.
- Python
from spire.xls import *
from spire.xls.common import *

# Create a Workbook object
workbook = Workbook()
# Load an Excel file
workbook.LoadFromFile("Hyperlinks.xlsx")

# Get the first worksheet of the file
sheet = workbook.Worksheets[0]

# Get the first hyperlink in the worksheet
link = sheet.HyperLinks[0]

# Change the display text of the hyperlink
link.TextToDisplay = "Spire.XLS for .NET"
# Change the address of the hyperlink
link.Address = "http://www.e-iceblue.com"

# Save the resulting file
workbook.SaveToFile("ModifyHyperlink.xlsx", ExcelVersion.Version2016)

workbook.Dispose()

Remove Hyperlinks from Excel in Python
Removing hyperlinks can help eliminate unnecessary links and clean up your spreadsheet.
The following steps demonstrate how to remove a specific hyperlink from an Excel worksheet in Python using Spire.XLS for Python:
- Create a Workbook object.
- Load an Excel file using Workbook.LoadFromFile() method.
- Get a specific worksheet using Workbook.Worksheets[] property.
- Remove a specific hyperlink from the worksheet using Worksheet.Hyperlinks.RemoveAt() method.
- Save the resulting file using Workbook.SaveToFile() method.
- Python
from spire.xls import *
from spire.xls.common import *

# Create a Workbook object
workbook = Workbook()
# Load an Excel file
workbook.LoadFromFile("Hyperlinks.xlsx")

# Get the first worksheet of the file
sheet = workbook.Worksheets[0]

# Remove the first hyperlink and keep its display text
sheet.HyperLinks.RemoveAt(0)

# Save the resulting file
workbook.SaveToFile("RemoveHyperlink.xlsx", ExcelVersion.Version2016)

workbook.Dispose()
Apply for a Temporary License
If you'd like to remove the evaluation message from the generated documents, or to get rid of the function limitations, please request a 30-day trial license for yourself.
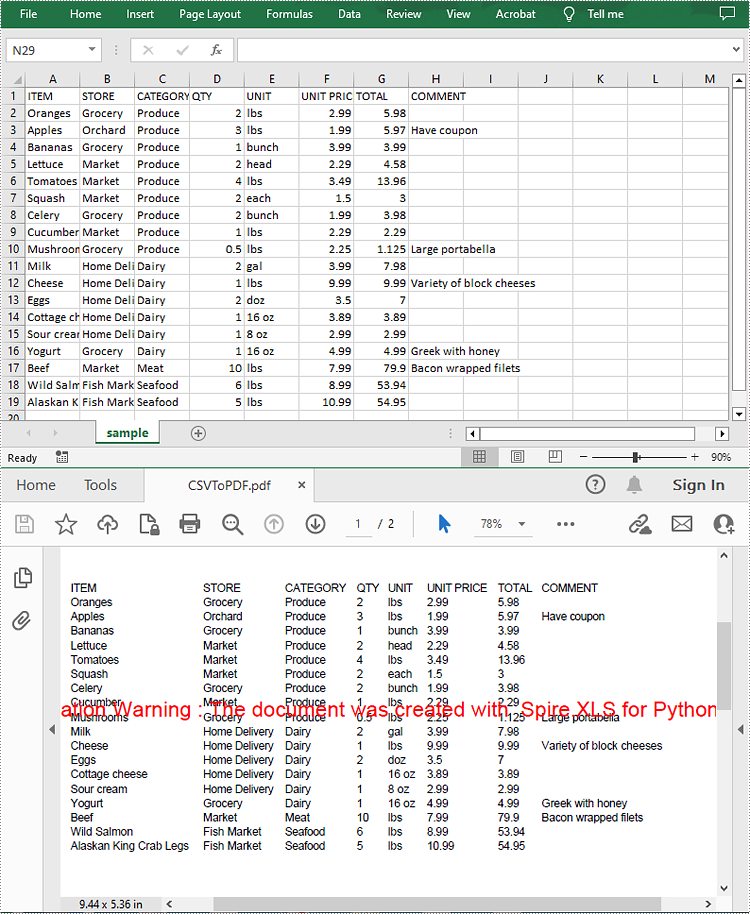
A CSV (Comma-Separated Values) file is a plain text file used to store tabular data. Although CSV files are widely supported by spreadsheet programs, there may still be times when you need to convert them to PDF files to ensure broader accessibility and also enable security features. This article will demonstrate how to convert CSV to PDF in Python using Spire.XLS for Python.
Install Spire.XLS for Python
This scenario requires Spire.XLS for Python and plum-dispatch v1.7.4. They can be easily installed in your Windows through the following pip command.
pip install Spire.XLS
If you are unsure how to install, please refer to this tutorial: How to Install Spire.XLS for Python on Windows
Convert CSV to PDF in Python
The Workbook.SaveToFile() method provided by Spire.XLS for Python allows to save a CSV file as a PDF file. The following are the detailed steps.
- Create a Workbook object.
- Load a CSV file using Workbook.LoadFromFile() method.
- Set the Workbook.ConverterSetting.SheetFitToPage property as true to ensure the worksheet is rendered to one PDF page.
- Get the first worksheet in the Workbook using Workbook.Worksheets[] property.
- Loop through the columns in the worksheet and auto-fit the width of each column using Worksheet.AutoFitColumn() method.
- Convert the CSV file to PDF using Workbook.SaveToFile() method.
- Python
from spire.xls import *
from spire.xls.common import *

# Create a Workbook object
workbook = Workbook()

# Load a CSV file
workbook.LoadFromFile("sample.csv", ",", 1, 1)

# Set the SheetFitToPage property as true
workbook.ConverterSetting.SheetFitToPage = True

# Get the first worksheet
sheet = workbook.Worksheets[0]

# Autofit columns in the worksheet
i = 1
while i < sheet.Columns.Length:
    sheet.AutoFitColumn(i)
    i += 1

# Save the CSV file to PDF
workbook.SaveToFile("CSVToPDF.pdf", FileFormat.PDF)
workbook.Dispose()
Apply for a Temporary License
If you'd like to remove the evaluation message from the generated documents, or to get rid of the function limitations, please request a 30-day trial license for yourself.
Merging cells means combining multiple adjacent cells into a larger one. The merged cell will inherit all the properties and contents of the original cells. This feature is particularly useful when you need to create a larger cell to accommodate more content or create a header row. Unmerging cells, on the other hand, involves reverting the merged cells back to the original multiple cells. The unmerged cells will revert back to their original independent state, and you can input different content into each individual cell. Merging and unmerging cells are common operations in spreadsheet software, allowing you to adjust the layout and structure of a table as needed, making the data clearer and easier to understand. In this article, you will learn how to merge or unmerge cells in Excel in Python by using Spire.XLS for Python.
- Merge the Cells of the Specified Row or Column
- Merge Ranges of Cells
- Unmerge the Cells of the Specified Row or Column
- Unmerge Ranges of Cells
Install Spire.XLS for Python
This scenario requires Spire.XLS for Python and plum-dispatch v1.7.4. They can be easily installed in your Windows through the following pip command.
pip install Spire.XLS
If you are unsure how to install, please refer to this tutorial: How to Install Spire.XLS for Python on Windows
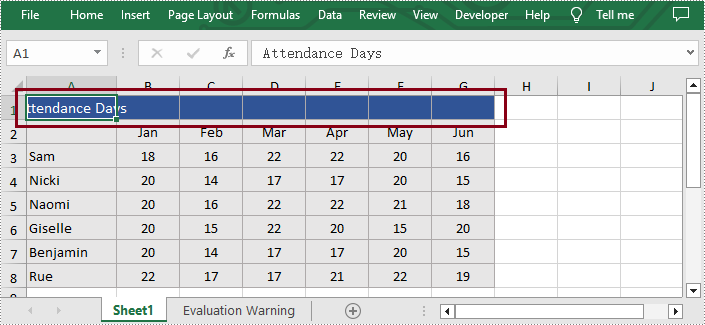
Merge the Cells of the Specified Row or Column
With Spire.XLS for Python, users are able to effortlessly merge the cells of the specific column or row in Excel, thereby enhancing their data manipulation capabilities. The following are the detailed steps.
- Create an object of Workbook class.
- Load a sample Excel file using Workbook.LoadFromFile() method.
- Get the desired worksheet by using Workbook.Worksheets[] property.
- Access the cells of the specific column or row and merge them by calling Worksheet.Columns[].Merge() or Worksheet.Rows[].Merge() methods.
- Save the result file using Workbook.SaveToFile() method.
- Python
from spire.xls import *
from spire.xls.common import *

inputFile = "Sample.xlsx"
outputFile = "MergeRowColumn.xlsx"

#Create an object of Workbook class
workbook = Workbook()

#Load a sample Excel file from disk
workbook.LoadFromFile(inputFile)

#Get the first worksheet of this file
sheet = workbook.Worksheets[0]

#Merge the first column in Excel
#sheet.Columns[0].Merge()

#Merge the first row in Excel
sheet.Rows[0].Merge()

#Save the result file
workbook.SaveToFile(outputFile, ExcelVersion.Version2013)
workbook.Dispose()
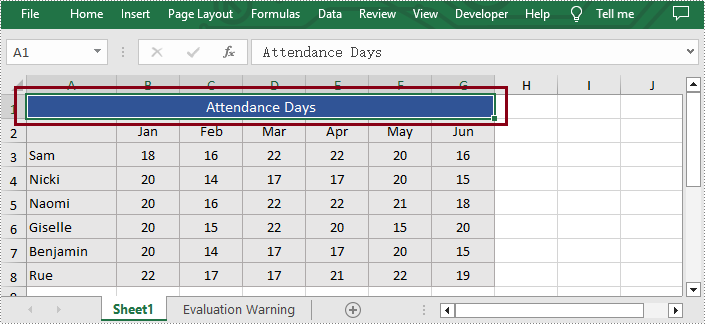
Merge Ranges of Cells
In addition to merging the specific column or row, Spire.XLS for Python also supports users to merge the specified cell ranges. The following are the detailed steps.
- Create an object of Workbook class.
- Load a sample Excel file using Workbook.LoadFromFile() method.
- Get the desired worksheet by using Workbook.Worksheets[] property.
- Access the specific range of cells and merge them together by calling Worksheet.Range[].Merge() method.
- Save the result file using Workbook.SaveToFile() method.
- Python
from spire.xls import *
from spire.xls.common import *

inputFile = "Sample.xlsx"
outputFile = "MergeCellRange.xlsx"

#Create an object of Workbook class
workbook = Workbook()

#Load a sample Excel file from disk
workbook.LoadFromFile(inputFile)

#Get the first worksheet of this file
sheet = workbook.Worksheets[0]

#Merge the particular cell range in Excel
sheet.Range["B6:G6"].Merge()

#Save the result file
workbook.SaveToFile(outputFile, ExcelVersion.Version2013)
workbook.Dispose()
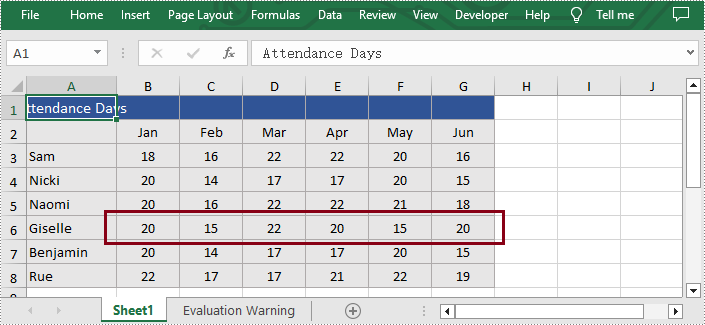
Unmerge the Cells of the Specified Row or Column
Additionally, users are also allowed to unmerge the merged cells of the specific column or row at any time with Spire.XLS for Python. The following are the detailed steps.
- Create an object of Workbook class.
- Load a sample Excel file using Workbook.LoadFromFile() method.
- Get the desired worksheet by using Workbook.Worksheets[] property.
- Access the merged cells of the specific column or row and unmerge them by calling Worksheet.Columns[].UnMerge() and Worksheet.Rows[].UnMerge() methods.
- Save the result file using Workbook.SaveToFile() method.
- Python
from spire.xls import *
from spire.xls.common import *

inputFile = "MergeRowColumn.xlsx"
outputFile = "UnmergeRowColumn.xlsx"

#Create an object of Workbook class
workbook = Workbook()

#Load a sample file from disk
workbook.LoadFromFile(inputFile)

#Get the first worksheet of this file
sheet = workbook.Worksheets[0]

#Unmerge the first column in Excel
#sheet.Columns[0].UnMerge()

#Unmerge the first column in Excel
sheet.Rows[0].UnMerge()

#Save to file.
workbook.SaveToFile(outputFile, ExcelVersion.Version2013)
workbook.Dispose()
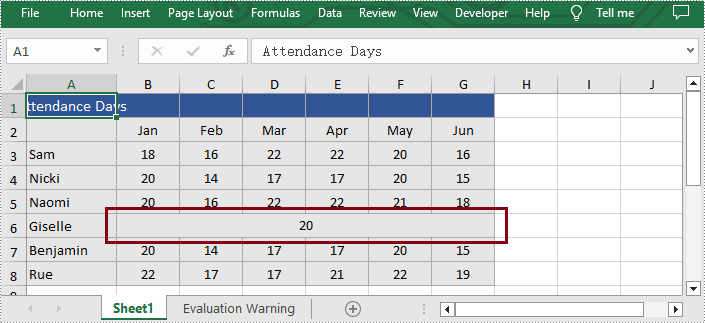
Unmerge Ranges of Cells
What's more, users are also able to unmerge the specified cell ranges using Spire.XLS for Python. The following are the detailed steps.
- Create an object of Workbook class.
- Load a sample Excel file using Workbook.LoadFromFile() method.
- Get the desired worksheet by using Workbook.Worksheets[] property.
- Access the specific cell ranges and unmerge them by calling Worksheet.Range[].UnMerge() method.
- Save the result file using Workbook.SaveToFile() method.
- Python
from spire.xls import *
from spire.xls.common import *

inputFile = "MergeCellRange.xlsx"
outputFile = "UnmergeCellRange.xlsx"

#Create an object of Workbook class
workbook = Workbook()

#Load a sample file from disk
workbook.LoadFromFile(inputFile)

#Get the first worksheet of this file
sheet = workbook.Worksheets[0]

#Unmerge the particular cell range in Excel
sheet.Range["B6:G6"].UnMerge()

#Save to file.
workbook.SaveToFile(outputFile, ExcelVersion.Version2013)
workbook.Dispose()
Apply for a Temporary License
If you'd like to remove the evaluation message from the generated documents, or to get rid of the function limitations, please request a 30-day trial license for yourself.
Hyperlinks are a useful tool in Microsoft Excel that allows users to create clickable links within their spreadsheets. By adding hyperlinks, you can conveniently navigate between different sheets, workbooks, websites, or even specific cells within the same workbook. Whether you need to reference external resources, connect related data, or create interactive reports, hyperlinks can help you achieve your purpose with ease. In this article, we will demonstrate how to add hyperlinks to Excel in Python using Spire.XLS for Python.
Install Spire.XLS for Python
This scenario requires Spire.XLS for Python and plum-dispatch v1.7.4. They can be easily installed in your Windows through the following pip command.
pip install Spire.XLS
If you are unsure how to install, please refer to this tutorial: How to Install Spire.XLS for Python on Windows
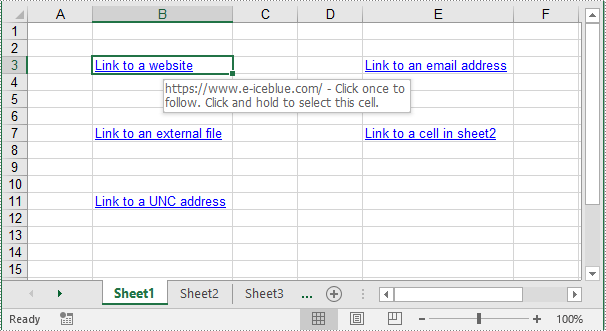
Add Text Hyperlinks to Excel in Python
Text hyperlinks in Excel are clickable words or phrases that can direct users to different parts of the Excel file, external resources, or email addresses. The following steps explain how to add a text hyperlink to an Excel file using Spire.XLS for Python:
- Create a Workbook object.
- Get the desired worksheet using Workbook.Worksheets[] property.
- Access the specific cell that you want to add a hyperlink to using Worksheet.Range[] property.
- Add a hyperlink to the cell using Worksheet.HyperLinks.Add() method.
- Set the type, display text and address of the hyperlink using XlsHyperLink.Type, XlsHyperLink.TextToDisplay and XlsHyperLink.Address properties.
- Save the resulting file using Workbook.SaveToFile() method.
- Python
from spire.xls import *
from spire.xls.common import *
# Create a Workbook object
workbook = Workbook()
# Get the first worksheet
sheet = workbook.Worksheets[0]
# Add a text hyperlink that leads to a webpage
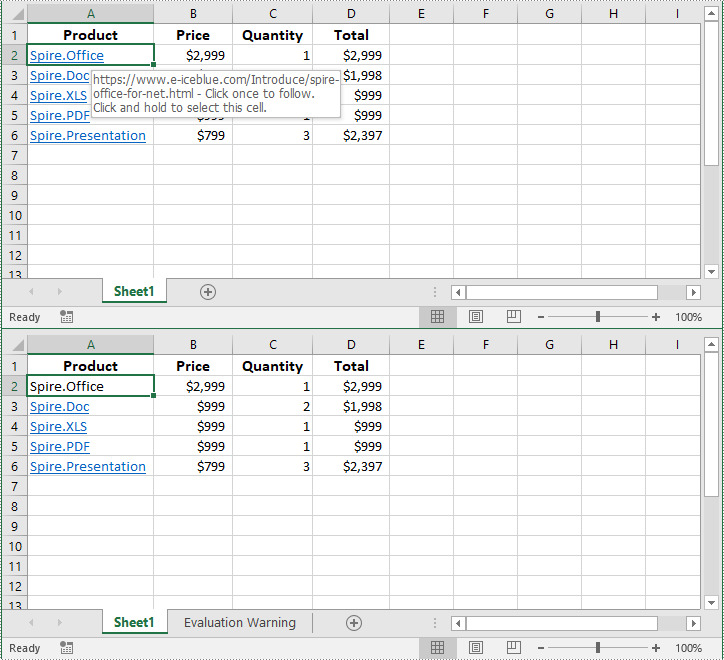
cell1 = sheet.Range["B3"]
urlLink = sheet.HyperLinks.Add(cell1)
urlLink.Type = HyperLinkType.Url
urlLink.TextToDisplay = "Link to a website"
urlLink.Address = "https://www.e-iceblue.com/"
# Add a text hyperlink that leads to an email address
cell2 = sheet.Range["E3"]
mailLink = sheet.HyperLinks.Add(cell2)
mailLink.Type = HyperLinkType.Url
mailLink.TextToDisplay = "Link to an email address"
mailLink.Address = "mailto:example@outlook.com"
# Add a text hyperlink that leads to an external file
cell3 = sheet.Range["B7"]
fileLink = sheet.HyperLinks.Add(cell3)
fileLink.Type = HyperLinkType.File
fileLink.TextToDisplay = "Link to an external file"
fileLink.Address = "C:\\Users\\Administrator\\Desktop\\Report.xlsx"
# Add a text hyperlink that leads to a cell in another sheet
cell4 = sheet.Range["E7"]
linkToSheet = sheet.HyperLinks.Add(cell4)
linkToSheet.Type = HyperLinkType.Workbook
linkToSheet.TextToDisplay = "Link to a cell in sheet2"
linkToSheet.Address = "Sheet2!B5"
# Add a text hyperlink that leads to a UNC address
cell5 = sheet.Range["B11"]
uncLink = sheet.HyperLinks.Add(cell5)
uncLink.Type = HyperLinkType.Unc
uncLink.TextToDisplay = "Link to a UNC address"
uncLink.Address = "\\\\192.168.0.121"
# Autofit column widths
sheet.AutoFitColumn(2)
sheet.AutoFitColumn(5)
# Save the resulting file
workbook.SaveToFile("AddTextHyperlinks.xlsx", ExcelVersion.Version2016)
workbook.Dispose()
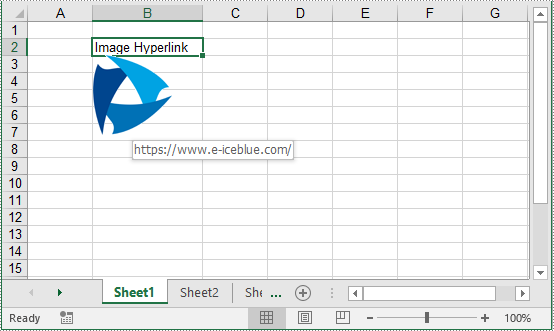
Add Image Hyperlinks to Excel in Python
Image hyperlinks in Excel work similarly to text hyperlinks but use images as clickable elements instead of words or phrases. They provide a visually appealing and intuitive way to navigate within the spreadsheet or to external resources. The following steps explain how to add an image hyperlink to an Excel file using Spire.XLS for Python:
- Create a Workbook object.
- Get the desired worksheet using Workbook.Worksheets[] property.
- Insert an image into the worksheet using Worksheet.Pictures.Add() method.
- Add a hyperlink to the image using XlsBitmapShape.SetHyperLink() method.
- Save the result file using Workbook.SaveToFile() method.
- Python
from spire.xls import *
from spire.xls.common import *

# Create a Workbook object
workbook = Workbook()

# Get the first worksheet
sheet = workbook.Worksheets[0]

# Add text to the worksheet
sheet.Range["B2"].Text = "Image Hyperlink"
# Set the width of the second column
sheet.Columns[1].ColumnWidth = 15

# Insert an image into the worksheet
picture = sheet.Pictures.Add(3, 2, "logo2.png")

# Add a hyperlink to the image
picture.SetHyperLink("https://www.e-iceblue.com", True)

# Save the resulting file
workbook.SaveToFile("AddImageHyperlink.xlsx", ExcelVersion.Version2013)
workbook.Dispose()
Apply for a Temporary License
If you'd like to remove the evaluation message from the generated documents, or to get rid of the function limitations, please request a 30-day trial license for yourself.
Fonts play a crucial role in enhancing the visual appeal and readability of data in Microsoft Excel. Whether you're creating a spreadsheet, designing a report, or simply organizing information, the ability to set or change fonts can greatly impact the overall presentation. Excel offers a wide range of font options, allowing you to customize the style, size, and formatting to suit your specific needs. In this article, you will learn how to set or change fonts in Excel in Python using Spire.XLS for Python.
- Set Different Fonts for Different Cells in Python
- Apply Multiple Fonts in a Single Cell in Python
- Change the Font Style of a Cell Range in Python
Install Spire.XLS for Python
This scenario requires Spire.XLS for Python and plum-dispatch v1.7.4. They can be easily installed in your Windows through the following pip command.
pip install Spire.XLS
If you are unsure how to install, please refer to this tutorial: How to Install Spire.XLS for Python on Windows
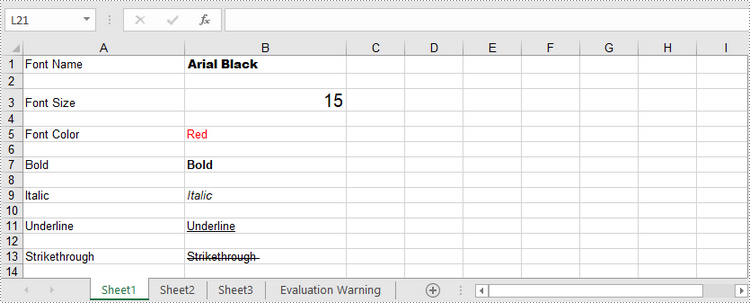
Set Different Fonts for Different Cells in Python
With Spire.XLS for Python, customizing fonts in specific cells becomes a breeze. By utilizing the CellRange.Style.Font property, you gain control over font name, color, size, and style effortlessly. Follow these steps to apply a font style to a particular cell using Spire.XLS for Python.
- Create a Workbook object.
- Get a specific worksheet through Workbook.Worksheets[index] property.
- Get a specific cell through Worksheet.Range[int Row, int Column] property.
- Set the value of the cell through CellRange.Value property.
- Set the font name, color, size and style of the cell value through the properties under the CellRange.Style.Font object.
- Save the workbook to an Excel file using Workbook.SaveToFile() method.
- Python
from spire.xls import *
from spire.xls.common import *

# Create a Workbook object
workbook = Workbook()

# Get the first worksheet
sheet = workbook.Worksheets[0]

# Set font name
row = 1
sheet.Range[row, 1].Value = "Font Name"
sheet.Range[row, 2].Value = "Arial Black"
sheet.Range[row, 2].Style.Font.FontName = "Arial Black"

# Set font size
row += 2
sheet.Range[row, 1].Value = "Font Size"
sheet.Range[row, 2].Value = "15"
sheet.Range[row, 2].Style.Font.Size = 15

# Set font color
row += 2
sheet.Range[row, 1].Value = "Font Color"
sheet.Range[row, 2].Value = "Red"
sheet.Range[row, 2].Style.Font.Color = Color.get_Red()

# Make text bold
row += 2
sheet.Range[row, 1].Value = "Bold"
sheet.Range[row, 2].Value = "Bold"
sheet.Range[row, 2].Style.Font.IsBold = True;

# Make text italic
row += 2
sheet.Range[row, 1].Value = "Italic"
sheet.Range[row, 2].Value = "Italic"
sheet.Range[row, 2].Style.Font.IsItalic = True

# Underline text
row += 2
sheet.Range[row, 1].Value = "Underline"
sheet.Range[row, 2].Value = "Underline"
sheet.Range[row, 2].Style.Font.Underline = FontUnderlineType.Single

# Strikethrough text
row += 2
sheet.Range[row, 1].Value = "Strikethrough "
sheet.Range[row, 2].Value = "Strikethrough "
sheet.Range[row, 2].Style.Font.IsStrikethrough = True

# Set column width
sheet.Columns[0].ColumnWidth = 25
sheet.Columns[1].ColumnWidth = 25

# Save the workbook to an Excel file
workbook.SaveToFile("output/ApplyFontInCell.xlsx", ExcelVersion.Version2016)
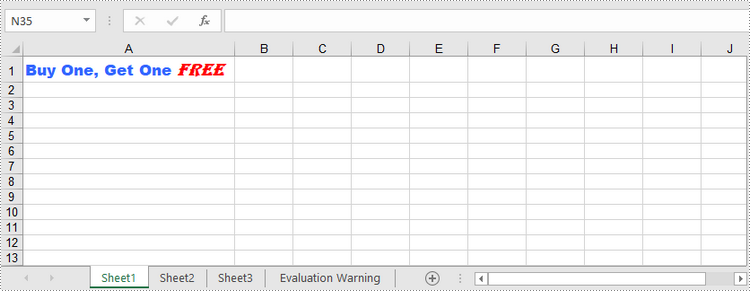
Apply Multiple Fonts in a Single Cell in Python
To emphasize specific characters within a cell, you can mix fonts. Here are the steps to apply multiple fonts in a single cell using Spire.XLS for Python:
- Create a Workbook object.
- Get a specific worksheet through Workbook.Worksheets[index] property.
- Create two ExcelFont objects using Workbook.CreateFont() method.
- Get a specific cell through Worksheet.Range[int Row, int Column] property, and set the rich text content of the cell through CellRange.RichText.Text property.
- Apply the two ExcelFont objects to the rich text using RichText.SetFont() method.
- Save the workbook to an Excel file using Workbook.SaveToFile() method.
- Python
from spire.xls import *
from spire.xls.common import *

# Create a Workbook object
workbook = Workbook()

# Get the first worksheet
sheet = workbook.Worksheets[0]

# Create a font
font1 = workbook.CreateFont()
font1.FontName = "Arial Black"
font1.KnownColor = ExcelColors.LightBlue
font1.IsBold = True
font1.Size = 13

# Create another font
font2 = workbook.CreateFont()
font2.KnownColor = ExcelColors.Red
font2.IsBold = True
font2.IsItalic = True
font2.FontName = "Algerian"
font2.Size = 15;

# Returns a RichText object from a specified cell
richText = sheet.Range["A1"].RichText

# Set the text of RichText object
richText.Text = "Buy One, Get One Free"

# Apply the first font to specified range of characters
richText.SetFont(0, 16, font1)

# Apply the second font to specified range of characters
richText.SetFont(17, 21, font2)

# Set column width
sheet.Columns[0].ColumnWidth = 33

# Save the workbook to an Excel file
workbook.SaveToFile("output/ApplyMultipleFontsInSingleCell.xlsx", ExcelVersion.Version2016)
Change the Font Style of a Cell Range in Python
Spire.XLS for Python offers the CellStyle class, enabling users to handle cell formatting like fill color, text alignment, and font style. By creating a cell style, you can apply it to a specific range of cells using the CellRange.ApplyStyle() method or to an entire worksheet using the Worksheet.ApplyStyle() method. To change the font style of a cell range using Spire.XLS for Python, follow these steps.
- Create a Workbook object.
- Load a sample Excel file using Workbook.LoadFromFile() method.
- Get a specific worksheet using Workbook.Worksheets[index] property.
- Create a CellStyle object using Workbook.Styles.Add() method, and set the font style through the CellStyle.Font property.
- Apply the cell style to a cell range using CellRange.ApplyStyle() method.
- Save the workbook to another Excel file using Workbook.SaveToFile() method.
- Python
from spire.xls import *
from spire.xls.common import *

# Create a Workbook object
workbook = Workbook()

# Load a sample Excel file
workbook.LoadFromFile("C:\\Users\\Administrator\\Desktop\\sample.xlsx")

# Get the first worksheet
sheet = workbook.Worksheets[0]

# Create a CellStyle object
fontStyle = workbook.Styles.Add("headerFontStyle")

# Set the font color, size and style
fontStyle.Font.Color = Color.get_White()
fontStyle.Font.IsBold = True
fontStyle.Font.Size = 12

# Create a CellStyleFlag object, setting the FontColor, FontBold, ad FontSize properties to true
flag = CellStyleFlag()
flag.FontColor = True
flag.FontBold = True
flag.FontSize = True

# Apply the cell style to header row
sheet.Range[1, 1, 1, 8].ApplyStyle(fontStyle, flag)

# Apply the cell style to the whole worksheet
# sheet.ApplyStyle(fontStyle)

# Save the workbook to another Excel file
workbook.SaveToFile("output/ApplyFontToCellRange.xlsx", ExcelVersion.Version2016)

Apply for a Temporary License
If you'd like to remove the evaluation message from the generated documents, or to get rid of the function limitations, please request a 30-day trial license for yourself.
Converting Excel spreadsheets to image formats can be extremely valuable and versatile in a wide range of situations. Whether you need to share data with others who don’t have Excel installed on their devices, present information in a document or presentation, or publish content online, converting Excel to image format offers a convenient solution. In this article, we will introduce how to programmatically convert Excel to images in Python using Spire.XLS for Python.
- Convert an Excel Worksheet to an Image in Python
- Convert an Excel Worksheet to an Image without White Margins in Python
- Convert a Specific Cell Range to an Image in Python
Install Spire.XLS for Python
This scenario requires Spire.XLS for Python and plum-dispatch v1.7.4. They can be easily installed in your Windows through the following pip command.
pip install Spire.XLS
If you are unsure how to install, please refer to this tutorial: How to Install Spire.XLS for Python on Windows
Convert an Excel Worksheet to an Image in Python
You can easily convert a whole Excel worksheet to an image by using the Worksheet.SaveToImage() method provided by Spire.XLS for Python. The detailed steps are as follows:
- Create a Workbook object.
- Load an Excel file using Workbook.LoadFromFile() method.
- Get a specific worksheet by its index using Workbook.Worksheets[int index] property.
- Convert the worksheet to an image using Worksheet.ToImage() method.
- Save the image to a PNG file (you can also save the image as other image formats such as JPG and BMP).
- Python
from spire.xls import *
from spire.xls.common import *

# Create a Workbook object
workbook = Workbook()
# Load an Excel file
workbook.LoadFromFile("Sample.xlsx")

# Get the first worksheet
sheet = workbook.Worksheets[0]

# Save the worksheet to an image
image = sheet.ToImage(sheet.FirstRow, sheet.FirstColumn, sheet.LastRow, sheet.LastColumn)
# Save the image to a PNG file
image.Save("SheetToImage.png")
workbook.Dispose()
Convert an Excel Worksheet to an Image without White Margins in Python
When converting an Excel worksheet to an image, you may find the resulting image has unwanted white margins surrounding the cells. If you want to convert the worksheet to an image without any extraneous margins, you can remove the page margins set in the original worksheet. The detailed steps are as follows:
- Create a Workbook object.
- Load an Excel file using Workbook.LoadFromFile() method.
- Get a specific worksheet by its index using Workbook.Worksheets[int index] property.
- Remove all margins from the worksheet by setting its left, right, top, and bottom margin values to zero.
- Convert the worksheet to an image using Worksheet.ToImage() method.
- Save the image to a PNG file.
- Python
from spire.xls import *
from spire.xls.common import *

# Create a Workbook object
workbook = Workbook()
# Load an Excel file
workbook.LoadFromFile("Sample.xlsx")

# Get the first worksheet
sheet = workbook.Worksheets[0]

# Set all margins of the worksheet to zero
sheet.PageSetup.LeftMargin = 0
sheet.PageSetup.BottomMargin = 0
sheet.PageSetup.TopMargin = 0
sheet.PageSetup.RightMargin = 0

# Convert the worksheet to an image
image = sheet.ToImage(sheet.FirstRow, sheet.FirstColumn, sheet.LastRow, sheet.LastColumn)
# Save the image to a PNG file
image.Save("SheetToImageWithoutMargins.png")
workbook.Dispose()
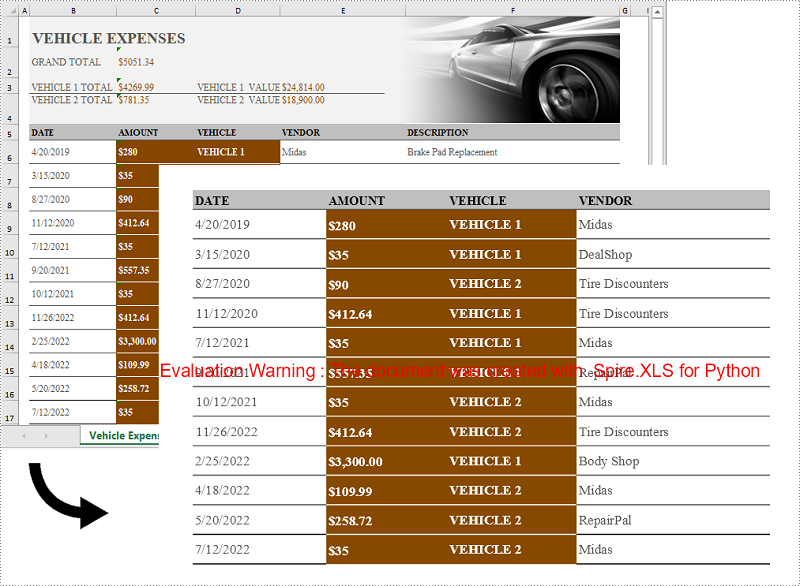
Convert a Specific Cell Range to an Image in Python
In addition to converting a whole worksheet to an image, Spire.XLS for Python also supports converting a specific cell range of a worksheet to an image. The detailed steps are as follows:
- Create a Workbook object.
- Load an Excel file using Workbook.LoadFromFile() method.
- Get a specific worksheet by its index using Workbook.Worksheets[int index] property.
- Convert a specific cell range of the worksheet to an image using Worksheet.ToImage() method and pass the index of the start row, start column, end row, and end column of the cell range to the method as parameters.
- Save the image to a PNG file.
- Python
from spire.xls import *
from spire.xls.common import *

# Create a Workbook object
workbook = Workbook()
# Load an Excel file
workbook.LoadFromFile("Sample.xlsx")

# Get the first worksheet
sheet = workbook.Worksheets[0]

# Convert a specific cell range of the worksheet to an image
image = sheet.ToImage(5, 2, 17, 5)
# Save the image to a PNG file
image.Save("CellRangeToImage.png")
workbook.Dispose()
Apply for a Temporary License
If you'd like to remove the evaluation message from the generated documents, or to get rid of the function limitations, please request a 30-day trial license for yourself.
Inserting or deleting images in Excel can be a powerful way to enhance your spreadsheets and make them visually appealing. Whether you want to include logos, charts, diagrams, or any other graphical elements, Excel provides the functionality to seamlessly integrate images into your worksheets. Additionally, Excel offers the options to manipulate and organize images, allowing you to resize, move, or delete them as needed. In this article, we will explore how to programmatically insert or delete pictures in Excel in Python by using Spire.XLS for Python.
Install Spire.XLS for Python
This scenario requires Spire.XLS for Python and plum-dispatch v1.7.4. They can be easily installed in your Windows through the following pip command.
pip install Spire.XLS
If you are unsure how to install, please refer to this tutorial: How to Install Spire.XLS for Python on Windows
Insert a Picture to a Specific Cell in Python
To add a picture to a certain cell, you use Worksheet.Pictures.Add(int topRow, int leftColumn, Image image) method. The following are the detailed steps.
- Initialize a Workbook instance.
- Get a specific worksheet through Workbook.Worksheets[sheetIndex] property.
- Insert a picture into a specific cell using Worksheet.Pictures.Add() method and return an object of ExcelPicture.
- Set the width and height of the picture, as well as the distance between the picture and the cell border through the properties under the ExcelPicture object.
- Save the workbook to an Excel file using Workbook.SaveToFile() method.
- Python
from spire.xls import *
from spire.xls.common import *

# Create a Workbook object
workbook = Workbook()

# Get the first worksheet.
sheet = workbook.Worksheets[0]

# Add a picture to a specific cell
imgPath = "C:\\Users\\Administrator\\Desktop\\logo.png"
picture = sheet.Pictures.Add(1, 3, imgPath)

# Set the picture width and height
picture.Width = 150
picture.Height = 150

# Adjust the column width and row height so that the cell can accommodate the picture
sheet.Columns[2].ColumnWidth = 25
sheet.Rows[0].RowHeight = 135

# Set the distance between cell border and image
picture.LeftColumnOffset = 90
picture.TopRowOffset = 20

# Save to file
workbook.SaveToFile("output/InsertImage.xlsx", ExcelVersion.Version2013)
workbook.Dispose()
Delete Pictures in a Worksheet in Python
A picture in a worksheet can be removed using Worksheet.Pictures[imgIndex].Remove() method. To delete all pictures, you can use a for loop to iterate through the pictures in the worksheet. The following are the detailed steps.
- Create a Workbook object.
- Load an Excel file using Workbook.LoadFromFile() method.
- Get a specific worksheet through Workbook.Worksheets[sheetIndex] property.
- Delete images in the worksheet using Worksheet.Pictures[imgIndex].Remove() method.
- Save the workbook to another Excel file using Workbook.SaveToFile() method.
- Python
from spire.xls import *
from spire.xls.common import *

# Create a Workbook object
workbook = Workbook()

# Load an Excel file
workbook.LoadFromFile("C:\\Users\\Administrator\\Desktop\\InsertImage.xlsx")

# Get the first worksheet
sheet = workbook.Worksheets[0]

# Delete all pictures from the worksheet
for i in range(sheet.Pictures.Count - 1, -1, -1):
    sheet.Pictures[i].Remove()

# Delete a specific picture
# sheet.Pictures[imgIndex].Remove()

# Save to file
workbook.SaveToFile("output/DeleteImage.xlsx", ExcelVersion.Version2013)
workbook.Dispose()
Apply for a Temporary License
If you'd like to remove the evaluation message from the generated documents, or to get rid of the function limitations, please request a 30-day trial license for yourself.
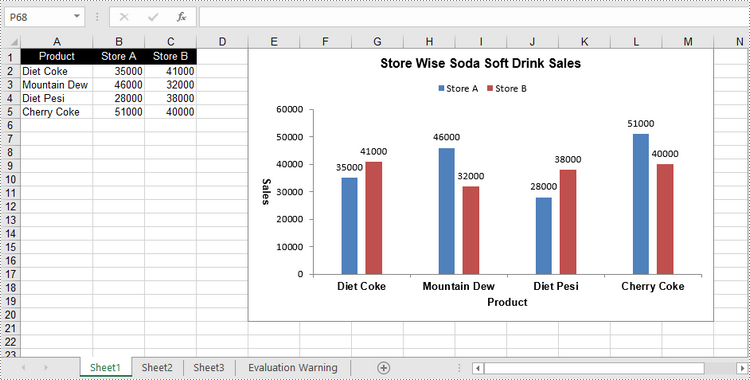
A clustered column chart and a stacked column chart are two variants of column chart. The clustered column chart enables straightforward comparison of values across different categories, while the stacked column chart displays both the total for each category and the proportion of its individual components. In this article, you will learn how to create clustered or stacked column charts in Excel in Python using Spire.XLS for Python.
Install Spire.XLS for Python
This scenario requires Spire.XLS for Python and plum-dispatch v1.7.4. They can be easily installed in your Windows through the following pip command.
pip install Spire.XLS
If you are unsure how to install, please refer to this tutorial: How to Install Spire.XLS for Python on Windows
Create a Clustered Column Chart in Excel in Python
To add a chart to a worksheet, use Worksheet.Chart.Add(ExcelChartType chartType) method. The ExcelChartType enumeration includes various chart types predefined in MS Excel. The following are the steps to add a clustered column chart in Excel using Spire.XLS for Python.
- Create a Workbook object.
- Get a specific worksheet through Workbook.Worksheets[index] property.
- Write data into the specified cells.
- Add a clustered column char to the worksheet using Worksheet.Chart.Add(ExcelChartType.ColumnClustered) method.
- Set the chart data through Chart.DataRange property.
- Set the position, title, and other attributes of the chart through the properties under the Chart object.
- Save the workbook to an Excel file using Workbook.SaveToFile() method.
- Python
from spire.xls import *
from spire.xls.common import *

# Create a Workbook object
workbook = Workbook()

# Get the first sheet
sheet = workbook.Worksheets[0]

# Set chart data
sheet.Range["A1"].Value = "Product"
sheet.Range["A2"].Value = "Diet Coke"
sheet.Range["A3"].Value = "Mountain Dew"
sheet.Range["A4"].Value = "Diet Pesi"
sheet.Range["A5"].Value = "Cherry Coke"

sheet.Range["B1"].Value = "Store A"
sheet.Range["B2"].NumberValue = 35000
sheet.Range["B3"].NumberValue = 46000
sheet.Range["B4"].NumberValue = 28000
sheet.Range["B5"].NumberValue = 51000
sheet.Range["C1"].Value = "Store B"
sheet.Range["C2"].NumberValue = 41000
sheet.Range["C3"].NumberValue = 32000
sheet.Range["C4"].NumberValue = 38000
sheet.Range["C5"].NumberValue = 40000

# Set cell style
sheet.Range["A1:C1"].RowHeight = 15
sheet.Range["A1:C1"].Style.Color = Color.get_Black()
sheet.Range["A1:C1"].Style.Font.Color = Color.get_White()
sheet.Range["A1:C1"].Style.VerticalAlignment = VerticalAlignType.Center
sheet.Range["A1:C1"].Style.HorizontalAlignment = HorizontalAlignType.Center
sheet.AutoFitColumn(1)

# Add a chart to the sheet
chart = sheet.Charts.Add(ExcelChartType.ColumnClustered)

# Set data range of chart
chart.DataRange = sheet.Range["A1:C5"]
chart.SeriesDataFromRange = False

# Set position of the chart
chart.LeftColumn = 5
chart.TopRow = 1
chart.RightColumn = 14
chart.BottomRow = 21

# Set chart title
chart.ChartTitle = "Store Wise Soda Soft Drink Sales"
chart.ChartTitleArea.IsBold = True
chart.ChartTitleArea.Size = 12

# Set axis title
chart.PrimaryCategoryAxis.Title = "Product"
chart.PrimaryCategoryAxis.Font.IsBold = True
chart.PrimaryCategoryAxis.TitleArea.IsBold = True
chart.PrimaryValueAxis.Title = "Sales"
chart.PrimaryValueAxis.HasMajorGridLines = False
chart.PrimaryValueAxis.TitleArea.IsBold = True
chart.PrimaryValueAxis.TitleArea.TextRotationAngle = 90

# Set series color, overlap, gap width and data labels
series = chart.Series
for i in range(len(series)):
    cs = series[i]
    cs.Format.Options.IsVaryColor = True
    cs.Format.Options.Overlap = -50
    cs.Format.Options.GapWidth = 350
    cs.DataPoints.DefaultDataPoint.DataLabels.HasValue = True

# Set legend position
chart.Legend.Position = LegendPositionType.Top

# Save the document
workbook.SaveToFile("ClusteredColumnChart.xlsx", ExcelVersion.Version2016)
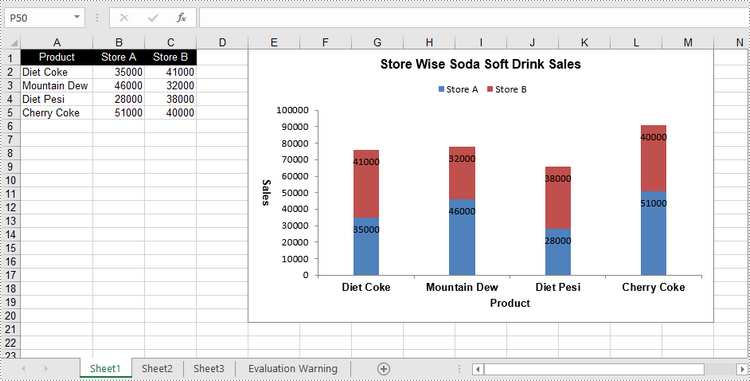
Create a Stacked Column Chart in Excel in Python
The process of creating a stacked column chart is similar to that of creating a clustered column chart. The only difference is that you must change the Excel chart type from ColumnClustered to ColumnStacked.
- Create a Workbook object.
- Get a specific worksheet through Workbook.Worksheets[index] property.
- Write data into the specified cells.
- Add a clustered column char to the worksheet using Worksheet.Chart.Add(ExcelChartType.ColumnStacked) method.
- Set the chart data through Chart.DataRange property.
- Set the position, title, and other attributes of the chart through the properties under the Chart object.
- Save the workbook to an Excel file using Workbook.SaveToFile() method.
- Python
from spire.xls import *
from spire.xls.common import *

# Create a Workbook object
workbook = Workbook()

# Get the first sheet
sheet = workbook.Worksheets[0]

# Set chart data
sheet.Range["A1"].Value = "Product"
sheet.Range["A2"].Value = "Diet Coke"
sheet.Range["A3"].Value = "Mountain Dew"
sheet.Range["A4"].Value = "Diet Pesi"
sheet.Range["A5"].Value = "Cherry Coke"
sheet.Range["B1"].Value = "Store A"
sheet.Range["B2"].NumberValue = 35000
sheet.Range["B3"].NumberValue = 46000
sheet.Range["B4"].NumberValue = 28000
sheet.Range["B5"].NumberValue = 51000
sheet.Range["C1"].Value = "Store B"
sheet.Range["C2"].NumberValue = 41000
sheet.Range["C3"].NumberValue = 32000
sheet.Range["C4"].NumberValue = 38000
sheet.Range["C5"].NumberValue = 40000

# Set cell style
sheet.Range["A1:C1"].RowHeight = 15
sheet.Range["A1:C1"].Style.Color = Color.get_Black()
sheet.Range["A1:C1"].Style.Font.Color = Color.get_White()
sheet.Range["A1:C1"].Style.VerticalAlignment = VerticalAlignType.Center
sheet.Range["A1:C1"].Style.HorizontalAlignment = HorizontalAlignType.Center
sheet.AutoFitColumn(1)

# Add a chart to the sheet
chart = sheet.Charts.Add(ExcelChartType.ColumnStacked)

# Set data range of chart
chart.DataRange = sheet.Range["A1:C5"]
chart.SeriesDataFromRange = False

# Set position of the chart
chart.LeftColumn = 5
chart.TopRow = 1
chart.RightColumn = 14
chart.BottomRow = 21

# Set chart title
chart.ChartTitle = "Store Wise Soda Soft Drink Sales"
chart.ChartTitleArea.IsBold = True
chart.ChartTitleArea.Size = 12

# Set axis title
chart.PrimaryCategoryAxis.Title = "Product"
chart.PrimaryCategoryAxis.Font.IsBold = True
chart.PrimaryCategoryAxis.TitleArea.IsBold = True
chart.PrimaryValueAxis.Title = "Sales"
chart.PrimaryValueAxis.HasMajorGridLines = False
chart.PrimaryValueAxis.TitleArea.IsBold = True
chart.PrimaryValueAxis.TitleArea.TextRotationAngle = 90

# Set series color, gap width and data labels
series = chart.Series
for i in range(len(series)):
    cs = series[i]
    cs.Format.Options.IsVaryColor = True
    cs.Format.Options.GapWidth = 270
    cs.DataPoints.DefaultDataPoint.DataLabels.HasValue = True
    cs.DataPoints.DefaultDataPoint.DataLabels.Position = DataLabelPositionType.Inside

# Set legend position
chart.Legend.Position = LegendPositionType.Top

# Save the document
workbook.SaveToFile("StackedColumnChart.xlsx", ExcelVersion.Version2016)
Apply for a Temporary License
If you'd like to remove the evaluation message from the generated documents, or to get rid of the function limitations, please request a 30-day trial license for yourself.
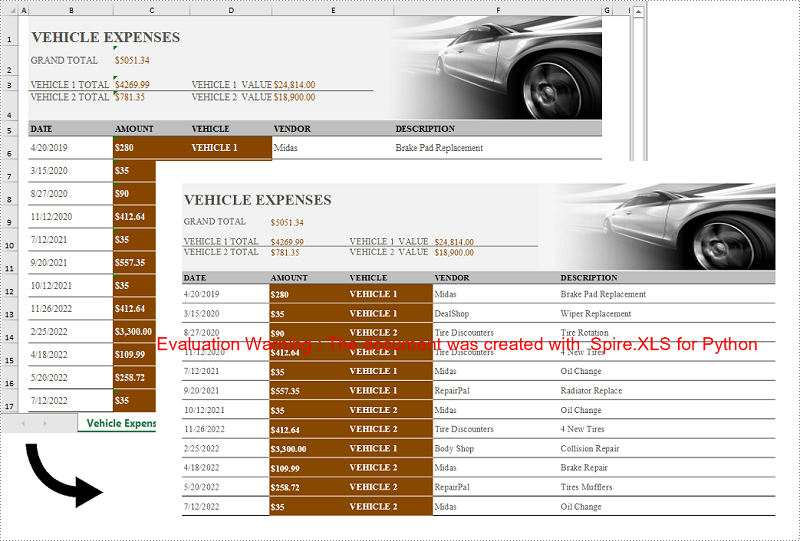
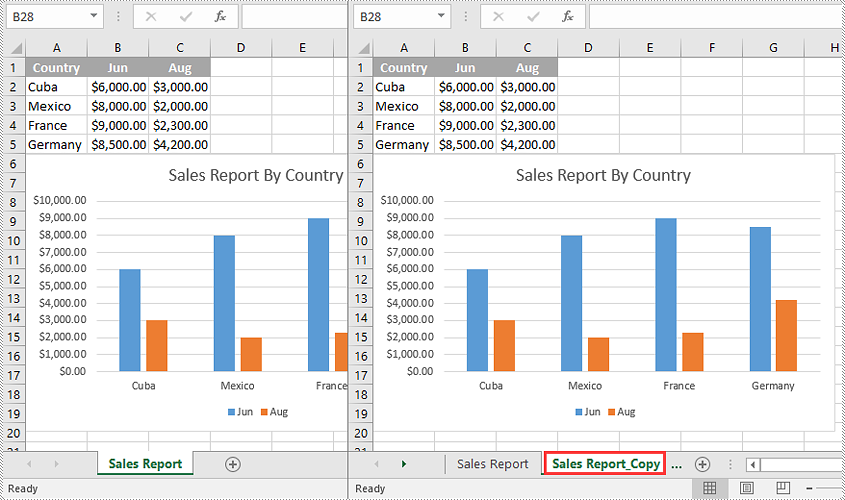
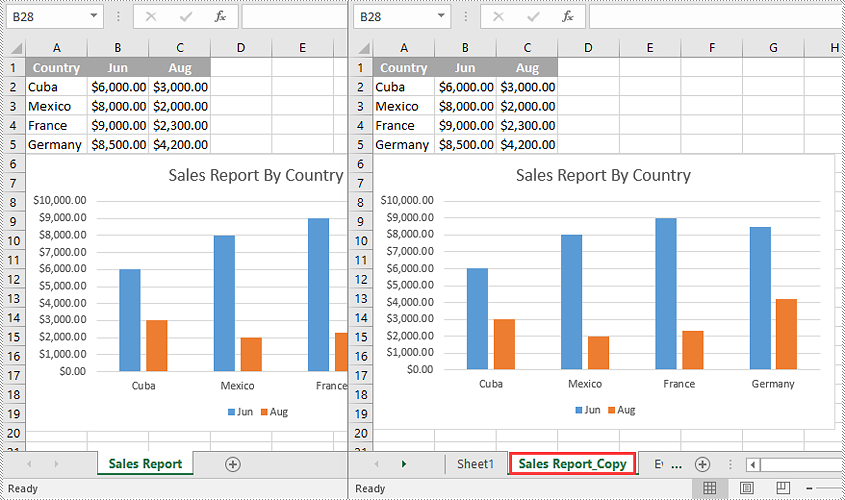
Copying worksheets in Excel is a critical skill to have, especially when you need to create new worksheets based on existing ones. By utilizing the copy function, you can avoid potential errors that may arise from manually recreating the same content. This not only saves time and effort but also ensures that your data remains accurate and reliable. In this article, we will demonstrate how to copy worksheets in Excel in Python using Spire.XLS for Python.
- Copy a Worksheet in the Same Excel Workbook
- Copy a Worksheet to Another Excel Workbook
- Copy Visible Worksheets to a New Excel Workbook
Install Spire.XLS for Python
This scenario requires Spire.XLS for Python and plum-dispatch v1.7.4. They can be easily installed in your Windows through the following pip command.
pip install Spire.XLS
If you are unsure how to install, please refer to this tutorial: How to Install Spire.XLS for Python on Windows
Copy a Worksheet in the Same Excel Workbook in Python
You can copy a worksheet within the same workbook by adding a new worksheet to the workbook and then copying the data from the original worksheet to the new one.
The following steps demonstrate how to copy a worksheet within the same workbook:
- Initialize an instance of the Workbook class.
- Load an Excel workbook using the Workbook.LoadFromFile() method.
- Get a specific worksheet using the Workbook.Worksheets[int index] property.
- Add a new worksheet to the workbook using the Workbook.Worksheets.Add() method.
- Copy the data from the specific worksheet to the new worksheet using the Worksheet.CopyFrom(Worksheet worksheet) method.
- Save the resulting workbook to another file using the Workbook.SaveToFile() method.
- Python
from spire.xls import *
from spire.xls.common import *

#Initialize an instance of the Workbook class
workbook = Workbook()
#Load an Excel workbook
workbook.LoadFromFile("Input.xlsx")

#Get the first worksheet
sourceSheet = workbook.Worksheets[0]

sheetName = sourceSheet.Name + "_Copy"

#Add a new worksheet with a specific name to the workbook
destSheet = workbook.Worksheets.Add(sheetName)

#Copy the first worksheet to the newly added worksheet
destSheet.CopyFrom(sourceSheet)

#Save the result workbook to another file
workbook.SaveToFile("CopyInSameWorkbook.xlsx", ExcelVersion.Version2013)
workbook.Dispose()
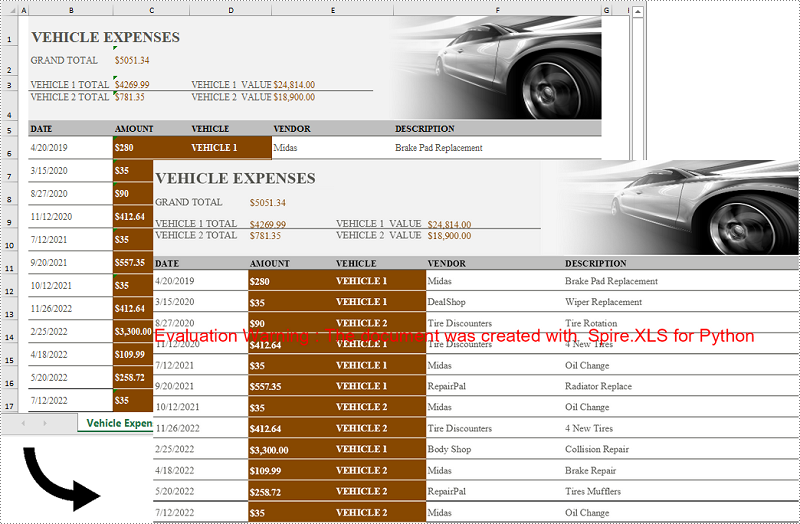
Copy a Worksheet to Another Excel Workbook in Python
To copy a worksheet from one workbook to another, you need to add a new worksheet to the destination workbook and then copy the data of the worksheet from the source workbook to the new worksheet of the destination workbook. If you want to maintain the source formatting, you can copy the theme of the source workbook to the destination workbook.
The following steps demonstrate how to copy a worksheet from one workbook to another:
- Initialize an instance of the Workbook class.
- Load the source workbook using the Workbook.LoadFromFile() method.
- Get a specific worksheet using the Workbook.Worksheets[int index] property.
- Initialize an instance of the Workbook class.
- Load the destination workbook using the Workbook.LoadFromFile() method.
- Add a new worksheet to the destination workbook using the Workbook.Worksheets.Add() method.
- Copy the specific worksheet of the source workbook to the new worksheet of the destination workbook using the Worksheet.CopyFrom(Worksheet worksheet) method.
- Copy the theme from the source workbook to the destination workbook using the Workbook.CopyTheme (Workbook srcWorkbook) method.
- Save the resulting workbook to another file using the Workbook.SaveToFile() method.
- Python
from spire.xls import *
from spire.xls.common import *

#Initialize an instance of the Workbook class
sourceWorkbook = Workbook()
#Load the source Excel workbook
sourceWorkbook.LoadFromFile("CopyWorksheets-Input.xlsx")

#Get the first worksheet of the source workbook
sourceSheet = sourceWorkbook.Worksheets[0]
#Get the name of the first worksheet
sheetName = sourceSheet.Name + "_Copy"

#Initialize an instance of the Workbook class
destWorkbook = Workbook()
 #Load the destination Excel workbook
destWorkbook.LoadFromFile("CopyWorksheets-Sample.xlsx")

#Add a new worksheet with a specific name to the destination workbook
destSheet = destWorkbook.Worksheets.Add(sheetName)

#Copy the first worksheet of the source workbook to the new worksheet of the destination workbook
destSheet.CopyFrom(sourceSheet)

#Copy the theme from the source workbook to the destination workbook
destWorkbook.CopyTheme(sourceWorkbook)

#Save the destination workbook to another file
destWorkbook.SaveToFile("CopyToAnotherWorkbook.xlsx", ExcelVersion.Version2013)

sourceWorkbook.Dispose()
destWorkbook.Dispose()
Copy Visible Worksheets to a New Excel Workbook in Python
If you only want to share visible worksheets rather than the entire workbook with others, you can copy the visible worksheets to a new workbook.
The following steps demonstrate how to copy visible worksheets from a workbook to a new workbook:
- Initialize an instance of the Workbook class.
- Load the source workbook using the Workbook.LoadFromFile() method.
- Initialize an instance of the Workbook class to create a new workbook, then clear the default worksheets in the new workbook using the Workbook.Worksheets.Clear() method.
- Iterate through all the worksheets in the source workbook.
- Check if the current worksheet is visible using the Worksheet.Visibility property.
- If the result is true, add a new worksheet to the new workbook using the Workbook.Worksheets.Add() method.
- Copy the worksheet from the source workbook to the new worksheet of the new workbook using the Worksheet.CopyFrom(Worksheet worksheet) method.
- Copy the theme from the source workbook to the new workbook using the Workbook.CopyTheme(Workbook srcWorkbook) method.
- Save the resulting workbook to another file using the Workbook.SaveToFile() method.
- Python
from spire.xls import *
from spire.xls.common import *

#Initialize an instance of the Workbook class
sourceWorkbook = Workbook()
#Load the source Excel workbook
sourceWorkbook.LoadFromFile("CopyWorksheets-Input.xlsx")

#Initialize an instance of the Workbook class to create a new workbook
newWorkbook = Workbook()
newWorkbook.Version = ExcelVersion.Version2013
#Clear the default worksheets in the new workbook
newWorkbook.Worksheets.Clear()

#Iterate through all the worksheets in the source workbook
for sourceSheet in sourceWorkbook.Worksheets:
    #Check if the current worksheet is visible
    if sourceSheet.Visibility == WorksheetVisibility.Visible:
        sheetName = sourceSheet.Name + "_Copy"
        #Add a new worksheet with a specific name to the new workbook
        destSheet = newWorkbook.Worksheets.Add(sheetName)
        #Copy the worksheet from the source workbook to the new worksheet of the new workbook
        destSheet.CopyFrom(sourceSheet)

#Copy the theme from the source workbook to the new workbook
newWorkbook.CopyTheme(sourceWorkbook)

#Save the new workbook to another file
newWorkbook.SaveToFile("CopyVisibleSheetsToNewWorkbook.xlsx", ExcelVersion.Version2013)
sourceWorkbook.Dispose()
newWorkbook.Dispose()
Apply for a Temporary License
If you'd like to remove the evaluation message from the generated documents, or to get rid of the function limitations, please request a 30-day trial license for yourself.
