
Spire.XLS for Python (113)
Formatting plays a crucial role in making your Excel spreadsheets clean, organized, and visually appealing. Often, you may want to apply the same formatting to multiple cells or ranges in your workbook. Instead of manually formatting each cell individually, Excel provides a convenient feature called "Copy Cell Formatting" that allows you to quickly replicate the formatting from one cell to others.
Here in this article, you will learn how to programmatically copy cell formatting in Excel using Spire.XLS for Python.
Install Spire.XLS for Python
This scenario requires Spire.XLS for Python and plum-dispatch v1.7.4. They can be easily installed in your system through the following pip command.
pip install Spire.XLS
If you are unsure how to install, please refer to this tutorial: How to Install Spire.XLS for Python on Windows
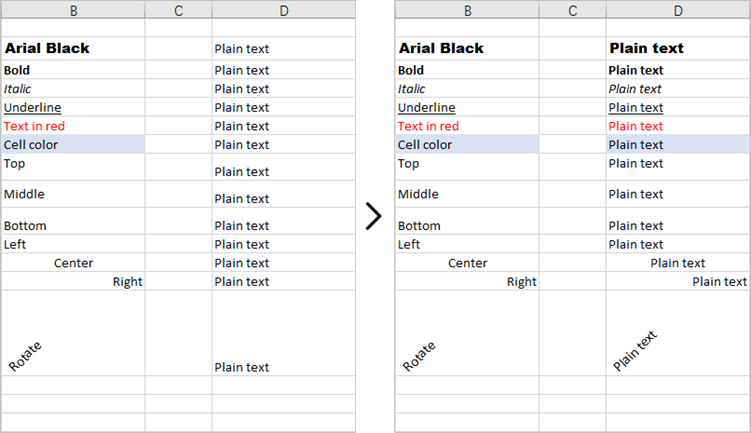
Copy Formatting from One Cell to Another in Python
You can access a specific cell by using the Worksheet.Range[row:int, column:int] property. The formatting of that cell can be retrieved through the CellRange.Style property, and this formatting can then be applied to a different cell.
The steps to copy formatting from one to cell to anther are as follows.
- Create a Workbook object.
- Load an Excel document from a give path.
- Get a specific worksheet within the workbook.
- Get a specific cell through Worksheet.Range[row:int, column:int] property.
- Get the cell formatting through CellRange.Style property, and apply it to another cell through the same property.
- Save the workbook to a different Excel file.
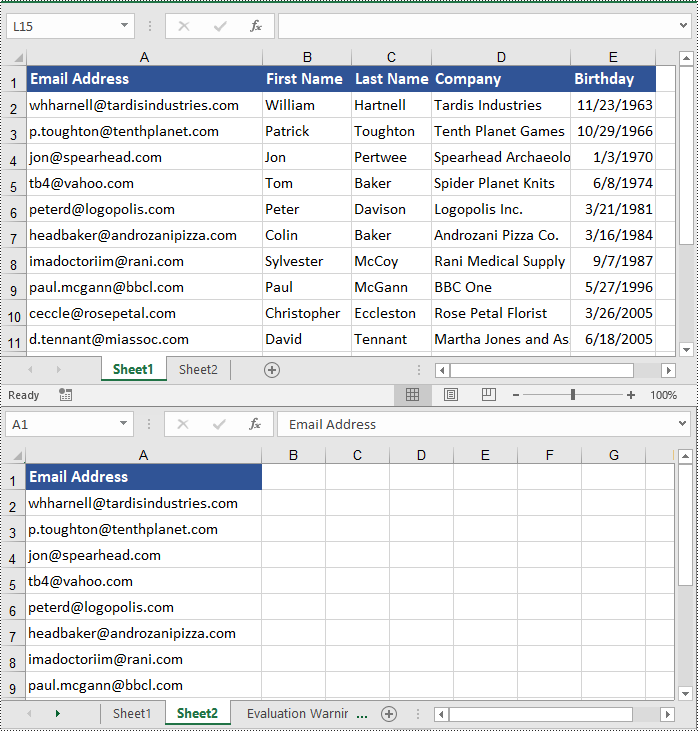
This code example loads an existing Excel document, copies the formatting (style) from the cells in the second column to the cells in the fourth column for rows 2 through 14, and then saves the modified workbook to a new Excel file.
- Python
from spire.xls import *
from spire.xls.common import *

# Create a Workbook object
workbook = Workbook()

# Load an Excel document
workbook.LoadFromFile("C:\\Users\\Administrator\\Desktop\\Input.xlsx")

# Get a specific worksheet
worksheet = workbook.Worksheets[0]

# Loop through the selected rows
for i in range(2, 15):

    # Get style (formatting) of a specific cell
    style = worksheet.Range[i, 2].Style

    # Apply the style to a different cell
    worksheet.Range[i, 4].Style = style

# Save the workbook to file
workbook.SaveToFile("output/CopyFormatting.xlsx",ExcelVersion.Version2016)

# Dispose resources
workbook.Dispose()
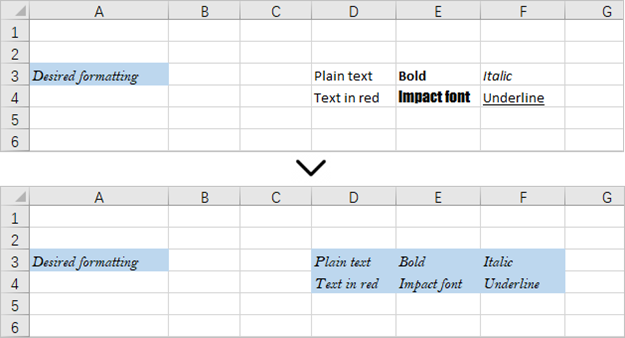
Copy Formatting from One Cell to a Cell Range in Python
Once you get the style (formatting) of a certain cell, you can apply it to a cell rang which is retrieved through the Worksheet.Range[row:int, column:int, endRow:int, endColumn:int] property.
Here are the steps to copy formatting from once cell to a cell range.
- Create a Workbook object.
- Load an Excel document from a give path.
- Get a specific worksheet within the workbook.
- Get a specific cell through Worksheet.Range[row:int, column:int] property.
- Get the formatting of the cell through CellRange.Style property.
- Get a cell range through Worksheet.Range[row:int, column:int, endRow:int, endColumn:int] property.
- Apply the formatting to the cell range through CellRange.Style property.
- Save the workbook to a different Excel file.
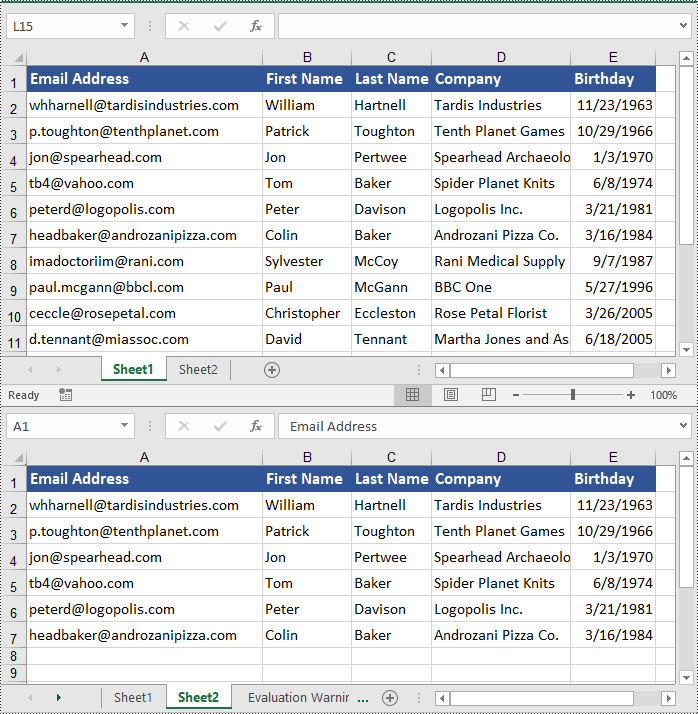
This code example loads an existing Excel document, retrieves the style of a cell located in the third row and first column, and then applies that style to a range of cells from the third row, fourth column to the fourth row, sixth column.
- Python
from spire.xls import *
from spire.xls.common import *

# Create a Workbook object
workbook = Workbook()

# Load an Excel document
workbook.LoadFromFile("C:\\Users\\Administrator\\Desktop\\Input.xlsx")

# Get a specific worksheet
worksheet = workbook.Worksheets[0]

# Get style (formatting) of a specific cell
style = worksheet.Range[3, 1].Style

# Apply the style to a cell range
worksheet.Range[3, 4, 4, 6].Style = style

# Save the workbook to file
workbook.SaveToFile("output/ApplyFormatToCellRange.xlsx",ExcelVersion.Version2016)

# Dispose resources
workbook.Dispose()
Apply for a Temporary License
If you'd like to remove the evaluation message from the generated documents, or to get rid of the function limitations, please request a 30-day trial license for yourself.
Python: Export and Import Data Between Excel Files and Databases
2024-06-28 01:05:53 Written by KoohjiThe ability to export data from Excel files to databases, and vice versa, has become a crucial functionality in data management. Exporting data from an Excel file to a database offers scalability and enhanced security, enabling efficient handling of large datasets and facilitating collaboration with concurrency control. Conversely, importing data from databases into Excel provides the familiar spreadsheet interface for data analysis, visualization, and presentation, making complex information accessible to users. With the powerful Python language, developers can easily automate the transfer of data between databases and spreadsheets.
This article demonstrates how to use Spire.XLS for Python to export data from a database to Excel files and import data from Excel files to a database with simple Python code, taking the SQLite database as the example.
- Export Data from a Database to an Excel File with Python
- Export Data from an Excel Worksheet to a Database with Python
Install Spire.XLS for Python
This scenario requires Spire.XLS for Python and plum-dispatch v1.7.4. They can be easily installed in your Windows through the following pip command.
pip install Spire.XLS
If you are unsure how to install, please refer to: How to Install Spire.XLS for Python on Windows
Export Data from a Database to an Excel File with Python
Spire.XLS for Python offers a range of classes, methods, and properties to create, read, and edit Excel workbooks. Developers can use the sqlite3 module from the Python standard library to read data from databases and utilize Spire.XLS for Python to create Excel files and write data into them, thereby enabling the export of database data to Excel worksheets.
The detailed steps are as follows:
- Connect to a database.
- Create an instance of Workbook class and clear the default worksheets.
- Iterate through the tables in the database to get all the column names and the data in the columns.
- Create a worksheet for each table using Workbook.Worksheets.Add() method, write the column names to the header row of the worksheet, and then write data to other rows through Worksheet.Range[].Value property.
- Format the worksheet.
- Save the workbook using Workbook.SaveToFile() method.
- Python
from spire.xls import *
from spire.xls.common import *
import sqlite3

# Connect to database
conn = sqlite3.connect("Sales Data.db")
cursor = conn.cursor()

# Get all the table names in the database
cursor.execute("SELECT name FROM sqlite_master WHERE type='table';")
tableNames = [name[0] for name in cursor.fetchall()]

# Create an Excel file
workbook = Workbook()
workbook.Worksheets.Clear()

# Iterate through each table in the database
for tableName in tableNames:
    # Get the column names of the table
    cursor.execute(f"PRAGMA table_info('{tableName}')")
    columnsInfo = cursor.fetchall()
    columnNames = [columnInfo[1] for columnInfo in columnsInfo]

    # Get the data of the table
    cursor.execute(f"SELECT * FROM {tableName}")
    rows = cursor.fetchall()

    # Create a worksheet
    sheet = workbook.Worksheets.Add(tableName)

    # Write the header to the worksheet
    for i in range(len(columnNames)):
        sheet.Range[1, i + 1].Value = columnNames[i]

    # Write the data to the worksheet
    for j in range(1, len(rows)):
        column = rows[j]
        for k in range(len(column)):
            sheet.Range[j + 1, k + 1].Value = column[k]

    # Format the worksheet
    sheet.AllocatedRange.Style.Font.FontName = "Times New Roman"
    sheet.AllocatedRange.Style.Font.Size = 12.0
    sheet.AllocatedRange.AutoFitRows()
    sheet.AllocatedRange.AutoFitColumns()

# Save the Excel file
workbook.SaveToFile("output/DataBaseToExcel.xlsx", FileFormat.Version2016)
workbook.Dispose()
conn.close()
Export Data from an Excel Worksheet to a Database with Python
Spire.XLS for Python can also assist developers in reading various types of data from Excel files, and then developers can use sqlite3 to write the data to a database. Below are the detailed steps:
- Create an instance of Workbook class.
- Load an Excel workbook using Workbook.LoadFromFile() method.
- Connect to a database.
- Iterate through the worksheets in the workbook.
- Get a worksheet using Workbook.Worksheets.get_Item() method and get the name of the worksheet using Worksheet.Name property.
- Get the data in the header row through Worksheet.Range[].Value property.
- Create a table in the database with the worksheet name as the table name and create columns in the table with the header row data as the column names.
- Get the values from the worksheet cells through Worksheet.Range[].Value property and write them to the corresponding position in the database table.
- Commit the changes and close the connection.
- Python
from spire.xls import *
from spire.xls.common import *
import sqlite3

# Create an instance of Workbook
workbook = Workbook()

# Load an Excel file
workbook.LoadFromFile("Sample.xlsx")

# Connect to database
conn = sqlite3.connect("output/Report.db")
cursor = conn.cursor()

for s in range(workbook.Worksheets.Count):
    # Get a worksheet
    sheet = workbook.Worksheets.get_Item(s)

    # Get the sheet name
    sheetName = sheet.Name
    sheetName = sheetName.replace(" ", "")

    # Get the data in the header row
    header = []
    for i in range(sheet.AllocatedRange.ColumnCount):
        headerValue = sheet.Range[1, i + 1].Value
        headerValue = headerValue.replace(" ", "")
        header.append(headerValue)

    # Create a database table
    createTableSql = f"CREATE TABLE IF NOT EXISTS {sheetName} ({', '.join([f'{header[i]} TEXT' for i in range(len(header))])})"
    cursor.execute(createTableSql)

    # Insert data into the database table
    for row in range(1, sheet.AllocatedRange.RowCount):
        data = []
        for col in range(sheet.AllocatedRange.ColumnCount):
            # Get the cell value
            value = sheet.Range[row + 1, col + 1].Value
            data.append(value)
        # Insert the cell values into the database table
        insertSql = f"INSERT INTO {sheetName} ({', '.join(header)}) VALUES ({', '.join(['?' for _ in data])})"
        cursor.execute(insertSql, data)

# Commit the changes and close the connection
conn.commit()
conn.close()

workbook.Dispose()
Apply for a Temporary License
If you'd like to remove the evaluation message from the generated documents, or to get rid of the function limitations, please request a 30-day trial license for yourself.
Working with large Excel workbooks can sometimes become unwieldy, especially when you need to share or distribute parts of the data independently. In these cases, it can be helpful to split your Excel file into multiple smaller files. This not only makes the individual files more manageable, but also allows you to better organize and share your data. In this article, we will demonstrate how to split an Excel file in Python using Spire.XLS for Python.
Install Spire.XLS for Python
This scenario requires Spire.XLS for Python and plum-dispatch v1.7.4. They can be easily installed in your Windows through the following pip command.
pip install Spire.XLS
If you are unsure how to install, please refer to this tutorial: How to Install Spire.XLS for Python on Windows
Split Excel by Worksheets in Python
If your Excel file contains multiple worksheets, you can easily split each sheet into an Excel file by using the Workbook.Worksheets.AddCopy() method provided by Spire.XLS for Python. The detailed steps are as follows.
- Create an object of the Workbook class.
- Load an Excel file using Workbook.LoadFromFile() method.
- Iterate through the worksheets in the Excel file.
- For each worksheet, create a new Workbook object for it.
- Remove the default worksheets in the new workbook using Workbook.Worksheets.Clear() method.
- Copy the worksheet to the new workbook using Workbook.Worksheets.AddCopy() method.
- Save the new workbook to an Excel file using Workbook.SaveToFile() method.
- Python
from spire.xls import *
from spire.xls.common import *

# Create an object of the Workbook class
workbook = Workbook()
# Load an Excel file
workbook.LoadFromFile("Sample.xlsx")

# Specify the folder path for the generated Excel files
folderPath = "C:\\Users\\Administrator\\Desktop\\Output\\"

# Iterate through all worksheets in the Excel file
for worksheet in workbook.Worksheets:
    # For each worksheet, create a new Workbook object
    newWorkbook = Workbook()
    # Remove the worksheets from the new workbook
    newWorkbook.Worksheets.Clear()

    # Copy the worksheet from the Excel file to the new workbook
    newWorkbook.Worksheets.AddCopy(worksheet)

    # Save the new workbook to the specified folder
    newWorkbook.SaveToFile(folderPath + worksheet.Name + ".xlsx", FileFormat.Version2016)

workbook.Dispose()
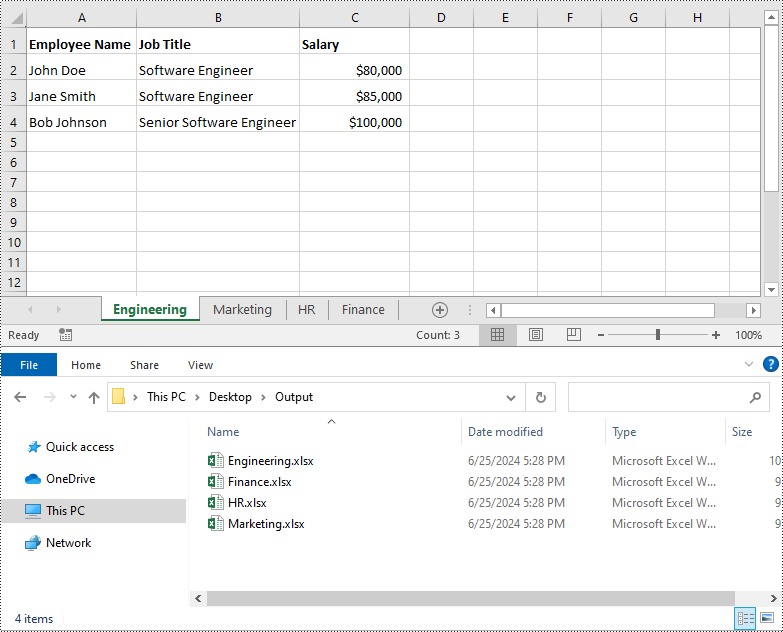
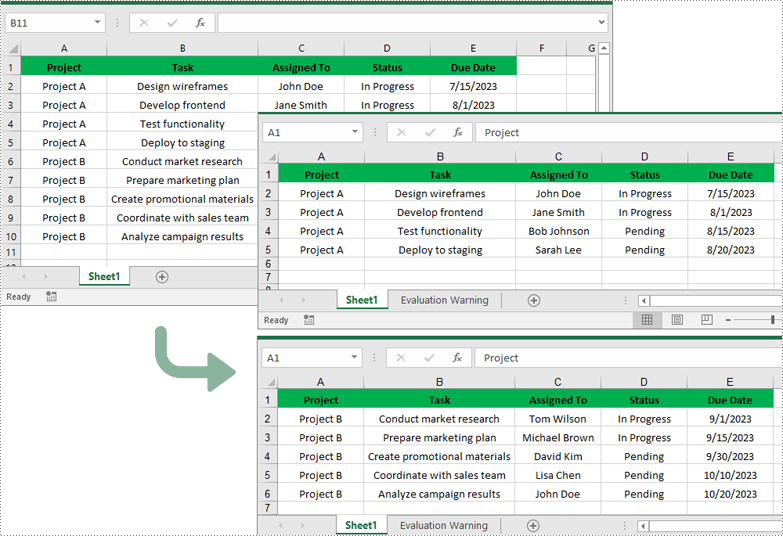
Split Excel by Rows in Python
If you have a large worksheet where a specific number of rows represent a unique record or entry, you can extract these individual rows or records into separate Excel files for focused data analysis using the Worksheet.CopyRow() method. The detailed steps are as follows.
- Create an object of the Workbook class.
- Load an Excel file using Workbook.LoadFromFile() method.
- Get the original worksheet where you want to copy rows from using Workbook.Worksheets[index] property.
- Create a new Workbook object and remove the default worksheets from the new workbook using Workbook.Worksheets.Clear() method.
- Add a new Worksheet to the new workbook using Workbook.Worksheets.Add() method.
- Copy specific rows from the original worksheet to the new worksheet using Worksheet.CopyRow() method.
- Copy Column widths from the original worksheet to the new worksheet.
- Save the new workbook to an Excel file using Workbook.SaveToFile() method.
- Python
from spire.xls import *
from spire.xls.common import *

# Create a Workbook object and load an Excel file
workbook = Workbook()
workbook.LoadFromFile("Sample.xlsx")
# Get the original (the 1st) worksheet
worksheet = workbook.Worksheets[0]
# Get the header row
header = worksheet.Rows[0]

# Specify the folder path for the generated Excel files
folderPath = "C:\\Users\\Administrator\\Desktop\\Output\\"

# Create a new Workbook object
newWorkbook1 = Workbook()
# Remove the default worksheets
newWorkbook1.Worksheets.Clear()
# Add a new worksheet
newWorksheet1 = newWorkbook1.Worksheets.Add("Sheet1")
# Copy rows 1-5 from the original worksheet to the new worksheet
for i in range(1, 6):
    worksheet.CopyRow(worksheet.Rows[i - 1], newWorksheet1, newWorksheet1.LastDataRow + 1, CopyRangeOptions.All)
# Copy column widths from the original worksheet to the new worksheet
for i in range(worksheet.Columns.Count):
    newWorksheet1.SetColumnWidth(i + 1, worksheet.GetColumnWidth(i + 1))
# Save the new workbook to the specified folder
newWorkbook1.SaveToFile(folderPath + "Rows1-5.xlsx", FileFormat.Version2016)
newWorkbook1.Dispose()

# Create a new Workbook object
newWorkbook2 = Workbook()
# Remove the default worksheets
newWorkbook2.Worksheets.Clear()
# Add a new worksheet
newWorksheet2 = newWorkbook2.Worksheets.Add("Sheet1")
# Copy header row from the original worksheet to the new worksheet
worksheet.CopyRow(worksheet.Rows[0], newWorksheet2, newWorksheet2.LastDataRow + 1, CopyRangeOptions.All)
# Copy rows 6-10 from the original worksheet to the new worksheet
for i in range(6, 11):
    worksheet.CopyRow(worksheet.Rows[i - 1], newWorksheet2, newWorksheet2.LastDataRow + 1, CopyRangeOptions.All)
# Copy column widths from the original worksheet to the new worksheet
for i in range(worksheet.Columns.Count):
    newWorksheet2.SetColumnWidth(i + 1, worksheet.GetColumnWidth(i + 1))
# Save the new workbook to the specified folder
newWorkbook2.SaveToFile(folderPath + "Rows6-10.xlsx", FileFormat.Version2016)
newWorkbook2.Dispose()
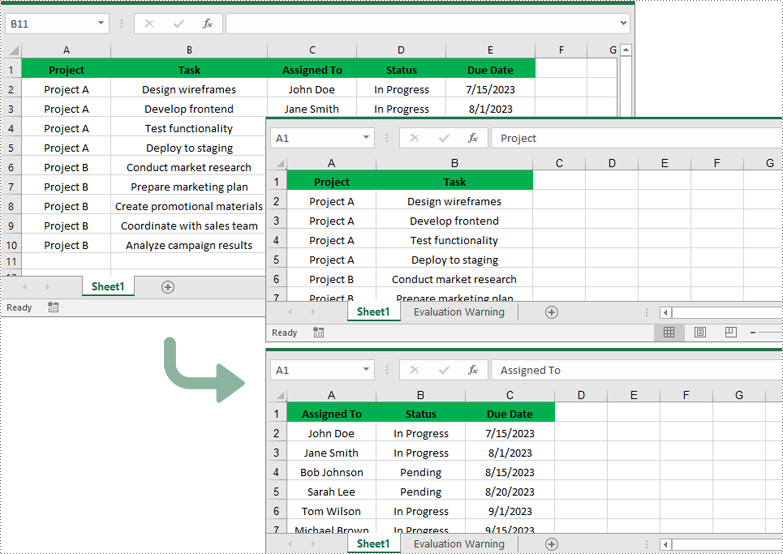
Split Excel by Columns in Python
In addition to splitting by rows, you can also split an Excel file by columns using the Worksheet.CopyColumn() method. The detailed steps are as follows.
- Create an object of the Workbook class.
- Load an Excel file using Workbook.LoadFromFile() method.
- Get the original worksheet where you want to copy columns from using Workbook.Worksheets[index] property.
- Create a new Workbook object and remove the default worksheets from the new workbook using Workbook.Worksheets.Clear() method.
- Add a new Worksheet to the new workbook using Workbook.Worksheets.Add() method.
- Copy specific columns from the original worksheet to the new worksheet using Worksheet.CopyColumn() method.
- Copy row heights from the original worksheet to the new worksheet.
- Save the new workbook to an Excel file using Workbook.SaveToFile() method.
- Python
from spire.xls import *
from spire.xls.common import *

# Create a Workbook object and load an Excel file
workbook = Workbook()
workbook.LoadFromFile("Sample.xlsx")
# Get the original (the 1st) worksheet
worksheet = workbook.Worksheets[0]

# Specify the folder path for the generated Excel files
folderPath = "C:\\Users\\Administrator\\Desktop\\Output\\"

# Create a new Workbook object
newWorkbook1 = Workbook()
# Remove the default worksheets
newWorkbook1.Worksheets.Clear()
# Add a new worksheet
newWorksheet1 = newWorkbook1.Worksheets.Add("Sheet1")
# Copy columns 1-2 from the original worksheet to the new worksheet
for i in range(1, 3):
    worksheet.CopyColumn(worksheet.Columns[i-1], newWorksheet1, newWorksheet1.LastDataColumn + 1, CopyRangeOptions.All)
# Copy row heights from the original worksheet to the new worksheet
for i in range(worksheet.Rows.Count):
    newWorksheet1.SetRowHeight(i + 1, worksheet.GetRowHeight(i + 1))
# Save the new workbook to the specified folder
newWorkbook1.SaveToFile(folderPath + "Columns1-2.xlsx", FileFormat.Version2016)
newWorkbook1.Dispose()

# Create a new Workbook object
newWorkbook2 = Workbook()
# Remove the default worksheets
newWorkbook2.Worksheets.Clear()
# Add a new worksheet
newWorksheet2 = newWorkbook2.Worksheets.Add("Sheet1")
# Copy columns 3-5 from the original worksheet to the new worksheet
for i in range(3, 6):
    worksheet.CopyColumn(worksheet.Columns[i-1], newWorksheet2, newWorksheet2.LastDataColumn + 1, CopyRangeOptions.All)

# Copy row heights from the original worksheet to the new worksheet
for i in range(worksheet.Rows.Count):
    newWorksheet2.SetRowHeight(i + 1, worksheet.GetRowHeight(i + 1))
# Save the new workbook to the specified folder
newWorkbook2.SaveToFile(folderPath + "Columns3-5.xlsx", FileFormat.Version2016)
newWorkbook2.Dispose()
Apply for a Temporary License
If you'd like to remove the evaluation message from the generated documents, or to get rid of the function limitations, please request a 30-day trial license for yourself.
When working with large amounts of information, the ability to quickly sort data can be very beneficial at times. By arranging data in ascending, descending, or customized order, users can easily spot trends, analyze relationships, and extract valuable insights. In this article, you will learn how to sort columns or rows in Excel in Python using Spire.XLS for Python.
- Sort By Columns in Excel in Python
- Sort By Custom List in Excel in Python
- Sort By Rows in Excel in Python
Install Spire.XLS for Python
This scenario requires Spire.XLS for Python and plum-dispatch v1.7.4. They can be easily installed in your Windows through the following pip command.
pip install Spire.XLS
If you are unsure how to install, please refer to this tutorial: How to Install Spire.XLS for Python on Windows
Sort By Columns in Excel in Python
The Workbook.DataSorter.SortColumns.Add(key: int, sortComparsionType: SortComparsionType, orderBy: OrderBy) method provided by Spire.XLS for Python allows users to sort data based on different criteria. For example, you can sort cell values, cell colors or font colors in ascending, descending, or other order.
The following are the steps to sort the values in a specified column:
- Create a Workbook instance.
- Load an Excel file using Workbook.LoadFromFile() method.
- Get a specified worksheet using Workbook.Worksheets[] property.
- Specify the sorting mode using Workbook.DataSorter.SortColumns.Add() method.
- Sort data in a specified cell range using Workbook.DataSorter.Sort() method.
- Save the result file using Workbook.SaveToFile() method.
- Python
from spire.xls.common import *
from spire.xls import *

# Create a Workbook instance
workbook = Workbook()

# Load an Excel file
workbook.LoadFromFile("Budget.xlsx")

# Get the first worksheet
worksheet = workbook.Worksheets[0]

# Sort values in the specified column in ascending order
workbook.DataSorter.SortColumns.Add(0, SortComparsionType.Values, OrderBy.Ascending)

# Sort in the specified cell range
workbook.DataSorter.Sort(worksheet["A1:E7"])

# Save the result file
workbook.SaveToFile("SortByColumns.xlsx", ExcelVersion.Version2016)
workbook.Dispose()
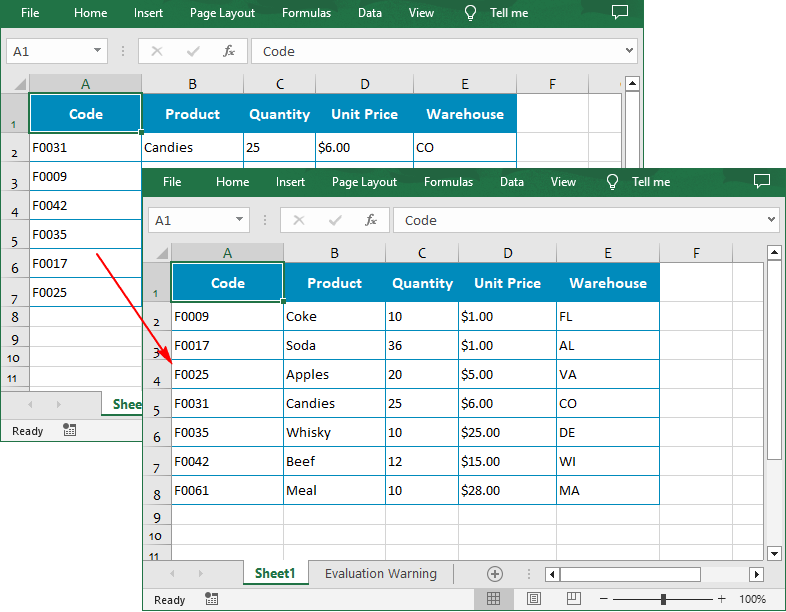
Sort By Custom List in Excel in Python
You can also create a custom list and then sort data based on it using the Workbook.DataSorter.SortColumns.Add(key: int, customSortOrder: List[str]) method.
The following are the steps to sort data using a custom list:
- Create a Workbook instance.
- Load an Excel file using Workbook.LoadFromFile() method.
- Get a specified worksheet using Workbook.Worksheets[] property.
- Create a custom sort list, and then sort a specified column using it though Workbook.DataSorter.SortColumns.Add() method.
- Sort data in a specified cell range using Workbook.DataSorter.Sort() method.
- Save the result file using Workbook.SaveToFile() method.
- Python
from spire.xls.common import *
from spire.xls import *
# Create a Workbook instance
workbook = Workbook()
# Load an Excel file
workbook.LoadFromFile("Budget.xlsx")
# Get the first worksheet
worksheet = workbook.Worksheets[0]
# Create a custom sort list
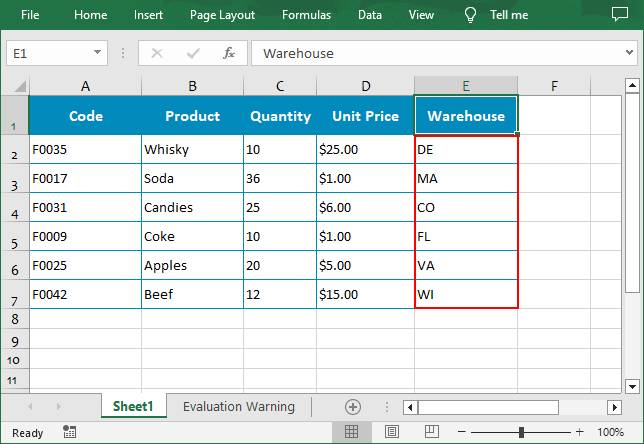
customList = ["DE","MA", "CO", "FL", "VA", "WI"]
# Sort a specified column using the custom list
workbook.DataSorter.SortColumns.Add(4, customList )
# Sort in the specified cell range
workbook.DataSorter.Sort(worksheet["A1:E7"])
# Save the result file
workbook.SaveToFile("CustomSortList.xlsx", ExcelVersion.Version2016)
workbook.Dispose()
Sort By Rows in Excel in Python
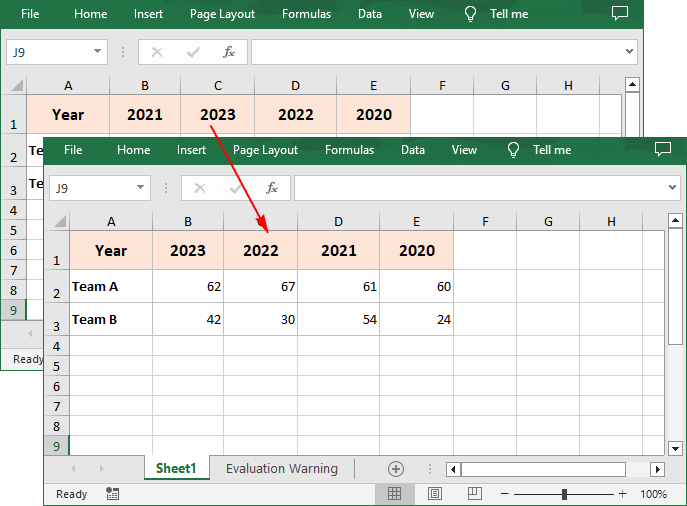
To sort a specified row in Excel, you need to set the sort orientation to LeftToRight, specify the sort mode and sort row data accordingly.
The following are the steps to sort the values in a specified row:
- Create a Workbook instance.
- Load an Excel file using Workbook.LoadFromFile() method.
- Get a specified worksheet using Workbook.Worksheets[] property.
- Set whether to include titles when sorting using Workbook.DataSorter.IsIncludeTitle property.
- Set the sort orientation using Workbook.DataSorter.Orientation property.
- Specify the sorting mode, and then sort data in the first row using Workbook.DataSorter.Sort(Worksheet.Rows[0]) method.
- Save the result file using Workbook.SaveToFile() method.
- Python
from spire.xls.common import *
from spire.xls import *

# Create a Workbook instance
workbook = Workbook()

# Load an Excel file
workbook.LoadFromFile("Year.xlsx")

# Get the first worksheet
sheet = workbook.Worksheets[0]

# Set whether to include titles when sorting
workbook.DataSorter.IsIncludeTitle = True

# Set the sort orientation
workbook.DataSorter.Orientation = SortOrientationType.LeftToRight

# Specify the sorting mode
workbook.DataSorter.SortColumns.Add(0,SortComparsionType.Values,OrderBy.Descending)

# Sort data in the first row
workbook.DataSorter.Sort(sheet.Rows[0])

# Save the result file
workbook.SaveToFile("SortByRows.xlsx", ExcelVersion.Version2016)
workbook.Dispose()
Apply for a Temporary License
If you'd like to remove the evaluation message from the generated documents, or to get rid of the function limitations, please request a 30-day trial license for yourself.
Setting the number format for cells in Excel worksheets is crucial for data management and presentation, which enhances readability, ensures consistency, and facilitates accurate data analysis. Proper number formatting allows users to distinguish between different types of numerical data, such as currency, percentages, dates, and scientific notations, making complex datasets more comprehensible at a glance. In this article, we will explore how to automate the process of setting the number format for cells in Excel worksheets with Spire.XLS for Python in Python programs.
Install Spire.XLS for Python
This scenario requires Spire.XLS for Python and plum-dispatch v1.7.4. They can be easily installed in your Windows through the following pip command.
pip install Spire.XLS
If you are unsure how to install, please refer to: How to Install Spire.XLS for Python on Windows
Set the Number Format for Cells in Excel Worksheets
In an Excel workbook, the number format of a cell is determined by its format code. Developers can utilize various symbols in format code to define how numerical data, date and time, currency, etc. are displayed. Below are some commonly used symbols in number format codes:
- #: Represents a digit placeholder that displays only non-zero digits.
- 0: Represents a digit placeholder and always occupies at least one position.
- ; (semicolon): Separates formats for positive numbers, negative numbers, and zero.
- / (slash): In date formats, separates year, month, and day.
- $: Currency symbol, used for representing monetary values, adaptable to system regional settings.
- () (parentheses): Formats negative numbers by enclosing them in parentheses.
- [ ] (square brackets): Utilized in conditional formatting, such as color settings [Red] or conditions like [<=100]"Low";[>100]"High".
Spire.XLS for Python provides the CellRange.NumberValue property to set the number value of a cell and the CellRange.NumberFormat property to set the number format with format code. Below are the steps for setting the number format for cells in Excel worksheets with Python:
- Create an instance of Workbook class to create an Excel workbook.
- Get the first default worksheet using Workbook.Worksheets.get_Item() method.
- Add text to header row through Worksheet.Range[].Text property.
- Add number value to cells through Worksheet.Range[].NumberValue property and set the number format for the cells with format code through Worksheet.Range[].NumberFormat property.
- Save the Excel workbook using Workbook.SaveToFile() method.
- Python
from spire.xls import *
from spire.xls.common import *
# Create an instance of Workbook
workbook = Workbook()
# Get the first worksheet
sheet = workbook.Worksheets.get_Item(0)
# Set the header row
sheet.Range["B9"].Text = "Number Format"
sheet.Range["C9"].Text = "Value"
sheet.Range["D9"].Text = "Display"
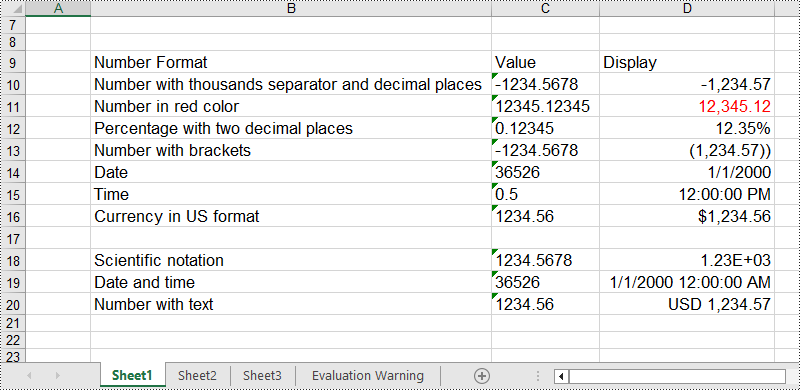
# Number with thousands separator and decimal places
sheet.Range["B10"].Text = "Number with thousands separator and decimal places"
sheet.Range["C10"].Text = "-1234.5678"
sheet.Range["D10"].NumberValue = -1234.5678
sheet.Range["D10"].NumberFormat = "#,##0.00"
# Number in red color
sheet.Range["B11"].Text = "Number in red color"
sheet.Range["C11"].Text = "12345.12345"
sheet.Range["D11"].NumberValue = 12345.12345
sheet.Range["D11"].NumberFormat = "[Red]#,##0.00"
# Percentage with two decimal places
sheet.Range["B12"].Text = "Percentage with two decimal places"
sheet.Range["C12"].Text = "0.12345"
sheet.Range["D12"].NumberValue = 0.12345
sheet.Range["D12"].NumberFormat = "0.00%"
# Number with brackets
sheet.Range["B13"].Text = "Number with brackets"
sheet.Range["C13"].Text = "-1234.5678"
sheet.Range["D13"].NumberValue = -1234.5678
sheet.Range["D13"].NumberFormat = "(#,##0.00;(#,##0.00))"
# Date
sheet.Range["B14"].Text = "Date"
sheet.Range["C14"].Text = "36526"
sheet.Range["D14"].NumberValue = 36526
sheet.Range["D14"].NumberFormat = "m/d/yyyy"
# Time
sheet.Range["B15"].Text = "Time"
sheet.Range["C15"].Text = "0.5"
sheet.Range["D15"].NumberValue = 0.5
sheet.Range["D15"].NumberFormat = "h:mm:ss AM/PM"
# Currency in US format
sheet.Range["B16"].Text = "Currency in US format"
sheet.Range["C16"].Text = "1234.56"
sheet.Range["D16"].NumberValue = 1234.56
sheet.Range["D16"].NumberFormat = "$#,##0.00"
# Scientific notation
sheet.Range["B18"].Text = "Scientific notation"
sheet.Range["C18"].Text = "1234.5678"
sheet.Range["D18"].NumberValue = 1234.5678
sheet.Range["D18"].NumberFormat = "0.00E+00"
# Date and time
sheet.Range["B19"].Text = "Date and time"
sheet.Range["C19"].Text = "36526"
sheet.Range["D19"].NumberValue = 36526
sheet.Range["D19"].NumberFormat = "m/d/yyyy h:mm:ss AM/PM"
# Number with text
sheet.Range["B20"].Text = "Number with text"
sheet.Range["C20"].Text = "1234.56"
sheet.Range["D20"].NumberValue = 1234.5678
sheet.Range["D20"].NumberFormat = "\"USD \"#,##0.00"
# Set the font size and autofit rows and columns
sheet.AllocatedRange.Style.Font.Size = 13
sheet.AllocatedRange.AutoFitRows()
sheet.AllocatedRange.AutoFitColumns()
# Save the file
workbook.SaveToFile("output/SetNumberFormatExcel.xlsx", FileFormat.Version2016)
workbook.Dispose()
Apply for a Temporary License
If you'd like to remove the evaluation message from the generated documents, or to get rid of the function limitations, please request a 30-day trial license for yourself.
Copying data in Excel is a fundamental feature that allows you to quickly and efficiently reproduce data. It can be especially valuable when building spreadsheets with similar structures, or needing to propagate the same information across multiple areas of your workbook. By mastering the art of copying in Excel, you can boost your productivity and reduce the risk of manual data entry errors. In this article, we will explain how to copy rows, columns and cells in Excel in Python using Spire.XLS for Python.
Install Spire.XLS for Python
This scenario requires Spire.XLS for Python and plum-dispatch v1.7.4. They can be easily installed in your Windows through the following pip command.
pip install Spire.XLS
If you are unsure how to install, please refer to this tutorial: How to Install Spire.XLS for Python on Windows
Copy Rows in Excel in Python
You can use the Worksheet.CopyRow(sourceRow, destSheet, destRowIndex, copyOptions) method provided by Spire.XLS for Python to easily copy a row in the same or between different worksheets in Excel. The detailed steps are as follows.
- Create an object of the Workbook class.
- Load an Excel file using the Workbook.LoadFromFile() method.
- Get the source worksheet and the destination worksheet using the Workbook.Worksheets[index] property.
- Get the desired row that you want to copy using the Worksheet.Rows[index] property.
- Copy the row and its format from the source worksheet to the destination worksheet using the Worksheet.CopyRow(sourceRow, destSheet, destRowIndex, copyOptions) method.
- Copy the column widths of cells in the source row to the corresponding cells in the destination row.
- Save the workbook to a file using the Workbook.SaveToFile() method.
- Python
from spire.xls import *
from spire.xls.common import *
# Create a Workbook object
workbook = Workbook()
# Load an Excel file
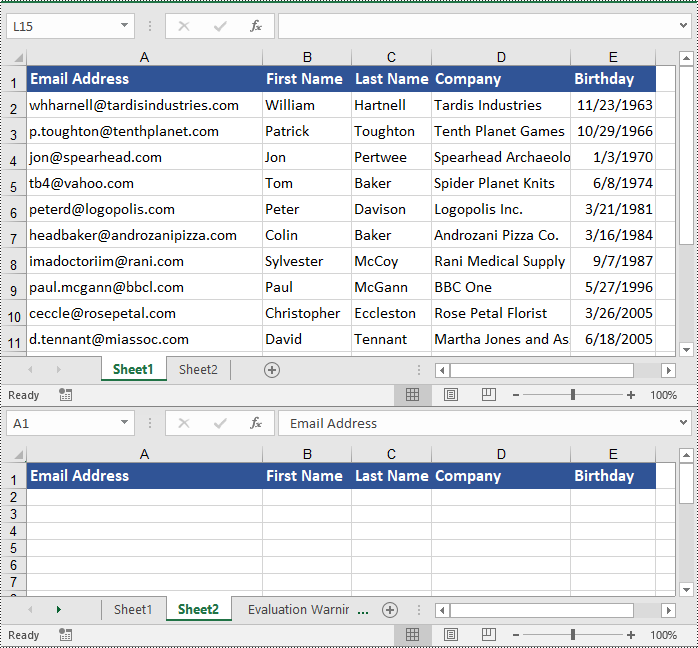
workbook.LoadFromFile("ContactList.xlsx")
# Get the source worksheet
sheet1 = workbook.Worksheets[0]
# Get the destination worksheet
sheet2 = workbook.Worksheets[1]
# Get the desired row that you want to copy
row = sheet1.Rows[0]
# Copy the row from the source worksheet to the first row of the destination worksheet
sheet1.CopyRow(row, sheet2, 1, CopyRangeOptions.All)
columns = sheet1.Columns.Length
# Copy the column widths of the cells in the source row to the corresponding cells in the destination row
for i in range(columns):
column_width = row.Columns[i].ColumnWidth
sheet2.Rows[0].Columns[i].ColumnWidth = column_width
# Save the workbook to a file
workbook.SaveToFile("CopyRow.xlsx", ExcelVersion.Version2016)
workbook.Dispose()
Copy Columns in Excel in Python
To copy a column in an Excel worksheet, you can use the Worksheet.CopyColumn(sourceColumn, destSheet, destColIndex, copyOptions) method. The detailed steps are as follows.
- Create an object of the Workbook class.
- Load an Excel file using the Workbook.LoadFromFile() method.
- Get the source worksheet and the destination worksheet using the Workbook.Worksheets[index] property.
- Get the desired column that you want to copy using the Worksheet.Columns[index] property.
- Copy the column and its format from the source worksheet to the destination worksheet using the Worksheet.CopyColumn(sourceColumn, destSheet, destColIndex, copyOptions) method.
- Copy the row heights of cells in the source column to the corresponding cells in the destination column.
- Save the workbook to a file using the Workbook.SaveToFile() method.
- Python
from spire.xls import *
from spire.xls.common import *

# Create a Workbook object
workbook = Workbook()
# Load an Excel file
workbook.LoadFromFile("ContactList.xlsx")

# Get the source worksheet
sheet1 = workbook.Worksheets[0]
# Get the destination worksheet
sheet2 = workbook.Worksheets[1]

# Get the desired column that you want to copy
column = sheet1.Columns[0]

# Copy the column from the source worksheet to the first column of the destination worksheet
sheet1.CopyColumn(column, sheet2, 1, CopyRangeOptions.All)

rows = column.Rows.Length
# Copy the row heights of cells in the source column to the corresponding cells in the destination column
for i in range(rows):
    row_height = column.Rows[i].RowHeight
    sheet2.Columns[0].Rows[i].RowHeight = row_height

# Save the workbook to a file
workbook.SaveToFile("CopyColumn.xlsx", ExcelVersion.Version2016)
workbook.Dispose()
Copy Cells in Excel in Python
In addition to copying entire rows and columns, you are also able to copy an individual cell or a range of cells using the CellRange.Copy(destRange, copyOptions) method. The detailed steps are as follows.
- Create an object of the Workbook class.
- Load an Excel file using the Workbook.LoadFromFile() method.
- Get the source worksheet and the destination worksheet using the Workbook.Worksheets[index] property.
- Get the source cell range and the destination cell range using the Worksheet.Range[] property.
- Copy the source cell range and its format from the source worksheet to the destination cell range in the destination worksheet using the CellRange.Copy(destRange, copyOptions) method.
- Copy the row heights and column widths of the source cell range to the destination cell range.
- Save the workbook to a file using the Workbook.SaveToFile() method.
- Python
from spire.xls import *
from spire.xls.common import *

# Create a Workbook object
workbook = Workbook()
# Load an Excel file
workbook.LoadFromFile("ContactList.xlsx")

# Get the source worksheet
sheet1 = workbook.Worksheets[0]
# Get the destination worksheet
sheet2 = workbook.Worksheets[1]

# Get the source cell range
range1 = sheet1.Range["A1:E7"]
# Get the destination cell range
range2 = sheet2.Range["A1:E7"]

# Copy the source cell range from the source worksheet to the destination cell range in the destination worksheet
range1.Copy(range2, CopyRangeOptions.All)

# Copy the row heights and column widths of the source cell range to the destination cell range
for i, row in enumerate(range1.Rows):
    for j, column in enumerate(row.Columns):
        range2.Rows[i].Columns[j].ColumnWidth = column.ColumnWidth
        range2.Rows[i].RowHeight = row.RowHeight

# Save the workbook to a file
workbook.SaveToFile("CopyCells.xlsx", ExcelVersion.Version2016)
workbook.Dispose()
Apply for a Temporary License
If you'd like to remove the evaluation message from the generated documents, or to get rid of the function limitations, please request a 30-day trial license for yourself.
Drop-down lists in Excel worksheets are an indispensable tool for enhancing data accuracy, efficiency, and usability in spreadsheet management. By offering pre-defined options within a cell, they not only streamline data entry processes but also enforce consistency, reducing the likelihood of input errors. This feature is particularly valuable when working with large datasets or collaborative projects where maintaining uniformity across multiple entries is crucial. This article demonstrates how to create customized drop-down lists within Excel worksheets using Spire.XLS for Python, empowering users to create organized and user-friendly worksheets.
- Create Drop-Down Lists Based on Cell Values Using Python
- Create Drop-Down Lists Based on Strings Using Python
Install Spire.XLS for Python
This scenario requires Spire.XLS for Python and plum-dispatch v1.7.4. They can be easily installed in your Windows through the following pip command.
pip install Spire.XLS
If you are unsure how to install, please refer to: How to Install Spire.XLS for Python on Windows
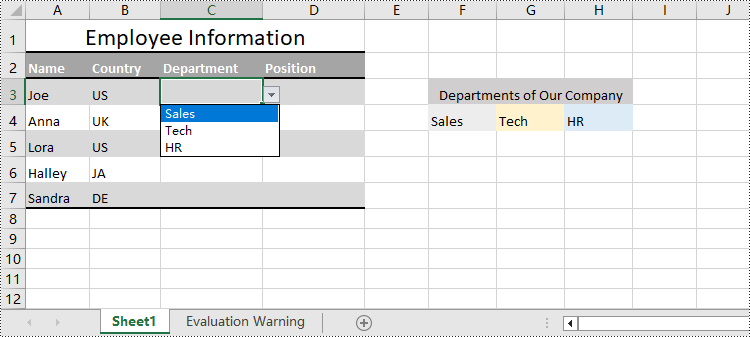
Create Drop-Down Lists Based on Cell Values Using Python
In Excel worksheets, creating drop-down lists is accomplished through the data validation feature. With Spire.XLS for Python, developers can use the CellRange.DataValidation.DataRange property to create drop-down lists within cells and use the data from the specified cell range as list options.
The detailed steps for creating a drop-down list based on cell values are as follows:
- Create an instance of Workbook class.
- Load an Excel file using Workbook.LoadFromFile() method.
- Get a worksheet using Workbook.Worksheets.get_Item() method.
- Get a specific cell range through Worksheet.Range[] property.
- Set the data range for data validation of the cell range through CellRange.DataValidation.DataRange property to create drop-down lists with cell values.
- Save the workbook using Workbook.SaveToFile() method.
- Python
from spire.xls import *
from spire.xls.common import *

# Create an instance of Workbook
workbook = Workbook()

# Load an Excel file
workbook.LoadFromFile("Sample.xlsx")

# Get the first worksheet
sheet = workbook.Worksheets.get_Item(0)

# Get a specific cell range
cellRange = sheet.Range["C3:C7"]

# Set the data range for data validation to create drop-down lists in the cell range
cellRange.DataValidation.DataRange = sheet.Range["F4:H4"]

# Save the workbook
workbook.SaveToFile("output/DropDownListExcel.xlsx", FileFormat.Version2016)
workbook.Dispose()
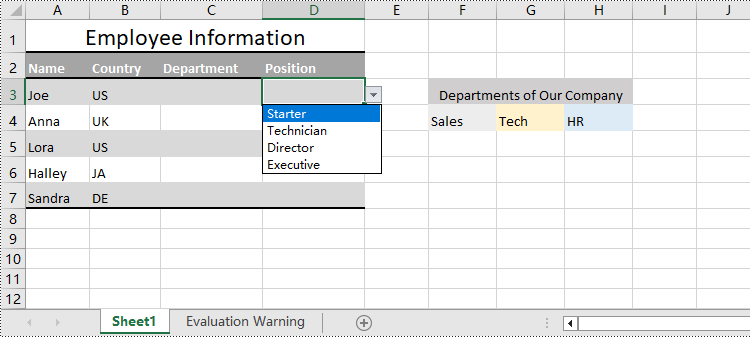
Create Drop-Down Lists Based on String Using Python
Spire.XLS for Python also provides the CellRange.DataValidation.Values property to create drop-down lists in cells directly using string lists.
The detailed steps for creating drop-down lists based on values are as follows:
- Create an instance of Workbook class.
- Load an Excel file using Workbook.LoadFromFile() method.
- Get a worksheet using Workbook.Worksheets.get_Item() method.
- Get a specific cell range through Worksheet.Range[] property.
- Set a string list as the values of data validation in the cell range through CellRange.DataValidation.Values property to create drop-down lists based on strings.
- Save the workbook using Workbook.SaveToFile() method.
- Python
from spire.xls import *
from spire.xls.common import *

# Create an instance of Workbook
workbook = Workbook()

# Load an Excel file
workbook.LoadFromFile("Sample.xlsx")

# Get the first worksheet
sheet = workbook.Worksheets.get_Item(0)

# Get a cell range
cellRange = sheet.Range["D3:D7"]

# Set the value for data validation to create drop-down lists
cellRange.DataValidation.Values = ["Starter", "Technician", "Director", "Executive"]

# Save the workbook
workbook.SaveToFile("output/ValueDropDownListExcel.xlsx", FileFormat.Version2016)
workbook.Dispose()
Apply for a Temporary License
If you'd like to remove the evaluation message from the generated documents, or to get rid of the function limitations, please request a 30-day trial license for yourself.
Excel files often contain a wealth of comments that can provide valuable context and insights. These comments may include important text notes, instructions, or even embedded images that can be incredibly useful for various data analysis and reporting tasks. Extracting this information from the comments can be a valuable step in unlocking the full potential of the data. In this article, we will demonstrate how to effectively extract text and images from comments in Excel files in Python using Spire.XLS for Python.
Install Spire.XLS for Python
This scenario requires Spire.XLS for Python and plum-dispatch v1.7.4. They can be easily installed in your Windows through the following pip command.
pip install Spire.XLS
If you are unsure how to install, please refer to this tutorial: How to Install Spire.XLS for Python on Windows
Extract Text from Comments in Excel in Python
You can get the text of comments using the ExcelCommentObject.Text property. The detailed steps are as follows.
- Create an object of the Workbook class.
- Load an Excel file using Workbook.LoadFromFile() method.
- Create a list to store the extracted comment text.
- Get the comments in the worksheet using Worksheet.Comments property.
- Traverse through the comments.
- Get the text of each comment using ExcelCommentObject.Text property and append it to the list.
- Save the content of the list to a text file.
- Python
from spire.xls import *
from spire.xls.common import *

# Create a Workbook object
workbook = Workbook()

# Load an Excel file
workbook.LoadFromFile("Comments.xlsx")

# Get the first worksheet
worksheet = workbook.Worksheets[0]

# Create a list to store the comment text
comment_text = []

# Get all the comments in the worksheet
comments = worksheet.Comments

# Extract the text from each comment and add it to the list
for i, comment in enumerate(comments, start=1):
    comment_text.append(f"Comment {i}:")
    text = comment.Text
    comment_text.append(text)
    comment_text.append("")

# Write the comment text to a file
with open("comments.txt", "w", encoding="utf-8") as file:
    file.write("\n".join(comment_text))
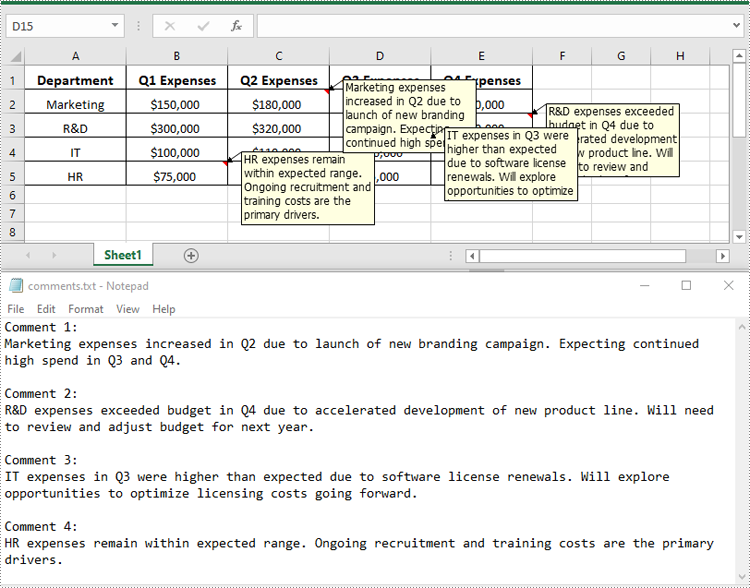
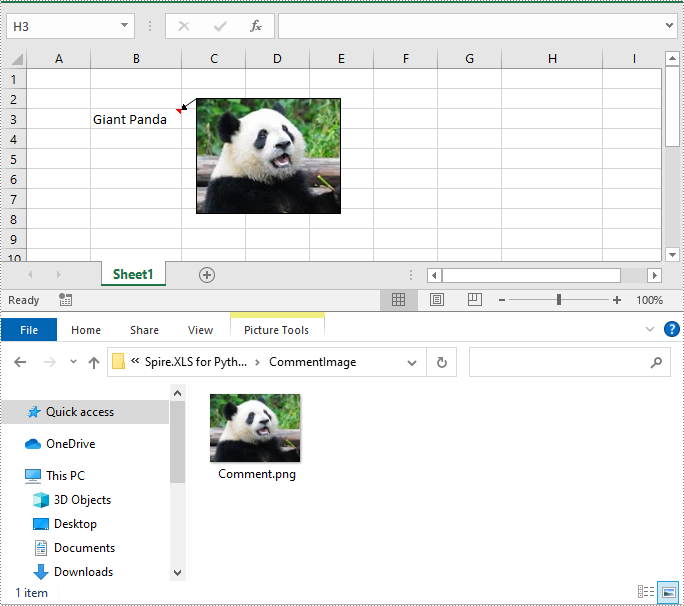
Extract Images from Comments in Excel in Python
To get the images embedded in Excel comments, you can use the ExcelCommentObject.Fill.Picture property. The detailed steps are as follows.
- Create an object of the Workbook class.
- Load an Excel file using Workbook.LoadFromFile() method.
- Get a specific comment in the worksheet using Worksheet.Comments[index] property.
- Get the embedded image in the comment using ExcelCommentObject.Fill.Picture property.
- Save the image to an image file.
- Python
from spire.xls import *
from spire.xls.common import *

# Create a Workbook object
workbook = Workbook()

# Load an Excel file
workbook.LoadFromFile("ImageComment.xlsx")

# Get the first worksheet
worksheet = workbook.Worksheets[0]

# Get a specific comment in the worksheet
comment = worksheet.Comments[0]

# Extract the image from the comment and save it to an image file
image = comment.Fill.Picture
image.Save("CommentImage/Comment.png")
Apply for a Temporary License
If you'd like to remove the evaluation message from the generated documents, or to get rid of the function limitations, please request a 30-day trial license for yourself.
Excel has been a widely used tool for data organization and analysis for many years. Over time, Microsoft has introduced different file formats for storing Excel data, the most common being the older XLS format and the more modern XLSX format.
The XLS format, introduced in the late 1990s, had certain limitations, such as a file size limit of 65,536 rows and 256 columns, and a maximum of 65,000 unique styles. The XLSX format, introduced in 2007, addressed these limitations by allowing for larger file sizes, more rows and columns, and expanded style capabilities. While XLSX is now the standard format, there are still many existing XLS files that need to be accessed and used, which makes the ability to convert between these formats an essential skill. In this article, we will explain how to convert Excel XLS to XLSX and vice versa in Python using Spire.XLS for Python.
Install Spire.XLS for Python
This scenario requires Spire.XLS for Python and plum-dispatch v1.7.4. They can be easily installed in your Windows through the following pip command.
pip install Spire.XLS
If you are unsure how to install, please refer to this tutorial: How to Install Spire.XLS for Python on Windows
Convert XLSX to XLS in Python
To convert an XLSX file to XLS format, you can use the Workbook.SaveToFile(fileName, ExcelVersion.Version97to2003) method. The ExcelVersion.Version97to2003 parameter specifies that the workbook should be saved in the Excel 97-2003 (XLS) format. The detailed steps are as follows.
- Create an object of the Workbook class.
- Load an XLSX file using the Workbook.LoadFromFile() method.
- Save the XLSX file to XLS format using the Workbook.SaveToFile(fileName, ExcelVersion.Version97to2003) method.
- Python
from spire.xls import *
from spire.xls.common import *

# Specify the input and output file paths
inputFile = "Sample1.xlsx"
outputFile = "XlsxToXls.xls"

# Create a Workbook object
workbook = Workbook()
# Load the XLSX file
workbook.LoadFromFile(inputFile)

# Save the XLSX file to XLS format
workbook.SaveToFile(outputFile, ExcelVersion.Version97to2003)
workbook.Dispose()
Convert XLS to XLSX in Python
To convert an XLS file to XLSX format, you need to specify the target Excel version to a version higher than 97-2003, such as 2007 (ExcelVersion.Version2007), 2010 (ExcelVersion.Version2010), 2013 (ExcelVersion.Version2013), or 2016 (ExcelVersion.Version2016). The detailed steps are as follows.
- Create an object of the Workbook class.
- Load an XLS file using the Workbook.LoadFromFile() method.
- Save the XLS file to an Excel 2016 (XLSX) file using the Workbook.SaveToFile(fileName, ExcelVersion.Version2016) method.
- Python
from spire.xls import *
from spire.xls.common import *

# Specify the input and output file paths
inputFile = "Sample2.xls"
outputFile = "XlsToXlsx.xlsx"

# Create a Workbook object
workbook = Workbook()
# Load the XLS file
workbook.LoadFromFile(inputFile)

# Save the XLS file to XLSX format
workbook.SaveToFile(outputFile, ExcelVersion.Version2016)
workbook.Dispose()
Apply for a Temporary License
If you'd like to remove the evaluation message from the generated documents, or to get rid of the function limitations, please request a 30-day trial license for yourself.
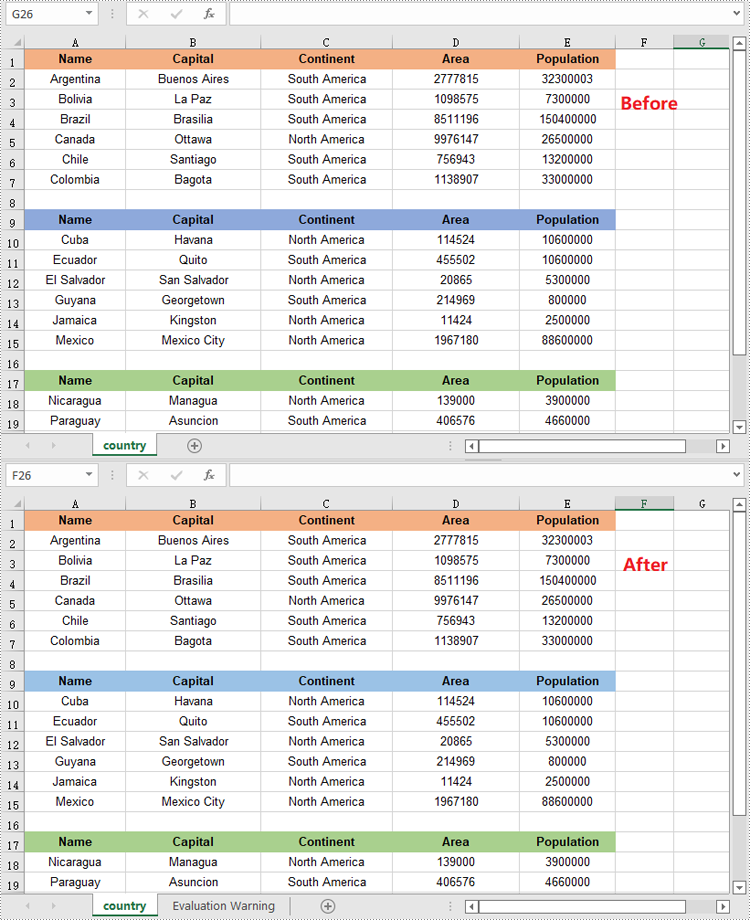
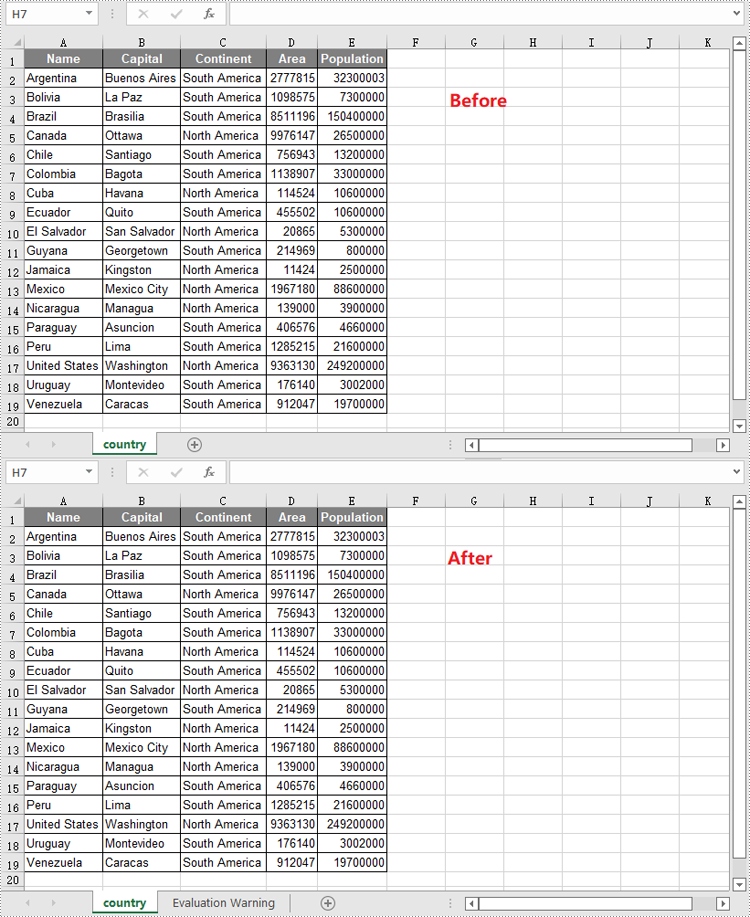
Reordering columns or rows in Excel is a simple process that allows you to change the arrangement of data within your spreadsheet. This can be useful for better organizing your data or aligning it with other columns or rows. You can reorder by using drag-and-drop, cut and paste, or keyboard shortcuts depending on the version of Excel you are using.
This article focus on introducing how to programmatically reorder columns or rows in an Excel worksheet in Python using Spire.XLS for Python.
Install Spire.XLS for Python
This scenario requires Spire.XLS for Python and plum-dispatch v1.7.4. They can be easily installed in your system through the following pip command.
pip install Spire.XLS
If you are unsure how to install, please refer to this tutorial: How to Install Spire.XLS for Python on Windows
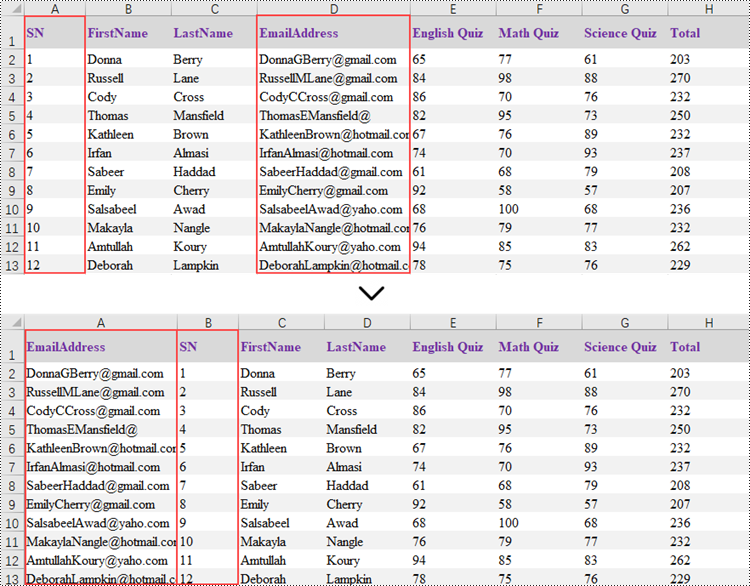
Reorder Columns in Excel in Python
Spire.XLS does not provide a straightforward way to reorganize the order of columns or rows within an Excel worksheet. The solution requires creating a duplicate of the target worksheet. Then, you can copy the columns or rows from the copied worksheet and paste them into the original worksheet in the new preferred column or row sequence.
The following are the steps to reorder columns in an Excel worksheet using Python.
- Create a Workbook object.
- Load an Excel document from the specified file path.
- Get the target worksheet using Workbook.Worksheets[index] property.
- Specify the new column order within a list.
- Create a temporary sheet and copy the data from the target sheet into it.
- Copy the columns from the temporary worksheet to the target worksheet in the desired order using Worksheet.Columns[index].Copy() method.
- Remove the temporary sheet.
- Save the workbook to a different Excel document.
- Python
from spire.xls import *
from spire.xls.common import *

# Create a Workbook object
workbook = Workbook()

# Load the Excel document
workbook.LoadFromFile("C:\\Users\\Administrator\\Desktop\\Input.xlsx")

# Get a specific worksheet
targetSheet = workbook.Worksheets[0]

# Specify the new column order in a list (the column index starts from 0)
newColumnOrder = [3, 0, 1, 2, 4, 5 ,6, 7]

# Add a temporary worksheet
tempSheet = workbook.Worksheets.Add("temp")

# Copy data from the target worksheet to the temporary sheet
tempSheet.CopyFrom(targetSheet)

# Iterate through the newColumnOrder list
for i in range(len(newColumnOrder)):

    # Copy the column from the temporary sheet to the target sheet in the new order
    tempSheet.Columns[newColumnOrder[i]].Copy(targetSheet.Columns[i], True, True)

    # Reset the column width in the target sheet
    targetSheet.Columns[i].ColumnWidth = tempSheet.Columns[newColumnOrder[i]].ColumnWidth

# Remove the temporary sheet
workbook.Worksheets.Remove(tempSheet)

# Save the workbook to another Excel file
workbook.SaveToFile("output/ReorderColumns.xlsx", FileFormat.Version2016)

# Dispose resources
workbook.Dispose()
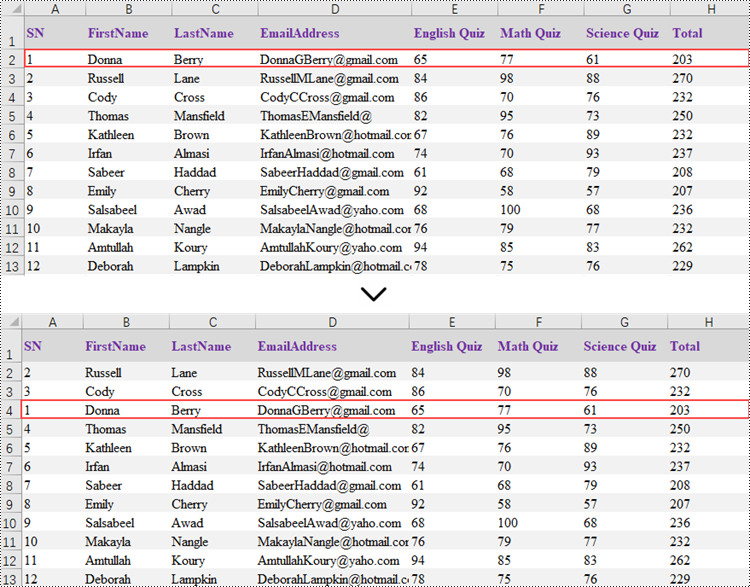
Reorder Rows in Excel in Python
Rearranging the rows in an Excel spreadsheet follows a similar approach to reorganizing the columns. The steps to reorder the rows within an Excel worksheet are as outlined below.
- Create a Workbook object.
- Load an Excel document from the specified file path.
- Get the target worksheet using Workbook.Worksheets[index] property.
- Specify the new row order within a list.
- Create a temporary sheet and copy the data from the target sheet into it.
- Copy the rows from the temporary worksheet to the target worksheet in the desired order using Worksheet.Rows[index].Copy() method.
- Remove the temporary sheet.
- Save the workbook to a different Excel document.
- Python
from spire.xls import *
from spire.xls.common import *

# Create a Workbook object
workbook = Workbook()

# Load the Excel document
workbook.LoadFromFile("C:\\Users\\Administrator\\Desktop\\Input.xlsx")

# Get a specific worksheet
targetSheet = workbook.Worksheets[0]

# Specify the new row order in a list (the row index starts from 0)
newRowOrder = [0, 2, 3, 1, 4, 5 ,6, 7, 8, 9, 10, 11, 12]

# Add a temporary worksheet
tempSheet = workbook.Worksheets.Add("temp")

# Copy data from the first worksheet to the temporary sheet
tempSheet.CopyFrom(targetSheet)

# Iterate through the newRowOrder list
for i in range(len(newRowOrder)):

    # Copy the row from the temporary sheet to the target sheet in the new order
    tempSheet.Rows[newRowOrder[i]].Copy(targetSheet.Rows[i], True, True)

    # Reset the row height in the target sheet
    targetSheet.Rows[i].RowHeight = tempSheet.Rows[newRowOrder[i]].RowHeight

# Remove the temporary sheet
workbook.Worksheets.Remove(tempSheet)

# Save the workbook to another Excel file
workbook.SaveToFile("output/ReorderRows.xlsx", FileFormat.Version2016)

# Dispose resources
workbook.Dispose()
Apply for a Temporary License
If you'd like to remove the evaluation message from the generated documents, or to get rid of the function limitations, please request a 30-day trial license for yourself.
