
Cells (29)
When working with Excel in C#, copying rows, columns, and cells can feel like a simple task, but it often comes with a catch—how to keep the formatting intact. Whether you’re organizing data for a report, creating a presentation, or just trying to keep your spreadsheet looking sharp, maintaining the original look is crucial. In this article, we will demonstrate the methods to copy rows, columns, and cells in Excel while preserving the original formatting in C# using Spire.XLS for .NET.
- Copy Rows in Excel with Formatting in C#
- Copy Columns in Excel with Formatting in C#
- Copy Cells in Excel with Formatting in C#
Install Spire.XLS for .NET
To begin with, you need to add the DLL files included in the Spire.XLS for.NET package as references in your .NET project. The DLLs files can be either downloaded from this link or installed via NuGet.
PM> Install-Package Spire.XLS
Copy Rows in Excel with Formatting in C#
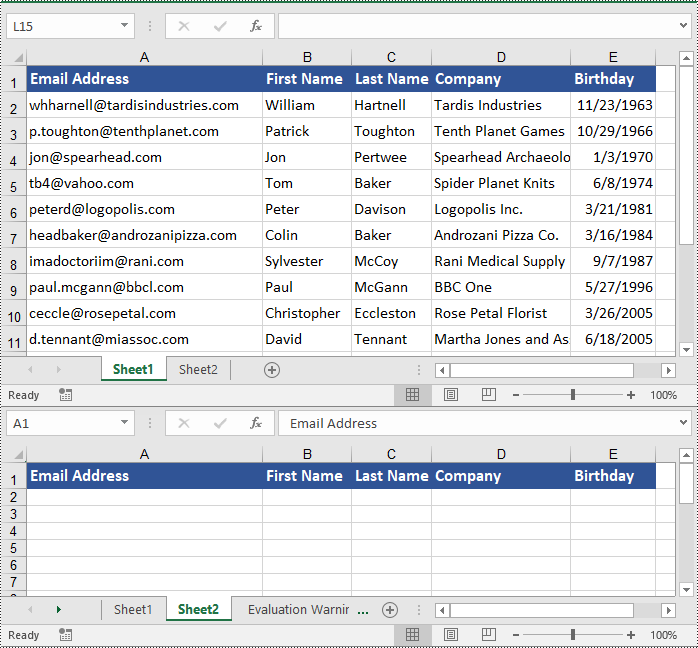
Copying rows in Excel while preserving their formatting can be efficiently achieved using the Worksheet.CopyRow(CellRange sourceRow, Worksheet destSheet, int destRowIndex, CopyRangeOptions copyOptions) method. This method enables you to duplicate rows either within the same worksheet or across different worksheets with precision. Additionally, you can control the copying behavior, such as copying all formatting, conditional formatting, data validations, styles, or even just the formula values, through the CopyRangeOptions parameter.
The following steps explain how to copy rows across different worksheets with formatting using Spire.XLS for .NET.
- Create an object of the Workbook class.
- Load an Excel file using the Workbook.LoadFromFile() method.
- Get the source worksheet and the destination worksheet using the Workbook.Worksheets[index] property.
- Get the desired row that you want to copy using the Worksheet.Rows[index] property.
- Copy the row and its formatting from the source worksheet to the destination worksheet using the Worksheet.CopyRow(CellRange sourceRow, Worksheet destSheet, int destRowIndex, CopyRangeOptions copyOptions) method.
- Copy the column widths of cells in the source row to the corresponding cells in the destination row.
- Save the workbook to a file using the Workbook.SaveToFile() method.
- C#
using Spire.Xls;

namespace CopyRows
{
    internal class Program
    {
        static void Main(string[] args)
        {
            // Create a Workbook object
            Workbook workbook = new Workbook();
            // Load an Excel file
            workbook.LoadFromFile("ContactList.xlsx");

            // Get the source worksheet
            Worksheet sheet1 = workbook.Worksheets[0];

            // Get the destination worksheet
            Worksheet sheet2 = workbook.Worksheets[1];

            // Get the desired row that you want to copy
            CellRange row = sheet1.Rows[0];

            // Copy the row from the source worksheet to the first row of the destination worksheet
            sheet1.CopyRow(row, sheet2, 1, CopyRangeOptions.All);

            int columns = sheet1.Columns.Length;

            // Copy the column widths of the cells in the source row to the corresponding cells in the destination row
            for (int i = 0; i < columns; i++)
            {
                double columnWidth = row.Columns[i].ColumnWidth;
                sheet2.Rows[0].Columns[i].ColumnWidth = columnWidth;
            }

            // Save the workbook to a file
            workbook.SaveToFile("CopyRow.xlsx", ExcelVersion.Version2016);
            workbook.Dispose();
        }
    }
}
Copy Columns in Excel with Formatting in C#
Similarly, copying columns in Excel with formatting can be accomplished using the Worksheet.CopyColumn(CellRange sourceColumn, Worksheet destSheet, int destColIndex, CopyRangeOptions copyOptions) method. The detailed steps are as follows.
- Create an object of the Workbook class.
- Load an Excel file using the Workbook.LoadFromFile() method.
- Get the source worksheet and the destination worksheet using the Workbook.Worksheets[index] property.
- Get the desired column that you want to copy using the Worksheet.Columns[index] property.
- Copy the column and its formatting from the source worksheet to the destination worksheet using the Worksheet.CopyColumn(CellRange sourceColumn, Worksheet destSheet, int destColIndex, CopyRangeOptions copyOptions) method.
- Copy the row heights of cells in the source column to the corresponding cells in the destination column.
- Save the workbook to a file using the Workbook.SaveToFile() method.
- C#
using Spire.Xls;

namespace CopyColumns
{
    internal class Program
    {
        static void Main(string[] args)
        {
            // Create a Workbook object
            Workbook workbook = new Workbook();
            // Load an Excel file
            workbook.LoadFromFile("ContactList.xlsx");

            // Get the source worksheet
            Worksheet sheet1 = workbook.Worksheets[0];

            // Get the destination worksheet
            Worksheet sheet2 = workbook.Worksheets[1];

            // Get the desired column that you want to copy
            CellRange column = sheet1.Columns[0];

            // Copy the column from the source worksheet to the first column of the destination worksheet
            sheet1.CopyColumn(column, sheet2, 1, CopyRangeOptions.All);

            int rows = column.Rows.Length;

            // Copy the row heights of cells in the source column to the corresponding cells in the destination column
            for (int i = 0; i < rows; i++)
            {
                double rowHeight = column.Rows[i].RowHeight;
                sheet2.Columns[0].Rows[i].RowHeight = rowHeight;
            }

            // Save the workbook to a file
            workbook.SaveToFile("CopyColumn.xlsx", ExcelVersion.Version2016);
            workbook.Dispose();
        }
    }
}

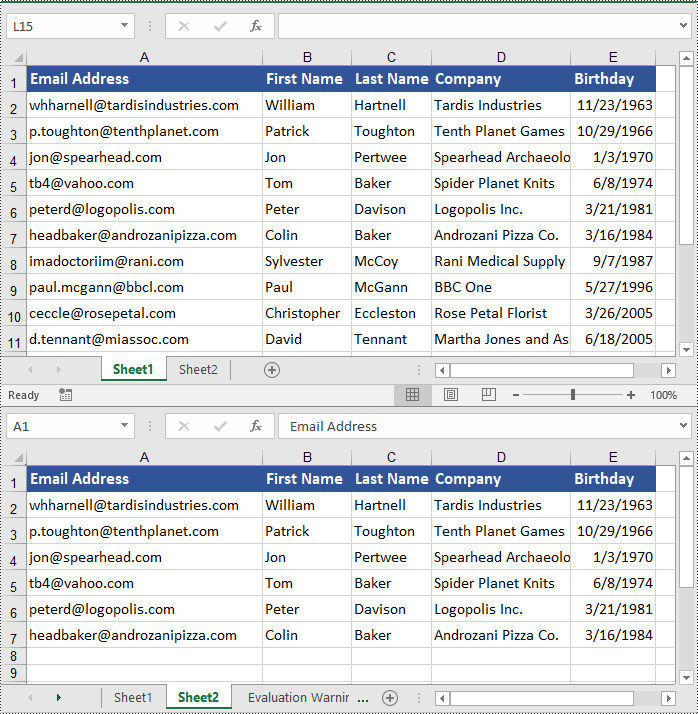
Copy Cells in Excel with Formatting in C#
In addition to copying rows and columns in Excel with formatting, Spire.XLS for .NET also allows copying cell ranges with formatting using the CellRange.Copy(CellRange destRange, CopyRangeOptions copyOptions) method. The detailed steps are as follows.
- Create an object of the Workbook class.
- Load an Excel file using the Workbook.LoadFromFile() method.
- Get the source worksheet and the destination worksheet using the Workbook.Worksheets[index] property.
- Get the source cell range and the destination cell range using the Worksheet.Range[] property.
- Copy the source cell range and its formatting from the source worksheet to the destination cell range in the destination worksheet using the CellRange.Copy(CellRange destRange, CopyRangeOptions copyOptions) method.
- Copy the row heights and column widths of the source cell range to the destination cell range.
- Save the workbook to a file using the Workbook.SaveToFile() method.
- C#
using Spire.Xls;

namespace CopyCells
{
    internal class Program
    {
        static void Main(string[] args)
        {
            // Create a Workbook object
            Workbook workbook = new Workbook();
            // Load an Excel file
            workbook.LoadFromFile("ContactList.xlsx");

            // Get the source worksheet
            Worksheet sheet1 = workbook.Worksheets[0];
            // Get the destination worksheet
            Worksheet sheet2 = workbook.Worksheets[1];

            // Get the source cell range
            CellRange range1 = sheet1.Range["A1:E7"];
            // Get the destination cell range
            CellRange range2 = sheet2.Range["A1:E7"];

            // Copy the source cell range from the source worksheet to the destination cell range in the destination worksheet
            range1.Copy(range2, CopyRangeOptions.All);

            // Copy the row heights and column widths of the source cell range to the destination cell range
            for (int i = 0; i < range1.Rows.Length; i++)
            {
                CellRange row = range1.Rows[i];
                for (int j = 0; j < row.Columns.Length; j++)
                {
                    CellRange column = row.Columns[j];
                    range2.Rows[i].Columns[j].ColumnWidth = column.ColumnWidth;
                    range2.Rows[i].RowHeight = row.RowHeight;
                }
            }

            // Save the workbook to a file
            workbook.SaveToFile("CopyCells.xlsx", ExcelVersion.Version2016);
            workbook.Dispose();
        }
    }
}
Apply for a Temporary License
If you'd like to remove the evaluation message from the generated documents, or to get rid of the function limitations, please request a 30-day trial license for yourself.
When working with Excel files programmatically in C#, determining the data type of a cell is critical for accurate data processing. Whether you're validating user inputs, parsing spreadsheets, or migrating data, knowing how to get the cell data types ensures your application handles information correctly.
In this guide, you'll learn how to use Spire.XLS for .NET library to check the cell data types in Excel in C#, covering the following aspects:
- Install the .NET Excel Library
- Learn the Cell Data Types in Spire.XLS
- How to Get Cell Data Type in Excel in C#
Install the .NET Excel Library
Before proceeding, you need to have the Spire.XLS for .NET library installed in your project. A recommended way to install it is via NuGet, and there are two available options:
- 1.Right-click the project in “Solution Explorer -> Manage NuGet Packages”. Search for “Spire.XLS” and install the latest version.
- 2.Go to “Tools -> NuGet Package Manager -> Package Manager Console”, and then run the following command:
PM> Install-Package Spire.XLS
Alternatively, you can download the library from this link and manually add the DLL files as references.
Learn the Cell Data Types in Spire.XLS
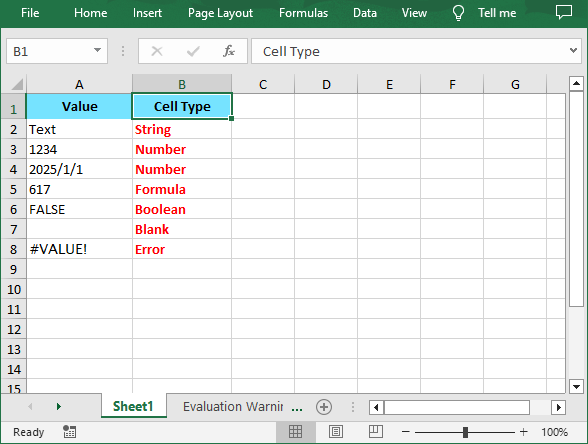
Spire.XLS provides the XlsWorksheet.TRangeValueType enumeration to represents the cell value types. It includes following members:
| Cell Type | Description |
| String | Represents the cells that store alphanumeric characters, including numbers stored as text. |
| Number | Represents the cells that contain numeric value, including integers, decimals, scientific notation, and date-time values. |
| Formula | Represents the cells that contain a formula. |
| Blank | Represents the cells contain no data. |
| Boolean | Represents the cells that contain TRUE or FALSE. |
| Error | Represents the cells may display errors as #VALUE! or #N/A due to invalid operations. |
How to Get Cell Data Type in Excel in C#
To check the value type of a cell, you need to follow the below steps.
- Create a Workbook object.
- Load an XLS or XLSX Excel file, and then get a specified worksheet within it.
- Get a specified cell range in the sheet though the Worksheet.Range[] property.
- Iterate through each cell in the cell range.
- Get the row number and column number of the current cell.
- Call the Worksheet.GetCellType(int row, int column, bool bNeedFormulaSubType) method to get the value type of the current cell, and return a specific enumeration member of the XlsWorksheet.TRangeValueType enumeration type.
- Converts the value of the enumeration member to its corresponding text string.
- Write the text string to another cell and set its font style.
- Save the result file using the Workbook.SaveToFile() method.
- Sample C# Code
using System.Drawing;
using Spire.Xls;
using Spire.Xls.Core.Spreadsheet;

namespace GetCellType
{
    class Program
    {
        static void Main(string[] args)
        {
            // Create a Workbook object
            Workbook workbook = new Workbook();
            // Load an Excel file
            workbook.LoadFromFile("Test1.xlsx");

            // Get the first worksheet
            Worksheet sheet = workbook.Worksheets[0];
            // Get a specified cell range
            CellRange range = sheet.Range["A2:A8"];

            // Iterate through all cells in the range
            foreach (CellRange cell in range)
            {
                // Get the row number and column number of the current cell
                int row = cell.Row;
                int column = cell.Column;

                // Get the value type of the current cell
                XlsWorksheet.TRangeValueType cellType = sheet.GetCellType(row, column, false);

                // Convert the cell type value to a text string and write to another cell
                sheet[row, column + 1].Text = cellType.ToString();

                // Set the font style of the output cell
                sheet[row, column + 1].Style.Font.Color = Color.Red;
                sheet[row, column + 1].Style.Font.IsBold = true;
            }

            // Save the result file
            workbook.SaveToFile("GetCellType.xlsx", ExcelVersion.Version2016);
        }
    }
}
A screenshot of the result file:
Conclusion
Spire.XLS simplifies checking Excel cell data types in C# with its intuitive API. By leveraging the GetCellType() method, you can accurately determine whether a cell contains a number, string, boolean, etc. This approach ensures robust data processing for applications that interact with Excel files.
Get a Free License
To fully experience the capabilities of Spire.XLS for .NET without any evaluation limitations, you can request a free 30-day trial license.
Shrink to fit is a useful option in Excel, it enables us to automatically reduce the font size in a cell until the text fits within the cell. This article demonstrates how to accomplish the same functionality programmatically in C# using Spire.XLS.
Below is the screenshot of the input Excel file:
Detail steps:
Step 1: Instantiate a Workbook object and load the Excel file.
Workbook workbook = new Workbook();
workbook.LoadFromFile(@"Input.xlsx");
Step 2: Get the first worksheet.
Worksheet sheet = workbook.Worksheets[0];
Step 3: Specify the cell range to shrink text.
CellRange cell = sheet.Range["A1:E3"];
Step 4: Enable ShrinkToFit.
CellStyle style = cell.Style;
style.ShrinkToFit = true;
Step 5: Save the file.
workbook.SaveToFile("ShrinkTextToFitCell.xlsx", ExcelVersion.Version2013);
Output:
Full code:
using Spire.Xls;
namespace ShrinkText
{
    class Program
    {

        static void Main(string[] args)
        {
            //Load the Excel file
            Workbook workbook = new Workbook();
            workbook.LoadFromFile(@"Input.xlsx");

            //Get the first worksheet
            Worksheet sheet = workbook.Worksheets[0];

            //The cell range to shrink text
            CellRange cell = sheet.Range["A1:E3"];

            //Enable ShrinkToFit
            CellStyle style = cell.Style;
            style.ShrinkToFit = true;

            //Save the file
            workbook.SaveToFile("ShrinkTextToFitCell.xlsx", ExcelVersion.Version2013);
        }
    }
}
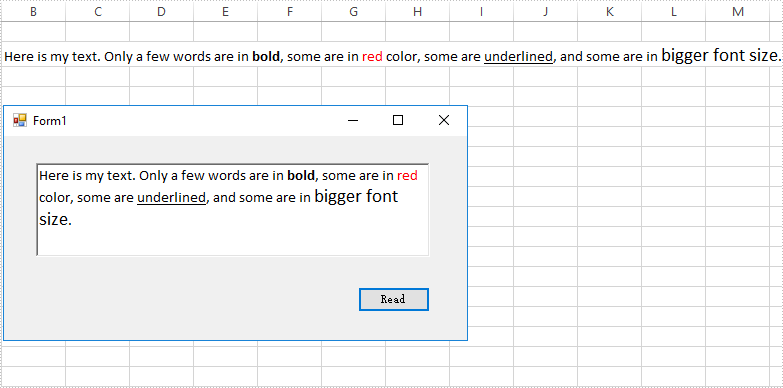
Using Spire.XLS, you're able to apply multiple fonts in a single cell in order to create rich-formatted text within the cell, you can also extract the formatted text from the cell(s) in an existing Excel document. The following code snippets will show you how to read rich text from an Excel cell in C# and VB.NET.
Step 1: Create a Workbook instance and load a sample Excel file.
Workbook wb = new Workbook();
wb.LoadFromFile(@"C:\Users\Administrator\Desktop\Sample.xlsx");
Step 2: Get the first worksheet.
Worksheet sheet= wb.Worksheets[0];
Step 3: Get the rtf text from the specified cell.
richTextBox1.Rtf = sheet.Range["B2"].RichText.RtfText;
Output:
Full Code:
private void btn_read_Click(object sender, EventArgs e)
{
    Workbook wb = new Workbook();
    wb.LoadFromFile(@"C:\Users\Administrator\Desktop\Sample.xlsx");
    Worksheet sheet= wb.Worksheets[0];
    richTextBox1.Rtf = sheet.Range["B2"].RichText.RtfText;
}
Private  Sub btn_read_Click(ByVal sender As Object, ByVal e As EventArgs)
    Dim wb As Workbook =  New Workbook()
    wb.LoadFromFile("C:\Users\Administrator\Desktop\Sample.xlsx")
    Dim sheet As Worksheet =  wb.Worksheets(0)
    richTextBox1.Rtf = sheet.Range("B2").RichText.RtfText
End Sub
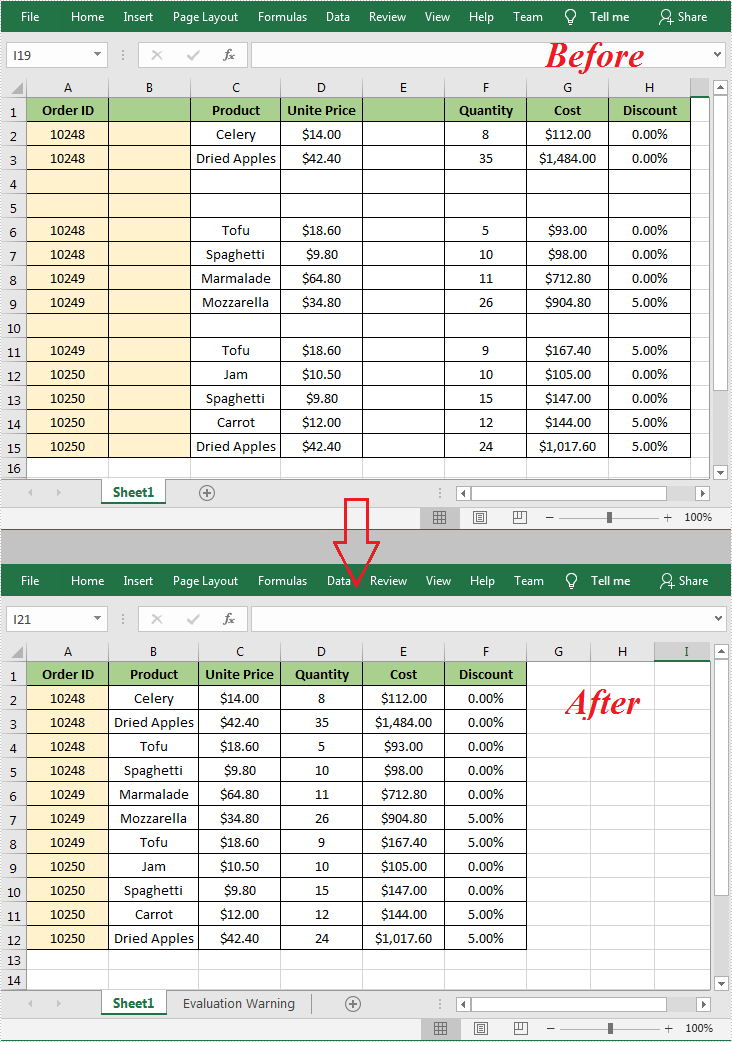
When working with an Excel document, some blank rows or columns may appear due to the modification of data. Although having blank rows or columns in a worksheet isn't necessarily a bad thing, in most cases they are still undesirable. Furthermore, such blank rows or columns may cause errors if formulas are applied. To delete these blank rows or columns, you can simply select and delete them, but if there are a lot of blank rows and columns, deleting them manually is a very time-consuming task. In this article, you will learn how to programmatically delete blank rows and columns in an Excel worksheet using Spire.XLS for .NET.
Install Spire.XLS for .NET
To begin with, you need to add the DLL files included in the Spire.XLS for .NET package as references in your .NET project. The DLL files can be either downloaded from this link or installed via NuGet.
PM> Install-Package Spire.XLS
Delete Blank Rows and Columns in Excel
The detailed steps are as follows.
- Instantiate a Workbook object.
- Load a sample Excel file using Workbook.LoadFromFile() method.
- Get a specified worksheet using Workbook.Worksheets[] property.
- Loop through all used rows in the specified worksheet and determine whether the row is blank using XlsRange.IsBlank property.
- Delete the blank rows using Worksheet.DeleteRow() method.
- Loop through all used columns in the specified worksheet and determine whether the column is blank using XlsRange.IsBlank property.
- Delete the blank columns using Worksheet.DeleteColumn() method.
- Save the result file using Workbook.SaveToFile() method.
- C#
- VB.NET
using System.Linq;
using Spire.Xls;

namespace DeleteBlankRowsAndColumns
{
    class Program
    {
        static void Main(string[] args)
        {
            //Instantiate a Workbook object
            Workbook workbook = new Workbook();

            //Load a sample Excel file
            workbook.LoadFromFile("sample.xlsx");

            //Get the first worksheet
            Worksheet sheet = workbook.Worksheets[0];

            //Delete blanks rows
            for (int i = sheet.Rows.Count() - 1; i >= 0; i--)
            {
                if (sheet.Rows[i].IsBlank)
                {
                    sheet.DeleteRow(i + 1); //Index parameter in DeleteRow method starts from 1
                }
            }

            //Delete blank columns
            for (int j = sheet.Columns.Count() - 1; j >= 0; j--)
            {
                if (sheet.Columns[j].IsBlank)
                {
                    sheet.DeleteColumn(j + 1); //Index parameter in DeleteColumn method starts from 1
                }
            }

            //Save the file
            workbook.SaveToFile("DeleteBlankRowsAndColumns.xlsx", ExcelVersion.Version2013);
        }
    }
}
Apply for a Temporary License
If you'd like to remove the evaluation message from the generated documents, or to get rid of the function limitations, please request a 30-day trial license for yourself.
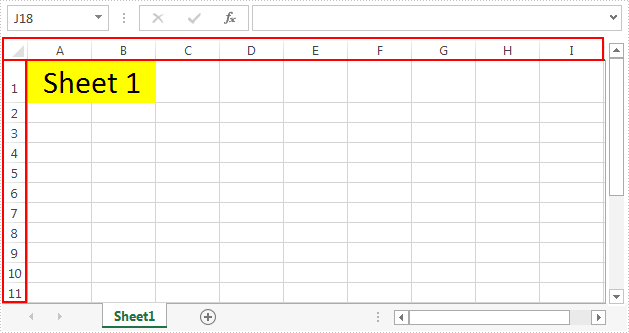
In Spire.XLS, we can hide or show the headers of rows and columns by setting the RowColumnHeadersVisible property of XlsWorksheet class. This article elaborates the steps of how to accomplish this function using Spire.XLS.
The following screenshot shows the input file which contain one worksheet with row and column headers.
Detail steps:
Step 1: Instantiate a Workbook instance and load the Excel file.
Workbook workbook = new Workbook();
workbook.LoadFromFile("Input.xlsx");
Step 2: Get the first worksheet.
Worksheet sheet = workbook.Worksheets[0];
Step 3: Hide or show the headers of rows and columns in the worksheet.
//Hide the headers of rows and columns
sheet.RowColumnHeadersVisible = false;

//Show the headers of rows and columns
//sheet.RowColumnHeadersVisible = true;
Step 4: Save the file.
workbook.SaveToFile("Output.xlsx");
The screenshot after hiding the row and column headers:
Full code:
using Spire.Xls;
namespace ShowRowColumnHeader
{
    class Program
    {

        static void Main(string[] args)
        {
            // Instantiate a Workbook instance
            Workbook workbook = new Workbook();
            //Load the Excel file
            workbook.LoadFromFile("Input.xlsx");

            //Get the first worksheet
            Worksheet sheet = workbook.Worksheets[0];

            //Hide the headers of rows and columns
            sheet.RowColumnHeadersVisible = false;

            //Show the headers of rows and columns
            //sheet.RowColumnHeadersVisible = true;

            //Save the file
            workbook.SaveToFile("Output.xlsx");
        }
    }
}
When we operate the data on an Excel worksheet, we may need to delete text from a cell in a spreadsheet document and sometimes even remove all the contents with format from the cell range. This article will demonstrate how to remove the value and format from Excel Cell range with the help of Spire.XLS.
Step 1: Create an instance of Excel workbook and load the document from file.
Workbook workbook = new Workbook();
workbook.LoadFromFile("Sample.xlsx");
Step 2: Get the first worksheet from the workbook.
Worksheet sheet = workbook.Worksheets[0];
Step 3: Set the value as null to remove the original content from the Excel Cell.
sheet.Range["A1"].Value = "";
Step 4: Clear the contents to remove the original content from the Excel Cell.
sheet.Range["A3"].ClearContents();
Step 5: Remove the contents with format from the Excel cell.
sheet.Range["B1"].ClearAll();
Step 6: Save document to file.
workbook.SaveToFile("result.xlsx",FileFormat.Version2010);
Effective screenshot of remove the value and format from Excel Cell range:
Full codes:
using Spire.Xls;
namespace RemoveValue
{
    class Program
    {

        static void Main(string[] args)
        {
            Workbook workbook = new Workbook();
            workbook.LoadFromFile("Sample.xlsx");

            Worksheet sheet = workbook.Worksheets[0];

            sheet.Range["A1"].Value = "";

            sheet.Range["A3"].ClearContents();

            sheet.Range["B1"].ClearAll();


            workbook.SaveToFile("result.xlsx", FileFormat.Version2010);
        }
    }
}
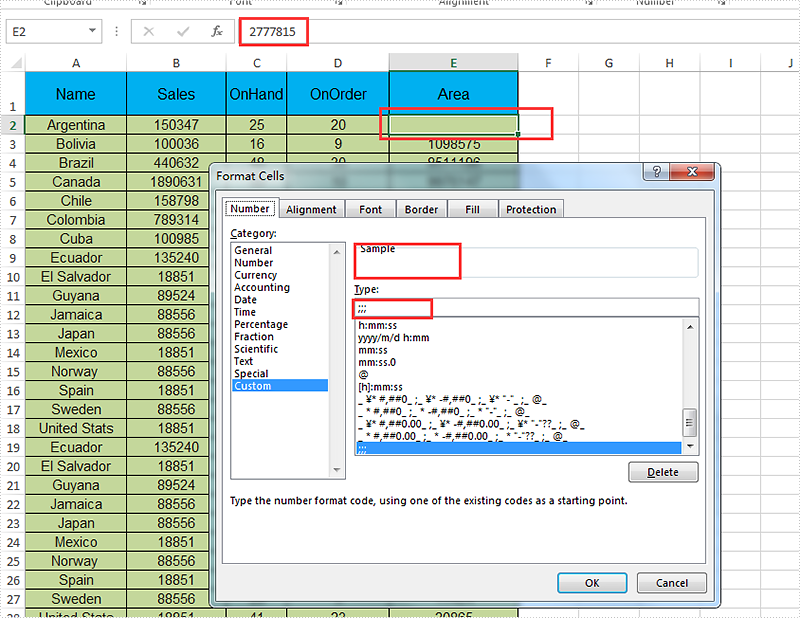
We have already demonstrated how to using Spire.XLS hide excel columns and rows in C#. Sometimes we don't want to show the data on a certain cell to others but not hide the whole row or column. Then we can only hide the data on this cell by setting the number format for it. This article will focus on showing how to hide the content on a certain cell by setting the number format as ";;;" to hide the content to others.
Step 1: Initialize an instance of Workbook and load the document from file.
Workbook workbook = new Workbook();
workbook.LoadFromFile("Sample.xlsx");
Step 2: Get the first worksheet from the workbook.
Worksheet worksheet = workbook.Worksheets[0];
Step 3: Hide the area by setting the number format as ";;;".
worksheet.Range["E2"].NumberFormat = ";;;";
Step 4: Save the document to file.
workbook.SaveToFile("Result.xlsx", FileFormat.Version2010);
Effective screenshot of hide the content on Excel cell by setting the number format:
Full codes:
using Spire.Xls;
namespace HideContent
{
    class Program
    {

        static void Main(string[] args)
        {
            Workbook workbook = new Workbook();
            workbook.LoadFromFile("Sample.xlsx");

            Worksheet worksheet = workbook.Worksheets[0];
            worksheet.Range["E2"].NumberFormat = ";;;";

            workbook.SaveToFile("Result.xlsx", FileFormat.Version2010);
        }
    }
}
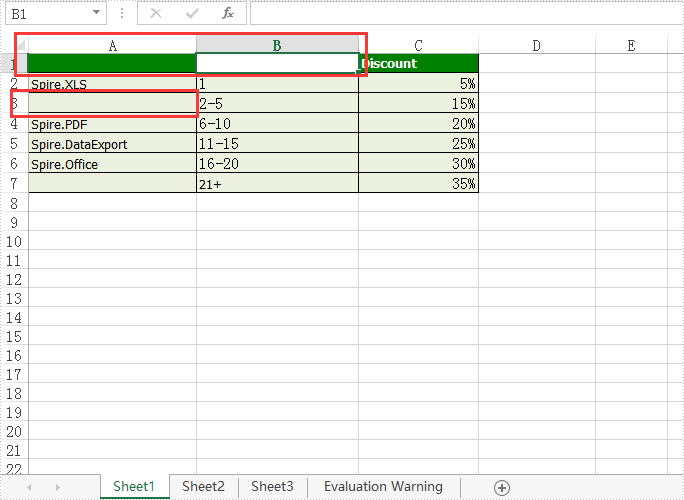
Spire.Xls.CellRange class provides a method named Intersect(CellRange range) that is used to find the intersection of certain ranges. This is very useful when we need to get the common value(s) of two ranges in an excel worksheet.
In below picture, we take range A2:C8 and range B2:D8 as an example. Cells filled in yellow color are the intersection of the two ranges.
Now refer to the following detail steps:
Step 1: Instantiate an object of Workbook class and load the Excel document.
Workbook workbook = new Workbook();
workbook.LoadFromFile("Sample.xlsx");
Step 2: Get the first worksheet.
Worksheet sheet = workbook.Worksheets[0];
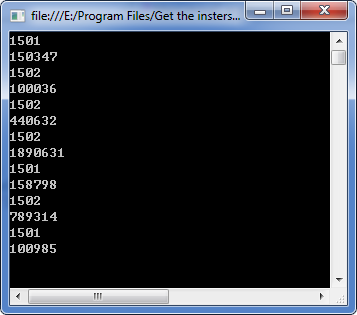
Step 3: Get the intersection of the two ranges and print the common values of them.
CellRange range = sheet.Range["A2:C8"].Intersect(sheet.Range["B2:D8"]);
foreach (CellRange r in range)
{
    Console.WriteLine(r.Value);
}
Output:
Full code:
using System;
using Spire.Xls;

namespace Get_the_instersection_of_two_ranges
{
    class Program
    {
        static void Main(string[] args)
        {
            Workbook workbook = new Workbook();
            workbook.LoadFromFile("Sample.xlsx");
            Worksheet sheet = workbook.Worksheets[0];
            CellRange range = sheet.Range["A2:C8"].Intersect(sheet.Range["B2:D8"]);
            foreach (CellRange r in range)
            {
                Console.WriteLine(r.Value);
            }
            Console.ReadKey();
        }
    }
}
Imports Spire.Xls

Namespace Get_the_instersection_of_two_ranges
	Class Program
		Private Shared Sub Main(args As String())
			Dim workbook As New Workbook()
			workbook.LoadFromFile("Sample.xlsx")
			Dim sheet As Worksheet = workbook.Worksheets(0)
			Dim range As CellRange = sheet.Range("A2:C8").Intersect(sheet.Range("B2:D8"))
			For Each r As CellRange In range
				Console.WriteLine(r.Value)
			Next
			Console.ReadKey()
		End Sub
	End Class
End Namespace
To make the text within a cell diverse, we can apply different font to different range of characters. Spire.XLS also provides the ability to apply multiple fonts in a single cell by using RichText.SetFont() method. This article presents how to create different fonts in a workbook and apply them to a certain cell in C# and VB.NET.
Code Snippet:
Step 1: Initialize an instance of Workbook class and get the first worksheet.
Workbook wb = new Workbook();
Worksheet sheet = wb.Worksheets[0];
Step 2: Create a font object in workbook, setting the font color, size and type.
ExcelFont font1 = wb.CreateFont();
font1.KnownColor = ExcelColors.LightBlue;
font1.IsBold = true;
font1.Size = 10;
Step 3: Create another font object specifying its properties.
ExcelFont font2 = wb.CreateFont();
font2.KnownColor = ExcelColors.Red;
font2.IsBold = true;
font2.IsItalic = true;
font2.FontName = "Times New Roman";
font2.Size = 11;
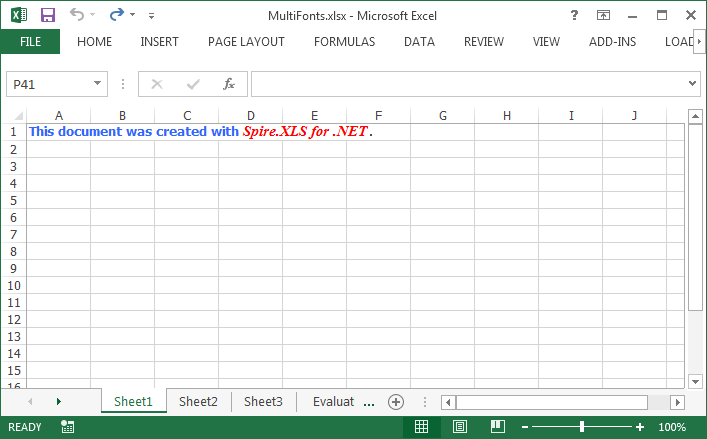
Step 4: Write a RichText string to the cell 'A1', and set the font for the specific range of characters using RichText.SetFont() method.
RichText richText = sheet.Range["A1"].RichText;
richText.Text = "This document was created with Spire.XLS for .NET.";
richText.SetFont(0, 29, font1);
richText.SetFont(31, 48, font2);
Step 5: Save the file.
wb.SaveToFile("MultiFonts.xlsx", ExcelVersion.Version2010);
Output:
Full Code:
using Spire.Xls;
namespace ApplyMutipleFont
{
    class Program
    {

        static void Main(string[] args)
        {
            Workbook wb = new Workbook();
            Worksheet sheet = wb.Worksheets[0];

            ExcelFont font1 = wb.CreateFont();
            font1.KnownColor = ExcelColors.LightBlue;
            font1.IsBold = true;
            font1.Size = 10;

            ExcelFont font2 = wb.CreateFont();
            font2.KnownColor = ExcelColors.Red;
            font2.IsBold = true;
            font2.IsItalic = true;
            font2.FontName = "Times New Roman";
            font2.Size = 11;

            RichText richText = sheet.Range["A1"].RichText;
            richText.Text = "This document was created with Spire.XLS for .NET.";
            richText.SetFont(0, 29, font1);
            richText.SetFont(31, 48, font2);

            wb.SaveToFile("MultiFonts.xlsx", ExcelVersion.Version2010);
        }
    }
}
Imports Spire.Xls
Namespace ApplyMutipleFont
	Class Program

		Private Shared Sub Main(args As String())
			Dim wb As New Workbook()
			Dim sheet As Worksheet = wb.Worksheets(0)

			Dim font1 As ExcelFont = wb.CreateFont()
			font1.KnownColor = ExcelColors.LightBlue
			font1.IsBold = True
			font1.Size = 10

			Dim font2 As ExcelFont = wb.CreateFont()
			font2.KnownColor = ExcelColors.Red
			font2.IsBold = True
			font2.IsItalic = True
			font2.FontName = "Times New Roman"
			font2.Size = 11

			Dim richText As RichText = sheet.Range("A1").RichText
			richText.Text = "This document was created with Spire.XLS for .NET."
			richText.SetFont(0, 29, font1)
			richText.SetFont(31, 48, font2)

			wb.SaveToFile("MultiFonts.xlsx", ExcelVersion.Version2010)
		End Sub
	End Class
End Namespace
