C#: Copy Rows, Columns and Cells in Excel with Formatting
When working with Excel in C#, copying rows, columns, and cells can feel like a simple task, but it often comes with a catch—how to keep the formatting intact. Whether you’re organizing data for a report, creating a presentation, or just trying to keep your spreadsheet looking sharp, maintaining the original look is crucial. In this article, we will demonstrate the methods to copy rows, columns, and cells in Excel while preserving the original formatting in C# using Spire.XLS for .NET.
- Copy Rows in Excel with Formatting in C#
- Copy Columns in Excel with Formatting in C#
- Copy Cells in Excel with Formatting in C#
Install Spire.XLS for .NET
To begin with, you need to add the DLL files included in the Spire.XLS for.NET package as references in your .NET project. The DLLs files can be either downloaded from this link or installed via NuGet.
PM> Install-Package Spire.XLS
Copy Rows in Excel with Formatting in C#
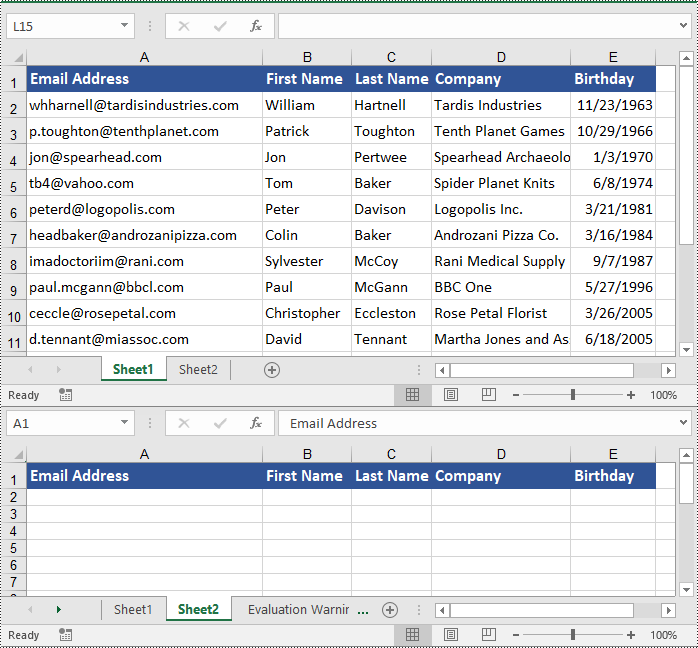
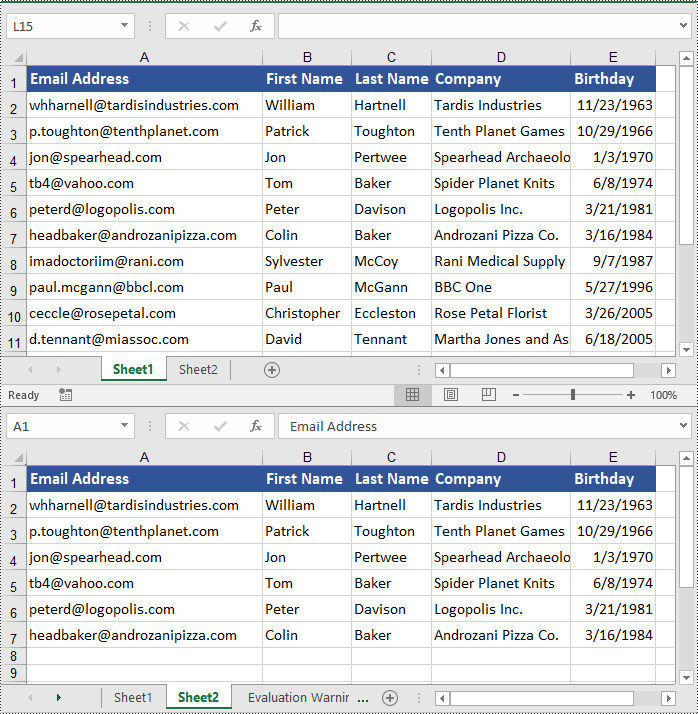
Copying rows in Excel while preserving their formatting can be efficiently achieved using the Worksheet.CopyRow(CellRange sourceRow, Worksheet destSheet, int destRowIndex, CopyRangeOptions copyOptions) method. This method enables you to duplicate rows either within the same worksheet or across different worksheets with precision. Additionally, you can control the copying behavior, such as copying all formatting, conditional formatting, data validations, styles, or even just the formula values, through the CopyRangeOptions parameter.
The following steps explain how to copy rows across different worksheets with formatting using Spire.XLS for .NET.
- Create an object of the Workbook class.
- Load an Excel file using the Workbook.LoadFromFile() method.
- Get the source worksheet and the destination worksheet using the Workbook.Worksheets[index] property.
- Get the desired row that you want to copy using the Worksheet.Rows[index] property.
- Copy the row and its formatting from the source worksheet to the destination worksheet using the Worksheet.CopyRow(CellRange sourceRow, Worksheet destSheet, int destRowIndex, CopyRangeOptions copyOptions) method.
- Copy the column widths of cells in the source row to the corresponding cells in the destination row.
- Save the workbook to a file using the Workbook.SaveToFile() method.
- C#
using Spire.Xls;

namespace CopyRows
{
    internal class Program
    {
        static void Main(string[] args)
        {
            // Create a Workbook object
            Workbook workbook = new Workbook();
            // Load an Excel file
            workbook.LoadFromFile("ContactList.xlsx");

            // Get the source worksheet
            Worksheet sheet1 = workbook.Worksheets[0];

            // Get the destination worksheet
            Worksheet sheet2 = workbook.Worksheets[1];

            // Get the desired row that you want to copy
            CellRange row = sheet1.Rows[0];

            // Copy the row from the source worksheet to the first row of the destination worksheet
            sheet1.CopyRow(row, sheet2, 1, CopyRangeOptions.All);

            int columns = sheet1.Columns.Length;

            // Copy the column widths of the cells in the source row to the corresponding cells in the destination row
            for (int i = 0; i < columns; i++)
            {
                double columnWidth = row.Columns[i].ColumnWidth;
                sheet2.Rows[0].Columns[i].ColumnWidth = columnWidth;
            }

            // Save the workbook to a file
            workbook.SaveToFile("CopyRow.xlsx", ExcelVersion.Version2016);
            workbook.Dispose();
        }
    }
}
Copy Columns in Excel with Formatting in C#
Similarly, copying columns in Excel with formatting can be accomplished using the Worksheet.CopyColumn(CellRange sourceColumn, Worksheet destSheet, int destColIndex, CopyRangeOptions copyOptions) method. The detailed steps are as follows.
- Create an object of the Workbook class.
- Load an Excel file using the Workbook.LoadFromFile() method.
- Get the source worksheet and the destination worksheet using the Workbook.Worksheets[index] property.
- Get the desired column that you want to copy using the Worksheet.Columns[index] property.
- Copy the column and its formatting from the source worksheet to the destination worksheet using the Worksheet.CopyColumn(CellRange sourceColumn, Worksheet destSheet, int destColIndex, CopyRangeOptions copyOptions) method.
- Copy the row heights of cells in the source column to the corresponding cells in the destination column.
- Save the workbook to a file using the Workbook.SaveToFile() method.
- C#
using Spire.Xls;

namespace CopyColumns
{
    internal class Program
    {
        static void Main(string[] args)
        {
            // Create a Workbook object
            Workbook workbook = new Workbook();
            // Load an Excel file
            workbook.LoadFromFile("ContactList.xlsx");

            // Get the source worksheet
            Worksheet sheet1 = workbook.Worksheets[0];

            // Get the destination worksheet
            Worksheet sheet2 = workbook.Worksheets[1];

            // Get the desired column that you want to copy
            CellRange column = sheet1.Columns[0];

            // Copy the column from the source worksheet to the first column of the destination worksheet
            sheet1.CopyColumn(column, sheet2, 1, CopyRangeOptions.All);

            int rows = column.Rows.Length;

            // Copy the row heights of cells in the source column to the corresponding cells in the destination column
            for (int i = 0; i < rows; i++)
            {
                double rowHeight = column.Rows[i].RowHeight;
                sheet2.Columns[0].Rows[i].RowHeight = rowHeight;
            }

            // Save the workbook to a file
            workbook.SaveToFile("CopyColumn.xlsx", ExcelVersion.Version2016);
            workbook.Dispose();
        }
    }
}

Copy Cells in Excel with Formatting in C#
In addition to copying rows and columns in Excel with formatting, Spire.XLS for .NET also allows copying cell ranges with formatting using the CellRange.Copy(CellRange destRange, CopyRangeOptions copyOptions) method. The detailed steps are as follows.
- Create an object of the Workbook class.
- Load an Excel file using the Workbook.LoadFromFile() method.
- Get the source worksheet and the destination worksheet using the Workbook.Worksheets[index] property.
- Get the source cell range and the destination cell range using the Worksheet.Range[] property.
- Copy the source cell range and its formatting from the source worksheet to the destination cell range in the destination worksheet using the CellRange.Copy(CellRange destRange, CopyRangeOptions copyOptions) method.
- Copy the row heights and column widths of the source cell range to the destination cell range.
- Save the workbook to a file using the Workbook.SaveToFile() method.
- C#
using Spire.Xls;

namespace CopyCells
{
    internal class Program
    {
        static void Main(string[] args)
        {
            // Create a Workbook object
            Workbook workbook = new Workbook();
            // Load an Excel file
            workbook.LoadFromFile("ContactList.xlsx");

            // Get the source worksheet
            Worksheet sheet1 = workbook.Worksheets[0];
            // Get the destination worksheet
            Worksheet sheet2 = workbook.Worksheets[1];

            // Get the source cell range
            CellRange range1 = sheet1.Range["A1:E7"];
            // Get the destination cell range
            CellRange range2 = sheet2.Range["A1:E7"];

            // Copy the source cell range from the source worksheet to the destination cell range in the destination worksheet
            range1.Copy(range2, CopyRangeOptions.All);

            // Copy the row heights and column widths of the source cell range to the destination cell range
            for (int i = 0; i < range1.Rows.Length; i++)
            {
                CellRange row = range1.Rows[i];
                for (int j = 0; j < row.Columns.Length; j++)
                {
                    CellRange column = row.Columns[j];
                    range2.Rows[i].Columns[j].ColumnWidth = column.ColumnWidth;
                    range2.Rows[i].RowHeight = row.RowHeight;
                }
            }

            // Save the workbook to a file
            workbook.SaveToFile("CopyCells.xlsx", ExcelVersion.Version2016);
            workbook.Dispose();
        }
    }
}
Apply for a Temporary License
If you'd like to remove the evaluation message from the generated documents, or to get rid of the function limitations, please request a 30-day trial license for yourself.
C#/VB.NET: Delete Blank Rows and Columns in Excel
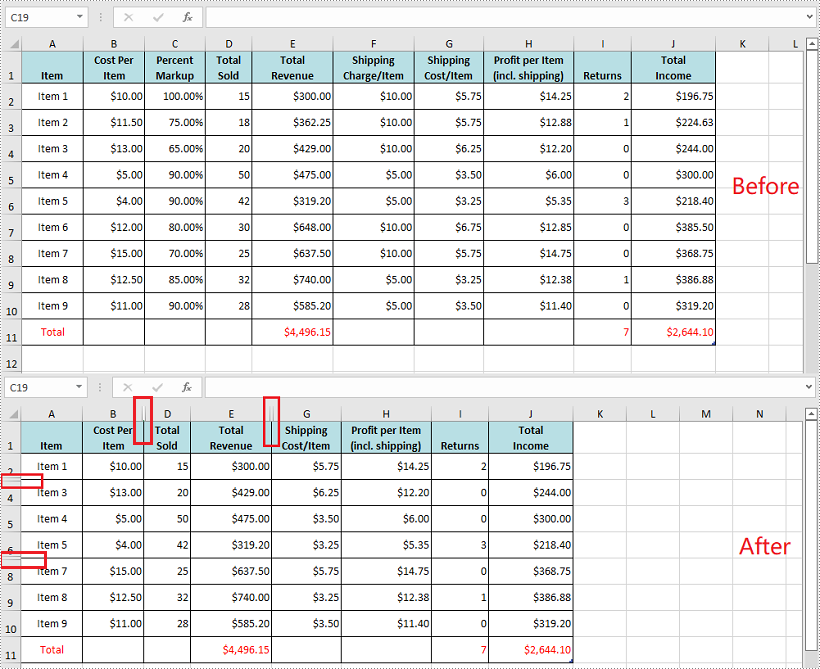
When working with an Excel document, some blank rows or columns may appear due to the modification of data. Although having blank rows or columns in a worksheet isn't necessarily a bad thing, in most cases they are still undesirable. Furthermore, such blank rows or columns may cause errors if formulas are applied. To delete these blank rows or columns, you can simply select and delete them, but if there are a lot of blank rows and columns, deleting them manually is a very time-consuming task. In this article, you will learn how to programmatically delete blank rows and columns in an Excel worksheet using Spire.XLS for .NET.
Install Spire.XLS for .NET
To begin with, you need to add the DLL files included in the Spire.XLS for .NET package as references in your .NET project. The DLL files can be either downloaded from this link or installed via NuGet.
PM> Install-Package Spire.XLS
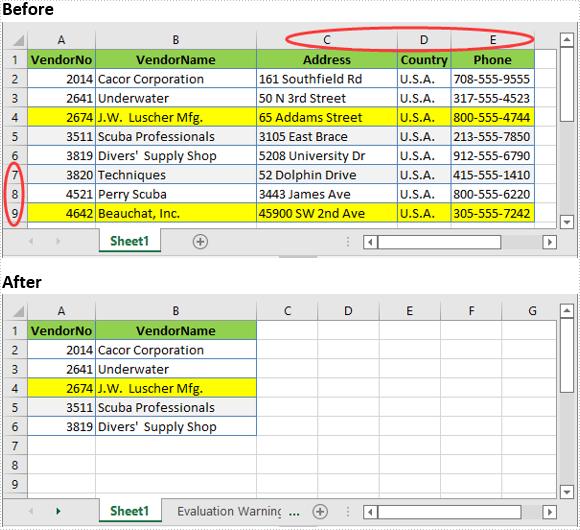
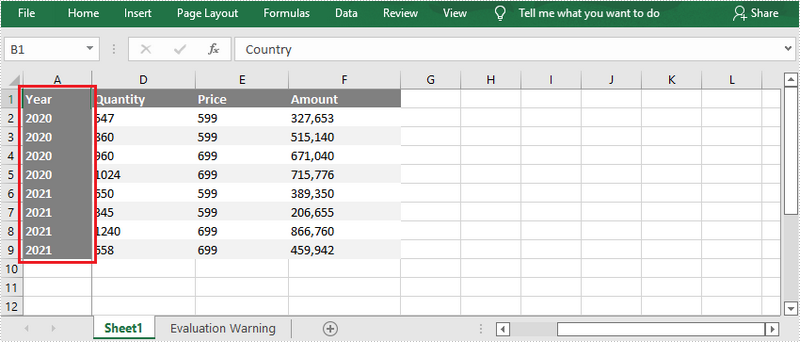
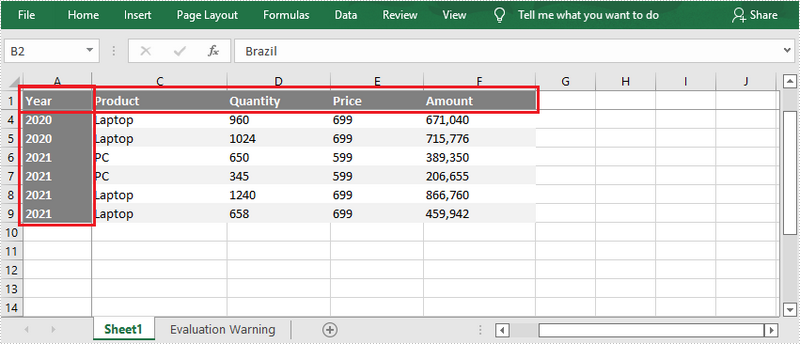
Delete Blank Rows and Columns in Excel
The detailed steps are as follows.
- Instantiate a Workbook object.
- Load a sample Excel file using Workbook.LoadFromFile() method.
- Get a specified worksheet using Workbook.Worksheets[] property.
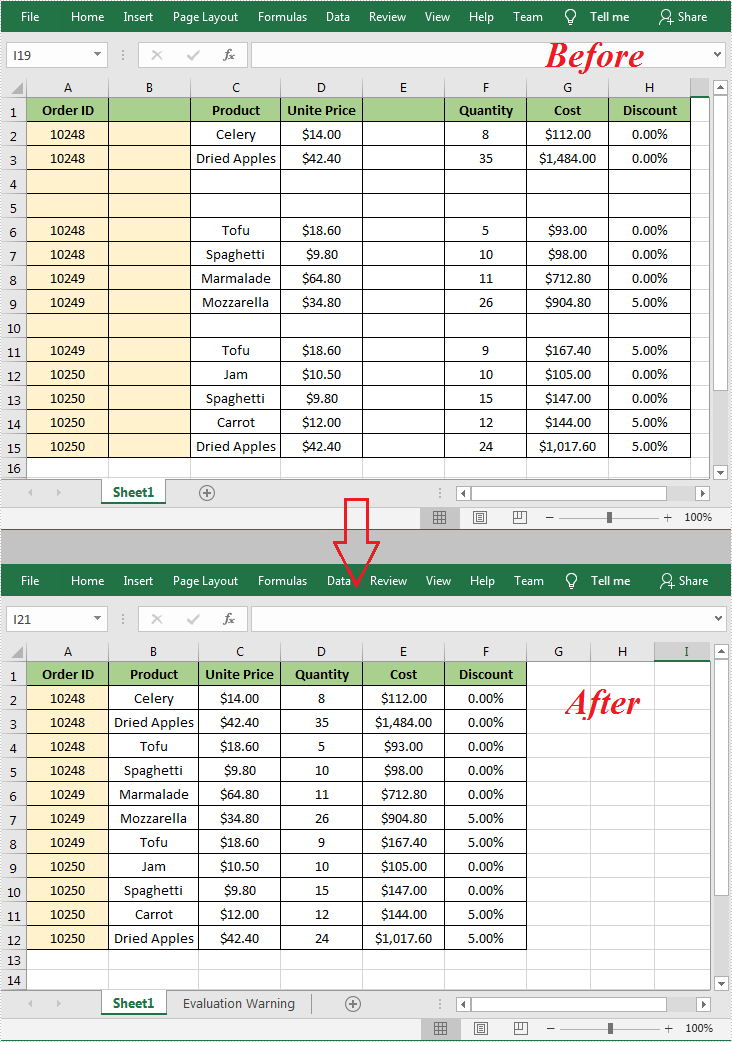
- Loop through all used rows in the specified worksheet and determine whether the row is blank using XlsRange.IsBlank property.
- Delete the blank rows using Worksheet.DeleteRow() method.
- Loop through all used columns in the specified worksheet and determine whether the column is blank using XlsRange.IsBlank property.
- Delete the blank columns using Worksheet.DeleteColumn() method.
- Save the result file using Workbook.SaveToFile() method.
- C#
- VB.NET
using System.Linq;
using Spire.Xls;

namespace DeleteBlankRowsAndColumns
{
    class Program
    {
        static void Main(string[] args)
        {
            //Instantiate a Workbook object
            Workbook workbook = new Workbook();

            //Load a sample Excel file
            workbook.LoadFromFile("sample.xlsx");

            //Get the first worksheet
            Worksheet sheet = workbook.Worksheets[0];

            //Delete blanks rows
            for (int i = sheet.Rows.Count() - 1; i >= 0; i--)
            {
                if (sheet.Rows[i].IsBlank)
                {
                    sheet.DeleteRow(i + 1); //Index parameter in DeleteRow method starts from 1
                }
            }

            //Delete blank columns
            for (int j = sheet.Columns.Count() - 1; j >= 0; j--)
            {
                if (sheet.Columns[j].IsBlank)
                {
                    sheet.DeleteColumn(j + 1); //Index parameter in DeleteColumn method starts from 1
                }
            }

            //Save the file
            workbook.SaveToFile("DeleteBlankRowsAndColumns.xlsx", ExcelVersion.Version2013);
        }
    }
}
Apply for a Temporary License
If you'd like to remove the evaluation message from the generated documents, or to get rid of the function limitations, please request a 30-day trial license for yourself.
C#/VB.NET: AutoFit Column Width and Row Height in Excel
When the text entered in a cell is too long to be fully displayed in the current cell, the “AutoFit” feature in Excel allows you to quickly adjust the column width or row height to fit all the content and make the entire worksheet more readable. In this article, you will learn how to programmatically AutoFit the column width and row height in an Excel worksheet using Spire.XLS for .NET.
Install Spire.XLS for .NET
To begin with, you need to add the DLL files included in the Spire.XLS for .NET package as references in your .NET project. The DLL files can be either downloaded from this link or installed via NuGet.
PM> Install-Package Spire.XLS
AutoFit Column Width and Row Height in Excel
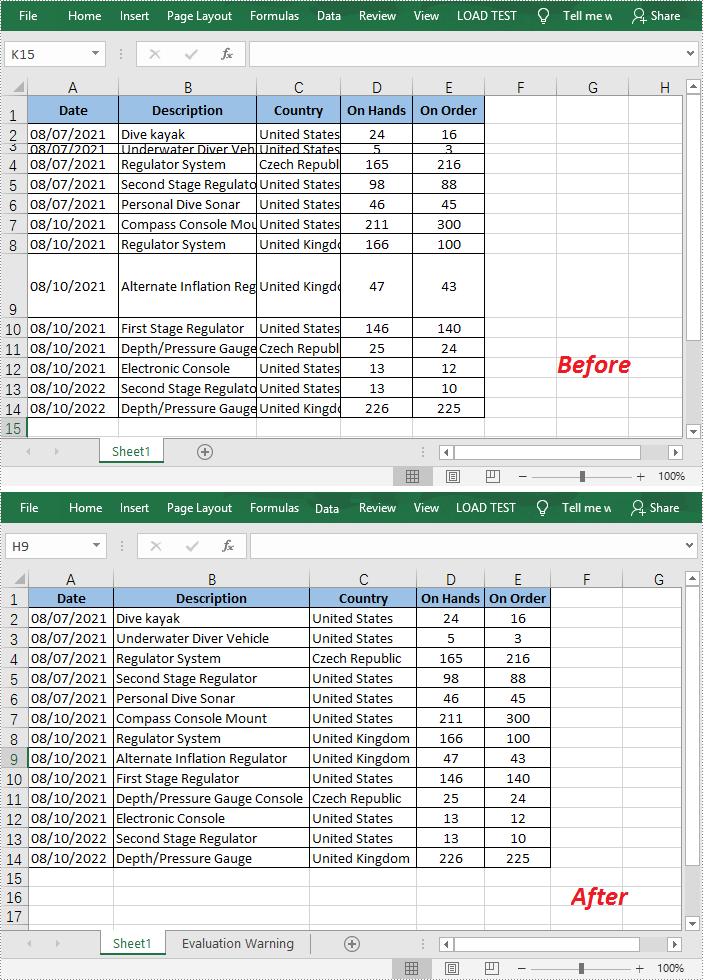
The detailed steps are as follows.
- Create a Workbook object.
- Load a sample Excel document using Workbook.LoadFromFile() method.
- Get a specified worksheet using Workbook.Worksheets[] property.
- Get the used range on the specified worksheet using Worksheet.AllocatedRange property.
- AutoFit column width and row height in the range using CellRange.AutoFitColumns() and CellRange.AutoFitRows() methods.
- Save the result file using Workbook.SaveToFile() method.
- C#
- VB.NET
using Spire.Xls;

namespace AutofitColumn
{
    class Program
    {
        static void Main(string[] args)
        {
            //Create a Workbook object
            Workbook workbook = new Workbook();

            //Load a sample Excel document
            workbook.LoadFromFile(@"E:\Files\Test.xlsx");

            //Get the first worksheet
            Worksheet worksheet = workbook.Worksheets[0];

            //AutoFit column width and row height
            worksheet.AllocatedRange.AutoFitColumns();
            worksheet.AllocatedRange.AutoFitRows();

            //Save the result file
            workbook.SaveToFile("AutoFit.xlsx", FileFormat.Version2010);
        }
    }
}
Apply for a Temporary License
If you'd like to remove the evaluation message from the generated documents, or to get rid of the function limitations, please request a 30-day trial license for yourself.
C#: Set Number Format in Excel
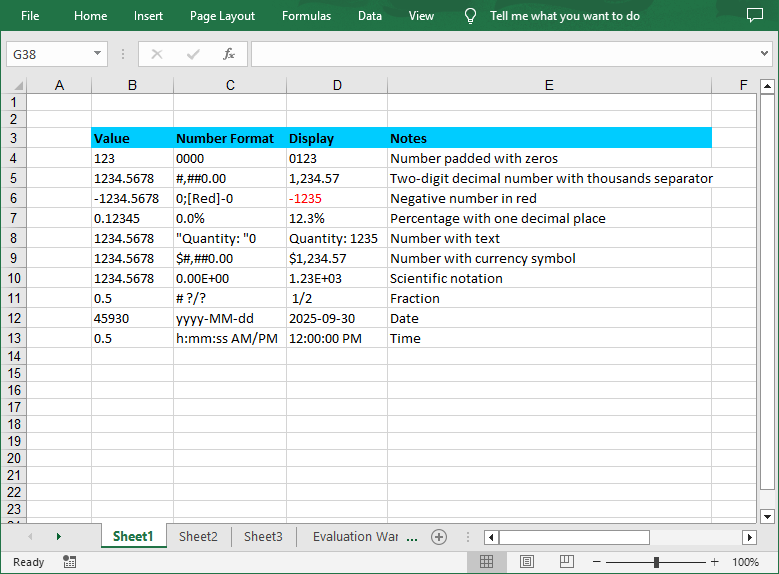
In Excel worksheets, the raw data is often displayed as plain numbers that lack intuitiveness. By setting number format, these numbers can be transformed into a more understandable form. For example, setting sales data in a currency format, i.e., adding a currency symbol and a thousands separator, can make the represented amounts clear at a glance. Formatting market share data into a percentage format can clearly shows the proportions of each part, facilitating quick comparisons and analysis. In this article, you will learn how to set number formats in Excel cells in C# using Spire.XLS for .NET.
Install Spire.XLS for .NET
To begin with, you need to add the DLL files included in the Spire.XLS for .NET package as references in your .NET project. The DLL files can be either downloaded from this link or installed via NuGet.
PM> Install-Package Spire.XLS
Symbols in Excel Number Format
In Excel number format codes, several symbols are used to define how numbers are displayed. Below is a detailed explanation of the common symbols:
| Symbols | Description |
| 0 | A required digit placeholder, padded with zeros if necessary. |
| # | An optional digit placeholder. It does not display insignificant zeros. |
| ? | An optional digit placeholder. It adds spaces to align decimal points and trailing zeros for fractions. |
| . | Represents the decimal point. |
| , | Serves as a thousands separator. |
| ; | Separates different sections of a number format code for positive, negative, zero, and text values. |
| % | Multiplies the number by 100 and adds a percentage sign. |
| E - + | Scientific notation. |
| Currency ($, €, ¥, etc.) | Displays the respective currency symbol. |
| [Color] | Specifies a color for the number display. |
| Date/Time (yyyy, mmmm, mm, dd, hh, ss, AM/PM) | Represent year, full month name, month, day, hour, minute, second, and 12-hour clock markers respectively. |
Set Number Format in Excel Cells in C#
Spire.XLS for .NET provides the CellRange.NumberValue property to set the number value of a cell and the CellRange.NumberFormat property to set the number format with format code. The detailed steps are as follows:
- Create a Workbook instance.
- Get a specified worksheet through Workbook.Worksheets[] property.
- Get a specified cell through Worksheet.Range[] property.
- Add text to specified cells through CellRange.Text property.
- Add numeric values to specified cells through CellRange.NumberValue property, and then set the number formats through CellRange.NumberFormat property.
- Save the result file using Workbook.SaveToFile() method.
- C#
using Spire.Xls;

namespace SetNumberFormat
{
    class Program
    {
        static void Main(string[] args)
        {
            // Create a Workbook instance
            Workbook workbook = new Workbook();

            // Get the first worksheet
            Worksheet sheet = workbook.Worksheets[0];

            // Add text to sepcified cells and set cell styles
            sheet.Range["B3"].Text = "Value";
            sheet.Range["C3"].Text = "Number Format";
            sheet.Range["D3"].Text = "Display";
            sheet.Range["E3"].Text = "Notes";
            sheet.Range["B3:E3"].Style.Font.IsBold = true;
            sheet.Range["B3:E3"].Style.KnownColor = ExcelColors.SkyBlue;

            // Number padded with zeros
            sheet.Range["B4"].Text = "123";
            sheet.Range["C4"].Text = "0000";
            sheet.Range["D4"].NumberValue = 123;
            sheet.Range["D4"].NumberFormat = "0000";
            sheet.Range["E4"].Text = "Number padded with zeros";

            // Two-digit decimal number with thousands separator
            sheet.Range["B5"].Text = "1234.5678";
            sheet.Range["C5"].Text = "#,##0.00";
            sheet.Range["D5"].NumberValue = 1234.5678;
            sheet.Range["D5"].NumberFormat = "#,##0.00";
            sheet.Range["E5"].Text = "Two-digit decimal number with thousands separator";

            // Negative number in red
            sheet.Range["B6"].Text = "-1234.5678";
            sheet.Range["C6"].Text = "0;[Red]-0";
            sheet.Range["D6"].NumberValue = -1234.5678;
            sheet.Range["D6"].NumberFormat = "0;[Red]-0";
            sheet.Range["E6"].Text = "Negative number in red";

            // Percentage with one decimal place
            sheet.Range["B7"].Text = "0.12345";
            sheet.Range["C7"].Text = "0.0%";
            sheet.Range["D7"].NumberValue = 0.12345;
            sheet.Range["D7"].NumberFormat = "0.0%";
            sheet.Range["E7"].Text = "Percentage with one decimal place";

            // Number with text
            sheet.Range["B8"].Text = "1234.5678";
            sheet.Range["C8"].Text = "\"Quantity: \"0";
            sheet.Range["D8"].NumberValue = 1234.5678;
            sheet.Range["D8"].NumberFormat = "\"Quantity: \"0";
            sheet.Range["E8"].Text = "Number with text";

            // Number with currency symbol
            sheet.Range["B9"].Text = "1234.5678";
            sheet.Range["C9"].Text = "$#,##0.00";
            sheet.Range["D9"].NumberValue = 1234.5678;
            sheet.Range["D9"].NumberFormat = "$#,##0.00";
            sheet.Range["E9"].Text = "Number with currency symbol";

            // Scientific notation format
            sheet.Range["B10"].Text = "1234.5678";
            sheet.Range["C10"].Text = "0.00E+00";
            sheet.Range["D10"].NumberValue = 1234.5678;
            sheet.Range["D10"].NumberFormat = "0.00E+00";
            sheet.Range["E10"].Text = "Scientific notation";

            // Fraction
            sheet.Range["B11"].Text = "0.5";
            sheet.Range["C11"].Text = "# ?/?";
            sheet.Range["D11"].NumberValue = 0.5;
            sheet.Range["D11"].NumberFormat = "# ?/?";
            sheet.Range["E11"].Text = "Fraction";

            // Date
            sheet.Range["B12"].Text = "45930";
            sheet.Range["C12"].Text = "yyyy-MM-dd";
            sheet.Range["D12"].NumberValue = 45930;
            sheet.Range["D12"].NumberFormat = "yyyy-MM-dd";
            sheet.Range["E12"].Text = "Date";

            // Time
            sheet.Range["B13"].Text = "0.5";
            sheet.Range["C13"].Text = "h:mm:ss AM/PM";
            sheet.Range["D13"].NumberValue = 0.5;
            sheet.Range["D13"].NumberFormat = "h:mm:ss AM/PM";
            sheet.Range["E13"].Text = "Time";

            // Set cell styles for the used range
            sheet.AllocatedRange.Style.Font.FontName = "Calibri";
            sheet.AllocatedRange.Style.Font.Size = 11;
            sheet.AllocatedRange.Style.HorizontalAlignment = HorizontalAlignType.Left;

            // Autofit column width
            sheet.AutoFitColumn(2);
            sheet.AutoFitColumn(3);
            sheet.AutoFitColumn(4);
            sheet.AutoFitColumn(5);

            // Save the result file
            workbook.SaveToFile("ExcelNumberFormat.xlsx", ExcelVersion.Version2016);
        }
    }
}
Apply for a Temporary License
If you'd like to remove the evaluation message from the generated documents, or to get rid of the function limitations, please request a 30-day trial license for yourself.
C#VB.NET: Set Row Height and Column Width in Excel
When creating a spreadsheet, you can adjust the layout and appearance of it by setting the row height and column width. Microsoft Excel provides users with various methods to modify column width and row height, such as dragging the boundaries of columns or rows to the desired size, or entering specific values in the column width box or row height box. However, it is crucial for developers to understand how to achieve this functionality through programming. In this article, we will show you how to set row height and column width in Excel by using Spire.XLS for .NET.
Install Spire.XLS for .NET
To begin with, you need to add the DLL files included in the Spire.XLS for.NET package as references in your .NET project. The DLLs files can be either downloaded from this link or installed via NuGet.
PM> Install-Package Spire.XLS
Set the Row Height in Excel
Spire.XLS for .NET supports users to set the row height programmatically by calling Worksheet.SetRowHeight() method. The following are detailed steps.
- Create an object of Workbook class.
- Load a sample file using Workbook.LoadFromFile() method.
- Get the first sheet from this file by using Workbook.Worksheets[] property.
- Set the height of the first row by calling Worksheet.SetRowHeight() method.
- Save the result file using Workbook.SaveToFile() method.
- C#
- VB.NET
using Spire.Xls;
namespace SetExcelRow
{
    class Program
    {

        static void Main(string[] args)
        {
            //Create an object of  Workbook class
            Workbook workbook = new Workbook();

            //Load a sample file from disk
            workbook.LoadFromFile(@"sample.xlsx");

            //Get the first worksheet from the sample file
            Worksheet sheet = workbook.Worksheets[0];

            //Set the row height of the first row
            sheet.SetRowHeight(1, 25);

            //Save the result file
            workbook.SaveToFile("SetRow.xlsx", ExcelVersion.Version2013);
            workbook.Dispose();
        }
    }
}
Set the Column Width in Excel
What's more, Spire.XLS for .NET also enable users to set the column width in Excel programmatically by calling Worksheet.SetColumnWidth() method. The following are detailed steps.
- Create an object of Workbook class.
- Load a sample file using Workbook.LoadFromFile() method.
- Get the first sheet from this file by using Workbook.Worksheets[] property.
- Set the width of the fourth column by calling Worksheet.SetColumnWidth() method.
- Save the result file using Workbook.SaveToFile() method.
- C#
- VB.NET
using Spire.Xls;
namespace SetExcelColumn
{
    class Program
    {

        static void Main(string[] args)
        {
            //Create an object of  Workbook class
            Workbook workbook = new Workbook();

            //Load a sample file from disk
            workbook.LoadFromFile(@"sample.xlsx");

            //Get the first worksheet from the sample file
            Worksheet sheet = workbook.Worksheets[0];

            //Set the column width of the fourth column
            sheet.SetColumnWidth(4, 15);

            //Save the result file
            workbook.SaveToFile("SetColumn.xlsx", ExcelVersion.Version2013);
            workbook.Dispose();
        }
    }
}

Apply for a Temporary License
If you'd like to remove the evaluation message from the generated documents, or to get rid of the function limitations, please request a 30-day trial license for yourself.
C#/VB.NET: Delete Rows and Columns from Excel
When the data in specific rows or columns are no longer needed, you can delete those rows or columns from your worksheet. In this article, you will learn how to delete rows and columns from Excel in C# and VB.NET using Spire.XLS for .NET library.
Install Spire.XLS for.NET
To begin with, you need to add the DLL files included in the Spire.XLS for.NET package as references in your .NET project. The DLLs files can be either downloaded from this link or installed via NuGet.
PM> Install-Package Spire.XLS
Delete a Specific Row and Column from Excel in C# and VB.NET
The following are the steps to delete a specific row and column from an Excel worksheet:
- Create a Workbook instance.
- Load an Excel file using Workbook.LoadFromFile() method.
- Get the desired worksheet using Workbook.Worksheets[sheetIndex] property.
- Delete the desired row from the worksheet by its index (1-based) using Worksheet.DeleteRow(rowIndex) method.
- Delete the desired column from the worksheet by its index (1-based) using Worksheet.DeleteColumn(columnIndex) method.
- Save the result file using Workbook.SaveToFile() method.
- C#
- VB.NET
using Spire.Xls;

namespace DeleteRowAndColumn
{
    class Program
    {
        static void Main(string[] args)
        {
            //Create a Workbook instance
            Workbook workbook = new Workbook();
            //Load an Excel file
            workbook.LoadFromFile("Sample.xlsx");

            //Get the first worksheet
            Worksheet sheet = workbook.Worksheets[0];
            //Delete the 9th row
            sheet.DeleteRow(9);
            //Delete the 3rd column
            sheet.DeleteColumn(3);

            //Save the result file
            workbook.SaveToFile("DeleteRowAndColumn.xlsx", ExcelVersion.Version2016);
        }
    }
}

Delete Multiple Rows and Columns from Excel in C# and VB.NET
The following are the steps to delete multiple rows and columns from an Excel worksheet:
- Create a Workbook instance.
- Load an Excel file using Workbook.LoadFromFile() method.
- Get the desired worksheet using Workbook.Worksheets[sheetIndex] property.
- Delete the desired rows from the worksheet using Worksheet.DeleteRow(startRowIndex, rowCount) method.
- Delete the desired columns from the worksheet using Worksheet.DeleteColumn(startColumnIndex, columnCount) method.
- Save the result file using Workbook.SaveToFile() method.
- C#
- VB.NET
using Spire.Xls;

namespace DeleteMultipleRowsAndColumns
{
    class Program
    {
        static void Main(string[] args)
        {
            //Create a Workbook instance
            Workbook workbook = new Workbook();
            //Load an Excel file
            workbook.LoadFromFile(@"Sample.xlsx");

            //Get the first worksheet
            Worksheet sheet = workbook.Worksheets[0];
            //Delete 3 rows from the worksheet starting from the 7th row
            sheet.DeleteRow(7, 3);
            //Delete 3 columns from the worksheet starting from the 3rd column
            sheet.DeleteColumn(3, 3);

            //Save the result file
            workbook.SaveToFile("DeleteMultipleRowsAndColumns.xlsx", ExcelVersion.Version2016);
        }
    }
}
Apply for a Temporary License
If you'd like to remove the evaluation message from the generated documents, or to get rid of the function limitations, please request a 30-day trial license for yourself.
C#/VB.NET Hide or Show Rows and Columns in Excel
When dealing with Excel files containing large amounts of data, you may sometimes need to hide certain rows and columns to conceal useless data so that you can focus on the information you need to analyze. In this article, you will learn how to hide or show rows and columns in Excel in C# and VB.NET using Spire.XLS for .NET.
- Hide Specific Rows and Columns in Excel
- Show Specific Hidden Rows and Columns in Excel
- Hide Multiple Rows and Columns at Once in Excel
- Show All Hidden Rows and Columns in Excel
Install Spire.XLS for .NET
To begin with, you need to add the DLL files included in the Spire.XLS for .NET package as references in your .NET project. The DLL files can be either downloaded from this link or installed via NuGet.
PM> Install-Package Spire.XLS
Hide Specific Rows and Columns in Excel in C# and VB.NET
The following steps demonstrate how to hide specific rows and columns in Excel in C# and VB.NET:
- Initialize an instance of the Workbook class.
- Load an Excel file using Workbook.LoadFromFile() method.
- Get a specific worksheet through Workbook.Worksheets[int sheetIndex] property.
- Hide specific rows in the worksheet using Worksheet.HideRow(int rowIndex) method.
- Hide Specific columns in the worksheet using Worksheet.HideColumn(int columnIndex) method.
- Save the result file using Workbook.SaveToFile() method.
- C#
- VB.NET
using Spire.Xls;

namespace HideExcelRowsAndColumns
{
    class Program
    {
        static void Main(string[] args)
        {
            //Create a Workbook instance
            Workbook workbook = new Workbook();
            //Load an Excel file
            workbook.LoadFromFile("Input.xlsx");

            //Get the first worksheet
            Worksheet sheet = workbook.Worksheets[0];

            //Hide the 3rd and the 7th rows
            sheet.HideRow(3);
            sheet.HideRow(7);

            //Hide the 3rd and the 6th columns
            sheet.HideColumn(3);
            sheet.HideColumn(6);

            //Save the result file
            workbook.SaveToFile("HideRowsAndColumns.xlsx", ExcelVersion.Version2013);
        }
    }
}
Show Specific Hidden Rows and Columns in Excel in C# and VB.NET
The following steps demonstrate how to show specific hidden rows and columns in Excel in C# and VB.NET:
- Initialize an instance of the Workbook class.
- Load an Excel file using Workbook.LoadFromFile() method.
- Get a specific worksheet through Workbook.Worksheets[int sheetIndex] property.
- Show specific hidden rows in the worksheet using Worksheet.ShowRow(int rowIndex) method.
- Show specific hidden columns in the worksheet using Worksheet.ShowColumn(int columnIndex) method.
- Save the result file using Workbook.SaveToFile() method.
- C#
- VB.NET
using Spire.Xls;

namespace ShowExcelRowsAndColumns
{
    class Program
    {
        static void Main(string[] args)
        {
            //Create a Workbook instance
            Workbook workbook = new Workbook();
            //Load an Excel file
            workbook.LoadFromFile("HideRowsAndColumns.xlsx");

            //Get the first worksheet
            Worksheet sheet = workbook.Worksheets[0];

            //Show the 3rd and the 7th rows
            sheet.ShowRow(3);
            sheet.ShowRow(7);

            //Show the 3rd and the 6th columns
            sheet.ShowColumn(3);
            sheet.ShowColumn(6);

            //Save the result file
            workbook.SaveToFile("ShowRowsAndColumns.xlsx", ExcelVersion.Version2013);
        }
    }
}
Hide Multiple Rows and Columns at Once in Excel in C# and VB.NET
The following steps demonstrate how to hide multiple rows and columns at once in Excel in C# and VB.NET:
- Initialize an instance of the Workbook class.
- Load an Excel file using Workbook.LoadFromFile() method.
- Get a specific worksheet through Workbook.Worksheets[int sheetIndex] property.
- Hide multiple rows in the worksheet using Worksheet.HideRows(int rowIndex, int rowCount) method.
- Hide multiple columns in the worksheet using Worksheet.HideColumns(int columnIndex, int columnCount) method.
- Save the result file using Workbook.SaveToFile() method.
- C#
- VB.NET
using Spire.Xls;

namespace HideMultipleExcelRowsAndColumns
{
    class Program
    {
        static void Main(string[] args)
        {
            //Create a Workbook instance
            Workbook workbook = new Workbook();
            //Load an Excel file
            workbook.LoadFromFile("Input.xlsx");

            //Get the first worksheet
            Worksheet sheet = workbook.Worksheets[0];

            //Hide 3, 4 and 5 rows
            sheet.HideRows(3, 3);

            //Hide 5, 6 and 7 columns
            sheet.HideColumns(5, 3);

            //Save the result file
            workbook.SaveToFile("HideMultipleRowsAndColumns.xlsx", ExcelVersion.Version2013);
        }
    }
}

Show All Hidden Rows and Columns in Excel in C# and VB.NET
The following steps demonstrate how to show all hidden rows and columns in Excel in C# and VB.NET:
- Initialize an instance of the Workbook class.
- Load an Excel file using Workbook.LoadFromFile() method.
- Get a specific worksheet through Workbook.Worksheets[int sheetIndex] property.
- Iterate through the rows in the worksheet and find the hidden rows using Worksheet.GetRowIsHide(int rowIndex) method.
- Show all hidden rows using Worksheet.ShowRow(int rowIndex) method.
- Iterate through the columns in the worksheet and find the hidden columns using Worksheet.GetColumnIsHide(int columnIndex) method.
- Show all hidden columns using Worksheet.ShowColumn(int columnIndex) method.
- Save the result file using Workbook.SaveToFile() method.
- C#
- VB.NET
using Spire.Xls;

namespace ShowAllHiddenRowsAndColumns
{
    class Program
    {
        static void Main(string[] args)
        {
            //Create a Workbook instance
            Workbook workbook = new Workbook();
            //Load an Excel file
            workbook.LoadFromFile("HideRowsAndColumns.xlsx");

            //Get the first worksheet
            Worksheet sheet = workbook.Worksheets[0];

            //Iterate through the rows in the worksheet
            for (int i = 1; i <= sheet.LastRow; i++)
            {
                //Check if the current row is hidden
                if (sheet.GetRowIsHide(i))
                {
                    //Show the hidden row
                    sheet.ShowRow(i);
                }
            }

            //Iterate through the columns in the worksheet
            for (int j = 1; j <= sheet.LastRow; j++)
            {
                //Check if the current column is hidden
                if (sheet.GetColumnIsHide(j))
                {
                    //Show the hidden column
                    sheet.ShowColumn(j);
                }
            }

            //Save the result file
            workbook.SaveToFile("ShowAllHiddenRowsAndColumns.xlsx", ExcelVersion.Version2013);
        }
    }
}
Apply for a Temporary License
If you'd like to remove the evaluation message from the generated documents, or to get rid of the function limitations, please request a 30-day trial license for yourself.
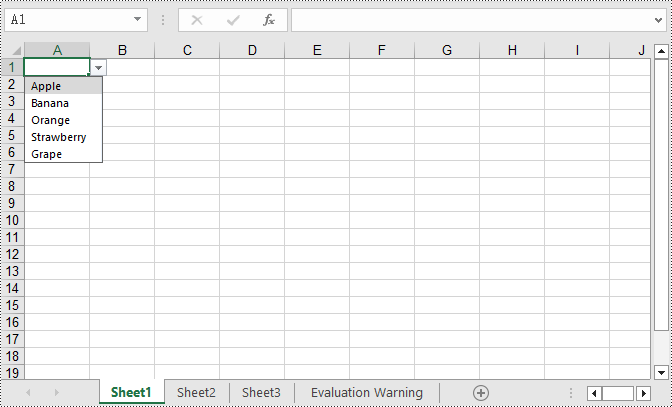
C#: Create Dropdown Lists in an Excel Document
The purpose of creating dropdown lists in an Excel document is to provide a convenient way for data input, restricting users to select only from predefined options. This helps prevent input errors and ensures data accuracy. With dropdown lists, users can choose from a fixed list of options without the need to manually enter data, thereby reducing the possibility of input errors. This article will introduce how to use Spire.XLS for .NET to create dropdown lists in Excel documents within a C# project.
- Create Dropdown List using String Array in C#
- Create Dropdown List using Data from the Same Worksheet in C#
- Create Dropdown List using Data from Different Worksheets in C#
- Create Linked Dropdown Lists in the Same Worksheet in C#
- Create Linked Dropdown Lists across Different Worksheets in C#
Install Spire.XLS for .NET
To begin with, you need to add the DLL files included in the Spire.XLS for .NET package as references in your .NET project. The DLL files can be either downloaded from this link or installed via NuGet.
PM> Install-Package Spire.XLS
Create Dropdown List using String Array in C#
Using Spire.XLS, you can easily create dropdown lists in cells by assigning a string array to the CellRange.DataValidation.Values property. Here are the detailed steps:
- Create a Workbook object.
- Use Workbook.Worksheets[0] to get the first worksheet in the workbook.
- Create a string array and assign it to the CellRange.DataValidation.Values property.
- Save the document to a specified path using the Workbook.SaveToFile() method.
- C#
using Spire.Xls;

namespace SpireXlsDemo
{
    internal class Program
    {
        static void Main(string[] args)
        {
            // Create a Workbook object
            Workbook workbook = new Workbook();

            // Get the first Worksheet in the Workbook object
            Worksheet worksheet = workbook.Worksheets[0];

            // Create a string array
            string[] values = new string[] { "Apple", "Banana", "Orange", "Strawberry", "Grape" };

            // Set data validation in cell A1 of the worksheet, restricting selectable values to those in the values array
            worksheet.Range["A1"].DataValidation.Values = values;

            // Save the Workbook object as an Excel file
            workbook.SaveToFile("DropdownListCreatedFromArray.xlsx", ExcelVersion.Version2016);

            // Dispose of the resources occupied by the Workbook object
            workbook.Dispose();
        }
    }
}
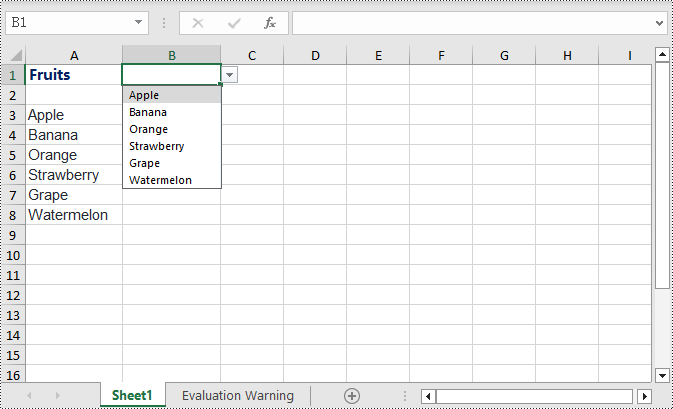
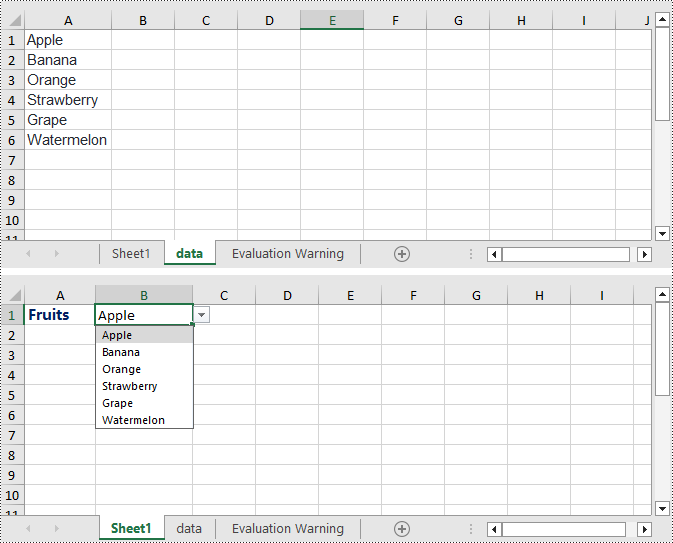
Create Dropdown List using Data from the Same Worksheet in C#
The following example demonstrates creating a dropdown list in the worksheet where the data is located by specifying the data range and applying it to the corresponding cell. Here are the detailed steps:
- Create a Workbook object.
- Load an Excel document using the Workbook.LoadFromFile() method.
- Access the first worksheet in the workbook using Workbook.Worksheets[0].
- Get the data range using Worksheet.Range[""].
- Specify cell B1 as a dropdown list and set the data range using Worksheet.Range["B1"].DataValidation.DataRange.
- Save the document to a specified path using the Workbook.SaveToFile() method.
- C#
using Spire.Xls;

namespace SpireXlsDemo
{
    internal class Program
    {
        static void Main(string[] args)
        {
            // Create a new workbook object
            Workbook workbook = new Workbook();

            // Load workbook data from a file
            workbook.LoadFromFile("Sample1.xlsx");

            // Get the first worksheet in the workbook
            Worksheet worksheet = workbook.Worksheets[0];

            // Get the cell range from A3 to A8 in the worksheet
            CellRange dataRange = worksheet.Range["A3:A8"];

            // Set cell B1 as a dropdown with data range obtained earlier
            worksheet.Range["B1"].DataValidation.DataRange = dataRange;

            // Save the workbook to a new file
            workbook.SaveToFile("CreateDropdownInSameWorksheet.xlsx", ExcelVersion.Version2016);

            // Dispose of the workbook resources
            workbook.Dispose();
        }
    }
}
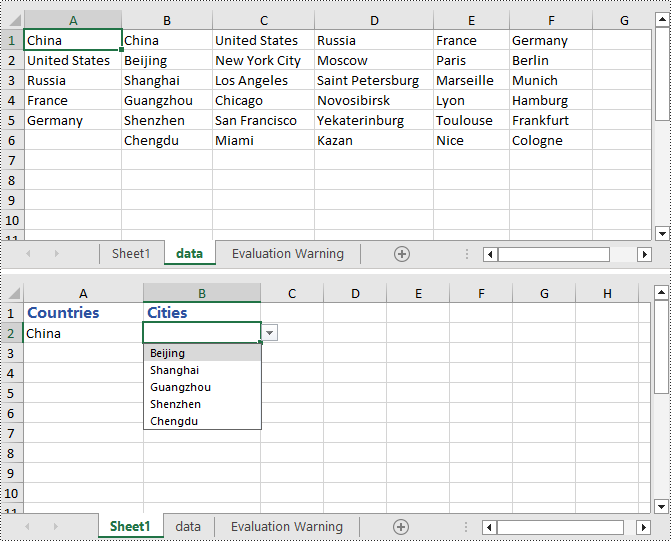
Create Dropdown List using Data from Different Worksheets in C#
This example demonstrates how to specify a data range in one worksheet and apply it to a specific cell in another worksheet. In this process, it is necessary to ensure that Worksheet.ParentWorkbook.Allow3DRangesInDataValidation = true is set to enable the functionality of creating dropdown lists across different worksheets. Here are the detailed steps:
- Create a Workbook object.
- Load an Excel document using the Workbook.LoadFromFile() method.
- Retrieve a specific worksheet from the workbook using Workbook.Worksheets[].
- Set Worksheet.ParentWorkbook.Allow3DRangesInDataValidation = true to enable the use of 3D ranges in data validation within the worksheet.
- Use CellRange.DataValidation.DataRange to specify a cell as a dropdown list and set the data range.
- Save the document to a specified path using the Workbook.SaveToFile() method.
- C#
using Spire.Xls;

namespace SpireXlsDemo
{
    internal class Program
    {
        static void Main(string[] args)
        {
            // Create a Workbook object
            Workbook workbook = new Workbook();

            // Load the workbook from a file
            workbook.LoadFromFile("Sample2.xlsx");

            // Get the first worksheet
            Worksheet worksheet1 = workbook.Worksheets[0];

            // Get the second worksheet
            Worksheet worksheet2 = workbook.Worksheets[1];

            // Allow the use of 3D ranges in data validation
            worksheet1.ParentWorkbook.Allow3DRangesInDataValidation = true;

            // Define the data range
            CellRange dataRange = worksheet2.Range["A1:A6"];

            // Apply the data range to cell B1 in worksheet 1 as data validation
            worksheet1.Range["B1"].DataValidation.DataRange = dataRange;

            // Save the workbook to a file
            workbook.SaveToFile("Create the Dropdowns Across Different Worksheets.xlsx", ExcelVersion.Version2016);

            // Release the resources of the workbook
            workbook.Dispose();
        }
    }
}
Create Linked Dropdown Lists in the Same Worksheet in C#
Linked dropdown menus refer to the automatic updating of options in one dropdown menu based on the selection made in another dropdown menu. This example demonstrates how to create linked dropdown lists (dropdown menus) functionality within the same worksheet. This is achieved by adding an INameRange object and setting the reference range, as well as setting the data range and formula for data validation to achieve the linked dropdown effect. Here are the detailed steps:
- Create a Workbook object.
- Load an Excel document using the Workbook.LoadFromFile() method.
- Retrieve a specific worksheet from the workbook using Workbook.Worksheets[].
- Add an INamedRange object and set the reference range.
- Set Worksheet.ParentWorkbook.Allow3DRangesInDataValidation = true to enable the use of 3D ranges in data validation within the worksheet.
- Use CellRange.DataValidation.DataRange to specify a cell as a dropdown box and set the data range.
- Set CellRange.DataValidation.AllowType = CellDataType.User to specify the data validation type for cells in the worksheet as user-defined.
- Set CellRange.DataValidation.Formula1 = "=INDIRECT(SUBSTITUTE(A2,\" \",\"_\"))", which means that the data validation for this cell will dynamically select the data range based on the value in the cell.
- Save the document to a specified path using the Workbook.SaveToFile() method.
- C#
using Spire.Xls;

namespace SpireXlsDemo
{
    internal class Program
    {
        static void Main(string[] args)
        {
            // Create a new workbook object
            Workbook workbook = new Workbook();

            // Load the workbook from a file
            workbook.LoadFromFile("Sample3.xlsx");

            // Get the first worksheet
            Worksheet worksheet1 = workbook.Worksheets[0];

            // Get the second worksheet
            Worksheet worksheet2 = workbook.Worksheets[1];

            // Add named range objects and set reference ranges
            Spire.Xls.Core.INamedRange namedRange = workbook.NameRanges.Add(worksheet2.Range["A1"].Text);
            namedRange.RefersToRange = worksheet2.Range["B2:B6"];
            namedRange = workbook.NameRanges.Add(worksheet2.Range["A2"].Text.Replace(" ", "_"));
            namedRange.RefersToRange = worksheet2.Range["C2:C6"];
            namedRange = workbook.NameRanges.Add(worksheet2.Range["A3"].Text);
            namedRange.RefersToRange = worksheet2.Range["D2:D6"];
            namedRange = workbook.NameRanges.Add(worksheet2.Range["A4"].Text);
            namedRange.RefersToRange = worksheet2.Range["E2:E6"];
            namedRange = workbook.NameRanges.Add(worksheet2.Range["A5"].Text);
            namedRange.RefersToRange = worksheet2.Range["F2:F6"];

            // Allow 3D ranges in data validation
            worksheet1.ParentWorkbook.Allow3DRangesInDataValidation = true;

            // Set the data range for data validation
            worksheet1.Range["A2"].DataValidation.DataRange = worksheet2.Range["A1:A5"];
            worksheet1.Range["B2"].DataValidation.AllowType = CellDataType.User;

            // Set the formula
            worksheet1.Range["B2"].DataValidation.Formula1 = "=INDIRECT(SUBSTITUTE(A2,\" \",\"_\"))";

            // Save the workbook to a file
            workbook.SaveToFile("Linked Dropdowns in the Same Worksheet.xlsx", ExcelVersion.Version2016);

            // Dispose of the workbook resources
            workbook.Dispose();
        }
    }
}
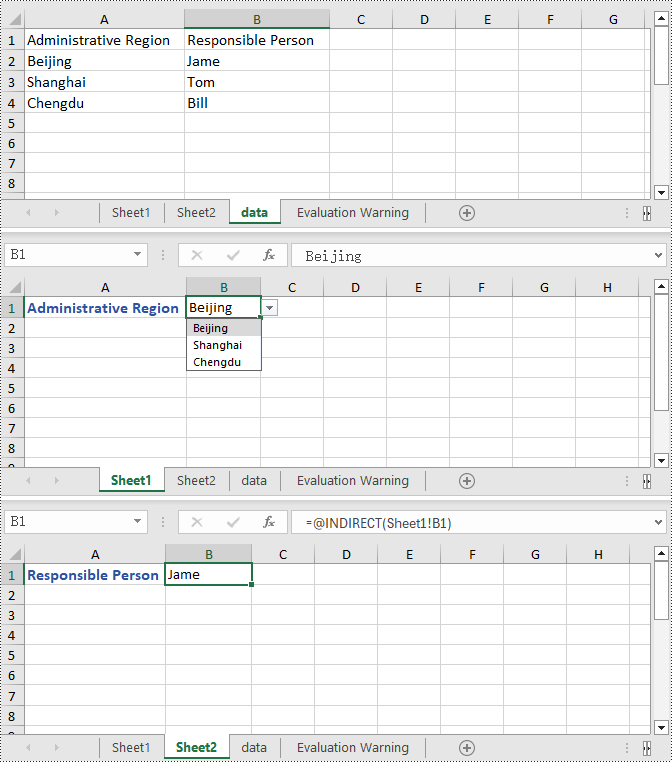
Create Linked Dropdown Lists across Different Worksheets in C#
This example demonstrates how to implement linked dropdown lists between different worksheets in an Excel document. By adding an INameRange object and setting the reference range, you can set the data validation range in the first worksheet and set the cell formula in the second worksheet to achieve the linked dropdown effect. Here are the detailed steps:
- Create a Workbook object.
- Load an Excel document using the Workbook.LoadFromFile() method.
- Retrieve a specific worksheet from the workbook using Workbook.Worksheets[].
- Add an INamedRange object and set the reference range.
- Set Worksheet.ParentWorkbook.Allow3DRangesInDataValidation = true to enable data validation using 3D ranges in the worksheet.
- Set the data validation range using CellRange.DataValidation.DataRange.
- Set the formula in a cell in the second worksheet using CellRange.Formula = "=INDIRECT(" + worksheet1.Name + "!B1)" to indirectly reference the value of a cell in the first worksheet.
- Save the document to a specified path using the Workbook.SaveToFile() method.
- C#
using Spire.Xls;

namespace SpireXlsDemo
{
	internal class Program
	{
		static void Main(string[] args)
		{
                                     // Create a Workbook object
                                     Workbook workbook = new Workbook();

                                     // Load the workbook from a file
                                     workbook.LoadFromFile("Sample4.xlsx");

                                     // Get the first worksheet
                                     Worksheet worksheet1 = workbook.Worksheets[0];

                                     // Get the second worksheet
                                     Worksheet worksheet2 = workbook.Worksheets[1];

                                     // Get the data worksheet
                                     Worksheet dataSheet = workbook.Worksheets[2];

                                     // Add a named range object and set the reference range
                                     Spire.Xls.Core.INamedRange namedRange = workbook.NameRanges.Add(dataSheet.Range["A2"].Text);
                                     namedRange.RefersToRange = dataSheet.Range["B2"];
                                     namedRange = workbook.NameRanges.Add(dataSheet.Range["A3"].Text);
                                     namedRange.RefersToRange = dataSheet.Range["B3"];
                                     namedRange = workbook.NameRanges.Add(dataSheet.Range["A4"].Text);
                                     namedRange.RefersToRange = dataSheet.Range["B4"];

                                     // Allow 3D ranges in data validation
                                     worksheet1.ParentWorkbook.Allow3DRangesInDataValidation = true;

                                     // Set the data range for data validation
                                     worksheet1.Range["B1"].DataValidation.DataRange = dataSheet.Range["A2:A4"];

                                     // Set the formula for cell B1 in the second worksheet
                                     worksheet2.Range["B1"].Formula = "=INDIRECT(" + worksheet1.Name + "!B1)";

                                     // Save the workbook to a file
                                     workbook.SaveToFile("Creating Linked Dropdowns Across Different Worksheets.xlsx", ExcelVersion.Version2016);

                                     // Release the resources of the workbook
                                     workbook.Dispose();
		}
	}
}
Apply for a Temporary License
If you'd like to remove the evaluation message from the generated documents, or to get rid of the function limitations, please request a 30-day trial license for yourself.
C#/VB.NET: Freeze Rows and Columns in Excel
Excel Panes can be frozen in order to keep certain rows or columns visible when scrolling through the worksheet. This is particularly helpful when you have a huge amount of data that you need to deal with. In this article, you will learn how to freeze rows or/and columns in C# and VB.NET using Sprie.XLS for .NET.
Spire.XLS provides the Worksheet.FreezePanes(int rowIndex, int columnIndex) method to freeze all rows and columns above and left of the selected cell which is determined by the rowIndex and the columnIndex.

The following sections will demonstrate how to:
Install Spire.XLS for .NET
To begin with, you need to add the DLL files included in the Spire.XLS for .NET package as references in your .NET project. The DLL files can be either downloaded from this link or installed via NuGet.
PM> Install-Package Spire.XLS
Freeze the Top Row
To freeze the top row, the selected cell should be the cell (2, 1) – “A2”. The following are the steps to freeze the top row using Spire.XLS for .NET.
- Create a Workbook object.
- Load an Excel file using Workbook.LoadFromFile() method.
- Get a specific worksheet through Workbook.Worksheets[sheetIndex] property.
- Freeze the top row by passing (2, 1) to the Worksheet.FreezePanes(int rowIndex, int columnIndex) method as the parameter.
- Save the workbook to another Excel file using Workbook.SaveToFile() method.
- C#
- VB.NET
using Spire.Xls;

namespace FreezeTopRow
{
    class Program
    {
        static void Main(string[] args)
        {
            //Create a Workbook instance
            Workbook workbook = new Workbook();

            //Load an Excel document
            workbook.LoadFromFile(@"C:\Users\Administrator\Desktop\sample.xlsx");

            //Get the first worksheet
            Worksheet sheet = workbook.Worksheets[0];

            //Freeze the top row
            sheet.FreezePanes(2, 1);

            //Save to another file
            workbook.SaveToFile("FreezeTopRow.xlsx", ExcelVersion.Version2016);
        }
    }
}
Freeze the First Column
To freeze the first column, the selected cell should be the cell (1, 2) – “B1”. The following are the steps to freeze the first column using Spire.XLS for .NET.
- Create a Workbook object.
- Load an Excel file using Workbook.LoadFromFile() method.
- Get a specific worksheet through Workbook.Worksheets[sheetIndex] property.
- Freeze the top row by passing (1, 2) to the Worksheet.FreezePanes(int rowIndex, int columnIndex) method as the parameter.
- Save the workbook to another Excel file using Workbook.SaveToFile() method.
- C#
- VB.NET
using Spire.Xls;

namespace FreezeFirstColumn
{
    class Program
    {
        static void Main(string[] args)
        {
            //Create a Workbook instance
            Workbook workbook = new Workbook();

            //Load an Excel document
            workbook.LoadFromFile(@"C:\Users\Administrator\Desktop\sample.xlsx");

            //Get the first worksheet
            Worksheet sheet = workbook.Worksheets[0];

            //Freeze the first column
            sheet.FreezePanes(1, 2);

            //Save to another file
            workbook.SaveToFile("FreezeFirstColumn.xlsx", ExcelVersion.Version2016);
        }
    }
}
Freeze the First Row and the First Column
To freeze the first row and the first column, the selected cell should be the cell (2, 2) – “B2”. The following are the detailed steps.
- Create a Workbook object.
- Load an Excel file using Workbook.LoadFromFile() method.
- Get a specific worksheet through Workbook.Worksheets[sheetIndex] property.
- Freeze the first row and the first column by passing (2, 2) to the Worksheet.FreezePanes(int rowIndex, int columnIndex) method as the parameter.
- Save the workbook to another Excel file using Workbook.SaveToFile() method.
- C#
- VB.NET
using Spire.Xls;

namespace FreezeFirstRowAndFirstColumn
{
    class Program
    {
        static void Main(string[] args)
        {
            //Create a Workbook instance
            Workbook workbook = new Workbook();

            //Load an Excel document
            workbook.LoadFromFile(@"C:\Users\Administrator\Desktop\sample.xlsx");

            //Get the first worksheet
            Worksheet sheet = workbook.Worksheets[0];

            //Freeze the first row and the first column
            sheet.FreezePanes(2, 2);

            //Save to another file
            workbook.SaveToFile("FreezeFirstRowAndFirstColumn.xlsx", ExcelVersion.Version2016);
        }
    }
}
Apply for a Temporary License
If you'd like to remove the evaluation message from the generated documents, or to get rid of the function limitations, please request a 30-day trial license for yourself.
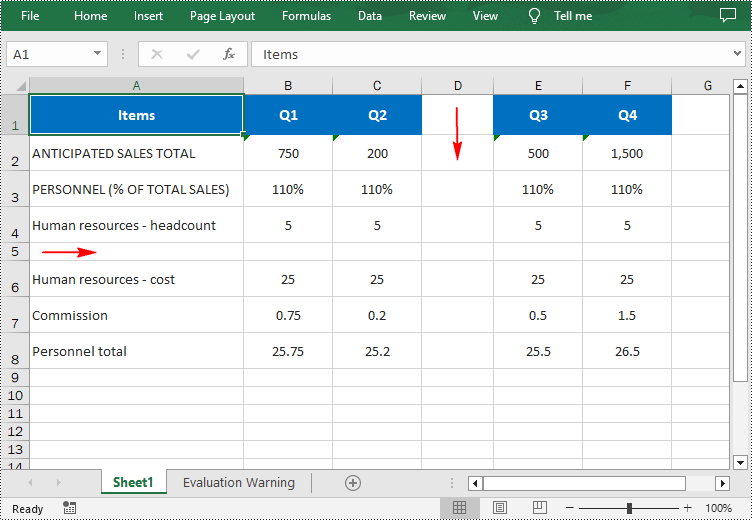
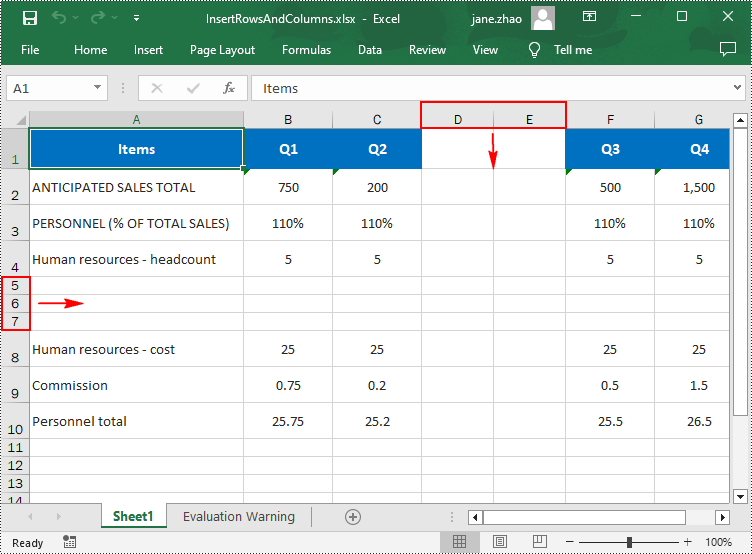
C#: Insert Rows and Columns in Excel
When working with Excel spreadsheets, it is common to add additional rows or columns as your data set grows or the scope of your project expands. By inserting rows and columns, you can quickly modify the structure of your spreadsheet to accommodate new information. In this article, you will learn how to insert rows and columns in Excel in C# using Spire.XLS for .NET.
Install Spire.XLS for .NET
To begin with, you need to add the DLL files included in the Spire.XLS for .NET package as references in your .NET project. The DLL files can be either downloaded from this link or installed via NuGet.
PM> Install-Package Spire.XLS
Insert a Row and a Column in Excel in C#
Spire.XLS for .NET provides the Worksheet.InsertRow(int rowIndex) and Worksheet.InsertColumn(int columnIndex) methods for inserting a blank row and a blank column in an Excel worksheet. The following are the detailed steps:
- Create a Workbook instance.
- Load a sample Excel file using Workbook.LoadFromFile() method.
- Get a specified worksheet using Workbook.Worksheets[sheetIndex] property.
- Insert a row into the worksheet using Worksheet.InsertRow(int rowIndex) method.
- Insert a column into the worksheet using Worksheet.InsertColumn(int columnIndex) method.
- Save the result file using Workbook.SaveToFile() method.
- C#
using Spire.Xls;

namespace InsertRowColumn
{
    class Program
    {
        static void Main(string[] args)
        {
            //Create a Workbook instance
            Workbook workbook = new Workbook();

            //Load an Excel document
            workbook.LoadFromFile("input.xlsx");

            //Get a specified worksheet
            Worksheet worksheet = workbook.Worksheets[0];

            //Insert a blank row as the 5th row in the worksheet
            worksheet.InsertRow(5);

            //Insert a blank column as the 4th column in the worksheet
            worksheet.InsertColumn(4);

            //Save the result file
            workbook.SaveToFile("InsertRowAndColumn.xlsx", ExcelVersion.Version2016);
        }
    }
}
Insert Multiple Rows and Columns in Excel in C#
To insert multiple rows and columns into a worksheet, you can use the Worksheet.InsertRow(int rowIndex, int rowCount) and Worksheet.InsertColumn(int columnIndex, int columnCount) methods. The following are detailed steps.
- Create a Workbook instance.
- Load a sample Excel file using Workbook.LoadFromFile() method.
- Get a specified worksheet using Workbook.Worksheets[sheetIndex] property.
- Insert multiple rows into the worksheet using Worksheet.InsertRow(int rowIndex, int rowCount) method.
- Insert multiple columns into the worksheet using Worksheet.InsertColumn(int columnIndex, int columnCount) method.
- Save the result file using Workbook.SaveToFile() method.
- C#
using Spire.Xls;

namespace InsertRowColumn
{
    class Program
    {
        static void Main(string[] args)
        {
            //Create a Workbook instance
            Workbook workbook = new Workbook();

            //Load an Excel document
            workbook.LoadFromFile(@"E:\PythonExcel\input1.xlsx");

            //Get a specified worksheet
            Worksheet worksheet = workbook.Worksheets[0];

            //Insert three blank rows into the worksheet
            worksheet.InsertRow(5, 3);

            //Insert two blank columns into the worksheet
            worksheet.InsertColumn(4, 2);

            //Save the result file
            workbook.SaveToFile("InsertRowsAndColumns.xlsx", ExcelVersion.Version2016);
        }
    }
}
Apply for a Temporary License
If you'd like to remove the evaluation message from the generated documents, or to get rid of the function limitations, please request a 30-day trial license for yourself.