Append HTML String to PowerPoint in C#, VB.NET
Spire.Presentation supports to insert HTML formatted text to PowerPoint slide. The following code snippets demonstrate how to.
Step 1: Create an instance of Presentation class.
Presentation ppt = new Presentation();
Step 2: Insert an autoshape (rectangle) in slide.
IAutoShape shape = ppt.Slides[0].Shapes.AppendShape(ShapeType.Rectangle, new RectangleF(50, 50, 400, 100));
Step 3: Clear default paragraphs in the shape.
shape.TextFrame.Paragraphs.Clear();
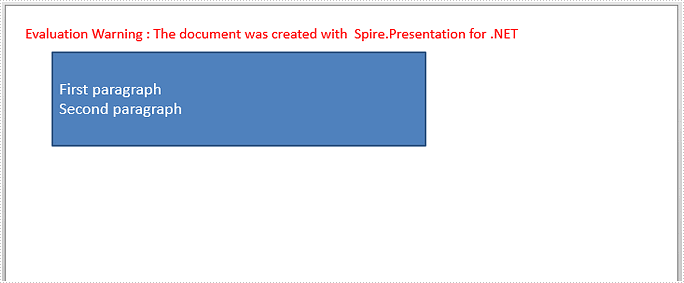
Step 4: Add paragraphs to shape from HTML code. Make sure your HTML segments are written between <html><body> and </body></html> tags, otherwise, AddFromHtml method will fail to work.
string htmlText= "<html><body><p>First paragraph</p><p>Second paragraph</p></body></html>";
shape.TextFrame.Paragraphs.AddFromHtml(htmlText);
Step 5: Save to file.
ppt.SaveToFile("output.pptx", FileFormat.Pptx2013);
Output:
Full Code:
using Spire.Presentation;
using System.Drawing;
namespace AppendHTMLString
{
class Program
{
static void Main(string[] args)
{
Presentation ppt = new Presentation();
IAutoShape shape = ppt.Slides[0].Shapes.AppendShape(ShapeType.Rectangle, new RectangleF(50, 50, 400, 100));
shape.TextFrame.Paragraphs.Clear();
string htmlText = "First paragraph
Second paragraph
";
shape.TextFrame.Paragraphs.AddFromHtml(htmlText);
ppt.SaveToFile("output.pptx", FileFormat.Pptx2013);
}
}
}
Imports Spire.Presentation Imports System.Drawing Namespace AppendHTMLString Class Program Private Shared Sub Main(args As String()) Dim ppt As New Presentation() Dim shape As IAutoShape = ppt.Slides(0).Shapes.AppendShape(ShapeType.Rectangle, New RectangleF(50, 50, 400, 100)) shape.TextFrame.Paragraphs.Clear() Dim htmlText As String = "First paragraph
Second paragraph
" shape.TextFrame.Paragraphs.AddFromHtml(htmlText) ppt.SaveToFile("output.pptx", FileFormat.Pptx2013) End Sub End Class End Namespace
Copy a paragraph from one presentation slide to another in C#
In our daily work, we may need to copy the contents from one presentation slides to another. This article is aimed to introduce the method of how to copy the content from one paragraph from the source PowerPoint document to the target document by using Spire.Presenation.
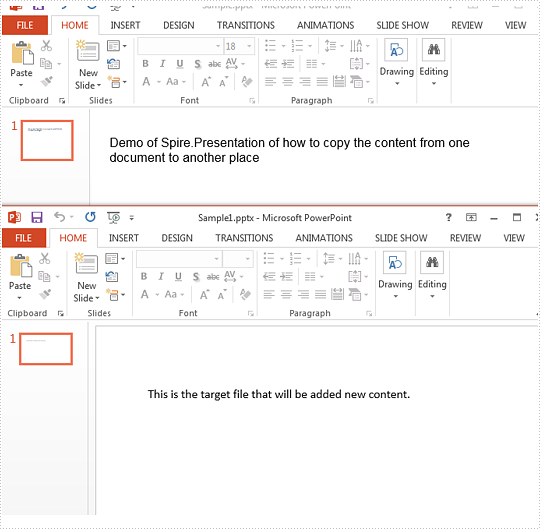
Firstly, View the original presentation slide and the target presentation slide.
Step 1: Initialize an instances of Presentation class and load the source document from file
Presentation ppt = new Presentation();
ppt.LoadFromFile("Sample.pptx", FileFormat.Pptx2010);
Step 2: Get the text from the first shape on the first slide.
string Text = "";
IShape shp = ppt.Slides[0].Shapes[0];
Text = ((IAutoShape)shp).TextFrame.Text;
Step 3: Get the first shape on the first slide from the target document file.
Presentation ppt2 = new Presentation("Sample1.pptx", FileFormat.Pptx2010);
IShape destshp = ppt2.Slides[0].Shapes[0];
Step 4: Get text from placeholder.
((IAutoShape)destshp).TextFrame.Text += Text;
Step 5: Save the document to file.
ppt2.SaveToFile("Sample1.pptx", FileFormat.Pptx2010);
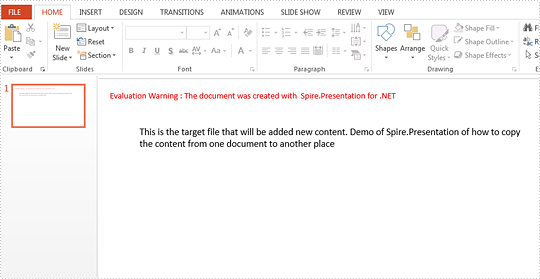
Effective screenshot after copy the paragraph from the source file:
Full codes:
using Spire.Presentation;
namespace CoppyParagh
{
    class Program
    {
        static void Main(string[] args)
        {

            Presentation ppt = new Presentation();
            ppt.LoadFromFile("Sample.pptx", FileFormat.Pptx2010);

            string Text = "";
            IShape shp = ppt.Slides[0].Shapes[0];
            Text = ((IAutoShape)shp).TextFrame.Text;

            Presentation ppt2 = new Presentation("Sample1.pptx", FileFormat.Pptx2010);
            IShape destshp = ppt2.Slides[0].Shapes[0];
            ((IAutoShape)destshp).TextFrame.Text += Text;

            ppt2.SaveToFile("Sample1.pptx", FileFormat.Pptx2010);


        }
    }
}
Text replacement on the presentation slides
By using Spire.Presentation for .NET, developers can easily modify the texts on the presentation slides. In this topic, we are going to demonstrate how to use Spire.Presentation to replace the specific texts in a placeholder in C#.
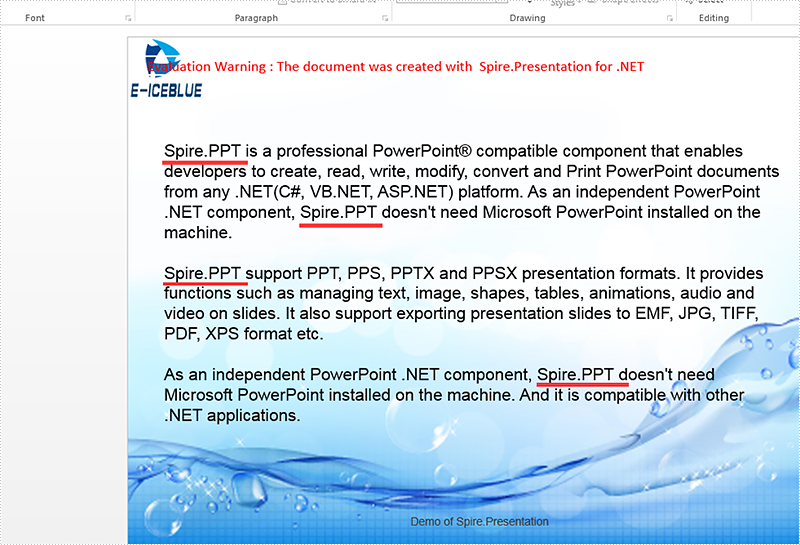
Firstly, view the original sample document that the text "Spire.Presentation for .NET" will be replaced later.

Step 1: Create an instance of Dictionary<string,string> and add an item for the instance.
Dictionary<string, string> TagValues = new Dictionary<string, string>();
TagValues.Add("Spire.Presentation for .NET", "Spire.PPT");
Step 2: Create a presentation instance and load the document from file.
Presentation presentation = new Presentation();
presentation.LoadFromFile("Sample.pptx", FileFormat.Pptx2010);
Step 3: Call ReplaceTags event to replace all the texts on the first slide.
ReplaceTags(presentation.Slides[0], TagValues);
Step 4: Save the document to file and lance to process it.
presentation.SaveToFile("Result.pptx", FileFormat.Pptx2010);
System.Diagnostics.Process.Start("Result.pptx");
The following ReplaceTags() method shows how to replace the text on the first presentation slide:
public void ReplaceTags(Spire.Presentation.ISlide pSlide, Dictionary<string, string> TagValues)
{
    foreach (IShape curShape in pSlide.Shapes)
    {
        if (curShape is IAutoShape)
        {
            foreach (TextParagraph tp in (curShape as IAutoShape).TextFrame.Paragraphs)
            {
                foreach (var curKey in TagValues.Keys)
                {
                    if (tp.Text.Contains(curKey))
                    {
                        tp.Text = tp.Text.Replace(curKey, TagValues[curKey]);
                    }
                }
            }
        }
    }
}
Effective screenshot after the replacing the text on the presentation slide:
Full codes of how to replace the text on the presentation slides:
public ReplaceText()
{
    {
        Dictionary<string, string> TagValues = new Dictionary<string, string>();
        TagValues.Add("Spire.Presentation for .NET", "Spire.PPT");

        Presentation presentation = new Presentation();

        presentation.LoadFromFile("Sample.pptx", FileFormat.Pptx2010);

        ReplaceTags(presentation.Slides[0], TagValues);

        presentation.SaveToFile("Result.pptx", FileFormat.Pptx2010);
        System.Diagnostics.Process.Start("Result.pptx");
    }
}
public void ReplaceTags(Spire.Presentation.ISlide pSlide, Dictionary<string, string> TagValues)
{
    foreach (IShape curShape in pSlide.Shapes)
    {
        if (curShape is IAutoShape)
        {
            foreach (TextParagraph tp in (curShape as IAutoShape).TextFrame.Paragraphs)
            {
                foreach (var curKey in TagValues.Keys)
                {
                    if (tp.Text.Contains(curKey))
                    {
                        tp.Text = tp.Text.Replace(curKey, TagValues[curKey]);
                    }
                }
            }
        }
    }
}
Set Shadow Effects for the Text on the Presentation Slides
Spire.Presentation for .NET offers classes of InnerShadowEffect and OuterShadowEffect to enable developers to set the shadow effects for the Text on the presentation slides. This article will focus on how to apply the Font outer shadow effects for the Text in C#.
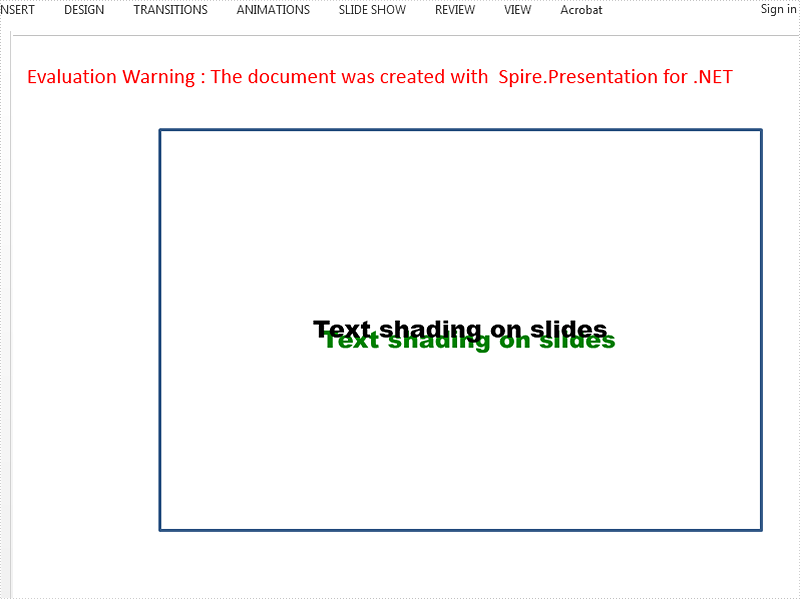
Firstly, view the effective screenshot for the Text after apply the outer shadow effects via Spire.Presentation.
Step 1: Create an instance of Presentation class.
Presentation presentation = new Presentation();
Step 2: Get reference of the slide.
ISlide slide = presentation.Slides[0];
Step 3: Add a new rectangle shape to the first slide.
IAutoShape shape = slide.Shapes.AppendShape(ShapeType.Rectangle, new RectangleF(120, 70, 450, 300));
shape.Fill.FillType = Spire.Presentation.Drawing.FillFormatType.None;
Step 4: Add the text to the shape and set the font for the text.
shape.AppendTextFrame("Text shading on slides");
shape.TextFrame.Paragraphs[0].TextRanges[0].LatinFont = new TextFont("Arial Black");
shape.TextFrame.Paragraphs[0].TextRanges[0].Fill.FillType = FillFormatType.Solid;
shape.TextFrame.Paragraphs[0].TextRanges[0].Fill.SolidColor.Color = Color.Black;
Step 5: Add outer shadow and set all necessary parameters.
Spire.Presentation.Drawing.OuterShadowEffect Shadow = new Spire.Presentation.Drawing.OuterShadowEffect();

Shadow.BlurRadius = 0;
Shadow.Direction = 50;
Shadow.Distance = 10;
Shadow.ColorFormat.Color = Color.Green;
Step 6: Apply the shadow effects to the shape.
shape.TextFrame.TextRange.EffectDag.OuterShadowEffect = Shadow;
Step 7: Save the document.
presentation.SaveToFile("Result.pptx", FileFormat.Pptx2010);
We can also use the code as below to set the inner shadow for the text font. It is almost the same as how to set the outer shadow effects.
Spire.Presentation.Drawing.InnerShadowEffect Shadow = new Spire.Presentation.Drawing.InnerShadowEffect();
Full codes of how to apply the shadow effects for the text font:
using Spire.Presentation;
using Spire.Presentation.Drawing;
using System.Drawing;
namespace SetShadowEffect
{
    class Program
    {
        static void Main(string[] args)
        {
            Presentation presentation = new Presentation();
            ISlide slide = presentation.Slides[0];

            IAutoShape shape = slide.Shapes.AppendShape(ShapeType.Rectangle, new RectangleF(120, 70, 450, 300));
            shape.Fill.FillType = Spire.Presentation.Drawing.FillFormatType.None;

            shape.AppendTextFrame("Text shading on slides");
            shape.TextFrame.Paragraphs[0].TextRanges[0].LatinFont = new TextFont("Arial Black");
            shape.TextFrame.Paragraphs[0].TextRanges[0].Fill.FillType = FillFormatType.Solid;
            shape.TextFrame.Paragraphs[0].TextRanges[0].Fill.SolidColor.Color = Color.Black;

            //Spire.Presentation.Drawing.InnerShadowEffect Shadow = new Spire.Presentation.Drawing.InnerShadowEffect();

            //Add Outer shadow and set all necessary parameters
            Spire.Presentation.Drawing.OuterShadowEffect Shadow = new Spire.Presentation.Drawing.OuterShadowEffect();

            Shadow.BlurRadius = 0;
            Shadow.Direction = 50;
            Shadow.Distance = 10;
            Shadow.ColorFormat.Color = Color.Green;

            shape.TextFrame.TextRange.EffectDag.OuterShadowEffect = Shadow;

            presentation.SaveToFile("Result.pptx", FileFormat.Pptx2010);

        }
    }
}
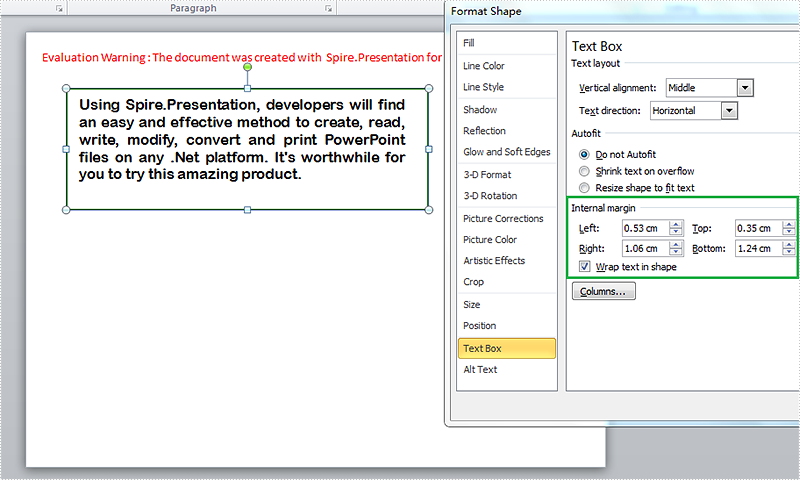
How to set margins for text inside shapes in C#
Margin is the space between the text and the edge of paper or shape. MS office sets default margins for users but usually we need to reset the margins to best fit our formatting needs. In Presentation, text is often inside a shape or textbox, and there is an option to set the margins for text inside shapes. It’s worthy of mentioning that Spire.Presentation provides the APIs to help users set margins for text inside shapes. This article is going to introduce the method to set the internal margins of shapes in C# using Spire.Presentation.
Note: before start, please download the latest version of Spire.Presentation and use the .dll in the bin folder as the reference of Visual Studio.
Step 1: Initial a new Presentation and insert a sample shape.
Presentation presentation = new Presentation();
IAutoShape shape = presentation.Slides[0].Shapes.AppendShape(ShapeType.Rectangle, new RectangleF(50, 70, 450, 150));
Step 2: Add sample text into the shape and format the text.
            shape.Fill.FillType = FillFormatType.None;
            shape.ShapeStyle.LineColor.Color = Color.DarkGreen;
            shape.TextFrame.Paragraphs[0].Alignment = TextAlignmentType.Justify;
            shape.TextFrame.Text = "Using Spire.Presentation, developers will find an easy and effective method to create, read, write, modify, convert and print PowerPoint files on any .Net platform. It's worthwhile for you to try this amazing product.";
            shape.TextFrame.Paragraphs[0].TextRanges[0].LatinFont = new TextFont("Arial Rounded MT Bold");
            shape.TextFrame.Paragraphs[0].TextRanges[0].Fill.FillType = FillFormatType.Solid;
            shape.TextFrame.Paragraphs[0].TextRanges[0].Fill.SolidColor.Color = Color.Black;
Step 3: Set the margins for the text frame.
            shape.TextFrame.MarginTop = 10;
            shape.TextFrame.MarginBottom = 35;
            shape.TextFrame.MarginLeft = 15;
            shape.TextFrame.MarginRight = 30;
Step 4: Save the document and launch to see effects.
            presentation.SaveToFile("result.pptx", FileFormat.Pptx2010);
            System.Diagnostics.Process.Start("result.pptx");
Effects:
Full Codes:
using System;
using System.Collections.Generic;
using System.Linq;
using System.Text;
using Spire.Presentation;
using Spire.Presentation.Drawing;
using System.Drawing;

namespace test
{
    class Program
    {
        static void Main(string[] args)
        {
            Presentation presentation = new Presentation();
            IAutoShape shape = presentation.Slides[0].Shapes.AppendShape(ShapeType.Rectangle, new RectangleF(50, 70, 450, 150));

            shape.Fill.FillType = FillFormatType.None;
            shape.ShapeStyle.LineColor.Color = Color.DarkGreen;
            shape.TextFrame.Paragraphs[0].Alignment = TextAlignmentType.Justify;
            shape.TextFrame.Text = "Using Spire.Presentation, developers will find an easy and effective method to create, read, write, modify, convert and print PowerPoint files on any .Net platform. It's worthwhile for you to try this amazing product.";
            shape.TextFrame.Paragraphs[0].TextRanges[0].LatinFont = new TextFont("Arial Rounded MT Bold");
            shape.TextFrame.Paragraphs[0].TextRanges[0].Fill.FillType = FillFormatType.Solid;
            shape.TextFrame.Paragraphs[0].TextRanges[0].Fill.SolidColor.Color = Color.Black;

            shape.TextFrame.MarginTop = 10;
            shape.TextFrame.MarginBottom = 35;
            shape.TextFrame.MarginLeft = 15;
            shape.TextFrame.MarginRight = 30;

            presentation.SaveToFile("result.pptx", FileFormat.Pptx2010);
            System.Diagnostics.Process.Start("result.pptx");

        }
    }
}
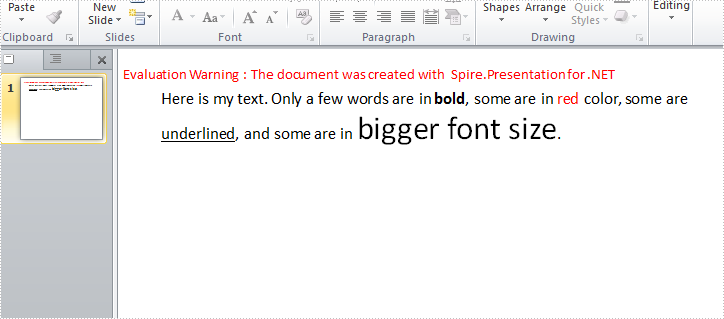
How to Mix Font Styles within a Single TextRange in C#, VB.NET
To emphasize some words or phrases in a sentence, most probably you will set different formats such as font type, color, and size to these parts. When we programmatically insert a sentence with various kinds of font styles into a PowerPoint slide, it is an easy task if we format the text at the first place and then append the text to a paragraph. In this article, we attach more importance to introduce how to mix font styles within a single TextRange on an existing PowerPoint slide.
Test File:
As is shown in test file, all words in this TextRange are in the same font style. Now we would like to make some changes.

Code Snippet:
Step 1: Create a new PowerPoint document and load the test file.
Presentation ppt = new Presentation("Sample.pptx", FileFormat.Pptx2010);
Step 2: Get the shape from PowerPoint slide, get the text from shape and save to a new string variable.
IAutoShape shape = ppt.Slides[0].Shapes[0] as IAutoShape;
string originalText = shape.TextFrame.Text;
Step 3: Split the string by specified words and return substrings to a string array.
string[] splitArray = originalText.Split(new string[] { "bold", "red","underlined","bigger font size" }, StringSplitOptions.None);
Step 4: Remove the paragraph from TextRange.
TextParagraph tp = shape.TextFrame.TextRange.Paragraph;
tp.TextRanges.Clear();
Step 5: Append normal text that is in front of ‘bold’ to the paragraph.
TextRange tr = new TextRange(splitArray[0]);
tp.TextRanges.Append(tr);
Step 6: Set font style of the text ‘bold’ as bold, and append it to the paragraph.
tr = new TextRange("bold");
tr.IsBold = TriState.True;
tp.TextRanges.Append(tr);
Step 7: Repeat step 5 and step 6 to append the rest normal texts and formatted texts to the paragraph.
//normal text
tr = new TextRange(splitArray[1]);
tp.TextRanges.Append(tr);
//red text
tr = new TextRange("red");
tr.Fill.FillType = Spire.Presentation.Drawing.FillFormatType.Solid;
tr.Format.Fill.SolidColor.Color = Color.Red;
tp.TextRanges.Append(tr);
//normal text
tr = new TextRange(splitArray[2]);
tp.TextRanges.Append(tr);
//underline text
tr = new TextRange("underlined");
tr.TextUnderlineType = TextUnderlineType.Single;
tp.TextRanges.Append(tr);
//normal text
tr = new TextRange(splitArray[3]);
tp.TextRanges.Append(tr);
//bigger size text
tr = new TextRange("bigger font size");
tr.FontHeight = 35;
tp.TextRanges.Append(tr);
//normal text
tr = new TextRange(splitArray[4]);
tp.TextRanges.Append(tr);
Step 8: Save the file.
ppt.SaveToFile("Result.pptx", FileFormat.Pptx2010);
Output:
Full Code:
using Spire.Presentation;
using System;
using System.Drawing;
namespace MixFontStyle
{
    class Program
    {
        static void Main(string[] args)
        {
            Presentation ppt = new Presentation("Sample.pptx", FileFormat.Pptx2010);
            IAutoShape shape = ppt.Slides[0].Shapes[0] as IAutoShape;
            string originalText = shape.TextFrame.Text;
            string[] splitArray = originalText.Split(new string[] { "bold", "red", "underlined", "bigger font size" }, StringSplitOptions.None);
            TextParagraph tp = shape.TextFrame.TextRange.Paragraph;
            tp.TextRanges.Clear();
            //normal text
            TextRange tr = new TextRange(splitArray[0]);
            tp.TextRanges.Append(tr);
            //bold text
            tr = new TextRange("bold");
            tr.IsBold = TriState.True;
            tp.TextRanges.Append(tr);
            //normal text
            tr = new TextRange(splitArray[1]);
            tp.TextRanges.Append(tr);
            //red text
            tr = new TextRange("red");
            tr.Fill.FillType = Spire.Presentation.Drawing.FillFormatType.Solid;
            tr.Format.Fill.SolidColor.Color = Color.Red;
            tp.TextRanges.Append(tr);
            //normal text
            tr = new TextRange(splitArray[2]);
            tp.TextRanges.Append(tr);
            //underline text
            tr = new TextRange("underlined");
            tr.TextUnderlineType = TextUnderlineType.Single;
            tp.TextRanges.Append(tr);
            //normal text
            tr = new TextRange(splitArray[3]);
            tp.TextRanges.Append(tr);
            //bigger size text
            tr = new TextRange("bigger font size");
            tr.FontHeight = 35;
            tp.TextRanges.Append(tr);
            //normal text
            tr = new TextRange(splitArray[4]);
            tp.TextRanges.Append(tr);
            ppt.SaveToFile("Result.pptx", FileFormat.Pptx2010);

        }
    }
}
Imports Spire.Presentation
Imports System.Drawing
Namespace MixFontStyle
	Class Program
		Private Shared Sub Main(args As String())
			Dim ppt As New Presentation("Sample.pptx", FileFormat.Pptx2010)
			Dim shape As IAutoShape = TryCast(ppt.Slides(0).Shapes(0), IAutoShape)
			Dim originalText As String = shape.TextFrame.Text
			Dim splitArray As String() = originalText.Split(New String() {"bold", "red", "underlined", "bigger font size"}, StringSplitOptions.None)
			Dim tp As TextParagraph = shape.TextFrame.TextRange.Paragraph
			tp.TextRanges.Clear()
			'normal text
			Dim tr As New TextRange(splitArray(0))
			tp.TextRanges.Append(tr)
			'bold text
			tr = New TextRange("bold")
			tr.IsBold = TriState.[True]
			tp.TextRanges.Append(tr)
			'normal text
			tr = New TextRange(splitArray(1))
			tp.TextRanges.Append(tr)
			'red text
			tr = New TextRange("red")
			tr.Fill.FillType = Spire.Presentation.Drawing.FillFormatType.Solid
			tr.Format.Fill.SolidColor.Color = Color.Red
			tp.TextRanges.Append(tr)
			'normal text
			tr = New TextRange(splitArray(2))
			tp.TextRanges.Append(tr)
			'underline text
			tr = New TextRange("underlined")
			tr.TextUnderlineType = TextUnderlineType.[Single]
			tp.TextRanges.Append(tr)
			'normal text
			tr = New TextRange(splitArray(3))
			tp.TextRanges.Append(tr)
			'bigger size text
			tr = New TextRange("bigger font size")
			tr.FontHeight = 35
			tp.TextRanges.Append(tr)
			'normal text
			tr = New TextRange(splitArray(4))
			tp.TextRanges.Append(tr)
			ppt.SaveToFile("Result.pptx", FileFormat.Pptx2010)

		End Sub
	End Class
End Namespace
Delete Text Boxes in PowerPoint with C# (Including Empty Ones)
 Deleting text boxes in a PowerPoint presentation is a crucial step when cleaning up templates or removing unwanted content—but doing it manually can be time-consuming, especially when dealing with multiple slides. If you're looking for how to delete text boxes in PowerPoint using C#, you're in the right place. This guide covers everything from deleting a specific text box to removing empty ones or clearing all text boxes on a slide—providing practical, code-based solutions to streamline your workflow.
- Before We Start: Install PowerPoint Library
- Delete Specific Text Boxes in PowerPoint Slides
- Delete Empty Text Boxes in PowerPoint Slides
- Delete All Text Boxes from a PowerPoint Slide
- Conclusion
- FAQs
Before We Start: Install PowerPoint Library
Before we dive into the main content, let’s first set up the required tools. In this tutorial, we’ll be using Spire.Presentation for .NET to demonstrate how to delete text boxes in a PowerPoint presentation. This is a professional third-party PowerPoint library that allows you to manipulate slide elements—such as adding or deleting text boxes—without relying on Microsoft Office.
To install the library, you have two options:
- Download Spire.Presentation and install it manually from the official website.
- Use NuGet Package Manager, which is the recommended approach for most Visual Studio users. Simply run the following command in the Package Manager Console:
PM> Install-Package Spire.Presentation
This will automatically download and add the library to your project. A free version is available for learning or evaluation, with limited features but no time restrictions.
How to Delete a Specific Text Box in PowerPoint Slides Using C#
When you only need to remove or replace a small part of the slide content, it's best to precisely target the specific text box you want to delete. With the help of Spire.Presentation, you can easily delete a specific text box from a PowerPoint presentation. The basic workflow includes: loading the PowerPoint file, locating the slide, identifying the target text box, and removing it.
We’ll first look at the complete code, then break it down step by step.
Code Example – Remove "Text Box 1" from Slide 2:
using Spire.Presentation;

namespace RemoveTextbox
{
    class Program
    {
        static void Main(string[] args)
        {
            // Create a Presentation instance and load a PowerPoint file
            Presentation ppt = new Presentation("/input/pre1.pptx", FileFormat.Pptx2010);
            // Get the second slide
            ISlide slide = ppt.Slides[1];

            // Loop through all shapes on the slide
            for (int i = 0; i < slide.Shapes.Count;)
            {
                IAutoShape shape = slide.Shapes[i] as IAutoShape;

                // Check if the shape is a text box and contains the specified text
                if (shape != null && shape.IsTextBox && shape.TextFrame.Text.Equals("Text Box 1"))
                {
                    //  Remove the text box
                    slide.Shapes.Remove(shape);
                }
                else
                {
                    i++;
                }
            }

            // Save the modified presentation
            string outputPath = "/output/Deletespecifictextbox.pptx";
            ppt.SaveToFile(outputPath, FileFormat.Pptx2010);
            System.Diagnostics.Process.Start(outputPath);
        }
    }
}
Text boxes removing result preview: 
Key steps explained:
- Create a Presentation class and load a PowerPoint file.
- Get a slide with Presentation.Slides[] property.
- Loop through shapes on the slide and check if they are IAutoShape and contain the target text.
- If it is, delete the text box using ISlide.Shapes.Remove() method.
After cleaning up empty or unwanted text boxes, you may want to add new content dynamically. Learn how to add a paragraph to a PowerPoint slide using C# in this related tutorial.
How to Delete Empty Text Boxes in PowerPoint with C#
When working with PowerPoint presentations, deleting empty text boxes is a common requirement. These unused placeholders can clutter your slides and negatively affect the overall layout. Cleaning them up is an important step in creating a polished and professional presentation.
Code example - Delete all text boxes on the 3rd slide from a Microsoft PowerPoint Presentation:
using Spire.Presentation;

namespace RemoveEmptyTextboxes
{
    class Program
    {
        static void Main(string[] args)
        {
            // Load the PowerPoint presentation
            Presentation ppt = new Presentation("/input/pre1.pptx", FileFormat.Pptx2010);

            // Access the third slide (index starts from 0)
            ISlide slide = ppt.Slides[2];

            // Iterate through all shapes on the slide
            for (int i = 0; i < slide.Shapes.Count;)
            {
                IAutoShape shape = slide.Shapes[i] as IAutoShape;

                // Check if the shape is a text box and its text is null, empty, or whitespace
                if (shape != null && shape.IsTextBox && string.IsNullOrWhiteSpace(shape.TextFrame.Text))
                {
                    // Remove empty text box
                    slide.Shapes.Remove(shape);
                }
                else
                {
                    i++;
                }
            }

            // Save the updated presentation
            string outputPath = "/output/RemoveEmptyTextboxes.pptx";
            ppt.SaveToFile(outputPath, FileFormat.Pptx2010);
        }
    }
}
Text boxes removing result preview: 
Key steps explained:
- Load a PowerPoint file and get a slide.
- Iterate through shapes on the slide and check if they are text boxes and empty.
- Delete all empty text boxes through ISlide.Shapes.Remove() method.
Tip: If you want to delete all empty text boxes from the entire PowerPoint presentation, simply loop through each slide instead of targeting a single one. You can do this by iterating through presentation.Slides and checking each shape on every slide.
foreach (ISlide slide in presentation.Slides)
{
    for (int i = slide.Shapes.Count - 1; i >= 0; i--)
    {
        IShape shape = slide.Shapes[i];
        if (shape is IAutoShape autoShape && string.IsNullOrWhiteSpace(autoShape.TextFrame.Text))
        {
            slide.Shapes.Remove(shape);
        }
    }
}
How to Delete All Text Boxes in PowerPoint Slides Using C#
Now let’s move on to the final section—deleting all text boxes from a slide, including both empty and non-empty ones. This approach is even simpler than the previous examples. You just need to loop through the shapes on a slide, check whether each shape is an IAutoShape, and remove it using the ISlide.Shapes.Remove(shape) method. We won’t break down the steps here, as the code is self-explanatory. Just copy the snippet below, update the file path and other details as needed, and you're good to go.
Code example - Delete all text boxes on the second slide:
namespace RemoveTextboxes
{
    internal class Program
    {
        static void Main(string[] args)
        {
            // Create a new Presentation object
            Presentation ppt = new Presentation("/input/pre1.pptx", FileFormat.Pptx2010);

            // Get the second slide and loop through its shapes
            ISlide slide = ppt.Slides[1];

            for (int i = 0; i < slide.Shapes.Count;)
            {
                // Check if the shape is an AutoShape and remove it
                IAutoShape shape = slide.Shapes[i] as IAutoShape;
                slide.Shapes.Remove(shape);
            }
            // Save the updated presentation
            ppt.SaveToFile("/output/deletetextbox.pptx", FileFormat.Pptx2010);
            System.Diagnostics.Process.Start("Result.pptx");
        }
    }
}
Text boxes removing result preview: 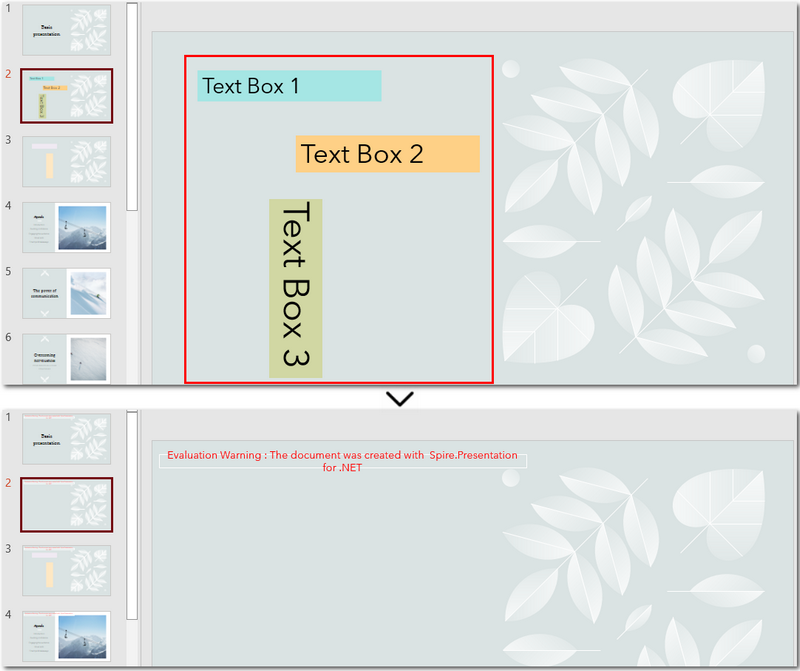
The Conclusion
The page explored how to delete text boxes in PowerPoint using C#. Whether you’re removing a specific text box, deleting empty text boxes, or clearing all text boxes, the process becomes simple and straightforward with the help of Spire.Presentation for .NET. If you’re interested in this PowerPoint library, you can request a free 30-day trial license to explore its full capabilities.
FAQs about Deleting Text Boxes in PowerPoint
1. Why can't I delete a text box in PowerPoint?
There are a few possible reasons: the text box might be part of the slide master, grouped with other elements, or accidentally locked. If you're automating PowerPoint using C#, make sure you correctly access the Shapes collection of the target slide and identify the right shape type (e.g., IAutoShape) before attempting to delete it.
2. How do I delete a text box from a PowerPoint slide using C#?
You can access the slide using Presentation.Slides[index], loop through the Shapes collection, find the text box (typically an IAutoShape), and remove it with ISlide.Shapes.Remove(shape). Full code examples are provided in this article for deleting specific, empty, or all text boxes.
C#/VB.NET: Extract Text from PowerPoint Presentations
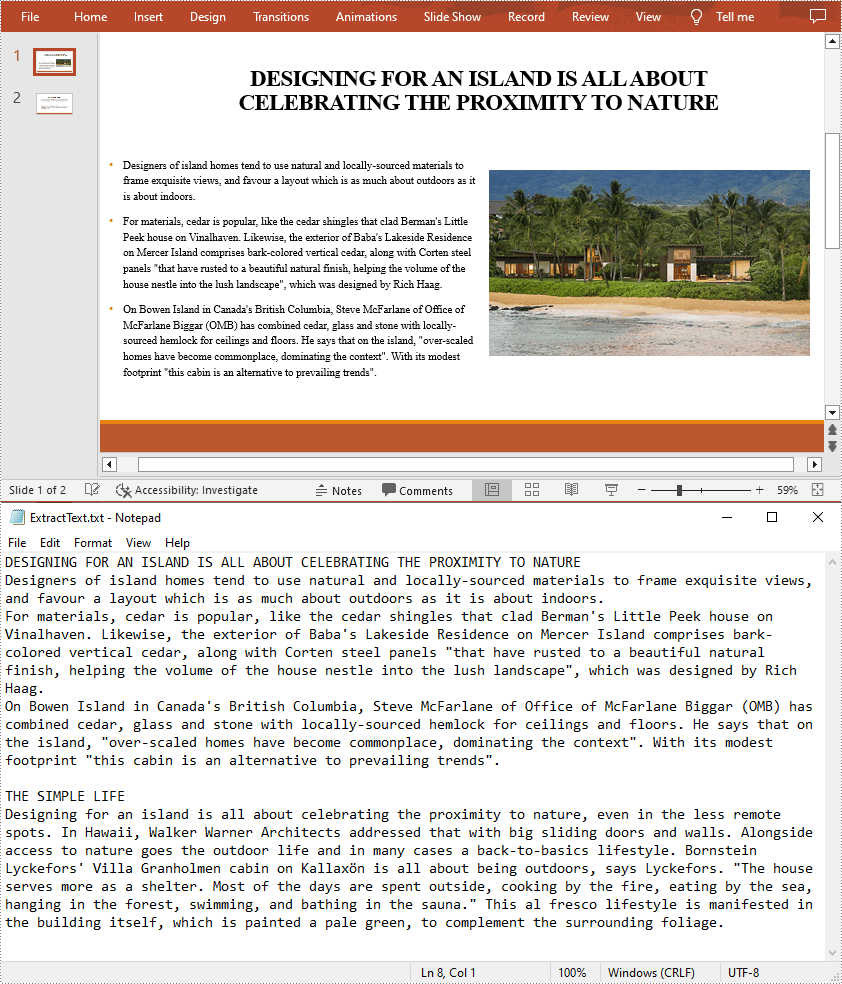
When sending a PowerPoint document containing a lot of media files and images to others for text proofreading, you may find that the transfer speed is quite slow because of the large file size. In such a case, it is better to extract the text from PowerPoint to MS Word or Notepad first, and then send only the text content. In addition, the extracted text content can also be archived or backed up for future reference. In this article, you will learn how to extract text from a PowerPoint Presentation in C# and VB.NET using Spire.Presentation for .NET.
Install Spire.Presentation for .NET
To begin with, you need to add the DLL files included in the Spire.Presentation for.NET package as references in your .NET project. The DLL files can be either downloaded from this link or installed via NuGet.
PM> Install-Package Spire.Presentation
Extract Text from PowerPoint Presentations in C# and VB.NET
To facilitate the sharing or delivery of text information in a PowerPoint document, text extraction is an operation occasionally required. The following are the steps to extract text from all presentation slides and save in a TXT file.
- Initialize an instance of the Presentation class.
- Load a sample PowerPoint document using Presentation.LoadFromFile() method.
- Create a StringBuilder instance.
- Iterate through each slide in the document, and then iterate through all the shapes in each slide.
- Determine whether the shapes are of IAutoShape type. If yes, iterate through all the paragraphs in each shape and get the paragraph text using TextParagraph.Text property.
- Append the extracted text to the StringBuilder instance using StringBuilder.AppendLine() method
- Create a new txt file and write the extracted text to the file using File.WriteAllText() method.
- C#
- VB.NET
using Spire.Presentation;
using System.IO;
using System.Text;
namespace ExtractText
{
    class Program
    {
        static void Main(string[] args)
        {
            //Initialize an instance of the Presentation class
            Presentation presentation = new Presentation();

            //Load a sample PowerPoint document
            presentation.LoadFromFile("Island.pptx");
            //Create a StringBuilder instance
            StringBuilder sb = new StringBuilder();

            //Iterate through each slide in the document
            foreach (ISlide slide in presentation.Slides)
            {
                //Iterate through each shape in each slide
                foreach (IShape shape in slide.Shapes)
                {
                    //Check if the shape is of IAutoShape type
                    if (shape is IAutoShape)
                    {
                        //Iterate through all paragraphs in each shape
                        foreach (TextParagraph tp in (shape as IAutoShape).TextFrame.Paragraphs)
                        {
                            //Extract text and save to StringBuilder instance
                            sb.AppendLine(tp.Text);
                        }
                    }
                }
            }
            //Create a new txt file to save the extracted text
            File.WriteAllText("ExtractText.txt", sb.ToString());
        }
    }
}
Apply for a Temporary License
If you'd like to remove the evaluation message from the generated documents, or to get rid of the function limitations, please request a 30-day trial license for yourself.
Add a Paragraph to PowerPoint file
PPT file format is a vivid and explicit way to present your stuff. PPT file can be very beautiful and powerful. And text is a basic element that PPT supports. Spire.Presentation is a powerful .NET component specially designed for developers. It enables developers to manipulate PPT files easily and flexibly. In this document, I will introduce you how to add a paragraph to PPT file using Spire.Presentation.
Step 1. Create a PPT document.
Presentation presentation = new Presentation();
Step 2. Add a new shape to the document.
IAutoShape shape = presentation.Slides[0].Shapes.AppendShape(ShapeType.Rectangle, new RectangleF(50, 70, 450, 150));
shape.Fill.FillType = FillFormatType.None;
shape.ShapeStyle.LineColor.Color = Color.White;
Shape represents a TextBox in PPT document.
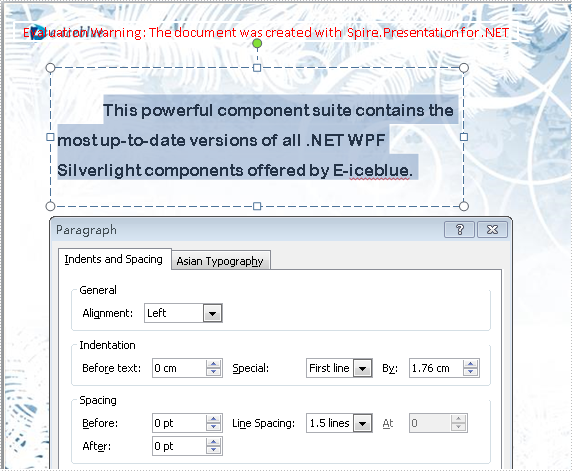
Step 3. Add some text to the shape.
shape.TextFrame.Text = "This powerful component suite contains the most up-to-date versions of all .NET WPF Silverlight components offered by E-iceblue.";
These will form a new paragraph.
Step 4. Set the alignment of the paragraph.
shape.TextFrame.Paragraphs[0].Alignment = TextAlignmentType.Left;
Step 5. Set the indent of the paragraph.
shape.TextFrame.Paragraphs[0].Indent = 25*2;
Step 6. Set the line spacing of the paragraph.
shape.TextFrame.Paragraphs[0].LineSpacing = 250;
Step 7. Save the document.
presentation.SaveToFile("para.pptx", FileFormat.Pptx2010);
Full code:
using Spire.Presentation;
using Spire.Presentation.Drawing;
using System.Drawing;
namespace AddParagh
{
    class Program
    {
        static void Main(string[] args)
        {
            //create PPT document
            Presentation presentation = new Presentation();

            //set background Image
            string ImageFile = "bg.png";
            RectangleF rect = new RectangleF(0, 0, presentation.SlideSize.Size.Width, presentation.SlideSize.Size.Height);
            presentation.Slides[0].Shapes.AppendEmbedImage(ShapeType.Rectangle, ImageFile, rect);
            presentation.Slides[0].Shapes[0].Line.FillFormat.SolidFillColor.Color = Color.FloralWhite;

            //append new shape
            IAutoShape shape = presentation.Slides[0].Shapes.AppendShape(ShapeType.Rectangle, new RectangleF(50, 70, 450, 150));
            shape.Fill.FillType = FillFormatType.None;
            shape.ShapeStyle.LineColor.Color = Color.White;

            //set the alignment
            shape.TextFrame.Paragraphs[0].Alignment = TextAlignmentType.Left;
            //set the indent
            shape.TextFrame.Paragraphs[0].Indent = 50;
            //set the linespacing
            shape.TextFrame.Paragraphs[0].LineSpacing = 150;
            shape.TextFrame.Text = "This powerful component suite contains the most up-to-date versions of all .NET WPF Silverlight components offered by E-iceblue.";

            //set the Font
            shape.TextFrame.Paragraphs[0].TextRanges[0].LatinFont = new TextFont("Arial Rounded MT Bold");
            shape.TextFrame.Paragraphs[0].TextRanges[0].Fill.FillType = FillFormatType.Solid;
            shape.TextFrame.Paragraphs[0].TextRanges[0].Fill.SolidColor.Color = Color.Black;

            //save the document
            presentation.SaveToFile("para.pptx", FileFormat.Pptx2010);
            System.Diagnostics.Process.Start("para.pptx");
        }
    }
}
'create PPT document
Dim presentation As New Presentation()

'set background Image
Dim ImageFile As String = "bg.png"
Dim rect As New RectangleF(0, 0, presentation.SlideSize.Size.Width, presentation.SlideSize.Size.Height)
presentation.Slides(0).Shapes.AppendEmbedImage(ShapeType.Rectangle, ImageFile, rect)
presentation.Slides(0).Shapes(0).Line.FillFormat.SolidFillColor.Color = Color.FloralWhite

'append new shape
Dim shape As IAutoShape = presentation.Slides(0).Shapes.AppendShape(ShapeType.Rectangle, New RectangleF(50, 70, 450, 150))
shape.Fill.FillType = FillFormatType.None
shape.ShapeStyle.LineColor.Color = Color.White

'set the alignment
shape.TextFrame.Paragraphs(0).Alignment = TextAlignmentType.Left
'set the indent
shape.TextFrame.Paragraphs(0).Indent = 50
'set the linespacing
shape.TextFrame.Paragraphs(0).LineSpacing = 150
shape.TextFrame.Text = "This powerful component suite contains the most up-to-date versions of all .NET WPF Silverlight components offered by E-iceblue."

'set the Font
shape.TextFrame.Paragraphs(0).TextRanges(0).LatinFont = New TextFont("Arial Rounded MT Bold")
shape.TextFrame.Paragraphs(0).TextRanges(0).Fill.FillType = FillFormatType.Solid
shape.TextFrame.Paragraphs(0).TextRanges(0).Fill.SolidColor.Color = Color.Black

'save the document
presentation.SaveToFile("para.pptx", FileFormat.Pptx2010)
System.Diagnostics.Process.Start("para.pptx")
Screenshot:
C#/VB.NET: Create Numbered or Bulleted Lists in PowerPoint
Lists are a powerful tool in PowerPoint presentations that enable you to organize and present information in a clear and concise manner. Whether you're showcasing key points, summarizing ideas, or highlighting important details, utilizing lists can enhance the visual appeal, readability and professionalism of your slides. In this article, we will explore how to create numbered lists and bulleted lists in PowerPoint presentations in C# and VB.NET using Spire.Presentation for .NET.
- Create a Numbered List in PowerPoint
- Create a Symbol Bulleted List in PowerPoint
- Create an Image Bulleted List in PowerPoint
Install Spire.Presentation for .NET
To begin with, you need to add the DLL files included in the Spire.Presentation for.NET package as references in your .NET project. The DLL files can be either downloaded from this link or installed via NuGet.
PM> Install-Package Spire.Presentation
Create a Numbered List in PowerPoint in C# and VB.NET
A numbered list in PowerPoint is a list of items where each item is preceded by a number or a sequence of numbers. It follows a sequential order, typically starting from 1 and progressing incrementally. Numbered lists are commonly used to present steps, instructions, rankings, or any information that requires a specific order.
To create a numbered list in a PowerPoint presentation using Spire.Presentation for .NET, you can follow these steps:
- Create a Presentation object.
- Get the first slide using Presentation.Slides[0] property.
- Append a shape to the slide using ISlide.Shapes.AppendShape() method and set the shape style.
- Specify the items of the list inside a String array.
- Create paragraphs based on the list items, and set the bullet type of these paragraphs to Numbered using ParagraphProperties.BulletType property.
- Set the numbered bullet style of these paragraphs using ParagraphProperties.BulletStyle property.
- Add these paragraphs to the shape using IAutoShape.TextFrame.Paragraphs.Append() method.
- Save the document to a PowerPoint file using Presentation.SaveToFile() method.
- C#
- VB.NET
using Spire.Presentation;
using Spire.Presentation.Drawing;
using System.Drawing;
namespace CreateNumberedList
{
internal class Program
{
static void Main(string[] args)
{
//Create a Presentation object
Presentation presentation = new Presentation();
//Get the first slide
ISlide slide = presentation.Slides[0];
//Add a shape to the slide and set the shape style
IAutoShape shape = slide.Shapes.AppendShape(ShapeType.Rectangle, new RectangleF(50, 50, 300, 200));
shape.Fill.FillType = FillFormatType.None;
shape.Line.FillType= FillFormatType.None;
//Add text to the default paragraph
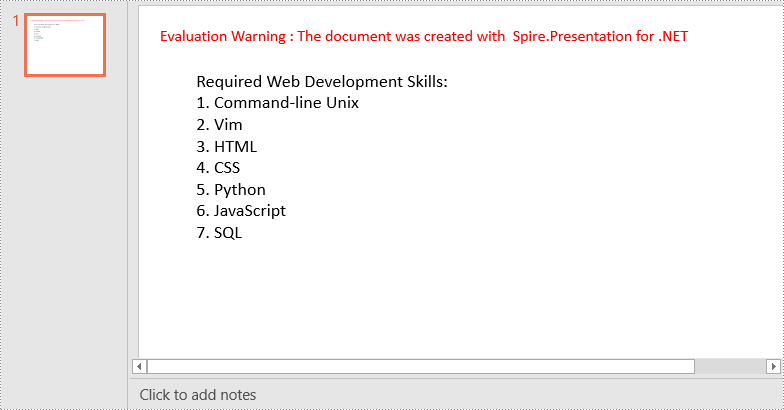
TextParagraph paragraph = shape.TextFrame.Paragraphs[0];
paragraph.Text = "Required Web Development Skills:";
paragraph.Alignment = TextAlignmentType.Left;
paragraph.TextRanges[0].Fill.FillType = FillFormatType.Solid;
paragraph.TextRanges[0].Fill.SolidColor.Color = Color.Black;
//Specify the list items
string[] listItems = new string[] {
" Command-line Unix",
" Vim",
" HTML",
" CSS",
" Python",
" JavaScript",
" SQL"
};
//Create a numbered list
foreach (string item in listItems)
{
TextParagraph textParagraph = new TextParagraph();
textParagraph.Text = item;
textParagraph.Alignment = TextAlignmentType.Left;
textParagraph.TextRanges[0].Fill.FillType = FillFormatType.Solid;
textParagraph.TextRanges[0].Fill.SolidColor.Color = Color.Black;
textParagraph.BulletType = TextBulletType.Numbered;
textParagraph.BulletStyle = NumberedBulletStyle.BulletArabicPeriod;
shape.TextFrame.Paragraphs.Append(textParagraph);
}
//Save the result document
presentation.SaveToFile("NumberedList.pptx", FileFormat.Pptx2013);
}
}
}
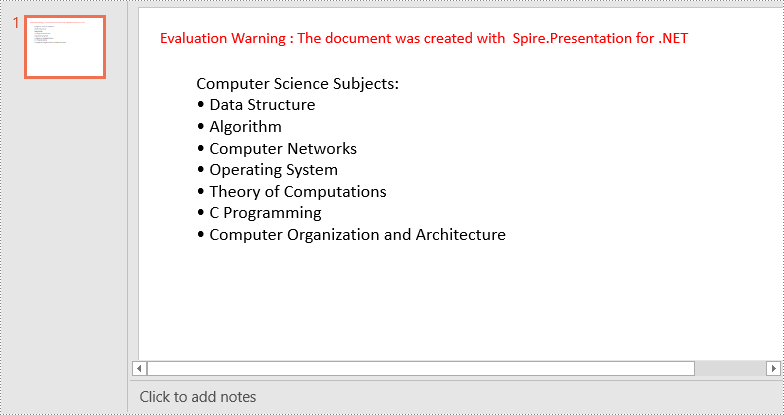
Create a Symbol Bulleted List in PowerPoint in C# and VB.NET
A symbol bulleted list in PowerPoint uses symbols instead of numbers to visually represent each item. Symbol bulleted lists are useful for presenting non-sequential information or a collection of points without a specific order.
To create a symbol bulleted list in a PowerPoint presentation using Spire.Presentation for .NET, you can follow these steps:
- Create a Presentation object.
- Get the first slide using Presentation.Slides[0] property.
- Append a shape to the slide using ISlide.Shapes.AppendShape() method and set the shape style.
- Specify the items of the list inside a String array.
- Create paragraphs based on the list items, and set the bullet type of these paragraphs to Symbol using ParagraphProperties.BulletType property.
- Add these paragraphs to the shape using IAutoShape.TextFrame.Paragraphs.Append() method.
- Save the document to a PowerPoint file using Presentation.SaveToFile() method.
- C#
- VB.NET
using Spire.Presentation;
using Spire.Presentation.Drawing;
using System.Drawing;

namespace CreateSymbolBulletedList
{
    internal class Program
    {
        static void Main(string[] args)
        {
            //Create a Presentation object
            Presentation presentation = new Presentation();
            //Get the first slide
            ISlide slide = presentation.Slides[0];

            //Add a shape to the slide and set the shape style
            IAutoShape shape = slide.Shapes.AppendShape(ShapeType.Rectangle, new RectangleF(50, 50, 350, 200));
            shape.Fill.FillType = FillFormatType.None;
            shape.Line.FillType = FillFormatType.None;

            //Add text to the default paragraph
            TextParagraph paragraph = shape.TextFrame.Paragraphs[0];
            paragraph.Text = "Computer Science Subjects:";
            paragraph.Alignment = TextAlignmentType.Left;
            paragraph.TextRanges[0].Fill.FillType = FillFormatType.Solid;
            paragraph.TextRanges[0].Fill.SolidColor.Color = Color.Black;

            //Specify the list items
            string[] listItems = new string[] {
                " Data Structure",
                " Algorithm",
                " Computer Networks",
                " Operating System",
                " Theory of Computations",
                " C Programming",
                " Computer Organization and Architecture"
            };

            //Create a symbol bulleted list
            foreach (string item in listItems)
            {
                TextParagraph textParagraph = new TextParagraph();
                textParagraph.Text = item;
                textParagraph.Alignment = TextAlignmentType.Left;
                textParagraph.TextRanges[0].Fill.FillType = FillFormatType.Solid;
                textParagraph.TextRanges[0].Fill.SolidColor.Color = Color.Black;
                textParagraph.BulletType = TextBulletType.Symbol;
                shape.TextFrame.Paragraphs.Append(textParagraph);
            }

            //Save the result document
            presentation.SaveToFile("SymbolBulletedList.pptx", FileFormat.Pptx2013);
        }
    }
}
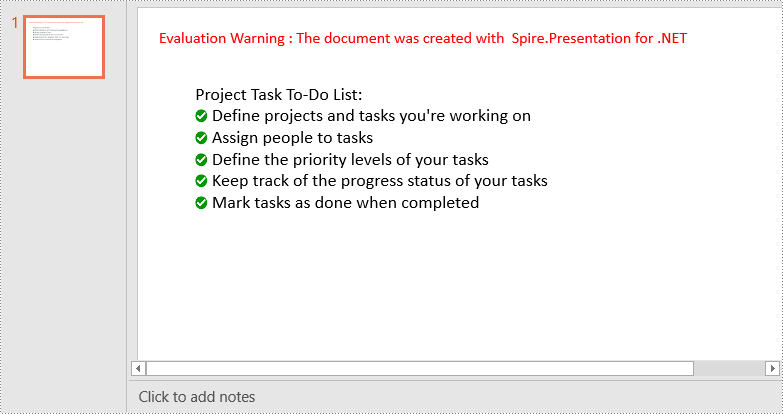
Create an Image Bulleted List in PowerPoint in C# and VB.NET
An image bulleted list in PowerPoint replaces the traditional bullet points with small images or icons. Instead of using numbers or symbols, each item is represented by an image that adds a visual element to the list. Image bulleted lists are commonly used when you want to incorporate visual cues or represent items with relevant icons or graphics.
To create an image bulleted list in a PowerPoint presentation using Spire.Presentation for .NET, you can follow these steps:
- Create a Presentation object.
- Get the first slide using Presentation.Slides[0] property.
- Append a shape to the slide using ISlide.Shapes.AppendShape() method and set the shape style.
- Specify the items of the list inside a String array.
- Create paragraphs based on the list items, and set the bullet type of these paragraphs to Picture using ParagraphProperties.BulletType property.
- Set the image that will be used as bullets using ParagraphProperties.BulletPicture.EmbedImage property.
- Add these paragraphs to the shape using IAutoShape.TextFrame.Paragraphs.Append() method.
- Save the document to a PowerPoint file using Presentation.SaveToFile() method.
- C#
- VB.NET
using Spire.Presentation;
using Spire.Presentation.Drawing;
using System.Drawing;

namespace CreateImageBulletedList
{
    internal class Program
    {
        static void Main(string[] args)
        {
            //Create a Presentation object
            Presentation presentation = new Presentation();
            //Get the first slide
            ISlide slide = presentation.Slides[0];

            //Add a shape to the slide and set the shape style
            IAutoShape shape = slide.Shapes.AppendShape(ShapeType.Rectangle, new RectangleF(50, 50, 400, 180));
            shape.Fill.FillType = FillFormatType.None;
            shape.Line.FillType = FillFormatType.None;

            //Add text to the default paragraph
            TextParagraph paragraph = shape.TextFrame.Paragraphs[0];
            paragraph.Text = "Project Task To-Do List:";
            paragraph.Alignment = TextAlignmentType.Left;
            paragraph.TextRanges[0].Fill.FillType = FillFormatType.Solid;
            paragraph.TextRanges[0].Fill.SolidColor.Color = Color.Black;

            //Specify the list items
            string[] listItems = new string[] {
                " Define projects and tasks you're working on",
                " Assign people to tasks",
                " Define the priority levels of your tasks",
                " Keep track of the progress status of your tasks",
                " Mark tasks as done when completed"
            };

            //Create an image bulleted list
            foreach (string item in listItems)
            {
                TextParagraph textParagraph = new TextParagraph();
                textParagraph.Text = item;
                textParagraph.Alignment = TextAlignmentType.Left;
                textParagraph.TextRanges[0].Fill.FillType = FillFormatType.Solid;
                textParagraph.TextRanges[0].Fill.SolidColor.Color = Color.Black;
                textParagraph.BulletType = TextBulletType.Picture;
                IImageData image = presentation.Images.Append(Image.FromFile("icon.png"));
                textParagraph.BulletPicture.EmbedImage = image;
                shape.TextFrame.Paragraphs.Append(textParagraph);
            }

            //Save the result document
            presentation.SaveToFile("ImageBulletedList.pptx", FileFormat.Pptx2013);
        }
    }
}
Apply for a Temporary License
If you'd like to remove the evaluation message from the generated documents, or to get rid of the function limitations, please request a 30-day trial license for yourself.