Python: Accept or Reject Tracked Changes in Excel
Accepting and rejecting tracked changes in Excel are essential features that empower users to effectively manage and control modifications made by multiple contributors. Accepting changes allows users to include modifications in the spreadsheet, facilitating collaboration and ensuring that the final version reflects collective input. Conversely, rejecting changes enables users to maintain the original content and avoid incorporating incorrect or unnecessary modifications. These functions provide users with the ability to maintain data integrity, ensure document accuracy, and streamline the collaborative process in Excel. In this article, we will demonstrate how to accept and reject tracked changes in Excel in Python using Spire.XLS for Python.
Install Spire.XLS for Python
This scenario requires Spire.XLS for Python and plum-dispatch v1.7.4. They can be easily installed in your Windows through the following pip command.
pip install Spire.XLS
If you are unsure how to install, please refer to this tutorial: How to Install Spire.XLS for Python on Windows
Accept Tracked Changes in Excel in Python
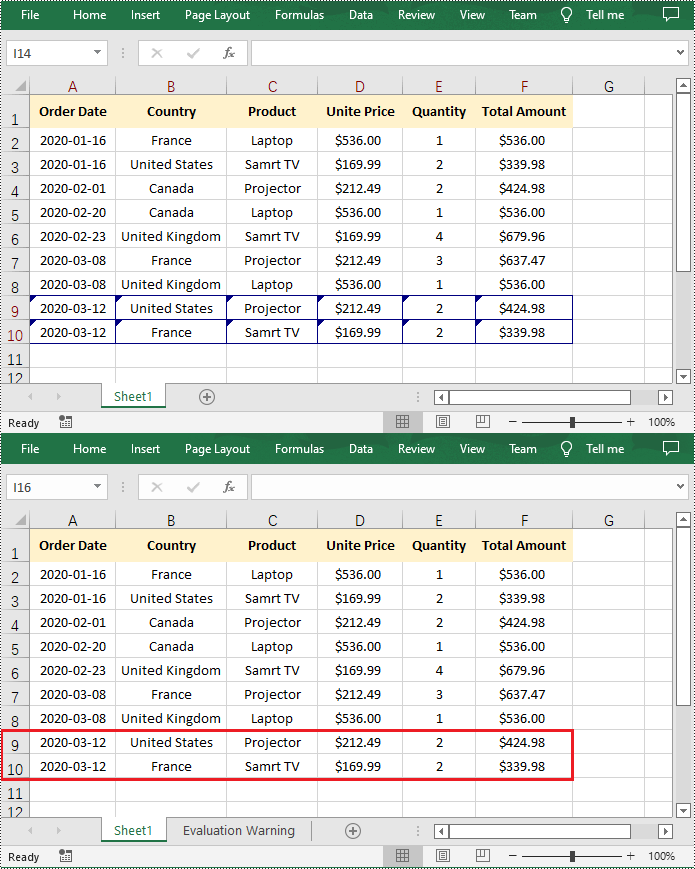
Spire.XLS for Python provides the Workbook.HasTrackedChanges property to determine whether an Excel workbook has tracked changes or not. If the property returns True, you can use the Workbook.AcceptAllTrackedChanges() method to accept these changes at once.
The following steps explain how to accept all tracked changes in an Excel workbook using Spire.XLS for Python:
- Create a Workbook object.
- Load a sample Excel workbook using Workbook.LoadFromFile() method.
- Check if the workbook has tracked changes using Workbook.HasTrackedChanges property.
- Accept all tracked changes in the workbook using Workbook.AcceptAllTrackedChanges() method.
- Save the result workbook using Workbook.SaveToFile() method.
- Python
from spire.xls.common import *
from spire.xls import *

# Specify the input and output file paths
inputFile = "Sample.xlsx"
outputFile = "AcceptChanges.xlsx"

# Create a Workbook object
workbook = Workbook()
# Load an Excel file
workbook.LoadFromFile(inputFile)

# Check if the file has tracked changes
if workbook.HasTrackedChanges:
    # Accept all tracked changes in the file
    workbook.AcceptAllTrackedChanges()

# Save the result file
workbook.SaveToFile(outputFile, FileFormat.Version2013)
workbook.Dispose()
Reject Tracked Changes in Excel in Python
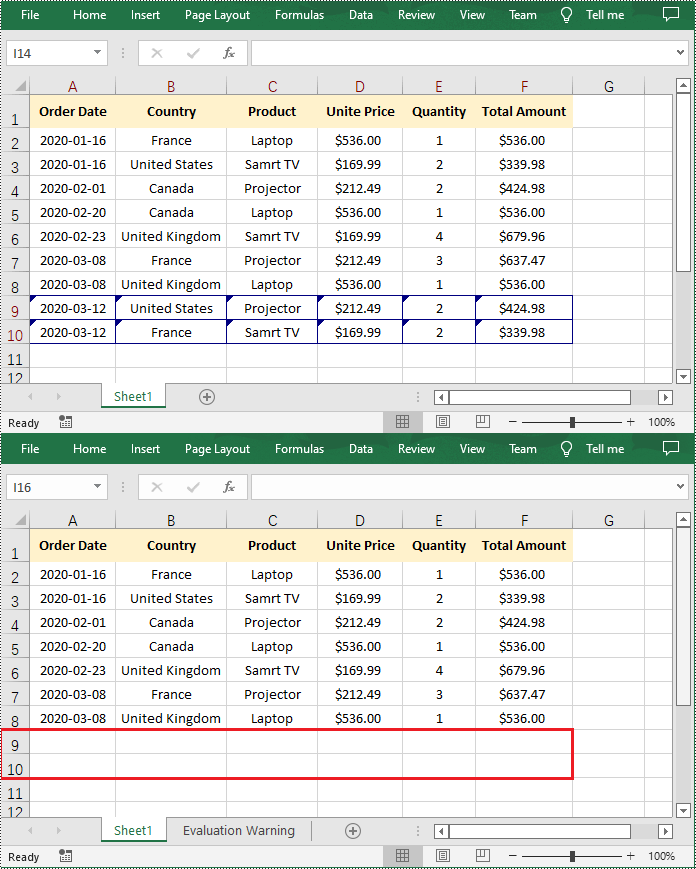
If the changes made to a workbook compromise the integrity of the data, such as introducing errors, inconsistencies, or inaccuracies, you can reject these changes by using the Workbook.RejectAllTrackedChanges() method.
The following steps explain how to reject all tracked changes in an Excel workbook using Spire.XLS for Python:
- Create a Workbook object.
- Load a sample Excel workbook using Workbook.LoadFromFile() method.
- Check if the workbook has tracked changes using Workbook.HasTrackedChanges property.
- Reject all tracked changes in the workbook using Workbook.RejectAllTrackedChanges() method.
- Save the result workbook using Workbook.SaveToFile() method.
- Python
from spire.xls.common import *
from spire.xls import *

# Specify the input and output file paths
inputFile = "Sample.xlsx"
outputFile = "RejectChanges.xlsx"

# Create a Workbook object
workbook = Workbook()
# Load an Excel file
workbook.LoadFromFile(inputFile)

# Check if the file has tracked changes
if workbook.HasTrackedChanges:
    # Reject all tracked changes in the file
    workbook.RejectAllTrackedChanges()

# Save the result file
workbook.SaveToFile(outputFile, FileFormat.Version2013)
workbook.Dispose()
Apply for a Temporary License
If you'd like to remove the evaluation message from the generated documents, or to get rid of the function limitations, please request a 30-day trial license for yourself.
Python: Add Document Properties in Excel
In Excel, document properties refer to the metadata or information associated with an Excel file. These properties provide details about the workbook itself, such as author, title, subject, keywords, and other descriptive information. Document properties are useful for organizing and categorizing Excel files, making it easier to search, sort, and manage a collection of workbooks. In this article, you will learn how to add document properties in Excel in Python using Spire.XLS for Python.
- Add Built-in Document Properties in Excel in Python
- Add Custom Document Properties in Excel in Python
Install Spire.XLS for Python
This scenario requires Spire.XLS for Python and plum-dispatch v1.7.4. They can be easily installed in your Windows through the following pip command.
pip install Spire.XLS
If you are unsure how to install, please refer to this tutorial: How to Install Spire.XLS for Python on Windows
Add Built-in Document Properties in Excel in Python
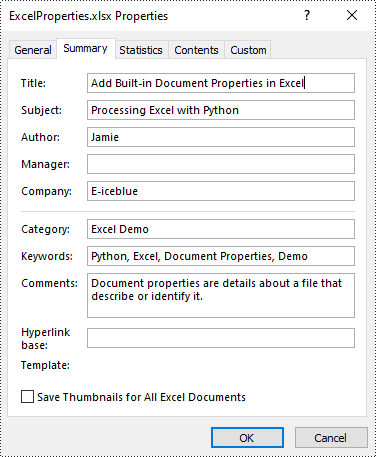
Built-in document properties are basic information about a document such as title, subject, author, category, etc. The names of these properties are predefined that cannot be edited, but Spire.XLS for Python allows you to set specific values for these properties. The following are the detailed steps.
- Create a Workbook object.
- Load an Excel document using Workbook.LoadFromFile() method.
- Get the built-in document properties of the document using Workbook.DocumentProperties property.
- Set specific document properties such as title, author, keywords and comments using the properties of BuiltInDocumentProperties class.
- Save the result document using Workbook.SaveToFile() method.
- Python
from spire.xls import *
from spire.xls.common import *

inputFile = "sample.xlsx"
outputFile = "ExcelProperties.xlsx"

# Create a Workbook object
workbook = Workbook()

# Load a sample Excel document
workbook.LoadFromFile(inputFile)

# Set built-in document properties for the Excel workbook
workbook.DocumentProperties.Author = "Jamie"
workbook.DocumentProperties.Title = "Add Built-in Document Properties in Excel"
workbook.DocumentProperties.Subject = "Processing Excel with Python"
workbook.DocumentProperties.Keywords = "Python, Excel, Document Properties, Demo"
workbook.DocumentProperties.Category = "Excel Demo"
workbook.DocumentProperties.Company = "E-iceblue"
workbook.DocumentProperties.Comments = "Document properties are details about a file that describe or identify it."

# Save the result document
workbook.SaveToFile(outputFile, FileFormat.Version2016)
workbook.Dispose()
Add Custom Document Properties in Excel in Python
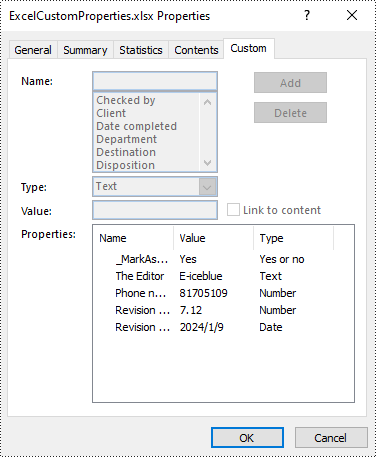
Custom document properties are additional properties that you can define for an Excel document. With Spire.XLS for Python, you can add custom properties with specified names and values through the ICustomDocumentProperties.Add() method. The following are the detailed steps.
- Create a Workbook object.
- Load an Excel document using Workbook.LoadFromFile() method.
- Get the custom document properties of the document using Workbook.CustomDocumentProperties property.
- Add custom document properties with different data types to the document using ICustomDocumentProperties.Add() method.
- Save the result document using Workbook.SaveToFile() method.
- Python
from spire.xls import *
from spire.xls.common import *

inputFile = "sample.xlsx"
outputFile = "ExcelCustomProperties.xlsx"

# Create a Workbook object
workbook = Workbook()

# Load a sample Excel document
workbook.LoadFromFile(inputFile)

# Add a custom property to make the document as final
workbook.CustomDocumentProperties.Add("_MarkAsFinal", True)

# Add other custom properties to the document
workbook.CustomDocumentProperties.Add("The Editor", "E-iceblue")
workbook.CustomDocumentProperties.Add("Phone number", 81705109)
workbook.CustomDocumentProperties.Add("Revision number", 7.12)
workbook.CustomDocumentProperties.Add("Revision date", DateTime.get_Now())

# Save the result document
workbook.SaveToFile(outputFile, FileFormat.Version2016)
workbook.Dispose()
Apply for a Temporary License
If you'd like to remove the evaluation message from the generated documents, or to get rid of the function limitations, please request a 30-day trial license for yourself.
How to Merge Excel Files in Python (.xls & .xlsx) - No Excel Required
Merging Excel files is a common task for data analysts and financial teams working with large datasets. While Microsoft Excel supports manual merging, it becomes inefficient and error-prone when dealing with large volumes of files.
In this step-by-step guide, you will learn how to merge multiple Excel files (.xls and .xlsx) using Python and Spire.XLS for Python library. Whether you're combining workbooks, merging worksheets, or automating bulk Excel file processing, this guide will help you save time and streamline your workflow with practical solutions.
Table of Contents
- Why Merge Excel Files with Python?
- Getting Started with Spire.XLS for Python
- How to Merge Multiple Excel Files into One Workbook using Python
- How to Combine Multiple Excel Worksheets into a Single Worksheet using Python
- Conclusion
- FAQs: Merge Excel Files with Python
Why Merge Excel Files with Python?
Using Python to merge Excel files brings several key advantages:
- Automation: Save time and eliminate repetitive manual work by automating the merging process.
- No Excel Dependency: Merge files without installing Microsoft Excel—ideal for headless, server-side, or cloud environments.
- Flexible Merging: Customize merging by selecting specific sheets, ranges, columns, or rows.
- Scalability: Handle hundreds or even thousands of Excel files with consistent performance.
- Error Reduction: Reduce manual errors and ensure data accuracy with automated scripts.
Whether you’re consolidating monthly reports or merging large datasets, Python helps streamline the process efficiently.
Getting Started with Spire.XLS for Python
Spire.XLS for Python is a standalone library that allows developers to create, read, edit, and save Excel files without the need for Microsoft Excel installation.
Key Features Include:
- Supports Multiple Formats: .xls, .xlsx, and more.
- Worksheet Operations: Copy, rename, delete, and merge worksheets seamlessly across workbooks.
- Formula & Formatting Preservation: Retain formulas and formatting during editing or merging.
- Advanced Features: Includes chart creation, conditional formatting, pivot tables, and more.
- File Conversion: Convert Excel files to PDF, HTML, CSV, and more.
Installation
Run the following pip command in your terminal or command prompt to install Spire.XLS from PyPI:
pip install spire.xls
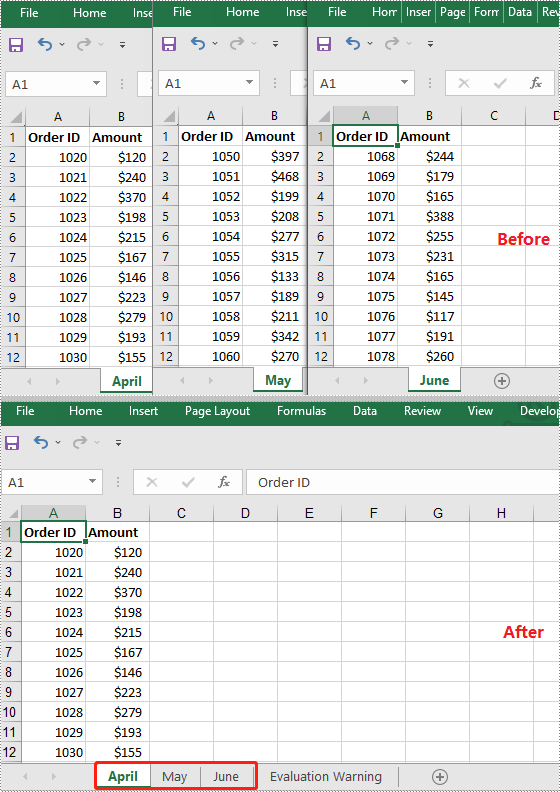
How to Merge Multiple Excel Files into One Workbook using Python
When working with multiple Excel files, consolidating all worksheets into a single workbook can simplify data management and reporting. This approach preserves each original worksheet separately, making it easy to organize and review data from different sources such as department budgets, regional reports, or monthly summaries.
Steps
To merge multiple Excel files into a single workbook using Python, follow these steps:
- Loop through the files.
- Load each Excel file using LoadFromFile().
- For the first file, assign it as the base workbook.
- For subsequent files, copy all worksheets into the base workbook using AddCopy().
- Save the final combined workbook to a new file.
Code Example
import os
from spire.xls import *

# Folder containing Excel files to merge
input_folder = './sample_files'
# Output file name for the merged workbook
output_file = 'merged_workbook.xlsx'

# Initialize merged workbook as None
merged_workbook = None

# Iterate over all files in the input folder
for filename in os.listdir(input_folder):
    # Process only Excel files with .xls or .xlsx extensions
    if filename.endswith('.xlsx') or filename.endswith('.xls'):
        file_path = os.path.join(input_folder, filename)

        # Load the current Excel file into a Workbook object
        source_workbook = Workbook()
        source_workbook.LoadFromFile(file_path)

        if merged_workbook is None:
            # For the first file, assign it as the base merged workbook
            merged_workbook = source_workbook
        else:
            # For subsequent files, copy each worksheet into the merged workbook
            for i in range(source_workbook.Worksheets.Count):
                sheet = source_workbook.Worksheets.get_Item(i)
                merged_workbook.Worksheets.AddCopy(sheet, WorksheetCopyType.CopyAll)

# Save the combined workbook to the specified output file
merged_workbook.SaveToFile(output_file, ExcelVersion.Version2016)
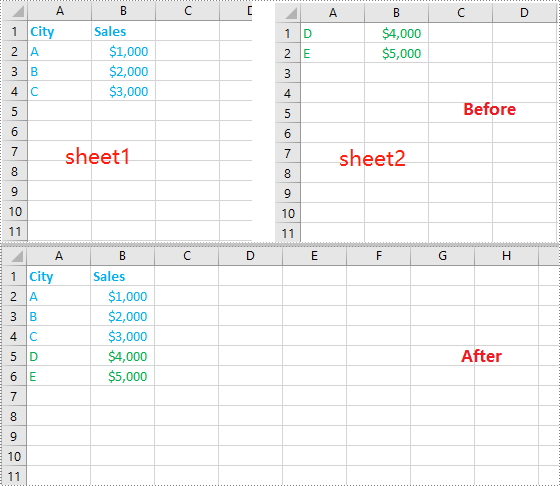
How to Combine Multiple Excel Worksheets into a Single Worksheet using Python
Merging data from multiple Excel worksheets into one worksheet allows you to aggregate information efficiently, especially when working with data such as sales logs, survey responses, or performance reports.
Steps
To combine worksheet data from multiple Excel files into a single worksheet using Python, follow these steps:
- Create a new workbook and select its first worksheet as the destination.
- Loop through the files.
- Load each Excel file using LoadFromFile().
- Get the desired worksheet that you want to merge from the current file.
- Copy the used cell range from the desired worksheet to the destination worksheet, placing data consecutively below the previously copied content.
- Save the combined data into a new Excel file.
Code Example
import os
from spire.xls import *

# Folder containing Excel files to merge
input_folder = './excel_worksheets'
# Output file name for the merged workbook
output_file = 'merged_into_one_sheet.xlsx'

# Create a new workbook to hold merged data
merged_workbook = Workbook()
# Use the first worksheet in the new workbook as the merge target
merged_sheet = merged_workbook.Worksheets[0]

# Initialize the starting row for copying data
current_row = 1

# Loop through all files in the input folder
for filename in os.listdir(input_folder):
    # Process only Excel files (.xls or .xlsx)
    if filename.endswith('.xlsx') or filename.endswith('.xls'):
        file_path = os.path.join(input_folder, filename)

        # Load the current Excel file
        workbook = Workbook()
        workbook.LoadFromFile(file_path)

        # Get the first worksheet from the current workbook
        sheet = workbook.Worksheets[0]

        # Get the used range from the first worksheet
        source_range = sheet.Range

        # Set the destination range in the merged worksheet starting at current_row
        dest_range = merged_sheet.Range[current_row, 1]

        # Copy data from the used range to the destination range
        source_range.Copy(dest_range)

        # Update current_row to the row after the last copied row to prevent overlap
        current_row += sheet.LastRow

# Save the merged workbook to the specified output file in Excel 2016 format
merged_workbook.SaveToFile(output_file, ExcelVersion.Version2016)
Conclusion
When merging multiple Excel files into a single document—whether by appending sheets or combining data row by row—using a Python library like Spire.XLS enables automation and improves accuracy. This approach can help streamline workflows, especially in enterprise scenarios that require handling large datasets without relying on Microsoft Excel.
FAQs: Merge Excel Files with Python
Q1: Can I merge .xls and .xlsx files together?
A1: Yes. Spire.XLS handles both formats without needing conversion.
Q2: Do I need Excel installed on my machine to use Spire.XLS?
A2: No. Spire.XLS is standalone and works without Microsoft Office installed.
Q3: Can I merge only specific sheets from each workbook?
A3: Yes. You can customize your code to merge sheets by name or index. For example:
sheet = source_workbook.Worksheets["Summary"]
Q4: How do I avoid copying header rows multiple times?
A4: Add logic like:
if current_row > 1:
    start_row = 2 # Skip header

else:
    start_row = 1
Q5: Can I keep track of which file each row came from?
A5: Yes. Add a new column in the merged sheet containing the source file name for each row.
Q6: Is there a file size or row limit when using Spire.XLS?
A6: Spire.XLS follows the same row and column limits as Excel: .xlsx supports up to 1,048,576 rows × 16,384 columns, and .xls supports up to 65,536 rows × 256 columns.
Q7: Can I preserve formulas and formatting while merging?
A7: Yes. When merging Excel files, formatting and formulas are preserved.
Python: Insert or Delete Pictures in Excel
Inserting or deleting images in Excel can be a powerful way to enhance your spreadsheets and make them visually appealing. Whether you want to include logos, charts, diagrams, or any other graphical elements, Excel provides the functionality to seamlessly integrate images into your worksheets. Additionally, Excel offers the options to manipulate and organize images, allowing you to resize, move, or delete them as needed. In this article, we will explore how to programmatically insert or delete pictures in Excel in Python by using Spire.XLS for Python.
Install Spire.XLS for Python
This scenario requires Spire.XLS for Python and plum-dispatch v1.7.4. They can be easily installed in your Windows through the following pip command.
pip install Spire.XLS
If you are unsure how to install, please refer to this tutorial: How to Install Spire.XLS for Python on Windows
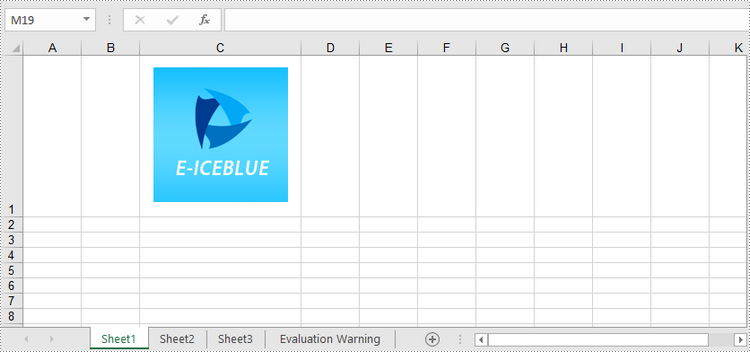
Insert a Picture to a Specific Cell in Python
To add a picture to a certain cell, you use Worksheet.Pictures.Add(int topRow, int leftColumn, Image image) method. The following are the detailed steps.
- Initialize a Workbook instance.
- Get a specific worksheet through Workbook.Worksheets[sheetIndex] property.
- Insert a picture into a specific cell using Worksheet.Pictures.Add() method and return an object of ExcelPicture.
- Set the width and height of the picture, as well as the distance between the picture and the cell border through the properties under the ExcelPicture object.
- Save the workbook to an Excel file using Workbook.SaveToFile() method.
- Python
from spire.xls import *
from spire.xls.common import *

# Create a Workbook object
workbook = Workbook()

# Get the first worksheet.
sheet = workbook.Worksheets[0]

# Add a picture to a specific cell
imgPath = "C:\\Users\\Administrator\\Desktop\\logo.png"
picture = sheet.Pictures.Add(1, 3, imgPath)

# Set the picture width and height
picture.Width = 150
picture.Height = 150

# Adjust the column width and row height so that the cell can accommodate the picture
sheet.Columns[2].ColumnWidth = 25
sheet.Rows[0].RowHeight = 135

# Set the distance between cell border and image
picture.LeftColumnOffset = 90
picture.TopRowOffset = 20

# Save to file
workbook.SaveToFile("output/InsertImage.xlsx", ExcelVersion.Version2013)
workbook.Dispose()
Delete Pictures in a Worksheet in Python
A picture in a worksheet can be removed using Worksheet.Pictures[imgIndex].Remove() method. To delete all pictures, you can use a for loop to iterate through the pictures in the worksheet. The following are the detailed steps.
- Create a Workbook object.
- Load an Excel file using Workbook.LoadFromFile() method.
- Get a specific worksheet through Workbook.Worksheets[sheetIndex] property.
- Delete images in the worksheet using Worksheet.Pictures[imgIndex].Remove() method.
- Save the workbook to another Excel file using Workbook.SaveToFile() method.
- Python
from spire.xls import *
from spire.xls.common import *

# Create a Workbook object
workbook = Workbook()

# Load an Excel file
workbook.LoadFromFile("C:\\Users\\Administrator\\Desktop\\InsertImage.xlsx")

# Get the first worksheet
sheet = workbook.Worksheets[0]

# Delete all pictures from the worksheet
for i in range(sheet.Pictures.Count - 1, -1, -1):
    sheet.Pictures[i].Remove()

# Delete a specific picture
# sheet.Pictures[imgIndex].Remove()

# Save to file
workbook.SaveToFile("output/DeleteImage.xlsx", ExcelVersion.Version2013)
workbook.Dispose()
Apply for a Temporary License
If you'd like to remove the evaluation message from the generated documents, or to get rid of the function limitations, please request a 30-day trial license for yourself.
Python: Create, Read, or Update Excel Documents
The Excel spreadsheet is extensively utilized for organizing, analyzing, and presenting data in a tabular format. The capacity to programmatically interact with Excel files holds great value as it facilitates automation and integration of Excel functionality within software applications. Specifically, knowing how to create new Excel documents, retrieve information from existing ones, and update or modify them as needed through code would be very helpful. This article will demonstrate how to create, read, or update Excel documents in Python using Spire.XLS for Python.
- Create an Excel Document in Python
- Read Data from a Worksheet in Python
- Update an Excel Document in Python
Install Spire.XLS for Python
This scenario requires Spire.XLS for Python and plum-dispatch v1.7.4. They can be easily installed in your Windows through the following pip command.
pip install Spire.XLS
If you are unsure how to install, please refer to this tutorial: How to Install Spire.XLS for Python on Windows
Create an Excel Document in Python
Spire.XLS for Python offers a variety of classes and interfaces that you can use to create and edit Excel documents. Here is a list of important classes, properties and methods involved in this article.
| Member | Description |
| Workbook class | Represents an Excel workbook model. |
| Workbook.Worksheets.Add() method | Adds a worksheet to workbook. |
| Workbook.SaveToFile() method | Saves the workbook to an Excel document. |
| Worksheet class | Represents a worksheet in a workbook. |
| Worksheet.Range property | Gets a specific cell or cell range from worksheet. |
| Worksheet.Range.Text property | Gets or sets the text value of a cell. |
| Worksheet.Rows property | Gets a collection of rows in worksheet. |
| CellRange class | Represents a cell or cell range in worksheet. |
The following are the steps to create an Excel document from scratch using Spire.XLS for Python.
- Create a Workbook object.
- Add a worksheet using Workbook.Worksheets.Add() method.
- Write data to specific cells through Worksheet.Range.Text property.
- Save the workbook to an Excel document using Workbook.SaveToFile() method.
- Python
from spire.xls import *
from spire.xls.common import *
# Create a Workbook object
wb = Workbook()
# Remove default worksheets
wb.Worksheets.Clear()
# Add a worksheet and name it "Employee"
sheet = wb.Worksheets.Add("Employee")
# Merge the cells between A1 and G1
sheet.Range["A1:G1"].Merge()
# Write data to A1 and apply formatting to it
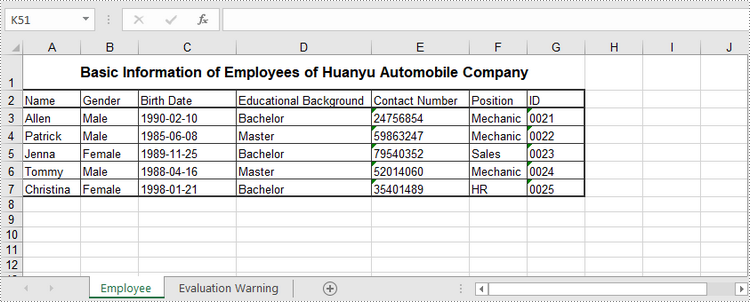
sheet.Range["A1"].Text = "Basic Information of Employees of Huanyu Automobile Company"
sheet.Range["A1"].HorizontalAlignment = HorizontalAlignType.Center
sheet.Range["A1"].VerticalAlignment = VerticalAlignType.Center
sheet.Range["A1"].Style.Font.IsBold = True
sheet.Range["A1"].Style.Font.Size = 13
# Set row height of the first row
sheet.Rows[0].RowHeight = 30
# Write data to specific cells
sheet.Range["A2"].Text = "Name"
sheet.Range["B2"].Text = "Gender"
sheet.Range["C2"].Text = "Birth Date"
sheet.Range["D2"].Text = "Educational Background"
sheet.Range["E2"].Text = "Contact Number"
sheet.Range["F2"].Text = "Position"
sheet.Range["G2"].Text = "ID"
sheet.Range["A3"].Text = "Allen"
sheet.Range["B3"].Text = "Male"
sheet.Range["C3"].Text = "1990-02-10"
sheet.Range["D3"].Text = "Bachelor"
sheet.Range["E3"].Text = "24756854"
sheet.Range["F3"].Text = "Mechanic"
sheet.Range["G3"].Text = "0021"
sheet.Range["A4"].Text = "Patrick"
sheet.Range["B4"].Text = "Male"
sheet.Range["C4"].Text = "1985-06-08"
sheet.Range["D4"].Text = "Master"
sheet.Range["E4"].Text = "59863247"
sheet.Range["F4"].Text = "Mechanic"
sheet.Range["G4"].Text = "0022"
sheet.Range["A5"].Text = "Jenna"
sheet.Range["B5"].Text = "Female"
sheet.Range["C5"].Text = "1989-11-25"
sheet.Range["D5"].Text = "Bachelor"
sheet.Range["E5"].Text = "79540352"
sheet.Range["F5"].Text = "Sales"
sheet.Range["G5"].Text = "0023"
sheet.Range["A6"].Text = "Tommy"
sheet.Range["B6"].Text = "Male"
sheet.Range["C6"].Text = "1988-04-16"
sheet.Range["D6"].Text = "Master"
sheet.Range["E6"].Text = "52014060"
sheet.Range["F6"].Text = "Mechanic"
sheet.Range["G6"].Text = "0024"
sheet.Range["A7"].Text = "Christina"
sheet.Range["B7"].Text = "Female"
sheet.Range["C7"].Text = "1998-01-21"
sheet.Range["D7"].Text = "Bachelor"
sheet.Range["E7"].Text = "35401489"
sheet.Range["F7"].Text = "HR"
sheet.Range["G7"].Text = "0025"
# Set row height of a range
sheet.Range["A2:G7"].RowHeight = 15
# Set column width
sheet.SetColumnWidth(3, 15)
sheet.SetColumnWidth(4, 21)
sheet.SetColumnWidth(5, 15)
# Set border style of a range
sheet.Range["A2:G7"].BorderAround(LineStyleType.Medium)
sheet.Range["A2:G7"].BorderInside(LineStyleType.Thin)
sheet.Range["A2:G2"].BorderAround(LineStyleType.Medium)
sheet.Range["A2:G7"].Borders.KnownColor = ExcelColors.Black
# Save to a .xlsx file
wb.SaveToFile("output/NewSpreadsheet.xlsx", FileFormat.Version2016)
Read Data from a Worksheet in Python
The Worksheet.Range.Value property returns number value or text value of a cell as a string. To get data of a whole worksheet or a cell range, loop through the cells within it. The following are the steps to get data of a worksheet using Spire.XLS for Python.
- Create a Workbook object.
- Load an Excel document using Workbook.LoadFromFile() method.
- Get a specific worksheet through Workbook.Worksheets[index] property.
- Get the cell range contain data though Worksheet.AllocatedRange property.
- Iterate through the rows and columns to get cells within the range, and return the value of each cell through CellRange.Value property.
- Python
from spire.xls import *
from spire.xls.common import *

# Create a Workbook object
wb = Workbook()

# Load an existing Excel file
wb.LoadFromFile("C:\\Users\\Administrator\\Desktop\\NewSpreadsheet.xlsx");

# Get the first worksheet
sheet = wb.Worksheets[0]

# Get the cell range containing data
locatedRange = sheet.AllocatedRange

# Iterate through the rows
for i in range(len(sheet.Rows)):

    # Iterate through the columns
    for j in range(len(locatedRange.Rows[i].Columns)):

        # Get data of a specific cell
        print(locatedRange[i + 1, j + 1].Value + "  ", end='')

    print("")

Update an Excel Document in Python
To change the value of a certain cell, just re-assign a value to it through Worksheet.Range.Value property. The following are the detailed steps.
- Create a Workbook object.
- Load an Excel document using Workbook.LoadFromFile() method.
- Get a specific worksheet through Workbook.Worksheets[index] property.
- Change the value of a particular cell though Worksheet.Range.Value property.
- Save the workbook to an Excel file using Workbook.SaveToFile() method.
- Python
from spire.xls import *
from spire.xls.common import *
# Create a Workbook object
wb = Workbook();
# Load an existing Excel file
wb.LoadFromFile("C:\\Users\\Administrator\\Desktop\\NewSpreadsheet.xlsx")
# Get the first worksheet
sheet = wb.Worksheets[0]
# Change the value of a specific cell
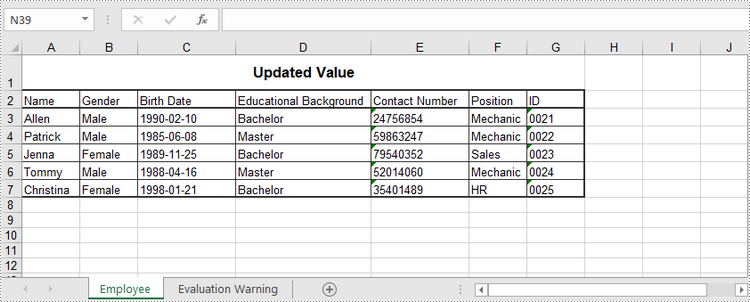
sheet.Range["A1"].Value = "Updated Value"
# Save to file
wb.SaveToFile("output/Updated.xlsx", ExcelVersion.Version2016)
Apply for a Temporary License
If you'd like to remove the evaluation message from the generated documents, or to get rid of the function limitations, please request a 30-day trial license for yourself.