Insert Header and Footer to Excel with C#, VB.NET in WPF
Generally we add predefined information or insert elements such as data, time and file name to Excel header or footer for printing purpose. Header or footer can be manually inserted or modified in Page Layout View or from Page Setup dialog box.
This article will present how to insert header and footer at runtime using Spire.XLS for WPF. Spire.XLS provides a class of PageSetup that contains all the page setup settings including header and footer, and a set of script commands that are used to set header and footer formatting.
Script Commands:
| Commands | Description |
| &G | A picture |
| &D | The current data |
| &T | The current time |
| &A | Worksheet name |
| &F | File name |
| &B | Make text bold |
| &I | Italicize text |
| &<Font name> | Font name. For example: &"Arial" |
| &K<Html color code> | Font color. For example: &KFFFFF0 |
Code Snippets:
Step 1: Initialize a new instance of Workbook class and get the first sheet from workbook.
Workbook wb = new Workbook();
Worksheet sheet = wb.Worksheets[0];
Step 2: Insert header text with formatting (specified font name, size and color) to the left part of Excel header.
sheet.PageSetup.LeftHeader ="&\"Showcard Gothic\"&14&K8B2252 Header and Footer Sample";
Step 3: Insert footer with formatting to the center part of Excel footer.
sheet.PageSetup.CenterFooter = "&B Copyright © 2016 e-iceblue. All Rights Reserved.";
Step 4: Save and launch the file.
wb.SaveToFile(@"..\Sample.xls");
System.Diagnostics.Process.Start(@"..\Sample.xls");
Output:
Header

Footer

Full Code:
using System.Drawing;
using System.Windows;

namespace WpfApplication1
{
    public partial class MainWindow : Window
    {
        public MainWindow()
        {
            InitializeComponent();
        }
        private void button1_Click(object sender, RoutedEventArgs e)
        {
            Workbook wb = new Workbook();
            Worksheet sheet = wb.Worksheets[0];

            sheet.PageSetup.LeftHeader = "&\"Showcard Gothic\"&14&K8B2252 Header and Footer Sample";
            sheet.PageSetup.CenterFooter = "&B Copyright © 2016 e-iceblue. All Rights Reserved.";

            wb.SaveToFile(@"..\Sample.xls");
            System.Diagnostics.Process.Start(@"..\Sample.xls");

        }
    }
}
Imports System.Drawing
Imports System.Windows

Namespace WpfApplication1
	Public Partial Class MainWindow
		Inherits Window
		Public Sub New()
			InitializeComponent()
		End Sub
		Private Sub button1_Click(sender As Object, e As RoutedEventArgs)
			Dim wb As New Workbook()
			Dim sheet As Worksheet = wb.Worksheets(0)

			sheet.PageSetup.LeftHeader = "&""Showcard Gothic""&14&K8B2252 Header and Footer Sample"
			sheet.PageSetup.CenterFooter = "&B Copyright © 2016 e-iceblue. All Rights Reserved."

			wb.SaveToFile("..\Sample.xls")
			System.Diagnostics.Process.Start("..\Sample.xls")

		End Sub
	End Class
End Namespace
How to Insert Hyperlink in Excel for WPF Applications
Generally, a hyperlink is a picture or a piece of text which contains a web link that points to another object. The object can be a website, an email address and a file, etc. By clicking on the hyperlink, readers can access the target place quickly and conveniently.
This article demonstrates how to insert hyperlink in excel for WPF Applications by using Spire.XLS for WPF.
Below is the effective screenshot:

In this sample, we added two hyperlinks: one for cell A5, another for cell D13. Now, refer to the following detail steps:
Code snippets:
Use namespace:
using System.Windows;
using Spire.Xls;
Step 1: Initialize a new instance of Workbook class and load the excel document from file, then get its first worksheet.
Workbook workbook = new Workbook();
workbook.LoadFromFile("Vendors Information.xlsx");
Worksheet sheet = workbook.Worksheets[0];
Step 2: In the first worksheet, add hyperlink to cell A5, set its display text as the existing text of cell A5, next set type and address.
HyperLink Link = sheet.HyperLinks.Add(sheet.Range["A5"]);
Link.TextToDisplay = sheet.Range["A5"].Text;
Link.Type = HyperLinkType.Url;
Link.Address = "https://en.wikipedia.org/wiki/Canada";
Step 3: Add a new hyperlink to cell D13 and set its display text, type and address.
HyperLink NewLink = sheet.HyperLinks.Add(sheet.Range["D13"]);
NewLink.TextToDisplay = "https://www.google.com";
NewLink.Type = HyperLinkType.Url;
NewLink.Address = "https://www.google.com";
Step 4: Save and launch the file.
workbook.SaveToFile("Hyperlink.xlsx", ExcelVersion.Version2010);
System.Diagnostics.Process.Start("Hyperlink.xlsx");
Full codes:
private void button1_Click(object sender, RoutedEventArgs e)
{
    Workbook workbook = new Workbook();
    workbook.LoadFromFile("Vendors Information.xlsx");
    Worksheet sheet = workbook.Worksheets[0];

    HyperLink Link = sheet.HyperLinks.Add(sheet.Range["A5"]);
    Link.TextToDisplay = sheet.Range["A5"].Text;
    Link.Type = HyperLinkType.Url;
    Link.Address = "https://en.wikipedia.org/wiki/Canada";

    HyperLink NewLink = sheet.HyperLinks.Add(sheet.Range["D13"]);
    NewLink.TextToDisplay = "https://www.google.com";
    NewLink.Type = HyperLinkType.Url;
    NewLink.Address = "https://www.google.com";

    workbook.SaveToFile("Hyperlink.xlsx", ExcelVersion.Version2010);
    System.Diagnostics.Process.Start("Hyperlink.xlsx");
}
Private Sub button1_Click(sender As Object, e As RoutedEventArgs)
	Dim workbook As New Workbook()
	workbook.LoadFromFile("Vendors Information.xlsx")
	Dim sheet As Worksheet = workbook.Worksheets(0)

	Dim Link As HyperLink = sheet.HyperLinks.Add(sheet.Range("A5"))
	Link.TextToDisplay = sheet.Range("A5").Text
	Link.Type = HyperLinkType.Url
	Link.Address = "https://en.wikipedia.org/wiki/Canada"

	Dim NewLink As HyperLink = sheet.HyperLinks.Add(sheet.Range("D13"))
	NewLink.TextToDisplay = "https://www.google.com"
	NewLink.Type = HyperLinkType.Url
	NewLink.Address = "https://www.google.com"

	workbook.SaveToFile("Hyperlink.xlsx", ExcelVersion.Version2010)
	System.Diagnostics.Process.Start("Hyperlink.xlsx")
End Sub
Encrypt Workbook or Worksheet with Password in WPF
The simplest and most efficient way to keep your Excel file confidential is to encrypt the whole workbook or the specified worksheet with password. Apart from setting a password for your document, you could also choose whether to protect workbook structure or protect worksheet with a certain protection type.
In this article, I am going to introduce how to password protect a workbook or a worksheet as well as set specified permissions to control what types of changes people can make to this workbook using Spire.XLS for WPF.
Code Snippets:
Step 1: Initialize a new instance of workbook class and load an existing Excel file.
Workbook wb = new Workbook();
wb.LoadFromFile("sample.xlsx", ExcelVersion.Version2013);
Step 2: Call Workbook.Protect(string passwordToOpen, bool bIsProtectWindow, bool bIsProtectContent) to protect the workbook with password and also protect the workbook window and structure.
wb.Protect("password-1",true,true);
Step 3: Get the third worksheet from workbook, call protect method of XlsWorksheetBase class to encrypt the sheet with password and set the protection type as None which represents no changes are allowed in the protected sheet. Besides None, there are 17 others in SheetProtectionType enum that can help you to set different permissions to command what users can do to this worksheet.
Worksheet sheet = wb.Worksheets[2];
sheet.Protect("password-2", SheetProtectionType.None);
Step 4: Save and launch the file.
wb.SaveToFile("ProtectedExcel.xlsx");
System.Diagnostics.Process.Start("ProtectedExcel.xlsx");
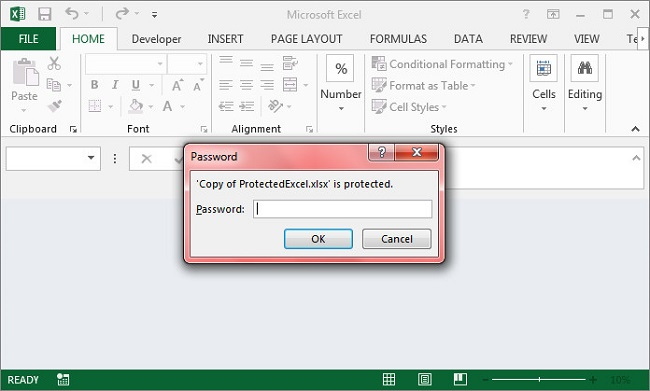
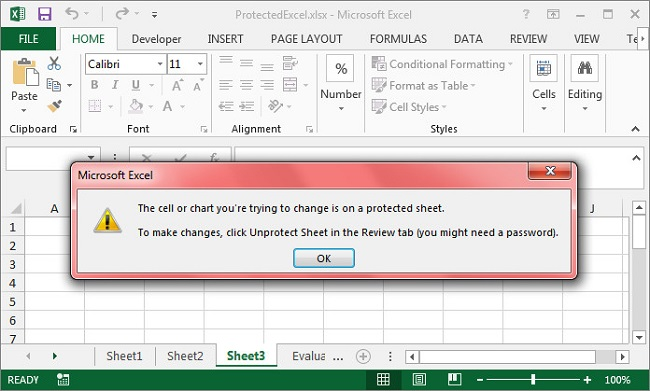
Output:
Protect Workbook
Protect Worksheet
Full Code:
using Spire.Xls;
using System.Windows;

namespace WpfApplication1
{
    public partial class MainWindow : Window
    {
        public MainWindow()
        {
            InitializeComponent();
        }
        private void button1_Click(object sender, RoutedEventArgs e)
        {
            Workbook wb = new Workbook();
            wb.LoadFromFile("sample.xlsx", ExcelVersion.Version2013);

            wb.Protect("password-1", true, true);
            Worksheet sheet = wb.Worksheets[2];
            sheet.Protect("password-2", SheetProtectionType.None);

            wb.SaveToFile("ProtectedExcel.xlsx");
            System.Diagnostics.Process.Start("ProtectedExcel.xlsx");

        }
    }
}
Imports Spire.Xls
Imports System.Windows

Namespace WpfApplication1
	Public Partial Class MainWindow
		Inherits Window
		Public Sub New()
			InitializeComponent()
		End Sub
		Private Sub button1_Click(sender As Object, e As RoutedEventArgs)
			Dim wb As New Workbook()
			wb.LoadFromFile("sample.xlsx", ExcelVersion.Version2013)

			wb.Protect("password-1", True, True)
			Dim sheet As Worksheet = wb.Worksheets(2)
			sheet.Protect("password-2", SheetProtectionType.None)

			wb.SaveToFile("ProtectedExcel.xlsx")
			System.Diagnostics.Process.Start("ProtectedExcel.xlsx")

		End Sub
	End Class
End Namespace
How to Find and Highlight Excel Data in WPF
In Microsoft Excel, we can easily find the data we want by using the find function. But how to achieve this programmatically? With Spire.XLS for WPF, not only can we find the specific data in excel with high-efficiency, but also we can highlight it with different color.
In this article, we’ll demonstrate how to find and highlight excel data using Spire.XLS for WPF in C# and VB.NET.
At first, please download Spire.XLS and install it correctly, then add Spire.XLS.Wpf.dll and Spire.License.dll from the installation folder as reference.
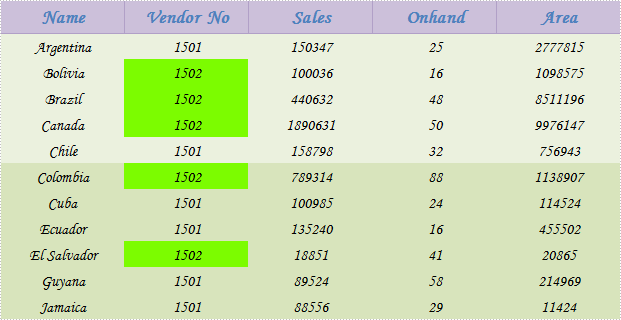
Below is the effective screenshot:
Detail steps:
Use namespace:
using System.Windows;
using Spire.Xls;
using System.Drawing;
Step 1: Initialize a new Workbook instance and load the sample excel document from file.
Workbook workbook = new Workbook();
workbook.LoadFromFile("Sample.xlsx");
Step 2: Get its first worksheet, then find and highlight the specific number 1502 in worksheet 1.
Worksheet sheet = workbook.Worksheets[0];
foreach (CellRange range in sheet.FindAllNumber(1502,true))
{
    range.Style.Color = Color.LawnGreen;
}
Apart from finding number, Spire.XLS also supports us to find string, datetime, bool, etc.
Step 3: Save and launch the file.
workbook.SaveToFile("result.xlsx", ExcelVersion.Version2010);
System.Diagnostics.Process.Start("result.xlsx");
Full codes:
private void button1_Click(object sender, RoutedEventArgs e)
{
    //load the sample excel document from file
    Workbook workbook = new Workbook();
    workbook.LoadFromFile("Sample.xlsx");

    //find and highlight excel data
    Worksheet sheet = workbook.Worksheets[0];
    foreach (CellRange range in sheet.FindAllNumber(1502,true))
    {
        range.Style.Color = Color.LawnGreen;
    }
    //save and launch the file
    workbook.SaveToFile("result.xlsx", ExcelVersion.Version2010);
    System.Diagnostics.Process.Start("result.xlsx");
}
Private Sub button1_Click(sender As Object, e As RoutedEventArgs)
	'load the sample excel document from file
	Dim workbook As New Workbook()
	workbook.LoadFromFile("Sample.xlsx")

	'find and highlight excel data
	Dim sheet As Worksheet = workbook.Worksheets(0)
	For Each range As CellRange In sheet.FindAllNumber(1502,True)
		range.Style.Color = Color.LawnGreen
	Next
	'save and launch the file
	workbook.SaveToFile("result.xlsx", ExcelVersion.Version2010)
	System.Diagnostics.Process.Start("result.xlsx")
End Sub
Add formatted comments to Excel in WPF
Excel comments in individual cells are extra information that explain more about the data in these cells. The information can be notes for readers, reminders for yourself, and cross-references to other reports. In this article, I am going to introduce how to add and format Excel comments using Spire.XLS for WPF.
Before start, please download Spire.XLS Pack and add the Spire.XLS.Wpf.dll and Spire.License.dll from Bin folder to reference of your WPF project.
Code Snippets:
Step 1: Initialize a new Workbook, get the first worksheet from workbook.
Workbook wb = new Workbook();
Worksheet sheet = wb.Worksheets[0];
Step 2: Create a font style that will be used to format comment.
ExcelFont font = wb.CreateFont();
font.FontName = "Calibri";
font.Color = Color.Blue;
font.Size = 10;
font.IsBold = true;
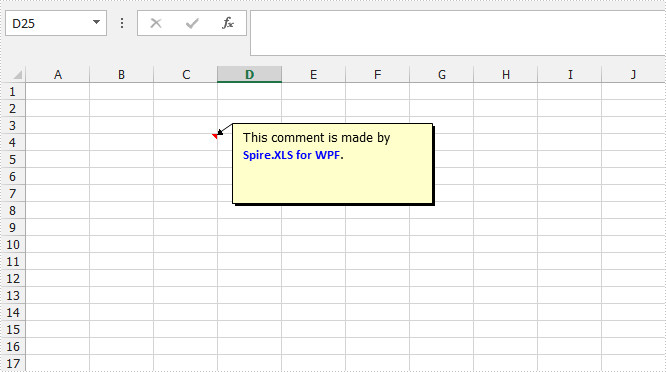
Step 3: Add a comment to C4 and set the size of comment box, set the text and set font for specified range of characters.
ExcelComment comment = sheet.Range["C4"].Comment;
comment.Height = 80;
comment.Width = 200;
comment.RichText.Text = "This comment is made by Spire.XLS for WPF.";
comment.RichText.SetFont(23, 40, font);
Step 4: Save and launch the file.
wb.SaveToFile("result.xlsx", ExcelVersion.Version2013);
System.Diagnostics.Process.Start("result.xlsx");
Output:
Full Code:
using Spire.Xls;
using System.Drawing;
using System.Windows;

namespace WpfApplication1
{
    public partial class MainWindow : Window
    {
        public MainWindow()
        {
            InitializeComponent();
        }
        private void button1_Click(object sender, RoutedEventArgs e)
        {
            Workbook wb = new Workbook();
            Worksheet sheet = wb.Worksheets[0];

            ExcelFont font = wb.CreateFont();
            font.FontName = "Calibri";
            font.Color = Color.Blue;
            font.Size = 10;
            font.IsBold = true;

            ExcelComment comment = sheet.Range["C4"].Comment;
            comment.Height = 80;
            comment.Width = 200;
            comment.RichText.Text = "This comment is made by Spire.XLS for WPF.";
            comment.RichText.SetFont(23, 40, font);

            wb.SaveToFile("result.xlsx", ExcelVersion.Version2013);
            System.Diagnostics.Process.Start("result.xlsx");

        }
    }
}
Imports Spire.Xls
Imports System.Drawing
Imports System.Windows

Namespace WpfApplication1
	Public Partial Class MainWindow
		Inherits Window
		Public Sub New()
			InitializeComponent()
		End Sub
		Private Sub button1_Click(sender As Object, e As RoutedEventArgs)
			Dim wb As New Workbook()
			Dim sheet As Worksheet = wb.Worksheets(0)

			Dim font As ExcelFont = wb.CreateFont()
			font.FontName = "Calibri"
			font.Color = Color.Blue
			font.Size = 10
			font.IsBold = True

			Dim comment As ExcelComment = sheet.Range("C4").Comment
			comment.Height = 80
			comment.Width = 200
			comment.RichText.Text = "This comment is made by Spire.XLS for WPF."
			comment.RichText.SetFont(23, 40, font)

			wb.SaveToFile("result.xlsx", ExcelVersion.Version2013)
			System.Diagnostics.Process.Start("result.xlsx")

		End Sub
	End Class
End Namespace
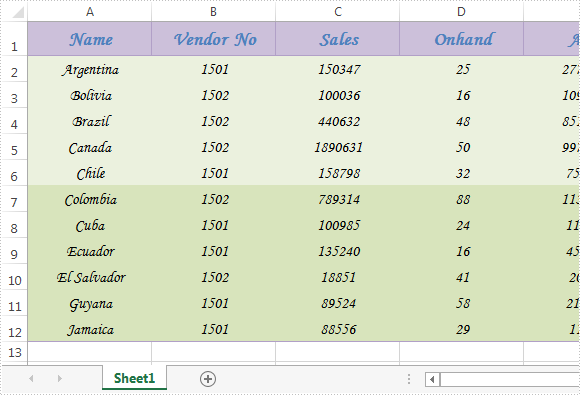
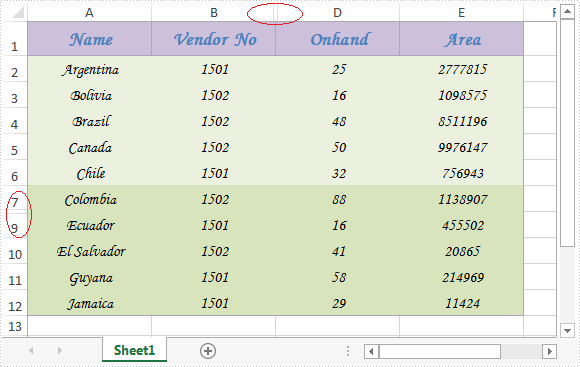
Hide or Unhide Excel Row and Column in WPF
Sometimes, hide row and column can make the data processing job easier and more efficient when working with a large excel file. However, hidden rows and columns are always hidden and invisible, for this reason, you need to unhide them before showing the whole excel file.
Spire.XLS for WPF provides developers four methods: HideRow(), HideColumn(), ShowRow() and ShowColumn() to hide or unhide excel row and column in WPF.
Please check the screenshot of the original excel worksheet:
Before using the code, make sure that Spire.XLS is installed on system correctly, next create a WPF application project and add the dll file from the installation folder as reference, after that use following namespace:
using System.Windows;
using Spire.Xls;
Code snippets:
Step 1: Initialize a new instance of Workbook class and load the original excel file.
Workbook workbook = new Workbook();
workbook.LoadFromFile("Excel.xlsx");
Step 2: Get the first worksheet of the file.
Worksheet sheet = workbook.Worksheets[0];
Step 3: Hide or unhide row and column.
Hide the 8th row and the 3rd column:
sheet.HideRow(8);
sheet.HideColumn(3);
Unhide:
sheet.ShowRow(8);
sheet.ShowColumn(3);
Step 4: Save and launch the file.
Effective screenshot after hiding:
Full codes:
using Spire.Xls;
using System.Windows;

namespace WpfApplication1
{
    public partial class MainWindow : Window
    {
        public MainWindow()
        {
            InitializeComponent();
        }
        private void button1_Click(object sender, RoutedEventArgs e)
        {
            //initialize a new instance
            Workbook workbook = new Workbook();
            //load the sample excel file
            workbook.LoadFromFile("Excel.xlsx");
            //get its first worksheet
            Worksheet sheet = workbook.Worksheets[0];

            //hide the 8th row and the 3rd column of the first worksheet
            sheet.HideRow(8);
            sheet.HideColumn(3);
            /*//unhide
            sheet.ShowRow(8);
            sheet.ShowColumn(3);*/

            //save and launch the file
            workbook.SaveToFile("Sample.xlsx", ExcelVersion.Version2010);
            System.Diagnostics.Process.Start(workbook.FileName);
        }

    }
}
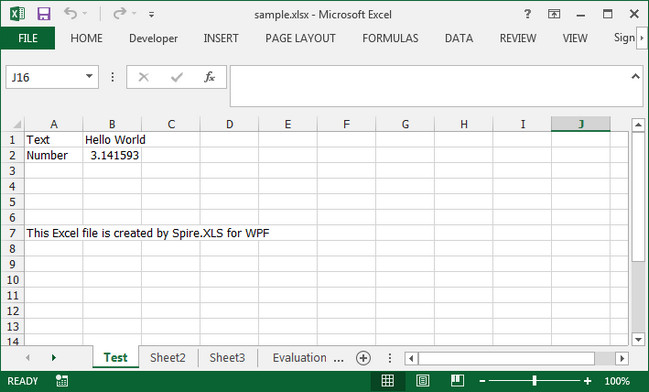
Create, Write and Save Excel File in WPF with C#, VB.NET
Creating, Writing and Saving Excel file are basic tasks in our daily life. This guide will demonstrate how to create an Excel file, insert some data and save the file with specified file format using Spire.XLS for WPF.
Apart from creating Excel from scratch, Spire.XLS also supports to load an existing Excel file, modify the data and do a large range of manipulations in Excel.
Code Snippets:
Step 1: Initialize a new instance of Workbook class. By default, three blank worksheets will be added into the workbook accordingly.
Workbook workbook = new Workbook();
Step 2: Get the first worksheet from workbook and rename the sheet as "Test”.
Worksheet sheet = workbook.Worksheets[0];
sheet.Name = "Test";
Step 3: Insert some text value and number value into the specified cells.
sheet.Range["A1"].Text = "Text";
sheet.Range["A2"].Text = "Number";
sheet.Range["B1"].Text = "Hello World";
sheet.Range["B2"].NumberValue = 3.1415926;
sheet.Range["A7"].Text = "This Excel file is created by Spire.XLS for WPF";
Step 4: Save the file in the format of Excel 2013.
workbook.SaveToFile("sample.xlsx",ExcelVersion.Version2013);
Output:
Full Code:
using Spire.Xls;
using System.Windows;

namespace WpfApplication1
{
    public partial class MainWindow : Window
    {
        public MainWindow()
        {
            InitializeComponent();
        }
        private void button1_Click(object sender, RoutedEventArgs e)
        {
            Workbook workbook = new Workbook();
            Worksheet sheet = workbook.Worksheets[0];
            sheet.Name = "Test";

            sheet.Range["A1"].Text = "Text";
            sheet.Range["A2"].Text = "Number";
            sheet.Range["B1"].Text = "Hello World";
            sheet.Range["B2"].NumberValue = 3.1415926;
            sheet.Range["A7"].Text = "This Excel file is created by Spire.XLS for WPF";

            workbook.SaveToFile("sample.xlsx", ExcelVersion.Version2013);
            System.Diagnostics.Process.Start("sample.xlsx");

        }
    }
}
Imports Spire.Xls
Imports System.Windows

Namespace WpfApplication1
	Public Partial Class MainWindow
		Inherits Window
		Public Sub New()
			InitializeComponent()
		End Sub
		Private Sub button1_Click(sender As Object, e As RoutedEventArgs)
			Dim workbook As New Workbook()
			Dim sheet As Worksheet = workbook.Worksheets(0)
			sheet.Name = "Test"

			sheet.Range("A1").Text = "Text"
			sheet.Range("A2").Text = "Number"
			sheet.Range("B1").Text = "Hello World"
			sheet.Range("B2").NumberValue = 3.1415926
			sheet.Range("A7").Text = "This Excel file is created by Spire.XLS for WPF"

			workbook.SaveToFile("sample.xlsx", ExcelVersion.Version2013)
			System.Diagnostics.Process.Start("sample.xlsx")

		End Sub
	End Class
End Namespace
How to Save Excel chart as Image for WPF applications
With the help of Spire.XLS for WPF, developers can easily save the whole Excel Worksheet to Image for their WPF applications. Sometimes we don’t want to share the whole Excel file with data to others and only want to show some charts on the Excel. Spire.XLS for WPF offers a method of workbook.SaveChartAsImage(); to enable us to save the Excel chart to image easily. In the following section, we will demonstrate how to save the Excel chart as image in .png for example for WPF applications.
Firstly, please view the whole Excel worksheet with data and two charts, a pie chart and a bar chart:
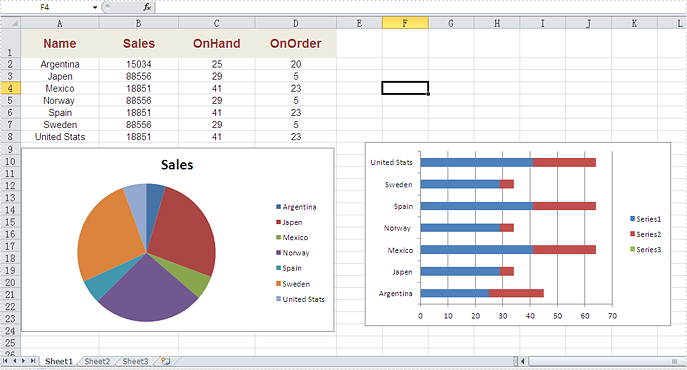
Note: Before Start, please download the latest version of Spire.XLS and add Spire.Xls.Wpf.dll in the bin folder as the reference of Visual Studio.
Here comes to the code snippets of how to save excel chart as image:
Step 1: Create a new Excel workbook and load from file.
Workbook workbook = new Workbook();
workbook.LoadFromFile("Sample.xlsx", ExcelVersion.Version2010);
Step 2: Get the first worksheet from workbook.
Worksheet sheet = workbook.Worksheets[0];
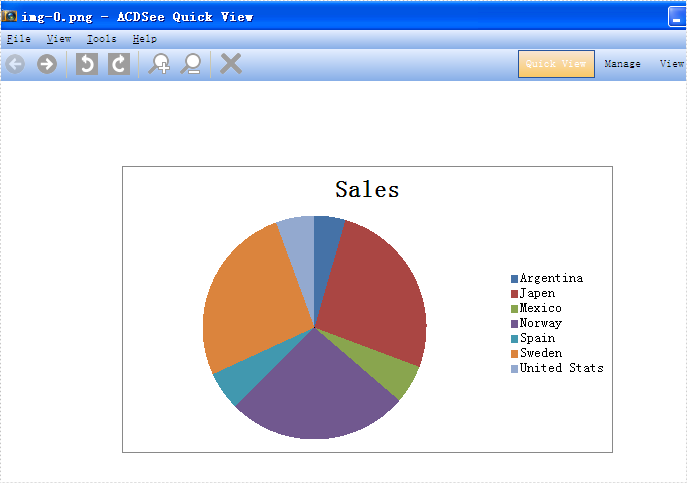
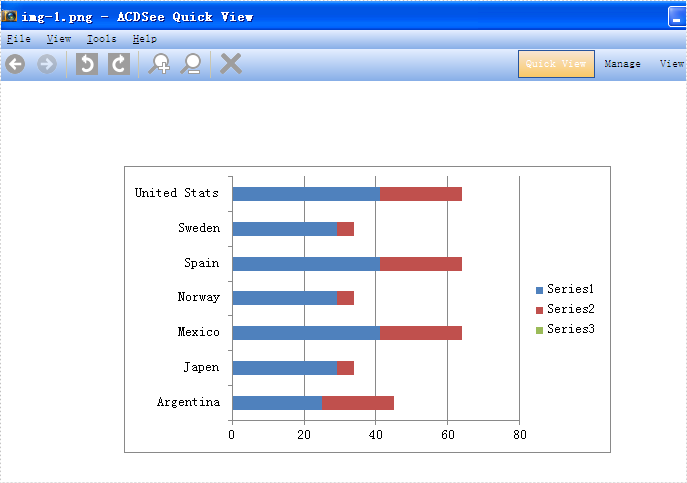
Step 3: Save all the charts in the first worksheet as images.
System.Drawing.Image[] imgs = workbook.SaveChartAsImage(sheet);

for (int i = 0; i < imgs.Length; i++)
{

    imgs[i].Save(string.Format("img-{0}.png", i), ImageFormat.Png);

}
Effective screenshots:
Full codes:
using Spire.Xls;
using System.Drawing.Imaging;
using System.Windows;

namespace WpfApplication1
{
    public partial class MainWindow : Window
    {
        public MainWindow()
        {
            InitializeComponent();
        }
        private void button2_Click(object sender, RoutedEventArgs e)
        {
            Workbook workbook = new Workbook();
            workbook.LoadFromFile("Sample.xlsx", ExcelVersion.Version2010);

            Worksheet sheet = workbook.Worksheets[0];
            System.Drawing.Image[] imgs = workbook.SaveChartAsImage(sheet);

            for (int i = 0; i < imgs.Length; i++)
            {

                imgs[i].Save(string.Format("img-{0}.png", i), ImageFormat.Png);

            }
        }
    }
}
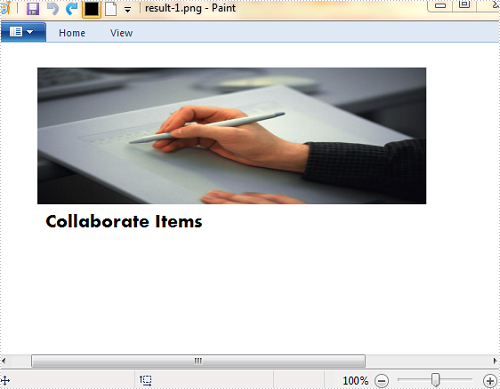
Convert Excel Worksheet to Image in WPF
Since Excel spreadsheets or diagrams are difficult to distribute, it is reasonable that we frequently convert our Excel files to a web-friendly format, such as image. Plus, if we convert Excel to image, the data cannot be formatted and modified directly. In this article, I’ll introduce how to save each worksheet in an Excel file as an image to local folder in WPF using Spire.XLS for WPF.
The sample file for test contains three worksheets, sheet 1 and sheet 2 have some contents in them. What we need is to convert each worksheet that contains contents to image respectively.

Detailed Steps:
Step 1: Create a new project by choosing WPF Application in Visual Studio, add a button in MainWindow, double click the button to write code.
Step 2: Create a new instance of Spire.Xls.Workbook class and load the sample Excel file.
Workbook workbook = new Workbook();
workbook.LoadFromFile("sample.xlsx", ExcelVersion.Version2010);
Step 3: Use for sentence to traverse each worksheet in the Excel. Call Worksheet.SaveToImage() to save worksheet as image, set image format as png.
for (int i = 0; i < workbook.Worksheets.Count; i++)
{
    workbook.Worksheets[i].SaveToImage(string.Format("result-{0}.png", i));
}
Result:
Image 1
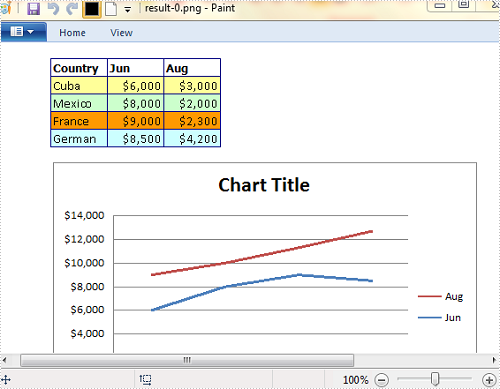
Image 2
Full Code:
using Spire.Xls;

namespace WpfApplication
{
    ///
    /// Interaction logic for MainWindow.xaml
    ///
    public partial class MainWindow : Window
    {
        public MainWindow()
        {
            InitializeComponent();
        }

        private void button1_Click(object sender, RoutedEventArgs e)
        {
            Workbook workbook = new Workbook();
            workbook.LoadFromFile("sample.xlsx", ExcelVersion.Version2010);
            for (int i = 0; i < workbook.Worksheets.Count; i++)
            {
                workbook.Worksheets[i].SaveToImage(string.Format("result-{0}.png", i));
            }
        }
    }
}
Export Data from Excel to Datatable in WPF
In this section, I will introduce a solution to export Excel to datatable through a datagridview via this WPF Excel component Spire.XLS for WPF. Using it, we can quickly export any Excel sheet to datatable. First let us see below picture:

When we export Excel to datatable, first we need to initialize a new instance of the class Spire.Xls.Workbook, here it is named “workbook”, then, after loading our Excel file from system by this method: Spire.Xls.Workbook.LoadFromFile(string fileName, ExcelVersion version); we need to decide which sheet will be exported to datatable. When using Spire.XLS for WPF, we do not need to install MS Excel, so suppose we do not know how many sheets in our Excel file, we can use this class System.Random provided by Microsoft to get the page count and export any sheet to datatable by calling the method: Spire.Xls.Worksheet.ExportDataTable(). After export data to datatable, with the help of the two properties of the class System.Data.Dataview:System.Data.Dataview.AutoGenerateColumns and System.Data.Dataview.ItemsSource. The datatable columns will be automatically created and all the data in datatable will be shown in datagrid.
Here we can download Spire.XLS for WPF and install it on system. After adding Spire.Xls dll on system, we can start our task of excel to datatable by below code:
using System.Data;
using Spire.Xls;

namespace wpfexceltodatatable
{
    public partial class MainWindow : Window
    {
        public MainWindow()
        {
            InitializeComponent();
        }
        private void button1_Click(object sender, RoutedEventArgs e)
        {
          //load an excel file
            Workbook workbook = new Workbook();
            workbook.LoadFromFile(@"..\excel.xls", ExcelVersion.Version97to2003);
            //get the count of excel worksheet
            int sheetCount = workbook.Worksheets.Count;
            Random r = new Random();
            int index = r.Next(0, sheetCount);
           //show datatable in datagrid
            Worksheet sheet = workbook.Worksheets[index];
            DataTable dataTable = sheet.ExportDataTable();
            DataView view = new DataView(dataTable);
            this.dataGrid1.ItemsSource = view;
            this.dataGrid1.AutoGenerateColumns = true;
        }
    }
}
Imports System.Data
Imports Spire.Xls

Namespace wpfexceltodatatable
	Public Partial Class MainWindow
		Inherits Window
		Public Sub New()
			InitializeComponent()
		End Sub
		Private Sub button1_Click(sender As Object, e As RoutedEventArgs)
			'load an excel file
			Dim workbook As New Workbook()
			workbook.LoadFromFile("..\excel.xls", ExcelVersion.Version97to2003)
			'get the count of excel worksheet
			Dim sheetCount As Integer = workbook.Worksheets.Count
			Dim r As New Random()
			Dim index As Integer = r.[Next](0, sheetCount)
			'show datatable in datagrid
			Dim sheet As Worksheet = workbook.Worksheets(index)
			Dim dataTable As DataTable = sheet.ExportDataTable()
			Dim view As New DataView(dataTable)
			Me.dataGrid1.ItemsSource = view
			Me.dataGrid1.AutoGenerateColumns = True
		End Sub
	End Class
End Namespace