C#/VB.NET: Merge or Unmerge Cells in Excel
Merging cells means joining two or more separate cells into one large cell, which is useful when you need to create a label that spans multiple columns. In this article, we will demonstrate how to merge or unmerge cells in Excel in C# and VB.NET using Spire.XLS for .NET library.
Install Spire.XLS for .NET
To begin with, you need to add the DLL files included in the Spire.XLS for .NET package as references in your .NET project. The DLL files can be either downloaded from this link or installed via NuGet.
PM> Install-Package Spire.XLS
Merge Cells in Excel in C# and VB.NET
The following are the steps to merge cells in Excel:
- Create a Workbook instance
- Load the Excel file using Workbook.LoadFromFile() method.
- Get the desired worksheet using Workbook.Worksheets[sheetIndex] property.
- Access the specific range of cells and merge them into one using XlsRange.Merge() method.
- Center the text in the merged cell by setting CellRange.Style.HorizontalAlignment property to HorizontalAlignType.Center.
- Save the result file using Workbook.SaveToFile() method.
- C#
- VB.NET
using Spire.Xls;

namespace MergeCells
{
    class Program
    {
        static void Main(string[] args)
        {
            //Create a Workbook instance
            Workbook workbook = new Workbook();
            //Load the Excel file
            workbook.LoadFromFile("Sample.xlsx");

            //Get the first worksheet
            Worksheet sheet = workbook.Worksheets[0];
            //Merge cells A1-D1 into one cell
            CellRange range = sheet.Range["A1:D1"];
            range.Merge();
            //Center the text in the merged cell
            range.Style.HorizontalAlignment = HorizontalAlignType.Center;

            //Save the result file
            workbook.SaveToFile("MergeCells.xlsx", ExcelVersion.Version2013);
        }
    }
}
Unmerge Cells in Excel in C# and VB.NET
The following are the steps to unmerge cells in Excel:
- Create a Workbook instance
- Load the Excel file using Workbook.LoadFromFile() method.
- Get the desired worksheet using Workbook.Worksheets[sheetIndex] property.
- Access the specific range of cells and unmerge them using XlsRange.UnMerge() method.
- Save the result file using Workbook.SaveToFile() method.
- C#
- VB.NET
using Spire.Xls;

namespace UnmergeCells
{
    class Program
    {
        static void Main(string[] args)
        {

            //Create a Workbook instance
            Workbook workbook = new Workbook();
            //Load the Excel file
            workbook.LoadFromFile("MergeCells.xlsx");

            //Get the first worksheet
            Worksheet sheet = workbook.Worksheets[0];
            //Unmerge cells A1-D1
            CellRange range = sheet.Range["A1:D1"];
            range.UnMerge();

            //Save the result file
            workbook.SaveToFile("UnMergeCells.xlsx", ExcelVersion.Version2013);
        }
    }
}
Apply for a Temporary License
If you'd like to remove the evaluation message from the generated documents, or to get rid of the function limitations, please request a 30-day trial license for yourself.
C#: Set Background Color or Image to Excel Worksheets
Setting a background in Excel can offer several benefits that enhance the usability and visual appeal of your workbook. For example, you can set background colors or images that align with company branding or specific themes, making your spreadsheets visually cohesive with other marketing or business materials. In this article, you will learn how set a background color or image for an Excel worksheet in C# using Spire.XLS for .NET.
Install Spire.XLS for .NET
To begin with, you need to add the DLL files included in the Spire.XLS for .NET package as references in your .NET project. The DLL files can be either downloaded from this link or installed via NuGet.
PM> Install-Package Spire.XLS
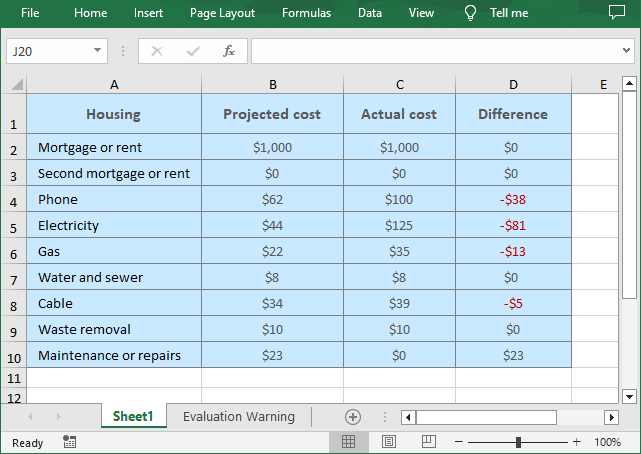
Add a Background Color for an Excel Worksheet
Spire.XLS for .NET provides the CellRange.Style.Color property to set the background color for a specified cell range. The following are the detailed steps:
- Create a Workbook object.
- Load an Excel workbook using Workbook.LoadFromFile() method.
- Get a specified worksheet using Workbook.Worksheets[] property.
- Get the used range in the worksheet through Worksheet.AllocatedRange property.
- Set a background color for the used range through CellRange.Style.Color property.
- Save the result file using Workbook.SaveToFile() method.
- C#
using Spire.Xls;
using System.Drawing;

namespace ExcelBackgroundColor
{
    class Program
    {
        static void Main(string[] args)
        {

            // Create a Workbook object
            Workbook workbook = new Workbook();

            // Load an Excel workbook
            workbook.LoadFromFile("Budget.xlsx");

            // Get the first worksheet
            Worksheet sheet = workbook.Worksheets[0];

            // Get the used range of the worksheet
            CellRange usedRange = sheet.AllocatedRange;

            // Set the background color of the range
            usedRange.Style.Color = Color.FromArgb(200, 233, 255);

            // Save the workbook
            workbook.SaveToFile("ExcelBackgroundColor.xlsx", ExcelVersion.Version2016);
        }
    }
}
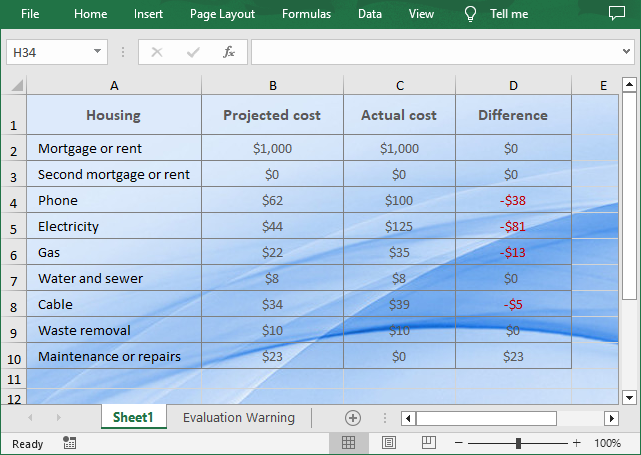
Add a Background Image for an Excel Worksheet
To insert a background image in Excel, you can load an image first and then set it as the worksheet background through the Worksheet.PageSetup.BackgroundImage property. The following are the detailed steps:
- Create a Workbook object.
- Load an Excel workbook using Workbook.LoadFromFile() method.
- Get a specified worksheet using Workbook.Worksheets[] property.
- Load an image using Image.FromFile() method.
- Set the image as the background of the worksheet through Worksheet.PageSetup.BackgroundImage property.
- Save the result file using Workbook.SaveToFile() method.
- C#
using Spire.Xls;
using System.Drawing;

namespace ExcelBackgroundImage
{
    class Program
    {
        static void Main(string[] args)
        {

            // Create a Workbook object
            Workbook workbook = new Workbook();

            // Load an Excel workbook
            workbook.LoadFromFile("Budget.xlsx");

            // Get the first worksheet
            Worksheet sheet = workbook.Worksheets[0];

            // Load an image
            Bitmap image = new Bitmap(Image.FromFile("C:\\Users\\Administrator\\Desktop\\bg.jpg"));

            // Set the background of the worksheet
            sheet.PageSetup.BackgoundImage = image;

            // Save the workbook
            workbook.SaveToFile("ExcelBackgroundImage.xlsx", ExcelVersion.Version2016);
        }
    }
}
Apply for a Temporary License
If you'd like to remove the evaluation message from the generated documents, or to get rid of the function limitations, please request a 30-day trial license for yourself.
How to Merge and Center Cells in Excel using C# (and VB.NET)

Working with large Excel files often means merging rows, columns, or specific cell ranges to keep the data clean and easy to read. You can merge cells in Excel using C# or VB.NET with just a few lines of code and even center the content both horizontally and vertically for a professional look. Whether it’s combining entire rows, joining columns, or formatting a selected range, these examples show how to automate the process and improve your workflow.
- Merge Rows or Columns in Excel using C#
- Merge a Specific Cell Range in Excel
- Merge and Center Cells in Excel using VB.NET
- The Conclusion
If you often work with Excel files in .NET projects, handling tasks like merging cells, formatting data, or generating reports, you’ll want a tool that makes the process fast and reliable. Spire.XLS is a lightweight library that lets you create, read, and modify Excel files directly in C# or VB.NET—without relying on Microsoft Office. You can add it to your project in seconds via NuGet:
PM> Install-Package Spire.XLS
From there, you’re ready to start automating your Excel workflow.
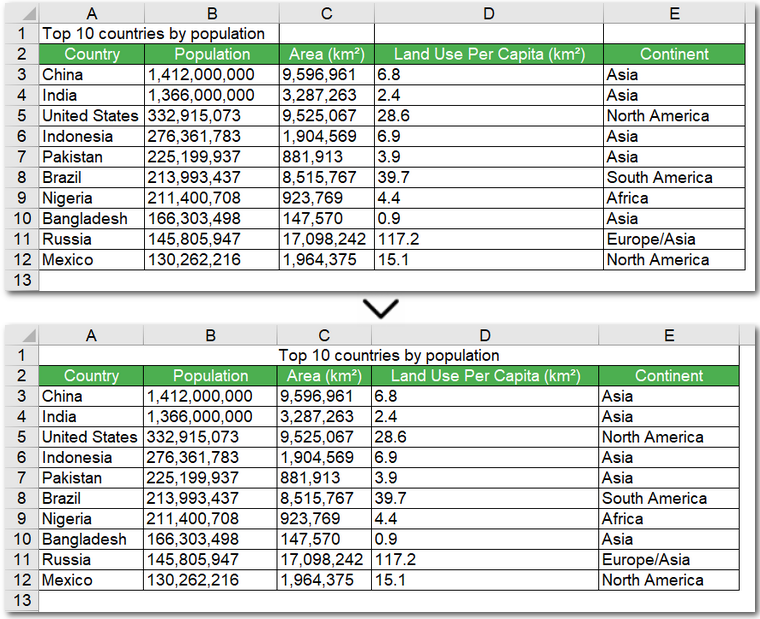
Merge Rows or Columns in Excel using C#
Merging rows or columns in Excel is a common way to organize data and create professional-looking spreadsheets. For example, you can merge the first row across multiple columns to form a clear, centered table header. Using C# code, this process can be automated easily, saving time and ensuring consistency across large Excel files.
Here's the code example of merging the first row and centering it in Excel using C#:
using Spire.Xls;
namespace MergeCells
{

    class Program
    {

        static void Main(string[] args)
        {
            // Create a Workbook instance and load an Excel file
            Workbook workbook = new Workbook();
            workbook.LoadFromFile("\\Population.xlsx");

            // Get the first worksheet
            Worksheet sheet = workbook.Worksheets[0];

            // Merge the first row
            sheet.Rows[0].Merge();
            // Merge the first column
            //sheet.Columns[0].Merge();

            // Set the alignment to center horizontally and vertically
            sheet.Rows[0].Style.HorizontalAlignment = HorizontalAlignType.Center;
            sheet.Rows[0].Style.VerticalAlignment = VerticalAlignType.Center;

            // Save the Excel file
            workbook.SaveToFile("\\Mergerowsandcenter.xls");

        }
    }
}
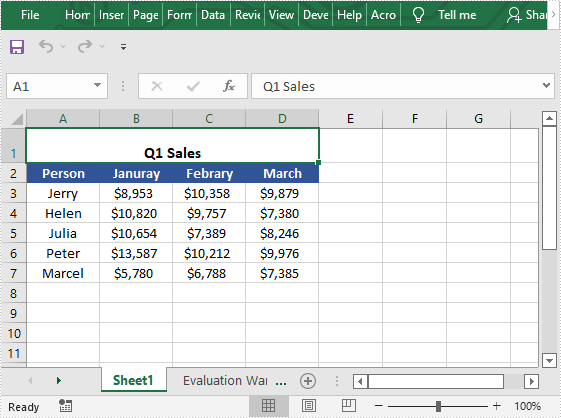
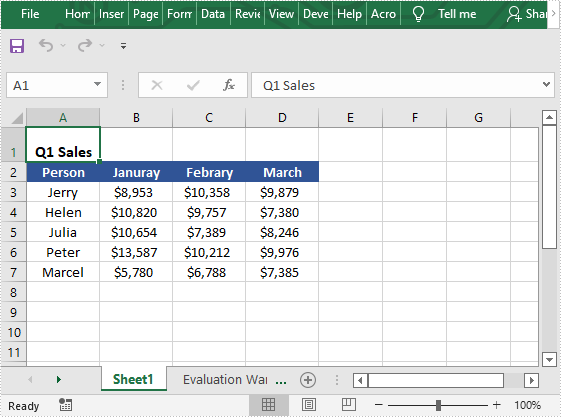
Here's the preview of merging the first row in Excel:
Code steps explained:
- Create a Workbook object and read an Excel file.
- Get a worksheet.
- Merge a certain row using Worksheet.Rows[].Merge() method.
- Set the alignment to center horizontally and vertically by adjusting the Style.HorizontalAlignment and Style.VerticalAlignment properties.
- Save the modified Excel file.
The C# code above for merging rows in an Excel file can also be used to merge columns, which is indicated with comments in the code.
After merging cells to create a clean table header, you might sometimes need to undo the operation. You can easily unmerge cells in Excel in C# or VB.NET, restoring the original cell layout without affecting your data.
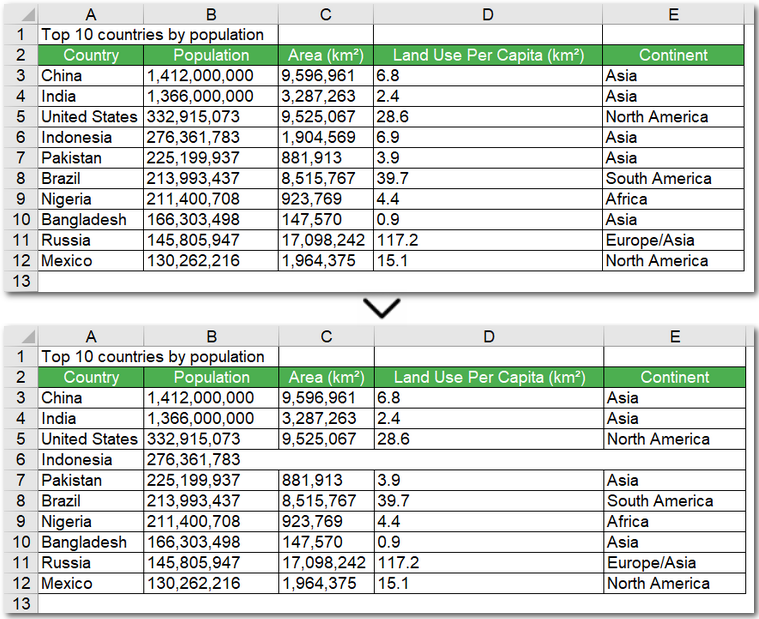
Merge a Specific Cell Range in Excel
Merging a specific cell range in Excel using C# is useful when you want to highlight a section of data, such as a summary row or a group of related columns. The process is very similar to merging entire rows or columns, and you can use the same Merge() method—applied to a CellRange object via Worksheet.Range[].Merge() method. By specifying the exact range to merge, you can create a clear, organized layout that improves readability and automates the operation across multiple sheets or files without manually adjusting each cell.
The code example below demonstrates how to merge the cell range "B6:E6" in an Excel worksheet using C#:
using Spire.Xls;
namespace MergeCells
{

    class Program
    {

        static void Main(string[] args)
        {
            // Create a Workbook instance and load an Excel file
            Workbook workbook = new Workbook();
            workbook.LoadFromFile("\\Population.xlsx");

            // Get the first worksheet
            Worksheet sheet = workbook.Worksheets[0];

            // Merge the particular cell range in Excel
            sheet.Range["B6:E6"].Merge();

            // Save the Excel file
            workbook.SaveToFile("\\Mergecellrange.xls");

        }
    }
}
Here's the preview of merging a cell range in an Excel file using C#:
Merge and Center Cells in Excel using VB.NET
Just like in C#, you can merge and center cells in Excel using VB.NET to create clean table headers or highlight key data sections. The steps are very similar, and the same Merge() method applies to rows, columns, or specific cell ranges. If you want, you can even convert C# examples to VB.NET using our handy C# ↔ VB.NET code converter, making it easy to adapt existing code for your project.
Here's a code example of merging the first row and centering it in Excel using VB.NET:
Imports Spire.Xls

Namespace MergeCells

    Friend Class Program

        Private Shared Sub Main(args As String())
            ' Create a Workbook instance and load an Excel file
            Dim workbook As Workbook = New Workbook()
            workbook.LoadFromFile("E:\Administrator\Python1\input\Population.xlsx")

            ' Get the first worksheet
            Dim sheet As Worksheet = workbook.Worksheets(0)

            ' Merge the first row
            sheet.Rows(0).Merge()
            ' Merge the first column
            'sheet.Columns[0].Merge();

            ' Set the alignment to center horizontally and vertically
            sheet.Rows(0).Style.HorizontalAlignment = HorizontalAlignType.Center
            sheet.Rows(0).Style.VerticalAlignment = VerticalAlignType.Center

            ' Save the Excel file
            workbook.SaveToFile("\Mergerowsandcenter.xls")

        End Sub
    End Class
End Namespace
The Conclusion
By following these examples, you can merge cells in Excel using C#, whether it’s entire rows, columns, or specific ranges. With the help of Spire.XLS, you can merge cells in Excel files automatically without hassle and create clear, professional-looking spreadsheets. Start streamlining your workflow today and get a 30-day free license to try all features without restrictions.
C#/VB.NET: Add or Remove Cell Borders in Excel
Cell borders refer to lines that can be added around a cell or range of cells. They can be used to serve different purposes, such as to separate sections in a worksheet, draw readers' attention to important cells, or make the worksheet look more presentable. This article will introduce how to add or remove cell borders in Excel in C# and VB.NET using Spire.XLS for .NET.
Install Spire.XLS for .NET
To begin with, you need to add the DLL files included in the Spire.XLS for .NET package as references in your .NET project. The DLL files can be either downloaded from this link or installed via NuGet.
PM> Install-Package Spire.XLS
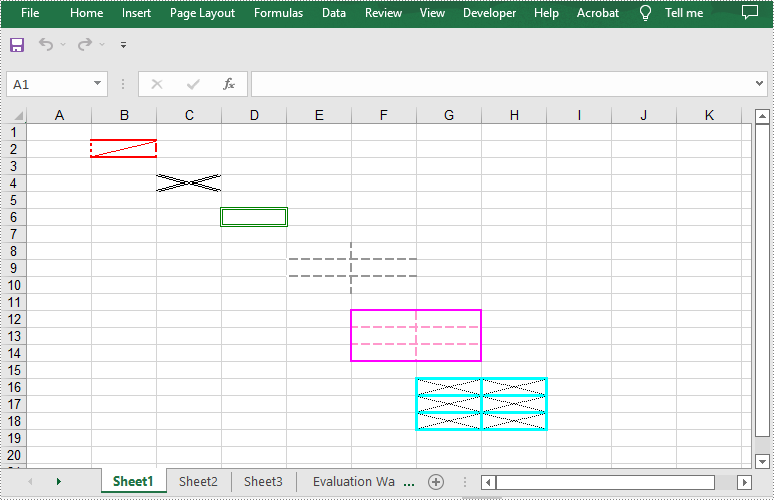
Add Cell Borders in Excel in C# and VB.NET
Spire.XLS for .NET allows adding various kinds of borders to cells in Excel, such as left border, right border, top border, bottom border, diagonal borders, inside borders and outside borders.
You can add a specific border or multiple borders to individual cells or ranges of cells. In addition, you can also set different line styles and line colors for the borders. The following are the main steps to apply different kinds of cell borders with different line styles and line colors:
- Initialize an instance of the Workbook class.
- Get a specific worksheet by its index through Workbook.Worksheets[int] property.
- Get a specific cell range by its name through Worksheet.Range[string] property.
- Get specific borders (such as left, right, top, bottom and diagonal) from the Borders collection of the cell range through CellRange.Borders[BordersLineType] property.
- Set the line styles of the specific borders through IBorder.LineStyle property.
- Set the line colors of the specific borders through IBorder.Color property.
- Get a specific cell range by its name through Worksheet.Range[string] property.
- Add outside borders and/or inside borders to the cell range using CellRange.BorderAround(LineStyleType, Color) method and/or CellRange.BorderInside(LineStyleType, Color) method. Note that inside borders cannot be applied to a single cell.
- Get a specific cell range by its name through Worksheet.Range[string] property.
- Set the line styles and line colors for borders of the cell range through BordersCollection.LineStyle and BordersCollection.Color properties, then set the line style and color for diagonal borders of the cell range.
- Save the result file using Workbook.SaveToFile() method.
- C#
- VB.NET
using Spire.Xls;
using Spire.Xls.Core;
using System.Drawing;

namespace AddCellBorders
{
    class Program
    {
        static void Main(string[] args)
        {
            //Create a Workbook instance
            Workbook workbook = new Workbook();
            //Get the first worksheet
            Worksheet sheet = workbook.Worksheets[0];

            //Set left, right, top, bottom and diagonal up borders for cell B2
            CellRange range = sheet.Range["B2"];
            IBorder leftBorder = range.Borders[BordersLineType.EdgeLeft];
            leftBorder.LineStyle = LineStyleType.MediumDashDotDot;
            leftBorder.Color = Color.Red;
            IBorder rightBorder = range.Borders[BordersLineType.EdgeRight];
            rightBorder.LineStyle = LineStyleType.MediumDashed;
            rightBorder.Color = Color.Red;
            IBorder topBorder = range.Borders[BordersLineType.EdgeTop];
            topBorder.LineStyle = LineStyleType.Medium;
            topBorder.Color = Color.Red;
            IBorder bottomBorder = range.Borders[BordersLineType.EdgeBottom];
            bottomBorder.LineStyle = LineStyleType.Medium;
            bottomBorder.Color = Color.Red;
            IBorder diagonalUpBorder = range.Borders[BordersLineType.DiagonalUp];
            diagonalUpBorder.LineStyle = LineStyleType.Thin;
            diagonalUpBorder.Color = Color.Red;

            //Set diagonal borders for cell C4
            range = sheet.Range["C4"];
            diagonalUpBorder = range.Borders[BordersLineType.DiagonalUp];
            diagonalUpBorder.LineStyle = LineStyleType.Double;
            diagonalUpBorder.Color = Color.Blue;
            IBorder diagonalDownBorder = range.Borders[BordersLineType.DiagonalDown];
            diagonalDownBorder.LineStyle = LineStyleType.Double;
            diagonalDownBorder.Color = Color.Blue;

            //Set outside borders for cell D6
            range = sheet.Range["D6"];
            range.BorderAround(LineStyleType.Double, Color.Green);

            //Set inside borders for cell range E8:F10
            range = sheet.Range["E8:F10"];
            range.BorderInside(LineStyleType.MediumDashed, Color.DarkGray);

            //Set inside and outside borders for cell range F12:G14
            range = sheet.Range["F12:G14"];
            range.BorderInside(LineStyleType.MediumDashed, Color.Pink);
            range.BorderAround(LineStyleType.Medium, Color.Magenta);

            //Set borders for cell range G16:H18
            range = sheet.Range["G16:H18"];
            range.Borders.LineStyle = LineStyleType.Thick;
            range.Borders.Color = Color.Cyan;
            //Set line style and line color of diagonal borders for cell range G16:H18
            diagonalUpBorder = range.Borders[BordersLineType.DiagonalUp];
            diagonalUpBorder.LineStyle = LineStyleType.Dotted;
            diagonalUpBorder.Color = Color.DarkGray;
            diagonalDownBorder = range.Borders[BordersLineType.DiagonalDown];
            diagonalDownBorder.LineStyle = LineStyleType.Dotted;
            diagonalDownBorder.Color = Color.DarkGray;

            //Save the result file
            workbook.SaveToFile("AddBorders.xlsx", ExcelVersion.Version2013);
        }
    }
}
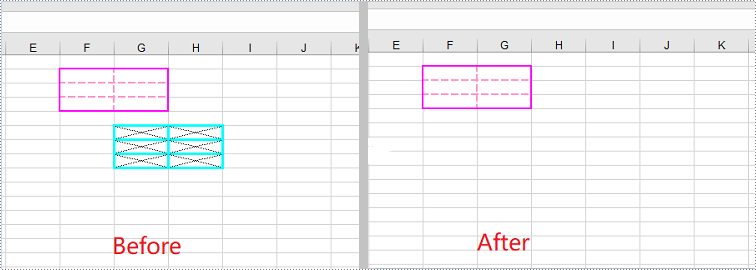
Remove Cell Borders in Excel in C# and VB.NET
You can remove all borders of a cell or range of cells by setting the CellRange.Borders.LineStyle property as LineStyleType.None. The following are the details steps:
- Initialize an instance of the Workbook class.
- Load an Excel file using Workbook.LoadFromFile() method.
- Get a specific worksheet by its index through Workbook.Worksheets[int] property.
- Get a specific cell range by its name through Worksheet.Range[string] property.
- Remove the borders of the cell range by setting CellRange.Borders.LineStyle property as LineStyleType.None.
- Save the result file using Workbook.SaveToFile() method.
- C#
- VB.NET
using Spire.Xls;

namespace RemoveCellBorders
{
    class Program
    {
        static void Main(string[] args)
        {
            //Create a Workbook instance
            Workbook workbook = new Workbook();
            //Load an Excel file
            workbook.LoadFromFile("AddBorders.xlsx");

            //Get the first worksheet
            Worksheet sheet = workbook.Worksheets[0];

            //Remove borders of cell range G16:H18
            CellRange range = sheet.Range["G16:H18"];
            range.Borders.LineStyle = LineStyleType.None;

            workbook.SaveToFile("RemoveBorders.xlsx", ExcelVersion.Version2013);
        }
    }
}
Apply for a Temporary License
If you'd like to remove the evaluation message from the generated documents, or to get rid of the function limitations, please request a 30-day trial license for yourself.
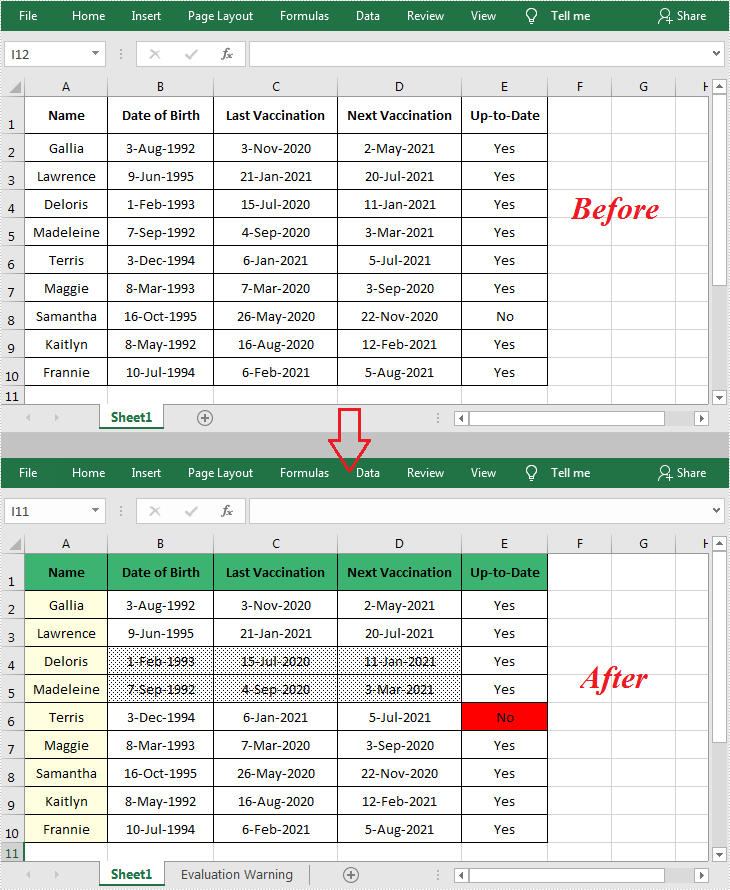
C#/VB.NET: Set Background Color and Pattern for Excel Cells
By default, the cells in an Excel document are formatted with a background color of transparent. When you need to emphasize some important data in particular cells, Microsoft Excel provides the "Fill Color" formatting option to change the background color or pattern style of the cells. In this article, you will learn how to programmatically set background color and pattern style for a specified cell or cell range in Excel using Spire.XLS for .NET.
Install Spire.XLS for .NET
To begin with, you need to add the DLL files included in the Spire.XLS for .NET package as references in your .NET project. The DLL files can be either downloaded from this link or installed via NuGet.
PM> Install-Package Spire.XLS
Set Background Color and Pattern for Excel Cells
The detailed steps are as follows.
- Instantiate a Workbook object.
- Load a sample Excel file using Workbook.LoadFromFile() method.
- Get a specified worksheet using Workbook.Worksheets[] property.
- Get a specified cell range using Worksheet.Range[] property.
- Get the style of the specified cell range using CellRange.Style property.
- Set the background color for the specified cell range using CellStyle.Color property.
- Set the fill pattern style for the specified cell range using CellStyle.FillPattern property.
- Save the result file using Workbook.SaveToFile() method.
- C#
- VB.NET
using System.Drawing;
using Spire.Xls;

namespace CellBackground
{
    class Program
    {
        static void Main(string[] args)
        {
            //Instantiate a Workbook object
            Workbook workbook = new Workbook();

            //Load a sample Excel file
            workbook.LoadFromFile(@"C:\Users\Administrator\Desktop\data.xlsx");

            //Get the first worksheet
            Worksheet worksheet = workbook.Worksheets[0];

            //Set background color for Range ["A1:E1"] and ["A2:A10"]
            worksheet.Range["A1:E1"].Style.Color = Color.MediumSeaGreen;
            worksheet.Range["A2:A10"].Style.Color = Color.LightYellow;

            //Set background color for cell E6
            worksheet.Range["E6"].Style.Color = Color.Red;

            //Set pattern style for Range ["B4:D5"]
            worksheet.Range["B4:D5"].Style.FillPattern = ExcelPatternType.Percent125Gray;

            //Save the result file
            workbook.SaveToFile("CellBackground.xlsx", ExcelVersion.Version2013);
        }

    }
}
Apply for a Temporary License
If you'd like to remove the evaluation message from the generated documents, or to get rid of the function limitations, please request a 30-day trial license for yourself.