
Page Setup (5)
The inclusion of line numbers in Word documents serves as a critical tool for enhancing readability, facilitating reference, and streamlining collaborative editing processes. Whether you're a lawyer marking up contracts, a researcher annotating scientific papers, or a student revising a thesis, line numbers provide a precise way to cite specific lines, making discussions and revisions more efficient.
The powerful Python programming language enables users to batch add or remove line numbers in Word documents, providing a robust means to automate document preparation workflows. This article will demonstrate how to utilize Spire.Doc for Python to add or remove line numbers in Word documents with Python code.
Install Spire.Doc for Python
This scenario requires Spire.Doc for Python and plum-dispatch v1.7.4. They can be easily installed in your Windows through the following pip command.
pip install Spire.Doc
If you are unsure how to install, please refer to: How to Install Spire.Doc for Python on Windows
Add Line Numbers to Word Documents with Python
Spire.Doc for Python provides properties under PageSetup class for line number formatting. The properties and their functions are as follows:
- LineNumberingStep: Used to set the interval of the line number display.
- LineNumberingStartValue: Used to set the start number of the line number.
- LineNumberingDistanceFromText: Used to set the distance between the line number and the text.
- LineNumberingRestartMode: Used to set when the line number restarts, like every page, every section, or continuously without restarting.
It is important to note that line numbers will only be displayed when the PageSetup.LineNumberingStep property is set to a value greater than 0.
The detailed steps for adding line numbers to Word documents are as follows:
- Create an instance of Document class.
- Load a Word document using Document.LoadFromFile() method.
- Iterate through the sections in the document:
- Get the current section using Document.Sections.get_Item() method.
- Get the page setup of the section through Section.PageSetup property.
- Set the display interval of the line numbers through PageSetup.LineNumberingStep property.
- Set the start number of the line numbers through PageSetup.LineNumberingStartValue property.
- Set the distance between line numbers and text through PageSetup.LineNumberingDistanceFromText property.
- Set the restarting mode of the line numbers through PageSetup.LineNumberingRestartMode property.
- Save the document using Document.SaveToFile() method.
- Python
from spire.doc import *
from spire.doc.common import *

# Create an instance of Document class
doc = Document()

# Load a Word document
doc.LoadFromFile("Sample.docx")

# Iterate through the sections
for i in range(0, doc.Sections.Count):
    # Get the current section
    section = doc.Sections.get_Item(i)
    # Get the page setup of the section
    pageSetup = section.PageSetup
    # Set the interval of the line numbering
    pageSetup.LineNumberingStep = 2
    # Set the start number of the line numbering
    pageSetup.LineNumberingStartValue = 1
    # Set the distance between the line number and text
    pageSetup.LineNumberingDistanceFromText = 20
    # Set the restarting mode of the line number
    pageSetup.LineNumberingRestartMode = LineNumberingRestartMode.Continuous

# Save the document
doc.SaveToFile("output/AddLineNumberWord.docx", FileFormat.Docx)
doc.Close()

Remove Line Numbers from Word Documents with Python
Since the value of the PageSetup.LineNumberingStep property directly determines the display of line numbers, developers can simply set the value to 0 to remove the line numbers from Word documents.
The detailed steps for removing line numbers from a Word document are as follows:
- Create an instance of Document class.
- Load a Word document using Document.LoadFromFile() method.
- Iterate through the sections in the document:
- Get the current section using Document.Sections.get_Item() method.
- Set the display interval of the line numbers to 0 through Section.PageSetup.LineNumberingStep property to remove the line numbers.
- Save the document using Document.SaveToFile() method.
- Python
from spire.doc import *
from spire.doc.common import *

# Create an instance of Document class
doc = Document()

# Load a Word document
doc.LoadFromFile("output/AddLineNumberWord.docx")

# Iterate through the sections
for i in range(0, doc.Sections.Count):
    # Get the current section
    section = doc.Sections.get_Item(i)
    # Set the interval of the line numbering to 0 to remove the line numbering
    section.PageSetup.LineNumberingStep = 0

# Save the document
doc.SaveToFile("output/RemoveLineNumberWord.docx", FileFormat.Docx)
doc.Close()

Apply for a Temporary License
If you'd like to remove the evaluation message from the generated documents, or to get rid of the function limitations, please request a 30-day trial license for yourself.
Section breaks in Word allow users to divide a document into sections, each with unique formatting options. This is especially useful when working with long documents where you want to apply different layouts, headers, footers, margins or page orientations within the same document. In this article, you will learn how to insert or remove section breaks in Word in Python using Spire.Doc for Python.
Install Spire.Doc for Python
This scenario requires Spire.Doc for Python and plum-dispatch v1.7.4. They can be easily installed in your Windows through the following pip commands.
pip install Spire.Doc
If you are unsure how to install, please refer to this tutorial: How to Install Spire.Doc for Python on Windows
Insert Section Breaks in Word in Python
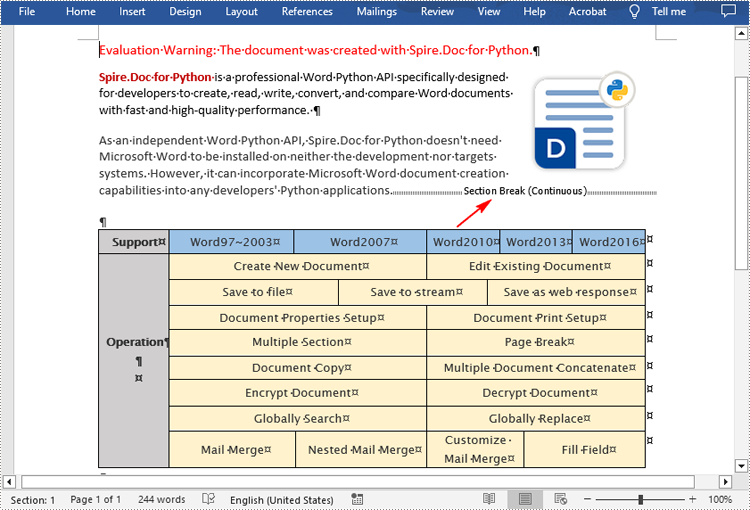
Spire.Doc for Python provides the Paragraph.InsertSectionBreak(breakType: SectionBreakType) method to insert a specified type of section break to a paragraph. The following table provides an overview of the supported section break types, along with their corresponding Enums and descriptions:
| Section Break | Enum | Description |
| New page | SectionBreakType.New_Page | Start the new section on a new page. |
| Continuous | SectionBreakType.No_Break | Start the new section on the same page, allowing for continuous content flow. |
| Odd page | SectionBreakType.Odd_Page | Start the new section on the next odd-numbered page. |
| Even page | SectionBreakType.Even_Page | Start the new section on the next even-numbered page. |
| New column | SectionBreakType.New_Column | Start the new section in the next column if columns are enabled. |
The following are the detailed steps to insert a continuous section break:
- Create a Document instance.
- Load a Word document using Document.LoadFromFile() method.
- Get a specified section using Document.Sections[] property.
- Get a specified paragraph of the section using Section.Paragraphs[] property.
- Add a section break to the end of the paragraph using Paragraph.InsertSectionBreak() method.
- Save the result document using Document.SaveToFile() method.
- Python
from spire.doc import *
from spire.doc.common import *

inputFile = "sample.docx"
outputFile = "InsertSectionBreak.docx"

# Create a Document instance
document = Document()

# Load a Word document
document.LoadFromFile(inputFile)

# Get a specific section
section = document.Sections.get_Item(0)

# Get a specific paragraph
paragraph = section.Paragraphs.get_Item(0)

# Insert a continuous section break
paragraph.InsertSectionBreak(SectionBreakType.NoBreak)

# Save the result document
document.SaveToFile(outputFile, FileFormat.Docx2016)
document.Close()
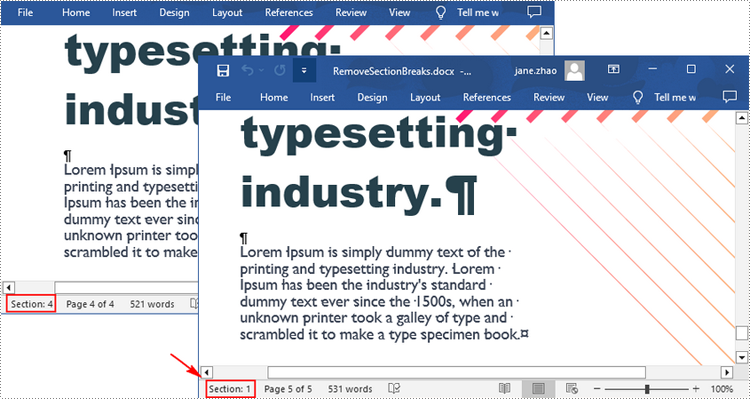
Remove Section Breaks in Word in Python
To delete all sections breaks in a Word document, we need to access the first section in the document, then copy the contents of the other sections to the first section and delete them. The following are the detailed steps:
- Create a Document instance.
- Load a Word document using Document.LoadFromFile() method.
- Get the first section using Document.Sections[] property.
- Iterate through other sections in the document.
- Get the second section, and then iterate through to get its child objects.
- Clone the child objects of the second section and add them to the first section using Section.Body.ChildObjects.Add() method.
- Delete the second section using Document.Sections.Remove() method.
- Repeat the process to copy and delete the remaining sections.
- Save the result document using Document.SaveToFile() method.
- Python
from spire.doc import *
from spire.doc.common import *

inputFile = "Report.docx"
outputFile = "RemoveSectionBreaks.docx"

# Create a Document instance
document = Document()

# Load a Word document
document.LoadFromFile(inputFile)

# Get a specific section
section = document.Sections.get_Item(0)

# Iterate through other sections in the document
for i in range(document.Sections.Count - 1):
    # Get the second section in the document
    section = document.Sections[1]

    # Iterate through all child objects of the second section
    for j in range(section.Body.ChildObjects.Count):
        # Get the child objects
        obj = section.Body.ChildObjects.get_Item(j)
        # Clone the child objects to the first section
        sec.Body.ChildObjects.Add(obj.Clone())
        # Remove the second section
        document.Sections.Remove(section)

# Save the result document
document.SaveToFile(outputFile, FileFormat.Docx2016)
document.Close()
Apply for a Temporary License
If you'd like to remove the evaluation message from the generated documents, or to get rid of the function limitations, please request a 30-day trial license for yourself.
Page size refers to the dimensions of a document's page. It determines the width and height of the printable area and plays a crucial role in the overall layout and design of the document. Different types of documents may require specific page sizes, such as standard letter size (8.5 x 11 inches) for business letters or A4 size (210 x 297 mm) for international correspondence. Adjusting the page size ensures that your document is compatible with the intended output or presentation medium. In this article, we will demonstrate how to adjust the page size of a Word document in Python using Spire.Doc for Python.
- Adjust the Page Size of a Word Document to a Standard Page Size in Python
- Adjust the Page Size of a Word Document to a Custom Page Size in Python
Install Spire.Doc for Python
This scenario requires Spire.Doc for Python and plum-dispatch v1.7.4. They can be easily installed in your Windows through the following pip commands.
pip install Spire.Doc
If you are unsure how to install, please refer to this tutorial: How to Install Spire.Doc for Python on Windows
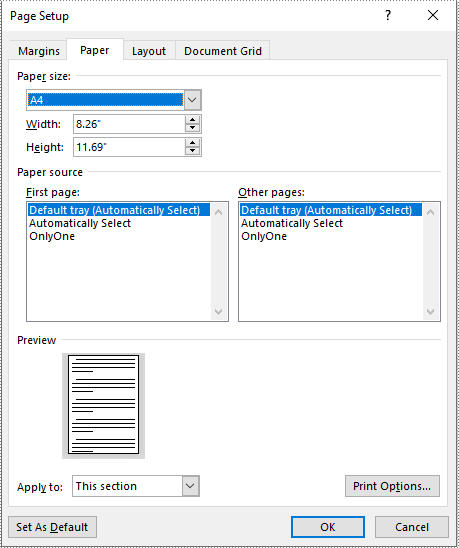
Adjust the Page Size of a Word Document to a Standard Page Size in Python
With Spire.Doc for Python, you can easily adjust the page sizes of Word documents to a variety of standard page sizes, such as A3, A4, A5, A6, B4, B5, B6, letter, legal, and tabloid. The following steps explain how to change the page size of a Word document to a standard page size using Spire.Doc for Python:
- Create an instance of the Document class.
- Load a Word document using the Document.LoadFromFile() method.
- Iterate through the sections in the document.
- Set the page size of each section to a standard page size, such as A4, by setting the Section.PageSetup.PageSize property to PageSize.A4().
- Save the result document using the Document.SaveToFile() method.
- Python
from spire.doc import *
from spire.doc.common import *

# Create an instance of the Document class
doc = Document()
# Load a Word document
doc.LoadFromFile("Input.docx")

# Iterate through the sections in the document
for i in range(doc.Sections.Count):
    section = doc.Sections.get_Item(i)
    # Change the page size of each section to A4
    section.PageSetup.PageSize = PageSize.A4()

# Save the result document
doc.SaveToFile("StandardSize.docx", FileFormat.Docx2016)
doc.Close()
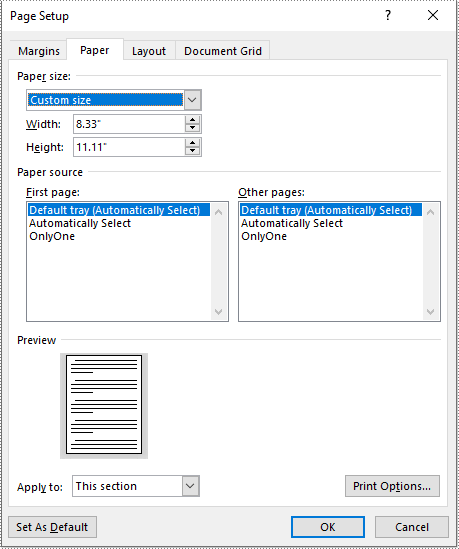
Adjust the Page Size of a Word Document to a Custom Page Size in Python
If you plan to print your document on paper with dimensions that don't match any standard paper size, you can change the page size of your document to a custom page size that matches the exact dimensions of the paper. The following steps explain how to change the page size of a Word document to a custom page size using Spire.Doc for Python:
- Create an instance of the Document class.
- Load a Word document using the Document.LoadFromFile() method.
- Create an instance of the SizeF class with customized dimensions.
- Iterate through the sections in the document.
- Set the page size of each section to a custom page size by assigning the SizeF instance to the Section.PageSetup.PageSize property.
- Save the result document using the Document.SaveToFile() method.
- Python
from spire.doc import *
from spire.doc.common import *

# Create an instance of the Document class
doc = Document()
# Load a Word document
doc.LoadFromFile("Input.docx")

# Create an instance of the SizeF class with customized dimensions
customSize = SizeF(600.0, 800.0)

# Iterate through the sections in the document
for i in range(doc.Sections.Count):
    section = doc.Sections.get_Item(i)
    # Change the page size of each section to the specified dimensions
    section.PageSetup.PageSize = customSize

# Save the result document
doc.SaveToFile("CustomSize.docx", FileFormat.Docx2016)
doc.Close()
Apply for a Temporary License
If you'd like to remove the evaluation message from the generated documents, or to get rid of the function limitations, please request a 30-day trial license for yourself.
A page break is a formatting element used in documents to indicate the end of one page and the beginning of a new page. It is typically represented by a horizontal line or other visual indicator that separates content into different pages. This feature is commonly used when creating lengthy documents such as reports, essays, or books to enhance the overall layout and readability. In this article, you will learn how to how to insert page break into Word documents in Python using Spire.Doc for Python.
Install Spire.Doc for Python
This scenario requires Spire.Doc for Python and plum-dispatch v1.7.4. They can be easily installed in your Windows through the following pip command.
pip install Spire.Doc
If you are unsure how to install, please refer to this tutorial: How to Install Spire.Doc for Python on Windows
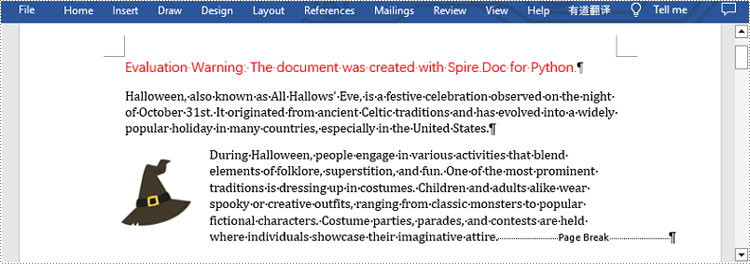
Insert Page Break after a Specific Paragraph
Spire.Doc for Python provides Paragraph.AppendBreak(BreakType.PageBreak) method to insert a page break after a specific paragraph. The following are detailed steps.
- Create an object of Document class.
- Load a sample file from disk using Document.LoadFromFile() method.
- Get the first section of this file by Document.Sections[sectionIndex] property.
- Get the second paragraph in the section by Section.Paragraphs[paragraphIndex] property.
- Insert a page break after this paragraph using Paragraph.AppendBreak(BreakType.PageBreak) method.
- Save the result file using Document.SaveToFile() method.
- Python
from spire.doc import *
from spire.doc.common import *

inputFile =  "sample.docx"
outputFile = "InsertPageBreak.docx"

#Create an object of Document class
document = Document()

#Load a sample file from disk
document.LoadFromFile(inputFile)

#Insert a page break after this paragraph
paragraph.AppendBreak(BreakType.PageBreak)

#Save the result file
document.SaveToFile(outputFile, FileFormat.Docx2013)
document.Close()
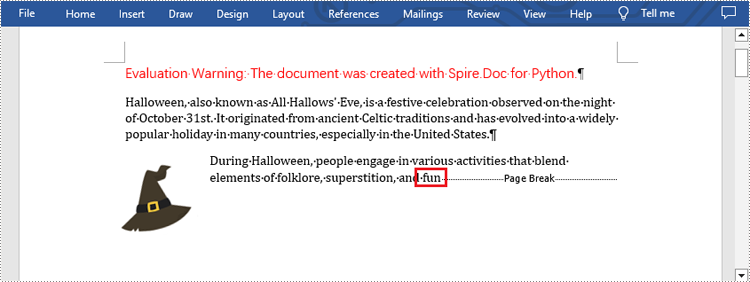
Insert Page Break after a Specific Text
What's more, you are also allowed to insert page break after a specific text by using Paragraph.ChildObjects.Insert() method provided by this library. The following are detailed steps.
- Create an object of Document class.
- Load a sample file from disk using Document.LoadFromFile() method.
- Find a specific text using Document.FindAllString() method.
- Loop through all searched text and access the text range of it by calling TextSelection.GetAsOneRange() method.
- Get the paragraph where the text range is located by ParagraphBase.OwnerParagraph property.
- Get the position index of the text range in the paragraph using Paragraph.ChildObjects.IndexOf() method.
- Create an object of Break class to create a page break.
- Insert page break after the searched text using Paragraph.ChildObjects.Insert() method.
- Save the result file using Document.SaveToFile() method.
- Python
from spire.doc import *
from spire.doc.common import *

inputFile = "sample.docx"
outputFile =  "InsertPageBreakAfterText.docx"

#Create an object of Document class
document = Document()

#Load a sample file from disk
document.LoadFromFile(inputFile)

#Find the specified text
selection = document.FindAllString("fun", True, True)

#Loop through all searched text
for ts in selection:

    #Get the text range of the searched text
    range = ts.GetAsOneRange()

    #Get the paragraph where the text range is located
    paragraph = range.OwnerParagraph

    #Get the position index of the text range in the paragraph
    index = paragraph.ChildObjects.IndexOf(range)

    #Create an object of Break class
    pageBreak = Break(document, BreakType.PageBreak)

    #Insert page break after the searched text
    paragraph.ChildObjects.Insert(index + 1, pageBreak)

#Save the result file
document.SaveToFile(outputFile, FileFormat.Docx2013)
document.Close()
Apply for a Temporary License
If you'd like to remove the evaluation message from the generated documents, or to get rid of the function limitations, please request a 30-day trial license for yourself.
Setting proper margins is an essential step in creating professional Word documents. Margins may seem like a small detail, but they play a vital role in improving the readability and visual appeal of a document. By defining the space around content, margins help maintain a consistent and balanced layout, prevent text from being truncated, and make documents look more organized and aesthetically pleasing. This article will show how to use Spire.Doc for Python to set page margins for Word documents through Python programs.
Install Spire.Doc for Python
This scenario requires Spire.Doc for Python and plum-dispatch v1.7.4. They can be easily installed in your Windows through the following pip command.
pip install Spire.Doc
If you are unsure how to install, please refer to this tutorial: How to Install Spire.Doc for Python on Windows
Set the Page Margins of a Word Document
Spire.Doc for Python provides properties under the Margins class that can be used to set margins for each side of a document separately or to set the same margins for all sides. One important thing to note is that the margins are set based on sections. For consistent margins throughout the document, it is necessary to iterate through each section of the document to set the margins. Below are the detailed steps for setting page margins:
- Create an object of Document class.
- Load a Word document using Document.LoadFromFile() method.
- Loop through the sections of the document.
- Get a section using Document.Sections.get_Item() method.
- Get the margins of the section using Section.PageSetup.Margins property.
- Set the top, bottom, left, and right margin using property under Margins class.
- Python
from spire.doc import *
from spire.doc.common import *

# Create an object of Document class
doc = Document()

# Load a Word document
doc.LoadFromFile("Sample.docx")

# Loop thorugh the sections of document
for i in range(doc.Sections.Count):
    # Get a section
    section = doc.Sections.get_Item(i)
    # Get the margins of the section
    margins = section.PageSetup.Margins
    # Set the top, bottom, left, and right margins
    margins.Top = 17.9
    margins.Bottom = 17.9
    margins.Left = 20.9
    margins.Right = 20.9
    # margins.All = 17.9

# Save the document
doc.SaveToFile("output/SetPageMargins.docx", FileFormat.Auto)
Apply for a Temporary License
If you'd like to remove the evaluation message from the generated documents, or to get rid of the function limitations, please request a 30-day trial license for yourself.
