
Table (9)
Modern workflows often span multiple platforms-while analysts work with data in Excel, polished reports are created in Word. Manually copying data between these documents can lead to errors, version conflicts, and inconsistent formatting. Python-driven automation provides an efficient solution by seamlessly integrating Excel's data capabilities with Word's formatting strengths. This integration ensures data integrity, reduces repetitive formatting, and accelerates report creation for financial, academic, and compliance-related tasks.
This article explores how to use Spire.Office for Python to insert Excel tables into Word documents using Python code.
- Read Excel Data and Insert It into Word Documents
- Copy Data and Formatting from Excel to Word
- Integrate Excel Worksheets as OLE into Word Documents
Install Spire.Office for Python
This scenario requires Spire.Office for Python and plum-dispatch v1.7.4. They can be easily installed in your Windows through the following pip command.
pip install Spire.Office
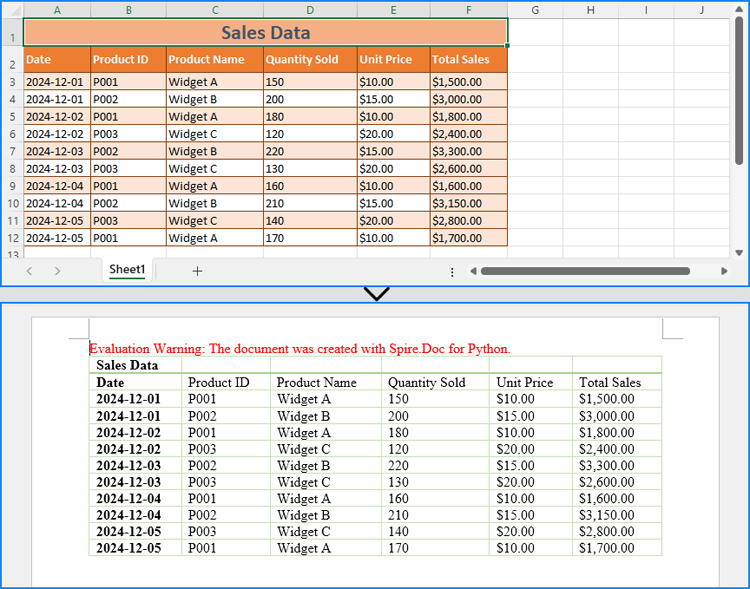
Read Excel Data and Insert It into Word Documents
With Spire.XLS for Python, developers can extract data from Excel worksheets while preserving number formatting using the CellRange.NumberText property. The extracted data can then be inserted into a Word table created using Spire.Doc for Python. This method is ideal for simple Excel worksheets and cases requiring table reformatting.
Steps to Read Excel Data and Insert It into Word:
- Create an instance of the Workbook class and load an Excel file using the Workbook.LoadFromFile() method.
- Retrieve the worksheet using the Workbook.Worksheets.get_Item() method and obtain the used cell range with the Worksheet.AllocatedRange property.
- Initialize a Document instance to create a Word document.
- Add a section using the Document.AddSection() method and insert a table using the Section.AddTable() method.
- Define the number of rows and columns based on the used cell range with the Table.ResetCells() method.
- Iterate through the rows and columns of the used cell range.
- Retrieve the corresponding table cell using the Table.Rows.get_Item().Cells.get_Item() method and add a paragraph using the TableCell.AddParagraph() method.
- Extract the cell value using the CellRange.get_Item().NumberText property and append it to the paragraph using the Paragraph.AppendText() method.
- Apply the required formatting to the Word table.
- Save the Word document using the Document.SaveToFile() method.
- Python
from spire.doc import Document, AutoFitBehaviorType, FileFormat, DefaultTableStyle
from spire.xls import Workbook

# Specify the file names
excel_file = "Sample.xlsx"
word_file = "output/ExcelDataToWord.docx"

# Create a Workbook instance
workbook = Workbook()
# Load the Excel file
workbook.LoadFromFile(excel_file)

# Get the first worksheet
sheet = workbook.Worksheets.get_Item(0)
# Get the used cell range in the first worksheet
allocatedRange = sheet.AllocatedRange

# Create a Document instance
doc = Document()

# Add a section to the document and add a table to the section
section = doc.AddSection()
table = section.AddTable()

# Reset the number of rows and columns in the Word table to match the number of rows and columns in the Excel worksheet
table.ResetCells(allocatedRange.RowCount, allocatedRange.ColumnCount)

# Loop through each row and column in the used cell range
for rowIndex in range(allocatedRange.RowCount):
    # Loop through each column in the row
    for colIndex in range(allocatedRange.ColumnCount):
        # Add a cell to the Word table and add a paragraph to the cell
        cell = table.Rows.get_Item(rowIndex).Cells.get_Item(colIndex)
        paragraph = cell.AddParagraph()
        # Append the cell value to the Word table
        paragraph.AppendText(allocatedRange.get_Item(rowIndex + 1, colIndex + 1).NumberText)

# Auto-fit the table to the window and apply a table style
table.AutoFit(AutoFitBehaviorType.AutoFitToWindow)
table.ApplyStyle(DefaultTableStyle.GridTable1LightAccent6)

# Save the Word document
doc.SaveToFile(word_file, FileFormat.Docx2019)

# Dispose resources
doc.Dispose()
workbook.Dispose()
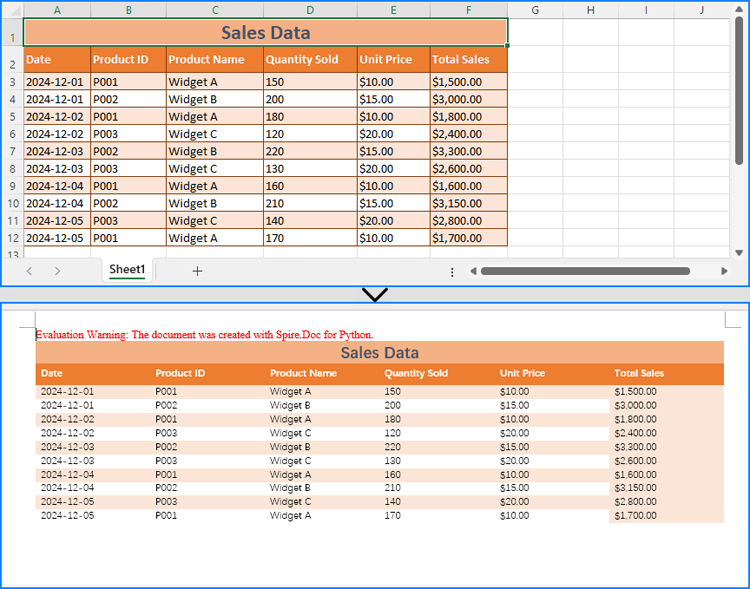
Copy Data and Formatting from Excel to Word
Spire.XLS for Python and Spire.Doc for Python can also be used together to copy both data and formatting from Excel to Word, preserving the table's original structure and appearance.
To handle format preservation, two helper methods are needed:
- MergeCells: Merges table cells in Word according to the merged cells in the Excel worksheet.
- CopyFormatting: Copies Excel cell formatting (font style, background color, horizontal and vertical alignment) to the Word table.
Steps to Copy Data and Formatting:
- Create a Workbook instance and load an Excel file using the Workbook.LoadFromFile() method.
- Retrieve a worksheet using the Workbook.Worksheets.get_Item() method.
- Initialize a Document instance and add a section with the Document.AddSection() method.
- Insert a table using the Section.AddTable() method.
- Adjust the table’s structure based on the worksheet using the Table.ResetCells() method.
- Apply cell merging using the MergeCells() method.
- Iterate through each worksheet row and set row heights using the Table.Rows.get_Item().Height property.
- For each column in a row:
- Retrieve worksheet cells using the Worksheet.Range.get_Item() method and table cells using the TableRow.Cells.get_Item() method.
- Extract cell data using the CellRange.NumberText property and append it to the table cell using the TableCell.AddParagraph().AppendText() method.
- Apply formatting using the CopyFormatting() method.
- Save the Word document using the Document.SaveToFile() method.
- Python
from spire.xls import Workbook, HorizontalAlignType, ExcelPatternType, VerticalAlignType
from spire.doc import Document, Color, HorizontalAlignment, VerticalAlignment, PageOrientation, FileFormat

def MergeCells(worksheet, wordTable):
    # Check if there are merged cells
    if not worksheet.HasMergedCells:
        return
    for cell_range in worksheet.MergedCells:
        start_row, start_col = cell_range.Row, cell_range.Column
        row_count, col_count = cell_range.RowCount, cell_range.ColumnCount
        # Process horizontal merging
        if col_count > 1:
            for row in range(start_row, start_row + row_count):
                wordTable.ApplyHorizontalMerge(row - 1, start_col - 1, start_col - 1 + col_count - 1)
        # Process vertical merging
        if row_count > 1:
            wordTable.ApplyVerticalMerge(start_col - 1, start_row - 1, start_row - 1 + row_count - 1)

def CopyFormatting(tableTextRange, excelCell, wordCell):
    # Copy font styles
    font = excelCell.Style.Font
    tableTextRange.CharacterFormat.TextColor = Color.FromRgb(font.Color.R, font.Color.G, font.Color.B)
    tableTextRange.CharacterFormat.FontSize = float(font.Size)
    tableTextRange.CharacterFormat.FontName = font.FontName
    tableTextRange.CharacterFormat.Bold = font.IsBold
    tableTextRange.CharacterFormat.Italic = font.IsItalic
    # Copy background colors
    if excelCell.Style.FillPattern != ExcelPatternType.none:
        wordCell.CellFormat.BackColor = Color.FromRgb(excelCell.Style.Color.R, excelCell.Style.Color.G,
                                                      excelCell.Style.Color.B)
    # Copy the horizontal alignment
    hAlignMap = {
        HorizontalAlignType.Left: HorizontalAlignment.Left,
        HorizontalAlignType.Center: HorizontalAlignment.Center,
        HorizontalAlignType.Right: HorizontalAlignment.Right
    }
    if excelCell.HorizontalAlignment in hAlignMap:
        tableTextRange.OwnerParagraph.Format.HorizontalAlignment = hAlignMap[excelCell.HorizontalAlignment]
    # Copy the vertical alignment
    vAlignMap = {
        VerticalAlignType.Top: VerticalAlignment.Top,
        VerticalAlignType.Center: VerticalAlignment.Middle,
        VerticalAlignType.Bottom: VerticalAlignment.Bottom
    }
    if excelCell.VerticalAlignment in vAlignMap:
        wordCell.CellFormat.VerticalAlignment = vAlignMap[excelCell.VerticalAlignment]

# Specify the file names
excelFileName = "Sample.xlsx"
wordFileName = "output/ExcelDataFormatToWord.docx"

# Create a Workbook instance and load the Excel file
workbook = Workbook()
workbook.LoadFromFile(excelFileName)

# Get a worksheet
sheet = workbook.Worksheets.get_Item(0)

# Create a Document instance
doc = Document()
# Add a section to the document and set the page orientation
section = doc.AddSection()
section.PageSetup.Orientation = PageOrientation.Landscape

# Add a table to the section
table = section.AddTable()
# Set the number of rows and columns according to the number of rows and columns in the Excel worksheet
table.ResetCells(sheet.LastRow, sheet.LastColumn)

# Execute the MergeCells method to merge cells
MergeCells(sheet, table)

# Iterate through each row and column in the Excel worksheet
for r in range(1, sheet.LastRow + 1):
    tableRow = table.Rows.get_Item(r - 1)
    tableRow.Height = float(sheet.Rows.get_Item(r - 1).RowHeight)
    for c in range(1, sheet.LastColumn + 1):
        # Get the corresponding cell in the Excel worksheet and the cell in the Word table
        eCell = sheet.Range.get_Item(r, c)
        wCell = table.Rows.get_Item(r - 1).Cells.get_Item(c - 1)
        # Append the cell value to the Word table
        textRange = wCell.AddParagraph().AppendText(eCell.NumberText)
        # Copy the cell formatting
        CopyFormatting(textRange, eCell, wCell)

# Save the Word document
doc.SaveToFile(wordFileName, FileFormat.Docx2019)
doc.Dispose()
workbook.Dispose()
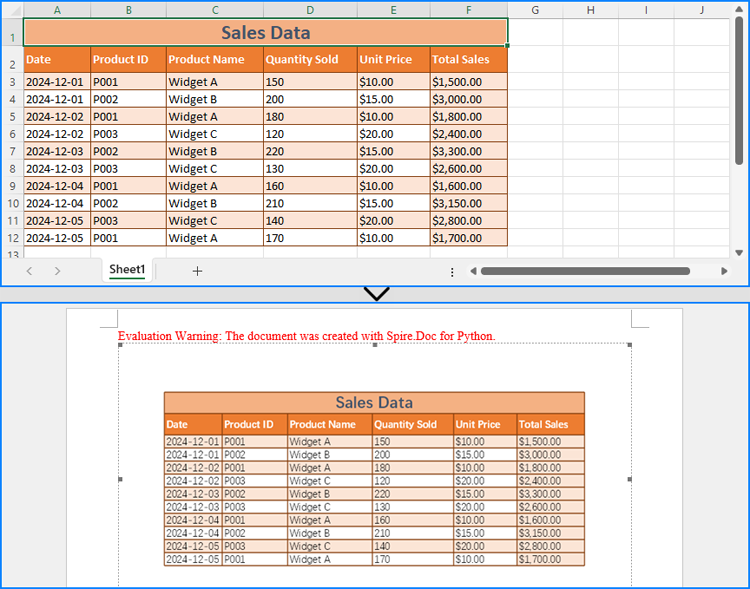
Integrate Excel Worksheets as OLE into Word Documents
Beyond copying data and formatting, Excel worksheets can be embedded as OLE objects in Word documents. This approach enables full worksheet visualization and allows users to edit Excel data directly from the Word document.
Using the Paragraph.AppendOleObject(str: filename, DocPicture, OleObjectType.ExcelWorksheet) method, developers can easily insert an Excel file as an OLE object.
Steps to Insert an Excel Worksheet as an OLE Object:
- Create a Workbook instance and load an Excel file using the Workbook.LoadFromFile() method.
- Retrieve a worksheet using the Workbook.Worksheets.get_Item() method and save it as an image using the Worksheet.ToImage().Save() method.
- Initialize a Document instance to create a Word document.
- Add a section using the Document.AddSection() method and insert a paragraph using the Section.AddParagraph() method.
- Create a DocPicture instance and load the saved image using the DocPicture.LoadImage() method.
- Resize the image according to the page layout using the DocPicture.Width property.
- Insert the Excel file as an OLE object into the paragraph using the Paragraph.AppendOleObject() method.
- Set the DocOleObject.DisplayAsIcon property to False to ensure that the OLE object updates dynamically after worksheet edits.
- Save the Word document using the Document.SaveToFile() method.
- Python
from spire.doc import Document, DocPicture, FileFormat, OleObjectType
from spire.xls import Workbook

# Specify the file path and names
excelFileName = "Sample.xlsx"
wordFileName = "output/ExcelOleToWord.docx"
tempImageName = "SheetImage.png"

# Create a Workbook instance and load the Excel file
workbook = Workbook()
workbook.LoadFromFile(excelFileName)

# Save the first worksheet as an image
sheet = workbook.Worksheets.get_Item(0)
sheet.ToImage(1, 1, sheet.LastRow, sheet.LastColumn).Save(tempImageName)

# Initialize a Document instance to create a Word document
doc = Document()
# Add a section to the document and add a paragraph to the section
section = doc.AddSection()
paragraph = section.AddParagraph()

# Create a DocPicture instance and load the image
pic = DocPicture(doc)
pic.LoadImage(tempImageName)

# Set the image width
pic.Width = section.PageSetup.PageSize.Width - section.PageSetup.Margins.Left - section.PageSetup.Margins.Right

# Insert the Excel file into the Word document as an OLE object and set the saved image as the display image
ole = paragraph.AppendOleObject(excelFileName, pic, OleObjectType.ExcelWorksheet)
# Set to not display the OLE object as an icon
ole.DisplayAsIcon = False

# Save the Word document
doc.SaveToFile(wordFileName, FileFormat.Docx2019)
workbook.Dispose()
doc.Dispose()
Get a Free License
To fully experience the capabilities of Install Spire.Office for Python without any evaluation limitations, you can request a free 30-day trial license.
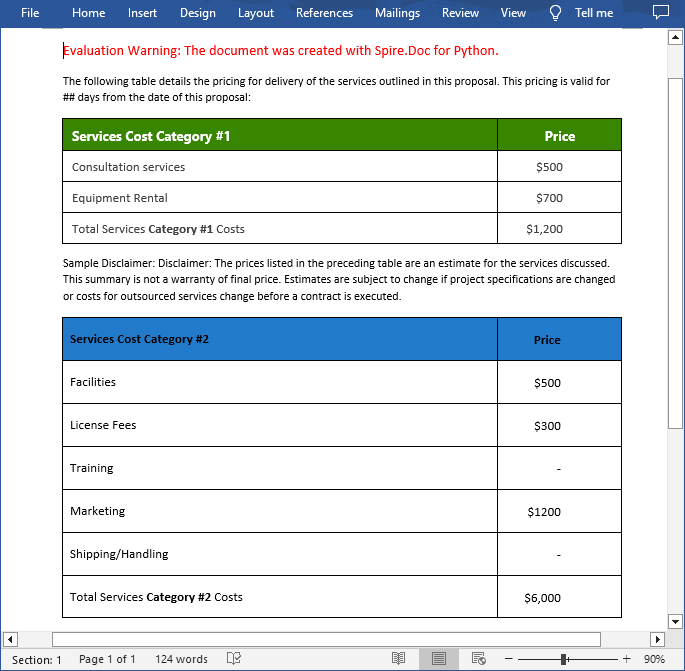
Merge tables in Word can be useful when you want to combine data from multiple tables into a single, larger table to create a more comprehensive view of the information. On the contrary, split tables can help you divide a large table into smaller, more manageable sections so you can focus on specific data sets. This article will demonstrate how to merge or split tables in Word in Python using Spire.Doc for Python.
Install Spire.Doc for Python
This scenario requires Spire.Doc for Python and plum-dispatch v1.7.4. They can be easily installed in your Windows through the following pip commands.
pip install Spire.Doc
If you are unsure how to install, please refer to this tutorial: How to Install Spire.Doc for Python on Windows
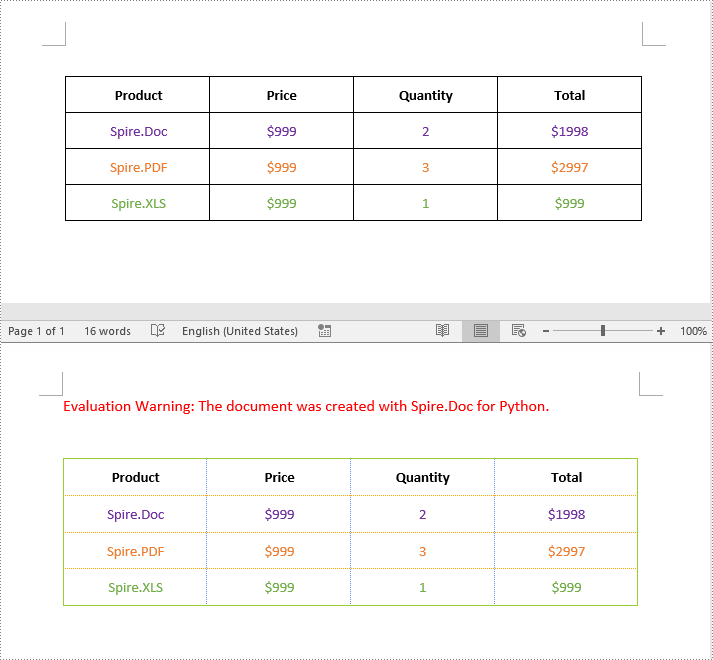
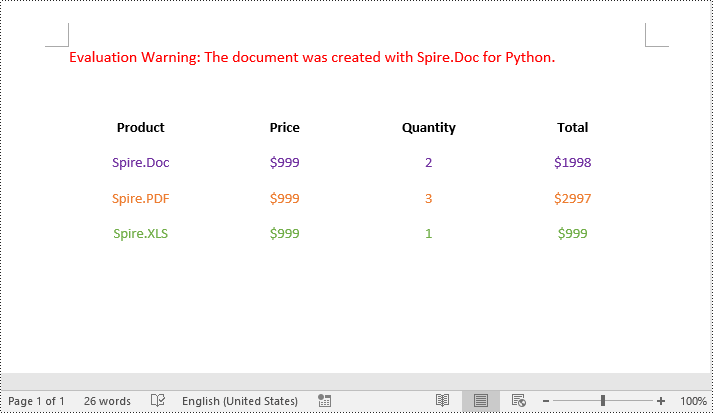
Merge Tables in Word in Python
With Spire.Doc for Python, you can combine two or more tables into one by copying all rows from other tables to the target table and then deleting the other tables. The following are the detailed steps.
- Create a Document instance.
- Load a Word document using Document.LoadFromFile() method.
- Get a specified section using Document.Sections[] property.
- Get two tables in the section using Section.Tables[] property.
- Iterate through all rows in the second table and copy them using Table.Rows[].Clone() method.
- Add the rows of the second table to the first table using Table.Rows.Add() method.
- Save the result document using Document.SaveToFile() method.
- Python
from spire.doc import *
from spire.doc.common import *

inputFile = "Cost.docx"
outputFile = "CombineTables.docx"

# Create a Document instance
doc = Document()

# Load a Word document
doc.LoadFromFile(inputFile)

# Get the first section
section = doc.Sections[0]

# Get the first and second table in the section
table1 = section.Tables[0] if isinstance(section.Tables[0], Table) else None
table2 = section.Tables[1] if isinstance(section.Tables[1], Table) else None

# Add rows of the second table to the first table
for i in range(table2.Rows.Count):
    table1.Rows.Add(table2.Rows[i].Clone())

# Remove the second table
section.Tables.Remove(table2)

# Save the result document
section.Document.SaveToFile(outputFile, FileFormat.Docx2013)
doc.Close()
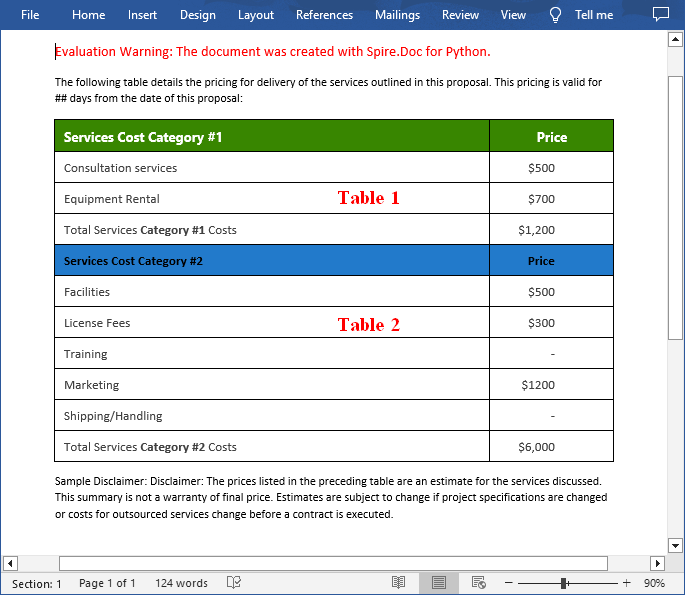
Spilt a Table in Word in Python
To split a table into two or more tables, you need to create a new table, then copy the specified rows from the original table to the new table, and then delete those rows from the original table. The following are the detailed steps.
- Create a Document instance.
- Load a Word document using Document.LoadFromFile() method.
- Get a specified section using Document.Sections[] property.
- Get a specified table in the section using Section.Tables[] property.
- Specify the row index where the table will be split.
- Create a new instance of the Table class.
- Iterate through the specified rows in the original table and copy them using Table.Rows[].Clone() method.
- Add the specified rows to the new table using Table.Rows.Add() method.
- Iterate through the copied rows and remove each row from the original table using Table.Rows.RemoveAt() method.
- Add the new table to the section using Section.Tables.Add() method.
- Save the result document using Document.SaveToFile() method.
- Python
from spire.doc import *
from spire.doc.common import *

inputFile = "CombineTables.docx"
outputFile = "SplitTable.docx"

# Create a Document instance
doc = Document()

# Load a Word document
doc.LoadFromFile(inputFile)

# Get the first section
section = doc.Sections[0]

# Get the first table in the section
table = section.Tables[0] if isinstance(section.Tables[0], Table) else None

# Specify to split the table from the fifth row
splitIndex = 4

# Create a new table
newTable = Table(section.Document, True)

# Adds rows (from the 5th to the last row) to the new table
for i in range(splitIndex, table.Rows.Count):
    newTable.Rows.Add(table.Rows[i].Clone())

# Delete rows from the original table
for i in range(table.Rows.Count - 1, splitIndex - 1, -1):
    table.Rows.RemoveAt(i)

# Add the new table to the section
section.Tables.Add(newTable)

# Save the result document
section.Document.SaveToFile(outputFile, FileFormat.Docx2013)
doc.Close()
Apply for a Temporary License
If you'd like to remove the evaluation message from the generated documents, or to get rid of the function limitations, please request a 30-day trial license for yourself.
Tables in Word documents can sometimes disrupt the flow of text or the visual balance of a page. Removing these tables can help in creating a more aesthetically pleasing document, which is crucial for reports, presentations, or publications where appearance is important. In this article, you will learn how to remove tables from a Word document in Python using Spire.Doc for Python.
Install Spire.Doc for Python
This scenario requires Spire.Doc for Python and plum-dispatch v1.7.4. They can be easily installed in your Windows through the following pip commands.
pip install Spire.Doc
If you are unsure how to install, please refer to this tutorial: How to Install Spire.Doc for Python on Windows
Remove a Specified Table in Word in Python
Spire.Doc for Python provides the Section.Tables.RemoveAt(int index) method to delete a specified table in a Word document by index. The following are the detailed steps.
- Create a Document instance.
- Load a Word document using Document.LoadFromFile() method.
- Get a specified section using Document.Sections[] property.
- Delete a specified table by index using Section.Tables.RemoveAt() method.
- Save the result document using Document.SaveToFile() method.
- Python
from spire.doc import *
from spire.doc.common import *

inputFile = "Tables.docx"
outputFile = "RemoveTable.docx"

# Create a Document instance
doc = Document()

# Load a Word document
doc.LoadFromFile(inputFile)

# Get the first section in the document
sec = doc.Sections[0]

# Remove the first table in the section
sec.Tables.RemoveAt(0)

# Save the result document
doc.SaveToFile(outputFile, FileFormat.Docx)
doc.Close()

Remove All Tables in Word in Python
To delete all tables from a Word document, you need to iterate through all sections in the document, then iterate through all tables in each section and remove them through the Section.Tables.Remove() method. The following are the detailed steps.
- Create a Document instance.
- Load a Word document using Document.LoadFromFile() method.
- Iterate through all sections in the document.
- Iterate through all tables in each section.
- Delete the tables using Section.Tables.Remove() method.
- Save the result document using Document.SaveToFile() method.
- Python
from spire.doc import *
from spire.doc.common import *

inputFile = "Tables.docx"
outputFile = "RemoveAllTables.docx"

# Create a Document instance
doc = Document()

# Load a Word document
doc.LoadFromFile(inputFile)

# Iterate through all sections in the document
for i in range(doc.Sections.Count):
    sec = doc.Sections.get_Item(i)

    # Iterate through all tables in each section
    for j in range(sec.Tables.Count):
        table = sec.Tables.get_Item(j)
        # Remove the table
        sec.Tables.Remove(table)

# Save the result document
doc.SaveToFile(outputFile, FileFormat.Docx)
doc.Close()
Apply for a Temporary License
If you'd like to remove the evaluation message from the generated documents, or to get rid of the function limitations, please request a 30-day trial license for yourself.
Tables are a powerful formatting tool in Word, allowing you to organize and present data effectively. However, the default table borders may not always align with your document's style and purpose. By selectively changing or removing the borders, you can achieve a variety of visual effects to suit your requirements. In this article, we will explore how to change and remove borders for tables in Word documents in Python using Spire.Doc for Python.
Install Spire.Doc for Python
This scenario requires Spire.Doc for Python. It can be easily installed in your Windows through the following pip command.
pip install Spire.Doc
If you are unsure how to install, please refer to this tutorial: How to Install Spire.Doc for Python on Windows
Change Borders for a Table in Word in Python
Spire.Doc for Python empowers you to retrieve the borders collection of a table by using the Table.TableFormat.Borders property. Once retrieved, you can access individual borders (like top border, bottom border, left border, right border, horizontal border, and vertical border) from the collection and then modify them by adjusting their line style, width, and color. The detailed steps are as follows.
- Create an object of the Document class.
- Load a Word document using Document.LoadFromFile() method.
- Get a specific section using Document.Sections[index] property.
- Get a specific table using Section.Tables[index] property.
- Get the borders collection of the table using Table.TableFormat.Borders property.
- Get an individual border, such as the top border from the borders collection using Borders.Top property, and then change its line style, width and color.
- Refer to the above step to get other individual borders from the borders collection, and then change their line style, width and color.
- Save the resulting document using Document.SaveToFile() method.
- Python
from spire.doc import *
from spire.doc.common import *

# Create an object of the Document class
document = Document()
# Load a Word document
document.LoadFromFile("Table.docx")

# Add a section to the document
section = document.Sections.get_Item(0)

# Get the first table in the section
table = section.Tables.get_Item(0) if isinstance(section.Tables.get_Item(0), Table) else None

# Get the collection of the borders
borders = table.TableFormat.Borders

# Get the top border and change border style, line width, and color
topBorder = borders.Top
topBorder.BorderType = BorderStyle.Single
topBorder.LineWidth = 1.0
topBorder.Color = Color.get_YellowGreen()

# Get the left border and change border style, line width, and color
leftBorder = borders.Left
leftBorder.BorderType = BorderStyle.Single
leftBorder.LineWidth = 1.0
leftBorder.Color = Color.get_YellowGreen()

# Get the right border and change border style, line width, and color
rightBorder = borders.Right
rightBorder.BorderType = BorderStyle.Single
rightBorder.LineWidth = 1.0
rightBorder.Color = Color.get_YellowGreen()

# Get the bottom border and change border style, line width, and color
bottomBorder = borders.Bottom
bottomBorder.BorderType = BorderStyle.Single
bottomBorder.LineWidth = 1.0
bottomBorder.Color = Color.get_YellowGreen()

# Get the horizontal border and change border style, line width, and color
horizontalBorder = borders.Horizontal
horizontalBorder.BorderType = BorderStyle.Dot
horizontalBorder.LineWidth = 1.0
horizontalBorder.Color = Color.get_Orange()

# Get the vertical border and change border style, line width, and color
verticalBorder = borders.Vertical
verticalBorder.BorderType = BorderStyle.Dot
verticalBorder.LineWidth = 1.0
verticalBorder.Color = Color.get_CornflowerBlue()

# Save the resulting document
document.SaveToFile("ChangeBorders.docx", FileFormat.Docx2013)
document.Close()
Remove Borders from a Table in Word in Python
To remove borders from a table, you need to set the BorderType property of the borders to BorderStyle.none. The detailed steps are as follows.
- Create an object of the Document class.
- Load a Word document using Document.LoadFromFile() method.
- Get a specific section using Document.Sections[index] property.
- Get a specific table using Section.Tables[index] property.
- Get the borders collection of the table using Table.TableFormat.Borders property.
- Get an individual border, such as the top border from the borders collection using Borders.Top property. Then set the BorderType property of the top border to BorderStyle.none.
- Refer to the above step to get other individual borders from the borders collection and then set the BorderType property of the borders to BorderStyle.none.
- Save the resulting document using Document.SaveToFile() method.
- Python
from spire.doc import *
from spire.doc.common import *

# Initialize an instance of the Document class
document = Document()
document.LoadFromFile("ChangeBorders.docx")

# Add a section to the document
section = document.Sections.get_Item(0)

# Get the first table in the section
table = section.Tables.get_Item(0) if isinstance(section.Tables.get_Item(0), Table) else None

# Get the borders collection of the table
borders = table.TableFormat.Borders

# Remove top border
topBorder = borders.Top
topBorder.BorderType = BorderStyle.none

# Remove left border
leftBorder = borders.Left
leftBorder.BorderType = BorderStyle.none

# Remove right border
rightBorder = borders.Right
rightBorder.BorderType = BorderStyle.none

# Remove bottom border
bottomBorder = borders.Bottom
bottomBorder.BorderType = BorderStyle.none

# remove inside horizontal border
horizontalBorder = borders.Horizontal
horizontalBorder.BorderType = BorderStyle.none

# Remove inside vertical border
verticalBorder = borders.Vertical
verticalBorder.BorderType = BorderStyle.none

# Save the resulting document
document.SaveToFile("RemoveBorders.docx", FileFormat.Docx2013)
document.Close()
Apply for a Temporary License
If you'd like to remove the evaluation message from the generated documents, or to get rid of the function limitations, please request a 30-day trial license for yourself.
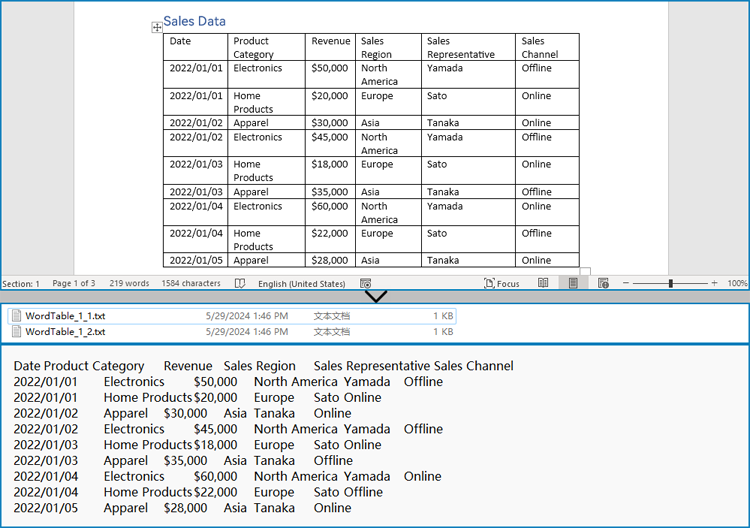
Word documents often contain valuable data in the form of tables, which can be used for reporting, data analysis, and record-keeping. However, manually extracting and transferring these tables to other formats can be a time-consuming and error-prone task. By automating this process using Python, we can save time, ensure accuracy, and maintain consistency. Spire.Doc for Python provides a seamless solution for the table extraction task, making it effortless to create accessible and manageable files with data from Word document tables. This article will demonstrate how to leverage Spire.Doc for Python to extract tables from Word documents and write them into text files and Excel worksheets.
- Extract Tables from Word Documents to Text Files with Python
- Extract Tables from Word Documents to Excel Workbooks with Python
Install Spire.Doc for Python
This scenario requires Spire.Doc for Python and plum-dispatch v1.7.4. They can be easily installed in your Windows through the following pip command.
pip install Spire.Doc
If you are unsure how to install, please refer to: How to Install Spire.Doc for Python on Windows
Extract Tables from Word Documents to Text Files with Python
Spire.Doc for Python offers the Section.Tables property to retrieve a collection of tables within a section of a Word document. Then, developers can use the properties and methods under the ITable class to access the data in the tables and write it into a text file. This provides a convenient solution for converting Word document tables into text files.
The detailed steps for extracting tables from Word documents to text files are as follows:
- Create an object of Document class and load a Word document using Document.LoadFromFile() method.
- Iterate through the sections in the document and get the table collection of each section through Section.Tables property.
- Iterate through the tables and create a string object for each table.
- Iterate through the rows in each table and the cells in each row, get the text of each cell through TableCell.Paragraphs[].Text property, and add the cell text to the string.
- Save each string to a text file.
- Python
from spire.doc import *
from spire.doc.common import *

# Create an instance of Document
doc = Document()

# Load a Word document
doc.LoadFromFile("Sample.docx")

# Loop through the sections
for s in range(doc.Sections.Count):
    # Get a section
    section = doc.Sections.get_Item(s)
    # Get the tables in the section
    tables = section.Tables
    # Loop through the tables
    for i in range(0, tables.Count):
        # Get a table
        table = tables.get_Item(i)
        # Initialize a string to store the table data
        tableData = ''
        # Loop through the rows of the table
        for j in range(0, table.Rows.Count):
            # Loop through the cells of the row
            for k in range(0, table.Rows.get_Item(j).Cells.Count):
                # Get a cell
                cell = table.Rows.get_Item(j).Cells.get_Item(k)
                # Get the text in the cell
                cellText = ''
                for para in range(cell.Paragraphs.Count):
                    paragraphText = cell.Paragraphs.get_Item(para).Text
                    cellText += (paragraphText + ' ')
                # Add the text to the string
                tableData += cellText
                if k < table.Rows.get_Item(j).Cells.Count - 1:
                    tableData += '\t'
            # Add a new line
            tableData += '\n'

        # Save the table data to a text file
        with open(f'output/Tables/WordTable_{s+1}_{i+1}.txt', 'w', encoding='utf-8') as f:
            f.write(tableData)
doc.Close()
Extract Tables from Word Documents to Excel Workbooks with Python
Developers can also utilize Spire.Doc for Python to retrieve table data and then use Spire.XLS for Python to write the table data into an Excel worksheet, thereby enabling the conversion of Word document tables into Excel workbooks.
Install Spire.XLS for Python via PyPI:
pip install Spire.XLS
The detailed steps for extracting tables from Word documents to Excel workbooks are as follows:
- Create an object of Document class and load a Word document using Document.LoadFromFile() method.
- Create an object of Workbook class and clear the default worksheets using Workbook.Worksheets.Clear() method.
- Iterate through the sections in the document and get the table collection of each section through Section.Tables property.
- Iterate through the tables and create a worksheet for each table using Workbook.Worksheets.Add() method.
- Iterate through the rows in each table and the cells in each row, get the text of each cell through TableCell.Paragraphs[].Text property, and write the text to the worksheet using Worksheet.SetCellValue() method.
- Save the workbook using Workbook.SaveToFile() method.
- Python
from spire.doc import *
from spire.doc.common import *
from spire.xls import *
from spire.xls.common import *

# Create an instance of Document
doc = Document()

# Load a Word document
doc.LoadFromFile('Sample.docx')

# Create an instance of Workbook
wb = Workbook()
wb.Worksheets.Clear()

# Loop through sections in the document
for i in range(doc.Sections.Count):
    # Get a section
    section = doc.Sections.get_Item(i)
    # Loop through tables in the section
    for j in range(section.Tables.Count):
        # Get a table
        table = section.Tables.get_Item(j)
        # Create a worksheet
        ws = wb.Worksheets.Add(f'Table_{i+1}_{j+1}')
        # Write the table to the worksheet
        for row in range(table.Rows.Count):
            # Get a row
            tableRow = table.Rows.get_Item(row)
            # Loop through cells in the row
            for cell in range(tableRow.Cells.Count):
                # Get a cell
                tableCell = tableRow.Cells.get_Item(cell)
                # Get the text in the cell
                cellText = ''
                for paragraph in range(tableCell.Paragraphs.Count):
                    paragraph = tableCell.Paragraphs.get_Item(paragraph)
                    cellText = cellText + (paragraph.Text + ' ')
                # Write the cell text to the worksheet
                ws.SetCellValue(row + 1, cell + 1, cellText)

# Save the workbook
wb.SaveToFile('output/Tables/WordTableToExcel.xlsx', FileFormat.Version2016)
doc.Close()
wb.Dispose()
Apply for a Temporary License
If you'd like to remove the evaluation message from the generated documents, or to get rid of the function limitations, please request a 30-day trial license for yourself.
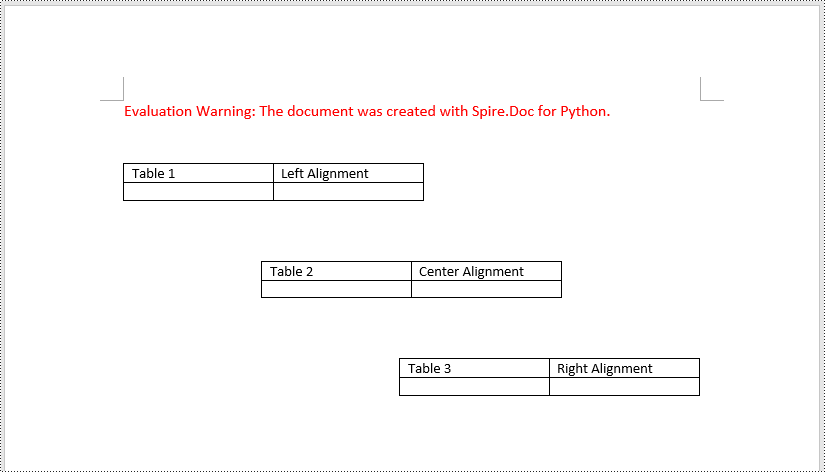
Proper alignment of tables and text in Microsoft Word is crucial for creating visually appealing and easy-to-read documents. By aligning table headers, numeric data, and text appropriately, you can enhance the organization and clarity of your information, making it more accessible to your readers. In this article, we will demonstrate how to align tables and the text in table cells in Microsoft Word in Python using Spire.Doc for Python.
Install Spire.Doc for Python
This scenario requires Spire.Doc for Python and plum-dispatch v1.7.4. They can be easily installed in your Windows through the following pip commands.
pip install Spire.Doc
If you are unsure how to install, please refer to this tutorial: How to Install Spire.Doc for Python on Windows
Align Tables in Word in Python
A table in a Word document can be aligned to the left, center, or right side by using the Table.TableFormat.HorizontalAlignment property. The detailed steps are as follows.
- Create an instance of the Document class.
- Load a Word document using Document.LoadFromFile() method.
- Get a specific section in the document using Document.Sections[index] property.
- Get a specific table in the section using Section.Tables[index] property.
- Set the alignment for the table using Table.TableFormat.HorizontalAlignment property.
- Save the result document using Document.SaveToFile() method.
- Python
from spire.doc import *
from spire.doc.common import *

# Create an instance of the Document class
document = Document()
# Load a Word document
document.LoadFromFile("Tables.docx")

# Get the first section in the document
section = document.Sections[0]

# Get the first, second, and third tables in the section
table1 = section.Tables[0]
table2 = section.Tables[1]
table3 = section.Tables[2]

# Align the first table to the left
table1.TableFormat.HorizontalAlignment = RowAlignment.Left
# Align the second table to the center
table2.TableFormat.HorizontalAlignment = RowAlignment.Center
# Align the third table to the right
table3.TableFormat.HorizontalAlignment = RowAlignment.Right

# Save the result document
document.SaveToFile("AlignTable.docx", FileFormat.Docx2013)
document.Close()
Align the Text in Table Cells in Word in Python
The text within a table cell can be horizontally aligned to the left, center, or right side using the TableCell.Paragraphs[index].Format.HorizontalAlignment property. Additionally, they can also be vertically aligned to the top, center, or bottom of the cell using the TableCell.CellFormat.VerticalAlignment property. The detailed steps are as follows.
- Create an instance of the Document class.
- Load a Word document using Document.LoadFromFile() method.
- Get a specific section in the document using Document.Sections[index] property.
- Get a specific table in the section using Section.Tables[index] property.
- Loop through the rows in the table.
- Loop through the cells in each row.
- Set the vertical alignment for the text in each cell using TableCell.CellFormat.VerticalAlignment property.
- Loop through the paragraphs in each cell.
- Set the horizontal alignment for each paragraph using TableCell.Paragraphs[index].Format.HorizontalAlignment property.
- Save the result document using Document.SaveToFile() method.
- Python
from spire.doc import *
from spire.doc.common import *

# Create an instance of the Document class
document = Document()
# Load a Word document
document.LoadFromFile("Table.docx")

# Get the first section in the document
section = document.Sections[0]

# Get the first tables in the section
table = section.Tables[0]

# Loop through the rows in the table
for row_index in range(table.Rows.Count):
    row = table.Rows[row_index]
    # Loop through the cells in the row
    for cell_Index in range(row.Cells.Count):
        cell = row.Cells[cell_Index]
        # Vertically align the text in the cell to the center
        cell.CellFormat.VerticalAlignment = VerticalAlignment.Middle
        # Horizontally align the text in the cell to the center
        for para_index in range(cell.Paragraphs.Count):
            paragraph = cell.Paragraphs[para_index]
            paragraph.Format.HorizontalAlignment = HorizontalAlignment.Center

# Save the result document
document.SaveToFile("AlignTableText.docx", FileFormat.Docx2013)
document.Close()
Apply for a Temporary License
If you'd like to remove the evaluation message from the generated documents, or to get rid of the function limitations, please request a 30-day trial license for yourself.
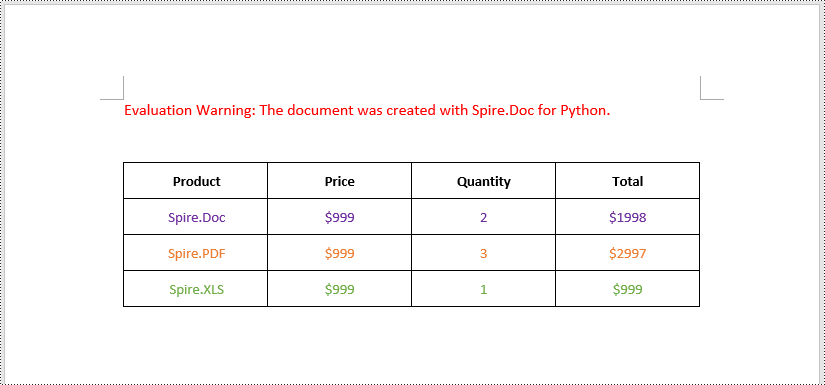
Images are an effective tool for conveying complex information. By inserting images into tables, you can enhance data presentation with charts, graphs, diagrams, illustrations, and more. This not only enables readers to easily comprehend the information being presented but also adds visual appeal to your document. In certain cases, you may also come across situations where you need to extract images from tables for various purposes. For example, you might want to reuse an image in a presentation, website, or another document. Extracting images allows you to repurpose them, streamlining your content creation process and increasing efficiency. In this article, we will explore how to insert and extract images in Word tables in Python using Spire.Doc for Python.
Install Spire.Doc for Python
This scenario requires Spire.Doc for Python and plum-dispatch v1.7.4. They can be easily installed in your Windows through the following pip commands.
pip install Spire.Doc
If you are unsure how to install, please refer to this tutorial: How to Install Spire.Doc for Python on Windows
Insert Images into a Word Table in Python
Spire.Doc for Python provides the TableCell.Paragraphs[index].AppendPicture() method to add an image to a specific table cell. The detailed steps are as follows.
- Create an object of the Document class.
- Load a Word document using the Document.LoadFromFile() method.
- Get a specific section in the document using the Document.Sections[index] property.
- Get a specific table in the section using the Section.Tables[index] property.
- Access a specific cell in the table using the Table.Row[index].Cells[index] property.
- Add an image to the cell using the TableCell.Paragraphs[index].AppendPicture() method and set the image width and height.
- Save the result document using the Document.SaveToFile() method.
- Python
from spire.doc import *
from spire.doc.common import *

# Create an object of the Document class
doc = Document()
# Load a Word document
doc.LoadFromFile("Table2.docx")

# Get the first section
section = doc.Sections.get_Item(0)

# Get the first table in the section
table = section.Tables.get_Item(0)

# Add an image to the 3rd cell of the second row in the table
cell = table.Rows[1].Cells[2]
picture = cell.Paragraphs[0].AppendPicture("doc.png")
# Set image width and height
picture.Width = 100
picture.Height = 100

# Add an image to the 3rd cell of the 3rd row in the table
cell = table.Rows[2].Cells[2]
picture = cell.Paragraphs[0].AppendPicture("xls.png")
# Set image width and height
picture.Width = 100
picture.Height = 100

# Save the result document
doc.SaveToFile("AddImagesToTable.docx", FileFormat.Docx2013)
doc.Close()

Extract Images from a Word Table in Python
To extract images from a Word table, you need to iterate through all objects in the table and identify the ones of the DocPicture type. Once the DocPicture objects are found, you can access their image bytes using the DocPicture.ImageBytes property, and then save the image bytes to image files. The detailed steps are as follows.
- Create an object of the Document class.
- Load a Word document using the Document.LoadFromFile() method.
- Get a specific section in the document using the Document.Sections[index] property.
- Get a specific table in the section using the Section.Tables[index] property.
- Create a list to store the extracted image data.
- Iterate through all rows in the table.
- Iterate through all cells in each row.
- Iterate through all paragraphs in each cell.
- Iterate through all child objects in each paragraph.
- Check if the current child object is of DocPicture type.
- Get the image bytes of the DocPicture object using the DocPicture.ImageBytes property and append them to the list.
- Save the image bytes in the list to image files.
- Python
from spire.doc import *
from spire.doc.common import *

# Create an object of the Document class
doc = Document()
# Load a Word document
doc.LoadFromFile("AddImagesToTable.docx")

# Get the first section
section = doc.Sections.get_Item(0)

# Get the first table in the section
table = section.Tables.get_Item(0)

# Create a list to store image bytes
image_data = []

# Iterate through all rows in the table
for i in range(table.Rows.Count):
    row = table.Rows.get_Item(i)
    # Iterate through all cells in each row
    for j in range(row.Cells.Count):
        cell = row.Cells[j]
        # Iterate through all paragraphs in each cell
        for k in range(cell.Paragraphs.Count):
            paragraph = cell.Paragraphs[k]
            # Iterate through all child objects in each paragraph
            for o in range(paragraph.ChildObjects.Count):
                child_object = paragraph.ChildObjects[o]
                # Check if the current child object is of DocPicture type
                if isinstance(child_object, DocPicture):
                    picture = child_object
                    # Get the image bytes
                    bytes = picture.ImageBytes
                    # Append the image bytes to the list
                    image_data.append(bytes)

# Save the image bytes in the list to image files
for index, item in enumerate(image_data):
    image_Name = f"Images/Image-{index}.png"
    with open(image_Name, 'wb') as imageFile:
        imageFile.write(item)

doc.Close()

Apply for a Temporary License
If you'd like to remove the evaluation message from the generated documents, or to get rid of the function limitations, please request a 30-day trial license for yourself.
A table is a powerful tool in a Word document that allows you to organize and present information in a structured manner. It consists of rows and columns, forming a grid-like structure. Tables are commonly used for various purposes, such as creating schedules, comparing data, or displaying data in a neat and organized format. In this article, you will learn how to programmatically create tables in a Word document in Python using Spire.Doc for Python.
- Create a Simple Table in Word in Python
- Create a Table from an HTML String in Python
- Merge and Split Cells in a Table in Python
- Fill a Table with Data in Word in Python
Install Spire.Doc for Python
This scenario requires Spire.Doc for Python and plum-dispatch v1.7.4. They can be easily installed in your Windows through the following pip command.
pip install Spire.Doc
If you are unsure how to install, please refer to this tutorial: How to Install Spire.Doc for Python on Windows
Prerequisite Knowledge
Spire.Doc for Python offers the Table class to represent a table in a Word document. You can create table objects either through the constructor or the Section.AddTable() method. After the table object is created, you can use the Table.AddRow() method to dynamically add rows to the table, or specify the number of rows and columns of the table, and then populate it with data in a single pass.
Also, Spire.Doc for Python supports creating tables from an HTML string. This method does not return an object of Table. Therefore, you cannot use the properties or methods under the Table class to deal with the table created from an HTML string. You need to set up the content and style of the table in the HTML string.
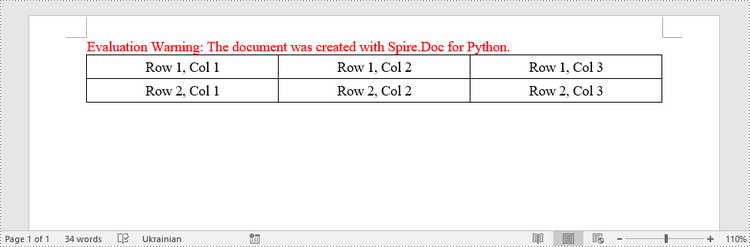
Create a Simple Table in Word in Python
This example demonstrates how to create a simple plain table using the Table class and how to add rows one by one. Here are the main steps.
- Create a Document object.
- Add a section to it using Document.AddSection() method.
- Create a Table object.
- Add a row to it using Table.AddRow() method.
- Get a specific cell of the row through Row.Cells[index] property.
- Add text to the cell using TableCell.AddParagraph().AppendText() method.
- Add the table to the document using Section.AddTable() method.
- Save the document to a .docx file using Document.SaveToFile() method.
- Python
from spire.doc import *
from spire.doc.common import *

# Create a Document object
doc = Document()

# Add a section
section = doc.AddSection()

# Create a table
table = Table(doc, True)

# Set the width of table
table.PreferredWidth = PreferredWidth(WidthType.Percentage, int(100))

# Set the border of table
table.TableFormat.Borders.BorderType = BorderStyle.Single
table.TableFormat.Borders.Color = Color.get_Black()

# Add a row
row = table.AddRow(False, 3)
row.Height = 20.0

# Add data to the cells
cell = row.Cells[0]
cell.CellFormat.VerticalAlignment = VerticalAlignment.Middle
paragraph = cell.AddParagraph()
paragraph.Format.HorizontalAlignment = HorizontalAlignment.Center
paragraph.AppendText("Row 1, Col 1")
cell = row.Cells[1]
cell.CellFormat.VerticalAlignment = VerticalAlignment.Middle
paragraph = cell.AddParagraph()
paragraph.Format.HorizontalAlignment = HorizontalAlignment.Center
paragraph.AppendText("Row 1, Col 2")
cell = row.Cells[2]
cell.CellFormat.VerticalAlignment = VerticalAlignment.Middle
paragraph = cell.AddParagraph()
paragraph.Format.HorizontalAlignment = HorizontalAlignment.Center
paragraph.AppendText("Row 1, Col 3")

# Add the second row
row = table.AddRow(False, 3)
row.Height = 20.0
cell = row.Cells[0]
cell.CellFormat.VerticalAlignment = VerticalAlignment.Middle
paragraph = cell.AddParagraph()
paragraph.Format.HorizontalAlignment = HorizontalAlignment.Center
paragraph.AppendText("Row 2, Col 1")
cell = row.Cells[1]
cell.CellFormat.VerticalAlignment = VerticalAlignment.Middle
paragraph = cell.AddParagraph()
paragraph.Format.HorizontalAlignment = HorizontalAlignment.Center
paragraph.AppendText("Row 2, Col 2")
cell = row.Cells[2]
cell.CellFormat.VerticalAlignment = VerticalAlignment.Middle
paragraph = cell.AddParagraph()
paragraph.Format.HorizontalAlignment = HorizontalAlignment.Center
paragraph.AppendText("Row 2, Col 3")

# Add the table to the section
section.Tables.Add(table)

# Save the document
doc.SaveToFile("output/CreateTable.docx", FileFormat.Docx2013)
doc.Close()
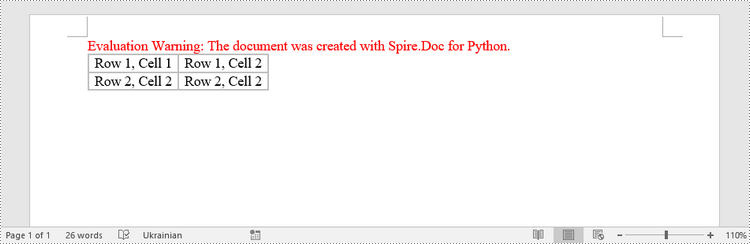
Create a Table from an HTML String in Python
To create a table from an HTML string, use the Paragraph.AppendHTML() method. The following are the steps.
- Create a Document object.
- Add a section to it using Document.AddSection() method.
- Specify the HTML string for generating the table.
- Add a paragraph using Section.AddParagraph() method.
- Add the HTML table to the paragraph using Paragraph.AppendHTML() method.
- Save the document to a .docx file using Document.SaveToFile() method.
- Python
from spire.doc import *
from spire.doc.common import *

# Create a Document object
document = Document()

# Add a section
section = document.AddSection()

# Specify HTML string
HTML = "<table border='2px'>" + "<tr>" + "<td>Row 1, Cell 1</td>" + "<td>Row 1, Cell 2</td>" + \
    "</tr>" + "<tr>" + "<td>Row 2, Cell 2</td>" + \
    "<td>Row 2, Cell 2</td>" + "</tr>" + "</table>"

# Add a paragraph
paragraph = section.AddParagraph()

# Append HTML string to the paragraph
paragraph.AppendHTML(HTML)

# Save to Word document
document.SaveToFile("output/HtmlTable.docx", FileFormat.Docx2013)
document.Close()
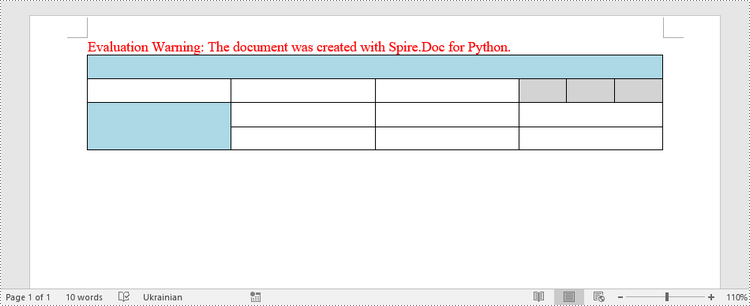
Merge and Split Cells in a Table in Python
When working with tables, the ability to merge or split cells provides a powerful way to customize and format data. This example shows you how to combine adjacent cells into a single cell and how to divide a single cell into multiple smaller cells using Spire.Doc for Python.
- Create a Document object.
- Add a section using Document.AddSection() method.
- Add a table using Section.AddTable() method.
- Set the column number and row number of the table using Table.ResetCells() method.
- Horizontally merge cells using Table.ApplyHorizontalMerge() method.
- Vertically merge cells using Table.ApplyVerticalMerge() method.
- Split a cell into multiple smaller cells using TableCell.SplitCell() method.
- Save the document to a .docx file using Document.SaveToFile() method.
- Python
from spire.doc import *
from spire.doc.common import *

# Create a Document object
document = Document()

# Add a section
section = document.AddSection()

# Create a table
table = section.AddTable(True)

# Set the row number and column number of table
table.ResetCells(4, 4)

# Set the width of table
table.PreferredWidth = PreferredWidth(WidthType.Percentage, int(100))

# Set row height
for i in range(0, table.Rows.Count):
    table.Rows[i].Height = 20.0

# Horizontally merge cells
table.ApplyHorizontalMerge(0, 0, 3)

# Vertically merge cells
table.ApplyVerticalMerge(0, 2, 3)

# Get a cell
cell = table.Rows.get_Item(1).Cells.get_Item(3)

# Split the cell into 3 smaller cells
cell.SplitCell(3, 0)

# Fill specified cells with color
table.Rows[0].Cells[0].CellFormat.BackColor = Color.get_LightBlue()
table.Rows[2].Cells[0].CellFormat.BackColor = Color.get_LightBlue()
table.Rows[1].Cells[3].CellFormat.BackColor = Color.get_LightGray()
table.Rows[1].Cells[4].CellFormat.BackColor = Color.get_LightGray()
table.Rows[1].Cells[5].CellFormat.BackColor = Color.get_LightGray()

# Save to Word document
document.SaveToFile("output/MergeAndSplit.docx", FileFormat.Docx2013)
document.Close()
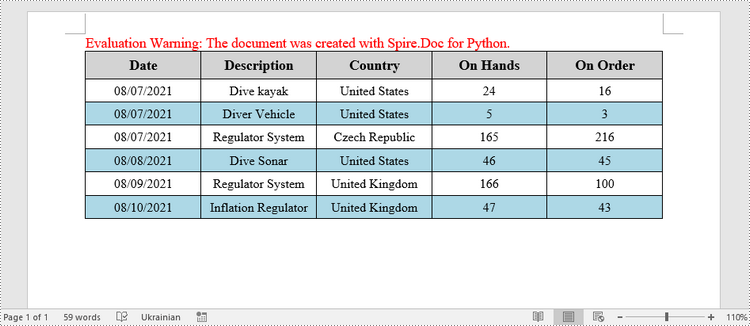
Fill a Table with Data in Word in Python
This example creates a 5x7 table, writes the data from lists into the cells, and applies different formatting to the header row and other rows. The following are the main steps.
- Create a Document object.
- Add a section using Document.AddSection() method.
- Add a table using Section.AddTable() method.
- Specify the data for filling the table in two lists.
- Reset the row number and column number of the table depending on the height and width of the data using Table.ResetCells() method.
- Write data into the corresponding cells using TableCell.AddParagraph().AppendText() method.
- Apply different colors to different rows through TableCell.CellFormat.BackColor property.
- Save the document to a .docx file using Document.SaveToFile() method.
- Python
import math
from spire.doc import *
from spire.doc.common import *

# Create a Document object
doc = Document()

# Add a section
section = doc.AddSection()

# Create a table
table = section.AddTable(True)

# Specify table data
header_data = ["Date", "Description", "Country", "On Hands", "On Order"]
row_data = [ ["08/07/2021","Dive kayak","United States","24","16"],
                ["08/07/2021","Diver Vehicle","United States","5","3"],
                ["08/07/2021","Regulator System","Czech Republic","165","216"],
                ["08/08/2021","Dive Sonar","United States","46","45"],
                ["08/09/2021","Regulator System","United Kingdom","166","100"],
                ["08/10/2021","Inflation Regulator","United Kingdom","47","43"]]

# Set the row number and column number of table
table.ResetCells(len(row_data) + 1, len(header_data))

# Set the width of table
table.PreferredWidth = PreferredWidth(WidthType.Percentage, int(100))

# Get header row
headerRow = table.Rows[0]
headerRow.IsHeader = True
headerRow.Height = 23
headerRow.RowFormat.BackColor = Color.get_LightGray()

# Fill the header row with data and set the text formatting
i = 0
while i < len(header_data):
    headerRow.Cells[i].CellFormat.VerticalAlignment = VerticalAlignment.Middle
    paragraph = headerRow.Cells[i].AddParagraph()
    paragraph.Format.HorizontalAlignment = HorizontalAlignment.Center
    txtRange = paragraph.AppendText(header_data[i])
    txtRange.CharacterFormat.Bold = True
    txtRange.CharacterFormat.FontSize = 12
    i += 1

# Fill the rest rows with data and set the text formatting
r = 0
while r < len(row_data):
    dataRow = table.Rows[r + 1]
    dataRow.Height = 20
    dataRow.HeightType = TableRowHeightType.Exactly
    c = 0
    while c < len(row_data[r]):
        dataRow.Cells[c].CellFormat.VerticalAlignment = VerticalAlignment.Middle
        paragraph = dataRow.Cells[c].AddParagraph()
        paragraph.Format.HorizontalAlignment = HorizontalAlignment.Center
        txtRange =  paragraph.AppendText(row_data[r][c])
        txtRange.CharacterFormat.FontSize = 11
        c += 1
    r += 1

# Alternate row color
for j in range(1, table.Rows.Count):
    if math.fmod(j, 2) == 0:
        row2 = table.Rows[j]
        for f in range(row2.Cells.Count):
            row2.Cells[f].CellFormat.BackColor = Color.get_LightBlue()

# Set the border of table
table.TableFormat.Borders.BorderType = BorderStyle.Single
table.TableFormat.Borders.LineWidth = 1.0
table.TableFormat.Borders.Color = Color.get_Black()

# Save the document
doc.SaveToFile("output/Table.docx", FileFormat.Docx2013)
Apply for a Temporary License
If you'd like to remove the evaluation message from the generated documents, or to get rid of the function limitations, please request a 30-day trial license for yourself.
Adding or removing rows and columns in a Word table allows you to adjust the table's structure to accommodate your data effectively. By adding rows and columns, you can effortlessly expand the table as your data grows, ensuring that all relevant information is captured and displayed in a comprehensive manner. On the other hand, removing unnecessary rows and columns allows you to streamline the table, eliminating any redundant or extraneous data that may clutter the document. In this article, we will demonstrate how to add or delete table rows and columns in Word in Python using Spire.Doc for Python.
- Add or Insert a Row into a Word Table in Python
- Add or Insert a Column into a Word Table in Python
- Delete a Row from a Word Table in Python
- Delete a Column from a Word Table in Python
Install Spire.Doc for Python
This scenario requires Spire.Doc for Python and plum-dispatch v1.7.4. They can be easily installed in your Windows through the following pip command.
pip install Spire.Doc
If you are unsure how to install, please refer to this tutorial: How to Install Spire.Doc for Python on Windows
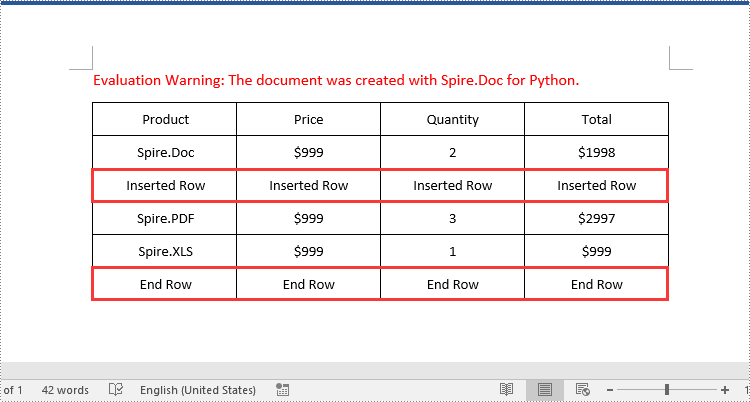
Add or Insert a Row into a Word Table in Python
You can add a row to the end of a Word table or insert a row at a specific location of a Word table using the Table.AddRow() or Table.InsertRow() method. The following are the detailed steps:
- Create a Document object.
- Load a Word document using Document.LoadFromFile() method.
- Get the first section of the document using Document.Sections[] property.
- Get the first table of the section using Section.Tables[] property.
- Insert a row at a specific location of the table using Table.Rows.Insert() method.
- Add data to the newly inserted row.
- Add a row to the end of the table using Table.AddRow() method.
- Add data to the newly added row.
- Save the resulting document using Document.SaveToFile() method.
- Python
from spire.doc import *
from spire.doc.common import *

# Create a Document object
document = Document()
# Load a Word document
document.LoadFromFile("Table1.docx")

# Get the first section of the document
section = document.Sections.get_Item(0)

# Get the first table of the first section
table = section.Tables.get_Item(0) if isinstance(section.Tables.get_Item(0), Table) else None

# Insert a row into the table as the third row
table.Rows.Insert(2, table.AddRow())
# Get the inserted row
insertedRow = table.Rows[2]
# Add data to the row
for i in range(insertedRow.Cells.Count):
    cell = insertedRow.Cells[i]
    paragraph = cell.AddParagraph()
    paragraph.AppendText("Inserted Row")
    paragraph.Format.HorizontalAlignment = HorizontalAlignment.Center
    cell.CellFormat.VerticalAlignment = VerticalAlignment.Middle

# Add a row at the end of the table
addedRow = table.AddRow()
# Add data to the row
for i in range(addedRow.Cells.Count):
    cell = addedRow.Cells[i]
    paragraph = cell.AddParagraph()
    paragraph.AppendText("End Row")
    paragraph.Format.HorizontalAlignment = HorizontalAlignment.Center
    cell.CellFormat.VerticalAlignment = VerticalAlignment.Middle

# Save the resulting document
document.SaveToFile("AddRows.docx", FileFormat.Docx2016)
document.Close()
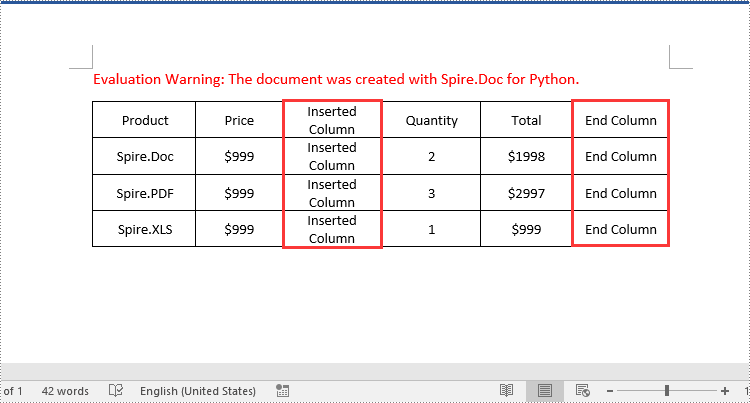
Add or Insert a Column into a Word Table in Python
Spire.Doc for Python doesn't offer a direct method to add or insert a column into a Word table. But you can achieve this by adding or inserting cells at a specific location of each table row using TableRow.Cells.Add() or TableRow.Cells.Insert() method. The detailed steps are as follows:
- Create a Document object.
- Load a Word document using Document.LoadFromFile() method.
- Get the first section of the document using Document.Sections[] property.
- Get the first table of the section using Section.Tables[] property.
- Loop through each row of the table.
- Create a TableCell object, then insert it at a specific location of each row using TableRow.Cells.Insert() method and set cell width.
- Add data to the cell and set text alignment.
- Add a cell to the end of each row using TableRow.AddCell() method and set cell width.
- Add data to the cell and set text alignment.
- Save the resulting document using Document.SaveToFile() method.
- Python
from spire.doc import *
from spire.doc.common import *

# Create a Document object
document = Document()
# Load a Word document
document.LoadFromFile("Table1.docx")

# Get the first section of the document
section = document.Sections.get_Item(0)

# Get the first table of the first section
table = section.Tables.get_Item(0) if isinstance(section.Tables.get_Item(0), Table) else None

# Loop through the rows of the table
for i in range(table.Rows.Count):
    row = table.Rows.get_Item(i)
    # Create a TableCell object
    cell = TableCell(document)
    # Insert the cell as the third cell of the row and set cell width
    row.Cells.Insert(2, cell)
    cell.Width = row.Cells[0].Width
    # Add data to the cell
    paragraph = cell.AddParagraph()
    paragraph.AppendText("Inserted Column")
    # Set text alignment
    paragraph.Format.HorizontalAlignment = HorizontalAlignment.Center
    cell.CellFormat.VerticalAlignment = VerticalAlignment.Middle

    # Add a cell to the end of the row and set cell width
    cell = row.AddCell()
    cell.Width = row.Cells[1].Width
    # Add data to the cell
    paragraph = cell.AddParagraph()
    paragraph.AppendText("End Column")
    # Set text alignment
    paragraph.Format.HorizontalAlignment = HorizontalAlignment.Center
    cell.CellFormat.VerticalAlignment = VerticalAlignment.Middle

# Save the resulting document
document.SaveToFile("AddColumns.docx", FileFormat.Docx2016)
document.Close()
Delete a Row from a Word Table in Python
To delete a specific row from a Word table, you can use the Table.Rows.RemoveAt() method. The detailed steps are as follows:
- Create a Document object.
- Load a Word document using Document.LoadFromFile() method.
- Get the first section of the document using Document.Sections[] property.
- Get the first table of the section using Section.Tables[] property.
- Remove a specific row from the table using Table.Rows.RemoveAt() method.
- Save the resulting document using Document.SaveToFile() method.
- Python
from spire.doc import *
from spire.doc.common import *

# Create a Document object
document = Document()
# Load a Word document
document.LoadFromFile("AddRows.docx")

# Get the first section of the document
section = document.Sections.get_Item(0)

# Get the first table of the first section
table = section.Tables.get_Item(0) if isinstance(section.Tables.get_Item(0), Table) else None

# Remove the third row
table.Rows.RemoveAt(2)
# Remove the last row
table.Rows.RemoveAt(table.Rows.Count - 1)

# Save the resulting document
document.SaveToFile("RemoveRows.docx", FileFormat.Docx2016)
document.Close()

Delete a Column from a Word Table in Python
To delete a specific column from a Word table, you need to remove the corresponding cell from each table row using the TableRow.Cells.RemoveAt() method. The detailed steps are as follows:
- Create a Document object.
- Load a Word document using Document.LoadFromFile() method.
- Get the first section of the document using Document.Sections[] property.
- Get the first table of the section using Section.Tables[] property.
- Loop through each row of the table.
- Remove a specific cell from each row using TableRow.Cells.RemoveAt() method.
- Save the resulting document using Document.SaveToFile() method.
- Python
from spire.doc import *
from spire.doc.common import *

# Create a Document object
document = Document()
# Load a Word document
document.LoadFromFile("AddColumns.docx")

# Get the first section of the document
section = document.Sections.get_Item(0)

# Get the first table of the first section
table = section.Tables.get_Item(0) if isinstance(section.Tables.get_Item(0), Table) else None

# Loop through the rows of the table
for i in range(table.Rows.Count):
    row = table.Rows.get_Item(i)
    # Remove the third cell from the row
    row.Cells.RemoveAt(2)
    # Remove the last cell from the row
    row.Cells.RemoveAt(row.Cells.Count - 1)

# Save the resulting document
document.SaveToFile("RemoveColumns.docx", FileFormat.Docx2016)
document.Close()

Apply for a Temporary License
If you'd like to remove the evaluation message from the generated documents, or to get rid of the function limitations, please request a 30-day trial license for yourself.
