
Image and Shapes (8)
Python Tutorial: Delete Text Boxes in PowerPoint Automatically
2025-06-12 07:00:22 Written by AdministratorText boxes are one of the most common elements used to display content in PowerPoint. However, as slides get frequently edited, you may end up with a clutter of unnecessary text boxes. Manually deleting them can be time-consuming. This guide will show you how to delete text boxes in PowerPoint using Python. Whether you want to delete all text boxes, remove a specific one, or clean up only the empty ones, you'll learn how to do it in just a few lines of code — saving time and making your workflow much more efficient. 
- Install the Python Library
- Delete All Text Boxes
- Delete a Specific Text Box
- Delete Empty Text Boxes
- Compare All Three Methods
- FAQs
Install the Python Library for PowerPoint Automation
To make this task easier, installing the right Python library is essential. In this guide, we’ll use Spire.Presentation for Python to demonstrate how to automate the removal of text boxes in a PowerPoint file. As a standalone third-party component, Spire.Presentation doesn’t require Microsoft Office to be installed on your machine. Its API is simple and beginner-friendly, and installation is straightforward — just run:
pip install spire.presentation
Alternatively, you can download the package for custom installation. A free version is also available, which is great for small projects and testing purposes.
How to Delete All Text Boxes in PowerPoint
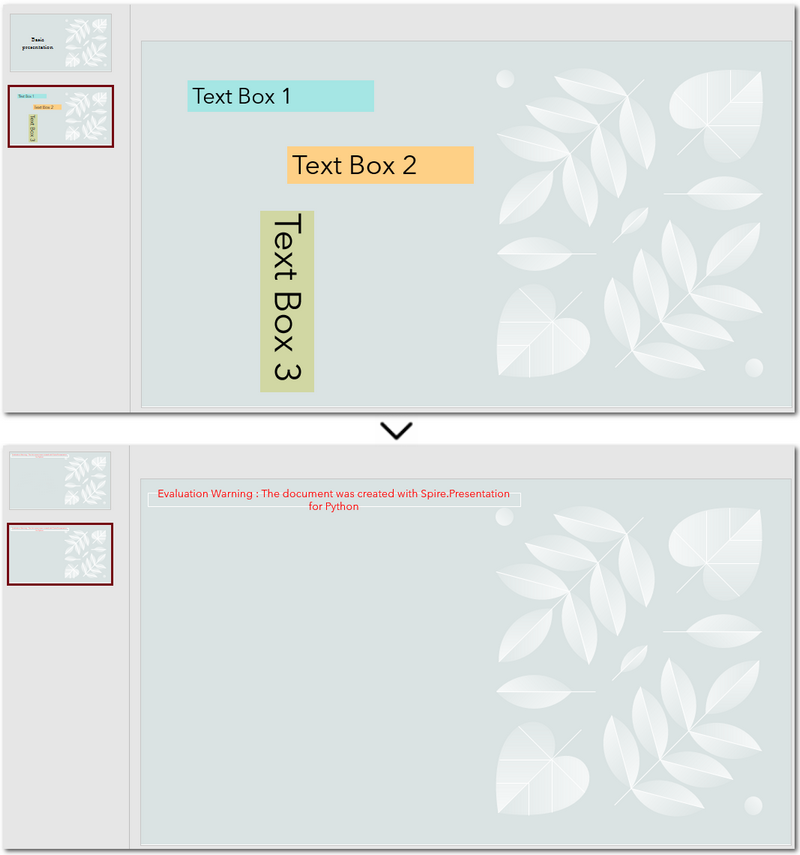
Let’s start by looking at how to delete all text boxes — a common need when you're cleaning up a PowerPoint template. Instead of adjusting each text box and its content manually, it's often easier to remove them all and then re-add only what you need. With the help of Spire.Presentation, you can use the IAutoShape.Remove() method to remove text boxes in just a few lines of code. Let’s see how it works in practice. Steps to delete all text boxes in a PowerPoint presentation with Python:
- Create an instance of Presentation class, and load a sample PowerPoint file.
- Loop through all slides and all shapes on slides, and check if the shape is IAutoShape and if it is a text box.
- Remove text boxes in the PowerPoint presentation through IAutoShape.Remove() method.
- Save the modified PowerPoint file.
The following is a complete code example for deleting all text boxes in a PowerPoint presentation:
from spire.presentation import *

# Create a Presentation object and load a PowerPoint file
presentation = Presentation()
presentation.LoadFromFile("E:/Administrator/Python1/input/pre1.pptx")

# Loop through all slides
for slide in presentation.Slides:
    # Loop through all shapes in the slide
    for i in range(slide.Shapes.Count - 1, -1, -1):
        shape = slide.Shapes[i]
        # Check if the shape is IAutoShape and is a text box
        if isinstance(shape, IAutoShape) and shape.IsTextBox:
            # Remove the shape
            slide.Shapes.Remove(shape)

# Save the modified presentation
presentation.SaveToFile("E:/Administrator/Python1/output/RemoveAllTextBoxes.pptx", FileFormat.Pptx2013)
presentation.Dispose()
Warm Tip: When looping through shapes, use reverse order to avoid skipping any elements after deletion.
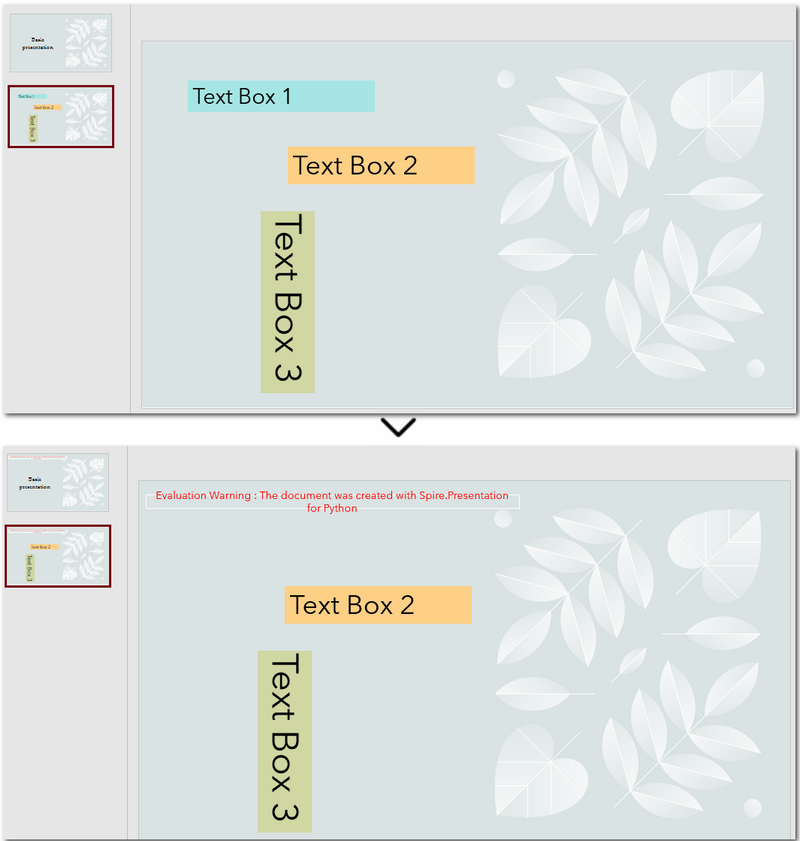
How to Delete a Specific Text Box in PowerPoint
If you only need to remove a few specific text boxes — for example, the first text box on the second slide — this method is perfect for you. In Python, you can first locate the target slide by its index, then identify the text box by its content, and finally remove it. This approach gives you precise control when you know exactly which text box needs to be deleted. Let’s walk through how to do this in practice. Steps to delete a specific text box in PowerPoint using Python:
- Create an object of Presentation class and read a PowerPoint document.
- Get a slide using Presentation.Slides[] property.
- Loop through each shape on the slide and check if it is the target text box.
- Remove the text box through IAutoShape.Remove() method.
- Save the modified PowerPoint presentation.
The following code demonstrates how to delete a text box with the content "Text Box 1" on the second slide of the presentation:
from spire.presentation import *

# Create a new Presentation object and load a PowerPoint file
presentation = Presentation()
presentation.LoadFromFile("E:/Administrator/Python1/input/pre1.pptx")

# Get the second slide
slide = presentation.Slides[1]

# Loop through all shapes on the slide
for i in range(slide.Shapes.Count - 1, -1, -1):
    shape = slide.Shapes[i]
    # Check if the shape is a text box and its text is "Text Box 1"
    if isinstance(shape, IAutoShape) and shape.IsTextBox:
        if shape.TextFrame.Text.strip() == "Text Box 1":
            slide.Shapes.Remove(shape)

# Save the modified presentation
presentation.SaveToFile("E:/Administrator/Python1/output/RemoveSpecificTextbox.pptx", FileFormat.Pptx2013)
presentation.Dispose()
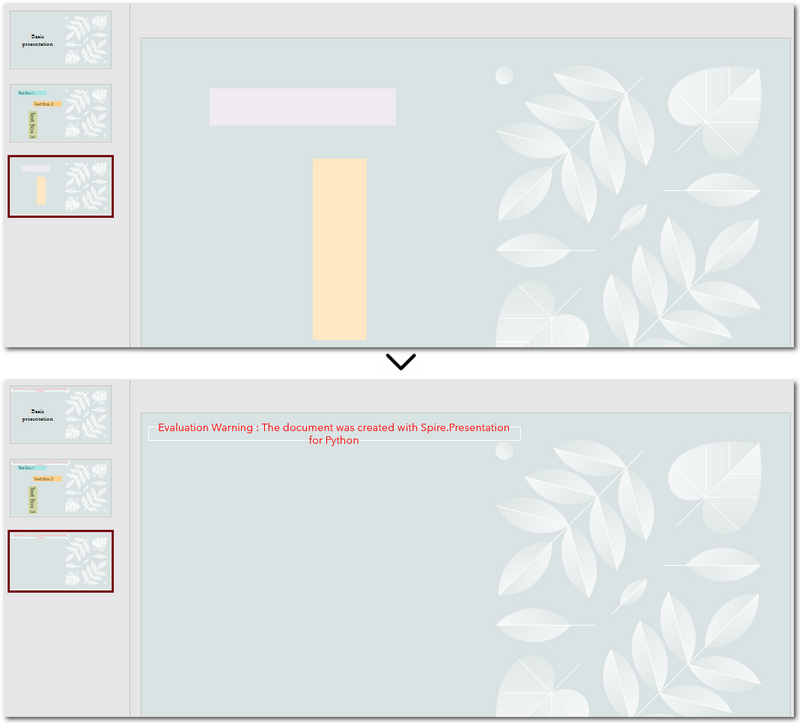
How to Delete Empty Text Boxes in PowerPoint
Another common scenario is removing all empty text boxes from a PowerPoint file — especially when you're cleaning up slides exported from other tools or merging multiple presentations and want to get rid of unused placeholders. Instead of checking each slide manually, automating the process with Python allows you to quickly remove all blank text boxes and keep only the meaningful content. It’s a far more efficient approach. Steps to delete empty text boxes in PowerPoint file using Python:
- Create an object of Presentation class, and load a PowerPoint file.
- Loop through all slides and all shapes on slides.
- Check if the shape is a text box and is empty.
- Remove text boxes in the PowerPoint presentation through IAutoShape.Remove() method.
- Save the modified PowerPoint file.
Here's the code example that shows how to delete empty text boxes in a PowerPoint presentation:
from spire.presentation import *

# Create a Presentation instance and load a sample file
presentation = Presentation()
presentation.LoadFromFile("E:/Administrator/Python1/input/pre1.pptx")

# Loop through each slide
for slide in presentation.Slides:
    # Iterate through shapes
    for i in range(slide.Shapes.Count - 1, -1, -1):
        shape = slide.Shapes[i]
        # Check if the shape is a textbox and its text is empty
        if isinstance(shape, IAutoShape) and shape.IsTextBox:
            text = shape.TextFrame.Text.strip()
            # Remove the shape if it is empty
            if not text:
                slide.Shapes.Remove(shape)

# Save the result file
presentation.SaveToFile("E:/Administrator/Python1/output/RemoveEmptyTextBoxes.pptx", FileFormat.Pptx2013)
presentation.Dispose()
Compare All Three Methods: Which One Should You Use?
Each of the three methods we've discussed has its own ideal use case. If you're still unsure which one fits your needs after reading through them, the table below will help you compare them at a glance — so you can quickly pick the most suitable solution.
| Method | Best For | Keeps Valid Content? |
|---|---|---|
| Delete All Text Boxes | Cleaning up entire templates or resetting slides | ❌ No |
| Delete Specified Text Box | When you know exactly which text box to remove (e.g., slide 2, shape 1) | ✅ Yes |
| Delete Empty Text Boxes | Cleaning up imported or merged presentations | ✅ Yes |
Conclusion and Best Practice
Whether you're refreshing templates, fine-tuning individual slides, or cleaning up empty placeholders, automating PowerPoint with Python can save you hours of manual work. Choose the method that fits your workflow best — and start making your presentations cleaner and more efficient today.
FAQs about Deleting Text Boxes in PowerPoint
Q1: Why can't I delete a text box in PowerPoint?
A: One common reason is that the text box is placed inside the Slide Master layout. In this case, it can’t be selected or deleted directly from the normal slide view. You’ll need to go to the View → Slide Master tab, locate the layout, and delete it from there.
Q2: How can I delete a specific text box using Python?
A: You can locate the specific text box by accessing the slide and then searching for the shape based on its index or text content. Once identified, use the IAutoShape.Remove() method to delete it. This is useful when you know exactly which text box needs to be removed.
Q3: Is it possible to remove a text box without deleting the content?
A: If you want to keep the content but remove the text box formatting (like borders or background), you can extract the text before deleting the shape and reinsert it elsewhere — for example, as a plain paragraph. However, PowerPoint doesn’t natively support detaching text from its container without removing the shape.
Python: Save Shapes as Image Files in PowerPoint Presentations
2024-10-21 01:03:20 Written by KoohjiExtracting and repurposing elements from PowerPoint presentations is a valuable skill for cross-platform content sharing. By converting shapes from slides into standalone image files, users can seamlessly integrate them into documents, web pages, or design projects without losing their original formatting and visual effects. With Python, this process becomes straightforward. In this article, we'll explore how to use Spire.Presentation for Python to save shapes from presentation slides as image files with simple Python code.
- Save Shapes from Slides as Image Files with Python
- Save Images from Slides with Formatting as Images Files
Install Spire.Presentation for Python
This scenario requires Spire.Presentation for Python and plum-dispatch v1.7.4. They can be easily installed in your Windows through the following pip command.
pip install Spire.Presentation
If you are unsure how to install, please refer to: How to Install Spire.Presentation for Python on Windows
Save Shapes from Slides as Image Files with Python
Spire.Presentation for Python provides the Slide.Shapes.SaveAsImage(shapIndex: int, dpiX: int, dpiY: int) method to save shapes in presentation slides as images with the specified DPI(optional). With this method, developers can save either a specific shape or all shapes in a PowerPoint presentation. The detailed steps are as follows:
- Create an instance of Presentation class.
- Load a PowerPoint presentation using Presentation.LoadFromFile() method.
- Get a slide using Presentation.Slides.get_Item() method.
- Iterate through the shapes in the slide:
- Save each shape as an image stream using Slide.Shapes.SaveAsImage() method.
- Save the image stream as an image file using Stream.Save() method.
- Python
from spire.presentation import *
# Create an instance of Presentation
presentation = Presentation()
# Load a PowerPoint file
presentation.LoadFromFile("Sample.pptx")
# Get the first slide
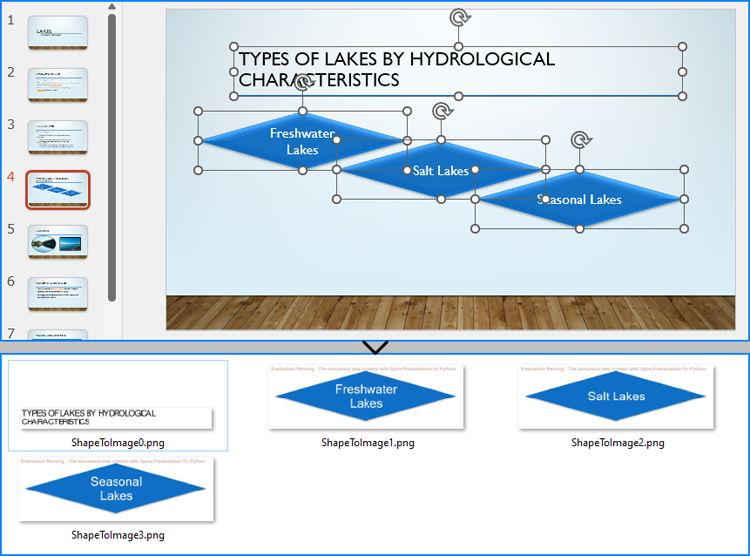
slide = presentation.Slides.get_Item(3)
# Save the shape as an image stream
for i in range(slide.Shapes.Count):
imageStream = slide.Shapes.SaveAsImage(i, 256, 256)
# Save the image
imageStream.Save(f"output/Shapes/ShapeToImage{i}.png")
# Release resources
presentation.Dispose()
Save Images from Slides with Formatting as Images Files
By using the methods provided by Spire.Presentation for Python, developers can also save images from slides as image files while preserving the edits and formatting applied to them. This requires first checking if the shape is an object of SlidePicture class, and if so, the shape can be saved as an image file. The detailed steps are as follows:
- Create an instance of Presentation class.
- Load a PowerPoint presentation using Presentation.LoadFromFile() method.
- Get a slide using Presentation.Slides.get_Item() method.
- Iterate through the shapes in the slide:
- Check if each shape is an object of SlidePicture class.
- If it is, save the shape as an image stream using Slide.Shapes.SaveAsImage() method.
- Save the image stream to a file using Stream.Save() method.
- Python
from spire.presentation import *

# Create an instance of Presentation
presentation = Presentation()

# Load a PowerPoint file
presentation.LoadFromFile("Sample.pptx")

# Get a slide
slide = presentation.Slides.get_Item(4)

# Iterate through all shapes in the slide
i = 0
for shape in slide.Shapes:
  # Check if the shape is an object of SlidePicture
  if isinstance(shape, SlidePicture):
    # Save the shape as an image
    shape = shape if isinstance(shape, SlidePicture) else None
    image = slide.Shapes.SaveAsImage(slide.Shapes.IndexOf(shape), 256, 256)
    image.Save(f"output/Images/ImageShape{i}.png")
    i += 1

# Release resources
presentation.Dispose()

Apply for a Temporary License
If you'd like to remove the evaluation message from the generated documents, or to get rid of the function limitations, please request a 30-day trial license for yourself.
In Microsoft PowerPoint, animations are not limited to just text; they can also be applied to shapes or other objects to create dynamic and engaging slides. Animations can be used to achieve various effects, such as drawing attention to a specific shape, demonstrating a process, or simply adding a touch of flair to your presentation. For instance, you might want to animate a shape to make it appear, disappear, or move in a particular sequence. Additionally, extracting and reusing animations can save time and ensure consistency across multiple presentations. In this article, we will demonstrate how to add animations to shapes in PowerPoint along with how to extract animation information from slides in PowerPoint in Python using Spire.Presentation for Python.
- Add Animations to Shapes and Text within Shapes in PowerPoint in Python
- Add Exit Animations to Shapes in PowerPoint in Python
- Extract the Animation Information from PowerPoint Slides in Python
Install Spire.Presentation for Python
This scenario requires Spire.Presentation for Python and plum-dispatch v1.7.4. They can be easily installed in your Windows through the following pip command.
pip install Spire.Presentation
If you are unsure how to install, please refer to this tutorial: How to Install Spire.Presentation for Python on Windows
Add Animations to Shapes and Text within Shapes in PowerPoint in Python
You can use the IShape.Slide.Timeline.MainSequence.AddEffect(shape:IShape, animationEffectType:AnimationEffectType) method to add an animation effect to a shape. If you want to apply the animation effect to the text of a specific paragraph(s) within a shape, you can use the AnimationEffect.SetStartEndParagraph(startParaIndex:int, endParaIndex:int) method. The detailed steps are as follows.
- Create an instance of the Presentation class.
- Load a PowerPoint presentation using the Presentation.LoadFromFile() method.
- Access a specific slide using the Presentation.Slides[] property.
- Add a rectangle shape to the slide using the ISlide.Shapes.AppendShape(shapeType:ShapeType, rectangle:RectangleF) method.
- Set the fill type, fill color, and border color for the rectangle.
- Add a text frame to the rectangle using the IShape.AppendTextFrame() method.
- Add an animation effect to the rectangle using IShape.Slide.Timeline.MainSequence.AddEffect(shape:IShape, animationEffectType:AnimationEffectType) method.
- Add another animation effect to the rectangle. Then apply the animation effect to specific paragraph(s) within the rectangle using the AnimationEffect.SetStartEndParagraph(startParaIndex:int, endParaIndex:int) method.
- Save the result presentation using the Presentation.SaveToFile() method.
- Python
from spire.presentation.common import *
from spire.presentation import *
# Create an object of the Presentation class
ppt = Presentation()
# Get the first slide in the presentation
slide = ppt.Slides[0]
# Add a rectangle shape to the slide
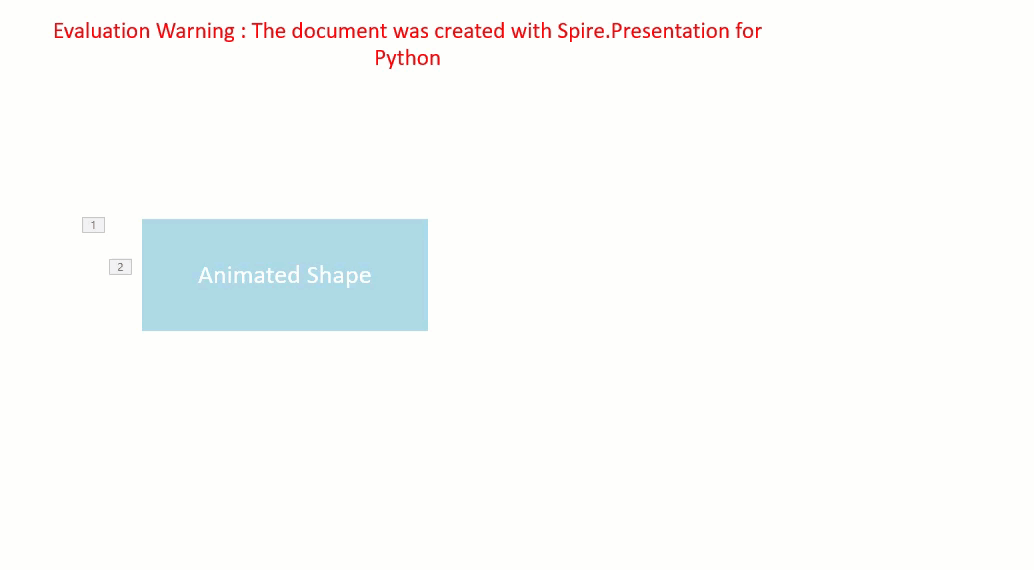
shape = slide.Shapes.AppendShape(ShapeType.Rectangle, RectangleF.FromLTRB(100, 150, 300, 230))
# Set an alternative title for the shape (optional)
shape.AlternativeTitle = "Rectangle"
# Set the fill type, fill color and border color for the shape
shape.Fill.FillType = FillFormatType.Solid
shape.Fill.SolidColor.Color = Color.get_LightBlue()
shape.ShapeStyle.LineColor.Color = Color.get_White()
# Add a text frame to the shape and set the text content
shape.AppendTextFrame("Animated Shape")
# Add the 'fade-out swivel' animation effect to the shape
shape.Slide.Timeline.MainSequence.AddEffect(shape, AnimationEffectType.FadedSwivel)
# Add the 'float' animation effect to the shape
animation = shape.Slide.Timeline.MainSequence.AddEffect(shape, AnimationEffectType.Float)
# Set the start and end index of the paragraph(s) to apply the 'float' animation
animation.SetStartEndParagraphs(0, 0)
# Save the presentation to a new file
ppt.SaveToFile("ApplyAnimation.pptx", FileFormat.Pptx2013)
ppt.Dispose()
Add Exit Animations to Shapes in PowerPoint in Python
In PowerPoint, animations are categorized into four main types: entrance, emphasis, exit, and motion paths. Some animations, like "fly in" or "fade", can be used as both entrance and exit effects. When using Spire.Presentation to add these animations to shapes in your presentations, these animations are typically set as entrance effects by default. If you want to change the type of the animation to exit, you can use the AnimationEffect.PresetClassType property. The detailed steps are as follows.
- Create an instance of the Presentation class.
- Load a PowerPoint presentation using the Presentation.LoadFromFile() method.
- Access a specific slide using the Presentation.Slides[] property.
- Add a cube shape to the slide using the ISlide.Shapes.AppendShape(shapeType:ShapeType, rectangle:RectangleF) method.
- Set the fill type, fill color, and border color for the cube.
- Add a text frame to the cube using the IShape.AppendTextFrame() method.
- Add an animation effect to the cube using the IShape.Slide.Timeline.MainSequence.AddEffect(shape:IShape, animationEffectType:AnimationEffectType) method.
- Change the animation effect type to exit using the AnimationEffect.PresetClassType property.
- Save the presentation using the Presentation.SaveToFile() method.
- Python
from spire.presentation.common import *
from spire.presentation import *
# Create an object of the Presentation class
ppt = Presentation()
# Get the first slide in the presentation
slide = ppt.Slides[0]
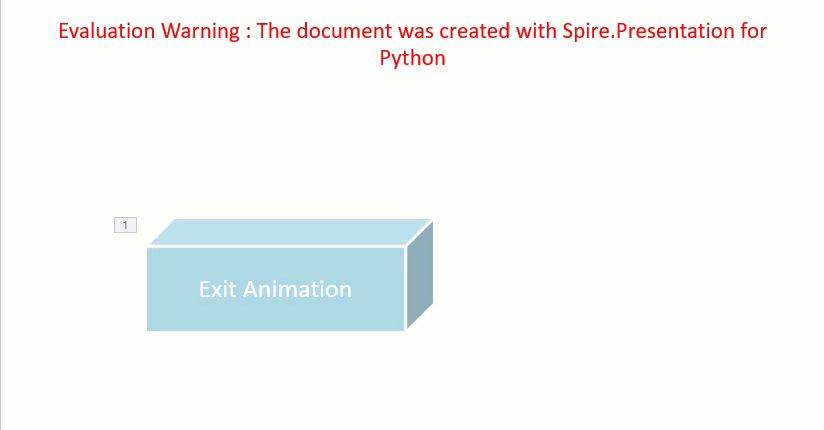
# Add a cube shape to the slide
shape = slide.Shapes.AppendShape(ShapeType.Cube, RectangleF.FromLTRB(100, 150, 300, 230))
# Set an alternative title for the shape (optional)
shape.AlternativeTitle = "Cube"
# Set the fill type, fill color and border color for the shape
shape.Fill.FillType = FillFormatType.Solid
shape.Fill.SolidColor.Color = Color.get_LightBlue()
shape.ShapeStyle.LineColor.Color = Color.get_White()
# Add a text frame to the shape and set the text content
shape.AppendTextFrame("Exit Animation")
# Add a 'random bars' animation effect to the shape
effect = shape.Slide.Timeline.MainSequence.AddEffect(shape, AnimationEffectType.RandomBars)
# Set the animation effect type to exit animation
effect.PresetClassType = TimeNodePresetClassType.Exit
# Save the presentation to a new file
ppt.SaveToFile("ExitAnimation.pptx", FileFormat.Pptx2013)
ppt.Dispose()
Extract the Animation Information from PowerPoint Slides in Python
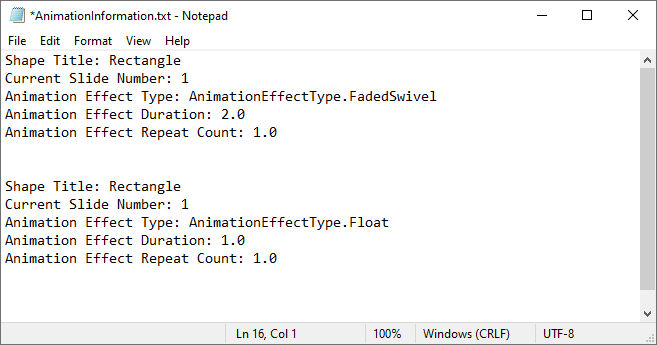
To extract animation information from slides in a PowerPoint presentation, you need to iterate through all slides and all animations within each slide, then use the properties of the AnimationEffect class to retrieve the information of the animations. The detailed steps are as follows.
- Create an instance of the Presentation class.
- Load a PowerPoint presentation using the Presentation.LoadFromFile() method.
- Iterate through all slides in the presentation and all animations within each slide.
- Use the AnimationEffect.ShapeTarget.AlternativeTitle property to get the title of the shape affected by the animation.
- Use the ISlide.SlideNumber property to get the number of the current slide.
- Use the AnimationEffect.AnimationEffectType property to get the type of animation effect.
- Use the AnimationEffect.Timing.Duration property to get the duration of the animation effect.
- Use the AnimationEffect.Timing.RepeatCount property to get the number of repetitions of the animation effect.
- Save the retrieved information to a text file.
- Python
from spire.presentation.common import *
from spire.presentation import *

# Create an object of the Presentation class
ppt = Presentation()
# Load a PowerPoint presentation
ppt.LoadFromFile("ApplyAnimation.pptx")

# Create a list to store the extracted animation information
sb = []

# Iterate through all slides in the presentation
for slide in ppt.Slides:
    # Iterate through all animation effects in the slide
    for effect in slide.Timeline.MainSequence:
        # Get the alternative title of the shape affected by the animation
        shapeTitle = effect.ShapeTarget.AlternativeTitle
        sb.append("Shape Title: " + shapeTitle)
        # Get the number of the current slide
        slideNumber = slide.SlideNumber
        sb.append("Current Slide Number: " + str(slideNumber))
        # Get the type of the animation effect
        animationEffectType = effect.AnimationEffectType
        sb.append("Animation Effect Type: " + str(animationEffectType))
        # Get the duration of the animation effect
        duration = effect.Timing.Duration
        sb.append("Animation Effect Duration: " + str(duration))
        # Get the number of repetitions of the animation effect
        count = effect.Timing.RepeatCount
        sb.append("Animation Effect Repeat Count: " + str(count))
        sb.append("\n")

# Save the extracted animation information to a text file
with open("AnimationInformation.txt", "w") as fp:
    for s in sb:
        fp.write(s + "\n")

ppt.Dispose()
Apply for a Temporary License
If you'd like to remove the evaluation message from the generated documents, or to get rid of the function limitations, please request a 30-day trial license for yourself.
Python: Insert, Rotate, Resize, Reposition, and Reorder Shapes in PowerPoint
2024-08-15 00:52:47 Written by KoohjiShapes are the fundamental building blocks that bring your PowerPoint slides to life. From simple geometric forms to complex icons and illustrations, these versatile visual elements enable you to add interest, highlight key information, and craft visually striking layouts. Whether you are creating professional-looking slides from scratch or enhancing existing ones, knowing how to insert and manipulate shapes is an essential skill. In this guide, we'll cover how to insert, rotate, resize, reposition, and reorder shapes in PowerPoint presentations in Python using Spire.Presentation for Python.
- Insert Shapes in PowerPoint in Python
- Rotate Shapes in PowerPoint in Python
- Resize and Reposition Shapes in PowerPoint in Python
- Reorder Shapes in PowerPoint in Python
Install Spire.Presentation for Python
This scenario requires Spire.Presentation for Python and plum-dispatch v1.7.4. They can be easily installed in your Windows through the following pip command.
pip install Spire.Presentation
If you are unsure how to install, please refer to this tutorial: How to Install Spire.Presentation for Python on Windows
Insert Shapes in PowerPoint in Python
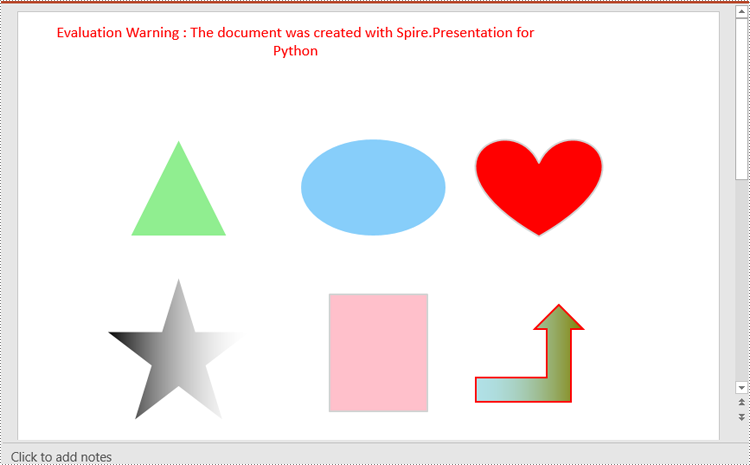
Spire.Presentation for Python enables you to add various types of shapes such as rectangles, circles, triangles, arrows, and eclipses to a PowerPoint slide by using the ISlide.Shapes.AppendShape() method.
Here are the steps to insert shapes in PowerPoint using Spire.Presentation for Python:
- Create an object of the Presentation class.
- Load a PowerPoint presentation using Presentation.LoadFromFile() method.
- Get a specific slide in the presentation using Presentation.Slides[index] property.
- Add various types of shapes to the slide using ISlide.Shapes.AppendShape() method and then set styles for the shapes.
- Save the resulting presentation using Presentation.SaveToFile() method.
- Python
from spire.presentation import *

# Create an object of the Presentation class
ppt = Presentation()

# Get the first slide
slide = ppt.Slides[0]

# Add a triangle shape to the slide
shape = slide.Shapes.AppendShape(ShapeType.Triangle, RectangleF.FromLTRB (115, 130, 215, 230))
shape.Fill.FillType = FillFormatType.Solid
shape.Fill.SolidColor.Color = Color.get_LightGreen()
shape.ShapeStyle.LineColor.Color = Color.get_White()

# Add an ellipse shape to the slide
shape = slide.Shapes.AppendShape(ShapeType.Ellipse, RectangleF.FromLTRB (290, 130, 440, 230))
shape.Fill.FillType = FillFormatType.Solid
shape.Fill.SolidColor.Color = Color.get_LightSkyBlue()
shape.ShapeStyle.LineColor.Color = Color.get_White()

# Add a heart shape to the slide
shape = slide.Shapes.AppendShape(ShapeType.Heart, RectangleF.FromLTRB (470, 130, 600, 230))
shape.Fill.FillType = FillFormatType.Solid
shape.Fill.SolidColor.Color = Color.get_Red()
shape.ShapeStyle.LineColor.Color = Color.get_LightGray()

# Add a five-pointed star shape to the slide
shape = slide.Shapes.AppendShape(ShapeType.FivePointedStar, RectangleF.FromLTRB (90, 270, 240, 420))
shape.Fill.FillType = FillFormatType.Gradient
shape.Fill.SolidColor.Color = Color.get_Black()
shape.ShapeStyle.LineColor.Color = Color.get_White()

# Add a rectangle shape to the slide
shape = slide.Shapes.AppendShape(ShapeType.Rectangle, RectangleF.FromLTRB (320, 290, 420, 410))
shape.Fill.FillType = FillFormatType.Solid
shape.Fill.SolidColor.Color = Color.get_Pink()
shape.ShapeStyle.LineColor.Color = Color.get_LightGray()

# Add an arrow shape to the slide
shape = slide.Shapes.AppendShape(ShapeType.BentUpArrow, RectangleF.FromLTRB (470, 300, 580, 400))
shape.Fill.FillType = FillFormatType.Gradient
shape.Fill.Gradient.GradientStops.AppendByKnownColors(1, KnownColors.Olive)
shape.Fill.Gradient.GradientStops.AppendByKnownColors(0, KnownColors.PowderBlue)
shape.ShapeStyle.LineColor.Color = Color.get_Red()

# Save the resulting presentation to a new file
ppt.SaveToFile("InsertShapes.pptx", FileFormat.Pptx2010)
ppt.Dispose()
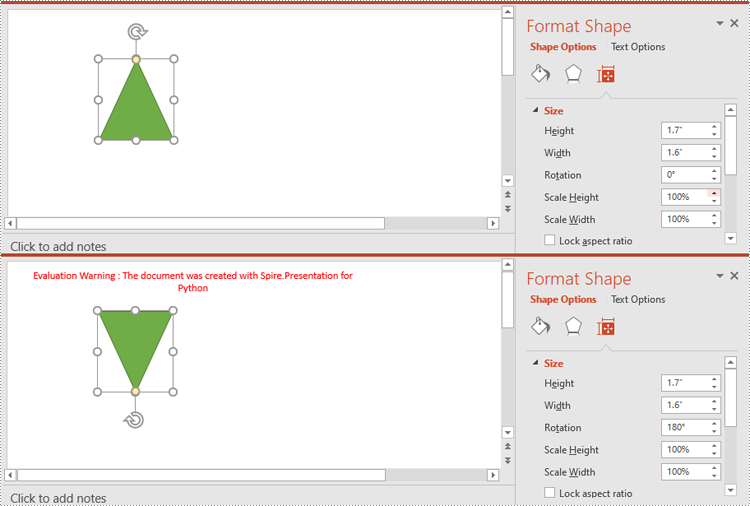
Rotate Shapes in PowerPoint in Python
The IShape.Rotation property in Spire.Presentation for Python is used to rotate a shape on a PowerPoint slide. Setting this property to a positive value will rotate the shape clockwise, while setting it to a negative value will rotate the shape counterclockwise.
Here are the steps to rotate a shape in PowerPoint using Spire.Presentation for Python:
- Create an object of the Presentation class.
- Load a PowerPoint presentation using Presentation.LoadFromFile() method.
- Get a specific slide in the presentation using Presentation.Slides[index] property.
- Get a specific shape on the slide using ISlide.Shapes[index] property.
- Rotate the shape by specific degrees using IShape.Rotation property.
- Save the resulting presentation using Presentation.SaveToFile() method.
- Python
from spire.presentation import *

# Create an object of the Presentation class
ppt = Presentation()
# Load a PowerPoint presentation
ppt.LoadFromFile("ShapeTemplate1.pptx")

# Get the first slide
slide = ppt.Slides[0]

# Get the first shape on the slide
shape = slide.Shapes[0] if isinstance(slide.Shapes[0], IAutoShape) else None

# Rotate the shape 180 degrees clockwise
shape.Rotation = 180

# Save the resulting presentation to a new file
ppt.SaveToFile("RotateShape.pptx", FileFormat.Pptx2016)
ppt.Dispose()
Resize and Reposition Shapes in PowerPoint in Python
The size and position of a shape can be reset through the IShape.Height, IShape.Width and IShape.Left, IShape.Top properties.
Here are the steps to reset the size and position of shapes in PowerPoint using Spire.Presentation for Python:
- Create an object of the Presentation class.
- Load a PowerPoint presentation using Presentation.LoadFromFile() method.
- Get the original slide height and width using Presentation.SlideSize.Size.Height and Presentation.SlideSize.Size.Width properties.
- Change the slide size using Presentation.SlideSize.Type property, and then get the new slide height and width.
- Calculate the ratio for resetting the size and position of the shapes based on the original and new slide heights and widths.
- Iterate through the slides in the presentation and the shapes on each slide.
- Reset the size and position of each shape based on the specified ratio using IShape.Height, IShape.Width, IShape.Left and IShape.Top properties.
- Save the resulting presentation using Presentation.SaveToFile() method.
- Python
from spire.presentation import *

# Create an object of the Presentation class
ppt = Presentation()
# Load a PowerPoint presentation
ppt.LoadFromFile("ShapeTemplate.pptx")

# Get the original slide height and width
currentHeight = ppt.SlideSize.Size.Height
currentWidth = ppt.SlideSize.Size.Width

# Change the slide size to A3
ppt.SlideSize.Type = SlideSizeType.A3

# Get the new slide height and width
newHeight = ppt.SlideSize.Size.Height
newWidth = ppt.SlideSize.Size.Width

# Calculate the ratio for resizing shapes based on the original and new slide heights and widths
ratioHeight = newHeight / currentHeight
ratioWidth = newWidth / currentWidth

# Iterate through the slides in the presentation
for slide in ppt.Slides:
    # Iterate through the shapes on the slide
    for shape in slide.Shapes:
        if isinstance(shape, IAutoShape):
            # Reset the size of the shape based on the specified ratio
            shape.Height = shape.Height * ratioHeight
            shape.Width = shape.Width * ratioWidth
            # Reset the position (x and y coordinates) of the shape based on the specified ratio
            shape.Top = shape.Top * ratioHeight
            shape.Left = shape.Left * ratioWidth

# Save the resulting presentation to a new file
ppt.SaveToFile("ResizeAndRepositionShapes.pptx", FileFormat.Pptx2016)
ppt.Dispose()

Reorder Shapes in PowerPoint in Python
The order in which shapes are arranged determines which shapes appear in front of or behind others. Using the ISlide.Shapes.ZOrder() method, you can easily change the order of multiple overlapping shapes on a PowerPoint slide.
Here are the steps to change the order of shapes in PowerPoint using Spire.Presentation for Python:
- Create an object of the Presentation class.
- Load a PowerPoint presentation using Presentation.LoadFromFile() method.
- Get a specific slide in the presentation using Presentation.Slides[index] property.
- Get a specific shape on the slide using ISlide.Shapes[index] property.
- Change the stacking order of the shape using ISlide.Shapes.ZOrder() method.
- Save the resulting presentation using Presentation.SaveToFile() method.
- Python
from spire.presentation import *

# Create an object of the Presentation class
ppt = Presentation()
# Load a PowerPoint presentation
ppt.LoadFromFile("ShapeTemplate3.pptx")

# Get the first slide
slide = ppt.Slides[0]

# Get the first shape on the slide
shape = slide.Shapes[0] if isinstance(slide.Shapes[0], IAutoShape) else None

# Change the stacking order of the shape
slide.Shapes.ZOrder(1, shape)

# Save the resulting presentation to a new file
ppt.SaveToFile("ReorderShapes.pptx", FileFormat.Pptx2016)
ppt.Dispose()
Apply for a Temporary License
If you'd like to remove the evaluation message from the generated documents, or to get rid of the function limitations, please request a 30-day trial license for yourself.
Python: Remove Images from Slides and Slide Masters in PowerPoint
2024-07-31 00:55:55 Written by KoohjiRemoving images from slides and slide masters can be essential for many reasons, such as decluttering slides, maintaining uniformity, preparing templates, or modifying a template. Using Python, you can easily handle this task in seconds.
This guide will demonstrate removing images from slides and slide masters in PowerPoint documents in Python with Spire.Presentation for Python. Check this page and make a clean presentation.
- Remove Images from Slides
- Remove Images from Slide Masters
- Remove Specified Images from Slides
- Remove Specified Images from Slide Masters
Install Spire.Presentation for Python
This scenario requires Spire.Presentation for Python and plum-dispatch v1.7.4. They can be easily installed in your Windows through the following pip command.
pip install Spire.Presentation
If you are unsure how to install it, please refer to this tutorial: How to Install Spire. Presentation for Python on Windows.
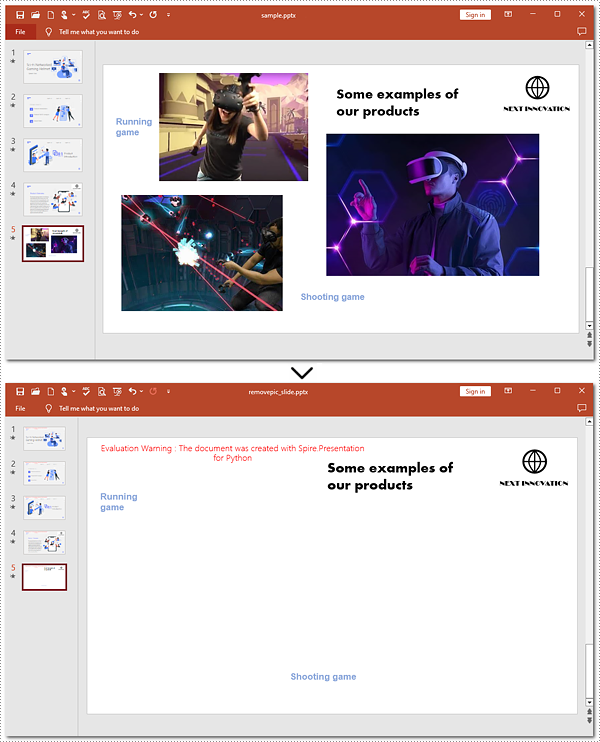
Remove Images from Slides of PowerPoint in Python
Removing images from PowerPoint slides can be efficiently managed using Python. The Presentation.Shapes.RemoveAt() method published by Spire. Presentation for Python allows users to delete pictures from a PowerPoint presentation without effort. The following instructions will guide you through the whole process.
Steps to remove images from a slide:
- Create an object for the Presentation class.
- Load the target PowerPoint document to be operated with the Presentation.LoadFromFile() method.
- Get the slide that you want to modify using the Presentation.Slides[] property.
- Loop through shapes on the slide.
- Determine if these shapes are images.
- Remove images from the slide using the Presentation.Shapes.RemoveAt() method.
- Save the resulting PowerPoint document with the Presentation.SaveToFile() method.
Here's the code example for reference:
- Python
from spire.presentation.common import *
from spire.presentation import *


# Create a Presentation object
ppt = Presentation()
# Load the PowerPoint document to be modified from the disk
ppt.LoadFromFile("sample.pptx")

# Get the fifth slide
slide = ppt.Slides[4]

# Loop through shapes on the slide
for i in range(slide.Shapes.Count - 1, -1, -1):
    # Check if those shapes are images
    if isinstance(slide.Shapes[i], SlidePicture):
        # Remove pictures on the fifth slide
        slide.Shapes.RemoveAt(i)


# Save to file
ppt.SaveToFile("removepic_slide.pptx", FileFormat.Pptx2013)

# Release the resources
ppt.Dispose()
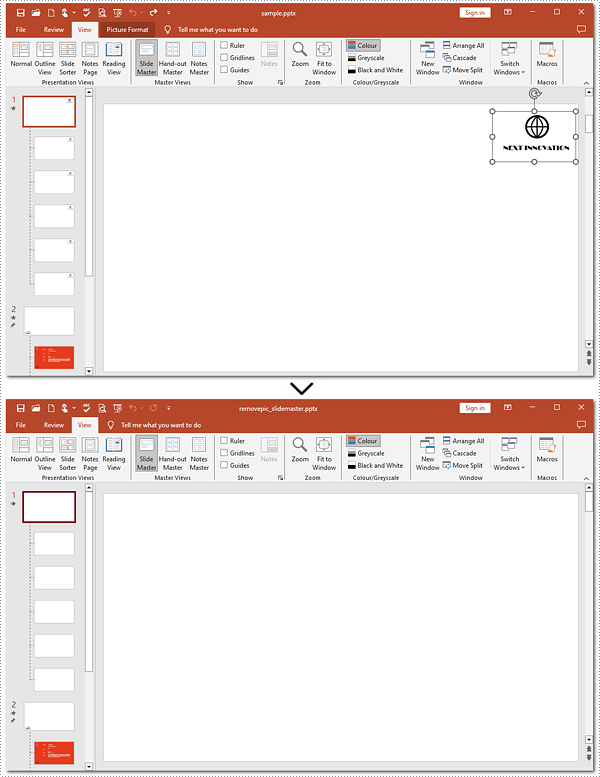
Remove Images from Slide Masters of PowerPoint Using Python
Removing images from slide masters is basically the same as doing that from a slide. To apply this action, you can use Presentation.Shapes.RemoveAt() method provided by Spire.Presentation for Python. Check out the steps below and make a nice and clean presentation.
Steps to remove images from Slide Masters:
- Instantiate a Presentation object.
- Read the PowerPoint document from disk using the Presentation.LoadFromFile() method.
- Get the second Slide Master with the Presentation.Masters[] property.
- Iterate through images on the second Slide Master.
- Confirm whether these shapes are images.
- Remove images from the second Slide Master using the Shapes.RemoveAt() method.
- Save the modified document with the Presentation.SaveToFile() method.
Here's the code example:
- Python
from spire.presentation.common import *
from spire.presentation import *


# Create an instance of the Presentation class
pre = Presentation()
# Open the sample PowerPoint document from the disk
pre.LoadFromFile("sample.pptx")

# Retrieve the first Slide Master
master = pre.Masters[0]

# Loop through shapes on the slide master
for i in range(master.Shapes.Count - 1, -1, -1):
    # Check whether these shapes are images
    if isinstance(master.Shapes[i], SlidePicture):
        # Remove images on the first slide master
        master.Shapes.RemoveAt(i)


# Save the generated file
pre.SaveToFile("removepic_slidemaster.pptx", FileFormat.Pptx2013)

# Release the resources
pre.Dispose()
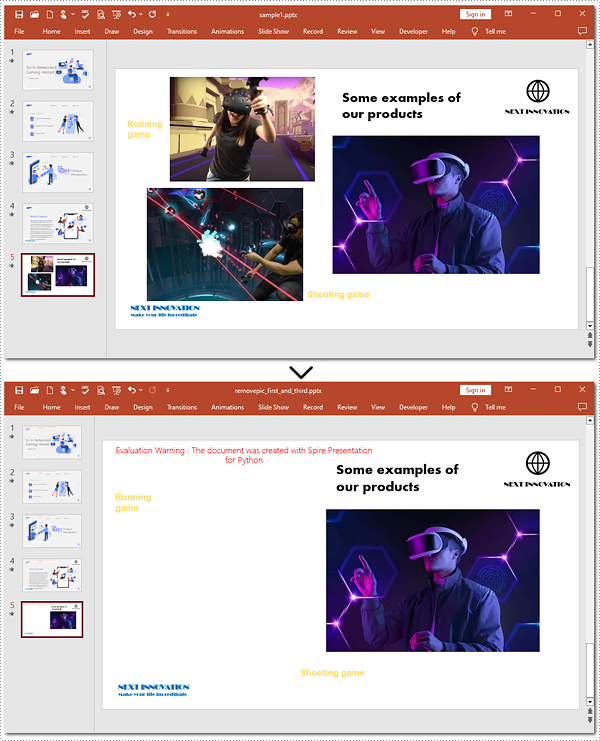
Delete Specified Images from Slides with Python
When working with PowerPoint presentations, you may need to remove specific images from your slides to refine your content. The guide below will walk you through targeting and removing specified images from a slide.
Steps to delete specified images:
- Instantiate an object of the Presentation class.
- Load the target file from the disk with the Presentation.LoadFromFile() method.
- Create a list to store image indexes.
- Get the 5th slide using the Presentation.Slides[] property.
- Loop through shapes on the slide.
- Verify whether these shapes are images.
- Find the 1st and 3rd pictures.
- Delete these two pictures by the Shapes.RemoveAt() method.
- Save the generated presentation using the Presentation.SaveToFile() method.
Below is the code example to refer to:
- Python
from spire.presentation.common import *
from spire.presentation import *


# Create a Presentation object
ppt = Presentation()
# Load the PowerPoint document from the disk
ppt.LoadFromFile("sample1.pptx")

# Create a list to keep track of image indexes to delete
indexes = []

# Get the fifth slide
slide = ppt.Slides[4]

# Iterate through shapes on the slide
image_index = 0
for i in range(slide.Shapes.Count - 1, -1, -1):
    # Check if shapes are pictures
    if isinstance(slide.Shapes[i], SlidePicture):
        image_index += 1
        # Record indexes of the first and third images
        if image_index in (1, 3):
            indexes.append(i)


# Remove the first and third images
for index in indexes:
    slide.Shapes.RemoveAt(index)

# Save to file
ppt.SaveToFile("removepic_first_and_third.pptx", FileFormat.Pptx2013)

# Release the resources
ppt.Dispose()
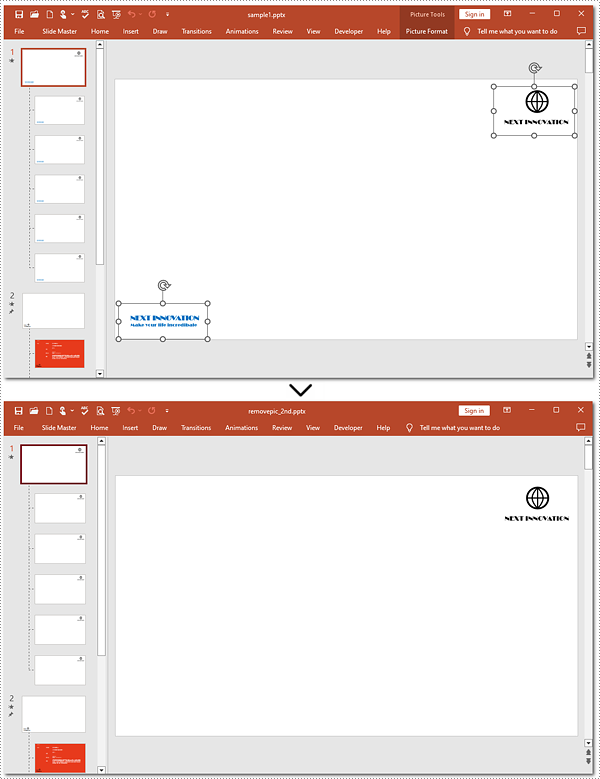
Delete Specified Images from Slide Masters in Python
Shapes.RemoveAt() method also supports removing a specified image from a slide master. To complete the task, you need to target the picture to be deleted. Refer to the detailed steps and a code example to finish the process.
Steps to remove a specified picture from a slide master:
- Create a new object for the Presentation class.
- Read the document from the disk using the Presentation.LoadFromFlie() method.
- Retrieve the 1st slide master by the Presentation.Masters[] property.
- Iterate through shapes on the slide master.
- Check if these shapes are images.
- Remove the 2nd picture with the Shapes.RemoveAt() method.
- Save the resulting presentation to the disk using the Presentation.SaveToFile() method.
Here is the code example:
- Python
from spire.presentation.common import *
from spire.presentation import *

# Create an instance of the Presentation class
pre = Presentation()
# Open the sample PowerPoint document from the disk
pre.LoadFromFile("sample1.pptx")

# Retrieve the first Slide Master
master = pre.Masters[0]

# Loop through the shapes in reverse order
for i in range(master.Shapes.Count - 1, -1, -1):
    # Check whether shapes are images
    if isinstance(master.Shapes[i], SlidePicture):
        # Remove the second image from the slide master
        if i == 1:
            master.Shapes.RemoveAt(i)
            break


# Save the generated file
pre.SaveToFile("removepic_2nd.pptx", FileFormat.Pptx2013)

# Release the resources
pre.Dispose()
Apply for a Temporary License
If you'd like to remove the evaluation message from the generated documents, or to get rid of the function limitations, please request a 30-day trial license for yourself.
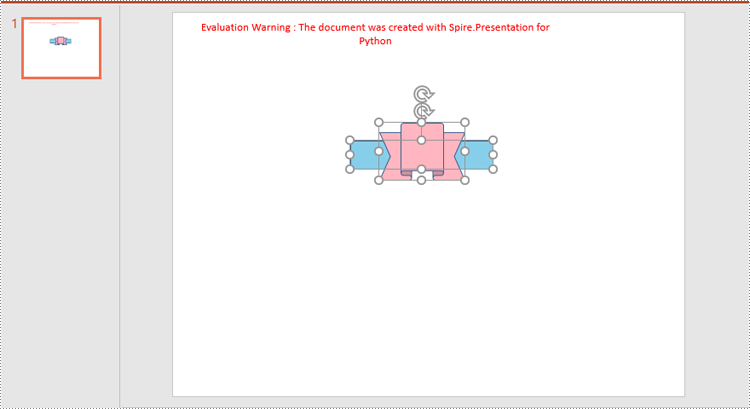
Grouping shapes in PowerPoint can greatly simplify the shape editing process, especially when dealing with complex arrangements of shapes. It allows you to modify the entire group collectively, saving time and effort compared to adjusting each shape individually. This is particularly beneficial when you need to apply consistent formatting or positioning to a set of shapes. Ungrouping shapes provides increased flexibility and customization options. By ungrouping a set of grouped shapes, you regain individual control over each shape. This allows you to make specific modifications, resize or reposition individual shapes, and apply unique formatting or styling as needed. In this article, we will explain how to group and ungroup shapes in PowerPoint in Python using Spire.Presentation for Python.
Install Spire.Presentation for Python
This scenario requires Spire.Presentation for Python and plum-dispatch v1.7.4. They can be easily installed in your Windows through the following pip command.
pip install Spire.Presentation
If you are unsure how to install, please refer to this tutorial: How to Install Spire.Presentation for Python on Windows
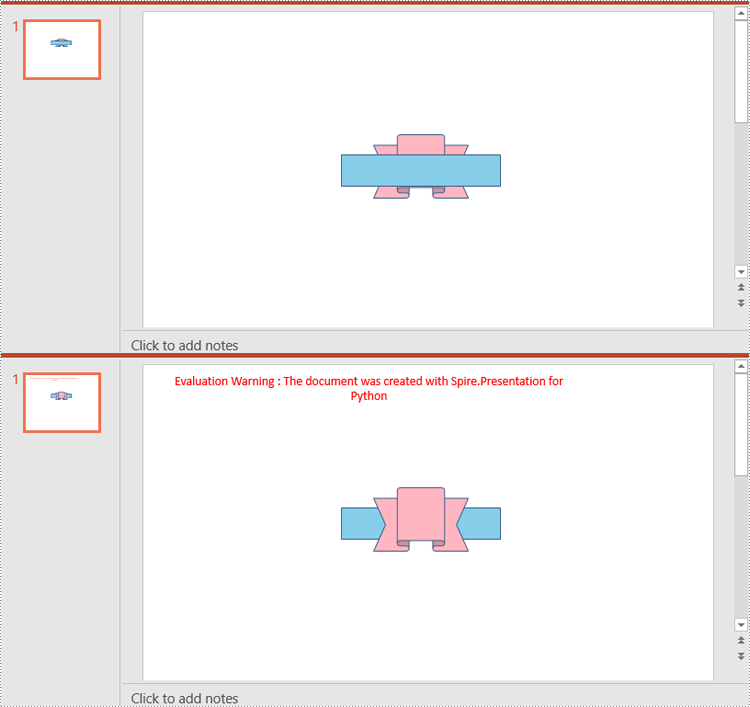
Group Shapes in PowerPoint in Python
Spire.Presentation for Python provides the ISlide.GroupShapes(shapeList: List) method to group two or more shapes on a specific slide. The detailed steps are as follows.
- Create an object of the Presentation class.
- Get the first slide using Presentation.Slides[0] property.
- Add two shapes to the slide using ISlide.Shapes.AppendShape() method.
- Create a list to store the shapes that need to be grouped.
- Add the two shapes to the list.
- Group the two shapes using ISlide.GroupShapes(shapeList: List) method.
- Save the result document using Presentation.SaveToFile() method.
- Python
from spire.presentation import *

# Create an object of the Presentation class
ppt = Presentation()
# Get the first slide
slide = ppt.Slides[0]

# Add two shapes to the slide
rectangle = slide.Shapes.AppendShape(ShapeType.Rectangle, RectangleF.FromLTRB (250, 180, 450, 220))
rectangle.Fill.FillType = FillFormatType.Solid
rectangle.Fill.SolidColor.KnownColor = KnownColors.SkyBlue

rectangle.Line.Width = 0.1
ribbon = slide.Shapes.AppendShape(ShapeType.Ribbon2, RectangleF.FromLTRB (290, 155, 410, 235))
ribbon.Fill.FillType = FillFormatType.Solid
ribbon.Fill.SolidColor.KnownColor = KnownColors.LightPink
ribbon.Line.Width = 0.1

# Add the two shapes to a list
shape_list = []
shape_list.append(rectangle)
shape_list.append(ribbon)

# Group the two shapes
slide.GroupShapes(shape_list)

# Save the resulting document
ppt.SaveToFile("GroupShapes.pptx", FileFormat.Pptx2013)
ppt.Dispose()
Ungroup Shapes in PowerPoint in Python
To ungroup the grouped shapes in a PowerPoint document, you need to iterate through all slides in the document and all shapes on each slide, find the grouped shapes and then ungroup them using ISlide.Ungroup(groupShape: GroupShape) method. The detailed steps are as follows.
- Create an object of the Presentation class.
- Load the PowerPoint document using Presentation.LoadFromFile() method.
- Iterate through all slides in the document.
- Iterate through all shapes on each slide.
- Check if the current shape is of GroupShape type. If the result is True, ungroup it using ISlide.Ungroup(groupShape: GroupShape) method.
- Save the result document using Presentation.SaveToFile() method.
- Python
from spire.presentation import *

# Create an object of the Presentation class
ppt = Presentation()
# Load a PowerPoint document
ppt.LoadFromFile("GroupShapes.pptx")

# Iterate through all slides in the document
for i in range(ppt.Slides.Count):
    slide = ppt.Slides[i]

    # Iterate through all shapes on each slide
    for j in range(slide.Shapes.Count):
        shape = slide.Shapes[j]

        # Check if the shape is a grouped shape
        if isinstance(shape, GroupShape):
            groupShape = shape
            # Ungroup the grouped shape
            slide.Ungroup(groupShape)

# Save the resulting document
ppt.SaveToFile("UngroupShapes.pptx", FileFormat.Pptx2013)
ppt.Dispose()
Apply for a Temporary License
If you'd like to remove the evaluation message from the generated documents, or to get rid of the function limitations, please request a 30-day trial license for yourself.
Images have the power to captivate audiences and enhance their understanding of your content. By adding relevant and visually appealing images to your PowerPoint presentations, you can effectively convey complex ideas and make your presentations more memorable and impactful. In this article, we will explain how to add images to PowerPoint presentations in Python using Spire.Presentation for Python.
Install Spire.Presentation for Python
This scenario requires Spire.Presentation for Python and plum-dispatch v1.7.4. They can be easily installed in your Windows through the following pip command.
pip install Spire.Presentation
If you are unsure how to install, please refer to this tutorial: How to Install Spire.Presentation for Python on Windows
Add an Image to a Slide in Python
Spire.Presentation for Python offers the ISlide.Shapes.AppendEmbedImageByPath() method to add an image to a specific slide. The detailed steps are as follows.
- Create an object of the Presentation class.
- Load a PowerPoint presentation using Presentation.LoadFromFile() method.
- Get a specific slide by its index through Presentation.Slides[index] property.
- Add an image to the slide using ISlide.Shapes.AppendEmbedImageByPath() method.
- Save the resulting presentation using Presentation.SaveToFile() method.
- Python
from spire.presentation.common import *
import math
from spire.presentation import *

inputFile = "Input.pptx"
outputFile = "AddImageToSlide.pptx"

# Create an object of the Presentation class
presentation = Presentation()
# Load a PowerPoint presentation
presentation.LoadFromFile(inputFile)

# Get the first slide
slide = presentation.Slides[0]

# Insert an image into the slide
imageFile = "Image.png"
left = math.trunc(presentation.SlideSize.Size.Width / float(2)) - 280
rect1 = RectangleF.FromLTRB (left, 140, 120 + left, 260)
image = slide.Shapes.AppendEmbedImageByPath (ShapeType.Rectangle, imageFile, rect1)
image.Line.FillType = FillFormatType.none

# Save the resulting presentation
presentation.SaveToFile(outputFile, FileFormat.Pptx2010)
presentation.Dispose()
Add an Image to a Slide Master in Python
A slide master is the top-level slide that governs the formatting and styling of all other slides within the presentation. When you make changes to the slide master, such as adding a logo, modifying the background or changing the font styles, those changes are automatically applied to all slides based on that slide master. If you want an image to appear on all your slides, you can add it to the slide master.
Spire.Presentation for Python offers the IMasterSlide.Shapes.AppendEmbedImageByPath() method to add an image to a slide master. The detailed steps are as follows.
- Create an object of the Presentation class.
- Load a PowerPoint presentation using Presentation.LoadFromFile() method.
- Get a specific slide master by its index through Presentation.Masters[index] property.
- Add an image to the slide master using IMasterSlide.Shapes.AppendEmbedImageByPath() method.
- Save the resulting presentation using Presentation.SaveToFile() method.
- Python
from spire.presentation.common import *
import math
from spire.presentation import *

inputFile = "Input1.pptx"
outputFile = "AddImageToSlideMaster.pptx"

# Create an object of the Presentation class
presentation = Presentation()
# Load a PowerPoint presentation
presentation.LoadFromFile(inputFile)

# Get the first slide master
master = presentation.Masters[0]

# Insert an image into the slide master
imageFile = "Logo.png"
rect1 = RectangleF.FromLTRB (40, 40, 80, 80)
image = master.Shapes.AppendEmbedImageByPath (ShapeType.Rectangle, imageFile, rect1)
image.Line.FillType = FillFormatType.none

# Save the resulting presentation
presentation.SaveToFile(outputFile, FileFormat.Pptx2010)
presentation.Dispose()

Apply for a Temporary License
If you'd like to remove the evaluation message from the generated documents, or to get rid of the function limitations, please request a 30-day trial license for yourself.
Extracting images from a PowerPoint presentation is necessary when you need to reuse them elsewhere. By doing so, you gain the flexibility to use these images outside the confines of the original presentation, thus maximizing their value in different projects. This article will demonstrate how to extract images from a PowerPoint document in Python using Spire.Presentation for Python.
Install Spire.Presentation for Python
This scenario requires Spire.Presentation for Python and plum-dispatch v1.7.4. They can be easily installed in your Windows through the following pip command.
pip install Spire.Presentation
If you are unsure how to install, please refer to this tutorial: How to Install Spire.Presentation for Python on Windows
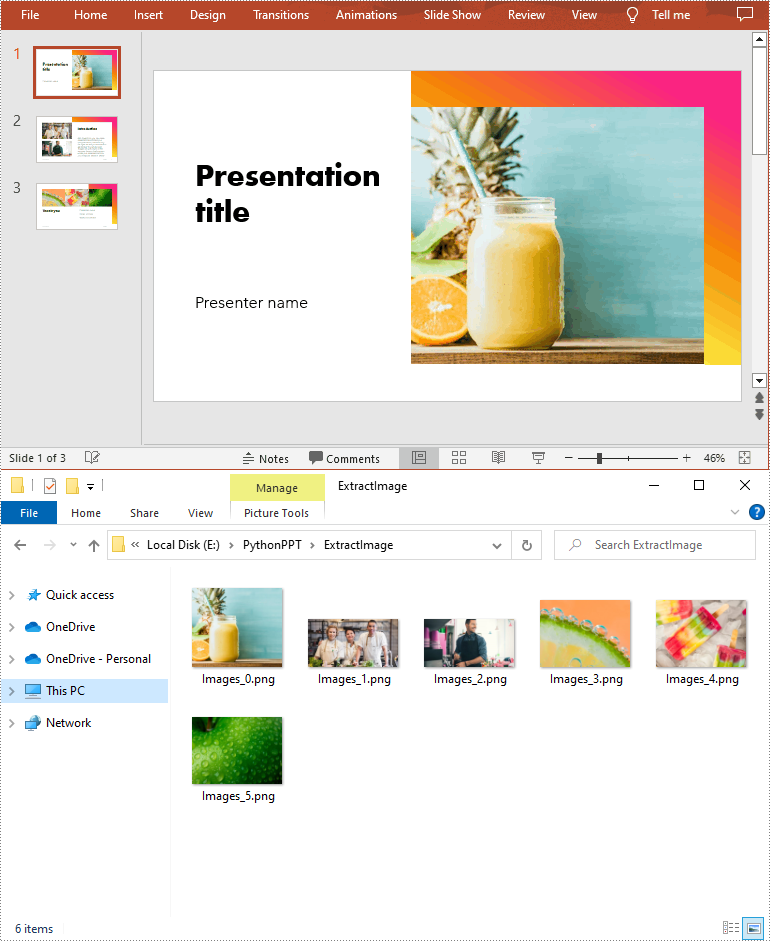
Extract Images from a PowerPoint Document in Python
To extract images from an entire PowerPoint presentation, you need to use the Presentation.Images property to get the collection of all the images in the presentation, then iterate through the elements in the collection and call IImageData.Image.Save() method to save each element to an image file. The following are the detailed steps:
- Create a Presentation instance.
- Load a PowerPoint document using Presentation.LoadFromFile() method.
- Get the collection of all the images in the document using Presentation.Images property.
- Iterate through the elements in the collection, and save each element as an image file using the IImageData.Image.Save() method.
- Python
from spire.presentation.common import *
from spire.presentation import *

# Create a Presentation instance
ppt = Presentation()

# Load a PowerPoint document
ppt.LoadFromFile("sample.pptx")

# Iterate through all images in the document
for i, image in enumerate(ppt.Images):

    # Extract the images
    ImageName = "ExtractImage/Images_"+str(i)+".png"
    image.Image.Save(ImageName)

ppt.Dispose()
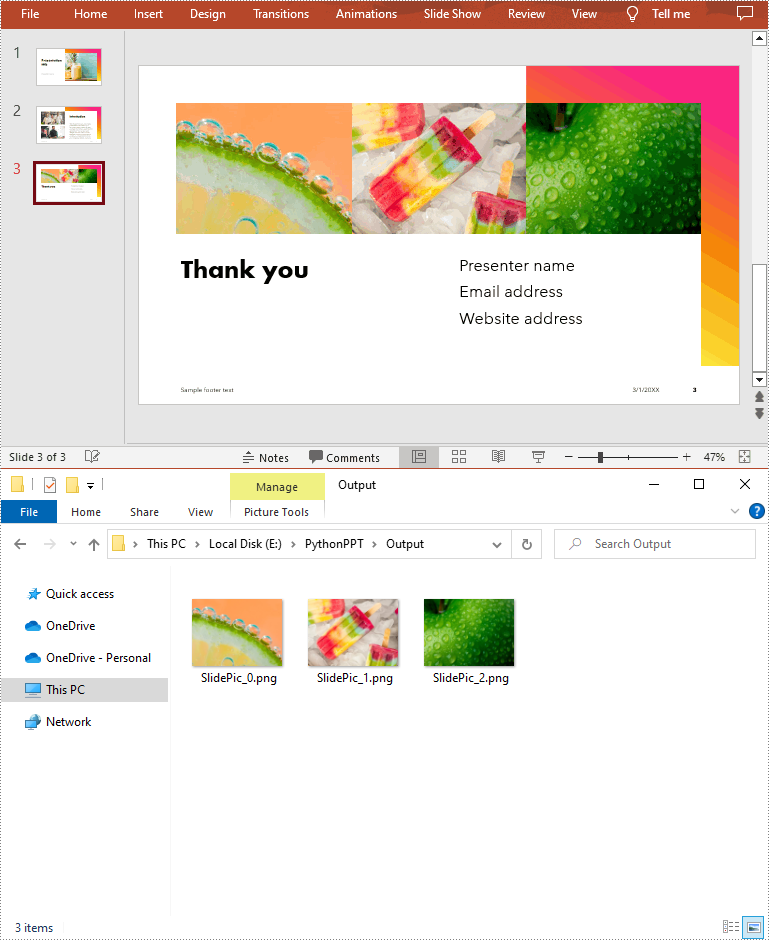
Extract Images from a Presentation Slide in Python
To extract images from a specific slide, you need to iterate through all shapes on the slide and find the shapes that are of SlidePicture or PictureShape type, then use the SlidePicture.PictureFill.Picture.EmbedImage.Image.Save() or PictureShape.EmbedImage.Image.Save() method to save the images to image files. The following are the detailed steps:
- Create a Presentation instance.
- Load a PowerPoint document using Presentation.LoadFromFile() method.
- Get a specified slide using Presentation.Slides[int] property.
- Iterate through all shapes on the slide.
- Determine whether the shapes are of SlidePicture or PictureShape type. If so, save the images to image files using SlidePicture.PictureFill.Picture.EmbedImage.Image.Save() or PictureShape.EmbedImage.Image.Save() method.
- Python
from spire.presentation.common import *
from spire.presentation import *

# Create a Presentation instance
ppt = Presentation()

# Load a PowerPoint document
ppt.LoadFromFile("sample.pptx")

# Get a specified slide
slide = ppt.Slides[2]

i = 0
#Traverse all shapes in the slide
for s in slide.Shapes:

    # Determine if the shape is of SlidePicture type
    if isinstance(s, SlidePicture):

        # If yes, then extract the image
        ps = s if isinstance(s, SlidePicture) else None
        ps.PictureFill.Picture.EmbedImage.Image.Save("Output/SlidePic_"+str(i)+".png")
        i += 1

    # Determine if the shape is of PictureShape type
    if isinstance(s, PictureShape):

        # If yes, then extract the image
        ps = s if isinstance(s, PictureShape) else None
        ps.EmbedImage.Image.Save("Output/SlidePic_"+str(i)+".png")
        i += 1

ppt.Dispose()
Apply for a Temporary License
If you'd like to remove the evaluation message from the generated documents, or to get rid of the function limitations, please request a 30-day trial license for yourself.
