
Spire.Doc for Python (103)
Word documents leverage Content Control technology to infuse dynamic vitality into document content, offering users enhanced flexibility and convenience when editing and managing documents. These controls, serving as interactive elements, empower users to freely add, remove, or adjust specified content sections while preserving the integrity of the document structure, thereby facilitating agile iterations and personalized customization of document content. This article will guide you how to use Spire.Doc for Python to modify content controls in Word documents within a Python project.
- Modify Content Controls in the Body using Python
- Modify Content Controls within Paragraphs using Python
- Modify Content Controls Wrapping Table Rows using Python
- Modify Content Controls Wrapping Table Cells using Python
- Modify Content Controls within Table Cells using Python
Install Spire.Doc for Python
This scenario requires Spire.Doc for Python and plum-dispatch v1.7.4. They can be easily installed in your VS Code through the following pip command.
pip install Spire.Doc
If you are unsure how to install, please refer to this tutorial: How to Install Spire.Doc for Python on Windows
Modify Content Controls in the Body using Python
In Spire.Doc, the object type for the body content control is StructureDocumentTag. To modify these controls, one needs to traverse the Section.Body.ChildObjects collection to locate objects of type StructureDocumentTag. Below are the detailed steps:
- Create a Document object.
- Use the Document.LoadFromFile() method to load a Word document into memory.
- Retrieve the body of a section in the document using Section.Body.
- Traverse the collection of child objects within Body.ChildObjects, identifying those that are of type StructureDocumentTag.
- Within the StructureDocumentTag.ChildObjects sub-collection, perform modifications based on the type of each child object.
- Finally, utilize the Document.SaveToFile() method to save the changes back to the Word document.
- Python
from spire.doc import *
from spire.doc.common import *
# Create a new document object
doc = Document()
# Load the document content from a file
doc.LoadFromFile("Sample1.docx")
# Get the body of the document
body = doc.Sections.get_Item(0).Body
# Create lists for paragraphs and tables
paragraphs = []
tables = []
for i in range(body.ChildObjects.Count):
obj = body.ChildObjects.get_Item(i)
# If it is a StructureDocumentTag object
if obj.DocumentObjectType == DocumentObjectType.StructureDocumentTag:
sdt = (StructureDocumentTag)(obj)
# If the tag is "c1" or the alias is "c1"
if sdt.SDTProperties.Tag == "c1" or sdt.SDTProperties.Alias == "c1":
for j in range(sdt.ChildObjects.Count):
child_obj = sdt.ChildObjects.get_Item(j)
# If it is a paragraph object
if child_obj.DocumentObjectType == DocumentObjectType.Paragraph:
paragraphs.append(child_obj)
# If it is a table object
elif child_obj.DocumentObjectType == DocumentObjectType.Table:
tables.append(child_obj)
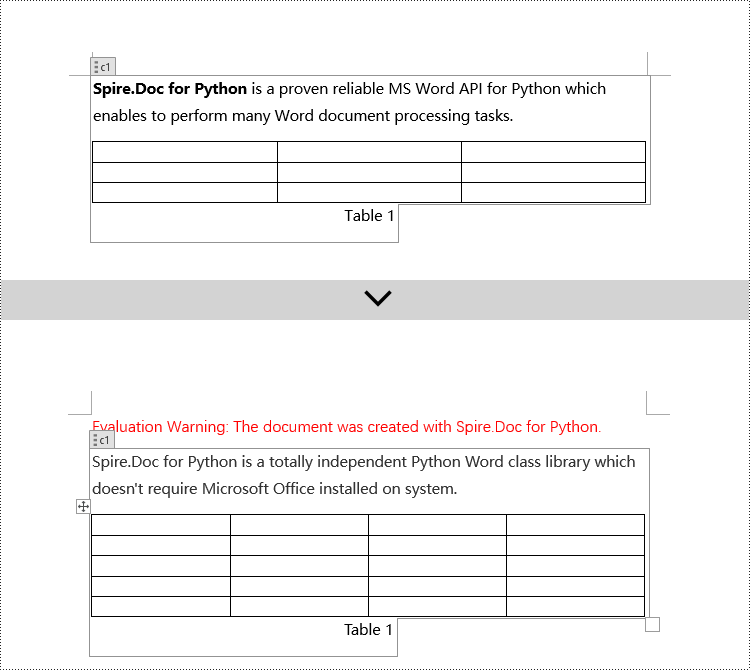
# Modify the text content of the first paragraph
if paragraphs:
(Paragraph)(paragraphs[0]).Text = "Spire.Doc for Python is a totally independent Python Word class library which doesn't require Microsoft Office installed on system."
if tables:
# Reset the cells of the first table
(Table)(tables[0]).ResetCells(5, 4)
# Save the modified document to a file
doc.SaveToFile("ModifyBodyContentControls.docx", FileFormat.Docx2016)
# Release document resources
doc.Close()
doc.Dispose()
Modify Content Controls within Paragraphs using Python
In Spire.Doc, the object type for content controls within paragraphs is StructureDocumentTagInline. To modify these, you would traverse the Paragraph.ChildObjects collection to locate objects of type StructureDocumentTagInline. Here are the detailed steps:
- Instantiate a Document object.
- Load a Word document using the Document.LoadFromFile() method.
- Get the body of a section in the document via Section.Body.
- Retrieve the first paragraph of the text body using Body.Paragraphs.get_Item(0).
- Traverse the collection of child objects within Paragraph.ChildObjects, identifying those that are of type StructureDocumentTagInline.
- Within the StructureDocumentTagInline.ChildObjects sub-collection, execute modification operations according to the type of each child object.
- Save the changes back to the Word document using the Document.SaveToFile() method.
- Python
from spire.doc import *
from spire.doc.common import *
# Create a new Document object
doc = Document()
# Load document content from a file
doc.LoadFromFile("Sample2.docx")
# Get the body of the document
body = doc.Sections.get_Item(0).Body
# Get the first paragraph in the body
paragraph = body.Paragraphs.get_Item(0)
# Iterate through child objects in the paragraph
for i in range(paragraph.ChildObjects.Count):
obj = paragraph.ChildObjects.get_Item(i)
# Check if the child object is StructureDocumentTagInline
if obj.DocumentObjectType == DocumentObjectType.StructureDocumentTagInline:
# Convert the child object to StructureDocumentTagInline type
structure_document_tag_inline = (StructureDocumentTagInline)(obj)
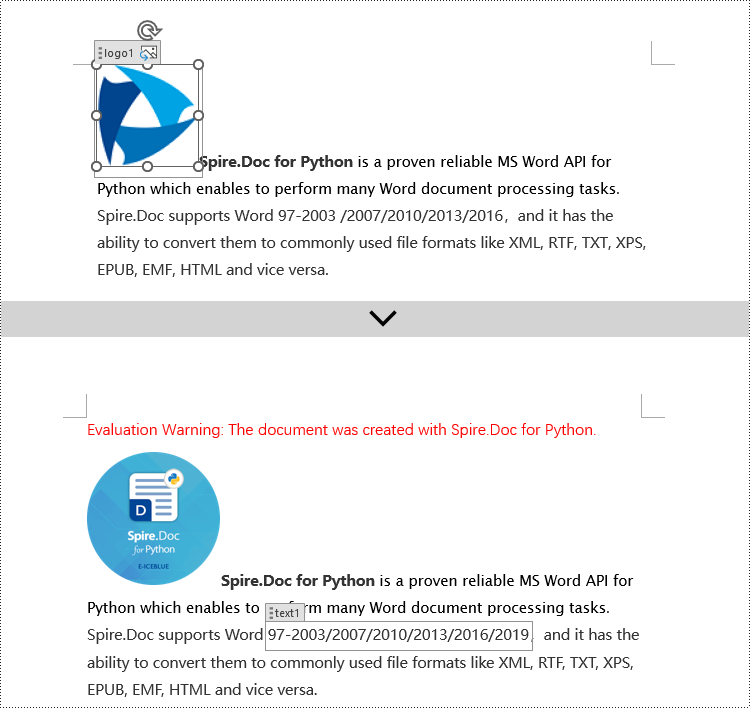
# Check if the Tag or Alias property is "text1"
if structure_document_tag_inline.SDTProperties.Tag == "text1":
# Iterate through child objects in the StructureDocumentTagInline object
for j in range(structure_document_tag_inline.ChildObjects.Count):
obj2 = structure_document_tag_inline.ChildObjects.get_Item(j)
# Check if the child object is a TextRange object
if obj2.DocumentObjectType == DocumentObjectType.TextRange:
# Convert the child object to TextRange type
range = (TextRange)(obj2)
# Set the text content to a specified content
range.Text = "97-2003/2007/2010/2013/2016/2019"
# Check if the Tag or Alias property is "logo1"
if structure_document_tag_inline.SDTProperties.Tag == "logo1":
# Iterate through child objects in the StructureDocumentTagInline object
for j in range(structure_document_tag_inline.ChildObjects.Count):
obj2 = structure_document_tag_inline.ChildObjects.get_Item(j)
# Check if the child object is an image
if obj2.DocumentObjectType == DocumentObjectType.Picture:
# Convert the child object to DocPicture type
doc_picture = (DocPicture)(obj2)
# Load a specified image
doc_picture.LoadImage("DOC-Python.png")
# Set the width and height of the image
doc_picture.Width = 100
doc_picture.Height = 100
# Save the modified document to a new file
doc.SaveToFile("ModifiedContentControlsInParagraph.docx", FileFormat.Docx2016)
# Release resources of the Document object
doc.Close()
doc.Dispose()
Modify Content Controls Wrapping Table Rows using Python
In Spire.Doc, the object type for content controls within table rows is StructureDocumentTagRow. To modify these controls, you need to traverse the Table.ChildObjects collection to find objects of type StructureDocumentTagRow. Here are the detailed steps:
- Create a Document object.
- Load a Word document using the Document.LoadFromFile() method.
- Retrieve the body of a section within the document using Section.Body.
- Obtain the first table in the text body via Body.Tables.get_Item(0).
- Traverse the collection of child objects within Table.ChildObjects, identifying those that are of type StructureDocumentTagRow.
- Access StructureDocumentTagRow.Cells collection to iterate through the cells within this controlled row, and then execute the appropriate modification actions on the cell contents.
- Lastly, use the Document.SaveToFile() method to persist the changes made to the document.
- Python
from spire.doc import *
from spire.doc.common import *
# Create a new document object
doc = Document()
# Load the document from a file
doc.LoadFromFile("Sample3.docx")
# Get the body of the document
body = doc.Sections.get_Item(0).Body
# Get the first table
table = body.Tables.get_Item(0)
# Iterate through the child objects in the table
for i in range(table.ChildObjects.Count):
obj = table.ChildObjects.get_Item(i)
# Check if the child object is of type StructureDocumentTagRow
if obj.DocumentObjectType == DocumentObjectType.StructureDocumentTagRow:
# Convert the child object to a StructureDocumentTagRow object
structureDocumentTagRow = (StructureDocumentTagRow)(obj)
# Check if the Tag or Alias property of the StructureDocumentTagRow is "row1"
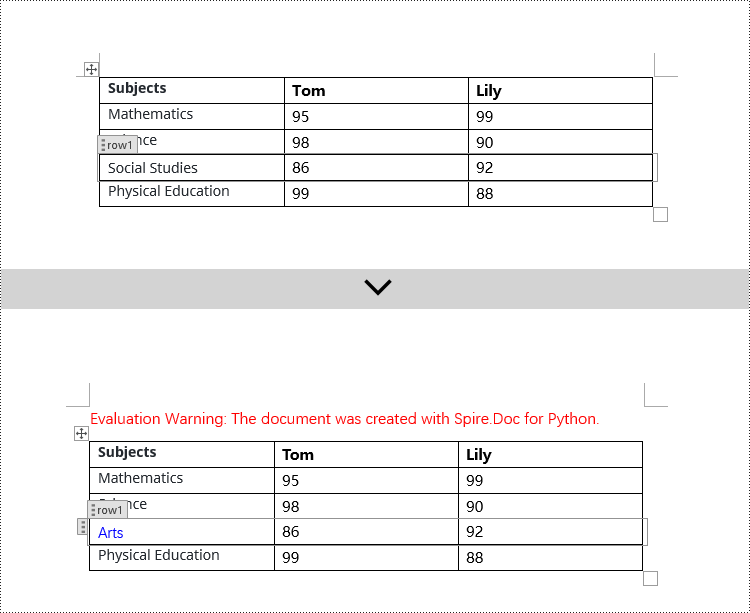
if structureDocumentTagRow.SDTProperties.Tag == "row1":
# Clear the paragraphs in the cell
structureDocumentTagRow.Cells.get_Item(0).Paragraphs.Clear()
# Add a paragraph in the cell and set the text
textRange = structureDocumentTagRow.Cells.get_Item(0).AddParagraph().AppendText("Arts")
textRange.CharacterFormat.TextColor = Color.get_Blue()
# Save the modified document to a file
doc.SaveToFile("ModifiedTableRowContentControl.docx", FileFormat.Docx2016)
# Release document resources
doc.Close()
doc.Dispose()
Modify Content Controls Wrapping Table Cells using Python
In Spire.Doc, the object type for content controls within table cells is StructureDocumentTagCell. To manipulate these controls, you need to traverse the TableRow.ChildObjects collection to locate objects of type StructureDocumentTagCell. Here are the detailed steps:
- Create a Document object.
- Load a Word document using the Document.LoadFromFile() method.
- Retrieve the body of a section in the document using Section.Body.
- Obtain the first table in the body using Body.Tables.get_Item(0).
- Traverse the collection of rows in the table.
- Within each TableRow, traverse its child objects TableRow.ChildObjects to identify those of type StructureDocumentTagCell.
- Access StructureDocumentTagCell.Paragraphs collection. This allows you to iterate through the paragraphs within the cell and apply the necessary modification operations to the content.
- Finally, use the Document.SaveToFile() method to save the modified document.
- Python
from spire.doc import *
from spire.doc.common import *
# Create a new document object
doc = Document()
# Load the document from a file
doc.LoadFromFile("Sample4.docx")
# Get the body of the document
body = doc.Sections.get_Item(0).Body
# Get the first table in the document
table = body.Tables.get_Item(0)
# Iterate through the rows of the table
for i in range(table.Rows.Count):
row = table.Rows.get_Item(i)
# Iterate through the child objects in each row
for j in range(row.ChildObjects.Count):
obj = row.ChildObjects.get_Item(j)
# Check if the child object is a StructureDocumentTagCell
if obj.DocumentObjectType == DocumentObjectType.StructureDocumentTagCell:
# Convert the child object to StructureDocumentTagCell type
structureDocumentTagCell = (StructureDocumentTagCell)(obj)
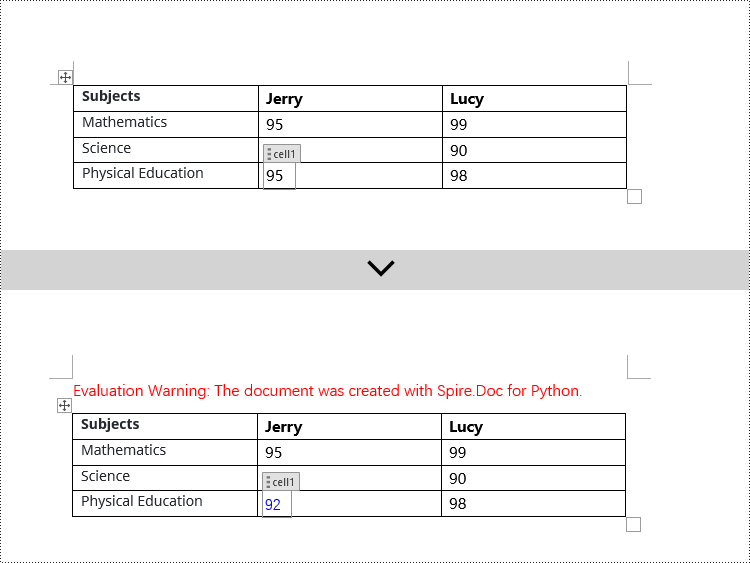
# Check if the Tag or Alias property of structureDocumentTagCell is "cell1"
if structureDocumentTagCell.SDTProperties.Tag == "cell1":
# Clear the paragraphs in the cell
structureDocumentTagCell.Paragraphs.Clear()
# Add a new paragraph and add text to it
textRange = structureDocumentTagCell.AddParagraph().AppendText("92")
textRange.CharacterFormat.TextColor = Color.get_Blue()
# Save the modified document to a new file
doc.SaveToFile("ModifiedTableCellContentControl.docx", FileFormat.Docx2016)
# Dispose of the document object
doc.Close()
doc.Dispose()
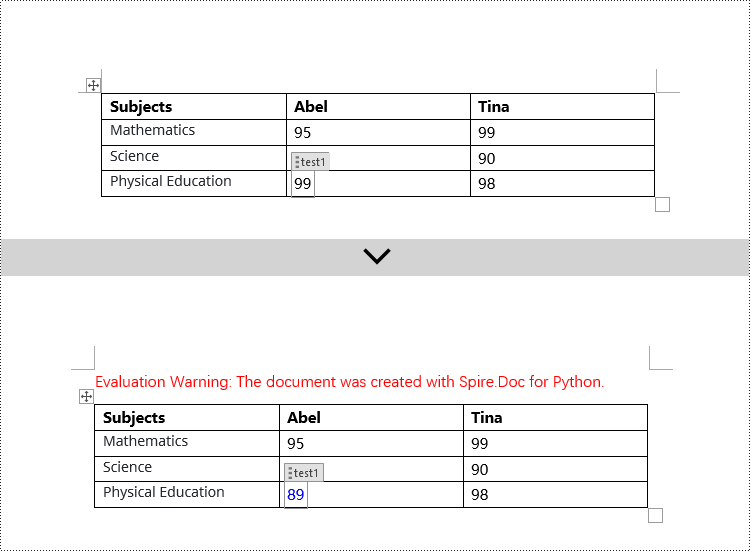
Modify Content Controls within Table Cells using Python
This case demonstrates modifying content controls within paragraphs inside table cells. The process involves navigating to the paragraph collection TableCell.Paragraphs within each cell, then iterating through each paragraph's child objects (Paragraph.ChildObjects) to locate StructureDocumentTagInline objects for modification. Here are the detailed steps:
- Initiate a Document instance.
- Use the Document.LoadFromFile() method to load a Word document.
- Retrieve the body of a section in the document with Section.Body.
- Obtain the first table in the body via Body.Tables.get_Item(0).
- Traverse the table rows collection (Table.Rows), engaging with each TableRow object.
- For each TableRow, navigate its cells collection (TableRow.Cells), entering each TableCell object.
- Within each TableCell, traverse its paragraph collection (TableCell.Paragraphs), examining each Paragraph object.
- In each paragraph, traverse its child objects (Paragraph.ChildObjects), identifying StructureDocumentTagInline instances for modification.
- Within the StructureDocumentTagInline.ChildObjects collection, apply the appropriate edits based on the type of each child object.
- Finally, utilize Document.SaveToFile() to commit the changes to the document.
- Python
from spire.doc import *
from spire.doc.common import *

 # Create a new Document object
doc = Document()

# Load document content from file
doc.LoadFromFile("Sample5.docx")

# Get the body of the document
body = doc.Sections.get_Item(0).Body

# Get the first table
table = body.Tables.get_Item(0)

# Iterate through the rows of the table
for r in range(table.Rows.Count):
    row = table.Rows.get_Item(r)
    for c in range(row.Cells.Count):
        cell = row.Cells.get_Item(c)
        for p in range(cell.Paragraphs.Count):
            paragraph = cell.Paragraphs.get_Item(p)
            for i in range(paragraph.ChildObjects.Count):
                obj = paragraph.ChildObjects.get_Item(i)

                # Check if the child object is of type StructureDocumentTagInline
                if obj.DocumentObjectType == DocumentObjectType.StructureDocumentTagInline:

                    # Convert to StructureDocumentTagInline object
                    structure_document_tag_inline = (StructureDocumentTagInline)(obj)

                    # Check if the Tag or Alias property of StructureDocumentTagInline is "test1"
                    if structure_document_tag_inline.SDTProperties.Tag == "test1":

                        # Iterate through the child objects of StructureDocumentTagInline
                        for j in range(structure_document_tag_inline.ChildObjects.Count):
                            obj2 = structure_document_tag_inline.ChildObjects.get_Item(j)

                            # Check if the child object is of type TextRange
                            if obj2.DocumentObjectType == DocumentObjectType.TextRange:

                                # Convert to TextRange object
                                textRange = (TextRange)(obj2)

                                # Set the text content
                                textRange.Text = "89"

                                # Set text color
                                textRange.CharacterFormat.TextColor = Color.get_Blue()

# Save the modified document to a new file
doc.SaveToFile("ModifiedContentControlInParagraphOfTableCell.docx", FileFormat.Docx2016)

# Dispose of the Document object resources
doc.Close()
doc.Dispose()
Apply for a Temporary License
If you'd like to remove the evaluation message from the generated documents, or to get rid of the function limitations, please request a 30-day trial license for yourself.
Python: Create a Table Of Contents for a Newly Created Word Document
2024-05-31 01:00:34 Written by KoohjiCreating a table of contents in a Word document significantly enhances its navigability and readability. It serves as a road map for the document, enabling readers to quickly overview the structure and grasp the content framework. This feature facilitates easy navigation for users to jump to any section within the document, which is particularly valuable for lengthy reports, papers, or manuals. It not only saves readers time in locating information but also augments the professionalism of the document and enhances the user experience. Moreover, a table of contents is easy to maintain and update; following any restructuring of the document, it can be swiftly revised to reflect the latest content organization, ensuring coherence and accuracy throughout the document. This article will demonstrate how to use Spire.Doc for Python to create a table of contents in a newly created Word document within a Python project.
- Python Create a Table Of Contents Using Heading Styles
- Python Create a Table Of Contents Using Outline Level Styles
- Python Create a Table Of Contents Using Image Captions
- Python Create a Table Of Contents Using Table Captions
Install Spire.Doc for Python
This scenario requires Spire.Doc for Python and plum-dispatch v1.7.4. They can be easily installed in your Windows through the following pip command.
pip install Spire.Doc
If you are unsure how to install, please refer to: How to Install Spire.Doc for Python on Windows
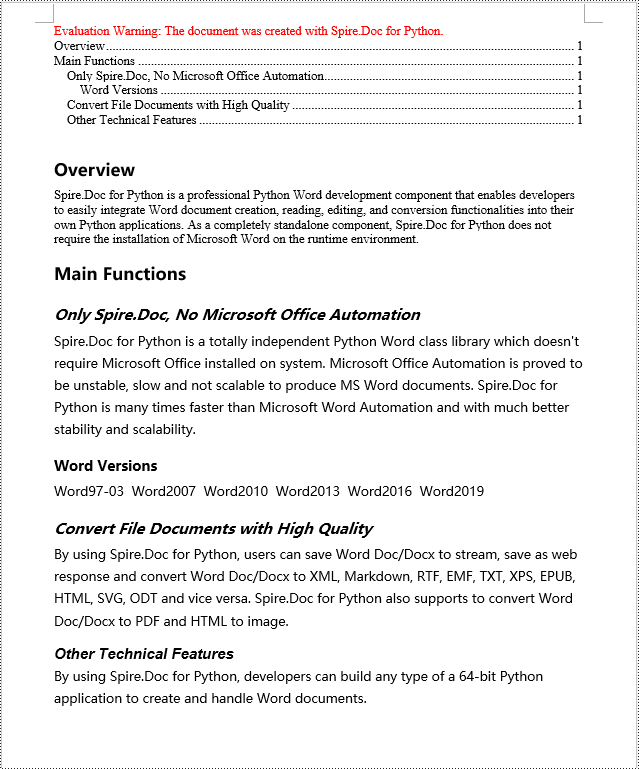
Python Create a Table Of Contents Using Heading Styles
Creating a table of contents using heading styles is a default method in Word documents to automatically generate a table of contents by utilizing different levels of heading styles to mark titles and sub-titles within the document, followed by leveraging Word's table of contents feature to automatically populate the contents. Here are the detailed steps:
- Create a Document object.
- Add a section using the Document.AddSection() method.
- Add a paragraph using the Section.AddParagraph() method.
- Create a table of contents object using the Paragraph.AppendTOC(int lowerLevel, int upperLevel) method.
- Create a CharacterFormat object and set the font.
- Apply a heading style to the paragraph using the Paragraph.ApplyStyle(BuiltinStyle.Heading1) method.
- Add text content using the Paragraph.AppendText() method.
- Apply character formatting to the text using the TextRange.ApplyCharacterFormat() method.
- Update the table of contents using the Document.UpdateTableOfContents() method.
- Save the document using the Document.SaveToFile() method.
- Python
from spire.doc import *
from spire.doc.common import *

# Create a new document object
doc = Document()

# Add a section to the document
section = doc.AddSection()

# Append a Table of Contents (TOC) paragraph
TOC_paragraph = section.AddParagraph()
TOC_paragraph.AppendTOC(1, 3)

# Create and set character format objects for font
character_format1 = CharacterFormat(doc)
character_format1.FontName = "Microsoft YaHei"

character_format2 = CharacterFormat(doc)
character_format2.FontName = "Microsoft YaHei"
character_format2.FontSize = 12

# Add a paragraph with Heading 1 style
paragraph = section.Body.AddParagraph()
paragraph.ApplyStyle(BuiltinStyle.Heading1)

# Add text and apply character formatting
text_range1 = paragraph.AppendText("Overview")
text_range1.ApplyCharacterFormat(character_format1)

# Insert normal content
paragraph = section.Body.AddParagraph()
text_range2 = paragraph.AppendText("Spire.Doc for Python is a professional Python Word development component that enables developers to easily integrate Word document creation, reading, editing, and conversion functionalities into their own Python applications. As a completely standalone component, Spire.Doc for Python does not require the installation of Microsoft Word on the runtime environment.")

# Add a paragraph with Heading 1 style
paragraph = section.Body.AddParagraph()
paragraph.ApplyStyle(BuiltinStyle.Heading1)
text_range1 = paragraph.AppendText("Main Functions")
text_range1.ApplyCharacterFormat(character_format1)

# Add a paragraph with Heading 2 style
paragraph = section.Body.AddParagraph()
paragraph.ApplyStyle(BuiltinStyle.Heading2)
textRange1 = paragraph.AppendText("Only Spire.Doc, No Microsoft Office Automation")
textRange1.ApplyCharacterFormat(character_format1)

# Add regular content
paragraph = section.Body.AddParagraph()
textRange2 = paragraph.AppendText("Spire.Doc for Python is a totally independent Python Word class library which doesn't require Microsoft Office installed on system. Microsoft Office Automation is proved to be unstable, slow and not scalable to produce MS Word documents. Spire.Doc for Python is many times faster than Microsoft Word Automation and with much better stability and scalability.")
textRange2.ApplyCharacterFormat(character_format2)

# Add a paragraph with Heading 3 style
paragraph = section.Body.AddParagraph()
paragraph.ApplyStyle(BuiltinStyle.Heading3)
textRange1 = paragraph.AppendText("Word Versions")
textRange1.ApplyCharacterFormat(character_format1)
paragraph = section.Body.AddParagraph()
textRange2 = paragraph.AppendText("Word97-03  Word2007  Word2010  Word2013  Word2016  Word2019")
textRange2.ApplyCharacterFormat(character_format2)

# Add a paragraph with Heading 2 style
paragraph = section.Body.AddParagraph()
paragraph.ApplyStyle(BuiltinStyle.Heading2)
textRange1 = paragraph.AppendText("Convert File Documents with High Quality")
textRange1.ApplyCharacterFormat(character_format1)

# Add regular content
paragraph = section.Body.AddParagraph()
textRange2 = paragraph.AppendText("By using Spire.Doc for Python, users can save Word Doc/Docx to stream, save as web response and convert Word Doc/Docx to XML, Markdown, RTF, EMF, TXT, XPS, EPUB, HTML, SVG, ODT and vice versa. Spire.Doc for Python also supports to convert Word Doc/Docx to PDF and HTML to image.")
textRange2.ApplyCharacterFormat(character_format2)

# Add a paragraph with Heading 2 style
paragraph = section.Body.AddParagraph()
paragraph.ApplyStyle(BuiltinStyle.Heading2)
extRange1 = paragraph.AppendText("Other Technical Features")
textRange1.ApplyCharacterFormat(character_format1)

# Add regular content
paragraph = section.Body.AddParagraph()
textRange2 = paragraph.AppendText("By using Spire.Doc for Python, developers can build any type of a 64-bit Python application to create and handle Word documents.")
textRange2.ApplyCharacterFormat(character_format2)

# Update the table of contents
doc.UpdateTableOfContents()

# Save the document
doc.SaveToFile("CreateTOCUsingHeadingStyles.docx", FileFormat.Docx2016)

# Release resources
doc.Dispose()
Python Create a Table Of Contents Using Outline Level Styles
In a Word document, you can create a table of contents using outline level styles. You can assign an outline level to a paragraph using the ParagraphFormat.OutlineLevel property. Afterwards, you apply these outline levels to the rules for generating the table of contents using the TableOfContent.SetTOCLevelStyle() method. Here's a detailed steps:
- Create a Document object.
- Add a section using the Document.AddSection() method.
- Create a ParagraphStyle object and set the outline level using ParagraphStyle.ParagraphFormat.OutlineLevel = OutlineLevel.Level1.
- Add the created ParagraphStyle object to the document using the Document.Styles.Add() method.
- Add a paragraph using the Section.AddParagraph() method.
- Create a table of contents object using the Paragraph.AppendTOC(int lowerLevel, int upperLevel) method.
- Set the default setting for creating the table of contents with heading styles to False, TableOfContent.UseHeadingStyles = false.
- Apply the outline level style to the table of contents rules using the TableOfContent.SetTOCLevelStyle(int levelNumber, string styleName) method.
- Create a CharacterFormat object and set the font.
- Apply the style to the paragraph using the Paragraph.ApplyStyle(ParagraphStyle.Name) method.
- Add text content using the Paragraph.AppendText() method.
- Apply character formatting to the text using the TextRange.ApplyCharacterFormat() method.
- Update the table of contents using the Document.UpdateTableOfContents() method.
- Save the document using the Document.SaveToFile() method.
- Python
from spire.doc import *
from spire.doc.common import *

# Create a document object
doc = Document()

# Add a section to the document
section = doc.AddSection()

# Define Outline Level 1
titleStyle1 = ParagraphStyle(doc)
titleStyle1.Name = "T1S"
titleStyle1.ParagraphFormat.OutlineLevel = OutlineLevel.Level1
titleStyle1.CharacterFormat.Bold = True
titleStyle1.CharacterFormat.FontName = "Microsoft YaHei"
titleStyle1.CharacterFormat.FontSize = 18
titleStyle1.ParagraphFormat.HorizontalAlignment = HorizontalAlignment.Left
doc.Styles.Add(titleStyle1)

# Define Outline Level 2
titleStyle2 = ParagraphStyle(doc)
titleStyle2.Name = "T2S"
titleStyle2.ParagraphFormat.OutlineLevel = OutlineLevel.Level2
titleStyle2.CharacterFormat.Bold = True
titleStyle2.CharacterFormat.FontName = "Microsoft YaHei"
titleStyle2.CharacterFormat.FontSize = 16
titleStyle2.ParagraphFormat.HorizontalAlignment = HorizontalAlignment.Left
doc.Styles.Add(titleStyle2)

# Define Outline Level 3
titleStyle3 = ParagraphStyle(doc)
titleStyle3.Name = "T3S"
titleStyle3.ParagraphFormat.OutlineLevel = OutlineLevel.Level3
titleStyle3.CharacterFormat.Bold = True
titleStyle3.CharacterFormat.FontName = "Microsoft YaHei"
titleStyle3.CharacterFormat.FontSize = 14
titleStyle3.ParagraphFormat.HorizontalAlignment = HorizontalAlignment.Left
doc.Styles.Add(titleStyle3)

# Add a paragraph
TOCparagraph = section.AddParagraph()
toc = TOCparagraph.AppendTOC(1, 3)
toc.UseHeadingStyles = False
toc.UseHyperlinks = True
toc.UseTableEntryFields = False
toc.RightAlignPageNumbers = True
toc.SetTOCLevelStyle(1, titleStyle1.Name)
toc.SetTOCLevelStyle(2, titleStyle2.Name)
toc.SetTOCLevelStyle(3, titleStyle3.Name)

# Define character format
characterFormat = CharacterFormat(doc)
characterFormat.FontName = "Microsoft YaHei"
characterFormat.FontSize = 12

# Add a paragraph and apply outline level style 1
paragraph = section.Body.AddParagraph()
paragraph.ApplyStyle(titleStyle1.Name)
paragraph.AppendText("Overview")

# Add a paragraph and set the text content
paragraph = section.Body.AddParagraph()
textRange = paragraph.AppendText("Spire.Doc for Python is a professional Word Python API specifically designed for developers to create, read, write, convert, and compare Word documents with fast and high-quality performance.")
textRange.ApplyCharacterFormat(characterFormat)

# Add a paragraph and apply outline level style 1
paragraph = section.Body.AddParagraph()
paragraph.ApplyStyle(titleStyle1.Name)
paragraph.AppendText("Main Functions")

# Add a paragraph and apply outline level style 2
paragraph = section.Body.AddParagraph()
paragraph.ApplyStyle(titleStyle2.Name)
paragraph.AppendText("Only Spire.Doc, No Microsoft Office Automation")

# Add a paragraph and set the text content
paragraph = section.Body.AddParagraph()
textRange = paragraph.AppendText("Spire.Doc for Python is a totally independent Python Word class library which doesn't require Microsoft Office installed on system. Microsoft Office Automation is proved to be unstable, slow and not scalable to produce MS Word documents. Spire.Doc for Python is many times faster than Microsoft Word Automation and with much better stability and scalability.")
textRange.ApplyCharacterFormat(characterFormat)

# Add a paragraph and apply outline level style 3
paragraph = section.Body.AddParagraph()
paragraph.ApplyStyle(titleStyle3.Name)
paragraph.AppendText("Word Versions")

# Add a paragraph and set the text content
paragraph = section.Body.AddParagraph()
textRange = paragraph.AppendText("Word97-03  Word2007  Word2010  Word2013  Word2016  Word2019")
textRange.ApplyCharacterFormat(characterFormat)

# Add a paragraph and apply outline level style 2
paragraph = section.Body.AddParagraph()
paragraph.ApplyStyle(titleStyle2.Name)
paragraph.AppendText("Convert File Documents with High Quality")

# Add a paragraph and set the text content
paragraph = section.Body.AddParagraph()
textRange = paragraph.AppendText("By using Spire.Doc for Python, users can save Word Doc/Docx to stream, save as web response and convert Word Doc/Docx to XML, RTF, EMF, TXT, XPS, EPUB, HTML, SVG, ODT and vice versa. Spire.Doc for Python also supports to convert Word Doc/Docx to PDF and HTML to image.")
textRange.ApplyCharacterFormat(characterFormat)

# Add a paragraph and apply outline level style 2
paragraph = section.Body.AddParagraph()
paragraph.ApplyStyle(titleStyle2.Name)
paragraph.AppendText("Other Technical Features")

# Add a paragraph and set the text content
paragraph = section.Body.AddParagraph()
textRange = paragraph.AppendText("By using Spire.Doc for Python, developers can build any type of a 64-bit Python application to create and handle Word documents.")
textRange.ApplyCharacterFormat(characterFormat)

# Update the table of contents
doc.UpdateTableOfContents()

# Save the document
doc.SaveToFile("CreateTOCUsingOutlineStyles.docx", FileFormat.Docx2016)

# Release resources
doc.Dispose()

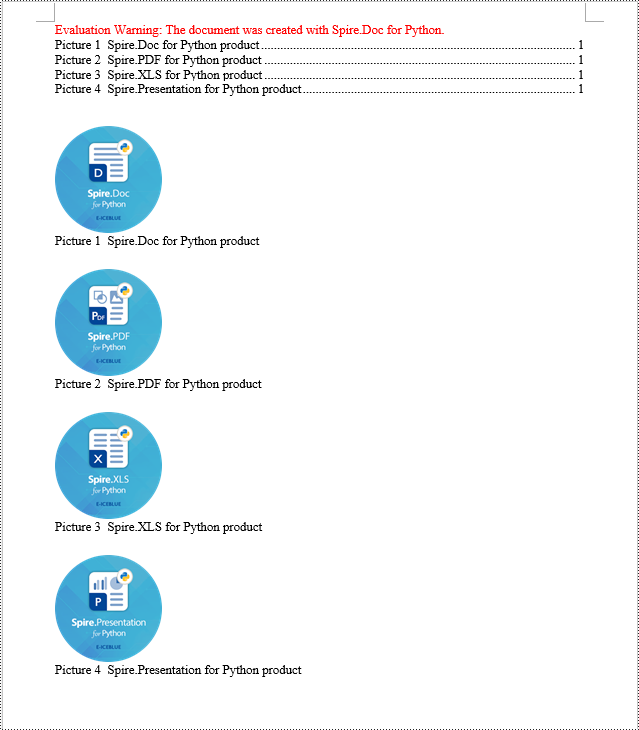
Python Create a Table Of Contents Using Image Captions
Using the Spire.Doc library, you can create a table of contents based on image captions by employing the TableOfContent(Document, "\\h \\z \\c \"Picture\"") method. Below are the detailed steps:
- Create a Document object.
- Add a section using the Document.AddSection() method.
- Create a table of content object with tocForImage = new TableOfContent(Document, " \\h \\z \\c \"Picture\"") and specify the style of the table of contents.
- Add a paragraph using the Section.AddParagraph() method.
- Add the table of content object to the paragraph using the Paragraph.Items.Add(tocForImage) method.
- Add a field separator using the Paragraph.AppendFieldMark(FieldMarkType.FieldSeparator) method.
- Add the text content "TOC" using the Paragraph.AppendText("TOC") method.
- Add a field end mark using the Paragraph.AppendFieldMark(FieldMarkType.FieldEnd) method.
- Add an image using the Paragraph.AppendPicture() method.
- Add a caption paragraph for the image using the DocPicture.AddCaption() method, including product information and formatting.
- Update the table of contents to reflect changes in the document using the Document.UpdateTableOfContents(tocForImage) method.
- Save the document using the Document.SaveToFile() method.
- Python
from spire.doc import *
from spire.doc.common import *

# Create a new document object
doc = Document()

# Add a section to the document
section = doc.AddSection()

# Create a table of content object for images
tocForImage = TableOfContent(doc, " \\h \\z \\c \"Picture\"")

# Add a paragraph to the section
tocParagraph = section.Body.AddParagraph()

# Add the TOC object to the paragraph
tocParagraph.Items.Add(tocForImage)

# Add a field separator
tocParagraph.AppendFieldMark(FieldMarkType.FieldSeparator)

# Add text content
tocParagraph.AppendText("TOC")

# Add a field end mark
tocParagraph.AppendFieldMark(FieldMarkType.FieldEnd)

# Add a blank paragraph to the section
section.Body.AddParagraph()

# Add a paragraph to the section
paragraph = section.Body.AddParagraph()

# Add an image
docPicture = paragraph.AppendPicture("images/DOC-Python.png")
docPicture.Width = 100
docPicture.Height = 100

# Add a caption paragraph for the image
obj = docPicture.AddCaption("Picture",CaptionNumberingFormat.Number,CaptionPosition.BelowItem)

paragraph = (Paragraph)(obj)
paragraph.AppendText("  Spire.Doc for Python product")
paragraph.Format.AfterSpacing = 20

# Continue adding paragraphs to the section
paragraph = section.Body.AddParagraph()
docPicture = paragraph.AppendPicture("images/PDF-Python.png")
docPicture.Width = 100
docPicture.Height = 100
obj = docPicture.AddCaption("Picture",CaptionNumberingFormat.Number,CaptionPosition.BelowItem)
paragraph = (Paragraph)(obj)
paragraph.AppendText("  Spire.PDF for Python product")
paragraph.Format.AfterSpacing = 20

paragraph = section.Body.AddParagraph()
docPicture = paragraph.AppendPicture("images/XLS-Python.png")
docPicture.Width = 100
docPicture.Height = 100
obj = docPicture.AddCaption("Picture",CaptionNumberingFormat.Number,CaptionPosition.BelowItem)
paragraph = (Paragraph)(obj)
paragraph.AppendText("  Spire.XLS for Python product")
paragraph.Format.AfterSpacing = 20

paragraph = section.Body.AddParagraph()
docPicture = paragraph.AppendPicture("images/PPT-Python.png")
docPicture.Width = 100
docPicture.Height = 100
obj = docPicture.AddCaption("Picture",CaptionNumberingFormat.Number,CaptionPosition.BelowItem)
paragraph = (Paragraph)(obj)
paragraph.AppendText("  Spire.Presentation for Python product")
paragraph.Format.AfterSpacing = 20

# Update the table of contents
doc.UpdateTableOfContents(tocForImage)

# Save the document to a file
doc.SaveToFile("CreateTOCWithImageCaptions.docx", FileFormat.Docx2016)

# Dispose of the document object
doc.Dispose()
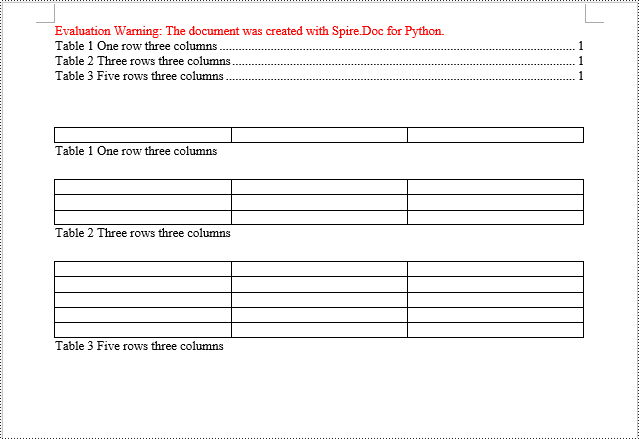
Python Create a Table Of Contents Using Table Captions
Similarly, you can create a table of contents based on table captions by employing the TableOfContent(Document, " \\h \\z \\c \"Table\"") method. Here are the detailed steps:
- Create a Document object.
- Add a section using the Document.AddSection() method.
- Create a table of content object tocForTable = new TableOfContent(Document, " \\h \\z \\c \"Table\"") and specify the style of the table of contents.
- Add a paragraph using the Section.AddParagraph() method.
- Add the table of content object to the paragraph using the Paragraph.Items.Add(tocForTable) method.
- Add a field separator using the Paragraph.AppendFieldMark(FieldMarkType.FieldSeparator) method.
- Add the text content "TOC" using the Paragraph.AppendText("TOC") method.
- Add a field end mark using the Paragraph.AppendFieldMark(FieldMarkType.FieldEnd) method.
- Add a table using the Section.AddTable() method and set the number of rows and columns using the Table.ResetCells(int rowsNum, int columnsNum) method.
- Add a table caption paragraph using the Table.AddCaption() method, including product information and formatting.
- Update the table of contents to reflect changes in the document using the Document.UpdateTableOfContents(tocForTable) method.
- Save the document using the Document.SaveToFile() method.
- Python
from spire.doc import *
from spire.doc.common import *

# Create a new document
doc = Document()

# Add a section to the document
section = doc.AddSection()

# Create a TableOfContent object
tocForTable = TableOfContent(doc,  " \\h \\z \\c \"Table\"")

# Add a paragraph in the section to place the TableOfContent object
tocParagraph = section.Body.AddParagraph()
tocParagraph.Items.Add(tocForTable)
tocParagraph.AppendFieldMark(FieldMarkType.FieldSeparator)
tocParagraph.AppendText("TOC")
tocParagraph.AppendFieldMark(FieldMarkType.FieldEnd)

# Add two empty paragraphs in the section
section.Body.AddParagraph()
section.Body.AddParagraph()

# Add a table in the section
table = section.Body.AddTable(True)
table.ResetCells(1, 3)

# Add a caption paragraph for the table
obj = table.AddCaption("Table", CaptionNumberingFormat.Number, CaptionPosition.BelowItem)
paragraph = (Paragraph)(obj)
paragraph.AppendText(" One row three columns")
paragraph.Format.AfterSpacing = 20

# Add a new table in the section
table = section.Body.AddTable(True)
table.ResetCells(3, 3)

# Add a caption paragraph for the second table
obj = table.AddCaption("Table", CaptionNumberingFormat.Number, CaptionPosition.BelowItem)
paragraph = (Paragraph)(obj)
paragraph.AppendText(" Three rows three columns")
paragraph.Format.AfterSpacing = 20

# Add another new table in the section
table = section.Body.AddTable(True)
table.ResetCells(5, 3)

# Add a caption paragraph for the third table
obj = table.AddCaption("Table", CaptionNumberingFormat.Number, CaptionPosition.BelowItem)
paragraph = (Paragraph)(obj)
paragraph.AppendText(" Five rows three columns")
paragraph.Format.AfterSpacing = 20

# Update the table of contents
doc.UpdateTableOfContents(tocForTable)

# Save the document to a specified file
doc.SaveToFile("CreateTOCUsingTableCaptions.docx", FileFormat.Docx2016)

# Dispose resources
doc.Dispose()
Apply for a Temporary License
If you'd like to remove the evaluation message from the generated documents, or to get rid of the function limitations, please request a 30-day trial license for yourself.
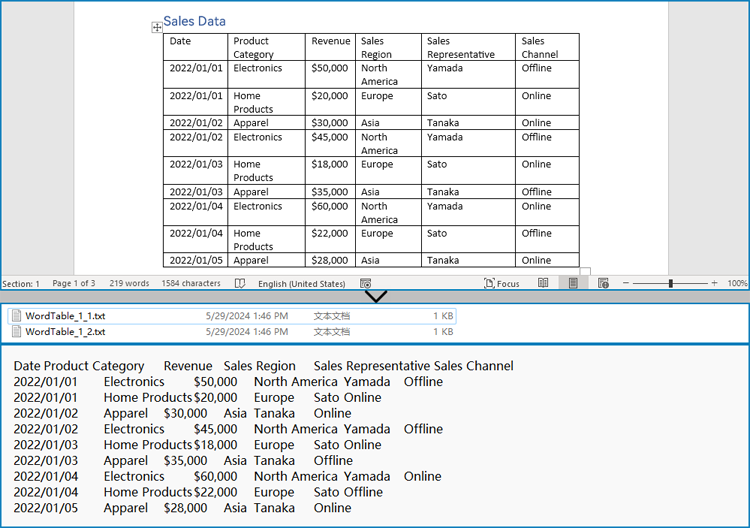
Word documents often contain valuable data in the form of tables, which can be used for reporting, data analysis, and record-keeping. However, manually extracting and transferring these tables to other formats can be a time-consuming and error-prone task. By automating this process using Python, we can save time, ensure accuracy, and maintain consistency. Spire.Doc for Python provides a seamless solution for the table extraction task, making it effortless to create accessible and manageable files with data from Word document tables. This article will demonstrate how to leverage Spire.Doc for Python to extract tables from Word documents and write them into text files and Excel worksheets.
- Extract Tables from Word Documents to Text Files with Python
- Extract Tables from Word Documents to Excel Workbooks with Python
Install Spire.Doc for Python
This scenario requires Spire.Doc for Python and plum-dispatch v1.7.4. They can be easily installed in your Windows through the following pip command.
pip install Spire.Doc
If you are unsure how to install, please refer to: How to Install Spire.Doc for Python on Windows
Extract Tables from Word Documents to Text Files with Python
Spire.Doc for Python offers the Section.Tables property to retrieve a collection of tables within a section of a Word document. Then, developers can use the properties and methods under the ITable class to access the data in the tables and write it into a text file. This provides a convenient solution for converting Word document tables into text files.
The detailed steps for extracting tables from Word documents to text files are as follows:
- Create an object of Document class and load a Word document using Document.LoadFromFile() method.
- Iterate through the sections in the document and get the table collection of each section through Section.Tables property.
- Iterate through the tables and create a string object for each table.
- Iterate through the rows in each table and the cells in each row, get the text of each cell through TableCell.Paragraphs[].Text property, and add the cell text to the string.
- Save each string to a text file.
- Python
from spire.doc import *
from spire.doc.common import *

# Create an instance of Document
doc = Document()

# Load a Word document
doc.LoadFromFile("Sample.docx")

# Loop through the sections
for s in range(doc.Sections.Count):
    # Get a section
    section = doc.Sections.get_Item(s)
    # Get the tables in the section
    tables = section.Tables
    # Loop through the tables
    for i in range(0, tables.Count):
        # Get a table
        table = tables.get_Item(i)
        # Initialize a string to store the table data
        tableData = ''
        # Loop through the rows of the table
        for j in range(0, table.Rows.Count):
            # Loop through the cells of the row
            for k in range(0, table.Rows.get_Item(j).Cells.Count):
                # Get a cell
                cell = table.Rows.get_Item(j).Cells.get_Item(k)
                # Get the text in the cell
                cellText = ''
                for para in range(cell.Paragraphs.Count):
                    paragraphText = cell.Paragraphs.get_Item(para).Text
                    cellText += (paragraphText + ' ')
                # Add the text to the string
                tableData += cellText
                if k < table.Rows.get_Item(j).Cells.Count - 1:
                    tableData += '\t'
            # Add a new line
            tableData += '\n'

        # Save the table data to a text file
        with open(f'output/Tables/WordTable_{s+1}_{i+1}.txt', 'w', encoding='utf-8') as f:
            f.write(tableData)
doc.Close()
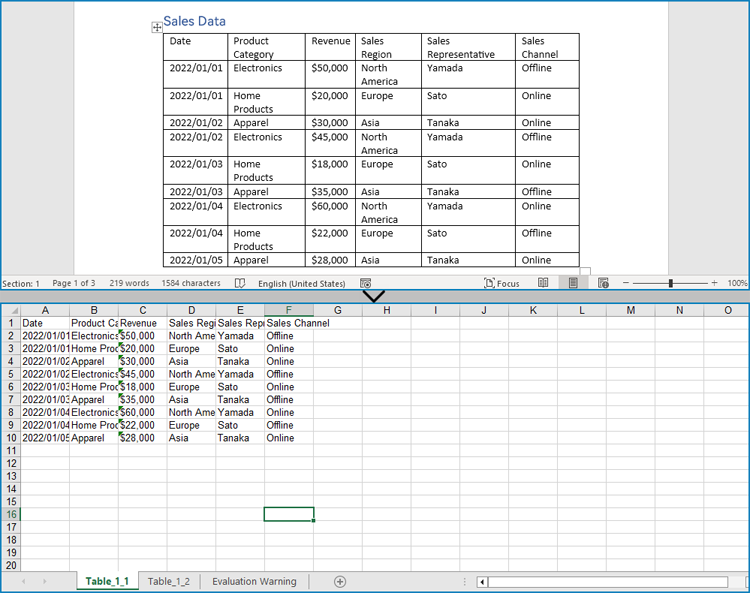
Extract Tables from Word Documents to Excel Workbooks with Python
Developers can also utilize Spire.Doc for Python to retrieve table data and then use Spire.XLS for Python to write the table data into an Excel worksheet, thereby enabling the conversion of Word document tables into Excel workbooks.
Install Spire.XLS for Python via PyPI:
pip install Spire.XLS
The detailed steps for extracting tables from Word documents to Excel workbooks are as follows:
- Create an object of Document class and load a Word document using Document.LoadFromFile() method.
- Create an object of Workbook class and clear the default worksheets using Workbook.Worksheets.Clear() method.
- Iterate through the sections in the document and get the table collection of each section through Section.Tables property.
- Iterate through the tables and create a worksheet for each table using Workbook.Worksheets.Add() method.
- Iterate through the rows in each table and the cells in each row, get the text of each cell through TableCell.Paragraphs[].Text property, and write the text to the worksheet using Worksheet.SetCellValue() method.
- Save the workbook using Workbook.SaveToFile() method.
- Python
from spire.doc import *
from spire.doc.common import *
from spire.xls import *
from spire.xls.common import *

# Create an instance of Document
doc = Document()

# Load a Word document
doc.LoadFromFile('Sample.docx')

# Create an instance of Workbook
wb = Workbook()
wb.Worksheets.Clear()

# Loop through sections in the document
for i in range(doc.Sections.Count):
    # Get a section
    section = doc.Sections.get_Item(i)
    # Loop through tables in the section
    for j in range(section.Tables.Count):
        # Get a table
        table = section.Tables.get_Item(j)
        # Create a worksheet
        ws = wb.Worksheets.Add(f'Table_{i+1}_{j+1}')
        # Write the table to the worksheet
        for row in range(table.Rows.Count):
            # Get a row
            tableRow = table.Rows.get_Item(row)
            # Loop through cells in the row
            for cell in range(tableRow.Cells.Count):
                # Get a cell
                tableCell = tableRow.Cells.get_Item(cell)
                # Get the text in the cell
                cellText = ''
                for paragraph in range(tableCell.Paragraphs.Count):
                    paragraph = tableCell.Paragraphs.get_Item(paragraph)
                    cellText = cellText + (paragraph.Text + ' ')
                # Write the cell text to the worksheet
                ws.SetCellValue(row + 1, cell + 1, cellText)

# Save the workbook
wb.SaveToFile('output/Tables/WordTableToExcel.xlsx', FileFormat.Version2016)
doc.Close()
wb.Dispose()
Apply for a Temporary License
If you'd like to remove the evaluation message from the generated documents, or to get rid of the function limitations, please request a 30-day trial license for yourself.
Proper alignment of tables and text in Microsoft Word is crucial for creating visually appealing and easy-to-read documents. By aligning table headers, numeric data, and text appropriately, you can enhance the organization and clarity of your information, making it more accessible to your readers. In this article, we will demonstrate how to align tables and the text in table cells in Microsoft Word in Python using Spire.Doc for Python.
Install Spire.Doc for Python
This scenario requires Spire.Doc for Python and plum-dispatch v1.7.4. They can be easily installed in your Windows through the following pip commands.
pip install Spire.Doc
If you are unsure how to install, please refer to this tutorial: How to Install Spire.Doc for Python on Windows
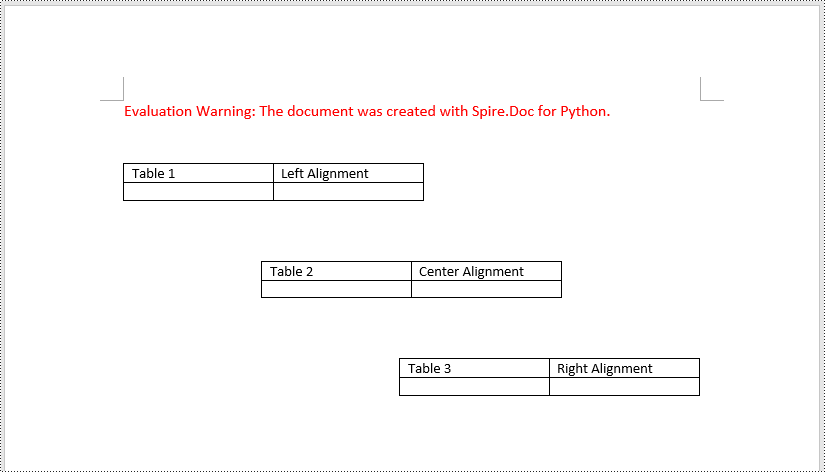
Align Tables in Word in Python
A table in a Word document can be aligned to the left, center, or right side by using the Table.TableFormat.HorizontalAlignment property. The detailed steps are as follows.
- Create an instance of the Document class.
- Load a Word document using Document.LoadFromFile() method.
- Get a specific section in the document using Document.Sections[index] property.
- Get a specific table in the section using Section.Tables[index] property.
- Set the alignment for the table using Table.TableFormat.HorizontalAlignment property.
- Save the result document using Document.SaveToFile() method.
- Python
from spire.doc import *
from spire.doc.common import *

# Create an instance of the Document class
document = Document()
# Load a Word document
document.LoadFromFile("Tables.docx")

# Get the first section in the document
section = document.Sections[0]

# Get the first, second, and third tables in the section
table1 = section.Tables[0]
table2 = section.Tables[1]
table3 = section.Tables[2]

# Align the first table to the left
table1.TableFormat.HorizontalAlignment = RowAlignment.Left
# Align the second table to the center
table2.TableFormat.HorizontalAlignment = RowAlignment.Center
# Align the third table to the right
table3.TableFormat.HorizontalAlignment = RowAlignment.Right

# Save the result document
document.SaveToFile("AlignTable.docx", FileFormat.Docx2013)
document.Close()
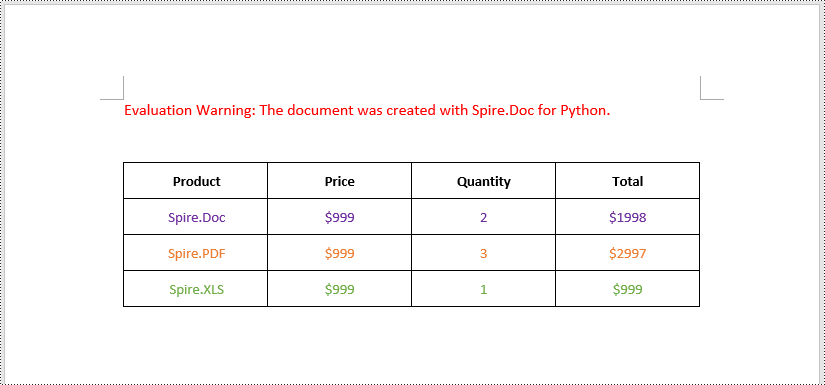
Align the Text in Table Cells in Word in Python
The text within a table cell can be horizontally aligned to the left, center, or right side using the TableCell.Paragraphs[index].Format.HorizontalAlignment property. Additionally, they can also be vertically aligned to the top, center, or bottom of the cell using the TableCell.CellFormat.VerticalAlignment property. The detailed steps are as follows.
- Create an instance of the Document class.
- Load a Word document using Document.LoadFromFile() method.
- Get a specific section in the document using Document.Sections[index] property.
- Get a specific table in the section using Section.Tables[index] property.
- Loop through the rows in the table.
- Loop through the cells in each row.
- Set the vertical alignment for the text in each cell using TableCell.CellFormat.VerticalAlignment property.
- Loop through the paragraphs in each cell.
- Set the horizontal alignment for each paragraph using TableCell.Paragraphs[index].Format.HorizontalAlignment property.
- Save the result document using Document.SaveToFile() method.
- Python
from spire.doc import *
from spire.doc.common import *

# Create an instance of the Document class
document = Document()
# Load a Word document
document.LoadFromFile("Table.docx")

# Get the first section in the document
section = document.Sections[0]

# Get the first tables in the section
table = section.Tables[0]

# Loop through the rows in the table
for row_index in range(table.Rows.Count):
    row = table.Rows[row_index]
    # Loop through the cells in the row
    for cell_Index in range(row.Cells.Count):
        cell = row.Cells[cell_Index]
        # Vertically align the text in the cell to the center
        cell.CellFormat.VerticalAlignment = VerticalAlignment.Middle
        # Horizontally align the text in the cell to the center
        for para_index in range(cell.Paragraphs.Count):
            paragraph = cell.Paragraphs[para_index]
            paragraph.Format.HorizontalAlignment = HorizontalAlignment.Center

# Save the result document
document.SaveToFile("AlignTableText.docx", FileFormat.Docx2013)
document.Close()
Apply for a Temporary License
If you'd like to remove the evaluation message from the generated documents, or to get rid of the function limitations, please request a 30-day trial license for yourself.
Python: Add, Read, and Remove Built-in Document Properties in Word Documents
2024-05-16 01:17:49 Written by KoohjiWord documents often contain metadata known as document properties, which include information like title, author, subject, and keywords. Manipulating these properties is invaluable for maintaining organized documentation, enhancing searchability, and ensuring proper attribution in collaborative environments. With Spire.Doc for Python, developers can automate the tasks of adding, reading, and removing document properties in Word documents to streamline document management workflows and enable the integration of these processes into larger automated systems. This article provides detailed steps and code examples that demonstrate how to utilize Spire.Doc for Python to effectively manage document properties within Word files.
- Add Built-in Document Properties to Word Documents with Python
- Read Built-in Document Properties from Word Documents with Python
- Remove Built-in Document Properties from Word Documents with Python
Install Spire.Doc for Python
This scenario requires Spire.Doc for Python and plum-dispatch v1.7.4. They can be easily installed in your Windows through the following pip commands.
pip install Spire.Doc
If you are unsure how to install, please refer to: How to Install Spire.Doc for Python on Windows
Add Built-in Document Properties to Word Documents with Python
Spire.Doc for Python provides developers with the Document.BuiltinDocumentProperties property to access the built-in properties of Word documents. The value of these properties can be set using the corresponding properties under the BuiltinDocumentProperties class.
The following steps show how to add the main built-in properties in Word documents:
- Create an object of Document class.
- Load a Word document using Document.LoadFromFile() method.
- Get the built-in properties through Document.BuiltinDocumentProperties property.
- Add values to the properties with properties under BuiltinDocumentProperties property.
- Save the document using Document.SaveToFile() method.
- Python
from spire.doc import *
from spire.doc.common import *
# Create an object of Document
doc = Document()
# Load a Word document
doc.LoadFromFile("Sample.docx")
# Set the built-in property
builtinProperty = doc.BuiltinDocumentProperties
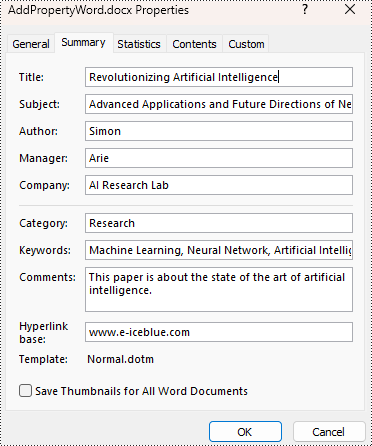
builtinProperty.Title = "Revolutionizing Artificial Intelligence"
builtinProperty.Subject = "Advanced Applications and Future Directions of Neural Networks in Artificial Intelligence"
builtinProperty.Author = "Simon"
builtinProperty.Manager = "Arie"
builtinProperty.Company = "AI Research Lab"
builtinProperty.Category = "Research"
builtinProperty.Keywords = "Machine Learning, Neural Network, Artificial Intelligence"
builtinProperty.Comments = "This paper is about the state of the art of artificial intelligence."
builtinProperty.HyperLinkBase = "www.e-iceblue.com"
# Save the document
doc.SaveToFile("output/AddPropertyWord.docx", FileFormat.Docx2019)
doc.Close()
Read Built-in Document Properties from Word Documents with Python
Besides adding values, the properties under the BuiltinDocumentProperties class also empower developers to read existing built-in properties of Word documents. This enables various functionalities like document search, information extraction, and document analysis.
The detailed steps for reading document built-in properties using Spire.Doc for Python are as follows:
- Create an object of Document class.
- Load a Word document using Document.LoadFromFile() method.
- Get the built-in properties of Document using Document.BuiltinDocumentProperties property.
- Get the value of the properties using properties under BuiltinDocumentProperties class.
- Output the built-in properties of the document.
- Python
from spire.doc import *
from spire.doc.common import *
# Create an object of Document
doc = Document()
# Load a Word document
doc.LoadFromFile("output/AddPropertyWord.docx")
# Get the built-in properties of the document
builtinProperties = doc.BuiltinDocumentProperties
# Get the value of the built-in properties
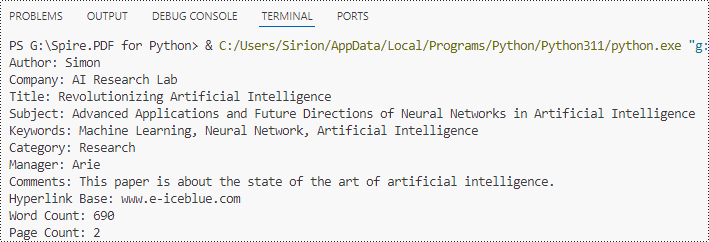
properties = [
"Author: " + builtinProperties.Author,
"Company: " + builtinProperties.Company,
"Title: " + builtinProperties.Title,
"Subject: " + builtinProperties.Subject,
"Keywords: " + builtinProperties.Keywords,
"Category: " + builtinProperties.Category,
"Manager: " + builtinProperties.Manager,
"Comments: " + builtinProperties.Comments,
"Hyperlink Base: " + builtinProperties.HyperLinkBase,
"Word Count: " + str(builtinProperties.WordCount),
"Page Count: " + str(builtinProperties.PageCount),
]
# Output the built-in properties
for i in range(0, len(properties)):
print(properties[i])
doc.Close()
Remove Built-in Document Properties from Word Documents with Python
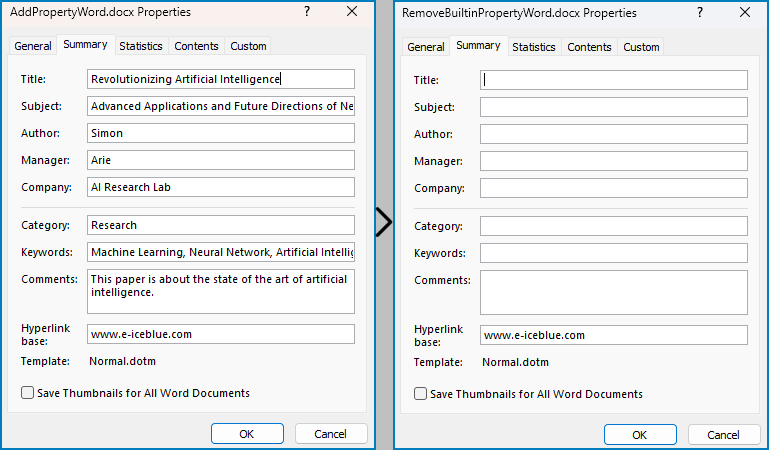
The built-in document properties of a Word document that contain specific content can be removed by setting them to null values. This protects private information while retaining necessary details.
The detailed steps for removing specific built-in document properties from Word documents are as follows:
- Create an object of Document class.
- Load a Word document using Document.LoadFromFile() method.
- Get the built-in properties of the document through Document.BuiltinDocumentProperties property.
- Set the value of some properties to none to remove the properties with properties under BuiltinDocumentProperties class.
- Save the document using Document.SaveToFile() method.
- Python
from spire.doc import *
from spire.doc.common import *

# Create an instance of the Document class
doc = Document()

# Load the Word document
doc.LoadFromFile("output/AddPropertyWord.docx")

# Get the document's built-in properties
builtinProperties = doc.BuiltinDocumentProperties

# Remove the built-in properties by setting them to None
builtinProperties.Author = None
builtinProperties.Company = None
builtinProperties.Title = None
builtinProperties.Subject = None
builtinProperties.Keywords = None
builtinProperties.Comments = None
builtinProperties.Category = None
builtinProperties.Manager = None

# Save the document
doc.SaveToFile("output/RemovePropertyWord.docx", FileFormat.Docx)
doc.Close()
Apply for a Temporary License
If you'd like to remove the evaluation message from the generated documents, or to get rid of the function limitations, please request a 30-day trial license for yourself.
Adding page numbers to a Word document is a fundamental feature that enhances readability and navigation, especially in lengthy documents. It allows readers to find specific content more easily and helps authors organize their work. Word offers flexible options for adding page numbers, including choosing the location (header, footer, or body) and customizing the format and appearance to match your document's design needs.
In this article, you will learn how to add pager numbers to a Word document, as well as customizing their appearance using Spire.Doc for Python.
- Add Page Numbers to a Word Document
- Add Page Numbers to a Specific Section
- Add Discontinuous Page Numbers to Different Sections
Install Spire.Doc for Python
This scenario requires Spire.Doc for Python and plum-dispatch v1.7.4. They can be easily installed in your Windows through the following pip command.
pip install Spire.Doc
Add Page Numbers to a Word Document in Python
To dynamically add page numbers to a Word document using Spire.Doc, you can leverage various fields such as FieldPage, FieldNumPages, and FieldSection. These fields serve as placeholders for the current page number, total page count, and section number, enabling you to customize and automate the pagination process.
You can embed these placeholders in the header or footer of your document by calling the Paragraph.AppendField() method.
Here's a step-by-step guide on how to insert a FieldPage and FieldNumPages field in the footer, which will display the page number in the format "X / Y":
- Create a Document object.
- Load a Word document from a specified file path.
- Get the first section using Document.Sections[index] property
- Get the footer of the first section using Section.HeadersFooters.Footer property.
- Add a paragraph to the footer using HeaderFooter.AddParagraph() method.
- Insert a FieldPage field, and a FieldNumPages field to the paragraph using Paragraph.AppendField() method.
- Save the document to a different Word file.
- Python
from spire.doc import *
from spire.doc.common import *

# Create a Document object
document = Document()

# Load a Word file
document.LoadFromFile("C:\\Users\\Administrator\\Desktop\\Input.docx")

# Get the first section
section = document.Sections[0]

# Get the footer of the section
footer = section.HeadersFooters.Footer

# Add "page number / page count" to the footer
footerParagraph = footer.AddParagraph()
footerParagraph.AppendField("page number", FieldType.FieldPage)
footerParagraph.AppendText(" / ")
footerParagraph.AppendField("page count", FieldType.FieldNumPages)
footerParagraph.Format.HorizontalAlignment = HorizontalAlignment.Center

# Apply formatting to the page number
style = ParagraphStyle(document)
style.CharacterFormat.Bold = True
style.CharacterFormat.FontName = "Times New Roman"
style.CharacterFormat.FontSize = 18
style.CharacterFormat.TextColor = Color.get_Red()
document.Styles.Add(style)
footerParagraph.ApplyStyle(style)

# Save the document
document.SaveToFile("Output/AddPageNumbersToDocument.docx")

# Dispose resources
document.Dispose()
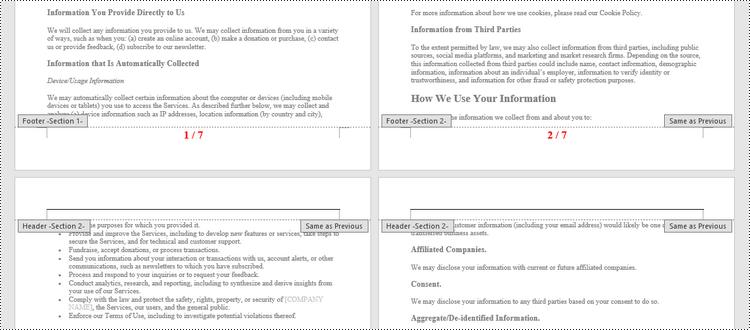
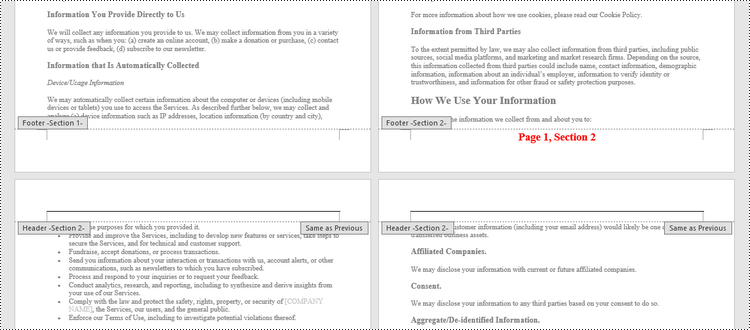
Add Page Numbers to a Specific Section in Python
By default, when you add page numbers to the footer of a section, they are automatically linked to the preceding section, maintaining a continuous sequence of page numbers. This behavior is convenient for most documents but may not be ideal when you want to start numbering from a certain section without affecting the numbering in other parts of the document.
If you need to add page numbers to a specific section without them being linked to the previous section, you must unlink the subsequent sections and clear the contents of their footers. Here's how you can do it using Spire.Doc for Python.
- Create a Document object.
- Load a Word document from a specified file path.
- Get a specific section using Document.Sections[index] property
- Get the footer of the section using Section.HeadersFooters.Footer property.
- Restart page numbering from 1 by setting Section.PageSetup.RestartPageNumbering property to true and Section.PageSetup.PageStartingNumber property to 1.
- Insert a FieldPage field and a FieldSection field to the footer using Paragraph.AppendField() method.
- Disable "Link to previous" by setting HeadersFooters.Footer.LinkToPrevious propety to false.
- Delete the content of the footers in the subsequent sections
- Save the document to a different Word file.
- Python
from spire.doc import *
from spire.doc.common import *

# Create a Document object
document = Document()

# Load a Word file
document.LoadFromFile("C:\\Users\\Administrator\\Desktop\\Input.docx")

# Get a specific section
sectionIndex = 1
section = document.Sections[sectionIndex]

# Restart page numbering from 1
section.PageSetup.RestartPageNumbering = True
section.PageSetup.PageStartingNumber = 1

# Get the footer of the section
footer = section.HeadersFooters.Footer

# Add "Page X, Section Y" to the footer
footerParagraph = footer.AddParagraph()
footerParagraph.AppendText("Page ")
footerParagraph.AppendField("page number", FieldType.FieldPage)
footerParagraph.AppendText(", Section ")
footerParagraph.AppendField("section number", FieldType.FieldSection)
footerParagraph.Format.HorizontalAlignment = HorizontalAlignment.Center

# Apply formatting to the page number
style = ParagraphStyle(document);
style.CharacterFormat.Bold = True
style.CharacterFormat.FontName = "Times New Roman"
style.CharacterFormat.FontSize = 18
style.CharacterFormat.TextColor = Color.get_Red()
document.Styles.Add(style)
footerParagraph.ApplyStyle(style)

# Disable "Link to previous" in the subsequent section
document.Sections[sectionIndex + 1].HeadersFooters.Footer.LinkToPrevious = False

# Delete the content of the footers in the subsequent sections
for i in range(sectionIndex +1, document.Sections.Count, 1):
    document.Sections[i].HeadersFooters.Footer.ChildObjects.Clear()
    document.Sections[i].HeadersFooters.Footer.AddParagraph()

# Save the document
document.SaveToFile("Output/AddPageNumbersToSection.docx")

# Dispose resources
document.Dispose()
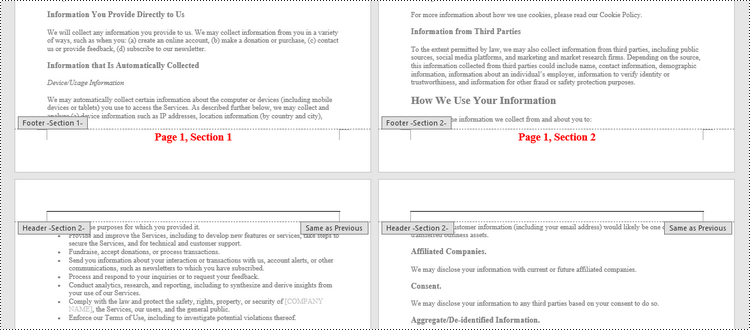
Add Discontinuous Page Numbers to Different Sections in Python
When working with documents that contain multiple sections, you might want to start page numbering anew for each section to clearly distinguish between them. To achieve this, you must go through each section individually, add page numbers, and then reset the page numbering for the next section.
The following are the steps to add discontinuous page numbers to different sections using Spire.Doc for Python.
- Create a Document object.
- Load a Word document from a specified file path.
- Iterate through the sections in the document.
- Get a specific section using Document.Sections[index] property
- Get the footer of the section using Section.HeadersFooters.Footer property.
- Restart page numbering from 1 by setting Section.PageSetup.RestartPageNumbering property to true and Section.PageSetup.PageStartingNumber property to 1.
- Insert a FieldPage field and a FieldSection field to the footer using Paragraph.AppendField() method.
- Save the document to a different Word file.
- Python
from spire.doc import *
from spire.doc.common import *

# Create a Document object
document = Document()

# Load a Word file
document.LoadFromFile("C:\\Users\\Administrator\\Desktop\\Input.docx")

# Iterate through the sections in the document
for i in range(document.Sections.Count):

    # Get a specific section
    section = document.Sections[i]

    # Restart page numbering from 1
    section.PageSetup.RestartPageNumbering = True
    section.PageSetup.PageStartingNumber = 1

    # Get the footer of the section
    footer = section.HeadersFooters.Footer

    # Add "Page X, Section Y" to the footer
    footerParagraph = footer.AddParagraph()
    footerParagraph.AppendText("Page ")
    footerParagraph.AppendField("page number", FieldType.FieldPage)
    footerParagraph.AppendText(", Section ")
    footerParagraph.AppendField("section number", FieldType.FieldSection)
    footerParagraph.Format.HorizontalAlignment = HorizontalAlignment.Center

    # Apply formatting to the page number
    style = ParagraphStyle(document)
    style.CharacterFormat.Bold = True
    style.CharacterFormat.FontName = "Times New Roman";
    style.CharacterFormat.FontSize = 18;
    style.CharacterFormat.TextColor = Color.get_Red()
    document.Styles.Add(style)
    footerParagraph.ApplyStyle(style)

# Save the document
document.SaveToFile("Output/AddDifferentPageNumbersToSections.docx")

# Dispose resources
document.Dispose()
Apply for a Temporary License
If you'd like to remove the evaluation message from the generated documents, or to get rid of the function limitations, please request a 30-day trial license for yourself.
In the modern office environment, Microsoft Word has become an indispensable part of our daily work and study. Whether it's writing reports, creating resumes, or designing promotional materials, Word provides us with a rich set of features and tools. Among them, the function of adding shapes is particularly popular among users because it allows us to easily enhance the visual appeal and expressiveness of documents. Manipulating shape elements is one of the highlights of Spire.Doc functionality, and this article will introduce you to how to add or delete shapes in Word using Spire.Doc for Python.
Install Spire.Doc for Python
This scenario requires Spire.Doc for Python and plum-dispatch v1.7.4. They can be easily installed in your Windows through the following pip command.
pip install Spire.Doc
If you are unsure how to install, please refer to this tutorial: How to Install Spire.Doc for Python on Windows
Add Shapes in Word Document in Python
Spire.Doc for Python supports adding various shapes such as rectangles, trapezoids, triangles, arrows, lines, emoticons, and many other predefined shape types. By calling the Paragraph.AppendShape(width: float, height: float, shapeType: 'ShapeType') method, you can not only easily insert these shapes at any position in the document but also customize various properties of the shapes, such as fill color, border style, rotation angle, transparency, etc., to meet different typesetting needs and visual effects. Below are the detailed steps:
- Create a new Document object.
- Call Document.AddSection() and Section.AddParagraph() methods to add a section and a paragraph within the section, respectively.
- Call the Paragraph.AppendShape(width: float, height: float, shapeType: 'ShapeType') method to add a shape on the paragraph, where width and height represent the dimensions of the shape, and shapeType enum is used to specify the type of shape.
- Define the style of the shape, such as fill color, border color, border style, and width.
- Set the horizontal and vertical position of the shape relative to the page.
- Add multiple other types of shapes using the same method.
- Save the document using the Document.SaveToFile() method.
- Python
from spire.doc import *
from spire.doc.common import *

# Create a new Document object
doc = Document()

# Add a new section in the document
sec = doc.AddSection()

# Add a paragraph in the new section
para = sec.AddParagraph()

# Add a rectangle shape in the paragraph with width and height both 60
shape1 = para.AppendShape(60, 60, ShapeType.Rectangle)

# Define the fill color of the shape
shape1.FillColor = Color.get_YellowGreen()

# Define the border color
shape1.StrokeColor = Color.get_Gray()

# Define the border style and width
shape1.LineStyle = ShapeLineStyle.Single
shape1.StrokeWeight = 1

# Set the horizontal and vertical position of the shape relative to the page
shape1.HorizontalOrigin = HorizontalOrigin.Page
shape1.HorizontalPosition = 100
shape1.VerticalOrigin = VerticalOrigin.Page
shape1.VerticalPosition = 200

# Similarly, add a triangle shape in the same paragraph and set its properties
shape2 = para.AppendShape(60, 60, ShapeType.Triangle)
shape2.FillColor = Color.get_Green()
shape2.StrokeColor = Color.get_Gray()
shape2.LineStyle = ShapeLineStyle.Single
shape2.StrokeWeight = 1
shape2.HorizontalOrigin = HorizontalOrigin.Page
shape2.HorizontalPosition = 200
shape2.VerticalOrigin = VerticalOrigin.Page
shape2.VerticalPosition = 200

# Add an arrow shape and set its properties
shape3 = para.AppendShape(60, 60, ShapeType.Arrow)
shape3.FillColor = Color.get_SeaGreen()
shape3.StrokeColor = Color.get_Gray()
shape3.LineStyle = ShapeLineStyle.Single
shape3.StrokeWeight = 1
shape3.HorizontalOrigin = HorizontalOrigin.Page
shape3.HorizontalPosition = 300
shape3.VerticalOrigin = VerticalOrigin.Page
shape3.VerticalPosition = 200

# Add a smiley face shape and set its properties
shape4 = para.AppendShape(60, 60, ShapeType.SmileyFace)
shape4.FillColor = Color.get_LightGreen()
shape4.StrokeColor = Color.get_Gray()
shape4.LineStyle = ShapeLineStyle.Single
shape4.StrokeWeight = 1
shape4.HorizontalOrigin = HorizontalOrigin.Page
shape4.HorizontalPosition = 400
shape4.VerticalOrigin = VerticalOrigin.Page
shape4.VerticalPosition = 200

# Save the document
outputFile = "AddShapes.docx"
doc.SaveToFile(outputFile, FileFormat.Docx2016)

# Release the document
doc.Close()

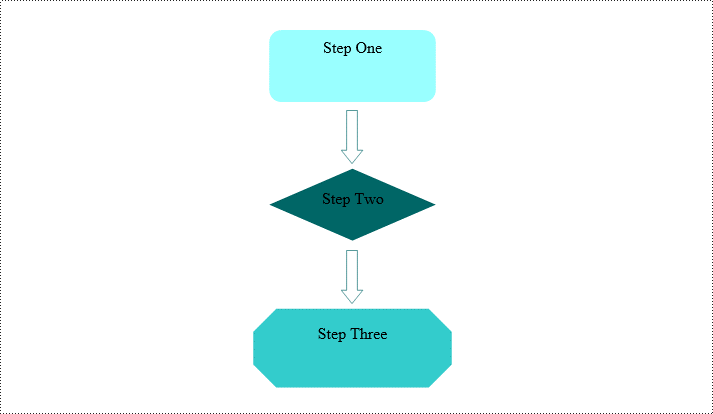
Add Shape Group in Word Document
Spire.Doc for Python not only provides the functionality to add individual shapes (such as rectangles, circles, lines, etc.) but also supports creating and managing grouped shapes. A grouped shape is a special collection of shapes that organizes multiple independent shapes together to form a whole, sharing the same transformation properties (such as position, rotation angle, etc.). Here are the specific steps to achieve this:
- Create an object of the Document class.
- Call the Document.AddSection() method to add a blank section.
- Call the Section.AddParagraph() method to add a blank paragraph in the section.
- Call Paragraph.AppendShapeGroup() to add a shape group and specify its dimensions.
- Create a Textbox and specify its shape type, dimensions, position, fill color, and other properties.
- Add paragraphs within the Textbox and insert text, setting the paragraph's horizontal alignment to center.
- Add the Textbox to the list of child objects of the shape group.
- Similar to the above steps, create shapes for symbols like arrows, diamond-shaped text boxes, octagonal text boxes, and set their properties, adding them to the list of child objects of the shape group.
- Save the document using the Document.SaveToFile() method.
- Python
from spire.doc import *
from spire.doc.common import *

# Create a Document object
doc = Document()

# Add a section to the document
sec = doc.AddSection()

# Add a paragraph to the section
para = sec.AddParagraph()

# Add a shape group to the paragraph and specify its horizontal position
shapegroup = para.AppendShapeGroup(375, 350)
shapegroup.HorizontalPosition = 180

# Calculate the relative unit scale X and Y for the shape group for subsequent element size positioning
X = float((shapegroup.Width / 1000.0))
Y = float((shapegroup.Height / 1000.0))

# Create a rounded rectangle text box
txtBox = TextBox(doc)

# Set the shape type of the text box
txtBox.SetShapeType(ShapeType.RoundRectangle)

# Set the width and height of the text box
txtBox.Width = 125 / X
txtBox.Height = 54 / Y

# Add a paragraph inside the text box and set its horizontal alignment to center
paragraph = txtBox.Body.AddParagraph()
paragraph.Format.HorizontalAlignment = HorizontalAlignment.Center

# Add the text "Step One" to the paragraph
paragraph.AppendText("Step One")

# Set the horizontal and vertical position of the text box
txtBox.HorizontalPosition = 19 / X
txtBox.VerticalPosition = 27 / Y

# Set the fill color of the text box and remove the border line
txtBox.Format.FillColor = Color.FromRgb(153, 255, 255)
txtBox.Format.NoLine = True

# Add the text box to the list of child objects of the shape group
shapegroup.ChildObjects.Add(txtBox)

# Create a downward arrow shape and specify its shape type
arrowLineShape = ShapeObject(doc, ShapeType.DownArrow)

# Set the width and height of the arrow shape
arrowLineShape.Width = 16 / X
arrowLineShape.Height = 40 / Y

# Set the horizontal and vertical position of the arrow shape
arrowLineShape.HorizontalPosition = 73 / X
arrowLineShape.VerticalPosition = 87 / Y

# Set the stroke color of the arrow shape
arrowLineShape.StrokeColor = Color.get_CadetBlue()

# Add the arrow shape to the list of child objects of the shape group
shapegroup.ChildObjects.Add(arrowLineShape)

# (Similar subsequent code, creating diamond-shaped text boxes, downward arrow shapes, and octagonal text boxes, with corresponding property settings and positioning)

txtBox = TextBox(doc)
txtBox.SetShapeType(ShapeType.Diamond)
txtBox.Width = 125 / X
txtBox.Height = 54 / Y
paragraph = txtBox.Body.AddParagraph()
paragraph.Format.HorizontalAlignment = HorizontalAlignment.Center
paragraph.AppendText("Step Two")
txtBox.HorizontalPosition = 19 / X
txtBox.VerticalPosition = 131 / Y
txtBox.Format.FillColor = Color.FromRgb(0, 102, 102)
txtBox.Format.NoLine = True
shapegroup.ChildObjects.Add(txtBox)

arrowLineShape = ShapeObject(doc, ShapeType.DownArrow)
arrowLineShape.Width = 16 / X
arrowLineShape.Height = 40 / Y
arrowLineShape.HorizontalPosition = 73 / X
arrowLineShape.VerticalPosition = 192 / Y
arrowLineShape.StrokeColor = Color.get_CadetBlue()
shapegroup.ChildObjects.Add(arrowLineShape)

txtBox = TextBox(doc)
txtBox.SetShapeType(ShapeType.Octagon)
txtBox.Width = 149 / X
txtBox.Height = 59 / Y
paragraph = txtBox.Body.AddParagraph()
paragraph.Format.HorizontalAlignment = HorizontalAlignment.Center
paragraph.AppendText("Step Three")
txtBox.HorizontalPosition = 7 / X
txtBox.VerticalPosition = 236 / Y
txtBox.Format.FillColor = Color.FromRgb(51, 204, 204)
txtBox.Format.NoLine = True
shapegroup.ChildObjects.Add(txtBox)

# Define the output file name
outputFile = "ShapeGroup.docx"

# Save the document
doc.SaveToFile(outputFile, FileFormat.Docx2016)

# Close the document object
doc.Close()
Remove Shapes from Word Document
Spire.Doc for Python supports efficiently removing individual shapes and shape groups from a Word document. Below are the detailed steps:
- Create an object of the Document class.
- Call the Document.LoadFromFile() method to load a document containing shapes.
- Traverse through all the sections of the document and the body elements within the sections to get paragraphs.
- Check if the child elements under the paragraph are shape objects or shape group objects.
- Call the Paragraph.ChildObjects.Remove() method to remove the shape object.
- Save the document using the Document.SaveToFile() method.
- Python
from spire.doc import *
from spire.doc.common import *

# Create an object of the Document class
doc = Document()

# Load a Word document
doc.LoadFromFile("ShapeGroup.docx")

# Iterate through all sections of the document
for s in range(doc.Sections.Count):
    # Get the current section
    section = doc.Sections.get_Item(i)

    # Iterate through all child objects within the section
    for i in range(section.Body.ChildObjects.Count):
        # Get the current child object
        document_object = section.Body.ChildObjects.get_Item(i)

        # If the current child object is a paragraph
        if isinstance(document_object, Paragraph):
            # Convert the child object to a paragraph object
            paragraph = document_object

            # Initialize the inner loop index
            j = 0

            # Iterate through all child objects within the paragraph
            while j < paragraph.ChildObjects.Count:
                # Get the current child object within the paragraph
                c_obj = paragraph.ChildObjects.get_Item(i)

                # If the current child object is a shape group or shape object
                if isinstance(c_obj, ShapeGroup) or isinstance(c_obj, ShapeObject):
                    # Remove the shape object from the paragraph
                    paragraph.ChildObjects.Remove(c_obj)

                    # Update the inner loop index
                    j -= 1

                # Increment the inner loop index
                j += 1

# Save the document
doc.SaveToFile("RemovedShapes.docx", FileFormat.Docx2016)

# Close the document object
doc.Close()
Apply for a Temporary License
If you'd like to remove the evaluation message from the generated documents, or to get rid of the function limitations, please request a 30-day trial license for yourself.
Mail merge is a powerful tool that allows users to efficiently create personalized documents for a large number of recipients. By using mail merge, users can streamline the document-creating process by automatically merging a template document with a data source, resulting in personalized and professional-looking documents that are tailored to each recipient, which is especially useful for tasks like sending out personalized emails, generating invoices, or creating customized marketing materials. This article demonstrates how to create and execute mail merge in Word documents with Spire.Doc for Python through Python code.
Install Spire.Doc for Python
This scenario requires Spire.Doc for Python and plum-dispatch v1.7.4. They can be easily installed in your Windows through the following pip command.
pip install Spire.Doc
If you are unsure how to install, please refer to: How to Install Spire.Doc for Python on Windows
Create Mail Merge in Word Documents with Python
Mail merging in Word documents involves the utilization of mail merge fields. Spire.Doc for Python offers the Paragraph.AppendField(str: fieldName, FieldType.FieldMergeField) method, which allows users to efficiently create mail merge fields within a designated paragraph of a document. This feature enables users to easily generate a set of documents tailored to specific recipients by swiftly inputting personalized information at a later stage.
The detailed steps for creating mail merge fields in Word documents are as follows:
- Create an object of Document class and load a Word document using Document.LoadFromFile() method.
- Get a section using Document.Sections.get_Item() method.
- Get the paragraphs to insert mail merge fields using Section.Paragraphs.get_Item() method.
- Append mail merge fields to the paragraphs using Paragraph.AppendField() method.
- Save the document using Document.SaveToFile() method.
- Python
from spire.doc import *
from spire.doc.common import *

# Create an object of Document class
doc = Document()

# Load a Word document
doc.LoadFromFile("Sample.docx")

# Get a section
section = doc.Sections.get_Item(1)

# Get the paragraphs to append the mail merge fields
para1 = section.Paragraphs.get_Item(0)
para2 = section.Paragraphs.get_Item(1)
para3 = section.Paragraphs.get_Item(2)
para4 = section.Paragraphs.get_Item(3)

# Append the mail merge fields and specify the field names
para1.AppendField("Name", FieldType.FieldMergeField)
para2.AppendField("Age", FieldType.FieldMergeField)
para3.AppendField("Phone Number", FieldType.FieldMergeField)
para4.AppendField("Membership Type", FieldType.FieldMergeField)

# Save the document
doc.SaveToFile("output/MailMergeFields.docx", FileFormat.Docx)
doc.Close()
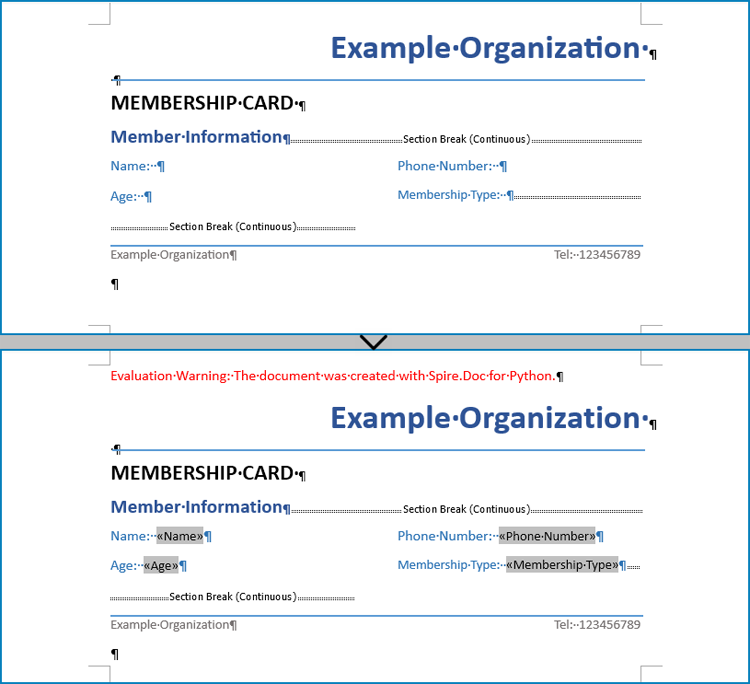
Perform Mail Merge in Word Documents with Python
Once the mail merge has been created, the MailMerge.Execute(List: fieldNames, List: dataSource) method can be employed to execute the mail merge within the document. This enables the swift generation of multiple Word documents, each containing unique content as per the specified data source.
The detailed steps for performing mail merge and generate personalized documents are as follows:
- Specify the data source
- Loop through the data source:
- Create an object of Document class and load a Word document using Document.LoadFromFile() method.
- Get the mail merge field names as a list using Document.MailMerge.GetMergeFieldNames() method.
- Execute mail merge with specified data using Document.MailMerge.Execute() method.
- Save the document using Document.SaveToFile() method.
- Python
from spire.doc import Document

# Specify the data source
dataSource = member_data = [
    ["Alice Johnson", "35", "+1-555-123-4567", "Premium"],
    ["Bob Williams", "42", "+1-555-765-4321", "Standard"],
    ["Charlie Brown", "28", "+44-1234-567890", "Basic"],
]

# Loop through the data source
for i in range(len(dataSource)):
    # Create an instance of Document
    doc = Document()
    # Load a Word document with mail merge fields
    doc.LoadFromFile("output/MailMergeFields.docx")
    # Get the merge field names
    fieldNames = doc.MailMerge.GetMergeFieldNames()
    # Execute mail merge
    doc.MailMerge.Execute(fieldNames, dataSource[i])
    # Save the document
    doc.SaveToFile(f"output/Members/Member-{dataSource[i][0]}.docx")
doc.Close()
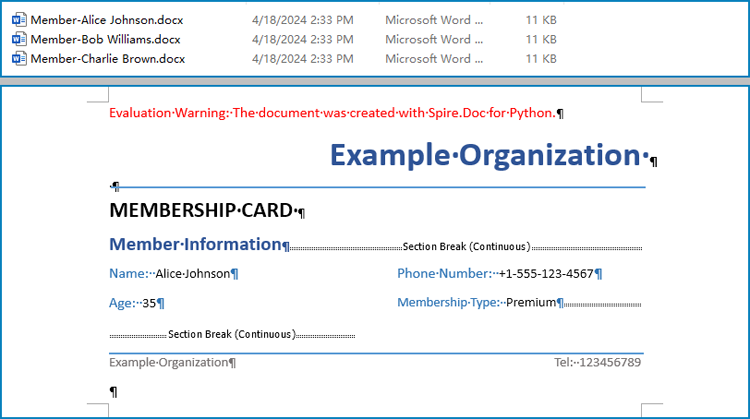
Apply for a Temporary License
If you'd like to remove the evaluation message from the generated documents, or to get rid of the function limitations, please request a 30-day trial license for yourself.
Paragraph indentations determine the horizontal space between the page margins and the text of paragraphs. They are an important formatting tool used in various types of written documents, such as essays, reports, and articles, to improve readability and create a visual distinction between paragraphs. In this article, we will demonstrate how to set paragraph indentations in Word documents in Python using Spire.Doc for Python.
Install Spire.Doc for Python
This scenario requires Spire.Doc for Python and plum-dispatch v1.7.4. They can be easily installed in your Windows through the following pip command.
pip install Spire.Doc
If you are unsure how to install, please refer to this tutorial: How to Install Spire.Doc for Python on Windows
Set Paragraph Indentations in Word in Python
Microsoft Word provides four types of paragraph indent options that enable you to format your document efficiently. These options are as follows:
- First Line Indent: The first line indent refers to the horizontal space between the left margin and the beginning of the first line of a paragraph. It indents only the first line while keeping the subsequent lines aligned with the left margin.
- Left Indent: The left indent, also known as the paragraph indent or the left margin indent, determines the horizontal distance between the left margin and the entire paragraph. It uniformly indents the entire paragraph from the left margin.
- Right Indent: The right indent sets the horizontal distance between the right margin and the entire paragraph. It indents the paragraph from the right side, shifting the text towards the left.
- Hanging Indent: The hanging indent is a unique indentation style where the first line remains aligned with the left margin, while all subsequent lines of the paragraph are indented inward. This creates a "hanging" effect, commonly used for bibliographies, references, or citations.
Spire.Doc for Python supports all these types of indents. The table below lists some of the core classes and methods that are used to set different paragraph indents in Word with Spire.Doc for Python:
| Name | Description |
| ParagraphFormat Class | Represents the format of a paragraph. |
| ParagraphFormat.SetLeftIndent() Method | Sets the left indent value for paragraph. |
| ParagraphFormat.SetRightIndent() Method | Sets the right indent value for paragraph. |
| ParagraphFormat.SetFirstLineIndent() Method | Sets the first line or hanging indent value. Positive value represents first-line indent, and negative value represents hanging indent. |
The steps below explain how to set paragraph indents in a Word document using Spire.Doc for Python:
- Create a Document instance.
- Load a sample Word document using Document.LoadFromFile() method.
- Get a specific section using Document.Sections[] property.
- Get a specific paragraph using Section.Paragraphs[] property.
- Get the paragraph format using Paragraph.Format property, and then set the paragraph indent using the above listed methods of ParagraphFormat class.
- Save the document to another file using Document.SaveToFile() method.
- Python
from spire.doc import *
from spire.doc.common import *

# Create a Document instance
doc = Document()
# Load a sample Word document
doc.LoadFromFile(""Sample6.docx"")

# Get the first section
section = doc.Sections.get_Item(0)

# Get the first paragraph and set the left indent
para1 = section.Paragraphs.get_Item(0)
para1.Format.SetLeftIndent(30)

# Get the second paragraph and set the right indent
para2 = section.Paragraphs.get_Item(1)
para2.Format.SetRightIndent(30)

# Get the third paragraph and set the first line indent
para3 = section.Paragraphs.get_Item(2)
para3.Format.SetFirstLineIndent(30)

# Get the fourth paragraph and set the hanging indent
para4 = section.Paragraphs.get_Item(3)
para4.Format.SetFirstLineIndent(-30)

# Save the document to file
doc.SaveToFile(""SetIndents.docx"", FileFormat.Docx2013)
doc.Close()
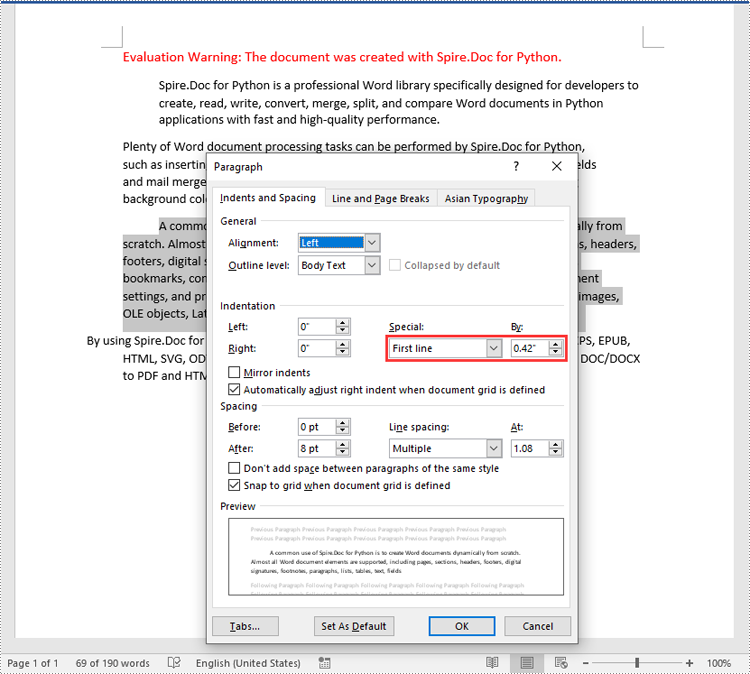
Apply for a Temporary License
If you'd like to remove the evaluation message from the generated documents, or to get rid of the function limitations, please request a 30-day trial license for yourself.
Text Alignment in Python | Left, Right, Center Align & More
2024-04-11 05:59:15 Written by hayes Liu
In the world of document automation, proper text alignment is crucial for creating professional, readable, and visually appealing documents. For developers and data professionals building reports, drafting letters, or designing invoices, mastering text alignment in Python is essential to producing polished, consistent documents without manual editing.
This guide delivers a step-by-step walkthrough on how to align text in Python using Spire.Doc for Python, a library that enables effortless control over Word document formatting.
- Why Choose Spire.Doc for Python to Align Text?
- Core Text Alignment Types in Spire.Doc
- Step-by-Step: Align Text in Word in Python
- FAQs About Python Text Alignment
- Conclusion
Why Choose Spire.Doc for Python to Align Text?
Before diving into code, let’s clarify why Spire.Doc is a top choice for text alignment tasks:
- Full Alignment Support: Natively supports all standard alignment types (Left, Right, Center, Justify) for paragraphs.
- No Microsoft Word Dependency: Runs independently - no need to install Word on your machine.
- High Compatibility: Works with .docx, .doc, and other Word formats, ensuring your aligned documents open correctly across devices.
- Fine-Grained Control: Adjust alignment for entire paragraphs or table cells.
Core Text Alignment Types in Spire.Doc
Spire.Doc uses the HorizontalAlignment enum to define text alignment. The most common values are:
- HorizontalAlignment.Left: Aligns text to the left margin (default).
- HorizontalAlignment.Right: Aligns text to the right margin.
- HorizontalAlignment.Center: Centers text horizontally between margins.
- HorizontalAlignment.Justify: Adjusts text spacing so both left and right edges align with margins.
- HorizontalAlignment.Distribute: Adjusts character spacing (adds space between letters) and word spacing to fill the line.
Below, we’ll cover how to programmatically set paragraph alignment (left, right, center, justified, and distributed) in Word using Python
Step-by-Step: Align Text in Word in Python
Here are the actionable steps to generate a Word document with 5 paragraphs, each using a different alignment style.
Step 1: Install Spire.Doc for Python
Open your terminal/command prompt, and then run the following command to install the latest version:
pip install Spire.Doc
Step 2: Import Required Modules
Import the core classes from Spire.Doc. These modules let you create documents, sections, paragraphs, and configure formatting:
from spire.doc import *
from spire.doc.common import *
Step 3: Create a New Word Document
Initialize a Document instance that represents your empty Word file:
# Create a Document instance
doc = Document()
Step 4: Add a Section to the Document
Word documents organize content into sections (each section can have its own margins, page size, etc.). We’ll add one section to hold our paragraphs:
# Add a section to the document
section = doc.AddSection()
Step 5: Add Paragraphs with Different Alignments
A section contains paragraphs, and each paragraph’s alignment is controlled via the HorizontalAlignment enum. We’ll create 5 paragraphs, one for each alignment type.
Left alignment is the default for most text (text aligns to the left margin).
# Left aligned text
paragraph1 = section.AddParagraph()
paragraph1.AppendText("This is left-aligned text.")
paragraph1.Format.HorizontalAlignment = HorizontalAlignment.Left
Right alignment is useful for dates, signatures, or page numbers (text aligns to the right margin).
# Right aligned text
paragraph2 = section.AddParagraph()
paragraph2.AppendText("This is right-aligned text.")
paragraph2.Format.HorizontalAlignment = HorizontalAlignment.Right
Center alignment works well for titles or headings (text centers between left and right margins). Use to center text in Python:
# Center aligned text
paragraph3 = section.AddParagraph()
paragraph3.AppendText("This is center-aligned text.")
paragraph3.Format.HorizontalAlignment = HorizontalAlignment.Center
Justified text aligns both left and right margins (spaces between words are adjusted for consistency). Ideal for formal documents like essays or reports.
# Justified
paragraph4 = section.AddParagraph()
paragraph4.AppendText("This is justified text.")
paragraph4.Format.HorizontalAlignment = HorizontalAlignment.Justify
Note: Justified alignment is more visible with longer text - short phrases may not show the spacing adjustment.
Distributed alignment is similar to justified, but evenly distributes single-line text (e.g., unevenly spaced words or short phrases).
# Distributed
Paragraph5 = section.AddParagraph()
Paragraph5.AppendText("This is evenly distributed text.")
Paragraph5.Format.HorizontalAlignment = HorizontalAlignment.Distribute
Step 6: Save and Close the Document
Finally, save the document to a specified path and close the Document instance to free resources:
# Save the document
document.SaveToFile("TextAlignment.docx", FileFormat.Docx2016)
# Close the document to release memory
document.Close()
Output:
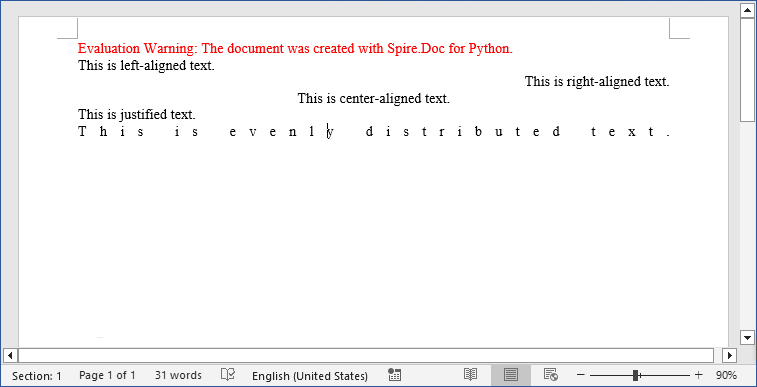
Pro Tip: Spire.Doc for Python also provides interfaces to align tables in Word or align text in table cells.
FAQs About Python Text Alignment
Q1: Is Spire.Doc for Python free?
A: Spire.Doc offers a free version with limitations. For full functionality, you can request a 30-day trial license here.
Q2: Can I set text alignment for existing Word documents
A: Yes. Spire.Doc lets you load existing documents and modify text alignment for specific paragraphs. Here’s a quick example:
from spire.doc import *

# Load an existing document
doc = Document()
doc.LoadFromFile("ExistingDocument.docx")

# Get the first section and first paragraph
section = doc.Sections[0]
paragraph = section.Paragraphs[0]

# Change alignment to center
paragraph.Format.HorizontalAlignment = HorizontalAlignment.Center

# Save the modified document
doc.SaveToFile("UpdatedDocument.docx", FileFormat.Docx2016)
doc.Close()
Q3: Can I apply different alignments to different parts of the same paragraph?
A: No. Text alignment is a paragraph-level setting in Word, not a character-level setting. This means all text within a single paragraph must share the same alignment (left, right, center, etc.).
If you need mixed alignment in the same line, you’ll need to use a table with invisible borders.
Q4: Can Spire.Doc for Python handle other text formatting?
A: Absolutely! Spire.Doc lets you combine alignment with other formatting like fonts, line spacing, bullet points, and more.
Conclusion
Automating Word text alignment with Python and Spire.Doc saves time, reduces human error, and ensures consistency across documents. The code example provided offers a clear template for implementing left, right, center, justified, and distributed alignment, and adapting it to your needs is as simple as modifying the text or adding more formatting rules.
Try experimenting with different alignment combinations, and explore Spire.Doc’s online documentation to unlock more formatting possibilities.
