
Spire.Doc for Python (103)
Comparing two Word documents for differences is a crucial task when reviewing changes, ensuring accuracy, and collaborating on content. This process allows you to identify additions, deletions, and modifications made between different document iterations. By comparing versions, you can efficiently track alterations, verify updates, and maintain document integrity. In this article, you will learn how to compare two versions of a Word document in Python using the Spire.Doc for Python library.
- Compare Two Versions of a Word Document in Python
- Compare Two Versions of a Word Document While Ignoring Formatting in Python
Install Spire.Doc for Python
This scenario requires Spire.Doc for Python and plum-dispatch v1.7.4. They can be easily installed in your Windows through the following pip command.
pip install Spire.Doc
If you are unsure how to install, please refer to: How to Install Spire.Doc for Python on Windows
Compare Two Versions of a Word Document in Python
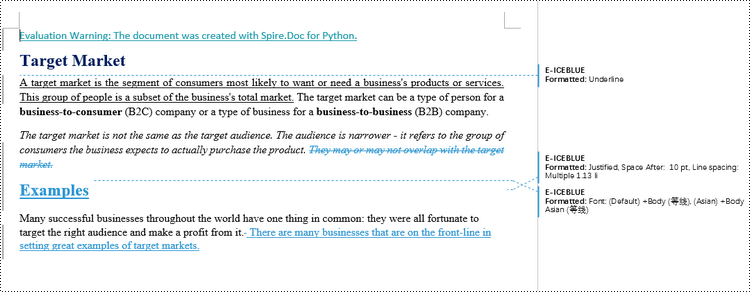
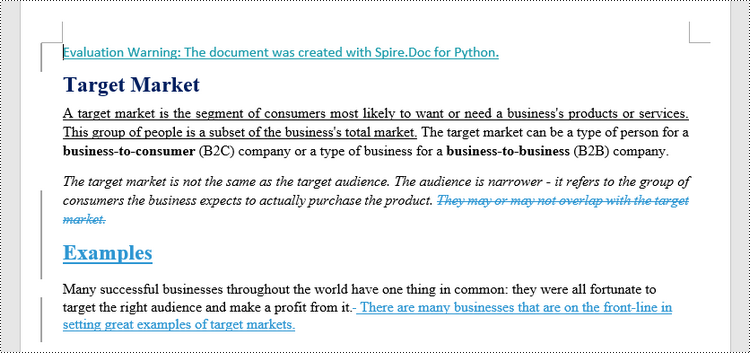
MS Word also offers a "Compare" feature that allows you to directly compare two versions of a document. This feature generates a new document that highlights the differences between the two versions.
To achieve similar results using Spire.Doc for Python, load the original and revised versions into two separate Document objects. Then, use the Compare() method to compare the revised version against the original. Finally, save the comparative document, which highlights the alterations, using the SaveToFile() method.
The steps to compare two version of a Word document using Python are as follows.
- Load the first document (original version) while initializing the Document object.
- Load the second document (revised version) while initializing the Document object.
- Call Compare() method of the first Document object to compare the revised version against the original version.
- Save the comparison results in a new Word document.
- Python
from spire.doc import *
from spire.doc.common import *

# Load the first document while initializing the Document object
firstDoc = Document("C:\\Users\\Administrator\\Desktop\\Original.docx")

# Load the second document while initializing the Document object
secondDoc = Document("C:\\Users\\Administrator\\Desktop\\Revised.docx")

# Compare two documents
firstDoc.Compare(secondDoc, "E-ICEBLUE")

# Save the comparison results in a new document
firstDoc.SaveToFile("Output/Differences.docx", FileFormat.Docx2016)

# Dispose resources
firstDoc.Dispose()
secondDoc.Dispose()
Compare Two Versions of a Word Document While Ignoring Formatting in Python
Comparing two versions of a Word document while ignoring formatting can be useful when you want to focus solely on the textual changes and disregard any formatting modifications.
To customize the comparison options in Spire.Doc for Python, use the CompareOptions class. If you want to exclude formatting from the comparison process, you can set the IgnoreFormatting property of the CompareOptions object to True. When you call the Compare() method, simply pass the CompareOptions object as an argument to achieve the desired comparison behavior.
The following are the steps to compare two versions of a Word document while ignoring formatting using Python.
- Load the first document (original version) while initializing the Document object.
- Load the second document (revised version) while initializing the Document object.
- Create a CompareOptions object and set its IgnoreFormatting property to True.
- Call Compare() method of the first Document object, passing the CompareOptions object as a parameter, to compare the revision against the original while ignoring formatting.
- Save the comparison results in a new Word document.
- Python
from spire.doc import *
from spire.doc.common import *

# Load the first document while initializing the Document object
firstDoc = Document("C:\\Users\\Administrator\\Desktop\\Original.docx")

# Load the second document while initializing the Document object
secondDoc = Document("C:\\Users\\Administrator\\Desktop\\Revised.docx")

# Set compare option to ignore formatting changes
compareOptions = CompareOptions()
compareOptions.IgnoreFormatting = True

# Compare the two Word documents with options
firstDoc.Compare(secondDoc, "E-ICEBLUE", compareOptions)

# Save the comparison results in a new document
firstDoc.SaveToFile("Output/DifferencesWithoutFormattingChanges.docx", FileFormat.Docx2016)

# Dispose resources
firstDoc.Dispose()
secondDoc.Dispose()
Apply for a Temporary License
If you'd like to remove the evaluation message from the generated documents, or to get rid of the function limitations, please request a 30-day trial license for yourself.
Efficient document organization and navigability are crucial for lengthy Word documents. One powerful way to streamline document readability and accessibility is by incorporating a table of contents (TOC) into a Word document, which allows readers to quickly locate specific sections and jump to relevant content. By harnessing the capabilities of Python, users can effortlessly generate a table of contents that dynamically updates as the document evolves. This article provides a step-by-step guide and code examples for inserting a table of contents into a Word document in Python programs using Spire.Doc for Python, empowering users to create professional-looking documents with ease.
- Insert the Default Table of Contents into a Word Document
- Insert a Custom Table of Contents into a Word Document
Install Spire.Doc for Python
This scenario requires Spire.Doc for Python and plum-dispatch v1.7.4. They can be easily installed in your Windows through the following pip command.
pip install Spire.Doc
If you are unsure how to install, please refer to: How to Install Spire.Doc for Python on Windows
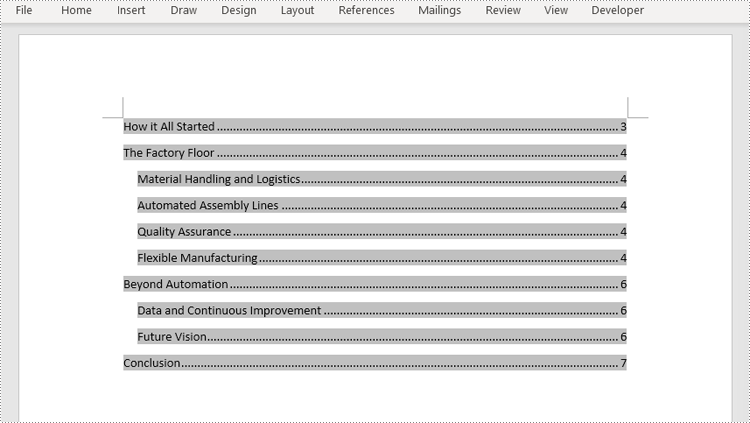
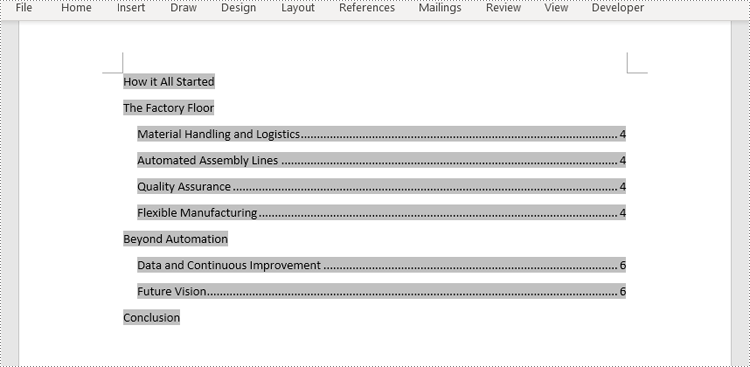
Insert the Default Table of Contents into a Word Document
Spire.Doc for Python supports inserting a table of contents in a Word document based on the headings of different levels. If the document does not have heading levels set, developers can set the heading levels using the Paragraph.ApplyStyle(BuiltinStyle) method before inserting a table of contents.
By using the Paragraph.AppendTOC(lowerLevel: int, upperLevel: int) method, developers can insert a table of contents at any paragraph and specify the titles to be displayed. It is important to note that after inserting the table of contents, developers need to use the Document.UpdateTableOfContents() method to update the table of contents so that its contents are displayed correctly.
- Create an object of Document class and load a Word document using Document.LoadFromFile() method.
- Add a section using Document.AddSection() method, add a paragraph to the section using Section.AddParagraph() method, and insert the new section after the cover section using Document.Sections.Insert(index: int, entity: Section) method.
- Update the table of contents using Document.UpdateTableOfContents() method.
- Save the document using Document.SaveToFile() method.
- Python
from spire.doc import *
from spire.doc.common import *

# Create an object of Document class
doc = Document()

# Load a Word document
doc.LoadFromFile("Sample.docx")

# Create a section for the table of contents
section = doc.AddSection()

# Add a paragraph in the section
paragraph = section.AddParagraph()

# Append a table of contents in the paragraph
paragraph.AppendTOC(1, 2)

# Insert the section after the cover section
doc.Sections.Insert(1, section)

# Update the table of contents
doc.UpdateTableOfContents()

# Save the document
doc.SaveToFile("output/DefaultTOC.docx")
doc.Close()
Insert a Custom Table of Contents into a Word Document
Developers can also create a table of contents by initializing a TableOfContent object, and customize it through switches. For example, the switch "{\\o \"1-2\" \\n 1-1}" indicates showing headings from level one to level three in the table of contents and omitting the page numbers of level one headings. The detailed steps for inserting a customized table of contents into a Word document are as follows:
- Create an object of Document class and load a Word document using Document.LoadFromFile() method.
- Add a section to the document using Document.AddSecction() method, add a paragraph to the section using Section.AddParagraph() method, and insert the section after the cover section using Document.Sections.Insert() method.
- Create an object of TableOfContents class and insert it into the added paragraph using Paragraph.Items.Add() method.
- Append field separator and field end mark to end the TOC filed using Paragraph.AppendFieldMark() method.
- Set the created table of contents as the table of contents of the document through Document.TOC property.
- Save the document using Document.SaveToFile() method.
- Python
from spire.doc import *
from spire.doc.common import *

# Create an object of Document class and load a Word document
doc = Document()
doc.LoadFromFile("Sample.docx")

# Add a section and a paragraph and insert the section after the cover section
section = doc.AddSection()
paragraph = section.AddParagraph()
doc.Sections.Insert(1, section)

# Customize a table of contents with switches
toc = TableOfContent(doc, "{\\o \"1-2\" \\n 1-1}")

# Insert the TOC to the paragraph
paragraph.Items.Add(toc)

# Insert field separator and filed end mark to end the TOC field
paragraph.AppendFieldMark(FieldMarkType.FieldSeparator)
paragraph.AppendFieldMark(FieldMarkType.FieldEnd)

# Set the TOC field as the table of contents of the document
doc.TOC = toc

# Update the TOC
doc.UpdateTableOfContents()

# Save the document
doc.SaveToFile("output/CustomizedTOC.docx")
doc.Close()
Apply for a Temporary License
If you'd like to remove the evaluation message from the generated documents, or to get rid of the function limitations, please request a 30-day trial license for yourself.
Converting Word documents to XPS, PostScript, and OFD documents is of significant importance. Firstly, this conversion makes it easier to share and display documents across different platforms and applications, as these formats typically have broader compatibility.
Secondly, converting to these formats can preserve the document's formatting, layout, and content, ensuring consistent display across different systems.
Additionally, XPS and OFD formats support high-quality printing, helping to maintain the visual appearance and print quality of the document. The PostScript format is commonly used for printing and graphic processing, converting to PostScript can ensure that the document maintains high quality when printed.
In this article, you will learn how to convert Word to XPS, PostScript, or OFD with Python using Spire.Doc for Python.
Install Spire.Doc for Python
This scenario requires Spire.Doc for Python and plum-dispatch v1.7.4. They can be easily installed in your Windows through the following pip commands.
pip install Spire.Doc
If you are unsure how to install, please refer to this tutorial: How to Install Spire.Doc for Python on Windows
Convert Word to XPS in Python
The Document.SaveToFile(filename:str, FileFormat.XPS) method provided by Spire.Doc for Python can convert a Word document to XPS format. The detailed steps are as follows:
- Create an object of the Document class.
- Use the Document.LoadFromFile() method to load the Word document.
- Use the Document.SaveToFile(filename:str, FileFormat.XPS) method to convert the Word document to an XPS document.
- Python
from spire.doc import *
from spire.doc.common import *

# Create a Document object
doc = Document()

# Load a Word document
doc.LoadFromFile("Sample.docx")

# Save the loaded document as an XPS document
doc.SaveToFile("Result.xps", FileFormat.XPS)

# Close the document object and release the resources occupied by the document object
doc.Close()
doc.Dispose()
Convert Word to PostScript in Python
With Document.SaveToFile(filename:str, FileFormat.PostScript) method in Spire.Doc for Python, you can convert a Word document to PostScript format. The detailed steps are as follows:
- Create an object of the Document class.
- Use the Document.LoadFromFile() method to load the Word document.
- Use the Document.SaveToFile(filename:str, FileFormat.PostScript) method to convert the Word document to a PostScript document.
- Python
from spire.doc import *
from spire.doc.common import *

# Create a Document object
doc = Document()

# Load a Word document
doc.LoadFromFile("Sample.docx")

# # Save the loaded document as a PostScript document
doc.SaveToFile("Result.ps", FileFormat.PostScript)

# Close the document object and release the resources occupied by the document object
doc.Close()
doc.Dispose()
Convert Word to OFD in Python
By utilizing the Document.SaveToFile() method in the Spire.Doc for Python library and specifying the file format as FileFormat.OFD, you can save a Word document as an OFD file format. The detailed steps are as follows:
- Create an object of the Document class.
- Use the Document.LoadFromFile() method to load the Word document.
- Use the Document.SaveToFile(filename:str, FileFormat.OFD) method to convert the Word document to an OFD document.
- Python
from spire.doc import *
from spire.doc.common import *

# Create a Document object
doc = Document()

# Load a Word document
doc.LoadFromFile("Sample.docx")

# Save the loaded document as an OFD document
doc.SaveToFile("Result.ofd", FileFormat.OFD)

# Close the document object and release the resources occupied by the document object
doc.Close()
doc.Dispose()
Get a Free License
To fully experience the capabilities of Spire.Doc for Python without any evaluation limitations, you can request a free 30-day trial license.
Images are an effective tool for conveying complex information. By inserting images into tables, you can enhance data presentation with charts, graphs, diagrams, illustrations, and more. This not only enables readers to easily comprehend the information being presented but also adds visual appeal to your document. In certain cases, you may also come across situations where you need to extract images from tables for various purposes. For example, you might want to reuse an image in a presentation, website, or another document. Extracting images allows you to repurpose them, streamlining your content creation process and increasing efficiency. In this article, we will explore how to insert and extract images in Word tables in Python using Spire.Doc for Python.
Install Spire.Doc for Python
This scenario requires Spire.Doc for Python and plum-dispatch v1.7.4. They can be easily installed in your Windows through the following pip commands.
pip install Spire.Doc
If you are unsure how to install, please refer to this tutorial: How to Install Spire.Doc for Python on Windows
Insert Images into a Word Table in Python
Spire.Doc for Python provides the TableCell.Paragraphs[index].AppendPicture() method to add an image to a specific table cell. The detailed steps are as follows.
- Create an object of the Document class.
- Load a Word document using the Document.LoadFromFile() method.
- Get a specific section in the document using the Document.Sections[index] property.
- Get a specific table in the section using the Section.Tables[index] property.
- Access a specific cell in the table using the Table.Row[index].Cells[index] property.
- Add an image to the cell using the TableCell.Paragraphs[index].AppendPicture() method and set the image width and height.
- Save the result document using the Document.SaveToFile() method.
- Python
from spire.doc import *
from spire.doc.common import *

# Create an object of the Document class
doc = Document()
# Load a Word document
doc.LoadFromFile("Table2.docx")

# Get the first section
section = doc.Sections.get_Item(0)

# Get the first table in the section
table = section.Tables.get_Item(0)

# Add an image to the 3rd cell of the second row in the table
cell = table.Rows[1].Cells[2]
picture = cell.Paragraphs[0].AppendPicture("doc.png")
# Set image width and height
picture.Width = 100
picture.Height = 100

# Add an image to the 3rd cell of the 3rd row in the table
cell = table.Rows[2].Cells[2]
picture = cell.Paragraphs[0].AppendPicture("xls.png")
# Set image width and height
picture.Width = 100
picture.Height = 100

# Save the result document
doc.SaveToFile("AddImagesToTable.docx", FileFormat.Docx2013)
doc.Close()

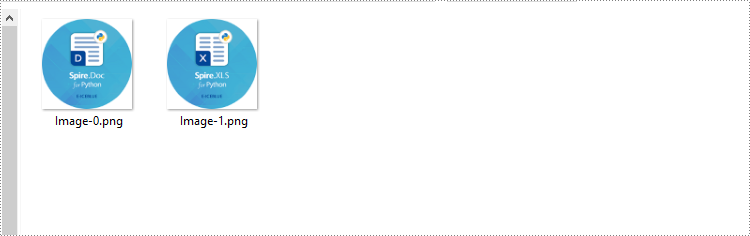
Extract Images from a Word Table in Python
To extract images from a Word table, you need to iterate through all objects in the table and identify the ones of the DocPicture type. Once the DocPicture objects are found, you can access their image bytes using the DocPicture.ImageBytes property, and then save the image bytes to image files. The detailed steps are as follows.
- Create an object of the Document class.
- Load a Word document using the Document.LoadFromFile() method.
- Get a specific section in the document using the Document.Sections[index] property.
- Get a specific table in the section using the Section.Tables[index] property.
- Create a list to store the extracted image data.
- Iterate through all rows in the table.
- Iterate through all cells in each row.
- Iterate through all paragraphs in each cell.
- Iterate through all child objects in each paragraph.
- Check if the current child object is of DocPicture type.
- Get the image bytes of the DocPicture object using the DocPicture.ImageBytes property and append them to the list.
- Save the image bytes in the list to image files.
- Python
from spire.doc import *
from spire.doc.common import *

# Create an object of the Document class
doc = Document()
# Load a Word document
doc.LoadFromFile("AddImagesToTable.docx")

# Get the first section
section = doc.Sections.get_Item(0)

# Get the first table in the section
table = section.Tables.get_Item(0)

# Create a list to store image bytes
image_data = []

# Iterate through all rows in the table
for i in range(table.Rows.Count):
    row = table.Rows.get_Item(i)
    # Iterate through all cells in each row
    for j in range(row.Cells.Count):
        cell = row.Cells[j]
        # Iterate through all paragraphs in each cell
        for k in range(cell.Paragraphs.Count):
            paragraph = cell.Paragraphs[k]
            # Iterate through all child objects in each paragraph
            for o in range(paragraph.ChildObjects.Count):
                child_object = paragraph.ChildObjects[o]
                # Check if the current child object is of DocPicture type
                if isinstance(child_object, DocPicture):
                    picture = child_object
                    # Get the image bytes
                    bytes = picture.ImageBytes
                    # Append the image bytes to the list
                    image_data.append(bytes)

# Save the image bytes in the list to image files
for index, item in enumerate(image_data):
    image_Name = f"Images/Image-{index}.png"
    with open(image_Name, 'wb') as imageFile:
        imageFile.write(item)

doc.Close()
Apply for a Temporary License
If you'd like to remove the evaluation message from the generated documents, or to get rid of the function limitations, please request a 30-day trial license for yourself.
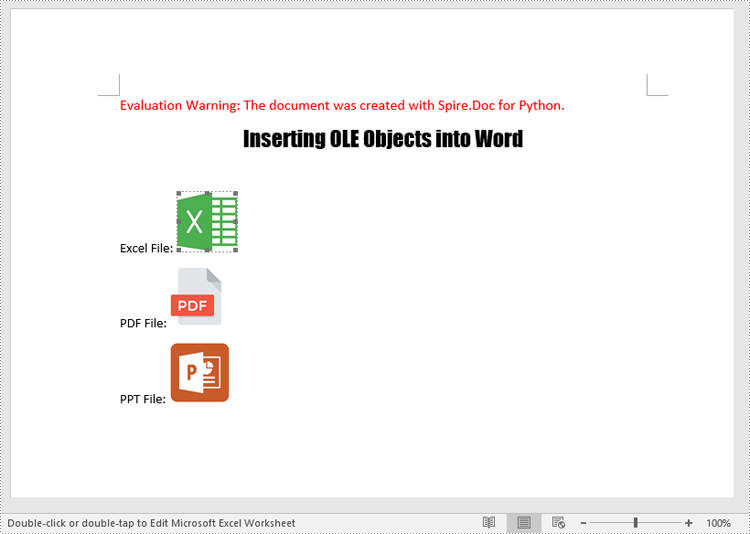
OLE (Object Linking and Embedding) objects in Word are files or data from other applications that can be inserted into a document. These objects can be edited and updated within Word, allowing you to seamlessly integrate content from various programs, such as Excel spreadsheets, PowerPoint presentations, or even multimedia files like images, audio, or video. In this article, we will introduce how to insert and extract OLE objects in a Word document in Python using Spire.Doc for Python.
Install Spire.Doc for Python
This scenario requires Spire.Doc for Python and plum-dispatch v1.7.4. They can be easily installed in your Windows through the following pip command.
pip install Spire.Doc
If you are unsure how to install, please refer to this tutorial: How to Install Spire.Doc for Python on Windows
Insert OLE Objects in Word in Python
Spire.Doc for Python provides the Paragraph.AppendOleObject(pathToFile:str, olePicture:DocPicture, type:OleObjectType) method to embed OLE objects in a Word document. The detailed steps are as follows.
- Create an object of the Document class.
- Load a Word document using the Document.LoadFromFile() method.
- Get a specific section using the Document.Sections.get_Item(index) method.
- Add a paragraph to the section using the Section.AddParagraph() method.
- Create an object of the DocPicture class.
- Load an image that will be used as the icon of the OLE object using the DocPicture.LoadImage() method and then set image width and height.
- Append an OLE object to the paragraph using the Paragraph.AppendOleObject(pathToFile:str, olePicture:DocPicture, type:OleObjectType) method.
- Save the result file using the Document.SaveToFile() method.
The following code example shows how to embed an Excel spreadsheet, a PDF file, and a PowerPoint presentation in a Word document using Spire.Doc for Python:
- Python
from spire.doc import *
from spire.doc.common import *

# Create an object of the Document class
doc = Document()
# Load a Word document
doc.LoadFromFile("Example.docx")

# Get the first section
section = doc.Sections.get_Item(0)

# Add a paragraph to the section
para1 = section.AddParagraph()
para1.AppendText("Excel File: ")
# Load an image which will be used as the icon of the OLE object
picture1 = DocPicture(doc)
picture1.LoadImage("Excel-Icon.png")
picture1.Width = 50
picture1.Height = 50
# Append an OLE object (an Excel spreadsheet) to the paragraph
para1.AppendOleObject("Budget.xlsx", picture1, OleObjectType.ExcelWorksheet)

# Add a paragraph to the section
para2 = section.AddParagraph()
para2.AppendText("PDF File: ")
# Load an image which will be used as the icon of the OLE object
picture2 = DocPicture(doc)
picture2.LoadImage("PDF-Icon.png")
picture2.Width = 50
picture2.Height = 50
# Append an OLE object (a PDF file) to the paragraph
para2.AppendOleObject("Report.pdf", picture2, OleObjectType.AdobeAcrobatDocument)

# Add a paragraph to the section
para3 = section.AddParagraph()
para3.AppendText("PPT File: ")
# Load an image which will be used as the icon of the OLE object
picture3 = DocPicture(doc)
picture3.LoadImage("PPT-Icon.png")
picture3.Width = 50
picture3.Height = 50
# Append an OLE object (a PowerPoint presentation) to the paragraph
para3.AppendOleObject("Plan.pptx", picture3, OleObjectType.PowerPointPresentation)

doc.SaveToFile("InsertOLE.docx", FileFormat.Docx2013)
doc.Close()
Extract OLE Objects from Word in Python
To extract OLE objects from a Word document, you first need to locate the OLE objects within the document. Once located, you can determine the file format of each OLE object. Finally, you can save the data of each OLE object to a file in its native file format. The detailed steps are as follows.
- Create an instance of the Document class.
- Load a Word document using the Document.LoadFromFile() method.
- Iterate through all sections of the document.
- Iterate through all child objects in the body of each section.
- Identify the paragraphs within each section.
- Iterate through the child objects in each paragraph.
- Locate the OLE object within the paragraph.
- Determine the file format of the OLE object.
- Save the data of the OLE object to a file in its native file format.
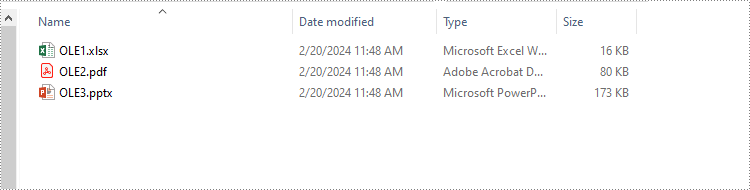
The following code example shows how to extract the embedded Excel spreadsheet, PDF file, and PowerPoint presentation from a Word document using Spire.Doc for Python:
- Python
from spire.doc import *
from spire.doc.common import *

# Create an object of the Document class
doc = Document()
# Load a Word document
doc.LoadFromFile("InsertOLE.docx")

i = 1
# Iterate through all sections of the Word document
for k in range(doc.Sections.Count):
    sec = doc.Sections.get_Item(k)
    # Iterate through all child objects in the body of each section
    for j in range(sec.Body.ChildObjects.Count):
        obj = sec.Body.ChildObjects.get_Item(j)
        # Check if the child object is a paragraph
        if isinstance(obj, Paragraph):
            par = obj if isinstance(obj, Paragraph) else None
            # Iterate through the child objects in the paragraph
            for m in range(par.ChildObjects.Count):
                o = par.ChildObjects.get_Item(m)
                # Check if the child object is an OLE object
                if o.DocumentObjectType == DocumentObjectType.OleObject:
                    ole = o if isinstance(o, DocOleObject) else None
                    s = ole.ObjectType
                    # Check if the OLE object is a PDF file
                    if s.startswith("AcroExch.Document"):
                        ext = ".pdf"
                    # Check if the OLE object is an Excel spreadsheet
                    elif s.startswith("Excel.Sheet"):
                        ext = ".xlsx"
                    # Check if the OLE object is a PowerPoint presentation
                    elif s.startswith("PowerPoint.Show"):
                        ext = ".pptx"
                    else:
                        continue
                    # Write the data of OLE into a file in its native format
                    with open(f"Output/OLE{i}{ext}", "wb") as file:
                            file.write(ole.NativeData)
                    i += 1

doc.Close()
Apply for a Temporary License
If you'd like to remove the evaluation message from the generated documents, or to get rid of the function limitations, please request a 30-day trial license for yourself.
Creating a fillable form in Word allows you to design a document that can be easily completed and customized by others. Whether you need to collect information, gather feedback, or create an interactive document, fillable forms provide a convenient way to capture data electronically. By adding various elements such as text fields, checkboxes, dropdown menus, and more, you can tailor the form to your specific requirements.
To create a fillable form in Word, you probably need to use the following tools.
- Content Controls: The areas where users input information in a form.
- Tables: Tables are used in forms to align text and form fields, and to create borders and boxes.
- Protection: Allows users to populate fields but not to make changes to the rest of the document.
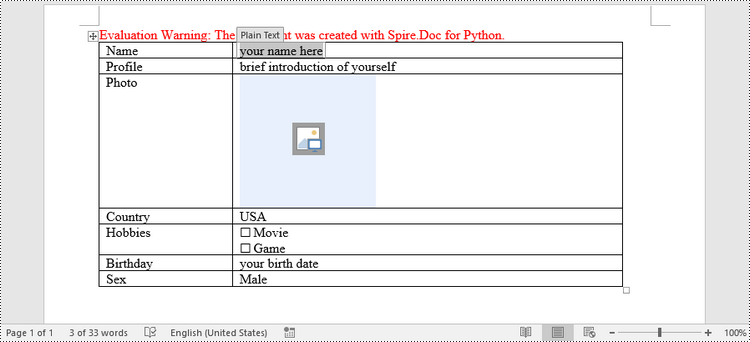
In Word, content controls serve as containers for structured documents, allowing users to organize content within a document. Word 2013 provides ten types of content controls. This article introduces how to create a fillable form in Word that includes the following seven commonly-used content controls using Spire.Doc for Python.
| Content Control | Description |
| Plain Text | A text field limited to plain text, so no formatting can be included. |
| Rich Text | A text field that can contain formatted text or other items, such as tables, pictures, or other content controls. |
| Picture | Accepts a single picture. |
| Drop-Down List | A drop-down list displays a predefined list of items for the user to choose from. |
| Combo Box | A combo box enables users to select a predefined value in a list or type their own value in the text box of the control. |
| Check Box | A check box provides a graphical widget that allows the user to make a binary choice: yes (checked) or no (not checked). |
| Date Picker | Contains a calendar control from which the user can select a date. |
Install Spire.Doc for Python
This scenario requires Spire.Doc for Python and plum-dispatch v1.7.4. They can be easily installed in your Windows through the following pip command.
pip install Spire.Doc
If you are unsure how to install, please refer to this tutorial: How to Install Spire.Doc for Python on Windows
Create a Fillable Form in Word in Python
Spire.Doc for Python offers the StructureDocumentTagInline class, which is utilized to generate structured document tags within a paragraph. By utilizing the SDTProperties property and SDTContent property of this class, one can define the properties and content of the current structured document tag. Below are the step-by-step instructions for creating a fill form in a Word document in Python.
- Create a Document object.
- Add a section using Document.AddSection() method.
- Add a table using Section.AddTable() method.
- Add a paragraph to a specific table cell using TableCell.AddParagraph() method.
- Create an instance of StructureDocumentTagInline class, and add it to the paragraph as a child object using Paragraph.ChildObjects.Add() method.
- Specify the type, content and other attributes of the structured document tag through the SDTProperties property and the SDTContent property of the StructureDocumentTagInline object.
- Prevent users from editing content outside form fields using Document.Protect() method.
- Save the document using Document.SaveToFile() method.
- Python
from spire.doc import *
from spire.doc.common import *

# Create a Document object
doc = Document()

# Add a section
section = doc.AddSection()

# Add a table
table = section.AddTable(True)
table.ResetCells(7, 2)
table.SetColumnWidth(0, 120, CellWidthType.Point)
table.SetColumnWidth(1, 350, CellWidthType.Point)

# Add text to the cells of the first column
paragraph = table.Rows.get_Item(0).Cells.get_Item(0).AddParagraph()
paragraph.AppendText("Name")
paragraph = table.Rows[1].Cells[0].AddParagraph()
paragraph.AppendText("Profile")
paragraph = table.Rows[2].Cells[0].AddParagraph()
paragraph.AppendText("Photo")
paragraph = table.Rows[3].Cells[0].AddParagraph()
paragraph.AppendText("Country")
paragraph = table.Rows[4].Cells[0].AddParagraph()
paragraph.AppendText("Hobbies")
paragraph = table.Rows[5].Cells[0].AddParagraph()
paragraph.AppendText("Birthday")
paragraph = table.Rows[6].Cells[0].AddParagraph()
paragraph.AppendText("Sex")

# Add a plain text content control to the cell (0,1)
paragraph = table.Rows[0].Cells[1].AddParagraph()
sdt = StructureDocumentTagInline(doc)
paragraph.ChildObjects.Add(sdt)
sdt.SDTProperties.SDTType = SdtType.Text
sdt.SDTProperties.Alias = "Plain Text"
sdt.SDTProperties.Tag = "Plain Text"
sdt.SDTProperties.IsShowingPlaceHolder = True
text = SdtText(True)
text.IsMultiline = False
sdt.SDTProperties.ControlProperties = text
textRange = TextRange(doc)
textRange.Text = "your name here"
sdt.SDTContent.ChildObjects.Add(textRange)

# Add a rich text content control to the cell (1,1)
paragraph = table.Rows[1].Cells[1].AddParagraph()
sdt = StructureDocumentTagInline(doc)
paragraph.ChildObjects.Add(sdt)
sdt.SDTProperties.SDTType = SdtType.RichText
sdt.SDTProperties.Alias = "Rich Text"
sdt.SDTProperties.Tag = "Rich Text"
sdt.SDTProperties.IsShowingPlaceHolder = True
text = SdtText(True)
text.IsMultiline = False
sdt.SDTProperties.ControlProperties = text
textRange = TextRange(doc)
textRange.Text = "brief introduction of yourself"
sdt.SDTContent.ChildObjects.Add(textRange )

# Add a picture content control to the cell (2,1)
paragraph = table.Rows[2].Cells[1].AddParagraph()
sdt = StructureDocumentTagInline(doc)
paragraph.ChildObjects.Add(sdt)
sdt.SDTProperties.SDTType = SdtType.Picture
sdt.SDTProperties.Alias = "Picture"
sdt.SDTProperties.Tag = "Picture"
sdtPicture = SdtPicture(True)
sdt.SDTProperties.ControlProperties = sdtPicture
pic = DocPicture(doc)
pic.LoadImage("C:\\Users\\Administrator\\Desktop\\placeHolder.png")
sdt.SDTContent.ChildObjects.Add(pic)

# Add a dropdown list content control to the cell (3,1)
paragraph = table.Rows[3].Cells[1].AddParagraph();
sdt = StructureDocumentTagInline(doc)
sdt.SDTProperties.SDTType = SdtType.DropDownList
sdt.SDTProperties.Alias = "Dropdown List"
sdt.SDTProperties.Tag = "Dropdown List"
paragraph.ChildObjects.Add(sdt)
stdList = SdtDropDownList()
stdList.ListItems.Add(SdtListItem("USA", "1"))
stdList.ListItems.Add(SdtListItem("China", "2"))
stdList.ListItems.Add(SdtListItem("Briza", "3"))
stdList.ListItems.Add(SdtListItem("Austrilia", "4"))
sdt.SDTProperties.ControlProperties = stdList;
textRange = TextRange(doc)
textRange .Text = stdList.ListItems[0].DisplayText
sdt.SDTContent.ChildObjects.Add(textRange )

# Add two check box content controls to the cell (4,1)
paragraph = table.Rows[4].Cells[1].AddParagraph()
sdt = StructureDocumentTagInline(doc)
paragraph.ChildObjects.Add(sdt)
sdt.SDTProperties.SDTType = SdtType.CheckBox
sdtCheckBox = SdtCheckBox()
sdt.SDTProperties.ControlProperties = sdtCheckBox
textRange = TextRange(doc)
sdt.ChildObjects.Add(textRange)
sdtCheckBox.Checked = False
paragraph.AppendText(" Movie")

paragraph = table.Rows[4].Cells[1].AddParagraph();
sdt = StructureDocumentTagInline(doc)
paragraph.ChildObjects.Add(sdt)
sdt.SDTProperties.SDTType = SdtType.CheckBox
sdtCheckBox = SdtCheckBox()
sdt.SDTProperties.ControlProperties = sdtCheckBox
textRange = TextRange(doc)
sdt.ChildObjects.Add(textRange)
sdtCheckBox.Checked = False
paragraph.AppendText(" Game")

# Add a date picker content control to the cell (5,1)
paragraph = table.Rows[5].Cells[1].AddParagraph()
sdt = StructureDocumentTagInline(doc)
paragraph.ChildObjects.Add(sdt)
sdt.SDTProperties.SDTType = SdtType.DatePicker
sdt.SDTProperties.Alias = "Date Picker"
sdt.SDTProperties.Tag = "Date Picker"
stdDate = SdtDate()
stdDate.CalendarType = CalendarType.Default
stdDate.DateFormat = "yyyy.MM.dd"
stdDate.FullDate = DateTime.get_Now()
sdt.SDTProperties.ControlProperties = stdDate
textRange = TextRange(doc)
textRange.Text = "your birth date"
sdt.SDTContent.ChildObjects.Add(textRange)

# Add a combo box content control to the cell (6,1)
paragraph = table.Rows[6].Cells[1].AddParagraph()
sdt = StructureDocumentTagInline(doc)
paragraph.ChildObjects.Add(sdt)
sdt.SDTProperties.SDTType = SdtType.ComboBox
sdt.SDTProperties.Alias = "Combo Box"
sdt.SDTProperties.Tag = "Combo Box"
stdComboBox = SdtComboBox()
stdComboBox.ListItems.Add(SdtListItem("Male"))
stdComboBox.ListItems.Add(SdtListItem("Female"))
sdt.SDTProperties.ControlProperties = stdComboBox
textRange = TextRange(doc)
textRange.Text = stdComboBox.ListItems[0].DisplayText
sdt.SDTContent.ChildObjects.Add(textRange)

# Allow users to edit the form fields only
doc.Protect(ProtectionType.AllowOnlyFormFields, "permission-psd")

# Save to file
doc.SaveToFile("output/Form.docx", FileFormat.Docx2013)
Apply for a Temporary License
If you'd like to remove the evaluation message from the generated documents, or to get rid of the function limitations, please request a 30-day trial license for yourself.
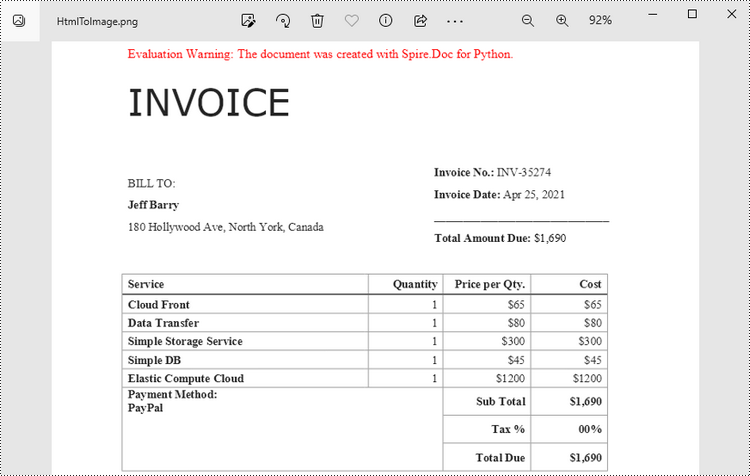
The conversion from HTML to image allows you to capture the appearance and layout of the HTML content as a static image file. It can be useful for various purposes, such as generating website previews, creating screenshots, archiving web pages, or integrating HTML content into applications that primarily deal with images. In this article, you will learn how to convert an HTML file or an HTML string to an image in Python using Spire.Doc for Python.
Install Spire.Doc for Python
This scenario requires Spire.Doc for Python and plum-dispatch v1.7.4. They can be easily installed in your Windows through the following pip command.
pip install Spire.Doc
If you are unsure how to install, please refer to this tutorial: How to Install Spire.Doc for Python on Windows
Convert an HTML File to an Image in Python
When an HTML file is loaded into the Document object using the Document.LoadFromFile() method, its contents are automatically rendered as the contents of a Word page. Then, a specific page can be saved as an image stream using the Document.SaveImageToStreams() method.
The following are the steps to convert an HTML file to an image with Python.
- Create a Document object.
- Load a HTML file using Document.LoadFromFile() method.
- Convert a specific page to an image stream using Document.SaveImageToStreams() method.
- Save the image stream as a PNG file using BufferedWriter.write() method.
- Python
from spire.doc import *
from spire.doc.common import *

# Create a Document object
document = Document()

# Load an HTML file
document.LoadFromFile("C:\\Users\\Administrator\\Desktop\\Sample.html", FileFormat.Html, XHTMLValidationType.none)

# Save the first page as an image stream
imageStream = document.SaveImageToStreams(0, ImageType.Bitmap)

# Convert the image stream as a PNG file
with open("output/HtmlToImage.png",'wb') as imageFile:
imageFile.write(imageStream.ToArray())
document.Close()
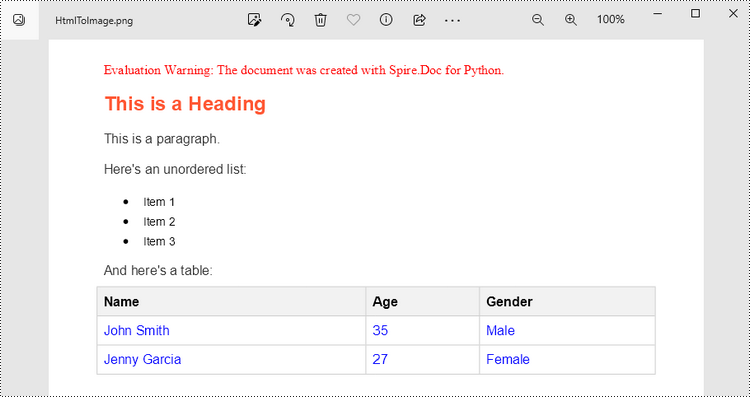
Convert an HTML String to an Image in Python
To render uncomplicated HTML strings (typically text and its formatting) as a Word page, you can utilize the Paragraph.AppendHTML() method. Afterwards, you can convert it to an image stream using the Document.SaveImageToStreams() method.
The following are the steps to convert an HTML string to an image in Python.
- Create a Document object.
- Add a section using Document.AddSection() method.
- Add a paragraph using Section.AddParagraph() method.
- Specify the HTML string, and add the it to the paragraph using Paragraph.AppendHTML() method.
- Convert a specific page to an image stream using Document.SaveImageToStreams() method.
- Save the image stream as a PNG file using BufferedWriter.write() method.
- Python
from spire.doc import *
from spire.doc.common import *

# Create a Document object
document = Document()

# Add a section to the document
sec = document.AddSection()

# Add a paragraph to the section
paragraph = sec.AddParagraph()

# Specify the HTML string
htmlString = """
<html>
<head>
    <title>HTML to Word Example</title>
    <style>
        body {
            font-family: Arial, sans-serif;
        }
        h1 {
            color: #FF5733;
            font-size: 24px;
            margin-bottom: 20px;
        }
        p {
            color: #333333;
            font-size: 16px;
            margin-bottom: 10px;
        }
        ul {
            list-style-type: disc;
            margin-left: 20px;
            margin-bottom: 15px;
        }
        li {
            font-size: 14px;
            margin-bottom: 5px;
        }
        table {
            border-collapse: collapse;
            width: 100%;
            margin-bottom: 20px;
        }
        th, td {
            border: 1px solid #CCCCCC;
            padding: 8px;
            text-align: left;
        }
        th {
            background-color: #F2F2F2;
            font-weight: bold;
        }
        td {
            color: #0000FF;
        }
    </style>
</head>
<body>
    <h1>This is a Heading</h1>
    <p>This is a paragraph.</p>
    <p>Here's an unordered list:</p>
    <ul>
        <li>Item 1</li>
        <li>Item 2</li>
        <li>Item 3</li>
    </ul>
    <p>And here's a table:</p>
    <table>
        <tr>
            <th>Name</th>
            <th>Age</th>
            <th>Gender</th>
        </tr>
        <tr>
            <td>John Smith</td>
            <td>35</td>
            <td>Male</td>
        </tr>
        <tr>
            <td>Jenny Garcia</td>
            <td>27</td>
            <td>Female</td>
        </tr>
    </table>
</body>
</html>
"""

# Append the HTML string to the paragraph
paragraph.AppendHTML(htmlString)

# Save the first page as an image stream
imageStream = document.SaveImageToStreams(0, ImageType.Bitmap)

# Convert the image stream as a PNG file
with open("output/HtmlToImage2.png",'wb') as imageFile:
    imageFile.write(imageStream.ToArray())
document.Close()
Get a Free License
To fully experience the capabilities of Spire.Doc for Python without any evaluation limitations, you can request a free 30-day trial license.
Captions play a significant role in Word documents by serving as markers, explanations, navigation aids, and accessibility features. They are crucial elements for creating professional, accurate, and user-friendly documents. Captions help improve the readability, usability, and accessibility of the document and are essential for understanding and effectively processing the document's content. This article will explain how to use Spire.Doc for Python to add or remove captions in Word documents using Python programs.
- Add Image Captions to a Word document in Python
- Add Table Captions to a Word document in Python
- Remove Captions from a Word document in Python
Install Spire.Doc for Python
This scenario requires Spire.Doc for Python and plum-dispatch v1.7.4. They can be easily installed in your Windows through the following pip command.
pip install Spire.Doc
If you are unsure how to install, please refer to this tutorial: How to Install Spire.Doc for Python on Windows
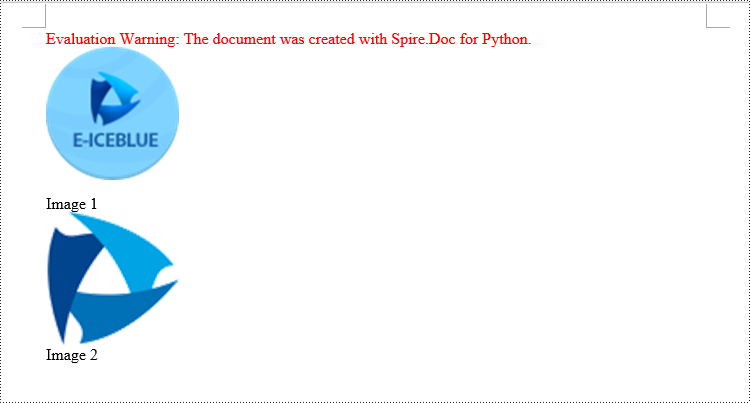
Add Image Captions to a Word document in Python
Spire.Doc for Python provides a convenient method to add captions to images. Simply call the DocPicture.AddCaption(self, name: str, numberingFormat: 'CaptionNumberingFormat', captionPosition: 'CaptionPosition') method to add a caption for the image. The detailed steps are as follows:
- Create an object of the Document class.
- Use the Document.AddSection() method to add a section.
- Add a paragraph using Section.AddParagraph() method.
- Use the Paragraph.AppendPicture(self ,imgFile:str) method to add a DocPicture image object to the paragraph.
- Use the DocPicture.AddCaption(self ,name:str,numberingFormat:'CaptionNumberingFormat',captionPosition:'CaptionPosition') method to add a caption with numbering format as CaptionNumberingFormat.Number.
- Set the Document.IsUpdateFields property to true to update all fields.
- Use the Document.SaveToFile() method to save the resulting document.
- Python
from spire.doc import *
from spire.doc.common import *

# Create a Word document object
document = Document()

# Add a section
section = document.AddSection()

# Add a new paragraph and add an image to it
pictureParagraphCaption = section.AddParagraph()
pictureParagraphCaption.Format.AfterSpacing = 10
pic1 = pictureParagraphCaption.AppendPicture("Data\\1.png")
pic1.Height = 100
pic1.Width = 100

# Add a caption to the image
format = CaptionNumberingFormat.Number
pic1.AddCaption("Image", format, CaptionPosition.BelowItem)

# Add another new paragraph and add an image to it
pictureParagraphCaption = section.AddParagraph()
pic2 = pictureParagraphCaption.AppendPicture("Data\\2.png")
pic2.Height = 100
pic2.Width = 100

# Add a caption to the image
pic2.AddCaption("Image", format, CaptionPosition.BelowItem)

# Update all fields in the document
document.IsUpdateFields = True

# Save the document as a docx file
result = "AddImageCaption.docx"
document.SaveToFile(result, FileFormat.Docx2016)

# Close the document object and release resources
document.Close()
document.Dispose()
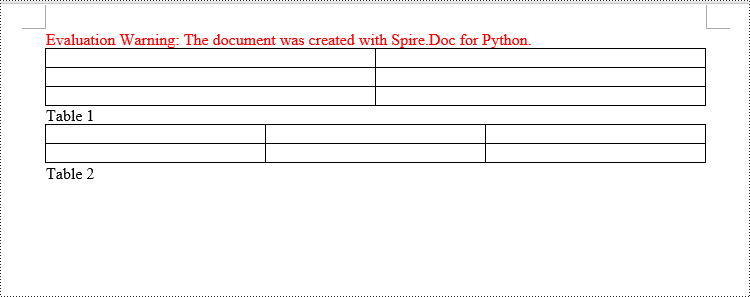
Add Table Captions to a Word document in Python
To facilitate the addition of captions to tables, Spire.Doc for Python also provides a convenient method similar to adding captions to images. You can use the Table.AddCaption(self, name:str, format:'CaptionNumberingFormat', captionPosition:'CaptionPosition') method to create a caption for the table. The following are the detailed steps:
- Create an object of the Document class.
- Use the Document.AddSection() method to add a section.
- Create a Table object and add it to the specified section in the document.
- Use the Table.ResetCells(self ,rowsNum:int,columnsNum:int) method to set the number of rows and columns in the table.
- Add a caption to the table using the Table.AddCaption(self ,name:str,format:'CaptionNumberingFormat',captionPosition:'CaptionPosition') method, specifying the caption numbering format as CaptionNumberingFormat.Number.
- Set the Document.IsUpdateFields property to true to update all fields.
- Use the Document.SaveToFile() method to save the resulting document.
- Python
from spire.doc import *
from spire.doc.common import *

# Create a Word document object
document = Document()

# Add a section
section = document.AddSection()

# Add a table
tableCaption = section.AddTable(True)
tableCaption.ResetCells(3, 2)

# Add a caption to the table
tableCaption.AddCaption("Table", CaptionNumberingFormat.Number, CaptionPosition.BelowItem)

# Add another table and caption to it
tableCaption = section.AddTable(True)
tableCaption.ResetCells(2, 3)
tableCaption.AddCaption("Table", CaptionNumberingFormat.Number, CaptionPosition.BelowItem)

# Update all fields in the document
document.IsUpdateFields = True

# Save the document as a docx file
result = "AddTableCaption.docx"
document.SaveToFile(result, FileFormat.Docx2016)

# Close the document object and release resources
document.Close()
document.Dispose()
Remove Captions from a Word document in Python
Spire.Doc for Python also supports removing captions from Word documents. Here are the detailed steps:
- Create an object of the Document class.
- Use the Document.LoadFromFile() method to load a Word document.
- Create a custom method, named detect_caption_paragraph(paragraph), to determine if a paragraph contains a caption.
- Iterate through all the Paragraph objects in the document using a loop and utilize the custom method, detect_caption_paragraph(paragraph), to identify and delete paragraphs that contain captions.
- Use the Document.SaveToFile() method to save the resulting document.
- Python
from spire.doc import *
from spire.doc.common import *

# Method to detect if a paragraph is a caption paragraph
def detect_caption_paragraph(paragraph):
    tag = False
    field = None

# Iterate through the child objects in the paragraph
    for i in range(len(paragraph.ChildObjects)):
        if paragraph.ChildObjects[i].DocumentObjectType == DocumentObjectType.Field:
            # Check if the child object is of Field type
            field = paragraph.ChildObjects[i]
            if field.Type == FieldType.FieldSequence:
                # Check if the Field type is FieldSequence, indicating a caption field type
                return True

    return tag

# Create a Word document object
document = Document()
# Load the sample.docx file
document.LoadFromFile("Data/sample.docx")

# Iterate through all sections
for i in range(len(document.Sections)):
    section = document.Sections.get_Item(i)

    # Iterate through paragraphs in reverse order within the section
    for j in range(len(section.Body.Paragraphs) - 1, -1, -1):
        # Check if the paragraph is a caption paragraph
        if detect_caption_paragraph(section.Body.Paragraphs[j]):
            # If it's a caption paragraph, remove it
            section.Body.Paragraphs.RemoveAt(j)

# Save the document after removing captions
result = "DeleteCaptions.docx"
document.SaveToFile(result, FileFormat.Docx2016)

# Close the document object and release resources
document.Close()
document.Dispose()
Apply for a Temporary License
If you'd like to remove the evaluation message from the generated documents, or to get rid of the function limitations, please request a 30-day trial license for yourself.
Page size refers to the dimensions of a document's page. It determines the width and height of the printable area and plays a crucial role in the overall layout and design of the document. Different types of documents may require specific page sizes, such as standard letter size (8.5 x 11 inches) for business letters or A4 size (210 x 297 mm) for international correspondence. Adjusting the page size ensures that your document is compatible with the intended output or presentation medium. In this article, we will demonstrate how to adjust the page size of a Word document in Python using Spire.Doc for Python.
- Adjust the Page Size of a Word Document to a Standard Page Size in Python
- Adjust the Page Size of a Word Document to a Custom Page Size in Python
Install Spire.Doc for Python
This scenario requires Spire.Doc for Python and plum-dispatch v1.7.4. They can be easily installed in your Windows through the following pip commands.
pip install Spire.Doc
If you are unsure how to install, please refer to this tutorial: How to Install Spire.Doc for Python on Windows
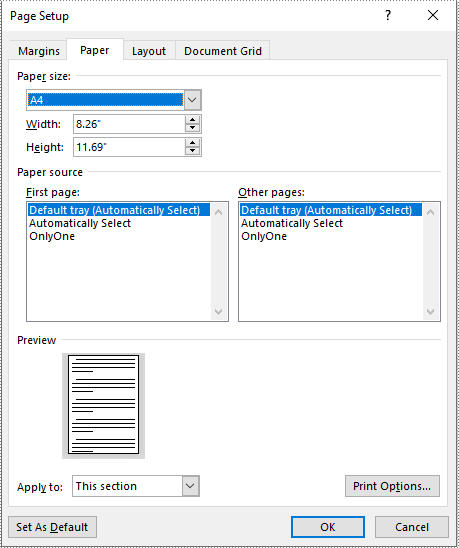
Adjust the Page Size of a Word Document to a Standard Page Size in Python
With Spire.Doc for Python, you can easily adjust the page sizes of Word documents to a variety of standard page sizes, such as A3, A4, A5, A6, B4, B5, B6, letter, legal, and tabloid. The following steps explain how to change the page size of a Word document to a standard page size using Spire.Doc for Python:
- Create an instance of the Document class.
- Load a Word document using the Document.LoadFromFile() method.
- Iterate through the sections in the document.
- Set the page size of each section to a standard page size, such as A4, by setting the Section.PageSetup.PageSize property to PageSize.A4().
- Save the result document using the Document.SaveToFile() method.
- Python
from spire.doc import *
from spire.doc.common import *

# Create an instance of the Document class
doc = Document()
# Load a Word document
doc.LoadFromFile("Input.docx")

# Iterate through the sections in the document
for i in range(doc.Sections.Count):
    section = doc.Sections.get_Item(i)
    # Change the page size of each section to A4
    section.PageSetup.PageSize = PageSize.A4()

# Save the result document
doc.SaveToFile("StandardSize.docx", FileFormat.Docx2016)
doc.Close()
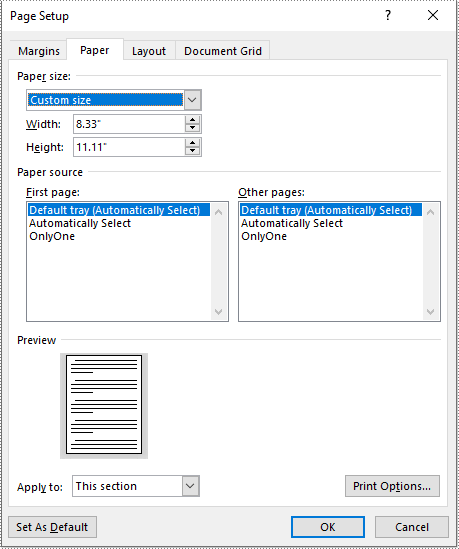
Adjust the Page Size of a Word Document to a Custom Page Size in Python
If you plan to print your document on paper with dimensions that don't match any standard paper size, you can change the page size of your document to a custom page size that matches the exact dimensions of the paper. The following steps explain how to change the page size of a Word document to a custom page size using Spire.Doc for Python:
- Create an instance of the Document class.
- Load a Word document using the Document.LoadFromFile() method.
- Create an instance of the SizeF class with customized dimensions.
- Iterate through the sections in the document.
- Set the page size of each section to a custom page size by assigning the SizeF instance to the Section.PageSetup.PageSize property.
- Save the result document using the Document.SaveToFile() method.
- Python
from spire.doc import *
from spire.doc.common import *

# Create an instance of the Document class
doc = Document()
# Load a Word document
doc.LoadFromFile("Input.docx")

# Create an instance of the SizeF class with customized dimensions
customSize = SizeF(600.0, 800.0)

# Iterate through the sections in the document
for i in range(doc.Sections.Count):
    section = doc.Sections.get_Item(i)
    # Change the page size of each section to the specified dimensions
    section.PageSetup.PageSize = customSize

# Save the result document
doc.SaveToFile("CustomSize.docx", FileFormat.Docx2016)
doc.Close()
Apply for a Temporary License
If you'd like to remove the evaluation message from the generated documents, or to get rid of the function limitations, please request a 30-day trial license for yourself.
Converting HTML to PDF in Python is a common need when you want to generate printable reports, preserve web content, or create offline documentation with consistent formatting. In this tutorial, you’ll learn how to convert HTML to PDF in Python— whether you're working with a local HTML file or a HTML string. If you're looking for a simple and reliable way to generate PDF files from HTML in Python, this guide is for you.
Install Spire.Doc to Convert HTML to PDF Easily
To convert HTML to PDF in Python, you’ll need a reliable library that supports HTML parsing and PDF rendering. Spire.Doc for Python is a powerful and easy-to-use HTML to PDF converter library that lets you generate PDF documents from HTML content — without relying on a browser, headless engine, or third-party tools.
Install via pip
You can install the library quickly with pip:
pip install spire.doc
Alternative: Manual Installation
You can also download the Spire.Doc package and perform a custom installation if you need more control over the environment.
Tip: Spire.Doc offers a free version suitable for small projects or evaluation purposes.
Once installed, you're ready to convert HTML to PDF in Python in just a few lines of code.
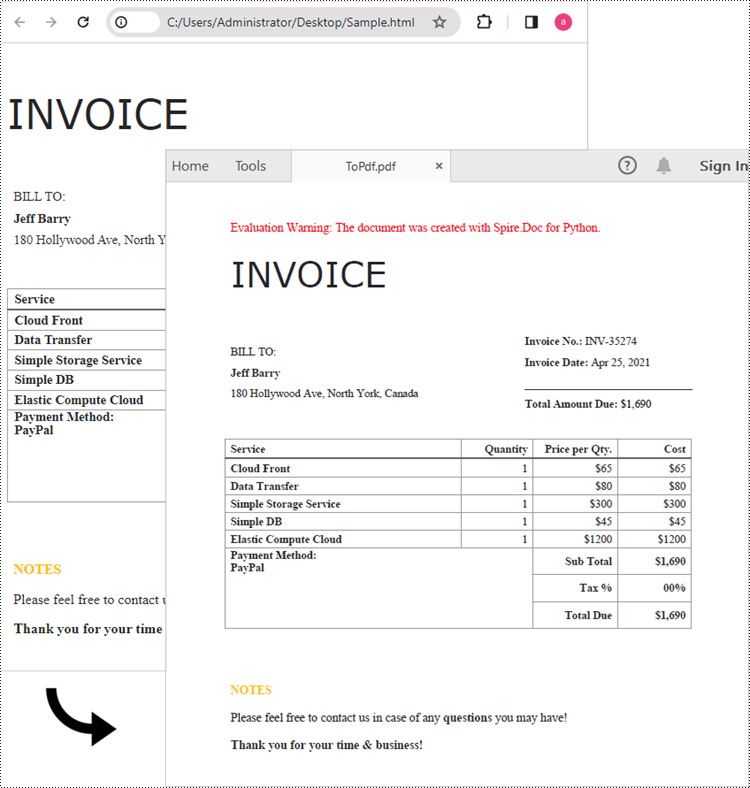
Convert HTML Files to PDF in Python
Spire.Doc for Python makes it easy to convert HTML files to PDF. The Document.LoadFromFile() method supports loading various file formats, including .html, .doc, and .docx. After loading an HTML file, you can convert it to PDF by calling Document.SaveToFile() method. Follow the steps below to convert an HTML file to PDF in Python using Spire.Doc.
Steps to convert an HTML file to PDF in Python:
- Create a Document object.
- Load an HTML file using Document.LoadFromFile() method.
- Convert it to PDF using Document.SaveToFile() method.
The following code shows how to convert an HTML file directly to PDF in Python:
from spire.doc import *
from spire.doc.common import *

# Create a Document object
document = Document()

# Load an HTML file
document.LoadFromFile("Sample.html", FileFormat.Html, XHTMLValidationType.none)

# Save the HTML file to a pdf file
document.SaveToFile("output/ToPdf.pdf", FileFormat.PDF)
document.Close()
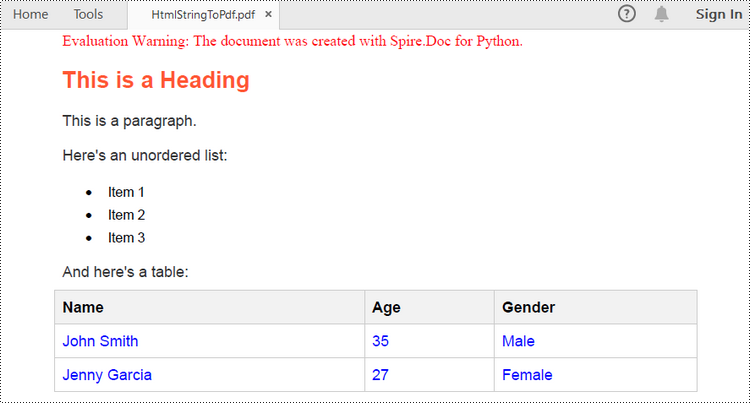
Convert an HTML String to PDF in Python
If you want to convert an HTML string to PDF in Python, Spire.Doc for Python provides a straightforward solution. For simple HTML content like paragraphs, text styles, and basic formatting, you can use the Paragraph.AppendHTML() method to insert the HTML into a Word document. Once added, you can save the document as a PDF using the Document.SaveToFile() method.
Here are the steps to convert an HTML string to a PDF file in Python.
- Create a Document object.
- Add a section using Document.AddSection() method and insert a paragraph using Section.AddParagraph() method.
- Specify the HTML string and add it to the paragraph using Paragraph.AppendHTML() method.
- Save the document as a PDF file using Document.SaveToFile() method.
Here's the complete Python code that shows how to convert an HTML string to a PDF:
from spire.doc import *
from spire.doc.common import *

# Create a Document object
document = Document()

# Add a section to the document
sec = document.AddSection()

# Add a paragraph to the section
paragraph = sec.AddParagraph()

# Specify the HTML string
htmlString = """
<html>
<head>
    <title>HTML to Word Example</title>
    <style>
        body {
            font-family: Arial, sans-serif;
        }
        h1 {
            color: #FF5733;
            font-size: 24px;
            margin-bottom: 20px;
        }
        p {
            color: #333333;
            font-size: 16px;
            margin-bottom: 10px;
        }
        ul {
            list-style-type: disc;
            margin-left: 20px;
            margin-bottom: 15px;
        }
        li {
            font-size: 14px;
            margin-bottom: 5px;
        }
        table {
            border-collapse: collapse;
            width: 100%;
            margin-bottom: 20px;
        }
        th, td {
            border: 1px solid #CCCCCC;
            padding: 8px;
            text-align: left;
        }
        th {
            background-color: #F2F2F2;
            font-weight: bold;
        }
        td {
            color: #0000FF;
        }
    </style>
</head>
<body>
    <h1>This is a Heading</h1>
    <p>This is a paragraph.</p>
    <p>Here's an unordered list:</p>
    <ul>
        <li>Item 1</li>
        <li>Item 2</li>
        <li>Item 3</li>
    </ul>
    <p>And here's a table:</p>
    <table>
        <tr>
            <th>Name</th>
            <th>Age</th>
            <th>Gender</th>
        </tr>
        <tr>
            <td>John Smith</td>
            <td>35</td>
            <td>Male</td>
        </tr>
        <tr>
            <td>Jenny Garcia</td>
            <td>27</td>
            <td>Female</td>
        </tr>
    </table>
</body>
</html>
"""

# Append the HTML string to the paragraph
paragraph.AppendHTML(htmlString)

# Save the document as a pdf file
document.SaveToFile("output/HtmlStringToPdf.pdf", FileFormat.PDF)
document.Close()
Customize the Conversion from HTML to PDF in Python
While converting HTML to PDF in Python is often straightforward, there are times when you need more control over the output. For example, you may want to set a password to protect the PDF document, or embed fonts to ensure consistent formatting across different devices. In this section, you’ll learn how to customize the HTML to PDF conversion using Spire.Doc for Python.
1. Set a Password to Protect the PDF
To prevent unauthorized viewing or editing, you can encrypt the PDF by specifying a user password and an owner password.
# Create a ToPdfParameterList object
toPdf = ToPdfParameterList()

# Set PDF encryption passwords
userPassword = "viewer"
ownerPassword = "E-iceblue"
toPdf.PdfSecurity.Encrypt(userPassword, ownerPassword, PdfPermissionsFlags.Default, PdfEncryptionKeySize.Key128Bit)

# Save as PDF with password protection
document.SaveToFile("/HtmlToPdfWithPassword.pdf", toPdf)
2. Embed Fonts to Preserve Formatting
To ensure the PDF displays correctly across all devices, you can embed all fonts used in the document.
# Create a ToPdfParameterList object
ppl = ToPdfParameterList()
ppl.IsEmbeddedAllFonts = True

# Save as PDF with embedded fonts
document.SaveToFile("/HtmlToPdfWithEmbeddedFonts.pdf", ppl)
These options give you finer control when you convert HTML to PDF in Python, especially for professional document sharing or long-term storage scenarios.
The Conclusion
Converting HTML to PDF in Python becomes simple and flexible with Spire.Doc for Python. Whether you're handling static HTML files or dynamic HTML strings, or need to secure and customize your PDFs, this library provides everything you need — all in just a few lines of code. Get a free 30-day license and start converting HTML to high-quality PDF documents in Python today!
FAQs
Q1: Can I convert an HTML file to PDF in Python? Yes. Using Spire.Doc for Python, you can convert a local HTML file to PDF with just a few lines of code.
Q2: How do I convert HTML to PDF in Chrome? While Chrome allows manual "Save as PDF", it’s not suitable for batch or automated workflows. If you're working in Python, Spire.Doc provides a better solution for programmatically converting HTML to PDF.
Q3: How do I convert HTML to PDF without losing formatting? To preserve formatting:
- Use embedded or inline CSS (not external files).
- Use absolute URLs for images and resources.
- Embed fonts using Spire.Doc options like IsEmbeddedAllFonts(True).
