
Spire.Doc for Python (103)
Converting Word documents to JSON is a common requirement when building automated document processing pipelines, feeding content into AI models, or migrating structured data from DOCX files into databases and APIs. Unlike CSV or XML, JSON provides a flexible, hierarchical format that can represent paragraphs, tables, and nested document structures in a single output.
However, Word files do not have a native JSON export format. A .docx file is a rich-text document composed of sections, paragraphs, styles, and tables—not a structured data source. Converting it to JSON requires deciding how to map that content into a meaningful schema.
This tutorial demonstrates how to convert Word to JSON in Python using Spire.Doc for Python. You will learn three progressively advanced methods: extracting plain paragraph text, converting Word tables to JSON arrays, and preserving the full document structure—including headings, paragraphs, and tables—in a hierarchical JSON output. The examples in this tutorial work with both DOCX and legacy DOC files supported by Spire.Doc.
Quick Navigation
- How Is Word Converted into JSON?
- Install the Required Library
- Method 1 – Convert Word Text to JSON
- Method 2 – Convert Word Tables to JSON
- Method 3 – Preserve Document Structure in JSON
- When to Use Word to JSON Conversion
- Limitations and Best Practices
- FAQ
- Conclusion
1. How Is Word Converted into JSON?
A Word document is a rich-text format organized into sections, paragraphs, and tables—not a structured data format. When you convert Word to JSON, there is no single standard for how the content should be represented. The right schema depends on how the JSON will be used:
| Goal | Recommended Schema | Key Characteristics |
|---|---|---|
| AI embedding / semantic search | Paragraph array | Flat list of text strings, one per paragraph |
| Full-text search indexing | Text blocks with metadata | Paragraphs with section index and style info |
| Database import from tables | Table row objects | Header-keyed dictionaries, one per row |
| RAG pipeline / knowledge base | Hierarchical structure | Nested sections with headings, paragraphs, and tables |
| Document archival / interchange | Full document model | Sections, styles, metadata, and all content types |
For example, a Word document containing a heading and a paragraph could be represented in JSON as:
{
  "document": [
    {"type": "heading", "level": 1, "text": "Project Overview"},
    {"type": "paragraph", "text": "This report summarizes the quarterly results."}
  ]
}
The three methods in this tutorial correspond directly to these schema choices:
- Method 1 produces a paragraph array (AI embedding, search indexing)
- Method 2 produces table row objects (database import, data extraction)
- Method 3 produces a hierarchical structure (RAG, knowledge base, document understanding)
Choose the method that matches your goal, or combine elements from multiple methods to build a custom schema.
2. Install the Required Library
This tutorial uses Spire.Doc for Python to read and parse DOC/DOCX files. Install it via pip:
pip install spire.doc
Alternatively, you can download Spire.Doc for Python and integrate it manually.
After installation, import the library in your Python script:
from spire.doc import Document, FileFormat
from spire.doc.common import *
Spire.Doc provides APIs to load Word documents, iterate through sections, paragraphs, and tables, and extract text content—everything needed to build a Word-to-JSON pipeline.
3. Method 1 – Convert Word Text to JSON
The simplest way to convert Word to JSON is to extract all paragraph text from the document and store it in a JSON array. This approach works well when you need the full text content without structural metadata—such as for full-text search, AI text embedding, or simple content export.
3.1 Read Paragraphs from a Word Document
Spire.Doc represents a Word document as a collection of Sections, each containing Paragraphs. To extract all text, you iterate through every section and every paragraph within it.
from spire.doc import Document
from spire.doc.common import *

input_file = "ProjectReport.docx"

document = Document()
document.LoadFromFile(input_file)

paragraphs = []
for i in range(document.Sections.Count):
    section = document.Sections.get_Item(i)
    for j in range(section.Paragraphs.Count):
        paragraph = section.Paragraphs.get_Item(j)
        text = paragraph.Text
        if text.strip():
            paragraphs.append(text)

document.Close()
Each paragraph's .Text property returns the plain text content, stripping away formatting. The if text.strip() check filters out empty paragraphs that exist as spacing or layout elements in Word.
3.2 Serialize the Extracted Text to JSON
Assuming the paragraph data extracted in the previous step is stored in the paragraphs list, you can serialize it to JSON and save it to a file as follows:
import json

output_file = "paragraphs.json"

result = {
    "source": input_file,
    "paragraph_count": len(paragraphs),
    "paragraphs": paragraphs
}

with open(output_file, "w", encoding="utf-8") as f:
    json.dump(result, f, indent=2, ensure_ascii=False)
Output Example
The following JSON snippet shows the structure of the generated output file:
{
  "source": "ProjectReport.docx",
  "paragraph_count": 3,
  "paragraphs": [
    "Quarterly Sales Report",
    "This document provides an overview of sales performance across all regions."
  ]
}
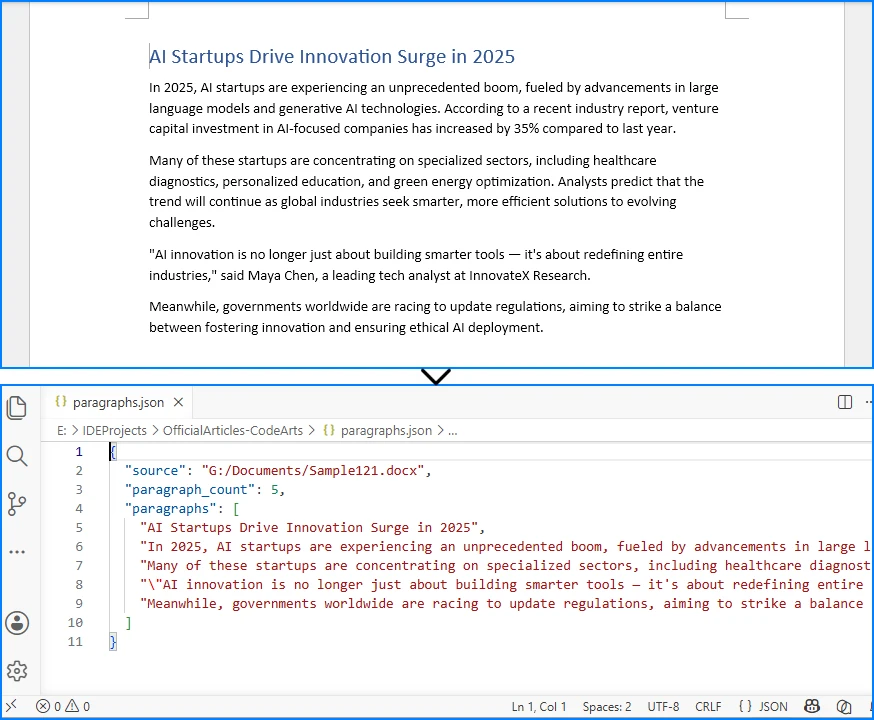
Conversion Result
The image below shows the source Word document and the JSON file generated after extracting paragraph text.
3.3 Explanation
Why iterate through Sections and Paragraphs instead of extracting all text at once? Because Word documents are organized hierarchically. A document contains one or more sections (each with its own page layout), and each section contains paragraphs. Iterating at this level gives you control over which content to include or skip—such as filtering empty paragraphs or limiting extraction to specific sections.
Storing paragraphs as a JSON array is the most straightforward structure. Each element is a string, making the output easy to consume in downstream systems. This approach is well-suited for:
- Full-text indexing – feed paragraph text into search engines like Elasticsearch
- AI text embedding – convert paragraphs into vector representations for semantic search
- Simple content export – extract readable text from Word files without formatting
However, this method loses structural information. Headings, body text, and list items are all treated the same way. If you need to distinguish between them, see Method 3.
If your goal is simply to extract text content from Word documents without converting it to JSON, you may also be interested in our guide on extracting text from Word documents in Python.
4. Method 2 – Convert Word Tables to JSON
In many Word documents—reports, invoices, product lists, configuration tables—the most valuable content lives inside tables, not in paragraphs. Converting Word tables to JSON allows you to extract structured row-and-column data that can be directly loaded into databases, APIs, or data analysis tools.
Why Tables Need Special Handling
Tables in Word are stored as a grid of rows and cells, where each cell contains its own paragraphs. Unlike paragraph text, table data has an inherent two-dimensional structure that maps naturally to JSON objects. The first row often contains column headers, and subsequent rows contain data records.
Extracting Tables from a Word Document
The following code reads all tables from a Word document, uses the first row as column headers, and converts each subsequent row into a JSON object:
import json
from spire.doc import Document
from spire.doc.common import *

input_file = "SalesData.docx"
output_file = "tables.json"

document = Document()
document.LoadFromFile(input_file)

all_tables = []

for i in range(document.Sections.Count):
    section = document.Sections.get_Item(i)
    for t in range(section.Tables.Count):
        table = section.Tables.get_Item(t)
        rows_data = []

        if table.Rows.Count < 2:
            continue

        header_row = table.Rows[0]
        headers = []
        for c in range(header_row.Cells.Count):
            cell_text = header_row.Cells[c].Paragraphs[0].Text.strip()
            headers.append(cell_text)

        for r in range(1, table.Rows.Count):
            row = table.Rows[r]
            row_dict = {}
            for c in range(row.Cells.Count):
                cell_text = row.Cells[c].Paragraphs[0].Text.strip()
                row_dict[headers[c] if c < len(headers) else f"Column_{c}"] = cell_text
            rows_data.append(row_dict)

        all_tables.append({
            "table_index": t,
            "headers": headers,
            "row_count": len(rows_data),
            "rows": rows_data
        })

document.Close()

result = {
    "source": input_file,
    "table_count": len(all_tables),
    "tables": all_tables
}

with open(output_file, "w", encoding="utf-8") as f:
    json.dump(result, f, indent=2, ensure_ascii=False)
Output Example
The following JSON snippet shows the structure of the generated output file, with each table row mapped to a JSON object using the header row as keys:
{
  "source": "SalesData.docx",
  "table_count": 1,
  "tables": [
    {
      "table_index": 0,
      "headers": ["Region", "Product", "Units Sold", "Revenue"],
      "row_count": 3,
      "rows": [
        {"Region": "North", "Product": "Laptop", "Units Sold": "120", "Revenue": "114000"},
        {"Region": "South", "Product": "Laptop", "Units Sold": "80", "Revenue": "76000"}
      ]
    }
  ]
}
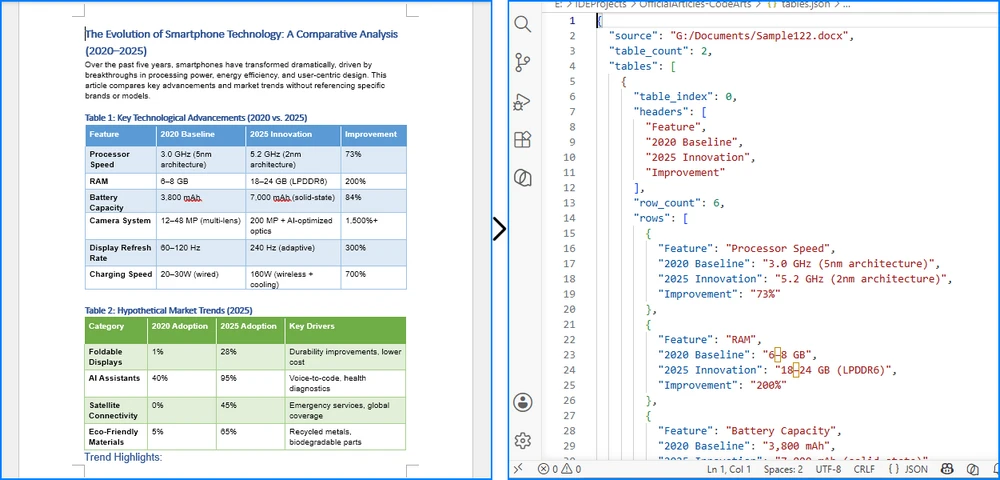
Conversion Result
The image below demonstrates how table data from a Word document is converted into structured JSON records.
Explanation
The code treats the first row as a header row and maps each cell in subsequent rows to the corresponding header key. This produces a JSON array of objects, which is the most common and useful format for tabular data.
Key considerations:
table.Rows.Count < 2skips tables that have only a header row or are emptyrow.Cells[c].Paragraphs[0].Textextracts text from the first paragraph in each cell. For simplicity, the example reads only the first paragraph. If a cell contains multiple paragraphs, iterate through the entireParagraphscollection and concatenate the results:
cell_text = "\n".join(
    row.Cells[c].Paragraphs[p].Text.strip()
    for p in range(row.Cells[c].Paragraphs.Count)
    if row.Cells[c].Paragraphs[p].Text.strip()
)
headers[c] if c < len(headers) else f"Column_{c}"handles cases where a data row has more cells than the header row
This method is ideal for extracting structured data from reports, invoices, product catalogs, and configuration tables stored in Word documents. The resulting JSON can be directly loaded into databases, used in web APIs, or processed by data analysis tools.
If you need to generate Word documents from structured JSON data, see our tutorial on converting JSON to Word in Python, which covers creating Word content and tables directly from JSON objects and arrays.
5. Method 3 – Preserve Document Structure in JSON
Methods 1 and 2 treat paragraphs and tables as separate, isolated elements. In practice, Word documents have a meaningful hierarchy: headings introduce sections, paragraphs provide detail, and tables present structured data within a specific context.
Preserving this hierarchy in JSON produces output that is far more useful for knowledge base construction, RAG (Retrieval-Augmented Generation) pipelines, and document understanding systems. Instead of a flat list of text, you get a structured representation that maintains the logical flow of the original document.
How to Preserve Headings, Paragraphs, and Tables in a Hierarchical JSON Structure
The approach is to iterate through all child objects in each section's body, determine the type of each object (paragraph or table), and build a structured JSON representation accordingly. For paragraphs, you can detect headings by checking the StyleName property.
import json
from spire.doc import Document
from spire.doc.common import *

input_file = "ProjectReport.docx"
output_file = "structured_output.json"

HEADING_STYLES = {
    "Heading1": 1,
    "Heading2": 2,
    "Heading3": 3,
    "Heading4": 4,
}

def get_heading_level(style_name):
    return HEADING_STYLES.get(style_name, None)

def extract_table_data(table):
    rows_data = []
    if table.Rows.Count < 1:
        return {"headers": [], "rows": []}

    header_row = table.Rows[0]
    headers = []
    for c in range(header_row.Cells.Count):
        headers.append(header_row.Cells[c].Paragraphs[0].Text.strip())

    for r in range(1, table.Rows.Count):
        row = table.Rows[r]
        row_dict = {}
        for c in range(row.Cells.Count):
            cell_text = row.Cells[c].Paragraphs[0].Text.strip()
            row_dict[headers[c] if c < len(headers) else f"Column_{c}"] = cell_text
        rows_data.append(row_dict)

    return {"headers": headers, "rows": rows_data}

document = Document()
document.LoadFromFile(input_file)

sections_data = []

for i in range(document.Sections.Count):
    section = document.Sections.get_Item(i)
    content_items = []

    for j in range(section.Body.ChildObjects.Count):
        obj = section.Body.ChildObjects.get_Item(j)

        if isinstance(obj, Paragraph):
            text = obj.Text.strip()
            if not text:
                continue

            heading_level = get_heading_level(obj.StyleName)
            if heading_level:
                content_items.append({
                    "type": "heading",
                    "level": heading_level,
                    "text": text
                })
            else:
                content_items.append({
                    "type": "paragraph",
                    "text": text
                })

        elif isinstance(obj, Table):
            table_data = extract_table_data(obj)
            content_items.append({
                "type": "table",
                "row_count": len(table_data["rows"]),
                "data": table_data
            })

    sections_data.append({
        "section_index": i,
        "content": content_items
    })

document.Close()

result = {
    "source": input_file,
    "section_count": len(sections_data),
    "sections": sections_data
}

with open(output_file, "w", encoding="utf-8") as f:
    json.dump(result, f, indent=2, ensure_ascii=False)
Output Example
The following JSON snippet shows how headings, paragraphs, and tables are represented in the hierarchical output structure:
{
  "source": "ProjectReport.docx",
  "section_count": 1,
  "sections": [
    {
      "section_index": 0,
      "content": [
        {
          "type": "heading",
          "level": 1,
          "text": "Quarterly Sales Report"
        },
        {
          "type": "paragraph",
          "text": "This report provides an overview of sales performance across all regions."
        },
        {
          "type": "heading",
          "level": 2,
          "text": "Regional Breakdown"
        },
        {
          "type": "table",
          "row_count": 3,
          "data": {
            "headers": ["Region", "Product", "Units Sold", "Revenue"],
            "rows": [
              {"Region": "North", "Product": "Laptop", "Units Sold": "120", "Revenue": "114000"}
            ]
          }
        }
      ]
    }
  ]
}
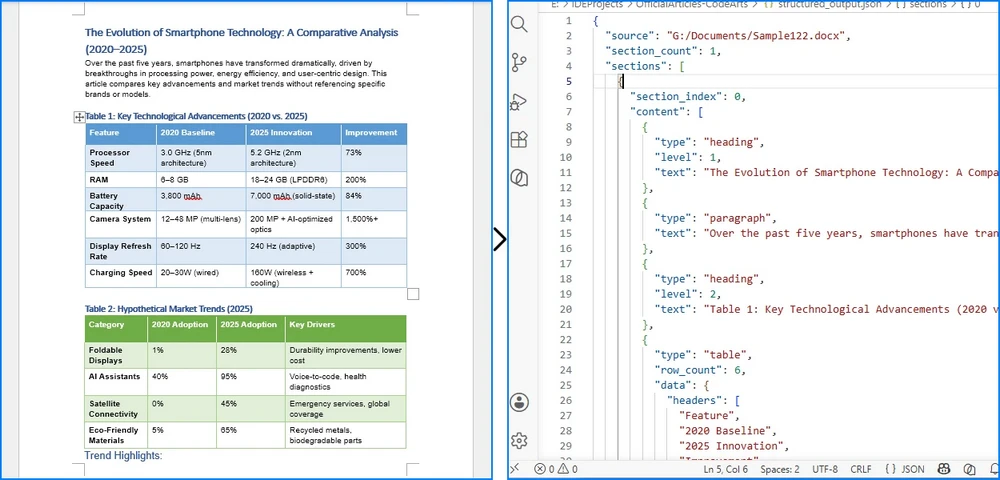
Conversion Result
The image below illustrates how headings, paragraphs, and tables are preserved in a hierarchical JSON structure.
Explanation
This method differs from the previous two in a fundamental way: it uses section.Body.ChildObjects to iterate through all content elements in document order, rather than separately iterating paragraphs and tables. This preserves the original sequence and interleaving of headings, paragraphs, and tables.
Key design decisions:
- Heading detection via
StyleName– Word headings are paragraphs styled with "Heading1", "Heading2", etc. Checking the style name allows you to distinguish headings from body text and record the heading level. Note that the exact heading style names may vary depending on the Word template or language settings (e.g., "Heading 1" with a space, or localized names like "标题 1" in Chinese). To handle these variations, normalize the style name before lookup:
def get_heading_level(style_name):
    normalized = style_name.lower().replace(" ", "")
    heading_map = {"heading1": 1, "heading2": 2, "heading3": 3, "heading4": 4}
    return heading_map.get(normalized, None)
ChildObjectsiteration – Unlikesection.Paragraphs(which only returns paragraphs) orsection.Tables(which only returns tables),ChildObjectsreturns all elements in their original order. This is essential for preserving the document's logical structure.- Structured JSON output – Each content item includes a
typefield (heading,paragraph, ortable), making it easy for downstream systems to process different content types appropriately.
This approach is particularly valuable for:
- RAG and AI pipelines – the heading structure enables chunking documents by section, improving retrieval accuracy
- Knowledge base construction – hierarchical JSON maps directly to tree-structured knowledge graphs
- Document understanding – preserving the relationship between headings and their associated content allows semantic analysis of document sections
If you need to extract specific content types from Word documents, such as headings, paragraphs, or tables, see our tutorial on reading Word documents in Python, which covers content extraction techniques in more detail.
6. When to Use Word to JSON Conversion
Word to JSON conversion is useful in any scenario where structured data needs to be extracted from Word documents at scale. Common use cases include:
- AI and RAG document processing – Convert Word documents into JSON chunks for embedding and retrieval in LLM-based applications. The hierarchical structure from Method 3 enables section-level chunking, which produces better retrieval results than flat text splitting.
- Knowledge base construction – Build structured knowledge bases from technical documentation, policy documents, or manuals stored as .docx files.
- Batch data extraction – Extract data from hundreds of Word reports, invoices, or forms and load the results into a database or data warehouse.
- Contract and resume parsing – Convert legal contracts, HR documents, or resumes into structured JSON for automated analysis and comparison.
- API and web application data exchange – Serve Word document content through REST APIs as JSON, enabling web and mobile applications to consume document data without handling .docx files directly.
7. Limitations and Best Practices
Limitations
- No standard JSON schema for Word – Unlike CSV or XML, there is no universally accepted format for representing Word content in JSON. The structure you choose must be designed for your specific use case.
- Complex formatting is not captured – The methods in this tutorial extract text content and basic structural metadata (heading levels, table data). They do not capture fonts, colors, images, page layout, headers/footers, or footnotes. If your application requires these elements, additional extraction logic is needed.
- Merged table cells require special handling – Word tables can contain merged cells (both horizontal and vertical). The simple row-by-row extraction in Method 2 assumes a regular grid. Documents with merged cells may produce unexpected results.
- Large documents may need chunked processing – For documents with hundreds of pages or dozens of tables, consider processing sections or tables individually to manage memory usage.
Best Practices
- Design your JSON schema before writing code – Decide what you need (text only? headings? tables? full structure?) and choose the appropriate extraction method.
- Validate output against sample documents – Word documents vary widely in structure and formatting. Test your conversion logic against representative samples from your actual document set.
- Handle encoding explicitly – Always specify
encoding="utf-8"when writing JSON files to avoid character encoding issues with non-ASCII text. - Use
ensure_ascii=Falseinjson.dump– This preserves Unicode characters in the output rather than escaping them, which is important for documents containing non-English text.
8. FAQ
Can I convert DOCX to JSON in Python?
Yes. Using Spire.Doc for Python, you can load any .docx file, iterate through its sections, paragraphs, and tables, and serialize the extracted content to JSON using Python's built-in json module. This tutorial demonstrates three methods for doing so, from simple text extraction to full structural preservation.
What is the best Word to JSON converter for developers?
For developers who need batch processing, automation, or custom JSON schemas, a Python-based approach using Spire.Doc is more flexible than online converters. Online tools work for one-off conversions but cannot handle large-scale processing, custom output formats, or integration into automated pipelines.
Can I convert Word tables to JSON?
Yes. By iterating through the tables in a Word document and extracting cell text row by row, you can convert table data into a JSON array of objects. Method 2 in this tutorial demonstrates this with header-based key mapping.
Does Word have a native JSON export option?
No. Microsoft Word does not provide a built-in JSON export format. Word files can be saved as DOCX, PDF, HTML, RTF, and plain text, but converting to JSON requires a programmatic approach that reads the document structure and maps it to a JSON schema.
Can I preserve headings and structure when converting Word to JSON?
Yes. By iterating through all child objects in each section's body and checking paragraph style names, you can detect headings, body paragraphs, and tables, then build a hierarchical JSON structure that preserves the document's logical organization. Method 3 in this tutorial provides a complete implementation.
Can I convert Word to JSON online?
Yes, there are online Word to JSON converters that can handle one-off conversions. However, online tools are limited to single-file processing and do not allow customization of the JSON schema. For batch processing, automated pipelines, or custom output structures, a Python-based approach using Spire.Doc is more practical and scalable.
9. Conclusion
In this article, we demonstrated how to convert Word documents to JSON in Python using Spire.Doc for Python. We covered three methods of increasing complexity: extracting paragraph text as a flat JSON array, converting Word tables to structured JSON objects, and preserving the full document hierarchy—including headings, paragraphs, and tables—in a single JSON output.
Each method serves a different purpose. Plain text extraction works for indexing and embedding. Table extraction is ideal for data migration and report parsing. Full structural preservation enables knowledge base construction and RAG pipelines. Choose the approach that matches your requirements, and extend the JSON schema as needed for your specific use case.
Spire.Doc for Python provides comprehensive Word document processing capabilities beyond JSON conversion, including document creation, formatting, mail merge, and format conversion. You can apply for a 30-day free license to evaluate all features.

JSON is one of the most common formats for exchanging structured data between applications, APIs, and databases. In many business scenarios, however, JSON data needs to be transformed into human-readable Word documents such as reports, invoices, summaries, contracts, or exported records.
Converting JSON to Word is not a simple file format conversion. JSON has no inherent Word structure, so the process requires parsing the JSON data and mapping its elements to appropriate Word document components such as paragraphs, tables, and headings.
This article demonstrates how to convert JSON data into Word documents in Python using Spire.Doc for Python. We'll cover multiple approaches, including exporting JSON as formatted text, creating Word tables from JSON arrays, and generating structured reports from nested JSON data.
Content Overview
- Understanding JSON-to-Word Conversion
- Install Spire.Doc for Python
- Method 1: Convert JSON to Word as Formatted Text
- Method 2: Convert JSON Arrays to Word Tables
- Method 3: Generate Structured Word Reports from JSON
- Handle Nested JSON Objects
- Handle Missing or Optional Fields
- Convert JSON Files to Word Documents
- Why Use Spire.Doc for JSON-to-Word Conversion
- FAQ
- Conclusion
1. Understanding JSON-to-Word Conversion
JSON and Word documents serve fundamentally different purposes. JSON is a structured data format designed for data exchange and machine processing, while Word documents are intended for human consumption with rich formatting, visual hierarchy, and page layout.
As a result, converting JSON to Word is not a direct format transformation. The JSON data must first be parsed and mapped to appropriate document elements before a Word document can be generated.
The conversion process typically follows this workflow:
JSON Data
      ↓
Parse JSON (json.loads)
      ↓
Map Data Structure
      ↓
Spire.Doc for Python
      ↓
Paragraphs / Tables / Headings
      ↓
DOCX Document
In Python, the built-in json module is commonly used to parse JSON data, while Spire.Doc for Python handles document generation. After the JSON structure is analyzed and mapped, Spire.Doc can create paragraphs, tables, headings, images, and other Word elements programmatically, producing a fully formatted DOCX document.
The table below shows common mappings between JSON structures and Word elements:
| JSON Structure | Word Element | Example |
|---|---|---|
| Key-Value Pair | Paragraph | "Name": "John" → Name: John |
| Array | Table | [{...}, {...}] → rows and columns |
| Object | Section | Nested object → grouped content |
| Title Field | Heading | "title": "Report" → Heading 1 |
| URL/Image Path | Image | "logo": "img.png" → embedded image |
Understanding these mappings is important because the same JSON data can be presented in different ways depending on the document's purpose. For example, simple key-value data may be exported as paragraphs, while collections of records are usually easier to read when rendered as tables. With Spire.Doc for Python, these mappings can be implemented programmatically to generate professional Word documents from structured JSON data.
2. Install Spire.Doc for Python
Before converting JSON to Word, you need to install Spire.Doc for Python in your development environment.
Install via pip (Recommended)
pip install spire.doc
Alternatively, you can download Spire.Doc for Python and integrate it manually.
After installation, import the library in your project:
from spire.doc import *
from spire.doc.common import *
3. Method 1: Convert JSON to Word as Formatted Text
This method is the simplest approach for converting JSON to Word. It works well for API responses, configuration files, and simple JSON exports where each key-value pair maps to a paragraph.
Sample JSON
{
  "Name": "John Smith",
  "Department": "Sales",
  "Country": "USA"
}
Python Code
import json
from spire.doc import Document, FileFormat, HorizontalAlignment

json_data = '{"Name": "John Smith", "Department": "Sales", "Country": "USA"}'
data = json.loads(json_data)

document = Document()
section = document.AddSection()

for key, value in data.items():
    paragraph = section.AddParagraph()
    text_range = paragraph.AppendText(f"{key}: {value}")
    text_range.CharacterFormat.FontSize = 12
    paragraph.Format.AfterSpacing = 6

document.SaveToFile("json_to_text.docx", FileFormat.Docx)
document.Close()
Output
The following Word document shows how JSON key-value pairs can be converted into formatted paragraphs.

When to Use This Approach
This method is best suited for:
- Simple key-value JSON objects
- API response exports
- Configuration file documentation
- Quick data snapshots
It is not ideal for large datasets or tabular data, where Method 2 (tables) provides better readability.
If your goal is to analyze, filter, or manipulate structured JSON data in a spreadsheet, you may also be interested in our guide on converting JSON to Excel in Python.
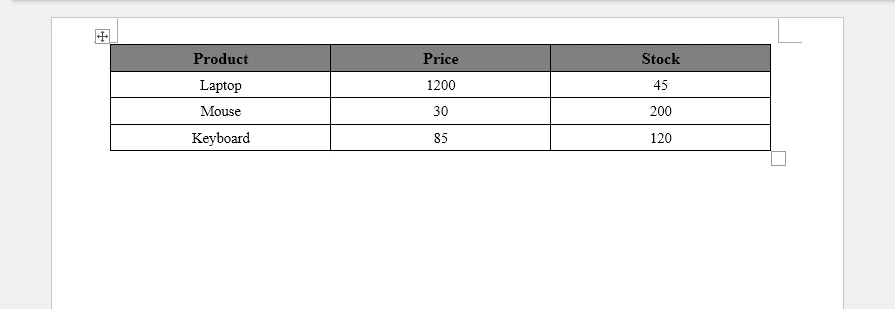
4. Method 2: Convert JSON Arrays to Word Tables
When JSON data contains arrays of objects, tables provide the most effective way to present the data in a Word document. This is the most common scenario for converting JSON to Word, as many APIs and databases return data as JSON arrays.
Sample JSON
[
  {"Product": "Laptop", "Price": 1200, "Stock": 45},
  {"Product": "Mouse", "Price": 30, "Stock": 200},
  {"Product": "Keyboard", "Price": 85, "Stock": 120}
]
Python Code
import json
from spire.doc import (
    Document, FileFormat, HorizontalAlignment,
    VerticalAlignment, TableRowHeightType, Color
)

json_data = '''[
  {"Product": "Laptop", "Price": 1200, "Stock": 45},
  {"Product": "Mouse", "Price": 30, "Stock": 200},
  {"Product": "Keyboard", "Price": 85, "Stock": 120}
]'''
data = json.loads(json_data)

document = Document()
section = document.AddSection()

if data:
    headers = list(data[0].keys())
    table = section.AddTable(True)
    table.ResetCells(len(data) + 1, len(headers))

    header_row = table.Rows[0]
    header_row.IsHeader = True
    header_row.Height = 20
    header_row.HeightType = TableRowHeightType.Exactly

    for col_index, header in enumerate(headers):
        header_row.Cells[col_index].CellFormat.Shading.BackgroundPatternColor = Color.get_Gray()
        header_row.Cells[col_index].CellFormat.VerticalAlignment = VerticalAlignment.Middle
        paragraph = header_row.Cells[col_index].AddParagraph()
        paragraph.Format.HorizontalAlignment = HorizontalAlignment.Center
        text_range = paragraph.AppendText(header)
        text_range.CharacterFormat.Bold = True
        text_range.CharacterFormat.FontSize = 12

    for row_index, record in enumerate(data):
        data_row = table.Rows[row_index + 1]
        data_row.Height = 20
        data_row.HeightType = TableRowHeightType.Exactly
        for col_index, key in enumerate(headers):
            data_row.Cells[col_index].CellFormat.VerticalAlignment = VerticalAlignment.Middle
            paragraph = data_row.Cells[col_index].AddParagraph()
            paragraph.Format.HorizontalAlignment = HorizontalAlignment.Center
            text_range = paragraph.AppendText(str(record.get(key, "")))
            text_range.CharacterFormat.FontSize = 11

document.SaveToFile("json_to_table.docx", FileFormat.Docx)
document.Close()
Output
The following screenshot shows the generated Word table created from the JSON array.
Why Use Tables for JSON Arrays
Tables are the natural fit for JSON array data because:
- Each JSON object maps to a table row
- Each key maps to a column header
- Data is aligned for easy scanning and comparison
- Tables are the standard format for reports, inventory lists, and exported database records
Enhancing JSON Tables with Formatting
Unlike plain text exports, Spire.Doc allows JSON data to be rendered as professionally formatted Word tables. Beyond basic table creation, you can apply:
- Table styles – Use
DefaultTableStyleorApplyStylefor consistent, polished table appearances - Borders and shading – Control cell borders, background colors, and alternating row colors
- Alignment – Set horizontal and vertical alignment at the cell, row, or table level
- Custom formatting – Apply font size, bold, and color to individual cells or ranges
- Auto-fit behavior – Use
AutoFitto adjust column widths to content or window size
These formatting capabilities transform raw JSON data into professional report layouts suitable for business documents, client deliverables, and automated reporting pipelines.
If you need to create more sophisticated Word tables, such as merged cells, custom table layouts, or advanced formatting, see our guide on creating and formatting tables in Word documents using Python.
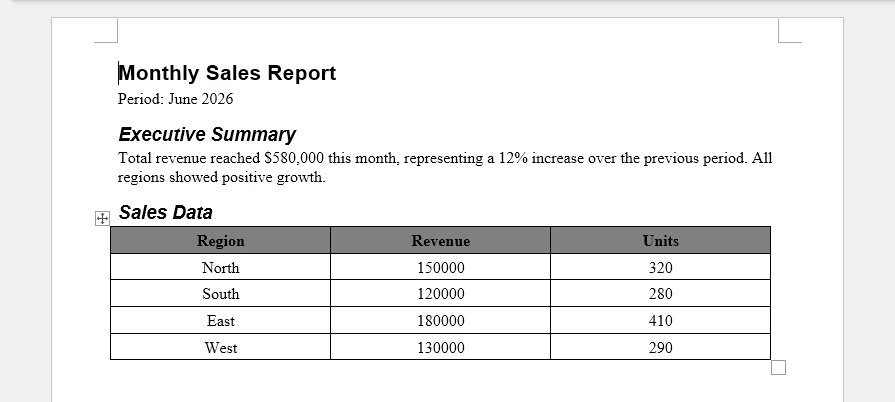
5. Method 3: Generate Structured Word Reports from JSON
Real-world JSON data often contains a mix of metadata, summary text, and tabular data. This method combines headings, paragraphs, and tables to generate a complete structured Word report from JSON.
Sample JSON
{
  "title": "Monthly Sales Report",
  "period": "June 2026",
  "summary": "Total revenue reached $580,000 this month, representing a 12% increase over the previous period. All regions showed positive growth.",
  "sales": [
    {"Region": "North", "Revenue": 150000, "Units": 320},
    {"Region": "South", "Revenue": 120000, "Units": 280},
    {"Region": "East", "Revenue": 180000, "Units": 410},
    {"Region": "West", "Revenue": 130000, "Units": 290}
  ]
}
Python Code
import json
from spire.doc import (
    Document, FileFormat, HorizontalAlignment,
    VerticalAlignment, TableRowHeightType, Color,
    BuiltinStyle
)

json_data = '''{
  "title": "Monthly Sales Report",
  "period": "June 2026",
  "summary": "Total revenue reached $580,000 this month, representing a 12% increase over the previous period. All regions showed positive growth.",
  "sales": [
    {"Region": "North", "Revenue": 150000, "Units": 320},
    {"Region": "South", "Revenue": 120000, "Units": 280},
    {"Region": "East", "Revenue": 180000, "Units": 410},
    {"Region": "West", "Revenue": 130000, "Units": 290}
  ]
}'''
data = json.loads(json_data)

document = Document()
section = document.AddSection()

heading_style = document.AddStyle(BuiltinStyle.Heading1)
subheading_style = document.AddStyle(BuiltinStyle.Heading2)

title_para = section.AddParagraph()
title_para.ApplyStyle(heading_style.Name)
title_para.AppendText(data.get("title", "Report"))

period_para = section.AddParagraph()
period_para.AppendText(f"Period: {data.get('period', 'N/A')}")
period_para.Format.AfterSpacing = 12

summary_heading = section.AddParagraph()
summary_heading.ApplyStyle(subheading_style.Name)
summary_heading.AppendText("Executive Summary")

summary_para = section.AddParagraph()
summary_para.AppendText(data.get("summary", ""))
summary_para.Format.AfterSpacing = 12

sales_heading = section.AddParagraph()
sales_heading.ApplyStyle(subheading_style.Name)
sales_heading.AppendText("Sales Data")

sales = data.get("sales", [])
if sales:
    headers = list(sales[0].keys())
    table = section.AddTable(True)
    table.ResetCells(len(sales) + 1, len(headers))

    header_row = table.Rows[0]
    header_row.IsHeader = True
    header_row.Height = 20
    header_row.HeightType = TableRowHeightType.Exactly

    for col_index, header in enumerate(headers):
        header_row.Cells[col_index].CellFormat.Shading.BackgroundPatternColor = Color.get_Gray()
        header_row.Cells[col_index].CellFormat.VerticalAlignment = VerticalAlignment.Middle
        paragraph = header_row.Cells[col_index].AddParagraph()
        paragraph.Format.HorizontalAlignment = HorizontalAlignment.Center
        text_range = paragraph.AppendText(header)
        text_range.CharacterFormat.Bold = True

    for row_index, record in enumerate(sales):
        data_row = table.Rows[row_index + 1]
        data_row.Height = 20
        data_row.HeightType = TableRowHeightType.Exactly
        for col_index, key in enumerate(headers):
            data_row.Cells[col_index].CellFormat.VerticalAlignment = VerticalAlignment.Middle
            paragraph = data_row.Cells[col_index].AddParagraph()
            paragraph.Format.HorizontalAlignment = HorizontalAlignment.Center
            paragraph.AppendText(str(record.get(key, "")))

document.SaveToFile("json_report.docx", FileFormat.Docx)
document.Close()
Output
The generated Word document combines headings, descriptive text, and tabular data into a structured report, making the JSON data easier to read and share.
Key Techniques
This example demonstrates several important techniques for generating Word reports from JSON:
- Headings – Use
BuiltinStyle.Heading1andHeading2for document structure and table-of-contents compatibility - Paragraphs – Add summary and descriptive text between headings
- Tables – Render JSON arrays as tabular data within the report
- Combinations – Mix multiple Word element types in a single document
Why Structured Reports Matter
In business environments, JSON data rarely exists in isolation. It typically comes from APIs, databases, or reporting systems and needs to be transformed into documents that decision-makers can read, share, and archive. Common scenarios include:
- Sales reports – Revenue, units, and regional breakdowns from CRM or ERP systems
- Inventory reports – Stock levels, reorder alerts, and warehouse summaries
- Customer summaries – Contact details, order history, and account status
- Compliance reports – Audit logs, access records, and policy status
- Automated reporting systems – Scheduled jobs that generate documents from JSON data and distribute them via email or document management systems
Spire.Doc makes it possible to transform structured JSON data into polished business documents automatically, combining headings, paragraphs, and tables in a single output.
If you need to build more sophisticated document layouts, such as multi-section reports, cover pages, tables of contents, headers, footers, or custom document templates, see our guide on creating structured Word documents in Python.
6. Handle Nested JSON Objects
Many real-world JSON responses contain nested objects. For example, a customer record may include an address object with its own fields. Handling these nested structures is essential for complete JSON-to-Word conversion.
Example JSON
{
  "customer": {
    "name": "Tom Wilson",
    "email": "tom@example.com",
    "address": {
      "street": "123 Main St",
      "city": "Springfield",
      "state": "IL"
    }
  }
}
Python Code
import json
from spire.doc import Document, FileFormat, HorizontalAlignment

def add_nested_object(section, obj, indent_level=0):
    for key, value in obj.items():
        if isinstance(value, dict):
            heading_para = section.AddParagraph()
            heading_text = "  " * indent_level + key.capitalize()
            text_range = heading_para.AppendText(heading_text)
            text_range.CharacterFormat.Bold = True
            text_range.CharacterFormat.FontSize = 12 - indent_level
            heading_para.Format.AfterSpacing = 4
            add_nested_object(section, value, indent_level + 1)
        else:
            paragraph = section.AddParagraph()
            label = "  " * indent_level + f"{key}: {value}"
            text_range = paragraph.AppendText(label)
            text_range.CharacterFormat.FontSize = 11
            paragraph.Format.AfterSpacing = 2

json_data = '''{
  "customer": {
    "name": "Tom Wilson",
    "email": "tom@example.com",
    "address": {
      "street": "123 Main St",
      "city": "Springfield",
      "state": "IL"
    }
  }
}'''
data = json.loads(json_data)

document = Document()
section = document.AddSection()

add_nested_object(section, data)

document.SaveToFile("json_nested.docx", FileFormat.Docx)
document.Close()
Output
The following screenshot shows the hierarchical Word document generated from the nested JSON structure.
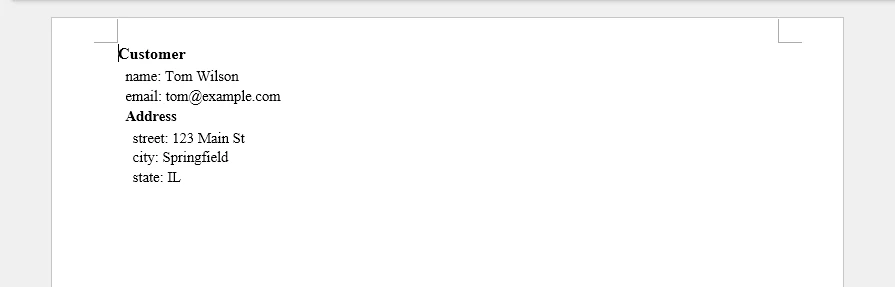
Nested JSON objects can be represented as hierarchical sections in a Word document, making complex data structures easier to read and navigate.
How It Works
The add_nested_object function recursively traverses the JSON structure:
- When it encounters a dict value, it creates a bold heading for the key and recurses into the nested object
- When it encounters a scalar value, it creates a paragraph with the key-value pair
- The
indent_levelparameter controls indentation and font size to create a visual hierarchy
This recursive approach handles arbitrarily deep nesting and produces a readable hierarchical layout in the Word document.
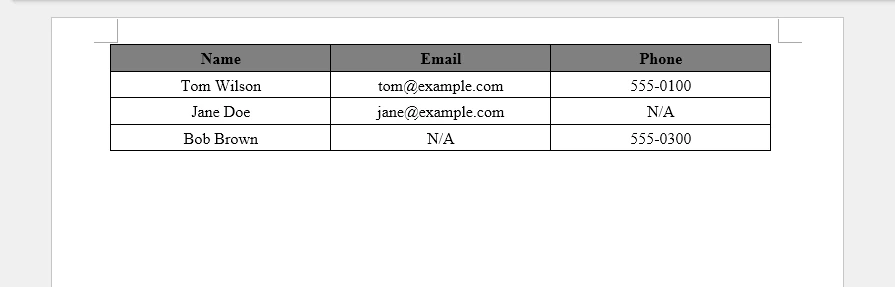
7. Handle Missing or Optional JSON Fields
In real-world applications, JSON data from APIs and databases often contains missing or optional fields. Records may have inconsistent keys, and some fields may be absent entirely. Handling these cases gracefully prevents errors and ensures the generated Word document remains complete.
Example JSON with Missing Fields
[
  {"Name": "Tom Wilson", "Email": "tom@example.com", "Phone": "555-0100"},
  {"Name": "Jane Doe", "Email": "jane@example.com"},
  {"Name": "Bob Brown", "Phone": "555-0300"}
]
Python Code
import json
from spire.doc import (
    Document, FileFormat, HorizontalAlignment,
    VerticalAlignment, TableRowHeightType, Color
)

json_data = '''[
  {"Name": "Tom Wilson", "Email": "tom@example.com", "Phone": "555-0100"},
  {"Name": "Jane Doe", "Email": "jane@example.com"},
  {"Name": "Bob Brown", "Phone": "555-0300"}
]'''
data = json.loads(json_data)

document = Document()
section = document.AddSection()

if data:
    all_keys = []
    for record in data:
        for key in record.keys():
            if key not in all_keys:
                all_keys.append(key)

    table = section.AddTable(True)
    table.ResetCells(len(data) + 1, len(all_keys))

    header_row = table.Rows[0]
    header_row.IsHeader = True
    header_row.Height = 20
    header_row.HeightType = TableRowHeightType.Exactly

    for col_index, header in enumerate(all_keys):
        header_row.Cells[col_index].CellFormat.Shading.BackgroundPatternColor = Color.get_Gray()
        header_row.Cells[col_index].CellFormat.VerticalAlignment = VerticalAlignment.Middle
        paragraph = header_row.Cells[col_index].AddParagraph()
        paragraph.Format.HorizontalAlignment = HorizontalAlignment.Center
        text_range = paragraph.AppendText(header)
        text_range.CharacterFormat.Bold = True

    for row_index, record in enumerate(data):
        data_row = table.Rows[row_index + 1]
        data_row.Height = 20
        data_row.HeightType = TableRowHeightType.Exactly
        for col_index, key in enumerate(all_keys):
            data_row.Cells[col_index].CellFormat.VerticalAlignment = VerticalAlignment.Middle
            paragraph = data_row.Cells[col_index].AddParagraph()
            paragraph.Format.HorizontalAlignment = HorizontalAlignment.Center
            paragraph.AppendText(str(record.get(key, "N/A")))

document.SaveToFile("json_missing_fields.docx", FileFormat.Docx)
document.Close()
Output
The following screenshot shows the generated Word table, where missing fields are automatically filled with placeholder values to maintain a consistent document structure.
Key Techniques
dict.get(key, "N/A")– Returns a default value when a key is missing, preventingKeyErrorexceptions- Dynamic column collection – Iterates all records to build a complete set of column headers, ensuring no field is missed even when it appears in only some records
- Consistent table structure – All rows have the same number of columns regardless of which fields are present in each record
This approach is essential for production use cases where API responses may vary in structure across different records or over time.
8. Convert JSON Files to Word Documents
In practice, JSON data often originates from files rather than inline strings. API export results, configuration files, database dumps, data exchange files, and log data are all commonly stored as .json files that need to be converted to Word documents.
The conversion process for JSON files follows this workflow:
JSON File (.json)
        ↓
Load JSON (json.load)
        ↓
Generate Word Document (Spire.Doc)
        ↓
DOCX Document
Python Code
import json
from spire.doc import Document, FileFormat

with open("data.json", "r", encoding="utf-8") as f:
    data = json.load(f)

document = Document()
section = document.AddSection()

# Process the loaded JSON data
# using any of the techniques shown in Methods 1–3
# (formatted text, tables, or structured reports)

document.SaveToFile("data_report.docx", FileFormat.Docx)
document.Close()
Key Points
json.load()reads and parses a JSON file directly, unlikejson.loads()which parses a stringencoding="utf-8"ensures proper handling of non-ASCII characters in JSON files- Once the JSON file is loaded into a Python dictionary or list, Spire.Doc for Python can generate paragraphs, tables, or structured reports from the parsed data using any of the methods described earlier in this article
For complete examples of processing the loaded data, refer to Method 1 for formatted text, Method 2 for tables, or Method 3 for structured reports.
9. Why Use Spire.Doc for JSON-to-Word Conversion
Converting JSON to Word involves several practical challenges that go beyond simple data parsing. Generating properly formatted tables, applying consistent styles, creating structured reports with headings and paragraphs, and handling nested or incomplete data all require a capable document generation API.
Challenges of JSON-to-Word Conversion
- Table generation – JSON arrays must be mapped to Word tables with headers, rows, and cell formatting
- Document formatting – Raw data exports lack the visual hierarchy that makes Word documents readable
- Structured reports – Combining headings, paragraphs, and tables in a single document requires coordinating multiple element types
- Nested data – Deeply nested JSON objects need recursive traversal and hierarchical layout
- Large documents – Generating multi-page reports from large JSON datasets demands efficient resource management
Benefits of Spire.Doc for Python
Spire.Doc for Python addresses these challenges with a straightforward API:
- Create Word documents without Microsoft Word – No Office installation or Interop dependencies required
- Generate paragraphs, tables, images, headers, and footers – Full coverage of Word document elements
- Apply built-in and custom styles – Consistent formatting across documents using
BuiltinStyleandParagraphStyle - Automate report generation – Programmatically build structured reports from any JSON data source
- Export to DOCX and other formats – Save to DOCX, PDF, HTML, RTF, and more using
FileFormat
With Spire.Doc, the JSON-to-Word conversion process becomes a structured mapping from parsed data to Word elements, rather than manual string formatting or template manipulation.
10. FAQ
How do I convert JSON to Word in Python?
Parse the JSON data using Python's built-in json module, then use Spire.Doc for Python to create a Word document. Map JSON key-value pairs to paragraphs, JSON arrays to tables, and use headings for structure. See Method 1 for a basic example and Method 3 for a complete report.
Can JSON arrays be converted into Word tables?
Yes. JSON arrays of objects map naturally to Word tables, where each object becomes a row and each key becomes a column. See Method 2 for a complete code example that creates a formatted table from a JSON array.
How do I create a DOCX report from API JSON responses?
Fetch the API response as JSON, parse it, and use Spire.Doc for Python to generate the report. Combine headings for titles, paragraphs for summaries, and tables for data arrays. See Method 3 for a structured report example.
Can nested JSON objects be exported to Word?
Yes. Use a recursive function to traverse nested JSON objects, creating headings for object keys and paragraphs for scalar values. See Section 6 for a detailed example of handling nested structures with visual hierarchy.
How do I convert a JSON file to a Word document?
Use Python's json.load() to read the JSON file, then process the parsed data with Spire.Doc for Python. See Section 8 for a code example.
What is the best way to generate Word documents from JSON data?
The best approach depends on the JSON structure. For simple key-value data, use formatted paragraphs. For arrays, use tables. For complex nested data with mixed content, combine headings, paragraphs, and tables as shown in Method 3.
11. Conclusion
Generating Word documents from JSON data is a common requirement in reporting, document automation, and data export workflows. With Spire.Doc for Python, you can create paragraphs, tables, and structured document layouts directly from JSON, making it easier to produce professional DOCX files from application data.
The same approach can be extended to API responses, database records, configuration files, and other structured data sources, helping automate document generation in both small projects and enterprise systems.
For scenarios involving large documents or document conversion requirements, a licensed version is required.

Inserting mathematical equations into Word documents programmatically is essential for developers building scientific document generators, academic reporting systems, educational platforms, or engineering automation tools. Whether you're generating research papers, technical documentation, or mathematics worksheets, automating equation insertion greatly improves efficiency and consistency.
However, manually formatting equations in Microsoft Word is time-consuming, and building a mathematical rendering engine from scratch can be extremely complex. Developers often need a reliable way to add equations in Word while supporting standard mathematical formats such as LaTeX and MathML.
With Spire.Doc for Python, developers can insert mathematical equations into Word documents directly from LaTeX and MathML code using a straightforward API. This article demonstrates how to create Word equations in Python, including how to insert formulas, convert equations between LaTeX, MathML, and Office MathML (OMML), and export Word equations into different mathematical formats.
Quick Navigation
- Understanding Mathematical Equations in Word Documents
- Install Spire.Doc for Python
- Insert Equations into Word from LaTeX in Python
- Add MathML Equations to Word Documents in Python
- Convert Word Equations to LaTeX or MathML
- Render Equation as Image
- Complete Example: Multi-Format Equation Processing
- Common Pitfalls
- FAQ
1. Understanding Mathematical Equations in Word Documents
Microsoft Word uses Office Math Markup Language (OMML) as its internal format for mathematical equations. OMML is an XML-based structure that controls equation layout, symbols, fractions, matrices, and other mathematical elements in Word documents. However, directly creating or editing OMML is cumbersome for most developers.
In real-world applications, mathematical content is more commonly written in LaTeX or MathML:
- LaTeX is widely used in academia and scientific publishing because of its concise syntax and powerful mathematical typesetting capabilities.
- MathML is an XML-based standard designed for mathematical content on the web and in educational systems.
To generate editable Word equations programmatically, developers often need to convert between these formats and Word's native equation objects.
Why Choose Spire.Doc for Python?
Spire.Doc for Python provides native support for Word equation processing through the OfficeMath class. Instead of manually generating OMML or relying on image-based workarounds, developers can directly create editable Word equations from LaTeX or MathML code.
Key capabilities include:
| Capability | Supported |
|---|---|
| Insert equations from LaTeX | ✓ |
| Insert equations from MathML | ✓ |
| Export Word equations to LaTeX | ✓ |
| Export Word equations to MathML | ✓ |
| Access native OMML content | ✓ |
| Render equations as images | ✓ |
These capabilities are particularly useful for academic report generation, educational platforms, MathML-to-Word conversion workflows, LaTeX publishing pipelines, and other automated document generation scenarios involving mathematical content.
2. Install Spire.Doc for Python
Install Spire.Doc for Python via pip:
pip install spire.doc
Import the required classes in your Python script:
from spire.doc import *
Alternatively, you can manually install the library from the Spire.Doc for Python download page.
3. Insert Equations into Word from LaTeX in Python
LaTeX is the most widely used format for writing mathematical equations in academic and scientific documents. With Spire.Doc for Python, you can convert LaTeX expressions into native Word equation objects and insert these equations directly into DOCX files.
The following example demonstrates how to insert multiple LaTeX equations into a Word document using the OfficeMath class.
from spire.doc import *
def insert_latex_equations():
# Create a new Word document
doc = Document()
section = doc.AddSection()
# Add a title paragraph
title_para = section.AddParagraph()
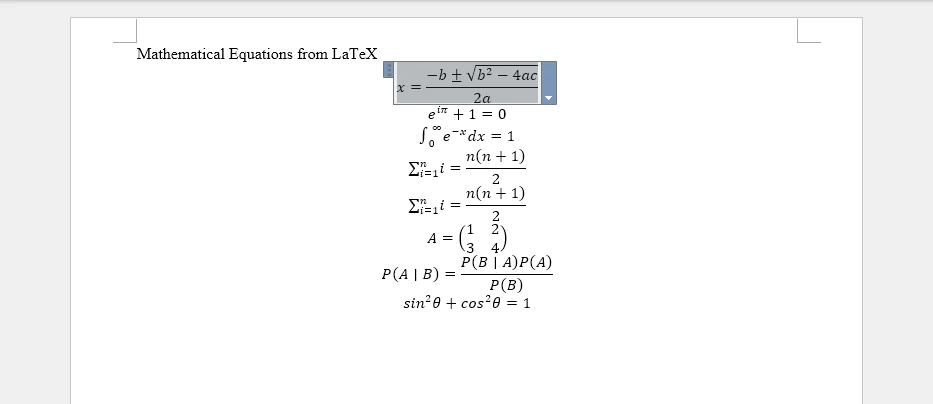
title_para.AppendText("Mathematical Equations from LaTeX")
title_para.Format.HorizontalAlignment = HorizontalAlignment.Left
# Define LaTeX equations to insert
latex_equations = [
r"x = \frac{-b \pm \sqrt{b^2 - 4ac}}{2a}", # Quadratic formula
r"e^{i\pi} + 1 = 0", # Euler's identity
r"\int_0^\infty e^{-x} \, dx = 1", # Definite integral
# Summation formula
r"\sum_{i=1}^{n} i = \frac{n(n+1)}{2}",
r"\sum_{i=1}^{n} i = \frac{n(n+1)}{2}", # Summation formula
r"A = \begin{pmatrix} 1 & 2 \\ 3 & 4 \end{pmatrix}", # Matrix
r"P(A \mid B) = \frac{P(B \mid A)P(A)}{P(B)}", # Probability formula
r"\sin^2\theta + \cos^2\theta = 1", # Trigonometric identity
]
# Insert each LaTeX equation as a separate paragraph
for latex_code in latex_equations:
# Create an OfficeMath object from LaTeX code
office_math = OfficeMath(doc)
office_math.FromLatexMathCode(latex_code)
# Add the equation to a new paragraph
para = section.AddParagraph()
para.Items.Add(office_math)
# Save the document
doc.SaveToFile("latex_equations.docx", FileFormat.Docx2019)
doc.Close()
print("LaTeX equations inserted successfully!")
if __name__ == "__main__":
insert_latex_equations()
The following screenshot shows the generated Word document with equations converted from LaTeX code.
Key API Methods
- Document – Represents the Word document container used to create sections and paragraphs
- OfficeMath – Represents a mathematical equation object in Word documents
- FromLatexMathCode() – Converts LaTeX mathematical code into an Office Math object that Word can render natively
- Items.Add() – Adds the OfficeMath object to a paragraph's content collection
- SaveToFile() – Saves the document to disk in DOCX format using FileFormat.Docx2019
This approach supports complex LaTeX constructs such as fractions, integrals, matrices, Greek letters, and other mathematical operators while preserving native Word equation formatting.
Adding Inline Equations
In addition to standalone equations, you can insert inline equations within text paragraphs. This is useful for embedding mathematical expressions within sentences or explanations.
from spire.doc import *

def insert_inline_equation():
    # Create a new Word document
    doc = Document()
    section = doc.AddSection()

    # Add introductory text
    para = section.AddParagraph()
    para.AppendText("The quadratic formula is ")

    # Insert inline equation
    office_math = OfficeMath(doc)
    office_math.FromLatexMathCode(r"x = \frac{-b \pm \sqrt{b^2 - 4ac}}{2a}")
    para.Items.Add(office_math)

    para.AppendText(", where a ≠ 0.")

    # Save the document
    doc.SaveToFile("inline_equation.docx", FileFormat.Docx2019)
    doc.Close()

if __name__ == "__main__":
    insert_inline_equation()
The inserted equation appears inline within the text:
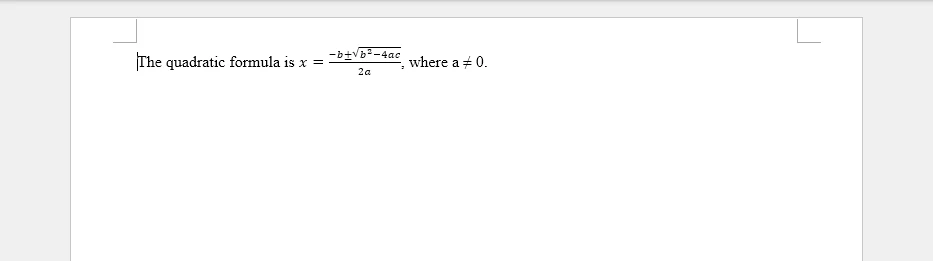
This approach makes it easy to embed mathematical expressions directly within regular text content, which is useful for educational materials, research papers, and technical documentation.
If you need to combine equations with formatted text, headings, tables, and other structured document elements, you can also refer to our tutorial on creating structured Word documents in Python.
4. Add MathML Equations to Word Documents in Python
MathML (Mathematical Markup Language) is an XML-based standard for representing mathematical expressions on the web and in digital documents. It's commonly used in online education platforms, scientific databases, and content management systems. The following example shows how to convert MathML to Word equations using Spire.Doc for Python.
from spire.doc import *
def insert_mathml_equations():
# Create a new Word document
doc = Document()
section = doc.AddSection()
# Add a title paragraph
title_para = section.AddParagraph()
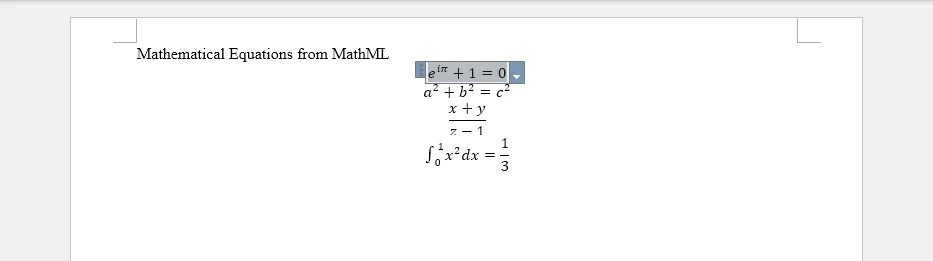
title_para.AppendText("Mathematical Equations from MathML")
# Define MathML equations to insert
mathml_equations = [
# Euler's identity
r'<math xmlns="http://www.w3.org/1998/Math/MathML">'
r'<msup><mi>e</mi><mrow><mi>i</mi><mi>π</mi></mrow></msup>'
r'<mo>+</mo><mn>1</mn><mo>=</mo><mn>0</mn>'
r'</math>',
# Pythagorean theorem
r'<math xmlns="http://www.w3.org/1998/Math/MathML">'
r'<msup><mi>a</mi><mn>2</mn></msup>'
r'<mo>+</mo>'
r'<msup><mi>b</mi><mn>2</mn></msup>'
r'<mo>=</mo>'
r'<msup><mi>c</mi><mn>2</mn></msup>'
r'</math>',
# Fraction expression
r'<math xmlns="http://www.w3.org/1998/Math/MathML">'
r'<mfrac>'
r'<mrow><mi>x</mi><mo>+</mo><mi>y</mi></mrow>'
r'<mrow><mi>z</mi><mo>−</mo><mn>1</mn></mrow>'
r'</mfrac>'
r'</math>',
# Integral equation
r'<math xmlns="http://www.w3.org/1998/Math/MathML">'
r'<msubsup><mo>∫</mo><mn>0</mn><mn>1</mn></msubsup>'
r'<msup><mi>x</mi><mn>2</mn></msup>'
r'<mi>d</mi><mi>x</mi>'
r'<mo>=</mo>'
r'<mfrac><mn>1</mn><mn>3</mn></mfrac>'
r'</math>'
]
# Insert each MathML equation as a separate paragraph
for mathml_code in mathml_equations:
# Create an OfficeMath object from MathML code
office_math = OfficeMath(doc)
office_math.FromMathMLCode(mathml_code)
# Add the equation to a new paragraph
para = section.AddParagraph()
para.Items.Add(office_math)
# Save the document
doc.SaveToFile("mathml_equations.docx", FileFormat.Docx2019)
doc.Close()
print("MathML equations inserted successfully!")
if __name__ == "__main__":
insert_mathml_equations()
The following screenshot shows the generated Word document with equations converted from MathML code.
Key API Method
- FromMathMLCode() – Parses MathML markup and converts it into a native Word equation object.
MathML support is especially useful when working with XML-based educational content, web-based equation systems, and STEM learning platforms that store mathematical expressions in MathML format.
Combining LaTeX and MathML in One Document
You can mix both LaTeX and MathML equations within the same document, allowing flexibility in content sources:
from spire.doc import *

def insert_mixed_equations():
    # Create a new Word document
    doc = Document()
    section = doc.AddSection()

    # Insert LaTeX equation
    latex_para = section.AddParagraph()
    latex_math = OfficeMath(doc)
    latex_math.FromLatexMathCode(r"E = mc^2")
    latex_para.Items.Add(latex_math)

    # Insert MathML equation
    mathml_para = section.AddParagraph()
    mathml_math = OfficeMath(doc)
    mathml_math.FromMathMLCode(
        r'<math xmlns="http://www.w3.org/1998/Math/MathML">'
        r'<mi>F</mi><mo>=</mo><mi>m</mi><mi>a</mi>'
        r'</math>'
    )
    mathml_para.Items.Add(mathml_math)

    # Save the document
    doc.SaveToFile("mixed_equations.docx", FileFormat.Docx2019)
    doc.Close()

if __name__ == "__main__":
    insert_mixed_equations()
This approach is useful when mathematical content comes from different sources, such as LaTeX-based publishing systems and MathML-based web applications.
If your mathematical content originates from web pages or HTML-based systems, you can also refer to our tutorial on converting HTML content to Word documents in Python.
5. Convert Word Equations to LaTeX, MathML, and OMML
Besides inserting equations into Word documents, Spire.Doc for Python also supports exporting Word equations to multiple mathematical markup formats. This is useful for interoperability between Word, LaTeX publishing systems, web-based MathML platforms, and custom XML workflows.
The following example demonstrates how to extract equations from a Word document and export them as LaTeX, MathML, and Office MathML (OMML).
from spire.doc import *

def export_equation_formats():
    # Load a Word document containing equations
    doc = Document()
    doc.LoadFromFile("equations.docx")

    # Access the first paragraph
    section = doc.Sections[0]
    para = section.Paragraphs[0]

    # Find OfficeMath objects
    for item in para.ChildObjects:
        if isinstance(item, OfficeMath):

            # Export to LaTeX
            latex_code = item.ToLaTexMathCode()
            print("LaTeX:")
            print(latex_code)
            print()

            # Export to MathML
            mathml_code = item.ToMathMLCode()
            print("MathML:")
            print(mathml_code)
            print()

            # Export to Office MathML (OMML)
            omml_code = item.ToOfficeMathMLCode()
            print("OMML:")
            print(omml_code)

            # Save outputs to files
            with open("equation.tex", "w", encoding="utf-8") as f:
                f.write(latex_code)

            with open("equation.xml", "w", encoding="utf-8") as f:
                f.write(mathml_code)

            with open("equation.omml", "w", encoding="utf-8") as f:
                f.write(omml_code)

            break

    doc.Close()

if __name__ == "__main__":
    export_equation_formats()
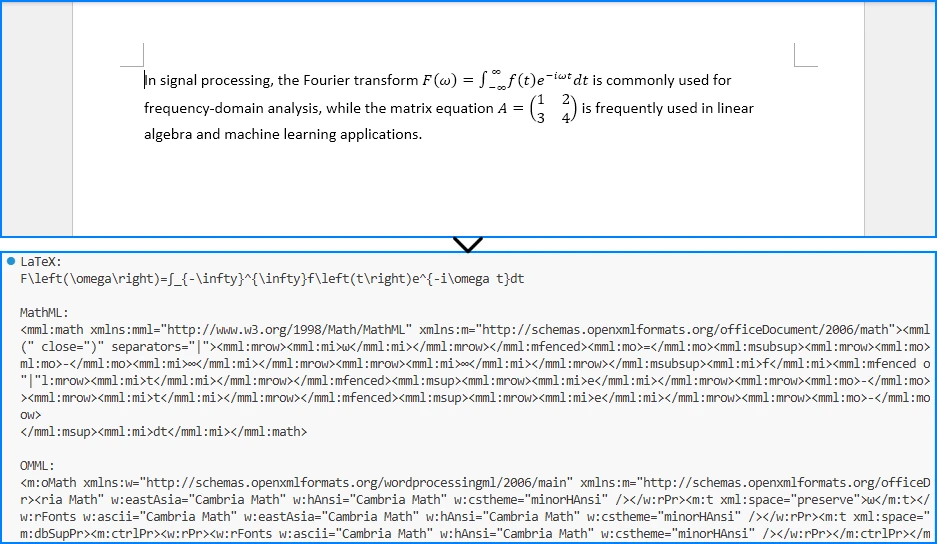
The following screenshot shows the exported equation formats printed in the Python console.
Supported Export Formats
| Format | Primary Use Case | Characteristics |
|---|---|---|
| LaTeX | Academic publishing and scientific papers | Compact syntax widely used in academia |
| MathML | Web-based mathematical content | XML-based format designed for browsers and educational systems |
| OMML | Microsoft Word integration | Native Office equation format with full Word compatibility |
These export capabilities make it easier to:
- Convert Word equations into LaTeX publishing workflows
- Publish equations on websites using MathML
- Integrate Word documents with XML-based systems
- Inspect and debug Word equation structures using OMML
6. Render Office Math Equations to Images
In some scenarios, you may need to export equations as image files for use in presentations, web pages, or other non-editable contexts. Spire.Doc for Python allows you to render Office Math equations into image streams that can be saved as image files.
from spire.doc import *
def render_equation_as_image():
# Create a new Word document with an equation
doc = Document()
section = doc.AddSection()
para = section.AddParagraph()
# Insert an equation
office_math = OfficeMath(doc)
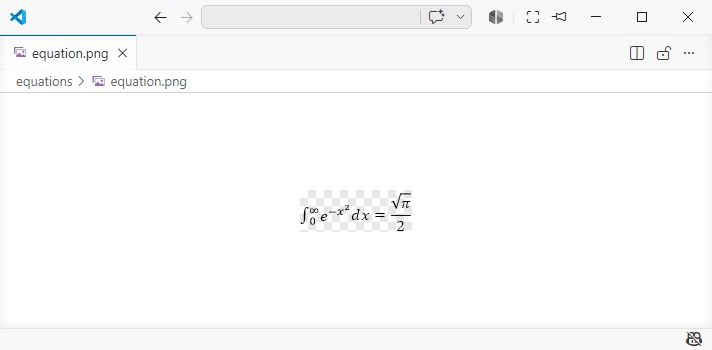
office_math.FromLatexMathCode(
r"\int_0^\infty e^{-x^2} dx = \frac{\sqrt{\pi}}{2}"
)
para.Items.Add(office_math)
# Render the equation as an image stream
image_stream = office_math.SaveImageToStream(ImageType.Bitmap)
# Save the image to file
with open("equations/equation.png", "wb") as f:
f.write(image_stream.ToArray())
# Release unmanaged resources
image_stream.Dispose()
doc.Close()
print("Equation rendered as image successfully!")
if __name__ == "__main__":
render_equation_as_image()
The following screenshot shows the equation rendered as an image file.
This feature is particularly useful for:
- Embedding equations in presentations
- Displaying formulas on web pages
- Generating static previews for document systems
If you want to render complete Word documents as images rather than exporting individual equations, check out our tutorial on converting Word documents to images in Python.
7. Complete Example: Multi-Format Equation Processing
The following comprehensive example demonstrates a complete workflow that combines multiple equation operations: inserting equations from different sources, exporting to various formats, and rendering as images.
from spire.doc import *

def complete_equation_workflow():
    """
    Demonstrates a complete workflow for equation processing:
    - Create equations from LaTeX and MathML
    - Export equations to LaTeX and MathML
    - Render equations as images
    """

    # Create a new Word document
    doc = Document()
    section = doc.AddSection()

    # Add document title
    title_para = section.AddParagraph()
    title_text = title_para.AppendText("Complete Equation Processing Workflow")
    title_text.CharacterFormat.FontSize = 16
    title_text.CharacterFormat.Bold = True
    title_para.Format.HorizontalAlignment = HorizontalAlignment.Center

    # Insert equations from LaTeX
    latex_section_title = section.AddParagraph()
    latex_title_text = latex_section_title.AppendText("\nEquations from LaTeX:")
    latex_title_text.CharacterFormat.Bold = True

    latex_examples = [
        (r"E = mc^2", "Einstein's Mass-Energy Equivalence"),
        (r"\sum_{i=1}^{n} i = \frac{n(n+1)}{2}", "Sum of First n Integers"),
        (r"\frac{d}{dx}\left(\int_a^x f(t)dt\right) = f(x)", "Fundamental Theorem of Calculus")
    ]

    first_equation = None

    for latex_code, description in latex_examples:
        # Add description
        desc_para = section.AddParagraph()
        desc_para.AppendText(f"{description}:")

        # Insert equation
        office_math = OfficeMath(doc)
        office_math.FromLatexMathCode(latex_code)

        eq_para = section.AddParagraph()
        eq_para.Items.Add(office_math)

        if first_equation is None:
            first_equation = office_math

    # Insert equations from MathML
    mathml_section_title = section.AddParagraph()
    mathml_title_text = mathml_section_title.AppendText("\nEquations from MathML:")
    mathml_title_text.CharacterFormat.Bold = True

    mathml_examples = [
        (
            r'<math xmlns="http://www.w3.org/1998/Math/MathML"><mi>a</mi><mo>+</mo><mi>b</mi><mo>=</mo><mi>c</mi></math>',
            "Simple Addition"
        ),
        (
            r'<math xmlns="http://www.w3.org/1998/Math/MathML"><msup><mi>e</mi><mrow><mi>i</mi><mi>π</mi></mrow></msup><mo>+</mo><mn>1</mn><mo>=</mo><mn>0</mn></math>',
            "Euler's Identity"
        )
    ]

    for mathml_code, description in mathml_examples:
        # Add description
        desc_para = section.AddParagraph()
        desc_para.AppendText(f"{description}:")

        # Insert equation
        office_math = OfficeMath(doc)
        office_math.FromMathMLCode(mathml_code)

        eq_para = section.AddParagraph()
        eq_para.Items.Add(office_math)

    # Save the Word document
    output_docx = "complete_equations.docx"
    doc.SaveToFile(output_docx, FileFormat.Docx2019)
    print(f"Word document saved: {output_docx}")

    # Export the first equation to LaTeX
    latex_export = first_equation.ToLaTexMathCode()

    with open("exported_equation.tex", "w", encoding="utf-8") as f:
        f.write(latex_export)

    print(f"Exported to LaTeX: {latex_export}")

    # Export the first equation to MathML
    mathml_export = first_equation.ToMathMLCode()

    with open("exported_equation.xml", "w", encoding="utf-8") as f:
        f.write(mathml_export)

    print("Exported to MathML")

    # Render the first equation as an image
    image_stream = first_equation.SaveImageToStream(ImageType.Bitmap)

    with open("equation_render.png", "wb") as f:
        f.write(image_stream.ToArray())

    # Release unmanaged resources
    image_stream.Dispose()

    print("Equation rendered as image successfully!")

    # Clean up
    doc.Close()

    print("\nWorkflow completed successfully!")

if __name__ == "__main__":
    complete_equation_workflow()
The generated Word document will look like this:
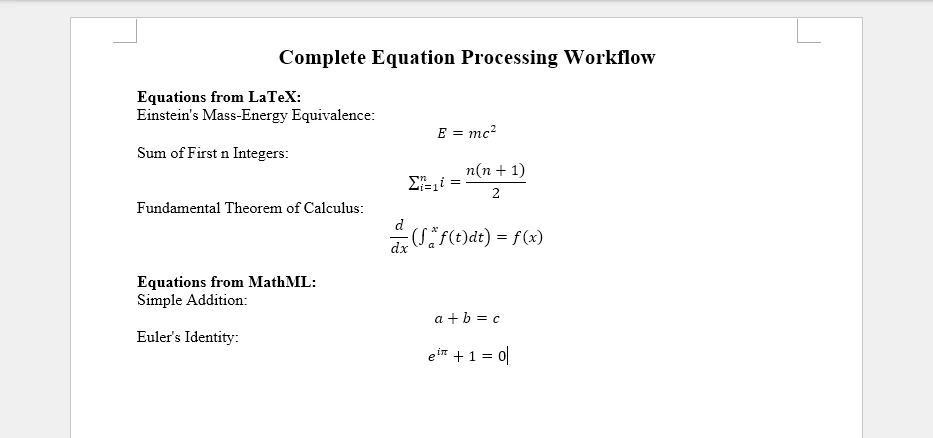
This complete example demonstrates:
- Multi-source equation insertion – Combining LaTeX and MathML inputs
- Descriptive labeling – Adding context to each equation
- Format conversion – Exporting to LaTeX and MathML
- Image rendering – Creating visual representations
- Resource management – Proper cleanup of document objects
The resulting Word document contains well-formatted equations with descriptions, while the exported files provide alternative formats for different use cases.
8. Common Pitfalls
Raw String Literals for LaTeX
When writing LaTeX code in Python strings, always use raw strings (prefix with r) to prevent escape sequence interpretation:
# Correct: Use raw string
latex_code = r"\int_0^\infty e^{-x} dx"

# Incorrect: Backslashes will be interpreted as escape sequences
latex_code = "\int_0^\infty e^{-x} dx"
Unsupported LaTeX Commands
Not all LaTeX commands are supported by Word's equation engine. Some advanced LaTeX constructs may not render correctly. Stick to standard mathematical notation whenever possible:
# Supported: Standard mathematical notation
office_math.FromLatexMathCode(r"\alpha + \beta = \gamma")

# Some advanced LaTeX constructs may not be supported
# office_math.FromLatexMathCode(r"\begin{align} ... \end{align}")
MathML Namespace Requirements
MathML code must include the proper namespace declaration to parse correctly:
# Correct: Include namespace
mathml = r'<math xmlns="http://www.w3.org/1998/Math/MathML"><mi>x</mi></math>'

# Incorrect: Missing namespace may fail
mathml = r'<math><mi>x</mi></math>'
Memory Management
Always close documents after processing to release resources, especially in batch operations:
doc = Document()

try:
    # Process equations
    doc.SaveToFile("output.docx", FileFormat.Docx2019)

finally:
    doc.Close()  # Ensure cleanup even if errors occur
Character Encoding
When saving exported LaTeX or MathML to files, ensure proper UTF-8 encoding for special characters:
with open("equation.tex", "w", encoding="utf-8") as f:
    f.write(latex_code)
Image Stream Disposal
Always dispose of image streams after use to properly release resources:
image_stream = office_math.SaveImageToStream(ImageType.Bitmap)

try:
    with open("equation.png", "wb") as f:
        f.write(image_stream.ToArray())

finally:
    image_stream.Dispose()
Conclusion
In this article, we demonstrated how to insert mathematical equations into Word documents in Python using Spire.Doc for Python. By leveraging the Spire API, developers can create Word equations from LaTeX and MathML code, convert between LaTeX, MathML, and Word’s native OMML format, and render equations as images. This capability is essential for automating scientific document generation, educational content creation, and mathematical publishing workflows.
Spire.Doc for Python provides comprehensive equation processing capabilities beyond basic insertion, including conversion between LaTeX and MathML into Word’s native OMML format, as well as exporting Word equations back to LaTeX, MathML, and OMML. The library simplifies complex mathematical typesetting while maintaining compatibility with Microsoft Word’s native equation engine.
If you want to evaluate the full capabilities of Spire.Doc for Python, you can apply for a 30-day free license.
9. FAQ
How do I insert equations into Word using Python?
Use the OfficeMath class from Spire.Doc for Python. Create an OfficeMath object, call FromLatexMathCode() or FromMathMLCode() with your equation code, then add it to a paragraph using para.Items.Add(office_math). Finally, save the document using doc.SaveToFile().
Can I add LaTeX equations to Word documents in Python?
Yes. Spire.Doc for Python supports inserting equations from LaTeX code using the FromLatexMathCode() method. Standard mathematical notation such as fractions, integrals, superscripts, subscripts, and Greek letters can be converted into Word-compatible equations.
Does Spire.Doc support MathML equations?
Yes. You can create Word equations from MathML using the FromMathMLCode() method. Make sure the MathML content includes the correct namespace declaration:
<math xmlns="http://www.w3.org/1998/Math/MathML">
Can I export Word equations back to LaTeX or MathML?
Yes. Spire.Doc for Python provides methods such as ToLaTexMathCode() and ToMathMLCode() to export Office Math equations into LaTeX or MathML formats. This is useful for content migration, storage, or integration with other mathematical systems.
How can I render equations as images?
Use the SaveImageToStream() method on an OfficeMath object to render the equation as an image stream. You can then save the stream as an image file and use it in presentations, web pages, or preview systems.
Modern development teams often need to share JavaScript or JSX source code with project managers, clients, auditors, or educators who don't use code editors. However, raw .js and .jsx files are difficult to review outside tools like VS Code or WebStorm, while manually copying code into Word documents frequently breaks indentation, formatting, and readability.
Using Spire.Doc for Python together with Pygments, developers can convert JavaScript to Word in Python with syntax highlighting and customizable document formatting. This automated approach is useful for technical documentation, compliance archiving, educational materials, code reviews, and client deliverables.
In this article, you'll learn how to convert JavaScript and JSX files to Word documents in Python using Spire.Doc for Python, including basic conversion, advanced formatting techniques, batch processing, and PDF export.
Quick Navigation
- Understanding the Conversion Workflow
- Prerequisites
- Basic Implementation of JavaScript to Word Conversion
- Advanced Scenarios
- Common Pitfalls
- Conclusion
- FAQ
1. Understanding the Conversion Workflow
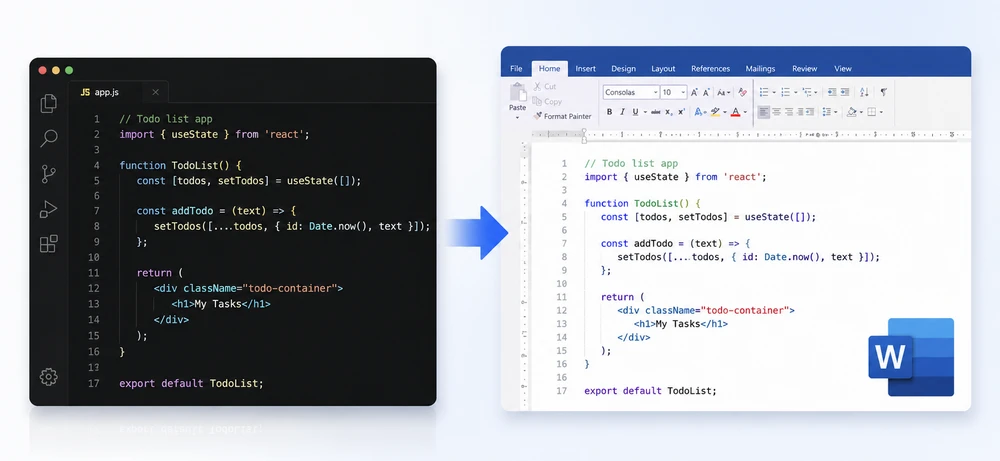
The conversion process uses Pygments to generate syntax-highlighted HTML, then imports this HTML into a Word document using Spire.Doc's HTML import functionality:
- Read source code from
.jsor.jsxfiles - Generate syntax-highlighted HTML using Pygments'
highlight()function - Import the HTML into Word using
AppendHTML()
This approach provides syntax coloring through Pygments' built-in styles, while Spire.Doc handles document structure including margins, headers, footers, and multi-format export. It provides a simple and flexible API for automating the conversion process.
2. Prerequisites
Before converting JavaScript files to Word documents in Python, you need to install Spire.Doc for Python and Pygments:
pip install spire.doc
pip install pygments
Verify the packages are available:
import spire.doc
from pygments import highlight
from pygments.formatters import HtmlFormatter
Alternatively, you can download Spire.Doc for Python and add it to your project.
3. Basic Implementation
The following example converts a JavaScript file to a Word document with syntax highlighting:
from spire.doc import *
from pygments import highlight
from pygments.lexers import JavascriptLexer
from pygments.formatters import HtmlFormatter
def convert_js_to_word(input_file: str, output_file: str) -> None:
"""Convert JavaScript file to Word document with syntax highlighting."""
with open(input_file, "r", encoding="utf-8") as file:
js_code = file.read()
document = Document()
section = document.AddSection()
section.PageSetup.Margins.All = 50
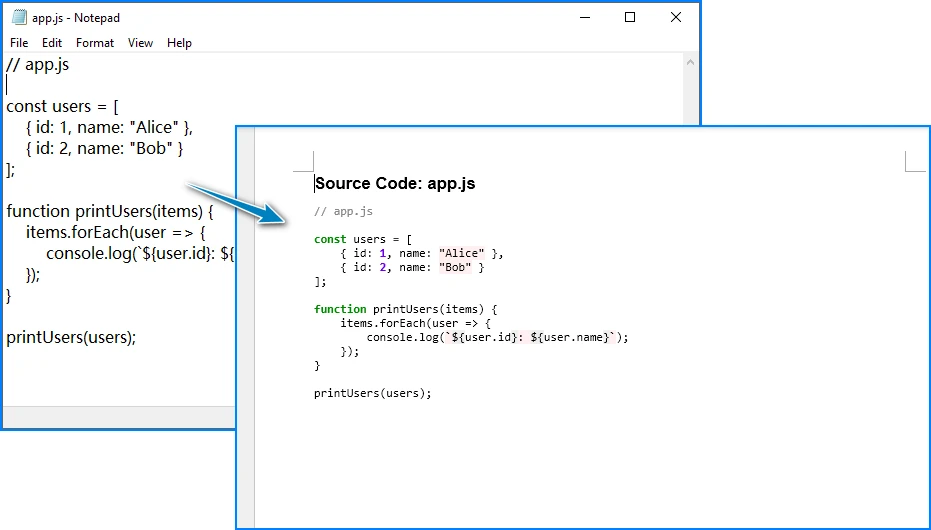
title_paragraph = section.AddParagraph()
title_text = title_paragraph.AppendText(f"Source Code: {input_file}")
title_text.CharacterFormat.FontName = "Arial"
title_text.CharacterFormat.FontSize = 14
title_text.CharacterFormat.Bold = True
title_paragraph.Format.AfterSpacing = 10
html_formatter = HtmlFormatter(
nowrap=True,
style='colorful',
noclasses=True
)
highlighted_html = highlight(js_code, JavascriptLexer(), html_formatter)
code_paragraph = section.AddParagraph()
code_paragraph.AppendHTML(f'<pre style="font-family: Consolas; font-size: 10pt;">{highlighted_html}</pre>')
document.SaveToFile(output_file, FileFormat.Docx)
document.Close()
print(f"Converted {input_file} to {output_file}")
convert_js_to_word("app.js", "JavaScriptCode.docx")
Key Components
- Document – Word document container for sections, paragraphs, and content
- Section – Document section with page setup properties (margins, orientation)
- Paragraph – Text container with formatting options
- AppendHTML() – Imports HTML content into the paragraph, including inline styles for colors and fonts
- highlight() – Pygments function that generates syntax-highlighted output
- HtmlFormatter – Pygments formatter producing HTML with inline styles (use
noclasses=True) - JavascriptLexer – Pygments lexer that identifies JavaScript syntax elements
Spire.Doc can import syntax-highlighted HTML generated by Pygments, allowing JavaScript code formatting and colors to be preserved in Word documents.
4. Advanced Scenarios
Convert JSX Files
For JSX files, it's recommended to use JsxLexer instead of JavascriptLexer to achieve more accurate syntax highlighting for component tags and embedded JSX expressions.
Example JSX input (App.jsx):
``jsx import React, { useState } from 'react';
const TodoList = () => { const [todos, setTodos] = useState([]);
return (
    <div className="todo-container">
        <h1>My Tasks</h1>
    </div>
);
};
export default TodoList;
Use `JsxLexer` when generating syntax-highlighted HTML:

```python
from pygments.lexers import JsxLexer

highlighted_html = highlight(
    jsx_code,
    JsxLexer(),
    html_formatter
)
Then convert the highlighted JSX content to Word using the same AppendHTML() workflow:
convert_js_to_word("App.jsx", "ReactComponent.docx")
The conversion result looks like this:
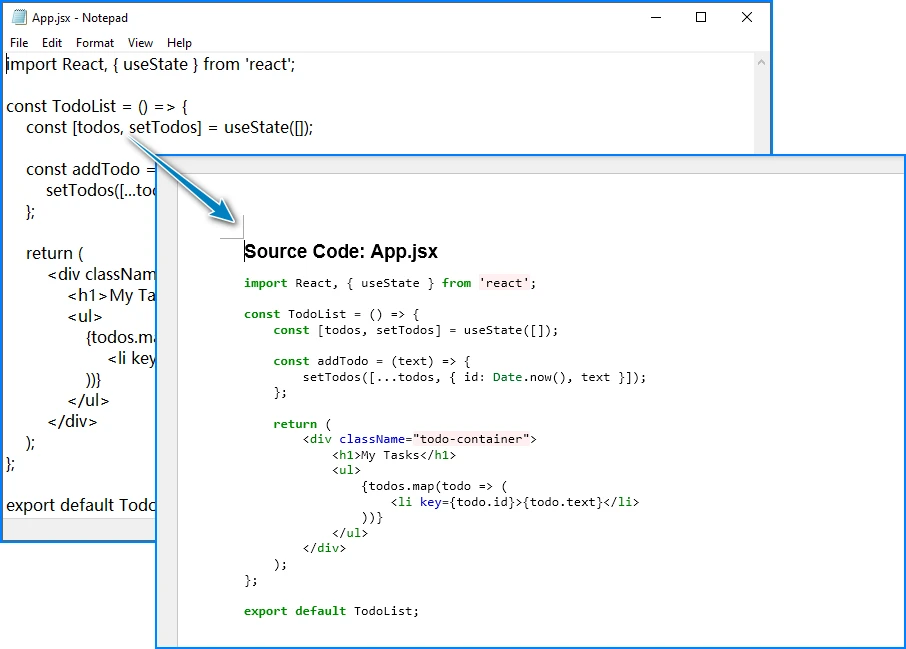
JsxLexer provides improved recognition for JSX tags, attributes, and embedded expressions compared to the standard JavaScript lexer, resulting in more accurate syntax coloring in the generated Word document.
Batch Convert Multiple Files
If you need to convert large numbers of JavaScript or JSX files, you can automate the process by scanning a folder and generating Word documents in batches.
import os
from pathlib import Path

def batch_convert_js_files(source_folder: str, output_folder: str) -> None:
    """Convert all JavaScript files in a folder to Word documents."""

    Path(output_folder).mkdir(parents=True, exist_ok=True)

    js_extensions = ('.js', '.jsx', '.mjs')

    converted_count = 0
    error_count = 0

    for filename in os.listdir(source_folder):
        if filename.lower().endswith(js_extensions):
            input_path = os.path.join(source_folder, filename)

            base_name = os.path.splitext(filename)[0]
            output_path = os.path.join(output_folder, f"{base_name}.docx")

            try:
                convert_js_to_word(input_path, output_path)
                converted_count += 1
            except Exception as e:
                print(f"Error converting {filename}: {str(e)}")
                error_count += 1

    print(f"\nBatch conversion complete:")
    print(f"  Converted: {converted_count} files")
    print(f"  Errors: {error_count} files")

batch_convert_js_files("src/scripts", "output/docs")
Add Line Numbers
Line numbers can improve readability during code reviews, audits, or technical documentation. Since Word HTML rendering may not fully support Pygments' built-in line number layouts, a practical approach is to prepend custom line numbers after syntax highlighting.
html_formatter = HtmlFormatter(
    nowrap=True,
    noclasses=True,
    style="colorful"
)

highlighted_html = highlight(
    js_code,
    JavascriptLexer(),
    html_formatter
)

highlighted_lines = highlighted_html.splitlines()

numbered_lines = []

for index, line in enumerate(highlighted_lines, start=1):

    numbered_line = (
        f'<span style="color: gray; font-weight: bold;">'
        f'{index:4d}  '
        f'</span>{line}'
    )

    numbered_lines.append(numbered_line)

combined_html = (
    '<pre style="font-family: Consolas; '
    'font-size: 10pt; line-height: 1.4;">'
    + '\n'.join(numbered_lines) +
    '</pre>'
)

paragraph.AppendHTML(combined_html)
The generated Word document with line numbers looks like this:
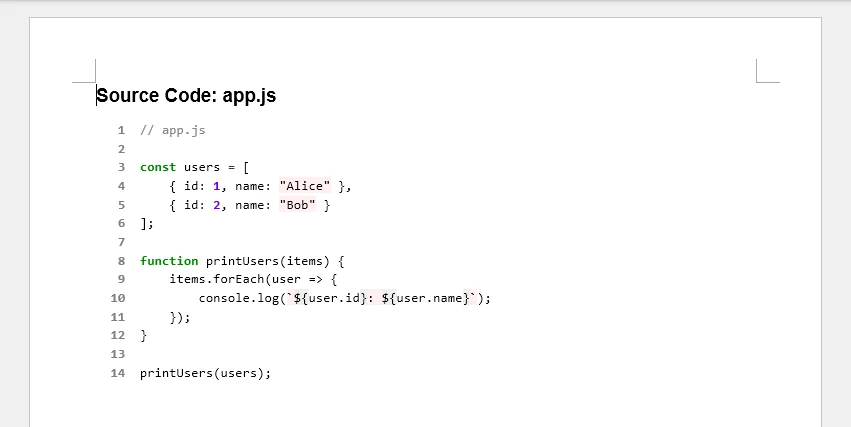
Add Headers and Footers
Headers and footers help organize generated Word documents by adding titles, page numbers, and document metadata. This is especially useful for formal reports or exported technical documentation.
def add_document_metadata(section: Section, document_title: str) -> None:
    """Add header and footer to document section."""

    header = section.HeadersFooters.Header.AddParagraph()
    header_text = header.AppendText(document_title)
    header_text.CharacterFormat.FontName = "Arial"
    header_text.CharacterFormat.FontSize = 10
    header_text.CharacterFormat.TextColor = Color.get_Black()
    header.Format.HorizontalAlignment = HorizontalAlignment.Left
    header.Format.TextAlignment = TextAlignment.Top

    header.Format.Borders.Bottom.BorderType = BorderStyle.Single
    header.Format.Borders.Bottom.Color = Color.get_Black()

    footer = section.HeadersFooters.Footer.AddParagraph()
    footer.Format.HorizontalAlignment = HorizontalAlignment.Center
    footer.Format.TextAlignment = TextAlignment.Bottom

    page_field = footer.AppendField("page", FieldType.FieldPage)
    page_field.CharacterFormat.FontName = "Arial"
    page_field.CharacterFormat.FontSize = 9

    footer.AppendText(" of ")
    total_pages_field = footer.AppendField("numPages", FieldType.FieldNumPages)
    total_pages_field.CharacterFormat.FontName = "Arial"
    total_pages_field.CharacterFormat.FontSize = 9

document = Document()
document.LoadFromFile("CodeWithLines.docx")
section = document.Sections[0]
add_document_metadata(section, "JavaScript Source Code Documentation")
document.SaveToFile("CodeWithHeadersFooters.docx", FileFormat.Docx)
The generated Word document with headers and footers looks like this:
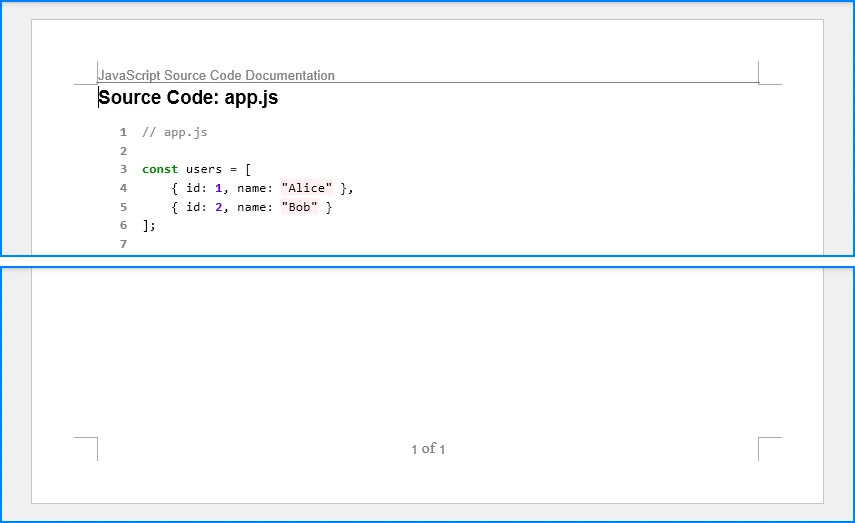
For more advanced customization options, refer to our guide on how to add headers and footers to Word documents in Python.
Export to PDF Format
In addition to DOCX output, Spire.Doc can export syntax-highlighted JavaScript code directly to PDF format. This is useful when distributing read-only documentation or sharing code outside Microsoft Word environments.
def convert_js_to_pdf(input_file: str, output_file: str) -> None:
    """Convert JavaScript file directly to PDF."""

    with open(input_file, "r", encoding="utf-8") as file:
        js_code = file.read()

    document = Document()
    section = document.AddSection()
    section.PageSetup.Margins.All = 50

    html_formatter = HtmlFormatter(noclasses=True, style='colorful')
    highlighted_html = highlight(js_code, JavascriptLexer(), html_formatter)

    paragraph = section.AddParagraph()
    paragraph.AppendHTML(f'<pre style="font-family: Consolas; font-size: 10pt;">{highlighted_html}</pre>')

    document.SaveToFile(output_file, FileFormat.PDF)
    document.Close()

convert_js_to_pdf("app.js", "JavaScriptCode.pdf")
For more advanced PDF conversion techniques, including layout control and document formatting, see our detailed guide on converting Word documents to PDF in Python.
Customize Syntax Highlighting Style
Pygments provides multiple built-in color schemes:
def convert_with_custom_style(input_file: str, output_file: str, style_name: str = 'monokai') -> None:
    """Convert JavaScript to Word with custom highlighting style."""

    with open(input_file, "r", encoding="utf-8") as file:
        js_code = file.read()

    document = Document()
    section = document.AddSection()
    section.PageSetup.Margins.All = 50

    html_formatter = HtmlFormatter(
        noclasses=True,
        style=style_name,
        nowrap=True
    )

    highlighted_html = highlight(js_code, JavascriptLexer(), html_formatter)

    paragraph = section.AddParagraph()
    paragraph.AppendHTML(f'<pre style="font-family: Consolas; font-size: 10pt;">{highlighted_html}</pre>')

    document.SaveToFile(output_file, FileFormat.Docx)
    document.Close()

convert_with_custom_style("app.js", "CodeMonokai.docx", style_name='monokai')
Available styles include: 'monokai', 'colorful', 'vim', 'vs', 'tango', 'friendly', 'default'
5. Common Pitfalls
Missing HtmlFormatter Configuration
Problem: Default HtmlFormatter generates CSS classes instead of inline styles, which Word cannot process without external stylesheets.
Solution: Always use noclasses=True:
html_formatter = HtmlFormatter(noclasses=True, style='colorful')
highlighted_html = highlight(js_code, JavascriptLexer(), html_formatter)
Encoding Errors with Special Characters
Problem: Reading files without UTF-8 encoding causes character corruption on some platforms.
Solution: Explicitly specify UTF-8 encoding:
with open(input_file, "r", encoding="utf-8") as file:
    js_code = file.read()
For files with BOM (Byte Order Mark), use utf-8-sig:
with open(input_file, "r", encoding="utf-8-sig") as file:
    js_code = file.read()
Indentation Loss
Problem: Not wrapping highlighted code in <pre> tags causes indentation to disappear.
Solution: Wrap syntax-highlighted HTML in <pre> tags:
highlighted_html = highlight(js_code, JavascriptLexer(), html_formatter)
paragraph.AppendHTML(f'<pre style="font-family: Consolas;">{highlighted_html}</pre>')
ModuleNotFoundError
Problem: Package not installed in current Python environment.
Solution:
pip install spire.doc
For virtual environments, ensure activation before installation:
source venv/bin/activate  # Linux/Mac
venv\Scripts\activate     # Windows
pip install spire.doc
Performance with Large Files
Problem: Very large JavaScript files (10,000+ lines) may cause slow conversion.
Solution: Process files in chunks:
def convert_large_file(input_file: str, output_file: str, chunk_size: int = 500) -> None:
    """Convert large JavaScript file in chunks."""

    with open(input_file, "r", encoding="utf-8") as file:
        lines = file.readlines()

    document = Document()
    section = document.AddSection()
    section.PageSetup.Margins.All = 50

    html_formatter = HtmlFormatter(noclasses=True, style='colorful')

    for i in range(0, len(lines), chunk_size):
        chunk = ''.join(lines[i:i + chunk_size])
        highlighted_html = highlight(chunk, JavascriptLexer(), html_formatter)

        paragraph = section.AddParagraph()
        paragraph.AppendHTML(f'<pre style="font-family: Consolas; font-size: 10pt;">{highlighted_html}</pre>')

    document.SaveToFile(output_file, FileFormat.Docx)
    document.Close()
Conclusion
This article demonstrated how to convert JavaScript and JSX files to Word documents in Python using Spire.Doc for Python and Pygments. By leveraging the highlight() function with HtmlFormatter and Spire.Doc's AppendHTML() method, developers can automate code documentation workflows with syntax highlighting.
Spire.Doc for Python provides document generation capabilities including table creation, image insertion, header/footer management, and multi-format export.
You can apply for a 30-day free license to evaluate all features.
7. FAQ
Can Spire.Doc convert JSX files to Word documents?
Yes. Pygments can highlight many JSX constructs using the JavaScript lexer, including component tags, props, and embedded expressions. However, JSX-specific syntax may not receive dedicated highlighting categories.
Does this solution require Microsoft Word installation?
No. Spire.Doc for Python operates independently without requiring Microsoft Word. The library generates DOCX files directly, making it suitable for server environments and CI/CD pipelines.
Can I convert JavaScript to formats other than DOCX?
Yes. Spire.Doc supports multiple export formats:
document.SaveToFile("output.pdf", FileFormat.PDF)
document.SaveToFile("output.html", FileFormat.Html)
document.SaveToFile("output.rtf", FileFormat.Rtf)
How do I handle TypeScript files (.ts, .tsx)?
Use TypescriptLexer:
from pygments.lexers import TypescriptLexer

highlighted_html = highlight(ts_code, TypescriptLexer(), html_formatter)
Is this approach suitable for enterprise-scale projects?
Yes. Python automation integrates with CI/CD pipelines and batch processing workflows. Local execution avoids security risks from uploading source code to online converters. Consider implementing logging, progress reporting, and error tracking for large deployments.
Can I customize syntax highlighting colors?
Yes. Pygments offers numerous built-in styles:
html_formatter = HtmlFormatter(noclasses=True, style='monokai')
Available styles: 'monokai', 'colorful', 'vim', 'vs', 'tango', 'friendly', 'default'
Developers often need to include Python code inside Word documents for technical documentation, tutorials, code reviews, internal reports, or client deliverables. While copying and pasting code manually works for small snippets, automated solutions provide better consistency, formatting control, and scalability — especially when working with long scripts or multiple files.
This tutorial demonstrates multiple practical methods to export Python code into Word documents using Python. Each method has its own strengths depending on whether you prioritize formatting, automation, syntax highlighting, or readability.
On This Page:
- Install Required Libraries
- Export Python Code to Word as Plain Text
- Add Syntax-Highlighted Python Code to Word
- Conclusion
- FAQs
Install Required Libraries
Install the necessary dependencies before running the examples:
pip install spire.doc pygments
Library Overview:
- Spire.Doc for Python — used to create and manipulate Word documents programmatically
- Pygments — used to generate syntax-highlighted code in RTF, HTML, or image formats
- Pathlib (built-in) — used for reading Python files from disk
- textwrap (built-in) — used to wrap long code lines before generating images formatting
Export Python Code to Word as Plain Text
Plain text insertion is the most straightforward method for embedding code in Word. It keeps scripts fully editable and preserves formatting such as indentation and line breaks.
Method 1. Insert Raw Python Code into a Word Document
This method reads a .py file and inserts the code directly into Word while applying a monospace font style.
from pathlib import Path
from spire.doc import *

# Read Python file
code_string = Path("demo.py").read_text(encoding="utf-8")

# Create a Word document
doc = Document()

# Add a section
section = doc.AddSection()
section.PageSetup.Margins.All = 60

# Add a paragraph
paragraph = section.AddParagraph()

# Insert code string to the paragraph
paragraph.AppendText(code_string)

# Create a paragraph style
style = ParagraphStyle(doc)
style.Name = "code"
style.CharacterFormat.FontName = "Consolas"
style.CharacterFormat.FontSize = 12
style.ParagraphFormat.LineSpacing = 12
doc.Styles.Add(style)

# Apply the style to the paragraph
paragraph.ApplyStyle("code")

# Save the document
doc.SaveToFile("Output.docx", FileFormat.Docx2019)
doc.Dispose()
How It Works:
This technique treats Python code as plain text and inserts it directly into a Word paragraph. The script reads the .py file using Path.read_text(), preserving indentation, blank lines, and overall structure.
After inserting the text, a custom paragraph style is created and applied. The use of a monospace font such as Consolas ensures alignment and readability, while fixed line spacing maintains consistent formatting across lines.
Because no intermediate format is used, this is the simplest and fastest approach. However, it does not provide syntax highlighting or semantic styling—Word only displays the code as formatted text.
Output:

You May Also Like: Generate Word Documents Using Python
Method 2. Generate a Word File from Markdown-Wrapped Code
If your workflow already uses Markdown, wrapping Python code inside fenced blocks provides a structured way to convert scripts into Word documents.
from pathlib import Path
from spire.doc import *

# Read Python file
code = Path("demo.py").read_text(encoding="utf-8")

# Convert to Markdown
md_content = f"```python\n{code}\n```"
Path("temp.md").write_text(md_content, encoding="utf-8")

# Load Markdown into Word
doc = Document()
doc.LoadFromFile("temp.md")

# Update page settings
doc.Sections[0].PageSetup.Margins.All = 60

# Save as a DOCX file
doc.SaveToFile("Output.docx", FileFormat.Docx)
doc.Dispose()
How It Works:
Instead of inserting text directly, this method wraps Python code inside Markdown fenced code blocks. The generated Markdown file is then loaded into Word using Spire.Doc’s Markdown parsing capability.
When Word imports Markdown, it automatically preserves code formatting such as indentation and line breaks. This approach is useful when your documentation workflow already uses Markdown or when code needs to coexist with headings, lists, and descriptive text.
Since Markdown itself does not inherently apply syntax coloring inside Word, the result is still plain code formatting—but the structure is cleaner and easier to manage within technical documentation pipelines.
Output:
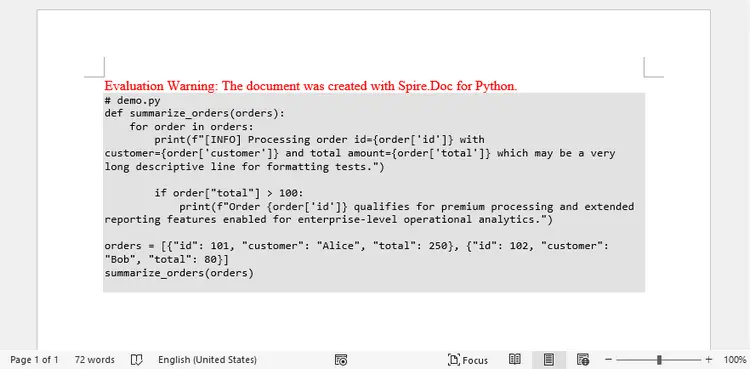
Add Syntax-Highlighted Python Code to Word
Syntax highlighting makes code easier to read and understand. By integrating Pygments, Python scripts can be converted into stylized formats before being embedded into Word.
This section explores three approaches — RTF, HTML, and image rendering — each with different strengths depending on your formatting goals.
Method 1. Use RTF for Preformatted Code Blocks
RTF allows syntax-highlighted code to remain fully editable within Word.
from pathlib import Path
from pygments import highlight
from pygments.lexers import PythonLexer
from pygments.formatters import RtfFormatter
from spire.doc import *

# Read Python file
code = Path("demo.py").read_text(encoding="utf-8")

# Set font
formatter = RtfFormatter(fontface ="Consolas")

# Specify the lexer
rtf_text = highlight(code, PythonLexer(), formatter)
rtf_text = rtf_text.replace(r"\f0", r"\f0\fs24") # font size (24 for 12-point font)

# Create a Word document
doc = Document()

# Add a section
section = doc.AddSection()
section.PageSetup.Margins.All = 60

# Add a paragraph
paragraph = section.AddParagraph()

# Insert the syntax-highlighted code as RTF
paragraph.AppendRTF(rtf_text)

# Save the document
doc.SaveToFile("Output.docx", FileFormat.Docx2019)
doc.Dispose()
How It Works:
Pygments analyzes Python syntax using a lexer, identifying tokens such as keywords, strings, and comments. The RTF formatter applies styling rules that represent colors and fonts using RTF control words.
The resulting RTF string is inserted directly into Word using AppendRTF(). Because RTF is a native Word-compatible format, the document preserves fonts, colors, and spacing without requiring additional rendering steps.
Font size is controlled by modifying RTF control words (e.g., \fs24), allowing precise control over appearance. This method produces editable, selectable code with syntax highlighting inside Word.
Output:
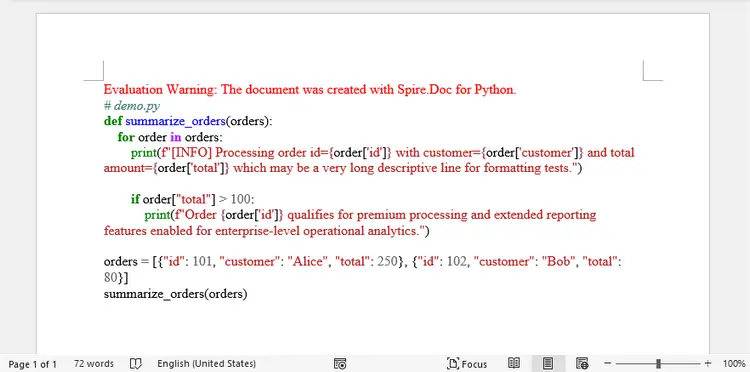
Method 2. Render Highlighted Code via HTML Formatting
HTML rendering provides visually rich syntax highlighting and automatic text wrapping.
from pathlib import Path
from pygments import highlight
from pygments.lexers import PythonLexer
from pygments.formatters import HtmlFormatter
from spire.doc import *

# Read Python file
code = Path("demo.py").read_text(encoding="utf-8")

# Generate HTML from the Python code with syntax highlighting
html_text = highlight(code, PythonLexer(), HtmlFormatter(full=True))

# Create a Word document
doc = Document()

# Add a section
section = doc.AddSection()
section.PageSetup.Margins.All = 60

# Add a paragraph
paragraph = section.AddParagraph()

# Add the HTML string to the paragraph
paragraph.AppendHTML(html_text)

# Save the document
doc.SaveToFile("Output.docx", FileFormat.Docx2019)
doc.Dispose()
How It Works:
Here, Pygments converts Python code into styled HTML using the HtmlFormatter. The HTML output includes inline styles or CSS rules that represent syntax colors and formatting.
Spire.Doc then interprets the HTML content and renders it into Word. During this process, HTML elements are translated into Word formatting structures, allowing the highlighted code to appear visually similar to web-based code blocks.
This approach is ideal when code originates from web content, static documentation sites, or Markdown-to-HTML workflows.
Output:
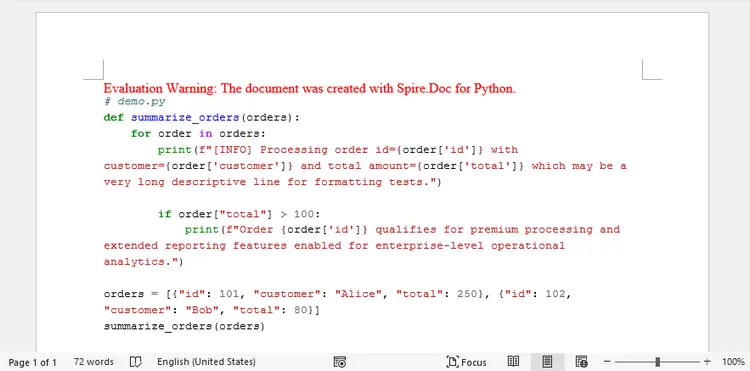
You May Also Like: Convert HTML to Word DOC or DOCX in Python
Method 3. Insert Syntax-Highlighted Code as Images
For scenarios where visual consistency matters more than editability, code can be rendered as an image before insertion.
from pathlib import Path
import textwrap
from pygments import highlight
from pygments.lexers import PythonLexer
from pygments.formatters import ImageFormatter
from spire.doc import *

# Read Python file
code = Path("demo.py").read_text(encoding="utf-8")

# Wrap long lines manually
def wrap_code_lines(code_text, max_width=75):
    wrapped_lines = []
    for line in code_text.splitlines():
        if len(line) > max_width:
            wrapped_lines.extend(textwrap.wrap(
                line,
                width=max_width,
                replace_whitespace=False,
                drop_whitespace=False
            ))
        else:
            wrapped_lines.append(line)
    return "\n".join(wrapped_lines)

code = wrap_code_lines(code, max_width=75)

# Step 3: Generate image
formatter = ImageFormatter(
    font_name="Consolas",
    font_size=18,
    scale=2,
    image_pad=10,
    line_pad=2,
    background_color="#ffffff"
)

img_bytes = highlight(code, PythonLexer(), formatter)

with open("code.png", "wb") as f:
    f.write(img_bytes)

# Create a Word document
doc = Document()
section = doc.AddSection()
section.PageSetup.Margins.All = 60

# Insert into Word
paragraph = section.AddParagraph()
picture = paragraph.AppendPicture("code.png")

# Ensure image fits page width
page_width = (
    section.PageSetup.PageSize.Width
    - section.PageSetup.Margins.Left
    - section.PageSetup.Margins.Right
)
picture.Width = page_width

# Save the document
doc.SaveToFile("Output.docx", FileFormat.Docx2019)
doc.Dispose()
How It Works:
This method renders Python code as an image instead of editable text. Pygments generates a syntax-highlighted bitmap using the ImageFormatter, allowing full visual control over fonts, colors, padding, and DPI.
Since image rendering does not automatically wrap long lines, the script manually wraps lengthy code lines using Python’s textwrap module before generating the image. This prevents oversized images that exceed page width.
After inserting the image into Word, its width is dynamically resized to fit the printable page area. Because the code is embedded as a graphic, it preserves exact visual appearance across platforms and prevents formatting inconsistencies—but the text is no longer editable.
Output:
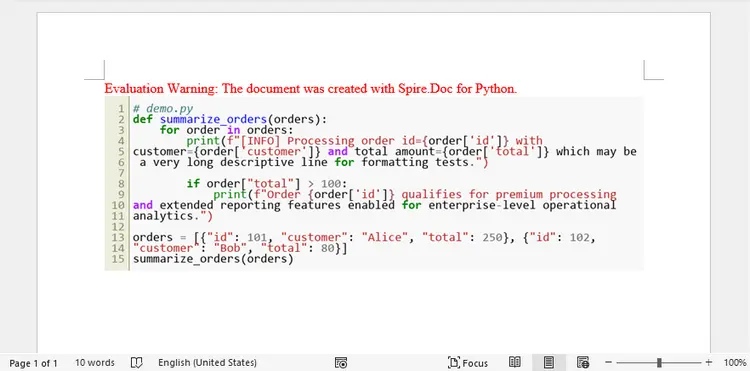
Conclusion
Converting Python code to Word documents can be achieved through several approaches depending on your goals. Plain text methods provide simplicity and flexibility, while RTF and HTML techniques offer powerful syntax highlighting with selectable text. Image-based code blocks deliver consistent visual formatting but require careful line wrapping and scaling.
For most documentation workflows:
- Use plain text for editable technical content
- Use HTML or RTF for syntax-highlighted documentation
- Use images when formatting consistency is critical
FAQs
Which method is best for tutorials?
HTML or RTF methods provide clear syntax highlighting with selectable text.
How can I preserve indentation and blank lines?
Read the .py file using .read_text() without stripping or modifying lines.
Why do image-based code blocks become too small?
Word scales images to fit page width. Increasing the image formatter’s scale or adjusting the wrapping width can improve readability.
Can readers copy code from Word?
Yes — except when code is inserted as an image.
Do I need Markdown for conversion?
No. Markdown is optional but useful when working with documentation pipelines.
Can I export the generated document as a PDF file?
Yes. When saving the document, simply specify PDF as the output format in the Document.SaveToFile() method.
Get a Free License
To fully experience the capabilities of Spire.Doc for Python without any evaluation limitations, you can request a 30-day trial license.
Creating Word documents programmatically is a common requirement in Python applications. Reports, invoices, contracts, audit logs, and exported datasets are often expected to be delivered as editable .docx files rather than plain text or PDFs.
Unlike plain text output, a Word document is a structured document composed of sections, paragraphs, styles, and layout rules. When generating Word documents in Python, treating .docx files as simple text containers quickly leads to layout issues and maintenance problems.
This tutorial focuses on practical Word document creation in Python using Spire.Doc for Python. It demonstrates how to construct documents using Word’s native object model, apply formatting at the correct structural level, and generate .docx files that remain stable and editable as content grows.
Content Overview
- 1. Understanding Word Document Structure in Python
- 2. Creating a Basic Word Document in Python
- 3. Adding and Formatting Text Content
- 4. Inserting Images into a Word Document
- 5. Creating and Populating Tables
- 6. Adding Headers and Footers
- 7. Controlling Page Layout with Sections
- 8. Setting Document Properties and Metadata
- 9. Saving, Exporting, and Performance Considerations
- 10. Common Pitfalls When Creating Word Documents in Python
1. Understanding Word Document Structure in Python
Before writing code, it is important to understand how a Word document is structured internally.
A .docx file is not a linear stream of text. It consists of multiple object layers, each with a specific responsibility:
- Document – the root container for the entire file
- Section – defines page-level layout such as size, margins, and orientation
- Paragraph – represents a logical block of text
- Run (TextRange) – an inline segment of text with character formatting
- Style – a reusable formatting definition applied to paragraphs or runs
When you create a Word document in Python, you are explicitly constructing this hierarchy in code. Formatting and layout behave predictably only when content is added at the appropriate level.
Spire.Doc for Python provides direct abstractions for these elements, allowing you to work with Word documents in a way that closely mirrors how Word itself organizes content.
2. Creating a Basic Word Document in Python
This section shows how to generate a valid Word document in Python using Spire.Doc. The example focuses on establishing the correct document structure and essential workflow.
Installing Spire.Doc for Python
pip install spire.doc
Alternatively, you can download Spire.Doc for Python and integrate it manually.
Creating a Simple .docx File
from spire.doc import Document, FileFormat

# Create the document container
document = Document()

# Add a section (defines page-level layout)
section = document.AddSection()

# Add a paragraph to the section
paragraph = section.AddParagraph()
paragraph.AppendText(
    "This document was generated using Python. "
    "It demonstrates basic Word document creation with Spire.Doc."
)

# Save the document
document.SaveToFile("basic_document.docx", FileFormat.Docx)
document.Close()
This example creates a minimal but valid .docx file that can be opened in Microsoft Word. It demonstrates the essential workflow: creating a document, adding a section, inserting a paragraph, and saving the file.

From a technical perspective:
- The Document object represents the Word file structure and manages its content.
- The Section defines the page-level layout context for paragraphs.
- The Paragraph contains the visible text and serves as the basic unit for all paragraph-level formatting.
All Word documents generated with Spire.Doc follow this same structural pattern, which forms the foundation for more advanced operations.
3. Adding and Formatting Text Content
Text in a Word document is organized hierarchically. Formatting can be applied at the paragraph level (controlling alignment, spacing, indentation, etc.) or the character level (controlling font, size, color, bold, italic, etc.). Styles provide a convenient way to store these formatting settings so they can be consistently applied to multiple paragraphs or text ranges without redefining the formatting each time. Understanding the distinction between paragraph formatting, character formatting, and styles is essential when creating or editing Word documents in Python.
Adding and Setting Paragraph Formatting
All visible text in a Word document must be added through paragraphs, which serve as containers for text and layout. Paragraph-level formatting controls alignment, spacing, and indentation, and can be set directly via the Paragraph.Format property. Character-level formatting, such as font size, bold, or color, can be applied to text ranges within the paragraph via the TextRange.CharacterFormat property.
from spire.doc import Document, HorizontalAlignment, FileFormat, Color

document = Document()
section = document.AddSection()

# Add the title paragraph
title = section.AddParagraph()
title.Format.HorizontalAlignment = HorizontalAlignment.Center
title.Format.AfterSpacing = 20  # Space after the title
title.Format.BeforeSpacing = 20
title_range = title.AppendText("Monthly Sales Report")
title_range.CharacterFormat.FontSize = 18
title_range.CharacterFormat.Bold = True
title_range.CharacterFormat.TextColor = Color.get_LightBlue()

# Add the body paragraph
body = section.AddParagraph()
body.Format.FirstLineIndent = 20
body_range = body.AppendText(
    "This report provides an overview of monthly sales performance, "
    "including revenue trends across different regions and product categories. "
    "The data presented below is intended to support management decision-making."
)
body_range.CharacterFormat.FontSize = 12

# Save the document
document.SaveToFile("formatted_paragraph.docx", FileFormat.Docx)
document.Close()
Below is a preview of the generated Word document.
Technical notes
- Paragraph.Format sets alignment, spacing, and indentation for the entire paragraph
- AppendText() returns a TextRange object, which allows character-level formatting (font size, bold, color)
- Every paragraph must belong to a section, and paragraph order determines reading flow and pagination
Creating and Applying Styles
Styles allow you to define paragraph-level and character-level formatting once and reuse it across the document. They can store alignment, spacing, font, and text emphasis, making formatting more consistent and easier to maintain. Word documents support both custom styles and built-in styles, which must be added to the document before being applied.
Creating and Applying a Custom Paragraph Style
from spire.doc import (
    Document, HorizontalAlignment, BuiltinStyle,
    TextAlignment, ParagraphStyle, FileFormat
)

document = Document()

# Create a new custom paragraph style
custom_style = ParagraphStyle(document)
custom_style.Name = "CustomStyle"
custom_style.ParagraphFormat.HorizontalAlignment = HorizontalAlignment.Center
custom_style.ParagraphFormat.TextAlignment = TextAlignment.Auto
custom_style.CharacterFormat.Bold = True
custom_style.CharacterFormat.FontSize = 20

# Inherit properties from a built-in heading style
custom_style.ApplyBaseStyle(BuiltinStyle.Heading1)

# Add the style to the document
document.Styles.Add(custom_style)

# Apply the custom style
title_para = document.AddSection().AddParagraph()
title_para.ApplyStyle(custom_style.Name)
title_para.AppendText("Regional Performance Overview")
Adding and Applying Built-in Styles
# Add a built-in style to the document
built_in_style = document.AddStyle(BuiltinStyle.Heading2)
document.Styles.Add(built_in_style)

# Apply the built-in style
heading_para = document.Sections.get_Item(0).AddParagraph()
heading_para.ApplyStyle(built_in_style.Name)
heading_para.AppendText("Sales by Region")

document.SaveToFile("document_styles.docx", FileFormat.Docx)
Preview of the generated Word document.
Technical Explanation
- ParagraphStyle(document) creates a reusable style object associated with the current document
- ParagraphFormat controls layout-related settings such as alignment and text flow
- CharacterFormat defines font-level properties like size and boldness
- ApplyBaseStyle() allows the custom style to inherit semantic meaning and default behavior from a built-in Word style
- Adding the style to document.Styles makes it available for use across all sections
Built-in styles, such as Heading 2, can be added explicitly and applied in the same way, ensuring the document remains compatible with Word features like outlines and tables of contents.
4. Inserting Images into a Word Document
In Word’s document model, images are embedded objects that belong to paragraphs, which ensures they flow naturally with text. Paragraph-anchored images adjust pagination automatically and maintain relative positioning when content changes.
Adding an Image to a Paragraph
from spire.doc import Document, TextWrappingStyle, HorizontalAlignment, FileFormat

document = Document()
section = document.AddSection()
section.AddParagraph().AppendText("\r\n\r\nExample Image\r\n")

# Insert an image
image_para = section.AddParagraph()
image_para.Format.HorizontalAlignment = HorizontalAlignment.Center
image = image_para.AppendPicture("Screen.jpg")

# Set the text wrapping style
image.TextWrappingStyle = TextWrappingStyle.Square
# Set the image size
image.Width = 350
image.Height = 200
# Set the transparency
image.FillTransparency(0.7)
# Set the horizontal alignment
image.HorizontalAlignment = HorizontalAlignment.Center

document.SaveToFile("document_images.docx", FileFormat.Docx)
Preview of the generated Word document.
Technical details
- AppendPicture() inserts the image into the paragraph, making it part of the text flow
- TextWrappingStyle determines how surrounding text wraps around the image
- Width and Height control the displayed size of the image
- FillTransparency() sets the image opacity
- HorizontalAlignment can center the image within the paragraph
Adding images to paragraphs ensures they behave like part of the text flow.
- Pagination adjusts automatically when images change size.
- Surrounding text reflows correctly when content is edited.
- When exporting to formats like PDF, images maintain their relative position.
These behaviors are consistent with Word’s handling of inline images.
For more advanced image operations in Word documents using Python, see how to insert images into a Word document with Python for a complete guide.
5. Creating and Populating Tables
Tables are commonly used to present structured data such as reports, summaries, and comparisons.
Internally, a table consists of rows, cells, and paragraphs inside each cell.
Creating and Formatting a Table in a Word Document
from spire.doc import Document, DefaultTableStyle, FileFormat, AutoFitBehaviorType

document = Document()
section = document.AddSection()
section.AddParagraph().AppendText("\r\n\r\nExample Table\r\n")

# Define the table data
table_headers = ["Region", "Product", "Units Sold", "Unit Price ($)", "Total Revenue ($)"]
table_data = [
    ["North", "Laptop", 120, 950, 114000],
    ["North", "Smartphone", 300, 500, 150000],
    ["South", "Laptop", 80, 950, 76000],
    ["South", "Smartphone", 200, 500, 100000],
    ["East", "Laptop", 150, 950, 142500],
    ["East", "Smartphone", 250, 500, 125000],
    ["West", "Laptop", 100, 950, 95000],
    ["West", "Smartphone", 220, 500, 110000]
]

# Add a table to the section
table = section.AddTable()
table.ResetCells(len(table_data) + 1, len(table_headers))

# Populate table headers
for col_index, header in enumerate(table_headers):
    header_range = table.Rows[0].Cells[col_index].AddParagraph().AppendText(header)
    header_range.CharacterFormat.FontSize = 14
    header_range.CharacterFormat.Bold = True

# Populate table data
for row_index, row_data in enumerate(table_data):
    for col_index, cell_data in enumerate(row_data):
        data_range = table.Rows[row_index + 1].Cells[col_index].AddParagraph().AppendText(str(cell_data))
        data_range.CharacterFormat.FontSize = 12

# Apply a default table style and auto-fit columns
table.ApplyStyle(DefaultTableStyle.ColorfulListAccent6)
table.AutoFit(AutoFitBehaviorType.AutoFitToContents)

document.SaveToFile("document_tables.docx", FileFormat.Docx)
Preview of the generated Word document.
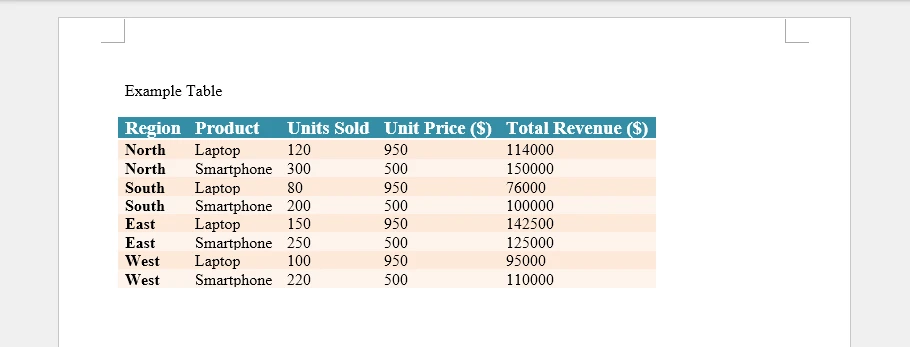
Technical details
- Section.AddTable() inserts the table into the section content flow
- ResetCells(rows, columns) defines the table grid explicitly
- Table[row, column] or Table.Rows[row].Cells[col] returns a TableCell
Tables in Word are designed so that each cell acts as an independent content container. Text is always inserted through paragraphs, and each cell can contain multiple paragraphs, images, or formatted text. This structure allows tables to scale from simple grids to complex report layouts, making them flexible for reports, summaries, or any structured content.
For more detailed examples and advanced operations using Python, such as dynamically generating tables, merging cells, or formatting individual cells, see how to insert tables into Word documents with Python for a complete guide.
6. Adding Headers and Footers
Headers and footers in Word are section-level elements. They are not part of the main content flow and do not affect body pagination.
Each section owns its own header and footer, which allows different parts of a document to display different repeated content.
Adding Headers and Footers in a Section
from spire.doc import Document, FileFormat, HorizontalAlignment, FieldType, BreakType

document = Document()
section = document.AddSection()
section.AddParagraph().AppendBreak(BreakType.PageBreak)

# Add a header
header = section.HeadersFooters.Header
header_para1 = header.AddParagraph()
header_para1.AppendText("Monthly Sales Report").CharacterFormat.FontSize = 12
header_para1.Format.HorizontalAlignment = HorizontalAlignment.Left

header_para2 = header.AddParagraph()
header_para2.AppendText("Company Name").CharacterFormat.FontSize = 12
header_para2.Format.HorizontalAlignment = HorizontalAlignment.Right

# Add a footer with page numbers
footer = section.HeadersFooters.Footer
footer_para = footer.AddParagraph()
footer_para.Format.HorizontalAlignment = HorizontalAlignment.Center
footer_para.AppendText("Page ").CharacterFormat.FontSize = 12
footer_para.AppendField("PageNum", FieldType.FieldPage).CharacterFormat.FontSize = 12
footer_para.AppendText(" of ").CharacterFormat.FontSize = 12
footer_para.AppendField("NumPages", FieldType.FieldNumPages).CharacterFormat.FontSize = 12

document.SaveToFile("document_header_footer.docx", FileFormat.Docx)
document.Dispose()
Preview of the generated Word document.
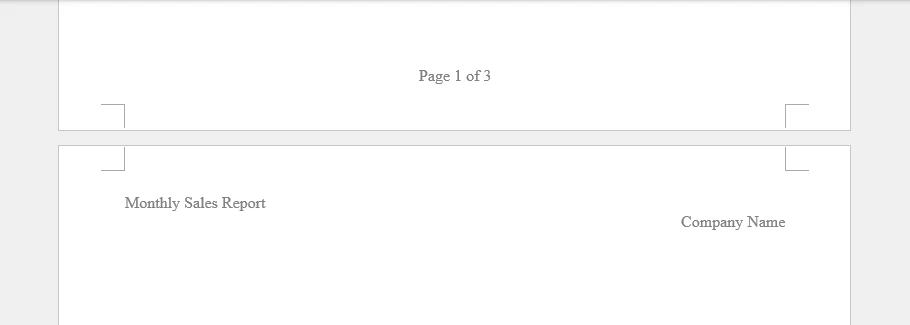
Technical notes
- section.HeadersFooters.Header / .Footer provides access to header/footer of the section
- AppendField() inserts dynamic fields like FieldPage or FieldNumPages to display dynamic content
Headers and footers are commonly used for report titles, company information, and page numbering. They update automatically as the document changes and are compatible with Word, PDF, and other export formats.
For more detailed examples and advanced operations, see how to insert headers and footers in Word documents with Python.
7. Controlling Page Layout with Sections
In Spire.Doc for Python, all page-level layout settings are managed through the Section object. Page size, orientation, and margins are defined by the section’s PageSetup and apply to all content within that section.
Configuring Page Size and Orientation
from spire.doc import PageSize, PageOrientation

section.PageSetup.PageSize = PageSize.A4()
section.PageSetup.Orientation = PageOrientation.Portrait
Technical explanation
- PageSetup is a layout configuration object owned by the Section
- PageSize defines the physical dimensions of the page
- Orientation controls whether pages are rendered in portrait or landscape mode
PageSetup defines the layout for the entire section. All paragraphs, tables, and images added to the section will follow these settings. Changing PageSetup in one section does not affect other sections in the document, allowing different sections to have different page layouts.
Setting Page Margins
section.PageSetup.Margins.Top = 50
section.PageSetup.Margins.Bottom = 50
section.PageSetup.Margins.Left = 60
section.PageSetup.Margins.Right = 60
Technical explanation
- Margins defines the printable content area for the section
- Margin values are measured in document units
Margins control the body content area for the section. They are evaluated at the section level, so you do not need to set them for individual paragraphs, and header/footer areas are not affected.
Using Multiple Sections for Different Layouts
When a document requires different page layouts, additional sections must be created.
landscape_section = document.AddSection()
landscape_section.PageSetup.Orientation = PageOrientation.Landscape
Technical notes
- AddSection() creates a new section and appends it to the document
- Each section maintains its own PageSetup, headers, and footers
- Content added after this call belongs to the new section
Using multiple sections allows mixing portrait and landscape pages or applying different layouts within a single Word document.
Below is an example preview of the above settings in a Word document:

8. Setting Document Properties and Metadata
In addition to visible content, Word documents expose metadata through built-in document properties. These properties are stored at the document level and do not affect layout or rendering.
Assigning Built-in Document Properties
document.BuiltinDocumentProperties.Title = "Monthly Sales Report"
document.BuiltinDocumentProperties.Author = "Data Analytics System"
document.BuiltinDocumentProperties.Company = "Example Corp"
Technical notes
BuiltinDocumentPropertiesprovides access to standard document properties- Properties such as
Title,Author, andCompanycan be set programmatically
Document properties are commonly used for file indexing, search, document management, and audit workflows. In addition to built-in properties, Word documents support other metadata such as Keywords, Subject, Comments, and Hyperlink base. You can also define custom properties using Document.CustomDocumentProperties.
For a guide on managing document custom properties with Python, see how to manage custom metadata in Word documents with Python.
9. Saving, Exporting, and Performance Considerations
After constructing a Word document in memory, the final step is saving or exporting it to the required output format. Spire.Doc for Python supports multiple export formats through a unified API, allowing the same document structure to be reused without additional formatting logic.
Saving and Exporting Word Documents in Multiple Formats
A document can be saved as DOCX for editing or exported to other commonly used formats for distribution.
from spire.doc import FileFormat

document.SaveToFile("output.docx", FileFormat.Docx)
document.SaveToFile("output.pdf", FileFormat.PDF)
document.SaveToFile("output.html", FileFormat.Html)
document.SaveToFile("output.rtf", FileFormat.Rtf)
The export process preserves document structure, including sections, tables, images, headers, and footers, ensuring consistent layout across formats. Check out all the supported formats in the FileFormat enumeration.
Performance Considerations for Document Generation
For scenarios involving frequent or large-scale Word document generation, performance can be improved by:
- Reusing document templates and styles
- Avoiding unnecessary section creation
- Writing documents to disk only after all content has been generated
- After saving or exporting, explicitly releasing resources using document.Close()
When generating many similar documents with different data, mail merge is more efficient than inserting content programmatically for each file. Spire.Doc for Python provides built-in mail merge support for batch document generation. For details, see how to generate Word documents in bulk using mail merge in Python.
Saving and exporting are integral parts of Word document generation in Python. By using Spire.Doc for Python’s export capabilities and following basic performance practices, Word documents can be generated efficiently and reliably for both individual files and batch workflows.
10. Common Pitfalls When Creating Word Documents in Python
The following issues frequently occur when generating Word documents programmatically.
Treating Word Documents as Plain Text
Issue Formatting breaks when content length changes.
Recommendation Always work with sections, paragraphs, and styles rather than inserting raw text.
Hard-Coding Formatting Logic
Issue Global layout changes require editing multiple code locations.
Recommendation Centralize formatting rules using styles and section-level configuration.
Ignoring Section Boundaries
Issue Margins or orientation changes unexpectedly affect the entire document.
Recommendation Use separate sections to isolate layout rules.
11. Conclusion
Creating Word documents in Python involves more than writing text to a file. A .docx document is a structured object composed of sections, paragraphs, styles, and embedded elements.
By using Spire.Doc for Python and aligning code with Word’s document model, you can generate editable, well-structured Word files that remain stable as content and layout requirements evolve. This approach is especially suitable for backend services, reporting pipelines, and document automation systems.
For scenarios involving large documents or document conversion requirements, a licensed version is required.
When it comes to working with web content and documents, the ability to parse HTML in Python is an essential skill for developers across various domains. HTML parsing involves extracting meaningful information from HTML documents, manipulating content, and processing web data efficiently. Whether you're working on web scraping projects, data extraction tasks, content analysis, or document processing, mastering HTML parsing techniques in Python can significantly enhance your productivity and capabilities.
In this guide, we'll explore how to effectively read HTML in Python using Spire.Doc for Python. You'll learn practical techniques for processing HTML content from strings, local files, and URLs, and implementing best practices for HTML parsing in your projects.
- Why Parse HTML in Python?
- Getting Started: Install HTML Parser in Python
- How Spire.Doc Parses HTML: Core Concepts
- Best Practices for Effective HTML Parsing
- Conclusion
Why Parse HTML in Python?
HTML (HyperText Markup Language) is the backbone of the web, used to structure and present content on websites. Parsing HTML enables you to:
- Extract specific data (text, images, tables, hyperlinks) from web pages or local files.
- Analyze content structure for trends, keywords, or patterns.
- Automate data collection for research, reporting, or content management.
- Clean and process messy HTML into structured data.
While libraries like BeautifulSoup excel at lightweight parsing, Spire.Doc for Python shines when you need to integrate HTML parsing with document creation or conversion. It offers a robust framework to parse and interact with HTML content as a structured document object model (DOM).
Getting Started: Install HTML Parser in Python
Before diving into parsing, you’ll need to install Spire.Doc for Python. The library is available via PyPI, making installation straightforward:
pip install Spire.Doc
This command installs the latest version of the library, along with its dependencies. Once installed, you’re ready to start parsing HTML.
How Spire.Doc Parses HTML: Core Concepts
At its core, Spire.Doc parses HTML by translating HTML’s tag-based structure into a hierarchical document model. This model is composed of objects that represent sections, paragraphs, and other elements, mirroring the original HTML’s organization. Let’s explore how this works in practice.
1. Parsing HTML Strings in Python
If you have a small HTML snippet (e.g., from an API response or user input), parse it directly from a string. This is great for testing or working with short, static HTML.
from spire.doc import *
from spire.doc.common import *

# Define HTML content as a string
html_string = """
<html>
    <head>
        <title>Sample HTML</title>
    </head>
    <body>
        <h1>Main Heading</h1>
        <p>This is a paragraph with <strong>bold text</strong>.</p>
        <div>
            <p>A nested paragraph inside a div.</p>
        </div>
        <ul>
          <li>List item 1</li>
          <li>List item 2</li>
          <li>List item 3</li>
        </ul>
    </body>
</html>
"""

# Initialize a new Document object
doc = Document()

# Add a section and paragraph to the document
section = doc.AddSection()
paragraph = section.AddParagraph()

# Load HTML content from the string
paragraph.AppendHTML(html_string)

print("Parsed HTML Text:")
print("-----------------------------")

# Extract text content from the parsed HTML
parsed_text = doc.GetText()

# Print the result
print(parsed_text)

# Close the document
doc.Close()
How It Works:
- HTML String: We define a sample HTML snippet with common elements (headings, paragraphs, lists).
- Document Setup: Spire.Doc uses a Word-like structure (sections → paragraphs) to organize parsed HTML.
- Parse HTML:
AppendHTML()converts the string into structured Word elements (e.g.,<h1>becomes a "Heading 1" style,<ul>becomes a list). - Extract Text:
GetText()pulls clean, plain text from the parsed document (no HTML tags).
Output:
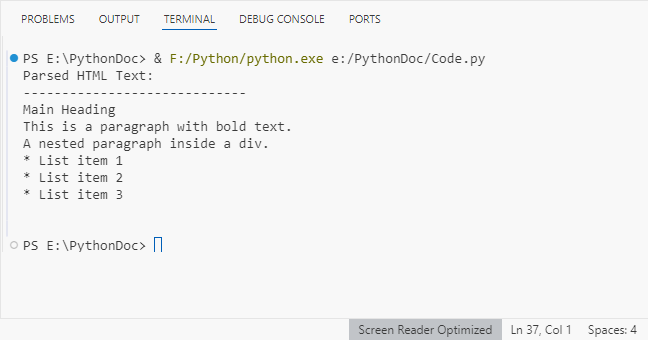
Spire.Doc supports exporting parsed HTML content to multiple formats such as TXT, Word via the SaveToFile() method.
2. Parsing HTML Files in Python
For local HTML files, Spire.Doc can load and parse them with a single method. This is useful for offline content (e.g., downloaded web pages, static reports).
from spire.doc import *
from spire.doc.common import *

# Define the path to your local HTML file
html_file_path = "example.html"

# Create a Document instance
doc = Document()

# Load and parse the HTML file
doc.LoadFromFile(html_file_path, FileFormat.Html)

# Analyze document structure
print(f"Document contains {doc.Sections.Count} section(s)")
print("-"*40)

# Process each section
for section_idx in range(doc.Sections.Count):
    section = doc.Sections.get_Item(section_idx)
    print(f"SECTION {section_idx + 1}")
    print(f"Section has {section.Body.Paragraphs.Count} paragraph(s)")
    print("-"*40)

    # Traverse through paragraphs in the current section
    for para_idx in range(section.Paragraphs.Count):
        para = section.Paragraphs.get_Item(para_idx)
        # Get paragraph style name and text content
        style_name = para.StyleName
        para_text = para.Text

        # Print paragraph information if content exists
        if para_text.strip():
            print(f"[{style_name}] {para_text}\n")

    # Add spacing between sections
    print()

# Close the document
doc.Close()
Key Features:
- Load Local Files:
LoadFromFile()reads the HTML file and auto-parses it into a Word structure. - Structure Analysis: Check the number of sections/paragraphs and their styles (critical for auditing content).
- Style Filtering: Identify headings (e.g., "Heading 1") or lists (e.g., "List Paragraph") to organize content.
Output:
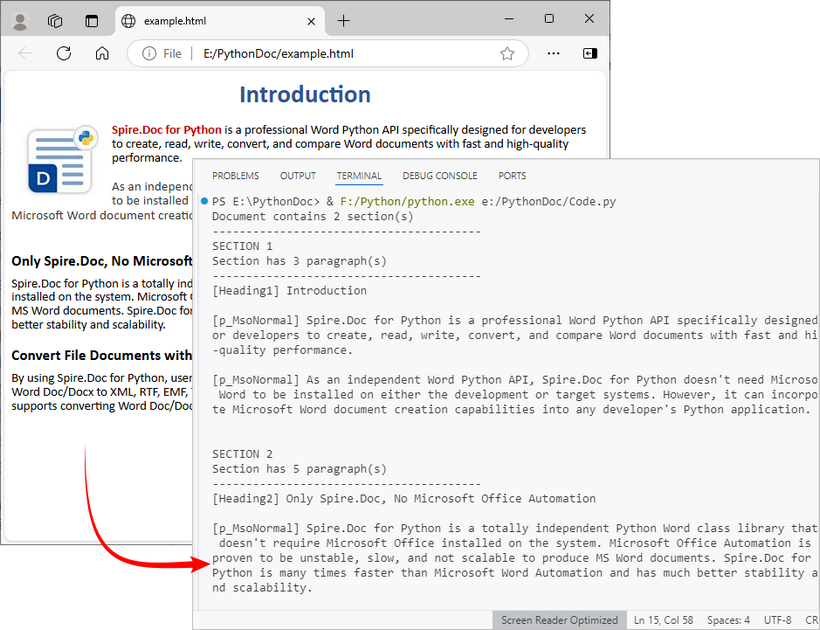
After loading the HTML file into the Document object, you can use Spire.Doc to extract specific elements like tables, hyperlinks from HTML.
3. Parsing a URL in Python
To parse HTML directly from a live web page, first fetch the HTML content from the URL using a library like requests, then pass the content to Spire.Doc for parsing. This is core for web scraping and real-time data extraction.
Install the Requests library via pip:
pip install requests
Python code to parse web page:
from spire.doc import *
from spire.doc.common import *
import requests

# Fetch html content from a URL
def fetch_html_from_url(url):
    """Fetch HTML from a URL and handle errors (e.g., 404, network issues)"""
    # Mimic a browser with User-Agent (avoids being blocked by websites)
    headers = {
        "User-Agent": "Mozilla/5.0 (Windows NT 10.0; Win64; x64)"
    }
    try:
        response = requests.get(url, headers=headers)
        response.raise_for_status()  # Raise exception for HTTP errors
        return response.text # Return raw HTML content
    except requests.exceptions.RequestException as e:
        raise Exception(f"Error fetching HTML: {str(e)}")

# Specify the target URL
url = "https://www.e-iceblue.com/privacypolicy.html"
print(f"Fetching HTML from: {url}")

# Get HTML content
html_content = fetch_html_from_url(url)

# Create document and insert HTML content into it
doc = Document()
section = doc.AddSection()
paragraph = section.AddParagraph()
paragraph.AppendHTML(html_content)

# Extract and display summary information
print("\nParsed Content Summary:")
print(f"Sections: {doc.Sections.Count}")
print("-------------------------------------------")

# Extract and display headings
print("Headings found:")
for para_idx in range(section.Paragraphs.Count):
    para = section.Paragraphs.get_Item(para_idx)

    if isinstance(para, Paragraph) and para.StyleName.startswith("Heading"):
        print(f"- {para.Text.strip()}")

# Close the document
doc.Close()
Steps Explained:
- Use requests.get() to fetch the HTML content from the URL.
- Pass the raw HTML text to Spire.Doc for parsing.
- Extract specific content (e.g., headings) from live pages for SEO audits or content aggregation.
Output:
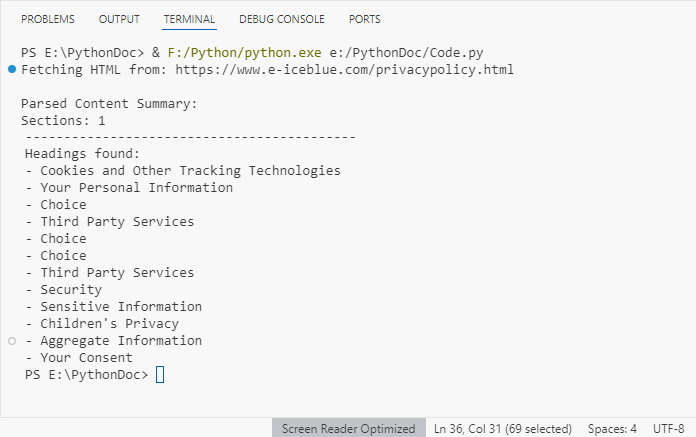
Best Practices for Effective HTML Parsing
To optimize your HTML parsing workflow with Spire.Doc, follow these best practices:
- Validate Input Sources: Before parsing, check that HTML content (strings or files) is accessible and not corrupted. This reduces parsing errors:
import os

html_file = "data.html"
if os.path.exists(html_file):
    doc.LoadFromFile(html_file, FileFormat.Html)
else:
    print(f"Error: File '{html_file}' not found.")
- Handle Exceptions: Wrap parsing operations in try-except blocks to catch catch errors (e.g., missing files, invalid HTML):
try:
    doc.LoadFromFile("sample.html", FileFormat.Html)
except Exception as e:
    print(f"Error loading HTML: {e}")
- Optimize for Large Files: For large HTML files, consider loading content in chunks or disabling non-essential parsing features to improve performance.
- Clean Extracted Data: Use Python’s string methods (e.g., strip(), replace()) to remove extra whitespace or unwanted characters from extracted text.
- Keep the Library Updated: Regularly update Spire.Doc with
pip install --upgrade Spire.Docto benefit from improved parsing logic and bug fixes.
Conclusion
Python makes HTML parsing accessible for all skill levels. Whether you’re working with HTML strings, local files, or remote URLs, the combination of Requests (for fetching) and Spire.Doc (for structuring) simplifies complex tasks like web scraping and content extraction.
By following the examples and best practices in this guide, you’ll turn unstructured HTML into actionable, organized data in minutes. To unlock the full potential of Spire.Doc for Python, you can request a 30-day trial license here.
How to Convert HTML to Markdown in Python: Step-by-Step Guide
2025-09-05 03:49:00 Written by Administrator
Converting HTML to Markdown using Python is a common task for developers managing web content, documentation, or API data. While HTML provides powerful formatting and structure, it can be verbose and harder to maintain for tasks like technical writing or static site generation. Markdown, by contrast, is lightweight, human-readable, and compatible with platforms such as GitHub, GitLab, Jekyll, and Hugo.
Automating HTML to Markdown conversion with Python streamlines workflows, reduces errors, and ensures consistent output. This guide covers everything from converting HTML files and strings to batch processing multiple files, along with best practices to ensure accurate Markdown results.
What You Will Learn
- Why Convert HTML to Markdown
- Install HTML to Markdown Library for Python
- Convert an HTML File to Markdown in Python
- Convert an HTML String to Markdown in Python
- Batch Conversion of Multiple HTML Files
- Best Practices for HTML to Markdown Conversion
- Conclusion
- FAQs
Why Convert HTML to Markdown?
Before diving into the code, let’s look at why developers often prefer Markdown over raw HTML in many workflows:
- Simplicity and Readability
Markdown is easier to read and edit than verbose HTML tags. - Portability Across Tools
Markdown is supported by GitHub, GitLab, Bitbucket, Obsidian, Notion, and static site generators like Hugo and Jekyll. - Better for Version Control
Being plain text, Markdown makes it easier to track changes with Git, review diffs, and collaborate. - Faster Content Creation
Writing Markdown is quicker than remembering HTML tag structures. - Integration with Static Site Generators
Popular frameworks rely on Markdown as the main content format. Converting from HTML ensures smooth migration. - Cleaner Documentation Workflows
Many documentation systems and wikis use Markdown as their primary format.
In short, converting HTML to Markdown improves maintainability, reduces clutter, and fits seamlessly into modern developer workflows.
Install HTML to Markdown Library for Python
Before converting HTML content to Markdown in Python, you’ll need a library that can handle both formats effectively. Spire.Doc for Python is a reliable choice that allows you to transform HTML files or HTML strings into Markdown while keeping headings, lists, images, and links intact.
You can install it from PyPI using pip:
pip install spire.doc
Once installed, you can automate the HTML to Markdown conversion in your Python scripts. The same library also supports broader scenarios. For example, when you need editable documents, you can rely on its HTML to Word conversion feature to transform web pages into Word files. And for distribution or archiving, HTML to PDF conversion is especially useful for generating standardized, platform-independent documents.
Convert an HTML File to Markdown in Python
One of the most common use cases is converting an existing .html file into a .md file. This is especially useful when migrating old websites, technical documentation, or blog posts into Markdown-based workflows, such as static site generators (Jekyll, Hugo) or Git-based documentation platforms (GitHub, GitLab, Read the Docs).
Steps
- Create a new Document instance.
- Load the .html file into the document using LoadFromFile().
- Save the document as a .md file using SaveToFile() with FileFormat.Markdown.
- Close the document to release resources.
Code Example
from spire.doc import *

# Create a Document instance
doc = Document()

# Load an existing HTML file
doc.LoadFromFile("input.html", FileFormat.Html)

# Save as Markdown file
doc.SaveToFile("output.md", FileFormat.Markdown)

# Close the document
doc.Close()
This converts input.html into output.md, preserving structural elements such as headings, paragraphs, lists, links, and images.
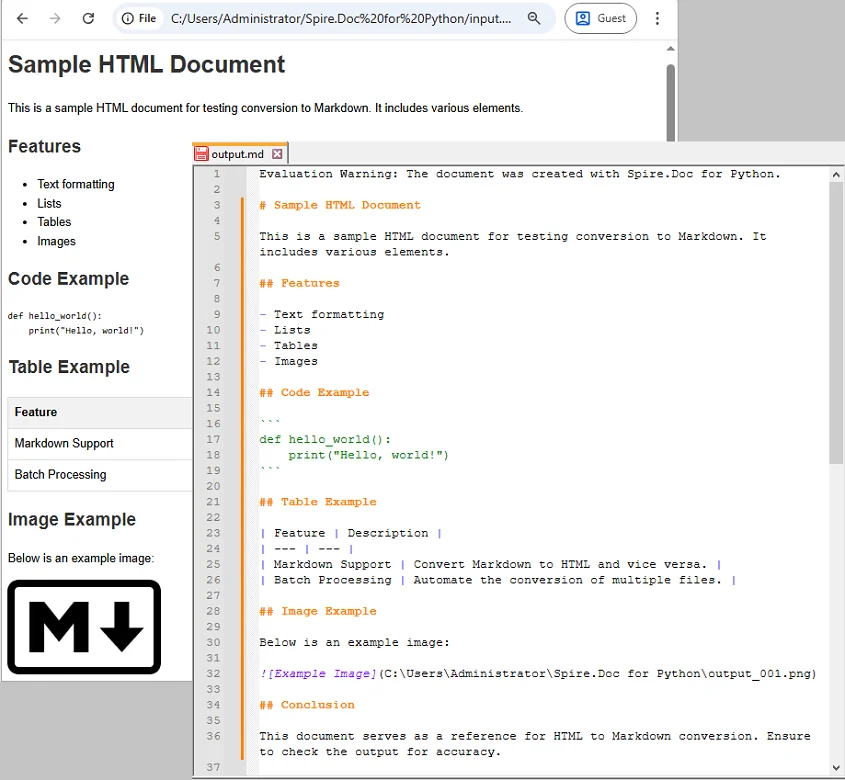
If you’re also interested in the reverse process, check out our guide on converting Markdown to HTML in Python.
Convert an HTML String to Markdown in Python
Sometimes, HTML content is not stored in a file but is dynamically generated—for example, when retrieving web content from an API or scraping. In these scenarios, you can convert directly from a string without needing to create a temporary HTML file.
Steps
- Create a new Document instance.
- Add a Section to the document.
- Add a Paragraph to the section.
- Append the HTML string to the paragraph using AppendHTML().
- Save the document as a Markdown file using SaveToFile().
- Close the document to release resources.
Code Example
from spire.doc import *

# Sample HTML string
html_content = """
<h1>Welcome</h1>
<p>This is a <strong>sample</strong> paragraph with <em>emphasis</em>.</p>
<ul>
  <li>First item</li>
  <li>Second item</li>
</ul>
"""

# Create a Document instance
doc = Document()

# Add a section
section = doc.AddSection()

# Add a paragraph and append the HTML string
paragraph = section.AddParagraph()
paragraph.AppendHTML(html_content)

# Save the document as Markdown
doc.SaveToFile("string_output.md", FileFormat.Markdown)

# close the document to release resources
doc.Close()
The resulting Markdown will look like this:
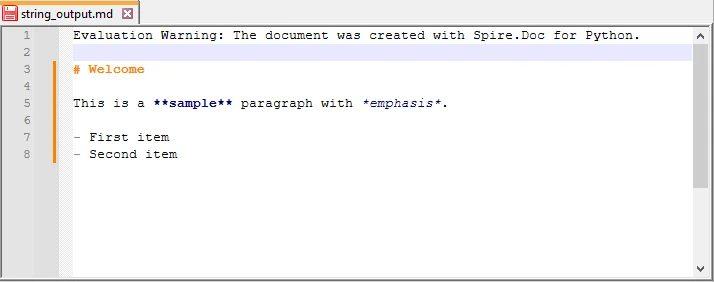
Batch Conversion of Multiple HTML Files
For larger projects, you may need to convert multiple .html files in bulk. A simple loop can automate the process.
import os
from spire.doc import *

# Define the folder containing HTML files to convert
input_folder = "html_files"

# Define the folder where converted Markdown files will be saved
output_folder = "markdown_files"

# Create the output folder if it doesn't exist
os.makedirs(output_folder, exist_ok=True)

# Loop through all files in the input folder
for filename in os.listdir(input_folder):
    # Process only files with .html extension
    if filename.endswith(".html"):
        # Create a new Document object
        doc = Document()

        # Load the HTML file into the Document object
        doc.LoadFromFile(os.path.join(input_folder, filename), FileFormat.Html)

        # Generate the output file path by replacing .html with .md
        output_file = os.path.join(output_folder, filename.replace(".html", ".md"))

        # Save the Document as a Markdown file
        doc.SaveToFile(output_file, FileFormat.Markdown)

        # Close the Document to release resources
        doc.Close()
This script processes all .html files inside html_files/ and saves the Markdown results into markdown_files/.
Best Practices for HTML to Markdown Conversion
Turning HTML to Markdown makes content easier to read, manage, and version-control. To ensure accurate and clean conversion, follow these best practices:
- Validate HTML Before Conversion
Ensure your HTML is properly structured. Invalid tags can cause incomplete or broken Markdown output. - Understand Markdown Limitations
Markdown does not support advanced CSS styling or custom HTML tags. Some formatting might get lost. - Choose File Encoding Carefully
Always be aware of character encoding. Open and save your files with a specific encoding (like UTF-8) to prevent issues with special characters. - Batch Processing
If converting multiple files, create a robust script that includes error handling (try-except blocks), logging, and skips problematic files instead of halting the entire process.
Conclusion
Converting HTML to Markdown in Python is a valuable skill for developers handling documentation pipelines, migrating web content, or processing data from APIs. With Spire.Doc for Python, you can:
- Convert individual HTML files into Markdown with ease.
- Transform HTML strings directly into .md files.
- Automate batch conversions to efficiently manage large projects.
By applying these methods, you can streamline your workflows and ensure your content remains clean, maintainable, and ready for modern publishing platforms.
FAQs
Q1: Can I convert Markdown back to HTML in Python?
A1: Yes, Spire.Doc supports the conversion of Markdown to HTML, allowing for seamless transitions between these formats.
Q2: Will the conversion preserve complex HTML elements like tables?
A2: While Spire.Doc effectively handles standard HTML elements, it's advisable to review complex layouts, such as tables and nested elements, to ensure accurate conversion results.
Q3: Can I automate batch conversion for multiple HTML files?
A3: Absolutely! You can automate batch conversion using scripts in Python, enabling efficient processing of multiple HTML files at once.
Q4: Is Spire.Doc free to use?
A4: Spire.Doc provides both free and commercial versions, giving developers the flexibility to access essential features at no cost or unlock advanced functionality with a license.
How to Convert Markdown to HTML in Python: Step-by-Step Guide
2025-09-05 02:05:04 Written by Administrator
Markdown (.md) is widely used in web development, documentation, and technical writing. Its simple syntax makes content easy to write and read. However, web browsers do not render Markdown directly. Converting Markdown to HTML ensures your content is structured, readable, and compatible with web platforms.
In this step-by-step guide, you will learn how to efficiently convert Markdown (.md) files into HTML using Python and Spire.Doc for Python, complete with practical code examples, clear instructions, and best practices for both single-file and batch conversions.
Table of Contents
- What is Markdown
- Why Convert Markdown to HTML
- Introducing Spire.Doc for Python
- Step-by-Step Guide: Converting Markdown to HTML in Python
- Automating Batch Conversion
- Best Practices for Markdown to HTML Conversion
- Conclusion
- FAQs
What is Markdown?
Markdown is a lightweight markup language designed for readability and ease of writing. Unlike HTML, which can be verbose and harder to write by hand, Markdown uses simple syntax to indicate headings, lists, links, images, and more.
Example Markdown:
# This is a Heading

This is a paragraph with \*\*bold text\*\* and \*italic text\*.

- Item 1

- Item 2
Even in its raw form, Markdown is easy to read, which makes it popular for documentation, blogging, README files, and technical writing.
For more on Markdown syntax, see the Markdown Guide.
Why Convert Markdown to HTML?
While Markdown is excellent for authoring content, web browsers cannot render it natively. Converting Markdown to HTML allows you to:
- Publish content on websites – Most CMS platforms require HTML for web pages.
- Enhance styling – HTML supports CSS and JavaScript for advanced formatting and interactivity.
- Maintain compatibility – HTML is universally supported by browsers, ensuring content displays correctly everywhere.
- Integrate with web frameworks – Frameworks like React, Vue, and Angular require HTML as the base for rendering components.
Introducing Spire.Doc for Python
Spire.Doc for Python is a robust library for handling multiple document formats. It supports reading and writing Word documents, Markdown files, and exporting content to HTML. The library allows developers to convert Markdown directly to HTML with minimal code, preserving proper formatting and structure.
In addition to HTML, Spire.Doc for Python also allows you to convert Markdown to Word in Python or convert Markdown to PDF in Python, making it particularly useful for developers who want a unified tool for handling Markdown across different output formats.
Benefits of Using Spire.Doc for Python for Markdown to HTML Conversion
- Easy-to-use API – Simple, intuitive methods that reduce development effort.
- Accurate formatting – Preserves all Markdown elements such as headings, lists, links, and emphasis in HTML.
- No extra dependencies – Eliminates the need for manual parsing or third-party libraries.
- Flexible usage – Supports both single-file conversion and automated batch processing.
Step-by-Step Guide: Converting Markdown to HTML in Python
Now that you understand the purpose and benefits of converting Markdown to HTML, let’s walk through a clear, step-by-step process to transform your Markdown files into structured, web-ready HTML.
Step 1: Install Spire.Doc for Python
First, ensure that Spire.Doc for Python is installed in your environment. You can install it directly from PyPI using pip:
pip install spire.doc
Step 2: Prepare Your Markdown File
Next, create a sample Markdown file that you want to convert. For example, example.md:
Step 3: Write the Python Script
Now, write a Python script that loads the Markdown file and converts it to HTML:
from spire.doc import *

# Create a Document object
doc = Document()

# Load the Markdown file
doc.LoadFromFile("example.md", FileFormat.Markdown)

# Save the document as HTML
doc.SaveToFile("example.html", FileFormat.Html)

# Close the document
doc.Close()
Explanation of the code:
- Document() initializes a new document object.
- LoadFromFile("example.md", FileFormat.Markdown) loads the Markdown file into memory.
- SaveToFile("example.html", FileFormat.Html) converts the loaded content into HTML and saves it to disk.
- doc.Close() ensures resources are released properly, which is particularly important when processing multiple files or running batch operations.
Step 4: Verify the HTML Output
Finally, open the generated example.html file in a web browser or HTML editor. Verify that the Markdown content has been correctly converted.

Automating Batch Conversion
You can convert multiple Markdown files in a folder automatically:
import os
from spire.doc import *

# Set the folder containing Markdown files
input_folder = "markdown_files"

# Set the folder where HTML files will be saved
output_folder = "html_files"

# Create the output folder if it doesn't exist
os.makedirs(output_folder, exist_ok=True)

# Loop through all files in the input folder
for filename in os.listdir(input_folder):
    # Process only Markdown files
    if filename.endswith(".md"):
        # Create a new Document object for each file
        doc = Document()

        # Load the Markdown file into the Document object
        doc.LoadFromFile(os.path.join(input_folder, filename), FileFormat.Markdown)

        # Construct the output file path by replacing .md extension with .html
        output_file = os.path.join(output_folder, filename.replace(".md", ".html"))

        # Save the loaded Markdown content as HTML
        doc.SaveToFile(output_file, FileFormat.Html)

        # Close the document to release resources
        doc.Close()
This approach allows you to process multiple Markdown files efficiently and generate corresponding HTML files automatically.
Best Practices for Markdown to HTML Conversion
While the basic steps are enough to complete a Markdown-to-HTML conversion, following a few best practices will help you avoid common pitfalls, improve compatibility, and ensure your output is both clean and professional:
- Use proper Markdown syntax – Ensure headings, lists, links, and emphasis are correctly written.
- Use UTF-8 Encoding: Always save your Markdown files in UTF-8 encoding to avoid issues with special characters or non-English text.
- Batch Processing: If you need to convert multiple files, wrap your script in a loop and process entire folders. This saves time and ensures consistent formatting across documents.
- Enhance Styling: Remember that HTML gives you the flexibility to add CSS and JavaScript for custom layouts, responsive design, and interactivity—something not possible in raw Markdown.
Conclusion
Converting Markdown to HTML using Python with Spire.Doc is simple, reliable, and efficient. It preserves formatting, supports automation, and produces clean HTML output ready for web use. By following this guide, you can implement a smooth Markdown to HTML workflow for both single documents and batch operations.
FAQs
Q1: Can I convert multiple Markdown files to HTML in Python?
A1: Yes, you can automate batch conversions by iterating through Markdown files in a directory and applying the conversion logic to each file.
Q2: Will the HTML preserve all Markdown formatting?
A2: Yes, Spire.Doc effectively preserves all essential Markdown formatting, including headings, lists, bold and italic text, links, and more.
Q3: Is there a way to handle images in Markdown during conversion?
A3: Yes, Spire.Doc supports the conversion of images embedded in Markdown, ensuring they are included in the resulting HTML.
Q4: Do I need additional libraries besides Spire.Doc?
A4: No additional libraries are required. Spire.Doc for Python provides a comprehensive solution for converting Markdown to HTML without any external dependencies.
Q5: Can I use the generated HTML in web frameworks?
A5: Yes, the HTML produced is fully compatible with popular web frameworks such as React, Vue, and Angular, making integration seamless.
Convert HTML to Text in Python | Simple Plain Text Output
2025-09-03 01:16:17 Written by Administrator
HTML (HyperText Markup Language) is a markup language used to create web pages, allowing developers to build rich and visually appealing layouts. However, HTML files often contain a large number of tags, which makes them difficult to read if you only need the main content. By using Python to convert HTML to text, this problem can be easily solved. Unlike raw HTML, the converted text file strips away all unnecessary markup, leaving only clean and readable content that is easier to store, analyze, or process further.
- Install HTML to Text Converter in Python
- Python Convert HTML File to Text
- Python Convert HTML String to Text
- The Conclusion
- FAQs
Install HTML to Text Converter in Python
To simplify the task, we recommend using Spire.Doc for Python. This Python Word library allows you to quickly remove HTML markup and extract clean plain text with ease. It not only works as an HTML-to-text converter, but also offers a wide range of features—covering almost everything you can do in Microsoft Word.
To install it, you can run the following pip command:
pip install spire.doc
Alternatively, you can download the Spire.Doc package and install it manually.
Python Convert HTML Files to Text in 3 Steps
After preparing the necessary tools, let's dive into today's main topic: how to convert HTML to plain text using Python. With the help of Spire.Doc, this task can be accomplished in just three simple steps: create a new document object, load the HTML file, and save it as a text file. It’s straightforward and efficient, even for beginners. Let’s take a closer look at how this process can be implemented in code!
Code Example – Converting an HTML File to a Text File:
from spire.doc import *
from spire.doc.common import *

# Open an html file
document = Document()
document.LoadFromFile("/input/htmlsample.html", FileFormat.Html, XHTMLValidationType.none)
# Save it as a Text document.
document.SaveToFile("/output/HtmlFileTotext.txt", FileFormat.Txt)

document.Close()
The following is a preview comparison between the source document (.html) and the output document (.txt):

Note that if the HTML file contains tables, the output text file will only retain the values within the tables and cannot preserve the original table formatting. If you want to keep certain styles while removing markup, it is recommended to convert HTML to a Word document . This way, you can retain headings, tables, and other formatting, making the content easier to edit and use.
How to Convert an HTML String to Text in Python
Sometimes, we don’t need the entire content of a web page and only want to extract specific parts. In such cases, you can convert an HTML string directly to text. This approach allows you to precisely control the information you need without further editing. Using Python to convert an HTML string to a text file is also straightforward. Here’s a detailed step-by-step guide:
Steps to convert an HTML string to a text document using Spire.Doc:
- Input the HTML string directly or read it from a local file.
- Create a Document object and add sections and paragraphs.
- Use Paragraph.AppendHTML() method to insert the HTML string into a paragraph.
- Save the document as a .txt file using Document.SaveToFile() method.
The following code demonstrates how to convert an HTML string to a text file using Python:
from spire.doc import *
from spire.doc.common import *

#Get html string.
#with open(inputFile) as fp:
    #HTML = fp.read()

# Load HTML from string
html = """<!DOCTYPE html>
<html lang="en">
<head>
  <meta charset="UTF-8">
  <title>HTML to Text Example</title>
  <style>
    body { font-family: Arial, sans-serif; margin: 20px; }
    header { background: #f4f4f4; padding: 10px; }
    nav a { margin: 0 10px; text-decoration: none; color: #333; }
    main { margin-top: 20px; }
  </style>
</head>
<body>
  <header>
    <h1>My Demo Page</h1>
    <nav>
      <a href="#">Home</a>
      <a href="#">About</a>
      <a href="#">Contact</a>
    </nav>
  </header>

  <main>
    <h2>Convert HTML to Text</h2>
    <p>This is a simple demo showing how HTML content can be displayed before converting it to plain text.</p>
  </main>
</body>
</html>
"""

# Create a new document
document = Document()
section = document.AddSection()
section.AddParagraph().AppendHTML(html)

# Save directly as TXT
document.SaveToFile("/output/HtmlStringTotext.txt", FileFormat.Txt)
document.Close()
Here's the preview of the converted .txt file: 
The Conclusion
In today’s tutorial, we focused on how to use Python to convert HTML to a text file. With the help of Spire.Doc, you can handle both HTML files and HTML strings in just a few lines of code, easily generating clean plain text files. If you’re interested in the other powerful features of the Python Word library, you can request a 30-day free trial license and explore its full capabilities for yourself.
FAQs about Converting HTML to Text in Python
Q1: How can I convert HTML to plain text using Python?
A: Use Spire.Doc to load an HTML file or string, insert it into a Document object with AppendHTML(), and save it as a .txt file.
Q2: Can I keep some formatting when converting HTML to text?
A: To retain styles like headings or tables, convert HTML to a Word document first, then export to text if needed.
Q3: Is it possible to convert only part of an HTML page to text?
A: Yes, extract the specific HTML segment as a string and convert it to text using Python for precise control.
