
Spire.Doc for Python (103)

Converting Word documents (DOCX or DOC) to HTML format is essential when you want to display formatted content on web pages, import legacy documents into content management systems, or generate web previews for DOCX files. HTML’s universal browser compatibility makes it an ideal format for sharing content online.
This guide shows how to convert Word to HTML in Python using Spire.Doc for Python. It covers both basic and advanced conversion techniques with practical examples, helping you handle diverse conversion needs.
Table of Contents
- Why Convert Word to HTML
- Install Word to HTML Converter in Python
- How to Convert Word to HTML Using Python
- Conclusion
- FAQs
Why Convert Word to HTML?
Here are some typical scenarios where converting Word to HTML is beneficial:
- Web publishing: Display Word content in a browser without requiring users to download the document.
- CMS integration: Import Word-based articles into a web-based content system.
- Content preview: Generate HTML previews for Word attachments or document archives.
- Email rendering: Convert DOCX content into HTML-friendly formats for email templates.
Install Word to HTML Converter in Python
Spire.Doc for Python is a professional library designed for Word document processing and conversion. It provides a reliable way to export Word documents to HTML while preserving accurate formatting and layout. 
Benefits of Using Spire.Doc for Word-to-HTML Conversion
- Accurate formatting: Preserves fonts, colors, styles, tables, and images.
- No Office dependency: Does not require Microsoft Word or Office Interop.
- Supports DOCX and DOC: Compatible with both modern and legacy Word formats.
- Customizable output: Fine-tune HTML export settings, including image embedding and CSS styling.
Installation
Install the library from PyPI using the following command:
pip install spire.doc
Need help with the installation? Check this step-by-step guide: How to Install Spire.Doc for Python on Windows.
How to Convert Word to HTML Using Python
This section demonstrates how to convert Word documents to HTML using Spire.Doc for Python. First, you'll see a quick example using default settings for fast export. Then, you'll learn how to customize the HTML output with advanced options.
Quick Conversion with Default Settings
The following code snippet shows how to save a Word document to HTML format using the default export settings. It’s suitable for simple use cases where no customization is needed.
from spire.doc import *
from spire.doc.common import *
# Create a Document instance
document = Document()
# Load a doc or docx document
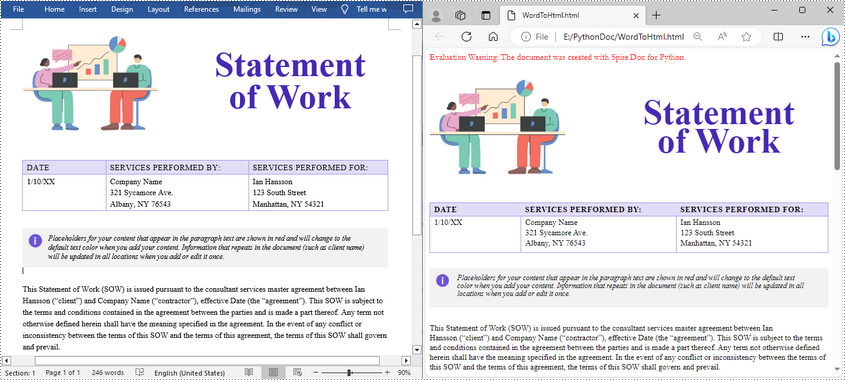
document.LoadFromFile("Statement.docx")
# Save the document to HTML format
document.SaveToFile("WordToHtml.html", FileFormat.Html)
document.Close()
Advanced Conversion Options
You can customize the HTML export to suit your needs by configuring options such as including headers and footers, linking to an external CSS stylesheet, choosing whether to embed images or save them separately, and exporting form fields as plain text. The example below shows how to set these options.
from spire.doc import *
from spire.doc.common import *

# Create a Document instance
document = Document()

# Load a .docx or .doc document
document.LoadFromFile("Statement.docx")

# Control whether to include headers and footers in the exported HTML
document.HtmlExportOptions.HasHeadersFooters = False

# Specify the name of the CSS file to use for styling the exported HTML
document.HtmlExportOptions.CssStyleSheetFileName = "sample.css"

# Set the CSS stylesheet type to external, so the HTML file links to the specified CSS file instead of embedding styles inline
document.HtmlExportOptions.CssStyleSheetType = CssStyleSheetType.External

# Configure image export: do not embed images inside HTML, save them to a separate folder
document.HtmlExportOptions.ImageEmbedded = False
document.HtmlExportOptions.ImagesPath = "Images/"

# Export form fields as plain text instead of interactive form elements
document.HtmlExportOptions.IsTextInputFormFieldAsText = True

# Save the document as an HTML file
document.SaveToFile("ToHtmlExportOption.html", FileFormat.Html)
document.Close()
Conclusion
Spire.Doc for Python delivers high-fidelity Word-to-HTML conversions without requiring Microsoft Word. Whether for quick exports or customized HTML output, it provides a versatile, dependable solution.
Beyond HTML conversion, Spire.Doc supports a wide range of Word automation tasks such as document merging, text replacement, and PDF conversion, empowering developers to build robust document processing pipelines. To explore these capabilities further, check out the full Python Word programming guide and start enhancing your document workflows today.
FAQs
Q1: Can Spire.Doc convert both DOC and DOCX files to HTML?
A1: Yes, it supports exporting both legacy DOC and modern DOCX formats.
Q2: Is Microsoft Word required for conversion?
A2: No, Spire.Doc works independently without needing Microsoft Word or Office Interop.
Q3: Can images be embedded directly in the HTML instead of saved separately?
A3: Yes, you can embed images directly into the HTML output by setting ImageEmbedded to True. This ensures that all images are included within the HTML file itself, without creating separate image files or folders.
Get a Free License
To fully experience the capabilities of Spire.Doc for Python without any evaluation limitations, you can request a free 30-day trial license.
Setting proper margins is an essential step in creating professional Word documents. Margins may seem like a small detail, but they play a vital role in improving the readability and visual appeal of a document. By defining the space around content, margins help maintain a consistent and balanced layout, prevent text from being truncated, and make documents look more organized and aesthetically pleasing. This article will show how to use Spire.Doc for Python to set page margins for Word documents through Python programs.
Install Spire.Doc for Python
This scenario requires Spire.Doc for Python and plum-dispatch v1.7.4. They can be easily installed in your Windows through the following pip command.
pip install Spire.Doc
If you are unsure how to install, please refer to this tutorial: How to Install Spire.Doc for Python on Windows
Set the Page Margins of a Word Document
Spire.Doc for Python provides properties under the Margins class that can be used to set margins for each side of a document separately or to set the same margins for all sides. One important thing to note is that the margins are set based on sections. For consistent margins throughout the document, it is necessary to iterate through each section of the document to set the margins. Below are the detailed steps for setting page margins:
- Create an object of Document class.
- Load a Word document using Document.LoadFromFile() method.
- Loop through the sections of the document.
- Get a section using Document.Sections.get_Item() method.
- Get the margins of the section using Section.PageSetup.Margins property.
- Set the top, bottom, left, and right margin using property under Margins class.
- Python
from spire.doc import *
from spire.doc.common import *

# Create an object of Document class
doc = Document()

# Load a Word document
doc.LoadFromFile("Sample.docx")

# Loop thorugh the sections of document
for i in range(doc.Sections.Count):
    # Get a section
    section = doc.Sections.get_Item(i)
    # Get the margins of the section
    margins = section.PageSetup.Margins
    # Set the top, bottom, left, and right margins
    margins.Top = 17.9
    margins.Bottom = 17.9
    margins.Left = 20.9
    margins.Right = 20.9
    # margins.All = 17.9

# Save the document
doc.SaveToFile("output/SetPageMargins.docx", FileFormat.Auto)
Apply for a Temporary License
If you'd like to remove the evaluation message from the generated documents, or to get rid of the function limitations, please request a 30-day trial license for yourself.
Adding bookmarks to Word documents is a useful feature that allows users to mark specific locations within their documents for quick reference or navigation. Bookmarks serve as virtual placeholders, making it easier to find and revisit important sections of a document without scrolling through lengthy pages. In this article, you will learn how to add bookmarks to a Word document in Python using Spire.Doc for Python.
Install Spire.Doc for Python
This scenario requires Spire.Doc for Python and plum-dispatch v1.7.4. They can be easily installed in your Windows through the following pip command.
pip install Spire.Doc
If you are unsure how to install, please refer to this tutorial: How to Install Spire.Doc for Python on Windows
Add Bookmarks to a Paragraph in Python
Spire.Doc for Python offers the BookmarkStart to represent the start of a bookmark and the BookmarkEnd to represent the end of a bookmark. To bookmark a paragraph, a BookmarkStart object is placed at the beginning of the paragraph and a BookmarkEnd object is appended at the end of the paragraph. The following are the detailed steps.
- Create a Document object.
- Load a Word file using Document.LoadFromFile() method.
- Get a specific paragraph through Document.Sections[index].Paragraphs[index] property.
- Create a BookmarkStart using Paragraph.AppendBookmarkStart() method and insert it at the beginning of the paragraph using Paragraph.Items.Insert() method.
- Append a BookmarkEnd at the end of the paragraph using Paragraph.AppendBookmarkEnd() method.
- Save the document to a different Word file using Document.SaveToFile() method.
- Python
from spire.doc import *
from spire.doc.common import *
# Create a Document object
doc = Document()
# Load a sample Word file
doc.LoadFromFile('C:/Users/Administrator/Desktop/input.docx')
# Get the second paragraph
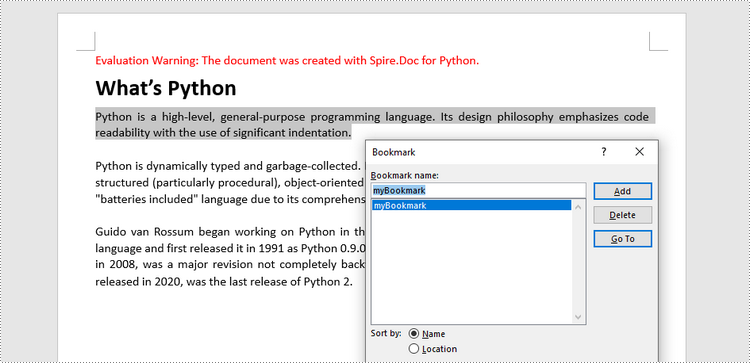
paragraph = doc.Sections[0].Paragraphs[2]
# Create a bookmark start
start = paragraph.AppendBookmarkStart('myBookmark')
# Insert it at the beginning of the paragraph
paragraph.Items.Insert(0, start)
# Append a bookmark end at the end of the paragraph
paragraph.AppendBookmarkEnd('myBookmark')
# Save the file
doc.SaveToFile('output/AddBookmarkToParagraph.docx', FileFormat.Docx2019)
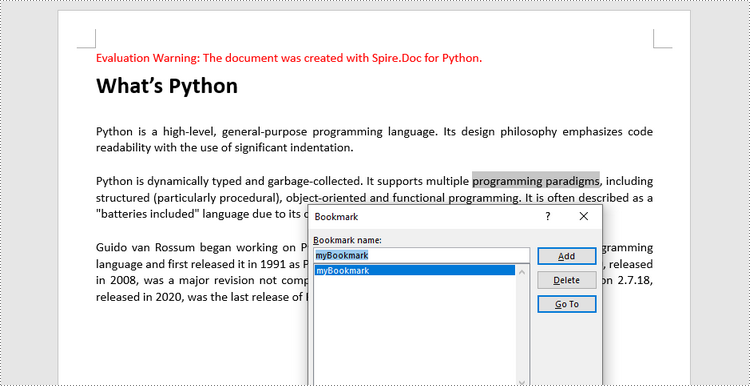
Add Bookmarks to Selected Text in Python
To bookmark a piece of text, you need first to get the text from the document and get its position inside its owner paragraph. And then place a BookmarkStart before it and a BookmarEnd after it. The detailed steps are as follows.
- Create a Document object.
- Load a Word file using Document.LoadFromFile() method.
- Find the string to be marked from the document.
- Get its owner paragraph and its position inside the paragraph.
- Insert a BookmarkStart before the text and a BookmarkEnd after the text.
- Save the document to a different Word file using Document.SaveToFile() method.
- Python
from spire.doc import *
from spire.doc.common import *

# Create a Document object
doc = Document()

# Load a sample Word file
doc.LoadFromFile('C:/Users/Administrator/Desktop/input.docx')

# Specify the string to find
stringToFind = 'programming paradigms'

# Find the selected text from the document
finds = doc.FindAllString(stringToFind, False, True)
specificText = finds[0]

# Find the paragraph where the text is located
paragraph = specificText.GetAsOneRange().OwnerParagraph

# Get the index of the text in the paragraph
index = paragraph.ChildObjects.IndexOf(specificText.GetAsOneRange())

# Create a bookmark start
start = paragraph.AppendBookmarkStart("myBookmark")

# Insert the bookmark start at the index position
paragraph.ChildObjects.Insert(index, start)

# Create a bookmark end
end = paragraph.AppendBookmarkEnd("myBookmark")

# Insert the bookmark end at the end of the selected text
paragraph.ChildObjects.Insert(index + 2, end)

# Save the document to a different file
doc.SaveToFile("output/AddBookmarkToSelectedText.docx", FileFormat.Docx2019)
Apply for a Temporary License
If you'd like to remove the evaluation message from the generated documents, or to get rid of the function limitations, please request a 30-day trial license for yourself.
The editing restriction function is a feature in Word documents that allows users to control and limit the editing capabilities and editable areas. It is commonly used to protect sensitive or important document from unauthorized or substandard modifications. By applying editing restrictions, the document owner can specify what types of changes can be made and which part of the document can be edited to protect the document and facilitate collaborating, information gathering, etc. This article is going to show how to restrict Word document editing and remove document editing restrictions using Spire.Doc for Python in Python programs.
- Restrict Editing of Entire Word Documents with Passwords
- Set Exceptions to Word Document Editing Restrictions
- Remove Editing Restrictions from Word Documents
Install Spire.Doc for Python
This scenario requires Spire.Doc for Python and plum-dispatch v1.7.4. They can be easily installed in your Windows through the following pip command.
pip install Spire.Doc
If you are unsure how to install, please refer to this tutorial: How to Install Spire.Doc for Python on Windows
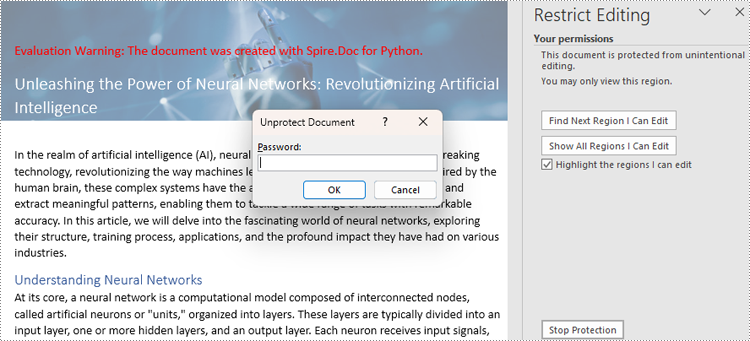
Restrict Editing of Entire Word Documents with Passwords
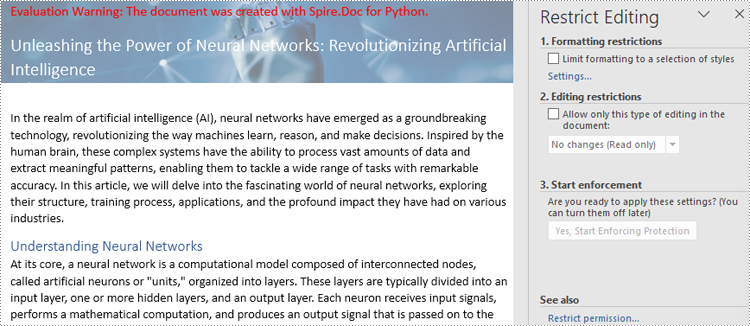
There are four types or editing restrictions in Word documents: No changes (Read only), Tracked changes, Comments, and Filling in forms. Spire.Doc for Python provides the Document.Protect() method set editing restrictions and ProtectionType Enum to represent the restriction types.
Here is a list of the ProtectionType Enum and the corresponding editing restrictions:
| Enum | Editing Restriction | Description |
| ProtectionType.AllowOnlyReading | No changes (Read only) | Allow reading only. |
| ProtectionType.AllowOnlyRevisions | Tracked changes | Allow tracked changes only. |
| ProtectionType.AllowOnlyComments | Comments | Allow comments only. |
| ProtectionType.AllowOnlyFormFields | Filling in forms | Allow filling out forms only. |
| ProtectionType.NoProtection | None | No restrictions. |
The steps for setting editing restrictions with a password on Word documents are as follows:
- Create an object of Document class.
- Load a Word document using Document.LoadFromFile() method.
- Set specified editing restrictions on the document using Document.Protect(type:ProtectionType, password:str) method.
- Save the document using Document.SaveToFile() method.
- Python
from spire.doc import *
from spire.doc.common import *

# Create an object of Document class
doc = Document()

# Load a Word document
doc.LoadFromFile("Sample.docx")

# Set the editing restriction type to No changes (Read only)
doc.Protect(ProtectionType.AllowOnlyReading, "password")

# Set the editing restriction type to Tracked changes
# doc.Protect(ProtectionType.AllowOnlyRevisions, "password")

# Set the editing restriction type to Comments
# doc.Protect(ProtectionType.AllowOnlyComments, "password")

# Set the editing restriction type to Filling in forms
# doc.Protect(ProtectionType.AllowOnlyFormFields, "password")

# Save the document
doc.SaveToFile("output/EditingRestrictions.docx")
doc.Close()
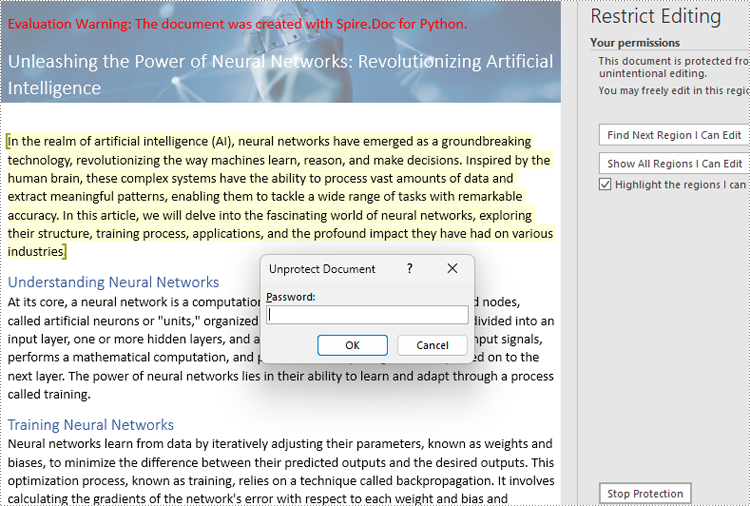
Set Exceptions to Word Document Editing Restrictions
Users can add exceptions (unrestricted areas) when setting editing restrictions on Word documents by inserting permission starting and ending tags. The details steps are as follows:
- Create an object of Document class.
- Load a Word document using Document.LoadFromFile() method.
- Get the first section using Document.Sections.get_Item() method.
- Create an object of PermissionStart class and an object of PermissionEnd class.
- Insert the permission start tag and the end tag to the document using Paragraph.ChildObjects.Insert() method and Paragraph.ChildObjects.Add() method.
- Set the editing restriction using Document.Protect() method.
- Save the document using Document.SaveToFile() method.
- Python
from spire.doc import *
from spire.doc.common import *

# Create an object of Document class
doc = Document()

# Load a Word document
doc.LoadFromFile("Sample.docx")

# Get the first section
section = doc.Sections.get_Item(0)

# Create a permission start tag and an end tag
start = PermissionStart(doc, "exception1")
end = PermissionEnd(doc, "exception1")

# Insert the permission start tag and the end tag to the first section
paragraph = section.Paragraphs.get_Item(1)
paragraph.ChildObjects.Insert(0,start)
paragraph.ChildObjects.Add(end)

# Set the editing restriction
doc.Protect(ProtectionType.AllowOnlyReading, "password")

# Save the document
doc.SaveToFile("output/RestrictionException.docx")
doc.Close()
Remove Editing Restrictions from Word Documents
To remove the editing restrictions of a document, simply set the editing restriction type to no restriction using the Document.Protect() method. The detailed steps are as follows:
- Create an object of Document class.
- Load a Word document using Document.LoadFromFile() method.
- Remove the restriction by setting the restriction type to None using Document.Protect() method.
- Save the document using Document.SaveToFile() method.
- Python
from spire.doc import *
from spire.doc.common import *

# Create an object of Document class
doc = Document()

# Load a Word document
doc.LoadFromFile("output/EditingRestrictions.docx")

# Remove the editing restriction by set the restriction type to None
doc.Protect(ProtectionType.NoProtection)

# Save the document
doc.SaveToFile("output/RemoveEditingRestriction.docx")
doc.Close()
Apply for a Temporary License
If you'd like to remove the evaluation message from the generated documents, or to get rid of the function limitations, please request a 30-day trial license for yourself.
The Find and Replace feature in Word offers a reliable and efficient solution for updating text within your documents. It eliminates the need for exhaustive manual searching and editing by automatically locating and replacing the desired text throughout the entire document. This not only saves time but also guarantees that every instance of the targeted text is updated consistently. In this article, we will demonstrate how to find and replace text in a Word document in Python using Spire.Doc for Python.
- Find Text and Replace All Its Instances with New Text
- Find Text and Replace Its First Instance with New Text
- Find and Replace Text Using a Regular Expression
- Find and Replace Text with an Image
Install Spire.Doc for Python
This scenario requires Spire.Doc for Python and plum-dispatch v1.7.4. They can be easily installed in your Windows through the following pip command.
pip install Spire.Doc
If you are unsure how to install, please refer to this tutorial: How to Install Spire.Doc for Python on Windows
Find Text and Replace All Its Instances with New Text
You can find a text and replace all its instances with another text easily using the Document.Replace() method. The detailed steps are as follows:
- Create a Document object.
- Load a Word document using Document.LoadFromFile() method.
- Find a specific text and replace all its instances with another text using Document.Replace() method.
- Save the resulting document using Document.SaveToFile() method.
- Python
from spire.doc import *
from spire.doc.common import *
# Create a Document object
document = Document()
# Load a Word document
document.LoadFromFile("Sample.docx")
# Find a specific text and replace all its instances with another text
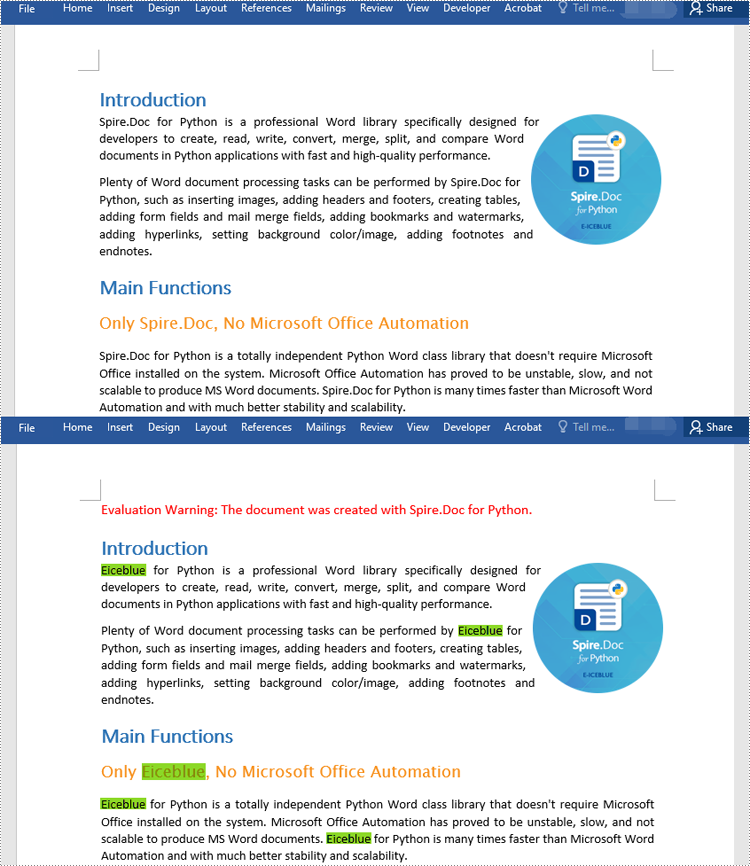
document.Replace("Spire.Doc", "Eiceblue", False, True)
# Save the resulting document
document.SaveToFile("ReplaceAllOccurrencesOfText.docx", FileFormat.Docx2016)
document.Close()
Find Text and Replace Its First Instance with New Text
Spire.Doc for Python provides the Document.ReplaceFirst property which enables you to change the replacement mode from replacing all instances to replacing the first instance. The following steps explain how to find a text and replace its first instance in a Word document:
- Create a Document object.
- Load a Word document using Document.LoadFromFile() method.
- Change the replacement mode to replace the first instance by setting the Document.ReplaceFirst property as True.
- Replace the first instance of a text with another text using Document.Replace() method.
- Save the resulting document using Document.SaveToFile() method.
- Python
from spire.doc import *
from spire.doc.common import *
# Create a Document object
document = Document()
# Load a Word document
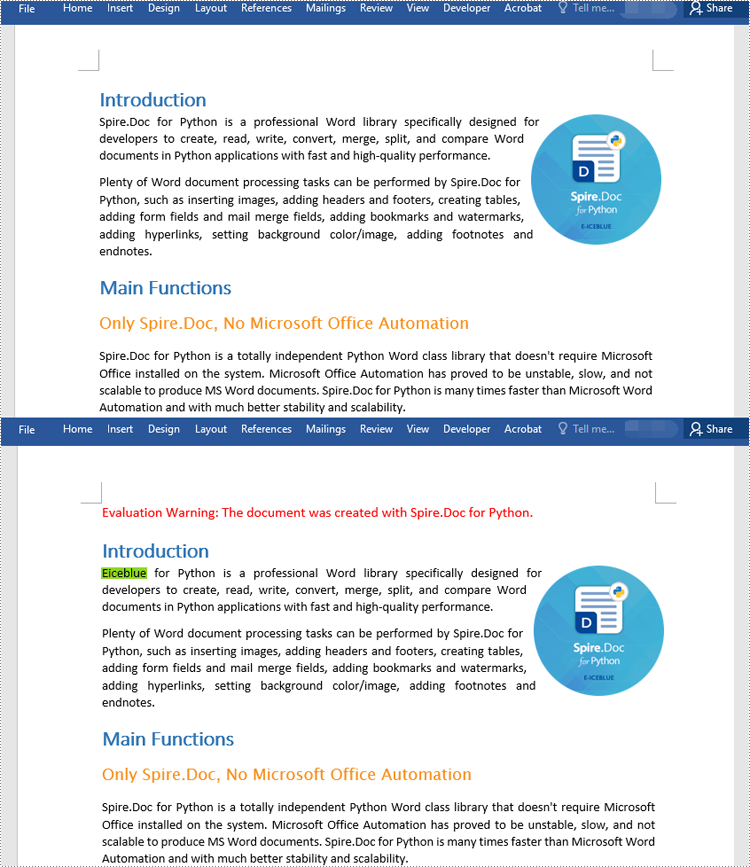
document.LoadFromFile("Sample.docx")
# Change the replacement mode to replace the first match
document.ReplaceFirst = True
# Replace the first instance of a text with another text
document.Replace("Spire.Doc", "Eiceblue", False, True)
# Save the resulting document
document.SaveToFile("ReplaceFirstOccurrenceOfText.docx", FileFormat.Docx2016)
document.Close()
Find and Replace Text Using a Regular Expression
You can replace a text matching a regular expression with new text by passing a Regex object and the new text to the Document.Replace() method as parameters. The detailed steps are as follows:
- Create a Document object.
- Load a Word document using Document.LoadFromFile() method.
- Create a Regex object to match the specific text.
- Replace the text matching the regex with another text using Document.Replace() method.
- Save the resulting document using Document.SaveToFile() method.
- Python
from spire.doc import *
from spire.doc.common import *
# Create a Document object
document = Document()
# Load a Word document
document.LoadFromFile("Sample1.docx")
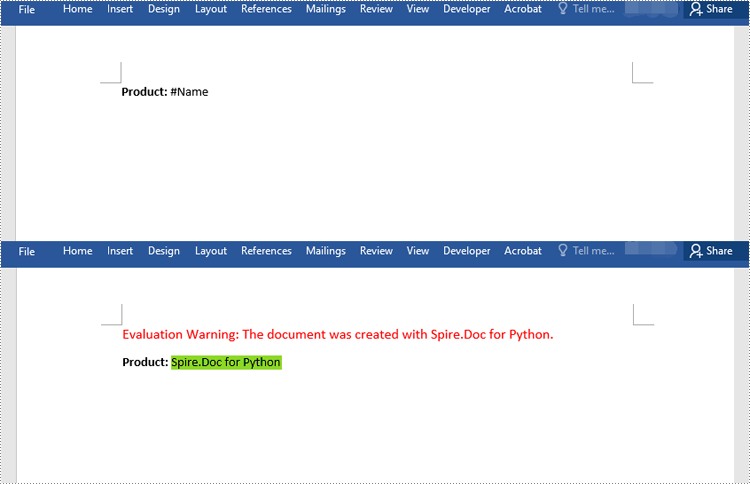
# Create a regex to match the text that starts with #
regex = Regex("""\\#\\w+\\b""")
# Find the text matching the regex and replace it with another text
document.Replace(regex, "Spire.Doc for Python")
#save the document
document.SaveToFile("ReplaceTextUsingRegex.docx", FileFormat.Docx2016)
document.Close()
Find and Replace Text with an Image
Spire.Doc for Python doesn't offer a direct method to replace text with image, but you can achieve this by inserting the image at the position of the text and then removing the text from the document. The detailed steps are as follows:
- Create a Document object.
- Load a Word document using Document.LoadFromFile() method.
- Find a specific text in the document using Document.FindAllString() method.
- Loop through the found results.
- Create a DocPicture object and load an image using DocPicture.LoadImage() method.
- Get the found text as a single text range and then get the index of the text range in its owner paragraph.
- Insert an image at the position of the text range and then remove the text range from the document.
- Save the resulting document using Document.SaveToFile() method.
- Python
from spire.doc import *
from spire.doc.common import *
# Create a Document object
document = Document()
# Load a Word document
document.LoadFromFile("Sample.docx")
# Find a specific text in the document
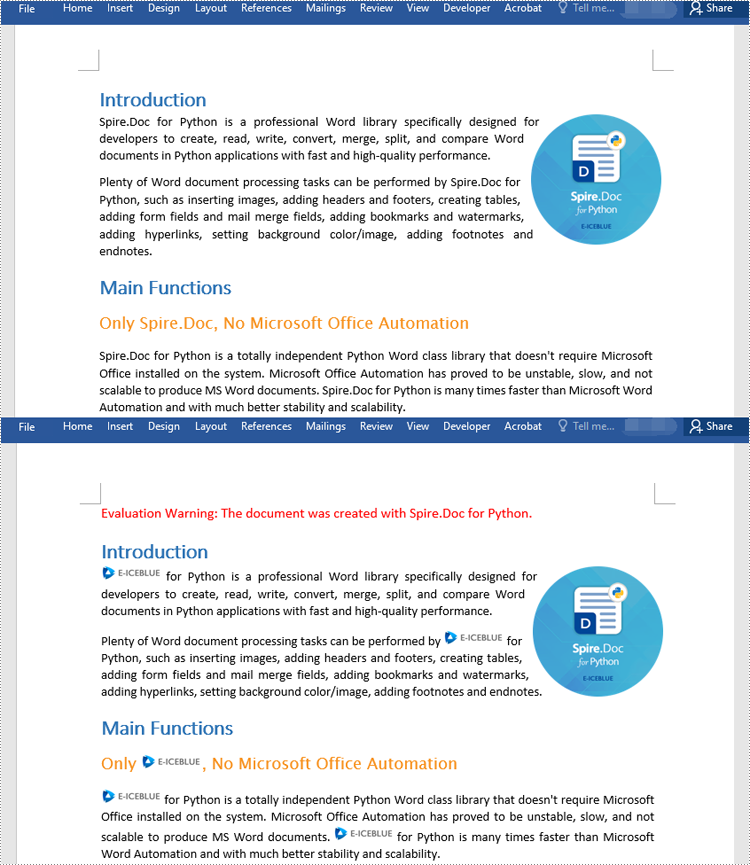
selections = document.FindAllString("Spire.Doc", True, True)
index = 0
testRange = None
# Loop through the found results
for selection in selections:
# Load an image
pic = DocPicture(document)
pic.LoadImage("logo.png")
# Get the found text as a single text range
testRange = selection.GetAsOneRange()
# Get the index of the text range in its owner paragraph
index = testRange.OwnerParagraph.ChildObjects.IndexOf(testRange)
# Insert an image at the index
testRange.OwnerParagraph.ChildObjects.Insert(index, pic)
# Remove the text range
testRange.OwnerParagraph.ChildObjects.Remove(testRange)
# Save the resulting document
document.SaveToFile("ReplaceTextWithImage.docx", FileFormat.Docx2016)
document.Close()
Apply for a Temporary License
If you'd like to remove the evaluation message from the generated documents, or to get rid of the function limitations, please request a 30-day trial license for yourself.
During the process of document creation, it is common to encounter numerous blank lines. These empty spaces can disrupt the flow of the content, clutter the layout, and undermine the overall aesthetic presentation of the document. In order to optimize the reading experience and ensure a well-structured document, it becomes crucial to eliminate the blank lines. This article will demonstrate how to delete blank lines from Word documents through Python programs using Spire.Doc for Python.
Install Spire.Doc for Python
This scenario requires Spire.Doc for Python and plum-dispatch v1.7.4. They can be easily installed in your Windows through the following pip command.
pip install Spire.Doc
If you are unsure how to install, please refer to this tutorial: How to Install Spire.Doc for Python on Windows
Remove Blank Lines from Word Documents
Blank lines in a Word document appear as blank paragraphs, which are child objects of sections. Therefore, removing blank lines simply requires iterating through the sections, identifying and deleting empty paragraphs within them. The detailed steps are as follows:
- Create an object of Document class.
- Load a Word document using Document.LoadFromFile() method.
- Iterate through each section and each child object of the sections.
- First, check if a child object is of paragraph type. If it is, continue to check if the sub-object is an instance of the "Paragraph" class. If it is, further check if the paragraph has no text. If there is no text, delete the paragraph using Section.Body.ChildObjects.Remove() method.
- Save the document using Document.SaveToFile() method.
- Python
from spire.doc import *
from spire.doc.common import *

# Create an object of the Document class
doc = Document()

# Load a Word document
doc.LoadFromFile("Sample.docx")

# Iterate through each section in the document
for i in range(doc.Sections.Count):
    section = doc.Sections.get_Item(i)
    j = 0
    # Iterate through each child object in the section
    while j < section.Body.ChildObjects.Count:
        # Check if the child object is of type Paragraph
        if section.Body.ChildObjects[j].DocumentObjectType == DocumentObjectType.Paragraph:
            objItem = section.Body.ChildObjects[j]
            # Check if the child object is an instance of the Paragraph class
            if isinstance(objItem, Paragraph):
                paraObj = Paragraph(objItem)
                # Check if the paragraph text is empty
                if len(paraObj.Text) == 0:
                    # If the paragraph text is empty, remove the object from the section's child objects list
                    section.Body.ChildObjects.Remove(objItem)
                    j -= 1
        j += 1

# Save the document
doc.SaveToFile("output/RemoveBlankLines.docx")
Apply for a Temporary License
If you'd like to remove the evaluation message from the generated documents, or to get rid of the function limitations, please request a 30-day trial license for yourself.
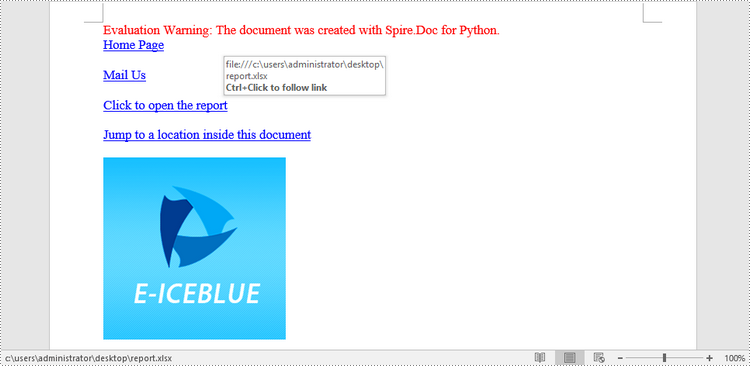
Hyperlinks are an essential component of creating dynamic and interactive Word documents. By linking specific text or objects to other documents, web pages, email addresses, or specific locations within the same document, hyperlinks allow users to navigate through information seamlessly. In this article, you will learn how to add or remove hyperlinks in a Word document in Python using Spire.Doc for Python.
Install Spire.Doc for Python
This scenario requires Spire.Doc for Python and plum-dispatch v1.7.4. They can be easily installed in your Windows through the following pip command.
pip install Spire.Doc
If you are unsure how to install, please refer to this tutorial: How to Install Spire.Doc for Python on Windows
Add Hyperlinks to Word in Python
Spire.Doc for Python offers the Paragraph.AppendHyperlink() method to add a web link, an email link, a file link, or a bookmark link to a piece of text or an image inside a paragraph. The following are the detailed steps.
- Create a Document object.
- Add a section and a paragraph to it.
- Insert a hyperlink based on text using Paragraph.AppendHyerplink(link: str, text: str, type: HyperlinkType) method.
- Add an image to the paragraph using Paragraph.AppendPicture() method.
- Insert a hyperlink based on the image using Paragraph.AppendHyerplink(link: str, picture: DocPicture, type: HyperlinkType) method.
- Save the result document using Document.SaveToFile() method.
- Python
from spire.doc import *
from spire.doc.common import *

# Create a Word document
doc = Document()

# Add a section
section = doc.AddSection()

# Add a paragraph
paragraph = section.AddParagraph()
paragraph.AppendHyperlink("https://www-iceblue.com/", "Home Page", HyperlinkType.WebLink)

# Append line breaks
paragraph.AppendBreak(BreakType.LineBreak)
paragraph.AppendBreak(BreakType.LineBreak)

# Add an email link
paragraph.AppendHyperlink("mailto:support@e-iceblue.com", "Mail Us", HyperlinkType.EMailLink)

# Append line breaks
paragraph.AppendBreak(BreakType.LineBreak)
paragraph.AppendBreak(BreakType.LineBreak)

# Add a file link
filePath = "C:\\Users\\Administrator\\Desktop\\report.xlsx"
paragraph.AppendHyperlink(filePath, "Click to open the report", HyperlinkType.FileLink)

# Append line breaks
paragraph.AppendBreak(BreakType.LineBreak)
paragraph.AppendBreak(BreakType.LineBreak)

# Add another section and create a bookmark
section2 = doc.AddSection()
bookmarkParagrapg = section2.AddParagraph()
bookmarkParagrapg.AppendText("Here is a bookmark")
start = bookmarkParagrapg.AppendBookmarkStart("myBookmark")
bookmarkParagrapg.Items.Insert(0, start)
bookmarkParagrapg.AppendBookmarkEnd("myBookmark")

# Link to the bookmark
paragraph.AppendHyperlink("myBookmark", "Jump to a location inside this document", HyperlinkType.Bookmark)

# Append line breaks
paragraph.AppendBreak(BreakType.LineBreak)
paragraph.AppendBreak(BreakType.LineBreak)

# Add an image link
image = "C:\\Users\\Administrator\\Desktop\\logo.png"
picture = paragraph.AppendPicture(image)
paragraph.AppendHyperlink("https://www.e-iceblue.com/", picture, HyperlinkType.WebLink)

# Save to file
doc.SaveToFile("output/CreateHyperlinks.docx", FileFormat.Docx2019);
doc.Dispose()
Remove Hyperlinks from Word in Python
To delete all hyperlinks in a Word document at once, you'll need to find all the hyperlinks in the document and then create a custom method FlattenHyperlinks() to flatten them. The following are the detailed steps.
- Create a Document object.
- Load a sample Word document using Document.LoadFromFile() method.
- Find all the hyperlinks in the document using custom method FindAllHyperlinks().
- Loop through the hyperlinks and flatten all of them using custom method FlattenHyperlinks().
- Save the result document using Document.SaveToFile() method.
- Python
from spire.doc import *
from spire.doc.common import *

# Find all the hyperlinks in a document
def FindAllHyperlinks(document):
    hyperlinks = []
    for i in range(document.Sections.Count):
        section = document.Sections.get_Item(i)
        for j in range(section.Body.ChildObjects.Count):
            sec = section.Body.ChildObjects.get_Item(j)
            if sec.DocumentObjectType == DocumentObjectType.Paragraph:
                for k in range((sec if isinstance(sec, Paragraph) else None).ChildObjects.Count):
                    para = (sec if isinstance(sec, Paragraph)
                            else None).ChildObjects.get_Item(k)
                    if para.DocumentObjectType == DocumentObjectType.Field:
                        field = para if isinstance(para, Field) else None
                        if field.Type == FieldType.FieldHyperlink:
                            hyperlinks.append(field)
    return hyperlinks

# Flatten the hyperlink fields
def FlattenHyperlinks(field):
    ownerParaIndex = field.OwnerParagraph.OwnerTextBody.ChildObjects.IndexOf(
        field.OwnerParagraph)
    fieldIndex = field.OwnerParagraph.ChildObjects.IndexOf(field)
    sepOwnerPara = field.Separator.OwnerParagraph
    sepOwnerParaIndex = field.Separator.OwnerParagraph.OwnerTextBody.ChildObjects.IndexOf(
        field.Separator.OwnerParagraph)
    sepIndex = field.Separator.OwnerParagraph.ChildObjects.IndexOf(
        field.Separator)
    endIndex = field.End.OwnerParagraph.ChildObjects.IndexOf(field.End)
    endOwnerParaIndex = field.End.OwnerParagraph.OwnerTextBody.ChildObjects.IndexOf(
        field.End.OwnerParagraph)

    FormatFieldResultText(field.Separator.OwnerParagraph.OwnerTextBody,
                           sepOwnerParaIndex, endOwnerParaIndex, sepIndex, endIndex)

    field.End.OwnerParagraph.ChildObjects.RemoveAt(endIndex)

    for i in range(sepOwnerParaIndex, ownerParaIndex - 1, -1):
        if i == sepOwnerParaIndex and i == ownerParaIndex:
            for j in range(sepIndex, fieldIndex - 1, -1):
                field.OwnerParagraph.ChildObjects.RemoveAt(j)

        elif i == ownerParaIndex:
            for j in range(field.OwnerParagraph.ChildObjects.Count - 1, fieldIndex - 1, -1):
                field.OwnerParagraph.ChildObjects.RemoveAt(j)

        elif i == sepOwnerParaIndex:
            for j in range(sepIndex, -1, -1):
                sepOwnerPara.ChildObjects.RemoveAt(j)
        else:
            field.OwnerParagraph.OwnerTextBody.ChildObjects.RemoveAt(i)

# Convert fields to text range and clear the text formatting
def FormatFieldResultText(ownerBody, sepOwnerParaIndex, endOwnerParaIndex, sepIndex, endIndex):
    for i in range(sepOwnerParaIndex, endOwnerParaIndex + 1):
        para = ownerBody.ChildObjects[i] if isinstance(
            ownerBody.ChildObjects[i], Paragraph) else None
        if i == sepOwnerParaIndex and i == endOwnerParaIndex:
            for j in range(sepIndex + 1, endIndex):
               if isinstance(para.ChildObjects[j], TextRange):
                 FormatText(para.ChildObjects[j])

        elif i == sepOwnerParaIndex:
            for j in range(sepIndex + 1, para.ChildObjects.Count):
                if isinstance(para.ChildObjects[j], TextRange):
                  FormatText(para.ChildObjects[j])
        elif i == endOwnerParaIndex:
            for j in range(0, endIndex):
               if isinstance(para.ChildObjects[j], TextRange):
                 FormatText(para.ChildObjects[j])
        else:
            for j, unusedItem in enumerate(para.ChildObjects):
                if isinstance(para.ChildObjects[j], TextRange):
                  FormatText(para.ChildObjects[j])

# Format text
def FormatText(tr):
    tr.CharacterFormat.TextColor = Color.get_Black()
    tr.CharacterFormat.UnderlineStyle = UnderlineStyle.none

# Create a Document object
doc = Document()

# Load a Word file
doc.LoadFromFile("C:\\Users\\Administrator\\Desktop\\test.docx")

# Get all hyperlinks
hyperlinks = FindAllHyperlinks(doc)

# Flatten all hyperlinks
for i in range(len(hyperlinks) - 1, -1, -1):
    FlattenHyperlinks(hyperlinks[i])

# Save to a different file
doc.SaveToFile("output/RemoveHyperlinks.docx", FileFormat.Docx)
doc.Close()
Apply for a Temporary License
If you'd like to remove the evaluation message from the generated documents, or to get rid of the function limitations, please request a 30-day trial license for yourself.
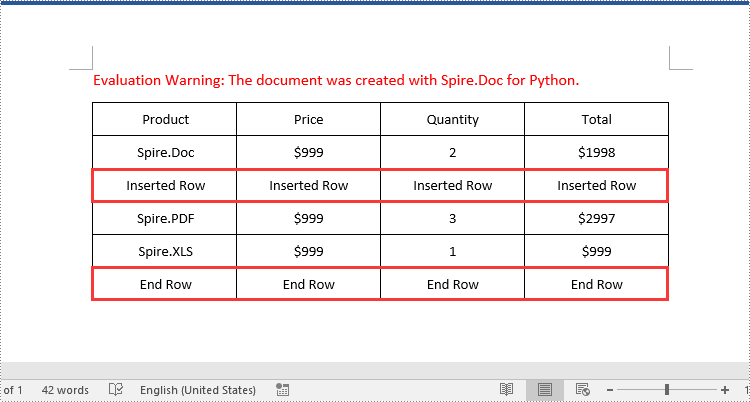
Adding or removing rows and columns in a Word table allows you to adjust the table's structure to accommodate your data effectively. By adding rows and columns, you can effortlessly expand the table as your data grows, ensuring that all relevant information is captured and displayed in a comprehensive manner. On the other hand, removing unnecessary rows and columns allows you to streamline the table, eliminating any redundant or extraneous data that may clutter the document. In this article, we will demonstrate how to add or delete table rows and columns in Word in Python using Spire.Doc for Python.
- Add or Insert a Row into a Word Table in Python
- Add or Insert a Column into a Word Table in Python
- Delete a Row from a Word Table in Python
- Delete a Column from a Word Table in Python
Install Spire.Doc for Python
This scenario requires Spire.Doc for Python and plum-dispatch v1.7.4. They can be easily installed in your Windows through the following pip command.
pip install Spire.Doc
If you are unsure how to install, please refer to this tutorial: How to Install Spire.Doc for Python on Windows
Add or Insert a Row into a Word Table in Python
You can add a row to the end of a Word table or insert a row at a specific location of a Word table using the Table.AddRow() or Table.InsertRow() method. The following are the detailed steps:
- Create a Document object.
- Load a Word document using Document.LoadFromFile() method.
- Get the first section of the document using Document.Sections[] property.
- Get the first table of the section using Section.Tables[] property.
- Insert a row at a specific location of the table using Table.Rows.Insert() method.
- Add data to the newly inserted row.
- Add a row to the end of the table using Table.AddRow() method.
- Add data to the newly added row.
- Save the resulting document using Document.SaveToFile() method.
- Python
from spire.doc import *
from spire.doc.common import *

# Create a Document object
document = Document()
# Load a Word document
document.LoadFromFile("Table1.docx")

# Get the first section of the document
section = document.Sections.get_Item(0)

# Get the first table of the first section
table = section.Tables.get_Item(0) if isinstance(section.Tables.get_Item(0), Table) else None

# Insert a row into the table as the third row
table.Rows.Insert(2, table.AddRow())
# Get the inserted row
insertedRow = table.Rows[2]
# Add data to the row
for i in range(insertedRow.Cells.Count):
    cell = insertedRow.Cells[i]
    paragraph = cell.AddParagraph()
    paragraph.AppendText("Inserted Row")
    paragraph.Format.HorizontalAlignment = HorizontalAlignment.Center
    cell.CellFormat.VerticalAlignment = VerticalAlignment.Middle

# Add a row at the end of the table
addedRow = table.AddRow()
# Add data to the row
for i in range(addedRow.Cells.Count):
    cell = addedRow.Cells[i]
    paragraph = cell.AddParagraph()
    paragraph.AppendText("End Row")
    paragraph.Format.HorizontalAlignment = HorizontalAlignment.Center
    cell.CellFormat.VerticalAlignment = VerticalAlignment.Middle

# Save the resulting document
document.SaveToFile("AddRows.docx", FileFormat.Docx2016)
document.Close()
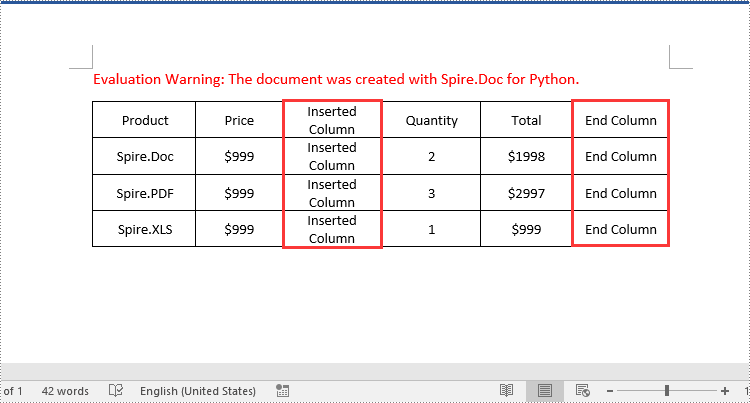
Add or Insert a Column into a Word Table in Python
Spire.Doc for Python doesn't offer a direct method to add or insert a column into a Word table. But you can achieve this by adding or inserting cells at a specific location of each table row using TableRow.Cells.Add() or TableRow.Cells.Insert() method. The detailed steps are as follows:
- Create a Document object.
- Load a Word document using Document.LoadFromFile() method.
- Get the first section of the document using Document.Sections[] property.
- Get the first table of the section using Section.Tables[] property.
- Loop through each row of the table.
- Create a TableCell object, then insert it at a specific location of each row using TableRow.Cells.Insert() method and set cell width.
- Add data to the cell and set text alignment.
- Add a cell to the end of each row using TableRow.AddCell() method and set cell width.
- Add data to the cell and set text alignment.
- Save the resulting document using Document.SaveToFile() method.
- Python
from spire.doc import *
from spire.doc.common import *

# Create a Document object
document = Document()
# Load a Word document
document.LoadFromFile("Table1.docx")

# Get the first section of the document
section = document.Sections.get_Item(0)

# Get the first table of the first section
table = section.Tables.get_Item(0) if isinstance(section.Tables.get_Item(0), Table) else None

# Loop through the rows of the table
for i in range(table.Rows.Count):
    row = table.Rows.get_Item(i)
    # Create a TableCell object
    cell = TableCell(document)
    # Insert the cell as the third cell of the row and set cell width
    row.Cells.Insert(2, cell)
    cell.Width = row.Cells[0].Width
    # Add data to the cell
    paragraph = cell.AddParagraph()
    paragraph.AppendText("Inserted Column")
    # Set text alignment
    paragraph.Format.HorizontalAlignment = HorizontalAlignment.Center
    cell.CellFormat.VerticalAlignment = VerticalAlignment.Middle

    # Add a cell to the end of the row and set cell width
    cell = row.AddCell()
    cell.Width = row.Cells[1].Width
    # Add data to the cell
    paragraph = cell.AddParagraph()
    paragraph.AppendText("End Column")
    # Set text alignment
    paragraph.Format.HorizontalAlignment = HorizontalAlignment.Center
    cell.CellFormat.VerticalAlignment = VerticalAlignment.Middle

# Save the resulting document
document.SaveToFile("AddColumns.docx", FileFormat.Docx2016)
document.Close()
Delete a Row from a Word Table in Python
To delete a specific row from a Word table, you can use the Table.Rows.RemoveAt() method. The detailed steps are as follows:
- Create a Document object.
- Load a Word document using Document.LoadFromFile() method.
- Get the first section of the document using Document.Sections[] property.
- Get the first table of the section using Section.Tables[] property.
- Remove a specific row from the table using Table.Rows.RemoveAt() method.
- Save the resulting document using Document.SaveToFile() method.
- Python
from spire.doc import *
from spire.doc.common import *

# Create a Document object
document = Document()
# Load a Word document
document.LoadFromFile("AddRows.docx")

# Get the first section of the document
section = document.Sections.get_Item(0)

# Get the first table of the first section
table = section.Tables.get_Item(0) if isinstance(section.Tables.get_Item(0), Table) else None

# Remove the third row
table.Rows.RemoveAt(2)
# Remove the last row
table.Rows.RemoveAt(table.Rows.Count - 1)

# Save the resulting document
document.SaveToFile("RemoveRows.docx", FileFormat.Docx2016)
document.Close()

Delete a Column from a Word Table in Python
To delete a specific column from a Word table, you need to remove the corresponding cell from each table row using the TableRow.Cells.RemoveAt() method. The detailed steps are as follows:
- Create a Document object.
- Load a Word document using Document.LoadFromFile() method.
- Get the first section of the document using Document.Sections[] property.
- Get the first table of the section using Section.Tables[] property.
- Loop through each row of the table.
- Remove a specific cell from each row using TableRow.Cells.RemoveAt() method.
- Save the resulting document using Document.SaveToFile() method.
- Python
from spire.doc import *
from spire.doc.common import *

# Create a Document object
document = Document()
# Load a Word document
document.LoadFromFile("AddColumns.docx")

# Get the first section of the document
section = document.Sections.get_Item(0)

# Get the first table of the first section
table = section.Tables.get_Item(0) if isinstance(section.Tables.get_Item(0), Table) else None

# Loop through the rows of the table
for i in range(table.Rows.Count):
    row = table.Rows.get_Item(i)
    # Remove the third cell from the row
    row.Cells.RemoveAt(2)
    # Remove the last cell from the row
    row.Cells.RemoveAt(row.Cells.Count - 1)

# Save the resulting document
document.SaveToFile("RemoveColumns.docx", FileFormat.Docx2016)
document.Close()

Apply for a Temporary License
If you'd like to remove the evaluation message from the generated documents, or to get rid of the function limitations, please request a 30-day trial license for yourself.
Converting a Word document into images can be a useful and convenient option when you want to share or present the content without worrying about formatting issues or compatibility across devices. By converting a Word document into images, you can ensure that the text, images, and formatting remain intact, making it an ideal solution for sharing documents on social media, websites, or through email. In this article, you will learn how to convert Word to PNG, JPEG or SVG in Python using Spire.Doc for Python.
Install Spire.Doc for Python
This scenario requires Spire.Doc for Python and plum-dispatch v1.7.4. They can be easily installed in your Windows through the following pip command.
pip install Spire.Doc
If you are unsure how to install, please refer to this tutorial: How to Install Spire.Doc for Python on Windows
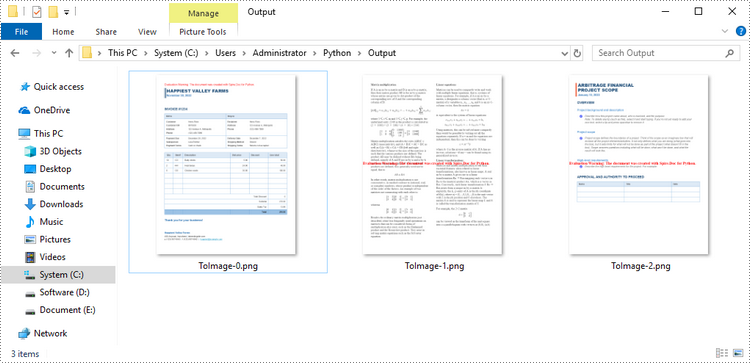
Convert Word to PNG or JPEG in Python
Spire.Doc for Python offers the Document.SaveImageToStream() method to convert a certain page into a bitmap image. Afterwards, you can save the bitmap image to a popular image format such as PNG, JPEG, or BMP. The detailed steps are as follows.
- Create a Document object.
- Load a Word file using Document.LoadFromFile() method.
- Retrieve each page in the document, and convert a specific page into a bitmap image using Document.SaveImageToStreams() method.
- Save the bitmap image into a PNG or JPEG file.
- Python
from spire.doc import *
from spire.doc.common import *

# Create a Document object
document = Document()

# Load a Word file
document.LoadFromFile("C:\\Users\\Administrator\\Desktop\\input.docx")

# Loop through the pages in the document
for i in range(document.GetPageCount()):

    # Convert a specific page to bitmap image
    imageStream = document.SaveImageToStreams(i, ImageType.Bitmap)

    # Save the bitmap to a PNG file
    with open('Output/ToImage-{0}.png'.format(i),'wb') as imageFile:
        imageFile.write(imageStream.ToArray())

document.Close()
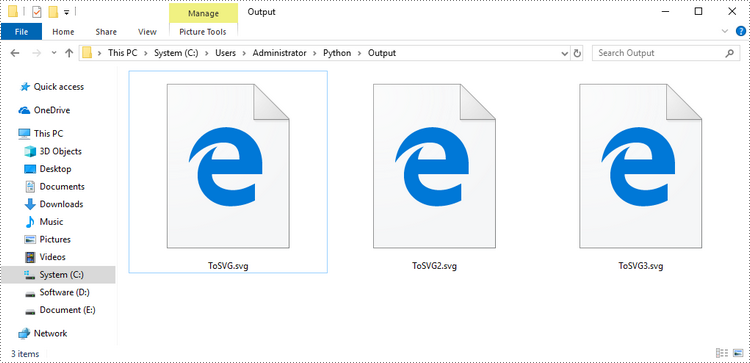
Convert Word to SVG in Python
To convert a Word document into multiple SVG files, you can simply use the Document.SaveToFile() method. Here are the steps.
- Create a Document object.
- Load a Word file using Document.LoadFromFile() method.
- Convert it to individual SVG files using Document.SaveToFile() method.
- Python
from spire.doc import *
from spire.doc.common import *

# Create a Document object
document = Document()

# Load a Word file
document.LoadFromFile("C:\\Users\\Administrator\\Desktop\\input.docx")

# Convert it to SVG files
document.SaveToFile("output/ToSVG.svg", FileFormat.SVG)

document.Close()
Get a Free License
To fully experience the capabilities of Spire.Doc for Python without any evaluation limitations, you can request a free 30-day trial license.
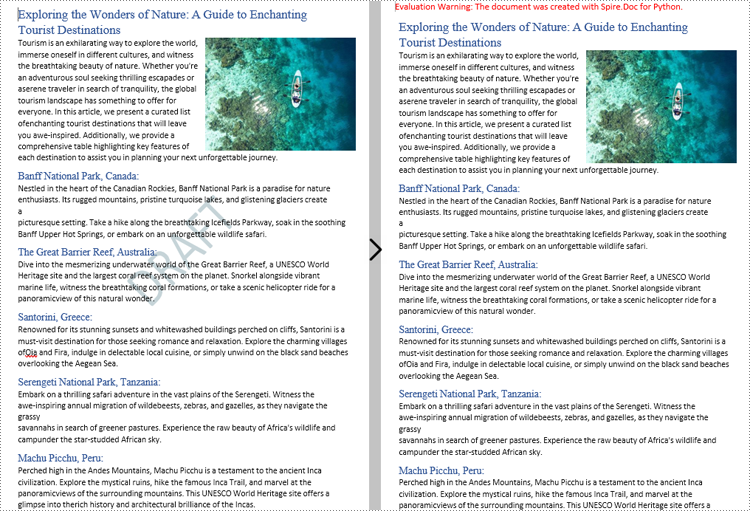
Watermarks in Word documents serve as overlayed text or pictures that are typically used to indicate documents’ status, confidentiality, draft nature, etc. While they are useful in certain contexts, watermarks often become a hindrance when it comes to presenting documents. They can be distracting, obscuring the readability, and reduce the overall quality of the document. This article will show how to remove watermarks from Word documents in Python programs using Spire.Doc for Python.
Install Spire.Doc for Python
This scenario requires Spire.Doc for Python and plum-dispatch v1.7.4. They can be easily installed in your Windows through the following pip commands.
pip install Spire.Doc
If you are unsure how to install, please refer to this tutorial: How to Install Spire.Doc for Python on Windows
Remove the Watermark from a Word Document
Spire.Doc for Python provides the Document.Watermark property which allows users to deal with the watermark of a Word document. Users can assign a null value to this property to remove the watermark of Word document. The detailed steps are as follows:
- Create an object of Document class.
- Load a Word document using Document.LoadFromFile() method.
- Remove the watermark by assigning a null value to Document.Watermark property.
- Save the document using Document.SaveToFile() method.
- Python
from spire.doc import *
from spire.doc.common import *

# Create an object of Document class
doc = Document()

# Load a Word document
doc.LoadFromFile("Sample.docx")

# Remove the watermark
doc.Watermark = None

# Save the document
doc.SaveToFile("output/RemoveWatermark.docx", FileFormat.Auto)
Apply for a Temporary License
If you'd like to remove the evaluation message from the generated documents, or to get rid of the function limitations, please request a 30-day trial license for yourself.
