
Program Guide (52)
Children categories
Reading PowerPoint Files in Python: Extract Text, Images & More
2025-07-24 03:50:38 Written by jie zou
PowerPoint (PPT & PPTX) files are rich with diverse content, including text, images, tables, charts, shapes, and metadata. Extracting these elements programmatically can unlock a wide range of use cases, from automating repetitive tasks to performing in-depth data analysis or migrating content across platforms.
In this tutorial, we'll explore how to read PowerPoint documents in Python using Spire.Presentation for Python, a powerful library for processing PowerPoint files.
Table of Contents:
- Python Library to Read PowerPoint Files
- Extracting Text from Slides
- Saving Images from Slides
- Accessing Metadata (Document Properties)
- Conclusion
- FAQs
1. Python Library to Read PowerPoint Files
To work with PowerPoint files in Python, we'll use Spire.Presentation for Python. This feature-rich library enables developers to create, edit, and read content from PowerPoint presentations efficiently. It allows for the extraction of text, images, tables, SmartArt, and metadata with minimal coding effort.
Before we begin, install the library using pip:
pip install spire.presentation
Now, let's dive into different ways to extract content from PowerPoint files.
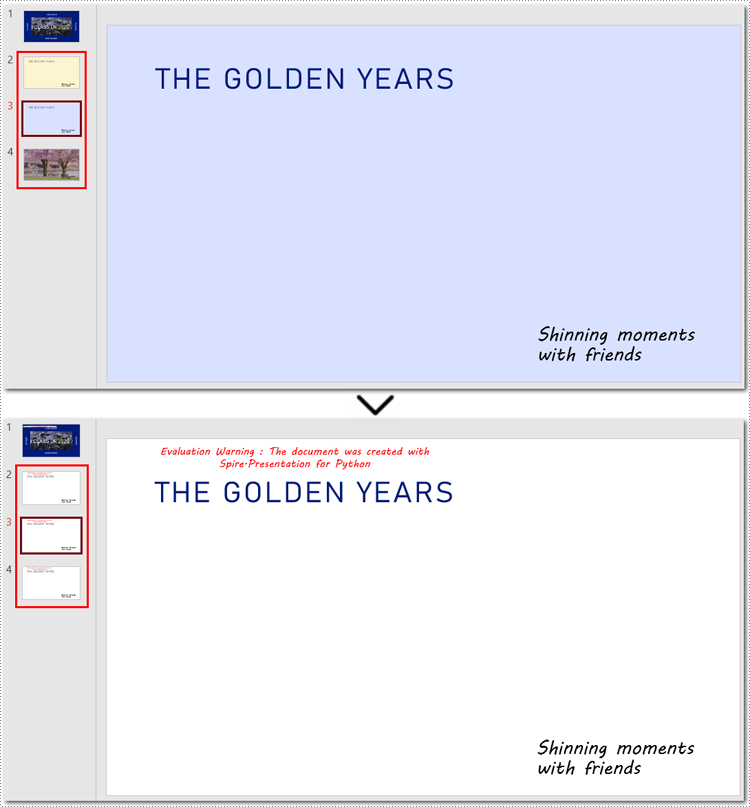
2. Extracting Text from Slides in Python
PowerPoint slides contain text in various forms—shapes, tables, SmartArt, and more. We'll explore how to extract text from each of these elements.
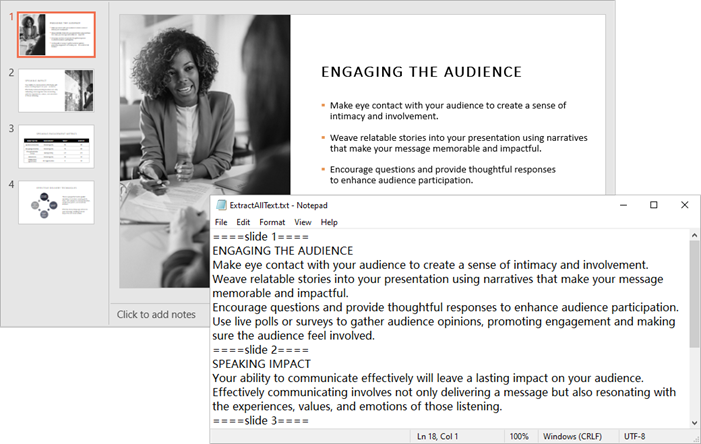
2.1 Extract Text from Shapes
Most text in PowerPoint slides resides within shapes (text boxes, labels, etc.). Here’s how to extract text from shapes:
Steps-by-Step Guide
- Initialize the Presentation object and load your PowerPoint file.
- Iterate through each slide and its shapes.
- Check if a shape is an IAutoShape (a standard text container).
- Extract text from each paragraph in the shape.
Code Example
from spire.presentation import *
from spire.presentation.common import *

# Create an object of Presentation class
presentation = Presentation()

# Load a PowerPoint presentation
presentation.LoadFromFile("C:\\Users\\Administrator\\Desktop\\Input.pptx")

# Create a list
text = []

# Loop through the slides in the document
for slide_index, slide in enumerate(presentation.Slides):
    # Add slide marker
    text.append(f"====slide {slide_index + 1}====")

    # Loop through the shapes in the slide
    for shape in slide.Shapes:
        # Check if the shape is an IAutoShape object
        if isinstance(shape, IAutoShape):
            # Loop through the paragraphs in the shape
            for paragraph in shape.TextFrame.Paragraphs:
                # Get the paragraph text and append it to the list
                text.append(paragraph.Text)

# Write the text to a txt file
with open("output/ExtractAllText.txt", "w", encoding='utf-8') as f:
    for s in text:
        f.write(s + "\n")

# Dispose resources
presentation.Dispose()
Output:
2.2 Extract Text from Tables
Tables in PowerPoint store structured data. Extracting this data requires iterating through each cell to maintain the table’s structure.
Step-by-Step Guide
- Initialize the Presentation object and load your PowerPoint file.
- Iterate through each slide to access its shapes.
- Identify table shapes (ITable objects).
- Loop through rows and cells to extract text.
Code Example
from spire.presentation import *
from spire.presentation.common import *

# Create a Presentation object
presentation = Presentation()

# Load a PowerPoint file
presentation.LoadFromFile("C:\\Users\\Administrator\\Desktop\\Input.pptx")

# Create a list for tables
tables = []

# Loop through the slides
for slide in presentation.Slides:
    # Loop through the shapes in the slide
    for shape in slide.Shapes:
        # Check whether the shape is a table
        if isinstance(shape, ITable):
            tableData = "

            # Loop through the rows in the table
            for row in shape.TableRows:
                rowData = "

                # Loop through the cells in the row
                for i in range(row.Count):
                    # Get the cell value
                    cellValue = row[i].TextFrame.Text
                    # Add cell value with spaces for better readability
                    rowData += (cellValue + "  |  " if i < row.Count - 1 else cellValue)
                tableData += (rowData + "\n")
            tables.append(tableData)

# Write the tables to text files
for idx, table in enumerate(tables, start=1):
    fileName = f"output/Table-{idx}.txt"
    with open(fileName, "w", encoding='utf-8') as f:
        f.write(table)

# Dispose resources
presentation.Dispose()
Output:

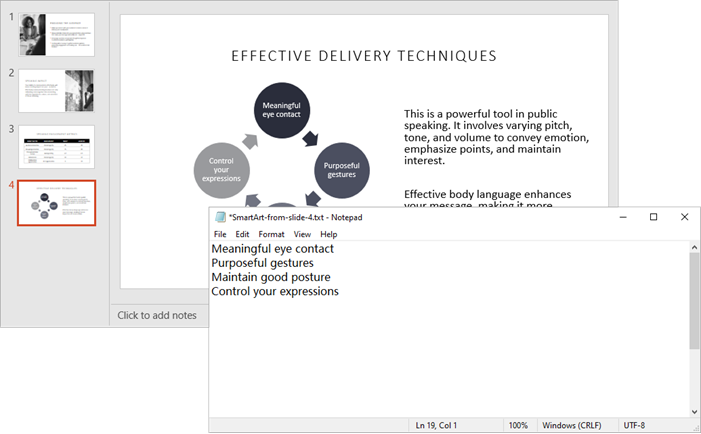
2.3 Extract Text from SmartArt
SmartArt is a unique feature in PowerPoint used for creating diagrams. Extracting text from SmartArt involves accessing its nodes and retrieving the text from each node.
Step-by-Step Guide
- Load the PowerPoint file into a Presentation object.
- Iterate through each slide and its shapes.
- Identify ISmartArt shapes in slides.
- Loop through each node in the SmartArt.
- Extract and save the text from each node.
Code Example
from spire.presentation.common import *
from spire.presentation import *

# Create a Presentation object
presentation = Presentation()

# Load a PowerPoint file
presentation.LoadFromFile("C:\\Users\\Administrator\\Desktop\\Input.pptx")

# Iterate through each slide in the presentation
for slide_index, slide in enumerate(presentation.Slides):

    # Create a list to store the extracted text for the current slide
    extracted_text = []

    # Loop through the shapes on the slide and find the SmartArt shapes
    for shape in slide.Shapes:
        if isinstance(shape, ISmartArt):
            smartArt = shape

            # Extract text from the SmartArt nodes and append to the list
            for node in smartArt.Nodes:
                extracted_text.append(node.TextFrame.Text)

    # Write the extracted text to a separate text file for each slide
    if extracted_text:  # Only create a file if there's text extracted
        file_name = f"output/SmartArt-from-slide-{slide_index + 1}.txt"
        with open(file_name, "w", encoding="utf-8") as text_file:
            for text in extracted_text:
                text_file.write(text + "\n")

# Dispose resources
presentation.Dispose()
Output:
You might also be interested in: Read Speaker Notes in PowerPoint in Python
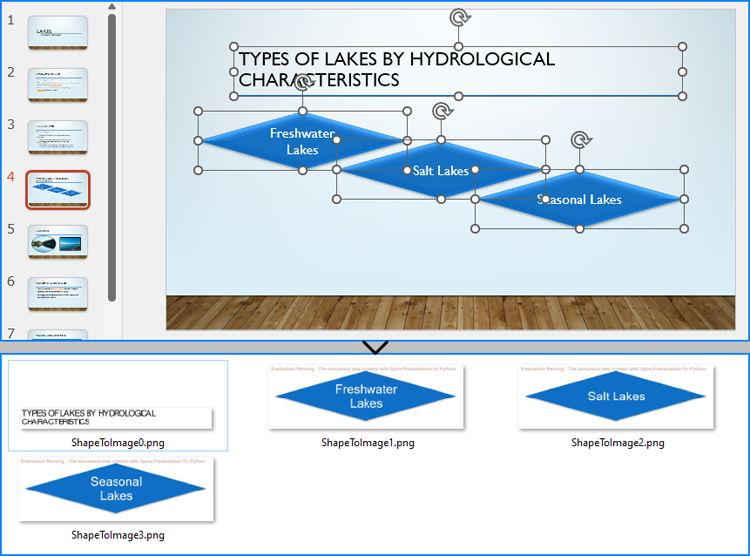
3. Saving Images from Slides in Python
In addition to text, slides often contain images that may be important for your analysis. This section will show you how to save images from the slides.
Step-by-Step Guide
- Initialize the Presentation object and load your PowerPoint file.
- Access the Images collection in the presentation.
- Iterate through each image and save it in a desired format (e.g., PNG).
Code Example
from spire.presentation.common import *
from spire.presentation import *

# Create a Presentation object
presentation = Presentation()

# Load a PowerPoint document
presentation.LoadFromFile("C:\\Users\\Administrator\\Desktop\\Input.pptx")

# Get the images in the document
images = presentation.Images

# Iterate through the images in the document
for i, image in enumerate(images):

    # Save a certain image in the specified path
    ImageName = "Output/Images_"+str(i)+".png"
    image_data = (IImageData)(image)
    image_data.Image.Save(ImageName)

# Dispose resources
presentation.Dispose()
Output:

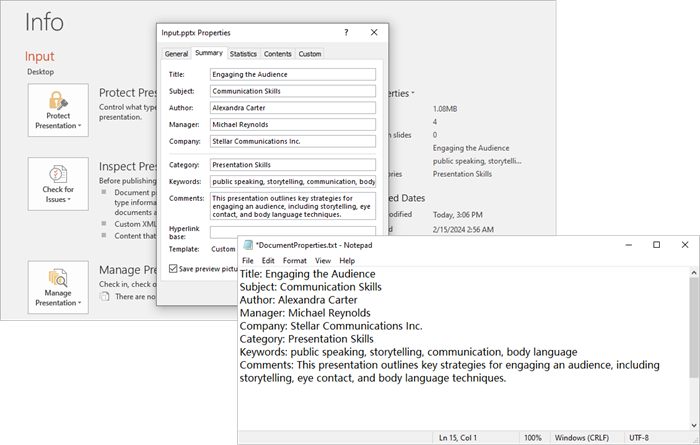
4. Accessing Metadata (Document Properties) in Python
Extracting metadata provides insights into the presentation, such as its title, author, and keywords. This section will guide you on how to access and save this metadata.
Step-by-Step Guide
- Create and load your PowerPoint file into a Presentation object.
- Access the DocumentProperty object.
- Extract properties like Title , Author , and Keywords .
Code Example
from spire.presentation.common import *
from spire.presentation import *

# Create a Presentation object
presentation = Presentation()

# Load a PowerPoint document
presentation.LoadFromFile("C:\\Users\\Administrator\\Desktop\\Input.pptx")

# Get the DocumentProperty object
documentProperty = presentation.DocumentProperty

# Prepare the content for the text file
properties = [
    f"Title: {documentProperty.Title}",
    f"Subject: {documentProperty.Subject}",
    f"Author: {documentProperty.Author}",
    f"Manager: {documentProperty.Manager}",
    f"Company: {documentProperty.Company}",
    f"Category: {documentProperty.Category}",
    f"Keywords: {documentProperty.Keywords}",
    f"Comments: {documentProperty.Comments}",
]

# Write the properties to a text file
with open("output/DocumentProperties.txt", "w", encoding="utf-8") as text_file:
    for line in properties:
        text_file.write(line + "\n")

# Dispose resources
presentation.Dispose()
Output:
You might also be interested in: Add Document Properties to a PowerPoint File in Python
5. Conclusion
With Spire.Presentation for Python, you can effortlessly read and extract various elements from PowerPoint files—such as text, images, tables, and metadata. This powerful library streamlines automation tasks, content analysis, and data migration, allowing for efficient management of PowerPoint files. Whether you're developing an analytics tool, automating document processing, or managing presentation content, Spire.Presentation offers a robust and seamless solution for programmatically handling PowerPoint files.
6. FAQs
Q1. Can Spire.Presentation handle password-protected PowerPoint files?
Yes, Spire.Presentation can open and process password-protected PowerPoint files. To access an encrypted file, use the LoadFromFile() method with the password parameter:
presentation.LoadFromFile("encrypted.pptx", "yourpassword")
Q2. How can I read comments from PowerPoint slides?
You can read comments from PowerPoint slides using the Spire.Presentation library. Here’s how:
from spire.presentation import *

presentation = Presentation()
presentation.LoadFromFile("Input.pptx")

with open("PowerPoint_Comments.txt", "w", encoding="utf-8") as file:
    for slide_idx, slide in enumerate(presentation.Slides):
        slide = (ISlide)(slide)
        if len(slide.Comments) > 0:
            for comment_idx, comment in enumerate(slide.Comments):
                file.write(f"Comment {comment_idx + 1} from Slide {slide_idx + 1}: {comment.Text}\n")
Q3. Does Spire.Presentation preserve formatting when extracting text?
Basic text extraction retrieves raw text content. For formatted text (fonts, colors), you would need to access additional properties like TextRange.LatinFont and TextRange.Fill .
Q4. Are there any limitations on file size when reading PowerPoint files in Python?
While Spire.Presentation can handle most standard presentations, extremely large files (hundreds of MB) may require optimization for better performance.
Q5. Can I create or modify PowerPoint documents using Spire.Presentation?
Yes, you can create PowerPoint documents and modify existing ones using Spire.Presentation. The library provides a range of features that allow you to add new slides, insert text, images, tables, and shapes, as well as edit existing content.
Get a Free License
To fully experience the capabilities of Spire.Presentation for Python without any evaluation limitations, you can request a free 30-day trial license.

Creating PowerPoint presentations programmatically can save time and enhance efficiency in generating reports, slideshows, and other visual presentations. By automating the process, you can focus on content and design rather than manual formatting.
In this tutorial, we will explore how to create PowerPoint documents in Python using Spire.Presentation for Python. This powerful tool allows developers to manipulate and generate PPT and PPTX files seamlessly.
Table of Contents:
- Python Library to Work with PowerPoint Files
- Installing Spire.Presentation for Python
- Creating a PowerPoint Document from Scratch
- Creating PowerPoint Documents Based on a Template
- Best Practices for Python PowerPoint Generation
- Wrap Up
- FAQs
1. Python Library to Work with PowerPoint Files
Spire.Presentation is a robust library for creating, reading, and modifying PowerPoint files in Python , without requiring Microsoft Office. This library supports a wide range of features, including:
- Create PowerPoint documents from scratch or templates.
- Add text, images, lists, tables, charts, and shapes.
- Customize fonts, colors, backgrounds, and layouts.
- Save as or export to PPT, PPTX, PDF, or images.
In the following sections, we will walk through the steps to install the library, create presentations, and add various elements to your slides.
2. Installing Spire.Presentation for Python
To get started, you need to install the Spire.Presentation library. You can install it using pip:
pip install spire.presentation
Once installed, you can begin utilizing its features in your Python scripts to create PowerPoint documents.
3. Creating a PowerPoint Document from Scratch
3.1 Generate and Save a Blank Presentation
Let's start by creating a basic PowerPoint presentation from scratch. The following code snippet demonstrates how to generate and save a blank presentation:
from spire.presentation.common import *
from spire.presentation import *

# Create a Presentation object
presentation = Presentation()

# Set the slide size type
presentation.SlideSize.Type = SlideSizeType.Screen16x9

# Add a slide (there is one slide in the document by default)
presentation.Slides.Append()

# Save the document as a PPT or PPTX file
presentation.SaveToFile("BlankPowerPoint.pptx", FileFormat.Pptx2019)
presentation.Dispose()
In this code:
- Presentation : Root class representing the PowerPoint file.
- SlideSize.Type : Sets the slide dimensions (e.g., SlideSizeType.Screen16x9 for widescreen).
- Slides.Append() : Adds a new slide to the presentation. By default, a presentation starts with one slide.
- SaveToFile() : Saves the presentation to the specified file format (PPTX in this case).
3.2 Add Basic Elements to Your Slides
Now that we have a blank presentation, let's add some basic elements like text, images, lists, and tables.
Add Formatted Text
To add formatted text, we can use the following code:
# Get the first slide
first_slide = presentation.Slides[0]

# Add a shape to the slide
rect = RectangleF.FromLTRB (30, 60, 900, 150)
shape = first_slide.Shapes.AppendShape(ShapeType.Rectangle, rect)
shape.ShapeStyle.LineColor.Color = Color.get_Transparent()
shape.Fill.FillType = FillFormatType.none

# Add text to the shape
shape.AppendTextFrame("This guide demonstrates how to create a PowerPoint document using Python.")

# Get text of the shape as a text range
textRange = shape.TextFrame.TextRange

# Set font name, style (bold & italic), size and color
textRange.LatinFont = TextFont("Times New Roman")
textRange.IsBold = TriState.TTrue
textRange.FontHeight = 32
textRange.Fill.FillType = FillFormatType.Solid
textRange.Fill.SolidColor.Color = Color.get_Black()

# Set alignment
textRange.Paragraph.Alignment = TextAlignmentType.Left
In this code:
- AppendShape() : Adds a shape to the slide. We create a rectangle shape that will house our text.
- AppendTextFrame() : Adds a text frame to the shape, allowing us to insert text into it.
- TextFrame.TextRange : Accesses the text range of the shape, enabling further customization such as font style, size, and color.
- Paragraph.Alignment : Sets the alignment of the text within the shape.
Add an Image
To include an image in your presentation, use the following code snippet:
# Get the first slide
first_slide = presentation.Slides[0]

# Load an image file
imageFile = "C:\\Users\\Administrator\\Desktop\\logo.png"
stream = Stream(imageFile)
imageData = presentation.Images.AppendStream(stream)

# Reset size
width = imageData.Width * 0.6
height = imageData.Height * 0.6

# Append it to the slide
rect = RectangleF.FromLTRB (750, 50, 750 + width, 50 + height)
image = first_slide.Shapes.AppendEmbedImageByImageData(ShapeType.Rectangle, imageData, rect)
image.Line.FillType = FillFormatType.none
In this code:
- Stream() : Creates a stream from the specified image file path.
- AppendStream() : Appends the image data to the presentation's image collection.
- AppendEmbedImageByImageData() : Adds the image to the slide at the specified rectangle coordinates.
You may also like: Insert Shapes in PowerPoint in Python
Add a List
To add a bulleted list to your slide, we can use:
# Get the first slide
first_slide = presentation.Slides[0]

# Specify list bounds and content
listBounds = RectangleF.FromLTRB(30, 150, 500, 350)
listContent = [
    " Step 1. Install Spire.Presentation for Python.",
    " Step 2. Create a Presentation object.",
    " Step 3. Add text, images, etc. to slides.",
    " Step 5. Set a background image or color.",
    " Step 6. Save the presentation to a PPT(X) file."
]

# Add a shape
autoShape = first_slide.Shapes.AppendShape(ShapeType.Rectangle, listBounds)
autoShape.TextFrame.Paragraphs.Clear()
autoShape.Fill.FillType = FillFormatType.none
autoShape.Line.FillType = FillFormatType.none

for content in listContent:
    # Create paragraphs based on the list content and add them to the shape
    paragraph = TextParagraph()
    autoShape.TextFrame.Paragraphs.Append(paragraph)
    paragraph.Text = content
    paragraph.TextRanges[0].Fill.FillType = FillFormatType.Solid
    paragraph.TextRanges[0].Fill.SolidColor.Color = Color.get_Black()
    paragraph.TextRanges[0].FontHeight = 20
    paragraph.TextRanges[0].LatinFont = TextFont("Arial")

    # Set the bullet type for these paragraphs
    paragraph.BulletType = TextBulletType.Symbol

    # Set line spacing
    paragraph.LineSpacing = 150
In this code:
- AppendShape() : Creates a rectangle shape for the list.
- TextFrame.Paragraphs.Append() : Adds paragraphs for each list item.
- BulletType : Sets the bullet style for the list items.
Add a Table
To include a table, you can use the following:
# Get the first slide
first_slide = presentation.Slides[0]

# Define table dimensions and data
widths = [200, 200, 200]
heights = [18, 18, 18, 18]
dataStr = [
    ["Slide Number", "Title", "Content Type"],
    ["1", "Introduction", "Text/Image"],
    ["2", "Project Overview", "Chart/Graph"],
    ["3", "Key Findings", "Text/List"]
]

# Add table to the slide
table = first_slide.Shapes.AppendTable(30, 360, widths, heights)

# Fill table with data and apply formatting
for rowNum, rowData in enumerate(dataStr):
    for colNum, cellData in enumerate(rowData):
        cell = table[colNum, rowNum]
        cell.TextFrame.Text = cellData

        textRange = cell.TextFrame.Paragraphs[0].TextRanges[0]
        textRange.LatinFont = TextFont("Times New Roman")
        textRange.FontHeight = 20

        cell.TextFrame.Paragraphs[0].Alignment = TextAlignmentType.Center

# Apply a built-in table style
table.StylePreset = TableStylePreset.MediumStyle2Accent1
In this code:
- AppendTable() : Adds a table to the slide at specified coordinates with defined widths and heights for columns and rows.
- Cell.TextFrame.Text : Sets the text for each cell in the table.
- StylePreset : Applies a predefined style to the table for enhanced aesthetics.
3.3 Apply a Background Image or Color
To set a custom background for your slide, use the following code:
# Get the first slide
first_slide = presentation.Slides[0]

# Get the background of the first slide
background = first_slide.SlideBackground

# Create a stream from the specified image file
stream = Stream("C:\\Users\\Administrator\\Desktop\\background.jpg")
imageData = presentation.Images.AppendStream(stream)

# Set the image as the background
background.Type = BackgroundType.Custom
background.Fill.FillType = FillFormatType.Picture
background.Fill.PictureFill.FillType = PictureFillType.Stretch
background.Fill.PictureFill.Picture.EmbedImage = imageData
In this code:
- SlideBackground : Accesses the background properties of the slide.
- Fill.FillType : Specifies the type of fill (in this case, an image).
- PictureFill.FillType : Sets how the background image is displayed (stretched, in this case).
- Picture.EmbedImage : Sets image data for the background.
For additional background options, refer to this tutorial: Set Background Color or Picture for PowerPoint Slides in Python
Output:
Below is a screenshot of the PowerPoint document generated by the code snippets provided above.
4. Creating PowerPoint Documents Based on a Template
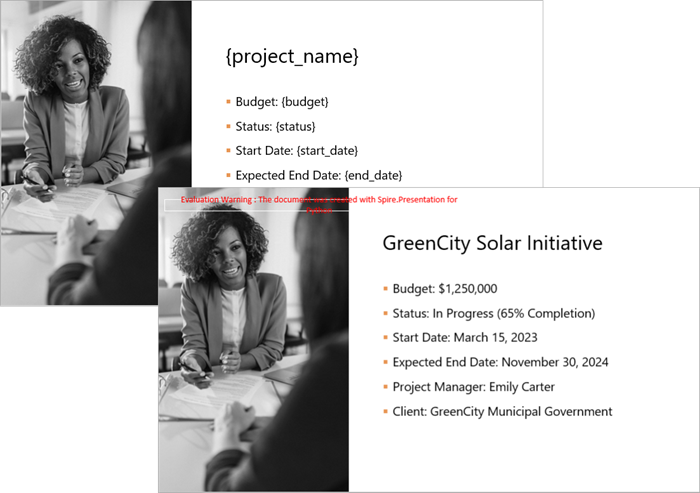
Using templates can simplify the process of creating presentations by allowing you to replace placeholders with actual data. Below is an example of how to create a PowerPoint document based on a template:
from spire.presentation.common import *
from spire.presentation import *

# Create a Presentation object
presentation = Presentation()

# Load a PowerPoint document from a specified file path
presentation.LoadFromFile("C:\\Users\\Administrator\\Desktop\\template.pptx")

# Get a specific slide from the presentation
slide = presentation.Slides[0]

# Define a list of replacements where each tuple consists of the placeholder and its corresponding replacement text
replacements = [
    ("{project_name}", "GreenCity Solar Initiative"),
    ("{budget}", "$1,250,000"),
    ("{status}", "In Progress (65% Completion)"),
    ("{start_date}", "March 15, 2023"),
    ("{end_date}", "November 30, 2024"),
    ("{manager}", "Emily Carter"),
    ("{client}", "GreenCity Municipal Government")
]

# Iterate through each replacement pair
for old_string, new_string in replacements:

    # Replace the first occurrence of the old string in the slide with the new string
    slide.ReplaceFirstText(old_string, new_string, False)

# Save the modified presentation to a new file
presentation.SaveToFile("Template-Based.pptx", FileFormat.Pptx2019)
presentation.Dispose()
In this code:
- LoadFromFile() : Loads an existing PowerPoint file that serves as the template.
- ReplaceFirstText() : Replaces placeholders within the slide with actual values. This is useful for dynamic content generation.
- SaveToFile() : Saves the modified presentation as a new file.
Output:
5. Best Practices for Python PowerPoint Generation
When creating PowerPoint presentations using Python, consider the following best practices:
- Maintain Consistency : Ensure that the formatting (fonts, colors, styles) is consistent across slides for a professional appearance.
- Modular Code: Break document generation into functions (e.g., add_list(), insert_image()) for reusability.
- Optimize Images : Resize and compress images before adding them to presentations to reduce file size and improve loading times.
- Use Templates : Whenever possible, use templates to save time and maintain a cohesive design.
- Test Your Code : Always test your presentation generation code to ensure that all elements are added correctly and appear as expected.
6. Wrap Up
In this tutorial, we explored how to create PowerPoint documents in Python using the Spire.Presentation library. We covered the installation, creation of presentations from scratch, adding various elements, and using templates for dynamic content generation. With these skills, you can automate the creation of presentations, making your workflow more efficient and effective.
7. FAQs
Q1. What is Spire.Presentation?
Spire.Presentation is a powerful library used for creating, reading, and modifying PowerPoint files in various programming languages, including Python.
Q2. Does this library require Microsoft Office to be installed?
No, Spire.Presentation operates independently and does not require Microsoft Office.
Q3. Can I customize the layout of slides in my presentation?
Yes, you can customize the layout of each slide by adjusting properties such as size, background, and the placement of shapes, text, and images.
Q4. Does Spire.Presentation support both PPT and PPTX format?
Yes, Spire.Presentation supports both PPT and PPTX formats, allowing you to create and manipulate presentations in either format.
Q5. Can I add charts to my presentations?
Yes, Spire.Presentation supports the addition of charts to your slides, allowing you to visualize data effectively. For detailed instruction, refer to: How to Create Column Charts in PowerPoint Using Python
Get a Free License
To fully experience the capabilities of Spire.Presentation for Python without any evaluation limitations, you can request a free 30-day trial license.
Python Tutorial: Delete Text Boxes in PowerPoint Automatically
2025-06-12 07:00:22 Written by AdministratorText boxes are one of the most common elements used to display content in PowerPoint. However, as slides get frequently edited, you may end up with a clutter of unnecessary text boxes. Manually deleting them can be time-consuming. This guide will show you how to delete text boxes in PowerPoint using Python. Whether you want to delete all text boxes, remove a specific one, or clean up only the empty ones, you'll learn how to do it in just a few lines of code — saving time and making your workflow much more efficient. 
- Install the Python Library
- Delete All Text Boxes
- Delete a Specific Text Box
- Delete Empty Text Boxes
- Compare All Three Methods
- FAQs
Install the Python Library for PowerPoint Automation
To make this task easier, installing the right Python library is essential. In this guide, we’ll use Spire.Presentation for Python to demonstrate how to automate the removal of text boxes in a PowerPoint file. As a standalone third-party component, Spire.Presentation doesn’t require Microsoft Office to be installed on your machine. Its API is simple and beginner-friendly, and installation is straightforward — just run:
pip install spire.presentation
Alternatively, you can download the package for custom installation. A free version is also available, which is great for small projects and testing purposes.
How to Delete All Text Boxes in PowerPoint
Let’s start by looking at how to delete all text boxes — a common need when you're cleaning up a PowerPoint template. Instead of adjusting each text box and its content manually, it's often easier to remove them all and then re-add only what you need. With the help of Spire.Presentation, you can use the IAutoShape.Remove() method to remove text boxes in just a few lines of code. Let’s see how it works in practice. Steps to delete all text boxes in a PowerPoint presentation with Python:
- Create an instance of Presentation class, and load a sample PowerPoint file.
- Loop through all slides and all shapes on slides, and check if the shape is IAutoShape and if it is a text box.
- Remove text boxes in the PowerPoint presentation through IAutoShape.Remove() method.
- Save the modified PowerPoint file.
The following is a complete code example for deleting all text boxes in a PowerPoint presentation:
from spire.presentation import *

# Create a Presentation object and load a PowerPoint file
presentation = Presentation()
presentation.LoadFromFile("E:/Administrator/Python1/input/pre1.pptx")

# Loop through all slides
for slide in presentation.Slides:
    # Loop through all shapes in the slide
    for i in range(slide.Shapes.Count - 1, -1, -1):
        shape = slide.Shapes[i]
        # Check if the shape is IAutoShape and is a text box
        if isinstance(shape, IAutoShape) and shape.IsTextBox:
            # Remove the shape
            slide.Shapes.Remove(shape)

# Save the modified presentation
presentation.SaveToFile("E:/Administrator/Python1/output/RemoveAllTextBoxes.pptx", FileFormat.Pptx2013)
presentation.Dispose()
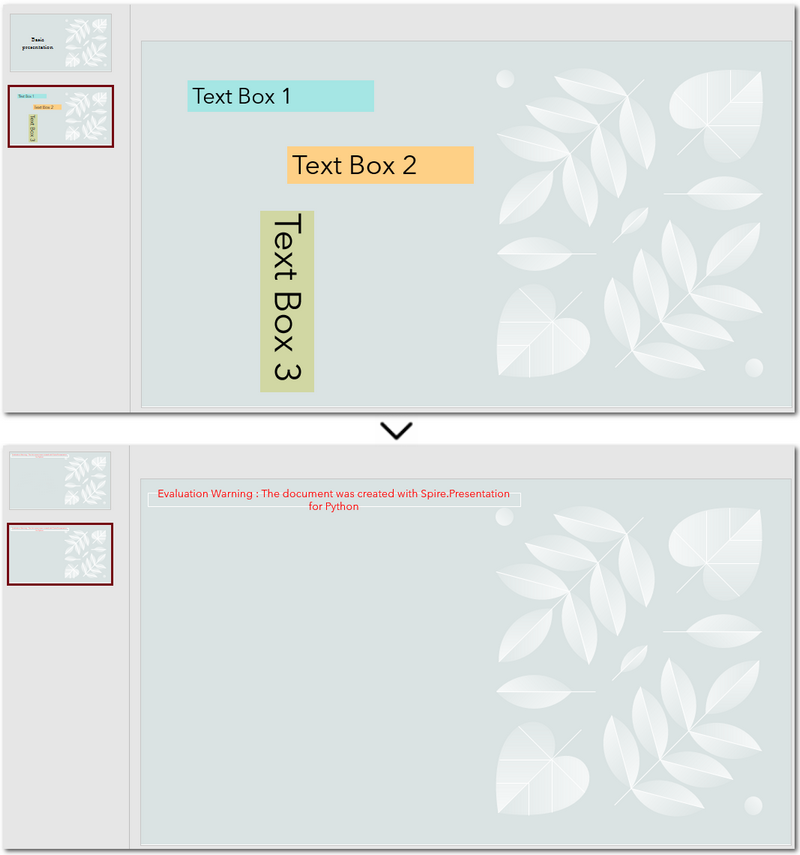
Warm Tip: When looping through shapes, use reverse order to avoid skipping any elements after deletion.
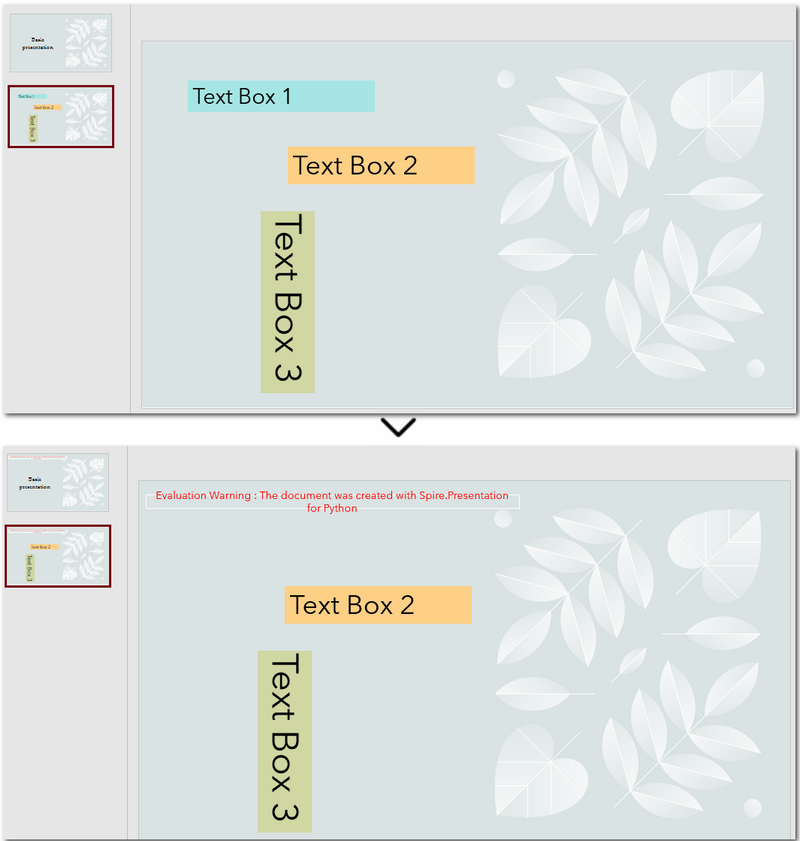
How to Delete a Specific Text Box in PowerPoint
If you only need to remove a few specific text boxes — for example, the first text box on the second slide — this method is perfect for you. In Python, you can first locate the target slide by its index, then identify the text box by its content, and finally remove it. This approach gives you precise control when you know exactly which text box needs to be deleted. Let’s walk through how to do this in practice. Steps to delete a specific text box in PowerPoint using Python:
- Create an object of Presentation class and read a PowerPoint document.
- Get a slide using Presentation.Slides[] property.
- Loop through each shape on the slide and check if it is the target text box.
- Remove the text box through IAutoShape.Remove() method.
- Save the modified PowerPoint presentation.
The following code demonstrates how to delete a text box with the content "Text Box 1" on the second slide of the presentation:
from spire.presentation import *

# Create a new Presentation object and load a PowerPoint file
presentation = Presentation()
presentation.LoadFromFile("E:/Administrator/Python1/input/pre1.pptx")

# Get the second slide
slide = presentation.Slides[1]

# Loop through all shapes on the slide
for i in range(slide.Shapes.Count - 1, -1, -1):
    shape = slide.Shapes[i]
    # Check if the shape is a text box and its text is "Text Box 1"
    if isinstance(shape, IAutoShape) and shape.IsTextBox:
        if shape.TextFrame.Text.strip() == "Text Box 1":
            slide.Shapes.Remove(shape)

# Save the modified presentation
presentation.SaveToFile("E:/Administrator/Python1/output/RemoveSpecificTextbox.pptx", FileFormat.Pptx2013)
presentation.Dispose()
How to Delete Empty Text Boxes in PowerPoint
Another common scenario is removing all empty text boxes from a PowerPoint file — especially when you're cleaning up slides exported from other tools or merging multiple presentations and want to get rid of unused placeholders. Instead of checking each slide manually, automating the process with Python allows you to quickly remove all blank text boxes and keep only the meaningful content. It’s a far more efficient approach. Steps to delete empty text boxes in PowerPoint file using Python:
- Create an object of Presentation class, and load a PowerPoint file.
- Loop through all slides and all shapes on slides.
- Check if the shape is a text box and is empty.
- Remove text boxes in the PowerPoint presentation through IAutoShape.Remove() method.
- Save the modified PowerPoint file.
Here's the code example that shows how to delete empty text boxes in a PowerPoint presentation:
from spire.presentation import *

# Create a Presentation instance and load a sample file
presentation = Presentation()
presentation.LoadFromFile("E:/Administrator/Python1/input/pre1.pptx")

# Loop through each slide
for slide in presentation.Slides:
    # Iterate through shapes
    for i in range(slide.Shapes.Count - 1, -1, -1):
        shape = slide.Shapes[i]
        # Check if the shape is a textbox and its text is empty
        if isinstance(shape, IAutoShape) and shape.IsTextBox:
            text = shape.TextFrame.Text.strip()
            # Remove the shape if it is empty
            if not text:
                slide.Shapes.Remove(shape)

# Save the result file
presentation.SaveToFile("E:/Administrator/Python1/output/RemoveEmptyTextBoxes.pptx", FileFormat.Pptx2013)
presentation.Dispose()
Compare All Three Methods: Which One Should You Use?
Each of the three methods we've discussed has its own ideal use case. If you're still unsure which one fits your needs after reading through them, the table below will help you compare them at a glance — so you can quickly pick the most suitable solution.
| Method | Best For | Keeps Valid Content? |
|---|---|---|
| Delete All Text Boxes | Cleaning up entire templates or resetting slides | ❌ No |
| Delete Specified Text Box | When you know exactly which text box to remove (e.g., slide 2, shape 1) | ✅ Yes |
| Delete Empty Text Boxes | Cleaning up imported or merged presentations | ✅ Yes |
Conclusion and Best Practice
Whether you're refreshing templates, fine-tuning individual slides, or cleaning up empty placeholders, automating PowerPoint with Python can save you hours of manual work. Choose the method that fits your workflow best — and start making your presentations cleaner and more efficient today.
FAQs about Deleting Text Boxes in PowerPoint
Q1: Why can't I delete a text box in PowerPoint?
A: One common reason is that the text box is placed inside the Slide Master layout. In this case, it can’t be selected or deleted directly from the normal slide view. You’ll need to go to the View → Slide Master tab, locate the layout, and delete it from there.
Q2: How can I delete a specific text box using Python?
A: You can locate the specific text box by accessing the slide and then searching for the shape based on its index or text content. Once identified, use the IAutoShape.Remove() method to delete it. This is useful when you know exactly which text box needs to be removed.
Q3: Is it possible to remove a text box without deleting the content?
A: If you want to keep the content but remove the text box formatting (like borders or background), you can extract the text before deleting the shape and reinsert it elsewhere — for example, as a plain paragraph. However, PowerPoint doesn’t natively support detaching text from its container without removing the shape.
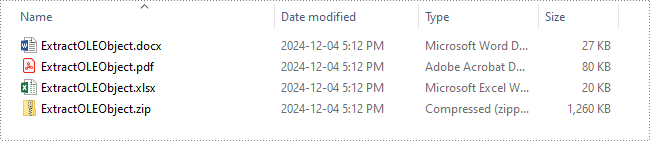
Python: Insert, Extract, or Remove OLE Objects in PowerPoint Presentations
2024-12-06 01:03:43 Written by KoohjiIncorporating external content into PowerPoint presentations can significantly enhance their impact and relevance. OLE (Object Linking and Embedding) objects provide an efficient way to embed or link various types of external files, such as Excel spreadsheets, Word documents, and PDF files, directly into PowerPoint slides. This functionality not only allows for seamless integration of dynamic data but also enables users to maintain a live connection to the original files. In this article, we will introduce how to insert, extract, or remove OLE objects in PowerPoint presentations in Python using Spire.Presentation for Python.
- Insert OLE Objects into a PowerPoint Presentation
- Extract OLE Objects from a PowerPoint Presentation
- Remove OLE Objects from a PowerPoint Presentation
Install Spire.Presentation for Python
This scenario requires Spire.Presentation for Python and plum-dispatch v1.7.4. They can be easily installed in your Windows through the following pip command.
pip install Spire.Presentation
If you are unsure how to install, please refer to this tutorial: How to Install Spire.Presentation for Python on Windows
Insert OLE Objects into a PowerPoint Presentation in Python
Spire.Presentation for Python provides the ISlide.Shapes.AppendOleObject() method, which allows you to insert various external files (such as Word documents, Excel spreadsheets, PDF files, PowerPoint presentations, and ZIP archives) as OLE objects into PowerPoint slides. The detailed steps are as follows.
- Create an object of the Presentation class.
- Access the desired slide using the Presentation.Slides[index] property.
- Add an OLE object to the slide using the ISlide.Shapes.AppendOleObject() method.
- Set the icon for the OLE object using the IOleObject.SubstituteImagePictureFillFormat.Picture.EmbedImage property.
- Specify the object type using the IOleObject.ProgId property.
- Save the presentation using the Presentation.SaveToFile() method.
- Python
from spire.presentation.common import *
from spire.presentation import *

# Create an object of the Presentation class
ppt = Presentation()

try:
    # Get the first slide
    slide = ppt.Slides[0]

    # Initialize the top position for the first object
    currentTop = 60
    # Spacing between OLE objects
    verticalSpacing = 20

    # Add an Excel icon to the presentation
    excelImageStream = Stream("icons/excel-icon.png")
    oleImage = ppt.Images.AppendStream(excelImageStream)
    # Define the position of the Excel OLE object
    excelRec = RectangleF.FromLTRB(100, currentTop, oleImage.Width + 100, currentTop + oleImage.Height)
    # Add an Excel file to the slide as an OLE object
    oleStream = Stream("Budget.xlsx")
    oleObject = slide.Shapes.AppendOleObject("excel", oleStream, excelRec)
    oleObject.SubstituteImagePictureFillFormat.Picture.EmbedImage = oleImage
    oleObject.ProgId = "Excel.Sheet.12"

    # Update the top position for the next object
    currentTop += oleImage.Height + verticalSpacing

    # Add a Word icon to the presentation
    wordImageStream = Stream("icons/word-icon.png")
    wordOleImage = ppt.Images.AppendStream(wordImageStream)
    # Define the position of the Word OLE object
    wordRec = RectangleF.FromLTRB(100, currentTop, wordOleImage.Width + 100, currentTop + wordOleImage.Height)
    # Add a Word file to the slide as an OLE object
    wordStream = Stream("Document.docx")
    wordOleObject = slide.Shapes.AppendOleObject("word", wordStream, wordRec)
    wordOleObject.SubstituteImagePictureFillFormat.Picture.EmbedImage = wordOleImage
    wordOleObject.ProgId = "Word.Document.12"

    # Update the top position for the next object
    currentTop += wordOleImage.Height + verticalSpacing

    # Add a PDF icon to the presentation
    pdfImageStream = Stream("icons/pdf-icon.png")
    pdfOleImage = ppt.Images.AppendStream(pdfImageStream)
    # Define the position of the PDF OLE object
    pdfRec = RectangleF.FromLTRB(100, currentTop, pdfOleImage.Width + 100, currentTop + pdfOleImage.Height)
    # Add a PDF file to the slide as an OLE object
    pdfStream = Stream("Report.pdf")
    pdfOleObject = slide.Shapes.AppendOleObject("pdf", pdfStream, pdfRec)
    pdfOleObject.SubstituteImagePictureFillFormat.Picture.EmbedImage = pdfOleImage
    pdfOleObject.ProgId = "Acrobat.Document"

    # Update the top position for the next object
    currentTop += pdfOleImage.Height + verticalSpacing

    # Add a zip package icon to the presentation
    zipImageStream = Stream("icons/zip-icon.png")
    zipOleImage = ppt.Images.AppendStream(zipImageStream)
    # Define the position of the zip package OLE object
    zipRec = RectangleF.FromLTRB(100, currentTop, zipOleImage.Width + 100, currentTop + zipOleImage.Height)
    # Add a zip file to the slide as an OLE object
    zipOleStream = Stream("Example.zip")
    zipOleObject = slide.Shapes.AppendOleObject("zip", zipOleStream, zipRec)
    zipOleObject.ProgId = "Package"
    zipOleObject.SubstituteImagePictureFillFormat.Picture.EmbedImage = zipOleImage

    # Save the PowerPoint presentation
    ppt.SaveToFile("AddOLEObjects.pptx", FileFormat.Pptx2010)

finally:
    excelImageStream.Close()
    oleStream.Close()
    wordImageStream.Close()
    wordStream.Close()
    pdfImageStream.Close()
    pdfStream.Close()
    zipImageStream.Close()
    zipOleStream.Close()
    ppt.Dispose()

Extract OLE Objects from a PowerPoint Presentation in Python
Spire.Presentation for Python enables you to extract the embedded OLE objects from a PowerPoint presentation and save them for further use. The detailed steps are as follows.
- Create an object of the Presentation class.
- Load a PowerPoint presentation using the Presentation.LoadFromFile() method.
- Iterate through all slides in the presentation and all shapes on each slide.
- Check if the shape is an OLE object.
- Get the data of the OLE object using the IOleObject.Data property.
- Identify the type of the OLE object using the IOleObject.ProgId property and save the OLE object data to its original format.
- Python
from spire.presentation.common import *
from spire.presentation import *

# Create an object of the Presentation class
presentation = Presentation()

try:
    # Load the PowerPoint presentation
    presentation.LoadFromFile("AddOLEObjects.pptx")

    # Define output file paths for different types of OLE objects
    output_files = {
        "Acrobat.Document": "ExtractedOLEs/ExtractOLEObject.pdf",
        "Excel.Sheet.12": "ExtractedOLEs/ExtractOLEObject.xlsx",
        "Word.Document.12": "ExtractedOLEs/ExtractOLEObject.docx",
        "Package": "ExtractedOLEs/ExtractOLEObject.zip"
    }

    # Iterate through each slide in the presentation
    for slide in presentation.Slides:
        # Iterate through each shape in the slide
        for shape in slide.Shapes:
            # Check if the shape is an OLE object
            if isinstance(shape, IOleObject):
                ole_object = shape
                # Retrieve the data of the OLE object
                ole_data_stream = ole_object.Data

                # Determine the appropriate output file based on the OLE object's ProgId
                output_file = output_files.get(ole_object.ProgId)
                if output_file:
                    # Save the OLE object data to the corresponding output file
                    ole_data_stream.Save(output_file)
                    # Close stream
                    ole_data_stream.Close()

finally:
    presentation.Dispose()
Remove OLE Objects from a PowerPoint Presentation in Python
If you need to remove unwanted OLE objects from a PowerPoint presentation to streamline your slides, you can use the ISlide.Shapes.Remove() method. The detailed steps are as follows.
- Create an object of the Presentation class.
- Load a PowerPoint presentation using the Presentation.LoadFromFile() method.
- Iterate through all slides in the presentation and all shapes on each slide.
- Check if the shape is an OLE object.
- Store the OLE objects in a list and then remove them from the slide using the ISlide.Shapes.Remove() method.
- Save the presentation using the Presentation.SaveToFile() method.
- Python
from spire.presentation.common import *
from spire.presentation import *

# Create an object of the Presentation class
presentation = Presentation()

try:
    # Load the PowerPoint presentation
    presentation.LoadFromFile("AddOLEObjects.pptx")

    # Iterate through each slide in the presentation
    for slide in presentation.Slides:
        # Create a list to store shapes that are OLE objects
        ole_shapes = []

        # Iterate through each shape in the slide
        for shape in slide.Shapes:
            # Check if the shape is an OLE object
            if isinstance(shape, IOleObject):
                ole_shapes.append(shape)

        # Remove all OLE objects from the slide
        for ole_object in ole_shapes:
            slide.Shapes.Remove(ole_object)

    # Save the modified PowerPoint presentation
    presentation.SaveToFile("RemoveOLEObjects.pptx", FileFormat.Pptx2010)

finally:
    presentation.Dispose()
Apply for a Temporary License
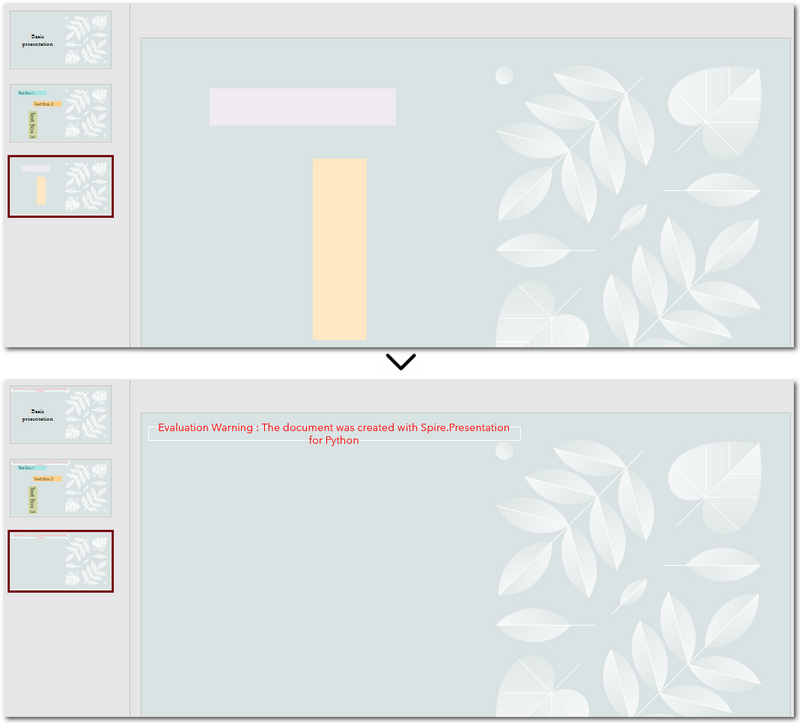
If you'd like to remove the evaluation message from the generated documents, or to get rid of the function limitations, please request a 30-day trial license for yourself.
Python: Insert, Retrieve, Reorder, and Remove Slides in PowerPoint Sections
2024-11-26 01:20:18 Written by AdministratorPowerPoint presentations are a powerful tool for presenting information in an organized and engaging manner. To further enhance the organization of slides, PowerPoint allows users to group slides into sections. This feature makes navigating and managing large presentations much easier. In this article, we'll show you how to manage slides within PowerPoint sections in Python using Spire.Presentation for Python. Specifically, we'll cover how to add, retrieve, reorder, and remove slides in these sections.
- Insert Slides into a PowerPoint Section in Python
- Retrieve Slides from a PowerPoint Section in Python
- Reorder Slides in a PowerPoint Section in Python
- Remove Slides from a PowerPoint Section in Python
Install Spire.Presentation for Python
This scenario requires Spire.Presentation for Python and plum-dispatch v1.7.4. They can be easily installed in your Windows through the following pip command.
pip install Spire.Presentation
If you are unsure how to install, please refer to this tutorial: How to Install Spire.Presentation for Python on Windows
Insert Slides into a PowerPoint Section in Python
Inserting slides is essential when you want to introduce new content to a section. Using Spire.Presentation for Python, you can quickly insert a slide into a section with the Section.Insert() method. The detailed steps are as follows.
- Create an instance of the Presentation class.
- Load a PowerPoint presentation using the Presentation.LoadFromFile() method.
- Get a specific section through its index (0-based) using the Presentation.SectionList(index) property.
- Add a new slide to the presentation, then insert it into the section using the Section.Insert() method.
- Remove the added slide from the presentation.
- Save the resulting presentation using the Presentation.SaveToFile() method.
- Python
from spire.presentation import *

# Create an instance of the Presentation class
presentation = Presentation()
# Load a PowerPoint presentation
presentation.LoadFromFile("Example.pptx")

# Access the first section
first_section = presentation.SectionList.get_Item(0)

# Add a new slide to the presentation and insert it at the start of the section
slide = presentation.Slides.Append()
first_section.Insert(0, slide)

# Remove the added slide from the presentation
presentation.Slides.Remove(slide)

# Save the modified presentation
presentation.SaveToFile("InsertSlidesInSection.pptx", FileFormat.Pptx2016)
# Close the Presentation object
presentation.Dispose()
Retrieve Slides from a PowerPoint Section in Python
Retrieving slides from a specific section allows you to focus on a smaller group of slides for tasks such as reordering or applying custom formatting. Using the Section.GetSlides() method in Spire.Presentation for Python, you can easily access all the slides in a particular section. The detailed steps are as follows.
- Create an instance of the Presentation class.
- Load a PowerPoint presentation using the Presentation.LoadFromFile() method.
- Get a specific section through its index (0-based) using the Presentation.SectionList(index) property.
- Retrieve the slides within the section using the Section.GetSlides() method.
- Iterate through the retrieved slides and get the slide number (1-based) of each slide.
- Python
from spire.presentation import *

# Create an instance of the Presentation class
presentation = Presentation()
# Load a PowerPoint presentation
presentation.LoadFromFile("Example.pptx")

# Retrieve the slides in the 3rd section
section = presentation.SectionList.get_Item(2)
slides = section.GetSlides()

output_content = "The slide numbers in this section are:\n"

# Get the slide number of each slide in the section
for slide in slides:
    output_content += str(slide.SlideNumber) + " "

# Save the slide number to a text file
with open("slide_numbers.txt", "w") as file:
    file.write(output_content)

Reorder Slides in a PowerPoint Section in Python
Reordering slides is important to ensure related content is in the right order. Spire.Presentation for Python offers the Section.Move() method, which allows you to move a slide to a new position within a section. The detailed steps are as follows.
- Create an instance of the Presentation class.
- Load a PowerPoint presentation using the Presentation.LoadFromFile() method.
- Get a specific section through its index (0-based) using the Presentation.SectionList(index) property.
- Move a specific slide in the section to another position using the Section.Move() method.
- Save the resulting presentation using the Presentation.SaveToFile() method.
- Python
from spire.presentation import *

# Create an instance of the Presentation class
presentation = Presentation()
# Load a PowerPoint presentation
presentation.LoadFromFile("Example.pptx")

# Access the 3rd section
section = presentation.SectionList.get_Item(2)

# Retrieve the slides in the section
slides = section.GetSlides()

# Move the 1st slide in the section to the specified position
section.Move(2, slides[0])

# Save the modified presentation
presentation.SaveToFile("ReorderSlidesInSection.pptx", FileFormat.Pptx2016)
# Close the Presentation object
presentation.Dispose()
Remove Slides from a PowerPoint Section in Python
Removing slides from a section streamlines your presentation, particularly when some slides become outdated or unnecessary. With Spire.Presentation for Python, you can easily remove a single slide or multiple slides from a section using the Section.RemoveAt() or Section.RemoveRange() method. The detailed steps are as follows.
- Create an instance of the Presentation class.
- Load a PowerPoint presentation using the Presentation.LoadFromFile() method.
- Get a specific section through its index (0-based) using the Presentation.SectionList(index) property.
- Remove a specific slide or a range of slides from the presentation using the Section.RemoveAt() or Section.RemoveRange() method.
- Save the resulting presentation using the Presentation.SaveToFile() method.
- Python
from spire.presentation import *

# Create an instance of the Presentation class
presentation = Presentation()
# Load a PowerPoint presentation
presentation.LoadFromFile("Example.pptx")

# Access the 3rd section
section = presentation.SectionList.get_Item(2)

# Remove the first slide from the section
section.RemoveAt(0)

# Or remove a range of slides from the section
# section.RemoveRange(0, 2)

# Save the modified presentation
presentation.SaveToFile("RemoveSlidesInSection.pptx", FileFormat.Pptx2016)
# Close the Presentation object
presentation.Dispose()
Apply for a Temporary License
If you'd like to remove the evaluation message from the generated documents, or to get rid of the function limitations, please request a 30-day trial license for yourself.
Splitting a PowerPoint presentation into smaller files or individual sections can be useful in various situations. For instance, when collaborating with a team, each member may only need a specific section of the presentation to work on. Additionally, breaking a large presentation into smaller parts can simplify sharing over email or uploading to platforms with file size restrictions. In this article, we'll show you how to split PowerPoint presentations by slides, slide ranges, and sections in Python using Spire.Presentation for Python.
- Split PowerPoint Presentations by Slides in Python
- Split PowerPoint Presentations by Slide Ranges in Python
- Split PowerPoint Presentations by Sections in Python
Install Spire.Presentation for Python
This scenario requires Spire.Presentation for Python and plum-dispatch v1.7.4. They can be easily installed in your Windows through the following pip command.
pip install Spire.Presentation
If you are unsure how to install, please refer to this tutorial: How to Install Spire.Presentation for Python on Windows
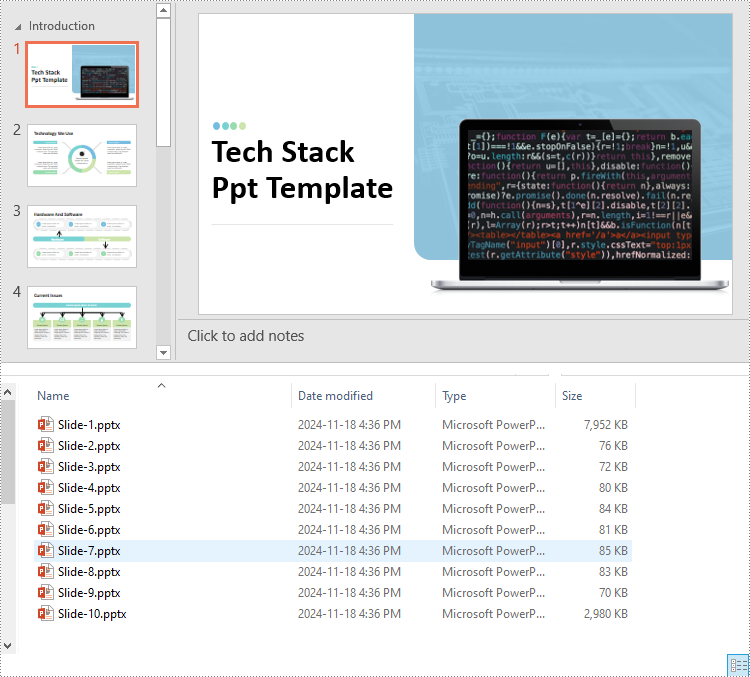
Split PowerPoint Presentations by Slides in Python
Developers can use Spire.Presentation for Python to split a PowerPoint presentation into individual slides by iterating through the slides in the presentation and adding each slide to a new presentation. The detailed steps are as follows.
- Create an instance of the Presentation class.
- Load a PowerPoint presentation using the Presentation.LoadFromFile() method.
- Iterate through all slides in the presentation:
- Access the current slide through the Presentation.Slides[index] property.
- Create a new PowerPoint presentation using the Presentation class and remove its default slide using the Presentation.Slides.RemoveAt(0) method.
- Append the current slide to the new presentation using the Presentation.Slides.AppendBySlide() method.
- Save the new presentation as a file using the ISlide.SaveToFile() method.
- Python
from spire.presentation.common import *
from spire.presentation import *

# Create an instance of the Presentation class
presentation = Presentation()
# Load a PowerPoint presentation
presentation.LoadFromFile("Sample.pptx")

# Iterate through all slides in the presentation
for i in range(presentation.Slides.Count):
    # Get the current slide
    slide = presentation.Slides[i]

    # Create a new PowerPoint presentation and remove its default slide
    newPresentation = Presentation()
    newPresentation.Slides.RemoveAt(0)

    # Append the current slide to the new presentation
    newPresentation.Slides.AppendBySlide(slide)

    # Save the new presentation as a file
    newPresentation.SaveToFile(f"output/Presentations/Slide-{i + 1}.pptx", FileFormat.Pptx2013)
    newPresentation.Dispose()

presentation.Dispose()
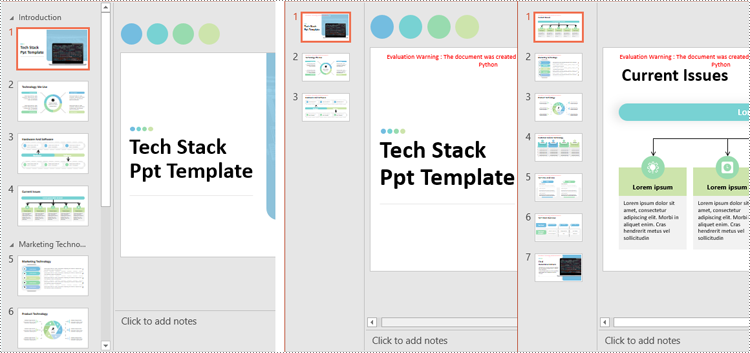
Split PowerPoint Presentations by Slide Ranges in Python
Apart from splitting a PowerPoint presentation into individual slides, developers can also divide it into specific ranges of slides by adding the desired slides to new presentations. The detailed steps are as follows.
- Create an instance of the Presentation class.
- Load a PowerPoint presentation using the Presentation.LoadFromFile() method.
- Create new PowerPoint presentations using the Presentation class and remove the default slides within them using the Presentation.Slides.RemoveAt(0) method.
- Append specified ranges of slides to the new presentations using the Presentation.Slides.AppendBySlide() method.
- Save the new presentations as files using the Presentation.SaveToFile() method.
- Python
from spire.presentation.common import *
from spire.presentation import *

# Create an instance of the Presentation class
presentation = Presentation()
# Load a PowerPoint presentation
presentation.LoadFromFile("Sample.pptx")

# Create two new PowerPoint presentations and remove their default slides
presentation1 = Presentation()
presentation2 = Presentation()
presentation1.Slides.RemoveAt(0)
presentation2.Slides.RemoveAt(0)

# Append slides 1-3 to the first new presentation
for i in range(3):
    presentation1.Slides.AppendBySlide(presentation.Slides[i])
# Append the remaining slides to the second new presentation
for i in range(3, presentation.Slides.Count):
    presentation2.Slides.AppendBySlide(presentation.Slides[i])

# Save the new presentations as files
presentation1.SaveToFile("output/Presentations/SlideRange1.pptx", FileFormat.Pptx2013)
presentation2.SaveToFile("output/Presentations/SlideRange2.pptx", FileFormat.Pptx2013)

presentation1.Dispose()
presentation2.Dispose()
presentation.Dispose()
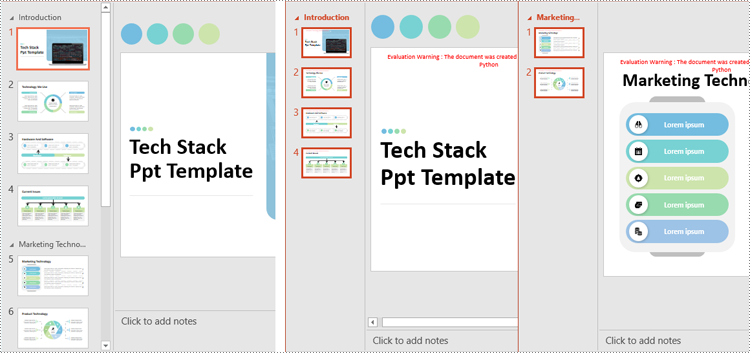
Split PowerPoint Presentations by Sections in Python
Sections in PowerPoint are often used to organize slides into manageable groups. With Spire.Presentation for Python, developers can split a PowerPoint presentation into sections by iterating through the sections in the presentation and adding the slides within each section to a new presentation. The detailed steps are as follows.
- Create an instance of the Presentation class.
- Load a PowerPoint presentation using the Presentation.LoadFromFile() method.
- Iterate through all sections in the presentation:
- Access the current section through the Presentation.SectionList[] property.
- Create a new PowerPoint presentation using the Presentation class and remove its default slide using the Presentation.Slides.RemoveAt(0) method.
- Add a section to the new presentation with the same name using the Presentation.SectionList.Append() method.
- Retrieve the slides of the current section using the Section.GetSlides() method.
- Iterate through the retrieved slides and add them to the section of the new presentation using the Section.Insert() method.
- Save the new presentation as a file using the Presentation.SaveToFile() method.
- Python
from spire.presentation.common import *
from spire.presentation import *

# Create an instance of the Presentation class
presentation = Presentation()
# Load a PowerPoint presentation
presentation.LoadFromFile("Sample.pptx")

# Iterate through all sections
for i in range(presentation.SectionList.Count):
    # Get the current section
    section = presentation.SectionList.get_Item(0)

    # Create a new PowerPoint presentation and remove its default slide
    newPresentation = Presentation()
    newPresentation.Slides.RemoveAt(0)
    # Add a section to the new presentation
    newSection = newPresentation.SectionList.Append(section.Name)

    # Retrieve the slides of the current section
    slides = section.GetSlides()

    # Insert each retrieved slide into the section of the new presentation
    for slide_index, slide in enumerate(slides):
        newSection.Insert(slide_index, slide)

    # Save the new presentation as a file
    newPresentation.SaveToFile(f"output/Presentations/Section-{i + 1}.pptx", FileFormat.Pptx2019)
    newPresentation.Dispose()

presentation.Dispose()
Apply for a Temporary License
If you'd like to remove the evaluation message from the generated documents, or to get rid of the function limitations, please request a 30-day trial license for yourself.
Python: Remove Backgrounds from PowerPoint Slide or Slide Masters
2024-11-06 01:03:12 Written by KoohjiA well-chosen background can enhance a presentation's appeal, but overly elaborate colors or images may distract viewers and obscure the main message. Additionally, when reusing templates, the original background may not suit the new content. In these cases, removing the background becomes essential to keep your slides clear and focused. This article will show you how to remove backgrounds from PowerPoint slides or slide masters in Python with Spire.Presentation for Python, giving you the flexibility to create clean, professional presentations that keep the audience's attention on what matters.
- Remove Backgrounds from the Specified Slide
- Remove Backgrounds from All Slides
- Remove Backgrounds from PowerPoint Slide Masters
Install Spire.Presentation for Python
This scenario requires Spire.Presentation for Python and plum-dispatch v1.7.4. They can be easily installed in your Windows through the following pip command.
pip install Spire.Presentation
If you are unsure how to install, please refer to this tutorial: How to Install Spire.Presentation for Python on Windows
Remove Backgrounds from the Specified Slide
There are typically two types of backgrounds in PowerPoint: background colors and background images. Although these backgrounds differ in their setup, the method to clear them is the same - using the BackgroundType property provided by Spire.Presentation for Python. Let's take a closer look at how to remove backgrounds from a PowerPoint slide with it.
Steps to remove background from a specified slide:
- Create an object for the Presentation class.
- Load a PowerPoint presentation from the local storage using Presentation.LoadFromFile() method.
- Get a certain slide with Presentation.Slides[] method.
- Remove the background by configuring BackgroundType property to none.
- Save the modified PowerPoint presentation using Presentation.SaveToFile() method, and release the memory.
Here is the code example of removing the background on the fourth slide:
- Python
from spire.presentation import *

# Create a Presentation document object
presentation = Presentation()
# Read the presentation document from file
presentation.LoadFromFile("imagebackground.pptx")

# Get the fourth slide
slide = presentation.Slides[3]

# Remove the background by setting the background type
slide.SlideBackground.Type = BackgroundType.none

# Save the modified presentation
presentation.SaveToFile("RemoveBackground.pptx", FileFormat.Pptx2010)

# Release resource
presentation.Dispose()
Remove Backgrounds from All Slides
Batch-deleting all slide backgrounds follows nearly the same steps as deleting a single slide background. The main difference is that you'll need to loop through each slide before setting the background type to ensure no slides are missed.
Steps to remove backgrounds from PowerPoint slides in a batch:
- Instantiate a Presentation class.
- Specify the file path to read a PowerPoint presentation using Presentation.LoadFromFile() method.
- Loop through each slide in the presentation.
- Remove all backgournds by applying BackgroundType.none property to each slide.
- Save the updated PowerPoint presentation as a new file with Presentation.SaveToFile() method, and release the resource.
Below is the code example for removing each background from PowerPoint slides:
- Python
from spire.presentation import *

# Create a Presentation document object
presentation = Presentation()
# Read the presentation document from file
presentation.LoadFromFile("presentation.pptx")

# Loop through each slide
for slide in presentation.Slides:
    # Remove the background image or color by setting the background type
    slide.SlideBackground.Type = BackgroundType.none

# Save the modified presentation
presentation.SaveToFile("RemoveBackground_allSlides.pptx", FileFormat.Pptx2010)

# Release resource
presentation.Dispose()
How to Remove Backgrounds from PowerPoint Slide Masters
If the slide background still exists after using the above method, you may need to remove the slide master's background instead. Unlike individual slides, setting the background of a slide master applies changes across all slides, so removing the slide master background can efficiently clear all backgrounds at once.
Steps to remove backgrounds from PowerPoint slide masters:
- Create an instance of the Presentation class.
- Load a presentation from the disk with Presentation.LoadFromFile() method.
- Retrieve a specified slide master using Presentation.Masters[] method.
- Access the background of the slide master with Masters.SlideBackground property.
- Remove the background by setting BackgroundType property to none.
- Save the newly modified PowerPoint presentation with Presentation.SaveToFile() method.
Note: Since the process of batch-removing slide master backgrounds is almost similar to deleting background from a slide master, this section will show the steps in the code comments rather than listing them separately.
Here is an example of removing the background from the third slide master:
- Python
from spire.presentation import *


# Create a Presentation object
presentation = Presentation()

# Load the sample file from the disk
presentation.LoadFromFile("presentation.pptx")

# Get the third slide master
master = presentation.Masters[2]

# Access the background of the slide master
SlideBackground = master.SlideBackground

# Clear the background by setting the slide master background style to none
master.SlideBackground.Type = BackgroundType.none

# Loop through each slide master
#for master in presentation.Masters:
    # Set the background type to none to remove it
    #master.SlideBackground.Type = BackgroundType.none

# Save the result presentation
presentation.SaveToFile("remove_background.pptx", FileFormat.Pptx2013)

# Release resources
presentation.Dispose()
Apply for a Temporary License
If you'd like to remove the evaluation message from the generated documents, or to get rid of the function limitations, please request a 30-day trial license for yourself.
Python: Save Shapes as Image Files in PowerPoint Presentations
2024-10-21 01:03:20 Written by KoohjiExtracting and repurposing elements from PowerPoint presentations is a valuable skill for cross-platform content sharing. By converting shapes from slides into standalone image files, users can seamlessly integrate them into documents, web pages, or design projects without losing their original formatting and visual effects. With Python, this process becomes straightforward. In this article, we'll explore how to use Spire.Presentation for Python to save shapes from presentation slides as image files with simple Python code.
- Save Shapes from Slides as Image Files with Python
- Save Images from Slides with Formatting as Images Files
Install Spire.Presentation for Python
This scenario requires Spire.Presentation for Python and plum-dispatch v1.7.4. They can be easily installed in your Windows through the following pip command.
pip install Spire.Presentation
If you are unsure how to install, please refer to: How to Install Spire.Presentation for Python on Windows
Save Shapes from Slides as Image Files with Python
Spire.Presentation for Python provides the Slide.Shapes.SaveAsImage(shapIndex: int, dpiX: int, dpiY: int) method to save shapes in presentation slides as images with the specified DPI(optional). With this method, developers can save either a specific shape or all shapes in a PowerPoint presentation. The detailed steps are as follows:
- Create an instance of Presentation class.
- Load a PowerPoint presentation using Presentation.LoadFromFile() method.
- Get a slide using Presentation.Slides.get_Item() method.
- Iterate through the shapes in the slide:
- Save each shape as an image stream using Slide.Shapes.SaveAsImage() method.
- Save the image stream as an image file using Stream.Save() method.
- Python
from spire.presentation import *

# Create an instance of Presentation
presentation = Presentation()

# Load a PowerPoint file
presentation.LoadFromFile("Sample.pptx")

# Get the first slide
slide = presentation.Slides.get_Item(3)

# Save the shape as an image stream
for i in range(slide.Shapes.Count):
  imageStream = slide.Shapes.SaveAsImage(i, 256, 256)
  # Save the image
  imageStream.Save(f"output/Shapes/ShapeToImage{i}.png")

# Release resources
presentation.Dispose()
Save Images from Slides with Formatting as Images Files
By using the methods provided by Spire.Presentation for Python, developers can also save images from slides as image files while preserving the edits and formatting applied to them. This requires first checking if the shape is an object of SlidePicture class, and if so, the shape can be saved as an image file. The detailed steps are as follows:
- Create an instance of Presentation class.
- Load a PowerPoint presentation using Presentation.LoadFromFile() method.
- Get a slide using Presentation.Slides.get_Item() method.
- Iterate through the shapes in the slide:
- Check if each shape is an object of SlidePicture class.
- If it is, save the shape as an image stream using Slide.Shapes.SaveAsImage() method.
- Save the image stream to a file using Stream.Save() method.
- Python
from spire.presentation import *

# Create an instance of Presentation
presentation = Presentation()

# Load a PowerPoint file
presentation.LoadFromFile("Sample.pptx")

# Get a slide
slide = presentation.Slides.get_Item(4)

# Iterate through all shapes in the slide
i = 0
for shape in slide.Shapes:
  # Check if the shape is an object of SlidePicture
  if isinstance(shape, SlidePicture):
    # Save the shape as an image
    shape = shape if isinstance(shape, SlidePicture) else None
    image = slide.Shapes.SaveAsImage(slide.Shapes.IndexOf(shape), 256, 256)
    image.Save(f"output/Images/ImageShape{i}.png")
    i += 1

# Release resources
presentation.Dispose()

Apply for a Temporary License
If you'd like to remove the evaluation message from the generated documents, or to get rid of the function limitations, please request a 30-day trial license for yourself.
Python: Apply Shadow, Transparent, and 3D Effects to Text in PowerPoint
2024-09-04 00:49:50 Written by KoohjiEnhancing the visual appeal of your PowerPoint presentations is crucial for capturing your audience's attention. One effective way to achieve this is by applying advanced text effects such as shadows, transparency, and 3D effects. These techniques can add depth, dimension, and a modern look to your text, making your slides more engaging and professional. In this article, we'll demonstrate how to apply shadow, transparent and 3D effects to text in PowerPoint in Python using Spire.Presentation for Python.
- Apply Shadow Effect to Text in PowerPoint in Python
- Apply Transparent Effect to Text in PowerPoint in Python
- Apply 3D Effect to Text in PowerPoint in Python
Install Spire.Presentation for Python
This scenario requires Spire.Presentation for Python. It can be easily installed in your Windows through the following pip command.
pip install Spire.Presentation
If you are unsure how to install, please refer to this tutorial: How to Install Spire.Presentation for Python on Windows
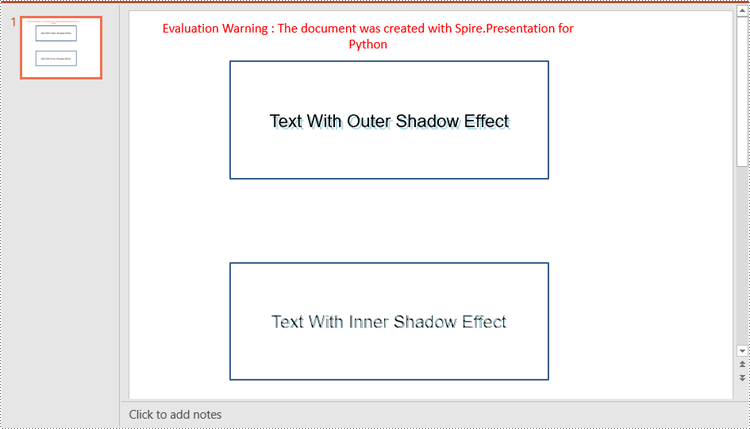
Apply Shadow Effect to Text in PowerPoint in Python
Spire.Presentation for Python offers the InnerShadowEffect and OuterShadowEffect classes for creating inner and outer shadow effects. These shadow effects can then be applied to the text within shapes by using the IAutoShape.TextFrame.TextRange.EffectDag.InnerShadowEffect and IAutoShape.TextFrame.TextRange.EffectDag.OuterShadowEffect properties. The detailed steps are as follows.
- Create an object of the Presentation class.
- Get a specific slide in the presentation using the Presentation.Slides[index] property.
- Add a shape to the slide using the ISilde.Shapes.AppendShape() method.
- Add text to the shape using the IAutoShape.AppendTextFrame() method.
- Create an inner or outer shadow effect using the InnerShadowEffect or OuterShadowEffect class.
- Set the blur radius, direction, distance and color, for the inner or outer shadow effect using the properties offered by the InnerShadowEffect or OuterShadowEffect class.
- Apply the inner or outer shadow effect to the text within the shape using the IAutoShape.TextFrame.TextRange.EffectDag.InnerShadowEffect or IAutoShape.TextFrame.TextRange.EffectDag.OuterShadowEffect property.
- Save the resulting presentation using the Presentation.SaveToFile() method.
- Python
from spire.presentation.common import *
from spire.presentation import *

# Create an object of the Presentation class
ppt = Presentation()

# Get the first slide
slide = ppt.Slides[0]

# Add the first rectangular shape to the slide
shape = slide.Shapes.AppendShape(ShapeType.Rectangle, RectangleF.FromLTRB(120, 60, 500, 200))
shape.Fill.FillType = FillFormatType.none

# Add text to the shape
shape.AppendTextFrame("Text With Outer Shadow Effect")
shape.TextFrame.Paragraphs[0].TextRanges[0].LatinFont = TextFont("Arial")
shape.TextFrame.Paragraphs[0].TextRanges[0].FontHeight = 21
shape.TextFrame.Paragraphs[0].TextRanges[0].Fill.FillType = FillFormatType.Solid
shape.TextFrame.Paragraphs[0].TextRanges[0].Fill.SolidColor.Color = Color.get_Black()

# Create an outer shadow effect
outerShadow = OuterShadowEffect()
# Set the blur radius, direction, distance and color for the outer shadow effect
outerShadow.BlurRadius = 0
outerShadow.Direction = 50
outerShadow.Distance = 10
outerShadow.ColorFormat.Color = Color.get_LightBlue()

# Apply the outer shadow effect to the text in the first rectangular shape
shape.TextFrame.TextRange.EffectDag.OuterShadowEffect = outerShadow

# Add the second rectangular shape to the slide
shape = slide.Shapes.AppendShape(ShapeType.Rectangle, RectangleF.FromLTRB(120, 300, 500, 440))
shape.Fill.FillType = FillFormatType.none

# Add text to the shape
shape.AppendTextFrame("Text With Inner Shadow Effect")
shape.TextFrame.Paragraphs[0].TextRanges[0].LatinFont = TextFont("Arial")
shape.TextFrame.Paragraphs[0].TextRanges[0].FontHeight = 21
shape.TextFrame.Paragraphs[0].TextRanges[0].Fill.FillType = FillFormatType.Solid
shape.TextFrame.Paragraphs[0].TextRanges[0].Fill.SolidColor.Color = Color.get_Black()

# Create an inner shadow effect
innerShadow = InnerShadowEffect()
# Set the blur radius, direction, distance and color for the inner shadow effect
innerShadow.BlurRadius = 0
innerShadow.Direction = 50
innerShadow.Distance = 10
innerShadow.ColorFormat.Color = Color.get_LightBlue()

# Apply the inner shadow effect to the text in the second rectangular shape
shape.TextFrame.TextRange.EffectDag.InnerShadowEffect = innerShadow

# Save the resulting presentation
ppt.SaveToFile("SetShadowEffect.pptx", FileFormat.Pptx2013)
ppt.Dispose()
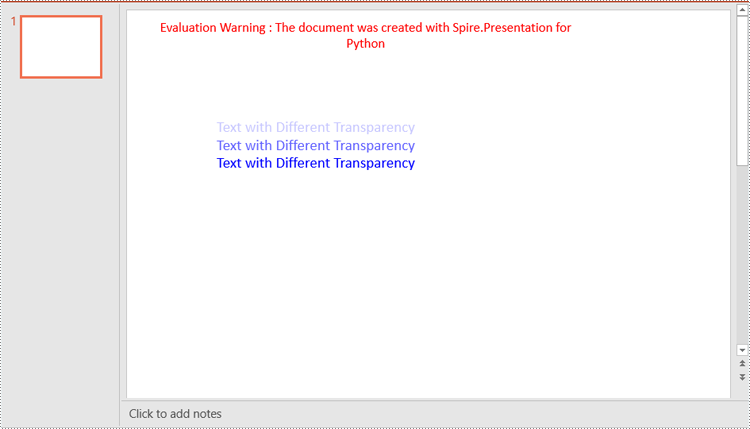
Apply Transparent Effect to Text in PowerPoint in Python
Spire.Presentation for Python does not offer a direct method to apply transparency effect to text, but you can control the transparency by adjusting the alpha value of the text color. The detailed steps are as follows.
- Create an object of the Presentation class.
- Get a specific slide in the presentation using the Presentation.Slides[index] property.
- Add a shape to the slide using the ISilde.Shapes.AppendShape() method.
- Retrieve the paragraph collection from the text frame within the shape using the IAutoShape.TextFrame.Paragraphs property, then remove any default paragraphs from the collection using the ParagraphList.Clear() method.
- Add new paragraphs to the collection using the ParagraphList.Append() method, and insert text into each paragraph using the TextParagraph.TextRanges.Append() method.
- Set the fill type of the text to solid using the TextRange.Fill.FillType property.
- Adjust the transparency of the text by setting the color with varying alpha values using the Color.FromArgb(alpha:int, red:int, green:int, blue:int) method, where the alpha value controls the transparency level—the lower the alpha, the more transparent the text.
- Save the resulting presentation using the Presentation.SaveToFile() method.
- Python
from spire.presentation.common import *
from spire.presentation import *

# Create an object of the Presentation class
ppt = Presentation()

# Get the first slide
slide = ppt.Slides[0]

# Add a rectangular shape to the slide
textboxShape = slide.Shapes.AppendShape(ShapeType.Rectangle, RectangleF.FromLTRB(100, 100, 400, 220))
# Make the border of the shape transparent
textboxShape.ShapeStyle.LineColor.Color = Color.get_Transparent()
# Set the shape's fill to none
textboxShape.Fill.FillType = FillFormatType.none

# Retrieve the paragraph collection from the text frame within the shape
paras = textboxShape.TextFrame.Paragraphs
# Remove any default paragraphs
paras.Clear()

# Add three new paragraphs to the text frame, each with a different transparency level for the text
alpha = 55  # Initial alpha value for text transparency
for i in range(3):
    # Create and add a new paragraph
    paras.Append(TextParagraph())
    # Add text to the paragraph
    paras[i].TextRanges.Append(TextRange("Text with Different Transparency"))
    # Set the text fill type to solid
    paras[i].TextRanges[0].Fill.FillType = FillFormatType.Solid
    # Set the text color with varying transparency, controlled by the alpha value
    paras[i].TextRanges[0].Fill.SolidColor.Color = Color.FromArgb(
        alpha,
        Color.get_Blue().R,
        Color.get_Blue().G,
        Color.get_Blue().B
    )
    # Increase alpha value to reduce transparency for the next paragraph
    alpha += 100

# Save the resulting presentation
ppt.SaveToFile("SetTransparency.pptx", FileFormat.Pptx2013)
ppt.Dispose()
Apply 3D Effect to Text in PowerPoint in Python
The FormatThreeD class in Spire.Presentation for Python is used for creating a 3D effect. You can access the FormatThreeD object using the IAutoShape.TextFrame.TextThreeD property, then use the properties of the FormatThreeD class to configure the settings for the 3D effect. The detailed steps are as follows.
- Create an object of the Presentation class.
- Get a specific slide in the presentation using the Presentation.Slides[index] property.
- Add a shape to the slide using the ISilde.Shapes.AppendShape() method.
- Add text to the shape using the IAutoshape.AppendTextFrame() method.
- Access the FormatThreeD object using the IAutoShape.TextFrame.TextThreeD property.
- Set the material type, top bevel type, contour color and width, and lighting type for the 3D effect through the properties of the FormatThreeD class.
- Save the resulting presentation using the Presentation.SaveToFile() method.
- Python
from spire.presentation.common import *
from spire.presentation import *

# Create an object of the Presentation class
ppt = Presentation()

# Get the first slide
slide = ppt.Slides[0]

# Add a rectangular shape to the slide
shape = slide.Shapes.AppendShape(ShapeType.Rectangle, RectangleF.FromLTRB(30, 40, 680, 240))
# Make the border of the shape transparent
shape.ShapeStyle.LineColor.Color = Color.get_Transparent()
# Set the shape's fill to none
shape.Fill.FillType = FillFormatType.none

# Add text to the shape
shape.AppendTextFrame("Text with 3D Effect")
# Set text color
textRange = shape.TextFrame.TextRange
textRange.Fill.FillType = FillFormatType.Solid
textRange.Fill.SolidColor.Color = Color.get_LightBlue()
# Set font
textRange.FontHeight = 40
textRange.LatinFont = TextFont("Arial")

# Access the FormatThreeD object
threeD = shape.TextFrame.TextThreeD
# Set the material type for the 3D effect
threeD.ShapeThreeD.PresetMaterial = PresetMaterialType.Metal
# Set the top bevel type for the 3D effect
threeD.ShapeThreeD.TopBevel.PresetType = BevelPresetType.Circle
# Set the contour color and width for the 3D effect
threeD.ShapeThreeD.ContourColor.Color = Color.get_Green()
threeD.ShapeThreeD.ContourWidth = 3
# Set the lighting type for the 3D effect
threeD.LightRig.PresetType = PresetLightRigType.Sunrise

# Save the resulting presentation
ppt.SaveToFile("Set3DEffect.pptx", FileFormat.Pptx2013)
ppt.Dispose()
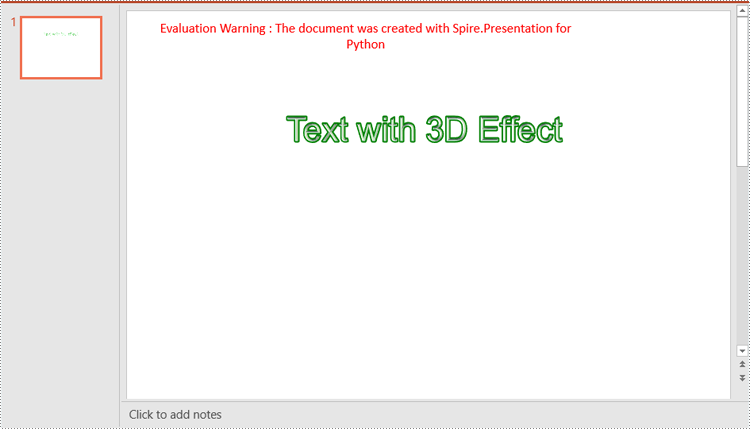
Apply for a Temporary License
If you'd like to remove the evaluation message from the generated documents, or to get rid of the function limitations, please request a 30-day trial license for yourself.
In Microsoft PowerPoint, animations are not limited to just text; they can also be applied to shapes or other objects to create dynamic and engaging slides. Animations can be used to achieve various effects, such as drawing attention to a specific shape, demonstrating a process, or simply adding a touch of flair to your presentation. For instance, you might want to animate a shape to make it appear, disappear, or move in a particular sequence. Additionally, extracting and reusing animations can save time and ensure consistency across multiple presentations. In this article, we will demonstrate how to add animations to shapes in PowerPoint along with how to extract animation information from slides in PowerPoint in Python using Spire.Presentation for Python.
- Add Animations to Shapes and Text within Shapes in PowerPoint in Python
- Add Exit Animations to Shapes in PowerPoint in Python
- Extract the Animation Information from PowerPoint Slides in Python
Install Spire.Presentation for Python
This scenario requires Spire.Presentation for Python and plum-dispatch v1.7.4. They can be easily installed in your Windows through the following pip command.
pip install Spire.Presentation
If you are unsure how to install, please refer to this tutorial: How to Install Spire.Presentation for Python on Windows
Add Animations to Shapes and Text within Shapes in PowerPoint in Python
You can use the IShape.Slide.Timeline.MainSequence.AddEffect(shape:IShape, animationEffectType:AnimationEffectType) method to add an animation effect to a shape. If you want to apply the animation effect to the text of a specific paragraph(s) within a shape, you can use the AnimationEffect.SetStartEndParagraph(startParaIndex:int, endParaIndex:int) method. The detailed steps are as follows.
- Create an instance of the Presentation class.
- Load a PowerPoint presentation using the Presentation.LoadFromFile() method.
- Access a specific slide using the Presentation.Slides[] property.
- Add a rectangle shape to the slide using the ISlide.Shapes.AppendShape(shapeType:ShapeType, rectangle:RectangleF) method.
- Set the fill type, fill color, and border color for the rectangle.
- Add a text frame to the rectangle using the IShape.AppendTextFrame() method.
- Add an animation effect to the rectangle using IShape.Slide.Timeline.MainSequence.AddEffect(shape:IShape, animationEffectType:AnimationEffectType) method.
- Add another animation effect to the rectangle. Then apply the animation effect to specific paragraph(s) within the rectangle using the AnimationEffect.SetStartEndParagraph(startParaIndex:int, endParaIndex:int) method.
- Save the result presentation using the Presentation.SaveToFile() method.
- Python
from spire.presentation.common import *
from spire.presentation import *

# Create an object of the Presentation class
ppt = Presentation()
# Get the first slide in the presentation
slide = ppt.Slides[0]

# Add a rectangle shape to the slide
shape = slide.Shapes.AppendShape(ShapeType.Rectangle, RectangleF.FromLTRB(100, 150, 300, 230))
# Set an alternative title for the shape (optional)
shape.AlternativeTitle = "Rectangle"

# Set the fill type, fill color and border color for the shape
shape.Fill.FillType = FillFormatType.Solid
shape.Fill.SolidColor.Color = Color.get_LightBlue()
shape.ShapeStyle.LineColor.Color = Color.get_White()

# Add a text frame to the shape and set the text content
shape.AppendTextFrame("Animated Shape")

# Add the 'fade-out swivel' animation effect to the shape
shape.Slide.Timeline.MainSequence.AddEffect(shape, AnimationEffectType.FadedSwivel)

# Add the 'float' animation effect to the shape
animation = shape.Slide.Timeline.MainSequence.AddEffect(shape, AnimationEffectType.Float)
# Set the start and end index of the paragraph(s) to apply the 'float' animation
animation.SetStartEndParagraphs(0, 0)

# Save the presentation to a new file
ppt.SaveToFile("ApplyAnimation.pptx", FileFormat.Pptx2013)
ppt.Dispose()
Add Exit Animations to Shapes in PowerPoint in Python
In PowerPoint, animations are categorized into four main types: entrance, emphasis, exit, and motion paths. Some animations, like "fly in" or "fade", can be used as both entrance and exit effects. When using Spire.Presentation to add these animations to shapes in your presentations, these animations are typically set as entrance effects by default. If you want to change the type of the animation to exit, you can use the AnimationEffect.PresetClassType property. The detailed steps are as follows.
- Create an instance of the Presentation class.
- Load a PowerPoint presentation using the Presentation.LoadFromFile() method.
- Access a specific slide using the Presentation.Slides[] property.
- Add a cube shape to the slide using the ISlide.Shapes.AppendShape(shapeType:ShapeType, rectangle:RectangleF) method.
- Set the fill type, fill color, and border color for the cube.
- Add a text frame to the cube using the IShape.AppendTextFrame() method.
- Add an animation effect to the cube using the IShape.Slide.Timeline.MainSequence.AddEffect(shape:IShape, animationEffectType:AnimationEffectType) method.
- Change the animation effect type to exit using the AnimationEffect.PresetClassType property.
- Save the presentation using the Presentation.SaveToFile() method.
- Python
from spire.presentation.common import *
from spire.presentation import *

# Create an object of the Presentation class
ppt = Presentation()
# Get the first slide in the presentation
slide = ppt.Slides[0]

# Add a cube shape to the slide
shape = slide.Shapes.AppendShape(ShapeType.Cube, RectangleF.FromLTRB(100, 150, 300, 230))
# Set an alternative title for the shape (optional)
shape.AlternativeTitle = "Cube"

# Set the fill type, fill color and border color for the shape
shape.Fill.FillType = FillFormatType.Solid
shape.Fill.SolidColor.Color = Color.get_LightBlue()
shape.ShapeStyle.LineColor.Color = Color.get_White()

# Add a text frame to the shape and set the text content
shape.AppendTextFrame("Exit Animation")

# Add a 'random bars' animation effect to the shape
effect = shape.Slide.Timeline.MainSequence.AddEffect(shape, AnimationEffectType.RandomBars)
# Set the animation effect type to exit animation
effect.PresetClassType = TimeNodePresetClassType.Exit

# Save the presentation to a new file
ppt.SaveToFile("ExitAnimation.pptx", FileFormat.Pptx2013)
ppt.Dispose()
Extract the Animation Information from PowerPoint Slides in Python
To extract animation information from slides in a PowerPoint presentation, you need to iterate through all slides and all animations within each slide, then use the properties of the AnimationEffect class to retrieve the information of the animations. The detailed steps are as follows.
- Create an instance of the Presentation class.
- Load a PowerPoint presentation using the Presentation.LoadFromFile() method.
- Iterate through all slides in the presentation and all animations within each slide.
- Use the AnimationEffect.ShapeTarget.AlternativeTitle property to get the title of the shape affected by the animation.
- Use the ISlide.SlideNumber property to get the number of the current slide.
- Use the AnimationEffect.AnimationEffectType property to get the type of animation effect.
- Use the AnimationEffect.Timing.Duration property to get the duration of the animation effect.
- Use the AnimationEffect.Timing.RepeatCount property to get the number of repetitions of the animation effect.
- Save the retrieved information to a text file.
- Python
from spire.presentation.common import *
from spire.presentation import *

# Create an object of the Presentation class
ppt = Presentation()
# Load a PowerPoint presentation
ppt.LoadFromFile("ApplyAnimation.pptx")

# Create a list to store the extracted animation information
sb = []

# Iterate through all slides in the presentation
for slide in ppt.Slides:
    # Iterate through all animation effects in the slide
    for effect in slide.Timeline.MainSequence:
        # Get the alternative title of the shape affected by the animation
        shapeTitle = effect.ShapeTarget.AlternativeTitle
        sb.append("Shape Title: " + shapeTitle)
        # Get the number of the current slide
        slideNumber = slide.SlideNumber
        sb.append("Current Slide Number: " + str(slideNumber))
        # Get the type of the animation effect
        animationEffectType = effect.AnimationEffectType
        sb.append("Animation Effect Type: " + str(animationEffectType))
        # Get the duration of the animation effect
        duration = effect.Timing.Duration
        sb.append("Animation Effect Duration: " + str(duration))
        # Get the number of repetitions of the animation effect
        count = effect.Timing.RepeatCount
        sb.append("Animation Effect Repeat Count: " + str(count))
        sb.append("\n")

# Save the extracted animation information to a text file
with open("AnimationInformation.txt", "w") as fp:
    for s in sb:
        fp.write(s + "\n")

ppt.Dispose()
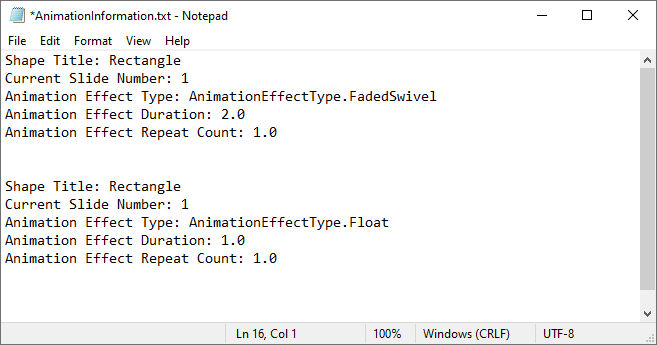
Apply for a Temporary License
If you'd like to remove the evaluation message from the generated documents, or to get rid of the function limitations, please request a 30-day trial license for yourself.
