
Program Guide (52)
Children categories
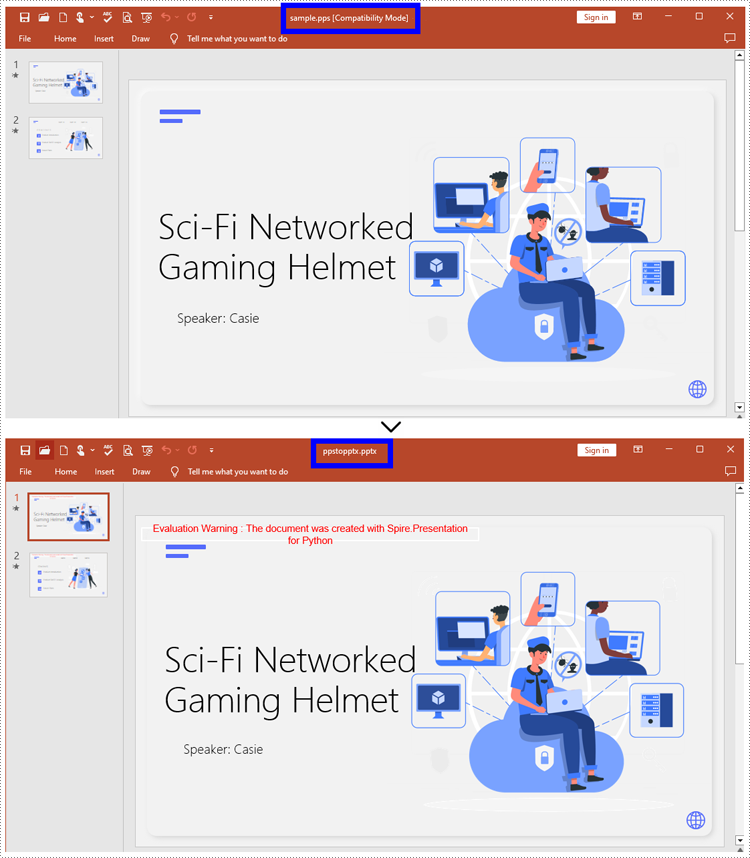
Converting between presentation documents is a common task, especially when dealing with different versions of Microsoft PowerPoint. PPS is used to display presentations directly as finalized documents. PPT is an older format compatible with PowerPoint 97-2003. PPTX, the default editable format in the latest version of PowerPoint, offers better data recovery capabilities, smaller file sizes, and enhanced security.
Whether you need to edit PPS documents or ensure compatibility with modern tools and features, converting them to PPTX is essential. This article will demonstrate how to convert PPS and PPT to PPTX documents using Python with Spire.Presentation for Python. Read on to learn more.
Install Spire.Presentation
This scenario requires Spire.Presentation for Python and plum-dispatch v1.7.4. They can be easily installed in your Windows through the following pip commands.
pip install Spire.Presentation
If you are unsure how to install, please refer to this tutorial: How to Install Spire.Presentation for Python on Windows.
How to Convert PPS to PPTX with Python
To convert PPS to PPTX format, you can call Document.SaveToFile() method offered by Spire.Presentation for Python. It supports converting various formats to PPT(X), such as PPS and PPT, as well as converting PPT documents to other formats like PDF and images (PNG, JPG, BMP, SVG).
Steps to convert PPS to PPTX:
- Create an object for the Presentation class.
- Import the document to be converted with Document.LoadFromFile() method.
- Convert it to a PPTX document using Document.SaveToFile() method.
Here is the code example for you:
- Python
from spire.presentation.common import *
from spire.presentation import *
# Create a Presentation document object
pre = Presentation()
# Load the file from the disk
pre.LoadFromFile("input/sample.pps")
# Save the document as PPTX
pre.SaveToFile("ppstopptx.pptx", FileFormat.Pptx2010)
pre.Dispose()
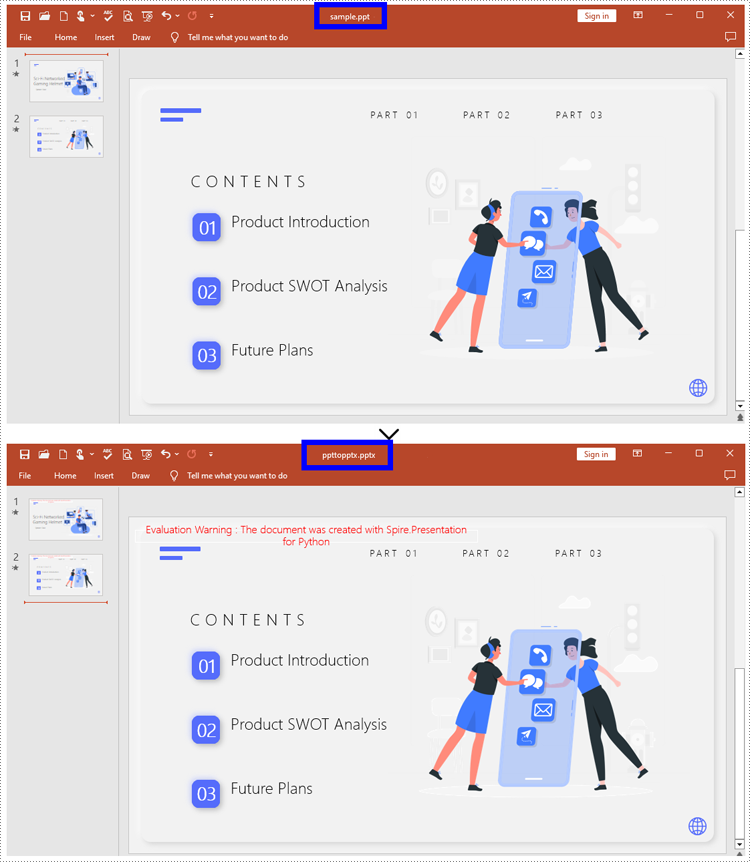
How to Convert PPT to PPTX with Python
Compared with PPT, PPTX has many advantages. Despite being mentioned above, it supports inserting more multimedia content and advanced formats, thereby improving the overall quality and performance of presentations. Spire.Presentation for Python provides Document.SaveToFile() to convert PPT to PPTX without data loss.
Steps to convert PPT to PPTX:
- Instantiate a new Presentation object.
- Load the document from the files with Document.LoadFromFile().
- Save the PPT document as a PPTX document by Document.SaveToFile().
Below is the code example to refer to:
- Python
from spire.presentation.common import *
from spire.presentation import *

# Create an instance of the Presentation class
pre = Presentation()

# Load the file to be converted
pre.LoadFromFile("input/Sample1.ppt")

# Convert the document to PPTX format
pre.SaveToFile("ppttopptx.pptx", FileFormat.Pptx2010)

pre.Dispose()
Apply for a Temporary License
If you'd like to remove the evaluation message from the generated documents, or to get rid of the function limitations, please request a 30-day trial license for yourself.
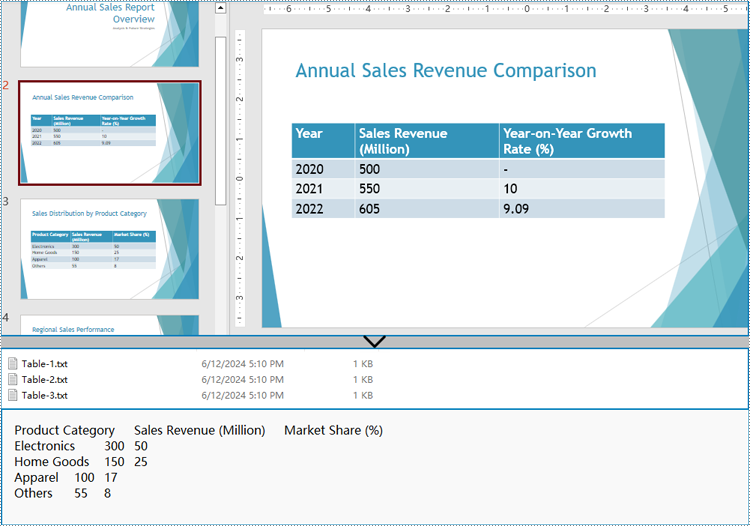
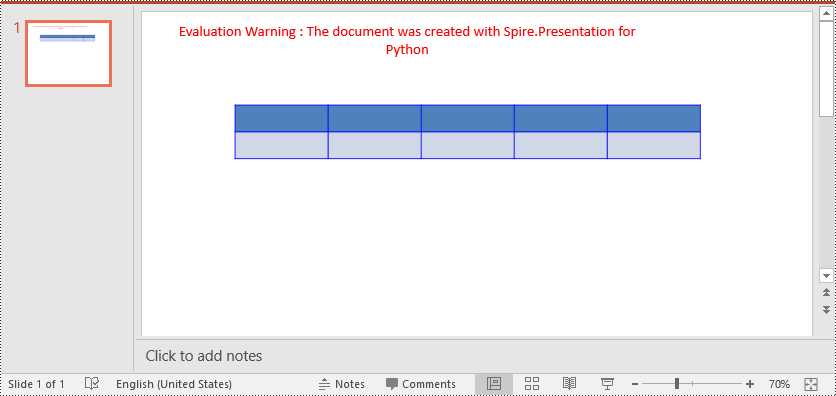
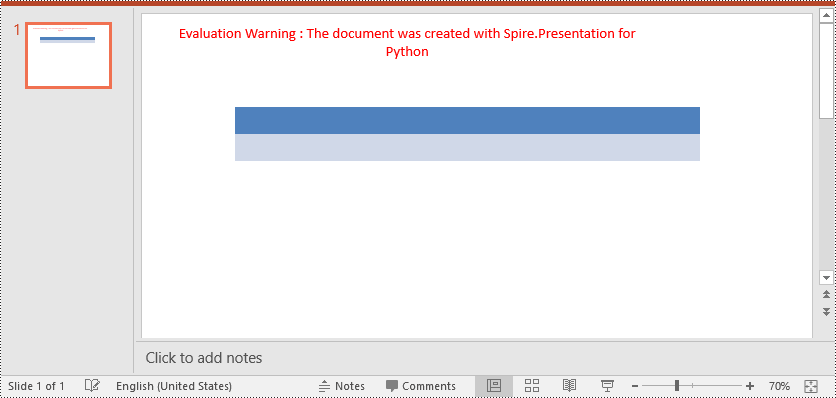
PowerPoint presentations often serve as repositories of essential data and information shared during meetings, lectures, and conferences. They frequently include tables for data presentation and basic analysis. However, to further analyze the data or integrate it into reports and spreadsheets, it becomes necessary to extract these tables and save them in other formats. By leveraging Python, users can efficiently extract tables from PowerPoint presentations, transforming static slides into dynamic data sets ready for processing.
This article aims to demonstrate how to extract tables from PowerPoint presentations and write them to text and Excel worksheets using Spire.Presentation for Python, thereby enhancing the utilization of data in presentations and streamlining the data extraction process.
- Extract Table Data from PowerPoint Presentations to Text Files
- Extract Table Data from PowerPoint Presentations to Excel Worksheets
Install Spire.Presentation for Python
This scenario requires Spire.Presentation for Python and plum-dispatch v1.7.4. They can be easily installed in your Windows through the following pip command.
pip install Spire.Presentation
If you are unsure how to install, please refer to: How to Install Spire.Presentation for Python on Windows
Extract Table Data from PowerPoint Presentations to Text Files
Spire.Presentation for Python provides the ITable class which represents a table in a presentation slide. By iterating through the shapes in each slide to check if it’s an instance of ITable class, developers can retrieve all the tables in the presentation file and get the data in the tables.
The detailed steps for extracting tables from PowerPoint presentations and writing them to text files are as follows:
- Create an instance of Presentation class and load a PowerPoint file using Presentation.LoadFromFile() method.
- Iterate through all the slides in the file and then all the shapes in the slides.
- Check if a shape is an instance of ITable class. If it is, iterate through the rows and then the cells in each row. Get the cell values using TableRow[].TextFrame.Text property and append them to strings.
- Write the table data to text files.
- Python
from spire.presentation import *
from spire.presentation.common import *

# Create an instance of Presentation
presentation = Presentation()

# Load a PowerPoint file
presentation.LoadFromFile("Sample.pptx")

tables = []
# Iterate through all the slides
for slide in presentation.Slides:
    # Iterate through all the shapes
    for shape in slide.Shapes:
        # Check whether the shape is a table
        if isinstance(shape, ITable):
            tableData = ""
            # Iterate through all the rows
            for row in shape.TableRows:
                rowData = ""
                # Iterate through all the cells in the row
                for i in range(0, row.Count):
                    # Get the cell value
                    cellValue = row[i].TextFrame.Text
                    rowData += (cellValue + "\t" if i < row.Count - 1 else cellValue)
                tableData += (rowData + "\n")
            tables.append(tableData)

# Write the tables to text files
for idx, table in enumerate(tables, start=1):
    fileName = f"output/Tables/Table-{idx}.txt"
    with open(fileName, "w") as f:
        f.write(table)
presentation.Dispose()
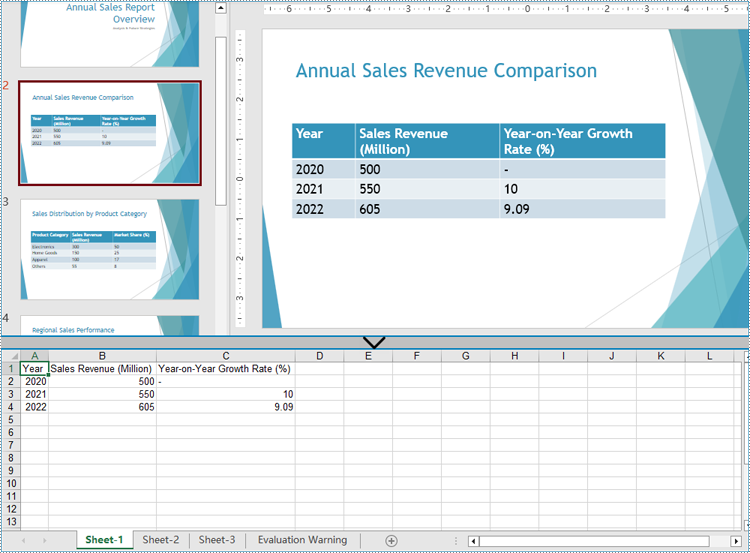
Extract Table Data from PowerPoint Presentations to Excel Worksheets
After extracting table data from presentations using Spire.Presentation for Python, developers can further utilize Spire.XLS for Python to write this data into Excel worksheets, facilitating further analysis, referencing, and format conversion.
Install Spire.XLS for Python via PyPI:
pip install Spire.XLS
The detailed steps for extracting tables from PowerPoint presentations and writing them to Excel worksheets are as follows:
- Create an instance of Presentation class and load a PowerPoint file using Presentation.LoadFromFile() method.
- Create an instance of Workbook class and clear the default worksheets.
- Iterate through the slides in the presentation and then the shapes in the slides to check if the shapes are instances of ITable class. Append all the ITable instances to a list.
- Iterate through the tables in the list and add a worksheet to the workbook for each table using Workbook.Worksheets.Add() method.
- Iterate through the rows of each table and then the cells in the rows to get the cell values through TableRow.TextFrame.Text property. Write the values to the corresponding cells in the worksheet through Worksheet.Range[].Value property.
- Save the workbook using Workbook.SaveToFile() method.
- Python
from spire.presentation import *
from spire.presentation.common import *
from spire.xls import *
from spire.xls.common import *

# Create an instance of Presentation
presentation = Presentation()

# Load a PowerPoint file
presentation.LoadFromFile("Sample.pptx")

# Create an Excel file and clear the default worksheets
workbook = Workbook()
workbook.Worksheets.Clear()

tables = []
# Iterate through all the slides
for slide in presentation.Slides:
    # Iterate through all the shapes
    for shape in slide.Shapes:
        # Check whether the shape is a table
        if isinstance(shape, ITable):
            tables.append(shape)

# Iterate through all the tables
for t in range(len(tables)):
    table = tables[t]
    sheet = workbook.Worksheets.Add(f"Sheet-{t+1}")
    for i in range(0, table.TableRows.Count):
        row = table.TableRows[i]
        for j in range(0, row.Count):
            sheet.Range[i + 1, j + 1].Value = row[j].TextFrame.Text
    # Autofit rows and columns
    sheet.AllocatedRange.AutoFitColumns()
    sheet.AllocatedRange.AutoFitRows()

# Save the Excel file
workbook.SaveToFile("output/PresentationTables.xlsx", FileFormat.Version2016)

presentation.Dispose()
workbook.Dispose()
Apply for a Temporary License
If you'd like to remove the evaluation message from the generated documents, or to get rid of the function limitations, please request a 30-day trial license for yourself.
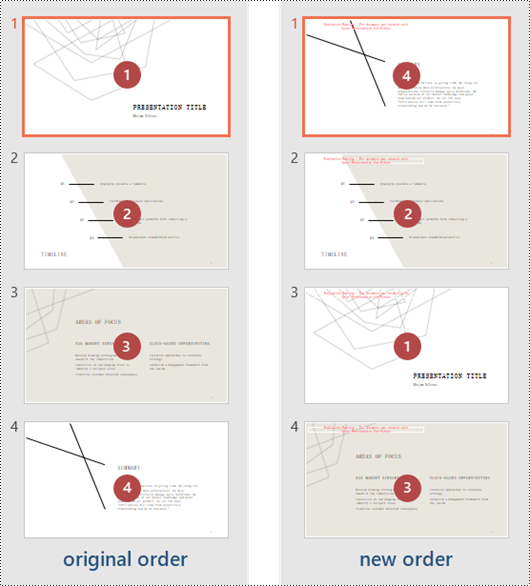
Rearranging slides in a PowerPoint presentation is a simple but essential skill. Whether you need to change the order of your points, group related slides together, or move a slide to a different location, the ability to efficiently reorganize your slides can help you create a more coherent and impactful presentation.
In this article, you will learn how to rearrange slides in a PowerPoint document in Python using Spire.Presentation for Python.
Install Spire.Presentation for Python
This scenario requires Spire.Presentation for Python and plum-dispatch v1.7.4. They can be easily installed in your system through the following pip command.
pip install Spire.Presentation
If you are unsure how to install, please refer to this tutorial: How to Install Spire.Presentation for Python on Windows
Rearrange Slides in a PowerPoint Document in Python
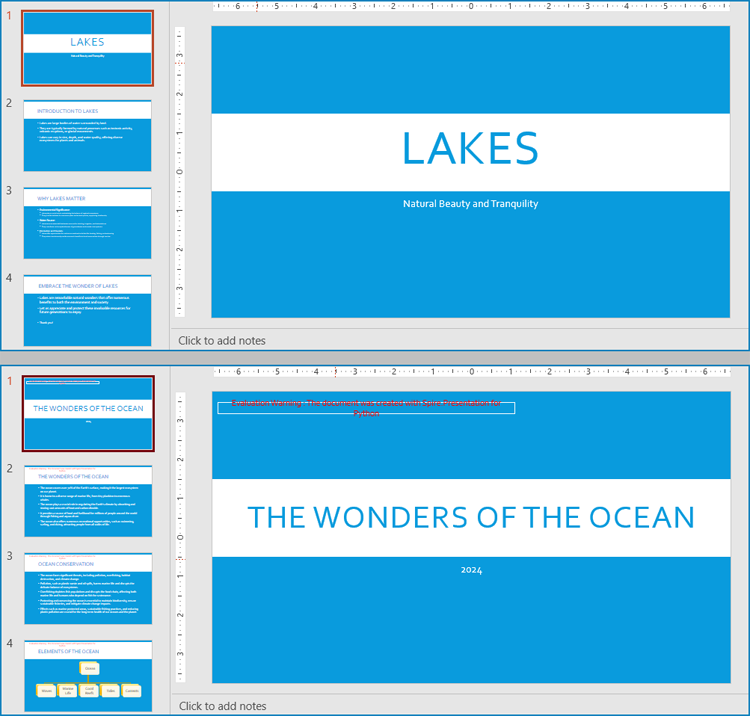
To reorder the slides in PowerPoint, two Presentation objects were created - one for loading the original document, and one for creating a new document. By copying the slides from the original document to the new one in the desired sequence, the slide order could be easily rearranged.
The following are the steps to rearrange slides in a PowerPoint document using Python.
- Create a Presentation object.
- Load a PowerPoint document using Presentation.LoadFromFile() method.
- Specify the slide order within a list.
- Create another Presentation object for creating a new presentation.
- Add the slides from the original document to the new presentation in the specified order using Presentation.Slides.AppendBySlide() method.
- Save the new presentation to a PPTX file using Presentation.SaveToFile() method.
- Python
from spire.presentation.common import *
from spire.presentation import *

# Create a Presentation object
presentation = Presentation()

# Load a PowerPoint file
presentation.LoadFromFile("C:\\Users\\Administrator\\Desktop\\input.pptx")

# Specify the new slide order within a list
newSlideOrder = [4,2,1,3]

# Create another Presentation object
new_presentation =  Presentation()

# Remove the default slide
new_presentation.Slides.RemoveAt(0)

# Iterate through the list
for i in range(len(newSlideOrder)):

    # Add the slides from the original PowerPoint file to the new PowerPoint document in the new order
    new_presentation.Slides.AppendBySlide(presentation.Slides[newSlideOrder[i] - 1])

# Save the new presentation to file
new_presentation.SaveToFile("output/NewOrder.pptx", FileFormat.Pptx2019)

# Dispose resources
presentation.Dispose()
new_presentation.Dispose()
Apply for a Temporary License
If you'd like to remove the evaluation message from the generated documents, or to get rid of the function limitations, please request a 30-day trial license for yourself.
Highlighting important text in your PowerPoint slides can be an effective way to draw your audience's attention and emphasize key points. Whether you are presenting complex information or delivering a persuasive pitch, using text highlighting can make your slides more visually engaging and help your message stand out. In this article, we will demonstrate how to highlight text in a PowerPoint presentation in Python using Spire.Presentation for Python.
Install Spire.Presentation for Python
This scenario requires Spire.Presentation for Python. It can be easily installed in your Windows through the following pip command.
pip install Spire.Presentation
If you are unsure how to install, please refer to this tutorial: How to Install Spire.Presentation for Python on Windows
Highlight Text in PowerPoint Presentation in Python
Spire.Presentation for Python provides a method called IAutoShape.TextFrame.HighLightText(text: str, color: Color, options: TextHighLightingOptions) to highlight specific text within the shapes of a PowerPoint presentation.
Follow the steps below to highlight specified text in your presentation using Spire.Presentation for Python:
- Create an instance of the Presentation class.
- Load a PowerPoint presentation using the Presentation.LoadFromFile() method.
- Create an instance of the TextHighLightingOptions class, and set the text highlighting options such as whole words only and case sensitive through the TextHighLightingOptions.WholeWordsOnly and TextHighLightingOptions.CaseSensitive properties.
- Loop through the slides in the presentation and the shapes on each slide.
- Check if the current shape is of IAutoShape type.
- If the result is true, typecast it to an IAutoShape object.
- Highlight all matches of specific text in the shape using the IAutoShape.TextFrame.HighLightText(text: str, color: Color, options: TextHighLightingOptions) method.
- Save the result presentation to a new file using the Presentation.SaveToFile() method.
- Python
from spire.presentation.common import *
from spire.presentation import *

# Specify the input and output file paths
input_file = "Example.pptx"
output_file = "HighlightText.pptx"

# Create an instance of the Presentation class
ppt = Presentation()
# Load the PowerPoint presentation
ppt.LoadFromFile(input_file)

# Specify the text to highlight
text_to_highlight = "Spire.Presentation"
# Specify the highlight color
highlight_color = Color.get_Yellow()

# Create an instance of the TextHighLightingOptions class
options = TextHighLightingOptions()
# Set the highlight options (case sensitivity and whole word highlighting)
options.WholeWordsOnly = True
options.CaseSensitive = True

# Loop through the slides in the presentation
for slide in ppt.Slides:
    # Loop through the shapes on each slide
    for shape in slide.Shapes:
            # Check if the shape is of IAutoShape type
            if isinstance (shape, IAutoShape):
                # Typecast the shape to an IAutoShape object
                auto_shape = IAutoShape(shape)
                # Search and highlight specified text within the shape
                auto_shape.TextFrame.HighLightText(text_to_highlight, highlight_color, options)

# Save the result presentation to a new PPTX file
ppt.SaveToFile(output_file, FileFormat.Pptx2013)
ppt.Dispose()
Apply for a Temporary License
If you'd like to remove the evaluation message from the generated documents, or to get rid of the function limitations, please request a 30-day trial license for yourself.
Python: Create, Modify, and Copy Slide Master in PowerPoint Presentations
2024-05-13 01:14:23 Written by KoohjiSlide Master in PowerPoint presentations is a powerful feature that lies at the heart of designing consistent and professional-looking slideshows. It's essentially a blueprint or a template that controls the overall design and layout of the slides, allowing users to establish uniformity across presentations without having to manually format each slide individually. In this article, we will explore how to harness the power of Spire.Presentation for Python to create, modify, and apply slide masters in PowerPoint presentations within Python programs.
- Create and Apply Slide Masters in PowerPoint Presentations
- Modify Slide Masters in PowerPoint Presentations
- Copy Slide Masters Between PowerPoint Presentations
Install Spire.Presentation for Python
This scenario requires Spire.Presentation for Python and plum-dispatch v1.7.4. They can be easily installed in your Windows through the following pip command.
pip install Spire.Presentation
If you are unsure how to install, please refer to: How to Install Spire.Presentation for Python on Windows
Create and Apply Slide Masters in PowerPoint Presentations
Every PowerPoint presentation in PowerPoint, regardless of whether it is newly created or not, will have at least one slide master. Developers can modify the default master or create new ones and apply them to slides with Spire.Presentation for Python to achieve a consistent style and content layout across the presentation.
The detailed steps for creating new slide masters and applying them to the slides in a presentation file are as follows:
- Create an object of Presentation class and load a PowerPoint presentation using Presentation.LoadFromFile() method.
- Create slide masters using Presentation.Masters.AppendSlide() method.
- Use the methods under IMasterSlide class to set the backgrounds, customize color schemes, insert images, shapes, and text, etc.
- Apply the slide masters to specific slides through ISlide.Layout property.
- Save the presentation using Presentation.SaveToFile() method.
- Python
from spire.presentation.common import *
from spire.presentation import *

# Create an instance of Presentation class
pres = Presentation()

# Load a Presentation file
pres.LoadFromFile("Sample.pptx")

# Add a cover slide master and a body slide master
master1 = pres.Masters.AppendSlide(pres.Masters.get_Item(0))
coverMaster = pres.Masters.get_Item(master1)
master2 = pres.Masters.AppendSlide(pres.Masters.get_Item(0))
bodyMaster = pres.Masters.get_Item(master2)

# Set background images for the two slide masters
pic1 = "Background1.jpg"
pic2 = "Background2.jpg"

rect = RectangleF.FromLTRB (0, 0, pres.SlideSize.Size.Width, pres.SlideSize.Size.Height)
coverMaster.SlideBackground.Fill.FillType = FillFormatType.Picture
image1 = coverMaster.Shapes.AppendEmbedImageByPath (ShapeType.Rectangle, pic1, rect)
coverMaster.SlideBackground.Fill.PictureFill.Picture.EmbedImage = image1.PictureFill.Picture.EmbedImage

bodyMaster.SlideBackground.Fill.FillType = FillFormatType.Picture
image2 = bodyMaster.Shapes.AppendEmbedImageByPath (ShapeType.Rectangle, pic2, rect)
bodyMaster.SlideBackground.Fill.PictureFill.Picture.EmbedImage = image2.PictureFill.Picture.EmbedImage

# Insert a logo to the body slide master
logo = "Logo.png"
bodyMaster.Shapes.AppendEmbedImageByPath(ShapeType.Rectangle, logo, RectangleF.FromLTRB(pres.SlideSize.Size.Width - 110, 10, pres.SlideSize.Size.Width - 10, 110))

# Insert text to the body slide master
shape = bodyMaster.Shapes.AppendShape(ShapeType.Rectangle, RectangleF.FromLTRB(pres.SlideSize.Size.Width - 210, 110, pres.SlideSize.Size.Width - 10, 150))
shape.Fill.FillType = FillFormatType.none
shape.Line.FillType = FillFormatType.none
shape.TextFrame.Text = "Spire.Presentation"

# Set the color scheme for the two slide masters
coverMaster.Theme.ColorScheme.Accent1.Color = Color.get_Red()
coverMaster.Theme.ColorScheme.Accent2.Color = Color.get_Blue()

bodyMaster.Theme.ColorScheme.Accent1.Color = Color.get_Brown()
coverMaster.Theme.ColorScheme.Accent2.Color = Color.get_Green()

# Apply the first master with layout to the first slide
pres.Slides.get_Item(0).Layout = coverMaster.Layouts.GetByType(SlideLayoutType.Title)

# Apply the second master with layout to other slides
for i in range(1, pres.Slides.Count):
    pres.Slides.get_Item(i).Layout = bodyMaster.Layouts.GetByType(SlideLayoutType.TitleAndObject)

# Save the document
pres.SaveToFile("output/CreateAndApplySlideMaster.pptx", FileFormat.Pptx2016)
pres.Dispose()
Modify Slide Masters in PowerPoint Presentations
A presentation can have multiple slide masters, which can be applied to different slides to achieve a unified style application and modification for different types of slides.
The Presentation.Masters.get_Item() method in Spire.Presentation for Python allows developers to retrieve the specified slide master in the presentation by index and modify the master. The following step-by-step example demonstrates how to retrieve a slide master and modify its background, color scheme, and embedded images:
- Create an object of Presentation class and load a PowerPoint presentation using Presentation.LoadFromFile() method.
- Get a slide master through Presentation.Masters property.
- Use the methods under IMasterSlide class to change the background, set the color scheme, delete and insert text and images, etc.
- Save the presentation using Presentation.SaveToFile() method.
- Python
from spire.presentation.common import *
from spire.presentation import *

# Create an object of Presentation
pres = Presentation()

# Load a PowerPoint presentation
pres.LoadFromFile("output/CreateAndApplySlideMaster.pptx")

# Get the third slide master
master = pres.Masters[2]

# Change the background
master.SlideBackground.Type = BackgroundType.Custom
master.SlideBackground.Fill.FillType = FillFormatType.Solid
master.SlideBackground.Fill.SolidColor.Color = Color.get_LightBlue()

# Change the color sheme
master.Theme.ColorScheme.Accent1.Color = Color.get_Red()
master.Theme.ColorScheme.Accent2.Color = Color.get_Green()

# Remove the pictures in the slide master
pictures = [shape for shape in master.Shapes if isinstance(shape, SlidePicture)]
for picture in pictures:
    master.Shapes.Remove(picture)

# Change the text in the slide master
texts = [shape for shape in master.Shapes if isinstance(shape, IAutoShape)]
for text in texts:
    if len(text.TextFrame.Text) != 0:
        text.TextFrame.Text = "Spire.Presentation for Python"

# Save the presentation
pres.SaveToFile("output/ModifySlideMaster.pptx", FileFormat.Pptx2016)
pres.Dispose()
Copy Slide Masters Between PowerPoint Presentations
Applying the slide style of a presentation to another presentation can be achieved by copying the slide master between presentations and applying the master style to the specified slides. The following are the steps to copy the slide master between presentations and apply it to the specified slides:
- Create two objects of Presentation class and load two presentation documents using Presentation.LoadFromFile() method.
- Get the slide master of the second presentation using Presentation.Masters.get_Item() method.
- Add the slide master to the first presentation using Presentation.Masters.AppendSlide() method.
- Apply the slide master to the slides in the second presentation through ISlide.Layout property.
- Save the first presentation using Presentation.SaveToFile() method.
- Python
from spire.presentation import *
from spire.presentation.common import *

# Create two objects of Presentation
pres1 = Presentation()
pres2 = Presentation()

# Load two PowerPoint documents
pres1.LoadFromFile("Sample.pptx")
pres2.LoadFromFile("Template.pptx")

# Get the slide master of the second presentation
master = pres2.Masters.get_Item(0)

# Add the slide master to the first presentation
index = pres1.Masters.AppendSlide(master)

# Apply the slide master to the first presentation
pres1.Slides.get_Item(0).Layout = pres1.Masters.get_Item(index).Layouts.GetByType(SlideLayoutType.Title)
for i in range(1, pres1.Slides.Count):
    pres1.Slides.get_Item(i).Layout = pres1.Masters.get_Item(index).Layouts.GetByType(SlideLayoutType.TitleAndObject)

# Save the first presentation
pres1.SaveToFile("output/CopySlideMaster.pptx", FileFormat.Pptx2013)
pres1.Dispose()
pres2.Dispose()
Apply for a Temporary License
If you'd like to remove the evaluation message from the generated documents, or to get rid of the function limitations, please request a 30-day trial license for yourself.
Python: Add, Modify, or Remove Footers from PowerPoint Documents
2024-04-18 01:08:25 Written by KoohjiIn a PowerPoint document, the footer is an area located at the bottom of each slide, typically containing textual information such as page numbers, dates, authors, and more. By adding a footer, you can give your slides a professional look and provide important information. Modifying the footer allows you to adjust the displayed content, style, and position to meet specific needs or styles. Removing the footer can clear the bottom content when extra information is not needed or to maintain a clean appearance. This article will introduce how to use Spire.Presentation for Python to add, modify, or remove footers in PowerPoint documents within a Python project.
- Python Add Footers in PowerPoint Documents
- Python Modify Footers in PowerPoint Documents
- Python Remove Footers in PowerPoint Documents
Install Spire.Presentation for Python
This scenario requires Spire.Presentation for Python and plum-dispatch v1.7.4. They can be easily installed in your Windows through the following pip command.
pip install Spire.Presentation
If you are unsure how to install, please refer to this tutorial: How to Install Spire.Presentation for Python on Windows
Python Add Footers in PowerPoint Documents
Using Spire.Presentation, you can add footers, page numbers, and time information to the bottom of each page in a PowerPoint document, ensuring consistent footer content across all pages. Here are the detailed steps:
- Create a Presentation object.
- Load a PowerPoint document using the Presentation.LoadFromFile() method.
- Set the footer visible using Presentation.FooterVisible = true and set the footer text.
- Set the slide number visible using Presentation.SlideNumberVisible = true, iterate through each slide, check for the lisence of a page number placeholder, and modify the text to the "Page X" format if found.
- Set the date visible using Presentation.DateTimeVisible = true.
- Set the format of the date using the Presentation.SetDateTime() method.
- Save the document using the Presentation.SaveToFile() method.
- Python
from spire.presentation.common import *
from spire.presentation import *
# Create a Presentation object
presentation = Presentation()
# Load the presentation from a file
presentation.LoadFromFile("Sample1.pptx")
# Set the footer visible
presentation.FooterVisible = True
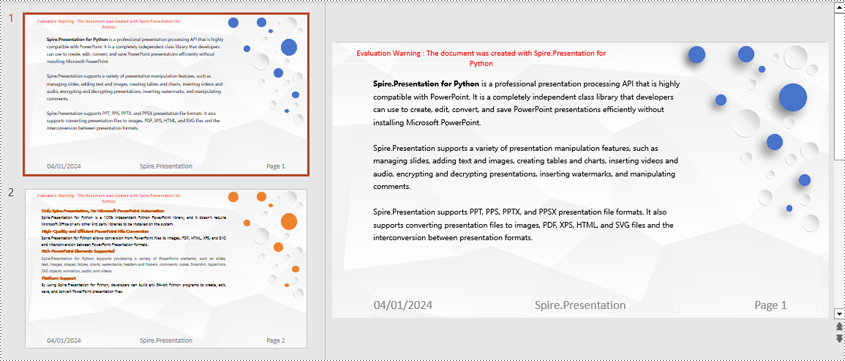
# Set the footer text to "Spire.Presentation"
presentation.SetFooterText("Spire.Presentation")
# Set the slide number visible
presentation.SlideNumberVisible = True
# Iterate through each slide in the presentation
for slide in presentation.Slides:
for shape in slide.Shapes:
if shape.IsPlaceholder:
# If it is a slide number placeholder
if shape.Placeholder.Type == PlaceholderType.SlideNumber:
autoShape = shape if isinstance(shape, IAutoShape) else None
if autoShape is not None:
text = autoShape.TextFrame.TextRange.Paragraph.Text
# Modify the slide number text to "Page X"
autoShape.TextFrame.TextRange.Paragraph.Text = "Page " + text
# Set the date and time visible
presentation.DateTimeVisible = True
# Set the date and time format
presentation.SetDateTime(DateTime.get_Now(), "MM/dd/yyyy")
# Save the modified presentation to a file
presentation.SaveToFile("AddFooter.pptx", FileFormat.Pptx2016)
# Dispose of the Presentation object resources
presentation.Dispose()
Python Modify Footers in PowerPoint Documents
To modify the footer in a PowerPoint document, you first need to inspect the elements of each slide to locate footer and page number placeholders. Then, for each type of placeholder, set the desired content and format to ensure consistent and compliant footers throughout the document. Here are the detailed steps:
- Create a Presentation object.
- Load a PowerPoint document using the Presentation.LoadFromFile() method.
- Use the Presentation.Slides[index] property to retrieve a slide.
- Iterate through the shapes in the slide using a for loop, check each shape to determine if it is a placeholder such as a footer or page number placeholder, and then modify its content or format accordingly.
- Save the document using the Presentation.SaveToFile() method.
- Python
from spire.presentation.common import *
from spire.presentation import *
def change_font(paragraph):
for textRange in paragraph.TextRanges:
# Set the text style to italic
textRange.IsItalic = TriState.TTrue
# Set the text font
textRange.EastAsianFont = TextFont("Times New Roman")
# Set the text font size to 12
textRange.FontHeight = 34
# Set the text color
textRange.Fill.FillType = FillFormatType.Solid
textRange.Fill.SolidColor.Color = Color.get_SkyBlue()
# Create a Presentation object
presentation = Presentation()
# Load a presentation from a file
presentation.LoadFromFile("Sample2.pptx")
# Get the first slide
slide = presentation.Slides[0]
# Iterate through the shapes on the slide
for shape in slide.Shapes:
# Check if the shape is a placeholder
if shape.Placeholder is not None:
# Get the placeholder type
type = shape.Placeholder.Type
# If it is a footer placeholder
if type == PlaceholderType.Footer:
# Convert the shape to IAutoShape type
autoShape = shape if isinstance(shape, IAutoShape) else None
if autoShape is not None:
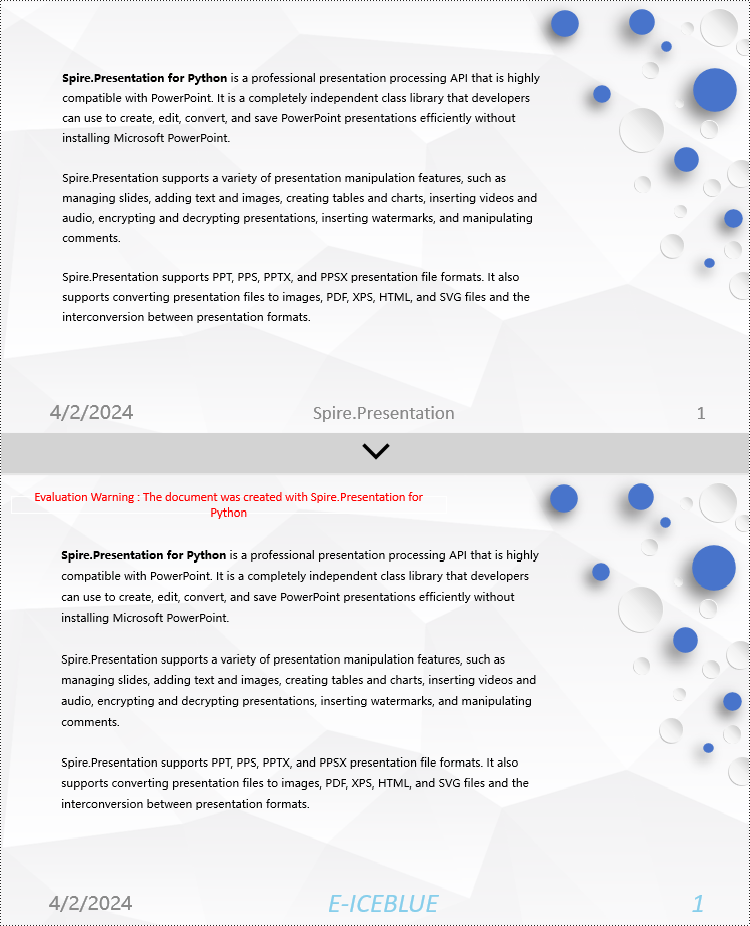
# Set the text content to "E-ICEBLUE"
autoShape.TextFrame.Text = "E-ICEBLUE"
# Modify the text font
change_font(autoShape.TextFrame.Paragraphs[0])
# If it is a slide number placeholder
if type == PlaceholderType.SlideNumber:
# Convert the shape to IAutoShape type
autoShape = shape if isinstance(shape, IAutoShape) else None
if autoShape is not None:
# Modify the text font
change_font(autoShape.TextFrame.Paragraphs[0])
# Save the modified presentation to a file
presentation.SaveToFile("ModifiedFooter.pptx", FileFormat.Pptx2016)
# Release the resources of the Presentation object
presentation.Dispose()
Python Remove Footers in PowerPoint Documents
To delete footers in a PowerPoint document, you first need to locate placeholders such as footers, page numbers, and time in the slides, and then remove them from the collection of shapes in the slide to ensure complete removal of footer content. Here are the detailed steps:
- Create a Presentation object.
- Load a PowerPoint document using the Presentation.LoadFromFile() method.
- Use the Presentation.Slides[index] property to retrieve a slide.
- Iterate through the shapes in the slide using a for loop, check if they are placeholders, and if they are footer placeholders, page number placeholders, or time placeholders, remove them from the slide.
- Save the document using the Presentation.SaveToFile() method.
- Python
from spire.presentation.common import *
from spire.presentation import *

# Create a Presentation object
presentation = Presentation()

# Load a presentation from a file
presentation.LoadFromFile("Sample2.pptx")

# Get the first slide
slide = presentation.Slides[0]

# Iterate through the shapes on the slide
for i in range(len(slide.Shapes) - 1, -1, -1):
    # Check if the shape is a placeholder
    if slide.Shapes[i].Placeholder is not None:
        # Get the placeholder type
        type = slide.Shapes[i].Placeholder.Type

        # If it is a footer placeholder
        if type == PlaceholderType.Footer:
            # Remove it from the slide
            slide.Shapes.RemoveAt(i)

        # If it is a slide number placeholder
        if type == PlaceholderType.SlideNumber:
            # Remove it from the slide
            slide.Shapes.RemoveAt(i)

        # If it is a date and time placeholder
        if type == PlaceholderType.DateAndTime:
            # Remove it from the slide
            slide.Shapes.RemoveAt(i)

# Save the modified presentation to a file
presentation.SaveToFile("RemovedFooter.pptx", FileFormat.Pptx2016)

# Release the resources of the Presentation object
presentation.Dispose()
Apply for a Temporary License
If you'd like to remove the evaluation message from the generated documents, or to get rid of the function limitations, please request a 30-day trial license for yourself.
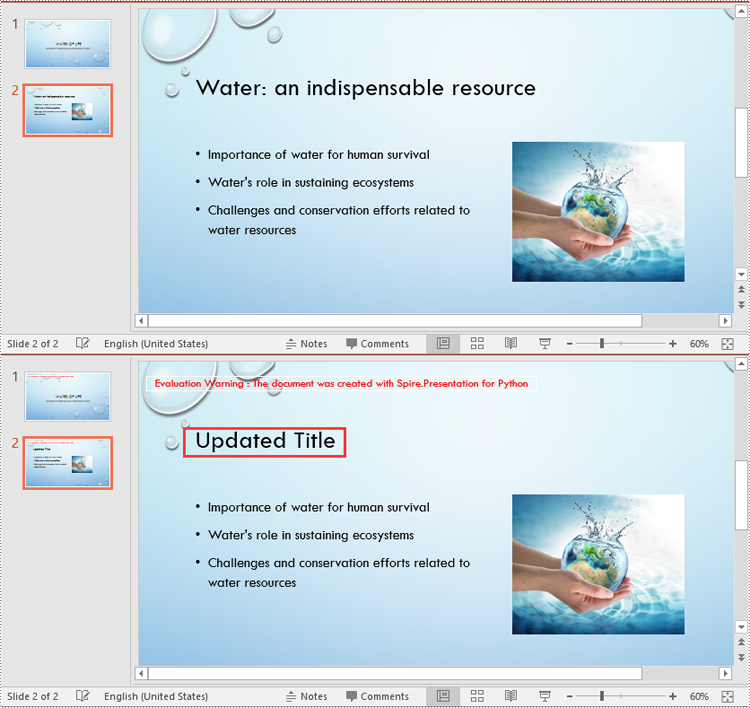
Slide titles play a crucial role in PowerPoint presentations because they can assist the audience in quickly grasping the topics or key points of each slide. When working with PowerPoint documents, users often encounter the need to update or extract slide titles for various purposes. For example, they may need to modify titles to reflect new content or extract titles to perform tasks such as summarizing or analyzing presentation content. Knowing how to programmatically update or extract slide titles can greatly save time and effort, particularly when dealing with extensive presentations. In this article, we will demonstrate how to update and extract slide titles in PowerPoint PPTX or PPT documents in Python using Spire.Presentation for Python.
Install Spire.Presentation for Python
This scenario requires Spire.Presentation for Python and plum-dispatch v1.7.4. They can be easily installed in your Windows through the following pip command.
pip install Spire.Presentation
If you are unsure how to install, please refer to this tutorial: How to Install Spire.Presentation for Python on Windows
Update Slide Titles in PowerPoint in Python
The title of a slide can be updated using the ISlide.Title property. The detailed steps are as follows.
- Create a Presentation instance.
- Load a PowerPoint PPTX or PPT document using Presentation.LoadFromFile() method.
- Get a specific slide of the document using Presentation.Slides[index] property.
- Update the title of the slide using ISlide.Title property.
- Save the result document using Presentation.SaveToFile() method.
- Python
from spire.presentation.common import *
from spire.presentation import *

# Create a Presentation object
ppt = Presentation()
# Load a PowerPoint document
ppt.LoadFromFile("Water Of Life.pptx")

# Get the second slide
slide = ppt.Slides[1]

# Update the title of the second slide
slide.Title = "Updated Title"

# Save the result document
ppt.SaveToFile("UpdateSlideTitle.pptx", FileFormat.Pptx2016)
ppt.Dispose()
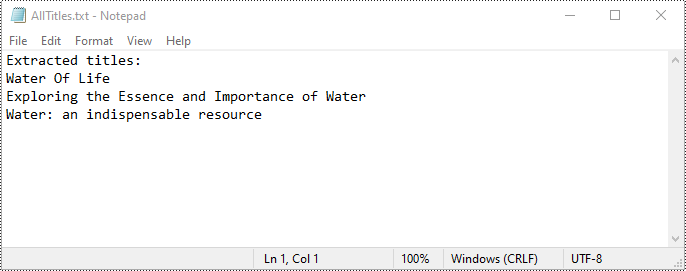
Extract All Slide Titles from PowerPoint in Python
To extract all slide titles from a PowerPoint document, you first need to iterate through all slides in the document and all shapes on each slide. Then identify shapes with placeholder types like Title, CenteredTitle, or Subtitle. After that retrieve the text content from the identified shapes using the IAutoShape.TextFrame.Text property. The detailed steps are as follows.
- Create a Presentation instance.
- Load a PowerPoint PPTX or PPT document using Presentation.LoadFromFile() method.
- Create a list to store the extracted titles.
- Iterate through all slides in the document.
- For each slide, iterate through all shapes on it.
- Identify shapes with placeholder types such as Title, CenteredTitle, or Subtitle.
- Typecast the identified shapes to IAutoShape object.
- Retrieve the text content of the identified shapes using the IAutoShape.TextFrame.Text property and append them to the list.
- Save the content of the list to a text file.
- Python
from spire.presentation.common import *
from spire.presentation import *

# Load a PowerPoint document
ppt = Presentation()
ppt.LoadFromFile("Water of Life.pptx")

# Create a list to store the extracted slide titles
titles = []

# Iterate through all slides in the document
for slide in ppt.Slides:
    # Iterate through all shapes on each slide
    for shape in slide.Shapes:
        # Find the shapes with placeholder types such as Title, CenteredTitle, or Subtitle
        if shape.Placeholder is not None and shape.Placeholder.Type in [PlaceholderType.Title, PlaceholderType.CenteredTitle, PlaceholderType.Subtitle]:
            # Typecast the shape to IautoShape object
            auto_shape = shape if isinstance(shape, IAutoShape) else None
            if auto_shape is not None:
                # Add the text of the shape to the titles list
                titles.append(auto_shape.TextFrame.Text)

# Save the extracted slide titles to a text file
with open("AllTitles.txt", "w") as file:
    file.write("Extracted titles:\n")
    file.write("\n".join(titles))

ppt.Dispose()
Apply for a Temporary License
If you'd like to remove the evaluation message from the generated documents, or to get rid of the function limitations, please request a 30-day trial license for yourself.
Python: Create a Pie Chart or a Doughnut Chart in PowerPoint
2024-03-19 01:13:26 Written by AdministratorPie charts and doughnut charts are two popular types of data visualization tools that are widely used to show the proportional distribution of categories within the whole. Both charts can serve as powerful communication aids, allowing viewers to quickly grasp the significance of each component and how it relates to the overall picture.
While pie charts and doughnut charts share many similarities, they also have unique characteristics that make them suitable for different analytical scenarios. In this article, you will learn how to create a pie chart or a doughnut chart in PowerPoint with Python using Spire.Presentation for Python.
Install Spire.Presentation for Python
This scenario requires Spire.Presentation for Python and plum-dispatch v1.7.4. They can be easily installed in your Windows through the following pip command.
pip install Spire.Presentation
If you are unsure how to install, please refer to this tutorial: How to Install Spire.Presentation for Python on Windows
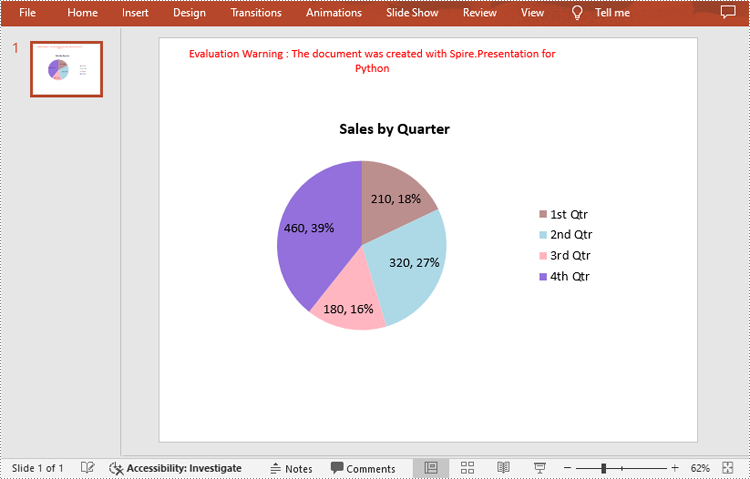
Create a Pie Chart in PowerPoint with Python
Pie charts are designed to resemble a circle, which is divided into sections or "slices", with each slice representing a portion of the whole.
With Spire.Prensetion for Python, you can add a pie chart to a presentation slide using the ISlide.Shapes.AppendChartInit(type: ChartType, rectangle: RectangleF, init: bool) method and specify the chart type as Pie. The following are the detailed steps.
- Create a Presentation instance.
- Get the first slide using Prenstion.Slides[] property.
- Add a pie chart at a specified location on the side using ISlide.Shapes.AppendChartInit(type: ChartType, rectangle RectangleF, init bool).
- Set and format the chart title.
- Define some data and append the data to the chart sheet as chart data using IChart.ChartData property.
- Set series labels, category labels, series values and other attributes using the properties of the IChart class.
- Set to show label value and percentage value.
- Save the result file using Presentation.SaveToFile() method.
- Python
from spire.presentation.common import *
from spire.presentation import *

# Create a Presentation instance
presentation = Presentation()

# Add a pie chart at a specified location on the first slide
rect = RectangleF.FromLTRB (40, 100, 590, 420)
chart = presentation.Slides[0].Shapes.AppendChartInit (ChartType.Pie, rect, False)

# Set and format chart title
chart.ChartTitle.TextProperties.Text = "Sales by Quarter"
chart.ChartTitle.TextProperties.IsCentered = True
chart.ChartTitle.Height = 30
chart.HasTitle = True

# Define some data
quarters = ["1st Qtr", "2nd Qtr", "3rd Qtr", "4th Qtr"]
sales = [210, 320, 180, 460]

# Append data to ChartData, which represents a data table where the chart data is stored
chart.ChartData[0,0].Text = "Quarters"
chart.ChartData[0,1].Text = "Sales"
i = 0
while i < len(quarters):
    chart.ChartData[i + 1,0].Text = quarters[i]
    chart.ChartData[i + 1,1].NumberValue = sales[i]
    i += 1

# Set series labels and category labels
chart.Series.SeriesLabel = chart.ChartData["B1","B1"]
chart.Categories.CategoryLabels = chart.ChartData["A2","A5"]

# Set values for series
chart.Series[0].Values = chart.ChartData["B2","B5"]

# Add data points to series
for i, unusedItem in enumerate(chart.Series[0].Values):
    cdp = ChartDataPoint(chart.Series[0])
    cdp.Index = i
    chart.Series[0].DataPoints.Add(cdp)

# Fill each data point with a different color
chart.Series[0].DataPoints.get_Item(0).Fill.FillType = FillFormatType.Solid
chart.Series[0].DataPoints.get_Item(0).Fill.SolidColor.Color = Color.get_RosyBrown()
chart.Series[0].DataPoints.get_Item(1).Fill.FillType = FillFormatType.Solid
chart.Series[0].DataPoints.get_Item(1).Fill.SolidColor.Color = Color.get_LightBlue()
chart.Series[0].DataPoints.get_Item(2).Fill.FillType = FillFormatType.Solid
chart.Series[0].DataPoints.get_Item(2).Fill.SolidColor.Color = Color.get_LightPink()
chart.Series[0].DataPoints.get_Item(3).Fill.FillType = FillFormatType.Solid
chart.Series[0].DataPoints.get_Item(3).Fill.SolidColor.Color = Color.get_MediumPurple()

# Set the data labels to display label value and percentage value
chart.Series[0].DataLabels.LabelValueVisible = True
chart.Series[0].DataLabels.PercentValueVisible = True

# Save the result file
presentation.SaveToFile("CreatePieChart.pptx", FileFormat.Pptx2016)
presentation.Dispose()
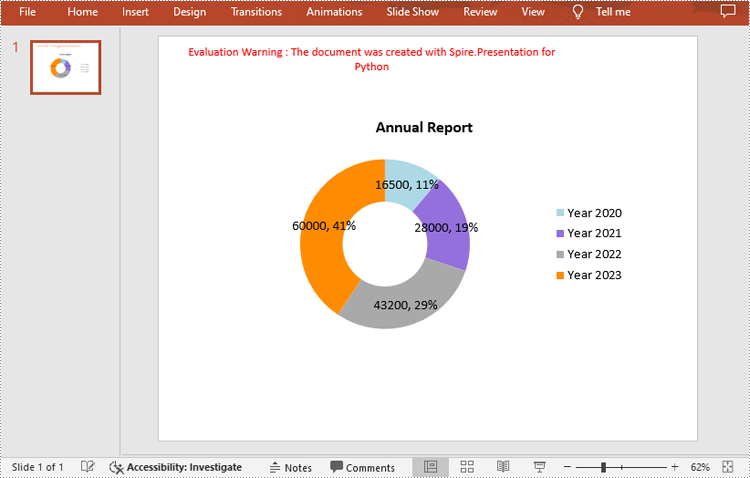
Create a Doughnut Chart in PowerPoint with Python
Doughnut charts are very similar to pie charts, with the primary difference being the presence of a "hole" in the center. This hole can be used to display additional information or to maintain a cleaner look.
To add a donut chart to a presentation slide, you can specify the ChartType parameter of ISlide.Shapes.AppendChartInit() method as Doughnut. The following are the detailed steps.
- Create a Presentation instance.
- Get the first slide using Prenstion.Slides[] property.
- Add a doughnut chart at a specified location on the side using ISlide.Shapes.AppendChartInit(type: ChartType, rectangle: RectangleF, init: bool).
- Define some data and append the data to the chart sheet as chart data using IChart.ChartData property.
- Set series labels, category labels, series values and other attributes using the properties of the IChart class.
- Set to show label value and percentage value.
- Save the result file using Presentation.SaveToFile() method.
- Python
from spire.presentation.common import *
from spire.presentation import *

# Create a Presentation instance
presentation = Presentation()

# Add a doughnut chart at a specified location on the first slide
rect = RectangleF.FromLTRB (80, 100, 630, 420)
chart = presentation.Slides[0].Shapes.AppendChartInit(ChartType.Doughnut, rect, False)

# Set and format chart title
chart.ChartTitle.TextProperties.Text = "Annual Report"
chart.ChartTitle.TextProperties.IsCentered = True
chart.ChartTitle.Height = 30

# Define some data
years = ["Year 2020", "Year 2021", "Year 2022", "Year 2023"]
sales = [16500, 28000, 43200, 60000]

# Append data to ChartData, which represents a data table where the chart data is stored
chart.ChartData[0,0].Text = "Quarters"
chart.ChartData[0,1].Text = "Sales"
i = 0
while i < len(years):
    chart.ChartData[i + 1,0].Text = years[i]
    chart.ChartData[i + 1,1].NumberValue = sales[i]
    i += 1

# Set series labels and category labels
chart.Series.SeriesLabel = chart.ChartData["B1","B1"]
chart.Categories.CategoryLabels = chart.ChartData["A2","A5"]

# Set values for series
chart.Series[0].Values = chart.ChartData["B2","B5"]

# Add data points to series
for i, item in enumerate(chart.Series[0].Values):
    cdp = ChartDataPoint(chart.Series[0])
    cdp.Index = i
    chart.Series[0].DataPoints.Add(cdp)

# Fill each data point with a different color
chart.Series[0].DataPoints.get_Item(0).Fill.FillType = FillFormatType.Solid
chart.Series[0].DataPoints.get_Item(0).Fill.SolidColor.Color = Color.get_LightBlue()
chart.Series[0].DataPoints.get_Item(1).Fill.FillType = FillFormatType.Solid
chart.Series[0].DataPoints.get_Item(1).Fill.SolidColor.Color = Color.get_MediumPurple()
chart.Series[0].DataPoints.get_Item(2).Fill.FillType = FillFormatType.Solid
chart.Series[0].DataPoints.get_Item(2).Fill.SolidColor.Color =  Color.get_DarkGray()
chart.Series[0].DataPoints.get_Item(3).Fill.FillType = FillFormatType.Solid
chart.Series[0].DataPoints.get_Item(3).Fill.SolidColor.Color = Color.get_DarkOrange()

# Set the data labels to display label value and percentage value
chart.Series[0].DataLabels.LabelValueVisible = True
chart.Series[0].DataLabels.PercentValueVisible = True

# Set the hole size of the doughnut chart
chart.Series[0].DoughnutHoleSize = 50

# Save the result file
presentation.SaveToFile("DoughnutChart.pptx", FileFormat.Pptx2016)
presentation.Dispose()
Apply for a Temporary License
If you'd like to remove the evaluation message from the generated documents, or to get rid of the function limitations, please request a 30-day trial license for yourself.
Table borders in PowerPoint refer to the visible lines or outlines that surround the cells within a table. These borders provide a visual separation between cells and help define the boundaries of the table. By setting or modifying table borders, you can customize the appearance of tables in your PowerPoint presentations. In this article, we will guide you on how to set and remove table borders in PowerPoint in Python using Spire.Presentation for Python.
Install Spire.Presentation for Python
This scenario requires Spire.Presentation for Python and plum-dispatch v1.7.4. They can be easily installed in your Windows through the following pip command.
pip install Spire.Presentation
If you are unsure how to install, please refer to this tutorial: How to Install Spire.Presentation for Python on Windows
Set Table Borders in PowerPoint in Python
Spire.Presentation for Python provides the ITable.SetTableBorder() method, which allows you to set borders for a table in PowerPoint. The detailed steps are as follows.
- Create an object of the Presentation class.
- Get the first slide of the presentation using Presentation.Slides[] property.
- Add a table to the slide using ISlide.Shapes.AppendTable() method.
- Add borders to the table and set the border type, width, and color using ITable.SetTableBorder() method.
- Save the result presentation using Presentation.SaveToFile() method.
- Python
from spire.presentation.common import *
from spire.presentation import *

# Create a Presentation object
presentation = Presentation()
# Get  the first slide of the presentation
slide = presentation.Slides[0]

# Specify the number and size of rows and columns in table
widths = [100, 100, 100, 100, 100]
heights = [20, 20]

# Add a table to the first slide
table = slide.Shapes.AppendTable(100, 100, widths, heights)

# Add borders to the table and set the border type, width, and color
table.SetTableBorder(TableBorderType.All, 1, Color.get_Blue())

# Save the result presentation
presentation.SaveToFile("SetBorders.pptx", FileFormat.Pptx2013)
presentation.Dispose()
Remove Table Borders in PowerPoint in Python
To remove borders from a table, you need to iterate through the cells in the table and then remove the borders from each cell. The detailed steps are as follows.
- Create an object of the Presentation class.
- Load a PowerPoint presentation using Presentation.LoadFromFile() method.
- Get a specific slide of the presentation using Presentation.Slides[] property.
- Get the table on the slide.
- Iterate through the rows in the table and the cells in each row.
- Remove the borders from each cell by setting the fill type of the top, bottom, left and right borders of the cell as none.
- Save the result presentation using Presentation.SaveToFile() method.
- Python
from spire.presentation.common import *
from spire.presentation import *

# Create a PowerPoint presentation
presentation = Presentation()
# Load a PowerPoint presentation
presentation.LoadFromFile("SetBorders.pptx")

# Get the first slide
slide = presentation.Slides[0]
# Get the table on the slide
table = slide.Shapes[0] if isinstance(slide.Shapes[0], ITable) else None
table = (ITable)(table)

# Iterate through the rows and cells in the table
for row in table.TableRows:
    for cell in row:
        # Remove borders from each cell by setting the fill type of the top, bottom, left and right borders of the cell as none
        cell.BorderTop.FillType = FillFormatType.none
        cell.BorderBottom.FillType = FillFormatType.none
        cell.BorderLeft.FillType = FillFormatType.none
        cell.BorderRight.FillType = FillFormatType.none

# Save the result presentation
presentation.SaveToFile("RemoveBorders.pptx", FileFormat.Pptx2013)
presentation.Dispose()
Apply for a Temporary License
If you'd like to remove the evaluation message from the generated documents, or to get rid of the function limitations, please request a 30-day trial license for yourself.
Working with multiple PowerPoint presentations at the same time can be a daunting task, often resulting in a less-than-ideal presentation experience. However, there is a solution that can streamline this process and ensure seamless transitions throughout the presentation. By combining multiple PowerPoint files into a single cohesive presentation, presenters can eliminate the need to repeatedly open different files, saving time and effort. While manually copying slides can be arduous and time-consuming, Python offers a swift and efficient solution. This article is going to show how to leverage Spire.Presentation for Python to merge PowerPoint presentations effortlessly through Python programs.
- Merging PowerPoint Presentations and Retain Their Designs
- Merging PowerPoint Presentations with Consistent Design
Install Spire.PDF for Python
This scenario requires Spire.Presentation for Python and plum-dispatch v1.7.4. They can be easily installed in your Windows through the following pip command.
pip install Spire.Presentation
If you are unsure how to install, please refer to: How to Install Spire.Presentation for Python on Windows
Merging PowerPoint Presentations and Retain Their Designs
Merging PowerPoint presentations can be accomplished by reading slides from one presentation and adding them to another presentation. During the process of adding to the target presentation, developers can use Presentation.Slides.AppendBySlide(ISlide) method to add slides and retain the original design of the slides.
The detailed steps are as follows:
- Create two instances of Presentation class.
- Load two PowerPoint presentations using Presentation.LoadFromFile() method.
- Iterate through each slide in the second presentation and add them to the first presentation while keeping their design using Presentation.Slides.AppendBySlide() method.
- Save the first presentation using Presentation.SaveToFile() method.
- Python
from spire.presentation import *
from spire.presentation.common import *

# Create two instances of Presentation class
pres1 = Presentation()
pres2 = Presentation()

# Load two presentation files
pres1.LoadFromFile("Sample1.pptx")
pres2.LoadFromFile("Sample2.pptx")

# Iterate through the slides of the second presentation
for slide in pres2.Slides:
    # Add each slides to the first presentation and keep the original design
    pres1.Slides.AppendBySlide(slide)

# Save the first presentation
pres1.SaveToFile("output/MergePresentations.pptx", FileFormat.Pptx2016)
pres1.Dispose()
pres2.Dispose()
Merging PowerPoint Presentations with Consistent Design
Developers can also use Presentation.Slides.AppendByMaster(slide Islide, master IMasterSlide) method to insert slides into the target presentation and change the design of the slides to the design of the target presentation. This allows for merging presentations and ensuring a consistent design.
The detailed stops are as follows:
- Create two instances of Presentation class.
- Load two PowerPoint presentations using Presentation.LoadFromFile() method.
- Iterate through each slide in the second presentation and add them to the first presentation while changing their design to the design of the first presentation using Presentation.Slides.AppendByMaster() method.
- Save the first presentation using Presentation.SaveToFile() method.
- Python
from spire.presentation import *
from spire.presentation.common import *

# Create two instances of Presentation class
pres1 = Presentation()
pres2 = Presentation()

# Load two presentation files
pres1.LoadFromFile("Sample1.pptx")
pres2.LoadFromFile("Sample2.pptx")

# Iterate through each slide in the second presentation
for slide in pres2.Slides:
    # Add each slide to the first presentation
    pres1.Slides.AppendByMaster(slide, pres1.Masters[0])

# Save the first presentation
pres1.SaveToFile("output/MergePresentationsDesign.pptx", FileFormat.Pptx2016)
pres1.Dispose()
pres2.Dispose()
Apply for a Temporary License
If you'd like to remove the evaluation message from the generated documents, or to get rid of the function limitations, please request a 30-day trial license for yourself.
