
Program Guide (52)
Children categories
Python: Add or Extract Audio and Video from PowerPoint Documents
2024-02-21 00:56:54 Written by KoohjiAdding or extracting audio and video in a PowerPoint document can greatly enrich the presentation content, enhance audience engagement, and improve comprehension. By adding audio, you can include background music, narration, or sound effects to make the content more lively and emotionally engaging. Inserting videos allows you to showcase dynamic visuals, demonstrate processes, or explain complex concepts, helping the audience to understand the content more intuitively. Extracting audio and video can help preserve important information or resources for reuse when needed. This article will introduce how to use Python and Spire.Presentation for Python to add or extract audio and video in PowerPoint.
- Add Audio in PowerPoint Documents in Python
- Extract Audio from PowerPoint Documents in Python
- Add Video in PowerPoint Documents in Python
- Extract Video from PowerPoint Documents in Python
Install Spire.Presentation for Python
This scenario requires Spire.Presentation for Python and plum-dispatch v1.7.4. They can be easily installed in your Windows through the following pip command.
pip install Spire.Presentation
If you are unsure how to install, please refer to this tutorial: How to Install Spire.Presentation for Python on Windows
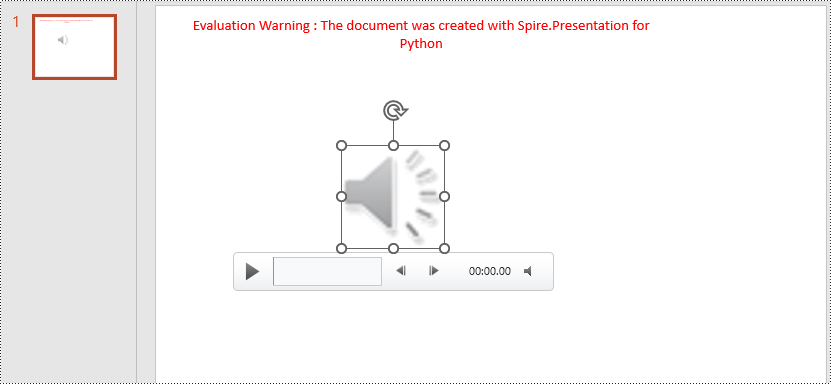
Add Audio in PowerPoint Documents in Python
Spire.Presentation for Python provides the Slide.Shapes.AppendAudioMedia() method, which can be used to add audio files to slides. The specific steps are as follows:
- Create an object of the Presentation class.
- Use the RectangleF.FromLTRB() method to create a rectangle.
- In the shapes collection of the first slide, use the Slide.Shapes.AppendAudioMedia() method to add the audio file to the previously created rectangle.
- Use the Presentation.SaveToFile() method to save the document as a PowerPoint file.
- Python
from spire.presentation.common import *
from spire.presentation import *

# Create a presentation object
presentation = Presentation()

# Create an audio rectangle
audioRect = RectangleF.FromLTRB(200, 150, 310, 260)

# Add audio
presentation.Slides[0].Shapes.AppendAudioMedia("data/Music.wav", audioRect)

# Save the presentation to a file
presentation.SaveToFile("AddAudio.pptx", FileFormat.Pptx2016)

# Release resources
presentation.Dispose()
Extract Audio from PowerPoint Documents in Python
To determine if a shape is of audio type, you can check if its type is IAudio. If the shape is of audio type, you can use the IAudio.Data property to retrieve audio data. The specific steps are as follows:
- Create an object of the Presentation class.
- Use the Presentation.LoadFromFile() method to load the PowerPoint document.
- Iterate through the shapes collection on the first slide, checking if each shape is of type IAudio.
- If the shape is of type IAudio, use IAudio.Data property to retrieve the audio data from the audio object.
- Use the AudioData.SaveToFile() method to save the audio data to a file.
- Python
from spire.presentation.common import *
from spire.presentation import *

# Create a presentation object
presentation = Presentation()

# Load a presentation from a file
presentation.LoadFromFile("Audio.pptx")

# Initialize a counter
i = 1

# Iterate through shapes in the first slide
for shape in presentation.Slides[0].Shapes:

    # Check if the shape is of audio type
    if isinstance(shape, IAudio):

        # Get the audio data and save it to a file
        AudioData = shape.Data
        AudioData.SaveToFile("ExtractAudio_"+str(i)+".wav")
        i = i + 1

# Release resources
presentation.Dispose()

Add Video in PowerPoint Documents in Python
Using the Slide.Shapes.AppendVideoMedia() method, you can add video files to slides. The specific steps are as follows:
- Create an object of the Presentation class.
- Use the RectangleF.FromLTRB() method to create a rectangle.
- In the shapes collection of the first slide, use the Slide.Shapes.AppendVideoMedia() method to add the video file to the previously created rectangle.
- Use the video.PictureFill.Picture.Url property to set the cover image of the video.
- Use the Presentation.SaveToFile() method to save the document as a PowerPoint file.
- Python
from spire.presentation.common import *
from spire.presentation import *

# Create a presentation object
presentation = Presentation()

# Create a video rectangle
videoRect = RectangleF.FromLTRB(200, 150, 450, 350)

# Add video
video = presentation.Slides[0].Shapes.AppendVideoMedia("data/Video.mp4", videoRect)
video.PictureFill.Picture.Url = "data/Video.png"

# Save the presentation to a file
presentation.SaveToFile("AddVideo.pptx", FileFormat.Pptx2016)

# Release resources
presentation.Dispose()

Extract Video from PowerPoint Documents in Python
The video type is IVideo. If the shape is of type IVideo, you can use the IVideo.EmbeddedVideoData property to retrieve video data. The specific steps are as follows:
- Create an object of the Presentation class.
- Use the Presentation.LoadFromFile() method to load the PowerPoint presentation.
- Iterate through the shapes collection on the first slide, checking if each shape is of type IVideo.
- If the shape is of type IVideo, use the IVideo.EmbeddedVideoData property to retrieve the video data from the video object.
- Use the VideoData.SaveToFile() method to save the video data to a file.
- Python
from spire.presentation.common import *
from spire.presentation import *

# Create a presentation object
presentation = Presentation()

# Load a presentation from a file
presentation.LoadFromFile("Video.pptx")

# Initialize a counter
i = 1

# Iterate through each slide in the presentation
for slide in presentation.Slides:

    # Iterate through shapes in each slide
    for shape in slide.Shapes:

        # Check if the shape is of video type
        if isinstance(shape, IVideo):

            # Get the video data and save it to a file
            VideoData = shape.EmbeddedVideoData
            VideoData.SaveToFile("ExtractVideo_"+str(i)+".avi")
            i = i + 1

# Release resources
presentation.Dispose()

Apply for a Temporary License
If you'd like to remove the evaluation message from the generated documents, or to get rid of the function limitations, please request a 30-day trial license for yourself.
Merging and splitting table cells in PowerPoint are essential features that enable users to effectively organize and present data. By merging cells, users can create larger cells to accommodate more information or establish header rows for better categorization. On the other hand, splitting cells allows users to divide a cell into smaller units to showcase specific details, such as individual data points or subcategories. These operations enhance the visual appeal and clarity of slides, helping the audience better understand and analyze the presented data. In this article, we will demonstrate how to merge and split table cells in PowerPoint in Python using Spire.Presentation for Python.
Install Spire.Presentation for Python
This scenario requires Spire.Presentation for Python and plum-dispatch v1.7.4. They can be easily installed in your Windows through the following pip command.
pip install Spire.Presentation
If you are unsure how to install, please refer to this tutorial: How to Install Spire.Presentation for Python on Windows
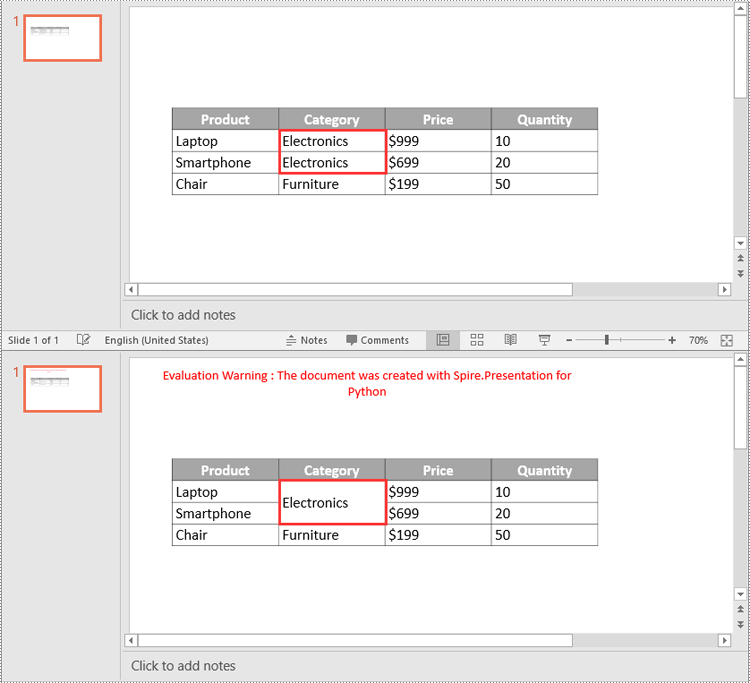
Merge Table Cells in PowerPoint in Python
Spire.Presentation for Python offers the ITable[columnIndex, rowIndex] property to access specific table cells. Once accessed, you can use the ITable.MergeCells(startCell, endCell, allowSplitting) method to merge them into a larger cell. The detailed steps are as follows.
- Create an object of the Presentation class.
- Load a PowerPoint presentation using Presentation.LoadFromFile() method.
- Get a specific slide using Presentation.Slides[index] property.
- Find the table on the slide by looping through all shapes.
- Get the cells you want to merge using ITable[columnIndex, rowIndex] property.
- Merge the cells using ITable.MergeCells(startCell, endCell, allowSplitting) method.
- Save the result presentation using Presentation.SaveToFile() method.
- Python
from spire.presentation.common import *
from spire.presentation import *

# Create a Presentation object
ppt = Presentation()

# Load a PowerPoint presentation
ppt.LoadFromFile("Table1.pptx")

# Get the first slide
slide = ppt.Slides[0]

# Find the table on the first slide
table = None
for shape in slide.Shapes:
    if isinstance(shape, ITable):
        table = shape
        # Get the cell at column 2, row 2
        cell1 = table[1, 1]
        # Get the cell at column 2, row 3
        cell2 = table[1, 2]
        # Check if the content of the cells is the same
        if cell1.TextFrame.Text == cell2.TextFrame.Text:
            # Clear the text in the second cell
            cell2.TextFrame.Paragraphs.Clear()
        # Merge the cells
        table.MergeCells(cell1, cell2, True)

# Save the result presentation to a new file
ppt.SaveToFile("MergeCells.pptx", FileFormat.Pptx2016)
ppt.Dispose()
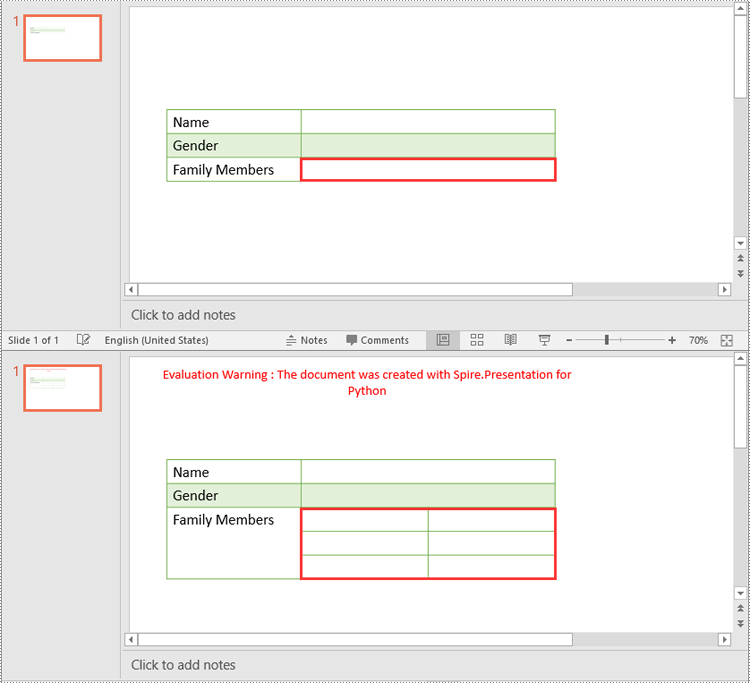
Split Table Cells in PowerPoint in Python
In addition to merging specific table cells, Spire.Presentation for Python also empowers you to split a specific table cell into smaller cells by using the Cell.Split(rowCount, colunmCount) method. The detailed steps are as follows.
- Create an object of the Presentation class.
- Load a PowerPoint presentation using Presentation.LoadFromFile() method.
- Get a specific slide using Presentation.Slides[index] property.
- Find the table on the slide by looping through all shapes.
- Get the cell you want to split using ITable[columnIndex, rowIndex] property.
- Split the cell into smaller cells using Cell.Split(rowCount, columnCount) method.
- Save the result presentation using Presentation.SaveToFile() method.
- Python
from spire.presentation.common import *
from spire.presentation import *

# Create a Presentation object
ppt = Presentation()

# Load a PowerPoint presentation
ppt.LoadFromFile("Table2.pptx")

# Get the first slide
slide = ppt.Slides[0]

# Find the table on the first slide
table = None
for shape in slide.Shapes:
    if isinstance(shape, ITable):
        table = shape
        # Get the cell at column 2, row 3
        cell = table[1, 2]
        # Split the cell into 3 rows and 2 columns
        cell.Split(3, 2)

# Save the result presentation to a new file
ppt.SaveToFile("SplitCells.pptx", FileFormat.Pptx2016)
ppt.Dispose()
Apply for a Temporary License
If you'd like to remove the evaluation message from the generated documents, or to get rid of the function limitations, please request a 30-day trial license for yourself.
A column chart in PowerPoint is a graphical representation of data that uses bars or columns to show comparisons between categories. It is commonly used to display financial data, statistics, and other quantitative information. Each column represents a category, and the height of the column corresponds to the value associated with that category. Column charts are easy to create and customize within PowerPoint, allowing users to quickly visualize their data.
In this article, you will learn how to programmatically create column charts in a PowerPoint document using Spire.Presentation for Python.
- Create a Clustered Column Chart in PowerPoint in Python
- Create a Stacked Column Chart in PowerPoint in Python
Install Spire.Presentation for Python
This scenario requires Spire.Presentation for Python and plum-dispatch v1.7.4. They can be easily installed in your Windows through the following pip command.
pip install Spire.Presentation
If you are unsure how to install, please refer to this tutorial: How to Install Spire.Presentation for Python on Windows
Create a Clustered Column Chart in PowerPoint in Python
A clustered column chart is a type of bar graph where the bars (or columns) are grouped together in clusters or segments, with each cluster representing a category and the height of the columns within the cluster reflecting the value of a data point for that category.
To add a clustered column chart in PowerPoint using Spire.Prensetion for Python, you can use the ISlide.Shapes.AppendChartInit(type: ChartType, rectangle RectangleF, init bool) method and specify the chart type as ColumnClustered. This method returns an object of IChart class, which you can use to set the chart data, title, series labels, category labels, series values and other attributes.
The following are the steps to create a clustered column chart in PowerPoint in Python.
- Create a Presentation object.
- Get the first slide using Prenstion.Slides[] property.
- Add a clustered column chart to the side using ISlide.Shapes.AppendChartInit(type: ChartType, rectangle RectangleF, init bool).
- Add text and numbers to the chart sheet as chart data using IChart.ChartData property.
- Set series labels, category labels, series values and other attributes using the properties of the IChart class.
- Save the document to a PowerPoint file using Presentation.SaveToFile() method.
- Python
from spire.presentation.common import *
from spire.presentation import *
# Create a Presentation object
presentation = Presentation()
# Set slide size type
presentation.SlideSize.Type = SlideSizeType.Screen16x9
# Get the first slide
slide = presentation.Slides[0]
# Add clustered column chart
rect = RectangleF.FromLTRB(40, 80, 700, 450)
chart = slide.Shapes.AppendChartInit(ChartType.ColumnClustered, rect, False)
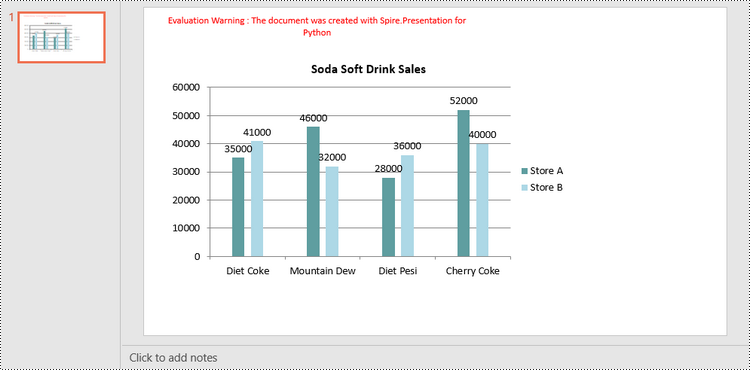
# Set chart title
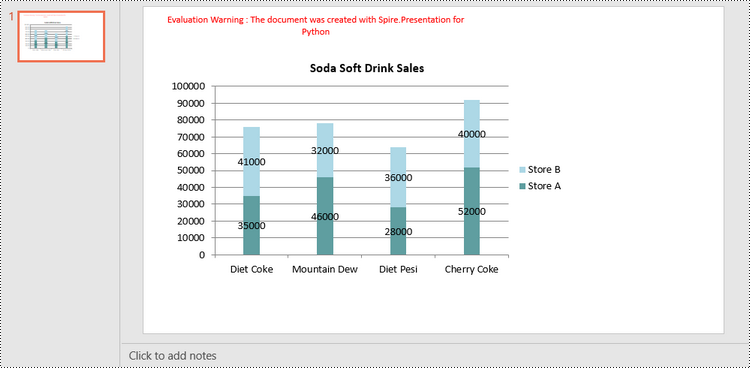
chart.ChartTitle.TextProperties.Text = "Soda Soft Drink Sales"
chart.ChartTitle.TextProperties.IsCentered = True
chart.ChartTitle.Height = 25
chart.HasTitle = True
# Insert text to chart as series labels
chart.ChartData[0,0].Text = "Product"
chart.ChartData[0,1].Text = "Store A"
chart.ChartData[0,2].Text = "Store B"
# Insert text to chart as category labels
chart.ChartData[1,0].Text = "Diet Coke"
chart.ChartData[2,0].Text = "Mountain Dew"
chart.ChartData[3,0].Text = "Diet Pesi"
chart.ChartData[4,0].Text = "Cherry Coke"
# Insert numbers to chart as values of series
Series1 = [35000, 46000, 28000, 52000]
Series2 = [41000, 32000, 36000, 40000]
i = 0
while i < len(Series1):
chart.ChartData[i + 1,1].NumberValue = Series1[i]
chart.ChartData[i + 1,2].NumberValue = Series2[i]
i += 1
# Set series labels
chart.Series.SeriesLabel = chart.ChartData["B1","C1"]
# Set category labels
chart.Categories.CategoryLabels = chart.ChartData["A2","A5"]
# Set values for series
chart.Series[0].Values = chart.ChartData["B2","B5"]
chart.Series[1].Values = chart.ChartData["C2","C5"]
# Set gap width
chart.GapWidth = 350
# Set overlap
chart.OverLap = -50
# Set fill color of each series
chart.Series[0].Fill.FillType = FillFormatType.Solid
chart.Series[0].Fill.SolidColor.Color = Color.get_CadetBlue()
chart.Series[1].Fill.FillType = FillFormatType.Solid
chart.Series[1].Fill.SolidColor.Color = Color.get_LightBlue()
# Add data labels
for i in range(len(Series1)):
chart.Series[0].DataLabels.Add()
chart.Series[1].DataLabels.Add()
# Save the document
presentation.SaveToFile("output/ClusteredColumnChart.pptx", FileFormat.Pptx2019)
presentation.Dispose()
Create a Stacked Column Chart in PowerPoint in Python
A stacked column chart is a variation of the standard column chart where each column represents a category, and the height of the column corresponds to the total value of the category.
To add a stacked column chart in PowerPoint using Spire.Prensetion for Python, you use the ISlide.Shapes.AppendChartInit(type: ChartType, rectangle RectangleF, init bool) method and specify the chart type as ColumnStacked. Then, you can use to set the chart data, title, series labels, category labels, series values and other attributes using the properties of the IChart class.
The following are the steps to create a stacked column chart in PowerPoint in Python.
- Create a Presentation object.
- Get the first slide using Prenstion.Slides[] property.
- Add a stacked column chart to the side using ISlide.Shapes.AppendChartInit(type: ChartType, rectangle RectangleF, init bool).
- Add text and numbers to the chart sheet as chart data using IChart.ChartData property.
- Set series labels, category labels, series values and other attributes using the properties of the IChart class.
- Save the document to a PowerPoint file using Presentation.SaveToFile() method.
- Python
from spire.presentation.common import *
from spire.presentation import *

# Create a Presentation object
presentation = Presentation()

# Set slide size type
presentation.SlideSize.Type = SlideSizeType.Screen16x9

# Get the first slide
slide = presentation.Slides[0]

# Add a stacked column chart
rect = RectangleF.FromLTRB(40, 80, 700, 450)
chart = slide.Shapes.AppendChartInit(ChartType.ColumnStacked, rect, False)

# Set chart title
chart.ChartTitle.TextProperties.Text = "Soda Soft Drink Sales"
chart.ChartTitle.TextProperties.IsCentered = True
chart.ChartTitle.Height = 25
chart.HasTitle = True

# Insert text to chart as series labels
chart.ChartData[0,0].Text = "Product"
chart.ChartData[0,1].Text = "Store A"
chart.ChartData[0,2].Text = "Store B"

# Insert text to chart as category labels
chart.ChartData[1,0].Text = "Diet Coke"
chart.ChartData[2,0].Text = "Mountain Dew"
chart.ChartData[3,0].Text = "Diet Pesi"
chart.ChartData[4,0].Text = "Cherry Coke"

# Insert numbers to chart as values of series
Series1 = [35000, 46000, 28000, 52000]
Series2 = [41000, 32000, 36000, 40000]
i = 0
while i < len(Series1):
    chart.ChartData[i + 1,1].NumberValue = Series1[i]
    chart.ChartData[i + 1,2].NumberValue = Series2[i]
    i += 1

# Set series labels
chart.Series.SeriesLabel = chart.ChartData["B1","C1"]

# Set category labels
chart.Categories.CategoryLabels = chart.ChartData["A2","A5"]

# Set values for series
chart.Series[0].Values = chart.ChartData["B2","B5"]
chart.Series[1].Values = chart.ChartData["C2","C5"]

# Set gap width
chart.GapWidth = 350

# Set fill color of each series
chart.Series[0].Fill.FillType = FillFormatType.Solid
chart.Series[0].Fill.SolidColor.Color = Color.get_CadetBlue()
chart.Series[1].Fill.FillType = FillFormatType.Solid
chart.Series[1].Fill.SolidColor.Color = Color.get_LightBlue()

# Add data labels
for i in range(len(Series1)):
    chart.Series[0].DataLabels.Add()
    chart.Series[1].DataLabels.Add()

# Save the document
presentation.SaveToFile("output/StackedColumnChart.pptx", FileFormat.Pptx2019)
presentation.Dispose()
Apply for a Temporary License
If you'd like to remove the evaluation message from the generated documents, or to get rid of the function limitations, please request a 30-day trial license for yourself.
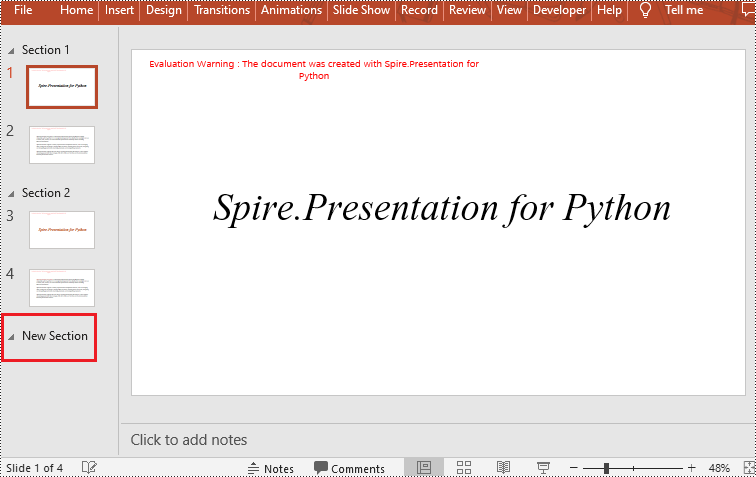
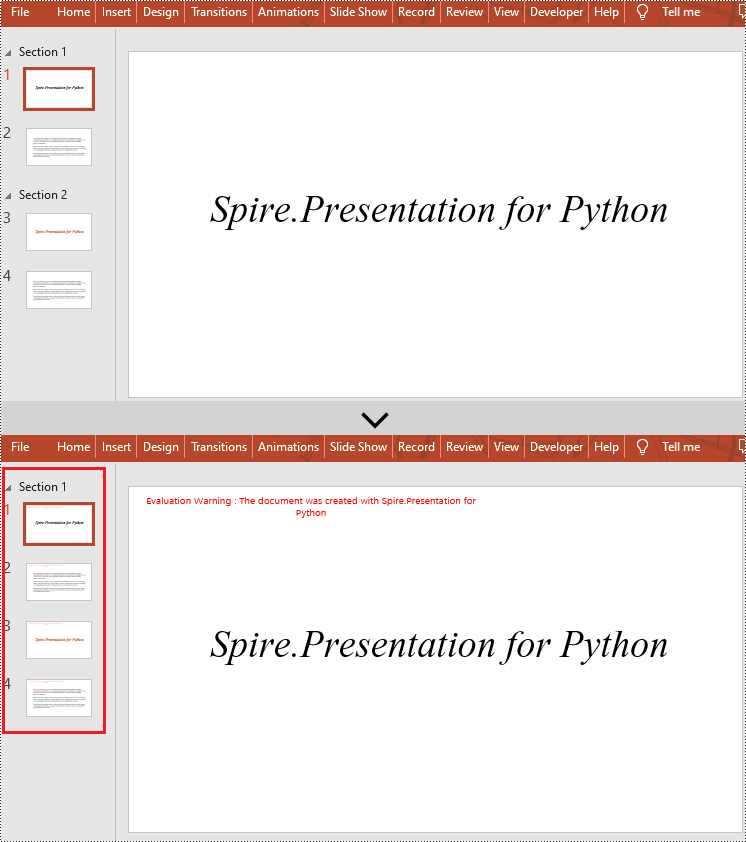
In PowerPoint, sections are a powerful tool for organizing and managing slides. By dividing slides into different sections, you can better organize content, navigate through your presentation, and present information in a more structured manner. This article will demonstrate how to add and remove sections in a PowerPoint presentation using Spire.Presentation for Python.
- Add a Section at the End of a PowerPoint
- Insert a Section Before a Specified Section
- Add a Section Before a Specified Slide in PowerPoint
- Remove a Section from a PowerPoint
Install Spire.PDF for Python
This scenario requires Spire.Presentation for Python and plum-dispatch v1.7.4. They can be easily installed in your Windows through the following pip command.
pip install Spire.Presentation
If you are unsure how to install, please refer to this tutorial: How to Install Spire.Presentation for Python on Windows
Add a Section at the End of a PowerPoint in Python
Spire.Presentation for Python provides the Presentation.SectionList.Append(section_name) method to add a section at the end of a presentation. Here are the specific steps to perform this operation:
- Create a Presentation class instance.
- Load a PowerPoint document using Presentation.LoadFromFile() method.
- Add a section at the end using the Presentation.SectionList.Append() method.
- Save the document using Presentation.SaveToFile() method.
- Python
from spire.presentation.common import *
from spire.presentation import *

# Create a new presentation object
presentation = Presentation()

# Load a sample PowerPoint presentation
presentation.LoadFromFile("sample.pptx")

# Append a new section
presentation.SectionList.Append("New Section")

# Save the presentation
presentation.SaveToFile("AddSection.pptx", FileFormat.Pptx2013)

# Dispose of the presentation object
presentation.Dispose()
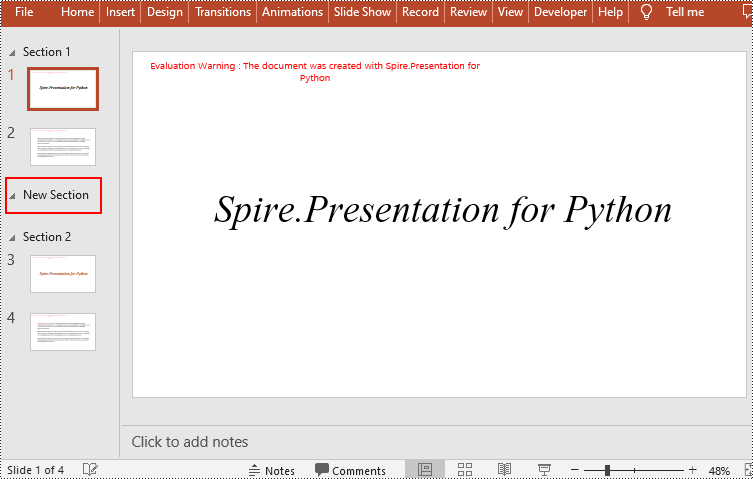
Insert a Section Before a Specified Section in Python
You can also use the Presentation.SectionList.Insert(index, section_name) method to insert a new section before a specific section. Here are the detailed steps:
- Create a Presentation class instance.
- Load a PowerPoint document using Presentation.LoadFromFile() method.
- Insert a new section before a specific section using the Presentation.SectionList.Insert() method, where index is the position of the specific section.
- Save the document using Presentation.SaveToFile() method.
- Python
from spire.presentation.common import *
from spire.presentation import *

# Create a new presentation object
presentation = Presentation()

# Load a sample PowerPoint presentation
presentation.LoadFromFile("sample.pptx")

# Insert a new section before the second section
presentation.SectionList.Insert(1," New Section")

# Save the presentation
presentation.SaveToFile("AddSection.pptx", FileFormat.Pptx2013)

# Dispose of the presentation object
presentation.Dispose()
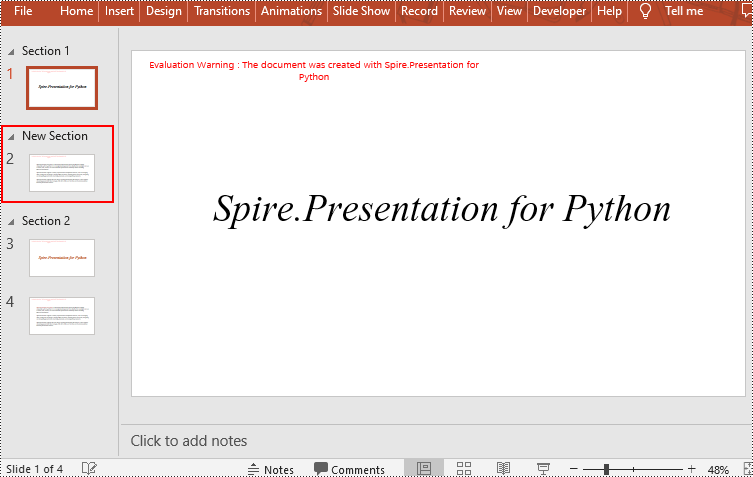
Add a Section Before a Specified Slide in Python
You can also use the Presentation.SectionList.Add(section_name, slide) method to insert a new section before a specific slide. Here are the detailed steps:
- Create a Presentation class instance.
- Load a PowerPoint document using Presentation.LoadFromFile() method.
- Insert a new section before a specific slide using the Presentation.SectionList.Add() method
- Save the document using Presentation.SaveToFile() method.
- Python
from spire.presentation.common import *
from spire.presentation import *

# Create a new presentation object
presentation = Presentation()

# Load a sample PowerPoint presentation
presentation.LoadFromFile("sample.pptx")

# Get the second slide
slide=presentation.Slides[1]

# Add a new section before the second slide
presentation.SectionList.Add("New Section",slide)

# Save the presentation
presentation.SaveToFile("AddSection.pptx", FileFormat.Pptx2013)

# Dispose of the presentation object
presentation.Dispose()
Remove a Section from a PowerPoint in Python
If you don't need a specific section, you can simply remove it using the Presentation.SectionList.RemoveAt(index_to_remove) method. Please note that removing a section does not delete the slides within that section. Here are the steps to delete a specific section while preserving its slides:
- Create a Presentation class instance.
- Load a PowerPoint document using Presentation.LoadFromFile() method.
- Remove a specific section using the Presentation.SectionList.RemoveAt(index_to_remove) method, which takes an integer index as a parameter. You can also remove all sections using the Presentation.Slides.RemoveAll() method.
- Save the document using Presentation.SaveToFile() method.
- Python
from spire.presentation.common import *
from spire.presentation import *

# Create a new presentation object
presentation = Presentation()

# Load a sample PowerPoint presentation
presentation.LoadFromFile("sample.pptx")

# Remove the second section
presentation.SectionList.RemoveAt(1)

# # Remove all sections
# presentation.SectionList.RemoveAll()

# Save the presentation
presentation.SaveToFile("RemoveSection.pptx", FileFormat.Pptx2013)

# Dispose of the presentation object
presentation.Dispose()
Apply for a Temporary License
If you'd like to remove the evaluation message from the generated documents, or to get rid of the function limitations, please request a 30-day trial license for yourself.
Using lists in PowerPoint allows you to present information in a structured and visually appealing way. They help break down complex ideas into digestible points, making it easier for your audience to understand and retain key concepts. Whether you're creating a slide deck for a business presentation, educational workshop, or conference talk, incorporating lists can enhance the visual appeal and effectiveness of your content. In this article, we will demonstrate how to create numbered lists and bulleted lists in PowerPoint presentations in Python using Spire.Presentation for Python.
- Create a Numbered List in PowerPoint in Python
- Create a Bulleted List with Symbol Bullets in PowerPoint in Python
- Create a Bulleted List with Image Bullets in PowerPoint in Python
Install Spire.Presentation for Python
This scenario requires Spire.Presentation for Python and plum-dispatch v1.7.4. They can be easily installed in your Windows through the following pip command.
pip install Spire.Presentation
If you are unsure how to install, please refer to this tutorial: How to Install Spire.Presentation for Python on Windows
Create a Numbered List in PowerPoint in Python
Spire.Presentation supports adding numerals or bullet points in front of paragraphs to create a numbered or bulleted list. To specify the bullet type, you can use the ParagraphProperties.BulletType property. The following are the steps to create a numbered list in a PowerPoint slide using Spire.Presentation for Python.
- Create a Presentation object.
- Get the first slide using Presentation.Slides[0] property.
- Append a shape to the slide using ISlide.Shapes.AppendShape() method and set the shape style.
- Specify the items of the numbered list inside a list.
- Create paragraphs based on the list items, and set the bullet type of these paragraphs to Numbered using ParagraphProperties.BulletType property.
- Set the numbered bullet style of these paragraphs using ParagraphProperties.BulletStyle property.
- Add these paragraphs to the shape using IAutoShape.TextFrame.Paragraphs.Append() method.
- Save the document to a PowerPoint file using Presentation.SaveToFile() method.
- Python
from spire.presentation.common import *
from spire.presentation import *
# Create an object of the Presentation class
presentation = Presentation()
# Get the first slide
slide = presentation.Slides[0]
# Add a shape to the slide and set the shape style
shape = slide.Shapes.AppendShape(ShapeType.Rectangle, RectangleF(50.0, 50.0, 300.0, 200.0))
shape.Fill.FillType = FillFormatType.none
shape.Line.FillType= FillFormatType.none
# Add text to the default paragraph
paragraph = shape.TextFrame.Paragraphs[0]
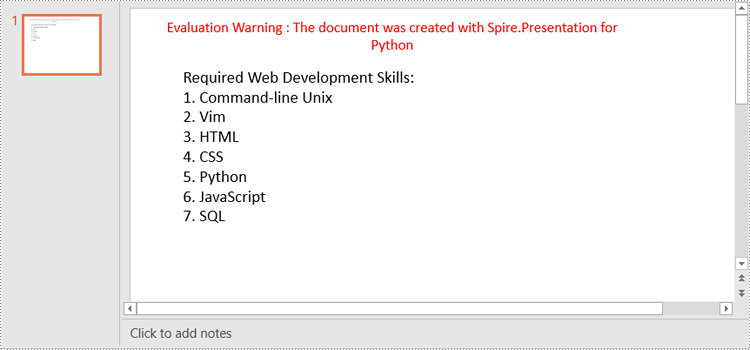
paragraph.Text = "Required Web Development Skills:"
paragraph.Alignment = TextAlignmentType.Left
paragraph.TextRanges[0].Fill.FillType = FillFormatType.Solid
paragraph.TextRanges[0].Fill.SolidColor.Color = Color.get_Black()
# Specify the list items
listItems = [
" Command-line Unix",
" Vim",
" HTML",
" CSS",
" Python",
" JavaScript",
" SQL"
]
# Create a numbered list
for item in listItems:
textParagraph = TextParagraph()
textParagraph.Text = item
textParagraph.Alignment = TextAlignmentType.Left
textParagraph.TextRanges[0].Fill.FillType = FillFormatType.Solid
textParagraph.TextRanges[0].Fill.SolidColor.Color = Color.get_Black()
textParagraph.BulletType = TextBulletType.Numbered
textParagraph.BulletStyle = NumberedBulletStyle.BulletArabicPeriod
shape.TextFrame.Paragraphs.Append(textParagraph)
# Save the result document
presentation.SaveToFile("NumberedList.pptx", FileFormat.Pptx2013)
presentation.Dispose()
Create a Bulleted List with Symbol Bullets in PowerPoint in Python
The process of creating a bulleted list with symbol bullets is very similar to that of creating a numbered list. The only difference is that you need to set the bullet type of the paragraphs to Symbol. The following are the steps.
- Create a Presentation object.
- Get the first slide using Presentation.Slides[0] property.
- Append a shape to the slide using ISlide.Shapes.AppendShape() method and set the shape style.
- Specify the items of the bulleted list inside a list.
- Create paragraphs based on the list items, and set the bullet type of these paragraphs to Symbol using ParagraphProperties.BulletType property.
- Add these paragraphs to the shape using IAutoShape.TextFrame.Paragraphs.Append() method.
- Save the document to a PowerPoint file using Presentation.SaveToFile() method.
- Python
from spire.presentation.common import *
from spire.presentation import *
# Create an object of the Presentation class
presentation = Presentation()
# Get the first slide
slide = presentation.Slides[0]
# Add a shape to the slide and set the shape style
shape = slide.Shapes.AppendShape(ShapeType.Rectangle, RectangleF(50.0, 50.0, 350.0, 200.0))
shape.Fill.FillType = FillFormatType.none
shape.Line.FillType = FillFormatType.none
# Add text to the default paragraph
paragraph = shape.TextFrame.Paragraphs[0]
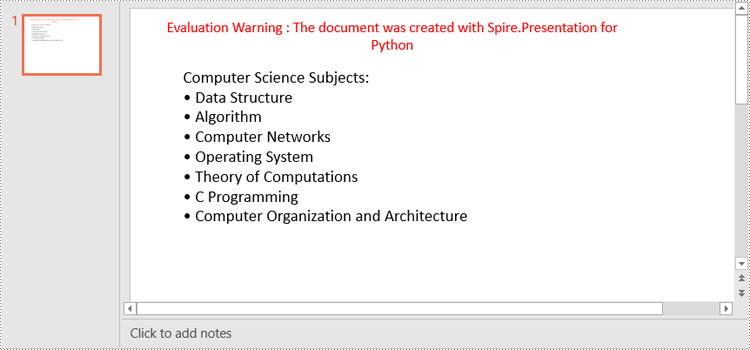
paragraph.Text = "Computer Science Subjects:"
paragraph.Alignment = TextAlignmentType.Left
paragraph.TextRanges[0].Fill.FillType = FillFormatType.Solid
paragraph.TextRanges[0].Fill.SolidColor.Color = Color.get_Black()
# Specify the list items
listItems = [
" Data Structure",
" Algorithm",
" Computer Networks",
" Operating System",
" Theory of Computations",
" C Programming",
" Computer Organization and Architecture"
]
# Create a symbol bulleted list
for item in listItems:
textParagraph = TextParagraph()
textParagraph.Text = item
textParagraph.Alignment = TextAlignmentType.Left
textParagraph.TextRanges[0].Fill.FillType = FillFormatType.Solid
textParagraph.TextRanges[0].Fill.SolidColor.Color = Color.get_Black()
textParagraph.BulletType = TextBulletType.Symbol
shape.TextFrame.Paragraphs.Append(textParagraph)
# Save the result document
presentation.SaveToFile("SymbolBulletedList.pptx", FileFormat.Pptx2013)
presentation.Dispose()
Create a Bulleted List with Image Bullets in PowerPoint in Python
To use an image as bullets, you need to set the bullet type of the paragraphs to Picture and then set the image as bullet points using the ParagraphProperties.BulletPicture.EmbedImage property. The following are the detailed steps.
- Create a Presentation object.
- Get the first slide using Presentation.Slides[0] property.
- Append a shape to the slide using ISlide.Shapes.AppendShape() method and set the shape style.
- Specify the items of the bulleted list inside a list.
- Create paragraphs based on the list items, and set the bullet type of these paragraphs to Picture using ParagraphProperties.BulletType property.
- Set an image as bullet points using ParagraphProperties.BulletPicture.EmbedImage property.
- Add these paragraphs to the shape using IAutoShape.TextFrame.Paragraphs.Append() method.
- Save the document to a PowerPoint file using Presentation.SaveToFile() method.
- Python
from spire.presentation.common import *
from spire.presentation import *
# Create an object of the Presentation class
presentation = Presentation()
# Get the first slide
slide = presentation.Slides[0]
# Add a shape to the slide and set the shape style
shape = slide.Shapes.AppendShape(ShapeType.Rectangle, RectangleF(50.0, 50.0, 400.0, 180.0))
shape.Fill.FillType = FillFormatType.none
shape.Line.FillType = FillFormatType.none
# Add text to the default paragraph
paragraph = shape.TextFrame.Paragraphs[0]
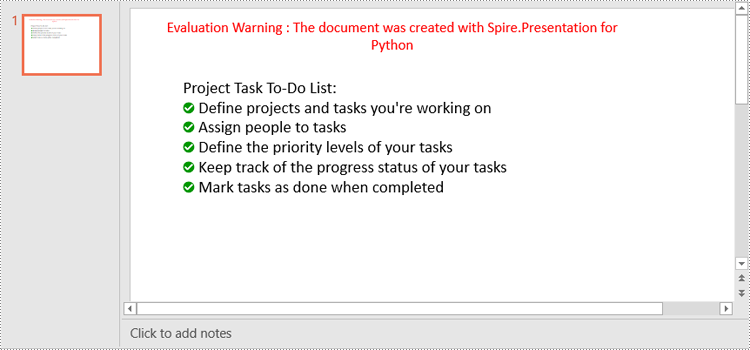
paragraph.Text = "Project Task To-Do List:"
paragraph.Alignment = TextAlignmentType.Left
paragraph.TextRanges[0].Fill.FillType = FillFormatType.Solid
paragraph.TextRanges[0].Fill.SolidColor.Color = Color.get_Black()
# Specify the list items
listItems = [
" Define projects and tasks you're working on",
" Assign people to tasks",
" Define the priority levels of your tasks",
" Keep track of the progress status of your tasks",
" Mark tasks as done when completed"
]
# Create an image bulleted list
for item in listItems:
textParagraph = TextParagraph()
textParagraph.Text = item
textParagraph.Alignment = TextAlignmentType.Left
textParagraph.TextRanges[0].Fill.FillType = FillFormatType.Solid
textParagraph.TextRanges[0].Fill.SolidColor.Color = Color.get_Black()
textParagraph.BulletType = TextBulletType.Picture
stream = Stream("icon.png")
imageData = presentation.Images.AppendStream(stream)
textParagraph.BulletPicture.EmbedImage = imageData
shape.TextFrame.Paragraphs.Append(textParagraph)
stream.Close()
# Save the result document
presentation.SaveToFile("ImageBulletedList.pptx", FileFormat.Pptx2013)
presentation.Dispose()
Apply for a Temporary License
If you'd like to remove the evaluation message from the generated documents, or to get rid of the function limitations, please request a 30-day trial license for yourself.
Converting PowerPoint to Html is a way to share your presentations with others online. By converting to Html, you can publish the document content on a web page, making it universally accessible and appealing to diverse audiences. In this article, you will learn how to convert PowerPoint presentations to HTML format in Python using Spire.Presentation for Python.
Install Spire.Presentation for Python
This scenario requires Spire.Presentation for Python and plum-dispatch v1.7.4. They can be easily installed in your Windows through the following pip command.
pip install Spire.Presentation
If you are unsure how to install, please refer to this tutorial: How to Install Spire.Presentation for Python on Windows
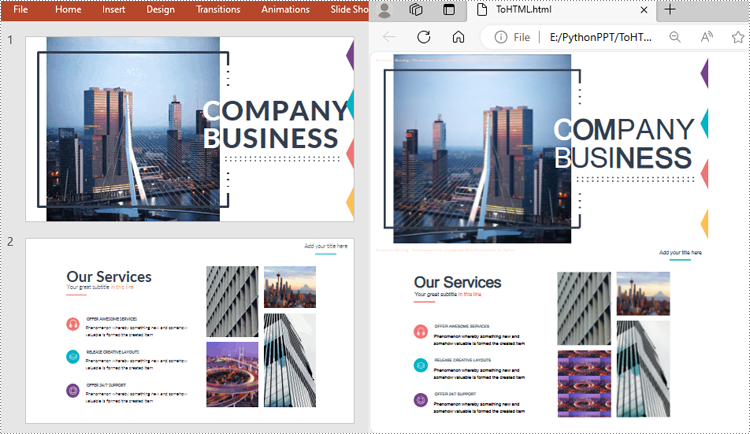
Convert a PowerPoint Presentation to HTML in Python
The Presentation.SaveToFile() method offered by Spire.Presentation for Python supports converting a PowerPoint presentation to HTML format. The following are the detailed steps:
- Create a Presentation instance.
- Load a PowerPoint document using Presentation.LoadFromFile() method.
- Save the PowerPoint document to HTML format using Presentation.SaveToFile() method.
- Python
from spire.presentation.common import *
from spire.presentation import *

inputFile ="Input.pptx"
outputFile = "ToHTML.html"

# Create a Presentation instance
ppt = Presentation()

# Load a PowerPoint document
ppt.LoadFromFile(inputFile)

#Save the document to HTML format
ppt.SaveToFile(outputFile, FileFormat.Html)
ppt.Dispose()
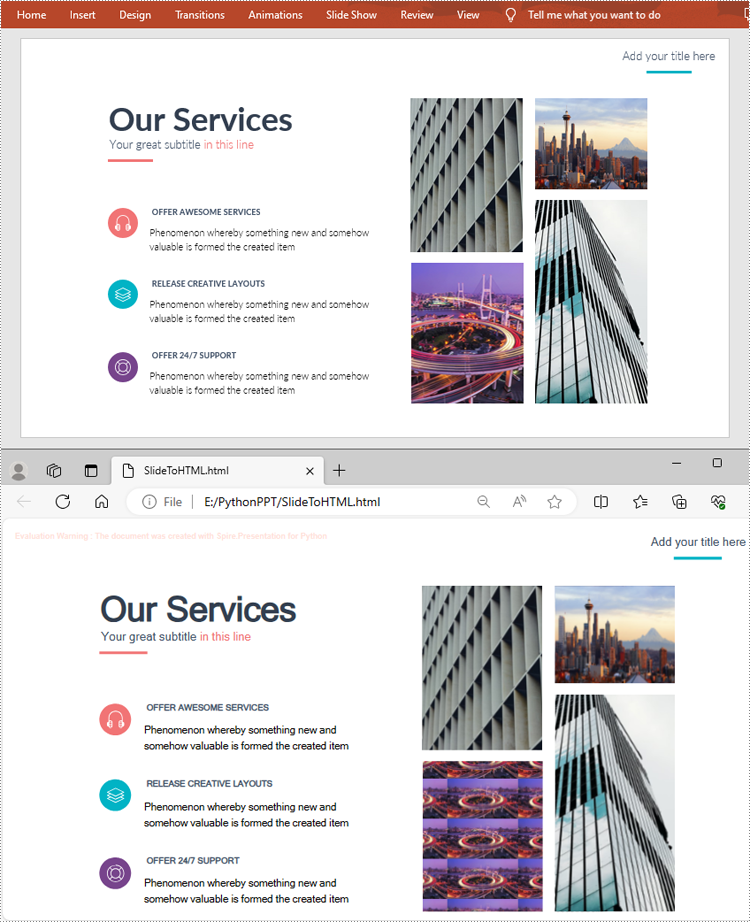
Convert a Specific PowerPoint Slide to HTML in Python
If you only need to convert a specific presentation slide to HTML, you can use the ISlide.SaveToFile(String, FileFormat) method. The following are the detailed steps.
- Create a Presentation instance.
- Load a PowerPoint document using Presentation.LoadFromFile() method.
- Get a specific slide by its index using Presentation.Slides[] property.
- Save the presentation slide to HTML format using ISlide.SaveToFile() method.
- Python
from spire.presentation.common import *
from spire.presentation import *

inputFile ="Input.pptx"
outputFile = "SlideToHTML.html"

# Create a Presentation instance
ppt = Presentation()

# Load a PowerPoint document
ppt.LoadFromFile(inputFile)

# Get the second slide
slide = ppt.Slides[1]

# Save the slide to HTML format
slide.SaveToFile(outputFile, FileFormat.Html)
ppt.Dispose()
Apply for a Temporary License
If you'd like to remove the evaluation message from the generated documents, or to get rid of the function limitations, please request a 30-day trial license for yourself.
When editing or updating a large presentation, manually locating and modifying specific text elements can be a tedious and time-consuming process. By using the replace feature in PowerPoint, you can quickly and accurately make updates throughout the presentation, ensuring that the information remains accurate and consistent. In this article, we will demonstrate how to replace text in PowerPoint presentations in Python using Spire.Presentation for Python.
- Replace the First Occurrence of a Specific Text in PowerPoint in Python
- Replace All Occurrences of a Specific Text in PowerPoint in Python
- Replace Text Using a Regular Expression in PowerPoint in Python
Install Spire.Presentation for Python
This scenario requires Spire.Presentation for Python and plum-dispatch v1.7.4. They can be easily installed in your Windows through the following pip command.
pip install Spire.Presentation
If you are unsure how to install, please refer to this tutorial: How to Install Spire.Presentation for Python on Windows
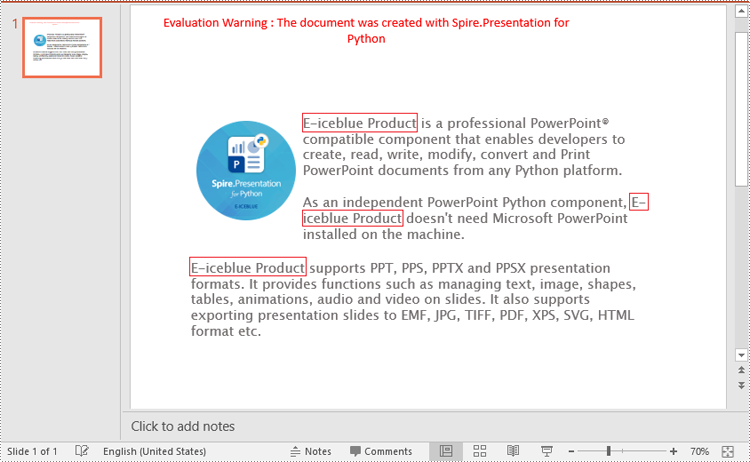
Replace the First Occurrence of a Specific Text in PowerPoint in Python
To replace the first occurrence of a specific text in a PowerPoint document, you can loop through all slides in the document, and then call the ISlide.ReplaceFirstText() method. The detailed steps are as follows.
- Create an object of the Presentation class.
- Load a PowerPoint document using Presentation.LoadFromFile() method.
- Loop through all slides in the PowerPoint document.
- Replace the first occurrence of a specific text with new text using ISlide.ReplaceFirstText() method.
- Save the result document using Presentation.SaveToFile() method.
- Python
from spire.presentation.common import *
from spire.presentation import *

# Create an object of the Presentation class
ppt = Presentation()
# Load a PowerPoint document
ppt.LoadFromFile("Sample.pptx")

# Loop through all slides in the document
for slide in ppt.Slides:
    # Replace the first occurrence of "Spire.Presentation for Python" with "E-iceblue Product"
    slide.ReplaceFirstText("Spire.Presentation for Python", "E-iceblue Product", False)
    break

# Save the result document
ppt.SaveToFile("ReplaceFirstTextOccurrence.pptx", FileFormat.Pptx2013)
ppt.Dispose()
Replace All Occurrences of a Specific Text in PowerPoint in Python
To replace all occurrences of a specific text in a PowerPoint document, you can loop through all slides in the document, and then use the ISlide.ReplaceAllText() method. The detailed steps are as follows.
- Create an object of the Presentation class.
- Load a PowerPoint document using Presentation.LoadFromFile() method.
- Loop through all slides in the PowerPoint document.
- Replace all occurrences of a specific text with new text using ISlide.ReplaceAllText() method.
- Save the result document using Presentation.SaveToFile() method.
- Python
from spire.presentation.common import *
from spire.presentation import *

# Create an object of the Presentation class
ppt = Presentation()
# Load a PowerPoint document
ppt.LoadFromFile("Sample.pptx")

# Loop through all slides in the document
for slide in ppt.Slides:
    # Replace all occurrences of "Spire.Presentation for Python" with "E-iceblue Product"
    slide.ReplaceAllText("Spire.Presentation for Python", "E-iceblue Product", False)

# Save the result document
ppt.SaveToFile("ReplaceAllTextOccurrences.pptx", FileFormat.Pptx2013)
ppt.Dispose()
Replace Text Using a Regular Expression in PowerPoint in Python
Spire.Presentation for Python provides the IShape.ReplaceTextWithRegex() method to replace text matching a regular expression pattern. The detailed steps are as follows.
- Create an object of the Presentation class.
- Load a PowerPoint document using Presentation.LoadFromFile() method.
- Loop through all slides in the PowerPoint document.
- Loop through all shapes on each slide.
- Replace text matching a regular expression pattern using IShape.ReplaceTextWithRegex() method.
- Save the result document using Presentation.SaveToFile() method.
- Python
from spire.presentation.common import *
from spire.presentation import *
# Create an object of the Presentation class
ppt = Presentation()
# Load a PowerPoint document
ppt.LoadFromFile("Sample1.pptx")
# Loop through all slides in the document
for slide in ppt.Slides:
# Loop through all shapes on each slide
for shape in slide.Shapes:
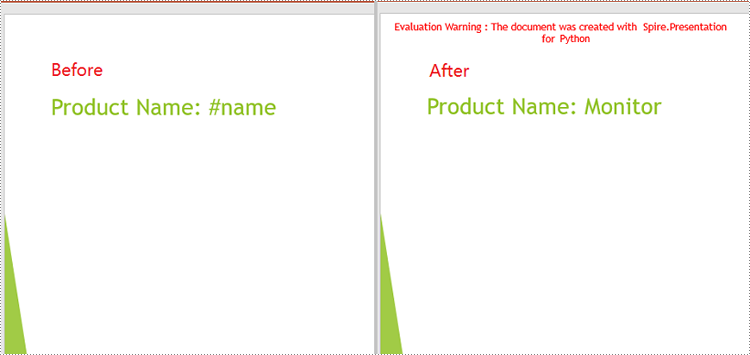
# Replace text starting with # on the slide to "Monitor"
shape.ReplaceTextWithRegex(Regex("#\w+"), "Monitor")
# Save the result document
ppt.SaveToFile("ReplaceTextUsingRegex.pptx", FileFormat.Pptx2013)
ppt.Dispose()
Apply for a Temporary License
If you'd like to remove the evaluation message from the generated documents, or to get rid of the function limitations, please request a 30-day trial license for yourself.
Setting an appropriate background is a crucial step when creating visually captivating and impactful PowerPoint presentations. The background serves as the foundation upon which your content is displayed, and choosing the right background can greatly enhance the overall aesthetic and effectiveness of your slides. Whether you are presenting at a business meeting, educational seminar, or social event, a well-designed background can engage your audience and effectively convey your message. In this article, we will explain how to set background color or picture for PowerPoint slides in Python using Spire.Presentation for Python.
- Set a Background Color for a PowerPoint Slide in Python
- Set a Gradient Background for a PowerPoint Slide in Python
- Set a Background Picture for a PowerPoint Slide in Python
- Set a Background for a Slide Master in PowerPoint in Python
Install Spire.Presentation for Python
This scenario requires Spire.Presentation for Python and plum-dispatch v1.7.4. They can be easily installed in your Windows through the following pip command.
pip install Spire.Presentation
If you are unsure how to install, please refer to this tutorial: How to Install Spire.Presentation for Python on Windows
Set a Background Color for a PowerPoint Slide in Python
Adding a background color for a PowerPoint slide is very simple. You just need to set the fill mode of the slide's background as a solid fill and then set a color for the slide’s background. The detailed steps are as follows.
- Create an object of the Presentation class.
- Load a PowerPoint presentation using Presentation.LoadFromFile() method.
- Get a specific slide using Presentation.Slides[index] property.
- Access the background of the slide using ISlide.SlideBackground property.
- Set the type of the slide's background as a custom type using SlideBackground.Type property.
- Set the fill mode of the slide’s background as a solid fill using SlideBackground.Fill.FillType property.
- Set a color for the slide’s background using SlideBackground.Fill.SolidColor.Color property.
- Save the result presentation using Presentation.SaveToFile() method.
- Python
from spire.presentation import *

# Create a Presentation object
ppt = Presentation()
# Load a PowerPoint presentation
ppt.LoadFromFile("Input.pptx")

# Get the first slide
slide = ppt.Slides[0]

# Access the background of the slide
background = slide.SlideBackground

# Set the type of the slide's background as a custom type
background.Type = BackgroundType.Custom
# Set the fill mode of the slide's background as a solid fill
background.Fill.FillType = FillFormatType.Solid
# Set a color for the slide's background
background.Fill.SolidColor.Color = Color.get_PaleTurquoise()

# Save the result presentation
ppt.SaveToFile("Solidbackground.pptx", FileFormat.Pptx2013)
ppt.Dispose()
Set a Gradient Background for a PowerPoint Slide in Python
Adding a gradient background is a little complex. You need to set the fill mode of the slide’s background as a gradient fill and then set the gradient stops and colors. The detailed steps are as follows.
- Create an object of the Presentation class.
- Load a PowerPoint presentation using Presentation.LoadFromFile() method.
- Get a specific slide using Presentation.Slides[index] property.
- Access the background of the slide using ISlide.SlideBackground property.
- Set the type of the slide's background as a custom type using SlideBackground.Type property.
- Set the fill mode of the slide’s background as a gradient fill using SlideBackground.Fill.FillType property.
- Set gradient stops and colors for the slide’s background using SlideBackground.Fill.Gradient.GradientStops.AppendByColor() method.
- Set the shape type and angle for the gradient fill.
- Save the result presentation using Presentation.SaveToFile() method.
- Python
from spire.presentation import *

# Create a Presentation object
ppt = Presentation()
# Load a PowerPoint presentation
ppt.LoadFromFile("Input.pptx")

# Get the first slide
slide = ppt.Slides[0]

# Access the background of the slide
background = slide.SlideBackground

# Set the type of the slide's background as a custom type
background.Type = BackgroundType.Custom

# Set the fill mode of the slide's background as a gradient fill
background.Fill.FillType = FillFormatType.Gradient

# Set gradient stops and colors
background.Fill.Gradient.GradientStops.AppendByColor(0.1, Color.get_LightCyan())
background.Fill.Gradient.GradientStops.AppendByColor(0.7, Color.get_LightSeaGreen())

# Set the shape type of the gradient fill
background.Fill.Gradient.GradientShape = GradientShapeType.Linear
# Set the angle of the gradient fill
background.Fill.Gradient.LinearGradientFill.Angle = 45

# Save the result presentation
ppt.SaveToFile("Gradientbackground.pptx", FileFormat.Pptx2013)
ppt.Dispose()
Set a Background Picture for a PowerPoint Slide in Python
To add a background picture for a PowerPoint slide, you need to set the fill mode of the slide's background as a picture fill, then add a picture to the image collection of the presentation and set it as the slide’s background. The detailed steps are as follows:
- Create an object of the Presentation class.
- Load a PowerPoint presentation using Presentation.LoadFromFile() method.
- Get a specific slide using Presentation.Slides[index] property.
- Access the background of the slide using ISlide.SlideBackground property.
- Set the type of the slide's background as a custom type using SlideBackground.Type property.
- Set the fill mode of the slide’s background as a picture fill using SlideBackground.Fill.FillType property.
- Add an image to the image collection of the presentation using Presentation.Images.AppendStream() method.
- Set the image as the slide’s background using SlideBackground.Fill.PictureFill.Picture.EmbedImage property.
- Save the result presentation using Presentation.SaveToFile() method.
- Python
from spire.presentation import *

# Create a Presentation object
ppt = Presentation()
# Load a PowerPoint presentation
ppt.LoadFromFile("Input.pptx")

# Get the first slide
slide = ppt.Slides[0]

# Access the background of the slide
background = slide.SlideBackground

# Set the type of the slide's background as a custom type
background.Type = BackgroundType.Custom

# Set the fill mode of the slide's background as a picture fill
background.Fill.FillType = FillFormatType.Picture

# Add an image to the image collection of the presentation
stream = Stream("background.jpg")
imageData = ppt.Images.AppendStream(stream)
# Set the image as the slide's background
background.Fill.PictureFill.FillType = PictureFillType.Stretch
background.Fill.PictureFill.Picture.EmbedImage = imageData

# Save the result presentation
ppt.SaveToFile("Picturebackground.pptx", FileFormat.Pptx2013)
ppt.Dispose()
Set a Background for a Slide Master in PowerPoint in Python
If you don't wish to set backgrounds for slides one by one, you can set a background for the slide master, then all slides using the same slide master will be applied with the background automatically. The following steps show how to set a solid background color for a slide master.
- Create an object of the Presentation class.
- Load a PowerPoint presentation using Presentation.LoadFromFile() method.
- Get a specific slide master using Presentation.Masters[index] property.
- Access the background of the slide master using IMasterSlide.SlideBackground property.
- Set the type of the slide master's background as a custom type using SlideBackground.Type property.
- Set the fill mode of the slide master's background as a solid fill using SlideBackground.Fill.FillType property.
- Set a color for the slide master's background using SlideBackground.Fill.SolidColor.Color property.
- Save the result presentation using Presentation.SaveToFile() method.
- Python
from spire.presentation import *

# Create a Presentation object
ppt = Presentation()
# Load a PowerPoint presentation
ppt.LoadFromFile("Input.pptx")

# Get the first slide master
slideMaster = ppt.Masters[0]

# Access the background of the slide master
background = slideMaster.SlideBackground

# Set the type of the slide master's background as a custom type
background.Type = BackgroundType.Custom

# Set the fill mode of the slide master's background as a solid fill
background.Fill.FillType = FillFormatType.Solid
# Set a color for the slide master's background
background.Fill.SolidColor.Color = Color.get_PeachPuff()

# Save the result presentation
ppt.SaveToFile("AddBackgroundToSlideMaster.pptx", FileFormat.Pptx2013)
ppt.Dispose()
Apply for a Temporary License
If you'd like to remove the evaluation message from the generated documents, or to get rid of the function limitations, please request a 30-day trial license for yourself.
Comments in Microsoft PowerPoint allow users to add additional information to specific slides or elements of a slide to improve collaboration and communication when sharing presentations. These comments can be related content, suggestions for changes, and so on. This feature is very useful when several people are working on a presentation together. In this article, you will learn how to use Spire.Presentation for Python to add, remove or replace comments on slides in Python programs.
- Add Comments to a Presentation Slide in Python
- Remove Comments from a Presentation Slide in Python
- Replace Comments on a Presentation Slide in Python
Install Spire.Presentation for Python
This scenario requires Spire.Presentation for Python and plum-dispatch v1.7.4. They can be easily installed in your Windows through the following pip commands.
pip install Spire.Presentation
If you are unsure how to install, please refer to this tutorial: How to Install Spire.Presentation for Python on Windows
Add Comments to a Presentation Slide in Python
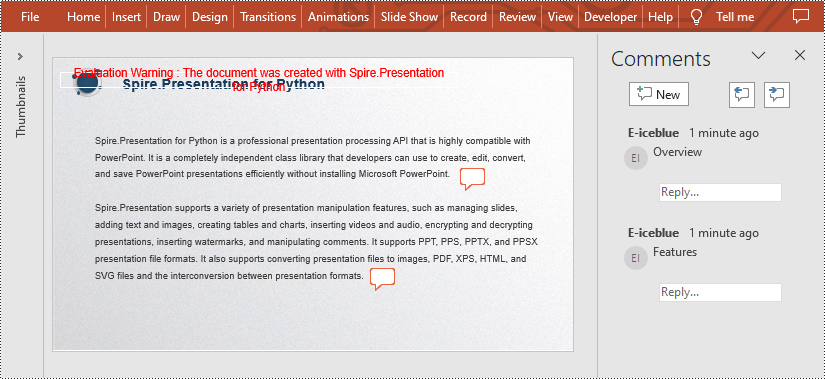
Spire.Presentation for Python provides the Presentation.CommentAuthors.AddAuthor() and Presentation.Slides[].AddComment(author:ICommentAuthor,text:str,position:PointF,dateTime:DateTime) methods to support adding comments to a slide. The detailed steps are as follows.
- Create a new PowerPoint presentation.
- Load a PowerPoint presentation using Presentation.LoadFromFile() method.
- Add the author of the comment by using Presentation.CommentAuthors.AddAuthor() method.
- Then add a comment to the first slide using Presentation.Slides[].AddComment(author:ICommentAuthor,text:str,position:PointF,dateTime:DateTime) method.
- Add another comment using the same method.
- Save the result file using Presentation.SaveToFile() method.
- Python
from spire.presentation.common import *
from spire.presentation import *

inputFile = "C:/Users/Administrator/Desktop/Sample.pptx"
outputFile = "C:/Users/Administrator/Desktop/AddComment.pptx"

# Create a Presentation instance
presentation = Presentation()

# Load a presentation from disk
presentation.LoadFromFile(inputFile)

# Add the author of the comment
author = presentation.CommentAuthors.AddAuthor("E-iceblue", "comment:")

# Add a comment to the first slide
point = PointF(45.0,12.0)
presentation.Slides[0].AddComment(author, "Overview", point, DateTime.get_Now())

# Add another comment to this slide
author = presentation.CommentAuthors.AddAuthor("E-iceblue", "comment:")
point = PointF(35.0,23.0)
presentation.Slides[0].AddComment(author, "Features", point, DateTime.get_Now())

# Save the result file
presentation.SaveToFile(outputFile, FileFormat.Pptx2010)
presentation.Dispose()
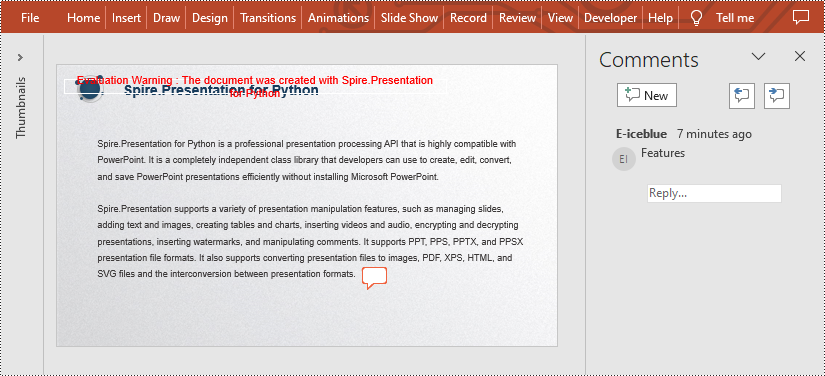
Remove Comments from a Presentation Slide in Python
You can also remove the specific comment from the slides by using Presentation.Slides[].DeleteComment(Comment) method. The detailed steps are as follows.
- Create a Presentation instance.
- Load a PowerPoint presentation using Presentation.LoadFromFile() method.
- Remove the first comment from the specified slide using Presentation.Slides[].DeleteComment(Comment) method.
- Save the result file using Presentation.SaveToFile() method.
- Python
from spire.presentation.common import *
from spire.presentation import *

inputFile = "C:/Users/Administrator/Desktop/AddComment.pptx"
outputFile = "C:/Users/Administrator/Desktop/DeleteComment.pptx"

# Create a Presentation instance
presentation = Presentation()

# Load a presentation from disk
presentation.LoadFromFile(inputFile)

# Delete the first comment from the first slide
presentation.Slides[0].DeleteComment(presentation.Slides[0].Comments[0])

# Save the result file
presentation.SaveToFile(outputFile, FileFormat.Pptx2010)
presentation.Dispose()
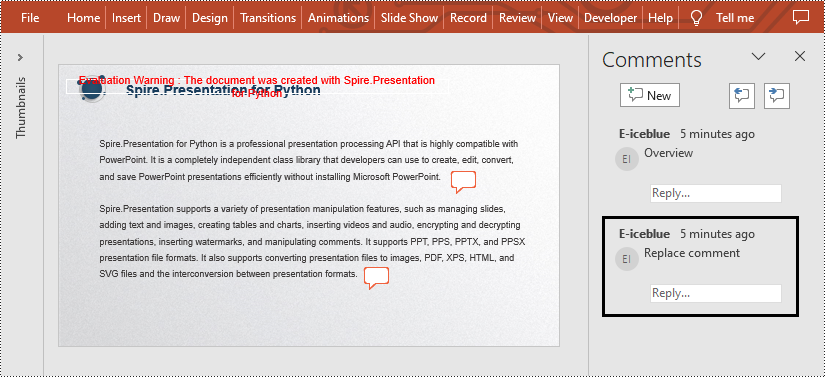
Replace Comments on a Presentation Slide in Python
If you want to replace the comment content with new text, please use the Presentation.Slides[].Comments[].Text property. The detailed steps are as follows.
- Create a Presentation instance.
- Load a PowerPoint presentation using Presentation.LoadFromFile() method.
- Replace the content of the second comment with new text by Presentation.Slides[].Comments[].Text property.
- Save the result file using Presentation.SaveToFile() method.
- Python
from spire.presentation.common import *
from spire.presentation import *

inputFile = "C:/Users/Administrator/Desktop/AddComment.pptx"
outputFile = "C:/Users/Administrator/Desktop/ReplaceComment.pptx"

# Create a Presentation instance
presentation = Presentation()

# Load a presentation from disk
presentation.LoadFromFile(inputFile)

# Replace the content of the second comment with new text
presentation.Slides[0].Comments[1].Text = "Replace comment"

# Save the result file
presentation.SaveToFile(outputFile, FileFormat.Pptx2010)
presentation.Dispose()
Apply for a Temporary License
If you'd like to remove the evaluation message from the generated documents, or to get rid of the function limitations, please request a 30-day trial license for yourself.
In a PowerPoint document, the choice of fonts plays a significant role in enhancing the overall visual appeal and effectiveness of the presentation. Different fonts can be used to establish a visual hierarchy, allowing you to emphasize key points, headings, or subheadings in your presentation and guide the audience's attention. This article introduces how to set or change fonts in a PowerPoint document in Python using Spire.Presentation for Python.
- Set Fonts when Creating a New PowerPoint Document in Python
- Change Fonts in an Existing PowerPoint Document in Python
Install Spire.Presentation for Python
This scenario requires Spire.Presentation for Python and plum-dispatch v1.7.4. They can be easily installed in your Windows through the following pip commands.
pip install Spire.Presentation
If you are unsure how to install, please refer to this tutorial: How to Install Spire.Presentation for Python on Windows
Set Fonts when Creating a New PowerPoint Document in Python
Spire.Presentation for Python offers the TextRange class to represent a range of text. A paragraph can consist of one or more text ranges. To apply font formatting to the characters in a text range, you can use the properties like LatinFont, IsBold, IsItalic, and FontHeight of the TextRange class. The following are the steps to set fonts when creating a new PowerPoint document in Python.
- Create a Presentation object.
- Get the first slide through Presentation.Slides[0] property.
- Add a shape to the slide using ISlide.Shapes.AppendShape() method.
- Add text to the shape using IAutoShape.AppendTextFrame() method.
- Get TextRange object through IAutoShape.TextFrame.TextRange property.
- Set the font information such as font name, font size, bold, italic, underline, and text color through the properties under the TextRange object.
- Save the presentation to a PPTX file using Presentation.SaveToFile() method.
- Python
from spire.presentation.common import *
import math
from spire.presentation import *

# Create a Presentation object
presentation = Presentation()

# Set slide size type
presentation.SlideSize.Type = SlideSizeType.Screen16x9

# Add a shape to the first slide
rec = RectangleF.FromLTRB (30, 100, 900, 250)
shape = presentation.Slides[0].Shapes.AppendShape(ShapeType.Rectangle, rec)

# Set line color and fill type of the shape
shape.ShapeStyle.LineColor.Color = Color.get_Transparent()
shape.Fill.FillType = FillFormatType.none

# Add text to the shape
shape.AppendTextFrame("Spire.Presentation for Python is a professional presentation processing API that \
is highly compatible with PowerPoint. It is a completely independent class library that developers can \
use to create, edit, convert, and save PowerPoint presentations efficiently without installing Microsoft PowerPoint.")

# Get text of the shape as a text range
textRange = shape.TextFrame.TextRange

# Set font name
textRange.LatinFont = TextFont("Times New Roman")

# Set font style (bold & italic)
textRange.IsBold = TriState.TTrue
textRange.IsItalic = TriState.TTrue

# Set underline type
textRange.TextUnderlineType = TextUnderlineType.Single

# Set font size
textRange.FontHeight = 22

# Set text color
textRange.Fill.FillType = FillFormatType.Solid
textRange.Fill.SolidColor.Color = Color.get_CadetBlue()

# Set alignment
textRange.Paragraph.Alignment = TextAlignmentType.Left

# Set line spacing
textRange.LineSpacing = 0.5

# Save to file
presentation.SaveToFile("output/SetFont.pptx", FileFormat.Pptx2019)
presentation.Dispose()
Change Fonts in an Existing PowerPoint Document in Python
To change the font for a specific paragraph, we need to get the paragraph from the document. Then, iterate through the text ranges in the paragraph and reset the font information for each text range. Below are the steps to change the font of a paragraph in an existing PowerPoint document using Spire.Presentation for Python.
- Create a Presentation object.
- Get a specific slide through Presentation.Slides[index] property.
- Get a specific shape through ISlide.Shapes[index] property.
- Get a specific paragraph of the shape through IAutoShape.TextFrame.Paragraphs[index] property.
- Iterate through the text ranges in the paragraph.
- Set the font information such as font name, font size, bold, italic, underline, and text color of a specific text range through the properties under the TextRange object.
- Save the presentation to a PPTX file using Presentation.SaveToFile() method.
- Python
from spire.presentation.common import *
from spire.presentation import *

# Create a Presentation object
presentation = Presentation()

# Load a PowerPoint file
presentation.LoadFromFile("C:\\Users\\Administrator\\Desktop\\input.pptx")

# Get the first slide
slide = presentation.Slides[0]

"# Get the first shape on the slide
shape = (IAutoShape)(slide.Shapes[0])

# Get the first paragraph of the shape
paragraph = shape.TextFrame.Paragraphs[0]

# Get the first paragraph of the shape
paragraph = shape.TextFrame.Paragraphs[0]

# Create a font
newFont = TextFont("Times New Roman")

# Loop through the text ranges in the paragraph
for textRange in paragraph.TextRanges:

    # Apply font to a specific text range
    textRange.LatinFont = newFont

    # Set font to Italic
    textRange.Format.IsItalic = TriState.TTrue

    # Set font size
    textRange.FontHeight = 25

    # Set font color
    textRange.Fill.FillType = FillFormatType.Solid
    textRange.Fill.SolidColor.Color = Color.get_Purple()

# Save to file
presentation.SaveToFile("output/ChangeFont.pptx", FileFormat.Pptx2019)
presentation.Dispose()
Apply for a Temporary License
If you'd like to remove the evaluation message from the generated documents, or to get rid of the function limitations, please request a 30-day trial license for yourself.
