Task lists, checklists, and to-do lists often need a tick for each item. Compared with typing yes or no into a cell, a checkbox makes the completion state obvious and reduces input mistakes. This article uses Spire.XLS for JavaScript to add checkboxes to Excel in the browser, with input and output files managed in a virtual file system (VFS) and no back-end service.
This article covers two core features:
For installation and project configuration, see Integrating Spire.XLS for JavaScript in a React Project. The examples below assume that Spire.XLS is installed and the WebAssembly module has been initialized.
Add a checkbox and set its caption
A checkbox floats above the cells as a form control; its position is determined by the row and column where it is added, and its size is measured in pixels. After adding it, set the caption so readers know which item it represents, then adjust the position and size as needed.
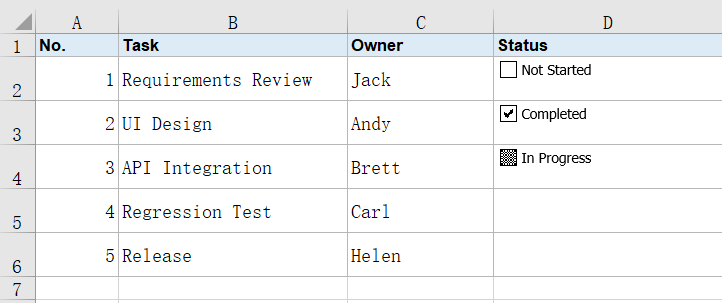
Writing and result for adding a checkbox and setting its caption:
| Writing | Result |
|---|---|
sheet.CheckBoxes.AddCheckBox(row, column, height, width) |
Adds a checkbox at the specified row and column |
checkbox.Text = text |
Sets the checkbox caption |
checkbox.CheckState = xlsModule.CheckState.Unchecked |
Displays the checkbox as unchecked |
checkbox.CheckState = xlsModule.CheckState.Checked |
Displays the checkbox as checked |
checkbox.CheckState = xlsModule.CheckState.Mixed |
Displays the checkbox in the mixed state |
The steps are:
- Load the font file and the Excel test file into the VFS with
window.spire.FetchFileToVFS. - Create a workbook with
new Workbook()and load the test file throughworkbook.LoadFromFile. - Get the task list worksheet with
workbook.Worksheets.get(0). - Add one checkbox each at rows 2, 3, and 4, column 4, with
sheet.CheckBoxes.AddCheckBox(row, column, height, width). - Set
checkbox.Textof the three checkboxes to Not Started, Completed, and In Progress. - Set
checkbox.CheckStateof the three checkboxes toxlsModule.CheckState.Unchecked,xlsModule.CheckState.Checked, andxlsModule.CheckState.Mixedto show the three states. - Write the result file with
workbook.SaveToFile, release resources withworkbook.Dispose, and read the workbook from the VFS to trigger the download.
Below is the complete code example that adds a checkbox and sets its caption:
function App() {
  const addCheckbox = async () => {
    // Get the Spire.XLS WASM module
    const xlsModule = window.wasmModule?.spirexls;

    // Check that the module is ready
    if (!xlsModule) {
      alert('Spire.Xls is not ready yet');
      return;
    }

    // Load the font and the test data file into the VFS
    await window.spire.FetchFileToVFS('ARIAL.TTF', '/Library/Fonts/', `${process.env.PUBLIC_URL}/font/`);
    const inputFileName = 'CheckBoxData.xlsx';
    await window.spire.FetchFileToVFS(inputFileName, '', `${process.env.PUBLIC_URL}data/`);

    // Load the workbook
    const workbook = new xlsModule.Workbook();
    workbook.LoadFromFile({ fileName: inputFileName });

    // Get the task list worksheet
    const sheet = workbook.Worksheets.get(0);

    // Add a checkbox at rows 2, 3, and 4, column 4
    const uncheckedBox = sheet.CheckBoxes.AddCheckBox(2, 4, 20, 120);
    const checkedBox = sheet.CheckBoxes.AddCheckBox(3, 4, 20, 120);
    const mixedBox = sheet.CheckBoxes.AddCheckBox(4, 4, 20, 120);

    // Set the caption for each of the three checkboxes
    uncheckedBox.Text = 'Not Started';
    checkedBox.Text = 'Completed';
    mixedBox.Text = 'In Progress';

    // Set the unchecked, checked, and mixed states respectively
    uncheckedBox.CheckState = xlsModule.CheckState.Unchecked;
    checkedBox.CheckState = xlsModule.CheckState.Checked;
    mixedBox.CheckState = xlsModule.CheckState.Mixed;

    // Save the result into the VFS
    const outputFileName = 'AddCheckbox.xlsx';
    workbook.SaveToFile({ fileName: outputFileName });

    // Dispose of the workbook to release its resources
    workbook.Dispose();

    // Read the result back out of the VFS and trigger the download
    const fileArray = window.dotnetRuntime.Module.FS.readFile(outputFileName);
    const blob = new Blob([fileArray], { type: 'application/vnd.openxmlformats-officedocument.spreadsheetml.sheet' });
    const url = URL.createObjectURL(blob);
    const a = document.createElement('a');
    a.href = url;
    a.download = outputFileName;
    a.click();
    URL.revokeObjectURL(url);
  };

  return (
    <div style={{ textAlign: 'center', height: '300px' }}>
      <h1>Add Checkboxes in Excel in React</h1>
      <button id="add-checkbox" onClick={addCheckbox}>Add Checkbox</button>
    </div>
  );
}

export default App;
Workbook after adding a checkbox:
Adjust checkbox size and 3D shading
The default size suits short captions; when the caption is longer or the area needs to stand out, specify a larger width and height when adding the checkbox. The 3D effect adds a recessed border and shadow, bringing the checkbox closer to the look of a traditional form control.
Writing and result for adjusting checkbox size and 3D shading:
| Writing | Result |
|---|---|
sheet.CheckBoxes.AddCheckBox(row, column, height, width) |
Adds a checkbox with the specified size |
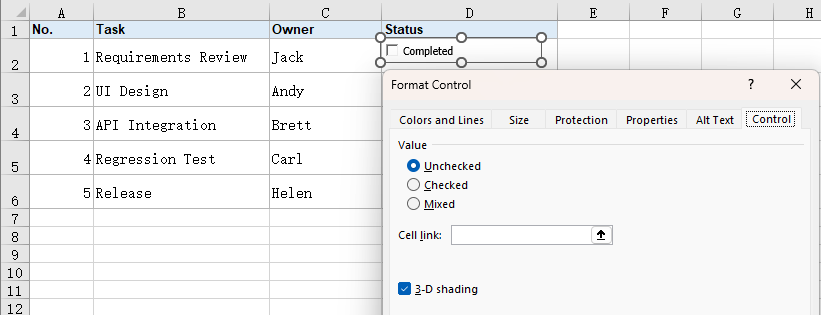
checkbox.Display3DShading = true |
Shows the 3D border and shadow on the checkbox |
The steps are:
- Load the font file and the Excel test file into the VFS with
window.spire.FetchFileToVFS. - Create a workbook with
new Workbook()and load the test file throughworkbook.LoadFromFile. - Get the task list worksheet with
workbook.Worksheets.get(0). - Add a larger checkbox with
sheet.CheckBoxes.AddCheckBox(2, 4, 24, 160)and set its caption. - Set
checkbox.Display3DShadingtotrue. - Write the result file with
workbook.SaveToFile, release resources withworkbook.Dispose, and read the workbook from the VFS to trigger the download.
Below is the complete code example that adjusts checkbox size and 3D shading:
function App() {
  const customizeCheckbox = async () => {
    // Get the Spire.XLS WASM module
    const xlsModule = window.wasmModule?.spirexls;

    // Check that the module is ready
    if (!xlsModule) {
      alert('Spire.Xls is not ready yet');
      return;
    }

    // Load the font and the test data file into the VFS
    await window.spire.FetchFileToVFS('ARIAL.TTF', '/Library/Fonts/', `${process.env.PUBLIC_URL}/font/`);
    const inputFileName = 'CheckBoxData.xlsx';
    await window.spire.FetchFileToVFS(inputFileName, '', `${process.env.PUBLIC_URL}data/`);

    // Load the workbook
    const workbook = new xlsModule.Workbook();
    workbook.LoadFromFile({ fileName: inputFileName });

    // Get the task list worksheet
    const sheet = workbook.Worksheets.get(0);

    // Add a larger checkbox and set its caption
    const checkbox = sheet.CheckBoxes.AddCheckBox(2, 4, 24, 160);
    checkbox.Text = 'Completed';

    // Show the 3D border and shadow
    checkbox.Display3DShading = true;

    // Save the result into the VFS
    const outputFileName = 'CheckboxSizeAndShading.xlsx';
    workbook.SaveToFile({ fileName: outputFileName });

    // Dispose of the workbook to release its resources
    workbook.Dispose();

    // Read the result back out of the VFS and trigger the download
    const fileArray = window.dotnetRuntime.Module.FS.readFile(outputFileName);
    const blob = new Blob([fileArray], { type: 'application/vnd.openxmlformats-officedocument.spreadsheetml.sheet' });
    const url = URL.createObjectURL(blob);
    const a = document.createElement('a');
    a.href = url;
    a.download = outputFileName;
    a.click();
    URL.revokeObjectURL(url);
  };

  return (
    <div style={{ textAlign: 'center', height: '300px' }}>
      <h1>Add Checkboxes in Excel in React</h1>
      <button id="size-and-shading" onClick={customizeCheckbox}>Size and 3D Shading</button>
    </div>
  );
}

export default App;
Workbook after adjusting checkbox size and 3D shading:
FAQ
Why does the added checkbox not appear where expected
Cause: The checkbox position is determined by the row and column specified when it is added. If that row or column is hidden, merged, or very small, the checkbox may be hidden or squeezed.
Solution: Check the target row and column, then adjust the column width and row height. For more precise placement, set the checkbox Left, Top, Width, and Height.
Why does the checkbox still show the default caption Check Box 1
Cause: A new checkbox carries a default caption, and that name stays until Text is set.
Solution: Set checkbox.Text immediately after adding the checkbox, for example Completed or the task name for that row.
Why is the checkbox size unsuitable or the caption cut off
Cause: The height and width passed when adding the checkbox are measured in pixels. If they are too small, a longer caption is clipped; a small row height or column width can also cut off the control.
Solution: Increase the width and height passed to AddCheckBox according to the caption length, and enlarge the column width and row height as needed.
Get a Free License
Spire.XLS for JavaScript offers a 30-day full-featured free trial license with no functional limitations. Apply here to evaluate before purchasing.