
Program Guide (96)
Children categories
Images play a crucial role in effectively communicating complex ideas or concepts. When there are low-quality or outdated images in a Word document, it is necessary to replace the images to enhance the overall visual appeal and professionalism of your document. In this article, you will learn how to replace images in a Word document in Python using Spire.Doc for Python.
Install Spire.Doc for Python
This scenario requires Spire.Doc for Python and plum-dispatch v1.7.4. They can be easily installed in your Windows through the following pip commands.
pip install Spire.Doc
If you are unsure how to install, please refer to this tutorial: How to Install Spire.Doc for Python on Windows
Replace Image with New Image in Word in Python
Spire.Doc for Python supports not only inserting images in Word, but also replacing existing images. The following are the detailed steps to get a specific image in Word and then replace it with a new image.
- Create a Document object.
- Load a Word document using Document.LoadFromFile() method.
- Create a list to store the images.
- Iterate through all sections in the document.
- Iterate through all paragraphs in each section.
- Iterate through all child objects in each paragraph.
- Find the images and add them to the list.
- Get a specific image from the list and replace it with another image using DocPicture.LoadImage() method.
- Save the result document using Document.SaveToFile() method.
- Python
from spire.doc import *
from spire.doc.common import *

# Create a Document object
doc = Document()

# Load a Word document
doc.LoadFromFile("Data.docx")

# Create a list to store the images
pictures = []

# Iterate through all sections in the document
for i in range(doc.Sections.Count):
    sec = doc.Sections.get_Item(i)

    # Iterate through all paragraphs in each section
    for j in range(sec.Paragraphs.Count):
        para = sec.Paragraphs.get_Item(j)

        # Iterate through all child objects in each paragraph
        for k in range(para.ChildObjects.Count):
            docObj = para.ChildObjects.get_Item(k)

            # Find the images and add them to the list
            if docObj.DocumentObjectType == DocumentObjectType.Picture:
                pictures.append(docObj)

# Replace the first picture in the list with a new image
picture = pictures[0] if isinstance(pictures[0], DocPicture) else None
picture.LoadImage("data.jpg")

# Save the result document
doc.SaveToFile("ReplaceImage.docx", FileFormat.Docx)
doc.Close()

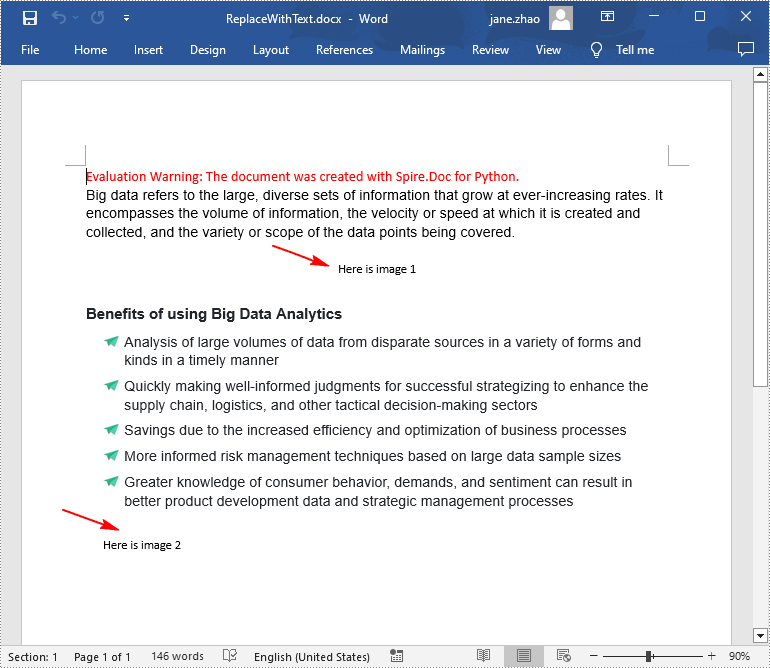
Replace Image with Text in Word in Python
Spire.Doc for Python doesn't provide a direct method to replace image with text, but you can achieve this task by inserting text at the image location and then removing the image from the document.
The following are the steps to replace all images in a Word document with text:
- Create a Document object.
- Load a Word document using Document.LoadFromFile() method.
- Iterate through all sections in the document.
- Iterate through all paragraphs in each section.
- Create a list to store the images.
- Iterate through all child objects in each paragraph.
- Find the images and add them to the list.
- Iterate through the images in the list.
- Get the index of the image in the paragraph using Paragraph.ChildObjects.Indexof() method.
- Initialize an instance of TextRange class and set text for the text range through TextRange.Text property.
- Insert the text range at the image location using Paragraph.ChildObjects.Insert() method.
- Remove the image from the paragraph using Paragraph.ChildObjects.Remove() method.
- Save the result document using Document.SaveToFile() method.
- Python
from spire.doc import *
from spire.doc.common import *

# Create a Document object
doc = Document()

# Load a Word document
doc.LoadFromFile("Data.docx")

j = 1
# Iterate through all sections in the document
for k in range(doc.Sections.Count):
    sec = doc.Sections.get_Item(k)

    # Iterate through all sections in the document
    for m in range(sec.Paragraphs.Count):
        para = sec.Paragraphs.get_Item(m)

        # Create a list to store the images
        pictures = []

        # Find the images and add them to the list
        for x in range(para.ChildObjects.Count):
            docObj = para.ChildObjects.get_Item(x)
            if docObj.DocumentObjectType == DocumentObjectType.Picture:
                pictures.append(docObj)

        # Iterate through all images in the list and replace them with text "Here is image {image index}"
        for pic in pictures:
            index = para.ChildObjects.IndexOf(pic)
            textRange = TextRange(doc)
            textRange.Text = "Here is image {0}".format(j)
            para.ChildObjects.Insert(index, textRange)
            para.ChildObjects.Remove(pic)
            j += 1

# Save the result document
doc.SaveToFile("ReplaceWithText.docx", FileFormat.Docx)
doc.Close()
Apply for a Temporary License
If you'd like to remove the evaluation message from the generated documents, or to get rid of the function limitations, please request a 30-day trial license for yourself.
When working with Word documents, sometimes you may need to adjust the content or layout of the document by deleting certain paragraphs. For example, when you have copied a very long paragraph from the Internet, you can delete redundant paragraphs as needed and keep only the useful ones. Or you can create a new document by deleting irrelevant paragraphs in an existing document. In this case, performing this process programmatically is a better option than tedious manual deletion, which can help you batch process a large number of documents in a short period of time. In this article, we will show you how to remove a specific paragraph or all paragraphs from Word documents in python using Spire.Doc for Python.
Install Spire.Doc for Python
This scenario requires Spire.Doc for Python and plum-dispatch v1.7.4. They can be easily installed in your Windows through the following pip command.
pip install Spire.Doc
If you are unsure how to install, please refer to this tutorial: How to Install Spire.Doc for Python on Windows
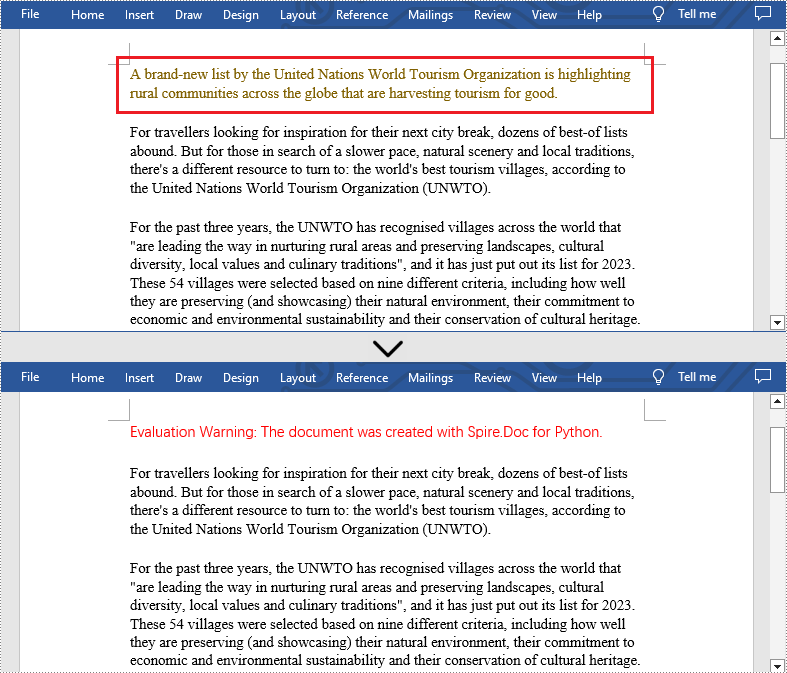
Delete a Specific Paragraph from Word Documents
With Spire.Doc for Python library, you are allowed to remove specific paragraphs from Word documents. You just need to get the desired section, and then call the Section.Paragraphs.RemoveAt() method to remove the paragraphs you want. The detailed steps are as follows.
- Create an object of Document class.
- Load a Word document from disk using Document.LoadFromFile() method.
- Get the first section of this file using Document.Sections[] property.
- Remove the first paragraph from this section using Section.Paragraphs.RemoveAt() method.
- Save the result file using Document.SaveToFile() method.
- Python
from spire.doc import *
from spire.doc.common import *

inputFile = "C:/Users/Administrator/Desktop/Sample.docx"
outputFile = "C:/Users/Administrator/Desktop/RemoveParagraphs.docx"

#Create an object of Document class
document = Document()

#Load a sample file from disk
document.LoadFromFile(inputFile)

#Get the first section of this file
section=document.Sections[0]

#Remove the first paragraph from this section
section.Paragraphs.RemoveAt(0)

#Save the result file
document.SaveToFile(outputFile, FileFormat.Docx2013)
document.Close()
Delete All Paragraphs from Word Documents
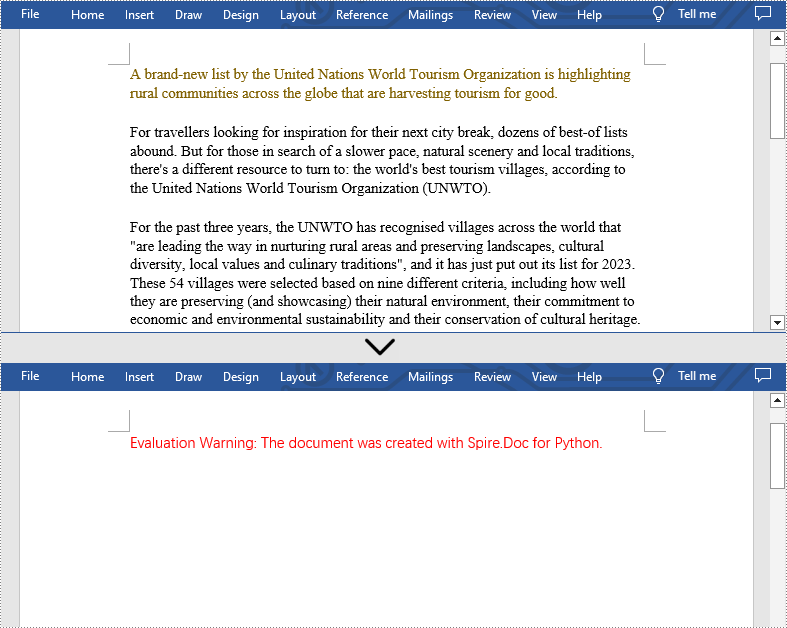
In addition, if you want to clear all paragraphs of the Word document at once, please loop through all sections first and call the Section.Paragraphs.Clear() method to do that. The detailed steps are as follows.
- Create an object of Document class.
- Load a Word document from disk using Document.LoadFromFile() method.
- Loop through all sections first and remove all paragraphs in each section by using Section.Paragraphs.Clear() method.
- Save the result file using Document.SaveToFile() method.
- Python
from spire.doc import *
from spire.doc.common import *

inputFile = "C:/Users/Administrator/Desktop/Sample.docx"
outputFile = "C:/Users/Administrator/Desktop/RemoveAllParagraphs.docx"

#Create an object of Document class
document = Document()

#Load a sample file from disk
document.LoadFromFile(inputFile)

#Remove paragraphs from the body of every section in the document
for i in range(document.Sections.Count):
    section = document.Sections.get_Item(i)
    section.Paragraphs.Clear()

#Save the result file
document.SaveToFile(outputFile, FileFormat.Docx2013)
document.Close()
Apply for a Temporary License
If you'd like to remove the evaluation message from the generated documents, or to get rid of the function limitations, please request a 30-day trial license for yourself.
Dealing with a large number of Word documents can be very challenging. Whether it's editing or reviewing a large number of documents, there's a lot of time wasted on opening and closing documents. What's more, sharing and receiving a large number of separate Word documents can be annoying, as it may require a lot of repeated sending and receiving operations by both the sharer and the receiver. Therefore, in order to enhance efficiency and save time, it is advisable to merge related Word documents into a single file. From this article, you will know how to use Spire.Doc for Python to easily merge Word documents through Python programs.
- Merge Word Documents by Inserting Files with Python
- Merge Word Documents by Cloning Contents with Python
Install Spire.Doc for Python
This scenario requires Spire.Doc for Python and plum-dispatch v1.7.4. They can be easily installed in your Windows through the following pip command.
pip install Spire.Doc
If you are unsure how to install, please refer to this tutorial: How to Install Spire.Doc for Python on Windows
Merge Word Documents by Inserting Files with Python
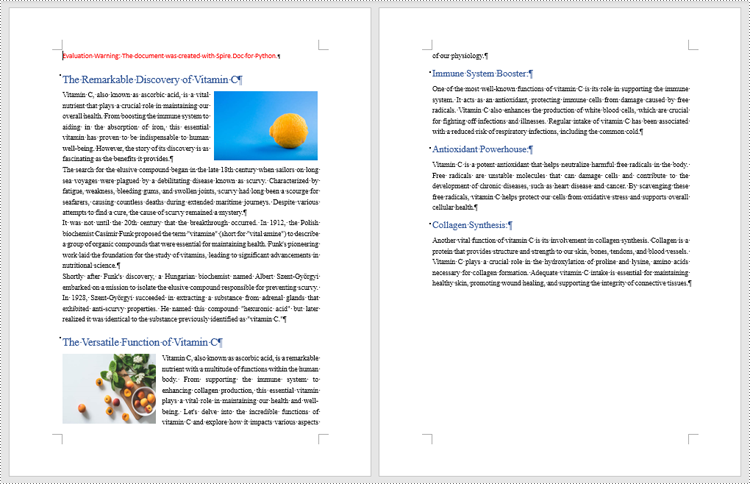
The method Document.insertTextFromFile() is used to insert other Word documents to the current one, and the inserted content will start from a new page. The detailed steps for merging Word documents by inserting are as follows:
- Create an object of Document class and load a Word document using Document.LoadFromFile() method.
- Insert the content from another document to it using Document.InsertTextFromFile() method.
- Save the document using Document.SaveToFile() method.
- Python
from spire.doc import *
from spire.doc.common import *

# Create an object of Document class and load a Word document
doc = Document()
doc.LoadFromFile("Sample1.docx")

# Insert the content from another Word document to this one
doc.InsertTextFromFile("Sample2.docx", FileFormat.Auto)

# Save the document
doc.SaveToFile("output/InsertDocuments.docx")
doc.Close()
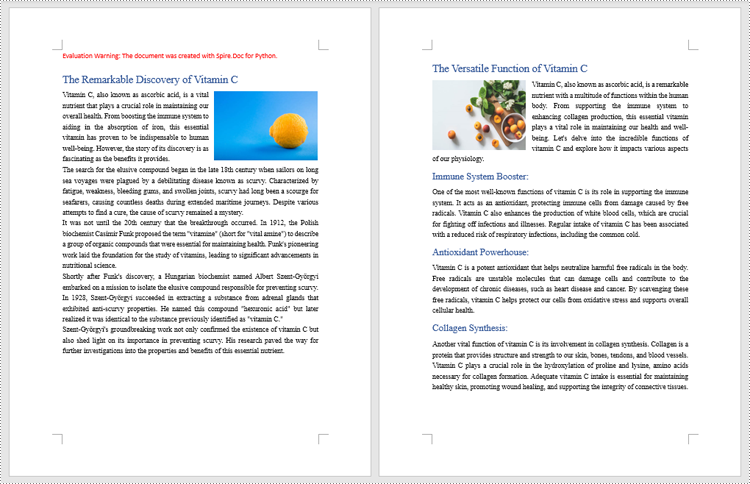
Merge Word Documents by Cloning Contents with Python
Merging Word documents can also be achieved by cloning contents from one Word document to another. This method maintains the formatting of the original document, and content cloned from another document continues at the end of the current document without starting a new Page. The detailed steps are as follows:
- Create two objects of Document class and load two Word documents using Document.LoadFromFile() method.
- Get the last section of the destination document using Document.Sections.get_Item() method.
- Loop through the sections in the document to be cloned and then loop through the child objects of the sections.
- Get a section child object using Section.Body.ChildObjects.get_Item() method.
- Add the child object to the last section of the destination document using Section.Body.ChildObjects.Add() method.
- Save the result document using Document.SaveToFile() method.
- Python
from spire.doc import *
from spire.doc.common import *

# Create two objects of Document class and load two Word documents
doc1 = Document()
doc1.LoadFromFile("Sample1.docx")
doc2 = Document()
doc2.LoadFromFile("Sample2.docx")

# Get the last section of the first document
lastSection = doc1.Sections.get_Item(doc1.Sections.Count - 1)

# Loop through the sections in the second document
for i in range(doc2.Sections.Count):
    section = doc2.Sections.get_Item(i)
    # Loop through the child objects in the sections
    for j in range(section.Body.ChildObjects.Count):
        obj = section.Body.ChildObjects.get_Item(j)
        # Add the child objects from the second document to the last section of the first document
        lastSection.Body.ChildObjects.Add(obj.Clone())

# Save the result document
doc1.SaveToFile("output/MergeByCloning.docx")
doc1.Close()
doc2.Close()
Apply for a Temporary License
If you'd like to remove the evaluation message from the generated documents, or to get rid of the function limitations, please request a 30-day trial license for yourself.
Comments are invaluable tools for collaboration and feedback in Word documents, allowing users to provide insights, suggestions, clarification, and discussions. Whether the goal is to share ideas, respond to existing comments, or remove outdated feedback, mastering the efficient handling of Word document comments can significantly enhance document workflow. This article aims to show how to add, delete, or reply to comments in Word documents using Spire.Doc for Python in Python programs.
- Add Comments to a Paragraph in Word Documents using Python
- Add Comments to Text in Word Documents using Python
- Remove Comments from Word Documents using Python
- Reply to Comments in Word Documents using Python
Install Spire.Doc for Python
This scenario requires Spire.Doc for Python and plum-dispatch v1.7.4. They can be easily installed in your Windows through the following pip command.
pip install Spire.Doc
If you are unsure how to install, please refer to this tutorial: How to Install Spire.Doc for Python on Windows
Add Comments to a Paragraph in Word Documents using Python
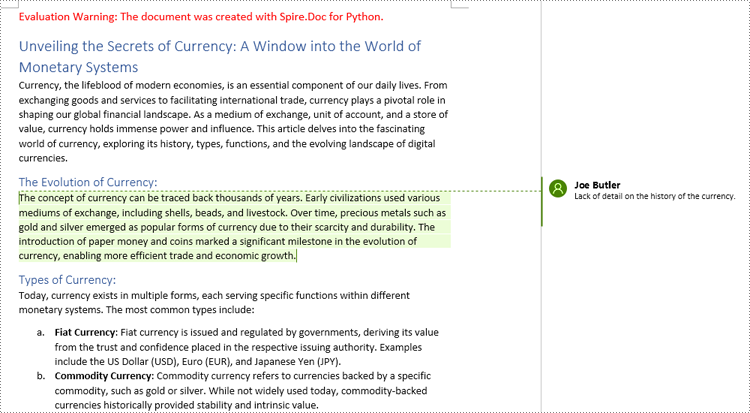
Spire.Doc for Python provides the Paragraph.AppendComment() method to add a comment to a specified paragraph. And the range of text corresponding to the comment needs to be controlled using the comment start marks and end marks. The detailed steps to add comments on paragraphs are as follows:
- Create an object of Document class and load a Word document using Document.LoadFromFile() method.
- Get the first section using Document.Sections.get_Item() method.
- Get the first paragraph in the section using Section.Paragraphs.get_Item() method.
- Add a comment to the paragraph using Paragraph.AppendComment() method.
- Set the author the comment through Comment.Format.Author property.
- Create a comment start mark and an end mark and set them as the start and end marks of the created comment though CommentMark.CommentId property.
- Insert the comment start mark and end mark at the beginning and end of the paragraph respectively using Paragraph.ChildObjects.Insert() method.
- Save the document using Document.SaveToFile() method.
- Python
from spire.doc import *
from spire.doc.common import *

# Create an object of Document class and load a Word document
doc = Document()
doc.LoadFromFile("Sample.docx")

# Get the first section
section = doc.Sections.get_Item(0)

# Get the forth paragraph
paragraph = section.Paragraphs.get_Item(4)

# Add a comment to the paragraph
comment = paragraph.AppendComment("Lack of detail on the history of the currency.")

# Set the author of the comment
comment.Format.Author = "Joe Butler"

# Create a comment start mark and an end mark and set them as the start and end marks of the created comment
commentStart = CommentMark(doc, CommentMarkType.CommentStart)
commentEnd = CommentMark(doc, CommentMarkType.CommentEnd)
commentStart.CommentId = comment.Format.CommentId
commentEnd.CommentId = comment.Format.CommentId

# Insert the comment start mark and end mark at the beginning and end of the paragraph respectively
paragraph.ChildObjects.Insert(0, commentStart)
paragraph.ChildObjects.Add(commentEnd)

# Save the document
doc.SaveToFile("output/CommentOnParagraph.docx")
doc.Close()
Add Comments to Text in Word Documents using Python
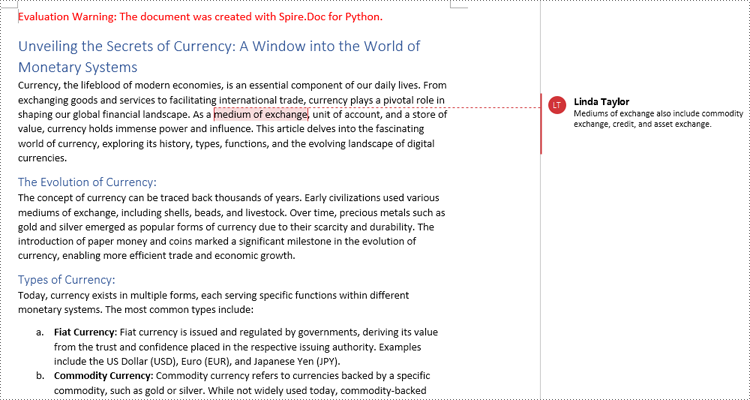
Spire.Doc for Python also supports finding specified text and adding comments to it. The detailed steps are as follows:
- Create an object of Document class and load a Word document using Document.LoadFromFile() method.
- Find the text to comment on using Document.FindString() method.
- Create an object of Comment class, set the comment content through Comment.Body.AddParagraph().Text property, and set the author of the comment through Comment.Format.Author property.
- Get the text as one text range using TextSelection.GetAsOneRange() method and get the paragraph the text belongs to through TextRange.OwnerParagraph property.
- Insert the comment after the found text using Paragraph.ChildObjects.Insert() method.
- Create a comment start mark and an end mark and set them as the start and end marks of the created comment though CommentMark.CommentId property.
- Insert the comment start mark and end mark before and after found text respectively using Paragraph.ChildObjects.Insert() method.
- Save the document using Document.SaveToFile() method.
- Python
from spire.doc import *
from spire.doc.common import *

# Create an object of Document class and load a Word document
doc = Document()
doc.LoadFromFile("Sample.docx")

# Find the text to comment on
text = doc.FindString("medium of exchange", True, True)

# Create a comment and set the content and author of the comment
comment = Comment(doc)
comment.Body.AddParagraph().Text = "Fiat currency is the only legal means of payment within a country or region."
comment.Format.Author = "Linda Taylor"

# Get the found text as a text range and get the paragraph it belongs to
range = text.GetAsOneRange()
paragraph =  range.OwnerParagraph

# Add the comment to the paragraph
paragraph.ChildObjects.Insert(paragraph.ChildObjects.IndexOf(range) + 1, comment)

# Create a comment start mark and an end mark and set them as the start and end marks of the created comment
commentStart = CommentMark(doc, CommentMarkType.CommentStart)
commentEnd = CommentMark(doc, CommentMarkType.CommentEnd)
commentStart.CommentId = comment.Format.CommentId
commentEnd.CommentId = comment.Format.CommentId

# Insert the created comment start and end tags before and after the found text respectively
paragraph.ChildObjects.Insert(paragraph.ChildObjects.IndexOf(range), commentStart)
paragraph.ChildObjects.Insert(paragraph.ChildObjects.IndexOf(range) + 1, commentEnd)

# Save the document
doc.SaveToFile ("output/CommentOnText.docx")
doc.Close()
Remove Comments from Word Documents using Python
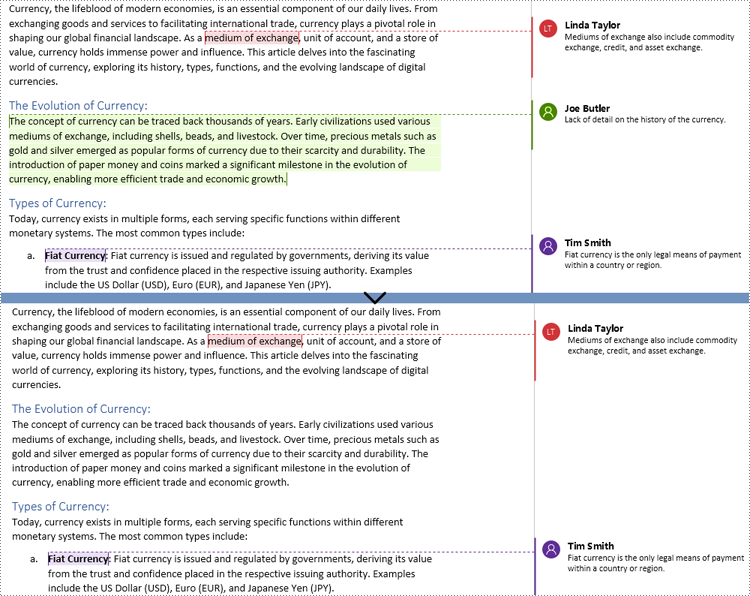
Spire.Doc for Python provides the Document.Comments.RemoveAt() method that can be used to remove a specified comment and the Document.Clear() method that can remove all comments. The detailed steps for removing comments are as follows:
- Create an object of Document class and load a Word document using Document.LoadFromFile() method.
- Delete a specific comment using Document.Comments.RemoveAt() method or delete all the comments using Document.Comments.Clear() method.
- Save the document using Document.SaveToFile() method.
- Python
from spire.doc import *
from spire.doc.common import *

# Create an object of Document class and load a Word document
doc = Document()
doc.LoadFromFile("Sample1.docx")

# Remove the second comment
doc.Comments.RemoveAt(1)

# Remove all comments
#doc.Comments.Clear()

# Save the document
doc.SaveToFile("output/RemoveComments.docx")
doc.Close()
Reply to Comments in Word Documents using Python
Spire.Doc for Python allows users to reply to a comment by setting a comment as a reply to another comment using Comment.ReplyToComment(Comment) method. The detailed steps are as follows:
- Create an object of Document class and load a Word document using Document.LoadFromFile() method.
- Get a comment using Document.Comments.get_Item() method.
- Create a comment and set its content and author through Comment.Body.AddParagraph().Text property and Comment.Format.Author property.
- Set the created comment as a reply to the obtained comment using Comment.ReplyToComment() method.
- Save the document using Document.SaveToFile() method.
- Python
from spire.doc import *
from spire.doc.common import *

# Create an object of Document class and load a Word document
doc = Document()
doc.LoadFromFile("output/CommentOnParagraph.docx")

# Get a comment
comment = doc.Comments.get_Item(0)

# Create a reply comment and set the content and author of it
reply = Comment(doc)
reply.Body.AddParagraph().Text = "We will give more details about the history of the currency."
reply.Format.Author = "Moris Peter"

# Set the created comment as a reply to obtained comment
comment.ReplyToComment(reply)

# Save the document
doc.SaveToFile("output/ReplyToComments.docx")
doc.Close()

Apply for a Temporary License
If you'd like to remove the evaluation message from the generated documents, or to get rid of the function limitations, please request a 30-day trial license for yourself.
Textboxes are versatile tools in Microsoft Word, allowing you to insert and position text or other elements anywhere on a page, giving you the power to create eye-catching flyers, brochures, or reports. Whether you're looking to emphasize a particular section of text, place captions near images, or simply add a decorative touch, the capacity to manipulate textboxes offers a practical and aesthetic advantage in document design. In this article, you will learn how to add or remove textboxes in a Word document in Python using Spire.Doc for Python.
Install Spire.Doc for Python
This scenario requires Spire.Doc for Python and plum-dispatch v1.7.4. They can be easily installed in your Windows through the following pip command.
pip install Spire.Doc
If you are unsure how to install, please refer to this tutorial: How to Install Spire.Doc for Python on Windows
Add a Textbox to a Word Document in Python
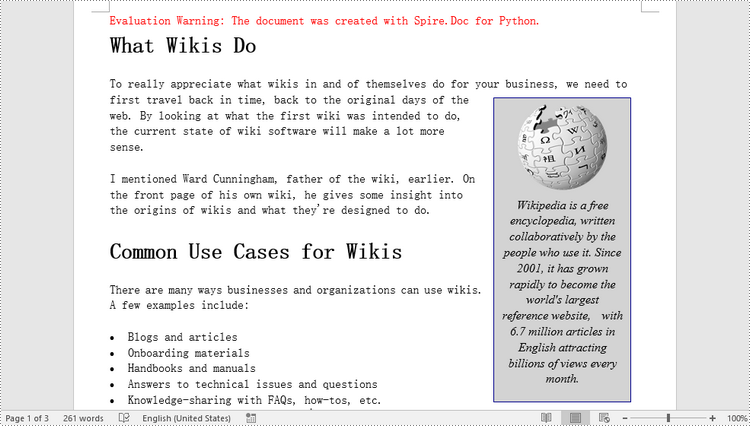
Spire.Doc for Python provides the Paragraph.AppendTextBox() method to insert a textbox in a specified paragraph. The content and formatting of the textbox can be set through the properties under the TextBox object. The following are the detailed steps.
- Create a Document object.
- Load a Word document using Document.LoadFromFile() method.
- Get the first section and add a paragraph to the section using Section.AddParagraph() method.
- Add a text box to the paragraph using Paragraph.AppendTextBox() method.
- Get the format of the textbox using TextBox.Format property, and then set the textbox's wrapping type, position, border color and fill color using the properties of TextBoxFormat Class.
- Add a paragraph to the textbox using TextBox.Body.AddParagraph() method.
- Add an image to the paragraph using Paragraph.AppendPicture() method.
- Add text to the textbox using Paragraph.AppendText() method
- Save the document to a different file using Document.SaveToFile() method.
- Python
from spire.doc import *
from spire.doc.common import *

# Create a Document object
document = Document()

# Load a Word document
document.LoadFromFile("C:/Users/Administrator/Desktop/input3.docx")

# Insert a textbox and set its wrapping style
textBox = document.Sections[0].Paragraphs[0].AppendTextBox(135, 300)
textBox.Format.TextWrappingStyle = TextWrappingStyle.Square

# Set the position of the textbox
textBox.Format.HorizontalOrigin = HorizontalOrigin.RightMarginArea
textBox.Format.HorizontalPosition = -145.0
textBox.Format.VerticalOrigin = VerticalOrigin.Page
textBox.Format.VerticalPosition = 120.0

# Set the border style and fill color of the textbox
textBox.Format.LineColor = Color.get_DarkBlue()
textBox.Format.FillColor = Color.get_LightGray()

# Insert an image to textbox as a paragraph
para = textBox.Body.AddParagraph();
picture = para.AppendPicture("C:/Users/Administrator/Desktop/Wikipedia_Logo.png")

# Set alignment for the paragraph
para.Format.HorizontalAlignment = HorizontalAlignment.Center

# Set the size of the inserted image
picture.Height = 90.0
picture.Width = 90.0

# Insert text to textbox as the second paragraph
textRange = para.AppendText("Wikipedia is a free encyclopedia, written collaboratively by the people who use it. "
    + "Since 2001, it has grown rapidly to become the world's largest reference website,  "
    + "with 6.7 million articles in English attracting billions of views every month.")

# Set alignment for the paragraph
para.Format.HorizontalAlignment = HorizontalAlignment.Center

# Set the font of the text
textRange.CharacterFormat.FontName = "Times New Roman"
textRange.CharacterFormat.FontSize = 12.0
textRange.CharacterFormat.Italic = True

# Save the result file
document.SaveToFile("output/AddTextBox.docx", FileFormat.Docx)
Remove a Textbox from a Word Document in Python
Spire.Doc for Python provides the Document.TextBoxes.RemoveAt(int index) method to delete a specified textbox. To delete all textboxes from a Word document, you can use the Document.TextBoxes.Clear() method. The following example shows how to remove the first textbox from a Word document.
- Create a Document object.
- Load a Word document using Document.LoadFromFile() method.
- Remove the first text box using Document.TextBoxes.RemoveAt(int index) method.
- Save the document to another file using Document.SaveToFile() method.
- Python
from spire.doc import *
from spire.doc.common import *

# Create a Document object
document = Document()

# Load a Word document
document .LoadFromFile("C:/Users/Administrator/Desktop/TextBox.docx")

# Remove the first textbox
document .TextBoxes.RemoveAt(0)

# Remove all textboxes
# document.TextBoxes.Clear()

# Save the result document
document.SaveToFile("output/RemoveTextbox.docx", FileFormat.Docx)
Apply for a Temporary License
If you'd like to remove the evaluation message from the generated documents, or to get rid of the function limitations, please request a 30-day trial license for yourself.
Python: Create Various Types of Lists in a Word Document
2023-10-27 00:57:31 Written by AdministratorLists are a powerful organizational tool that can be used to present information in a structured and easy-to-follow manner. Whether you want to create numbered lists, bulleted lists, or even custom lists with specific formatting, Word provides flexible options to suit your needs. By utilizing different list styles, you can improve the readability and visual appeal of your documents, making it simpler for readers to grasp key points and navigate through the content. In this article, you will learn how to programmatically create various types of lists in a Word document in Python using Spire.Doc for Python.
- Create a Numbered List in Word in Python
- Create a Bulleted List in Word in Python
- Create a Multi-Level Numbered List in Word in Python
- Create a Multi-Level Mixed-Type List in Word in Python
Install Spire.Doc for Python
This scenario requires Spire.Doc for Python and plum-dispatch v1.7.4. They can be easily installed in your Windows through the following pip command.
pip install Spire.Doc
If you are unsure how to install, please refer to this tutorial: How to Install Spire.Doc for Python on Windows
Create a Numbered List in Word in Python
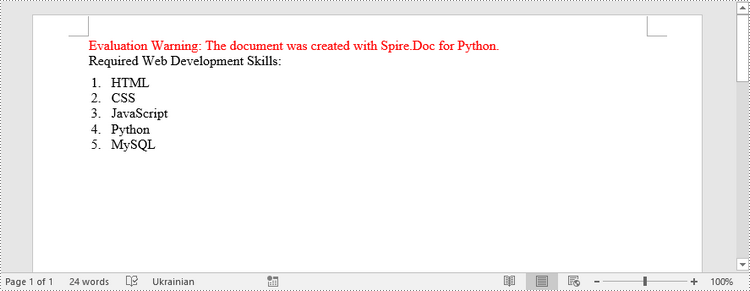
Spire.Doc for Python provides the ListStyle class, which enables you to establish either a numbered list style or a bulleted style. Subsequently, you can utilize the Paragraph.ListFormat.ApplyStyle() method to apply the defined list style to a paragraph. The steps to create a numbered list are as follows.
- Create a Document object.
- Add a section using Document.AddSection() method.
- Create an instance of ListStyle class, specifying the list type to Numbered.
- Get a specific level of the list through ListStyle.Levels[index] property, and set the numbering type through ListLevel.PatternType property.
- Add the list style to the document using Document.ListStyles.Add() method.
- Add several paragraphs to the document using Section.AddParagraph() method.
- Apply the list style to a specific paragraph using Paragraph.ListFormat.ApplyStyle() method.
- Specify the list level through Paragraph.ListFormat.ListLevelNumber property.
- Save the document to a Word file using Document.SaveToFile() method.
- Python
from spire.doc import *
from spire.doc.common import *

# Create a Document object
doc = Document()

# Add a section
section = doc.AddSection()

# Create a numbered list style
listStyle = doc.Styles.Add(ListType.Numbered,"numberedList")
Levels = listStyle.ListRef.Levels
Levels[0].PatternType = ListPatternType.Arabic
Levels[0].TextPosition = 20

# Add a paragraph
paragraph = section.AddParagraph()
paragraph.AppendText("Required Web Development Skills:")
paragraph.Format.AfterSpacing = 5.0

# Add a paragraph and apply the numbered list style to it
paragraph = section.AddParagraph()
paragraph.AppendText("HTML")
paragraph.ListFormat.ApplyStyle("numberedList")
paragraph.ListFormat.ListLevelNumber = 0

# Add another four paragraphs and apply the numbered list style to them
paragraph = section.AddParagraph()
paragraph.AppendText("CSS")
paragraph.ListFormat.ApplyStyle("numberedList")
paragraph.ListFormat.ListLevelNumber = 0

paragraph = section.AddParagraph()
paragraph.AppendText("JavaScript")
paragraph.ListFormat.ApplyStyle("numberedList")
paragraph.ListFormat.ListLevelNumber = 0

paragraph = section.AddParagraph()
paragraph.AppendText("Python")
paragraph.ListFormat.ApplyStyle("numberedList")
paragraph.ListFormat.ListLevelNumber = 0

paragraph = section.AddParagraph()
paragraph.AppendText("MySQL")
paragraph.ListFormat.ApplyStyle("numberedList")
paragraph.ListFormat.ListLevelNumber = 0

# Save the document to file
doc.SaveToFile("output/NumberedList.docx", FileFormat.Docx)
Create a Bulleted List in Word in Python
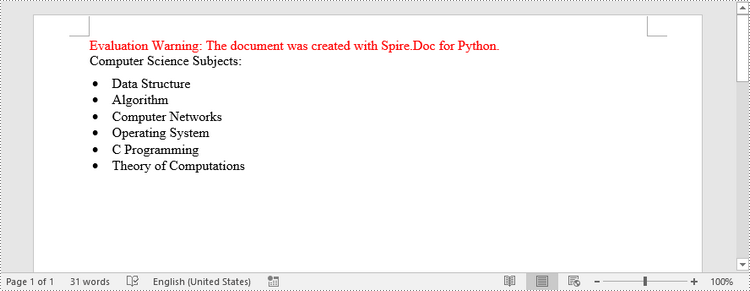
Creating a bulleted list follows a similar process to creating a numbered list, with the main difference being that you need to specify the list type as "Bulleted" and assign a bullet symbol to it. The following are the detailed steps.
- Create a Document object.
- Add a section using Document.AddSection() method.
- Create an instance of ListStyle class, specifying the list type to Bulleted.
- Get a specific level of the list through ListStyle.Levels[index] property, and set the bullet symbol through ListLevel.BulletCharacter property.
- Add the list style to the document using Document.ListStyles.Add() method.
- Add several paragraphs to the document using Section.AddParagraph() method.
- Apply the list style to a specific paragraph using Paragraph.ListFormat.ApplyStyle() method.
- Specify the list level through Paragraph.ListFormat.ListLevelNumber property.
- Save the document to a Word file using Document.SaveToFile() method.
- Python
from spire.doc import *
from spire.doc.common import *

# Create a Document object
doc = Document()

# Add a section
section = doc.AddSection()

# Create a bulleted list style
listStyle = doc.Styles.Add(ListType.Bulleted,"bulletedList")
Levels = listStyle.ListRef.Levels
Levels[0].BulletCharacter = "\u00B7"
Levels[0].CharacterFormat.FontName = "Symbol"
Levels[0].TextPosition = 20

# Add a paragraph
paragraph = section.AddParagraph()
paragraph.AppendText("Computer Science Subjects:")
paragraph.Format.AfterSpacing = 5.0

# Add a paragraph and apply the bulleted list style to it
paragraph = section.AddParagraph()
paragraph.AppendText("Data Structure")
paragraph.ListFormat.ApplyStyle("bulletedList")
paragraph.ListFormat.ListLevelNumber = 0

# Add another five paragraphs and apply the bulleted list style to them
paragraph = section.AddParagraph()
paragraph.AppendText("Algorithm")
paragraph.ListFormat.ApplyStyle("bulletedList")
paragraph.ListFormat.ListLevelNumber = 0

paragraph = section.AddParagraph()
paragraph.AppendText("Computer Networks")
paragraph.ListFormat.ApplyStyle("bulletedList")
paragraph.ListFormat.ListLevelNumber = 0

paragraph = section.AddParagraph()
paragraph.AppendText("Operating System")
paragraph.ListFormat.ApplyStyle("bulletedList")
paragraph.ListFormat.ListLevelNumber = 0

paragraph = section.AddParagraph()
paragraph.AppendText("C Programming")
paragraph.ListFormat.ApplyStyle("bulletedList")
paragraph.ListFormat.ListLevelNumber = 0

paragraph = section.AddParagraph()
paragraph.AppendText("Theory of Computations")
paragraph.ListFormat.ApplyStyle("bulletedList")
paragraph.ListFormat.ListLevelNumber = 0

# Save the document to file
doc.SaveToFile("output/BulletedList.docx", FileFormat.Docx);
Create a Multi-Level Numbered List in Word in Python
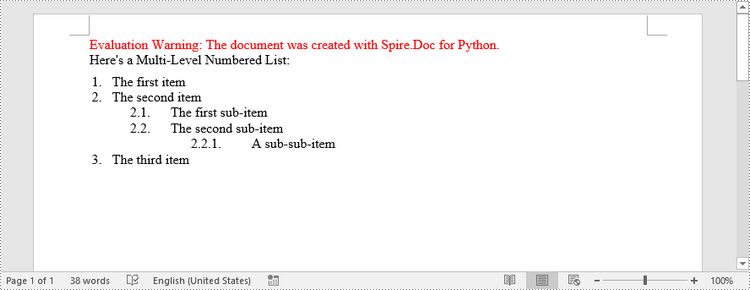
A multi-level list consists of at least two different levels. A certain level of a nested list can be accessed by the ListStyle.Levels[index] property, through which you can set the numbering type and prefix. The following are the steps to create a multi-level numbered list in Word.
- Create a Document object.
- Add a section using Document.AddSection() method.
- Create an instance of ListStyle class, specifying the list type to Numbered.
- Get a specific level of the list through ListStyle.Levels[index] property, and set the numbering type and prefix.
- Add the list style to the document using Document.ListStyles.Add() method.
- Add several paragraphs to the document using Section.AddParagraph() method.
- Apply the list style to a specific paragraph using Paragraph.ListFormat.ApplyStyle() method.
- Specify the list level through Paragraph.ListFormat.ListLevelNumber property.
- Save the document to a Word file using Document.SaveToFile() method.
- Python
from spire.doc import *
from spire.doc.common import *

# Create a Document object
doc = Document()

# Add a section
section = doc.AddSection()

# Create a numbered list style, specifying number prefix and pattern type of each level
listStyle = doc.Styles.Add(ListType.Numbered,"levelstyle")
Levels = listStyle.ListRef.Levels
Levels[0].PatternType = ListPatternType.Arabic
Levels[0].TextPosition = 20.0
Levels[1].NumberPrefix = "%1."
Levels[1].PatternType = ListPatternType.Arabic
Levels[2].NumberPrefix = "%1.%2."
Levels[2].PatternType = ListPatternType.Arabic

# Add a paragraph
paragraph = section.AddParagraph()
paragraph.AppendText("Here's a Multi-Level Numbered List:")
paragraph.Format.AfterSpacing = 5.0

# Add a paragraph and apply the numbered list style to it
paragraph = section.AddParagraph()
paragraph.AppendText("The first item")
paragraph.ListFormat.ApplyStyle("levelstyle")
paragraph.ListFormat.ListLevelNumber = 0

# Add another five paragraphs and apply the numbered list stype to them
paragraph = section.AddParagraph()
paragraph.AppendText("The second item")
paragraph.ListFormat.ApplyStyle("levelstyle")
paragraph.ListFormat.ListLevelNumber = 0

paragraph = section.AddParagraph()
paragraph.AppendText("The first sub-item")
paragraph.ListFormat.ApplyStyle("levelstyle")
paragraph.ListFormat.ListLevelNumber = 1

paragraph = section.AddParagraph()
paragraph.AppendText("The second sub-item")
paragraph.ListFormat.ContinueListNumbering()
paragraph.ListFormat.ApplyStyle("levelstyle")

paragraph = section.AddParagraph()
paragraph.AppendText("A sub-sub-item")
paragraph.ListFormat.ApplyStyle("levelstyle")
paragraph.ListFormat.ListLevelNumber = 2

paragraph = section.AddParagraph()
paragraph.AppendText("The third item")
paragraph.ListFormat.ApplyStyle("levelstyle")
paragraph.ListFormat.ListLevelNumber = 0

# Save the document to file
doc.SaveToFile("output/MultilevelNumberedList.docx", FileFormat.Docx)
Create a Multi-Level Mixed-Type List in Word in Python
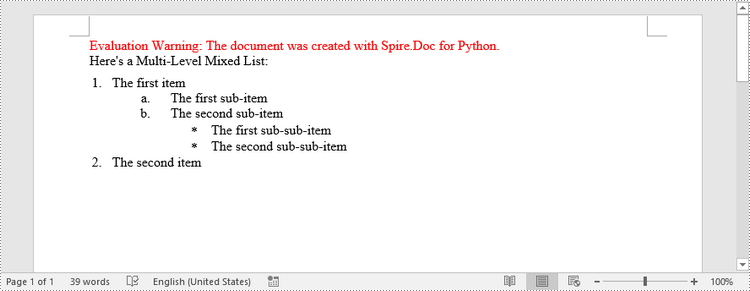
To combine number and symbol bullet points in a multi-level list, create separate list styles (numbered and bulleted) and apply them to different paragraphs. The detailed steps are as follows.
- Create a Document object.
- Add a section using Document.AddSection() method.
- Create a numbered list style and a bulleted list style.
- Add several paragraphs to the document using Section.AddParagraph() method.
- Apply different list style to different paragraphs using Paragraph.ListFormat.ApplyStyle() method.
- Save the document to a Word file using Document.SaveToFile() method.
- Python
from spire.doc import *
from spire.doc.common import *

# Create a Document object
doc = Document()

# Add a section
section = doc.AddSection()

# Create a numbered list style
numberList = doc.Styles.Add(ListType.Numbered, "numberedStyle")
Levels = numberList.ListRef.Levels
Levels[0].PatternType = ListPatternType.Arabic
Levels[0].TextPosition = 20
Levels[1].PatternType = ListPatternType.LowLetter

# Create a bulleted list style
bulletedListStyle = doc.Styles.Add(ListType.Bulleted, "bulletedStyle")
Levels = bulletedListStyle.ListRef.Levels
Levels[2].BulletCharacter = "\u002A"
Levels[2].CharacterFormat.FontName = "Symbol"

# Add a paragraph
paragraph = section.AddParagraph()
paragraph.AppendText("Here's a Multi-Level Mixed List:")
paragraph.Format.AfterSpacing = 5.0

# Add a paragraph and apply the numbered list style to it
paragraph = section.AddParagraph()
paragraph.AppendText("The first item")
paragraph.ListFormat.ApplyStyle("numberedStyle")
paragraph.ListFormat.ListLevelNumber = 0

# Add the other five paragraphs and apply different list stype to them
paragraph = section.AddParagraph()
paragraph.AppendText("The first sub-item")
paragraph.ListFormat.ApplyStyle("numberedStyle")
paragraph.ListFormat.ListLevelNumber = 1

paragraph = section.AddParagraph()
paragraph.AppendText("The second sub-item")
paragraph.ListFormat.ListLevelNumber = 1
paragraph.ListFormat.ApplyStyle("numberedStyle")

paragraph = section.AddParagraph()
paragraph.AppendText("The first sub-sub-item")
paragraph.ListFormat.ApplyStyle("bulletedStyle")
paragraph.ListFormat.ListLevelNumber = 2

paragraph = section.AddParagraph()
paragraph.AppendText("The second sub-sub-item")
paragraph.ListFormat.ApplyStyle("bulletedStyle")
paragraph.ListFormat.ListLevelNumber = 2

paragraph = section.AddParagraph()
paragraph.AppendText("The second item")
paragraph.ListFormat.ApplyStyle("numberedStyle")
paragraph.ListFormat.ListLevelNumber = 0

# Save the document to file
doc.SaveToFile("output/MultilevelMixedList.docx", FileFormat.Docx)
Apply for a Temporary License
If you'd like to remove the evaluation message from the generated documents, or to get rid of the function limitations, please request a 30-day trial license for yourself.
A page break is a formatting element used in documents to indicate the end of one page and the beginning of a new page. It is typically represented by a horizontal line or other visual indicator that separates content into different pages. This feature is commonly used when creating lengthy documents such as reports, essays, or books to enhance the overall layout and readability. In this article, you will learn how to how to insert page break into Word documents in Python using Spire.Doc for Python.
Install Spire.Doc for Python
This scenario requires Spire.Doc for Python and plum-dispatch v1.7.4. They can be easily installed in your Windows through the following pip command.
pip install Spire.Doc
If you are unsure how to install, please refer to this tutorial: How to Install Spire.Doc for Python on Windows
Insert Page Break after a Specific Paragraph
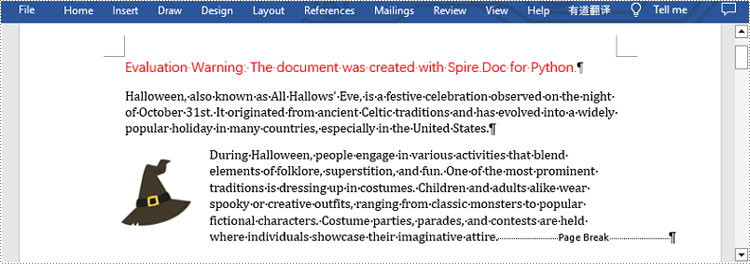
Spire.Doc for Python provides Paragraph.AppendBreak(BreakType.PageBreak) method to insert a page break after a specific paragraph. The following are detailed steps.
- Create an object of Document class.
- Load a sample file from disk using Document.LoadFromFile() method.
- Get the first section of this file by Document.Sections[sectionIndex] property.
- Get the second paragraph in the section by Section.Paragraphs[paragraphIndex] property.
- Insert a page break after this paragraph using Paragraph.AppendBreak(BreakType.PageBreak) method.
- Save the result file using Document.SaveToFile() method.
- Python
from spire.doc import *
from spire.doc.common import *

inputFile =  "sample.docx"
outputFile = "InsertPageBreak.docx"

#Create an object of Document class
document = Document()

#Load a sample file from disk
document.LoadFromFile(inputFile)

#Insert a page break after this paragraph
paragraph.AppendBreak(BreakType.PageBreak)

#Save the result file
document.SaveToFile(outputFile, FileFormat.Docx2013)
document.Close()
Insert Page Break after a Specific Text
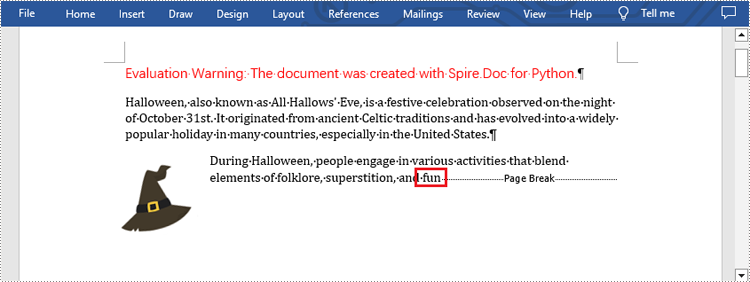
What's more, you are also allowed to insert page break after a specific text by using Paragraph.ChildObjects.Insert() method provided by this library. The following are detailed steps.
- Create an object of Document class.
- Load a sample file from disk using Document.LoadFromFile() method.
- Find a specific text using Document.FindAllString() method.
- Loop through all searched text and access the text range of it by calling TextSelection.GetAsOneRange() method.
- Get the paragraph where the text range is located by ParagraphBase.OwnerParagraph property.
- Get the position index of the text range in the paragraph using Paragraph.ChildObjects.IndexOf() method.
- Create an object of Break class to create a page break.
- Insert page break after the searched text using Paragraph.ChildObjects.Insert() method.
- Save the result file using Document.SaveToFile() method.
- Python
from spire.doc import *
from spire.doc.common import *

inputFile = "sample.docx"
outputFile =  "InsertPageBreakAfterText.docx"

#Create an object of Document class
document = Document()

#Load a sample file from disk
document.LoadFromFile(inputFile)

#Find the specified text
selection = document.FindAllString("fun", True, True)

#Loop through all searched text
for ts in selection:

    #Get the text range of the searched text
    range = ts.GetAsOneRange()

    #Get the paragraph where the text range is located
    paragraph = range.OwnerParagraph

    #Get the position index of the text range in the paragraph
    index = paragraph.ChildObjects.IndexOf(range)

    #Create an object of Break class
    pageBreak = Break(document, BreakType.PageBreak)

    #Insert page break after the searched text
    paragraph.ChildObjects.Insert(index + 1, pageBreak)

#Save the result file
document.SaveToFile(outputFile, FileFormat.Docx2013)
document.Close()
Apply for a Temporary License
If you'd like to remove the evaluation message from the generated documents, or to get rid of the function limitations, please request a 30-day trial license for yourself.
Modifying the font in a Word document can significantly impact its visual appearance and overall readability. Whether you want to enhance the document's style or align it with specific formatting requirements, changing the font is a straightforward process that allows you to customize your text. In this article, you will learn how to change font of a paragraph or a piece of text in a Word document in Python using Spire.Doc for Python.
Install Spire.Doc for Python
This scenario requires Spire.Doc for Python and plum-dispatch v1.7.4. They can be easily installed in your Windows through the following pip command.
pip install Spire.Doc
If you are unsure how to install, please refer to this tutorial: How to Install Spire.Doc for Python on Windows
Change the Font of a Paragraph in Python
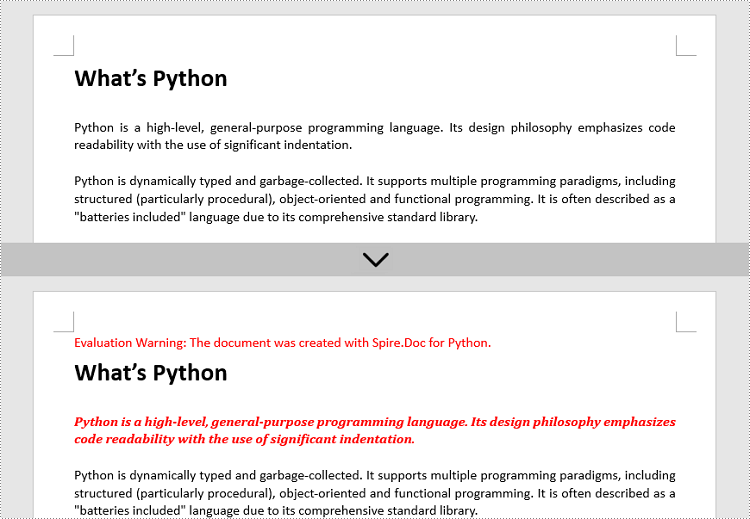
Using Spire.Doc for Python, you can create a ParagraphStyle object which defines the font information that can be applied to a certain paragraph. The following are the steps to change the font of a paragraph.
- Create a Document instance.
- Load a Word document using Document.LoadFromFile() method.
- Get a specified section through Document.Sections[index] property.
- Get a specified paragraph that you want to change the font through Section.Paragraphs[index] property.
- Create a ParagraphStyle instance, specifying the font name, font color and font style through the properties under it.
- Add the style to the document using Document.Styles.Add() method.
- Apply the style to the paragraph using Paragraph.ApplyStyle() method.
- Save the result document using Document.SaveToFile() method.
- Python
from spire.doc import *
from spire.doc.common import *

# Create a Document instance
document = Document()

# Load a Word document
document.LoadFromFile('C:/Users/Administrator/Desktop/input.docx')

# Get the first section
section = document.Sections[0]

# Get a specific paragraph
paragraph = section.Paragraphs[2]

# Create a paragraph style
style = ParagraphStyle(document)
style.Name = 'NewStyle'
style.CharacterFormat.Bold = True
style.CharacterFormat.Italic = True
style.CharacterFormat.TextColor = Color.get_Red()
style.CharacterFormat.FontName = 'Cambria'
document.Styles.Add(style)

# Apply the style to the paragraph
paragraph.ApplyStyle(style.Name)

# Save the result document
document.SaveToFile('output/ChangeFontOfParagraph.docx', FileFormat.Docx)
Change the Font of Specific Text in Python
To change the font of specific text (letter, phrase or sentence) in a Word document, you need first to find the text from the document and then set a different color or font style for it. The following are the detailed steps.
- Create a Document instance.
- Load a Word document using Document.LoadFromFile() method.
- Find the text that you want to change font color using Document.FindAllString() method.
- Loop through all occurrences of the searched text and change the font color or style for each occurrence through the properties under TextSelection.GetAsOneRange().CharacterFormat object.
- Save the result document using Document.SaveToFile() method.
- Python
from spire.doc import *
from spire.doc.common import *

# Create a Document instance
document = Document()

# Load a Word document
document.LoadFromFile('C:/Users/Administrator/Desktop/input.docx')

# Find the text that you want to change font
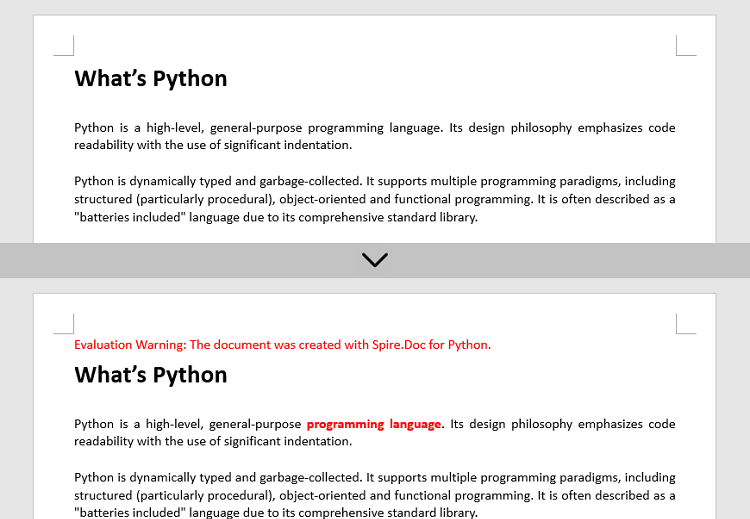
textSelections = document.FindAllString('programming language', False, True)

# Change the font style of the text
for selection in textSelections:
    selection.GetAsOneRange().CharacterFormat.TextColor = Color.get_Red()
    selection.GetAsOneRange().CharacterFormat.Bold = True

# Save the result document
document.SaveToFile('output/ChangeFontOfText.docx', FileFormat.Docx)
Apply for a Temporary License
If you'd like to remove the evaluation message from the generated documents, or to get rid of the function limitations, please request a 30-day trial license for yourself.

Converting Word documents (DOCX or DOC) to HTML format is essential when you want to display formatted content on web pages, import legacy documents into content management systems, or generate web previews for DOCX files. HTML’s universal browser compatibility makes it an ideal format for sharing content online.
This guide shows how to convert Word to HTML in Python using Spire.Doc for Python. It covers both basic and advanced conversion techniques with practical examples, helping you handle diverse conversion needs.
Table of Contents
- Why Convert Word to HTML
- Install Word to HTML Converter in Python
- How to Convert Word to HTML Using Python
- Conclusion
- FAQs
Why Convert Word to HTML?
Here are some typical scenarios where converting Word to HTML is beneficial:
- Web publishing: Display Word content in a browser without requiring users to download the document.
- CMS integration: Import Word-based articles into a web-based content system.
- Content preview: Generate HTML previews for Word attachments or document archives.
- Email rendering: Convert DOCX content into HTML-friendly formats for email templates.
Install Word to HTML Converter in Python
Spire.Doc for Python is a professional library designed for Word document processing and conversion. It provides a reliable way to export Word documents to HTML while preserving accurate formatting and layout. 
Benefits of Using Spire.Doc for Word-to-HTML Conversion
- Accurate formatting: Preserves fonts, colors, styles, tables, and images.
- No Office dependency: Does not require Microsoft Word or Office Interop.
- Supports DOCX and DOC: Compatible with both modern and legacy Word formats.
- Customizable output: Fine-tune HTML export settings, including image embedding and CSS styling.
Installation
Install the library from PyPI using the following command:
pip install spire.doc
Need help with the installation? Check this step-by-step guide: How to Install Spire.Doc for Python on Windows.
How to Convert Word to HTML Using Python
This section demonstrates how to convert Word documents to HTML using Spire.Doc for Python. First, you'll see a quick example using default settings for fast export. Then, you'll learn how to customize the HTML output with advanced options.
Quick Conversion with Default Settings
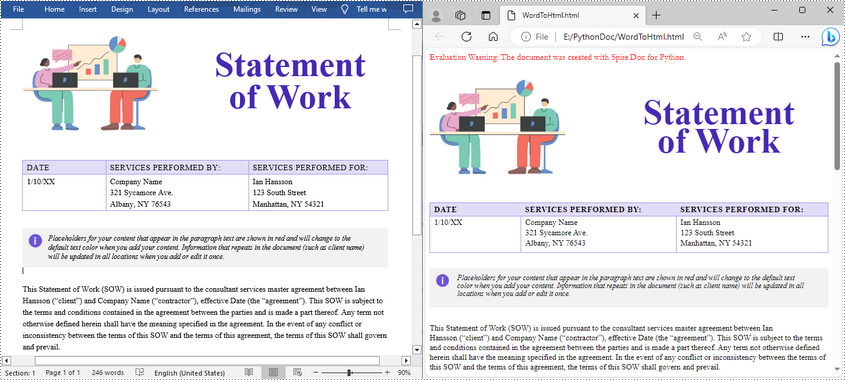
The following code snippet shows how to save a Word document to HTML format using the default export settings. It’s suitable for simple use cases where no customization is needed.
from spire.doc import *
from spire.doc.common import *

# Create a Document instance
document = Document()

# Load a doc or docx document
document.LoadFromFile("Statement.docx")

# Save the document to HTML format
document.SaveToFile("WordToHtml.html", FileFormat.Html)
document.Close()
Advanced Conversion Options
You can customize the HTML export to suit your needs by configuring options such as including headers and footers, linking to an external CSS stylesheet, choosing whether to embed images or save them separately, and exporting form fields as plain text. The example below shows how to set these options.
from spire.doc import *
from spire.doc.common import *

# Create a Document instance
document = Document()

# Load a .docx or .doc document
document.LoadFromFile("Statement.docx")

# Control whether to include headers and footers in the exported HTML
document.HtmlExportOptions.HasHeadersFooters = False

# Specify the name of the CSS file to use for styling the exported HTML
document.HtmlExportOptions.CssStyleSheetFileName = "sample.css"

# Set the CSS stylesheet type to external, so the HTML file links to the specified CSS file instead of embedding styles inline
document.HtmlExportOptions.CssStyleSheetType = CssStyleSheetType.External

# Configure image export: do not embed images inside HTML, save them to a separate folder
document.HtmlExportOptions.ImageEmbedded = False
document.HtmlExportOptions.ImagesPath = "Images/"

# Export form fields as plain text instead of interactive form elements
document.HtmlExportOptions.IsTextInputFormFieldAsText = True

# Save the document as an HTML file
document.SaveToFile("ToHtmlExportOption.html", FileFormat.Html)
document.Close()
Conclusion
Spire.Doc for Python delivers high-fidelity Word-to-HTML conversions without requiring Microsoft Word. Whether for quick exports or customized HTML output, it provides a versatile, dependable solution.
Beyond HTML conversion, Spire.Doc supports a wide range of Word automation tasks such as document merging, text replacement, and PDF conversion, empowering developers to build robust document processing pipelines. To explore these capabilities further, check out the full Python Word programming guide and start enhancing your document workflows today.
FAQs
Q1: Can Spire.Doc convert both DOC and DOCX files to HTML?
A1: Yes, it supports exporting both legacy DOC and modern DOCX formats.
Q2: Is Microsoft Word required for conversion?
A2: No, Spire.Doc works independently without needing Microsoft Word or Office Interop.
Q3: Can images be embedded directly in the HTML instead of saved separately?
A3: Yes, you can embed images directly into the HTML output by setting ImageEmbedded to True. This ensures that all images are included within the HTML file itself, without creating separate image files or folders.
Get a Free License
To fully experience the capabilities of Spire.Doc for Python without any evaluation limitations, you can request a free 30-day trial license.
Setting proper margins is an essential step in creating professional Word documents. Margins may seem like a small detail, but they play a vital role in improving the readability and visual appeal of a document. By defining the space around content, margins help maintain a consistent and balanced layout, prevent text from being truncated, and make documents look more organized and aesthetically pleasing. This article will show how to use Spire.Doc for Python to set page margins for Word documents through Python programs.
Install Spire.Doc for Python
This scenario requires Spire.Doc for Python and plum-dispatch v1.7.4. They can be easily installed in your Windows through the following pip command.
pip install Spire.Doc
If you are unsure how to install, please refer to this tutorial: How to Install Spire.Doc for Python on Windows
Set the Page Margins of a Word Document
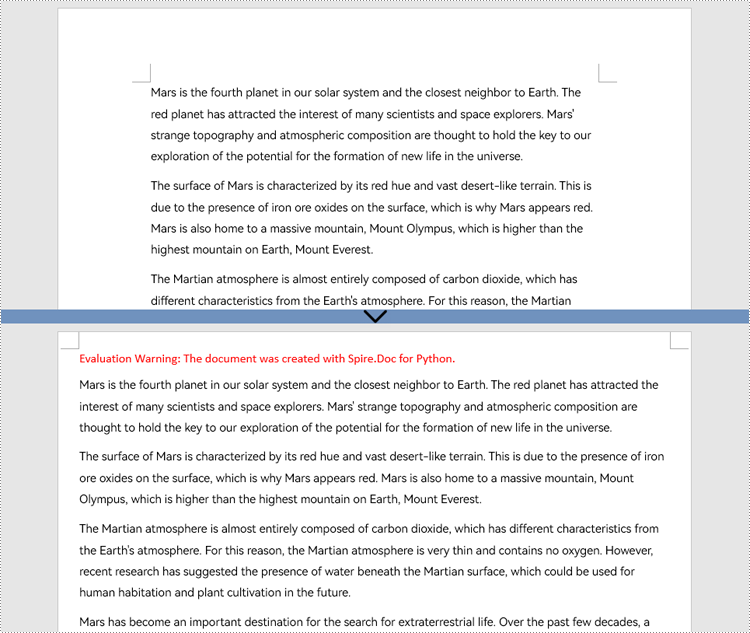
Spire.Doc for Python provides properties under the Margins class that can be used to set margins for each side of a document separately or to set the same margins for all sides. One important thing to note is that the margins are set based on sections. For consistent margins throughout the document, it is necessary to iterate through each section of the document to set the margins. Below are the detailed steps for setting page margins:
- Create an object of Document class.
- Load a Word document using Document.LoadFromFile() method.
- Loop through the sections of the document.
- Get a section using Document.Sections.get_Item() method.
- Get the margins of the section using Section.PageSetup.Margins property.
- Set the top, bottom, left, and right margin using property under Margins class.
- Python
from spire.doc import *
from spire.doc.common import *

# Create an object of Document class
doc = Document()

# Load a Word document
doc.LoadFromFile("Sample.docx")

# Loop thorugh the sections of document
for i in range(doc.Sections.Count):
    # Get a section
    section = doc.Sections.get_Item(i)
    # Get the margins of the section
    margins = section.PageSetup.Margins
    # Set the top, bottom, left, and right margins
    margins.Top = 17.9
    margins.Bottom = 17.9
    margins.Left = 20.9
    margins.Right = 20.9
    # margins.All = 17.9

# Save the document
doc.SaveToFile("output/SetPageMargins.docx", FileFormat.Auto)
Apply for a Temporary License
If you'd like to remove the evaluation message from the generated documents, or to get rid of the function limitations, please request a 30-day trial license for yourself.
