
Program Guide (86)
Children categories
In the realm of document management, the ability to add headers and footers to PDFs has become an essential feature. This functionality allows individuals and businesses to enhance the visual appeal, branding, and organization of their PDF documents.
By incorporating headers and footers, users can customize their PDFs with important contextual information, such as document titles, page numbers, logos, dates, copyright notices, or confidentiality disclaimers. This not only helps establish a professional look but also improves document navigation and ensures compliance with legal requirements.
In this article, we will delve into the process of seamlessly integrating headers and footers into existing PDF files by using the Spire.PDF for Python library.
Install Spire.PDF for Python
This scenario requires Spire.PDF for Python and plum-dispatch v1.7.4. They can be easily installed in your Windows through the following pip command.
pip install Spire.PDF
If you are unsure how to install, please refer to this tutorial: How to Install Spire.PDF for Python on Windows
Coordinate System in an Existing PDF
When using Spire.PDF for Python to manipulate an existing PDF document, the coordinate system's origin is positioned at the top left corner of the page. The x-axis extends to the right, while the y-axis extends downward.
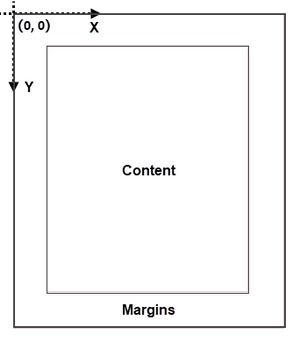
Understanding coordinate system is crucial for us, as nearly all newly added elements on a PDF page need to be positioned using specified coordinates. The process of creating headers and footers on PDF pages involves adding text, images, shapes, automatic fields, or other elements to the upper or lower margins of the page at designated coordinates.
Classes and Methods for Creating Header and Footer
In Spire.PDF for Python, there are several methods available for drawing elements on a PDF page. The PdfCanvas class provides the methods DrawString(), DrawImage(), and DrawLine(), which allow users to draw strings, images, and lines respectively, at specific coordinates on the page.
Additionally, Spire.PDF for Python offers specialized classes such as PdfPageNumberField, PdfPageCountField, and PdfSectionNumberField. These classes enable automatic access to the current page number, page count, and section number. Moreover, these classes include the Draw() method, which facilitates the easy addition of dynamic information to the header or footer section of the PDF document.
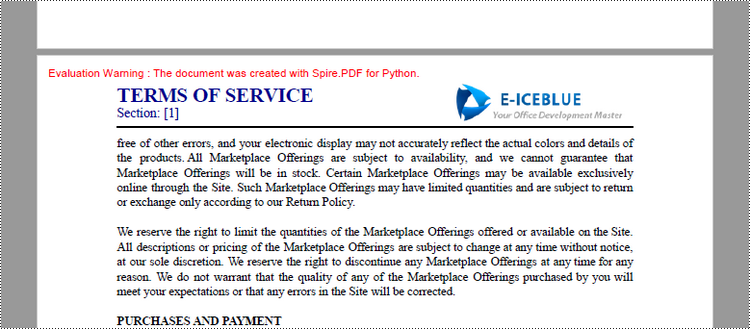
Add Header to an Existing PDF Document in Python
A header refers to a section that appears at the top of each page. The header typically contains information such as a logo, document title, date, or any other relevant details that provide context or branding to the document.
To add a header consisting of text, an image, a line and a section number to a PDF document, you can follow these steps:
- Create a PdfDocuemnt object.
- Load an existing PDF document from the specified path.
- Define the header content:
- Specify the text to be added to the header.
- Load an image for the header.
- Create a PdfSectionNumberField object to get the current section number, and create a PdfCompositeField object to combine text and the section number in a single field.
- Add the header to each page: Iterate through each page of the PDF document and add the header content at the designated position by using the Canvas.DrawString(), Canvas.DrawImage(), Canvas.DrawLine(), and PdfCompositeField.Draw() methods. When calling these methods, you need to consider the page size and margins when determining the position.
- Save the modified PDF to a new file or overwrite the existing file.
- Python
from spire.pdf.common import *
from spire.pdf import *

# Create a PdfDocument object
doc = PdfDocument()

# Load a PDF file
doc.LoadFromFile("C:\\Users\\Administrator\\Desktop\\Terms of service.pdf")

# Load an image
headerImage = PdfImage.FromFile("C:\\Users\\Administrator\\Desktop\\Logo-Small.png")

# Get the image width in pixel
width = headerImage.Width

# Get the image width in point
unitCvtr = PdfUnitConvertor()
pointWidth = unitCvtr.ConvertUnits(width, PdfGraphicsUnit.Pixel, PdfGraphicsUnit.Point)

# Create font, brush and pen
firstFont = PdfTrueTypeFont("Times New Roman", 18.0, PdfFontStyle.Bold, True)
secondFont = PdfTrueTypeFont("Times New Roman", 12.0, PdfFontStyle.Regular, True)
brush = PdfBrushes.get_DarkBlue()
pen = PdfPen(PdfBrushes.get_Black(), 1.5)

# Specify text to add to header
headerText = "TERMS OF SERVICE"

# Create a PdfSectionNumberField object
sectionField = PdfSectionNumberField(firstFont, brush)

# Create a PdfCompositeField object
compositeField = PdfCompositeField(secondFont, brush, "Section: [{0}]", [sectionField])

# Set the location of the composite field
compositeField.Location = PointF(72.0, 45.0)

# Iterate throuh the pages in the document
for i in range(doc.Pages.Count):

    # Get a specific page
    page = doc.Pages[i]

    # Draw an image at the specified position
    page.Canvas.DrawImage(headerImage, page.ActualSize.Width - pointWidth - 72.0, 20.0)

    # Draw a string at the specified position
    page.Canvas.DrawString(headerText, firstFont, brush, 72.0, 25.0)

    # Draw a line at the specified position
    page.Canvas.DrawLine(pen, 72.0, 65.0, page.ActualSize.Width - 72.0, 65.0)

    # Draw composite on the page
    compositeField.Draw(page.Canvas, 0.0, 0.0)

# Save the changes to a different PDF file
doc.SaveToFile("Output/AddHeader.pdf")

# Dispose resources
doc.Dispose()
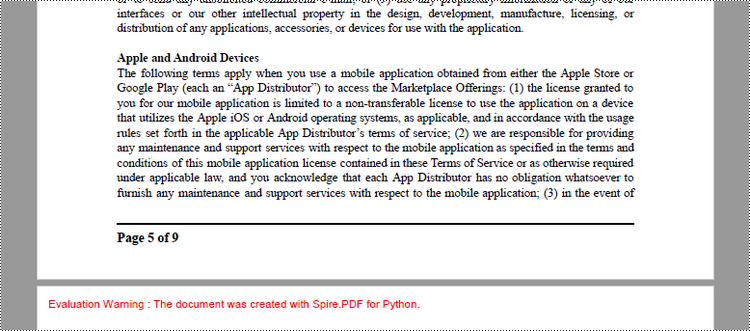
Add Footer to an Existing PDF Document in Python
A footer refers to a section that appears at the bottom of each page. The footer may contain information such as page numbers, copyright information, author name, date, or any other relevant details that provide additional context or navigation aids to the reader.
To add a footer which includes a line and "Page X of Y" to a PDF document, follow the steps below.
- Create a PdfDocuemnt object.
- Load an existing PDF document from the specified path.
- Define the footer content: Create a PdfPageNumberField object to get the current page number, and a PdfPageCountField object to get the total page count. In order to create a "Page X of Y" format, you can utilize a PdfCompositeField object to combine text and these two automatic fields in a single field.
- Add the footer to each page: Iterate through each page of the PDF document and add a line using the Canvas.DrawLine() method. Add the page number and page count to the footer space using the PdfCompositeField.Draw() method. When calling these methods, you need to consider the page size and margins when determining the position.
- Save the modified PDF to a new file or overwrite the existing file.
- Python
from spire.pdf.common import *
from spire.pdf import *

# Create a PdfDocument object
doc = PdfDocument()

# Load a PDF file
doc.LoadFromFile("C:\\Users\\Administrator\\Desktop\\Terms of service.pdf")

# Create font, brush and pen
font = PdfTrueTypeFont("Times New Roman", 12.0, PdfFontStyle.Bold, True)
brush = PdfBrushes.get_Black()
pen = PdfPen(brush, 1.5)

# Create a PdfPageNumberField object and a PdfPageCountField object
pageNumberField = PdfPageNumberField()
pageCountField = PdfPageCountField()

# Create a PdfCompositeField object to combine page count field and page number field in a single string
compositeField = PdfCompositeField(font, brush, "Page {0} of {1}", [pageNumberField, pageCountField])

# Get the page size
pageSize = doc.Pages[0].Size

# Set the location of the composite field
compositeField.Location = PointF(72.0, pageSize.Height - 45.0)

# Iterate through the pages in the document
for i in range(doc.Pages.Count):

    # Get a specific page
    page = doc.Pages[i]

    # Draw a line at the specified position
    page.Canvas.DrawLine(pen, 72.0, pageSize.Height - 50.0, pageSize.Width - 72.0, pageSize.Height - 50.0)

    # Draw the composite field on the page
    compositeField.Draw(page.Canvas, 0.0, 0.0)

# Save to a different PDF file
doc.SaveToFile("Output/AddFooter.pdf")

# Dispose resources
doc.Dispose()
Apply for a Temporary License
If you'd like to remove the evaluation message from the generated documents, or to get rid of the function limitations, please request a 30-day trial license for yourself.
XPS, or XML Paper Specification, is a file format developed by Microsoft as an alternative to PDF (Portable Document Format). Similar to PDF, XPS is specifically designed to preserve the visual appearance and layout of documents across different platforms and devices, ensuring consistent viewing regardless of the software or hardware being used.
Converting PDF files to XPS format offers several notable benefits. Firstly, XPS files are fully supported within the Windows ecosystem. If you work in a Microsoft-centric environment that heavily relies on Windows operating systems and Microsoft applications, converting PDF files to XPS guarantees smooth compatibility and an optimized viewing experience tailored to the Windows platform.
Secondly, XPS files are optimized for printing, ensuring precise reproduction of the document on paper. This makes XPS the preferred format when high-quality printed copies of the document are required.
Lastly, XPS files are based on XML, a widely adopted standard for structured data representation. This XML foundation enables easy extraction and manipulation of content within the files, as well as seamless integration of file content with other XML-based workflows or systems.
In this article, we will demonstrate how to convert PDF files to XPS format in Python using Spire.PDF for Python.
Install Spire.PDF for Python
This scenario requires Spire.PDF for Python and plum-dispatch v1.7.4. They can be easily installed in your Windows through the following pip command.
pip install Spire.PDF
If you are unsure how to install, please refer to this tutorial: How to Install Spire.PDF for Python on Windows
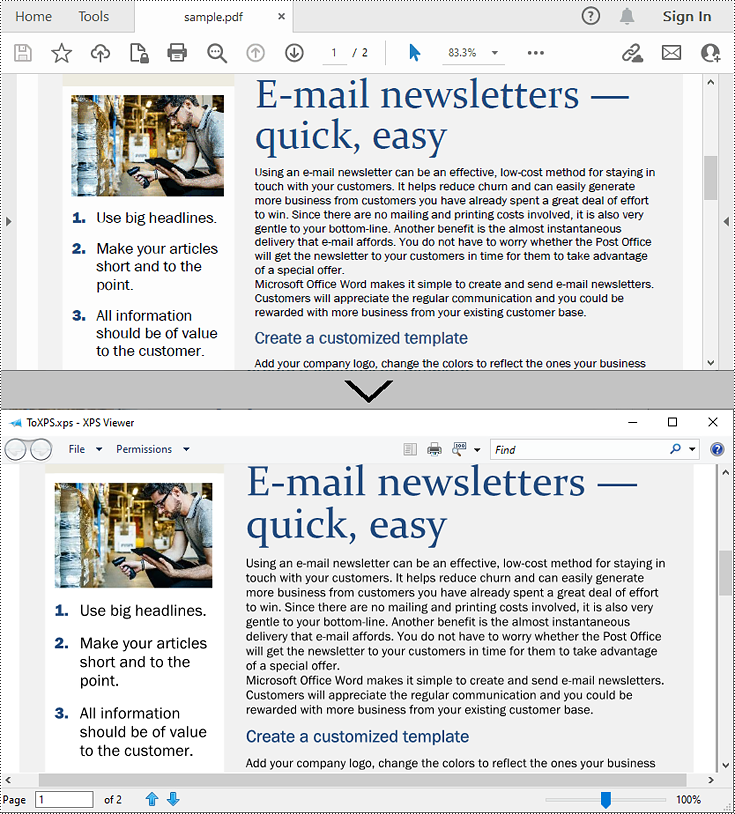
Convert PDF to XPS in Python
Converting a PDF file to the XPS file format is very easy with Spire.PDF for Python. Simply load the PDF file using the PdfDocument.LoadFromFile() method, and then save the PDF file to the XPS file format using the PdfDocument.SaveToFile(filename:str, fileFormat:FileFormat) method. The detailed steps are as follows:
- Create an object of the PdfDocument class.
- Load the sample PDF file using the PdfDocument.LoadFromFile() method.
- Save the PDF file to the XPS file format using the PdfDocument.SaveToFile (filename:str, fileFormat:FileFormat) method.
- Python
from spire.pdf.common import *
from spire.pdf import *

# Specify the input and output file paths
inputFile = "sample.pdf"
outputFile = "ToXPS.xps"

# Create an object of the PdfDocument class
pdf = PdfDocument()
# Load the sample PDF file
pdf.LoadFromFile(inputFile)

# Save the PDF file to the XPS file format
pdf.SaveToFile(outputFile, FileFormat.XPS)
# Close the PdfDocument object
pdf.Close()
Apply for a Temporary License
If you'd like to remove the evaluation message from the generated documents, or to get rid of the function limitations, please request a 30-day trial license for yourself.
Modifying PDF documents to suit various usage scenarios is a common task for PDF document creators and managers. Among these operations, splitting and merging PDF pages can assist in reorganizing PDF content for printing, typesetting, etc. By using Python programs, developers can easily split one page from a PDF document to several pages or merge multiple PDF pages into a single page. This article will demonstrate how to use Spire.PDF for Python for splitting and merging PDF pages in Python programs.
- Split One PDF Page into Several PDF Pages with Python
- Merge Multiple PDF Pages into a Single Page with Python
Install Spire.PDF for Python
This scenario requires Spire.PDF for Python and plum-dispatch v1.7.4. They can be easily installed in your Windows through the following pip command.
pip install Spire.PDF
If you are unsure how to install, please refer to: How to Install Spire.PDF for Python on Windows
Split One PDF Page into Several PDF Pages with Python
With Spire.PDF for Python, developers draw a PDF page on a new PDF page using the PdfPageBase.CreateTemplate().Draw(newPage PdfPageBase, PointF) method. When drawing, if the current new page cannot fully accommodate the content of the original page, a new page is automatically created, and the remaining content is drawn on it. Therefore, we can create a new PDF document and control the drawing result by specifying the page size to achieve specified division of PDF pages horizontally or vertically.
Here are the steps to vertically split a PDF page into two separate PDF pages:
- Create an object of PdfDocument class and load a PDF document using PdfDocument.LoadFromFile() method.
- Get the first page of the document using PdfDocument.Pages.get_Item() method.
- Create a new PDF document by creating an object of PdfDocument class.
- Set the margins of the new document to 0 through PdfDocument.PageSettings.Margins.All property.
- Get the width and height of the retrieved page through PdfPageBase.Size.Width property and PdfPageBase.Size.Height property.
- Set the width of the new PDF document to the same as the retrieved page through PdfDocument.PageSettings.Width property and its height to half of the retrieved page's height through PdfDocument.PageSettings.Height property.
- Add a new page in the new document using PdfDocument.Pages.Add() method.
- Draw the content of the retrieved page onto the new page using PdfPageBase.CreateTemplate().Draw() method.
- Save the new document using PdfDocument.SaveToFile() method.
- Python
from spire.pdf import *
from spire.pdf.common import *

# Create an object of PdfDocument class and load a PDF document
pdf = PdfDocument()
pdf.LoadFromFile("Sample.pdf")

# Get the first page of the document
page = pdf.Pages.get_Item(0)

# Create a new PDF document
newPdf = PdfDocument()

# Set the margins of the new PDF document to 0
newPdf.PageSettings.Margins.All = 0.0

# Get the width and height of the retrieved page
width = page.Size.Width
height = page.Size.Height

# Set the width of the new PDF document to the same as the retrieved page and its height to half of the retrieved page's height
newPdf.PageSettings.Width = width
newPdf.PageSettings.Height = height / 2

# Add a new page to the new PDF document
newPage = newPdf.Pages.Add()

# Draw the content of the retrieved page onto the new page
page.CreateTemplate().Draw(newPage, PointF(0.0, 0.0))

# Save the new PDF document
newPdf.SaveToFile("output/SplitPDFPage.pdf")
pdf.Close()
newPdf.Close()
Merge Multiple PDF Pages into a Single Page with Python
Similarly, developers can merge PDF pages by drawing different pages on the same PDF page. It should be noted that the pages to be merged are preferably in the same width or height, otherwise it is necessary to take the maximum value to ensure correct drawing.
The detailed steps for merging two PDF pages into a single PDF page are as follows:
- Create an object of PdfDocument class and load a PDF document using PdfDocument.LoadFromFile() method.
- Get the first and second pages of the document using PdfDocument.Pages.get_Item() method.
- Create a new PDF document by creating an object of PdfDocument class.
- Set the margins of the new document to 0 through PdfDocument.PageSettings.Margins.All property.
- Get the width and height of the two retrieved pages through PdfPageBase.Size.Width property and PdfPageBase.Size.Height property.
- Set the width of the new PDF document to the same as the retrieved pages through PdfDocument.PageSettings.Width property and its height to the sum of the two retrieved pages' heights through PdfDocument.PageSettings.Height property.
- Draw the content of the two retrieved pages onto the new page using PdfPageBase.CreateTemplate().Draw() method.
- Save the new document using PdfDocument.SaveToFile() method.
- Python
from spire.pdf import *
from spire.pdf.common import *

# Create an object of PdfDocument class and load a PDF document
pdf = PdfDocument()
pdf.LoadFromFile("Sample1.pdf")

# Get the first page and the second page of the document
page = pdf.Pages.get_Item(0)
page1 = pdf.Pages.get_Item(0)

# Create a new PDF document
newPdf = PdfDocument()

# Set the margins of the new PDF document to 0
newPdf.PageSettings.Margins.All = 0.0

# Set the page width of the new document to the same as the retrieved page
newPdf.PageSettings.Width = page.Size.Width

# Set the page height of the new document to the sum of the heights of the two retrieved pages
newPdf.PageSettings.Height = page.Size.Height + page1.Size.Height

# Add a new page to the new PDF document
newPage = newPdf.Pages.Add()

# Draw the content of the retrieved pages onto the new page
page.CreateTemplate().Draw(newPage, PointF(0.0, 0.0))
page1.CreateTemplate().Draw(newPage, PointF(0.0, page.Size.Height))

# Save the new document
newPdf.SaveToFile("output/MergePDFPages.pdf")
pdf.Close()
newPdf.Close()
Apply for a Temporary License
If you'd like to remove the evaluation message from the generated documents, or to get rid of the function limitations, please request a 30-day trial license for yourself.
In addition to text and images, PDF files can also contain various types of attachments, such as documents, images, audio files, or other multimedia elements. Extracting attachments from PDF files allows users to retrieve and save the embedded content, enabling easy access and manipulation outside of the PDF environment. This process proves especially useful when dealing with PDFs that contain important supplementary materials, such as reports, spreadsheets, or legal documents.
In this article, you will learn how to extract attachments from a PDF document in Python using Spire.PDF for Python.
- Extract Document-Level Attachments from PDF in Python
- Extract Annotation Attachments from PDF in Python
Install Spire.PDF for Python
This scenario requires Spire.PDF for Python and plum-dispatch v1.7.4. They can be easily installed in your Windows through the following pip command.
pip install Spire.PDF
If you are unsure how to install, please refer to this tutorial: How to Install Spire.PDF for Python on Windows
Prerequisite Knowledge
There are generally two categories of attachments in PDF files: document-level attachments and annotation attachments. Below, you can find a table outlining the disparities between these two types of attachments and how they are represented in Spire.PDF.
| Attachment type | Represented by | Definition |
| Document level attachment | PdfAttachment class | A file attached to a PDF at the document level won't appear on a page, but can be viewed in the "Attachments" panel of a PDF reader. |
| Annotation attachment | PdfAnnotationAttachment class | A file attached as an annotation can be found on a page or in the "Attachments" panel. An annotation attachment is shown as a paper clip icon on the page; reviewers can double-click the icon to open the file. |
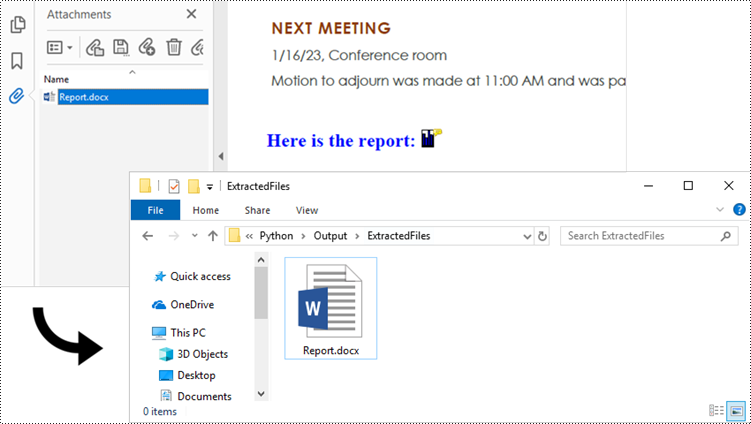
Extract Document-Level Attachments from PDF in Python
To retrieve document-level attachments in a PDF document, you can use the PdfDocument.Attachments property. Each attachment has a PdfAttachment.FileName property, which provides the name of the specific attachment, including the file extension. Additionally, the PdfAttachment.Data property allows you to access the attachment's data. To save the attachment to a specific folder, you can utilize the PdfAttachment.Data.Save() method.
The steps to extract document-level attachments from a PDF using Python are as follows.
- Create a PdfDocument object.
- Load a PDF file using PdfDocument.LoadFromFile() method.
- Get a collection of attachments using PdfDocument.Attachments property.
- Iterate through the attachments in the collection.
- Get a specific attachment from the collection, and get the file name and data of the attachment using PdfAttachment.FileName property and PdfAttachment.Data property.
- Save the attachment to a specified folder using PdfAttachment.Data.Save() method.
- Python
from spire.pdf import *
from spire.pdf.common import *

# Create a PdfDocument object
doc = PdfDocument()

# Load a PDF file
doc.LoadFromFile("C:\\Users\\Administrator\\Desktop\\Attachments.pdf")

# Get the attachment collection from the document
collection = doc.Attachments

# Loop through the collection
if collection.Count > 0:
    for i in range(collection.Count):

        # Get a specific attachment
        attactment = collection.get_Item(i)

        # Get the file name and data of the attachment
        fileName= attactment.FileName
        data = attactment.Data

        # Save it to a specified folder
        data.Save("Output\\ExtractedFiles\\" + fileName)

doc.Close()

Extract Annotation Attachments from PDF in Python
The Annotations attachment is a page-based element. To retrieve annotations from a specific page, use the PdfPageBase.AnnotationsWidget property. You then need to determine if a particular annotation is an attachment. If it is, save it to the specified folder while retaining its original filename.
The following are the steps to extract annotation attachments from a PDF using Python.
- Create a PdfDocument object.
- Load a PDF file using PdfDocument.LoadFromFile() method.
- Iterate though the pages in the document.
- Get the annotations from a particular page using PdfPageBase.AnnotationsWidget property.
- Iterate though the annotations, and determine if a specific annotation is an attachment annotation.
- If it is, get the file name and data of the annotation using PdfAttachmentAnnotation.FileName property and PdfAttachmentAnnotation.Data property.
- Save the annotated attachment to a specified folder.
- Python
from spire.pdf import *
from spire.pdf.common import *

# Create a PdfDocument object
doc = PdfDocument()

# Load a PDF file
doc.LoadFromFile("C:\\Users\\Administrator\\Desktop\\AnnotationAttachment.pdf")

# Iterate through the pages in the document
for i in range(doc.Pages.Count):

    # Get a specific page
    page = doc.Pages.get_Item(i)

    # Get the annotation collection of the page
    annotationCollection = page.AnnotationsWidget

    # If the page has annotations
    if annotationCollection.Count > 0:

        # Iterate through the annotations
        for j in range(annotationCollection.Count):

            # Get a specific annotation
            annotation = annotationCollection.get_Item(j)

            # Determine if the annotation is an attachment annotation
            if isinstance(annotation, PdfAttachmentAnnotationWidget):

                # Get the file name and data of the attachment
                fileName = annotation.FileName
                byteData = annotation.Data
                streamMs = Stream(byteData)

                # Save the attachment into a specified folder
                streamMs.Save("Output\\ExtractedFiles\\" + fileName)
Apply for a Temporary License
If you'd like to remove the evaluation message from the generated documents, or to get rid of the function limitations, please request a 30-day trial license for yourself.
Shapes play a vital role in PDF documents. By drawing graphics, defining outlines, filling colors, setting border styles, and applying geometric transformations, shapes provide rich visual effects and design options for documents. The properties of shapes such as color, line type, and fill effects can be customized according to requirements to meet personalized design needs. They can be used to create charts, decorations, logos, and other elements that enhance the readability and appeal of the document. This article will introduce how to use Spire.PDF for Python to draw shapes into PDF documents from Python.
- Draw Lines in PDF Documents in Python
- Draw Pies in PDF Documents in Python
- Draw Rectangles in PDF Documents in Python
- Draw Ellipses in PDF Documents in Python
Install Spire.PDF for Python
This scenario requires Spire.PDF for Python and plum-dispatch v1.7.4. They can be easily installed in your Windows through the following pip command.
pip install Spire.PDF
If you are unsure how to install, please refer to this tutorial: How to Install Spire.PDF for Python on Windows
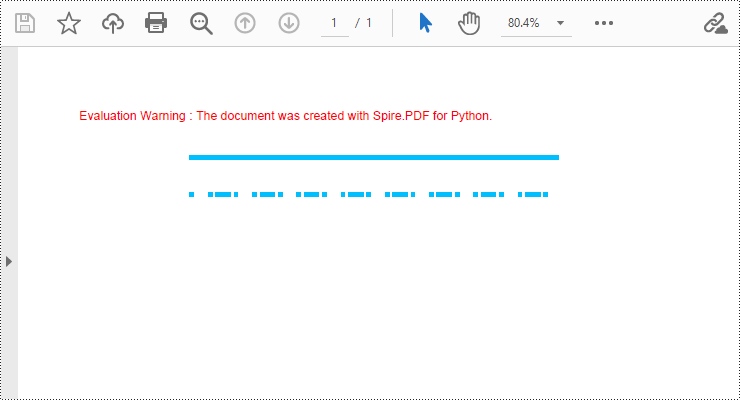
Draw Lines in PDF Documents in Python
Spire.PDF for Python provides the PdfPageBase.Canvas.DrawLine() method to draw lines by specifying the coordinates of the starting point and end point and a brush object. Here is a detailed step-by-step guide on how to draw lines:
- Create a PdfDocument object.
- Use the PdfDocument.Pages.Add() method to add a blank page to the PDF document.
- Save the current drawing state using the PdfPageBase.Canvas.Save() method so it can be restored later.
- Define the start point coordinate (x, y) and the length of a solid line segment.
- Create a PdfPen object.
- Draw a solid line segment using the PdfPageBase.Canvas.DrawLine() method with the previously created pen object.
- Set the DashStyle property of the pen to PdfDashStyle.Dash to create a dashed line style.
- Draw a dashed line segment using the pen with a dashed line style via the PdfPageBase.Canvas.DrawLine() method.
- Restore the previous drawing state using the PdfPageBase.Canvas.Restore(state) method.
- Save the document to a file using the PdfDocument.SaveToFile() method.
- Python
from spire.pdf.common import *
from spire.pdf import *

# Create PDF Document Object
doc = PdfDocument()

# Add a Page
page = doc.Pages.Add()

# Save the current drawing state
state = page.Canvas.Save()

# The starting X coordinate of the line
x = 100.0

# The starting Y coordinate of the line
y = 50.0

# The length of the line
width = 300.0

# Create a pen object with deep sky blue color and a line width of 3.0
pen = PdfPen(PdfRGBColor(Color.get_DeepSkyBlue()), 3.0)

# Draw a solid line
page.Canvas.DrawLine(pen, x, y, x + width, y)

# Set the pen style to dashed
pen.DashStyle = PdfDashStyle.Dash

# Set the dashed pattern to [1, 4, 1]
pen.DashPattern = [1, 4, 1]

# The Y coordinate for the start of the dashed line
y = 80.0

# Draw a dashed line
page.Canvas.DrawLine(pen, x, y, x + width, y)

# Restore the previously saved drawing state
page.Canvas.Restore(state)

# Save the document to a file
doc.SaveToFile("Drawing Lines.pdf")

# Close the document and release resources
doc.Close()
doc.Dispose()
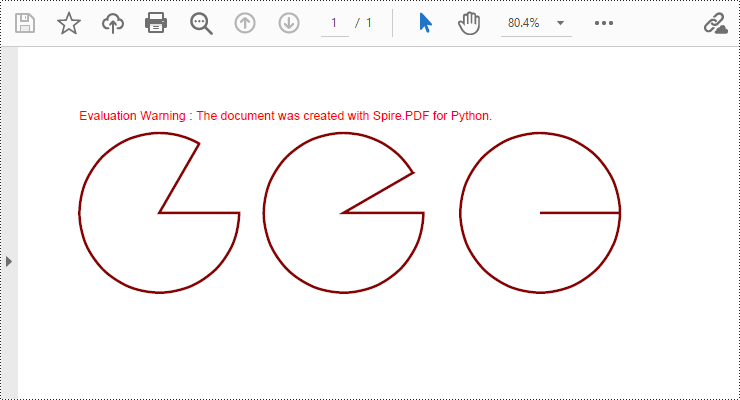
Draw Pies in PDF Documents in Python
To draw pie charts with different positions, sizes, and angles on a specified page, call the PdfPageBase.Canvas.DrawPie() method and pass appropriate parameters. The detailed steps are as follows:
- Create a PdfDocument object.
- Add a blank page to the PDF document using the PdfDocument.Pages.Add() method.
- Save the current drawing state using the PdfPageBase.Canvas.Save() method so it can be restored later.
- Create a PdfPen object.
- Call the PdfPageBase.Canvas.DrawPie() method and pass various position, size, and angle parameters to draw three pie charts.
- Restore the previous drawing state using the PdfPageBase.Canvas.Restore(state) method.
- Save the document to a file using the PdfDocument.SaveToFile() method.
- Python
from spire.pdf.common import *
from spire.pdf import *

# Create PDF Document Object
doc = PdfDocument()

# Add a Page
page = doc.Pages.Add()

# Save the current drawing state
state = page.Canvas.Save()

# Create a pen object with dark red color and a line width of 2.0
pen = PdfPen(PdfRGBColor(Color.get_DarkRed()), 2.0)

# Draw the first pie chart
page.Canvas.DrawPie(pen, 10.0, 30.0, 130.0, 130.0, 360.0, 300.0)

# Draw the second pie chart
page.Canvas.DrawPie(pen, 160.0, 30.0, 130.0, 130.0, 360.0, 330.0)

# Draw the third pie chart
page.Canvas.DrawPie(pen, 320.0, 30.0, 130.0, 130.0, 360.0, 360.0)

# Restore the previously saved drawing state
page.Canvas.Restore(state)

# Save the document to a file
doc.SaveToFile("Drawing Pie Charts.pdf")

# Close the document and release resources
doc.Close()
doc.Dispose()
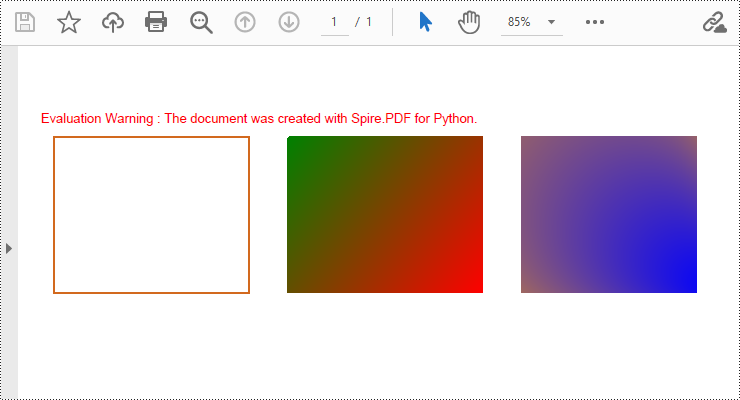
Draw Rectangles in PDF Documents in Python
Spire.PDF for Python provides the PdfPageBase.Canvas.DrawRectangle() method to draw rectangular shapes. By passing position and size parameters, you can define the position and dimensions of the rectangle. Here are the detailed steps for drawing a rectangle:
- Create a PdfDocument object.
- Use the PdfDocument.Pages.Add() method to add a blank page to the PDF document.
- Use the PdfPageBase.Canvas.Save() method to save the current drawing state for later restoration.
- Create a PdfPen object.
- Use the PdfPageBase.Canvas.DrawRectangle() method with the pen to draw the outline of a rectangle.
- Create a PdfLinearGradientBrush object for linear gradient filling.
- Use the PdfPageBase.Canvas.DrawRectangle() method with the linear gradient brush to draw a filled rectangle.
- Create a PdfRadialGradientBrush object for radial gradient filling.
- Use the PdfPageBase.Canvas.DrawRectangle() method with the radial gradient brush to draw a filled rectangle.
- Use the PdfPageBase.Canvas.Restore(state) method to restore the previously saved drawing state.
- Use the PdfDocument.SaveToFile() method to save the document to a file.
- Python
from spire.pdf.common import *
from spire.pdf import *

# Create PDF Document Object
doc = PdfDocument()

# Add a Page
page = doc.Pages.Add()

# Save the current drawing state
state = page.Canvas.Save()

# Create a Pen object with chocolate color and line width of 1.5
pen = PdfPen(PdfRGBColor(Color.get_Chocolate()), 1.5)

# Draw the outline of a rectangle using the pen
page.Canvas.DrawRectangle(pen, RectangleF(PointF(20.0, 30.0), SizeF(150.0, 120.0)))

# Create a linear gradient brush
linearGradientBrush = PdfLinearGradientBrush(PointF(200.0, 30.0), PointF(350.0, 150.0), PdfRGBColor(Color.get_Green()), PdfRGBColor(Color.get_Red()))

# Draw a filled rectangle using the linear gradient brush
page.Canvas.DrawRectangle(linearGradientBrush, RectangleF(PointF(200.0, 30.0), SizeF(150.0, 120.0)))

# Create a radial gradient brush
radialGradientBrush = PdfRadialGradientBrush(PointF(380.0, 30.0), 150.0, PointF(530.0, 150.0), 150.0, PdfRGBColor(Color.get_Orange()) , PdfRGBColor(Color.get_Blue()))

# Draw a filled rectangle using the radial gradient brush
page.Canvas.DrawRectangle(radialGradientBrush, RectangleF(PointF(380.0, 30.0), SizeF(150.0, 120.0)))

# Restore the previously saved drawing state
page.Canvas.Restore(state)

# Save the document to a file
doc.SaveToFile("Drawing Rectangle Shapes.pdf")

# Close the document and release resources
doc.Close()
doc.Dispose()
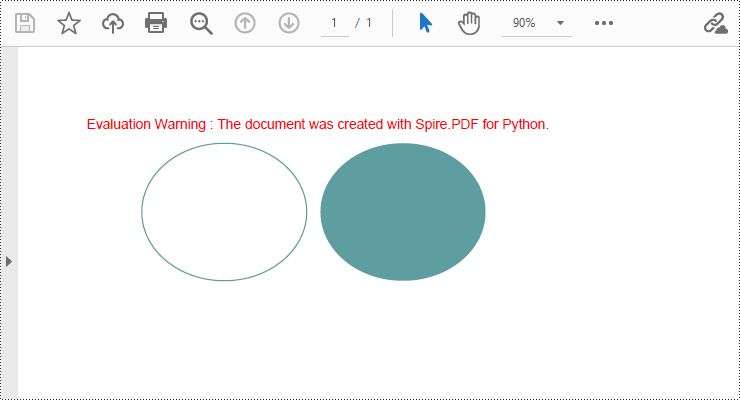
Draw Ellipses in PDF Documents in Python
Spire.PDF for Python provides the PdfPageBase.Canvas.DrawEllipse() method to draw elliptical shapes. You can use either a pen or a fill brush to draw ellipses in different styles. Here are the detailed steps for drawing an ellipse:
- Create a PdfDocument object.
- Use the PdfDocument.Pages.Add() method to add a blank page to the PDF document.
- Use the PdfPageBase.Canvas.Save() method to save the current drawing state for later restoration.
- Create a PdfPen object.
- Use the PdfPageBase.Canvas.DrawEllipse() method with the pen object to draw the outline of an ellipse, specifying the position and size of the ellipse.
- Create a PdfSolidBrush object.
- Use the PdfPageBase.Canvas.DrawEllipse() method with the fill brush object to draw a filled ellipse, specifying the position and size of the ellipse.
- Use the PdfPageBase.Canvas.Restore(state) method to restore the previously saved drawing state.
- Use the PdfDocument.SaveToFile() method to save the document to a file.
- Python
from spire.pdf.common import *
from spire.pdf import *

# Create PDF Document Object
doc = PdfDocument()

# Add a Page
page = doc.Pages.Add()

# Save the current drawing state
state = page.Canvas.Save()

# Create a Pen object
pen = PdfPens.get_CadetBlue()

# Draw the outline of an ellipse shape
page.Canvas.DrawEllipse(pen, 50.0, 30.0, 120.0, 100.0)

# Create a Brush object for filling
brush = PdfSolidBrush(PdfRGBColor(Color.get_CadetBlue()))

# Draw the filled ellipse shape
page.Canvas.DrawEllipse(brush, 180.0, 30.0, 120.0, 100.0)

# Restore the previously saved drawing state
page.Canvas.Restore(state)

# Save the document to a file
doc.SaveToFile("Drawing Ellipse Shape.pdf")

# Close the document and release resources
doc.Close()
doc.Dispose()
Apply for a Temporary License
If you'd like to remove the evaluation message from the generated documents, or to get rid of the function limitations, please request a 30-day trial license for yourself.
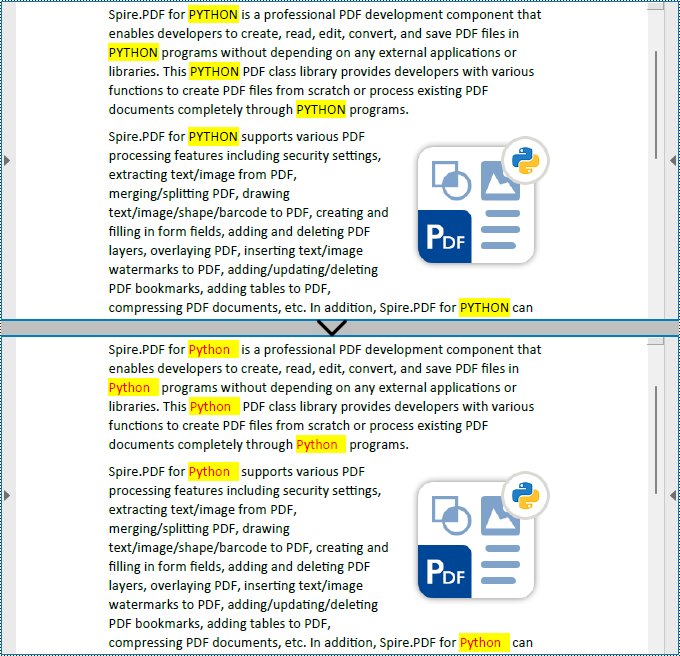
Finding and replacing text is a common need in document editing, as it helps users correct minor errors or make adjustments to terms appearing in the document. Although PDF documents have a fixed layout and editing can be challenging, users can still perform small modifications such as replacing text with Python, and achieve a satisfactory editing result. In this article, we will explore how to utilize Spire.PDF for Python to find and replace text in PDF documents within a Python program.
- Find Text and Replace the First Match in PDF with Python
- Find Text and Replace All Matches in PDF with Python
Install Spire.PDF for Python
This scenario requires Spire.PDF for Python and plum-dispatch v1.7.4. They can be easily installed in your Windows through the following pip commands.
pip install Spire.PDF
If you are unsure how to install, please refer to: How to Install Spire.PDF for Python on Windows
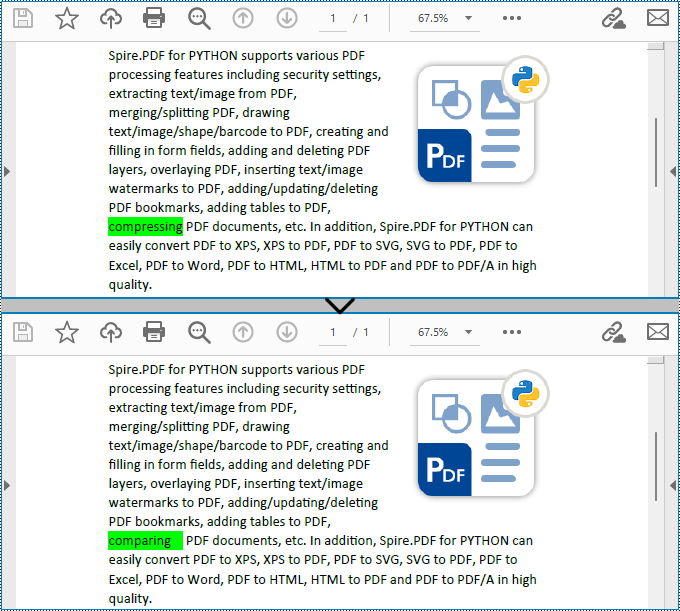
Find Text and Replace the First Match in PDF with Python
Spire.PDF for Python enables users to find text and replace the first match in PDF documents with the PdfTextReplacer.ReplaceText(string originalText, string newText) method. This replacement method is great for making simple replacements for words or phrases that only appear once on a single page of a document.
The detailed steps for finding text and replacing the first match are as follows:
- Create an object of PdfDocument class and load a PDF document using PdfDocument.LoadFromFile() method.
- Get a page of the document using PdfDocument.Pages.get_Item() method.
- Create an object of PdfTextReplacer class based on the page.
- Find specific text and replace the first match on the page using PdfTextReplacer.ReplaceText() method.
- Save the document using PdfDocument.SaveToFile() method.
- Python
from spire.pdf import *
from spire.pdf.common import *

# Create an object of PdfDocument
pdf = PdfDocument()

# Load a PDF document
pdf.LoadFromFile("Sample.pdf")

# Get a page
page = pdf.Pages.get_Item(0)

# Create an object of PdfTextReplacer class
replacer = PdfTextReplacer(page)

# Find and replace the first matched text
replacer.ReplaceText("compressing", "comparing")

# Save the document
pdf.SaveToFile("output/ReplaceFirstMatch.pdf")
pdf.Close()
Find Text and Replace All Matches in PDF with Python
Spire.PDF for Python also provides the PdfTextReplacer.ReplaceAllText(string originalText, string newText, Color textColor) method to find specific text and replace all matches with new text (optionally resetting the text color). The detailed steps are as follows:
- Create an object of PdfDocument class and load a PDF document using PdfDocument.LoadFromFile() method.
- Loop through the pages in the document.
- Get a page using PdfDocument.Pages.get_Item() method.
- Create an object of PdfTextReplacer class based on the page.
- Find specific text and replace all the matches with new text in a new color using PdfTextReplacer.ReplaceAllText() method.
- Save the document using PdfDocument.SaveToFile() method.
- Python
from spire.pdf import *
from spire.pdf.common import *

# Create an object of PdfDocument
pdf = PdfDocument()

# Load a PDF document
pdf.LoadFromFile("Sample.pdf")

# Loop through the pages in the document
for i in range(pdf.Pages.Count):
    # Get a page
    page = pdf.Pages.get_Item(0)
    # Create an object of PdfTextReplacer class based on the page
    replacer = PdfTextReplacer(page)
    # Find and replace all matched text with a new color
    replacer.ReplaceAllText("PYTHON", "Python", Color.get_Red())

# Save the document
pdf.SaveToFile("output/ReplaceAllMatches.pdf")
pdf.Close()
Apply for a Temporary License
If you'd like to remove the evaluation message from the generated documents, or to get rid of the function limitations, please request a 30-day trial license for yourself.
The inclusion of attachments in a PDF can be useful for sharing related files or providing additional context and resources alongside the main document. However, there may be instances when you need to remove attachments from a PDF for reasons like reducing file size, protecting sensitive information, or simply decluttering the document. In this article, you will learn how to remove attachments from a PDF document in Python using Spire.PDF for Python.
- Remove Document-Level Attachments from PDF in Python
- Remove Annotation Attachments from PDF in Python
Install Spire.PDF for Python
This scenario requires Spire.PDF for Python and plum-dispatch v1.7.4. They can be easily installed in your Windows through the following pip command.
pip install Spire.PDF
If you are unsure how to install, please refer to this tutorial: How to Install Spire.PDF for Python on Windows
Prerequisite Knowledge
There are typically two types of attachments in PDF, document-level attachments and annotation attachments. The following table lists the differences between them and their representations in Spire.PDF.
| Attachment type | Represented by | Definition |
| Document level attachment | PdfAttachment class | A file attached to a PDF at the document level won't appear on a page, but can be viewed in the "Attachments" panel of a PDF reader. |
| Annotation attachment | PdfAnnotationAttachment class | A file attached as an annotation can be found on a page or in the "Attachment" panel. An annotation attachment is shown as a paper clip icon on the page; reviewers can double-click the icon to open the file. |
Remove Document-Level Attachments from PDF in Python
To obtain all document-level attachments of a PDF document, use the PdfDocument.Attachments property. Then, you can remove all of them using the Clear() method or selectively remove a specific attachment using the RemoveAt() method. The following are the steps to remove document-level attachments from PDF in Python.
- Create a PdfDocument object.
- Load a PDF document using PdfDocument.LoadFromFile() method.
- Get the attachment collection from the document using PdfDocument.Attachments property.
- Remove all attachments using PdfAttachmentCollection.Clear() method. To remove a specific attachment, use PdfAttachmentCollection.RemoveAt() method.
- Save the changes to a different PDF file using PdfDocument.SaveToFile() method.
- Python
from spire.pdf import *
from spire.pdf.common import *

# Create a PdfDocument object
doc = PdfDocument()

# Load a PDF file
doc.LoadFromFile("C:\\Users\\Administrator\\Desktop\\Attachments.pdf")

# Get the attachment collection from the document
attachments = doc.Attachments

# Remove all attachments
attachments.Clear()

# Remove a specific attachment
# attachments.RemoveAt(0)

# Save the changes to file
doc.SaveToFile("output/DeleteAttachments.pdf")

# Close the document
doc.Close()
Remove Annotation Attachments from PDF in Python
Annotations are page-based elements, and to retrieve all annotations from a document, you need to iterate through the pages and obtain the annotations from each page. Next, identify if a particular annotation is an attachment annotation, and finally remove it from the annotation collection using the RemoveAt() method.
The following are the steps to remove annotation attachments from PDF in Python.
- Create a PdfDocument object.
- Load a PDF document using PdfDocument.LoadFromFile() method.
- Iterate through the pages in the document
- Get the annotation collection from a specific page through PdfPageBase.AnnotationsWidget property.
- Iterate through the annotations in the collection.
- Determine if a specific annotation is an instance of PdfAttachmentAnnotationWidget.
- Remove the attachment annotation using PdfAnnotationCollection.RemoveAt() method.
- Save the changes to a different PDF file using PdfDocument.SaveToFile() method.
- Python
from spire.pdf import *
from spire.pdf.common import *

# Create a PdfDocument object
doc = PdfDocument()

# Load a PDF file
doc.LoadFromFile("C:\\Users\\Administrator\\Desktop\\AnnotationAttachment.pdf")

# Iterate through the pages in the document
for i in range(doc.Pages.Count):

    # Get annotation collection from a certain page
    annotationCollection = doc.Pages.get_Item(i).AnnotationsWidget

    if annotationCollection.Count > 0:

        # Iterate through the annotation in the collection
        for j in range(annotationCollection.Count):

            # Get a specific annotation
            annotation = annotationCollection.get_Item(j)

            # Determine if it is an attachment annotation
            if isinstance(annotation, PdfAttachmentAnnotationWidget):

                # Remove the annotation
                annotationCollection.RemoveAt(j)

# Save the changes to file
doc.SaveToFile("output/DeleteAnnotationAttachment.pdf")

# Close the document
doc.Close()
Apply for a Temporary License
If you'd like to remove the evaluation message from the generated documents, or to get rid of the function limitations, please request a 30-day trial license for yourself.
By incorporating supplemental resources directly into the PDF, it consolidates all relevant information in a single file, making it easier to organize, share, and archive. This feature enables users to seamlessly share supporting documents, images, or multimedia elements, eliminating the need for separate file transfers or external links. It streamlines communication, improves efficiency, and ensures that recipients have convenient access to all the necessary resources within the PDF itself. In this article, you will learn how to attach files to a PDF document in Python with the help of Spire.PDF for Python.
Install Spire.PDF for Python
This scenario requires Spire.PDF for Python and plum-dispatch v1.7.4. They can be easily installed in your Windows through the following pip command.
pip install Spire.PDF
If you are unsure how to install, please refer to this tutorial: How to Install Spire.PDF for Python on Windows
Background Knowledge
There are generally two types of attachments in PDF, namely document level attachment and annotation attachment. Both are supported by Spire.PDF for Python. The table below lists the differences between them.
| Attachment type | Represented by | Definition |
| Document level attachment | PdfAttachment class | A file attached to a PDF at the document level won't appear on a page, but can be viewed in the "Attachments" panel of a PDF reader. |
| Annotation attachment | PdfAnnotationAttachment class | A file attached as an annotation can be found on a page or in the "Attachment" panel. An Annotation attachment is shown as a paper clip icon on the page; reviewers can double-click the icon to open the file. |
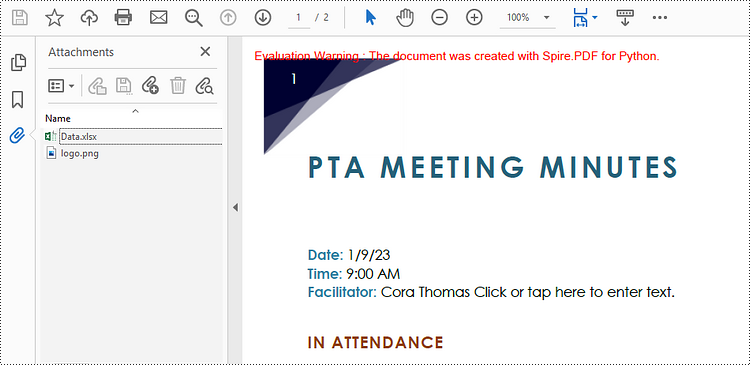
Attach Files to a PDF Document in Python
To attach files to PDFs at the document level, you first need to create a PdfAttachment object based on an external file, and then you can add it to a PDF document using the PdfDocument.Attachments.Add() method. The following are the detailed steps.
- Create a PdfDocument object.
- Load a PDF document using PdfDocument.LoadFromFile() method.
- Create a PdfAttachment object based on an external file.
- Add the attachment to the document using PdfDocument.Attachments.Add() method.
- Save the document to a different PDF file using PdfDocument.SaveToFile() method.
- Python
from spire.pdf import *
from spire.pdf.common import *

# Create a PdfDocument object
doc = PdfDocument()

# Load a sample PDF file
doc.LoadFromFile("C:\\Users\\Administrator\\Desktop\\Input.pdf")

# Create PdfAttachment objects based on external files
attachment_one = PdfAttachment("C:\\Users\\Administrator\\Desktop\\Data.xlsx")
attachment_two = PdfAttachment("C:\\Users\\Administrator\\Desktop\\logo.png")

# Add the attachments to PDF
doc.Attachments.Add(attachment_one)
doc.Attachments.Add(attachment_two)

# Save to file
doc.SaveToFile("output/Attachment.pdf")
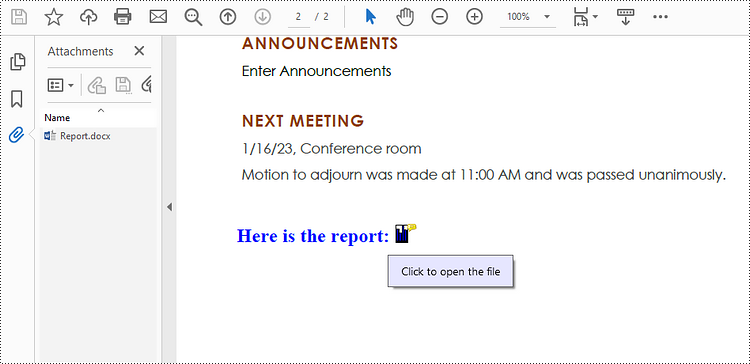
Attach Files as Annotations in PDF in Python
An annotation attachment is represented by the PdfAttachmentAnnotation class. Create an instance of this class, specify its attributes such as bounds, flag and text, and then add it to a specified page using the PdfPageBase.AnnotationsWidget.Add() method.
Below are the steps to attach files as annotations in PDF using Spire.PDF for Python.
- Create a PdfDocument object.
- Load a PDF document using PdfDocument.LoadFromFile() method.
- Get a specific page to add annotation through PdfDocument.Pages[] property.
- Create a PdfAttachmentAnnotation object based on an external file.
- Add the annotation attachment to the page using PdfPageBase.AnnotationsWidget.Add() method.
- Save the document to a different PDF file using PdfDocument.SaveToFile() method.
- Python
from spire.pdf import *
from spire.pdf.common import *

# Create a PdfDocument object
doc = PdfDocument()

# Load a sample PDF file
doc.LoadFromFile("C:\\Users\\Administrator\\Desktop\\Input.pdf")

# Get a specific page
page = doc.Pages[1]

# Draw a string on PDF
str = "Here is the report:"
font = PdfTrueTypeFont("Times New Roman", 16.0, PdfFontStyle.Bold, True)
x = 50.0
y = doc.Pages[0].ActualSize.Height - 300.0
page.Canvas.DrawString(str, font, PdfBrushes.get_Blue(), x, y)

# Create a PdfAttachmentAnnotation object based on an external file
data = Stream("C:\\Users\\Administrator\\Desktop\\Data.xlsx")
size = font.MeasureString(str);
bounds = RectangleF((x + size.Width + 5.0), y, 10.0, 15.0)
annotation = PdfAttachmentAnnotation(bounds, "Report.docx", data);

# Set color, flag, icon and text of the annotation
annotation.Color = PdfRGBColor(Color.get_Blue())
annotation.Flags = PdfAnnotationFlags.Default
annotation.Icon = PdfAttachmentIcon.Graph
annotation.Text = "Click to open the file"

# Add the attachment annotation to PDF
page.AnnotationsWidget.Add(annotation)

# Save to file
doc.SaveToFile("output/AnnotationAttachment.pdf")
Apply for a Temporary License
If you'd like to remove the evaluation message from the generated documents, or to get rid of the function limitations, please request a 30-day trial license for yourself.
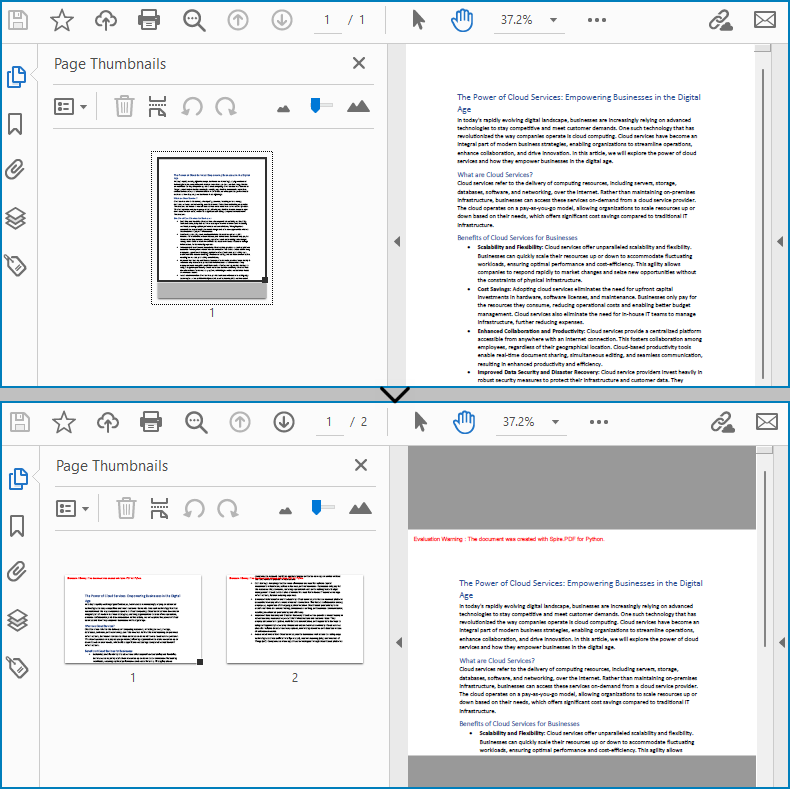
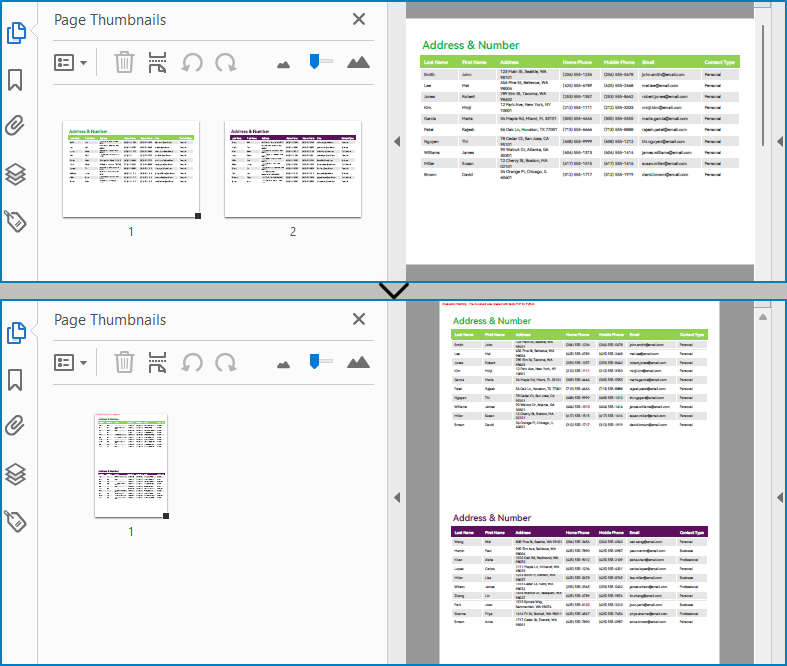
Sometimes, when dealing with PDF documents, there is a need to split a page into different sections based on content or layout. For instance, splitting a mixed-layout page with both horizontal and vertical content into two separate parts. This type of splitting is not commonly available in basic PDF management functions but can be important for academic papers, magazine ads, or mixed-layout designs. This article explains how to use Spire.PDF for Python to perform horizontal or vertical PDF page splitting.
Install Spire.PDF for Python
This scenario requires Spire.PDF for Python and plum-dispatch v1.7.4. They can be easily installed in your Windows through the following pip command.
pip install Spire.PDF
If you are unsure how to install, please refer to this tutorial: How to Install Spire.PDF for Python on Windows
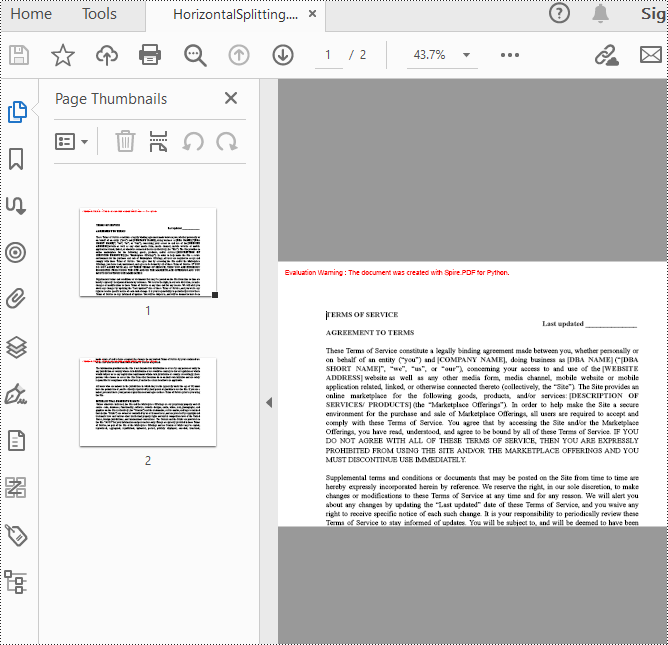
Split PDF Page Horizontally or Vertically with Python
Spire.PDF for Python not only supports splitting a PDF document into multiple PDF documents, but also allows splitting a specific page within a PDF into two or more pages. Here are the detailed steps to split a page:
- Create an instance of the PdfDocument class.
- Load the source PDF document using the PdfDocument.LoadFromFile() method.
- Retrieve the page(s) to be split using PdfDocument.Pages[].
- Create a new PDF document and set its page margins to 0.
- Set the width or height of the new document to half of the source document.
- Add a page to the new PDF document using the PdfDocument.Pages.Add() method.
- Create a template for the source document's page using the PdfPageBase.CreateTemplate() method.
- Draw the content of the source page onto the new page using the PdfTemplate.Draw() method.
- Save the split document using the PdfDocument.SaveToFile() method.
- Python
from spire.pdf.common import *
from spire.pdf import *

# Create a PdfDocument object
pdf = PdfDocument()

# Load the PDF document
pdf.LoadFromFile("Terms of service.pdf")

# Get the first page
page = pdf.Pages[0]

# Create a new PDF document and remove the page margins
newpdf = PdfDocument()
newpdf.PageSettings.Margins.All=0

# Horizontal splitting: Set the width of the new document's page to be the same as the width of the first page of the original document, and the height to half of the first page's height
newpdf.PageSettings.Width=page.Size.Width
newpdf.PageSettings.Height=page.Size.Height/2

'''
# Vertical splitting: Set the width of the new document's page to be half of the width of the first page of the original document, and the height to the same as the first page's height
newpdf.PageSettings.Width=page.Size.Width/2
newpdf.PageSettings.Height=page.Size.Height
'''

# Add a new page to the new PDF document
newPage = newpdf.Pages.Add()

# Set the text layout format
format = PdfTextLayout()
format.Break=PdfLayoutBreakType.FitPage
format.Layout=PdfLayoutType.Paginate

# Create a template based on the first page of the original document and draw it onto the new page of the new document, automatically paginating when the page is filled
page.CreateTemplate().Draw(newPage, PointF(0.0, 0.0), format)

# Save the document
newpdf.SaveToFile("HorizontalSplitting.pdf")

# Close the objects
newpdf.Close()
pdf.Close()
The result of horizontal splitting is as follows:
The result of vertical splitting is as follows:
Apply for a Temporary License
If you'd like to remove the evaluation message from the generated documents, or to get rid of the function limitations, please request a 30-day trial license for yourself.
PDF bookmarks are key tools for optimizing reading navigation. When expanded, users can click on the titles to jump to the corresponding chapters and display sub-level directories, enabling intuitive access and positioning within the document's deep structure. Collapsing bookmarks, on the other hand, allows users to hide all sub-bookmark information at the current level with a single click, simplifying the view and focusing on higher-level structure. These two operations work together to significantly enhance the efficiency and experience of reading complex, multi-level PDF documents. This article will introduce how to programmatically expand and collapse bookmarks in a PDF using Spire.PDF for Python.
Install Spire.PDF for Python
This scenario requires Spire.PDF for Python and plum-dispatch v1.7.4. They can be easily installed in your Windows through the following pip command.
pip install Spire.PDF
If you are unsure how to install, please refer to this tutorial: How to Install Spire.PDF for Python on Windows
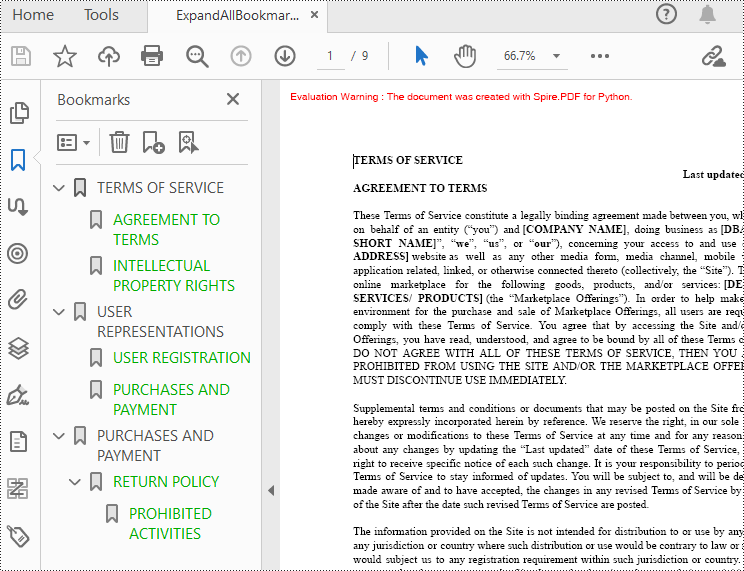
Expand or Collapse all Bookmarks in Python
Spire.PDF for Python provides the property BookMarkExpandOrCollapse to expand or collapse bookmarks, when set to True, it expands all bookmarks. Conversely, setting it to False will collapses all bookmarks. The following are the detailed steps for expanding bookmarks in a PDF document.
- Create a PdfDocument class instance.
- Load a PDF document using PdfDocument.LoadFromFile() method.
- Expand all bookmarks using BookMarkExpandOrCollapse property.
- Save the document using PdfDocument.SaveToFile() method.
- Python
from spire.pdf.common import *
from spire.pdf import *

# Create a PdfDocument object
doc = PdfDocument()

# Load a PDF file
doc.LoadFromFile("Terms of service.pdf")

# Set BookMarkExpandOrCollapse as True to expand all bookmarks, set False to collapse all bookmarks
doc.ViewerPreferences.BookMarkExpandOrCollapse = True

# Save the document
outputFile="ExpandAllBookmarks.pdf"
doc.SaveToFile(outputFile)

# Close the document
doc.Close()
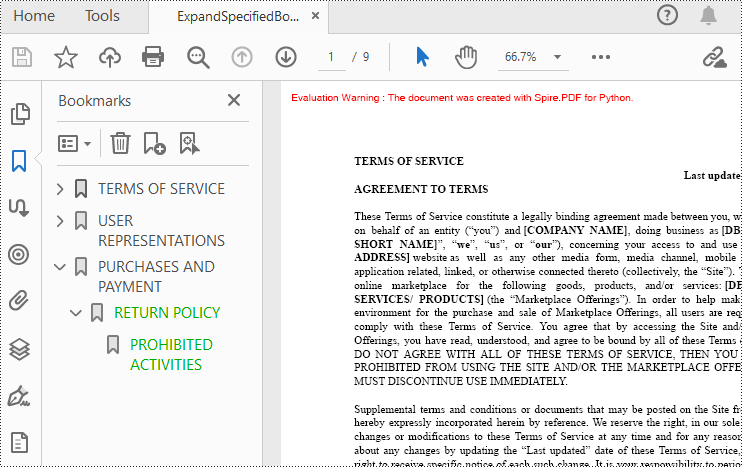
Expand or Collapse a specific Bookmark in Python
If you need to expand or collapse only a specific bookmark, you can use the property ExpandBookmark. The following are the detailed steps.
- Create a PdfDocument class instance.
- Load a PDF document using PdfDocument.LoadFromFile() method.
- Get a specific bookmark using PdfDocument.Bookmarks.get_Item() method.
- Expand the bookmark using ExpandBookmark property.
- Save the result document using PdfDocument.SaveToFile() method.
- Python
from spire.pdf.common import *
from spire.pdf import *

# Create a PdfDocument object
doc = PdfDocument()

# Load a PDF file
doc.LoadFromFile("Terms of service.pdf")

# Set ExpandBookmark as True for the third bookmark
doc.Bookmarks.get_Item(2).ExpandBookmark = True

# Save the document
outputFile="ExpandSpecifiedBookmarks.pdf"
doc.SaveToFile(outputFile)

# Close the document
doc.Close()
Apply for a Temporary License
If you'd like to remove the evaluation message from the generated documents, or to get rid of the function limitations, please request a 30-day trial license for yourself.
