Conversion (32)
CSV (Comma-Separated Values) and XML (eXtensible Markup Language) are two mainstream data exchange formats in modern software development. CSV excels at lightweight storage and transmission of tabular data, while XML is widely used for cross-system data interaction due to its hierarchical structure and strict validation rules. Converting CSV to XML is a common demand in scenarios such as configuration file generation, database record export, and third-party API integration.
Manual CSV parsing and XML generation are error-prone, inefficient, and difficult to maintain for large datasets. For C# developers, Spire.XLS for .NET provides a lightweight, high-performance solution for CSV-to-XML conversion.
This article will guide you through two core methods to convert CSV to XML in C# using Spire.XLS, covering basic conversion and customized XML output with complete code examples.
- Understanding the Two XML Output Types
- Method 1: Convert CSV to Excel XML in C#
- Method 2: Convert CSV to Custom XML in C#
- Handling Real World CSV Scenarios
- FAQs About CSV to XML Conversion
Prerequisites
Install Spire.XLS via NuGet
The quickest way to add Spire.XLS to your project is through the NuGet Package Manager. In Visual Studio, run the following command in the Package Manager Console:
Install-Package Spire.XLS
Alternatively, search for “Spire.XLS” in the NuGet UI and install the latest version.
Prepare a Sample CSV Data (For Testing)
Create a Products.csv file in your project’s output folder with this sample tabular data (includes headers and rows):
ID,ProductName,Category,Price,StockQuantity,ReleaseDate
1,Laptop,Electronics,999.99,50,2023-01-15
2,Wireless Mouse,Electronics,25.50,200,2023-02-20
3,Cotton T-Shirt,Apparel,19.99,150,2022-11-05
4,Coffee Mug,Home Goods,12.99,300,2022-09-10
5,Desk Chair,Furniture,150.00,75,2023-03-01
Understanding the Two XML Output Types
When converting CSV file to XML using Spire.XLS for .NET, you can produce two distinct types of XML output:
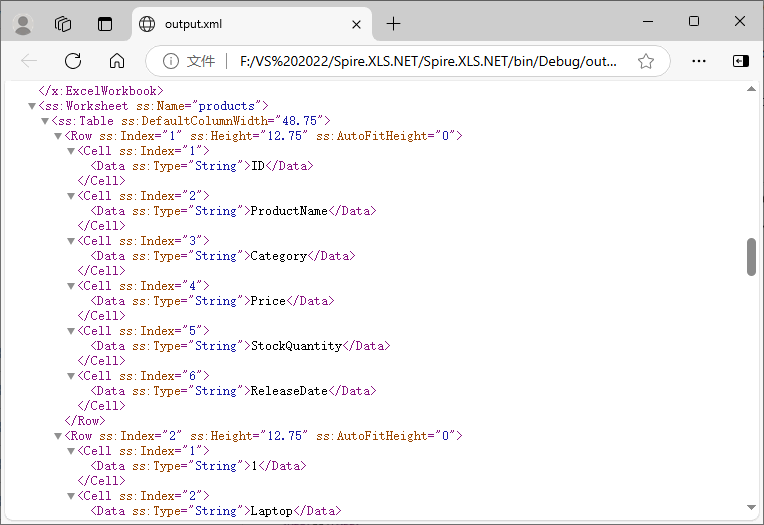
1. Excel XML (SpreadsheetML)
A standardized XML format based on Microsoft's Open XML specification. It retains the original table layout, cell formatting and overall structure of the CSV file. This is an ideal choice if you need to open, edit or process the generated XML with Excel and other spreadsheet-compatible tools.
2. Custom XML Structure
A user-defined XML schema enables free mapping of CSV columns to custom element tags, nested hierarchies, and adjustable presentation rules. This is ideal for integrating with third-party APIs, legacy systems, and business platforms that require specific fixed XML node structures.
Both approaches are covered in detail with C# code examples in the following sections. For developers working in Python, refer to our separate guide: Convert CSV to XML in Python
Method 1: Convert CSV to Excel XML in C#
This is the simplest approach that requires only a few lines of code. The CSV is loaded into a Workbook, then saved directly as Excel XML (SpreadsheetML) format. Suitable for cases where the target system accepts Excel's native XML format.
CSV to XML C# Code Example:
using Spire.Xls;

namespace CsvToExcelXmlConverter
{
    class Program
    {
        static void Main(string[] args)
        {
            // Create a Workbook instance
            Workbook workbook = new Workbook();

            // Load CSV into the first worksheet
            workbook.LoadFromFile("Products.csv", ",", 1, 1);

            // Save as Excel SpreadsheetML format
            workbook.SaveAsXml("output.xml");

            // Clean up resources
            workbook.Dispose();
        }
    }
}
Core Methods:
- LoadFromFile() – Spire.XLS automatically parses the CSV content into the first worksheet of the workbook.
- SaveAsXml() – Export the loaded CSV data as an Excel XML file.
The core data parts looks like:
Beyond converting CSV files, Spire.XLS for .NET also enables seamless conversion of Excel (XLS / XLSX) to XML using the same robust Workbook.SaveAsXml() method.
Method 2: Convert CSV to Custom XML in C#
When the target system expects a specific XML schema, you’ll need to build a custom XML document. Spire.XLS, together with the built-in .NET XmlWriter class, makes this straightforward: simply iterate over worksheet rows and columns, then generate well-structured XML efficiently.
Custom XML Code Example:
using Spire.Xls;
using System.Xml;

namespace CSVtoXMLConverter
{
    class program
    {
        static void Main(string[] args)
        {

            // Initialize workbook and load CSV
            Workbook workbook = new Workbook();
            workbook.LoadFromFile("Products.csv", ",", 1, 1);
            Worksheet worksheet = workbook.Worksheets[0];

            // Create custom XML settings (indentation for readability)
            XmlWriterSettings settings = new XmlWriterSettings
            {
                Indent = true,
                IndentChars = "\t",
                OmitXmlDeclaration = false,
                Encoding = System.Text.Encoding.UTF8
            };

            // Save CSV to XML with CUSTOM ROOT NODE and FORMATTING
            XmlWriter writer = XmlWriter.Create("Custom_Output.xml", settings);

            writer.WriteStartDocument();
            // Custom root element: <ProductInventory>
            writer.WriteStartElement("ProductInventory");


            // Loop through CSV rows (skip header row: start at 2)
            for (int row = 2; row <= worksheet.LastRow; row++)
            {
                // Custom data node: <Product>
                writer.WriteStartElement("Product");

                // Loop through CSV columns and write custom elements
                for (int col = 1; col <= worksheet.LastColumn; col++)
                {
                    string header = worksheet.Range[1, col].Text;
                    string value = worksheet.Range[row, col].Text;
                    writer.WriteElementString(header, value);
                }

                writer.WriteEndElement(); // Close <Product>
            }

            writer.WriteEndElement(); // Close <ProductInventory>
            writer.WriteEndDocument();

            writer.Close();
            workbook.Dispose();
        }

    }
}
How the code works:
- Load the CSV file into a Workbook.
- Access the worksheet – Retrieve the first worksheet containing the imported data.
- Create an XmlWriter – Configure it with indentation, encoding, and other formatting preferences.
- Write the XML document – Start the document, write the custom root element, then loop through rows (skipping the header row) and columns, writing an element per column using the header text as the tag name.
- Close resources – Close the XmlWriter and dispose of the Workbook.
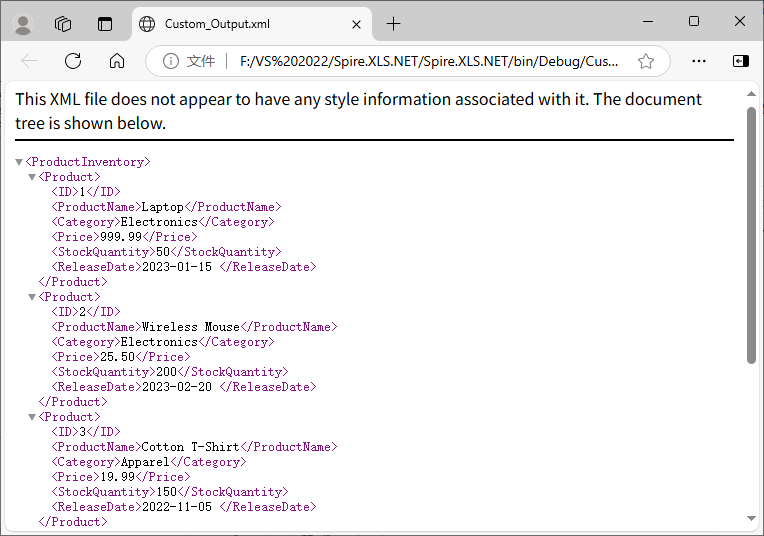
Output:
The generated XML uses <ProductInventory> as the root node and <Product> as the data node, with child nodes named after CSV headers, fully matching custom business requirements.
Bonus Tip: For scenarios requiring formal document delivery, you can also use Spire.XLS for .NET to convert XML files to PDF in C# effortlessly.
Handling Real‑World CSV Scenarios
Real-world CSV files often have non-standard delimiters, empty values, redundant rows/columns, or missing headers. The following solutions solve these common problems:
Different Delimiters
CSV files may use tabs (\t), semicolons (;), or pipes (|). Spire.XLS supports specifying custom delimiters when loading CSV files:
// Tab-separated
workbook.LoadFromFile("data.tsv", "\t", 1, 1);

// Semicolon-separated (common in European locales)
workbook.LoadFromFile("data.csv", ";", 1, 1);

// Pipe-separated
workbook.LoadFromFile("data.psv", "|", 1, 1);
Skipping Rows and Columns
If the CSV contains metadata rows or empty columns, adjust your loop bounds:
// start from row 3
for (int row = 3; row <= worksheet.LastRow; row++)
//start from column 3
for (int col = 3; col <= worksheet.LastColumn; col++)
Handling Missing Values and Empty Cells
Empty cells in CSV files appear as empty strings. You can handle them by writing a default value or omitting the elements:
// Option 1: Fill empty values with "N/A"
string value = worksheet.Range[row, col].Text;
if (string.IsNullOrEmpty(value))
    value = "N/A";
writer.WriteElementString(header, value);

// Option 2: Omit empty nodes
string value = worksheet.Range[row, col].Text;
if (!string.IsNullOrEmpty(value))
    writer.WriteElementString(header, value);
Missing Header Row
If your CSV has no header row, you can pass an array of custom names, or generate generic column names such as:
for (int col = 1; col <= worksheet.LastColumn; col++)
{
    string header = $"Column{col}";
    string value = worksheet.Range[row, col].Text;
    writer.WriteElementString(header, value);
}
Conclusion
Converting CSV to XML in C# with Spire.XLS for .NET eliminates manual parsing and reduces code complexity. Whether you need a simple one-line conversion to Excel XML or a fully customized XML structure, the code examples in this guide let you seamlessly integrate CSV-to-XML conversion into your C# applications.
For more Excel or CSV-related tasks in .NET development, visit the online documentation.
FAQs About CSV to XML Conversion
Q1: Can I convert only a specific range of cells (e.g., A1:C10)?
Yes. Instead of looping to worksheet.LastRow and LastColumn, set custom bounds (e.g., loop rows 2 to 11 for A1:C10) or directly access a range via worksheet.Range.
Q2: Does Spire.XLS require Microsoft Excel to be installed?
No, it is an independent .NET component and does not rely on Microsoft Excel, Office interop, or any third-party Office software.
Q3: Can I batch convert multiple CSV files to XML at once?
Yes. You can loop through all CSV files in a folder, load each one with Spire.XLS, and export them to corresponding XML files in batches with the same logic in the tutorial.
Q4: Can I add custom attributes and namespaces to generated XML elements?
Absolutely. Use XmlWriter.WriteAttributeString() to add custom attributes to nodes, and WriteStartElement with namespace parameters to define XML namespaces for enterprise-standard XML schemas.
Exporting database query results to PDF is a common requirement in applications such as reporting, data archiving, and document generation. In these scenarios, SQL query results need to be transformed into structured, readable documents that can be easily shared or printed.
Because database data is inherently tabular, preserving its structure during the export process is essential for maintaining clarity and usability. Without proper layout control, the resulting document can quickly become difficult to read, especially when dealing with large datasets.
This article demonstrates how to convert databases to PDF in C# using Spire.XLS for .NET, including examples on retrieving query results, organizing them into a structured table, and exporting them as a formatted PDF document.
Table of Contents
- Understanding the Task
- Convert Database to PDF Using C# (Step-by-Step)
- Complete C# Example for Database to PDF Conversion
- Advanced Scenarios
- Common Pitfalls
- Conclusion
- FAQ
1. Understanding the Task
Converting database content to PDF typically involves several key steps:
- Data retrieval: Execute SQL queries and load results into memory
- Data structuring: Organize query results into a consistent tabular format
- PDF export: Generate a document that preserves layout and readability
In practice, this workflow is commonly used for generating reports, creating invoices, or archiving query results, where maintaining a clear and structured presentation of data is essential.
2. Convert Database to PDF Using C# (Step-by-Step)
This section provides a complete workflow for converting database query results into a PDF document, including data retrieval, table structuring, formatting, and export.
2.1 Environment Setup
Before implementing the solution, make sure your development environment is ready:
-
.NET environment
Install Visual Studio or use the .NET CLI with a compatible .NET version (e.g., .NET 6 or later). -
Database access
Prepare a SQL Server database (or any relational database) and ensure you have a valid connection string. For modern .NET applications, use the recommended SQL client library:dotnet add package Microsoft.Data.SqlClientThis package provides the ADO.NET implementation for SQL Server and replaces the legacy
System.Data.SqlClient. -
Spire.XLS for .NET Install Spire.XLS via NuGet to handle table formatting and PDF export:
dotnet add package Spire.XLSYou can also download the Spire.XLS for .NET package and add it to your project manually.
Once configured, you can retrieve data from the database and use Spire.XLS to generate and export PDF documents.
2.2 Read Data from Database
The first step is to execute a SQL query and load the results into a DataTable. This structure preserves the schema and data types of the query result, making it suitable for further transformation.
using System.Data;
using Microsoft.Data.SqlClient;

string connectionString = "Server=localhost\\SQLEXPRESS;Database=SalesDB;User ID=demouser;Password=YourPassword;Encrypt=true;TrustServerCertificate=true;";
string query = @"
    SELECT o.OrderID, c.CustomerName, o.OrderDate, o.TotalAmount
    FROM Orders o
    JOIN Customers c ON o.CustomerID = c.CustomerID
    WHERE YEAR(o.OrderDate) = 2026;
";

DataTable dataTable = new DataTable();

using (SqlConnection conn = new SqlConnection(connectionString))
{
    SqlDataAdapter adapter = new SqlDataAdapter(query, conn);
    adapter.Fill(dataTable);
}
This example uses Microsoft.Data.SqlClient, the modern SQL client library for .NET, which is recommended over the legacy System.Data.SqlClient.
The SqlDataAdapter acts as a bridge between the database and in-memory data. It executes the query and fills the DataTable without requiring explicit connection management for reading operations.
In practical scenarios, this step can be extended to include:
- Parameterized queries to avoid SQL injection
- Stored procedures for complex data retrieval
- Data filtering and aggregation directly in SQL
By preparing clean and structured data at this stage, you reduce the complexity of downstream formatting and improve overall performance.
For a similar scenario involving exporting database query results to Excel instead of PDF, you can also refer to this guide: Export Database to Excel in C#.
2.3 Import Data and Export to PDF with Formatting
After retrieving the data, the next step is to map it into a worksheet, apply formatting, and export it as a PDF document. This approach leverages worksheet-based layout control to ensure the output remains structured and readable.
using Spire.Xls;
using System.Drawing;

// Create workbook and worksheet
Workbook workbook = new Workbook();
Worksheet sheet = workbook.Worksheets[0];

// Import DataTable with headers
sheet.InsertDataTable(dataTable, true, 1, 1);

// Format header row
CellRange headerRange = sheet.Range[1, 1, 1, dataTable.Columns.Count];
headerRange.Style.Font.IsBold = true;
headerRange.Style.Font.Size = 11;
headerRange.Style.Color = Color.LightGray;

// Apply borders to enhance table structure
CellRange dataRange = sheet.AllocatedRange;
dataRange.BorderAround(LineStyleType.Thin);
dataRange.BorderInside(LineStyleType.Thin);

// Align content for consistency
dataRange.Style.HorizontalAlignment = HorizontalAlignType.Center;
dataRange.Style.VerticalAlignment = VerticalAlignType.Center;

// Auto-fit columns for better layout
sheet.AllocatedRange.AutoFitColumns();

// Center the content horizontally in the page
sheet.PageSetup.CenterHorizontally = true;

// Export to PDF
workbook.SaveToFile("SalesReport_2026.pdf", FileFormat.PDF);
This step combines layout control and PDF generation into a single workflow.
Key points to note:
-
Worksheet as layout engine The worksheet acts as a structured canvas where database data is arranged into rows and columns. This ensures the original tabular structure is preserved in the final document.
-
Formatting directly impacts PDF output Adjustments such as column width, font style, and borders are not just visual improvements—they determine how the content is rendered in the PDF. Poor formatting can lead to truncated text or unreadable layouts.
-
Automatic pagination When exporting, the worksheet content is automatically split across pages based on layout and paper size, which is particularly useful for large datasets.
For further layout optimization, you can enhance the table formatting by:
- Enabling text wrapping for long fields
- Applying number/date formats for better readability
If your project requires more flexible PDF structure control, you can also explore converting DataTable to PDF in C# directly using Spire.PDF for .NET, which provides more advanced document-level layout capabilities for complex reporting needs.
3. Complete C# Example for Converting Databases to PDF
Below is the complete implementation that combines database retrieval, data formatting, and PDF export into a single workflow.
using System;
using System.Data;
using Microsoft.Data.SqlClient;
using Spire.Xls;
using System.Drawing;

class Program
{
    static void Main()
    {
        // Step 1: Retrieve data from database
        string connectionString = "Server=localhost\\SQLEXPRESS;Database=SalesDB;User ID=demouser;Password=YourPassword;Encrypt=true;TrustServerCertificate=true;";
        string query = @"
            SELECT o.OrderID, c.CustomerName, o.OrderDate, o.TotalAmount
            FROM Orders o
            JOIN Customers c ON o.CustomerID = c.CustomerID
            WHERE YEAR(o.OrderDate) = 2026;
        ";

        DataTable dataTable = new DataTable();

        using (SqlConnection conn = new SqlConnection(connectionString))
        {
            SqlDataAdapter adapter = new SqlDataAdapter(query, conn);
            adapter.Fill(dataTable);
        }

        // Step 2: Create workbook and import data
        Workbook workbook = new Workbook();
        Worksheet sheet = workbook.Worksheets[0];
        sheet.InsertDataTable(dataTable, true, 1, 1);

        // Step 3: Apply professional formatting
        // Format header row
        CellRange headerRange = sheet.Range[1, 1, 1, dataTable.Columns.Count];
        headerRange.Style.Font.IsBold = true;
        headerRange.Style.Font.Size = 11;
        headerRange.Style.Color = Color.LightGray;

        // Apply borders
        CellRange dataRange = sheet.AllocatedRange;
        dataRange.BorderAround(LineStyleType.Thin);
        dataRange.BorderInside(LineStyleType.Thin);

        // Set alignment
        dataRange.Style.HorizontalAlignment = HorizontalAlignType.Center;
        dataRange.Style.VerticalAlignment = VerticalAlignType.Center;

        // Auto-fit columns
        sheet.AllocatedRange.AutoFitColumns();

        // Center the content horizontally in the pages
        sheet.PageSetup.CenterHorizontally = true;

        // Step 4: Export to PDF
        workbook.SaveToFile("SalesReport_2026.pdf", FileFormat.PDF);

        Console.WriteLine("Database query results successfully exported to PDF.");
    }
}
Below is a preview of the generated PDF:
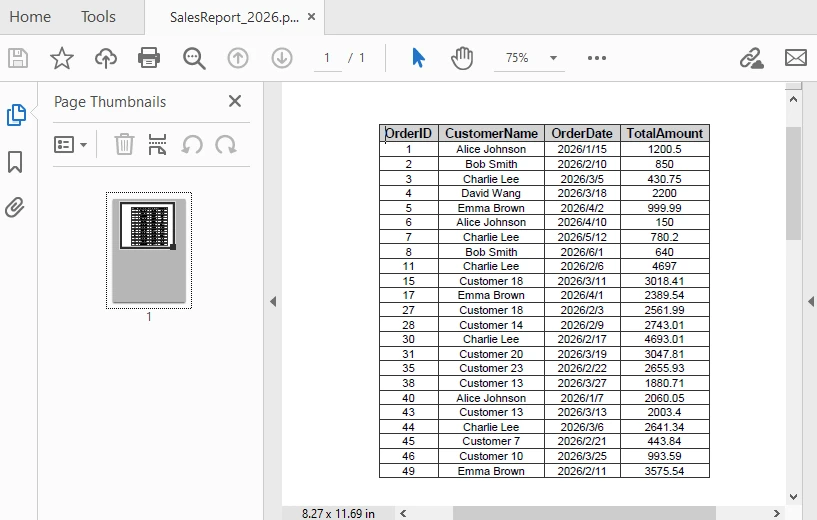
This example demonstrates an end-to-end workflow from SQL query execution to PDF generation.
4. Advanced Scenarios
In real-world applications, exporting database data to PDF often requires more than just basic conversion. You may need to handle batch exports, improve document readability, or adjust layout settings for better presentation. The following examples demonstrate common enhancements for real-world usage.
Export Multiple Query Results
For scenarios such as batch report generation or scheduled tasks, you may need to execute multiple queries and export each result as a separate PDF document:
string[] queries = {
    "SELECT * FROM Orders WHERE Status = 'Pending'",
    "SELECT * FROM Customers WHERE Region = 'North'"
};

for (int i = 0; i < queries.Length; i++)
{
    DataTable dt = ExecuteQuery(queries[i]);
    Workbook wb = new Workbook();
    Worksheet ws = wb.Worksheets[0];
    ws.InsertDataTable(dt, true, 1, 1);
    ws.AllocatedRange.AutoFitColumns();
    wb.SaveToFile($"Report_{i + 1}.pdf", FileFormat.PDF);
}
This approach is useful for automating report generation where multiple datasets need to be exported independently.
Add Title and Metadata
To improve readability and provide context, you can add a title row above the data before exporting to PDF:
// Insert title row
sheet.InsertRow(1);
sheet.Range[1, 1].Text = "Sales Report - 2026";
sheet.Range[1, 1].Style.Font.IsBold = true;
sheet.Range[1, 1].Style.Font.Size = 14;

// Merge title cells
sheet.Range[1, 1, 1, dataTable.Columns.Count].Merge();

// Auto-fit the title row
sheet.AutoFitRow(1);
The following image shows the generated PDF with the title row applied:
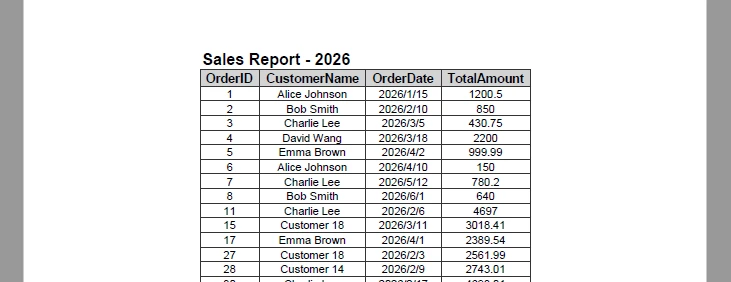
Adding a title helps users quickly understand the context of the document, especially when sharing or printing reports.
Set Page Size, Orientation, and Margins
To ensure the PDF layout fits your data properly, you can configure page size, orientation, and margins before exporting:
// Set the page size and orientation
sheet.PageSetup.PaperSize = PaperSizeType.PaperA4;
sheet.PageSetup.Orientation = PageOrientationType.Portrait;

// Set the page margins
sheet.PageSetup.TopMargin = 0.5f;
sheet.PageSetup.BottomMargin = 0.2f;
sheet.PageSetup.LeftMargin = 0.2f;
sheet.PageSetup.RightMargin = 0.2f;
Adjusting these settings helps prevent content overflow and ensures consistent layout across different reports.
Control Page Layout and Scaling
When working with large tables, you may need to control how content is distributed across pages. By default, content is split automatically, but you can adjust scaling behavior to fit more data within a page.
// Fit content to page width
workbook.ConverterSetting.SheetFitToWidth = true;

// Fit entire sheet into a single page (may reduce readability)
workbook.ConverterSetting.SheetFitToPage = true;
SheetFitToWidthensures the table fits within the page width while allowing vertical paginationSheetFitToPagescales the entire worksheet to fit into a single page
These settings are useful when generating compact reports, but should be used carefully to avoid making text too small.
Add Headers and Footers
Headers and footers are useful for adding contextual information such as report titles, timestamps, or page numbers:
sheet.PageSetup.LeftHeader = "&\"Arial,Bold\"&16 Sales Report - 2026";
sheet.PageSetup.RightHeader = "&\"Arial,Italic\"&10 Generated on &D";
sheet.PageSetup.CenterFooter = "&\"Arial,Regular\"&16 Page &P of &N";
The following image shows the generated PDF with headers and footers applied:
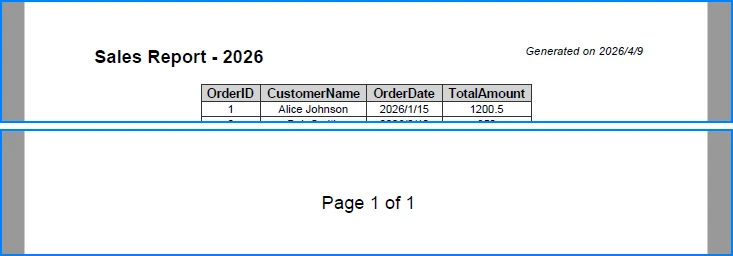
These elements improve document navigation and are especially valuable for multi-page reports.
Encrypt PDFs
To protect sensitive data, you can apply encryption to the exported PDF:
workbook.ConverterSetting.PdfSecurity.Encrypt("openpsd");
Encryption ensures that only authorized users can access the document, which is important for reports containing confidential or business-critical data.
For more related scenarios involving document export and PDF customization, you can also explore Excel to PDF conversion in C#.
5. Common Pitfalls
Database Connection Issues
Ensure the connection string is correct and the database server is accessible. Verify authentication settings (e.g., SQL authentication or integrated security) and confirm that encryption-related parameters match your environment configuration.
Empty Query Results
Check whether the DataTable contains data before proceeding. Empty result sets may lead to blank PDFs or unexpected formatting behavior.
if (dataTable.Rows.Count == 0)
{
    Console.WriteLine("No data found for the specified query.");
    return;
}
In production scenarios, you may also choose to generate a placeholder PDF or log the issue instead of exiting the process.
Column Width Overflow
When working with long text fields, AutoFitColumns() may produce excessively wide columns, which can negatively affect PDF layout.
To improve readability, consider:
- Setting a maximum column width
- Enabling text wrapping for long content
- Manually adjusting key columns based on data type
This is especially important when exporting large datasets with variable-length text.
Missing Font Support
If the exported PDF contains special characters (e.g., non-Latin text) or custom fonts, ensure the required fonts are installed and accessible at runtime.
Missing fonts may cause text rendering issues or fallback substitutions, which can affect document appearance and readability.
Unexpected PDF Layout
If the exported PDF layout appears compressed or improperly scaled, check page setup and scaling options such as SheetFitToWidth or SheetFitToPage.
Improper scaling may cause content to appear too small or distort the original table structure.
Conclusion
This article demonstrated a practical approach to converting database query results to PDF in C#. By combining structured data retrieval with worksheet-based formatting, you can generate clear and professional documents directly from SQL data.
This method is particularly effective for report generation and data presentation scenarios where maintaining table structure and readability is essential.
If you are evaluating Spire.XLS, you can request a free temporary license to remove evaluation limitations during development.
FAQ
Can Spire.XLS export database data to PDF without third-party tools?
Yes. Spire.XLS performs all operations independently and does not require Microsoft Office or any other external tools.
How do I handle large datasets when exporting to PDF?
For large datasets, consider paginating the results or filtering the query to retrieve only necessary data. You can also adjust PDF page settings to optimize output size.
Can I customize the PDF page layout?
Yes. Spire.XLS allows you to configure page settings including orientation, margins, and paper size before exporting to PDF.
Does this method work with databases other than SQL Server?
Yes. The approach works with any database that supports ADO.NET data providers, including MySQL, PostgreSQL, and Oracle. Simply use the appropriate connection class and data adapter.
Should I use Microsoft.Data.SqlClient or System.Data.SqlClient?
For modern .NET applications, it is recommended to use Microsoft.Data.SqlClient. It is actively maintained and provides better support for newer SQL Server features, while System.Data.SqlClient is considered legacy and no longer receives major updates.
Convert Excel to JSON and JSON to Excel in C# .NET – Step-by-Step Guide
2025-08-13 09:40:46 Written by alice yang
Excel files are widely used to enter, organize, and present tabular data, while JSON is commonly used by APIs and applications to exchange structured data between systems. Converting between these formats allows developers to import spreadsheet data into applications and export application data to Excel for reporting, analysis, or sharing.
In this tutorial, you’ll learn how to convert Excel to JSON and JSON to Excel in C# using Spire.XLS for .NET.
What We Will Cover:
- Why Convert Between Excel and JSON
- Prerequisites & Package Installation
- Basic Excel to JSON Conversion in C# .NET
- Advanced Excel to JSON Conversion Scenarios
- Convert JSON to Excel in C# .NET
- Tips and Best Practices
- FAQs
- Conclusion
Why Convert Between Excel and JSON?
Converting data between Excel (.xlsx or .xls) and JSON formats is a standard requirement in .NET applications for the following development tasks:
- Data Ingestion: Parses business-generated spreadsheets into standard server-side objects for backend processing.
- API Integration: Formats tabular data into standard JSON payloads required by web APIs and microservices.
- Frontend Serialization: Transforms structured server-side data into lightweight JSON format for consumption by web clients and JavaScript frameworks.
- NoSQL Storage: Prepares relational or tabular spreadsheet data for direct migration into document databases like MongoDB or Cosmos DB.
- Automated Reporting: Converts dynamic JSON application data into readable Excel reports for end users.
Prerequisites and Package Installation
Before you begin, ensure your development environment meets these specific requirements.
- Visual Studio (2019 or later recommended)
- .NET Environment: .NET Framework 4.0+, .NET Core 3.1+, or .NET 5.0+.
- NuGet Packages:
- Spire.XLS for .NET (version 15.11.3 or higher)
- Newtonsoft.Json (required for JSON serialization, deserialization and custom formatting)
Installing the Required NuGet Packages
Option 1: Using .NET Package Manager Console
Open your project in Visual Studio and run the following commands in the Package Manager Console:
Install-Package Spire.XLS
Install-Package Newtonsoft.Json
Option 2: Using .NET CLI
For cross-platform developers using terminal-based environments, execute the following commands inside the project's root folder:
dotnet add package Spire.XLS
dotnet add package Newtonsoft.Json
Basic Excel to JSON Conversion in C# .NET
Starting with Spire.XLS for .NET 15.11.3, developers can export an Excel workbook directly to JSON by calling the SaveToFile() method.
This method is suitable when you want to convert the whole workbook and do not need to customize the generated JSON structure.
Steps to Convert an Excel Workbook to JSON
- Instantiate a new
Workbookobject. - Use
LoadFromFile()to load your Excel workbook. - Call
SaveToFile()and specifyFileFormat.Jsonas the output format to export the workbook to JSON.
Complete Code Example
using System;
using Spire.Xls;

namespace ConvertExcelToJSON
{
    class Program
    {
        static void Main(string[] args)
        {
            string inputFile = @"Sample.xlsx";
            string outputFile = @"output.json";

            try
            {
                // Create a Workbook object
                using (Workbook workbook = new Workbook())
                {
                    // Load the Excel file
                    workbook.LoadFromFile(inputFile);

                    // Save the entire workbook into a single JSON file
                    // Supported in Spire.XLS 15.11.3 and later
                    workbook.SaveToFile(outputFile, FileFormat.Json);
                }
            }
            catch (Exception ex)
            {
                Console.WriteLine($"Error during conversion: {ex.Message}");
            }
        }
    }
}
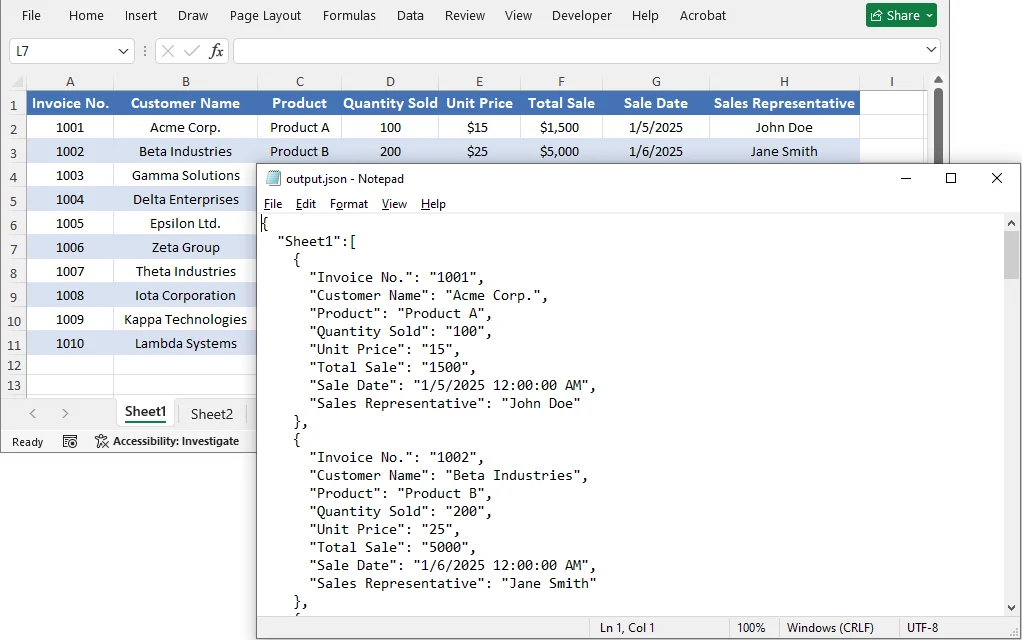
The Output JSON:
The converted JSON structure corresponds to the Excel data as follows:
- Worksheet name → Becomes a key in the outermost JSON object.
- Data in each worksheet → Becomes an array, where each object represents a single row.
- Header row values → Become the default field names for each data object.
Advanced Excel to JSON Conversion Scenarios
While saving the entire workbook to JSON is convenient, there are scenarios where you need more control—such as converting only a specific worksheet, cell range, or customizing the JSON output format. Spire.XLS provides flexible approaches to achieve these custom conversions.
Worksheet to JSON
To convert only a specific worksheet rather than the entire workbook, copy the target worksheet to a new workbook and then save that workbook as JSON.
Steps to Convert a Specific Worksheet to JSON
- Load the source workbook using
LoadFromFile(). - Get the target worksheet by its index or name.
- Create a new
Workbookobject for the output. - Use the
Worksheets.AddCopy()method to copy the target worksheet to the new workbook. - Call
SaveToFile()withFileFormat.Jsonon the new workbook.
Complete Code Example
using System;
using Spire.Xls;

namespace ConvertWorksheetToJSON
{
    class Program
    {
        static void Main(string[] args)
        {
            string inputFile = @"Sample.xlsx";
            string outputFile = @"sheet_output.json";

            try
            {
                using (Workbook sourceWorkbook = new Workbook())
                {
                    sourceWorkbook.LoadFromFile(inputFile);

                    // Access the first worksheet by index (or by name: sourceWorkbook.Worksheets["sheetName"])
                    Worksheet targetSheet = sourceWorkbook.Worksheets[0];

                    using (Workbook newWorkbook = new Workbook())
                    {
                        // Remove default worksheets from the new workbook
                        newWorkbook.Worksheets.Clear();

                        // Copy the target worksheet into the new workbook
                        newWorkbook.Worksheets.AddCopy(targetSheet);

                        // Save the single worksheet as JSON
                        newWorkbook.SaveToFile(outputFile, FileFormat.Json);
                    }
                }
            }
            catch (Exception ex)
            {
                Console.WriteLine($"Error: {ex.Message}");
            }
        }
    }
}
Cell Range to JSON
If you only need to export a portion of worksheet data—such as a specific table or range—copy the desired range to a new workbook and then save the result file as JSON.
Steps to Convert a Cell Range to JSON
- Load the source workbook.
- Get the target worksheet containing the data.
- Define the range you want to export (e.g., worksheet.Range["A1:D3"]).
- Instantiate a new
Workbookobject. - Copy the range data to a new worksheet in the new workbook with
Worksheet.Copy(). - Call
SaveToFile()with FileFormat.Json to save the new workbook as a .json file.
Complete Code Example
using System;
using Spire.Xls;

namespace ConvertExcelToJSON
{
    class Program
    {
        static void Main(string[] args)
        {
            string inputFile = @"Sample.xlsx";
            string outputFile = @"range_output.json";

            try
            {
                using (Workbook sourceWorkbook = new Workbook())
                {
                    sourceWorkbook.LoadFromFile(inputFile);
                    Worksheet sourceWorksheet = sourceWorkbook.Worksheets[0];

                    // Define the range to export (e.g., A1:D3)
                    CellRange sourceRange = sourceWorksheet.Range["A1:D3"];

                    using (Workbook targetWorkbook = new Workbook())
                    {
                        // Remove the default worksheets
                        targetWorkbook.Worksheets.Clear();

                        // Add a worksheet for the selected range
                        Worksheet targetWorksheet = targetWorkbook.Worksheets.Add("RangeData");

                        // Create a destination range with the same dimensions
                        CellRange destinationRange = targetWorksheet.Range["A1:D3"];

                        // Copy values and styles to the new workbook
                        sourceWorksheet.Copy(sourceRange, destinationRange, true);

                        // Export the isolated range to JSON
                        targetWorkbook.SaveToFile(outputFile, FileFormat.Json);
                    }
                }
            }
            catch (Exception ex)
            {
                Console.WriteLine($"Error exporting cell range: {ex.Message}");
            }
        }
    }
}
Customize JSON Output Formatting
The SaveToFile() method provides a quick conversion, but the output format is fixed. If you need greater control over the JSON output, export the worksheet data to a DataTable with ExportDataTable() and serialize it with Newtonsoft.Json. This allows you to customize property names, null handling, date formats, and indentation.
Steps for Custom JSON Output Formatting
- Load the Excel File.
- Access the worksheet and export its data to a DataTable using
ExportDataTable(). - Configure
JsonSerializerSettingsto define formatting rules (camelCase, null handling, date format, etc.). - Serialize the DataTable using
JsonConvert.SerializeObject()with the settings. - Save the JSON string to a file.
Complete Code Example
using System;
using System.Data;
using System.IO;
using Spire.Xls;
using Newtonsoft.Json;
using Newtonsoft.Json.Serialization;

namespace ConvertExcelToJSON
{
    class Program
    {
        static void Main(string[] args)
        {
            string excelFilePath = @"Sample.xlsx";
            string jsonOutputPath = "custom_output.json";

            try
            {
                using (Workbook workbook = new Workbook())
                {
                    workbook.LoadFromFile(excelFilePath);
                    Worksheet worksheet = workbook.Worksheets[0];

                    // Convert tabular data directly into an in-memory DataTable structure
                    DataTable dataTable = worksheet.ExportDataTable(worksheet.AllocatedRange, true);

                    // Define custom JSON serialization rules
                    JsonSerializerSettings settings = new JsonSerializerSettings
                    {
                        Formatting = Formatting.Indented, // Structured, readable format
                        ContractResolver = new CamelCasePropertyNamesContractResolver(), // camelCase naming conventions
                        NullValueHandling = NullValueHandling.Ignore, // Omit null fields from output string
                        DateFormatString = "yyyy-MM-dd" // Explicit date string overrides
                    };

                    // Serialize the data structure to string with settings applied
                    string jsonResult = JsonConvert.SerializeObject(dataTable, settings);

                    // Write string payload out to target destination
                    File.WriteAllText(jsonOutputPath, jsonResult);
                }
            }
            catch (Exception ex)
            {
                Console.WriteLine($"Error during custom serialization: {ex.Message}");
            }
        }
    }
}
Explanation of Customization Options
| Setting | Purpose |
|---|---|
| Formatting = Formatting.Indented | Produces human‑readable JSON with line breaks and indentation. |
| CamelCasePropertyNamesContractResolver | Applies camelCase naming to compatible column names, which is a common convention in JSON APIs. |
| NullValueHandling = NullValueHandling.Ignore | Omits values represented as null or DBNull.Value. |
| DateFormatString = "yyyy-MM-dd" | Formats values represented as DateTime or DateTimeOffset. |
Note on Column Names with Spaces:
When Excel headers contain spaces (e.g., "First Name"), the generated JSON keys will retain those spaces. Consumers must use bracket notation (obj["First Name"]) instead of dot notation. For cleaner camelCase property names, normalize the DataTable column names by iterating DataTable.Columns — e.g., remove spaces or apply a custom naming convention before serialization.
You can further customize the output by adding custom JsonConverter implementations, modifying date handling, or using different ContractResolver strategies. For more details, refer to the Newtonsoft.Json documentation.
How to Convert JSON to Excel in C# .NET
To convert JSON to Excel, deserialize the JSON data into a DataTable, then insert the table into an Excel worksheet.
Steps to Import JSON into Excel
- Load the JSON data from a file, API response, or string variable.
- Use
Newtonsoft.Json.JsonConvert.DeserializeObject<DataTable>()to convert the JSON data to a DataTable. - Instantiate a new
Workbookobject. - Use
InsertDataTable()to transfer data to a worksheet in the new workbook. - Style headers and data cells for better readability.
- Save the new workbook as an Excel file.
Complete Code Example
using System;
using System.Data;
using System.Drawing;
using Spire.Xls;
using Newtonsoft.Json;
namespace ConvertJSONToExcel
{
class Program
{
static void Main(string[] args)
{
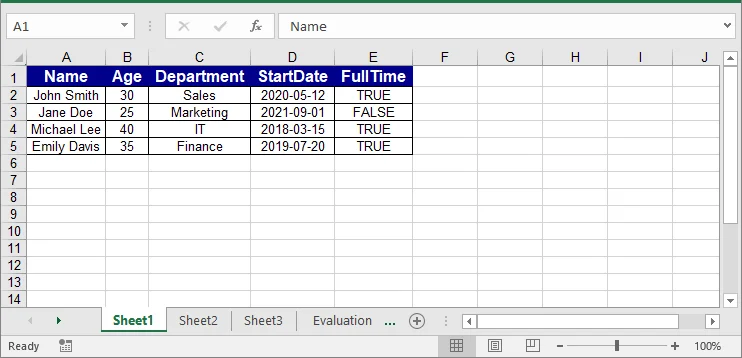
// Sample JSON array
string jsonInput = @"
[
{""Name"":""John Smith"",""Age"":30,""Department"":""Sales"",""StartDate"":""2020-05-12"",""FullTime"":true},
{""Name"":""Jane Doe"",""Age"":25,""Department"":""Marketing"",""StartDate"":""2021-09-01"",""FullTime"":false},
{""Name"":""Michael Lee"",""Age"":40,""Department"":""IT"",""StartDate"":""2018-03-15"",""FullTime"":true},
{""Name"":""Emily Davis"",""Age"":35,""Department"":""Finance"",""StartDate"":""2019-07-20"",""FullTime"":true}
]";
string excelOutputPath = "output.xlsx";
try
{
// Deserialize the JSON array into a DataTable
DataTable dataTable = JsonConvert.DeserializeObject<DataTable>(jsonInput);
using (Workbook workbook = new Workbook())
{
Worksheet worksheet = workbook.Worksheets[0];
// Insert the data and column headers starting at cell A1
worksheet.InsertDataTable(dataTable, true, 1, 1);
// --- Define Header Styles ---
CellStyle headerStyle = workbook.Styles.Add("HeaderStyle");
headerStyle.Font.IsBold = true;
headerStyle.Font.Size = 12;
headerStyle.Font.Color = Color.White;
headerStyle.Color = Color.DarkBlue;
headerStyle.HorizontalAlignment = HorizontalAlignType.Center;
headerStyle.VerticalAlignment = VerticalAlignType.Center;
// Apply the style to the header row
int colCount = dataTable.Columns.Count;
worksheet.Range[1, 1, 1, colCount].CellStyleName = "HeaderStyle";
// --- Define Data Row Styles ---
CellStyle dataStyle = workbook.Styles.Add("DataStyle");
dataStyle.HorizontalAlignment = HorizontalAlignType.Center;
dataStyle.VerticalAlignment = VerticalAlignType.Center;
dataStyle.Borders[BordersLineType.EdgeLeft].LineStyle = LineStyleType.Thin;
dataStyle.Borders[BordersLineType.EdgeRight].LineStyle = LineStyleType.Thin;
dataStyle.Borders[BordersLineType.EdgeTop].LineStyle = LineStyleType.Thin;
dataStyle.Borders[BordersLineType.EdgeBottom].LineStyle = LineStyleType.Thin;
// Apply the style to data rows
int rowCount = dataTable.Rows.Count;
worksheet.Range[2, 1, rowCount + 1, colCount].CellStyleName = "DataStyle";
// Autofit column widths
worksheet.AllocatedRange.AutoFitColumns();
// Save the workbook as an XLSX file
workbook.SaveToFile(excelOutputPath, ExcelVersion.Version2016);
}
}
catch (Exception ex)
{
Console.WriteLine($"Conversion exception thrown: {ex.Message}");
}
}
}
}
Handling Wrapped or Nested JSON
The direct DataTable deserialization works best with a flat JSON array. If the records are wrapped inside a root object or contain nested objects and arrays, extract and flatten the required values before converting them to a DataTable.
For example, the following JSON string contains both a root wrapper and nested data:
string jsonInput = @"
{
  ""status"": ""success"",
  ""data"": [
    {
      ""Name"": ""John Smith"",
      ""Department"": {
        ""Id"": 10,
        ""Name"": ""Sales""
      },
      ""Skills"": [
        ""Negotiation"",
        ""CRM""
      ]
    },
    {
      ""Name"": ""Jane Doe"",
      ""Department"": {
        ""Id"": 20,
        ""Name"": ""Marketing""
      },
      ""Skills"": [
        ""Content Writing"",
        ""Analytics""
      ]
    }
  ]
}";
The following method extracts the data array, flattens the nested values, and returns a DataTable:
using System.Data;
using System.IO;
using System.Linq;
using Newtonsoft.Json;
using Newtonsoft.Json.Linq;

private static DataTable ConvertNestedJsonToDataTable(string jsonInput)
{
    // Parse either a root object or a root array.
    JToken rootToken = JToken.Parse(jsonInput);

    // Accept a root array or an array stored in the "data" property.
    JArray records = rootToken as JArray
        ?? ((rootToken as JObject)?["data"] as JArray)
        ?? throw new InvalidDataException(
            "The JSON does not contain a valid record array.");

    // Flatten nested objects and arrays into tabular fields.
    var flattenedRecords = records.Select(record => new
    {
        Name = (string)record["Name"] ?? string.Empty,

        // Convert the nested Department object into separate columns.
        DepartmentId = (int?)record["Department"]?["Id"],
        DepartmentName =
            (string)record["Department"]?["Name"] ?? string.Empty,

        // Join the Skills array into a comma-separated string.
        Skills = string.Join(
            ", ",
            record["Skills"]?.Values<string>()
                ?? Enumerable.Empty<string>())
    });

    // Convert the flattened records into a DataTable.
    string flattenedJson =
        JsonConvert.SerializeObject(flattenedRecords);

    DataTable dataTable =
        JsonConvert.DeserializeObject<DataTable>(flattenedJson);

    if (dataTable == null || dataTable.Columns.Count == 0)
        throw new InvalidDataException(
            "The JSON contains no tabular records.");

    return dataTable;
}
The returned DataTable can then be inserted into a worksheet using InsertDataTable():
DataTable nestedTable = ConvertNestedJsonToDataTable(jsonInput);
worksheet.InsertDataTable(nestedTable, true, 1, 1);
Note: This mapping is based on the structure of the sample JSON. For other JSON schemas, adjust the selected properties and output columns accordingly.
Tips and Best Practices
When converting between Excel and JSON, following these best practices will help ensure data integrity and usability:
- Validate Data Types: Ensure that data types (dates, numbers, booleans) are correctly formatted to avoid issues during conversion.
- Handle Empty Cells: Decide how to treat empty cells (convert to null, omit, or use default values) to maintain data integrity.
- Use Consistent Naming Conventions: Standardize column names in Excel for clear and consistent JSON keys.
- Test Thoroughly: Always test the conversion processes to ensure valid JSON output and accurate Excel representation.
- Include Headers: When converting JSON to Excel, always insert headers for improved readability and usability.
FAQs
Do I need Microsoft Excel installed to use these examples?
No. Spire.XLS is a standalone .NET library that reads, writes, and converts Excel files without any dependency on Microsoft Office or Excel Interop.
Can I convert older .xls (97–2003) files as well as .xlsx to JSON?
Yes. LoadFromFile() automatically detects the file format, so the same code works for both .xls and .xlsx sources.
Can I convert nested JSON to Excel?
JsonConvert.DeserializeObject<DataTable>() works with flat JSON arrays. For nested JSON, flatten the structure into a simple list of objects before calling InsertDataTable().
Does this approach work in ASP.NET Core or other cross-platform .NET apps?
Yes. Spire.XLS supports .NET Framework, .NET Core, and .NET 5–10, so the same code runs in console apps, ASP.NET Core services, and cross-platform (Linux/macOS) environments.
Conclusion
This tutorial demonstrated how to convert Excel workbooks, individual worksheets, and cell ranges to JSON, as well as how to import JSON data into Excel in C#. By combining Spire.XLS with Newtonsoft.Json, you can handle both straightforward conversions and scenarios that require custom formatting or nested data processing.
Get a Free License
To fully experience the capabilities of Spire.XLS for .NET without any evaluation limitations, you can request a free 30-day trial license.
How to Convert Markdown to PDF and Excel in C# .NET: A Complete Guide
2025-07-18 06:09:23 Written by jie zou
Markdown is a lightweight markup language widely used for writing formatted text using simple plain syntax. Favored by developers, writers, and technical content creators for its readability and ease of use, Markdown is perfect for drafting documents, notes, and technical content. However, Markdown files (.md) often need to be converted into other formats such as PDF for official distribution or Excel for data analysis and reporting.
In this comprehensive guide, you will learn how to convert Markdown files to PDF and Excel using C# and Spire.XLS for .NET — a powerful and easy-to-use library that supports direct Markdown loading and exporting to multiple formats. Whether you want to generate polished PDF documents or structured Excel spreadsheets, this tutorial covers everything you need.
Table of Contents
- Why Convert Markdown to PDF and Excel?
- Prerequisites (Library & Environment Setup)
- How to Convert Markdown to PDF in C# (Step-by-Step with Code)
- How to Convert Markdown to Excel in C# (Step-by-Step with Code)
- Complete C# Code Example: Convert Markdown to PDF and Excel in One Go
- Best Practices for Markdown Conversion
- Conclusion
- FAQs
Why Convert Markdown to PDF and Excel?
Markdown is great for writing, but it has limitations when sharing or processing documents:
- PDF files provide a fixed-layout, platform-independent format ideal for sharing polished reports, manuals, or official documentation. PDFs maintain the original style and layout regardless of device or software.
- Excel files are essential when Markdown contains tabular data that you want to analyze, manipulate, or integrate into business processes. Converting Markdown tables to Excel spreadsheets lets you utilize formulas, filters, charts, and data tools effectively.
By converting Markdown to these formats programmatically in C#, you can automate documentation workflows, batch-process files, and integrate with other .NET applications.
Prerequisites (Library & Environment Setup)
Before you start converting Markdown files, ensure your development environment meets the following requirements:
- .NET Framework or .NET Core installed.
- Spire.XLS for .NET: A comprehensive Excel library that supports loading Markdown and exporting to PDF and Excel formats.
Install Spire.XLS via NuGet
You can easily install Spire.XLS in your C# project via NuGet by opening the NuGet Package Manager and executing the following command:
Install-Package Spire.XLS
This package provides all the necessary classes and methods to load Markdown and export documents without relying on Microsoft Office automation.
How to Convert Markdown to PDF in C# (Step-by-Step with Code)
To convert a Markdown file to PDF in C#, follow the steps below:
Step 1: Load the Markdown File
Create a new instance of the Workbook class and load your Markdown file:
Workbook workbook = new Workbook();
workbook.LoadFromMarkdown("test.md");
This method parses the Markdown content, including text and tables, into an Excel workbook structure that Spire.XLS can manipulate.
Step 2: Customize Conversion Settings (Optional)
After loading the Markdown file, you can apply conversion settings to ensure the PDF output retains a clean and readable layout. For example, enabling the SheetFitToPage option ensures that the entire Markdown content fits within a single PDF page.
workbook.ConverterSetting.SheetFitToPage = true;
Step 3: Export as PDF
Save the workbook as a PDF file:
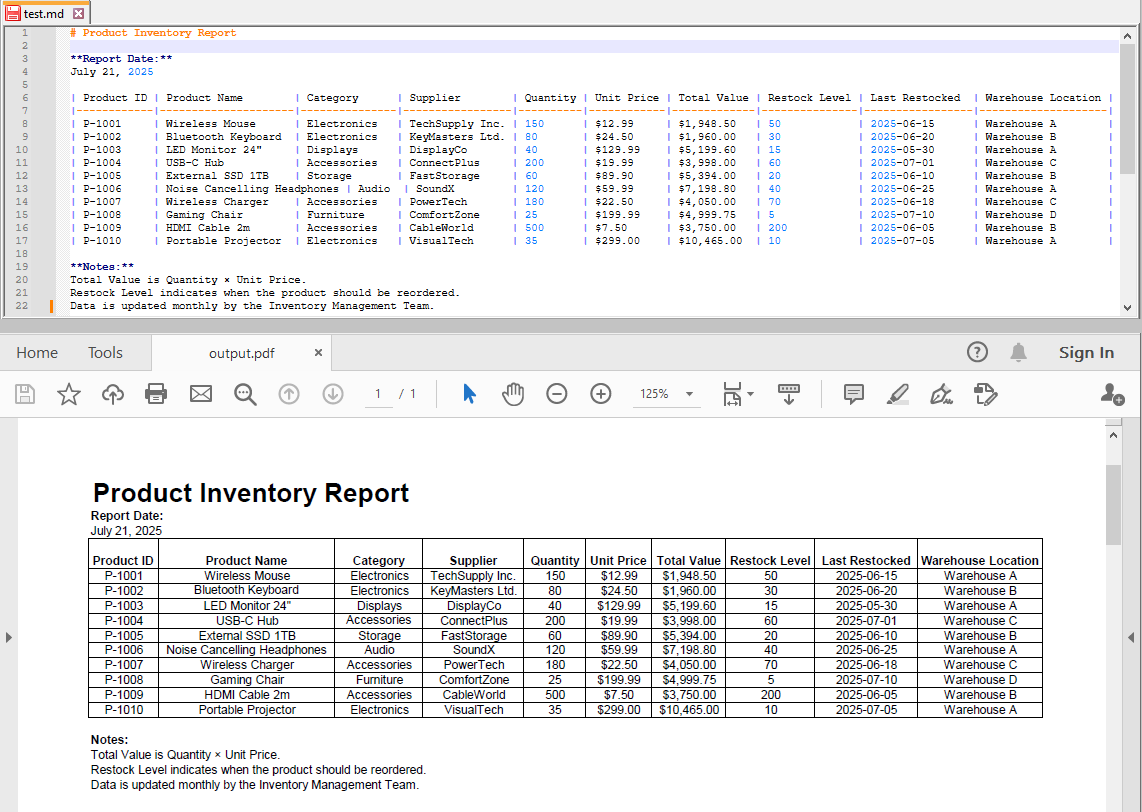
workbook.SaveToFile("output.pdf", FileFormat.PDF);
This generates a well-formatted PDF document preserving the Markdown layout and styling suitable for printing or sharing.
How to Convert Markdown to Excel in C# (Step-by-Step with Code)
After loading the Markdown file into the workbook, you can also export it to an Excel spreadsheet format:
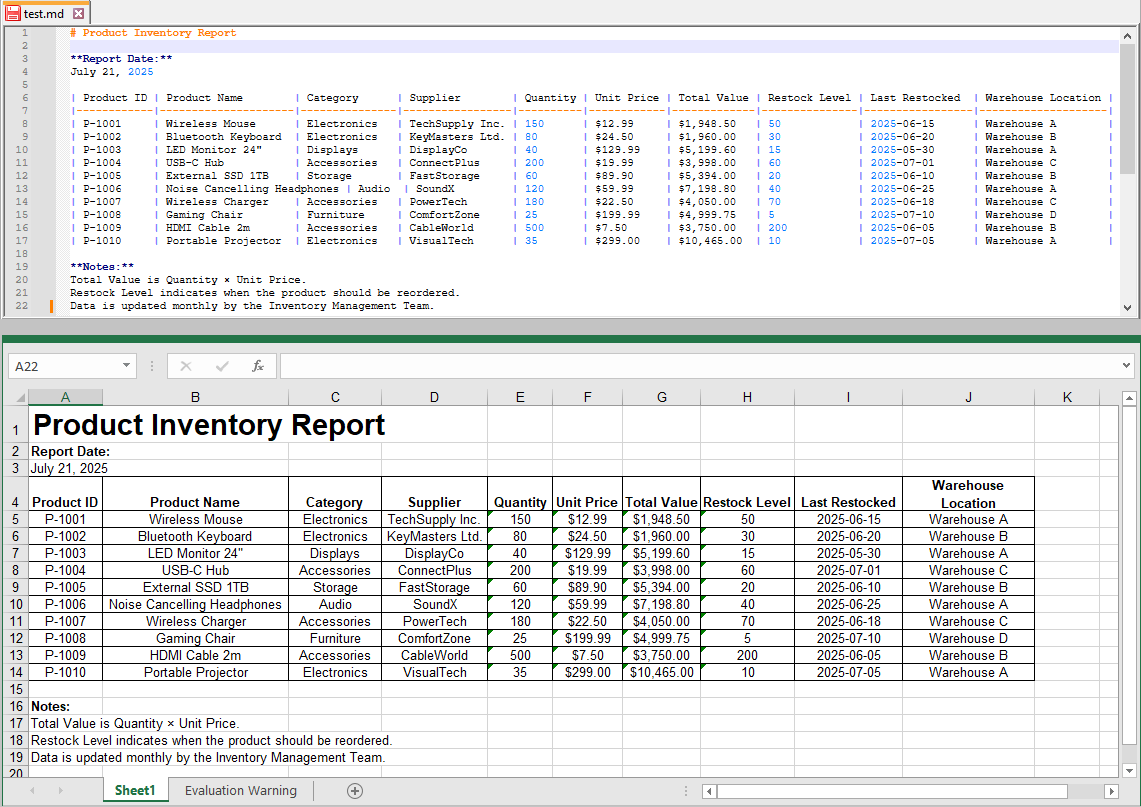
workbook.SaveToFile("output.xls", ExcelVersion.Version97to2003);
You may also choose other Excel versions depending on your target compatibility:
workbook.SaveToFile("output.xlsx", ExcelVersion.Version2016);
The exported Excel file retains tables and structured data from your Markdown, allowing further analysis or manipulation.
Complete C# Code Example: Convert Markdown to PDF and Excel in One Go
Here’s the full example combining both PDF and Excel exports in a single run:
using Spire.Xls;

namespace MarkdownToPdfAndExcel
{
    internal class Program
    {
        static void Main(string[] args)
        {
            // Initialize the workbook
            Workbook workbook = new Workbook();

            // Load Markdown content
            workbook.LoadFromMarkdown("test.md");

            // Fit the sheet data to one page (optional)
            workbook.ConverterSetting.SheetFitToPage = true;

            // Export to PDF
            workbook.SaveToFile("output.pdf", FileFormat.PDF);

            // Export to xls (Excel 97-2003 format)
            workbook.SaveToFile("output.xls", ExcelVersion.Version97to2003);

            // Export to xlsx (Excel 2016 format)
            workbook.SaveToFile("output.xlsx", ExcelVersion.Version2016);

            workbook.Dispose();
        }
    }
}
Best Practices for Markdown Conversion
- Use UTF-8 Encoding: Ensure your Markdown files use UTF-8 encoding, especially if they contain special or non-English characters. This ensures proper character display and avoids encoding errors during conversion.
- Maintain Clean and Well-Formatted Markdown Tables: To achieve accurate and reliable Excel conversions, structure your Markdown tables carefully. Use consistent pipe (|) delimiters and avoid malformed syntax to preserve table integrity in the output spreadsheet.
- Load Once, Export Multiple Formats: For optimal performance, load your Markdown content into the Workbook object a single time, then export it to various formats such as PDF and Excel. This reduces processing overhead and speeds up batch conversions.
- Assess Markdown Complexity: Spire.XLS effectively supports basic Markdown syntax, such as headings and tables. However, advanced features like embedded images or code blocks with syntax highlighting might require pre-processing or conversion through intermediate formats like HTML.
- Choose Appropriate Excel Export Versions: To maximize compatibility with your users’ software, select the Excel file format based on their environment. For example, use the .xls format for legacy Excel 97–2003 users, and .xlsx for Excel 2007 and later versions to ensure broad accessibility and full feature support.
Conclusion
Converting Markdown to PDF and Excel using C# and Spire.XLS is a fast, flexible, and reliable approach to modern document workflows. With minimal code, developers can automate the transformation of lightweight Markdown into professional PDFs for distribution and Excel spreadsheets for business analytics.
This method streamlines technical writing, reporting, and data handling tasks within .NET applications and enables seamless integration with other business processes.
FAQs
Q1: Can I batch convert multiple Markdown files using Spire.XLS in C#?
A1: Yes, you can loop through multiple Markdown files, load each one using Spire.XLS, and export them individually to PDF or Excel formats within the same C# project.
Q2: Is Microsoft Office required to use Spire.XLS for Markdown conversion?
A2: No, Spire.XLS is a standalone library and does not rely on Microsoft Office or Excel being installed on the machine.
Q3: Is Spire.XLS free to use?
A3: Spire.XLS offers a free version with some limitations. A commercial license is available for full features.
Get a Free License
To fully experience the capabilities of Spire.XLS for .NET without any evaluation limitations, you can request a free 30-day trial license.
In data processing and management scenarios, efficiently transforming raw text (TXT) files into structured Excel spreadsheets is a common requirement. For developers who are automating reports or processing log files, converting TXT to Excel using C# streamlines data organization and analysis. This guide explores how to achieve this using Spire.XLS for .NET, a powerful library designed to handle Excel XLS or XLSX files without requiring Microsoft Office.
- Why Convert TXT to Excel Programmatically?
- How to Convert Text Files to Excel in C# (Step-by-Step Guide)
- Pro Tips for TXT to Excel Conversion
Why Convert TXT to Excel Programmatically?
Text files are simple but lack the analytical power of Excel. Key advantages of converting TXT to XLS or XLSX format include:
- Automation: Process large or recurring files without manual intervention.
- Data Structuring: Organize raw text into rows, columns, and sheets.
- Advanced Features: Leverage Excel formulas, charts, and pivot tables.
- Integration: Embed conversion feature into .NET applications or APIs.
How to Convert Text Files to Excel in C# (Step-by-Step Guide)
Install Spire.XLS for .NET
Spire.XLS for .NET is a professional Excel document processing component, provides efficient and convenient APIs that allow developers to achieve TXT to Excel conversion through simple code.
Before getting started, you can choose one of these methods to install the library:
Method 1: NuGet Package Manager
- Open your project in Visual Studio.
- Right-click on the project in the Solution Explorer and select "Manage NuGet Packages."
- Search for "Spire.XLS" and click "Install".
Method 2: Package Manager Console
- Go to "Tools > NuGet Package Manager > Package Manager Console."
- Run the following command in the console:
PM> Install-Package Spire.XLS
Method 3: Manual Installation with DLL Files
- Visit the Spire.XLS Download Page and get the latest version.
- Extract the files and then add the Spire.Xls.dll to your project.
Import a Text File into Excel Using C#
Follow the below steps to write the data in a txt file into an Excel worksheet:
- Read TXT File: use the File.ReadAllLines() method to read all lines in a text file and returns them as an array of strings.
- Parse each line:
- Use the string.Trim() method to remove the leading/trailing whitespaces.
- Use the string.Split() method to split the data based on specified delimiters.
- Add the split text data to a list.
- Create a Workbook instance and get a worksheet
- Write Data to specified cells:
- Iterate through the rows and columns in the list.
- Assign the data in the list to the corresponding Excel cells through the Worksheet.Range[].Value property.
- Save the Excel File.
Code Example:
- C#
using Spire.Xls;
using System.IO;
using System.Collections.Generic;
class TxtToExcelConverter
{
static void Main()
{
// Open a text file and read all lines in it
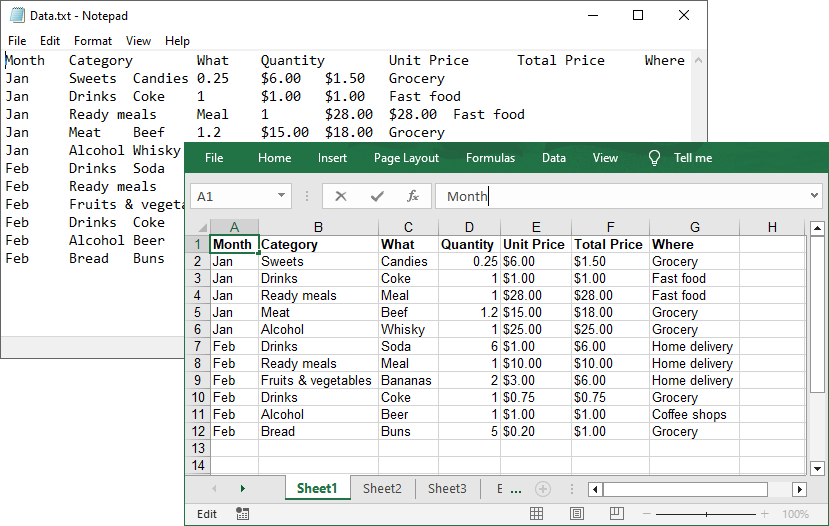
string[] lines = File.ReadAllLines("Data.txt");
// Create a list to store the data in text file
List data = new List();
// Split data into rows and columns and add to the list
foreach (string line in lines)
{
data.Add(line.Trim().Split('\t')); // Adjust delimiter as needed
}
// Create a Workbook object
Workbook workbook = new Workbook();
// Get the first worksheet
Worksheet sheet = workbook.Worksheets[0];
// Iterate through the rows and columns in the data list
for (int row = 0; row < data.Count; row++)
{
for (int col = 0; col < data[row].Length; col++)
{
// Write the text data in specified cells
sheet.Range[row + 1, col + 1].Value = data[row][col];
// Set the header row to Bold
sheet.Range[1, col + 1].Style.Font.IsBold = true;
}
}
// Autofit columns
sheet.AllocatedRange.AutoFitColumns();
// Save the Excel file
workbook.SaveToFile("TXTtoExcel.xlsx", ExcelVersion.Version2016);
workbook.Dispose();
}
}Result:
Pro Tips for TXT to Excel Conversion
- Handling Different Delimiters:
If your TXT file uses a different delimiter (e.g., space, comma, semicolon), modify the parameter of the Split(params char[] separator) method.
- Format Cells:
After a text file being converted to an Excel file, you can take advantage of the Spire.XLS library’s rich features to format cells, such as setting the background colors, adding cell borders, applying number formats, etc.
Conclusion
By following this step-by-step guide, you can efficiently transform unstructured text data into organized Excel spreadsheets, which is ideal for data analysis, reporting, and management. Remember to optimize your implementation for your specific delimiters and leverage Spire.XLS's advanced features for complex conversion scenarios.
Get a Free License
To fully experience the capabilities of Spire.XLS for .NET without any evaluation limitations, you can request a free 30-day trial license.
Microsoft Excel is a powerful tool for data management; however, its proprietary format can pose challenges for sharing and integrating data into web workflows. In contrast, Markdown is a lightweight and widely supported markup language that simplifies text formatting for documentation, wikis, and platforms like GitHub.
By converting Excel files to Markdown, you can seamlessly incorporate structured data into technical documents, READMEs, and static websites. This article will guide you through the steps to programmatically convert Excel files to Markdown format using C# and the Spire.XLS for .NET library.
Install Spire.XLS for .NET
To begin with, you need to add the DLL files included in the Spire.XLS for .NET package as references in your .NET project. The DLL files can be either downloaded from this link or installed via NuGet.
PM> Install-Package Spire.XLS
Convert an Excel XLS or XLSX File to Markdown in C#
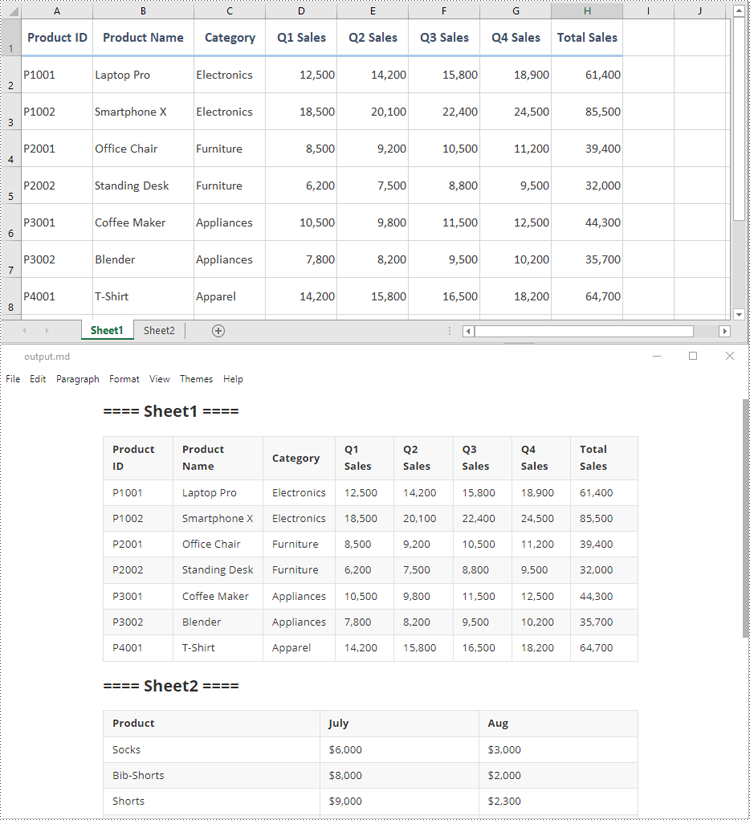
Developers can effortlessly convert Excel XLS or XLSX files to Markdown files by using the Workbook.SaveToMarkdown() method provided by Spire.XLS for .NET. The detailed steps are as follows.
- Create an object of the Workbook class.
- Load a sample Excel XLS or XLSX file into the Workbook object using the Workbook.LoadFromFile() method.
- Save the Excel file as a Markdown file using the Workbook.SaveToMarkdown() method.
- C#
using Spire.Xls;

namespace ConvertExcelToMarkdown
{
    internal class Program
    {
        static void Main(string[] args)
        {
            // Create an object of the Workbook class
            Workbook workbook = new Workbook();
            // Load a sample Excel XLS file
            //workbook.LoadFromFile("Sample.xls");
            // Load a sample Excel XLSX file
            workbook.LoadFromFile("Sample.xlsx");

            // Save the Excel file as a Markdown file
            workbook.SaveToMarkdown("output.md");
            // Release the resources used by the Workbook object
            workbook.Dispose();
        }
    }
}
Get a Free License
To fully experience the capabilities of Spire.XLS for .NET without any evaluation limitations, you can request a free 30-day trial license.
XML is often used for data interchange between different systems, while Excel is a widely recognized format for data analysis and reporting. By converting XML data to Excel, you can leverage Excel's powerful features to analyze and visualize the data more effectively. This conversion process is essential in various industries, including finance, healthcare, and e-commerce.
In this article, you will learn how to convert XML to Excel and PDF in C# using Spire.XLS for .NET.
Install Spire.XLS for .NET
To begin with, you need to add the DLL files included in the Spire.XLS for .NET package as references in your .NET project. The DLL files can be either downloaded from this link or installed via NuGet.
PM> Install-Package Spire.XLS
Understanding XML Structure: Elements, Attributes, and Data
Before converting XML to Excel, it's crucial to understand the structure of XML files. XML is a markup language that uses tags to define elements, attributes, and data. Here’s a breakdown of these components:
- Elements: These are the building blocks of XML. They are defined by start and end tags and can contain data or other elements.
<person>
    <name>John Doe</name>
    <age>30</age>
</person>
- Attributes: These provide additional information about elements. They are specified within the start tag of an element.
<person id="1">
    <name>John Doe</name>
    <age>30</age>
</person>
- Data: This is the content enclosed within the start and end tags of an element.
Understanding these components will help you map XML data to Excel effectively.
Convert XML to Excel in C#
In .NET, you can use the System.Xml.Linq namespace, which provides classes for working with XML files. The primary class used is XDocument, which allows you to load, navigate, and manipulate XML documents effortlessly.
Here's an example:
- C#
using System;
using System.Xml.Linq;

class Program
{
    static void Main()
    {
        // Load the XML file
        XDocument doc = XDocument.Load("data.xml");
        XElement root = doc.Root;

        // Iterate through elements
        foreach (XElement person in root.Elements("person"))
        {
            string name = person.Element("name")?.Value;
            string age = person.Element("age")?.Value;

            // Output the name and age
            Console.WriteLine($"Name: {name}, Age: {age}");
        }
    }
}
After parsing the XML data, the next step is to map it to an Excel worksheet. You can use Spire.XLS for .NET to create a new workbook, input data into specific cells, and apply various styles and formatting options. These include auto-fitting column widths, adjusting text alignment, and making the header bold.
To convert XML to Excel in C#, follow these steps:
- Utilize the System.Xml.Linq library to extract data from the XML file.
- Create a Workbook object.
- Add a worksheet using the Workbook.Worksheets.Add() method.
- Write the extracted data into the worksheet cells using the Worksheet.SetValue() method.
- Apply styles and formatting to enhance the appearance of the worksheet.
- Save the workbook to an Excel file using the Workbook.SaveToFile() method.
The following code demonstrates an efficient and advanced method for reading data from XML and importing it into an Excel file.
- C#
using Spire.Xls;
using System.Xml.Linq;
namespace ConvertXmlToExcel
{
class Program
{
static void Main(string[] args)
{
// Create a Workbook object
Workbook workbook = new Workbook();
// Remove default worksheets
workbook.Worksheets.Clear();
// Add a worksheet and name it
Worksheet worksheet = workbook.Worksheets.Add("Books");
// Load an XML file
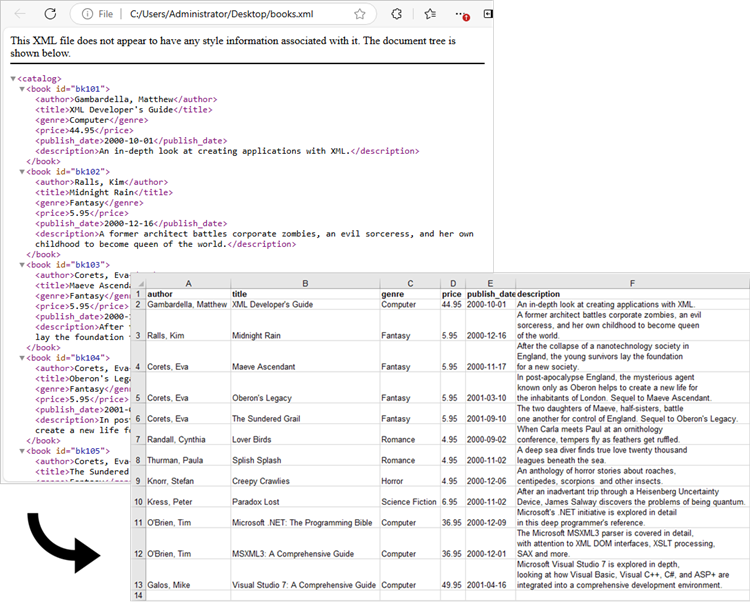
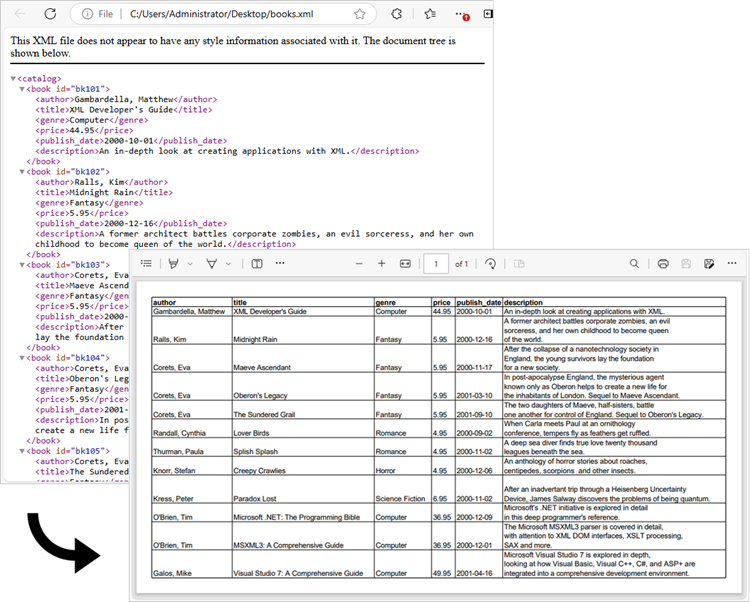
XDocument xmlDoc = XDocument.Load(@"C:\Users\Administrator\Desktop\Books.xml");
XElement xmlRoot = xmlDoc.Root;
// Get the first "book" element
XElement firstBook = xmlRoot.Element("book");
// Extract header information and convert it into a list
var headers = firstBook.Elements().ToList();
// Write header to Excel
for (int colIndex = 0; colIndex < headers.Count; colIndex++)
{
string headerText = headers[colIndex].Name.LocalName;
worksheet.SetValue(1, colIndex + 1, headerText);
}
// Write other data to Excel by iterating over each book element and each data node within it
int rowIndex = 2;
foreach (XElement book in xmlRoot.Elements("book"))
{
var dataNodes = book.Elements().ToList();
for (int colIndex = 0; colIndex < dataNodes.Count; colIndex++)
{
string value = dataNodes[colIndex].Value;
worksheet.SetValue(rowIndex, colIndex + 1, value);
}
rowIndex++;
}
// Set column width
worksheet.AllocatedRange.AutoFitColumns();
// Set alignment
worksheet.AllocatedRange.HorizontalAlignment = HorizontalAlignType.Left;
// Set font style
worksheet.Range["A1:F1"].Style.Font.IsBold = true;
// Save the workbook to an Excel file
workbook.SaveToFile("output/XmlToExcel.xlsx");
// Dispose resources
workbook.Dispose();
}
}
}
Convert XML to PDF in C#
The previous example effectively imports data from an XML file into an Excel worksheet. This worksheet can subsequently be converted to a PDF file using the Worksheet.SaveToPdf() method. To ensure a well-structured PDF, you may want to adjust page layout settings, such as margins and the preservation of gridlines, during the conversion process.
Here are the steps to convert XML to PDF using C#:
- Use the System.Xml.Linq library to retrieve data from the XML file.
- Create a Workbook object.
- Add a worksheet with the Workbook.Worksheets.Add() method.
- Populate the worksheet cells with data extracted from the XML file using the Worksheet.SetValue() method.
- Apply styles and formatting to improve the worksheet's appearance.
- Configure page settings using properties from the PageSetup object, accessible via Worksheet.PageSetup.
- Save the worksheet as a PDF file using the Worksheet.SaveToPdf() method.
The following code snippet illustrates how to import data from XML into a worksheet and then save that worksheet as a PDF file.
- C#
using Spire.Xls;
using Spire.Xls.Core;
using System.Xml.Linq;

namespace ConvertXmlToPdf
{
    class Program
    {
        static void Main(string[] args)
        {
            // Create a Workbook object
            Workbook workbook = new Workbook();

            // Remove default worksheets
            workbook.Worksheets.Clear();

            // Add a worksheet and name it
            Worksheet worksheet = workbook.Worksheets.Add("Books");

            // Load an XML file
            XDocument xmlDoc = XDocument.Load(@"C:\Users\Administrator\Desktop\Books.xml");
            XElement xmlRoot = xmlDoc.Root;

            // Get the first "book" element
            XElement firstBook = xmlRoot.Element("book");

            // Extract header information and convert it into a list
            var headers = firstBook.Elements().ToList();

            // Write header to Excel
            for (int colIndex = 0; colIndex < headers.Count; colIndex++)
            {
                string headerText = headers[colIndex].Name.LocalName;
                worksheet.SetValue(1, colIndex + 1, headerText);
            }

            // Write other data to Excel by iterating over each book element and each data node within it
            int rowIndex = 2;
            foreach (XElement book in xmlRoot.Elements("book"))
            {
                var dataNodes = book.Elements().ToList();
                for (int colIndex = 0; colIndex < dataNodes.Count; colIndex++)
                {
                    string value = dataNodes[colIndex].Value;
                    worksheet.SetValue(rowIndex, colIndex + 1, value);
                }
                rowIndex++;
            }

            // Set column width
            worksheet.AllocatedRange.AutoFitColumns();

            // Set alignment
            worksheet.AllocatedRange.HorizontalAlignment = HorizontalAlignType.Left;

            // Set font style
            worksheet.Range["A1:F1"].Style.Font.IsBold = true;

            // Fit worksheet on one page
            workbook.ConverterSetting.SheetFitToPage = true;

            // Get the PageSetup object
            PageSetup pageSetup = worksheet.PageSetup;

            // Set page margins
            pageSetup.TopMargin = 0.3;
            pageSetup.BottomMargin = 0.3;
            pageSetup.LeftMargin = 0.3;
            pageSetup.RightMargin = 0.3;

            // Preserve gridlines
            pageSetup.IsPrintGridlines = true;

            // Save the worksheet to a PDF file
            worksheet.SaveToPdf("output/XmlToPdf.pdf");

            // Dispose resources
            workbook.Dispose();
        }
    }
}
Apply for a Temporary License
If you'd like to remove the evaluation message from the generated documents, or to get rid of the function limitations, please request a 30-day trial license for yourself.
Convert Shapes and SmartArt in Excel to Image in C#, VB.NET
2021-08-10 07:09:45 Written by AdministratorThis article demonstrates how to convert shapes and SmartArt graphics in Excel to Image in C# using Spire.XLS for .NET.
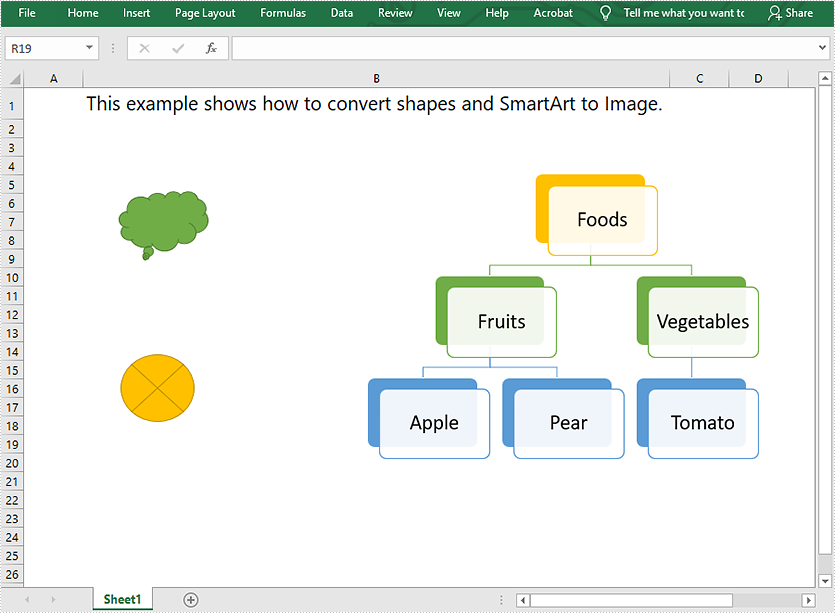
The input Excel file:
using Spire.Xls;
using System.Collections.Generic;
using System.Drawing;
using System.Drawing.Imaging;

namespace Convert_Shapes_and_SmartArt_to_Image
{
    class Program
    {
        static void Main(string[] args)
        {
            //Create a Workbook object
            Workbook workbook = new Workbook();
            //Load the Excel file
            workbook.LoadFromFile("Sample.xlsx");

            //Get the first worksheet
            Worksheet sheet = workbook.Worksheets[0];

            //Create a SaveShapeTypeOption object
            SaveShapeTypeOption shapelist = new SaveShapeTypeOption();
            //Save shapes and SmartArt graphics in the worksheet to images
            List<Bitmap> images = sheet.SaveShapesToImage(shapelist);

            //Save images to file
            int index = 0;
            foreach (Image img in images)
            {
                img.Save("Image/" + "toImage" + index + ".Png", ImageFormat.Png);
                index++;
            }
        }
    }
}
Imports Spire.Xls
Imports System.Collections.Generic
Imports System.Drawing.Imaging

Namespace Convert_Shapes_and_SmartArt_to_Image
    Friend Class Program
        Private Shared Sub Main(ByVal args As String())
            'Create a Workbook object
            Dim workbook As Workbook = New Workbook()
            'Load the Excel file
            workbook.LoadFromFile("Sample.xlsx")

            'Get the first worksheet
            Dim sheet As Worksheet = workbook.Worksheets(0)

            'Create a SaveShapeTypeOption object
            Dim shapelist As SaveShapeTypeOption = New SaveShapeTypeOption()
            'Save shapes and SmartArt graphics in the worksheet to images
            Dim images As List(Of Bitmap) = sheet.SaveShapesToImage(shapelist)

            'Save images to file
            Dim index As Integer = 0

            For Each img As Image In images
                img.Save("Image/" & "toImage" & index & ".Png", ImageFormat.Png)
                index += 1
            Next
        End Sub
    End Class
End Namespace
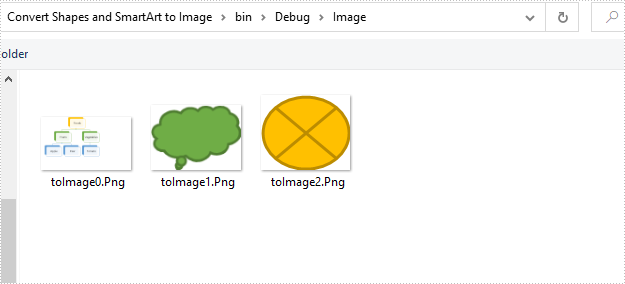
Converted images:
HTML (HyperText Markup Language) is primarily used for structuring content on web pages. While it excels at presenting information visually on the web, it lacks the robust analytical capabilities and data manipulation features found in spreadsheet software like Excel. By converting HTML data to Excel, users can leverage Excel's advanced functionalities like formulas, charts, tables, and macros to organize and analyze data efficiently. In this article, we will explain how to convert HTML to Excel in C# using Spire.XLS for .NET.
Install Spire.XLS for .NET
To begin with, you need to add the DLL files included in the Spire.XLS for .NET package as references in your .NET project. The DLL files can be either downloaded from this link or installed via NuGet.
PM> Install-Package Spire.XLS
Convert HTML to Excel in C#
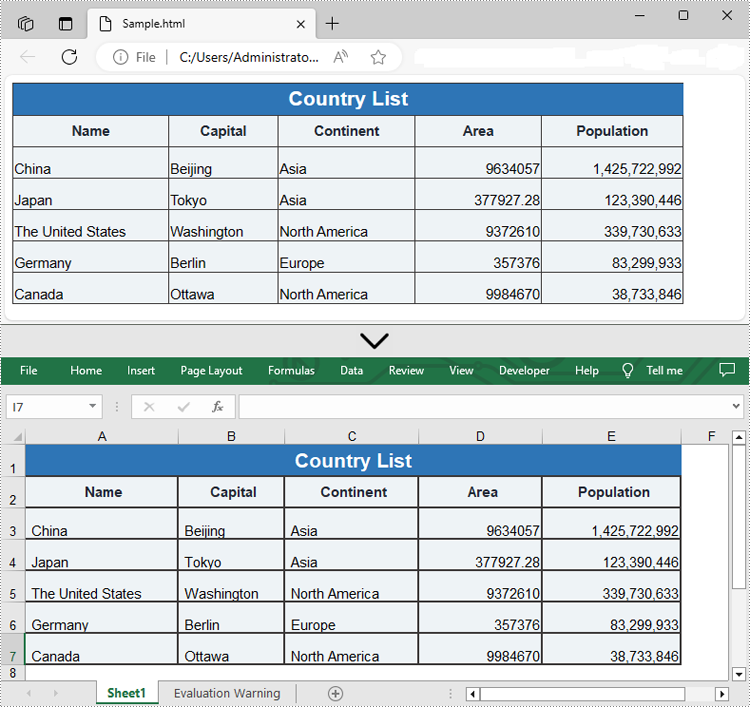
Spire.XLS for .NET offers the Workbook.LoadFromHtml() method to load an HTML file. After loading the HTML file, you can easily save it in Excel format using the Workbook.SaveToFile() method. The detailed steps are as follows.
- Create an object of the Workbook class.
- Load an HTML file using the Workbook.LoadFromHtml() method.
- Save the HTML file in Excel format using the Workbook.SaveToFile() method.
- C#
using Spire.Xls;

namespace ConvertHtmlToExcel
{
    internal class Program
    {
        static void Main(string[] args)
        {
            // Specify the input HTML file path
            string filePath = @"C:\Users\Administrator\Desktop\Sample.html";

            // Create an object of the workbook class
            Workbook workbook = new Workbook();

            // Load the HTML file
            workbook.LoadFromHtml(filePath);

            // Save the HTML file in Excel XLSX format
            string result = @"C:\Users\Administrator\Desktop\ToExcel.xlsx";
            workbook.SaveToFile(result, ExcelVersion.Version2013);

            workbook.Dispose();
        }
    }
}
Insert HTML String to Excel in C#
In addition to converting HTML files to Excel, Spire.XLS for .NET also allows you to insert HTML strings into Excel cells by using the CellRange.HtmlString property. The detailed steps are as follows.
- Create an object of the Workbook class.
- Get a specific worksheet by its index (0-based) using the Workbook.Worksheets[index] property.
- Get the cell that you want to add an HTML string to using the Worksheet.Range[] property.
- Add an HTML sting to the cell using the CellRange.HtmlString property.
- Save the resulting workbook to a new file using the Workbook.SaveToFile() method.
- C#
using Spire.Xls;
namespace InsertHtmlStringInExcel
{
internal class Program
{
static void Main(string[] args)
{
// Create an object of the workbook class
Workbook workbook = new Workbook();
// Get the first sheet
Worksheet sheet = workbook.Worksheets[0];
// Specify the HTML string
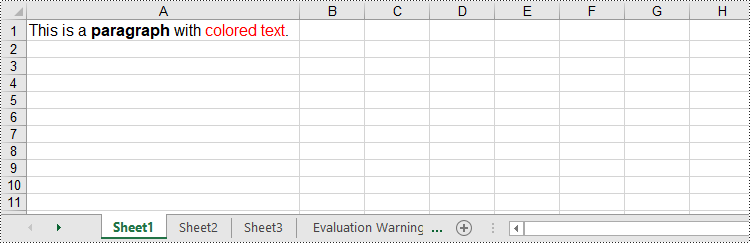
string htmlCode = "<p><font size='12'>This is a <b>paragraph</b> with <span style='color: red;'>colored text</span>.</font></p>";
// Get the cell that you want to add the HTML string to
CellRange range = sheet.Range["A1"];
// Add the HTML string to the cell
range.HtmlString = htmlCode;
// Auto-adjust the width of the first column based on its content
sheet.AutoFitColumn(1);
// Save the resulting workbook to a new file
string result = @"C:\Users\Administrator\Desktop\InsertHtmlStringIntoCell.xlsx";
workbook.SaveToFile(result, ExcelVersion.Version2013);
workbook.Dispose();
}
}
}
Apply for a Temporary License
If you'd like to remove the evaluation message from the generated documents, or to get rid of the function limitations, please request a 30-day trial license for yourself.
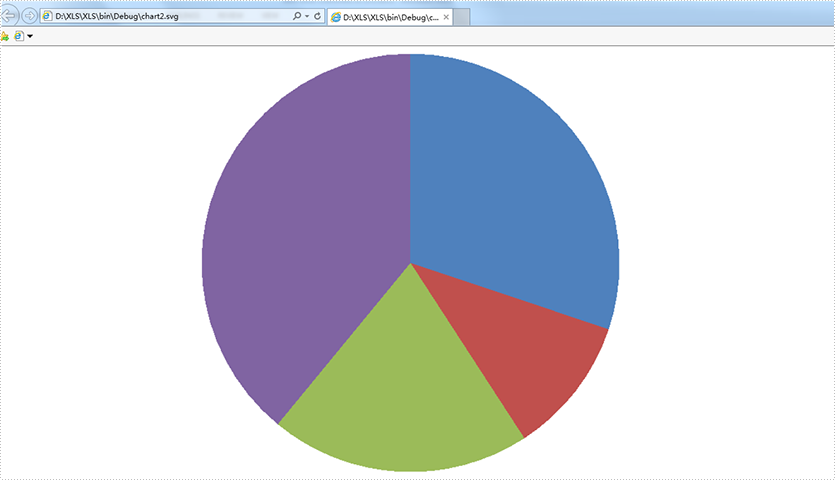
A ChartSheet represents a chart sheet. It is a worksheet that contains only a chart. This article will demonstrate how to convert a chart sheet to SVG stream by using Spire.XLS.
Firstly, view the sample Excel worksheets with two chart sheets.
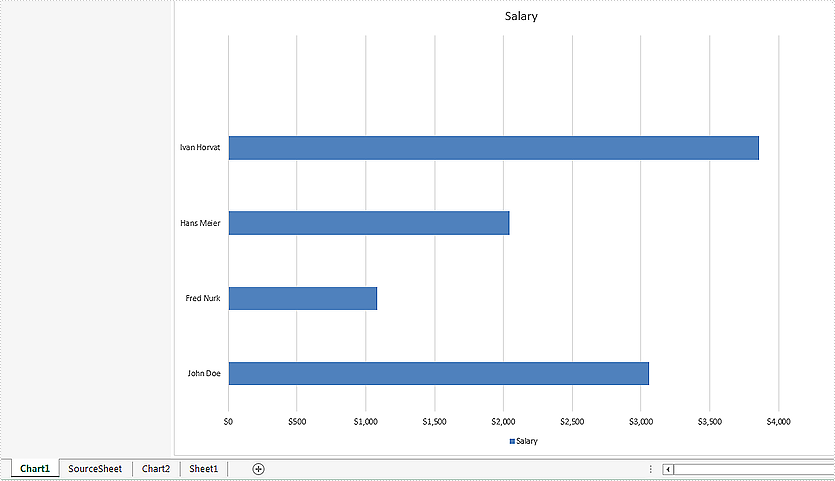
Convert all the chart sheets to SVG stream:
using System.Drawing.Imaging;
using System.IO;
namespace Convert
{
    class Program
    {
        static void Main(string[] args)
        {
            //load the document from file
            Workbook workbook = new Workbook();
            workbook.LoadFromFile("Sample.xlsx");

            //call ToSVGStream(Stream stream) method to save each chart sheet to SVG stream
            for (int i = 0; i < workbook.Chartsheets.Count; i++)
            {
                FileStream fs = new FileStream(string.Format("chartsheet-{0}.svg", i), FileMode.Create);
                workbook.Chartsheets[i].ToSVGStream(fs);
                fs.Flush();
                fs.Close();
            }


        }
    }
}
Effective screenshot of the two chart sheets to SVG.
using System.Drawing.Imaging;
using System.IO;
namespace Convert
{
    class Program
    {
        static void Main(string[] args)
        {
            //load the document from file
            Workbook workbook = new Workbook();
            workbook.LoadFromFile("Sample.xlsx");

            //get the second chartsheet by name
            ChartSheet cs = workbook.GetChartSheetByName("Chart2");

            //save to SVG stream
            FileStream fs = new FileStream(string.Format("chart2.svg"), FileMode.Create);
            cs.ToSVGStream(fs);
            fs.Flush();
            fs.Close();


        }
    }
}