
When creating presentations, adding watermarks, such as a company logo, slogan, or "CONFIDENTIAL" label, is an effective way to maintain a consistent design and indicate document ownership. However, because PowerPoint does not have a built-in, one-click watermark button, many users are unsure about how to add a watermark in PowerPoint presentations.
This guide walks you through several practical ways to add watermarks in PowerPoint, from manual Microsoft PowerPoint workarounds to batch processing with Python automation, helping you create secure and professional presentations easily.
- Insert Watermark in PowerPoint via Slide Master
- Put Watermark in PPT via Slide Master Code
- Add a Watermark in PowerPoint Slides Individually
- Best Practices
- FAQs
How to Insert Watermark in PowerPoint via Slide Master
Since MS PowerPoint lacks a watermark tool, the most effective way is to manually add text or image watermarks directly into the Slide Master. This applies the watermark to every slide automatically, saving time and keeping your formatting consistent across the entire presentation.
Step-by-Step Guide
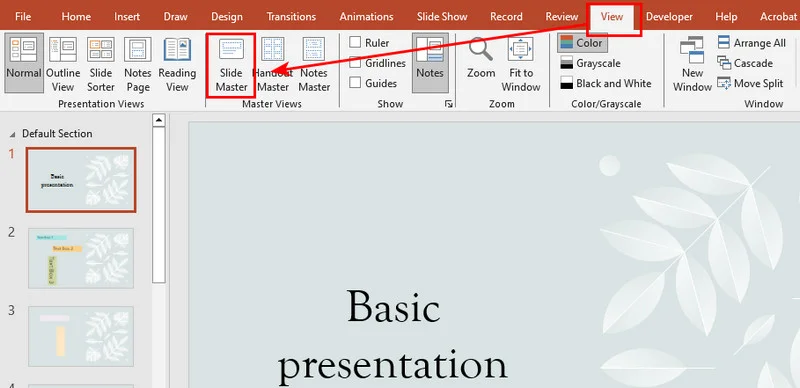
- Step 1: Open your presentation and navigate to View > Slide Master on the top ribbon.
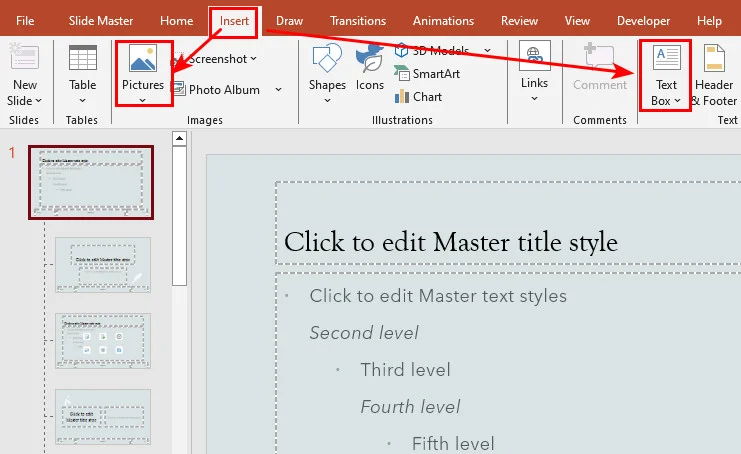
- Step 2: Scroll to the very top of the left thumbnail pane and click the primary slide master (the largest, top-most thumbnail).
- Step 3: Go to the Insert tab. Choose Text Box for a text watermark (e.g., "CONFIDENTIAL") or click Pictures to upload a low-opacity PNG logo.
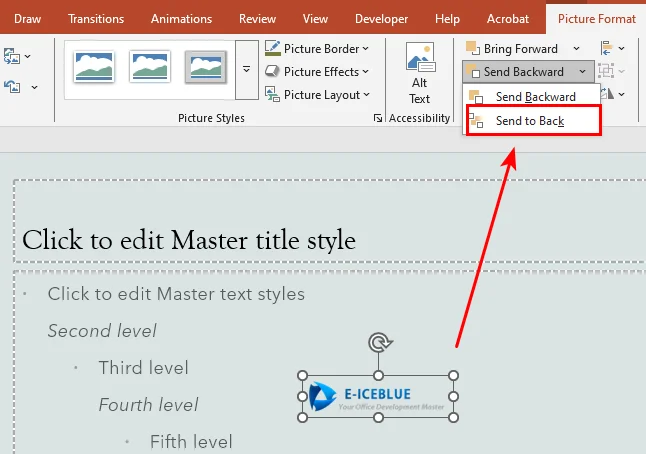
- Step 4: Right-click your inserted text or image and select Send to Back. This keeps your watermark underneath the main presentation data.
- Step 5: Click Close Master View in the Slide Master tab to return to the normal editing mode.
While this manual approach is perfect for one-off design tasks because it is highly visual and requires no technical background, it becomes inefficient when it comes to multiple presentations. Relying on repetitive manual work leaves too much room for human error. To handle large-scale document formatting effectively, we should turn to programmatic automation.
How to Put Watermark in PPT via Slide Master Code
When dealing with a large batch of PowerPoint files, automating the workflow with code is the more efficient choice. In this section, we will demonstrate how to automatically add watermarks in PowerPoint presentations using Free Spire.Presentation for Python. It is a free, standalone library that enables users to create and edit presentations without requiring Microsoft PowerPoint to be installed.
With the help of Free Spire.Presentation, we can still put watermarks in PPT by inserting an image or text into the Slide Master to apply the watermark across the entire presentation.
Here is the code example:
from spire.presentation.common import *
from spire.presentation import *

# Initialize and load the PPT file
presentation = Presentation()
presentation.LoadFromFile("/input/pre1.pptx")

# Get the slide master of the first slide
master = presentation.Masters[0]

# Calculate the coordinates to center the watermark image
img_width = 350.0
img_height = 110.0
left = (presentation.SlideSize.Size.Width - img_width) / 2
top = (presentation.SlideSize.Size.Height - img_height) / 2

# Define the coordinates using RectangleF class
rect = RectangleF(left, top, img_width, img_height)

# Add the image shape to the slide master as a watermark
image_shape = master.Shapes.AppendEmbedImageByPath(ShapeType.Rectangle, "/Logo1.png", rect)

# Optimize appearance and send the shape to the background
image_shape.Line.FillType = FillFormatType.none
image_shape.SetShapeArrange(ShapeArrange.SendToBack)

# Save the presentation
presentation.SaveToFile("/output/MasterImageWatermark.pptx", FileFormat.Pptx2010)
presentation.Dispose()
Here's the preview of the output PowerPoint presentation:
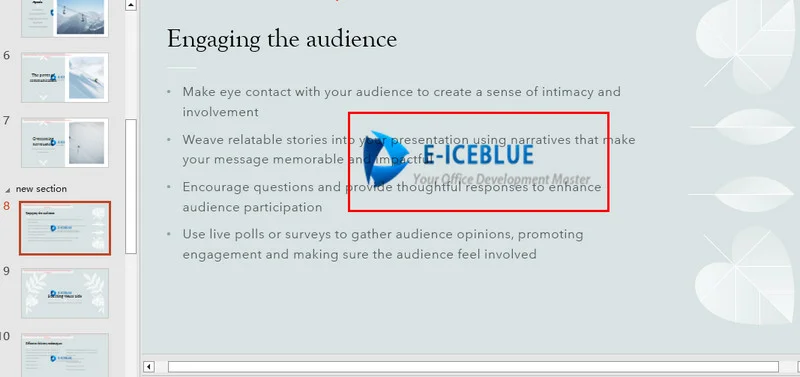
As seen in the left thumbnails, the same image watermark is now applied across all slides.
How to Add a Watermark in PowerPoint Slides Individually
While creating watermarks in Slide Master is ideal for protecting the full document, certain scenarios require a more precise way. For instance, you might want to stamp a "CONFIDENTIAL" text watermark only on specific content slides while leaving the cover page and closing slide clean and clear.
Adding a watermark to a specific slide is largely the same as the slide master method. You still insert rectangle shapes and add text or images. The only difference is that you use the presentation.Slides[index] property to target the specific slide instead of the global template.
Here is how to apply both text and image watermarks to the 8th slide:
from spire.presentation.common import *
from spire.presentation import *

# Initialize and load the PPT file
presentation = Presentation()
presentation.LoadFromFile("/input/pre1.pptx")

# Get presentation dimensions and target the 8th slide
slide_size = presentation.SlideSize.Size
first_slide = presentation.Slides[7]

# Load the image file stream
stream = Stream("/Logo1.png")
image = presentation.Images.AppendStream(stream)
stream.Close()

# Get the original width and height of the image
img_width = float(image.Width)
img_height = float(image.Height)

# Calculate the coordinates to center the image and define the bounding rectangle
img_left = (slide_size.Width - img_width) / 2
img_top = (slide_size.Height - img_height) / 2
img_rect = RectangleF(img_left, img_top, img_width, img_height)

# Add a rectangle shape and fill it with the image
img_shape = first_slide.Shapes.AppendShape(ShapeType.Rectangle, img_rect)
img_shape.Line.FillType = FillFormatType.none
img_shape.Locking.SelectionProtection = True  # Enable selection lock to prevent accidental modification
img_shape.Fill.FillType = FillFormatType.Picture
img_shape.Fill.PictureFill.FillType = PictureFillType.Stretch
img_shape.Fill.PictureFill.Picture.EmbedImage = image


# Define the width, height, and centering coordinates for the text watermark
txt_width = 350.0
txt_height = 110.0
txt_left = (slide_size.Width - txt_width) / 2
txt_top = (slide_size.Height - txt_height) / 2
txt_rect = RectangleF(txt_left, txt_top, txt_width, txt_height)

# Add a rectangle shape container for the text
txt_shape = first_slide.Shapes.AppendShape(ShapeType.Rectangle, txt_rect)
txt_shape.Fill.FillType = FillFormatType.none
txt_shape.ShapeStyle.LineColor.Color = Color.get_Transparent()
txt_shape.Line.FillType = FillFormatType.none
txt_shape.Rotation = -35                     # Rotate the text by -35 degrees
txt_shape.Locking.SelectionProtection = True  # Enable selection lock to prevent accidental modification

# Configure the watermark text content and formatting
txt_shape.TextFrame.Text = "CONFIDENTIAL"
text_range = txt_shape.TextFrame.TextRange
text_range.Fill.FillType = FillFormatType.Solid
text_range.Fill.SolidColor.Color = Color.FromArgb(120, Color.get_Black().R, Color.get_HotPink().G, Color.get_HotPink().B)
text_range.FontHeight = 45
text_range.LatinFont = TextFont("Times New Roman")

# Send both the image and text shapes to the background layer to prevent blocking content
img_shape.SetShapeArrange(ShapeArrange.SendToBack)
txt_shape.SetShapeArrange(ShapeArrange.SendToBack)

# Save the presentation file
presentation.SaveToFile("/output/WatermarkinSpecificSlide.pptx", FileFormat.Pptx2013)
presentation.Dispose()

The Selection Lock Hack
Because these shapes are added directly onto the main slide canvas rather than the Slide Master, users could technically click and move them. To prevent this, setting shape.Locking.SelectionProtection = True on both the image and text shapes acts as an additional safeguard. It helps prevent accidental editing.
You may like: 5 Effective Ways to Password Protect PowerPoint Files
Best Practices
Before running scripts or sharing PowerPoint presentations, keep these design principles in mind to keep your presentation clean and easy-to-read:
- Transparency is Key: 15% to 20% opacity level is recommended. The watermark should not cover the main text.
- Strategic Rotation: Tilt your text at a -35° or -45° angle. Diagonal text blocks make unauthorized smartphone screenshots or photo leaks much harder to crop out.
- Color Selection: Neutral colors are suggested. Use light grays for light slide backgrounds and deep slate tones for dark presentation themes. Avoid loud, high-contrast colors like pure red or black.
Conclusion
Adding watermarks to your PowerPoint presentations protects your brand and secures sensitive data. For a quick, one-off file, the manual Slide Master view works perfectly. However, Python automation is better suited for large-scale processing. By utilizing Free Spire.Presentation for Python, you can easily script both global master updates and page-specific locks without even needing Microsoft PowerPoint installed. Pick the method that fits your current need and start securing your presentations today.
FAQs about Adding Watermarks to PPT
Q1: Can users remove the Python-generated watermark?
Not during regular editing. A watermark added via the Slide Master is natively unclickable in the standard view. However, users can still open the Slide Master view to move or delete it manually. If you want absolute, unremovable security, export the presentation to a PDF.
Q2: Why does my watermark image look pixelated?
The source image resolution is too low. Whether adding it manually or via code, always use a high-resolution PNG file with a transparent background.
Q3: Will the watermark remain intact when printing the slides?
Yes. Watermarks are embedded directly onto the slide master or locked canvas coordinates. They will generally preserve the opacity and the position when printing and exporting.