When an Excel worksheet contains multiple sections, long tables, or many rows of data, Excel may automatically split the content across pages in inconvenient places. A heading may appear at the bottom of one page, a table may be divided in the middle, or related columns may be separated across different pages. Adding page breaks lets you control where a new printed page starts and makes reports easier to read.
In this article, we will cover 3 practical ways to insert page breaks in Excel:
- Add or move a page break in Excel manually
- Insert page breaks every N rows using VBA
- Add page breaks to multiple Excel files with C#
What Are Page Breaks in Excel?
A page break marks the point where one printed page ends and the next one begins.
Page breaks affect the print layout only. They do not move cells, change formulas, split a worksheet into separate sheets, or modify the underlying data.
Excel uses two kinds of page breaks:
- Automatic page breaks are created by Excel based on the paper size, margins, scaling, row heights, and column widths.
- Manual page breaks are inserted by the user to control where a new printed page starts.
You can insert two types of manual page breaks:
- Horizontal page break: Starts a new printed page at a specific row.
- Vertical page break: Starts a new printed page at a specific column.
Open Page Break Preview Before You Start
Page Break Preview shows how Excel currently divides the worksheet into printed pages. Although you do not need to open this view before inserting a page break, it makes page boundaries easier to see and helps you check the result.
To open Page Break Preview:
-
Go to the View tab on the Excel ribbon.
-
Select Page Break Preview.
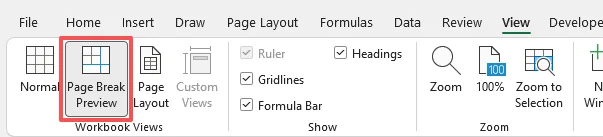
Excel will display the page boundaries directly on the worksheet.
Tip: Dashed lines indicate automatic page breaks created by Excel. Solid lines indicate manual page breaks, including automatic page breaks that you have moved manually.
Add or Move a Page Break in Excel Manually
Best for: Users who need to adjust the print layout of a single worksheet or insert only a few page breaks manually.
Insert a Horizontal Page Break
- Select the row directly below where you want the page to split (for example, click row number 10 to insert a break between rows 9 and 10).
- Go to the Page Layout tab.
- Click Breaks.
- Select Insert Page Break.
Result: Excel inserts a horizontal page break above the selected row.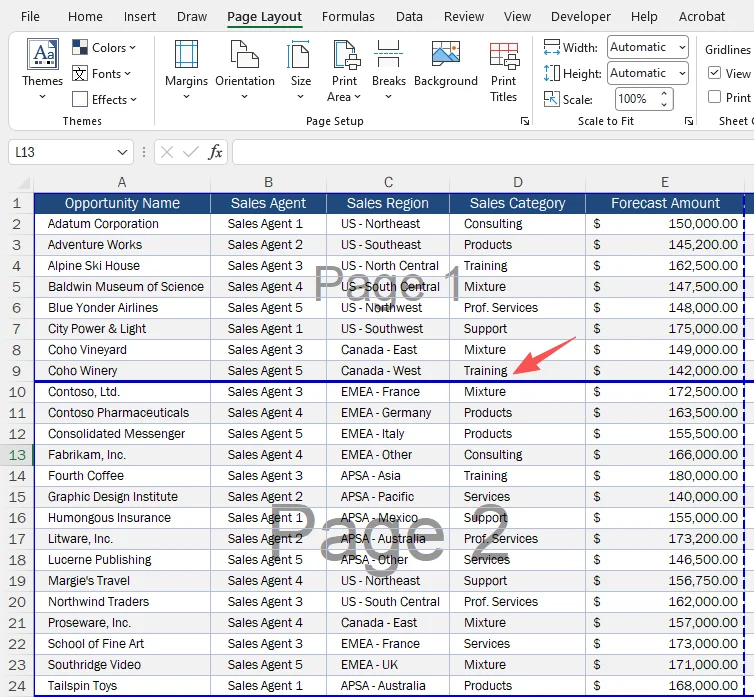
Insert a Vertical Page Break
- Select the column directly to the right of where you want the split (for example, click column D to insert a break between columns C and D).
- Go to the Page Layout tab.
- Click Breaks.
- Choose Insert Page Break.
Result: Excel inserts the page break to the left of the selected column.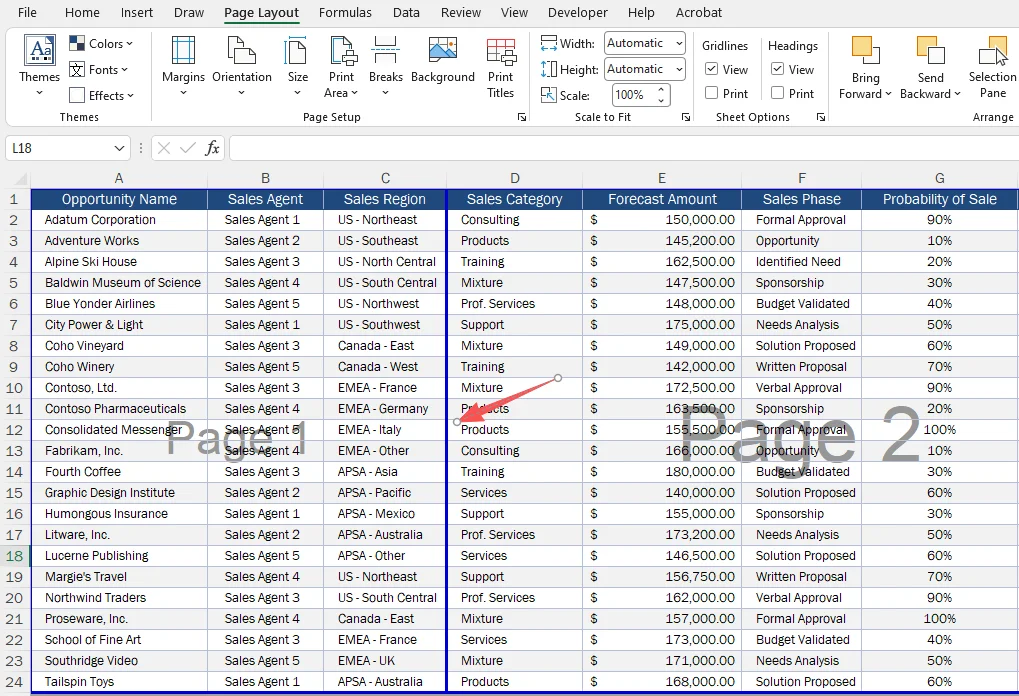
Move an Existing Page Break
You can move a page break without deleting and recreating it:
- Ensure you are in Page Break Preview.
- Drag the page break line to the desired position. If the line cannot be dragged, make sure that cell drag-and-drop is enabled in Excel Options. Moving an automatic page break turns it into a manual page break.
Note: For wide worksheets, page orientation, margins, and scaling settings may affect the final printed layout. Review the Print Preview if columns do not appear as expected.
Advantages and Limitations
| Advantages | Limitations |
|---|---|
| Quick and easy for small adjustments | Requires manual repetition for each break |
Insert Page Breaks Every N Rows Automatically with VBA
Best for: Excel desktop app users who need to insert page breaks at regular row intervals, such as every 10 rows.
Excel does not provide a simple built-in button for inserting page breaks every N rows. If you only need a few page breaks, manual insertion is usually enough.
However, when a worksheet contains hundreds or thousands of rows, adding page breaks one by one becomes time-consuming and error-prone. A short VBA macro can automate this process and apply the same page break rule consistently.
⚠️ Warning: Changes made by a VBA macro usually cannot be reversed with Ctrl + Z. Save a backup copy of the workbook before running the code, and only run macros from sources you trust!
Step-by-Step Guide
-
Press Alt + F11 to open the VBA editor.
-
Click Insert > Module to create a new module.
-
Paste the following VBA code into the module:
Sub InsertPageBreaksEveryNRows()
    Dim ws As Worksheet
    Dim intervalRows As Long
    Dim lastRow As Long
    Dim rowIndex As Long

    Set ws = ActiveSheet
    intervalRows = 10  ' Change this value to your desired interval

    lastRow = ws.Cells(ws.Rows.Count, "A").End(xlUp).Row

    For rowIndex = intervalRows + 1 To lastRow Step intervalRows
        If Not HasHorizontalPageBreak(ws, rowIndex) Then
            ws.HPageBreaks.Add Before:=ws.Rows(rowIndex)
        End If
    Next rowIndex
End Sub

Private Function HasHorizontalPageBreak(ws As Worksheet, breakRow As Long) As Boolean
    Dim pb As HPageBreak

    HasHorizontalPageBreak = False

    For Each pb In ws.HPageBreaks
        If pb.Location.Row = breakRow Then
            HasHorizontalPageBreak = True
            Exit Function
        End If
    Next pb
End Function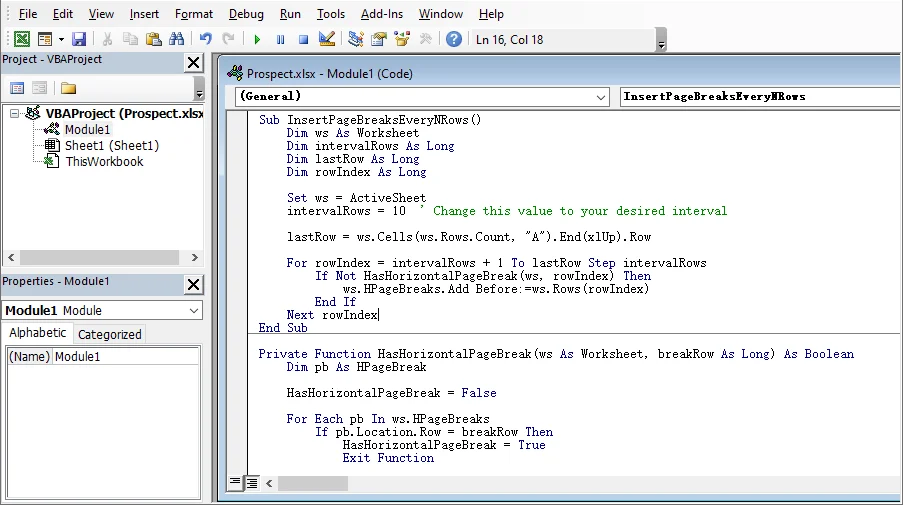
-
Change
intervalRows = 10to the number of worksheet rows you want between page breaks. -
Press F5 to run the macro.
Important Tips:
- The macro assumes column A contains data to determine the last row. If your data starts in a different column, change "A" to the appropriate column letter.
- The macro does not remove any existing page breaks. If you want to reset all breaks before inserting new ones, add
ActiveSheet.ResetAllPageBreaksat the beginning of the macro. - Excel allows up to 1,026 horizontal and vertical page breaks on one worksheet. Very small intervals on extremely large worksheets may exceed this limit.
- To keep the macro in the workbook, save the file as an Excel Macro-Enabled Workbook (.xlsm).
Advantages and Limitations
| Advantages | Limitations |
|---|---|
| Automates repeated page break insertion | Requires VBA knowledge |
| Supports custom row intervals | Only works in Excel desktop app |
Need to remove existing page breaks instead? See How to Remove Page Breaks in Excel.
Add Page Breaks to Multiple Excel Files with C#
Best for: Developers or advanced users who need to batch insert page breaks into multiple Excel files or automate Excel report generation inside enterprise software without interacting with the Microsoft Excel GUI.
While VBA is excellent for desktop automation, corporate automation workflows often require processing Excel documents server-side. In the .NET ecosystem, developers can utilize libraries like Free Spire.XLS for .NET to insert horizontal or vertical page breaks in C# without opening Excel.
Follow the steps below to add page breaks to multiple Excel workbooks with C# and Free Spire.XLS for .NET.
Steps
-
Install the required library.
Install the library through NuGet Package Manager:
Install-Package FreeSpire.XLS -
Add C# Code to batch insert page breaks.
The following example loops through multiple Excel files, inserts horizontal and vertical page breaks, and saves the processed workbooks.
using System;
using System.IO;
using Spire.Xls;

namespace ExcelPageBreak
{
    internal class Program
    {
        private static void Main()
        {
            // Folder containing the Excel files to process
            string inputFolder = @"C:\ExcelFiles";

            // Save processed files in a separate subfolder
            string outputFolder = Path.Combine(inputFolder, "Processed");
            Directory.CreateDirectory(outputFolder);

            // Find all .xlsx files in the input folder
            string[] files = Directory.GetFiles(
                inputFolder,
                "*.xlsx",
                SearchOption.TopDirectoryOnly
            );

            foreach (string filePath in files)
            {
                using (Workbook workbook = new Workbook())
                {
                    // Load the Excel file
                    workbook.LoadFromFile(filePath);

                    // Get the first worksheet
                    Worksheet sheet = workbook.Worksheets[0];

                    // Insert a horizontal page break above row 10
                    sheet.HPageBreaks.Add(sheet.Range["A10"]);

                    // Insert a vertical page break before column D
                    sheet.VPageBreaks.Add(sheet.Range["D1"]);

                    // Build the output file path
                    string outputPath = Path.Combine(
                        outputFolder,
                        Path.GetFileName(filePath)
                    );

                    // Save the processed workbook
                    workbook.SaveToFile(
                        outputPath,
                        FileFormat.Version2016
                    );
                }
            }

            Console.WriteLine(
                $"{files.Length} workbook(s) processed. " +
                $"Files were saved to: {outputFolder}"
            );
        }
    }
}
How the Code Works:
The code uses Directory.GetFiles() to find all .xlsx files in the specified input folder. For each workbook, it:
- Opens the file and selects the first worksheet.
- Adds a horizontal page break above row 10.
- Adds a vertical page break before column D.
- Saves the updated workbook to a separate
Processedfolder.
Change C:\ExcelFiles to the folder that contains your workbooks. You can also replace A10 and D1 with the row and column where you want each new printed page to begin.
Notes:
- The example processes files only in the selected folder. To include files in its subfolders, change
SearchOption.TopDirectoryOnlytoSearchOption.AllDirectories. - Free Spire.XLS limits .xls files to 5 worksheets per workbook and 200 rows per worksheet. These limits do not apply to .xlsx files, so the example above processes .xlsx files only. For larger .xls workbooks, convert them to .xlsx before processing.
Advantages and Limitations
| Advantages | Limitations |
|---|---|
| Automates page break insertion for multiple Excel files | Requires .NET programming knowledge |
| Does not require Microsoft Excel installation | Not suitable for simple manual adjustments |
Quick Comparison of All Page Break Insertion Methods
| Method | Best Use Case | Cross-platform Support? | Batch Processing? |
|---|---|---|---|
| Manual Insertion | One-off, small datasets | Limited (Desktop only) | No |
| VBA Macro | Repeated or interval-based rules | Limited (Desktop only) | Limited |
| C# + Free Spire.XLS | Batch processing & automated workflows | Yes (Cross-platform .NET) | Yes |
Why Are Page Breaks Not Working in Excel?
If a page break does not appear where expected, check the following settings:
-
The wrong row or column is selected.
Excel inserts a horizontal page break above the selected row and a vertical page break to the left of the selected column. Select the row or column where the next printed page should begin. -
The page break is not visible in the current view.
Open View > Page Break Preview to display automatic and manual page breaks directly on the worksheet. -
Fit To scaling is overriding manual page breaks.
When the worksheet uses the Fit To scaling option, Excel may ignore manual page breaks. Open the Page Setup dialog and select Adjust to instead. -
The print area does not include the expected content.
Check Page Layout > Print Area and confirm that the correct range is included. You can also clear the existing print area and set it again. -
The worksheet is protected.
A protected worksheet may prevent changes to page layout settings. Unprotect the sheet, insert or move the page break, and then protect it again if necessary.
After making changes, open File > Print to check the final page layout before printing or exporting the worksheet.
Frequently Asked Questions
Q1: Is there a shortcut to insert a page break in Excel?
A1: Excel does not have a universal shortcut for inserting page breaks. In Windows versions, you can use Alt → P → B → I to access the Insert Page Break command. The key sequence may vary by Excel version and display language.
Q2: Can I insert page breaks every N rows?
A2: Yes. Excel does not provide a built-in option for inserting page breaks at fixed row intervals. You can add them manually one by one or use VBA to automate the process.
Q3: How do I remove a page break in Excel?
A3: Select the row below a horizontal break or the column to the right of a vertical break, then go to Page Layout > Breaks > Remove Page Break. To remove all manual page breaks, select Reset All Page Breaks. Automatic page breaks cannot be removed directly.
Q4: Do page breaks affect my worksheet data?
A4: No. Page breaks only control how a worksheet is divided when printed or exported to PDF. They do not change cell values, formulas, formatting, or worksheet structure.
Summary
In this article, we have discussed three practical ways to insert page breaks in Excel, along with useful tips for avoiding common print layout issues. Choose the method that best matches your task, and review the final result in Print Preview before printing or exporting the worksheet to PDF.