Removing duplicate rows from Excel can be a challenging task, especially when dealing with large datasets. Whether you're cleaning a contact list, analyzing sales data, or organizing research results, removing duplicates is crucial for improving data quality and ensuring accurate analysis.
In this guide, we'll show you 6 simple methods to remove duplicate rows from Excel. From using Excel's built-in Remove Duplicates tool for quick fixes to leveraging advanced techniques like Power Query and C# automation, you'll learn how to streamline your workflow and keep your data clean and organized.
What You Will Learn
- Why Remove Duplicate Rows from Excel?
-
How to Remove Duplicate Rows from Excel?
- Remove Duplicate Rows Using the Remove Duplicates Tool
- Remove Duplicate Rows Using the Advanced Filter
- Find and Remove Duplicates in Excel Using a Conditional Formatting Helper Column
- Remove Duplicate Data in Excel Using Power Query
- Eliminate Duplicates with the UNIQUE Function in Excel 365
- Automate Duplicate Row Removal in Excel Using C#
- Which Method Should You Choose to Remove Duplicate Rows in Excel
- Best Practices for Removing Duplicates in Excel
Why Remove Duplicate Rows from Excel?
Before we dive into the methods, let's first discuss why removing duplicate rows from Excel is essential:
- Data Accuracy: Ensure calculations, such as sums and averages, are accurate and reliable.
- Clean Reporting: Generate precise pivot tables, charts, and dashboards without the risk of double-counting.
- Professionalism: Deliver clean, error-free data to your team or clients, boosting your credibility.
- Efficiency: Reduce file size and improve spreadsheet performance for faster loading and processing.
How to Remove Duplicate Rows from Excel?
When it comes to removing duplicate rows in Excel, there are several methods you can use depending on your specific needs. In this section, we'll explore 6 ways to clean up duplicate data in Excel, each tailored for different situations:
- Using the Remove Duplicates tool
- Using the Advanced Filter
- Using a Conditional Formatting helper column
- Using Power Query
- Using the UNIQUE function in Excel 365
- Automating the process with C#
Let's walk through each method so you can easily choose the best option to remove duplicates from Excel quickly and efficiently.
Remove Duplicate Rows Using the Remove Duplicates Tool
Excel's Remove Duplicates feature is the fastest and simplest way to clean up your data. This tool allows you to remove duplicates based on entire rows or specific columns.
Best for: Quick, one-time cleanup of an entire dataset.
Step-by-Step Instructions:
Step 1: Select Your Data
Click on any cell within your dataset. Excel will automatically detect and select the entire contiguous data range. If you wish to remove duplicates from a specific range, manually select that range before proceeding.
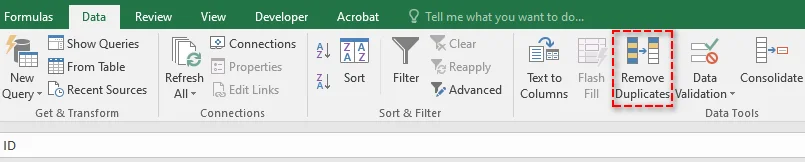
Step 2: Navigate to the Remove Duplicates Tool
Go to the Data tab on the ribbon and click on the Remove Duplicates button, which is located in the Data Tools group.
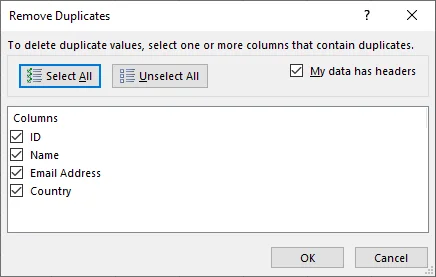
Step 3: Choose Your Columns
After clicking the Remove Duplicates button, a dialog box will appear:
- If your data has headers, ensure the My data has headers checkbox is selected. This allows Excel to treat the first row as headers, not data.
- By default, Excel selects all columns for duplicate checking. If you only want to find duplicates in specific columns (e.g., "Email Address"), uncheck the columns you don't need.
Step 4: Execute and Confirm
Click OK. Excel will process the data and display a message showing how many duplicate values were found and removed, and how many unique values remain.

You may also like: Remove Data Validation in Excel: Keep Data, Clear Restrictions
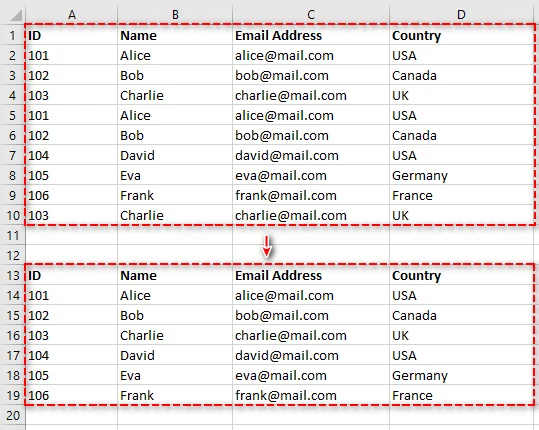
Remove Duplicate Rows Using the Advanced Filter
The Advanced Filter method provides more control over your data. Unlike the Remove Duplicates tool, it doesn't automatically delete duplicates but instead extracts a list of unique records to a new location. This approach is ideal if you want to review the unique list before making any changes to the original data.
Best for: When you want to keep the original data intact and review the results before making any deletions.
Step-by-Step Instructions:
Step 1: Select Your Data
Click on any cell within your data range.
Step 2: Open the Advanced Filter
Go to the Data tab, and click on the Advanced button, which is located in the Sort & Filter group.

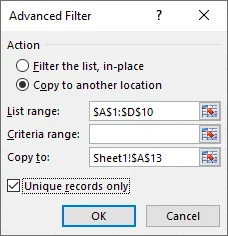
Step 3: Configure the Filter
In the pop-up window:
- Select the Copy to another location button.
- The List range should already be populated with your data range.
- Leave the Criteria range blank.
- Click in the Copy to box, then select a cell where you want the unique list to be copied (e.g., $A$13).
- Crucially, check the box for "Unique records only".
Step 4: Execute and Confirm
Click OK. Excel will copy all unique rows from your original data range to the new location you specified. You can now compare this unique list with your original data.
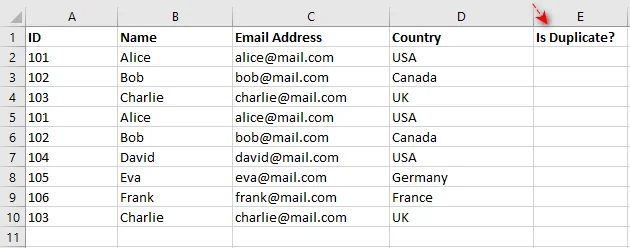
Find and Remove Duplicates in Excel Using a Conditional Formatting Helper Column
If you prefer not to delete anything immediately but instead want to identify and highlight duplicates for manual review, this method is perfect. It allows you to mark duplicates with a formula, then filter and delete them as needed.
Best for: Carefully reviewing and manually removing duplicates without permanent deletion right away.
Step-by-Step Instructions:
Step 1: Add a Helper Column
Insert a new column to the right of your data and give it a descriptive header like "Is Duplicate?". This column will be used to mark duplicate entries for easy identification.
Step 2: Enter the Formula
In the first cell of the new column, enter the following formula. Make sure to adjust the ranges to fit your data:
=COUNTIFS($A$2:$A2, A2, $B$2:$B2, B2, $C$2:$C2, C2, $D$2:$D2, D2) > 1
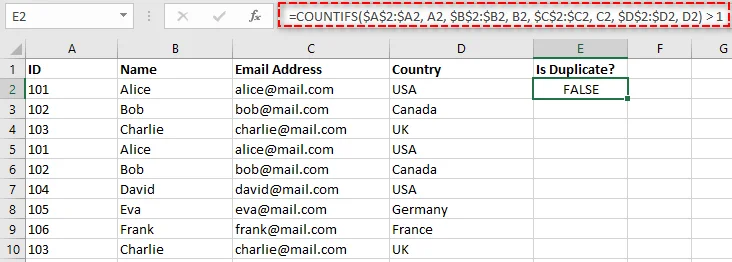
This is a "running count" formula that checks how many times the current row's combination of values (from columns A, B, C and D) has appeared so far. If the count is greater than 1, it will return TRUE, indicating a duplicate.
Note: A more modern alternative is the UNIQUE function in Excel 365, but this COUNTIFS method works in all versions of Excel.
Step 3: Copy the Formula Down
To apply the formula to the rest of the rows, double-click the fill handle (the small square at the bottom-right of the cell). This will copy the formula down the entire column, marking all duplicates.

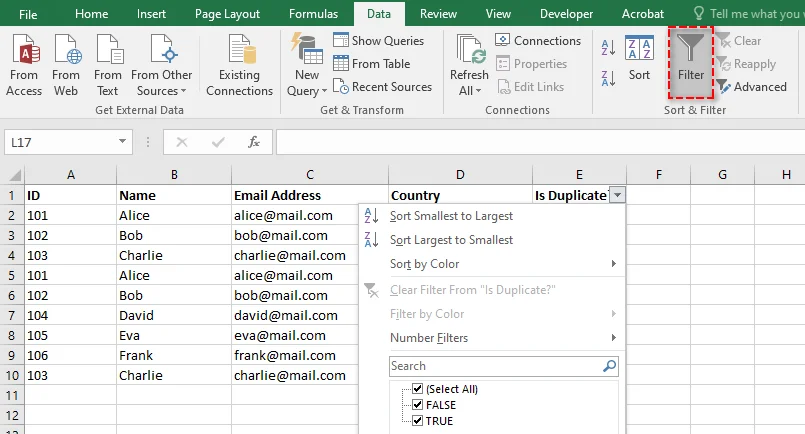
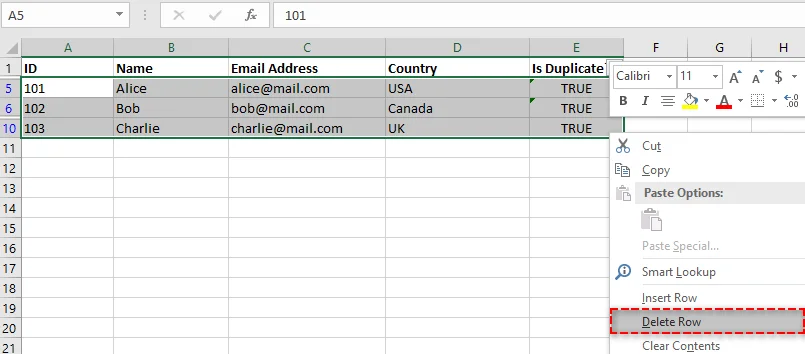
Step 4: Filter and Delete
-
Apply a filter to your data by selecting your header row and clicking Data > Filter.
-
Filter the "Is Duplicate?" column to show only TRUE values. This will display all duplicate rows (keeping the first instance).
-
Select all visible rows, right-click, and choose Delete Row to remove the duplicates.
-
Clear the filter to view your clean, unique list of data.
Remove Duplicate Data in Excel Using Power Query
For those who work with data regularly, Power Query (also known as Get & Transform) is a game-changer. It's a non-destructive and fully reversible process, allowing you to clean data without permanently altering the original. Plus, Power Query can be refreshed with a single click if your source data changes, making it ideal for ongoing data management.
Best for: Cleaning regularly updated data and creating a repeatable data-cleaning process.
Step-by-Step Instructions:
Step 1: Load Your Data into Power Query
-
Select your data range.
-
Go to the Data tab, and click on From Table in the Get & Transform group.

-
In the dialog box, ensure the My table has headers box is checked, then click OK. This will open the Power Query Editor window, where you can clean and transform your data.
Step 2: Remove Duplicates
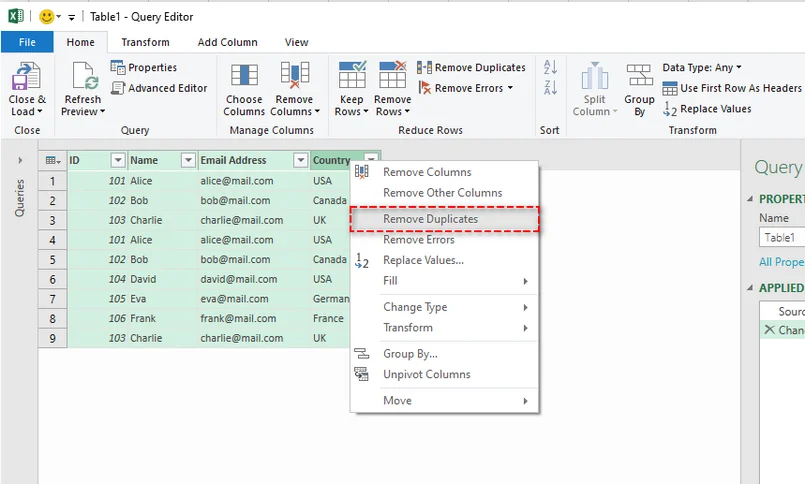
In the Power Query Editor, you can remove duplicates based on selected columns:
-
Select the columns you want to base the duplicate check on. Hold Ctrl to select multiple columns.
-
Right-click on one of the selected column headers and choose Remove Duplicates from the context menu.
- Tip: To remove duplicates based on the entire row, select all the columns before clicking Remove Duplicates.
Step 3: Close and Load
Once your duplicates are removed, click Close & Load from the Home tab. Power Query will create a new worksheet with your cleaned, duplicate-free data.
Eliminate Duplicates with the UNIQUE Function in Excel 365
If you have Microsoft 365, you have access to the revolutionary dynamic array functions. The UNIQUE function is the simplest way to extract a list of unique values in Excel without altering the original data.
Best for: Instantly extracting a unique list that updates dynamically.
Step-by-Step Instructions:
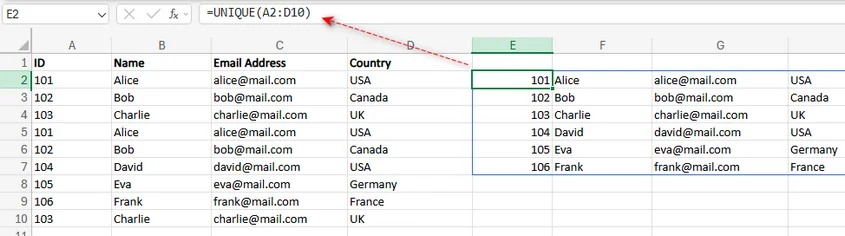
Step 1: Select a Single Cell
Click on an empty cell where you want the unique list to appear. This will be the starting point where the unique values will "spill" into.
Step 2: Enter the UNIQUE Formula
In the selected cell, enter the following formula:
=UNIQUE(A2:D10)
This assumes your data is in the range A2:D10. Modify the range according to your dataset.
Step 3: Press Enter
Once you've entered the formula, simply press Enter. Excel will automatically spill the entire list of unique rows into the cells below. This new list is dynamic. If you change data in your original range, the unique list will update automatically.
For more details on the UNIQUE Function, see the official Microsoft documentation: UNIQUE function.
Automate Duplicate Row Removal in Excel Using C#
If you're working with large Excel files and need to automate the removal of duplicate rows in Excel, using C# with a library like Spire.XLS for .NET can simplify the process. This tool allows you to create, read, and manipulate Excel files programmatically, without needing Excel installed on your system.
With Spire.XLS, you can easily remove duplicate rows from Excel files using just a few lines of C# code, saving you time and improving your data management workflow.
Best for: Developers or anyone looking to automate data cleaning, especially for large datasets.
Step-by-Step Instructions:
Step 1: Install Spire.XLS via NuGet
To get started, you need to download the library, or install it from NuGet by running the following command in the NuGet Package Manager Console:
PM> Install-Package Spire.XLS
This will add the Spire.XLS library to your project, enabling you to programmatically manipulate Excel files.
Step 2: Use the RemoveDuplicates Method
In your C# application, use the RemoveDuplicates method provided by Spire.XLS to automate duplicate row removal. Here's a simple code snippet to remove duplicate rows from Excel in C#:
using Spire.Xls;

namespace RemoveDuplicateRows
{
    internal class Program
    {
        static void Main(string[] args)
        {
            // Open the Excel file
            Workbook workbook = new Workbook();
            workbook.LoadFromFile("input.xlsx");

            // Get the desired worksheet
            Worksheet sheet = workbook.Worksheets[0];

            // Remove duplicates from the specified cell range (if you want to remove all duplicates in the worksheet, do not set the parameters)
            sheet.RemoveDuplicates(2, 1, 10, 4);

            // Save the modified file
            workbook.SaveToFile("RemoveDuplicates.xlsx", ExcelVersion.Version2016);
            workbook.Dispose();
        }
    }
}
This code will remove duplicate rows in the specified cell range and save the cleaned workbook to a new file.

Which Method Should You Choose to Remove Duplicate Rows in Excel?
Now that you're familiar with various techniques for removing duplicate rows from Excel, it's important to understand which method best suits your specific needs. The following table compares each method in terms of its ideal use case, advantages, and potential drawbacks, helping you make an informed decision based on your requirements.
| Method | Best For | Pros | Cons |
|---|---|---|---|
| Remove Duplicates | Quick, one-off cleaning. | Fast, built-in, simple. | Destructive (no undo). |
| Advanced Filter | Reviewing unique lists before deleting. | Non-destructive, gives control. | Slightly more steps. |
| Helper Column | Manual review and complex criteria. | Highly flexible, visual. | Requires formula knowledge. |
| Power Query | Repeating the process on updated data. | Reusable, powerful, non-destructive. | Steeper learning curve. |
| UNIQUE Function | Dynamic extraction (Excel 365). | Instant, dynamic, simple formula. | Doesn't delete source data. |
| C# Automation | Automating repetitive tasks. | Fully automated, highly customizable, integrates with other processes. | Requires programming knowledge, setup complexity. |
Best Practices for Removing Duplicates in Excel
While choosing the right method to remove duplicates is crucial, following best practices can further enhance the accuracy and efficiency of your data cleaning process. Here are some essential tips to keep in mind when removing duplicate data from your Excel files.
-
Backup Your Data
Always create a backup of your data before removing duplicates to avoid accidental loss of important information.
-
Be Aware of Hidden Duplicates
Sometimes duplicates aren't immediately visible due to extra spaces or case sensitivity. Use the TRIM function to remove unwanted spaces, and normalize case with LOWER or UPPER functions.
-
Remove Duplicates from Specific Columns
If duplicates are relevant only to certain columns (like email addresses), select only those columns when removing duplicates rather than checking the entire row.
-
Review Data Before Deleting
If you're using non-destructive methods (like Advanced Filter or Power Query), review the results before deleting to ensure no valuable data is lost.
-
Test Methods on a Small Dataset
Always test your chosen method on a small dataset to ensure it works as expected before applying it to the entire dataset.
Conclusion
No matter the size of your dataset, removing duplicate rows from Excel is a crucial step in maintaining clean and accurate data. Whether you're using Excel's built-in tools, leveraging Power Query for advanced data transformation, applying the dynamic UNIQUE function in Excel 365, or automating the process with C# using Spire.XLS, these methods can help you efficiently remove duplicate rows from Excel and optimize your data management.
Start cleaning your data today with these powerful techniques, and take your Excel productivity to the next level!
FAQs: Remove Duplicate Rows from Excel
Q1. What is the easiest way to remove duplicate rows from Excel?
A1: The easiest way to remove duplicate rows from Excel is by using the built-in Remove Duplicates tool. Simply select your data range, and Excel will remove duplicates in a few clicks.
Q2. How can I remove duplicates without changing the original data?
A2: Use Power Query or the Advanced Filter to extract unique records to a new location, keeping the original data intact.
Q3. How does the UNIQUE function in Excel 365 help remove duplicates?
A3: The UNIQUE function in Excel 365 dynamically removes duplicates by extracting unique values, and it updates automatically when data changes.
Q4. Can I automate removing duplicates in Excel using C#?
A4: Yes, you can automate the process using Spire.XLS for .NET. Just a few lines of C# code can help you remove duplicates programmatically, saving time on large datasets.
Q5. Should I back up my data before removing duplicates?
A5: Yes, always back up your data before removing duplicates, especially when using the Remove Duplicates tool to avoid accidental loss.