Formatting a cell range cell by cell means repeating the same group of properties down every column, and with enough columns one of them is easily missed; these formats also tend to be spread across fonts, borders and alignment, so each has to be set and then checked again on its own. Spire.XLS stores that group of formats as a named style, uses a flag object to state which of those formats should land this time, and then applies it to the target range: properties that were not ticked are not applied, and every other format on the range is left unchanged. Spire.XLS for JavaScript performs these operations in the browser through WebAssembly; the output file is managed by a virtual file system (VFS), with no backend service required.
This article covers two feature points:
For installation and project setup, see Integrating Spire.XLS for JavaScript in a React Project. The examples below assume Spire.XLS is installed and the WebAssembly module has been initialized.
Apply a named style to a cell range
Setting formats cell by cell means repeating the same block of code in every column, and with enough columns a cell is easily missed; fonts, borders and centring set separately would also mean working over the same block three times over. A named style stores a group of formats as an object that can be taken up repeatedly, and the flag object states which of those formats should land this time; together they apply the wanted parts to the whole range in a single call, leaving the range's other formatting unchanged. The steps are:
- Load the font file into the VFS, create a workbook, take the first worksheet and write the header and two data rows.
- Create a named style with
workbook.Styles.Addand give it the font colour, size and italic the header will use. - Set the top and bottom borders on that same style.
- Set horizontal and vertical centring on that same style.
- Create the flag object with
new xlsModule.CellStyleFlag()and tick the properties to land this time; the items left unticked are not written into the target cells. - Apply the style to the header range with
sheet.Range.get('A1:E1').ApplyStyle(tableStyle, flag); set the column widths so the header text displays in full, then save the workbook and dispose of it to free resources.
The full code example below shows how to apply cell styles to an Excel cell range in React:
function App() {
  const applyStyleToRange = async () => {
    // get the Spire.XLS WASM module
    const xlsModule = window.wasmModule?.spirexls;

    // check that the module is ready
    if (!xlsModule) {
      alert('Spire.Xls is not ready yet');
      return;
    }

    // load the font file into the VFS
    await window.spire.FetchFileToVFS('ARIAL.TTF', '/Library/Fonts/', `${process.env.PUBLIC_URL}/font/`);

    // create a new workbook and take the first worksheet
    const workbook = new xlsModule.Workbook();
    const sheet = workbook.Worksheets.get(0);

    // write the header and two data rows
    const columns = ['A', 'B', 'C', 'D', 'E'];
    const headers = ['Product', 'Spec', 'Quantity', 'Unit price', 'Amount'];
    headers.forEach((text, index) => {
      sheet.Range.get(`${columns[index]}1`).Value = text;
    });

    const rows = [
      ['Blu-ray mini projector', '1080P / 8G', '6', '1299', '7794'],
      ['Portable Bluetooth speaker', '20W / IPX7', '12', '399', '4788'],
    ];
    rows.forEach((row, rowIndex) => {
      columns.forEach((column, columnIndex) => {
        sheet.Range.get(`${column}${rowIndex + 2}`).Value = row[columnIndex];
      });
    });

    // create a named style
    const tableStyle = workbook.Styles.Add('tableStyle');

    // give the header its font colour, size and italic
    tableStyle.Font.Color = xlsModule.Color.get_CornflowerBlue();
    tableStyle.Font.Size = 16;
    tableStyle.Font.IsItalic = true;

    // set the top and bottom borders on the same style
    tableStyle.Borders.get(xlsModule.BordersLineType.EdgeTop).LineStyle = xlsModule.LineStyleType.Thin;
    tableStyle.Borders.get(xlsModule.BordersLineType.EdgeBottom).LineStyle = xlsModule.LineStyleType.Thin;

    // and set horizontal and vertical centring on the same style
    tableStyle.HorizontalAlignment = xlsModule.HorizontalAlignType.Center;
    tableStyle.VerticalAlignment = xlsModule.VerticalAlignType.Center;

    // create the flag object and tick the properties to land this time; unticked ones are not written to the target cells
    const flag = new xlsModule.CellStyleFlag();
    flag.FontColor = true;
    flag.FontSize = true;
    flag.FontItalic = true;
    flag.Borders = true;
    flag.HorizontalAlignment = true;
    flag.VerticalAlignment = true;

    // apply the style to the header range
    sheet.Range.get('A1:E1').ApplyStyle(tableStyle, flag);

    // set the column widths
    sheet.Columns.get(0).ColumnWidth = 22;
    sheet.Columns.get(1).ColumnWidth = 14;

    // save the workbook as an Excel file
    const outputFileName = 'ApplyStyleToRange.xlsx';
    workbook.SaveToFile({ fileName: outputFileName, version: xlsModule.ExcelVersion.Version2016 });

    // dispose of the workbook to free resources
    workbook.Dispose();

    // read the result file from the VFS and start the download
    const fileArray = window.dotnetRuntime.Module.FS.readFile(outputFileName);
    const blob = new Blob([fileArray], { type: 'application/vnd.openxmlformats-officedocument.spreadsheetml.sheet' });
    const url = URL.createObjectURL(blob);
    const a = document.createElement('a');
    a.href = url;
    a.download = outputFileName;
    a.click();
    URL.revokeObjectURL(url);
  };

  return (
    <div style={{ textAlign: 'center', height: '300px' }}>
      <h1>Apply cell styles to a cell range</h1>
      <button id="apply-style-to-range" onClick={applyStyleToRange}>Apply cell styles to the cell range</button>
    </div>
  );
}

export default App;
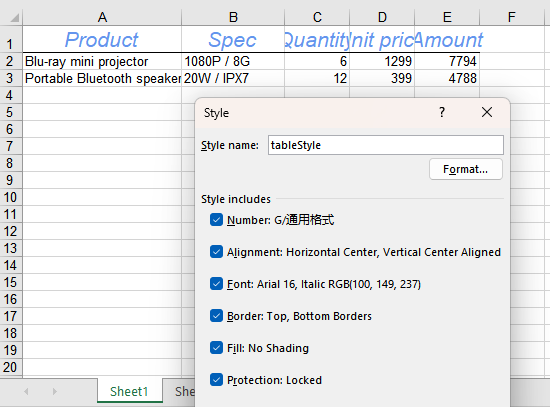
After running, the effect of applying the named style to the cell range:
Read and adjust the named style
Once a style has been saved, later changes concern the values inside it rather than the whole set of formats, and no workbook has to be rebuilt: load the result file produced by feature point 1, read the named style by name, take the size already set in it, increase it, and apply the style to another range. The flag decides the scope here too: this time only the size, borders and centring are ticked, so the style's colour and italic are not written into the data range. Note that applying a style writes its properties into the cells as they stand at that moment, and the cells keep no reference to the style, so the range has to be applied again for the change to take effect. The steps are:
- Run the code of feature point 1 first, so that its result file
ApplyStyleToRange.xlsxstays in the VFS as this run's input file. - Load that input file with
workbook.LoadFromFileand take the first worksheet. - Read the named style feature point 1 created with
workbook.Styles.get('tableStyle')and take itsFont.Sizeas the baseline. - Raise the baseline size and write it back to the style, as the size the data range will use.
- Create the flag object and tick only the size, borders and centring; apply the adjusted style to the data range with
sheet.Range.get('A2:E3').ApplyStyle(readBack, flag), set the column widths so the larger font size still fits, then save the workbook and dispose of it to free resources.
The full code example below shows how to load a result file, read the named style and apply it after adjusting the size in React:
function App() {
  const readAndAdjustFontStyle = async () => {
    // get the Spire.XLS WASM module
    const xlsModule = window.wasmModule?.spirexls;

    // check that the module is ready
    if (!xlsModule) {
      alert('Spire.Xls is not ready yet');
      return;
    }

    // load the font file into the VFS
    await window.spire.FetchFileToVFS('ARIAL.TTF', '/Library/Fonts/', `${process.env.PUBLIC_URL}/font/`);

    // load the result file produced by feature point 1 as this run's input
    const workbook = new xlsModule.Workbook();
    workbook.LoadFromFile({ fileName: 'ApplyStyleToRange.xlsx' });
    const sheet = workbook.Worksheets.get(0);

    // read the named style feature point 1 created and take its current font size as the baseline
    const readBack = workbook.Styles.get('tableStyle');
    const baseSize = readBack.Font.Size;

    // raise the baseline size to get the size the data range will use
    readBack.Font.Size = baseSize + 4;

    // create the flag object: this time tick only the font size, borders and centring, so the style's colour and italic stay off the data range
    const flag = new xlsModule.CellStyleFlag();
    flag.FontSize = true;
    flag.Borders = true;
    flag.HorizontalAlignment = true;
    flag.VerticalAlignment = true;

    // apply the adjusted style to the data range
    sheet.Range.get('A2:E3').ApplyStyle(readBack, flag);

    // set the column widths so the larger font size still fits
    sheet.Columns.get(0).ColumnWidth = 30;
    sheet.Columns.get(1).ColumnWidth = 20;

    // save the workbook as an Excel file
    const outputFileName = 'ReadAndAdjustFontStyle.xlsx';
    workbook.SaveToFile({ fileName: outputFileName, version: xlsModule.ExcelVersion.Version2016 });

    // dispose of the workbook to free resources
    workbook.Dispose();

    // read the result file from the VFS and start the download
    const fileArray = window.dotnetRuntime.Module.FS.readFile(outputFileName);
    const blob = new Blob([fileArray], { type: 'application/vnd.openxmlformats-officedocument.spreadsheetml.sheet' });
    const url = URL.createObjectURL(blob);
    const a = document.createElement('a');
    a.href = url;
    a.download = outputFileName;
    a.click();
    URL.revokeObjectURL(url);
  };

  return (
    <div style={{ textAlign: 'center', height: '300px' }}>
      <h1>Read the style and adjust its size</h1>
      <button id="read-and-adjust-font-style" onClick={readAndAdjustFontStyle}>Read the named style, adjust it, then apply it</button>
    </div>
  );
}

export default App;
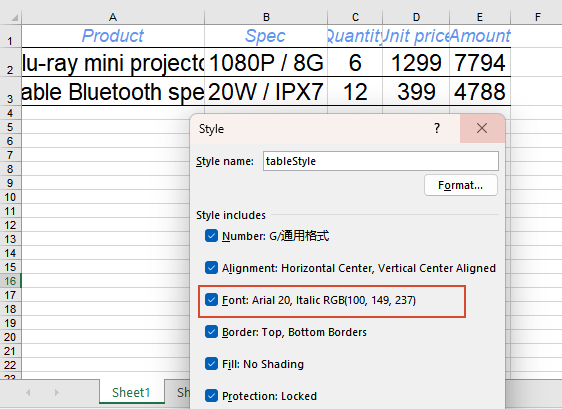
After running, the effect of reading the named style and adjusting its font size:
FAQ
Do the number formats already on the range change when I apply a style
Reason: No. Only the items ticked in the flag object are written into the target cells when the style is applied; the items left unticked take no part, so the number formats, borders and alignment already on the cells remain as they were.
Solution: Conversely, to apply number formats along with it, set the number format on the style as well and tick the matching item in the flag:
// give the style the number format first
tableStyle.NumberFormat = '0.00';

// tick the matching item in the flag
flag.NumberFormat = true;
sheet.Range.get('A1:E1').ApplyStyle(tableStyle, flag);
How do I apply a style to the whole worksheet
Reason: The examples above apply the style to one range at a time; a whole worksheet treated the same way would mean listing every range to cover. The worksheet object carries a method of the same name that covers the whole sheet in a single call.
Solution: Call ApplyStyle on the worksheet object to apply the whole style to the whole sheet:
sheet.ApplyStyle(tableStyle);
Get a Free License
Spire.XLS for JavaScript offers a 30-day full-featured free trial license with no functional limitations. Apply here to evaluate before purchasing.
