PDF Decrypt in C#, VB.NET
The sample demonstrates how to decrypt an encrypted PDF document and extract the embedded picture.
using System;
using System.Drawing;
using Spire.Pdf;

namespace Decryption
{
    class Program
    {
        static void Main(string[] args)
        {
            //Create a pdf document.
            String encryptedPdf = @"Encrypted.pdf";
            PdfDocument doc = new PdfDocument(encryptedPdf, "test");

            //extract image
            Image image = doc.Pages[0].ImagesInfo[0].Image;

            doc.Close();

            //Save image file.
            image.Save("Wikipedia_Science.png", System.Drawing.Imaging.ImageFormat.Png);

            //Launching the image file.
            System.Diagnostics.Process.Start("Wikipedia_Science.png");
        }
    }
}
Imports System.Drawing
Imports Spire.Pdf

Namespace Decryption
    Friend Class Program
        Shared Sub Main(ByVal args() As String)
            'Create a pdf document.
            Dim encryptedPdf As String = "Encrypted.pdf"
            Dim doc As New PdfDocument(encryptedPdf, "test")

            'extract image
            Dim image As Image = doc.Pages(0).ImagesInfo(0).Image

            doc.Close()

            'Save image file.
            image.Save("Wikipedia_Science.png", System.Drawing.Imaging.ImageFormat.Png)

            'Launching the image file.
            Process.Start("Wikipedia_Science.png")
        End Sub
    End Class
End Namespace
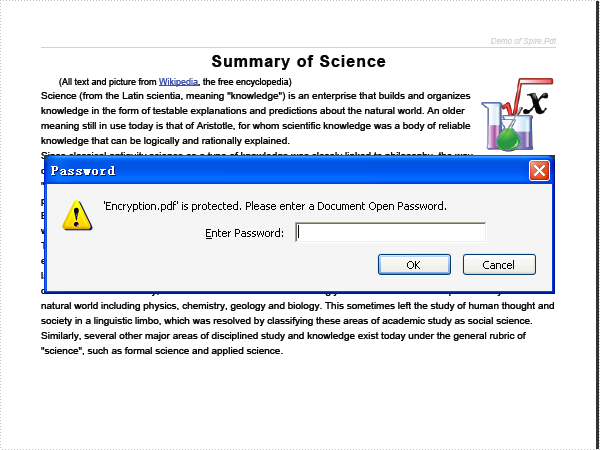
PDF Encryption in C#, VB.NET
The sample demonstrates how to encrypt an PDF document and set owner/user password.
using System;
using System.Drawing;
using Spire.Pdf;
using Spire.Pdf.Graphics;
using Spire.Pdf.Security;

namespace Encryption
{
    class Program
    {
        static void Main(string[] args)
        {
            //Create a pdf document.
            PdfDocument doc = new PdfDocument();

            // Create one page
            PdfPageBase page = doc.Pages.Add();

            //Draw the page
            DrawPage(page);

            //encrypt
            doc.Security.KeySize = PdfEncryptionKeySize.Key128Bit;
            doc.Security.OwnerPassword = "e-iceblue";
            doc.Security.UserPassword = "test";
            doc.Security.Permissions = PdfPermissionsFlags.Print | PdfPermissionsFlags.FillFields;

            //Save pdf file.
            doc.SaveToFile("Encryption.pdf");
            doc.Close();

            //Launching the Pdf file.
            System.Diagnostics.Process.Start("Encryption.pdf");
        }

        private static void DrawPage(PdfPageBase page)
        {
            float pageWidth = page.Canvas.ClientSize.Width;
            float y = 0;

            //page header
            PdfPen pen1 = new PdfPen(Color.LightGray, 1f);
            PdfBrush brush1 = new PdfSolidBrush(Color.LightGray);
            PdfTrueTypeFont font1 = new PdfTrueTypeFont(new Font("Arial", 8f, FontStyle.Italic));
            PdfStringFormat format1 = new PdfStringFormat(PdfTextAlignment.Right);
            String text = "Demo of Spire.Pdf";
            page.Canvas.DrawString(text, font1, brush1, pageWidth, y, format1);
            SizeF size = font1.MeasureString(text, format1);
            y = y + size.Height + 1;
            page.Canvas.DrawLine(pen1, 0, y, pageWidth, y);

            //title
            y = y + 5;
            PdfBrush brush2 = new PdfSolidBrush(Color.Black);
            PdfTrueTypeFont font2 = new PdfTrueTypeFont(new Font("Arial", 16f, FontStyle.Bold));
            PdfStringFormat format2 = new PdfStringFormat(PdfTextAlignment.Center);
            format2.CharacterSpacing = 1f;
            text = "Summary of Science";
            page.Canvas.DrawString(text, font2, brush2, pageWidth / 2, y, format2);
            size = font2.MeasureString(text, format2);
            y = y + size.Height + 6;

            //icon
            PdfImage image = PdfImage.FromFile(@"Wikipedia_Science.png");
            page.Canvas.DrawImage(image, new PointF(pageWidth - image.PhysicalDimension.Width, y));
            float imageLeftSpace = pageWidth - image.PhysicalDimension.Width - 2;
            float imageBottom = image.PhysicalDimension.Height + y;

            //refenrence content
            PdfTrueTypeFont font3 = new PdfTrueTypeFont(new Font("Arial", 9f));
            PdfStringFormat format3 = new PdfStringFormat();
            format3.ParagraphIndent = font3.Size * 2;
            format3.MeasureTrailingSpaces = true;
            format3.LineSpacing = font3.Size * 1.5f;
            String text1 = "(All text and picture from ";
            String text2 = "Wikipedia";
            String text3 = ", the free encyclopedia)";
            page.Canvas.DrawString(text1, font3, brush2, 0, y, format3);

            size = font3.MeasureString(text1, format3);
            float x1 = size.Width;
            format3.ParagraphIndent = 0;
            PdfTrueTypeFont font4 = new PdfTrueTypeFont(new Font("Arial", 9f, FontStyle.Underline));
            PdfBrush brush3 = PdfBrushes.Blue;
            page.Canvas.DrawString(text2, font4, brush3, x1, y, format3);
            size = font4.MeasureString(text2, format3);
            x1 = x1 + size.Width;

            page.Canvas.DrawString(text3, font3, brush2, x1, y, format3);
            y = y + size.Height;

            //content
            PdfStringFormat format4 = new PdfStringFormat();
            text = System.IO.File.ReadAllText(@"Summary_of_Science.txt");
            PdfTrueTypeFont font5 = new PdfTrueTypeFont(new Font("Arial", 10f));
            format4.LineSpacing = font5.Size * 1.5f;
            PdfStringLayouter textLayouter = new PdfStringLayouter();
            float imageLeftBlockHeight = imageBottom - y;
            PdfStringLayoutResult result
                = textLayouter.Layout(text, font5, format4, new SizeF(imageLeftSpace, imageLeftBlockHeight));
            if (result.ActualSize.Height < imageBottom - y)
            {
                imageLeftBlockHeight = imageLeftBlockHeight + result.LineHeight;
                result = textLayouter.Layout(text, font5, format4, new SizeF(imageLeftSpace, imageLeftBlockHeight));
            }
            foreach (LineInfo line in result.Lines)
            {
                page.Canvas.DrawString(line.Text, font5, brush2, 0, y, format4);
                y = y + result.LineHeight;
            }
            PdfTextWidget textWidget = new PdfTextWidget(result.Remainder, font5, brush2);
            PdfTextLayout textLayout = new PdfTextLayout();
            textLayout.Break = PdfLayoutBreakType.FitPage;
            textLayout.Layout = PdfLayoutType.Paginate;
            RectangleF bounds = new RectangleF(new PointF(0, y), page.Canvas.ClientSize);
            textWidget.StringFormat = format4;
            textWidget.Draw(page, bounds, textLayout);
        }
    }
}
Imports System.Drawing
Imports Spire.Pdf
Imports Spire.Pdf.Graphics
Imports Spire.Pdf.Security

Namespace Encryption
    Friend Class Program
        Shared Sub Main(ByVal args() As String)
            'Create a pdf document.
            Dim doc As New PdfDocument()

            ' Create one page
            Dim page As PdfPageBase = doc.Pages.Add()

            'Draw the page
            DrawPage(page)

            'encrypt
            doc.Security.KeySize = PdfEncryptionKeySize.Key128Bit
            doc.Security.OwnerPassword = "e-iceblue"
            doc.Security.UserPassword = "test"
            doc.Security.Permissions = PdfPermissionsFlags.Print Or PdfPermissionsFlags.FillFields

            'Save pdf file.
            doc.SaveToFile("Encryption.pdf")
            doc.Close()

            'Launching the Pdf file.
            Process.Start("Encryption.pdf")
        End Sub

        Private Shared Sub DrawPage(ByVal page As PdfPageBase)
            Dim pageWidth As Single = page.Canvas.ClientSize.Width
            Dim y As Single = 0

            'page header
            Dim pen1 As New PdfPen(Color.LightGray, 1.0F)
            Dim brush1 As PdfBrush = New PdfSolidBrush(Color.LightGray)
            Dim font1 As New PdfTrueTypeFont(New Font("Arial", 8.0F, FontStyle.Italic))
            Dim format1 As New PdfStringFormat(PdfTextAlignment.Right)
            Dim text As String = "Demo of Spire.Pdf"
            page.Canvas.DrawString(text, font1, brush1, pageWidth, y, format1)
            Dim size As SizeF = font1.MeasureString(text, format1)
            y = y + size.Height + 1
            page.Canvas.DrawLine(pen1, 0, y, pageWidth, y)

            'title
            y = y + 5
            Dim brush2 As PdfBrush = New PdfSolidBrush(Color.Black)
            Dim font2 As New PdfTrueTypeFont(New Font("Arial", 16.0F, FontStyle.Bold))
            Dim format2 As New PdfStringFormat(PdfTextAlignment.Center)
            format2.CharacterSpacing = 1.0F
            text = "Summary of Science"
            page.Canvas.DrawString(text, font2, brush2, pageWidth / 2, y, format2)
            size = font2.MeasureString(text, format2)
            y = y + size.Height + 6

            'icon
            Dim image As PdfImage = PdfImage.FromFile("Wikipedia_Science.png")
            page.Canvas.DrawImage(image, New PointF(pageWidth - image.PhysicalDimension.Width, y))
            Dim imageLeftSpace As Single = pageWidth - image.PhysicalDimension.Width - 2
            Dim imageBottom As Single = image.PhysicalDimension.Height + y

            'refenrence content
            Dim font3 As New PdfTrueTypeFont(New Font("Arial", 9.0F))
            Dim format3 As New PdfStringFormat()
            format3.ParagraphIndent = font3.Size * 2
            format3.MeasureTrailingSpaces = True
            format3.LineSpacing = font3.Size * 1.5F
            Dim text1 As String = "(All text and picture from "
            Dim text2 As String = "Wikipedia"
            Dim text3 As String = ", the free encyclopedia)"
            page.Canvas.DrawString(text1, font3, brush2, 0, y, format3)

            size = font3.MeasureString(text1, format3)
            Dim x1 As Single = size.Width
            format3.ParagraphIndent = 0
            Dim font4 As New PdfTrueTypeFont(New Font("Arial", 9.0F, FontStyle.Underline))
            Dim brush3 As PdfBrush = PdfBrushes.Blue
            page.Canvas.DrawString(text2, font4, brush3, x1, y, format3)
            size = font4.MeasureString(text2, format3)
            x1 = x1 + size.Width

            page.Canvas.DrawString(text3, font3, brush2, x1, y, format3)
            y = y + size.Height

            'content
            Dim format4 As New PdfStringFormat()
            text = System.IO.File.ReadAllText("Summary_of_Science.txt")
            Dim font5 As New PdfTrueTypeFont(New Font("Arial", 10.0F))
            format4.LineSpacing = font5.Size * 1.5F
            Dim textLayouter As New PdfStringLayouter()
            Dim imageLeftBlockHeight As Single = imageBottom - y
            Dim result As PdfStringLayoutResult _
                = textLayouter.Layout(text, font5, format4, New SizeF(imageLeftSpace, imageLeftBlockHeight))
            If result.ActualSize.Height < imageBottom - y Then
                imageLeftBlockHeight = imageLeftBlockHeight + result.LineHeight
                result = textLayouter.Layout(text, font5, format4, New SizeF(imageLeftSpace, imageLeftBlockHeight))
            End If
            For Each line As LineInfo In result.Lines
                page.Canvas.DrawString(line.Text, font5, brush2, 0, y, format4)
                y = y + result.LineHeight
            Next line
            Dim textWidget As New PdfTextWidget(result.Remainder, font5, brush2)
            Dim textLayout As New PdfTextLayout()
            textLayout.Break = PdfLayoutBreakType.FitPage
            textLayout.Layout = PdfLayoutType.Paginate
            Dim bounds As New RectangleF(New PointF(0, y), page.Canvas.ClientSize)
            textWidget.StringFormat = format4
            textWidget.Draw(page, bounds, textLayout)
        End Sub
    End Class
End Namespace
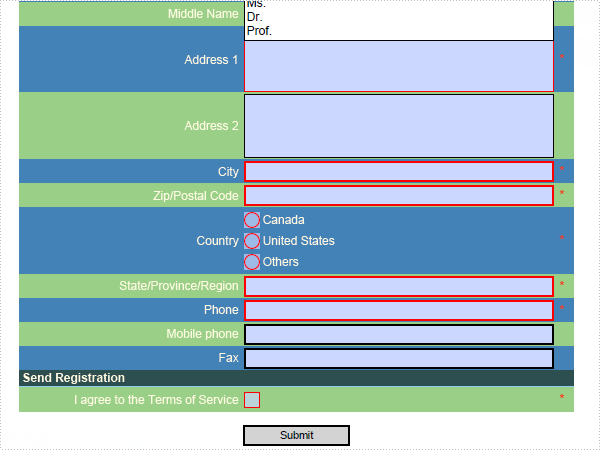
PDF FormField in C#, VB.NET
The sample demonstrates how to work with form, text box, check box, radio button, list box, combo box, button and form action in PDF document.
using System;
using System.Drawing;
using System.IO;
using System.Xml.XPath;
using Spire.Pdf;
using Spire.Pdf.Actions;
using Spire.Pdf.AutomaticFields;
using Spire.Pdf.Fields;
using Spire.Pdf.Graphics;

namespace FormField
{
    class Program
    {
        static void Main(string[] args)
        {
            //Create a pdf document.
            PdfDocument doc = new PdfDocument();

            //margin
            PdfUnitConvertor unitCvtr = new PdfUnitConvertor();
            PdfMargins margin = new PdfMargins();
            margin.Top = unitCvtr.ConvertUnits(2.54f, PdfGraphicsUnit.Centimeter, PdfGraphicsUnit.Point);
            margin.Bottom = margin.Top;
            margin.Left = unitCvtr.ConvertUnits(3.17f, PdfGraphicsUnit.Centimeter, PdfGraphicsUnit.Point);
            margin.Right = margin.Left;

            SetDocumentTemplate(doc, PdfPageSize.A4, margin);

            // Create one page
            PdfPageBase page = doc.Pages.Add(PdfPageSize.A4, new PdfMargins(0));

            float y = 0;

            //title
            y = DrawPageTitle(page, y);

            //load form config data
            using (Stream stream = File.OpenRead(@"Form.xml"))
            {
                XPathDocument xpathDoc = new XPathDocument(stream);
                XPathNodeIterator sectionNodes = xpathDoc.CreateNavigator().Select("/form/section");
                int fieldIndex = 0;
                foreach (XPathNavigator sectionNode in sectionNodes)
                {
                    //draw section label
                    String sectionLabel = sectionNode.GetAttribute("name", "");
                    y = DrawFormSection(sectionLabel, page, y);

                    XPathNodeIterator fieldNodes = sectionNode.Select("field");
                    foreach (XPathNavigator fieldNode in fieldNodes)
                    {
                        y = DrawFormField(fieldNode, doc.Form, page, y, fieldIndex++);
                    }
                }
            }

            //draw button
            y = y + 10;
            float buttonWidth = 80;
            float buttonX = (page.Canvas.ClientSize.Width - buttonWidth) / 2;
            RectangleF buttonBounds = new RectangleF(buttonX, y, buttonWidth, 16f);
            PdfButtonField button = new PdfButtonField(page, "submit");
            button.Text = "Submit";
            button.Bounds = buttonBounds;
            PdfSubmitAction submitAction = new PdfSubmitAction("http://www.e-iceblue.com");
            button.Actions.MouseUp = submitAction;
            doc.Form.Fields.Add(button);

            //Save pdf file.
            doc.SaveToFile("FormField.pdf");
            doc.Close();

            //Launching the Pdf file.
            System.Diagnostics.Process.Start("FormField.pdf");
        }
        private static void SetDocumentTemplate(PdfDocument doc, SizeF pageSize, PdfMargins margin)
        {
            PdfPageTemplateElement leftSpace
                = new PdfPageTemplateElement(margin.Left, pageSize.Height);
            doc.Template.Left = leftSpace;

            PdfPageTemplateElement topSpace
                = new PdfPageTemplateElement(pageSize.Width, margin.Top);
            topSpace.Foreground = true;
            doc.Template.Top = topSpace;

            //draw header label
            PdfTrueTypeFont font = new PdfTrueTypeFont(new Font("Arial", 9f, FontStyle.Italic));
            PdfStringFormat format = new PdfStringFormat(PdfTextAlignment.Right);
            String label = "Demo of Spire.Pdf";
            SizeF size = font.MeasureString(label, format);
            float y = topSpace.Height - font.Height - 1;
            PdfPen pen = new PdfPen(Color.Black, 0.75f);
            topSpace.Graphics.SetTransparency(0.5f);
            topSpace.Graphics.DrawLine(pen, margin.Left, y, pageSize.Width - margin.Right, y);
            y = y - 1 - size.Height;
            topSpace.Graphics.DrawString(label, font, PdfBrushes.Black, pageSize.Width - margin.Right, y, format);

            PdfPageTemplateElement rightSpace
                = new PdfPageTemplateElement(margin.Right, pageSize.Height);
            doc.Template.Right = rightSpace;

            PdfPageTemplateElement bottomSpace
                = new PdfPageTemplateElement(pageSize.Width, margin.Bottom);
            bottomSpace.Foreground = true;
            doc.Template.Bottom = bottomSpace;

            //draw footer label
            y = font.Height + 1;
            bottomSpace.Graphics.SetTransparency(0.5f);
            bottomSpace.Graphics.DrawLine(pen, margin.Left, y, pageSize.Width - margin.Right, y);
            y = y + 1;
            PdfPageNumberField pageNumber = new PdfPageNumberField();
            PdfPageCountField pageCount = new PdfPageCountField();
            PdfCompositeField pageNumberLabel = new PdfCompositeField();
            pageNumberLabel.AutomaticFields
                = new PdfAutomaticField[] { pageNumber, pageCount };
            pageNumberLabel.Brush = PdfBrushes.Black;
            pageNumberLabel.Font = font;
            pageNumberLabel.StringFormat = format;
            pageNumberLabel.Text = "page {0} of {1}";
            pageNumberLabel.Draw(bottomSpace.Graphics, pageSize.Width - margin.Right, y);

            PdfImage headerImage
                = PdfImage.FromFile(@"Header.png");
            PointF pageLeftTop = new PointF(-margin.Left, -margin.Top);
            PdfPageTemplateElement header = new PdfPageTemplateElement(pageLeftTop, headerImage.PhysicalDimension);
            header.Foreground = false;
            header.Graphics.SetTransparency(0.5f);
            header.Graphics.DrawImage(headerImage, 0, 0);
            doc.Template.Stamps.Add(header);

            PdfImage footerImage
                = PdfImage.FromFile(@"Footer.png");
            y = pageSize.Height - footerImage.PhysicalDimension.Height;
            PointF footerLocation = new PointF(-margin.Left, y);
            PdfPageTemplateElement footer = new PdfPageTemplateElement(footerLocation, footerImage.PhysicalDimension);
            footer.Foreground = false;
            footer.Graphics.SetTransparency(0.5f);
            footer.Graphics.DrawImage(footerImage, 0, 0);
            doc.Template.Stamps.Add(footer);
        }

        private static float DrawPageTitle(PdfPageBase page, float y)
        {
            PdfBrush brush1 = PdfBrushes.MidnightBlue;
            PdfBrush brush2 = PdfBrushes.Red;
            PdfTrueTypeFont font1 = new PdfTrueTypeFont(new Font("Arial", 12f, FontStyle.Bold));
            String title = "Your Account Information(* = Required)";
            SizeF size = font1.MeasureString(title);
            float x = (page.Canvas.ClientSize.Width - size.Width) / 2;
            page.Canvas.DrawString("Your Account Information(", font1, brush1, x, y);
            size = font1.MeasureString("Your Account Information(");
            x = x + size.Width;
            page.Canvas.DrawString("* = Required", font1, brush2, x, y);
            size = font1.MeasureString("* = Required");
            x = x + size.Width;
            page.Canvas.DrawString(")", font1, brush1, x, y);
            y = y + size.Height;

            y = y + 3;
            PdfTrueTypeFont font2 = new PdfTrueTypeFont(new Font("Arial", 8f, FontStyle.Italic));
            String p = "Your information is not public, shared in anyway, or displayed on this site.";
            page.Canvas.DrawString(p, font2, brush1, 0, y);

            return y + font2.Height;
        }

        private static float DrawFormSection(String label, PdfPageBase page, float y)
        {
            PdfBrush brush1 = PdfBrushes.LightYellow;
            PdfBrush brush2 = PdfBrushes.DarkSlateGray;
            PdfTrueTypeFont font = new PdfTrueTypeFont(new Font("Arial", 9f, FontStyle.Bold));
            PdfStringFormat format = new PdfStringFormat();
            float height = font.MeasureString(label).Height;
            page.Canvas.DrawRectangle(brush2, 0, y, page.Canvas.ClientSize.Width, height + 2);
            page.Canvas.DrawString(label, font, brush1, 2, y + 1);
            y = y + height + 2;
            PdfPen pen = new PdfPen(PdfBrushes.LightSkyBlue, 0.75f);
            page.Canvas.DrawLine(pen, 0, y, page.Canvas.ClientSize.Width, y);
            return y + 0.75f;
        }

        private static float DrawFormField(XPathNavigator fieldNode, PdfForm form, PdfPageBase page, float y, int fieldIndex)
        {
            float width = page.Canvas.ClientSize.Width;
            float padding = 2;

            //measure field label
            String label = fieldNode.GetAttribute("label", "");
            PdfTrueTypeFont font1 = new PdfTrueTypeFont(new Font("Arial", 9f));
            PdfStringFormat format = new PdfStringFormat(PdfTextAlignment.Right, PdfVerticalAlignment.Middle);
            float labelMaxWidth = width * 0.4f - 2 * padding;
            SizeF labelSize = font1.MeasureString(label, labelMaxWidth, format);

            //measure field height
            float fieldHeight = MeasureFieldHeight(fieldNode);

            float height = labelSize.Height > fieldHeight ? labelSize.Height : fieldHeight;
            height = height + 2;

            //draw background
            PdfBrush brush = PdfBrushes.SteelBlue;
            if (fieldIndex % 2 == 1)
            {
                brush = PdfBrushes.LightGreen;
            }
            page.Canvas.DrawRectangle(brush, 0, y, width, height);

            //draw field label
            PdfBrush brush1 = PdfBrushes.LightYellow;
            RectangleF labelBounds = new RectangleF(padding, y, labelMaxWidth, height);
            page.Canvas.DrawString(label, font1, brush1, labelBounds, format);

            //daw field
            float fieldMaxWidth = width * 0.57f - 2 * padding;
            float fieldX = labelBounds.Right + 2 * padding;
            float fieldY = y + (height - fieldHeight) / 2;
            String fieldType = fieldNode.GetAttribute("type", "");
            String fieldId = fieldNode.GetAttribute("id", "");
            bool required = "true" == fieldNode.GetAttribute("required", "");
            switch (fieldType)
            {
                case "text":
                case "password":
                    PdfTextBoxField textField = new PdfTextBoxField(page, fieldId);
                    textField.Bounds = new RectangleF(fieldX, fieldY, fieldMaxWidth, fieldHeight);
                    textField.BorderWidth = 0.75f;
                    textField.BorderStyle = PdfBorderStyle.Solid;
                    textField.Required = required;
                    if ("password" == fieldType)
                    {
                        textField.Password = true;
                    }
                    if ("true" == fieldNode.GetAttribute("multiple", ""))
                    {
                        textField.Multiline = true;
                        textField.Scrollable = true;
                    }
                    form.Fields.Add(textField);
                    break;
                case "checkbox":
                    PdfCheckBoxField checkboxField = new PdfCheckBoxField(page, fieldId);
                    float checkboxWidth = fieldHeight - 2 * padding;
                    float checkboxHeight = checkboxWidth;
                    checkboxField.Bounds = new RectangleF(fieldX, fieldY + padding, checkboxWidth, checkboxHeight);
                    checkboxField.BorderWidth = 0.75f;
                    checkboxField.Style = PdfCheckBoxStyle.Cross;
                    checkboxField.Required = required;
                    form.Fields.Add(checkboxField);
                    break;

                case "list":
                    XPathNodeIterator itemNodes = fieldNode.Select("item");
                    if ("true" == fieldNode.GetAttribute("multiple", ""))
                    {
                        PdfListBoxField listBoxField = new PdfListBoxField(page, fieldId);
                        listBoxField.Bounds = new RectangleF(fieldX, fieldY, fieldMaxWidth, fieldHeight);
                        listBoxField.BorderWidth = 0.75f;
                        listBoxField.MultiSelect = true;
                        listBoxField.Font = new PdfFont(PdfFontFamily.Helvetica, 9f);
                        listBoxField.Required = required;
                        //add items into list box.
                        foreach (XPathNavigator itemNode in itemNodes)
                        {
                            String text = itemNode.SelectSingleNode("text()").Value;
                            listBoxField.Items.Add(new PdfListFieldItem(text, text));
                        }
                        listBoxField.SelectedIndex = 0;
                        form.Fields.Add(listBoxField);

                        break;
                    }
                    if (itemNodes != null && itemNodes.Count <= 3)
                    {
                        PdfRadioButtonListField radioButtonListFile
                            = new PdfRadioButtonListField(page, fieldId);
                        radioButtonListFile.Required = required;
                        //add items into radio button list.
                        float fieldItemHeight = fieldHeight / itemNodes.Count;
                        float radioButtonWidth = fieldItemHeight - 2 * padding;
                        float radioButtonHeight = radioButtonWidth;
                        foreach (XPathNavigator itemNode in itemNodes)
                        {
                            String text = itemNode.SelectSingleNode("text()").Value;
                            PdfRadioButtonListItem fieldItem = new PdfRadioButtonListItem(text);
                            fieldItem.BorderWidth = 0.75f;
                            fieldItem.Bounds = new RectangleF(fieldX, fieldY + padding, radioButtonWidth, radioButtonHeight);
                            radioButtonListFile.Items.Add(fieldItem);

                            float fieldItemLabelX = fieldX + radioButtonWidth + padding;
                            SizeF fieldItemLabelSize = font1.MeasureString(text);
                            float fieldItemLabelY = fieldY + (fieldItemHeight - fieldItemLabelSize.Height) / 2;
                            page.Canvas.DrawString(text, font1, brush1, fieldItemLabelX, fieldItemLabelY);

                            fieldY = fieldY + fieldItemHeight;
                        }
                        form.Fields.Add(radioButtonListFile);

                        break;
                    }

                    //combo box
                    PdfComboBoxField comboBoxField = new PdfComboBoxField(page, fieldId);
                    comboBoxField.Bounds = new RectangleF(fieldX, fieldY, fieldMaxWidth, fieldHeight);
                    comboBoxField.BorderWidth = 0.75f;
                    comboBoxField.Font = new PdfFont(PdfFontFamily.Helvetica, 9f);
                    comboBoxField.Required = required;
                    //add items into combo box.
                    foreach (XPathNavigator itemNode in itemNodes)
                    {
                        String text = itemNode.SelectSingleNode("text()").Value;
                        comboBoxField.Items.Add(new PdfListFieldItem(text, text));
                    }
                    form.Fields.Add(comboBoxField);
                    break;

            }

            if (required)
            {
                //draw *
                float flagX = width * 0.97f + padding;
                PdfTrueTypeFont font3 = new PdfTrueTypeFont(new Font("Arial", 10f, FontStyle.Bold));
                SizeF size = font3.MeasureString("*");
                float flagY = y + (height - size.Height) / 2;
                page.Canvas.DrawString("*", font3, PdfBrushes.Red, flagX, flagY);
            }

            return y + height;
        }

        private static float MeasureFieldHeight(XPathNavigator fieldNode)
        {
            String fieldType = fieldNode.GetAttribute("type", "");
            float defaultHeight = 16f;
            switch (fieldType)
            {
                case "text":
                case "password":
                    if ("true" == fieldNode.GetAttribute("multiple", ""))
                    {
                        return defaultHeight * 3;
                    }
                    return defaultHeight;

                case "checkbox":
                    return defaultHeight;

                case "list":
                    if ("true" == fieldNode.GetAttribute("multiple", ""))
                    {
                        return defaultHeight * 3;
                    }
                    XPathNodeIterator itemNodes = fieldNode.Select("item");
                    if (itemNodes != null && itemNodes.Count <= 3)
                    {
                        return defaultHeight * 3;
                    }
                    return defaultHeight;

            }
            String message = String.Format("Invalid field type: {0}", fieldType);
            throw new ArgumentException(message);
        }
    }
}
Imports System.Drawing
Imports System.IO
Imports System.Xml.XPath
Imports Spire.Pdf
Imports Spire.Pdf.Actions
Imports Spire.Pdf.AutomaticFields
Imports Spire.Pdf.Fields
Imports Spire.Pdf.Graphics

Namespace FormField
    Friend Class Program
        Shared Sub Main(ByVal args() As String)
            'Create a pdf document.
            Dim doc As New PdfDocument()

            'margin
            Dim unitCvtr As New PdfUnitConvertor()
            Dim margin As New PdfMargins()
            margin.Top = unitCvtr.ConvertUnits(2.54F, PdfGraphicsUnit.Centimeter, PdfGraphicsUnit.Point)
            margin.Bottom = margin.Top
            margin.Left = unitCvtr.ConvertUnits(3.17F, PdfGraphicsUnit.Centimeter, PdfGraphicsUnit.Point)
            margin.Right = margin.Left

            SetDocumentTemplate(doc, PdfPageSize.A4, margin)

            ' Create one page
            Dim page As PdfPageBase = doc.Pages.Add(PdfPageSize.A4, New PdfMargins(0))

            Dim y As Single = 0

            'title
            y = DrawPageTitle(page, y)

            'load form config data
            Using stream As Stream = File.OpenRead("Form.xml")
                Dim xpathDoc As New XPathDocument(stream)
                Dim sectionNodes As XPathNodeIterator = xpathDoc.CreateNavigator().Select("/form/section")
                Dim fieldIndex As Integer = 0
                For Each sectionNode As XPathNavigator In sectionNodes
                    'draw section label
                    Dim sectionLabel As String = sectionNode.GetAttribute("name", "")
                    y = DrawFormSection(sectionLabel, page, y)

                    Dim fieldNodes As XPathNodeIterator = sectionNode.Select("field")
                    For Each fieldNode As XPathNavigator In fieldNodes
                        y = DrawFormField(fieldNode, doc.Form, page, y, fieldIndex)
                        fieldIndex += 1
                    Next fieldNode
                Next sectionNode
            End Using

            'draw button
            y = y + 10
            Dim buttonWidth As Single = 80
            Dim buttonX As Single = (page.Canvas.ClientSize.Width - buttonWidth) / 2
            Dim buttonBounds As New RectangleF(buttonX, y, buttonWidth, 16.0F)
            Dim button As New PdfButtonField(page, "submit")
            button.Text = "Submit"
            button.Bounds = buttonBounds
            Dim submitAction As New PdfSubmitAction("http://www.e-iceblue.com")
            button.Actions.MouseUp = submitAction
            doc.Form.Fields.Add(button)

            'Save pdf file.
            doc.SaveToFile("FormField.pdf")
            doc.Close()

            'Launching the Pdf file.
            Process.Start("FormField.pdf")
        End Sub
        Private Shared Sub SetDocumentTemplate(ByVal doc As PdfDocument, ByVal pageSize As SizeF, _
                                               ByVal margin As PdfMargins)
            Dim leftSpace As New PdfPageTemplateElement(margin.Left, pageSize.Height)
            doc.Template.Left = leftSpace

            Dim topSpace As New PdfPageTemplateElement(pageSize.Width, margin.Top)
            topSpace.Foreground = True
            doc.Template.Top = topSpace

            'draw header label
            Dim font As New PdfTrueTypeFont(New Font("Arial", 9.0F, FontStyle.Italic))
            Dim format As New PdfStringFormat(PdfTextAlignment.Right)
            Dim label As String = "Demo of Spire.Pdf"
            Dim size As SizeF = font.MeasureString(label, format)
            Dim y As Single = topSpace.Height - font.Height - 1
            Dim pen As New PdfPen(Color.Black, 0.75F)
            topSpace.Graphics.SetTransparency(0.5F)
            topSpace.Graphics.DrawLine(pen, margin.Left, y, pageSize.Width - margin.Right, y)
            y = y - 1 - size.Height
            topSpace.Graphics.DrawString(label, font, PdfBrushes.Black, pageSize.Width - margin.Right, y, format)

            Dim rightSpace As New PdfPageTemplateElement(margin.Right, pageSize.Height)
            doc.Template.Right = rightSpace

            Dim bottomSpace As New PdfPageTemplateElement(pageSize.Width, margin.Bottom)
            bottomSpace.Foreground = True
            doc.Template.Bottom = bottomSpace

            'draw footer label
            y = font.Height + 1
            bottomSpace.Graphics.SetTransparency(0.5F)
            bottomSpace.Graphics.DrawLine(pen, margin.Left, y, pageSize.Width - margin.Right, y)
            y = y + 1
            Dim pageNumber As New PdfPageNumberField()
            Dim pageCount As New PdfPageCountField()
            Dim pageNumberLabel As New PdfCompositeField()
            pageNumberLabel.AutomaticFields = New PdfAutomaticField() {pageNumber, pageCount}
            pageNumberLabel.Brush = PdfBrushes.Black
            pageNumberLabel.Font = font
            pageNumberLabel.StringFormat = format
            pageNumberLabel.Text = "page {0} of {1}"
            pageNumberLabel.Draw(bottomSpace.Graphics, pageSize.Width - margin.Right, y)

            Dim headerImage As PdfImage = PdfImage.FromFile("Header.png")
            Dim pageLeftTop As New PointF(-margin.Left, -margin.Top)
            Dim header As New PdfPageTemplateElement(pageLeftTop, headerImage.PhysicalDimension)
            header.Foreground = False
            header.Graphics.SetTransparency(0.5F)
            header.Graphics.DrawImage(headerImage, 0, 0)
            doc.Template.Stamps.Add(header)

            Dim footerImage As PdfImage = PdfImage.FromFile("Footer.png")
            y = pageSize.Height - footerImage.PhysicalDimension.Height
            Dim footerLocation As New PointF(-margin.Left, y)
            Dim footer As New PdfPageTemplateElement(footerLocation, footerImage.PhysicalDimension)
            footer.Foreground = False
            footer.Graphics.SetTransparency(0.5F)
            footer.Graphics.DrawImage(footerImage, 0, 0)
            doc.Template.Stamps.Add(footer)
        End Sub

        Private Shared Function DrawPageTitle(ByVal page As PdfPageBase, ByVal y As Single) As Single
            Dim brush1 As PdfBrush = PdfBrushes.MidnightBlue
            Dim brush2 As PdfBrush = PdfBrushes.Red
            Dim font1 As New PdfTrueTypeFont(New Font("Arial", 12.0F, FontStyle.Bold))
            Dim title As String = "Your Account Information(* = Required)"
            Dim size As SizeF = font1.MeasureString(title)
            Dim x As Single = (page.Canvas.ClientSize.Width - size.Width) / 2
            page.Canvas.DrawString("Your Account Information(", font1, brush1, x, y)
            size = font1.MeasureString("Your Account Information(")
            x = x + size.Width
            page.Canvas.DrawString("* = Required", font1, brush2, x, y)
            size = font1.MeasureString("* = Required")
            x = x + size.Width
            page.Canvas.DrawString(")", font1, brush1, x, y)
            y = y + size.Height

            y = y + 3
            Dim font2 As New PdfTrueTypeFont(New Font("Arial", 8.0F, FontStyle.Italic))
            Dim p As String = "Your information is not public, shared in anyway, or displayed on this site."
            page.Canvas.DrawString(p, font2, brush1, 0, y)

            Return y + font2.Height
        End Function

        Private Shared Function DrawFormSection(ByVal label As String, ByVal page As PdfPageBase, _
                                                ByVal y As Single) As Single
            Dim brush1 As PdfBrush = PdfBrushes.LightYellow
            Dim brush2 As PdfBrush = PdfBrushes.DarkSlateGray
            Dim font As New PdfTrueTypeFont(New Font("Arial", 9.0F, FontStyle.Bold))
            Dim format As New PdfStringFormat()
            Dim height As Single = font.MeasureString(label).Height
            page.Canvas.DrawRectangle(brush2, 0, y, page.Canvas.ClientSize.Width, height + 2)
            page.Canvas.DrawString(label, font, brush1, 2, y + 1)
            y = y + height + 2
            Dim pen As New PdfPen(PdfBrushes.LightSkyBlue, 0.75F)
            page.Canvas.DrawLine(pen, 0, y, page.Canvas.ClientSize.Width, y)
            Return y + 0.75F
        End Function

        Private Shared Function DrawFormField(ByVal fieldNode As XPathNavigator, ByVal form As PdfForm, _
                    ByVal page As PdfPageBase, ByVal y As Single, ByVal fieldIndex As Integer) As Single
            Dim width As Single = page.Canvas.ClientSize.Width
            Dim padding As Single = 2

            'measure field label
            Dim label As String = fieldNode.GetAttribute("label", "")
            Dim font1 As New PdfTrueTypeFont(New Font("Arial", 9.0F))
            Dim format As New PdfStringFormat(PdfTextAlignment.Right, PdfVerticalAlignment.Middle)
            Dim labelMaxWidth As Single = width * 0.4F - 2 * padding
            Dim labelSize As SizeF = font1.MeasureString(label, labelMaxWidth, format)

            'measure field height
            Dim fieldHeight As Single = MeasureFieldHeight(fieldNode)

            Dim height As Single = If(labelSize.Height > fieldHeight, labelSize.Height, fieldHeight)
            height = height + 2

            'draw background
            Dim brush As PdfBrush = PdfBrushes.SteelBlue
            If fieldIndex Mod 2 = 1 Then
                brush = PdfBrushes.LightGreen
            End If
            page.Canvas.DrawRectangle(brush, 0, y, width, height)

            'draw field label
            Dim brush1 As PdfBrush = PdfBrushes.LightYellow
            Dim labelBounds As New RectangleF(padding, y, labelMaxWidth, height)
            page.Canvas.DrawString(label, font1, brush1, labelBounds, format)

            'daw field
            Dim fieldMaxWidth As Single = width * 0.57F - 2 * padding
            Dim fieldX As Single = labelBounds.Right + 2 * padding
            Dim fieldY As Single = y + (height - fieldHeight) / 2
            Dim fieldType As String = fieldNode.GetAttribute("type", "")
            Dim fieldId As String = fieldNode.GetAttribute("id", "")
            Dim required As Boolean = "true" = fieldNode.GetAttribute("required", "")
            Select Case fieldType
                Case "text", "password"
                    Dim textField As New PdfTextBoxField(page, fieldId)
                    textField.Bounds = New RectangleF(fieldX, fieldY, fieldMaxWidth, fieldHeight)
                    textField.BorderWidth = 0.75F
                    textField.BorderStyle = PdfBorderStyle.Solid
                    textField.Required = required
                    If "password" = fieldType Then
                        textField.Password = True
                    End If
                    If "true" = fieldNode.GetAttribute("multiple", "") Then
                        textField.Multiline = True
                        textField.Scrollable = True
                    End If
                    form.Fields.Add(textField)
                Case "checkbox"
                    Dim checkboxField As New PdfCheckBoxField(page, fieldId)
                    Dim checkboxWidth As Single = fieldHeight - 2 * padding
                    Dim checkboxHeight As Single = checkboxWidth
                    checkboxField.Bounds = New RectangleF(fieldX, fieldY + padding, checkboxWidth, checkboxHeight)
                    checkboxField.BorderWidth = 0.75F
                    checkboxField.Style = PdfCheckBoxStyle.Cross
                    checkboxField.Required = required
                    form.Fields.Add(checkboxField)

                Case "list"
                    Dim itemNodes As XPathNodeIterator = fieldNode.Select("item")
                    If "true" = fieldNode.GetAttribute("multiple", "") Then
                        Dim listBoxField As New PdfListBoxField(page, fieldId)
                        listBoxField.Bounds = New RectangleF(fieldX, fieldY, fieldMaxWidth, fieldHeight)
                        listBoxField.BorderWidth = 0.75F
                        listBoxField.MultiSelect = True
                        listBoxField.Font = New PdfFont(PdfFontFamily.Helvetica, 9.0F)
                        listBoxField.Required = required
                        'add items into list box.
                        For Each itemNode As XPathNavigator In itemNodes
                            Dim text As String = itemNode.SelectSingleNode("text()").Value
                            listBoxField.Items.Add(New PdfListFieldItem(text, text))
                        Next itemNode
                        listBoxField.SelectedIndex = 0
                        form.Fields.Add(listBoxField)

                        Exit Select
                    End If
                    If itemNodes IsNot Nothing AndAlso itemNodes.Count <= 3 Then
                        Dim radioButtonListFile As New PdfRadioButtonListField(page, fieldId)
                        radioButtonListFile.Required = required
                        'add items into radio button list.
                        Dim fieldItemHeight As Single = fieldHeight / itemNodes.Count
                        Dim radioButtonWidth As Single = fieldItemHeight - 2 * padding
                        Dim radioButtonHeight As Single = radioButtonWidth
                        For Each itemNode As XPathNavigator In itemNodes
                            Dim text As String = itemNode.SelectSingleNode("text()").Value
                            Dim fieldItem As New PdfRadioButtonListItem(text)
                            fieldItem.BorderWidth = 0.75F
                            fieldItem.Bounds = New RectangleF(fieldX, fieldY + padding, radioButtonWidth, radioButtonHeight)
                            radioButtonListFile.Items.Add(fieldItem)

                            Dim fieldItemLabelX As Single = fieldX + radioButtonWidth + padding
                            Dim fieldItemLabelSize As SizeF = font1.MeasureString(text)
                            Dim fieldItemLabelY As Single = fieldY + (fieldItemHeight - fieldItemLabelSize.Height) / 2
                            page.Canvas.DrawString(text, font1, brush1, fieldItemLabelX, fieldItemLabelY)

                            fieldY = fieldY + fieldItemHeight
                        Next itemNode
                        form.Fields.Add(radioButtonListFile)

                        Exit Select
                    End If

                    'combo box
                    Dim comboBoxField As New PdfComboBoxField(page, fieldId)
                    comboBoxField.Bounds = New RectangleF(fieldX, fieldY, fieldMaxWidth, fieldHeight)
                    comboBoxField.BorderWidth = 0.75F
                    comboBoxField.Font = New PdfFont(PdfFontFamily.Helvetica, 9.0F)
                    comboBoxField.Required = required
                    'add items into combo box.
                    For Each itemNode As XPathNavigator In itemNodes
                        Dim text As String = itemNode.SelectSingleNode("text()").Value
                        comboBoxField.Items.Add(New PdfListFieldItem(text, text))
                    Next itemNode
                    form.Fields.Add(comboBoxField)

            End Select

            If required Then
                'draw *
                Dim flagX As Single = width * 0.97F + padding
                Dim font3 As New PdfTrueTypeFont(New Font("Arial", 10.0F, FontStyle.Bold))
                Dim size As SizeF = font3.MeasureString("*")
                Dim flagY As Single = y + (height - size.Height) / 2
                page.Canvas.DrawString("*", font3, PdfBrushes.Red, flagX, flagY)
            End If

            Return y + height
        End Function

        Private Shared Function MeasureFieldHeight(ByVal fieldNode As XPathNavigator) As Single
            Dim fieldType As String = fieldNode.GetAttribute("type", "")
            Dim defaultHeight As Single = 16.0F
            Select Case fieldType
                Case "text", "password"
                    If "true" = fieldNode.GetAttribute("multiple", "") Then
                        Return defaultHeight * 3
                    End If
                    Return defaultHeight

                Case "checkbox"
                    Return defaultHeight

                Case "list"
                    If "true" = fieldNode.GetAttribute("multiple", "") Then
                        Return defaultHeight * 3
                    End If
                    Dim itemNodes As XPathNodeIterator = fieldNode.Select("item")
                    If itemNodes IsNot Nothing AndAlso itemNodes.Count <= 3 Then
                        Return defaultHeight * 3
                    End If
                    Return defaultHeight

            End Select
            Dim message As String = String.Format("Invalid field type: {0}", fieldType)
            Throw New ArgumentException(message)
        End Function
    End Class
End Namespace
PDF Link in C#, VB.NET

using System;
using System.Drawing;
using Spire.Pdf;
using Spire.Pdf.Actions;
using Spire.Pdf.Annotations;
using Spire.Pdf.Graphics;

namespace Link
{
    class Program
    {
        static void Main(string[] args)
        {
            //Create a pdf document.
            PdfDocument doc = new PdfDocument();

            //margin
            PdfUnitConvertor unitCvtr = new PdfUnitConvertor();
            PdfMargins margin = new PdfMargins();
            margin.Top = unitCvtr.ConvertUnits(2.54f, PdfGraphicsUnit.Centimeter, PdfGraphicsUnit.Point);
            margin.Bottom = margin.Top;
            margin.Left = unitCvtr.ConvertUnits(3.17f, PdfGraphicsUnit.Centimeter, PdfGraphicsUnit.Point);
            margin.Right = margin.Left;

            // Create one page
            PdfPageBase page = doc.Pages.Add(PdfPageSize.A4, margin);

            float y = 10;
            float x = 0;
            PdfTrueTypeFont font = new PdfTrueTypeFont(new Font("Arial", 12));
            String label = "Simple Link: ";
            PdfStringFormat format = new PdfStringFormat();
            format.MeasureTrailingSpaces = true;
            page.Canvas.DrawString(label, font, PdfBrushes.OrangeRed, 0, y, format);
            x = font.MeasureString(label, format).Width;
            PdfTrueTypeFont font1 = new PdfTrueTypeFont(new Font("Arial", 12, FontStyle.Underline));
            String url1 = "http://www.e-iceblue.com";
            page.Canvas.DrawString(url1, font1, PdfBrushes.Blue, x, y);
            y = y + font1.MeasureString(url1).Height;

            label = "Web Link: ";
            page.Canvas.DrawString(label, font, PdfBrushes.OrangeRed, 0, y, format);
            x = font.MeasureString(label, format).Width;
            String text = "e-iceblue";
            PdfTextWebLink link2 = new PdfTextWebLink();
            link2.Text = text;
            link2.Url = url1;
            link2.Font = font1;
            link2.Brush = PdfBrushes.Blue;
            link2.DrawTextWebLink(page.Canvas, new PointF(x, y));
            y = y + font1.MeasureString(text).Height;

            label = "URI Annonationa: ";
            page.Canvas.DrawString(label, font, PdfBrushes.OrangeRed, 0, y, format);
            x = font.MeasureString(label, format).Width;
            text = "Google";
            PointF location = new PointF(x, y);
            SizeF size = font1.MeasureString(text);
            RectangleF linkBounds = new RectangleF(location, size);
            PdfUriAnnotation link3 = new PdfUriAnnotation(linkBounds);
            link3.Border = new PdfAnnotationBorder(0);
            link3.Uri = "http://www.google.com";
            (page as PdfNewPage).Annotations.Add(link3);
            page.Canvas.DrawString(text, font1, PdfBrushes.Blue, x, y);
            y = y + size.Height;

            label = "URI Annonationa Action: ";
            page.Canvas.DrawString(label, font, PdfBrushes.OrangeRed, 0, y, format);
            x = font.MeasureString(label, format).Width;
            text = "JavaScript Action (Click Me)";
            location = new PointF(x, y);
            size = font1.MeasureString(text);
            linkBounds = new RectangleF(location, size);
            PdfUriAnnotation link4 = new PdfUriAnnotation(linkBounds);
            link4.Border = new PdfAnnotationBorder(0.75f);
            link4.Color = Color.LightGray;
            //script
            String script
                = "app.alert({"
                + "    cMsg: \"Hello.\","
                + "    nIcon: 3,"
                + "    cTitle: \"JavaScript Action\""
                + "});";
            PdfJavaScriptAction action = new PdfJavaScriptAction(script);
            link4.Action = action;
            (page as PdfNewPage).Annotations.Add(link4);
            page.Canvas.DrawString(text, font1, PdfBrushes.Blue, x, y);
            y = y + size.Height;

            //Save pdf file.
            doc.SaveToFile("Link.pdf");
            doc.Close();

            //Launching the Pdf file.
            System.Diagnostics.Process.Start("Link.pdf");
        }
    }
}
Imports System.Drawing
Imports Spire.Pdf
Imports Spire.Pdf.Actions
Imports Spire.Pdf.Annotations
Imports Spire.Pdf.Graphics

Namespace Link
    Friend Class Program
        Shared Sub Main(ByVal args() As String)
            'Create a pdf document.
            Dim doc As New PdfDocument()

            'margin
            Dim unitCvtr As New PdfUnitConvertor()
            Dim margin As New PdfMargins()
            margin.Top = unitCvtr.ConvertUnits(2.54F, PdfGraphicsUnit.Centimeter, PdfGraphicsUnit.Point)
            margin.Bottom = margin.Top
            margin.Left = unitCvtr.ConvertUnits(3.17F, PdfGraphicsUnit.Centimeter, PdfGraphicsUnit.Point)
            margin.Right = margin.Left

            ' Create one page
            Dim page As PdfPageBase = doc.Pages.Add(PdfPageSize.A4, margin)

            Dim y As Single = 10
            Dim x As Single = 0
            Dim font As New PdfTrueTypeFont(New Font("Arial", 12))
            Dim label As String = "Simple Link: "
            Dim format As New PdfStringFormat()
            format.MeasureTrailingSpaces = True
            page.Canvas.DrawString(label, font, PdfBrushes.OrangeRed, 0, y, format)
            x = font.MeasureString(label, format).Width
            Dim font1 As New PdfTrueTypeFont(New Font("Arial", 12, FontStyle.Underline))
            Dim url1 As String = "http://www.e-iceblue.com"
            page.Canvas.DrawString(url1, font1, PdfBrushes.Blue, x, y)
            y = y + font1.MeasureString(url1).Height

            label = "Web Link: "
            page.Canvas.DrawString(label, font, PdfBrushes.OrangeRed, 0, y, format)
            x = font.MeasureString(label, format).Width
            Dim text As String = "e-iceblue"
            Dim link2 As New PdfTextWebLink()
            link2.Text = text
            link2.Url = url1
            link2.Font = font1
            link2.Brush = PdfBrushes.Blue
            link2.DrawTextWebLink(page.Canvas, New PointF(x, y))
            y = y + font1.MeasureString(text).Height

            label = "URI Annonationa: "
            page.Canvas.DrawString(label, font, PdfBrushes.OrangeRed, 0, y, format)
            x = font.MeasureString(label, format).Width
            text = "Google"
            Dim location As New PointF(x, y)
            Dim size As SizeF = font1.MeasureString(text)
            Dim linkBounds As New RectangleF(location, size)
            Dim link3 As New PdfUriAnnotation(linkBounds)
            link3.Border = New PdfAnnotationBorder(0)
            link3.Uri = "http://www.google.com"
            TryCast(page, PdfNewPage).Annotations.Add(link3)
            page.Canvas.DrawString(text, font1, PdfBrushes.Blue, x, y)
            y = y + size.Height

            label = "URI Annonationa Action: "
            page.Canvas.DrawString(label, font, PdfBrushes.OrangeRed, 0, y, format)
            x = font.MeasureString(label, format).Width
            text = "JavaScript Action (Click Me)"
            location = New PointF(x, y)
            size = font1.MeasureString(text)
            linkBounds = New RectangleF(location, size)
            Dim link4 As New PdfUriAnnotation(linkBounds)
            link4.Border = New PdfAnnotationBorder(0.75F)
            link4.Color = Color.LightGray
            'script
            Dim script As String _
                = "app.alert({" _
                & "    cMsg: ""Hello.""," _
                & "    nIcon: 3," _
                & "    cTitle: ""JavaScript Action""" _
                & "});"
            Dim action As New PdfJavaScriptAction(script)
            link4.Action = action
            TryCast(page, PdfNewPage).Annotations.Add(link4)
            page.Canvas.DrawString(text, font1, PdfBrushes.Blue, x, y)
            y = y + size.Height

            'Save pdf file.
            doc.SaveToFile("Link.pdf")
            doc.Close()

            'Launching the Pdf file.
            Process.Start("Link.pdf")
        End Sub
    End Class
End Namespace
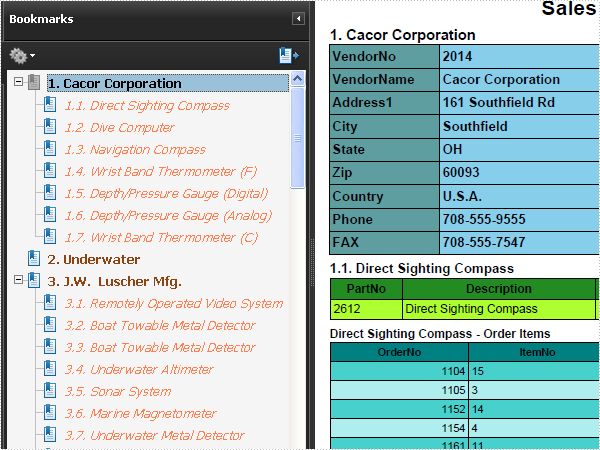
PDF Bookmark in C#, VB.NET
using System;
using System.Data;
using System.Data.OleDb;
using System.Drawing;
using Spire.Pdf;
using Spire.Pdf.Actions;
using Spire.Pdf.Bookmarks;
using Spire.Pdf.General;
using Spire.Pdf.Graphics;
using Spire.Pdf.Grid;
using Spire.Pdf.Tables;

namespace Bookmark
{
    class Program
    {
        static void Main(string[] args)
        {
            //Create a pdf document.
            PdfDocument doc = new PdfDocument();

            //margin
            PdfUnitConvertor unitCvtr = new PdfUnitConvertor();
            PdfMargins margin = new PdfMargins();
            margin.Top = unitCvtr.ConvertUnits(2.54f, PdfGraphicsUnit.Centimeter, PdfGraphicsUnit.Point);
            margin.Bottom = margin.Top;
            margin.Left = unitCvtr.ConvertUnits(3.17f, PdfGraphicsUnit.Centimeter, PdfGraphicsUnit.Point);
            margin.Right = margin.Left;

            //create section
            PdfSection section = doc.Sections.Add();
            section.PageSettings.Size = PdfPageSize.A4;
            section.PageSettings.Margins = margin;

            // Create one page
            PdfPageBase page = section.Pages.Add();

            float y = 10;

            //title
            PdfBrush brush1 = PdfBrushes.Black;
            PdfTrueTypeFont font1 = new PdfTrueTypeFont(new Font("Arial", 16f, FontStyle.Bold));
            PdfStringFormat format1 = new PdfStringFormat(PdfTextAlignment.Center);
            page.Canvas.DrawString("Sales Report", font1, brush1, page.Canvas.ClientSize.Width / 2, y, format1);
            y = y + font1.MeasureString("Sales Report", format1).Height;
            y = y + 5;

            PdfTrueTypeFont font2 = new PdfTrueTypeFont(new Font("Arial", 11f, FontStyle.Bold));
            PdfTrueTypeFont font3 = new PdfTrueTypeFont(new Font("Arial", 10f, FontStyle.Bold));
            using (OleDbConnection conn = new OleDbConnection())
            {
                conn.ConnectionString = @"Provider=Microsoft.Jet.OLEDB.4.0;Data Source=demo.mdb";
                conn.Open();

                OleDbCommand partQueryCommand = PreparePartQueryCommand(conn);
                OleDbCommand orderItemQueryCommand = PrepareOrderItemQueryCommand(conn);

                DataTable vendors = GetVendors(conn);
                for (int i = 0; i < vendors.Rows.Count; i++)
                {
                    if (i > 0)
                    {
                        //next page
                        page = section.Pages.Add();
                        y = 0;
                    }
                    //draw vendor
                    String vendorTitle = String.Format("{0}. {1}", i + 1, vendors.Rows[i].ItemArray[1]);
                    PdfLayoutResult drawVendorLayoutResult = DrawVendor(page, vendors, i, vendorTitle, y);

                    //add vendor bookmark
                    PdfDestination vendorBookmarkDest = new PdfDestination(page, new PointF(0, y));
                    PdfBookmark vendorBookmark = doc.Bookmarks.Add(vendorTitle);
                    vendorBookmark.Color = Color.SaddleBrown;
                    vendorBookmark.DisplayStyle = PdfTextStyle.Bold;
                    vendorBookmark.Action = new PdfGoToAction(vendorBookmarkDest);

                    y = drawVendorLayoutResult.Bounds.Bottom + 5;
                    page = drawVendorLayoutResult.Page;

                    //get parts of vendor
                    DataTable parts = GetParts(partQueryCommand, (double)vendors.Rows[i].ItemArray[0]);
                    for (int j = 0; j < parts.Rows.Count; j++)
                    {
                        if (j > 0)
                        {
                            //next page
                            page = section.Pages.Add();
                            y = 0;
                        }
                        //draw part
                        String partTitle = String.Format("{0}.{1}. {2}", i + 1, j + 1, parts.Rows[j].ItemArray[1]);
                        PdfLayoutResult drawPartLayoutResult = DrawPart(page, parts, j, partTitle, y);

                        //add part bookmark
                        PdfDestination partBookmarkDest = new PdfDestination(page, new PointF(0, y));
                        PdfBookmark partBookmark = vendorBookmark.Add(partTitle);
                        partBookmark.Color = Color.Coral;
                        partBookmark.DisplayStyle = PdfTextStyle.Italic;
                        partBookmark.Action = new PdfGoToAction(partBookmarkDest);

                        y = drawPartLayoutResult.Bounds.Bottom + 5;
                        page = drawPartLayoutResult.Page;

                        //get order items
                        String orderItemsTitle = String.Format("{0} - Order Items", parts.Rows[j].ItemArray[1]);
                        DataTable orderItems = GetOrderItems(orderItemQueryCommand, (double)parts.Rows[j].ItemArray[0]);
                        DrawOrderItems(page, orderItems, orderItemsTitle, y);
                    }
                }
            }

            //Save pdf file.
            doc.SaveToFile("Bookmark.pdf");
            doc.Close();

            //Launching the Pdf file.
            System.Diagnostics.Process.Start("Bookmark.pdf");
        }

        private static DataTable GetVendors(OleDbConnection conn)
        {
            String query
                = " SELECT VendorNo, VendorName, Address1, City, State, Zip, Country, Phone, FAX "
                + " FROM vendors ";
            using (OleDbDataAdapter adapter = new OleDbDataAdapter(query, conn))
            {
                DataTable dataTable = new DataTable();
                adapter.Fill(dataTable);

                return dataTable;
            }
        }

        private static DataTable GetParts(OleDbCommand query, double vendorId)
        {
            query.Parameters[0].Value = vendorId;
            using (OleDbDataAdapter adapter = new OleDbDataAdapter(query))
            {
                DataTable dataTable = new DataTable();
                adapter.Fill(dataTable);

                return dataTable;
            }
        }

        private static DataTable GetOrderItems(OleDbCommand query, double partId)
        {
            query.Parameters[0].Value = partId;
            using (OleDbDataAdapter adapter = new OleDbDataAdapter(query))
            {
                DataTable dataTable = new DataTable();
                adapter.Fill(dataTable);

                return dataTable;
            }
        }

        private static PdfLayoutResult DrawVendor(PdfPageBase page, DataTable vendors, int index, String title, float y)
        {
            //draw title
            PdfTrueTypeFont font1 = new PdfTrueTypeFont(new Font("Arial", 11f, FontStyle.Bold));
            DataRow row = vendors.Rows[index];
            page.Canvas.DrawString(title, font1, PdfBrushes.Black, 0, y);
            y = y + font1.MeasureString(title).Height + 1;

            //draw table
            Object[][] data = new Object[vendors.Columns.Count][];
            for (int i = 0; i < vendors.Columns.Count; i++)
            {
                data[i] = new Object[2];
                data[i][0] = vendors.Columns[i].ColumnName;
                data[i][1] = vendors.Rows[index].ItemArray[i];
            }

            PdfGrid grid = new PdfGrid();
            grid.Style.CellPadding = new PdfPaddings(2, 2, 1, 1);
            grid.DataSource = data;

            float width
                = page.Canvas.ClientSize.Width
                    - (grid.Columns.Count + 1) * 0.75f;
            grid.Columns[0].Width = width * 0.20f;
            grid.Columns[1].Width = width * 0.80f;

            PdfTrueTypeFont font2 = new PdfTrueTypeFont(new Font("Arial", 10f, FontStyle.Bold));
            PdfTrueTypeFont font3 = new PdfTrueTypeFont(new Font("Arial", 10f));
            for (int i = 0; i < grid.Rows.Count; i++)
            {
                grid.Rows[i].Style.Font = font2;
                grid.Rows[i].Cells[0].Style.BackgroundBrush = PdfBrushes.CadetBlue;
                grid.Rows[i].Cells[1].Style.BackgroundBrush = PdfBrushes.SkyBlue;
            }

            PdfGridLayoutFormat layout = new PdfGridLayoutFormat();
            layout.Break = PdfLayoutBreakType.FitPage;
            layout.Layout = PdfLayoutType.Paginate;

            return grid.Draw(page, new PointF(0, y), layout);
        }

        private static PdfLayoutResult DrawPart(PdfPageBase page, DataTable parts, int index, String title, float y)
        {
            //draw title
            PdfTrueTypeFont font1 = new PdfTrueTypeFont(new Font("Arial", 10f, FontStyle.Bold));
            DataRow row = parts.Rows[index];
            page.Canvas.DrawString(title, font1, PdfBrushes.Black, 0, y);
            y = y + font1.MeasureString(title).Height + 1;

            //draw table
            Object[][] data = new Object[2][];
            data[0] = new String[parts.Columns.Count];
            for (int i = 0; i < parts.Columns.Count; i++)
            {
                data[0][i] = parts.Columns[i].ColumnName;
            }
            data[1] = row.ItemArray;

            PdfTable table = new PdfTable();
            table.Style.CellPadding = 2;
            table.Style.BorderPen = new PdfPen(PdfBrushes.Black, 0.75f);
            table.Style.DefaultStyle.BackgroundBrush = PdfBrushes.GreenYellow;
            table.Style.DefaultStyle.Font = new PdfTrueTypeFont(new Font("Arial", 9f));
            table.Style.HeaderSource = PdfHeaderSource.Rows;
            table.Style.HeaderRowCount = 1;
            table.Style.HeaderStyle.BackgroundBrush = PdfBrushes.ForestGreen;
            table.Style.HeaderStyle.Font = new PdfTrueTypeFont(new Font("Arial", 9f, FontStyle.Bold));
            table.Style.HeaderStyle.StringFormat = new PdfStringFormat(PdfTextAlignment.Center);
            table.Style.ShowHeader = true;
            table.DataSource = data;

            float width
                = page.Canvas.ClientSize.Width
                    - (table.Columns.Count + 1) * table.Style.BorderPen.Width;
            for (int i = 0; i < table.Columns.Count; i++)
            {
                table.Columns[i].Width = i == 1 ? width * 0.35f : width * 0.13f;
            }

            PdfTableLayoutFormat tableLayout = new PdfTableLayoutFormat();
            tableLayout.Break = PdfLayoutBreakType.FitPage;
            tableLayout.Layout = PdfLayoutType.Paginate;

            return table.Draw(page, new PointF(0, y), tableLayout);
        }

        private static PdfLayoutResult DrawOrderItems(PdfPageBase page, DataTable orderItems, String title, float y)
        {
            //draw title
            PdfTrueTypeFont font1 = new PdfTrueTypeFont(new Font("Arial", 9f, FontStyle.Bold));
            page.Canvas.DrawString(title, font1, PdfBrushes.Black, 0, y);
            y = y + font1.MeasureString(title).Height + 1;

            PdfTable table = new PdfTable();
            table.Style.CellPadding = 2;
            table.Style.BorderPen = new PdfPen(PdfBrushes.Black, 0.75f);
            table.Style.DefaultStyle.BackgroundBrush = PdfBrushes.MediumTurquoise;
            table.Style.DefaultStyle.Font = new PdfTrueTypeFont(new Font("Arial", 8f));
            table.Style.AlternateStyle = new PdfCellStyle();
            table.Style.AlternateStyle.BackgroundBrush = PdfBrushes.PaleTurquoise;
            table.Style.AlternateStyle.Font = new PdfTrueTypeFont(new Font("Arial", 8f));
            table.Style.HeaderSource = PdfHeaderSource.ColumnCaptions;
            table.Style.HeaderStyle.BackgroundBrush = PdfBrushes.Teal;
            table.Style.HeaderStyle.Font = new PdfTrueTypeFont(new Font("Arial", 8f, FontStyle.Bold));
            table.Style.HeaderStyle.StringFormat = new PdfStringFormat(PdfTextAlignment.Center);
            table.Style.ShowHeader = true;
            table.DataSource = orderItems;
            for (int i = 2; i < table.Columns.Count; i++)
            {
                table.Columns[0].StringFormat = new PdfStringFormat(PdfTextAlignment.Right);
            }

            PdfTableLayoutFormat tableLayout = new PdfTableLayoutFormat();
            tableLayout.Break = PdfLayoutBreakType.FitPage;
            tableLayout.Layout = PdfLayoutType.Paginate;

            return table.Draw(page, new PointF(0, y), tableLayout);
        }

        private static OleDbCommand PreparePartQueryCommand(OleDbConnection conn)
        {
            OleDbCommand command = new OleDbCommand();
            command.CommandText
                = " SELECT PartNo, Description, OnHand, OnOrder, Cost, ListPrice "
                + " FROM parts WHERE VendorNo = @VendorNo";
            OleDbParameter param = new OleDbParameter("@VendorNo", OleDbType.Double);
            command.Parameters.Add(param);
            command.Connection = conn;
            return command;
        }

        private static OleDbCommand PrepareOrderItemQueryCommand(OleDbConnection conn)
        {
            OleDbCommand command = new OleDbCommand();
            command.CommandText
                = " SELECT OrderNo, ItemNo, Qty, Discount "
                + " FROM items WHERE PartNo = @PartNo";
            OleDbParameter param = new OleDbParameter("@PartNo", OleDbType.Double);
            command.Parameters.Add(param);
            command.Connection = conn;
            return command;
        }
    }
}
Imports System
Imports System.Data
Imports System.Data.OleDb
Imports System.Drawing
Imports Spire.Pdf
Imports Spire.Pdf.Actions
Imports Spire.Pdf.Bookmarks
Imports Spire.Pdf.General
Imports Spire.Pdf.Graphics
Imports Spire.Pdf.Grid
Imports Spire.Pdf.Tables

Namespace Bookmark
    Friend Class Program
        Shared Sub Main(ByVal args() As String)
            'Create a pdf document.
            Dim doc As New PdfDocument()

            'margin
            Dim unitCvtr As New PdfUnitConvertor()
            Dim margin As New PdfMargins()
            margin.Top = unitCvtr.ConvertUnits(2.54F, PdfGraphicsUnit.Centimeter, PdfGraphicsUnit.Point)
            margin.Bottom = margin.Top
            margin.Left = unitCvtr.ConvertUnits(3.17F, PdfGraphicsUnit.Centimeter, PdfGraphicsUnit.Point)
            margin.Right = margin.Left

            'create section
            Dim section As PdfSection = doc.Sections.Add()
            section.PageSettings.Size = PdfPageSize.A4
            section.PageSettings.Margins = margin

            ' Create one page
            Dim page As PdfPageBase = section.Pages.Add()

            Dim y As Single = 10

            'title
            Dim brush1 As PdfBrush = PdfBrushes.Black
            Dim font1 As New PdfTrueTypeFont(New Font("Arial", 16.0F, FontStyle.Bold))
            Dim format1 As New PdfStringFormat(PdfTextAlignment.Center)
            page.Canvas.DrawString("Sales Report", font1, brush1, page.Canvas.ClientSize.Width \ 2, y, format1)
            y = y + font1.MeasureString("Sales Report", format1).Height
            y = y + 5

            Dim font2 As New PdfTrueTypeFont(New Font("Arial", 11.0F, FontStyle.Bold))
            Dim font3 As New PdfTrueTypeFont(New Font("Arial", 10.0F, FontStyle.Bold))
            Using conn As New OleDbConnection()
                conn.ConnectionString = "Provider=Microsoft.Jet.OLEDB.4.0;Data Source=demo.mdb"
                conn.Open()

                Dim partQueryCommand As OleDbCommand = PreparePartQueryCommand(conn)
                Dim orderItemQueryCommand As OleDbCommand = PrepareOrderItemQueryCommand(conn)

                Dim vendors As DataTable = GetVendors(conn)
                For i As Integer = 0 To vendors.Rows.Count - 1
                    If i > 0 Then
                        'next page
                        page = section.Pages.Add()
                        y = 0
                    End If
                    'draw vendor
                    Dim vendorTitle As String = String.Format("{0}. {1}", i + 1, vendors.Rows(i).ItemArray(1))
                    Dim drawVendorLayoutResult As PdfLayoutResult = DrawVendor(page, vendors, i, vendorTitle, y)

                    'add vendor bookmark
                    Dim vendorBookmarkDest As New PdfDestination(page, New PointF(0, y))
                    Dim vendorBookmark As PdfBookmark = doc.Bookmarks.Add(vendorTitle)
                    vendorBookmark.Color = Color.SaddleBrown
                    vendorBookmark.DisplayStyle = PdfTextStyle.Bold
                    vendorBookmark.Action = New PdfGoToAction(vendorBookmarkDest)

                    y = drawVendorLayoutResult.Bounds.Bottom + 5
                    page = drawVendorLayoutResult.Page

                    'get parts of vendor
                    Dim parts As DataTable = GetParts(partQueryCommand, CDbl(vendors.Rows(i).ItemArray(0)))
                    For j As Integer = 0 To parts.Rows.Count - 1
                        If j > 0 Then
                            'next page
                            page = section.Pages.Add()
                            y = 0
                        End If
                        'draw part
                        Dim partTitle As String _
                            = String.Format("{0}.{1}. {2}", i + 1, j + 1, parts.Rows(j).ItemArray(1))
                        Dim drawPartLayoutResult As PdfLayoutResult = DrawPart(page, parts, j, partTitle, y)

                        'add part bookmark
                        Dim partBookmarkDest As New PdfDestination(page, New PointF(0, y))
                        Dim partBookmark As PdfBookmark = vendorBookmark.Add(partTitle)
                        partBookmark.Color = Color.Coral
                        partBookmark.DisplayStyle = PdfTextStyle.Italic
                        partBookmark.Action = New PdfGoToAction(partBookmarkDest)

                        y = drawPartLayoutResult.Bounds.Bottom + 5
                        page = drawPartLayoutResult.Page

                        'get order items
                        Dim orderItemsTitle As String _
                            = String.Format("{0} - Order Items", parts.Rows(j).ItemArray(1))
                        Dim orderItems As DataTable _
                            = GetOrderItems(orderItemQueryCommand, CDbl(parts.Rows(j).ItemArray(0)))
                        DrawOrderItems(page, orderItems, orderItemsTitle, y)
                    Next j
                Next i
            End Using

            'Save pdf file.
            doc.SaveToFile("Bookmark.pdf")
            doc.Close()

            'Launching the Pdf file.
            Process.Start("Bookmark.pdf")
        End Sub

        Private Shared Function GetVendors(ByVal conn As OleDbConnection) As DataTable
            Dim query As String _
                = " SELECT VendorNo, VendorName, Address1, City, State, Zip, Country, Phone, FAX " _
                & " FROM vendors "
            Using adapter As New OleDbDataAdapter(query, conn)
                Dim dataTable As New DataTable()
                adapter.Fill(dataTable)

                Return dataTable
            End Using
        End Function

        Private Shared Function GetParts(ByVal query As OleDbCommand, ByVal vendorId As Double) As DataTable
            query.Parameters(0).Value = vendorId
            Using adapter As New OleDbDataAdapter(query)
                Dim dataTable As New DataTable()
                adapter.Fill(dataTable)

                Return dataTable
            End Using
        End Function

        Private Shared Function GetOrderItems(ByVal query As OleDbCommand, ByVal partId As Double) As DataTable
            query.Parameters(0).Value = partId
            Using adapter As New OleDbDataAdapter(query)
                Dim dataTable As New DataTable()
                adapter.Fill(dataTable)

                Return dataTable
            End Using
        End Function

        Private Shared Function DrawVendor(ByVal page As PdfPageBase, ByVal vendors As DataTable, _
                        ByVal index As Integer, ByVal title As String, ByVal y As Single) As PdfLayoutResult
            'draw title
            Dim font1 As New PdfTrueTypeFont(New Font("Arial", 11.0F, FontStyle.Bold))
            Dim row As DataRow = vendors.Rows(index)
            page.Canvas.DrawString(title, font1, PdfBrushes.Black, 0, y)
            y = y + font1.MeasureString(title).Height + 1

            'draw table
            Dim data(vendors.Columns.Count - 1)() As Object
            For i As Integer = 0 To vendors.Columns.Count - 1
                data(i) = New Object(1) {}
                data(i)(0) = vendors.Columns(i).ColumnName
                data(i)(1) = vendors.Rows(index).ItemArray(i)
            Next i

            Dim grid As New PdfGrid()
            grid.Style.CellPadding = New PdfPaddings(2, 2, 1, 1)
            grid.DataSource = data

            Dim width As Single = page.Canvas.ClientSize.Width - (grid.Columns.Count + 1) * 0.75F
            grid.Columns(0).Width = width * 0.2F
            grid.Columns(1).Width = width * 0.8F

            Dim font2 As New PdfTrueTypeFont(New Font("Arial", 10.0F, FontStyle.Bold))
            Dim font3 As New PdfTrueTypeFont(New Font("Arial", 10.0F))
            For i As Integer = 0 To grid.Rows.Count - 1
                grid.Rows(i).Style.Font = font2
                grid.Rows(i).Cells(0).Style.BackgroundBrush = PdfBrushes.CadetBlue
                grid.Rows(i).Cells(1).Style.BackgroundBrush = PdfBrushes.SkyBlue
            Next i

            Dim layout As New PdfGridLayoutFormat()
            layout.Break = PdfLayoutBreakType.FitPage
            layout.Layout = PdfLayoutType.Paginate

            Return grid.Draw(page, New PointF(0, y), layout)
        End Function

        Private Shared Function DrawPart(ByVal page As PdfPageBase, ByVal parts As DataTable, ByVal index As Integer, _
                                         ByVal title As String, ByVal y As Single) As PdfLayoutResult
            'draw title
            Dim font1 As New PdfTrueTypeFont(New Font("Arial", 10.0F, FontStyle.Bold))
            Dim row As DataRow = parts.Rows(index)
            page.Canvas.DrawString(title, font1, PdfBrushes.Black, 0, y)
            y = y + font1.MeasureString(title).Height + 1

            'draw table
            Dim data(1)() As Object
            data(0) = New String(parts.Columns.Count - 1) {}
            For i As Integer = 0 To parts.Columns.Count - 1
                data(0)(i) = parts.Columns(i).ColumnName
            Next i
            data(1) = row.ItemArray

            Dim table As New PdfTable()
            table.Style.CellPadding = 2
            table.Style.BorderPen = New PdfPen(PdfBrushes.Black, 0.75F)
            table.Style.DefaultStyle.BackgroundBrush = PdfBrushes.GreenYellow
            table.Style.DefaultStyle.Font = New PdfTrueTypeFont(New Font("Arial", 9.0F))
            table.Style.HeaderSource = PdfHeaderSource.Rows
            table.Style.HeaderRowCount = 1
            table.Style.HeaderStyle.BackgroundBrush = PdfBrushes.ForestGreen
            table.Style.HeaderStyle.Font = New PdfTrueTypeFont(New Font("Arial", 9.0F, FontStyle.Bold))
            table.Style.HeaderStyle.StringFormat = New PdfStringFormat(PdfTextAlignment.Center)
            table.Style.ShowHeader = True
            table.DataSource = data

            Dim width As Single _
                = page.Canvas.ClientSize.Width - (table.Columns.Count + 1) * table.Style.BorderPen.Width
            For i As Integer = 0 To table.Columns.Count - 1
                table.Columns(i).Width = If(i = 1, width * 0.35F, width * 0.13F)
            Next i

            Dim tableLayout As New PdfTableLayoutFormat()
            tableLayout.Break = PdfLayoutBreakType.FitPage
            tableLayout.Layout = PdfLayoutType.Paginate

            Return table.Draw(page, New PointF(0, y), tableLayout)
        End Function

        Private Shared Function DrawOrderItems(ByVal page As PdfPageBase, ByVal orderItems As DataTable, _
                                               ByVal title As String, ByVal y As Single) As PdfLayoutResult
            'draw title
            Dim font1 As New PdfTrueTypeFont(New Font("Arial", 9.0F, FontStyle.Bold))
            page.Canvas.DrawString(title, font1, PdfBrushes.Black, 0, y)
            y = y + font1.MeasureString(title).Height + 1

            Dim table As New PdfTable()
            table.Style.CellPadding = 2
            table.Style.BorderPen = New PdfPen(PdfBrushes.Black, 0.75F)
            table.Style.DefaultStyle.BackgroundBrush = PdfBrushes.MediumTurquoise
            table.Style.DefaultStyle.Font = New PdfTrueTypeFont(New Font("Arial", 8.0F))
            table.Style.AlternateStyle = New PdfCellStyle()
            table.Style.AlternateStyle.BackgroundBrush = PdfBrushes.PaleTurquoise
            table.Style.AlternateStyle.Font = New PdfTrueTypeFont(New Font("Arial", 8.0F))
            table.Style.HeaderSource = PdfHeaderSource.ColumnCaptions
            table.Style.HeaderStyle.BackgroundBrush = PdfBrushes.Teal
            table.Style.HeaderStyle.Font = New PdfTrueTypeFont(New Font("Arial", 8.0F, FontStyle.Bold))
            table.Style.HeaderStyle.StringFormat = New PdfStringFormat(PdfTextAlignment.Center)
            table.Style.ShowHeader = True
            table.DataSource = orderItems
            For i As Integer = 2 To table.Columns.Count - 1
                table.Columns(0).StringFormat = New PdfStringFormat(PdfTextAlignment.Right)
            Next i

            Dim tableLayout As New PdfTableLayoutFormat()
            tableLayout.Break = PdfLayoutBreakType.FitPage
            tableLayout.Layout = PdfLayoutType.Paginate

            Return table.Draw(page, New PointF(0, y), tableLayout)
        End Function

        Private Shared Function PreparePartQueryCommand(ByVal conn As OleDbConnection) As OleDbCommand
            Dim command As New OleDbCommand()
            command.CommandText _
                = " SELECT PartNo, Description, OnHand, OnOrder, Cost, ListPrice " _
                & " FROM parts WHERE VendorNo = @VendorNo"
            Dim param As New OleDbParameter("@VendorNo", OleDbType.Double)
            command.Parameters.Add(param)
            command.Connection = conn
            Return command
        End Function

        Private Shared Function PrepareOrderItemQueryCommand(ByVal conn As OleDbConnection) As OleDbCommand
            Dim command As New OleDbCommand()
            command.CommandText _
                = " SELECT OrderNo, ItemNo, Qty, Discount " _
                & " FROM items WHERE PartNo = @PartNo"
            Dim param As New OleDbParameter("@PartNo", OleDbType.Double)
            command.Parameters.Add(param)
            command.Connection = conn
            Return command
        End Function
    End Class
End Namespace
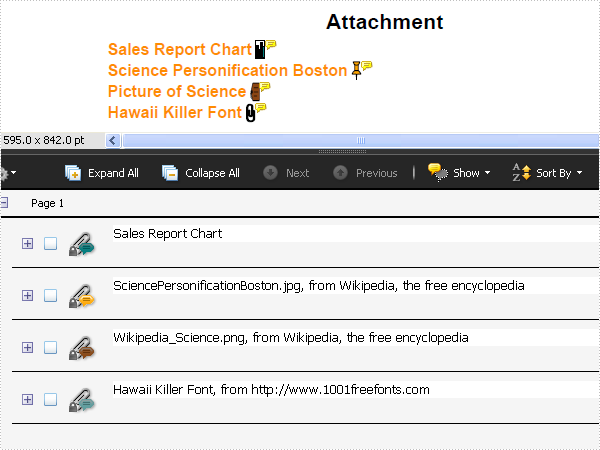
PDF Attachment in C#, VB.NET
The sample demonstrates how to work with attachment and attachment annotation in PDF document.
using System;
using System.Drawing;
using System.IO;
using Spire.Pdf;
using Spire.Pdf.Annotations;
using Spire.Pdf.Attachments;
using Spire.Pdf.Graphics;

namespace Attachment
{
    class Program
    {
        static void Main(string[] args)
        {
            //Create a pdf document.
            PdfDocument doc = new PdfDocument();

            //margin
            PdfUnitConvertor unitCvtr = new PdfUnitConvertor();
            PdfMargins margin = new PdfMargins();
            margin.Top = unitCvtr.ConvertUnits(2.54f, PdfGraphicsUnit.Centimeter, PdfGraphicsUnit.Point);
            margin.Bottom = margin.Top;
            margin.Left = unitCvtr.ConvertUnits(3.17f, PdfGraphicsUnit.Centimeter, PdfGraphicsUnit.Point);
            margin.Right = margin.Left;

            //create section
            PdfSection section = doc.Sections.Add();
            section.PageSettings.Size = PdfPageSize.A4;
            section.PageSettings.Margins = margin;

            // Create one page
            PdfPageBase page = section.Pages.Add();

            float y = 10;

            //title
            PdfBrush brush1 = PdfBrushes.Black;
            PdfTrueTypeFont font1 = new PdfTrueTypeFont(new Font("Arial", 16f, FontStyle.Bold));
            PdfStringFormat format1 = new PdfStringFormat(PdfTextAlignment.Center);
            page.Canvas.DrawString("Attachment", font1, brush1, page.Canvas.ClientSize.Width / 2, y, format1);
            y = y + font1.MeasureString("Attachment", format1).Height;
            y = y + 5;

            //attachment
            PdfAttachment attachment = new PdfAttachment("Header.png");
            attachment.Data = File.ReadAllBytes(@"Header.png");
            attachment.Description = "Page header picture of demo.";
            attachment.MimeType = "image/png";
            doc.Attachments.Add(attachment);

            attachment = new PdfAttachment("Footer.png");
            attachment.Data = File.ReadAllBytes(@"Footer.png");
            attachment.Description = "Page footer picture of demo.";
            attachment.MimeType = "image/png";
            doc.Attachments.Add(attachment);

            PdfTrueTypeFont font2 = new PdfTrueTypeFont(new Font("Arial", 12f, FontStyle.Bold));
            PointF location = new PointF(0, y);
            String label = "Sales Report Chart";
            byte[] data = File.ReadAllBytes(@"SalesReportChart.png");
            SizeF size = font2.MeasureString(label);
            RectangleF bounds = new RectangleF(location, size);
            page.Canvas.DrawString(label, font2, PdfBrushes.DarkOrange, bounds);
            bounds = new RectangleF(bounds.Right + 3, bounds.Top, font2.Height / 2, font2.Height);
            PdfAttachmentAnnotation annotation1
                = new PdfAttachmentAnnotation(bounds, "SalesReportChart.png", data);
            annotation1.Color = Color.Teal;
            annotation1.Flags = PdfAnnotationFlags.ReadOnly;
            annotation1.Icon = PdfAttachmentIcon.Graph;
            annotation1.Text = "Sales Report Chart";
            (page as PdfNewPage).Annotations.Add(annotation1);
            y = y + size.Height + 2;

            location = new PointF(0, y);
            label = "Science Personification Boston";
            data = File.ReadAllBytes(@"SciencePersonificationBoston.jpg");
            size = font2.MeasureString(label);
            bounds = new RectangleF(location, size);
            page.Canvas.DrawString(label, font2, PdfBrushes.DarkOrange, bounds);
            bounds = new RectangleF(bounds.Right + 3, bounds.Top, font2.Height / 2, font2.Height);
            PdfAttachmentAnnotation annotation2
                = new PdfAttachmentAnnotation(bounds, "SciencePersonificationBoston.jpg", data);
            annotation2.Color = Color.Orange;
            annotation2.Flags = PdfAnnotationFlags.NoZoom;
            annotation2.Icon = PdfAttachmentIcon.PushPin;
            annotation2.Text = "SciencePersonificationBoston.jpg, from Wikipedia, the free encyclopedia";
            (page as PdfNewPage).Annotations.Add(annotation2);
            y = y + size.Height + 2;

            location = new PointF(0, y);
            label = "Picture of Science";
            data = File.ReadAllBytes(@"Wikipedia_Science.png");
            size = font2.MeasureString(label);
            bounds = new RectangleF(location, size);
            page.Canvas.DrawString(label, font2, PdfBrushes.DarkOrange, bounds);
            bounds = new RectangleF(bounds.Right + 3, bounds.Top, font2.Height / 2, font2.Height);
            PdfAttachmentAnnotation annotation3
                = new PdfAttachmentAnnotation(bounds, "Wikipedia_Science.png", data);
            annotation3.Color = Color.SaddleBrown;
            annotation3.Flags = PdfAnnotationFlags.Locked;
            annotation3.Icon = PdfAttachmentIcon.Tag;
            annotation3.Text = "Wikipedia_Science.png, from Wikipedia, the free encyclopedia";
            (page as PdfNewPage).Annotations.Add(annotation3);
            y = y + size.Height + 2;

            location = new PointF(0, y);
            label = "Hawaii Killer Font";
            data = File.ReadAllBytes(@"Hawaii_Killer.ttf");
            size = font2.MeasureString(label);
            bounds = new RectangleF(location, size);
            page.Canvas.DrawString(label, font2, PdfBrushes.DarkOrange, bounds);
            bounds = new RectangleF(bounds.Right + 3, bounds.Top, font2.Height / 2, font2.Height);
            PdfAttachmentAnnotation annotation4
                = new PdfAttachmentAnnotation(bounds, "Hawaii_Killer.ttf", data);
            annotation4.Color = Color.CadetBlue;
            annotation4.Flags = PdfAnnotationFlags.NoRotate;
            annotation4.Icon = PdfAttachmentIcon.Paperclip;
            annotation4.Text = "Hawaii Killer Font, from http://www.1001freefonts.com";
            (page as PdfNewPage).Annotations.Add(annotation4);
            y = y + size.Height + 2;

            //Save pdf file.
            doc.SaveToFile("Attachment.pdf");
            doc.Close();

            //Launching the Pdf file.
            System.Diagnostics.Process.Start("Attachment.pdf");
        }
    }
}
Imports System.Drawing
Imports System.IO
Imports Spire.Pdf
Imports Spire.Pdf.Annotations
Imports Spire.Pdf.Attachments
Imports Spire.Pdf.Graphics

Namespace Attachment
    Friend Class Program
        Shared Sub Main(ByVal args() As String)
            'Create a pdf document.
            Dim doc As New PdfDocument()

            'margin
            Dim unitCvtr As New PdfUnitConvertor()
            Dim margin As New PdfMargins()
            margin.Top = unitCvtr.ConvertUnits(2.54F, PdfGraphicsUnit.Centimeter, PdfGraphicsUnit.Point)
            margin.Bottom = margin.Top
            margin.Left = unitCvtr.ConvertUnits(3.17F, PdfGraphicsUnit.Centimeter, PdfGraphicsUnit.Point)
            margin.Right = margin.Left

            'create section
            Dim section As PdfSection = doc.Sections.Add()
            section.PageSettings.Size = PdfPageSize.A4
            section.PageSettings.Margins = margin

            ' Create one page
            Dim page As PdfPageBase = section.Pages.Add()

            Dim y As Single = 10

            'title
            Dim brush1 As PdfBrush = PdfBrushes.Black
            Dim font1 As New PdfTrueTypeFont(New Font("Arial", 16.0F, FontStyle.Bold))
            Dim format1 As New PdfStringFormat(PdfTextAlignment.Center)
            page.Canvas.DrawString("Attachment", font1, brush1, page.Canvas.ClientSize.Width \ 2, y, format1)
            y = y + font1.MeasureString("Attachment", format1).Height
            y = y + 5

            'attachment
            Dim attachment As New PdfAttachment("Header.png")
            attachment.Data = File.ReadAllBytes("Header.png")
            attachment.Description = "Page header picture of demo."
            attachment.MimeType = "image/png"
            doc.Attachments.Add(attachment)

            attachment = New PdfAttachment("Footer.png")
            attachment.Data = File.ReadAllBytes("Footer.png")
            attachment.Description = "Page footer picture of demo."
            attachment.MimeType = "image/png"
            doc.Attachments.Add(attachment)

            Dim font2 As New PdfTrueTypeFont(New Font("Arial", 12.0F, FontStyle.Bold))
            Dim location As New PointF(0, y)
            Dim label As String = "Sales Report Chart"
            Dim data() As Byte = File.ReadAllBytes("SalesReportChart.png")
            Dim size As SizeF = font2.MeasureString(label)
            Dim bounds As New RectangleF(location, size)
            page.Canvas.DrawString(label, font2, PdfBrushes.DarkOrange, bounds)
            bounds = New RectangleF(bounds.Right + 3, bounds.Top, font2.Height \ 2, font2.Height)
            Dim annotation1 As New PdfAttachmentAnnotation(bounds, "SalesReportChart.png", data)
            annotation1.Color = Color.Teal
            annotation1.Flags = PdfAnnotationFlags.ReadOnly
            annotation1.Icon = PdfAttachmentIcon.Graph
            annotation1.Text = "Sales Report Chart"
            TryCast(page, PdfNewPage).Annotations.Add(annotation1)
            y = y + size.Height + 2

            location = New PointF(0, y)
            label = "Science Personification Boston"
            data = File.ReadAllBytes("SciencePersonificationBoston.jpg")
            size = font2.MeasureString(label)
            bounds = New RectangleF(location, size)
            page.Canvas.DrawString(label, font2, PdfBrushes.DarkOrange, bounds)
            bounds = New RectangleF(bounds.Right + 3, bounds.Top, font2.Height \ 2, font2.Height)
            Dim annotation2 As New PdfAttachmentAnnotation(bounds, "SciencePersonificationBoston.jpg", data)
            annotation2.Color = Color.Orange
            annotation2.Flags = PdfAnnotationFlags.NoZoom
            annotation2.Icon = PdfAttachmentIcon.PushPin
            annotation2.Text = "SciencePersonificationBoston.jpg, from Wikipedia, the free encyclopedia"
            TryCast(page, PdfNewPage).Annotations.Add(annotation2)
            y = y + size.Height + 2

            location = New PointF(0, y)
            label = "Picture of Science"
            data = File.ReadAllBytes("Wikipedia_Science.png")
            size = font2.MeasureString(label)
            bounds = New RectangleF(location, size)
            page.Canvas.DrawString(label, font2, PdfBrushes.DarkOrange, bounds)
            bounds = New RectangleF(bounds.Right + 3, bounds.Top, font2.Height \ 2, font2.Height)
            Dim annotation3 As New PdfAttachmentAnnotation(bounds, "Wikipedia_Science.png", data)
            annotation3.Color = Color.SaddleBrown
            annotation3.Flags = PdfAnnotationFlags.Locked
            annotation3.Icon = PdfAttachmentIcon.Tag
            annotation3.Text = "Wikipedia_Science.png, from Wikipedia, the free encyclopedia"
            TryCast(page, PdfNewPage).Annotations.Add(annotation3)
            y = y + size.Height + 2

            location = New PointF(0, y)
            label = "Hawaii Killer Font"
            data = File.ReadAllBytes("Hawaii_Killer.ttf")
            size = font2.MeasureString(label)
            bounds = New RectangleF(location, size)
            page.Canvas.DrawString(label, font2, PdfBrushes.DarkOrange, bounds)
            bounds = New RectangleF(bounds.Right + 3, bounds.Top, font2.Height \ 2, font2.Height)
            Dim annotation4 As New PdfAttachmentAnnotation(bounds, "Hawaii_Killer.ttf", data)
            annotation4.Color = Color.CadetBlue
            annotation4.Flags = PdfAnnotationFlags.NoRotate
            annotation4.Icon = PdfAttachmentIcon.Paperclip
            annotation4.Text = "Hawaii Killer Font, from http://www.1001freefonts.com"
            TryCast(page, PdfNewPage).Annotations.Add(annotation4)
            y = y + size.Height + 2

            'Save pdf file.
            doc.SaveToFile("Attachment.pdf")
            doc.Close()

            'Launching the Pdf file.
            Process.Start("Attachment.pdf")
        End Sub
    End Class
End Namespace
PDF ActionChain in C#, VB.NET
The sample demonstrates how to work with action, javascript action, page destination action and action annotation in PDF document.
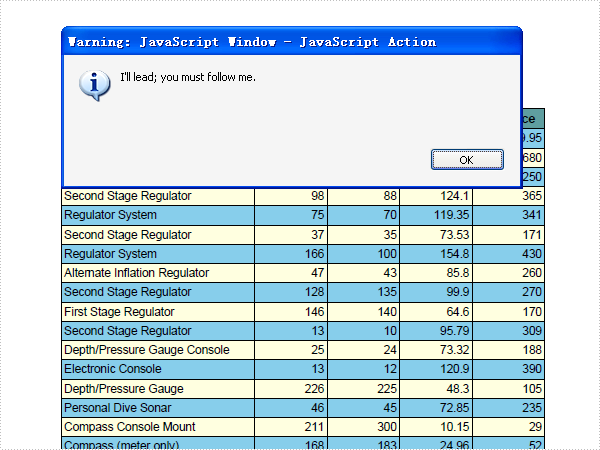
using System;
using System.Drawing;
using Spire.Pdf;
using Spire.Pdf.Graphics;
using Spire.Pdf.Actions;
using Spire.Pdf.General;
using Spire.Pdf.Tables;
using System.Data.OleDb;
using System.Data;

namespace ActionChain
{
    class Program
    {
        static void Main(string[] args)
        {
            //Create a pdf document.
            PdfDocument doc = new PdfDocument();

            //Draw pages
            PdfPageBase lastPage = DrawPages(doc);

            //script
            String script
                = "app.alert({"
                + "    cMsg: \"I'll lead; you must follow me.\","
                + "    nIcon: 3,"
                + "    cTitle: \"JavaScript Action\""
                + "});";
            PdfJavaScriptAction action1 = new PdfJavaScriptAction(script);
            doc.AfterOpenAction = action1;

            //script
            script
                = "app.alert({"
                + "    cMsg: \"The firt page!\","
                + "    nIcon: 3,"
                + "    cTitle: \"JavaScript Action\""
                + "});";
            PdfJavaScriptAction action2 = new PdfJavaScriptAction(script);
            action1.NextAction = action2;

            PdfDestination dest = new PdfDestination(lastPage);
            dest.Zoom = 1;
            PdfGoToAction action3 = new PdfGoToAction(dest);
            action2.NextAction = action3;

            //script
            script
                = "app.alert({"
                + "    cMsg: \"Oh sorry, it's the last page. I'm missing!\","
                + "    nIcon: 3,"
                + "    cTitle: \"JavaScript Action\""
                + "});";
            PdfJavaScriptAction action4 = new PdfJavaScriptAction(script);
            action3.NextAction = action4;

            //Save pdf file.
            doc.SaveToFile("ActionChain.pdf");
            doc.Close();

            //Launching the Pdf file.
            System.Diagnostics.Process.Start("ActionChain.pdf");
        }

        private static PdfPageBase DrawPages(PdfDocument doc)
        {
            //margin
            PdfUnitConvertor unitCvtr = new PdfUnitConvertor();
            PdfMargins margin = new PdfMargins();
            margin.Top = unitCvtr.ConvertUnits(2.54f, PdfGraphicsUnit.Centimeter, PdfGraphicsUnit.Point);
            margin.Bottom = margin.Top;
            margin.Left = unitCvtr.ConvertUnits(3.17f, PdfGraphicsUnit.Centimeter, PdfGraphicsUnit.Point);
            margin.Right = margin.Left;

            // Create one page
            PdfPageBase page = doc.Pages.Add(PdfPageSize.A4, margin);

            float y = 10;

            //title
            PdfBrush brush1 = PdfBrushes.Black;
            PdfTrueTypeFont font1 = new PdfTrueTypeFont(new Font("Arial", 16f, FontStyle.Bold));
            PdfStringFormat format1 = new PdfStringFormat(PdfTextAlignment.Center);
            page.Canvas.DrawString("Part List", font1, brush1, page.Canvas.ClientSize.Width / 2, y, format1);
            y = y + font1.MeasureString("Part List", format1).Height;
            y = y + 5;

            //create data table
            PdfTable table = new PdfTable();
            table.Style.CellPadding = 2;
            table.Style.BorderPen = new PdfPen(brush1, 0.75f);
            table.Style.DefaultStyle.BackgroundBrush = PdfBrushes.SkyBlue;
            table.Style.DefaultStyle.Font = new PdfTrueTypeFont(new Font("Arial", 10f));
            table.Style.AlternateStyle = new PdfCellStyle();
            table.Style.AlternateStyle.BackgroundBrush = PdfBrushes.LightYellow;
            table.Style.AlternateStyle.Font = new PdfTrueTypeFont(new Font("Arial", 10f));
            table.Style.HeaderSource = PdfHeaderSource.ColumnCaptions;
            table.Style.HeaderStyle.BackgroundBrush = PdfBrushes.CadetBlue;
            table.Style.HeaderStyle.Font = new PdfTrueTypeFont(new Font("Arial", 11f, FontStyle.Bold));
            table.Style.HeaderStyle.StringFormat = new PdfStringFormat(PdfTextAlignment.Center);
            table.Style.ShowHeader = true;

            using (OleDbConnection conn = new OleDbConnection())
            {
                conn.ConnectionString = @"Provider=Microsoft.Jet.OLEDB.4.0;Data Source=..\..\..\..\..\..\Data\demo.mdb";
                OleDbCommand command = new OleDbCommand();
                command.CommandText
                    = " select Description, OnHand, OnOrder, Cost, ListPrice from parts ";
                command.Connection = conn;
                using (OleDbDataAdapter dataAdapter = new OleDbDataAdapter(command))
                {
                    DataTable dataTable = new DataTable();
                    dataAdapter.Fill(dataTable);
                    table.DataSourceType = PdfTableDataSourceType.TableDirect;
                    table.DataSource = dataTable;
                }
            }
            float width
                = page.Canvas.ClientSize.Width
                    - (table.Columns.Count + 1) * table.Style.BorderPen.Width;
            for (int i = 0; i < table.Columns.Count; i++)
            {
                if (i == 0)
                {
                    table.Columns[i].Width = width * 0.40f * width;
                    table.Columns[i].StringFormat
                        = new PdfStringFormat(PdfTextAlignment.Left, PdfVerticalAlignment.Middle);
                }
                else
                {
                    table.Columns[i].Width = width * 0.15f * width;
                    table.Columns[i].StringFormat
                        = new PdfStringFormat(PdfTextAlignment.Right, PdfVerticalAlignment.Middle);
                }
            }

            PdfTableLayoutFormat tableLayout = new PdfTableLayoutFormat();
            tableLayout.Break = PdfLayoutBreakType.FitElement;
            tableLayout.Layout = PdfLayoutType.Paginate;

            PdfLayoutResult result = table.Draw(page, new PointF(0, y), tableLayout);
            y = result.Bounds.Bottom + 3;

            PdfBrush brush2 = PdfBrushes.Gray;
            PdfTrueTypeFont font2 = new PdfTrueTypeFont(new Font("Arial", 9f));
            result.Page.Canvas.DrawString(String.Format("* {0} parts in the list.", table.Rows.Count),
                font2, brush2, 5, y);

            return result.Page;
        }
    }
}
Imports System.Data.OleDb
Imports System.Drawing
Imports Spire.Pdf
Imports Spire.Pdf.Graphics
Imports Spire.Pdf.Actions
Imports Spire.Pdf.General
Imports Spire.Pdf.Tables

Namespace ActionChain
    Friend Class Program
        Shared Sub Main(ByVal args() As String)
            'Create a pdf document.
            Dim doc As New PdfDocument()

            'Draw pages
            Dim lastPage As PdfPageBase = DrawPages(doc)

            'script
            Dim script As String _
                = "app.alert({" _
                & "    cMsg: ""I'll lead; you must follow me.""," _
                & "    nIcon: 3," _
                & "    cTitle: ""JavaScript Action""" _
                & "});"
            Dim action1 As New PdfJavaScriptAction(script)
            doc.AfterOpenAction = action1

            'script
            script _
                = "app.alert({" _
                & "    cMsg: ""The firt page!""," _
                & "    nIcon: 3," _
                & "    cTitle: ""JavaScript Action""" _
                & "});"
            Dim action2 As New PdfJavaScriptAction(script)
            action1.NextAction = action2

            Dim dest As New PdfDestination(lastPage)
            dest.Zoom = 1
            Dim action3 As New PdfGoToAction(dest)
            action2.NextAction = action3

            'script
            script _
                = "app.alert({" _
                & "    cMsg: ""Oh sorry, it's the last page. I'm missing!""," _
                & "    nIcon: 3," _
                & "    cTitle: ""JavaScript Action""" _
                & "});"
            Dim action4 As New PdfJavaScriptAction(script)
            action3.NextAction = action4

            'Save pdf file.
            doc.SaveToFile("ActionChain.pdf")
            doc.Close()

            'Launching the Pdf file.
            Process.Start("ActionChain.pdf")
        End Sub

        Private Shared Function DrawPages(ByVal doc As PdfDocument) As PdfPageBase
            'margin
            Dim unitCvtr As New PdfUnitConvertor()
            Dim margin As New PdfMargins()
            margin.Top = unitCvtr.ConvertUnits(2.54F, PdfGraphicsUnit.Centimeter, PdfGraphicsUnit.Point)
            margin.Bottom = margin.Top
            margin.Left = unitCvtr.ConvertUnits(3.17F, PdfGraphicsUnit.Centimeter, PdfGraphicsUnit.Point)
            margin.Right = margin.Left

            ' Create one page
            Dim page As PdfPageBase = doc.Pages.Add(PdfPageSize.A4, margin)

            Dim y As Single = 10

            'title
            Dim brush1 As PdfBrush = PdfBrushes.Black
            Dim font1 As New PdfTrueTypeFont(New Font("Arial", 16.0F, FontStyle.Bold))
            Dim format1 As New PdfStringFormat(PdfTextAlignment.Center)
            page.Canvas.DrawString("Part List", font1, brush1, page.Canvas.ClientSize.Width \ 2, y, format1)
            y = y + font1.MeasureString("Part List", format1).Height
            y = y + 5

            'create data table
            Dim table As New PdfTable()
            table.Style.CellPadding = 2
            table.Style.BorderPen = New PdfPen(brush1, 0.75F)
            table.Style.DefaultStyle.BackgroundBrush = PdfBrushes.SkyBlue
            table.Style.DefaultStyle.Font = New PdfTrueTypeFont(New Font("Arial", 10.0F))
            table.Style.AlternateStyle = New PdfCellStyle()
            table.Style.AlternateStyle.BackgroundBrush = PdfBrushes.LightYellow
            table.Style.AlternateStyle.Font = New PdfTrueTypeFont(New Font("Arial", 10.0F))
            table.Style.HeaderSource = PdfHeaderSource.ColumnCaptions
            table.Style.HeaderStyle.BackgroundBrush = PdfBrushes.CadetBlue
            table.Style.HeaderStyle.Font = New PdfTrueTypeFont(New Font("Arial", 11.0F, FontStyle.Bold))
            table.Style.HeaderStyle.StringFormat = New PdfStringFormat(PdfTextAlignment.Center)
            table.Style.ShowHeader = True

            Using conn As New OleDbConnection()
                conn.ConnectionString = "Provider=Microsoft.Jet.OLEDB.4.0;Data Source=demo.mdb"
                Dim command As New OleDbCommand()
                command.CommandText = " select Description, OnHand, OnOrder, Cost, ListPrice from parts "
                command.Connection = conn
                Using dataAdapter As New OleDbDataAdapter(command)
                    Dim dataTable As New DataTable()
                    dataAdapter.Fill(dataTable)
                    table.DataSourceType = PdfTableDataSourceType.TableDirect
                    table.DataSource = dataTable
                End Using
            End Using
            Dim width As Single _
                = page.Canvas.ClientSize.Width - (table.Columns.Count + 1) * table.Style.BorderPen.Width
            For i As Integer = 0 To table.Columns.Count - 1
                If i = 0 Then
                    table.Columns(i).Width = width * 0.4F * width
                    table.Columns(i).StringFormat _
                        = New PdfStringFormat(PdfTextAlignment.Left, PdfVerticalAlignment.Middle)
                Else
                    table.Columns(i).Width = width * 0.15F * width
                    table.Columns(i).StringFormat _
                        = New PdfStringFormat(PdfTextAlignment.Right, PdfVerticalAlignment.Middle)
                End If
            Next i

            Dim tableLayout As New PdfTableLayoutFormat()
            tableLayout.Break = PdfLayoutBreakType.FitElement
            tableLayout.Layout = PdfLayoutType.Paginate

            Dim result As PdfLayoutResult = table.Draw(page, New PointF(0, y), tableLayout)
            y = result.Bounds.Bottom + 3

            Dim brush2 As PdfBrush = PdfBrushes.Gray
            Dim font2 As New PdfTrueTypeFont(New Font("Arial", 9.0F))
            result.Page.Canvas.DrawString(String.Format("* {0} parts in the list.", table.Rows.Count), _
                                          font2, brush2, 5, y)

            Return result.Page
        End Function
    End Class
End Namespace
PDF Action in C#, VB.NET
The sample demonstrates how to work with action, javascript action, page destination action and action annotation in PDF document.
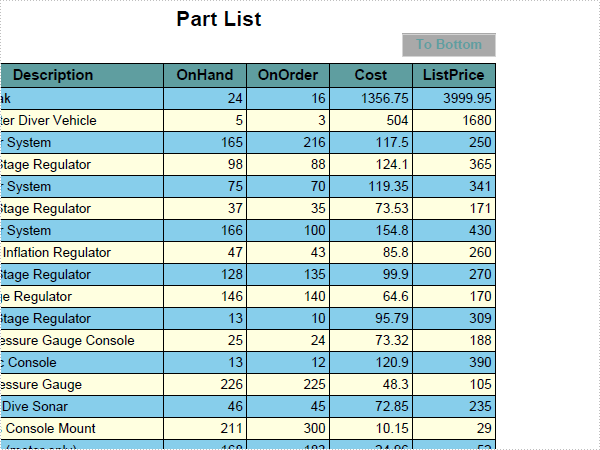
using System;
using System.Data;
using System.Data.OleDb;
using System.Drawing;
using Spire.Pdf;
using Spire.Pdf.Actions;
using Spire.Pdf.Annotations;
using Spire.Pdf.General;
using Spire.Pdf.Graphics;
using Spire.Pdf.Tables;

namespace Action
{
    class Program
    {
        static void Main(string[] args)
        {
            //Create a pdf document.
            PdfDocument doc = new PdfDocument();

            //margin
            PdfUnitConvertor unitCvtr = new PdfUnitConvertor();
            PdfMargins margin = new PdfMargins();
            margin.Top = unitCvtr.ConvertUnits(2.54f, PdfGraphicsUnit.Centimeter, PdfGraphicsUnit.Point);
            margin.Bottom = margin.Top;
            margin.Left = unitCvtr.ConvertUnits(3.17f, PdfGraphicsUnit.Centimeter, PdfGraphicsUnit.Point);
            margin.Right = margin.Left;

            // Create one page
            PdfPageBase page = doc.Pages.Add(PdfPageSize.A4, margin);

            float y = 10;

            //title
            PdfBrush brush1 = PdfBrushes.Black;
            PdfTrueTypeFont font1 = new PdfTrueTypeFont(new Font("Arial", 16f, FontStyle.Bold));
            PdfStringFormat format1 = new PdfStringFormat(PdfTextAlignment.Center);
            page.Canvas.DrawString("Part List", font1, brush1, page.Canvas.ClientSize.Width / 2, y, format1);
            y = y + font1.MeasureString("Part List", format1).Height;
            y = y + 2;

            //table top
            PdfDestination tableTopDest = new PdfDestination(page);
            tableTopDest.Location = new PointF(0, y);
            tableTopDest.Mode = PdfDestinationMode.Location;
            tableTopDest.Zoom = 1f;

            //Draw table
            PdfTrueTypeFont buttonFont = new PdfTrueTypeFont(new Font("Arial", 10f, FontStyle.Bold));
            float buttonWidth = 70;
            float buttonHeight = buttonFont.Height * 1.5f;
            float tableTop = y;
            PdfLayoutResult tableLayoutResult = DrawTable(page, y + buttonHeight + 5);

            //table bottom
            PdfDestination tableBottomDest = new PdfDestination(tableLayoutResult.Page);
            tableBottomDest.Location = new PointF(0, tableLayoutResult.Bounds.Bottom);
            tableBottomDest.Mode = PdfDestinationMode.Location;
            tableBottomDest.Zoom = 1f;

            //go to table bottom
            float x = page.Canvas.ClientSize.Width - buttonWidth;
            PdfStringFormat format2 = new PdfStringFormat(PdfTextAlignment.Center, PdfVerticalAlignment.Middle);
            RectangleF buttonBounds = new RectangleF(x, tableTop, buttonWidth, buttonHeight);
            page.Canvas.DrawRectangle(PdfBrushes.DarkGray, buttonBounds);
            page.Canvas.DrawString("To Bottom", buttonFont, PdfBrushes.CadetBlue, buttonBounds, format2);
            PdfGoToAction action1 = new PdfGoToAction(tableBottomDest);
            PdfActionAnnotation annotation1
                = new PdfActionAnnotation(buttonBounds, action1);
            annotation1.Border = new PdfAnnotationBorder(0.75f);
            annotation1.Color = Color.LightGray;
            (page as PdfNewPage).Annotations.Add(annotation1);

            //go to table top
            float tableBottom = tableLayoutResult.Bounds.Bottom + 5;
            buttonBounds = new RectangleF(x, tableBottom, buttonWidth, buttonHeight);
            tableLayoutResult.Page.Canvas.DrawRectangle(PdfBrushes.DarkGray, buttonBounds);
            tableLayoutResult.Page.Canvas.DrawString("To Top", buttonFont, PdfBrushes.CadetBlue, buttonBounds, format2);
            PdfGoToAction action2 = new PdfGoToAction(tableTopDest);
            PdfActionAnnotation annotation2
                = new PdfActionAnnotation(buttonBounds, action2);
            annotation2.Border = new PdfAnnotationBorder(0.75f);
            annotation2.Color = Color.LightGray;
            (tableLayoutResult.Page as PdfNewPage).Annotations.Add(annotation2);

            //goto last page
            PdfNamedAction action3 = new PdfNamedAction(PdfActionDestination.LastPage);
            doc.AfterOpenAction = action3;

            //script
            String script
                = "app.alert({"
                + "    cMsg: \"Oh no, you want to leave me.\","
                + "    nIcon: 3,"
                + "    cTitle: \"JavaScript Action\""
                + "});";
            PdfJavaScriptAction action4 = new PdfJavaScriptAction(script);
            doc.BeforeCloseAction = action4;

            //Save pdf file.
            doc.SaveToFile("Action.pdf");
            doc.Close();

            //Launching the Pdf file.
            System.Diagnostics.Process.Start("Action.pdf");
        }

        private static PdfLayoutResult DrawTable(PdfPageBase page, float y)
        {
            PdfBrush brush1 = PdfBrushes.Black;

            //create data table
            PdfTable table = new PdfTable();
            table.Style.CellPadding = 2;
            table.Style.BorderPen = new PdfPen(brush1, 0.75f);
            table.Style.DefaultStyle.BackgroundBrush = PdfBrushes.SkyBlue;
            table.Style.DefaultStyle.Font = new PdfTrueTypeFont(new Font("Arial", 10f));
            table.Style.AlternateStyle = new PdfCellStyle();
            table.Style.AlternateStyle.BackgroundBrush = PdfBrushes.LightYellow;
            table.Style.AlternateStyle.Font = new PdfTrueTypeFont(new Font("Arial", 10f));
            table.Style.HeaderSource = PdfHeaderSource.ColumnCaptions;
            table.Style.HeaderStyle.BackgroundBrush = PdfBrushes.CadetBlue;
            table.Style.HeaderStyle.Font = new PdfTrueTypeFont(new Font("Arial", 11f, FontStyle.Bold));
            table.Style.HeaderStyle.StringFormat = new PdfStringFormat(PdfTextAlignment.Center);
            table.Style.ShowHeader = true;

            using (OleDbConnection conn = new OleDbConnection())
            {
                conn.ConnectionString = @"Provider=Microsoft.Jet.OLEDB.4.0;Data Source=demo.mdb";
                OleDbCommand command = new OleDbCommand();
                command.CommandText
                    = " select Description, OnHand, OnOrder, Cost, ListPrice from parts ";
                command.Connection = conn;
                using (OleDbDataAdapter dataAdapter = new OleDbDataAdapter(command))
                {
                    DataTable dataTable = new DataTable();
                    dataAdapter.Fill(dataTable);
                    table.DataSourceType = PdfTableDataSourceType.TableDirect;
                    table.DataSource = dataTable;
                }
            }
            float width
                = page.Canvas.ClientSize.Width
                    - (table.Columns.Count + 1) * table.Style.BorderPen.Width;
            for (int i = 0; i < table.Columns.Count; i++)
            {
                if (i == 0)
                {
                    table.Columns[i].Width = width * 0.40f * width;
                    table.Columns[i].StringFormat
                        = new PdfStringFormat(PdfTextAlignment.Left, PdfVerticalAlignment.Middle);
                }
                else
                {
                    table.Columns[i].Width = width * 0.15f * width;
                    table.Columns[i].StringFormat
                        = new PdfStringFormat(PdfTextAlignment.Right, PdfVerticalAlignment.Middle);
                }
            }

            PdfTableLayoutFormat tableLayout = new PdfTableLayoutFormat();
            tableLayout.Break = PdfLayoutBreakType.FitElement;
            tableLayout.Layout = PdfLayoutType.Paginate;

            PdfLayoutResult result = table.Draw(page, new PointF(0, y), tableLayout);
            y = result.Bounds.Bottom + 3;

            PdfBrush brush2 = PdfBrushes.Gray;
            PdfTrueTypeFont font2 = new PdfTrueTypeFont(new Font("Arial", 9f));
            result.Page.Canvas.DrawString(String.Format("* {0} parts in the list.", table.Rows.Count),
                font2, brush2, 5, y);

            return result;
        }
    }
}
Imports System.Data
Imports System.Data.OleDb
Imports System.Drawing
Imports Spire.Pdf
Imports Spire.Pdf.Actions
Imports Spire.Pdf.Annotations
Imports Spire.Pdf.General
Imports Spire.Pdf.Graphics
Imports Spire.Pdf.Tables

Namespace Action
    Friend Class Program
        Shared Sub Main(ByVal args() As String)
            'Create a pdf document.
            Dim doc As New PdfDocument()

            'margin
            Dim unitCvtr As New PdfUnitConvertor()
            Dim margin As New PdfMargins()
            margin.Top = unitCvtr.ConvertUnits(2.54F, PdfGraphicsUnit.Centimeter, PdfGraphicsUnit.Point)
            margin.Bottom = margin.Top
            margin.Left = unitCvtr.ConvertUnits(3.17F, PdfGraphicsUnit.Centimeter, PdfGraphicsUnit.Point)
            margin.Right = margin.Left

            ' Create one page
            Dim page As PdfPageBase = doc.Pages.Add(PdfPageSize.A4, margin)

            Dim y As Single = 10

            'title
            Dim brush1 As PdfBrush = PdfBrushes.Black
            Dim font1 As New PdfTrueTypeFont(New Font("Arial", 16.0F, FontStyle.Bold))
            Dim format1 As New PdfStringFormat(PdfTextAlignment.Center)
            page.Canvas.DrawString("Part List", font1, brush1, page.Canvas.ClientSize.Width \ 2, y, format1)
            y = y + font1.MeasureString("Part List", format1).Height
            y = y + 2

            'table top
            Dim tableTopDest As New PdfDestination(page)
            tableTopDest.Location = New PointF(0, y)
            tableTopDest.Mode = PdfDestinationMode.Location
            tableTopDest.Zoom = 1.0F

            'Draw table
            Dim buttonFont As New PdfTrueTypeFont(New Font("Arial", 10.0F, FontStyle.Bold))
            Dim buttonWidth As Single = 70
            Dim buttonHeight As Single = buttonFont.Height * 1.5F
            Dim tableTop As Single = y
            Dim tableLayoutResult As PdfLayoutResult = DrawTable(page, y + buttonHeight + 5)

            'table bottom
            Dim tableBottomDest As New PdfDestination(tableLayoutResult.Page)
            tableBottomDest.Location = New PointF(0, tableLayoutResult.Bounds.Bottom)
            tableBottomDest.Mode = PdfDestinationMode.Location
            tableBottomDest.Zoom = 1.0F

            'go to table bottom
            Dim x As Single = page.Canvas.ClientSize.Width - buttonWidth
            Dim format2 As New PdfStringFormat(PdfTextAlignment.Center, PdfVerticalAlignment.Middle)
            Dim buttonBounds As New RectangleF(x, tableTop, buttonWidth, buttonHeight)
            page.Canvas.DrawRectangle(PdfBrushes.DarkGray, buttonBounds)
            page.Canvas.DrawString("To Bottom", buttonFont, PdfBrushes.CadetBlue, buttonBounds, format2)
            Dim action1 As New PdfGoToAction(tableBottomDest)
            Dim annotation1 As New PdfActionAnnotation(buttonBounds, action1)
            annotation1.Border = New PdfAnnotationBorder(0.75F)
            annotation1.Color = Color.LightGray
            TryCast(page, PdfNewPage).Annotations.Add(annotation1)

            'go to table top
            Dim tableBottom As Single = tableLayoutResult.Bounds.Bottom + 5
            buttonBounds = New RectangleF(x, tableBottom, buttonWidth, buttonHeight)
            tableLayoutResult.Page.Canvas.DrawRectangle(PdfBrushes.DarkGray, buttonBounds)
            tableLayoutResult.Page.Canvas.DrawString("To Top", buttonFont, _
                                                     PdfBrushes.CadetBlue, buttonBounds, format2)
            Dim action2 As New PdfGoToAction(tableTopDest)
            Dim annotation2 As New PdfActionAnnotation(buttonBounds, action2)
            annotation2.Border = New PdfAnnotationBorder(0.75F)
            annotation2.Color = Color.LightGray
            TryCast(tableLayoutResult.Page, PdfNewPage).Annotations.Add(annotation2)

            'goto last page
            Dim action3 As New PdfNamedAction(PdfActionDestination.LastPage)
            doc.AfterOpenAction = action3

            'script
            Dim script As String _
                = "app.alert({" & "    cMsg: ""Oh no, you want to leave me.""," _
                & "    nIcon: 3," & "    cTitle: ""JavaScript Action""" & "});"
            Dim action4 As New PdfJavaScriptAction(script)
            doc.BeforeCloseAction = action4

            'Save pdf file.
            doc.SaveToFile("Action.pdf")
            doc.Close()

            'Launching the Pdf file.
            Process.Start("Action.pdf")
        End Sub

        Private Shared Function DrawTable(ByVal page As PdfPageBase, ByVal y As Single) As PdfLayoutResult
            Dim brush1 As PdfBrush = PdfBrushes.Black

            'create data table
            Dim table As New PdfTable()
            table.Style.CellPadding = 2
            table.Style.BorderPen = New PdfPen(brush1, 0.75F)
            table.Style.DefaultStyle.BackgroundBrush = PdfBrushes.SkyBlue
            table.Style.DefaultStyle.Font = New PdfTrueTypeFont(New Font("Arial", 10.0F))
            table.Style.AlternateStyle = New PdfCellStyle()
            table.Style.AlternateStyle.BackgroundBrush = PdfBrushes.LightYellow
            table.Style.AlternateStyle.Font = New PdfTrueTypeFont(New Font("Arial", 10.0F))
            table.Style.HeaderSource = PdfHeaderSource.ColumnCaptions
            table.Style.HeaderStyle.BackgroundBrush = PdfBrushes.CadetBlue
            table.Style.HeaderStyle.Font = New PdfTrueTypeFont(New Font("Arial", 11.0F, FontStyle.Bold))
            table.Style.HeaderStyle.StringFormat = New PdfStringFormat(PdfTextAlignment.Center)
            table.Style.ShowHeader = True

            Using conn As New OleDbConnection()
                conn.ConnectionString = "Provider=Microsoft.Jet.OLEDB.4.0;Data Source=demo.mdb"
                Dim command As New OleDbCommand()
                command.CommandText = " select Description, OnHand, OnOrder, Cost, ListPrice from parts "
                command.Connection = conn
                Using dataAdapter As New OleDbDataAdapter(command)
                    Dim dataTable As New DataTable()
                    dataAdapter.Fill(dataTable)
                    table.DataSourceType = PdfTableDataSourceType.TableDirect
                    table.DataSource = dataTable
                End Using
            End Using
            Dim width As Single _
                = page.Canvas.ClientSize.Width - (table.Columns.Count + 1) * table.Style.BorderPen.Width
            For i As Integer = 0 To table.Columns.Count - 1
                If i = 0 Then
                    table.Columns(i).Width = width * 0.4F * width
                    table.Columns(i).StringFormat _
                        = New PdfStringFormat(PdfTextAlignment.Left, PdfVerticalAlignment.Middle)
                Else
                    table.Columns(i).Width = width * 0.15F * width
                    table.Columns(i).StringFormat _
                        = New PdfStringFormat(PdfTextAlignment.Right, PdfVerticalAlignment.Middle)
                End If
            Next i

            Dim tableLayout As New PdfTableLayoutFormat()
            tableLayout.Break = PdfLayoutBreakType.FitElement
            tableLayout.Layout = PdfLayoutType.Paginate

            Dim result As PdfLayoutResult = table.Draw(page, New PointF(0, y), tableLayout)
            y = result.Bounds.Bottom + 3

            Dim brush2 As PdfBrush = PdfBrushes.Gray
            Dim font2 As New PdfTrueTypeFont(New Font("Arial", 9.0F))
            result.Page.Canvas.DrawString(String.Format("* {0} parts in the list.", _
                                                        table.Rows.Count), font2, brush2, 5, y)

            Return result
        End Function
    End Class
End Namespace
PDF List in C#, VB.NET
The sample demonstrates how to work with ordered list, multiple levels list and set list style.
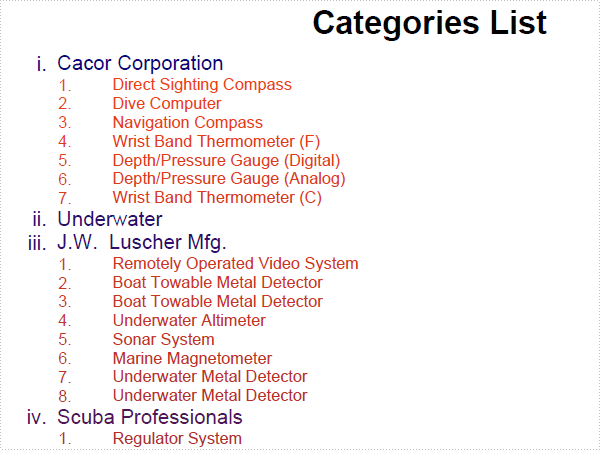
using System;
using System.Drawing;
using Spire.Pdf;
using Spire.Pdf.Graphics;
using Spire.Pdf.Lists;
using System.Data.OleDb;

namespace List
{
    class Program
    {
        static void Main(string[] args)
        {
            //Create a pdf document.
            PdfDocument doc = new PdfDocument();

            //margin
            PdfUnitConvertor unitCvtr = new PdfUnitConvertor();
            PdfMargins margin = new PdfMargins();
            margin.Top = unitCvtr.ConvertUnits(2.54f, PdfGraphicsUnit.Centimeter, PdfGraphicsUnit.Point);
            margin.Bottom = margin.Top;
            margin.Left = unitCvtr.ConvertUnits(3.17f, PdfGraphicsUnit.Centimeter, PdfGraphicsUnit.Point);
            margin.Right = margin.Left;

            // Create one page
            PdfPageBase page = doc.Pages.Add(PdfPageSize.A4, margin);

            float y = 10;

            //title
            PdfBrush brush1 = PdfBrushes.Black;
            PdfTrueTypeFont font1 = new PdfTrueTypeFont(new Font("Arial", 16f, FontStyle.Bold), true);
            PdfStringFormat format1 = new PdfStringFormat(PdfTextAlignment.Center);
            page.Canvas.DrawString("Categories List", font1, brush1, page.Canvas.ClientSize.Width / 2, y, format1);
            y = y + font1.MeasureString("Categories List", format1).Height;
            y = y + 5;

            RectangleF rctg = new RectangleF(new PointF(0, 0), page.Canvas.ClientSize);
            PdfLinearGradientBrush brush2
                = new PdfLinearGradientBrush(rctg, Color.Navy, Color.OrangeRed, PdfLinearGradientMode.Vertical);
            PdfLinearGradientBrush brush3
                = new PdfLinearGradientBrush(rctg, Color.OrangeRed, Color.Navy, PdfLinearGradientMode.Vertical);
            PdfTrueTypeFont font2 = new PdfTrueTypeFont(new Font("Arial", 10f), true);
            PdfTrueTypeFont font3 = new PdfTrueTypeFont(new Font("Arial", 8f), true);

            PdfOrderedMarker marker1
                = new PdfOrderedMarker(PdfNumberStyle.LowerRoman, new PdfFont(PdfFontFamily.Helvetica, 10f));
            PdfOrderedMarker marker2
                = new PdfOrderedMarker(PdfNumberStyle.Numeric, new PdfFont(PdfFontFamily.Helvetica, 8f));

            PdfSortedList vendorList = new PdfSortedList(font2);
            vendorList.Indent = 0;
            vendorList.TextIndent = 5;
            vendorList.Brush = brush2;
            vendorList.Marker = marker1;
            using (OleDbConnection conn = new OleDbConnection())
            {
                conn.ConnectionString = @"Provider=Microsoft.Jet.OLEDB.4.0;Data Source=demo.mdb";
                OleDbCommand command = new OleDbCommand();
                command.CommandText
                    = " select VendorNo, VendorName from vendors ";
                command.Connection = conn;

                OleDbCommand command2 = new OleDbCommand();
                command2.CommandText
                    = " select Description from parts where VendorNo = @VendorNo";
                command2.Connection = conn;
                OleDbParameter param = new OleDbParameter("@VendorNo", OleDbType.Double);
                command2.Parameters.Add(param);

                conn.Open();

                OleDbDataReader reader = command.ExecuteReader();
                while (reader.Read())
                {
                    double id = reader.GetDouble(0);
                    PdfListItem item = vendorList.Items.Add(reader.GetString(1));
                    PdfSortedList subList = new PdfSortedList(font3);
                    subList.Marker = marker2;
                    subList.Brush = brush3;
                    item.SubList = subList;
                    subList.TextIndent = 20;
                    command2.Parameters[0].Value = id;
                    using (OleDbDataReader reader2 = command2.ExecuteReader())
                    {
                        while (reader2.Read())
                        {
                            subList.Items.Add(reader2.GetString(0));
                        }
                    }
                    String maxNumberLabel = Convert.ToString(subList.Items.Count);
                    subList.Indent = 30 - font3.MeasureString(maxNumberLabel).Width;
                }
            }

            PdfTextLayout textLayout = new PdfTextLayout();
            textLayout.Break = PdfLayoutBreakType.FitPage;
            textLayout.Layout = PdfLayoutType.Paginate;
            vendorList.Draw(page, new PointF(0, y), textLayout);

            //Save pdf file.
            doc.SaveToFile("List.pdf");
            doc.Close();

            //Launching the Pdf file.
            System.Diagnostics.Process.Start("List.pdf");
        }
    }
}
Imports System.Data.OleDb
Imports System.Drawing
Imports Spire.Pdf
Imports Spire.Pdf.Graphics
Imports Spire.Pdf.Lists

Namespace List
    Friend Class Program
        Shared Sub Main(ByVal args() As String)
            'Create a pdf document.
            Dim doc As New PdfDocument()

            'margin
            Dim unitCvtr As New PdfUnitConvertor()
            Dim margin As New PdfMargins()
            margin.Top = unitCvtr.ConvertUnits(2.54F, PdfGraphicsUnit.Centimeter, PdfGraphicsUnit.Point)
            margin.Bottom = margin.Top
            margin.Left = unitCvtr.ConvertUnits(3.17F, PdfGraphicsUnit.Centimeter, PdfGraphicsUnit.Point)
            margin.Right = margin.Left

            ' Create one page
            Dim page As PdfPageBase = doc.Pages.Add(PdfPageSize.A4, margin)

            Dim y As Single = 10

            'title
            Dim brush1 As PdfBrush = PdfBrushes.Black
            Dim font1 As New PdfTrueTypeFont(New Font("Arial", 16.0F, FontStyle.Bold), True)
            Dim format1 As New PdfStringFormat(PdfTextAlignment.Center)
            page.Canvas.DrawString("Categories List", font1, brush1, page.Canvas.ClientSize.Width \ 2, y, format1)
            y = y + font1.MeasureString("Categories List", format1).Height
            y = y + 5

            Dim rctg As New RectangleF(New PointF(0, 0), page.Canvas.ClientSize)
            Dim brush2 As New PdfLinearGradientBrush(rctg, Color.Navy, Color.OrangeRed, PdfLinearGradientMode.Vertical)
            Dim brush3 As New PdfLinearGradientBrush(rctg, Color.OrangeRed, Color.Navy, PdfLinearGradientMode.Vertical)
            Dim font2 As New PdfTrueTypeFont(New Font("Arial", 10.0F), True)
            Dim font3 As New PdfTrueTypeFont(New Font("Arial", 8.0F), True)

            Dim marker1 As New PdfOrderedMarker(PdfNumberStyle.LowerRoman, New PdfFont(PdfFontFamily.Helvetica, 10.0F))
            Dim marker2 As New PdfOrderedMarker(PdfNumberStyle.Numeric, New PdfFont(PdfFontFamily.Helvetica, 8.0F))

            Dim vendorList As New PdfSortedList(font2)
            vendorList.Indent = 0
            vendorList.TextIndent = 5
            vendorList.Brush = brush2
            vendorList.Marker = marker1
            Using conn As New OleDbConnection()
                conn.ConnectionString = "Provider=Microsoft.Jet.OLEDB.4.0;Data Source=demo.mdb"
                Dim command As New OleDbCommand()
                command.CommandText = " select VendorNo, VendorName from vendors "
                command.Connection = conn

                Dim command2 As New OleDbCommand()
                command2.CommandText = " select Description from parts where VendorNo = @VendorNo"
                command2.Connection = conn
                Dim param As New OleDbParameter("@VendorNo", OleDbType.Double)
                command2.Parameters.Add(param)

                conn.Open()

                Dim reader As OleDbDataReader = command.ExecuteReader()
                Do While reader.Read()
                    Dim id As Double = reader.GetDouble(0)
                    Dim item As PdfListItem = vendorList.Items.Add(reader.GetString(1))
                    Dim subList As New PdfSortedList(font3)
                    subList.Marker = marker2
                    subList.Brush = brush3
                    item.SubList = subList
                    subList.TextIndent = 20
                    command2.Parameters(0).Value = id
                    Using reader2 As OleDbDataReader = command2.ExecuteReader()
                        Do While reader2.Read()
                            subList.Items.Add(reader2.GetString(0))
                        Loop
                    End Using
                    Dim maxNumberLabel As String = Convert.ToString(subList.Items.Count)
                    subList.Indent = 30 - font3.MeasureString(maxNumberLabel).Width
                Loop
            End Using

            Dim textLayout As New PdfTextLayout()
            textLayout.Break = PdfLayoutBreakType.FitPage
            textLayout.Layout = PdfLayoutType.Paginate
            vendorList.Draw(page, New PointF(0, y), textLayout)

            'Save pdf file.
            doc.SaveToFile("List.pdf")
            doc.Close()

            'Launching the Pdf file.
            Process.Start("List.pdf")
        End Sub
    End Class
End Namespace
PDF SimpleList in C#, VB.NET
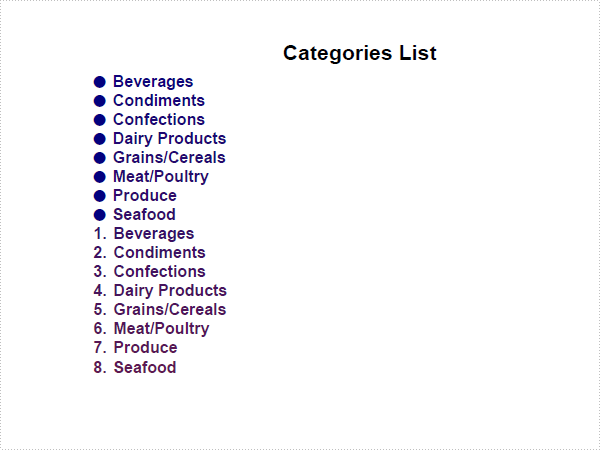
using System;
using System.Drawing;
using Spire.Pdf;
using Spire.Pdf.Graphics;
using Spire.Pdf.Lists;

namespace SimpleList
{
    class Program
    {
        static void Main(string[] args)
        {
            //Create a pdf document.
            PdfDocument doc = new PdfDocument();

            //margin
            PdfUnitConvertor unitCvtr = new PdfUnitConvertor();
            PdfMargins margin = new PdfMargins();
            margin.Top = unitCvtr.ConvertUnits(2.54f, PdfGraphicsUnit.Centimeter, PdfGraphicsUnit.Point);
            margin.Bottom = margin.Top;
            margin.Left = unitCvtr.ConvertUnits(3.17f, PdfGraphicsUnit.Centimeter, PdfGraphicsUnit.Point);
            margin.Right = margin.Left;

            // Create one page
            PdfPageBase page = doc.Pages.Add(PdfPageSize.A4, margin);

            float y = 10;

            //title
            PdfBrush brush1 = PdfBrushes.Black;
            PdfTrueTypeFont font1 = new PdfTrueTypeFont(new Font("Arial", 16f, FontStyle.Bold), true);
            PdfStringFormat format1 = new PdfStringFormat(PdfTextAlignment.Center);
            page.Canvas.DrawString("Categories List", font1, brush1, page.Canvas.ClientSize.Width / 2, y, format1);
            y = y + font1.MeasureString("Categories List", format1).Height;
            y = y + 5;

            RectangleF rctg = new RectangleF(new PointF(0, 0), page.Canvas.ClientSize);
            PdfLinearGradientBrush brush
                = new PdfLinearGradientBrush(rctg, Color.Navy, Color.OrangeRed, PdfLinearGradientMode.Vertical);
            PdfFont font = new PdfFont(PdfFontFamily.Helvetica, 12f, PdfFontStyle.Bold);
            String formatted
                = "Beverages\nCondiments\nConfections\nDairy Products\nGrains/Cereals\nMeat/Poultry\nProduce\nSeafood";

            PdfList list = new PdfList(formatted);
            list.Font = font;
            list.Indent = 8;
            list.TextIndent = 5;
            list.Brush = brush;
            PdfLayoutResult result = list.Draw(page, 0, y);
            y = result.Bounds.Bottom;

            PdfSortedList sortedList = new PdfSortedList(formatted);
            sortedList.Font = font;
            sortedList.Indent = 8;
            sortedList.TextIndent = 5;
            sortedList.Brush = brush;
            sortedList.Draw(page, 0, y);

            //Save pdf file.
            doc.SaveToFile("SimpleList.pdf");
            doc.Close();

            //Launching the Pdf file.
            System.Diagnostics.Process.Start("SimpleList.pdf");
        }
    }
}
Imports System.Drawing
Imports Spire.Pdf
Imports Spire.Pdf.Graphics
Imports Spire.Pdf.Lists

Namespace SimpleList
    Friend Class Program
        Shared Sub Main(ByVal args() As String)
            'Create a pdf document.
            Dim doc As New PdfDocument()

            'margin
            Dim unitCvtr As New PdfUnitConvertor()
            Dim margin As New PdfMargins()
            margin.Top = unitCvtr.ConvertUnits(2.54F, PdfGraphicsUnit.Centimeter, PdfGraphicsUnit.Point)
            margin.Bottom = margin.Top
            margin.Left = unitCvtr.ConvertUnits(3.17F, PdfGraphicsUnit.Centimeter, PdfGraphicsUnit.Point)
            margin.Right = margin.Left

            ' Create one page
            Dim page As PdfPageBase = doc.Pages.Add(PdfPageSize.A4, margin)

            Dim y As Single = 10

            'title
            Dim brush1 As PdfBrush = PdfBrushes.Black
            Dim font1 As New PdfTrueTypeFont(New Font("Arial", 16.0F, FontStyle.Bold), True)
            Dim format1 As New PdfStringFormat(PdfTextAlignment.Center)
            page.Canvas.DrawString("Categories List", font1, brush1, page.Canvas.ClientSize.Width \ 2, y, format1)
            y = y + font1.MeasureString("Categories List", format1).Height
            y = y + 5

            Dim rctg As New RectangleF(New PointF(0, 0), page.Canvas.ClientSize)
            Dim brush As New PdfLinearGradientBrush(rctg, Color.Navy, Color.OrangeRed, PdfLinearGradientMode.Vertical)
            Dim font As New PdfFont(PdfFontFamily.Helvetica, 12.0F, PdfFontStyle.Bold)
            Dim formatted As String = "Beverages" & vbLf & "Condiments" & vbLf & "Confections" _
                & vbLf & "Dairy Products" & vbLf & "Grains/Cereals" & vbLf & "Meat/Poultry" & _
                vbLf & "Produce" & vbLf & "Seafood"

            Dim list As New PdfList(formatted)
            list.Font = font
            list.Indent = 8
            list.TextIndent = 5
            list.Brush = brush
            Dim result As PdfLayoutResult = list.Draw(page, 0, y)
            y = result.Bounds.Bottom

            Dim sortedList As New PdfSortedList(formatted)
            sortedList.Font = font
            sortedList.Indent = 8
            sortedList.TextIndent = 5
            sortedList.Brush = brush
            sortedList.Draw(page, 0, y)

            'Save pdf file.
            doc.SaveToFile("SimpleList.pdf")
            doc.Close()

            'Launching the Pdf file.
            Process.Start("SimpleList.pdf")
        End Sub
    End Class
End Namespace