C#/VB.NET: Create, Fill, or Remove Fillable Forms in PDF
The ability to create fillable PDF forms that end users can fill out (without having to print) can be a real benefit to making your business efficient. With these documents, users can download them, fill them out, save them, and send them back to you. No more printing and scanning. In this article, you will learn how to create, fill, or remove fillable forms in PDF in C# and VB.NET by using Spire.PDF for .NET.
- Create Fillable Form Fields in a PDF Document
- Fill Form Fields in an Existing PDF Document
- Remove a Particular Field or All Fields from an Existing PDF Document
Spire.PDF for .NET offers a series of useful classes under the Spire.Pdf.Fields namespace, allowing programmers to create and edit various types of form fields including text box, check box, combo box, list box, and radio button. The table below lists some of the core classes involved in this tutorial.
| Class | Description |
| PdfForm | Represents interactive form of the PDF document. |
| PdfField | Represents field of the PDF document's interactive form. |
| PdfTextBoxField | Represents text box field in the PDF form. |
| PdfCheckBoxField | Represents check box field in the PDF form. |
| PdfComboBoxField | Represents combo box field in the PDF Form. |
| PdfListBoxField | Represents list box field of the PDF form. |
| PdfListFieldItem | Represents an item of a list field. |
| PdfRadioButtonListField | Represents radio button field in the PDF form. |
| PdfRadioButtonListItem | Represents an item of a radio button list. |
| PdfButtonField | Represents button field in the PDF form. |
| PdfSignatureField | Represents signature field in the PDF form. |
Install Spire.PDF for .NET
To begin with, you need to add the DLL files included in the Spire.PDF for.NET package as references in your .NET project. The DLLs files can be either downloaded from this link or installed via NuGet.
PM> Install-Package Spire.PDF
Create Fillable Form Fields in a PDF Document
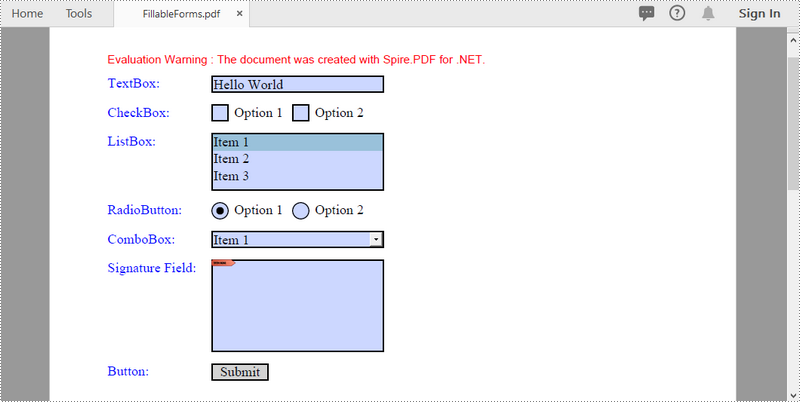
To create a PDF form, initialize an instance of the corresponding field class. Set its size and position in the document through the Bounds property, and then add it to PDF using PdfFormFieldCollection.Add() method. The following are the main steps to create various types of form fields in a PDF document using Spire.PDF for .NET.
- Create a PdfDocument object.
- Add a page using PdfDocuemnt.Pages.Add() method.
- Create a PdfTextBoxField object, set the properties of the field including Bounds, Font and Text, and then add it to the document using PdfFormFieldCollection.Add() method.
- Repeat the step 3 to add check box, combo box, list box, radio button, signature field and button to the document.
- Save the document to a PDF file using PdfDocument.SaveToFile() method.
- C#
- VB.NET
using Spire.Pdf;
using Spire.Pdf.Actions;
using Spire.Pdf.Fields;
using Spire.Pdf.Graphics;
using System.Drawing;

namespace CreateFillableFormsInPdf
{
    class Program
    {
        static void Main(string[] args)
        {
            //Create a PdfDocument object
            PdfDocument doc = new PdfDocument();

            //Add a page
            PdfPageBase page = doc.Pages.Add();

            //Initialize x and y coordinates
            float baseX = 100;
            float baseY = 30;

            //Create two brush objects
            PdfSolidBrush brush1 = new PdfSolidBrush(new PdfRGBColor(Color.Blue));
            PdfSolidBrush brush2 = new PdfSolidBrush(new PdfRGBColor(Color.Black));

            //Create a font
            PdfFont font = new PdfFont(PdfFontFamily.TimesRoman, 12f, PdfFontStyle.Regular);

            //Add a textbox
            page.Canvas.DrawString("TextBox:", font, brush1, new PointF(10, baseY));
            RectangleF tbxBounds = new RectangleF(baseX, baseY, 150, 15);
            PdfTextBoxField textBox = new PdfTextBoxField(page, "textbox");
            textBox.Bounds = tbxBounds;
            textBox.Text = "Hello World";
            textBox.Font = font;
            doc.Form.Fields.Add(textBox);
            baseY += 25;

            //add two checkboxes
            page.Canvas.DrawString("CheckBox:", font, brush1, new PointF(10, baseY));
            RectangleF checkboxBound1 = new RectangleF(baseX, baseY, 15, 15);
            PdfCheckBoxField checkBoxField1 = new PdfCheckBoxField(page, "checkbox1");
            checkBoxField1.Bounds = checkboxBound1;
            checkBoxField1.Checked = false;
            page.Canvas.DrawString("Option 1", font, brush2, new PointF(baseX + 20, baseY));

            RectangleF checkboxBound2 = new RectangleF(baseX + 70, baseY, 15, 15);
            PdfCheckBoxField checkBoxField2 = new PdfCheckBoxField(page, "checkbox2");
            checkBoxField2.Bounds = checkboxBound2;
            checkBoxField2.Checked = false;
            page.Canvas.DrawString("Option 2", font, brush2, new PointF(baseX + 90, baseY));
            doc.Form.Fields.Add(checkBoxField1);
            doc.Form.Fields.Add(checkBoxField2);
            baseY += 25;

            //Add a listbox
            page.Canvas.DrawString("ListBox:", font, brush1, new PointF(10, baseY));
            RectangleF listboxBound = new RectangleF(baseX, baseY, 150, 50);
            PdfListBoxField listBoxField = new PdfListBoxField(page, "listbox");
            listBoxField.Items.Add(new PdfListFieldItem("Item 1", "item1"));
            listBoxField.Items.Add(new PdfListFieldItem("Item 2", "item2"));
            listBoxField.Items.Add(new PdfListFieldItem("Item 3", "item3")); ;
            listBoxField.Bounds = listboxBound;
            listBoxField.Font = font;
            listBoxField.SelectedIndex = 0;
            doc.Form.Fields.Add(listBoxField);
            baseY += 60;

            //Add two radio buttons
            page.Canvas.DrawString("RadioButton:", font, brush1, new PointF(10, baseY));
            PdfRadioButtonListField radioButtonListField = new PdfRadioButtonListField(page, "radio");
            PdfRadioButtonListItem radioItem1 = new PdfRadioButtonListItem("option1");
            RectangleF radioBound1 = new RectangleF(baseX, baseY, 15, 15);
            radioItem1.Bounds = radioBound1;
            page.Canvas.DrawString("Option 1", font, brush2, new PointF(baseX + 20, baseY));

            PdfRadioButtonListItem radioItem2 = new PdfRadioButtonListItem("option2");
            RectangleF radioBound2 = new RectangleF(baseX + 70, baseY, 15, 15);
            radioItem2.Bounds = radioBound2;
            page.Canvas.DrawString("Option 2", font, brush2, new PointF(baseX + 90, baseY));
            radioButtonListField.Items.Add(radioItem1);
            radioButtonListField.Items.Add(radioItem2);
            radioButtonListField.SelectedIndex = 0;
            doc.Form.Fields.Add(radioButtonListField);
            baseY += 25;

            //Add a combobox
            page.Canvas.DrawString("ComboBox:", font, brush1, new PointF(10, baseY));
            RectangleF cmbBounds = new RectangleF(baseX, baseY, 150, 15);
            PdfComboBoxField comboBoxField = new PdfComboBoxField(page, "combobox");
            comboBoxField.Bounds = cmbBounds;
            comboBoxField.Items.Add(new PdfListFieldItem("Item 1", "item1"));
            comboBoxField.Items.Add(new PdfListFieldItem("Item 2", "itme2"));
            comboBoxField.Items.Add(new PdfListFieldItem("Item 3", "item3"));
            comboBoxField.Items.Add(new PdfListFieldItem("Item 4", "item4"));
            comboBoxField.SelectedIndex = 0;
            comboBoxField.Font = font;
            doc.Form.Fields.Add(comboBoxField);
            baseY += 25;

            //Add a signature field
            page.Canvas.DrawString("Signature Field:", font, brush1, new PointF(10, baseY));
            PdfSignatureField sgnField = new PdfSignatureField(page, "sgnField");
            RectangleF sgnBounds = new RectangleF(baseX, baseY, 150, 80);
            sgnField.Bounds = sgnBounds;
            doc.Form.Fields.Add(sgnField);
            baseY += 90;

            //Add a button
            page.Canvas.DrawString("Button:", font, brush1, new PointF(10, baseY));
            RectangleF btnBounds = new RectangleF(baseX, baseY, 50, 15);
            PdfButtonField buttonField = new PdfButtonField(page, "button");
            buttonField.Bounds = btnBounds;
            buttonField.Text = "Submit";
            buttonField.Font = font;
            PdfSubmitAction submitAction = new PdfSubmitAction("https://www.e-iceblue.com/getformvalues.php");
            submitAction.DataFormat = SubmitDataFormat.Html;
            buttonField.Actions.MouseDown = submitAction;
            doc.Form.Fields.Add(buttonField);

            //Save to file
            doc.SaveToFile("FillableForms.pdf", FileFormat.PDF);
        }
    }
}
Fill Form Fields in an Existing PDF Document
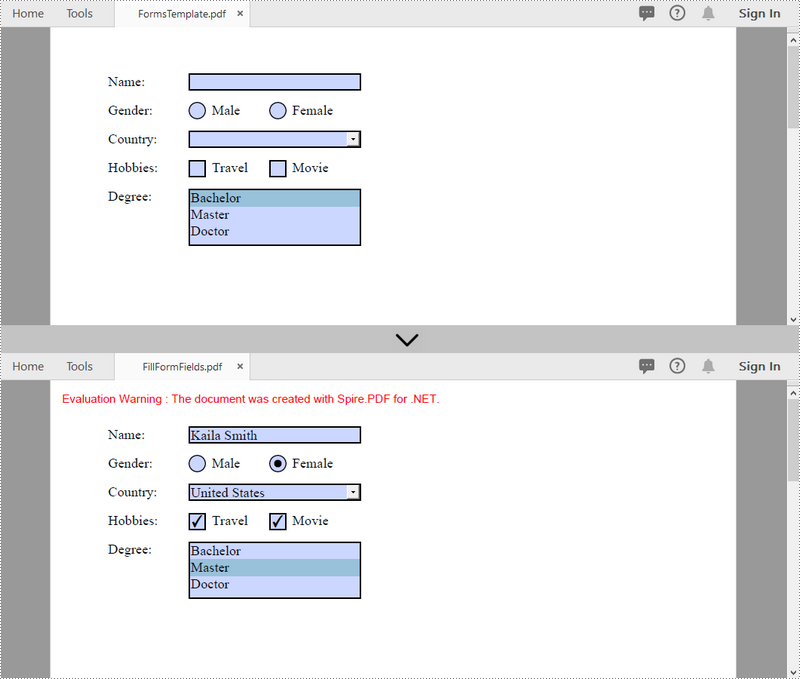
In order to fill out a form, we must first get all the form fields from the PDF document, determine the type of a certain field, and then input a value or select a value from a predefined list. The following are the steps to fill form fields in an existing PDF document using Spire.PDF for .NET.
- Create a PdfDocument object.
- Load a sample PDF document using PdfDocument.LoadFromFile() method.
- Get the form from the document through PdfDocument.Form property.
- Get the form widget collection through PdfFormWidget.FieldsWidget property.
- Loop through the form widget collection to get a specific PdfField.
- Determine if the PdfField is a certain field type such as text box. If yes, set the text of the text box through PdfTextBoxFieldWidget.Text property.
- Repeat the sixth step to fill radio button, check box, combo box, and list box with values.
- Save the document to a PDF file using PdfDocument.SaveToFile() method.
- C#
- VB.NET
using Spire.Pdf;
using Spire.Pdf.Fields;
using Spire.Pdf.Widget;

namespace FillFormFields
{
    class Program
    {
        static void Main(string[] args)
        {
            //Create a PdfDocument object
            PdfDocument doc = new PdfDocument();

            //Load a template containing forms
            doc.LoadFromFile(@"C:\Users\Administrator\Desktop\FormsTemplate.pdf");

            //Get the form from the document
            PdfFormWidget form = (PdfFormWidget)doc.Form;

            //Get the form widget collection
            PdfFormFieldWidgetCollection formWidgetCollection = form.FieldsWidget;

            //Loop through the widgets
            for (int i = 0; i < formWidgetCollection.Count; i++)
            {
                //Get a specific field
                PdfField field = formWidgetCollection[i];

                //Determine if the field is a text box
                if (field is PdfTextBoxFieldWidget)
                {
                    if (field.Name == "name")
                    {
                        //Set the text of text box
                        PdfTextBoxFieldWidget textBoxField = (PdfTextBoxFieldWidget)field;
                        textBoxField.Text = "Kaila Smith";
                    }
                }

                //Determine if the field is a radio button
                if (field is PdfRadioButtonListFieldWidget)
                {
                    if (field.Name == "gender")
                    {
                        //Set the selected index of radio button
                        PdfRadioButtonListFieldWidget radioButtonListField = (PdfRadioButtonListFieldWidget)field;
                        radioButtonListField.SelectedIndex = 1;
                    }
                }

                //Determine if the field is a combo box
                if (field is PdfComboBoxWidgetFieldWidget)
                {
                    if (field.Name == "country")
                    {
                        //Set the selected index of combo box
                        PdfComboBoxWidgetFieldWidget comboBoxField = (PdfComboBoxWidgetFieldWidget)field;
                        int[] index = { 0 };
                        comboBoxField.SelectedIndex = index;
                    }
                }

                //Determine if the field is a check box
                if (field is PdfCheckBoxWidgetFieldWidget)
                {
                    //Set the "Checked" status of check box
                    PdfCheckBoxWidgetFieldWidget checkBoxField = (PdfCheckBoxWidgetFieldWidget)field;
                    switch (checkBoxField.Name)
                    {
                        case "travel":
                            checkBoxField.Checked = true;
                            break;
                        case "movie":
                            checkBoxField.Checked = true;
                            break;
                    }
                }

                //Determine if the field is a list box
                if (field is PdfListBoxWidgetFieldWidget)
                {
                    if (field.Name == "degree")
                    {
                        //Set the selected index of list box
                        PdfListBoxWidgetFieldWidget listBox = (PdfListBoxWidgetFieldWidget)field;
                        int[] index = { 1 };
                        listBox.SelectedIndex = index;
                    }
                }
            }

            //Save to file
            doc.SaveToFile("FillFormFields.pdf", FileFormat.PDF);
        }
    }
}
Remove a Particular Field or All Fields from an Existing PDF Document
A form field in a PDF document can be accessed by its index or name and removed by PdfFieldCollection.Remove() method. The following are the steps to remove a particular field or all fields from an existing PDF document using Sprie.PDF for .NET.
- Create a PdfDocument object.
- Load a PDF document using PdfDocument.LoadFromFile() method.
- Get the form widget collection from the document.
- Loop through the widget collection to get a specific PdfField. Remove the field one by one using PdfFieldCollection.Remove() method.
- To remove a certain form field, get it from the document through PdfFormWidget.FieldsWidget["fieldName"] property and then call the PdfFieldCollectiont.Remove() method.
- Save the document to a PDF file using PdfDocument.SaveToFile() method.
- C#
- VB.NET
using Spire.Pdf;
using Spire.Pdf.Fields;
using Spire.Pdf.Widget;

namespace RemoveFormFields
{
    class Program
    {
        static void Main(string[] args)
        {
            //Create a PdfDocument object
            PdfDocument doc = new PdfDocument();

            //Load a PDF file
            doc.LoadFromFile(@"C:\Users\Administrator\Desktop\FormsTemplate.pdf");

            //Get the form fields from the document
            PdfFormWidget formWidget = doc.Form as PdfFormWidget;

            //Loop through the widgets
            for (int i = formWidget.FieldsWidget.List.Count - 1; i >= 0; i--)
            {
                //Get a specific field
                PdfField field = formWidget.FieldsWidget.List[i] as PdfField;

                //Remove the field
                formWidget.FieldsWidget.Remove(field);
            }

            //Get a specific field by its name
            //PdfField field = formWidget.FieldsWidget["name"];
            //Remove the field
            //formWidget.FieldsWidget.Remove(field);

            //Save to file
            doc.SaveToFile("DeleteAllFields.pdf");
        }
    }
}
Apply for a Temporary License
If you'd like to remove the evaluation message from the generated documents, or to get rid of the function limitations, please request a 30-day trial license for yourself.
Draw Special Shapes in PDF in C#/VB.NET
Spire.PDF can help us draw different shapes in PDF document. We can use Spire.PDF to draw rectangles in PDF, draw circles in PDF, draw arcs in PDF and draw ellipses in PDF. Besides these shapes, we can also use Spire.PDF to draw some other special shapes such as Spiral and five-pointed stars.
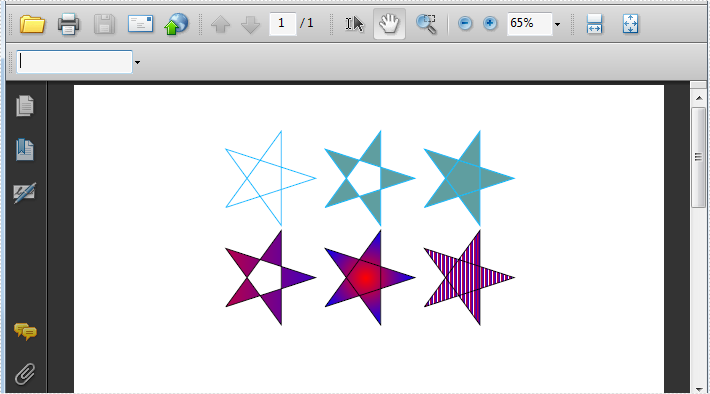
Draw Five-Pointed Star in PDF
By using Spire.PDF, we can draw different stars in PDF document. The sample below is showing how to draw 6 types of different five-pointed star.
using Spire.Pdf;
using Spire.Pdf.Graphics;
using System;
using System.Drawing;


namespace FivePointedStar
{
    class Program
    {
        private static void DrawStar(PdfPageBase page)
        {
            PdfDocument doc = new PdfDocument();
            PdfPageBase page = doc.Pages.Add();
            PointF[] points = new PointF[5];
            for (int i = 0; i < points.Length; i++)
            {
                float x = (float)Math.Cos(i * 2 * Math.PI / 5);
                float y = (float)Math.Sin(i * 2 * Math.PI / 5);
                points[i] = new PointF(x, y);
            }
            PdfPath path = new PdfPath();
            path.AddLine(points[2], points[0]);
            path.AddLine(points[0], points[3]);
            path.AddLine(points[3], points[1]);
            path.AddLine(points[1], points[4]);
            path.AddLine(points[4], points[2]);

            //save graphics state
            PdfDocument doc = new PdfDocument();
            PdfPageBase page = doc.Pages.Add();
            PdfGraphicsState state = page.Canvas.Save();
            PdfPen pen = new PdfPen(Color.DeepSkyBlue, 0.02f);
            PdfBrush brush1 = new PdfSolidBrush(Color.CadetBlue);

            page.Canvas.ScaleTransform(50f, 50f);
            page.Canvas.TranslateTransform(5f, 1.2f);
            page.Canvas.DrawPath(pen, path);

            page.Canvas.TranslateTransform(2f, 0f);
            path.FillMode = PdfFillMode.Alternate;
            page.Canvas.DrawPath(pen, brush1, path);

            page.Canvas.TranslateTransform(2f, 0f);
            path.FillMode = PdfFillMode.Winding;
            page.Canvas.DrawPath(pen, brush1, path);

            PdfLinearGradientBrush brush2
                = new PdfLinearGradientBrush(new PointF(-2, 0), new PointF(2, 0), Color.Red, Color.Blue);
            page.Canvas.TranslateTransform(-4f, 2f);
            path.FillMode = PdfFillMode.Alternate;
            page.Canvas.DrawPath(pen, brush2, path);

            PdfRadialGradientBrush brush3
                = new PdfRadialGradientBrush(new PointF(0f, 0f), 0f, new PointF(0f, 0f), 1f, Color.Red, Color.Blue);
            page.Canvas.TranslateTransform(2f, 0f);
            path.FillMode = PdfFillMode.Winding;
            page.Canvas.DrawPath(pen, brush3, path);

            PdfTilingBrush brush4 = new PdfTilingBrush(new RectangleF(0, 0, 4f, 4f));
            brush4.Graphics.DrawRectangle(brush2, 0, 0, 4f, 4f);

            page.Canvas.TranslateTransform(2f, 0f);
            path.FillMode = PdfFillMode.Winding;
            page.Canvas.DrawPath(pen, brush4, path);

            //restor graphics
            page.Canvas.Restore(state);
        }
    }
}
Imports Spire.Pdf
Imports Spire.Pdf.Graphics
Imports System.Drawing


Namespace FivePointedStar
	Class Program
		Private Shared Sub DrawStar(page As PdfPageBase)
			Dim doc As New PdfDocument()
			Dim page As PdfPageBase = doc.Pages.Add()
			Dim points As PointF() = New PointF(4) {}
			For i As Integer = 0 To points.Length - 1
				Dim x As Single = CSng(Math.Cos(i * 2 * Math.PI / 5))
				Dim y As Single = CSng(Math.Sin(i * 2 * Math.PI / 5))
				points(i) = New PointF(x, y)
			Next
			Dim path As New PdfPath()
			path.AddLine(points(2), points(0))
			path.AddLine(points(0), points(3))
			path.AddLine(points(3), points(1))
			path.AddLine(points(1), points(4))
			path.AddLine(points(4), points(2))

			'save graphics state
			Dim doc As New PdfDocument()
			Dim page As PdfPageBase = doc.Pages.Add()
			Dim state As PdfGraphicsState = page.Canvas.Save()
			Dim pen As New PdfPen(Color.DeepSkyBlue, 0.02F)
			Dim brush1 As PdfBrush = New PdfSolidBrush(Color.CadetBlue)

			page.Canvas.ScaleTransform(50F, 50F)
			page.Canvas.TranslateTransform(5F, 1.2F)
			page.Canvas.DrawPath(pen, path)

			page.Canvas.TranslateTransform(2F, 0F)
			path.FillMode = PdfFillMode.Alternate
			page.Canvas.DrawPath(pen, brush1, path)

			page.Canvas.TranslateTransform(2F, 0F)
			path.FillMode = PdfFillMode.Winding
			page.Canvas.DrawPath(pen, brush1, path)

			Dim brush2 As New PdfLinearGradientBrush(New PointF(-2, 0), New PointF(2, 0), Color.Red, Color.Blue)
			page.Canvas.TranslateTransform(-4F, 2F)
			path.FillMode = PdfFillMode.Alternate
			page.Canvas.DrawPath(pen, brush2, path)

			Dim brush3 As New PdfRadialGradientBrush(New PointF(0F, 0F), 0F, New PointF(0F, 0F), 1F, Color.Red, Color.Blue)
			page.Canvas.TranslateTransform(2F, 0F)
			path.FillMode = PdfFillMode.Winding
			page.Canvas.DrawPath(pen, brush3, path)

			Dim brush4 As New PdfTilingBrush(New RectangleF(0, 0, 4F, 4F))
			brush4.Graphics.DrawRectangle(brush2, 0, 0, 4F, 4F)

			page.Canvas.TranslateTransform(2F, 0F)
			path.FillMode = PdfFillMode.Winding
			page.Canvas.DrawPath(pen, brush4, path)

			'restor graphics
			page.Canvas.Restore(state)
		End Sub
	End Class
End Namespace
Effective Screenshot:
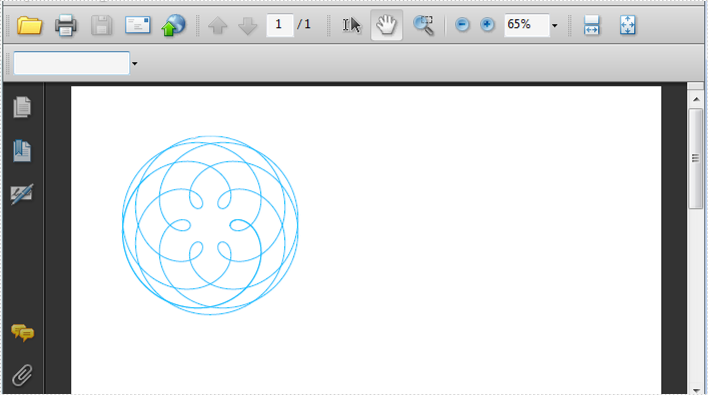
Draw Spiral in PDF
A spiral is a curve which emanates from a central point, getting progressively farther away as it revolves around the point. Spire.PDF can also help us easily draw Spiral in PDF and we can design at will.
using Spire.Pdf;
using Spire.Pdf.Graphics;
using System;

namespace DrawSpiral
{
    class Program
    {
        static void Main(string[] args)
        {
            PdfDocument doc = new PdfDocument();
            PdfPageBase page = doc.Pages.Add();
            //save graphics state
            PdfGraphicsState state = page.Canvas.Save();

            //Draw shap - spiro
            PdfPen pen = PdfPens.DeepSkyBlue;

            int nPoints = 1000;
            double r1 = 30;
            double r2 = 25;
            double p = 35;
            double x1 = r1 + r2 - p;
            double y1 = 0;
            double x2 = 0;
            double y2 = 0;

            page.Canvas.TranslateTransform(100, 100);

            for (int i = 0; i < nPoints; i++)
            {
                double t = i * Math.PI / 90;
                x2 = (r1 + r2) * Math.Cos(t) - p * Math.Cos((r1 + r2) * t / r2);
                y2 = (r1 + r2) * Math.Sin(t) - p * Math.Sin((r1 + r2) * t / r2);
                page.Canvas.DrawLine(pen, (float)x1, (float)y1, (float)x2, (float)y2);
                x1 = x2;
                y1 = y2;
            }

            //restor graphics
            page.Canvas.Restore(state);
        }
    }
}
Imports Spire.Pdf
Imports Spire.Pdf.Graphics
Imports Spire.Pdf.Texts
Imports System.Drawing

Namespace AddLineNumber
    Class Program
		Shared Sub Main(ByVal args() As String)
			Dim doc As New PdfDocument()
			Dim page As PdfPageBase = doc.Pages.Add()
			'save graphics state
			Dim state As PdfGraphicsState = page.Canvas.Save()

			'Draw shap - spiro
			Dim pen As PdfPen = PdfPens.DeepSkyBlue

			Dim nPoints As Integer = 1000
			Dim r1 As Double = 30
			Dim r2 As Double = 25
			Dim p As Double = 35
			Dim x1 As Double = r1 + r2 - p
			Dim y1 As Double = 0
			Dim x2 As Double = 0
			Dim y2 As Double = 0

			page.Canvas.TranslateTransform(100, 100)

			For i As Integer = 0 To nPoints - 1
				Dim t As Double = i * Math.PI / 90
				x2 = (r1 + r2) * Math.Cos(t) - p * Math.Cos((r1 + r2) * t / r2)
				y2 = (r1 + r2) * Math.Sin(t) - p * Math.Sin((r1 + r2) * t / r2)
				page.Canvas.DrawLine(pen, CSng(x1), CSng(y1), CSng(x2), CSng(y2))
				x1 = x2
				y1 = y2
			Next

			'restor graphics
			page.Canvas.Restore(state)

		End Sub
	End Class
End Namespace
Effective Screenshot:
C#/VB.NET: Insert, Replace or Delete Images in PDF
Compared with text-only documents, documents containing images are undoubtedly more vivid and engaging to readers. When generating or editing a PDF document, you may sometimes need to insert images to improve its appearance and make it more appealing. In this article, you will learn how to insert, replace or delete images in PDF documents in C# and VB.NET using Spire.PDF for .NET.
- Insert an Image into a PDF Document
- Replace an Image with Another Image in a PDF Document
- Delete a Specific Image in a PDF Document
Install Spire.PDF for .NET
To begin with, you need to add the DLL files included in the Spire.PDF for.NET package as references in your .NET project. The DLL files can be either downloaded from this link or installed via NuGet.
PM> Install-Package Spire.PDF
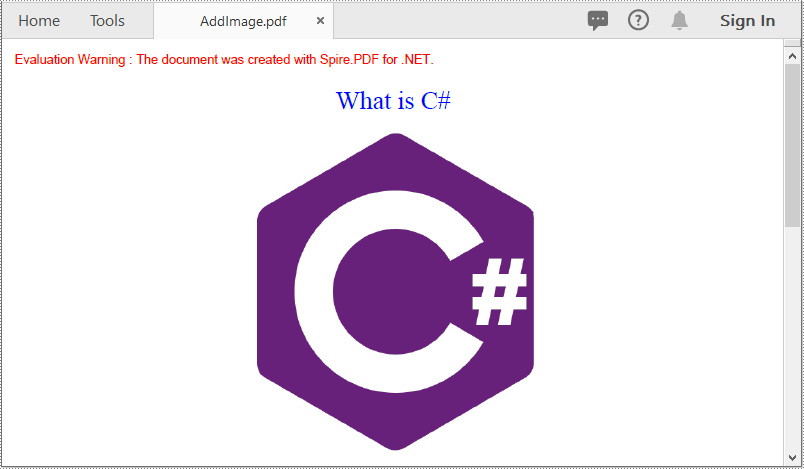
Insert an Image into a PDF Document in C# and VB.NET
The following steps demonstrate how to insert an image into an existing PDF document:
- Initialize an instance of the PdfDocument class.
- Load a PDF document using PdfDocument.LoadFromFile() method.
- Get the desired page in the PDF document through PdfDocument.Pages[pageIndex] property.
- Load an image using PdfImage.FromFile() method.
- Specify the width and height of the image area on the page.
- Specify the X and Y coordinates to start drawing the image.
- Draw the image on the page using PdfPageBase.Canvas.DrawImage() method.
- Save the result document using PdfDocument.SaveToFile() method.
- C#
- VB.NET
using Spire.Pdf;
using Spire.Pdf.Graphics;

namespace InsertImage
{
    class Program
    {
        static void Main(string[] args)
        {
            //Create a PdfDocument instance
            PdfDocument pdf = new PdfDocument();
            pdf.LoadFromFile("Input.pdf");

            //Get the first page in the PDF document
            PdfPageBase page = pdf.Pages[0];

            //Load an image
            PdfImage image = PdfImage.FromFile("image.jpg");

            //Specify the width and height of the image area on the page
            float width = image.Width * 0.50f;
            float height = image.Height * 0.50f;

            //Specify the X and Y coordinates to start drawing the image
            float x = 180f;
            float y = 70f;

            //Draw the image at a specified location on the page
            page.Canvas.DrawImage(image, x, y, width, height);

            //Save the result document
            pdf.SaveToFile("AddImage.pdf", FileFormat.PDF);
        }
    }
}
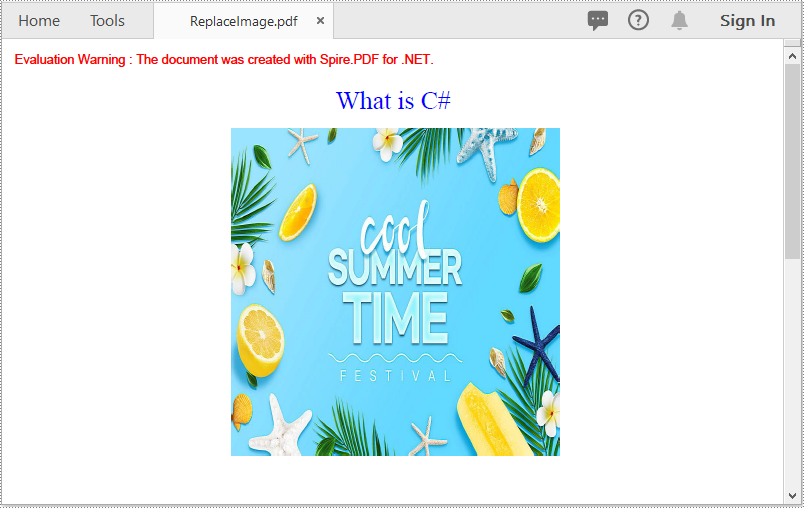
Replace an Image with Another Image in a PDF Document in C# and VB.NET
The following steps demonstrate how to replace an image with another image in a PDF document:
- Initialize an instance of the PdfDocument class.
- Load a PDF document using PdfDocument.LoadFromFile() method.
- Get the desired page in the PDF document through PdfDocument.Pages[pageIndex] property.
- Load an image using PdfImage.FromFile() method.
- Initialize an instance of the PdfImageHelper class.
- Get the image information from the page using PdfImageHelper.GetImagesInfo() method.
- Replace a specific image on the page with the loaded image using PdfImageHelper.ReplaceImage() method.
- Save the result document using PdfDocument.SaveToFile() method.
- C#
- VB.NET
using Spire.Pdf;
using Spire.Pdf.Graphics;
using Spire.Pdf.Utilities;

namespace ReplaceImage
{
    class Program
    {
        static void Main(string[] args)
        {
            //Create a PdfDocument instance
            PdfDocument doc = new PdfDocument();
            //Load a PDF document
            doc.LoadFromFile("AddImage.pdf");

            //Get the first page
            PdfPageBase page = doc.Pages[0];

            //Load an image
            PdfImage image = PdfImage.FromFile("image1.jpg");

            //Create a PdfImageHelper instance
            PdfImageHelper imageHelper = new PdfImageHelper();
            //Get the image information from the page
            PdfImageInfo[] imageInfo = imageHelper.GetImagesInfo(page);
            //Replace the first image on the page with the loaded image
            imageHelper.ReplaceImage(imageInfo[0], image);

            //Save the result document
            doc.SaveToFile("ReplaceImage.pdf", FileFormat.PDF);
        }
    }
}
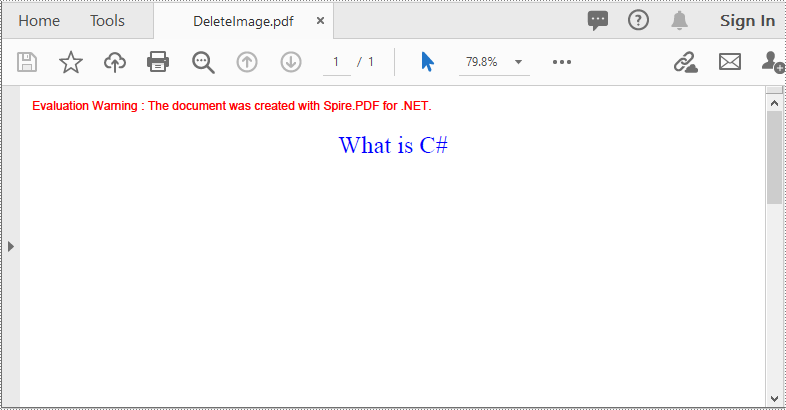
Delete a Specific Image in a PDF Document in C# and VB.NET
The following steps demonstrate how to delete an image from a PDF document:
- Initialize an instance of the PdfDocument class.
- Load a PDF document using PdfDocument.LoadFromFile() method.
- Get the desired page in the PDF document through PdfDocument.Pages[pageIndex] property.
- Delete a specific image on the page using PdfPageBase.DeleteImage() method.
- Save the result document using PdfDocument.SaveToFile() method.
- C#
- VB.NET
using Spire.Pdf;

namespace DeleteImage
{
    class Program
    {
        static void Main(string[] args)
        {
            //Create a PdfDocument instance
            PdfDocument pdf = new PdfDocument();
            //Load a PDF document
            pdf.LoadFromFile("AddImage.pdf");

            //Get the first page
            PdfPageBase page = pdf.Pages[0];

            //Delete the first image on the page
            PdfImageHelper imageHelper = new PdfImageHelper();
            PdfImageInfo[] imageInfos = imageHelper.GetImagesInfo(pdf.Pages[0]);
            for (int i = 0; i < imageInfos.Length; i++)
            { imageHelper.DeleteImage(imageInfos[i], true); }

            //Save the result document
            pdf.SaveToFile("DeleteImage.pdf", FileFormat.PDF);
        }
    }
}
Apply for a Temporary License
If you'd like to remove the evaluation message from the generated documents, or to get rid of the function limitations, please request a 30-day trial license for yourself.
XLS Report Silverlight
The sample demonstrates how to work with MarkerDesign in Silverlight via Spire.XLS.
Convert Specific Worksheet Cells to Image
This section aims at providing a detail solution for developers on how to convert specific worksheet cells to image via this .NET Excel component Spire.XLS for .NET in C#, VB.NET. This Excel library helps us quickly convert certain excel cells to different image formats such as jpeg, png, bmp, tiff, gif, ico, emf, exif etc.
When we convert worksheet to image, Spire.XLS for .NET provides us a method: Spire.Xls.Worksheet.ToImage(int firstRow, int firstColumn, int lastRow, int lastColumn); As we see, there are four parameters passed in this method. These four parameters determine the certain range of cells. After deciding the cell range, we can successfully convert cells to image. Now, let us see the whole task step by step.
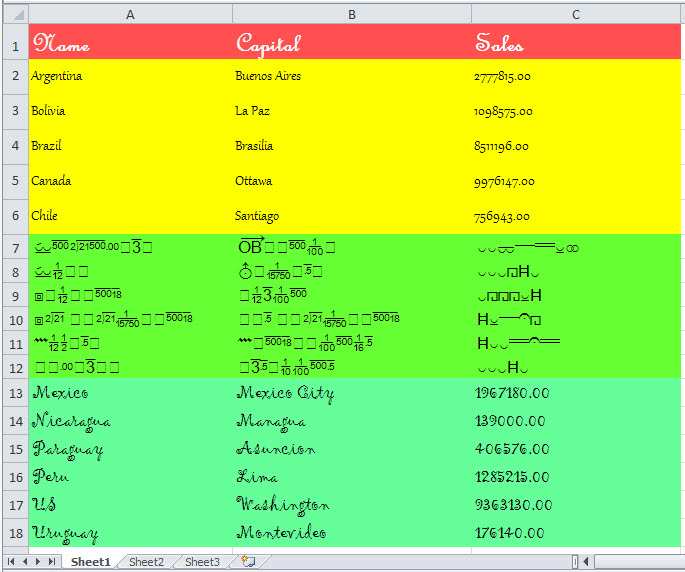
Step 1: Create a template Excel Workbook in MS Excel
I create a new Excel file in MS Excel and add some data which have different formats in the first sheet, here is a screenshot of created file.
Step 2: Download and Install Spire.XLS for .NET
Spire.XLS for .NET is an Excel Api which enables users to quickly generate, read, edit and manipulate Excel files on .NET Platform. Here you can download Spire.XLS for .NET and install it on your development computer. After installing it, Spire.XLS for .NET will run in evaluation mode which is the same when you install other Spire components. This evaluation mode has no time limit.
Step 3: Create a project and Add References
We can create a new project of Console Application either in C# or VB.NET. I create in C#, but we can choose VB.NET too.
In this project, we need to add references in our project. Apart from adding System.Drawing, we will use Spire.XLS for .NET, so we also have to add Spire.Xls.dll, Spire.Common.dll and Spire.License.dll in our download Bin folder of Spire.Xls. Here we can see the default path: "..\Spire.XLS\Bin\NET4.0\Spire.XLS.dll"
Step 4: Convert Specific Worksheet Cells to Image
In this step, first we can initialize a new object of the class Spire.Xls.Workbook, then, load the template Excel file. Since I want to convert cells in the first sheet to image, I need get the first worksheet data in Excel file. You also can get other worksheet data. Finally specify cell range and save the cells in the range as image file. Spire.XLS for .NET supports 12 image formats: Bmp, Emf, Equals, Exif, Gif, Icon, Jpeg, MemoryBmp, Png, ReferenceEquals, Tiff and Wmf.
using System.Drawing.Imaging;
using Spire.Xls;
namespace ConsoleApplication1
{
class Program
{
static void Main(string[] args)
{
//Initialize a new Workbook object
Workbook workbook = new Workbook();
//Open Template Excel file
workbook.LoadFromFile(@"..\excel to image.xlsx");
//Get the first wirksheet in Excel file
Worksheet sheet = workbook.Worksheets[0];
//Specify Cell Ranges and Save to certain Image formats
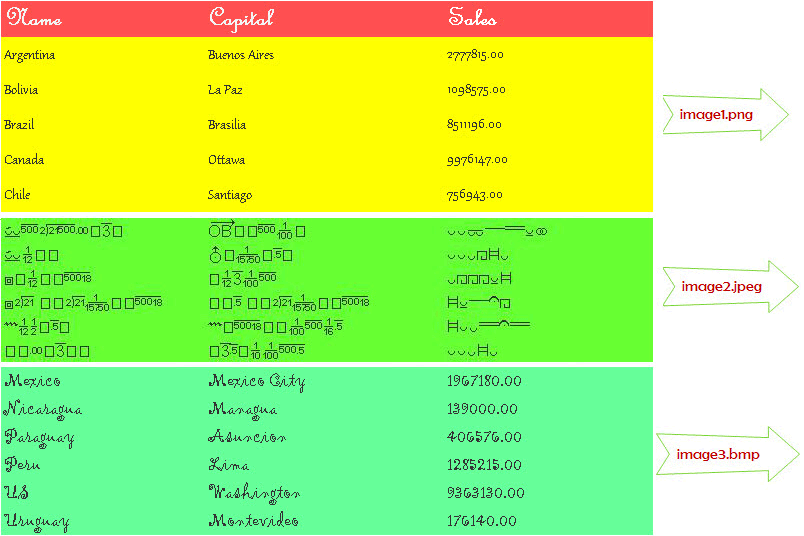
sheet.ToImage(1, 1, 6, 3).Save("image1.png", ImageFormat.Png);
sheet.ToImage(7, 1, 12, 3).Save("image2.jpeg", ImageFormat.Jpeg);
sheet.ToImage(13, 1, 18, 3).Save("image3.bmp", ImageFormat.Bmp);
}
}
}
Imports System.Drawing.Imaging
Imports Spire.Xls

Module Module1

    Sub Main()
        'Initialize a new Workbook object
        Dim workbook As New Workbook()
        'Open Template Excel file
        workbook.LoadFromFile("..\excel to image.xlsx")
        'Get the first wirksheet in Excel file
        Dim sheet As Worksheet = workbook.Worksheets(0)
        'Specify Cell Ranges and Save to certain Image formats
        sheet.ToImage(1, 1, 6, 3).Save("image1.png", ImageFormat.Png)
        sheet.ToImage(7, 1, 12, 3).Save("image2.jpeg", ImageFormat.Jpeg)
        sheet.ToImage(13, 1, 18, 3).Save("image3.bmp", ImageFormat.Bmp)
    End Sub

End Module
Result Task
After executing above code, cells in the first worksheet named "Sheet1" has been converted to three images. They are named "image1.png", "image2.jpeg" and "image3.bmp". You can see them as below:
In this section, I have introduced how we can convert specific cells to image by using Spire.XLS for .NET. I sincerely hope it can help you and give you some insight.
Spire.XLS for .NET offers fast speed, high efficiency and reliability to satisfy development application requirements. As you see above, the results do show that Spire.XLS for .NET benefit customers from years of research.
We appreciate any kind of queries, comments and suggestions at E-iceblue Forum. We promise a quick reply within minutes or hours as we can.
XLS to PDF in C#, VB.NET
The sample demonstrates how to convert Excel workbook to PDF file via Spire.XLS.
How to Export Datatable to Excel through DataGridView?
Export DataTable to Excel can be very easy through Spire.DataExport (or Spire.Office). Furthermore, Spire.DataExport enables user to Export data to Excel through DataGridView. Through DataGridView users can preview and modify data information before exporting.
Download Spire.DataExport (or Spire.Office) with .NET Framework together. Only 2 Simple steps you can finish the whole datatable to Excel exporting process.
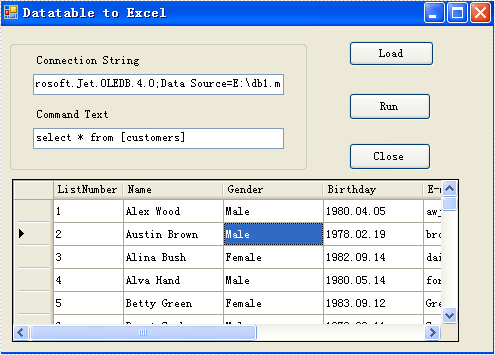
Step 1: Load Data Information
In this step, Spire.DataExport will help you load Data information from your datatable. After you put in your data source and SQL command, you can preview and modify data information in DataGridView area.
        private void btnLoad_Click(object sender, EventArgs e)
        {
            using(OleDbConnection oleDbConnection = new OleDbConnection())
            {
                oleDbConnection.ConnectionString = this.textBox1.Text;
                OleDbCommand oleDbCommand = new OleDbCommand();
                oleDbCommand.CommandText = this.textBox2.Text;
                oleDbCommand.Connection = oleDbConnection;
                using(OleDbDataAdapter da = new OleDbDataAdapter(oleDbCommand))
                {
                    DataTable dt = new DataTable();
                    da.Fill(dt);
                    dataGridView1.DataSource = dt;
                }
            }
        }
Effect Screenshot
Step 2: Set Export into Excel
Spire.DataExport allows user to export data into most popular file formats including MS Excel, MS Word, HTML, PDF, XML, CSV, DBF, DIF, etc. Now, in this step you should give an order to Export Data into Excel file format. Spire.DataExport will create a new MS Excel Worksheet for storing Data which exported out. You can rename the excel file in this step either.
        private void btnRun_Click(object sender, EventArgs e)
        {
            Spire.DataExport.XLS.CellExport cellExport = new Spire.DataExport.XLS.CellExport();
            Spire.DataExport.XLS.WorkSheet worksheet1 = new Spire.DataExport.XLS.WorkSheet();
            worksheet1.DataSource = Spire.DataExport.Common.ExportSource.DataTable;
            worksheet1.DataTable = this.dataGridView1.DataSource as DataTable;
            worksheet1.StartDataCol = ((System.Byte)(0));
            cellExport.Sheets.Add(worksheet1);
            cellExport.ActionAfterExport = Spire.DataExport.Common.ActionType.OpenView;
            cellExport.SaveToFile("20110223.xls");
        }
Effect Screenshot
Spire.DataExport for .NET Program Guide Content
Spire.DataExport for .NET is a professional .NET DataExport library, enables users to export data from database, datatable and other datasoure to MS Excel, MS Word, PDF, MS Access, DBF, SQL Script, SYLK, DIF, CSV and MS Clipboard without MS Office, Adobe Acrobat and other third-party installed on system. With Spire.DataExport, developer can create any WinForm and Web applications to export data.
Spire.DataExport is fantastic on formatting when exporting, especially for Excel. Users can format data, import formula, insert objects (image, hyperlinks etc.) and create chart when export a large amount of data to multiple worksheets. The following sections will present how to quickly export data in details.
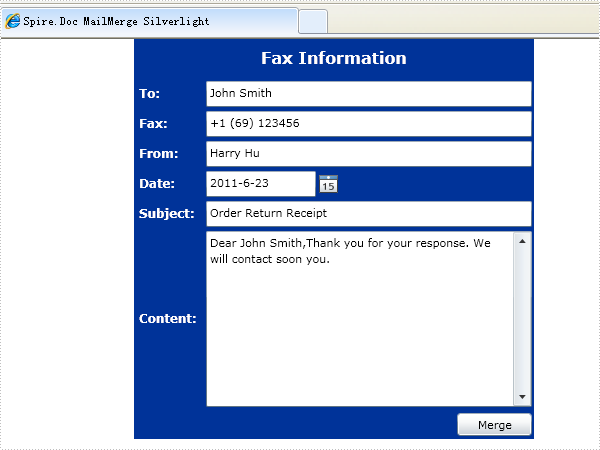
Doc MailMerge Silverlight
The sample demonstrates how to work with MailMerge in Silverlight via Spire.Doc.
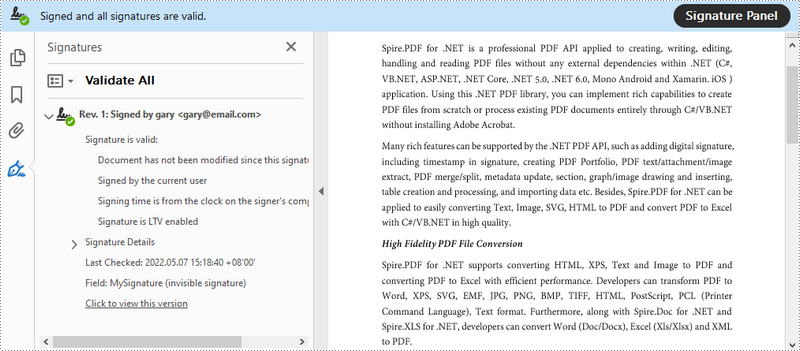
C#/VB.NET: Add or Remove Digital Signatures in PDF
As PDF documents become increasingly popular in business, ensuring their authenticity has become a key concern. Signing PDFs with a certificate-based signature can protect the content and also let others know who signed or approved the document. In this article, you will learn how to digitally sign PDF with an invisible or a visible signature, and how to remove digital signatures from PDF by using Spire.PDF for .NET.
- Add an Invisible Digital Signature to PDF
- Add a Visible Digital Signature to PDF
- Remove Digital Signatures from PDF
Install Spire.PDF for .NET
To begin with, you need to add the DLL files included in the Spire.PDF for.NET package as references in your .NET project. The DLLs files can be either downloaded from this link or installed via NuGet.
PM> Install-Package Spire.PDF
Add an Invisible Digital Signature to PDF
The following are the steps to add an invisible digital signature to PDF using Spire.PDF for .NET.
- Create a PdfDocument object.
- Load a sample PDF file using PdfDocument.LoadFromFile() method.
- Load a pfx certificate file while initializing the PdfCertificate object.
- Create a PdfSignature object based on the certificate.
- Set the document permissions through the PdfSignature object.
- Save the document to another PDF file using PdfDocument.SaveToFile() method.
- C#
- VB.NET
using Spire.Pdf;
using Spire.Pdf.Security;

namespace AddInvisibleSignature
{
    class Program
    {
        static void Main(string[] args)
        {
            //Create a PdfDocument object
            PdfDocument doc = new PdfDocument();

            //Load a sample PDF file
            doc.LoadFromFile("C:\\Users\\Administrator\\Desktop\\sample.pdf");

            //Load the certificate
            PdfCertificate cert = new PdfCertificate("C:\\Users\\Administrator\\Desktop\\MyCertificate.pfx", "e-iceblue");

            //Create a PdfSignature object
            PdfSignature signature = new PdfSignature(doc, doc.Pages[doc.Pages.Count - 1], cert, "MySignature");

            //Set the document permission to forbid changes but allow form fill
             signature.DocumentPermissions = PdfCertificationFlags.ForbidChanges Or PdfCertificationFlags.AllowFormFill

            //Save to another PDF file
            doc.SaveToFile("InvisibleSignature.pdf");
            doc.Close();
        }
    }
}
Add a Visible Digital Signature to PDF
The following are the steps to add a visible digital signature to PDF using Spire.PDF for .NET.
- Create a PdfDocument object.
- Load a sample PDF file using PdfDocument.LoadFromFile() method.
- Load a pfx certificate file while initializing the PdfCertificate object.
- Create a PdfSignature object and specify its position and size on the document.
- Set the signature details including date, name, location, reason, handwritten signature image, and document permissions.
- Save the document to another PDF file using PdfDocument.SaveToFile() method.
- C#
- VB.NET
using System;
using System.Drawing;
using Spire.Pdf;
using Spire.Pdf.Security;
using Spire.Pdf.Graphics;

namespace AddVisibleSignature
{
    class Program
    {
        static void Main(string[] args)
        {
            //Create a PdfDocument object
            PdfDocument doc = new PdfDocument();

            //Load a sample PDF file
            doc.LoadFromFile("C:\\Users\\Administrator\\Desktop\\sample.pdf");

            //Load the certificate
            PdfCertificate cert = new PdfCertificate("C:\\Users\\Administrator\\Desktop\\MyCertificate.pfx", "e-iceblue");

            //Create a PdfSignature object and specify its position and size
            PdfSignature signature = new PdfSignature(doc, doc.Pages[doc.Pages.Count - 1], cert, "MySignature");
            RectangleF rectangleF = new RectangleF(doc.Pages[0].ActualSize.Width - 260 - 54, 200, 260, 110);
            signature.Bounds = rectangleF;
            signature.Certificated = true;

            //Set the graphics mode to ImageAndSignDetail
            signature.GraphicsMode = GraphicMode.SignImageAndSignDetail;

            //Set the signature content
            signature.NameLabel = "Signer:";
            signature.Name = "Gary";
            signature.ContactInfoLabel = "Phone:";
            signature.ContactInfo = "0123456";
            signature.DateLabel = "Date:";
            signature.Date = DateTime.Now;
            signature.LocationInfoLabel = "Location:";
            signature.LocationInfo = "USA";
            signature.ReasonLabel = "Reason:";
            signature.Reason = "I am the author";
            signature.DistinguishedNameLabel = "DN:";
            signature.DistinguishedName = signature.Certificate.IssuerName.Name;

            //Set the signature image source
            signature.SignImageSource = PdfImage.FromFile("C:\\Users\\Administrator\\Desktop\\handwrittingSignature.png");

            //Set the signature font
            signature.SignDetailsFont = new PdfTrueTypeFont(new Font("Arial Unicode MS", 12f, FontStyle.Regular));

            //Set the document permission to forbid changes but allow form fill
            signature.DocumentPermissions = PdfCertificationFlags.ForbidChanges | PdfCertificationFlags.AllowFormFill;

            //Save to file
            doc.SaveToFile("VisiableSignature.pdf");
            doc.Close();
        }
    }
}

Remove Digital Signatures from PDF
The following are the steps to remove digital signatures from PDF using Spire.PDF for .NET.
- Create a PdfDocument object.
- Get form widgets from the document through PdfDocument.Form property.
- Loop through the widgets and determine if a specific widget is a PdfSignatureFieldWidget.
- Remove the signature widget using PdfFieldCollection.RemoveAt() method.
- Save the document to another PDF file using PdfDocument.SaveToFile() method.
- C#
- VB.NET
using Spire.Pdf;
using Spire.Pdf.Widget;

namespace RemoveSignature
{
    class Program
    {
        static void Main(string[] args)
        {
            //Create a PdfDocument object
            PdfDocument doc = new PdfDocument("C:\\Users\\Administrator\\Desktop\\VisiableSignature.pdf");

            //Get form widgets from the document
            PdfFormWidget widgets = doc.Form as PdfFormWidget;

            //Loop through the widgets
            for (int i = 0; i < widgets.FieldsWidget.List.Count; i++)
            {
                //Get the specific widget
                PdfFieldWidget widget = widgets.FieldsWidget.List[i] as PdfFieldWidget;

                //Determine if the widget is a PdfSignatureFieldWidget
                if (widget is PdfSignatureFieldWidget)
                {
                    //Remove the widget
                    widgets.FieldsWidget.RemoveAt(i);
                }
            }

            //Save the document to another PDF file
            doc.SaveToFile("RemoveSignatures.pdf");
        }
    }
}
Apply for a Temporary License
If you'd like to remove the evaluation message from the generated documents, or to get rid of the function limitations, please request a 30-day trial license for yourself.